Category Archives: Uncategorized

I Betcha You’ll Enjoy Thecha

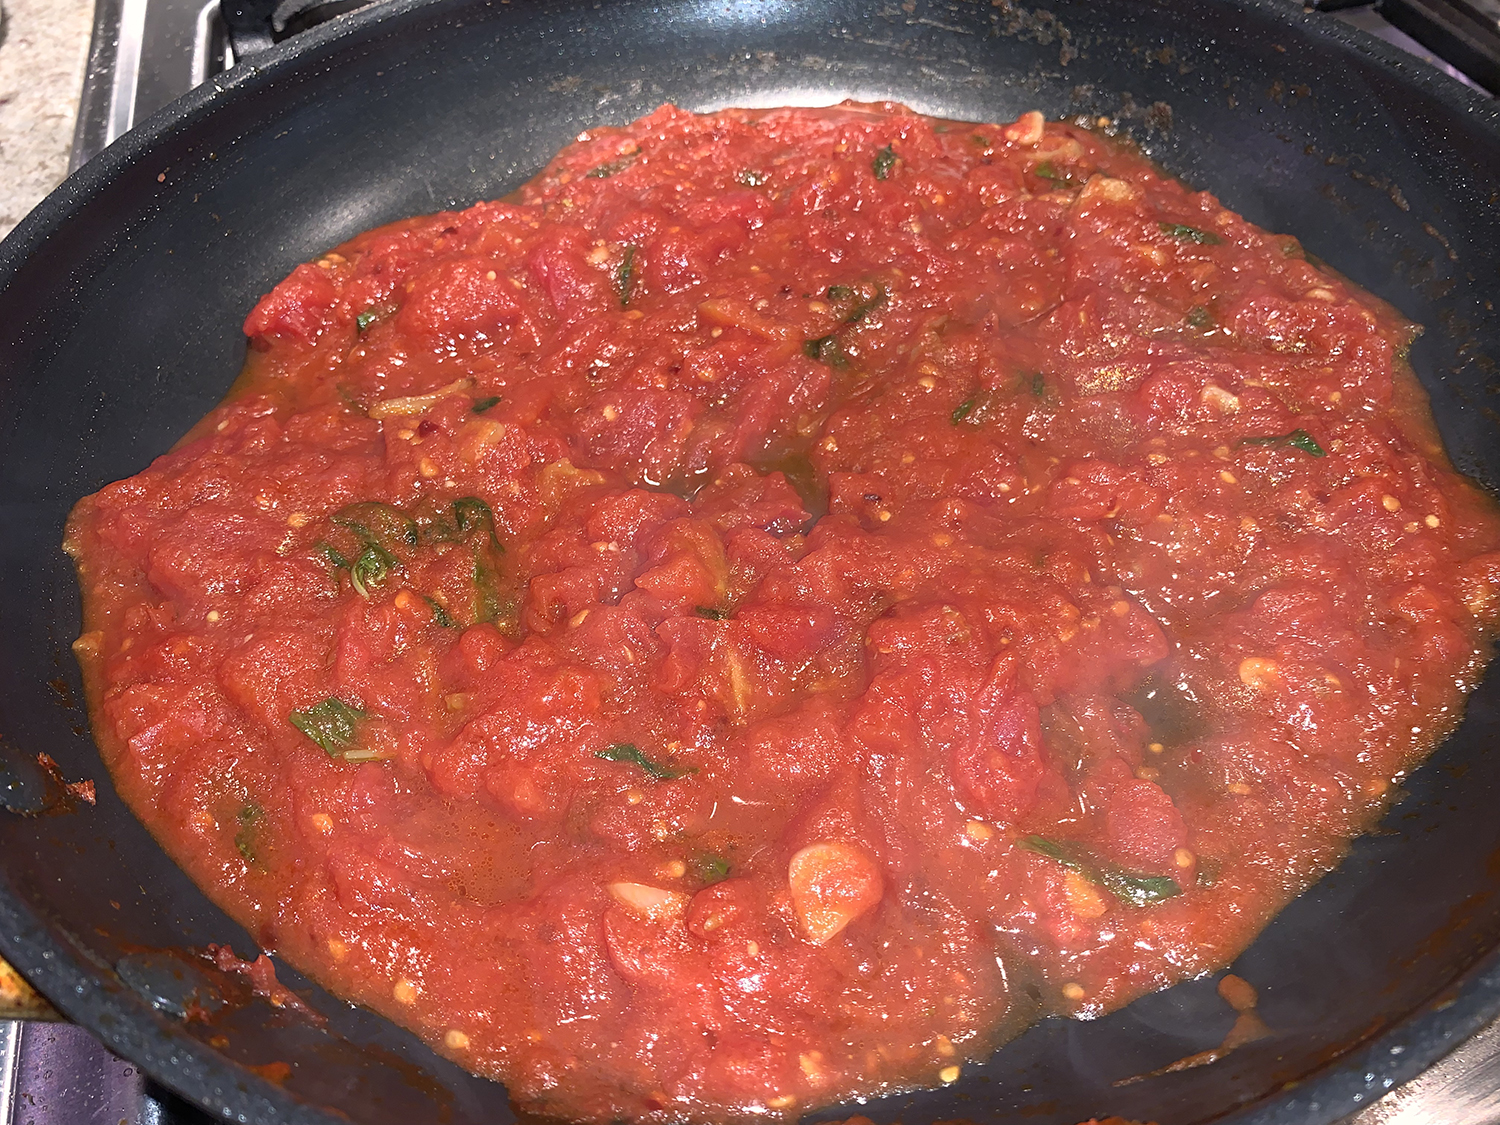
“Spicy, garlicky thecha is a green-(or red)-chile-based condiment that hails from Maharashtra in western India. You can use it to complement seared skirt steak, as well as chicken, eggplant, cauliflower, or any other ingredient that longs for massive flavor.” — Bon Appétit

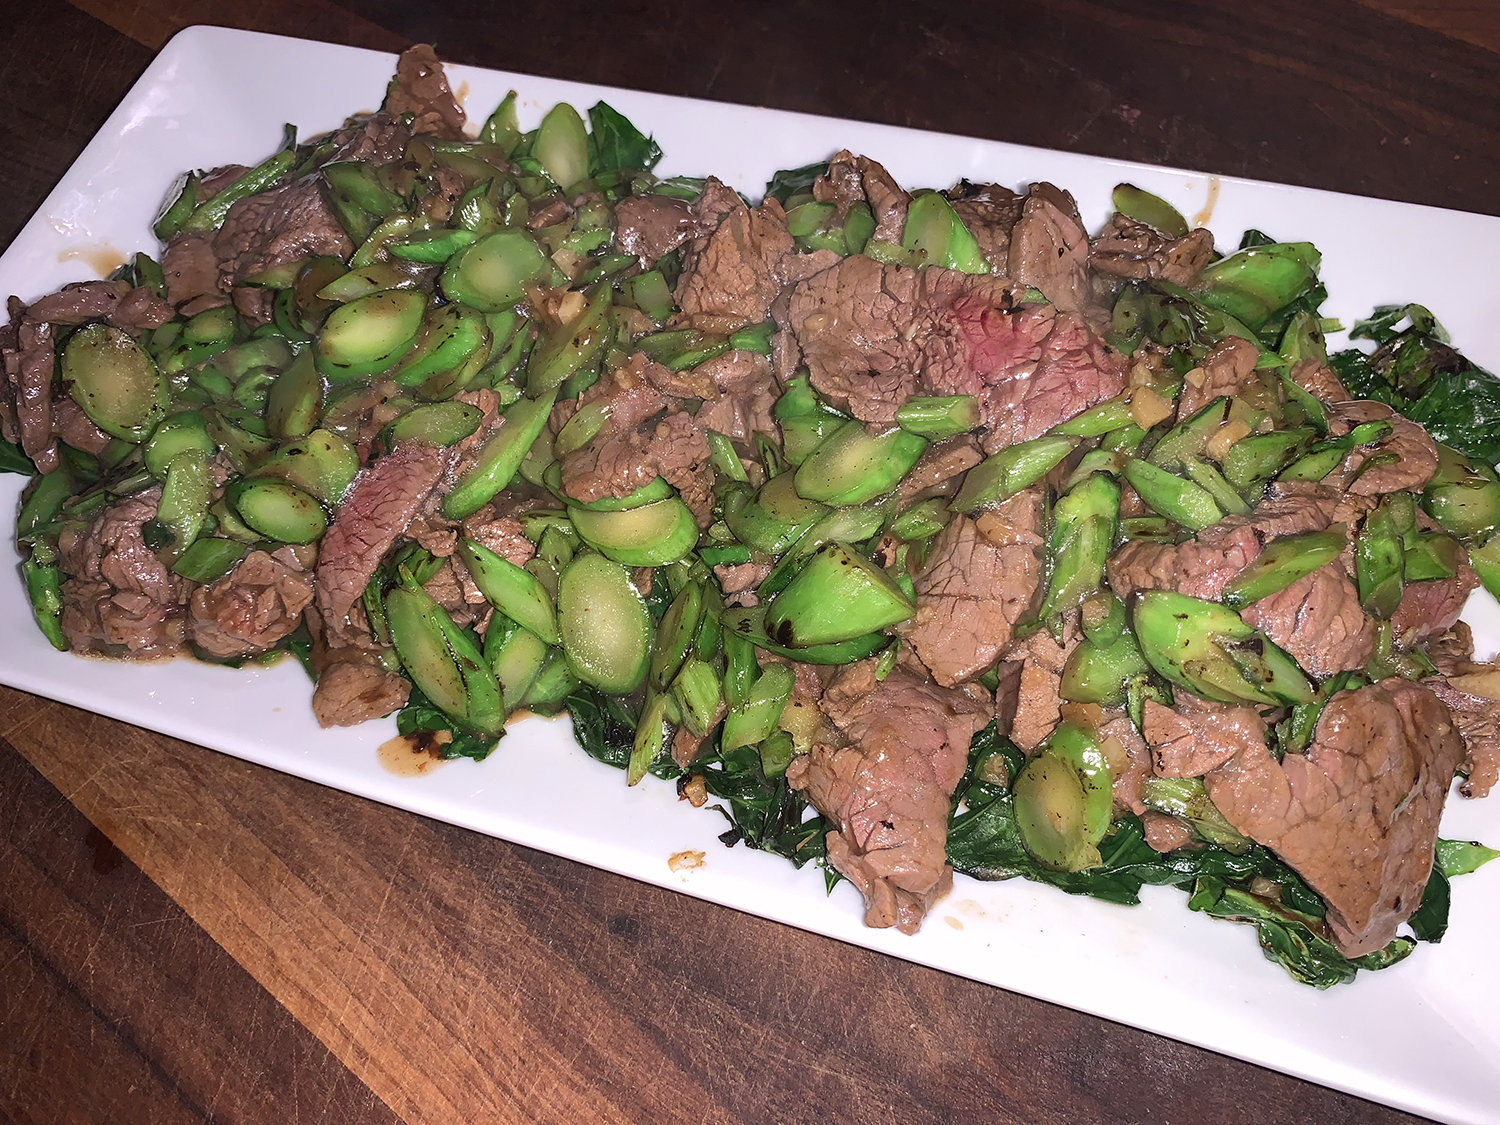
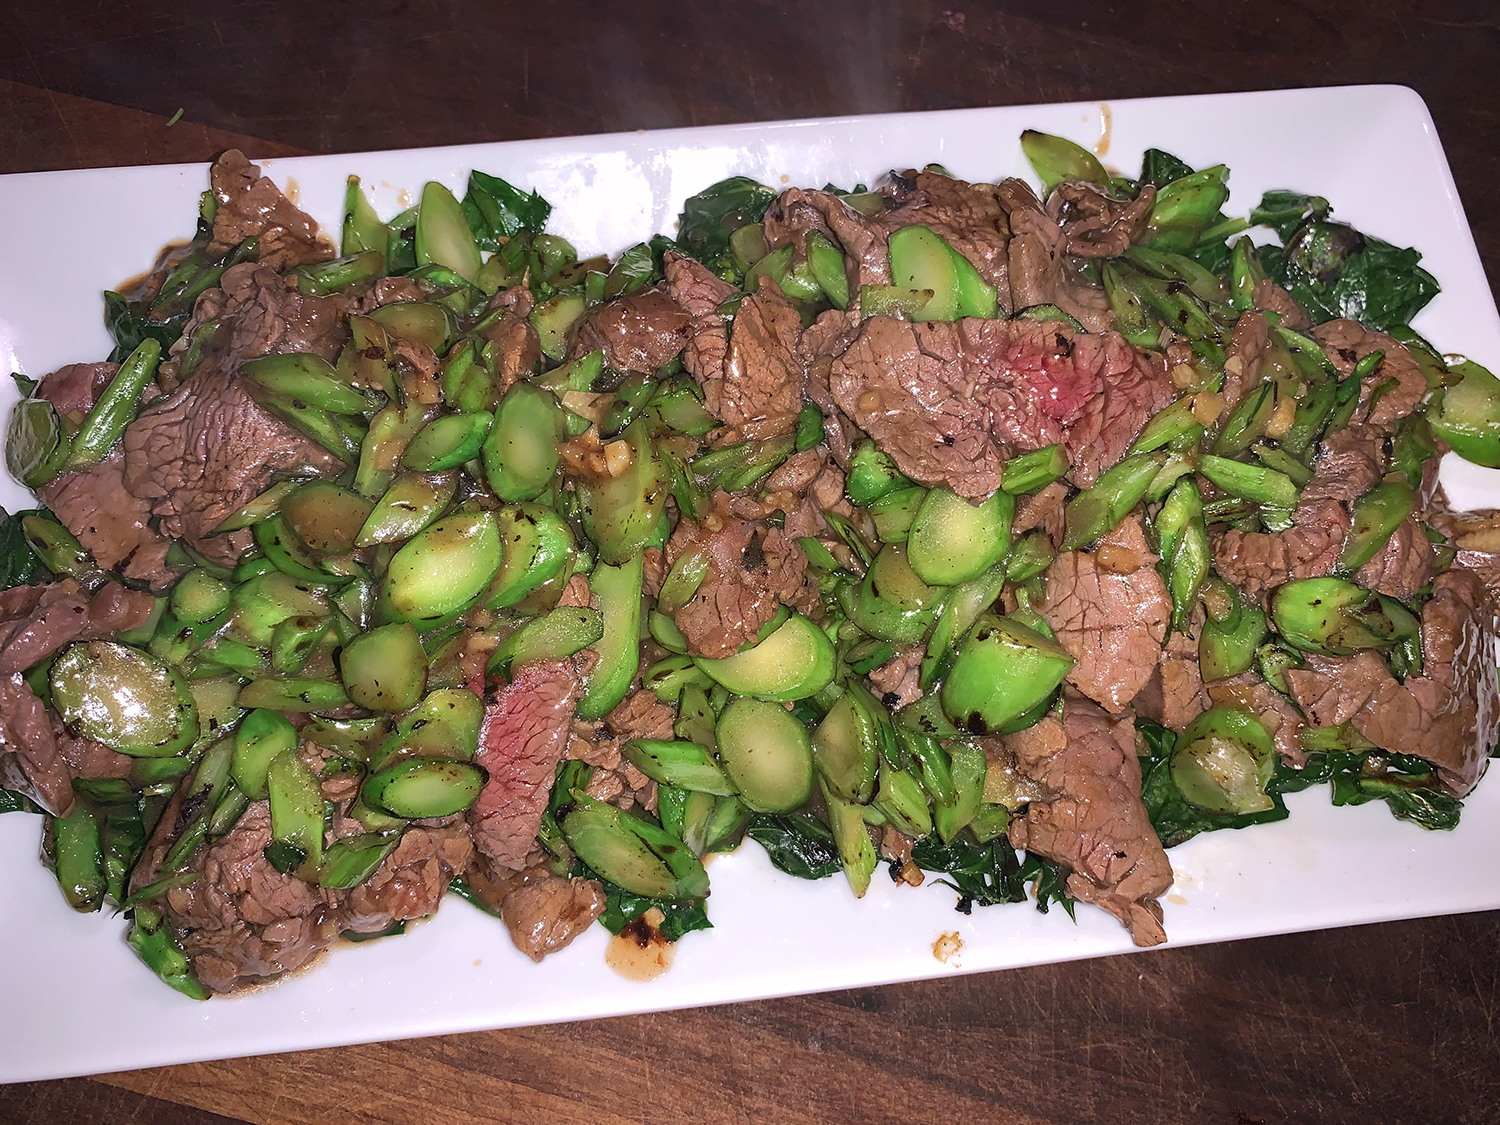
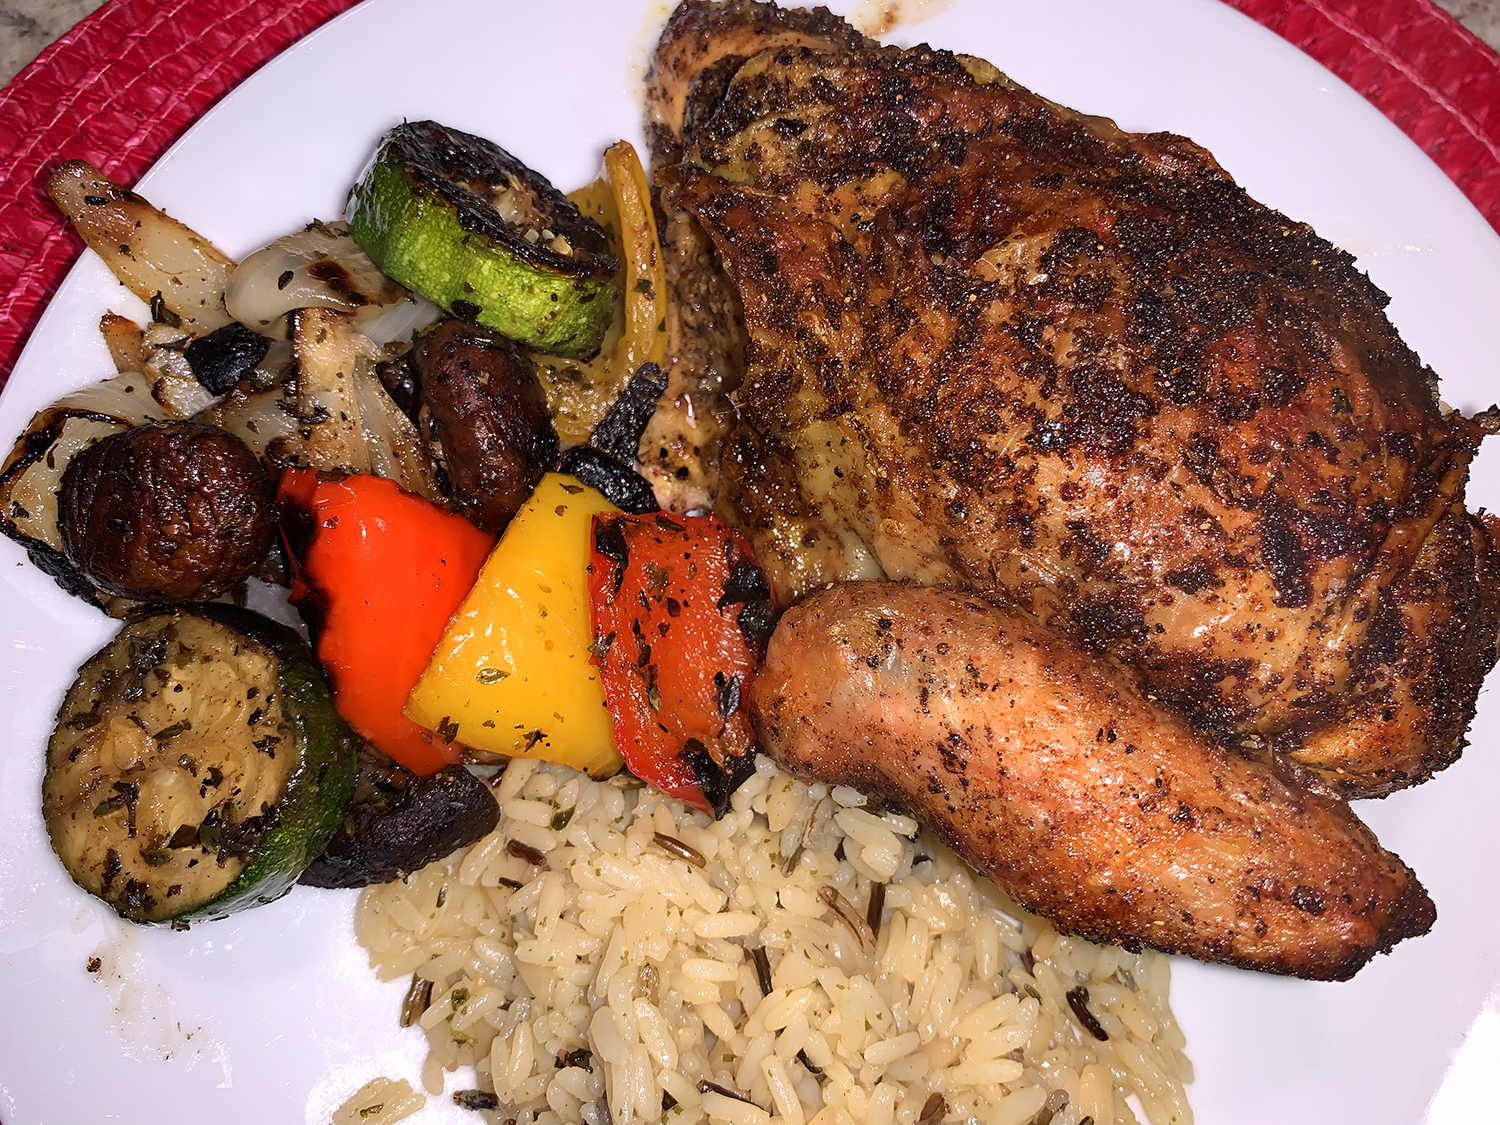
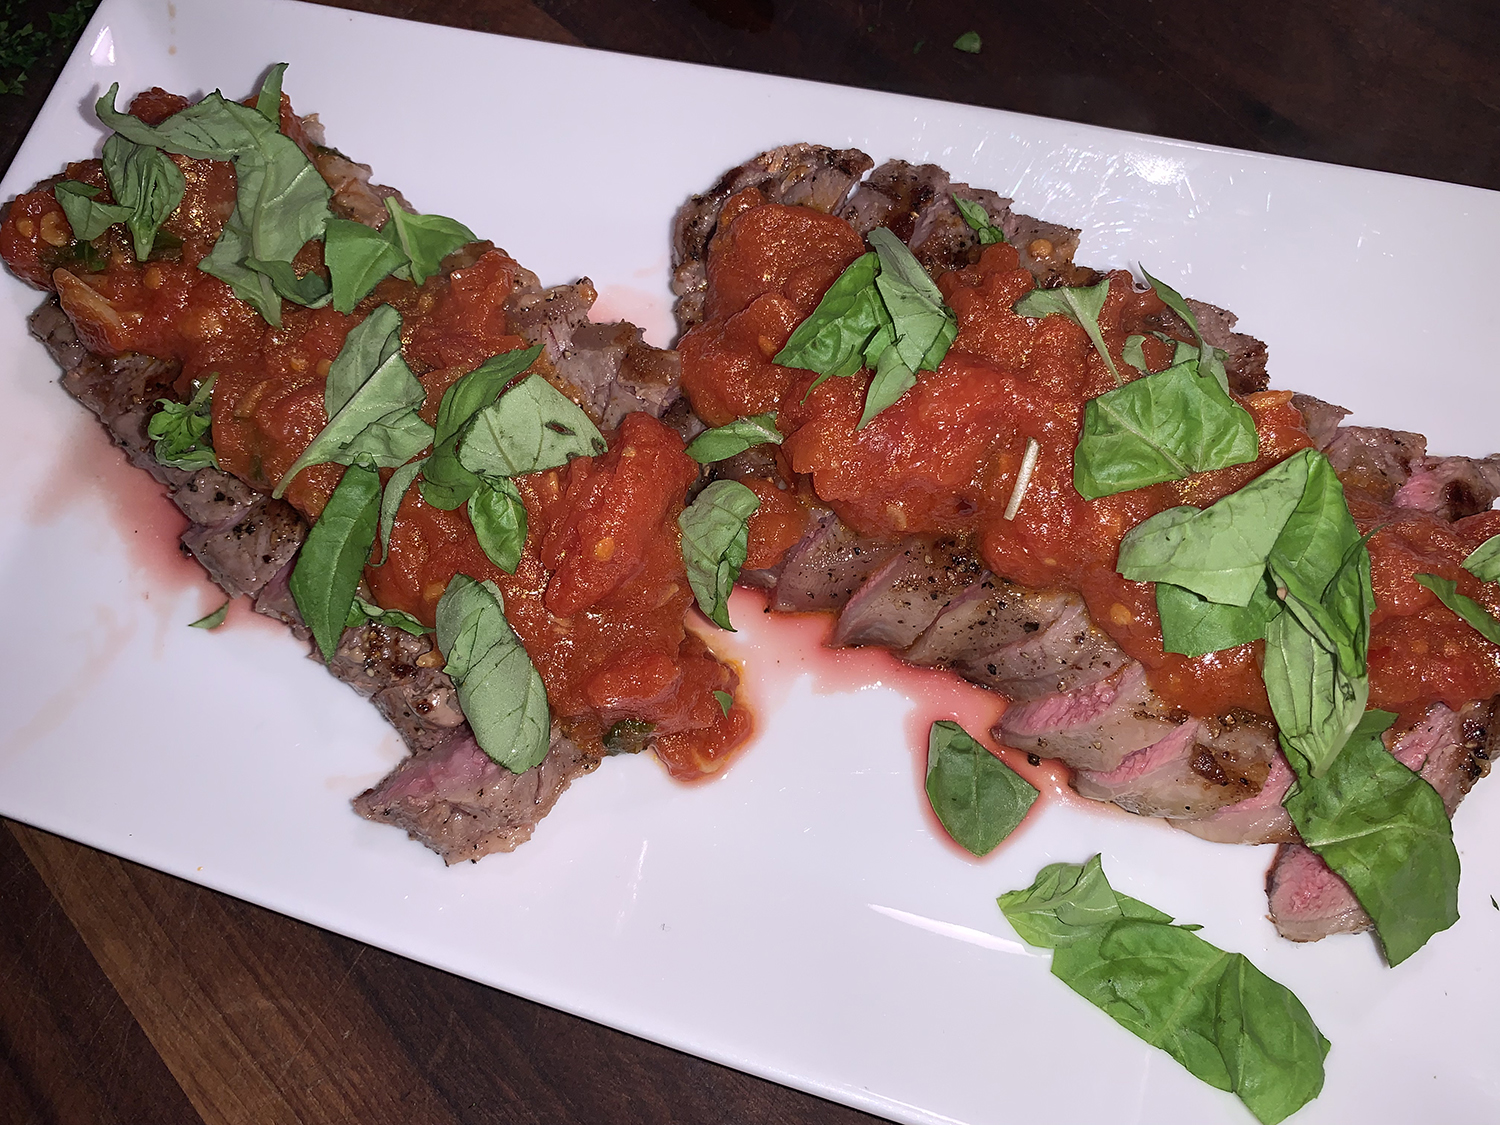
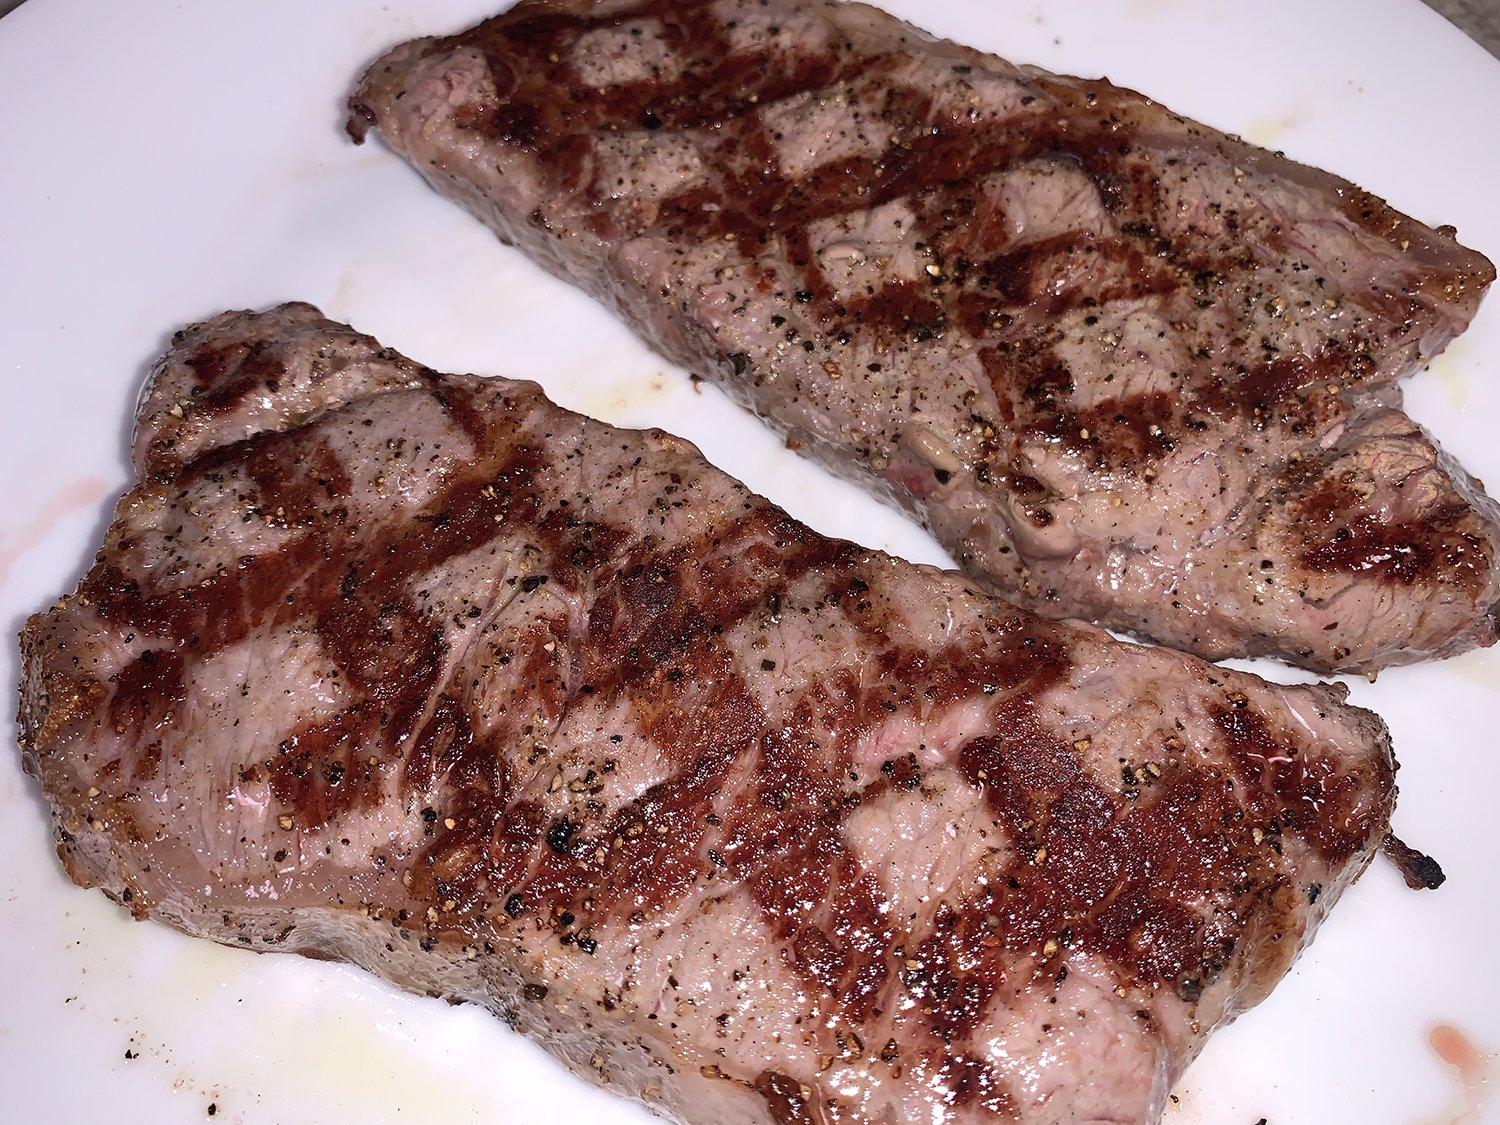
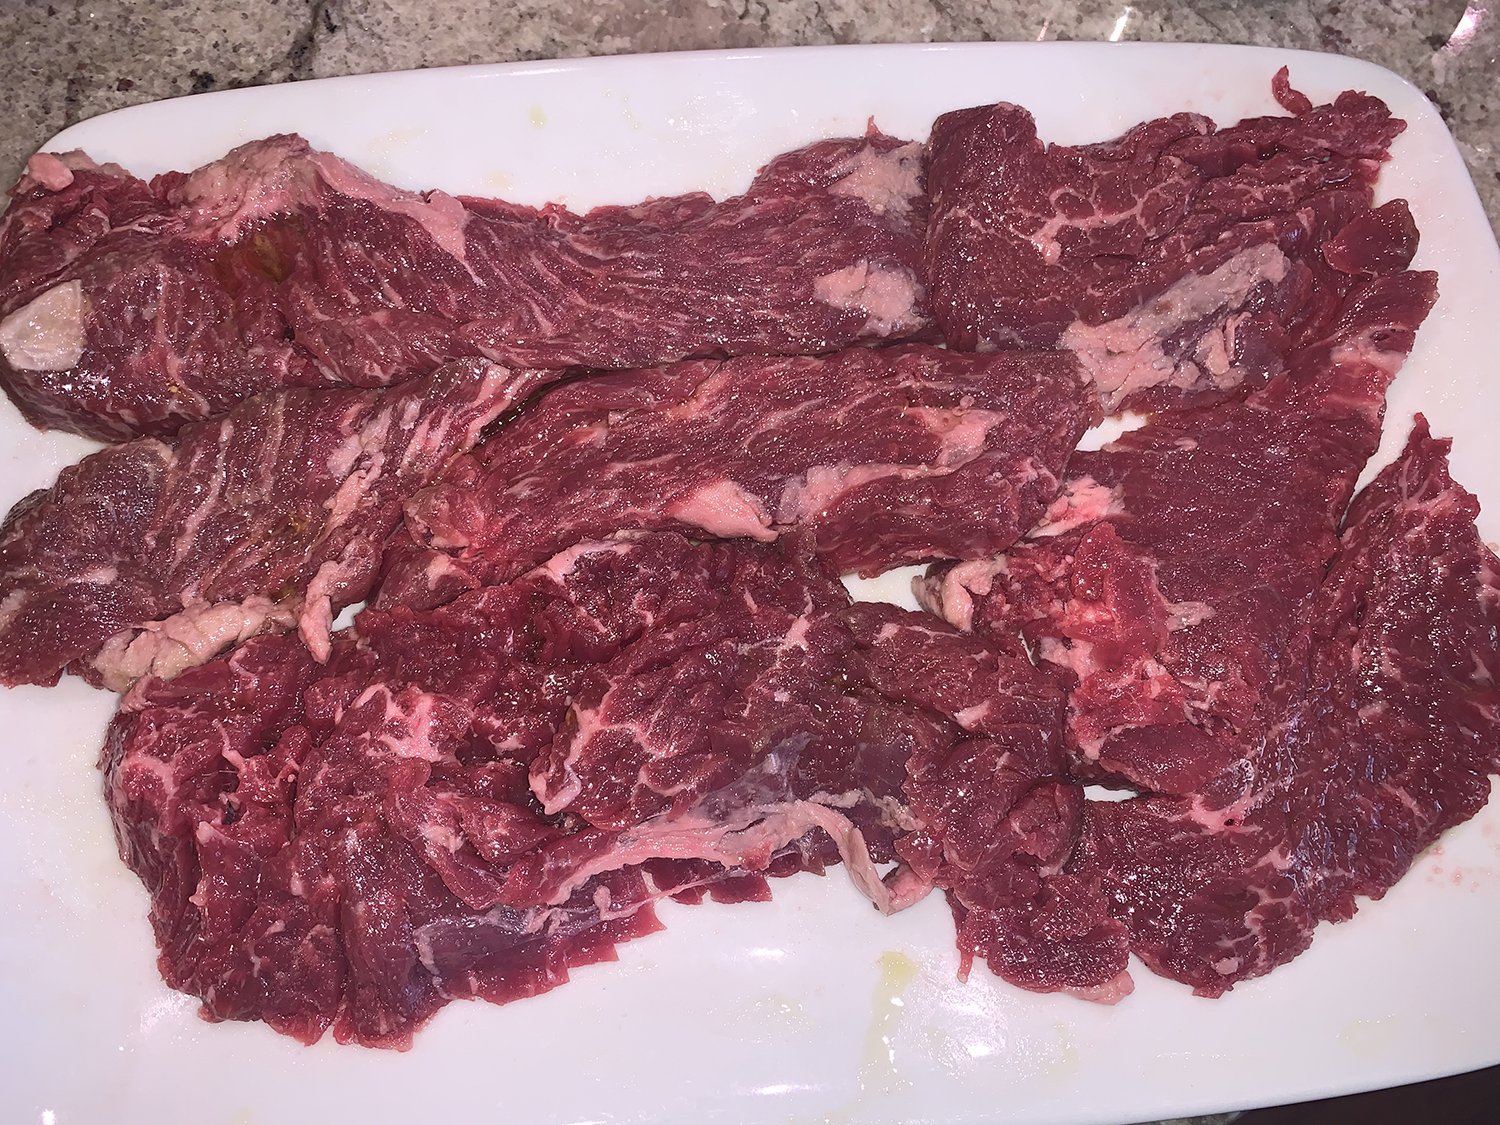
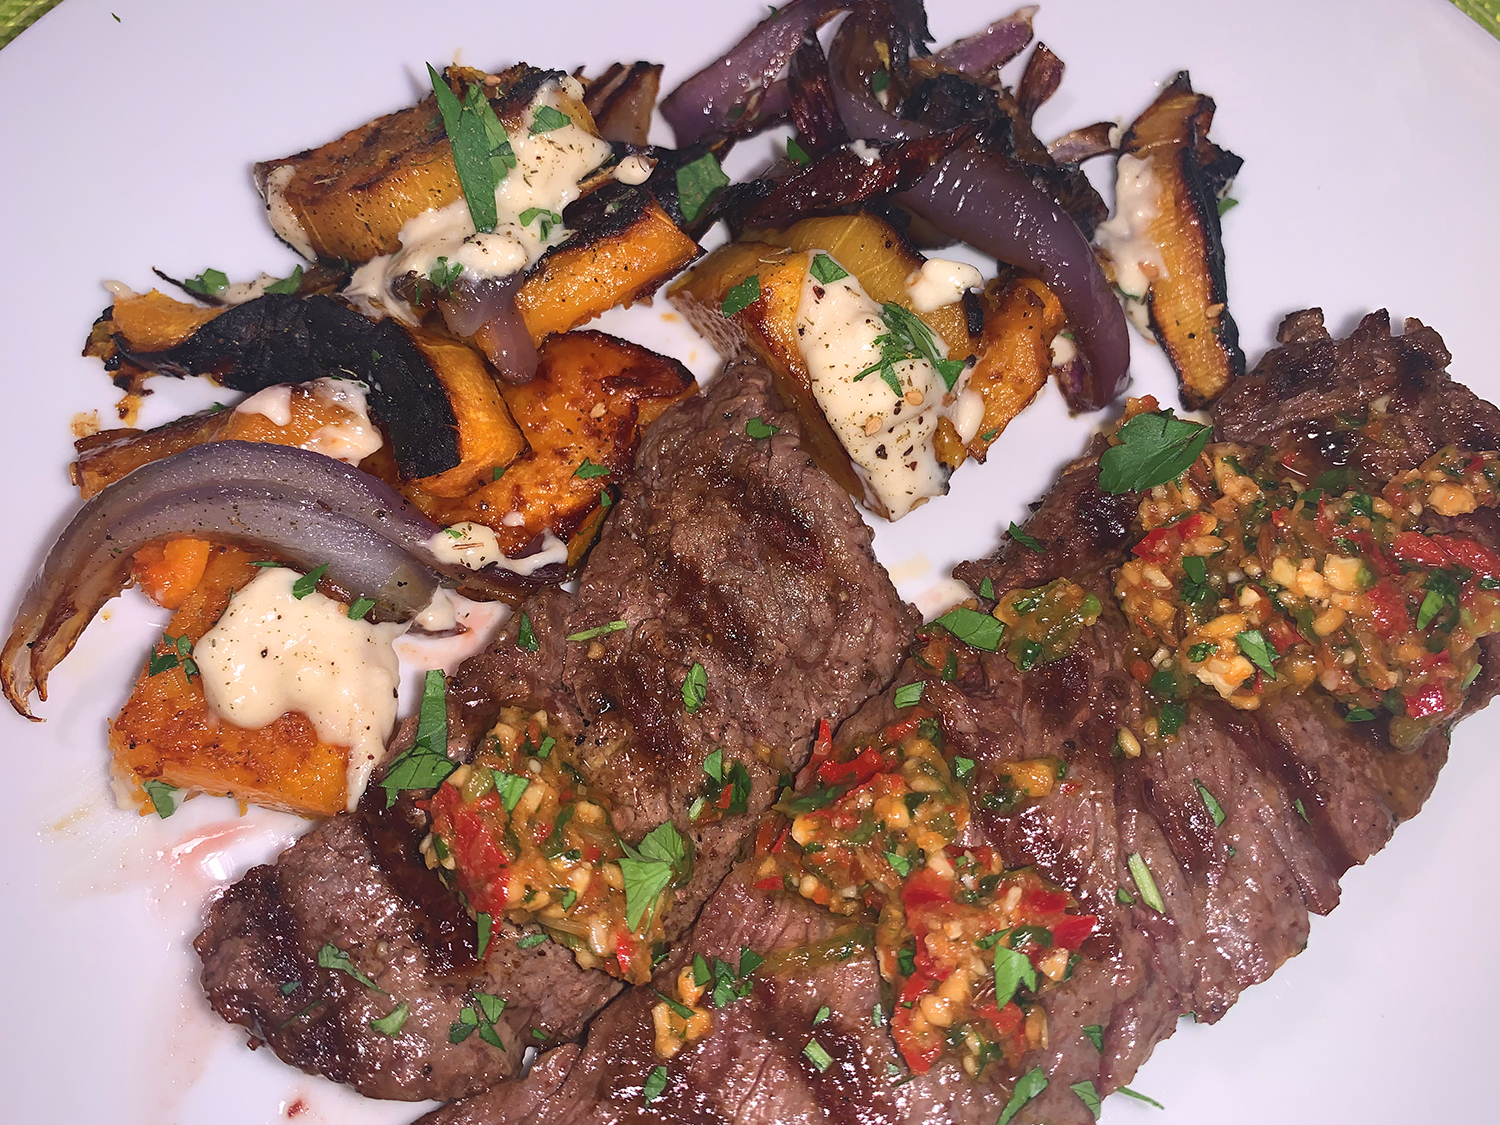
Since we had some flap meat in the freezer, and actually prefer it over skirt steak, it became the foundation for our meal. Because flap steak is thicker than skirt, we sliced the thicker portions and adjusted the times slightly. However, the Skirt Steak with Scallion Thecha recipe below mimics the original from Bon Appétit.

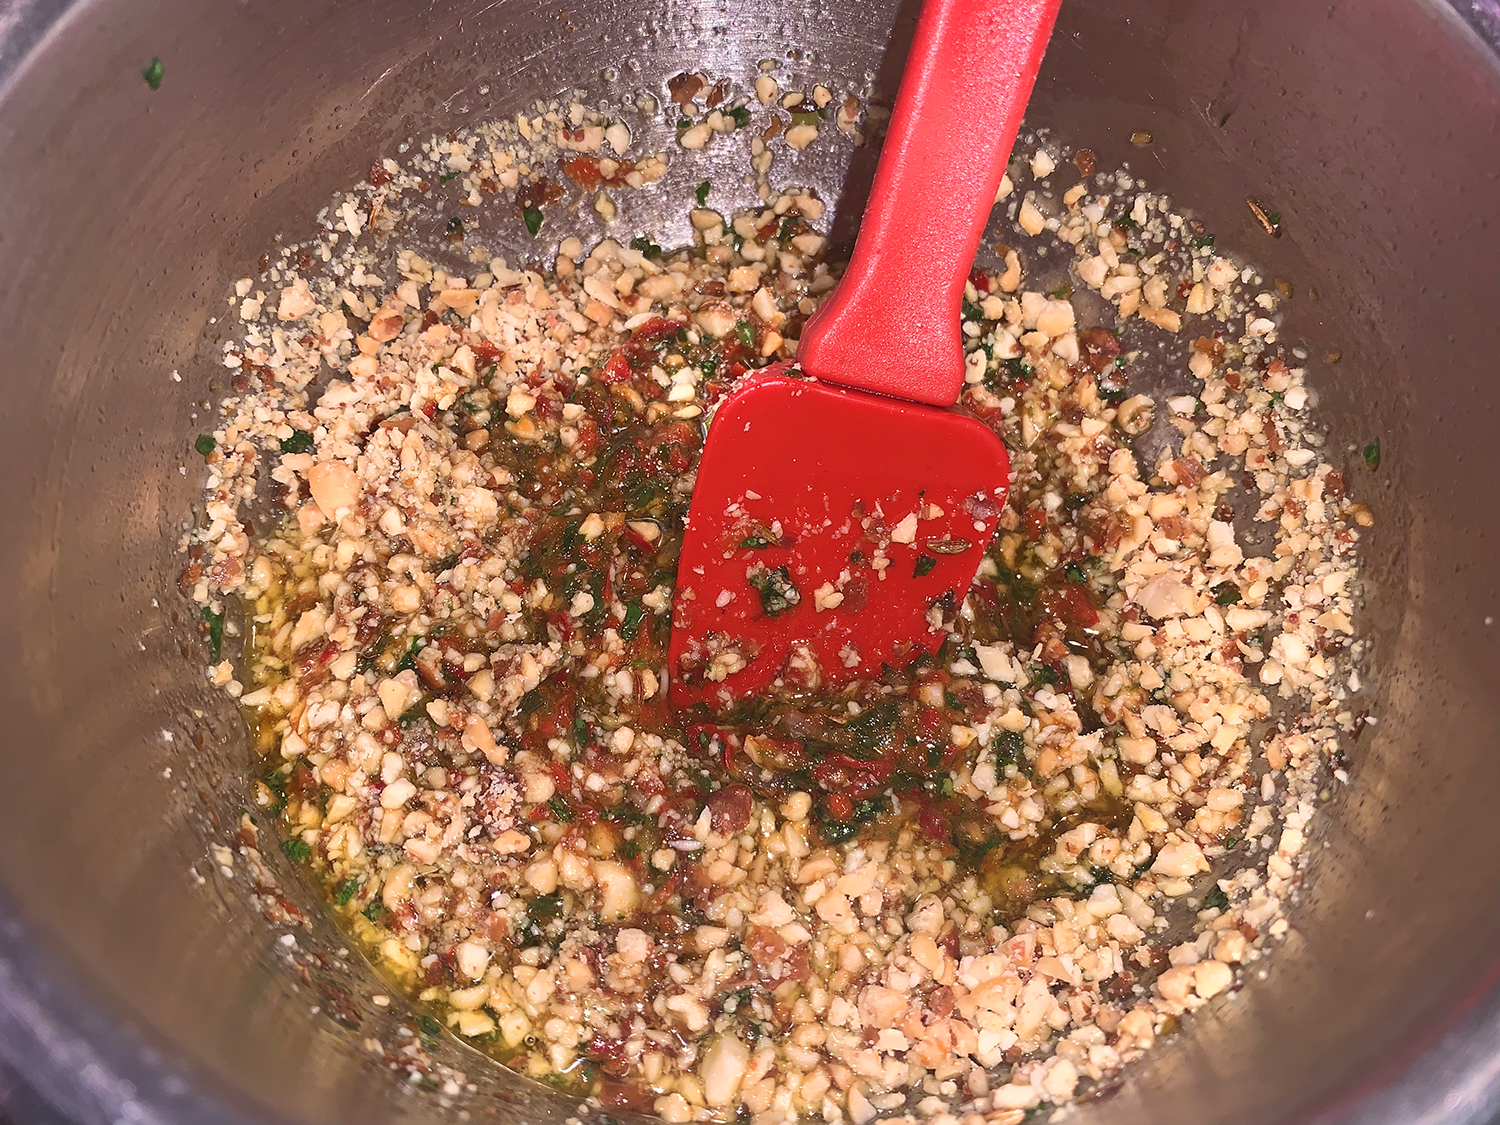
NOTE: To save a step, grind the peanuts in the mini-food processor before using it to make the thecha.

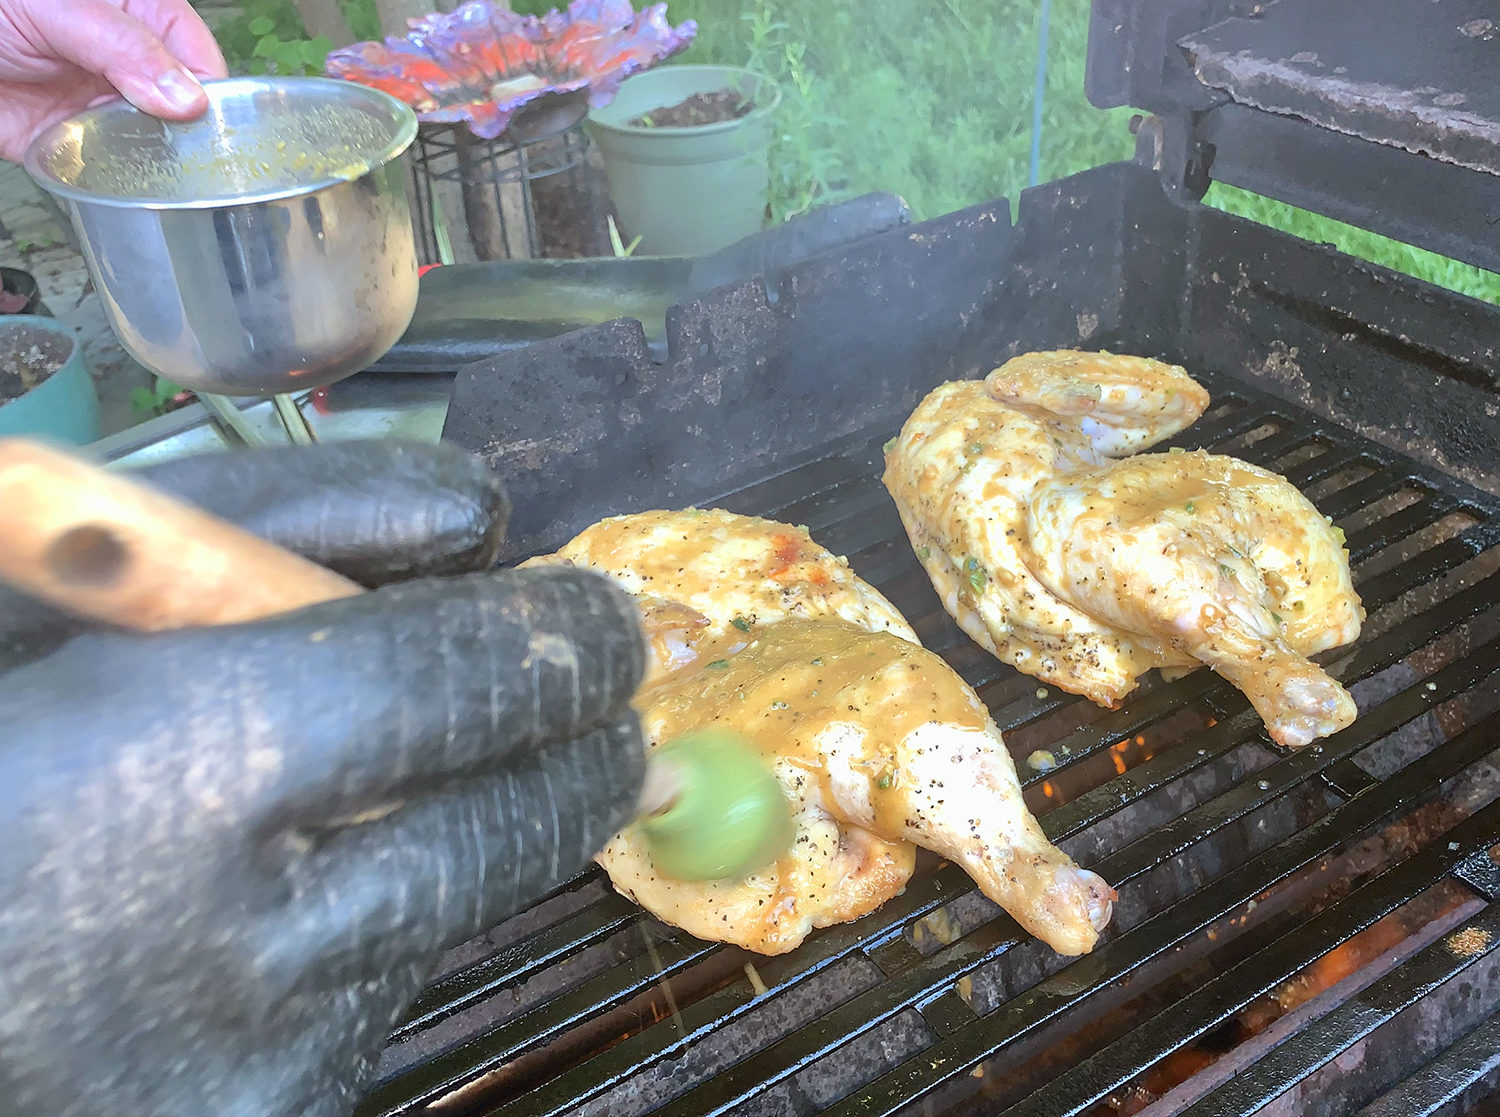
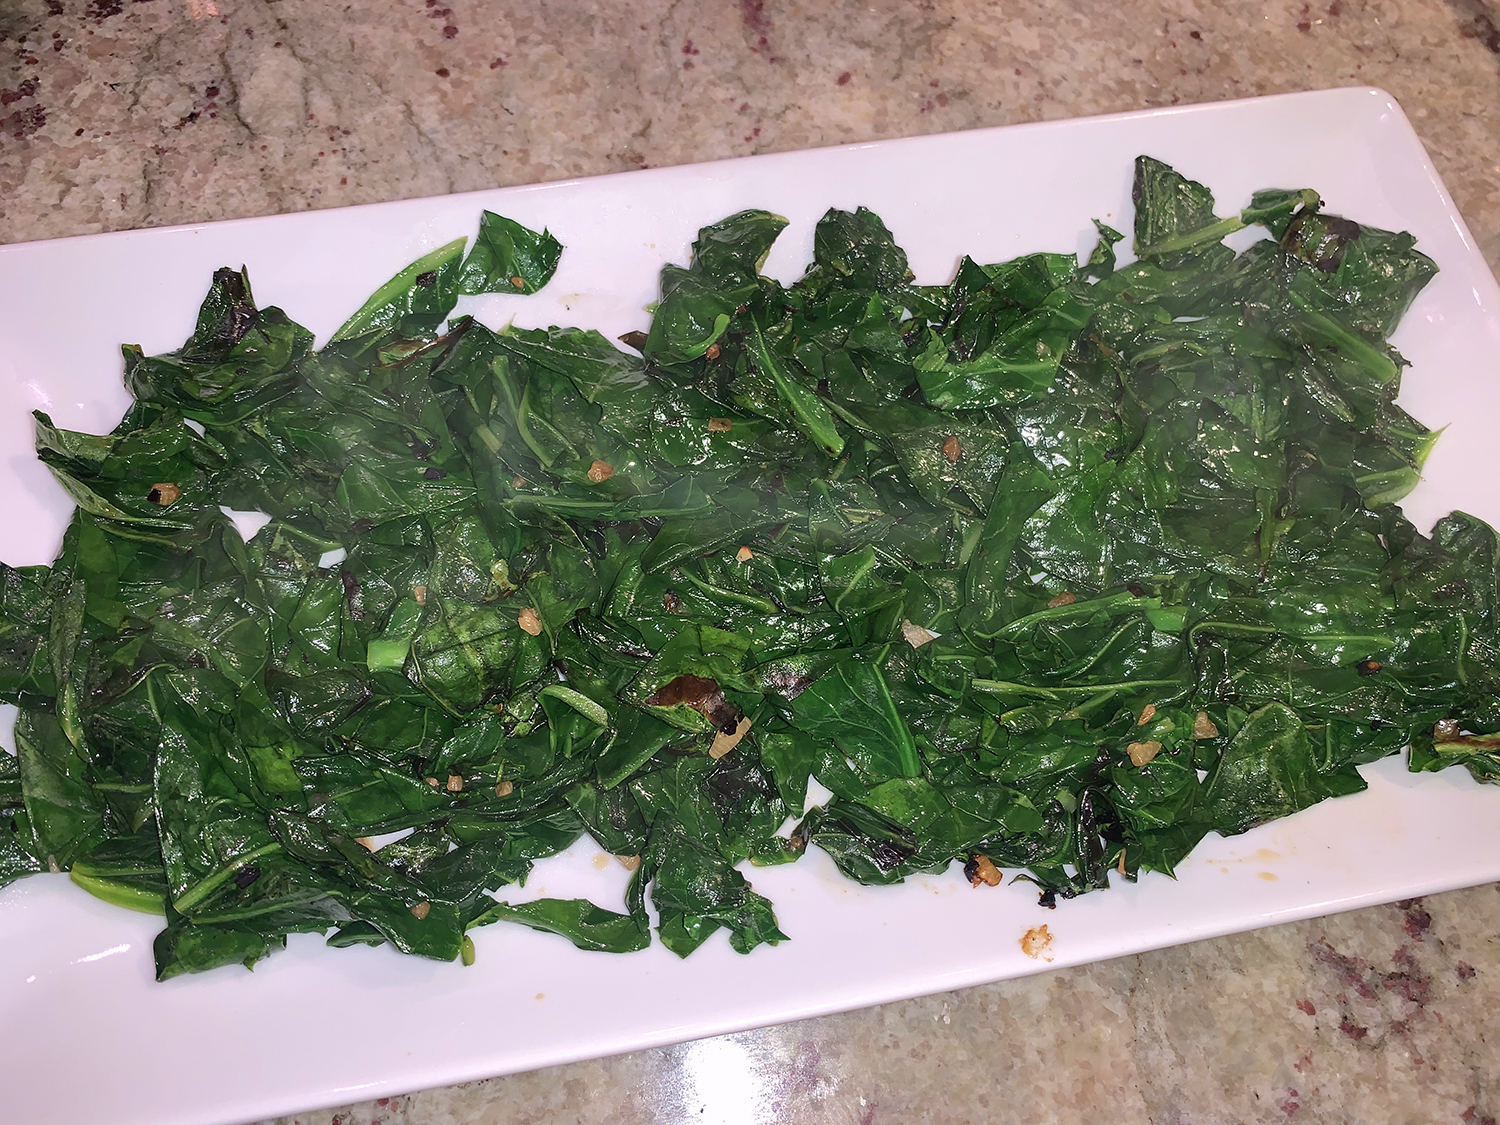
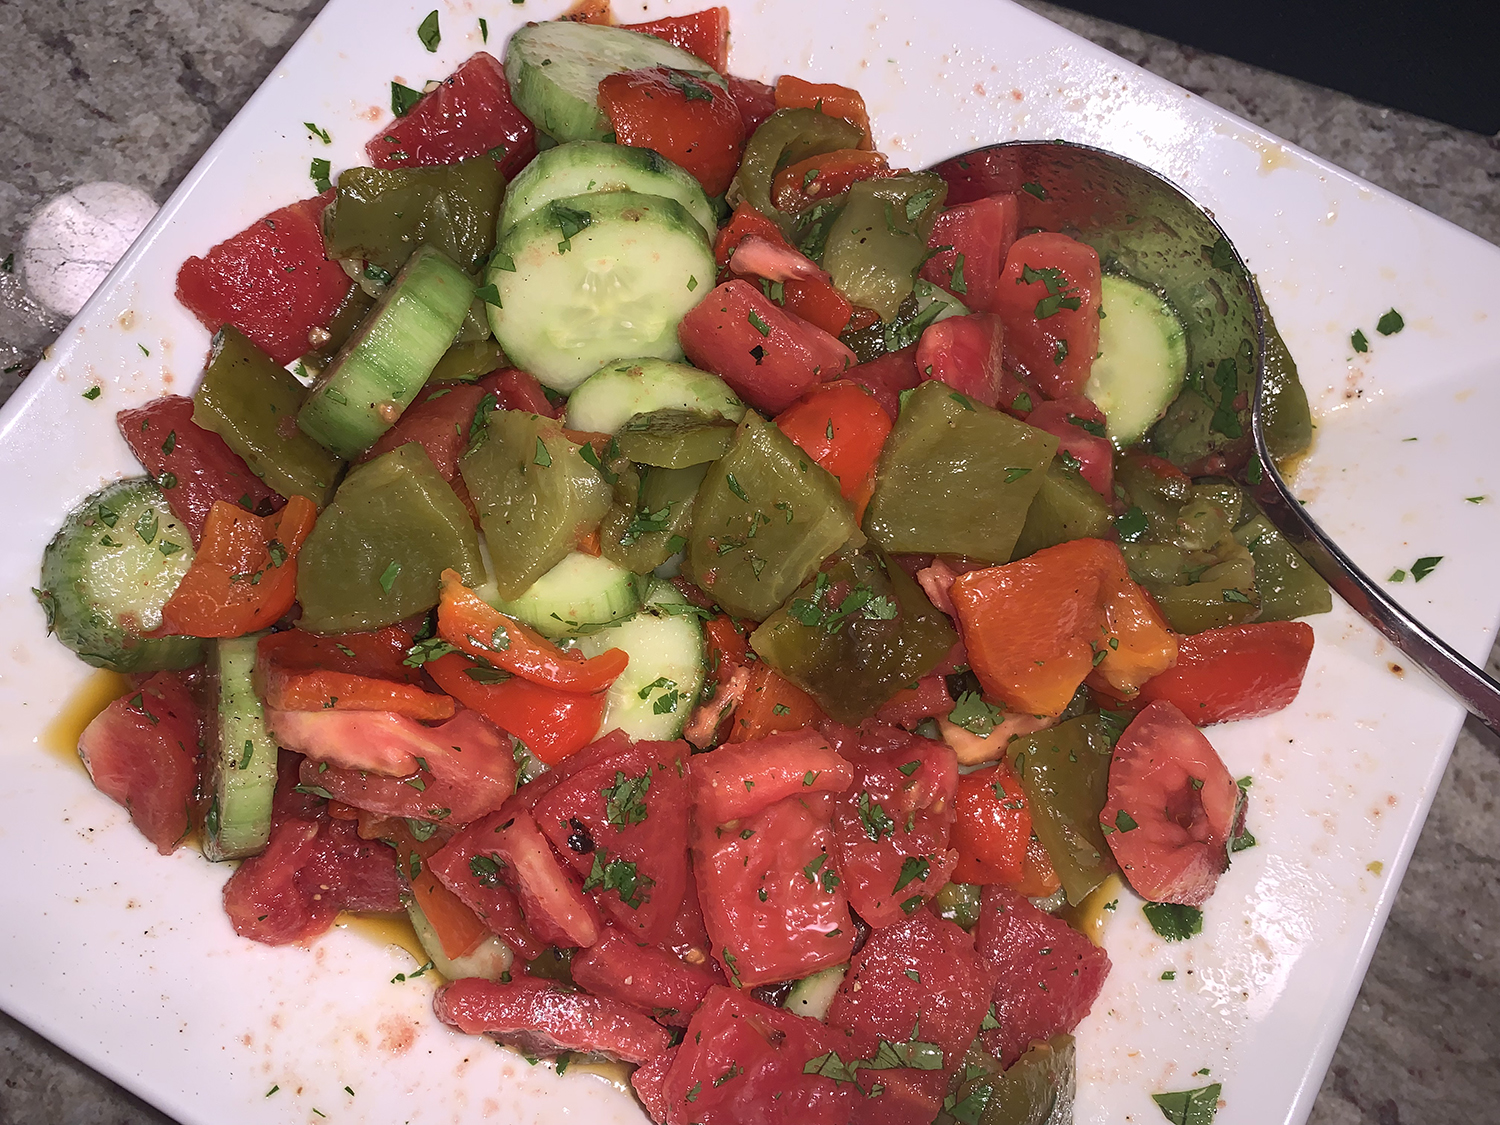
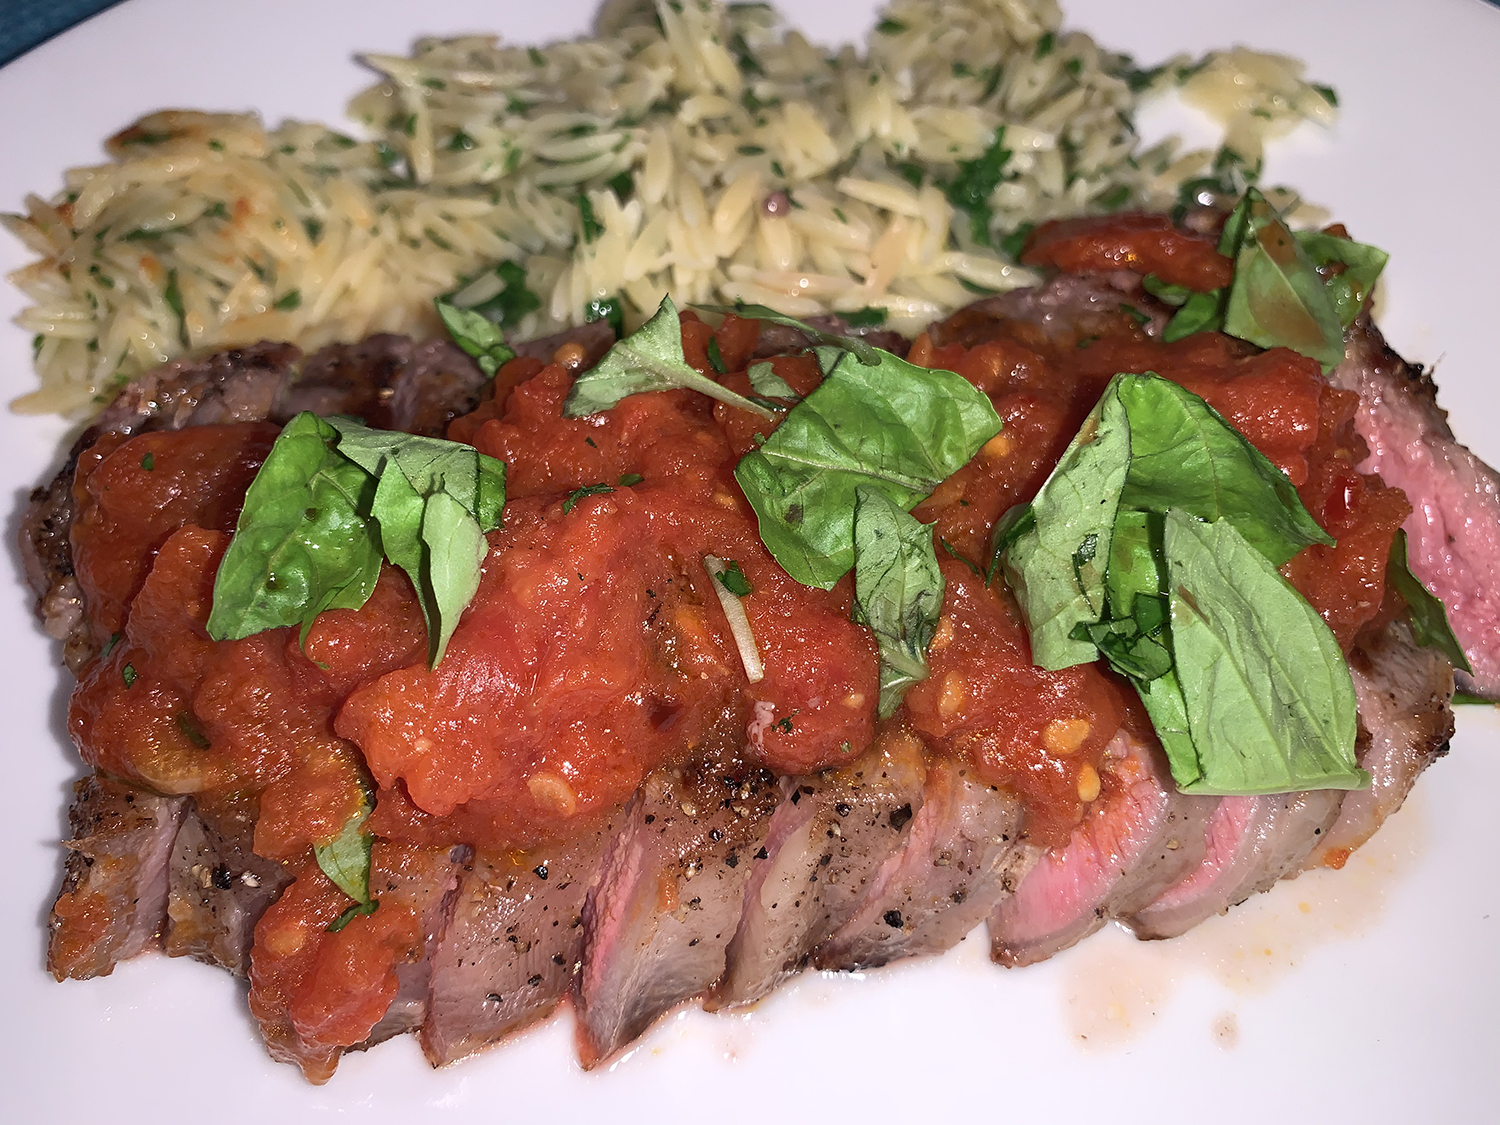
Our choice of sides was roasted butternut squash and red onions, plus a side salad; but you could also serve the steak with rice, roasted potatoes, and/or a salad for a full meal. Our Thai chiles were red, so the thecha is more red than one made with green serrano chiles, as is typical.

Skirt Steak with Scallion Thecha

  • Servings: 4
  • Difficulty: easy
  • Print

Ingredients

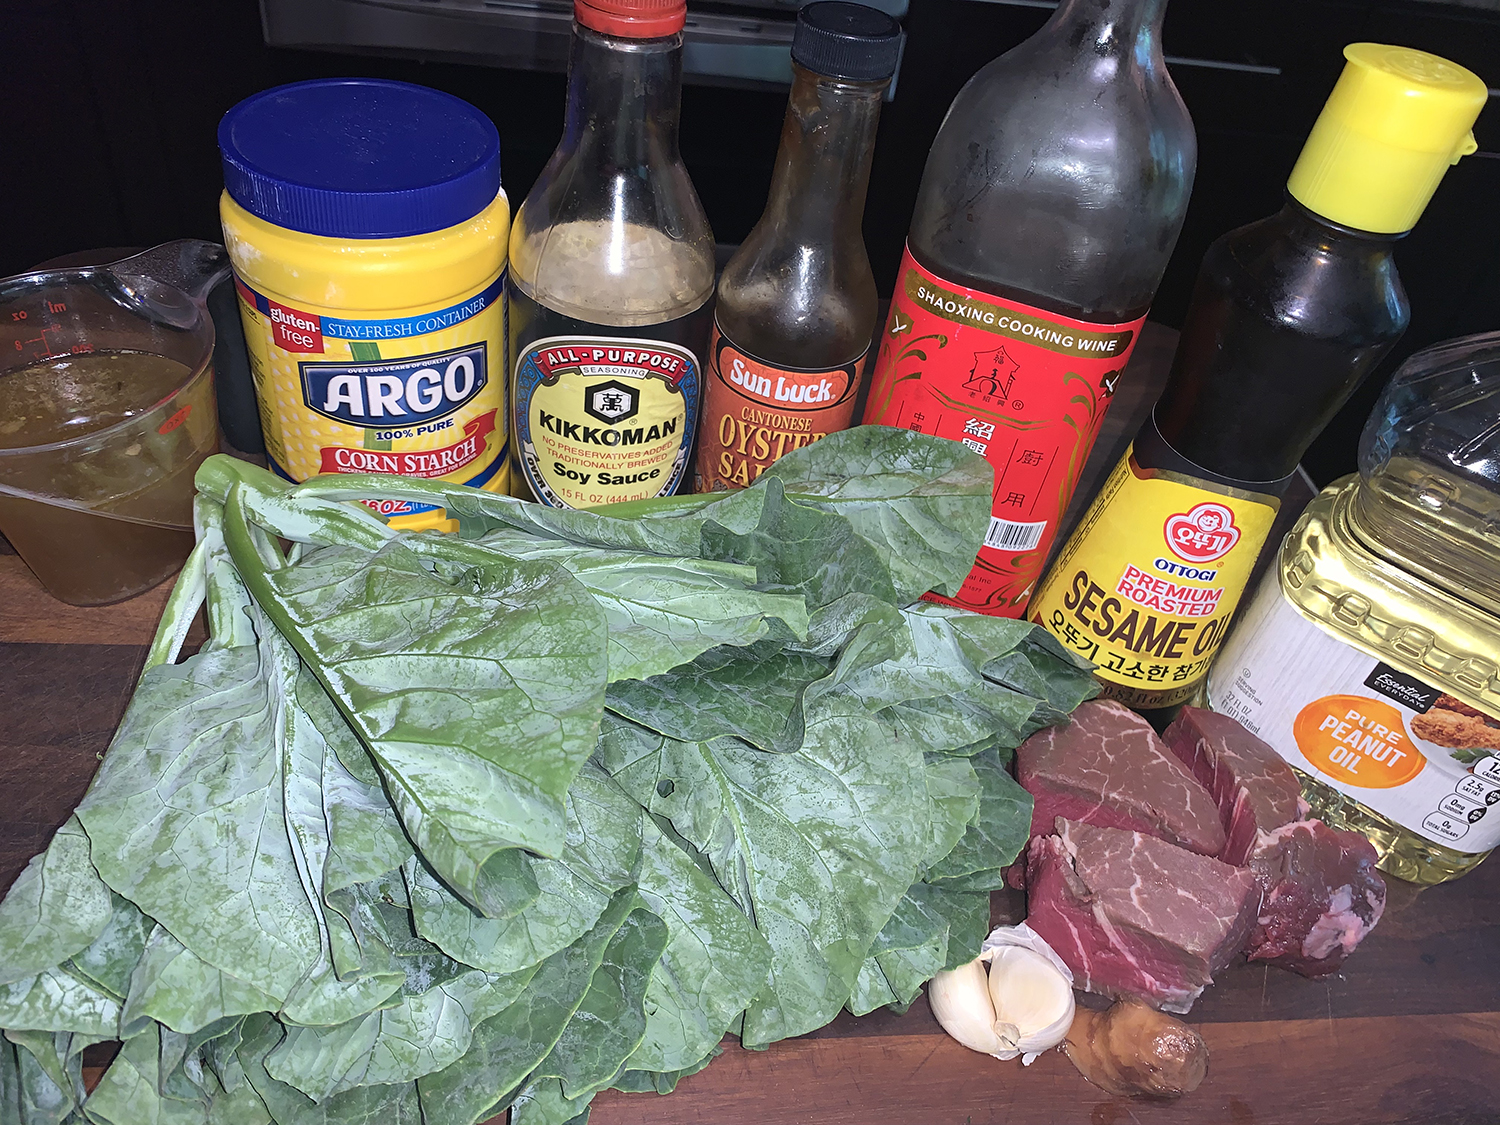
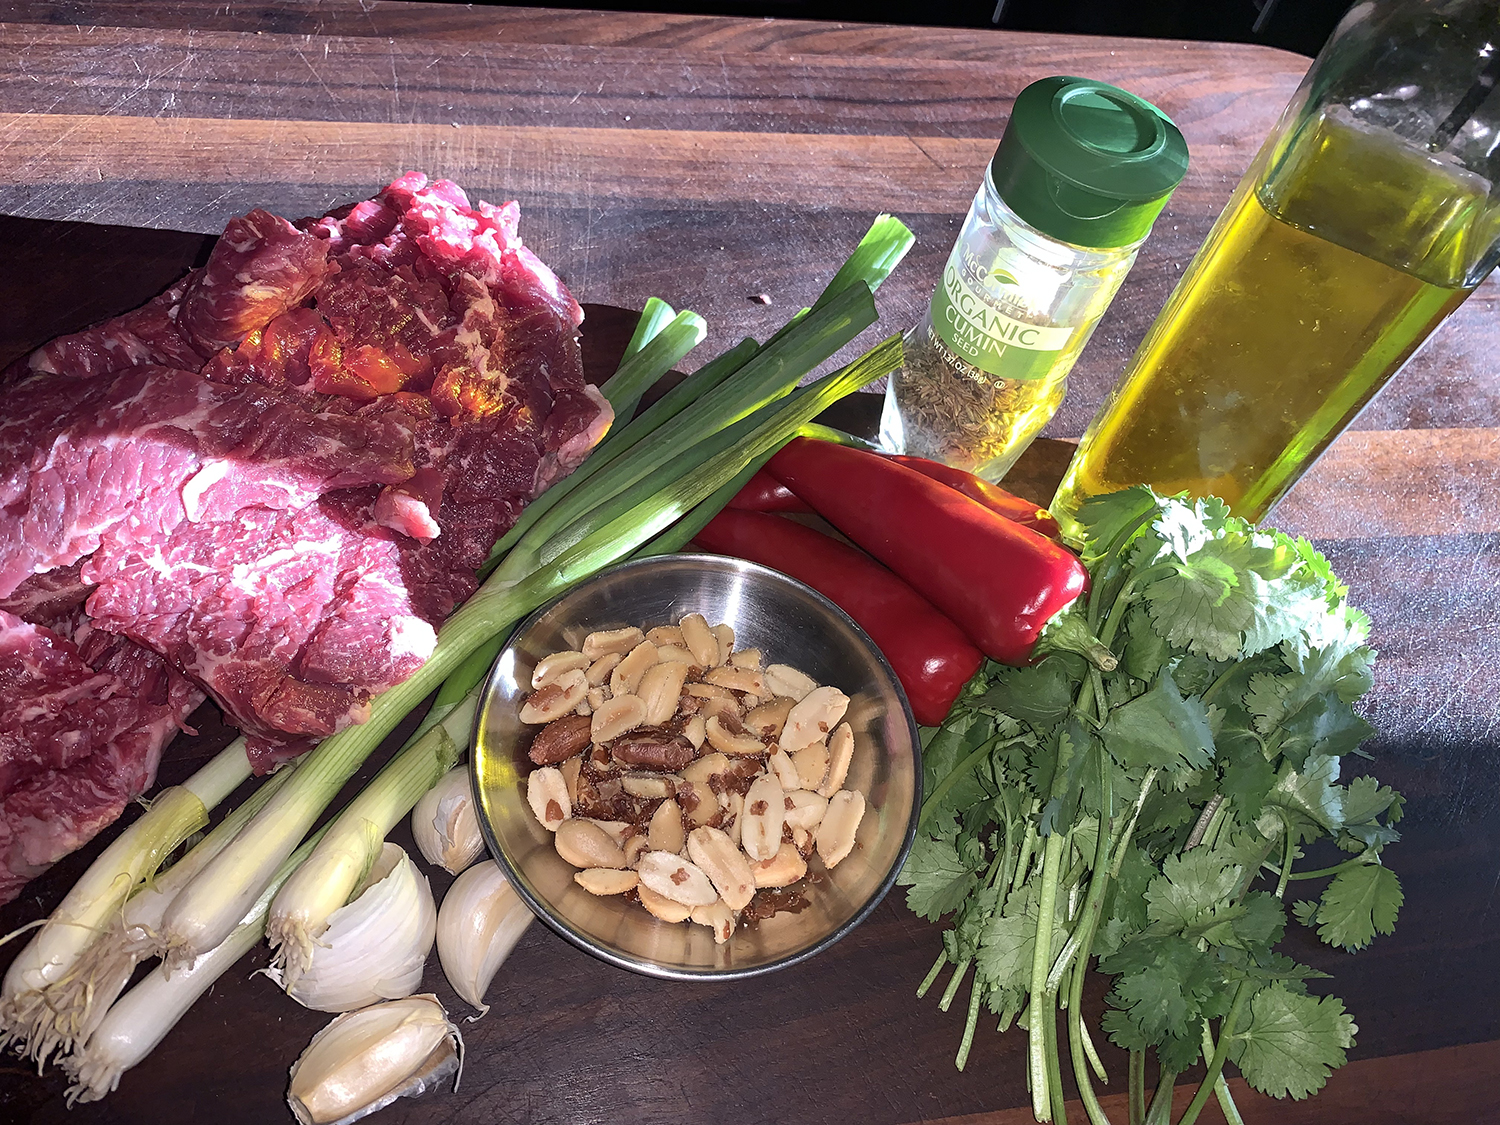
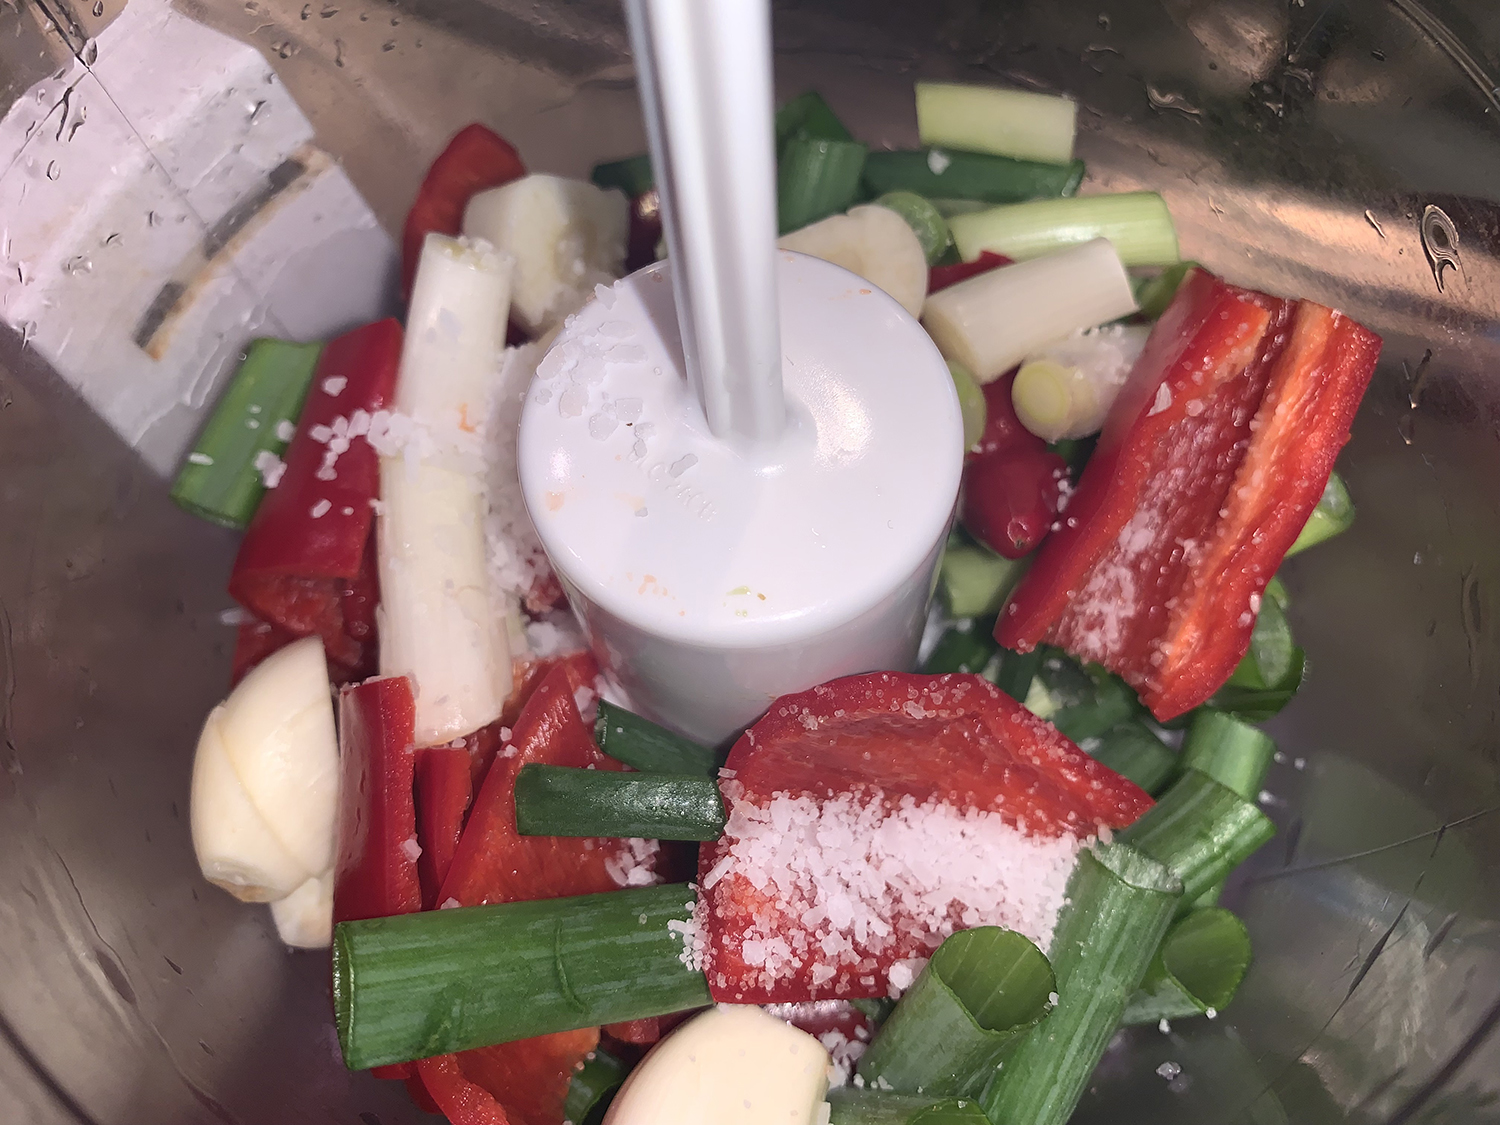
  • 1 small bunch cilantro, tough stems removed, leaves and tender stems coarsely chopped
  • 4 scallions, coarsely chopped
  • 3 green Thai or serrano chiles, stemmed and seeded
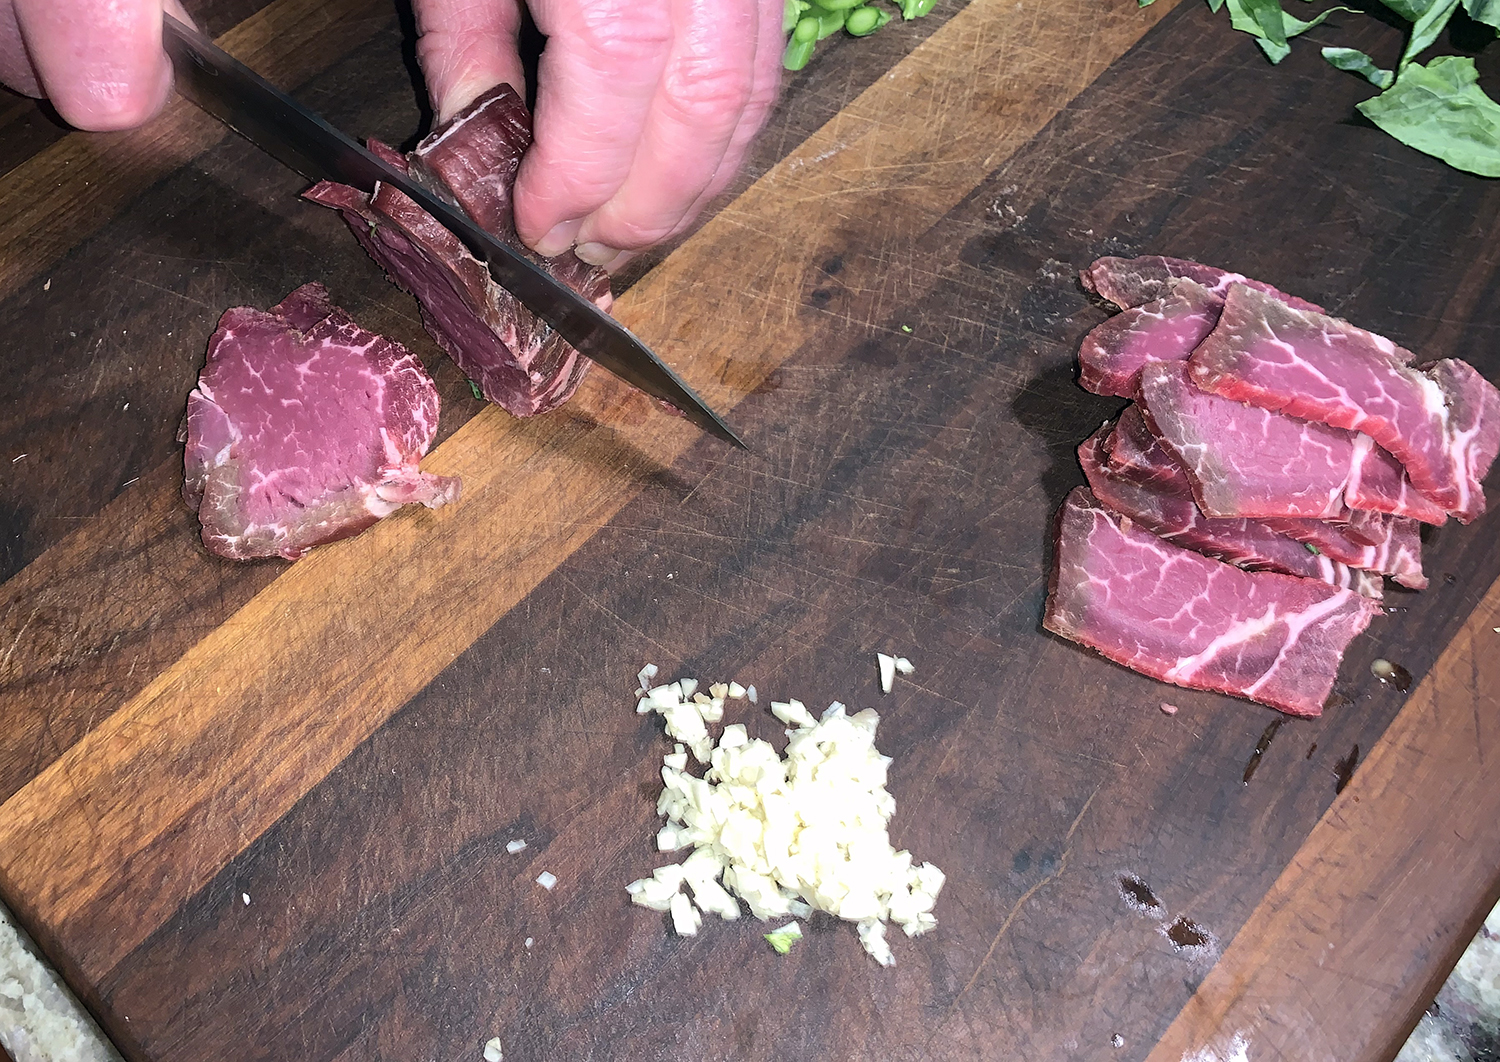
  • 4 garlic cloves, coarsest chopped
  • 1 tsp. Diamond Crystal or ½ tsp. Morton kosher salt, plus more
  • ⅓ cup vegetable oil, plus more for steak
  • 1 tsp. cumin seeds
  • ¼ cup salted or unsalted roasted peanuts, crushed
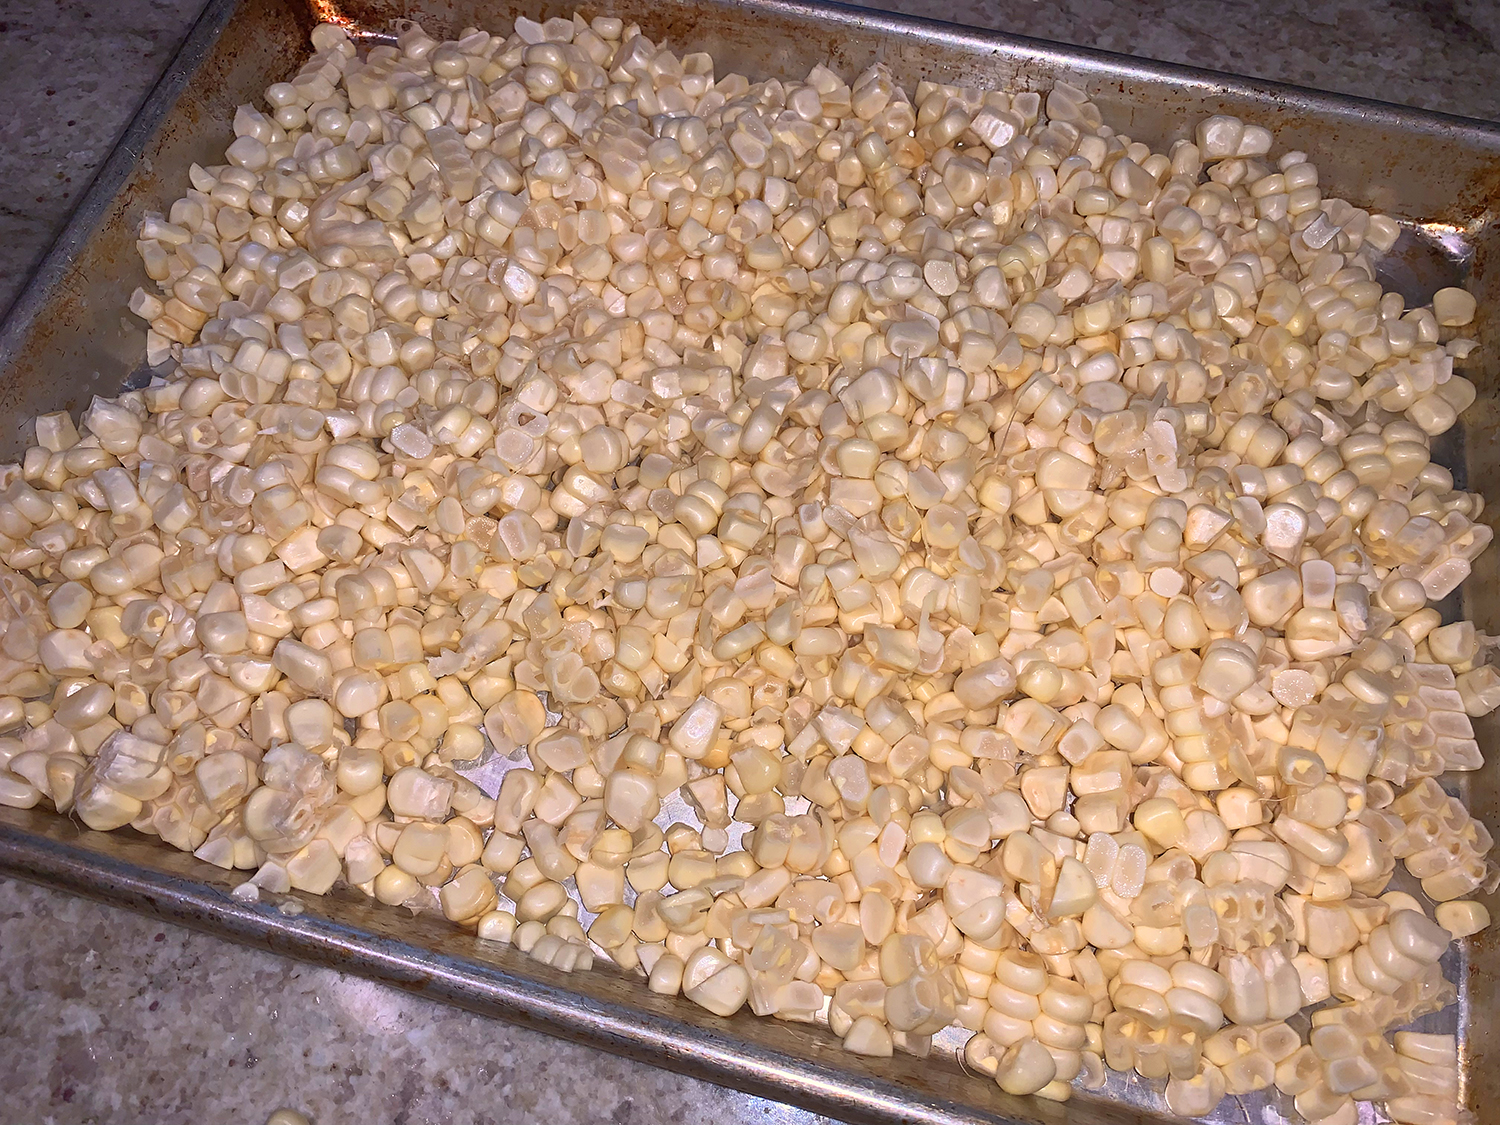
  • 1½ lb. ½”-thick skirt steak, cut into 5”-long pieces
  • Flaky sea salt

Directions

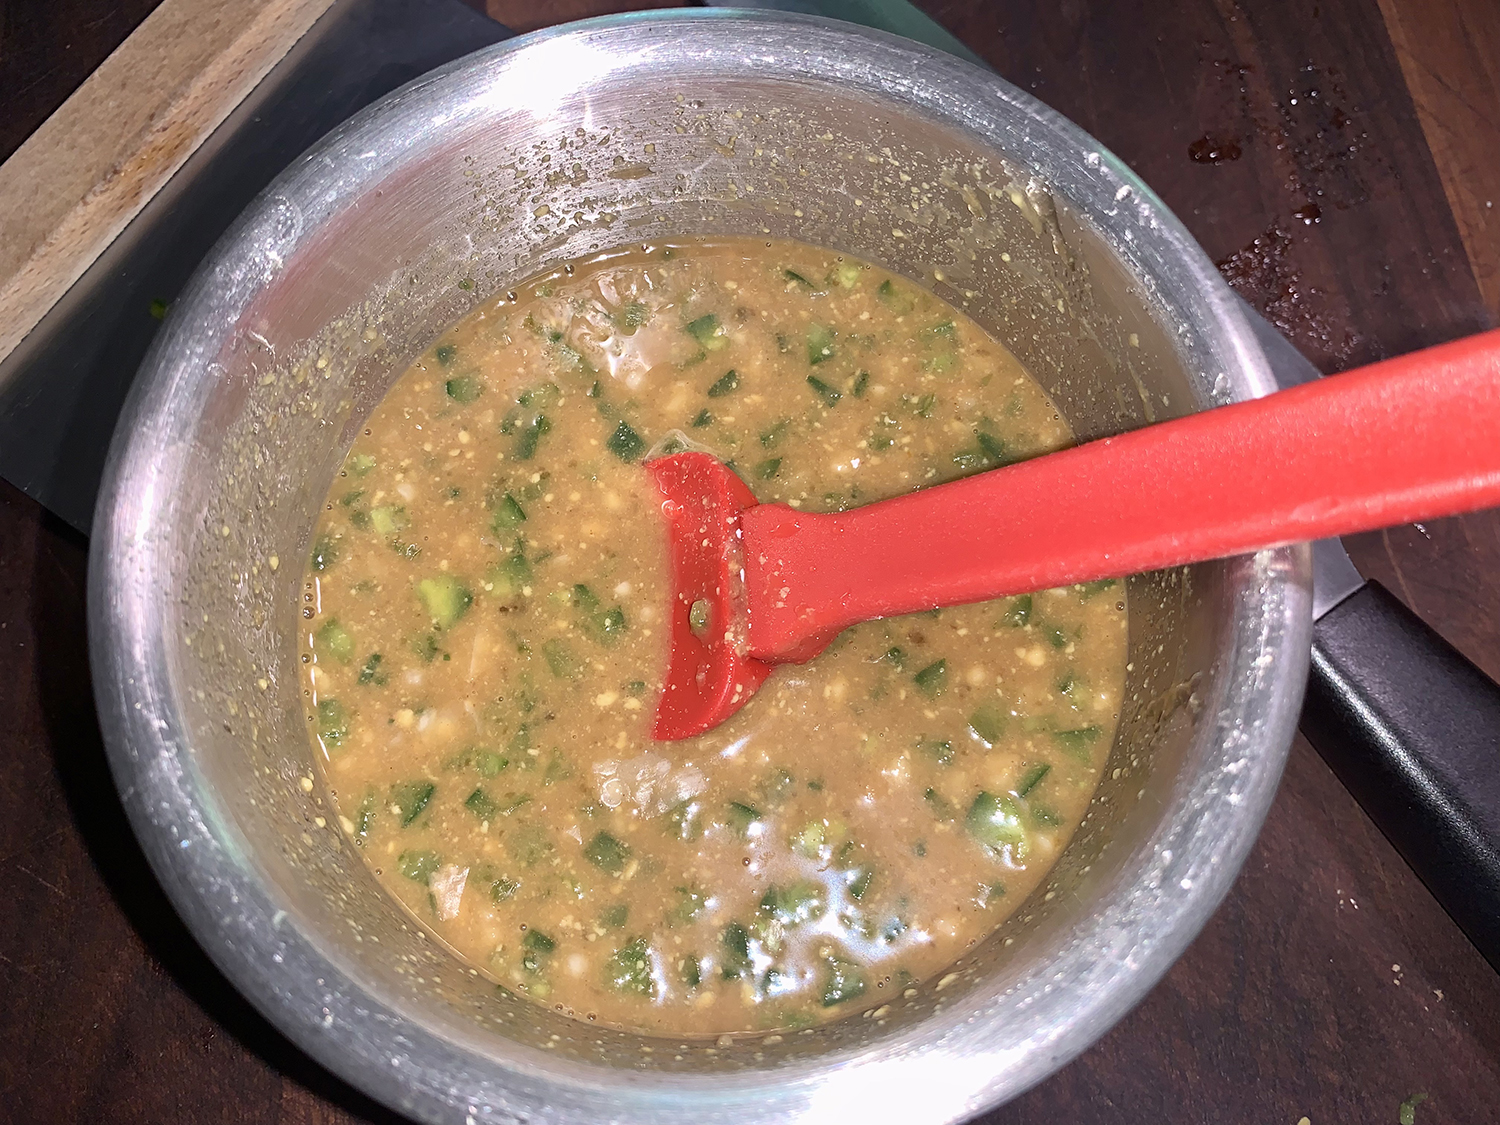
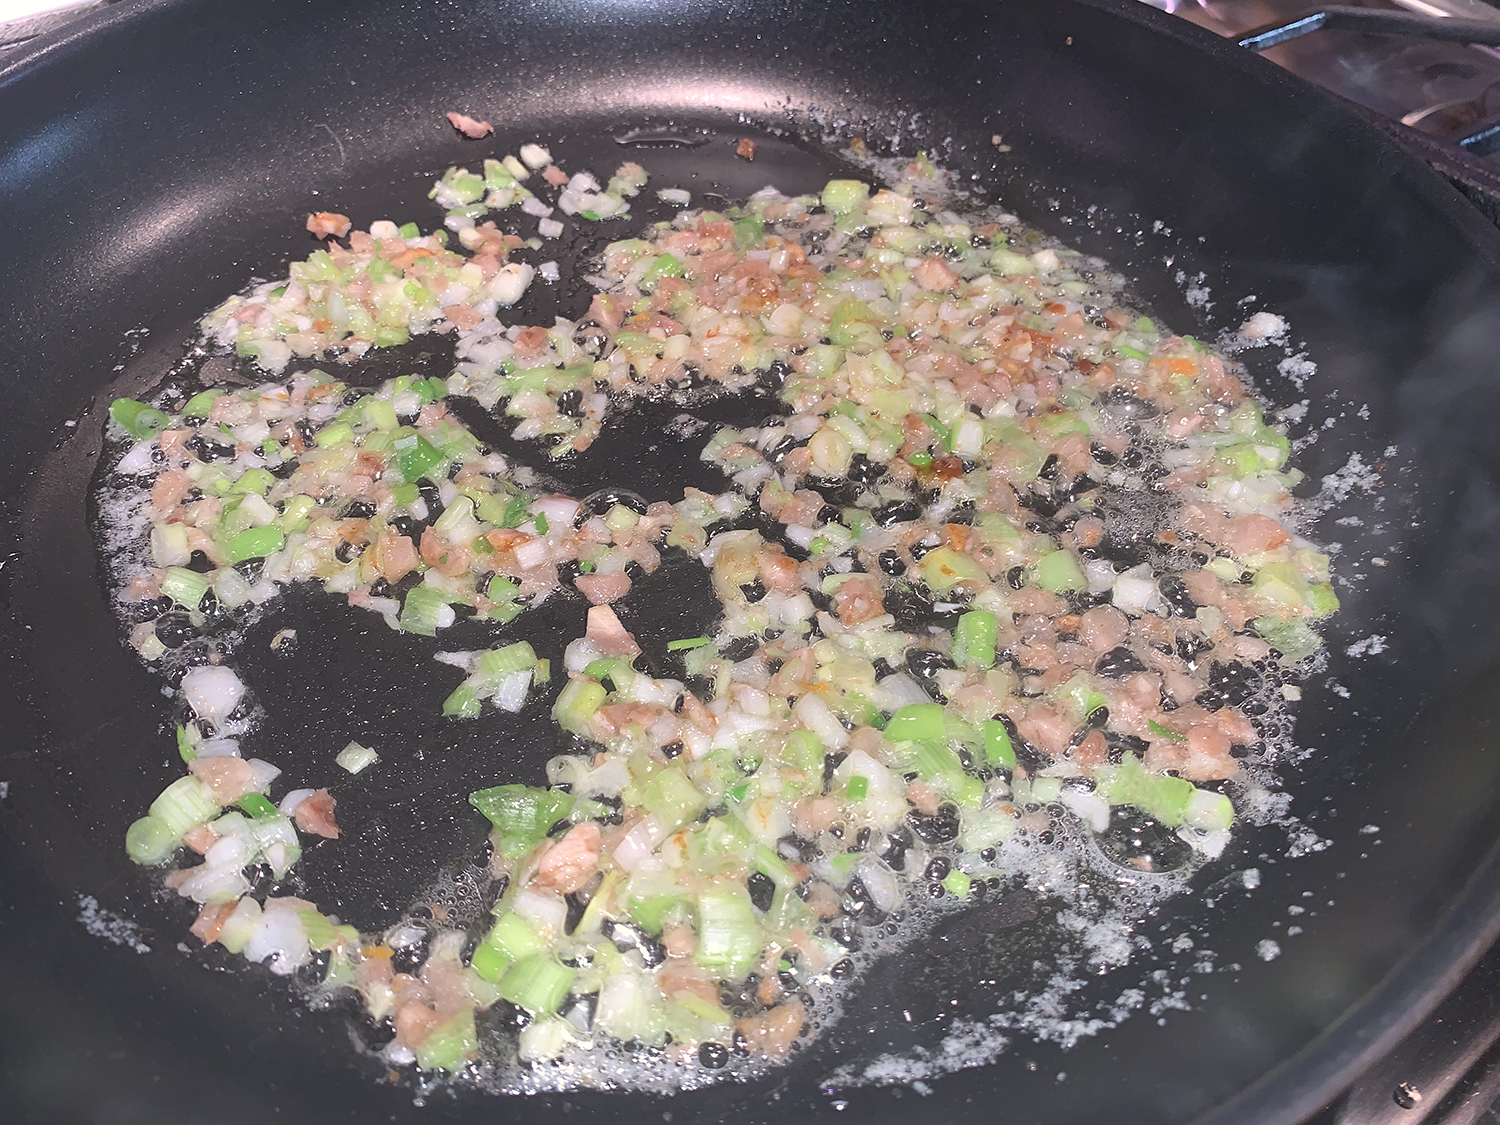
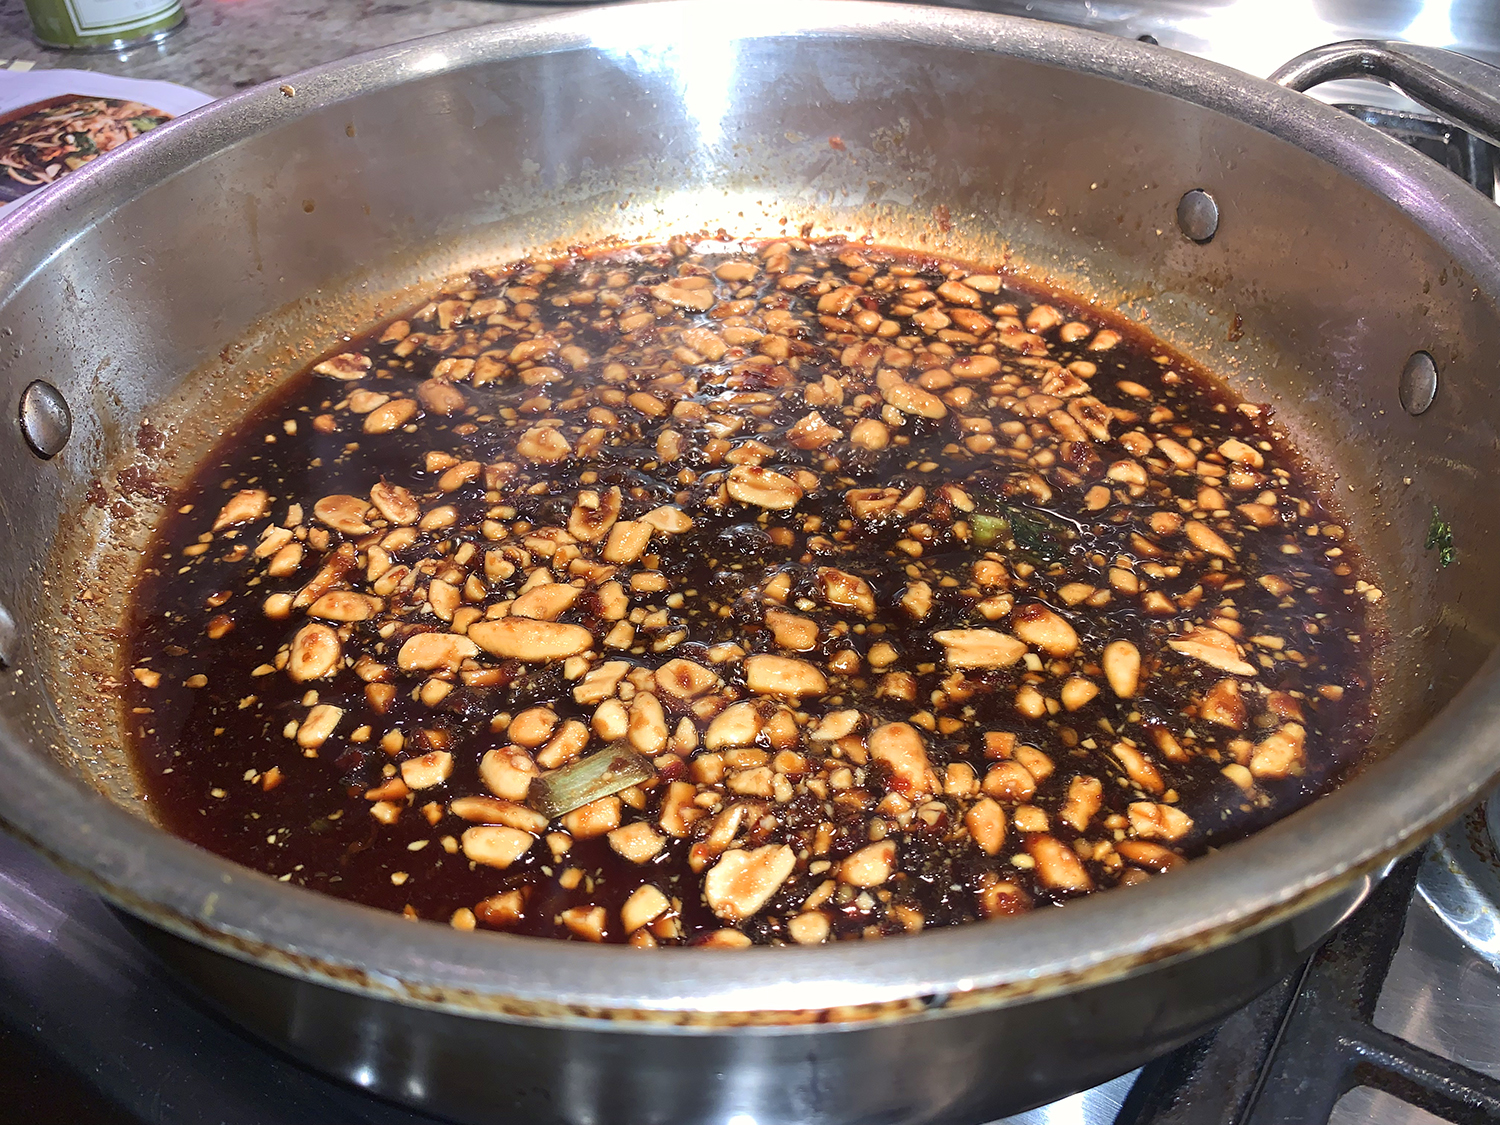
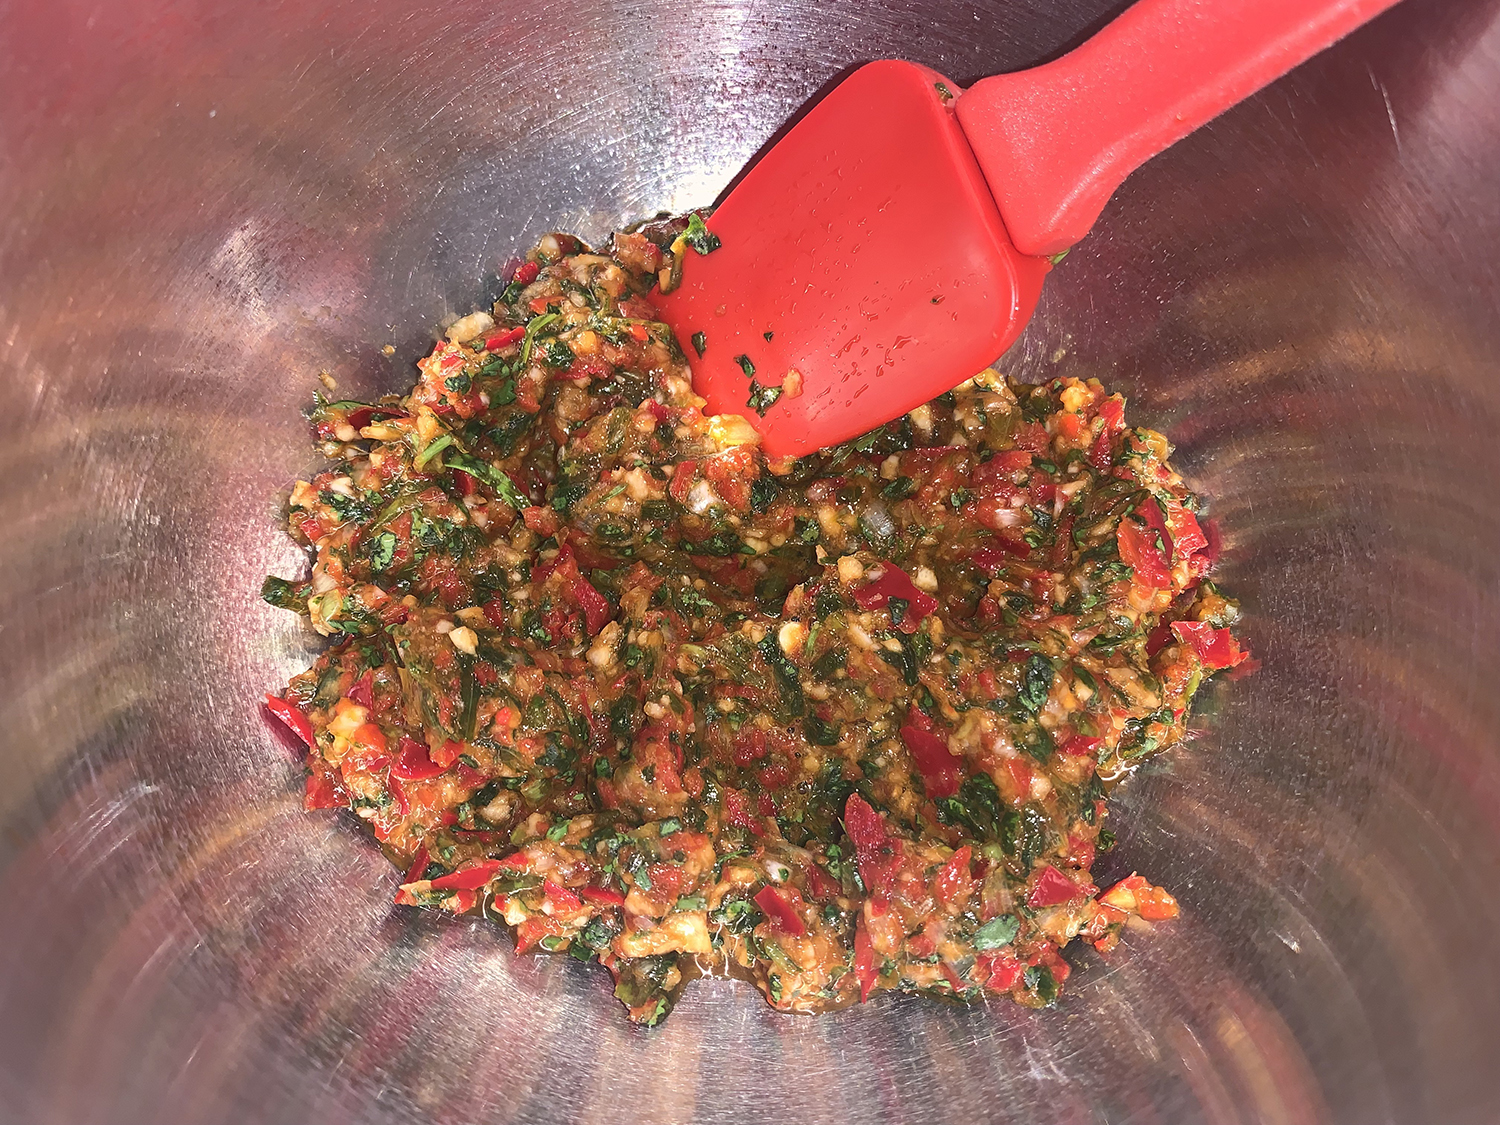
  1. Pulse cilantro, scallions, chiles, garlic, and 1 tsp. Diamond Crystal or ½ tsp. Morton kosher salt in a food processor (a mini processor works well here) until a coarse paste forms. Transfer to a small heatproof bowl.
  2. Heat ⅓ cup oil in a small skillet over medium-high. Cook cumin until fragrant, about 10 seconds. Transfer to bowl with paste; add peanuts and mix well. Set scallion thecha aside for serving.
  3. Pat steaks dry with paper towels and season on both sides with kosher salt. Rub a little oil over steaks to coat lightly.
  4. Heat a large cast-iron skillet over medium-high. Add half of the steak, arranging in a single layer, and cook, undisturbed, until a golden brown crust forms, 2–3 minutes. Turn steak over and cook until second side forms a golden brown crust, 2–3 minutes. (We had a large enough grill pan to cook all of the steak at once.)
  5. Transfer steak to a cutting board and repeat process with remaining steak, if necessary. Let rest 10 minutes.
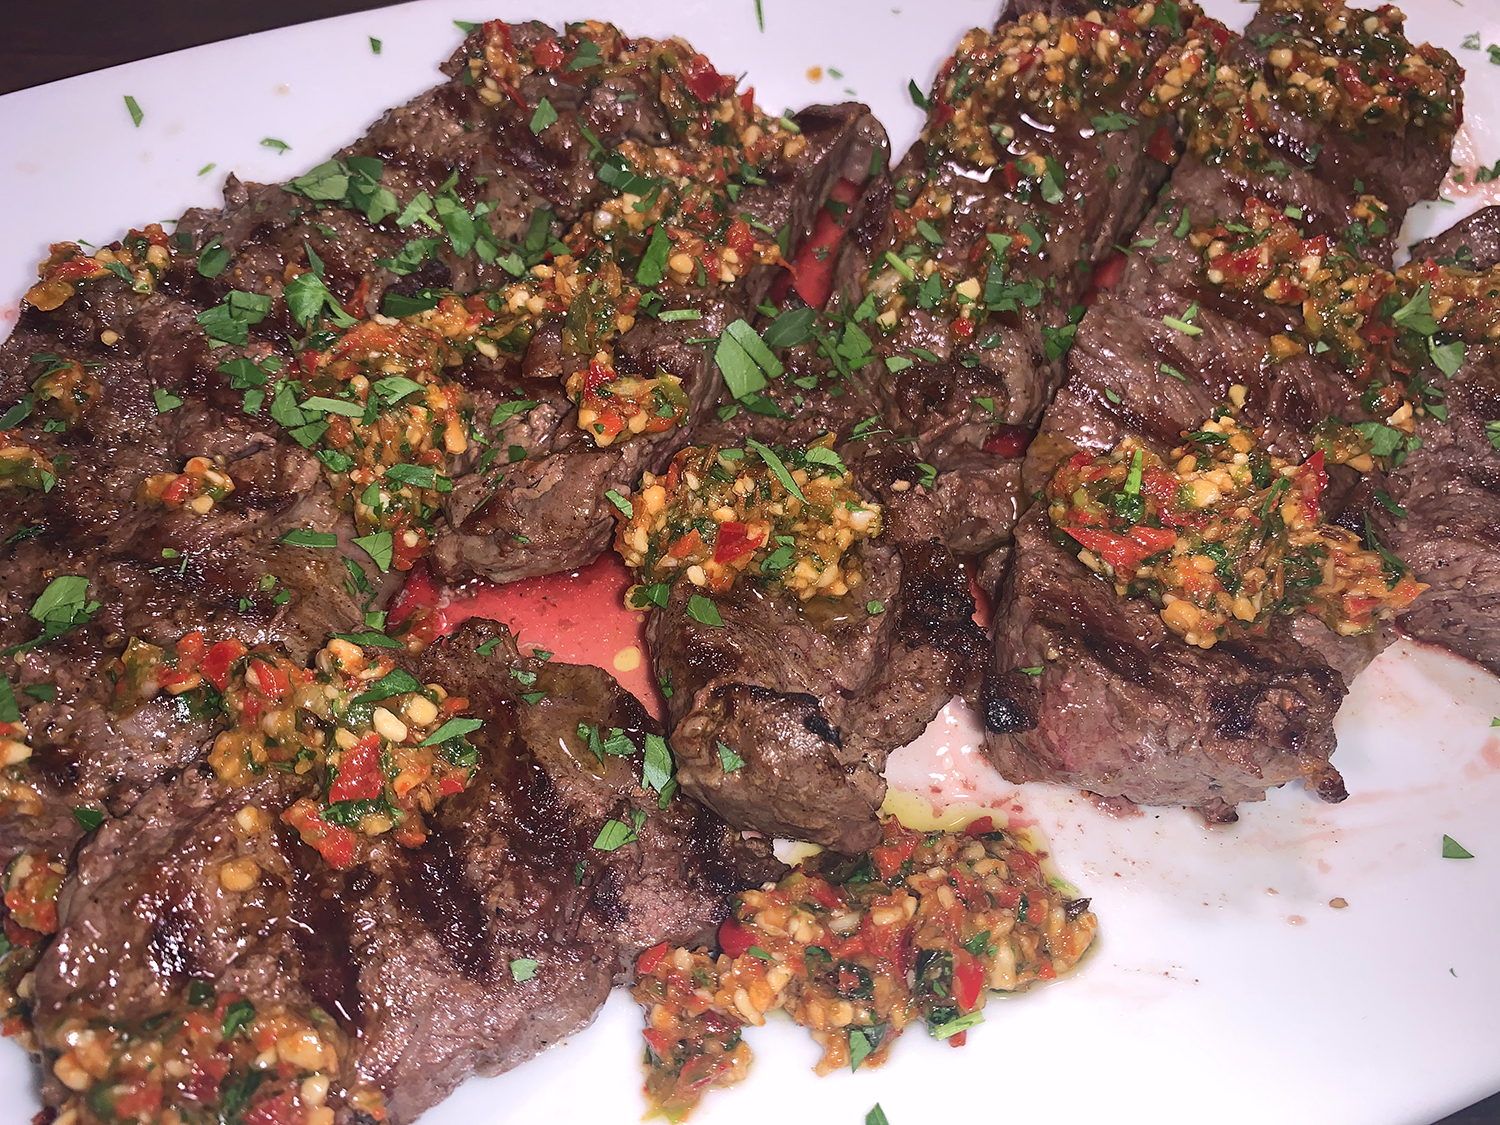
  6. Slice steak against the grain and arrange on a platter. Top with reserved scallion thecha and sprinkle with sea salt.

http://www.lynnandruss.com

Recipe by Rachel Gurjar for Bon Appétit

Sizzling Pork and Eggplant Hiyayakko

According to Bon Appétit where we sourced this recipe, Hiyayakko is a Japanese warm-weather starter or side dish made of a small square of chilled silken tofu, a sprinkling of toppings, and saucy drizzles (think a heap of bonito flakes and puddle of soy sauce, or fresh tomatoes with ponzu).

In this version, the simple template goes family-style, with sliced silken tofu carefully shingled on a platter, topped with a savory ground pork and eggplant stir-fry. The combination of cold, custardy tofu and hot, saucy pork was a bit odd in our opinion. We think next time we’d use firm tofu and flash-fry slabs of it in a hot skillet, then shingle it on a platter.

Fresh basil from the garden showered on top was the perfect garnish. If Thai basil is accessible, use that. Unable to source Chinese or Japanese eggplant, we substituted an Italian variety which is typically larger, and therefore had to slice it down differently.

The hubs thought it would be good over steamed rice. While I agree, it is no longer a low-carb or as high a protein meal. Your call…

Sizzling Pork and Eggplant Hiyayakko

  • Servings: 3-4
  • Difficulty: easy
  • Print

Ingredients

  • 2 16-oz. packages silken tofu
  • 3 Tbsp. vegetable oil, divided
  • 2 medium Chinese or Japanese eggplant (about 8 oz. total), cut into 3″-long pieces, quartered lengthwise
  • 1 lb. ground pork
  • 2 red Thai chiles, thinly sliced
  • 4 garlic cloves, finely grated
  • 1 2″ piece ginger, scrubbed, finely grated
  • 1 Tbsp. sugar
  • 1 Tbsp. fish sauce
  • 4 Tbsp. soy sauce, divided
  • 3 Tbsp. unseasoned rice vinegar, divided
  • Basil leaves (for serving)

Directions

  1. Wrap tofu in a few layers of paper towels to absorb moisture; place on a plate. Chill until ready to use.
  2. Heat 2 Tbsp. oil in a large skillet over medium-high. Cook eggplant, stirring occasionally, until slightly tender, 6–8 minutes. Transfer to a plate.
  3. Heat remaining 1 Tbsp. oil in same skillet. Cook pork, breaking up meat, 1 minute. Add chiles, garlic, ginger, and sugar and cook, stirring and continuing to break up meat into small pieces, until pork is no longer pink and mixture is fragrant, about 4 minutes.
  4. Return eggplant to skillet; add fish sauce, 2 Tbsp. soy sauce, and 2 Tbsp. vinegar. Cook, stirring often, until liquid is mostly absorbed and eggplant is browned and tender, about 3 minutes. Add remaining 2 Tbsp. soy sauce and remaining 1 Tbsp. vinegar and cook, stirring, until mixture is slightly saucy, about 1 minute. Remove from heat.
  5. Carefully unwrap tofu; slice crosswise ½”-thick. Shingle tofu on a platter. Spoon eggplant mixture over; top with basil.

http://www.lynnandruss.com

Adapted from a recipe by Kendra Vaculin for Bon Appétit

Sweet and Sticky Grilled Chicken

We just can’t get enough of roasted or grilled chicken. The bird is so versatile and the ways to prepare it are endless! “Pantry superstars do the heavy lifting in this easy, crowd-pleasing grilled chicken dinner.”

Now If you can find a whole chicken that is already split, the result is a chicken dinner with the same properties of spatchcocking (quick-cooking, lots of surface area to get charred, crispy skin) but which is more manageable than dealing with a whole bird. If you can’t score one, buy a whole chicken, butterfly it, then split it yourself by slicing directly between the two breasts.

The chicken got a bit too charred on the outside, but the inside meat was succulent and juicy!

For the tangy glaze, stir up a few condiment powerhouses like marmalade, Dijon mustard, and sherry vinegar, and brush them onto the chicken after cooking it most of the way through, covered over indirect heat. For the final 10 to 15 minutes, transfer the chicken halves to direct heat and baste with every flip until glistening and charred. Leftover glaze can be cooked down as a sauce to serve alongside the finished dish. 

Word to the wise, have extra napkins on hand 😉

Sweet and Sticky Grilled Chicken

  • Servings: 4
  • Difficulty: easy
  • Print

Ingredients

  • 1 3½–4-lb. chicken, backbone removed, halved
  • Kosher salt, freshly ground pepper
  • ½ cup orange marmalade or seedless jam of choice
  • ⅓ cup Dijon mustard
  • ⅓ cup sherry vinegar or red wine vinegar
  • 3 Tbsp. soy sauce
  • 1 jalapeño, finely chopped (optional)
  • 5 garlic cloves, finely grated
  • 1 Tbsp. vegetable oil, plus more for grill
  • Flaky sea salt

Directions

  1. Generously season chicken halves all over with salt and pepper. Let sit at room temperature at least 15 minutes, or chill up to 1 day. If chilling, let sit at room temperature 1 hour before grilling.
  2. Whisk marmalade, mustard, vinegar, soy sauce, jalapeño (if using), and garlic in a small bowl to combine. Set glaze aside.
  3. Prepare a grill for medium-high indirect heat (for a charcoal grill, bank coals on one side of grill; for a gas grill, leave one or two burners off). Lightly oil grate. Pat chicken dry with paper towels, then rub with 1 Tbsp. oil. Place, skin side down, over indirect heat. Cover grill and grill chicken, turning halfway through, until skin is lightly browned and an instant-read thermometer inserted into thickest part of thighs registers 120°–130°, 15–20 minutes.
  4. Uncover grill, turn chicken over, and move over direct heat. Brush chicken with reserved glaze. Grill, turning often and brushing generously with glaze (move to indirect heat if browning too quickly), until charred in spots and an instant-read thermometer inserted into thickest part of breast registers 150° (it will climb to 160° as chicken rests), 10–15 minutes. Transfer chicken, skin side up, to a cutting board; let rest 15 minutes.
  5. While chicken is resting, transfer any remaining glaze to a small saucepan and cook over medium-high heat, stirring occasionally, until bubbling and slightly thickened, about 5 minutes.
  6. Carve chicken and transfer to a platter; sprinkle with sea salt. Serve with sauce alongside.

http://www.lynnandruss.com

Recipe by Zaynab Issa For Bon Appétit

Stir-Fried Beef and Gai Lan

This riff on the ever-evolving Chinese American standard features gai lan (Chinese broccoli) and filet mignon: The luxurious cut is ideal for quick, high-heat cooking; is readily available in small portions; and just needed a brief chill in the freezer to firm up for easy slicing before being coated in a simple mixture of soy sauce, Shaoxing wine, and cornstarch.

While the meat chills, slice the gai lan stalks thin on the bias and cut the tender leaves into wide ribbons. Start the stir-fry by cooking the stalks in oil in a hot wok. As they sizzle, the oil smolders, infusing the dish with a smoky aroma. Then set the stalks aside and stir-fry the leaves with garlic and toasted sesame oil, speeding their cooking with a small but flavorful addition of chicken broth before arranging them on a serving platter.

Finally, stir-fry the marinated beef; returned the stalks to the wok; and stir in a blend of chicken broth, oyster sauce, soy sauce, Shaoxing wine, toasted sesame oil, and cornstarch. The sauce thickens in less than a minute. Arrange the beef mixture over the leaves, ensuring that each bite is perfectly sauced. If desired, serve with steamed rice.

If gai lan is unavailable, you can use broccolini, substituting the florets for the gai lan leaves. Do not use standard broccoli. In the end, we found it served 3 sufficiently, or 4 “small plates”.

Stir-Fried Beef and Gai Lan

  • Servings: 3-4
  • Difficulty: easy
  • Print

Ingredients

  • 1 (8-oz.) center-cut filet mignon, trimmed
  • 1 lb. gai lan, stalks trimmed
  • 5 tsp. Shaoxing wine or dry sherry, divided
  • 1 Tbsp. soy sauce, divided
  • 2 tsp. cornstarch, divided
  • ¾ cup chicken broth, divided
  • 2 Tbsp. oyster sauce
  • 1½ tsp. toasted sesame oil, divided
  • 2 Tbsp. vegetable oil, divided
  • 1½ tsp. grated fresh ginger
  • 2 cloves garlic, divided

Directions

  1. Prepare white rice as per package directions.
  2. Cut beef into 4 equal wedges. Transfer to plate and freeze until very firm, 20 to 25 minutes. While beef freezes, prepare gai lan. Remove leaves, small stems, and florets from stalks; slice leaves crosswise into 1½-inch strips (any florets and stems can go into pile with leaves); and cut stalks on bias into ¼-inch-thick pieces. Set aside.
  3. When beef is firm, stand 1 piece on its side and slice against grain ¼ inch thick. Repeat with remaining pieces. Transfer to bowl. Add 1 teaspoon Shaoxing wine, 1 teaspoon soy sauce, and 1 teaspoon cornstarch and toss until beef is evenly coated. Set aside.
  4. In second bowl, whisk together ½ cup broth, oyster sauce, ½ teaspoon sesame oil, remaining 4 teaspoons Shaoxing wine, remaining 2 teaspoons soy sauce, and remaining 1 teaspoon cornstarch; set aside.
  5. In third bowl, combine 4 teaspoons vegetable oil, ginger, and ¼ teaspoon garlic.
  6. Heat 1 teaspoon vegetable oil in wok over high heat until just smoking. Add stalks and cook, stirring slowly but constantly, until spotty brown and crisp-tender, 3 to 4 minutes. Transfer to bowl.
  7. Add remaining 1 teaspoon sesame oil, remaining 1 teaspoon vegetable oil, and remaining ½ teaspoon garlic to wok and cook, stirring constantly, until garlic is fragrant, about 15 seconds. Add leaves and cook, stirring frequently, until vibrant green, about 1 minute. Add remaining ¼ cup broth and cook, stirring constantly, until broth evaporates, 2 to 3 minutes. Spread evenly on serving dish.
  8. Add ginger-garlic mixture to wok and cook, stirring constantly, until fragrant, about 30 seconds. Add beef and cook, stirring slowly but constantly, until no longer pink, about 2 minutes. Return stalks to wok and add oyster sauce mixture. Cook, stirring constantly, until sauce thickens, 30 to 60 seconds. Place mixture on top of leaves. Serve.

http://www.lynnandruss.com

Recipe by Lan Lam for Cook’s Illustrated

Portuguese Salad

In a sense, this salad is glorified gazpacho, but chunkier—and it paired wonderfully with our Cataplana (Portugal’s Simple Seafood Stew) entrée. As it only feeds 3 to 4, we doubled the amounts to feed the party of 6.

As I’ve mentioned in the past, our gas oven broiler doesn’t do the best job. When I walked into the kitchen and saw The Hubs down on his knees with his arm stuck into the oven rotating the peppers with tongs, I gently told him that it might be much easier to char them directly over a gas burner. Smart man that he is, he took the hint, because when I walked back in, he was searing the plum tomatoes, two at a time, directly on the grates.

When it comes to hosting, we like to do as much as possible the day prior to the event. For this side dish, he blackened and peeled the tomatoes and bell peppers, then salted the peeled cucumber slices. About half an hour before the feast was served, the salad was finished with the dressing.

Portuguese Salad

  • Servings: 3-4
  • Difficulty: easy
  • Print

Ingredients

  • 1 red bell pepper
  • 1 green bell pepper
  • 3 plum tomatoes
  • 1/4 cup olive oil
  • 1 cucumber, peeled
  • 1/4 cup cilantro, chopped
  • 2 Tbsp. red wine vinegar
  • 1 tsp. chili paste
  • Salt and pepper

Directions

  1. Turn the broiler on, and set the red and green bell peppers underneath. Cook, turning occasionally, until lightly blackened on all sides. When done, place in a small plastic bag and let steam for a few minutes. Repeat with the tomatoes, but first lightly coat in olive oil. They will cook much quicker. Remove when lightly blackened all over and let cool on a tray.
  2. While the bell peppers and tomatoes cool, slice the cucumber into 1/2 inch inch thick slices. Set on a rack or on a paper towel, and sprinkle lightly with salt. Let those hang out for 20 minutes or so until they release some water. Dry with paper towels.
  3. Remove the bell peppers from the plastic bags when cooled. Peel off the skin, remove the stems, and chop into 1-inch squares. Repeat this process with the tomatoes, discarding most of the pulp.
  4. Toss the chopped bell peppers, tomato, and cucumbers in a large bowl. Add the chopped cilantro, olive oil, red wine vinegar, and chili paste. Season to taste with salt and pepper. Eat right away, or let sit in the fridge for 30 minutes for the flavors to really marry.

http://www.lynnandruss.com

Adapted from a recipe on Serious Eats by Nick Kindelsperger

Corn Sauté with Miso and Scallions

To create this corn side dish with rich, toasted flavor, strip the corn from the cobs when they are raw and then cook the kernels in a nearly smoking skillet. It is important not to stir the corn for a few minutes to give it a chance to brown. Once the corn is cooked, mix in plenty of salty, savory ingredients to balance the sweetness. Finally, an acidic component rounds out the dish.

Because fresh corn can vary in sweetness, the recipe calls for seasoning with a range of rice vinegar. We made it twice so far, and prefer the version with just 1 tablespoon of rice vinegar. When browning the corn kernels in a nonstick skillet, we found it took longer to get that caramelization, nearly three times longer! But so worth it because it was delicious and paired well with our grilled baby back ribs.

Corn Sauté with Miso and Scallions

  • Servings: 4-6
  • Difficulty: easy
  • Print

Ingredients

  • 2 Tbsp. unsalted butter
  • 6 scallions, white parts minced, green parts sliced thin on bias
  • 1 tsp. grated fresh ginger
  • 2 Tbsp. white miso
  • 1 – 2 Tbsp. rice vinegar
  • 1 Tbsp. vegetable oil
  • 4 ears corn, kernels cut from cobs (4 cups)
  • Salt
  • 1 Tbsp. mirin
  • 1 Tbsp. toasted sesame seeds

Directions

  1. Melt butter in 12-inch nonstick skillet over medium heat. Add scallion whites and ginger and cook, stirring frequently, until scallions are softened, 1 to 2 minutes. Transfer scallion mixture to large bowl and whisk in miso and 1 tablespoon vinegar. Wipe out skillet.
  2. Heat oil in now-empty skillet over medium-high heat until shimmering. Add corn and sprinkle with 1/4 teaspoon salt. Cook, without stirring, until corn is browned on bottom and beginning to pop, about 3-5 minutes. Stir and continue to cook, stirring once or twice, until corn is spotty brown all over, 2 to 3 minutes longer.
  3. Add mirin and cook until evaporated, about 1 minute. Transfer corn to bowl with scallion mixture.
  4. Stir in scallion greens. Season with salt and remaining vinegar to taste. Sprinkle with sesame seeds and serve.

http://www.lynnandruss.com

Recipe from Cook’s Illustrated

Iraqi Spice-Crusted Grilled Chicken

If you reside in the camp of bold flavors, then this bird is calling your name. Not only does it smell and taste wonderful, but the meat remains juicy while the skin gets nice and crispy. We paired ours with mixed vegetables that were grilled alongside the chicken, and an easy boxed rice dish. Some stores even sell the chicken already spatchcocked, but we prefer to buy it whole so that the extra parts can go into our poultry “body bag” and used to make stock.

To shorten the very long list of spices that make up the aromatic rub for traditional Iraqi grilled chicken, both curry powder and garam masala are used. These two Indian seasoning blends add up to about a dozen different spices at play in this recipe. Ground sumac in the rub lends the chicken earthy, citrusy notes and, along with the paprika, a deep, brick-red hue. But don’t omit the additional few spices listed!

Spatchcocked and grilled, the bird cooks in under an hour and is rich and complexly flavored, with smokiness from the grill. (If you’re using charcoal, don’t forget to open the grill vents, both on the bottom of the grill and on the lid. This is will allow airflow so the fire does not extinguish during the covered cooking time.)

Iraqi Spice-Crusted Grilled Chicken

  • Servings: 4
  • Difficulty: easy
  • Print

Ingredients

  • 2½ Tbsp. extra-virgin olive oil, divided
  • 3 medium garlic cloves, grated
  • 1 Tbsp. ground sumac
  • 2 tsp. ground coriander
  • 2 tsp. curry powder
  • 1 tsp. garam masala
  • 1 tsp. sweet or hot paprika
  • ¾ tsp. ground cumin
  • ½ tsp. ground cardamom
  • Kosher salt and ground black pepper
  • 1 whole chicken, about 4 lbs.
  • Lemon wedges, to serve

Directions

  1. In a small skillet over low, combine 1½ tablespoons of oil and the garlic. Cook, stirring frequently, until fragrant and sizzling, but not browned, about 2 minutes. Transfer to a small bowl and set aside.
  2. In another small bowl, stir together the sumac, coriander, curry powder, garam masala, paprika, cumin, cardamom, 1 tablespoon salt and 1 teaspoon pepper. Add 2 tablespoons of the spice mixture to the garlic oil and stir to form a paste.
  3. Place the chicken breast down on a cutting board. Using sturdy kitchen shears, cut along both sides of the backbone, from top to bottom; remove and discard the backbone (or save to make broth). Open up the chicken, then turn it skin up. Use the heel of your hands to press down firmly on the thickest part of the breast until the wishbone snaps. Loosen the skin over the chicken’s breasts and thighs by gently working your fingers between the skin and the flesh.
  4. Using your fingers, evenly distribute the garlic-spice paste under the skin and rub it into the flesh. Sprinkle the remaining spice mixture evenly on both sides of the chicken, patting gently to help it adhere. Let stand uncovered at room temperature for about 45 minutes.
  5. Prepare a grill for indirect, high-heat cooking. For a charcoal grill, spread a large chimney of hot coals evenly over one side of the grill bed; open the bottom grill vents and the lid vent. For a gas grill, turn all burners to high. Heat the grill, covered, for 5 to 10 minutes, then clean and oil the cooking grate.
  6. Using tongs, rotate the chicken to bring the breast side closest to the heat. Cover and cook until the thickest part of the breast reaches 160°F and the thighs reach 175°F, another 25 to 35 minutes.
  7. Brush the skin of the chicken with the remaining 1 tablespoon oil. Using tongs and a wide spatula, flip the chicken skin down onto the hot side of the grill. Cook until the skin is lightly charred, about 5 minutes. Transfer skin up to a cutting board and let rest for 15 minutes. Carve and serve with lemon wedges.

http://www.lynnandruss.com

Adapted from a recipe found in Milk Street Magazine

Portugal’s Simple Seafood Stew (Cataplana)

Simply delicious! It just so happened, that we started making our vacation plans to visit Portugal the same day we made this dish. The power of suggestion…

Cataplana is both the name of the dish and the pot that it is cooked in. There are two types of cataplana: either seafood packed with both fish and seafood, or a pork and clam version, which this one is. It uses abundant fresh seafood, smoky cured meat, and vibrant paprika in a rich, ruddy broth. In lieu of a traditional copper cataplana pot, we cooked ours in a Dutch oven with a tight-fitting lid to mimic the steamy cooking environment.

The strips of fresh fennel and red bell pepper, enliven the dish with a crisp‑tenderness that contrasts with the juicy chew of the sausage and the meaty clams. Since I don’t eat clams and The Hubs does, we substituted a bit more shrimp and fewer clams, but kept the ratios the same.

To accompany the stew and help mop up all of those luscious juices, we made some tasty toasted garlic baguette slices topped with grated parmesan and a hint of smoked paprika—the perfect companion! We made it again a few weeks later for a small party we hosted…

Portugal's Simple Seafood Stew (Cataplana)

  • Servings: 4-6
  • Difficulty: easy
  • Print

Ingredients

  • 12 oz. extra-large shrimp (21 to 25 per lb.), peeled, deveined, and cut in half crosswise
  • ¾ tsp. table salt, divided
  • 2 Tbsp. extra-virgin olive oil
  • 12 oz. linguica sausage, quartered lengthwise and sliced ¼ inch thick
  • 2 garlic cloves, minced
  • ¾ tsp. smoked paprika
  • ½ tsp. red pepper flakes
  • 1 large onion, halved and sliced thin
  • 1 fennel bulb, stalks discarded, bulb halved, cored, and sliced thin lengthwise
  • 1 red bell pepper, stemmed, seeded, and cut into ¼-inch-wide strips
  • 1 28-oz. can whole peeled tomatoes, drained and chopped coarse
  • 1 8-oz. bottle clam juice
  • ½ cup dry white wine
  • 3 lbs. littleneck or Manila clams, scrubbed
  • ½ cup chopped fresh parsley
  • Lemon wedges

Directions

  1. Combine shrimp and ¼ teaspoon salt in bowl; refrigerate until needed. Heat oil in large Dutch oven over medium-high heat until shimmering. Add linguica and cook, stirring occasionally, until browned and fat is slightly rendered, about 4 minutes.
  2. Stir in garlic, paprika, and pepper flakes and cook until fragrant, about 30 seconds.
  3. Add onion, fennel, bell pepper, and remaining ½ teaspoon salt and cook, stirring occasionally, until vegetables are softened, 8 to 10 minutes.
  4. Stir in tomatoes, clam juice, and wine. Bring to simmer and cook, stirring occasionally, until thickened slightly, about 5 minutes.
  5. Increase heat to high and bring mixture to boil. Stir in clams; cover and cook until clams have opened, 5 to 7 minutes, stirring halfway through cooking.
  6. Off heat, stir in shrimp. Cover and let stand off heat until shrimp are opaque and just cooked through, about 5 minutes.
  7. Discard any unopened clams. Stir in parsley; season with salt to taste; transfer to serving bowl if desired; and serve, passing lemon wedges separately.

http://www.lynnandruss.com

Recipe by Steve Dunn for Cook’s Illustrated

Braised Lamb Shoulder Chops with Capers, Balsamic Vinegar, and Red Peppers

Typically, we find lamb shoulder chops to be a tough cut of meat and benefit from a longer braise. However, Cook’s Illustrated tried a much shorter braise than usual for this lamb chop recipe—just enough to cook the meat. After only 15 to 20 minutes, they claimed the lamb was tender, but we beg to differ.  

Our initial concerns at the short amount of time (15 to 20 minutes originally) the lamb chops cooked were well-founded. After 20 minutes, they were still tough and we added another 10 minutes to the braise. In fact, they could have used even more time to tenderize. In the past, we’ve always braised them, covered over low heat for 2 hours, until they were fall-apart tender.

The much-anticipated caper and red pepper sauce with the deglazing liquid was delicious! Because we only cooked two chops, there was some sauce leftover which we made good use of on some pork chops the following day. Our pairings for the lamb included a side salad and a recent new potato fave, Crispy Parmesan Potatoes.

included

  • Servings: 4
  • Difficulty: easy
  • Print

Ingredients

  • 4 lamb shoulder chops, about 3/4 inch thick, trimmed of external fat
  • Salt and ground black pepper
  • 2 Tbsp. olive oil
  • 1 small onion, chopped fine
  • 1 red bell pepper, seeded and diced small
  • 2 small cloves garlic, minced
  • ⅓ cup dry red wine
  • 1 cup canned tomatoes packed in puree, chopped
  • 2 Tbsp. minced fresh parsley leaves
  • 2 Tbsp. capers, drained
  • 2 Tbsp. balsamic vinegar

Directions

  1. Sprinkle chops with salt and pepper to taste.
  2. Heat 1 tablespoon of the oil in 12-inch heavy-bottomed nonreactive skillet over medium-high heat. Cooking in 2 batches to avoid overcrowding, add 2 chops; sauté until brown on both sides, 4 to 5 minutes. Remove from pan; set aside. Repeat.
  3. Pour fat from pan; return pan to medium heat, adding remaining tablespoon of oil. Add onion and pepper; sauté until softened, about 4 minutes.
  4. Add garlic; cook until fragrant, about 1 minute longer.
  5. Add wine; simmer until reduced by half, scraping browned bits from pan bottom with wooden spoon, 2 to 3 minutes.
  6. Stir in tomatoes, then return chops to pan. Reduce heat to low; cover and simmer until chops are cooked through but tender, at least 30 minutes.
  7. Transfer chops to each of four plates. Stir parsley, capers, and balsamic vinegar into braising liquid; simmer until sauce thickens, 2 to 3 minutes. Adjust seasonings, spoon portion of sauce over each chop, and serve.

http://www.lynnandruss.com

Adapted from a recipe by Cook’s Illustrated

Greek Chicken and Potato Traybake

The Greek dish known as kotopoulo skorthato is typically called “Greek garlic-lemon chicken” in English, but the ensemble also includes potatoes, making it a delicious complete meal. OK, so we added a side of roasted broccolini to make it a more veggie-forward dinner.

For this riff, Milk Street used their trusty traybake technique—roasting the ingredients on a rimmed baking sheet in a hot oven to ensure the quickest cooking possible and to develop nice caramelization.

As a finale, toss in black olives, dill and capers to ratchet up the flavors. If using chicken breasts, try to purchase pieces that are close in size so they cook at the same rate. Since we used both thighs (for The Hubs) and breasts (for Yours Truly), we cut the breasts halves in half again, making them more uniform in size to the thighs.

Because we cooked 4 pounds of chicken pieces (25% more), we doubled the spice mixture so that we had enough to sprinkle on all sides of each piece. This meal was sooo flavorful, and not difficult at all!

Don’t use extra-large bone-in chicken breasts if you can help it; 12-ounce pieces work best. If unavoidable, keep in mind that bone-in breasts weighing about 1 pound each require 40 to 50 minutes of roasting.

Greek Chicken and Potato Traybake

  • Servings: 4
  • Difficulty: easy
  • Print

Ingredients

  • 1 tsp. dried oregano
  • ¼-½ tsp. red pepper flakes
  • Kosher salt and ground black pepper
  • 4 12-oz. bone-in, skin-on chicken breasts or 3 lbs. bone-in, skin-on chicken thighs, trimmed and patted dry
  • 2 Tbsp. extra-virgin olive oil
  • 1½ lbs. medium Yukon Gold potatoes, not peeled, cut into 1-inch-thick wedges
  • 2 lemons, halved crosswise
  • 8 medium garlic cloves, peeled
  • ½ cup pitted Kalamata olives, roughly chopped
  • 2 Tbsp. drained capers
  • 3 Tbsp. roughly chopped fresh dill, divided

Directions

  • Heat the oven to 475°F with a rack in the middle position. In a large bowl, stir together the oregano, pepper flakes, 1½ teaspoons salt and ½ teaspoon black pepper. Sprinkle 2 teaspoons of the mix onto all sides of the chicken. To the remaining seasoning mix in the bowl, add the oil, potatoes, lemon halves and garlic, then toss to coat.
  • Place the garlic in the center of a rimmed baking sheet, then arrange the chicken, skin up, around the garlic; this placement helps prevent the garlic from scorching during roasting. Arrange the lemons, cut sides up, and the potatoes in an even layer around the chicken. Roast until the thickest part of the breasts (if using) reaches 160°F and the thickest part of the largest thigh (if using) reaches 175°F, about 30 minutes.
  • Using tongs, transfer the chicken and lemon halves to a serving platter. Push the potatoes to the edge of the baking sheet, leaving the garlic in the center. Using a fork, mash the garlic to a rough paste. Add the olives, capers and 2 tablespoons of the dill to the baking sheet, then, using a wide metal spatula, stir and toss the ingredients, scraping up any browned bits.
  • Transfer the potato mixture to the platter, placing it around the chicken. Sprinkle with the remaining 1 tablespoon dill.

http://www.lynnandruss.com

Adapted from a recipe by Rebecca Richmond for Milk Street

Tuscan Spring Soup

In Tuscany, the advent of spring doesn’t signal the end of soup season, like it might here in the Northeast. But it does mean the soups that are served take on a different tone. Tender vegetables meet a rich, meaty broth in this light Tuscan-inspired soup—just perfect for a not-too-hot Spring evening.

And while a hallmark of Tuscan cuisine is its rusticity, this soup is all about luxury. In stark contrast to the typical hearty Tuscan soups, which often cleverly repurpose scraps, only the finest ingredients go into a typical “garmugia”—a pairing of pricey meats and the season’s freshest vegetables.

In garmugia, meat is a seasoning, not the main event. To that end, Milk Street omits the veal, as the combination of beef broth and pancetta (plus a simmered rind of Parmesan) gives the soup a wonderfully savory depth that enhances the vegetables without competing with them.

For their clean vegetal flavors and year-round availability, this soup opts for scallions, asparagus, artichoke hearts and frozen peas. By cooking the vegetables in sequence—starting with the sturdiest, ending with the most delicate—each ingredient retains its character, ensuring that they’re not overcooked. The artichoke hearts are simmered first, then the asparagus, followed by the peas, all topped with a finishing sprinkle of scallion greens for a burst of zingy freshness.

“Each bite of the finished soup is a spoonful of spring in a bowl, no matter the season.”

Milk Street instructs you to simmer the optional Parmesan rind into the mix to boost the umami notes. Canned artichoke hearts do well here, but frozen artichokes also work—just defrost and pat dry before use (you’ll need about 2 cups). To serve on the side, make savory Parmesan toasts that are perfect for dipping into the broth.

Don’t use ultra-slender asparagus, which will end up overcooked. Look for spears about the size of a pencil. To retain the bright-green color of the peas, don’t allow the soup to boil after the peas are stirred in.

Tuscan Spring Soup

  • Servings: 4
  • Difficulty: easy
  • Print

Ingredients

  • 4 Tbsp. extra-virgin olive oil, divided, plus more to serve
  • 3-4 oz. pancetta, chopped
  • 4 scallions, thinly sliced, whites and greens reserved separately
  • 4 thyme sprigs
  • 1½ qts. low-sodium beef broth
  • 1 chunk Parmesan rind (optional), plus ½ oz. Parmesan cheese, finely grated (¼ cup)
  • Kosher salt and ground black pepper
  • 8 oz. crusty white bread, sliced ½ inch thick
  • 14 oz. can artichoke hearts, rinsed, drained and quartered
  • 1 lb. asparagus, trimmed and cut into 1-inch lengths on the diagonal
  • ½ cup frozen peas, thawed

Directions

  • Heat the broiler with a rack about 6 inches from the element. In a large saucepan over medium, combine 1 tablespoon of oil and the pancetta. Cook, stirring occasionally, until the pancetta has rendered its fat and begins to brown, 3 to 5 minutes.
  • Add the scallion whites and thyme. Cook until the scallions are lightly browned, 1 to 2 minutes.
  • Add the broth, the Parmesan rind (if using) and ½ teaspoon pepper, then bring to a boil over medium-high.
  • Meanwhile, brush both sides of the bread slices with the remaining 3 tablespoons oil, then place in a single layer on a rimmed baking sheet. Sprinkle with the grated Parmesan, then broil until lightly browned, 1 to 2 minutes. Set aside.
  • When the soup reaches a boil, add the artichokes, reduce to medium and cook, stirring occasionally, for 5 minutes.
  • Add the asparagus and cook, stirring occasionally, until the asparagus is just tender, 2 to 4 minutes.
  • Stir in the peas, reduce to medium-low and cook, stirring, until the peas are heated through, about 3 minutes; do not allow the soup to boil.
  • Off heat, remove and discard the thyme and Parmesan rind (if used). Stir in the scallion greens, then taste and season with salt and pepper. Ladle into bowls, drizzle with additional oil and serve with the Parmesan toasts.

http://www.lynnandruss.com

Recipe by Shaula Clark for Milk Street

Prosciutto-Wrapped Figs with Goat Cheese and Honey

These addictive fig bites are very simple, but it’s crucial to use the best ingredients, from true Spanish ham to ripe, juicy figs, crunchy marcona almonds and best-quality olive oil. That being said, we couldn’t parse any Spanish dry-cured ham, such as jamon iberico or serrano and therefore opted for prosciutto. If you can locate the Spanish types, by all means use that.

The original recipe directs you to place the almonds on top of the ham-wrapped figs and goat cheese mixture. However, we didn’t think they’d stay atop the figs once encased, so we put the almond on top of the goat cheese and then wrapped it all in the thin slices of ham.

Just a word to the wise, let your guests know that there is a nut inside, so they aren’t surprised and think it’s a pit (as one of our guests thought)!

Prosciutto-Wrapped Figs with Goat Cheese and Honey

  • Servings: Yields 16 pieces
  • Difficulty: easy
  • Print

Ingredients

  • 8 fresh figs, stemmed and halved lengthwise
  • 1/4 cup ruby port
  • Black pepper
  • 4 oz. fresh goat cheese, at room temperature
  • 2 Tbsp. honey
  • 1 scallion, thinly sliced
  • Flaky sea salt, such as Maldon
  • 4 oz. very thinly sliced prosciutto, torn into 16 long strips
  • Extra-virgin olive oil, for drizzling
  • 16 marcona or roasted almonds
  • Small mint leaves, for garnish

Directions

  1. Arrange the figs cut side up on a plate. Drizzle with the port and season with black pepper. Let stand at room temperature for 10 minutes.
  2. Meanwhile, in a small bowl, using a fork, blend the goat cheese with the honey, scallion and a pinch of flaky sea salt.
  3. Dollop small spoonfuls of the goat cheese on the fig halves. Wrap each cheese-topped fig half in a strip of ham and transfer to a platter. Drizzle the figs with olive oil, top with the almonds, mint and sea salt and serve.

http://www.lynnandruss.com

Adapted from a recipe by Abraham Conlon for Food & Wine

Chocolate Olive Oil Cake

According to Milk Street, good olive oil is the secret to this rich, moist chocolate cake. Chocolate and olive oil might seem an unlikely pair, but in the Mediterranean, they are soul mates. And while the combination shows up in numerous desserts—from cookies to gelato—nowhere is this affinity more apparent than in the deliciously moist olive oil-based chocolate cakes made across Spain, Italy and Greece.

Your mouth watering yet? “Of all the ingredients that go into a cake, fat is one of the most important. Fat coats flour, which limits gluten formation to help cakes bake up fluffy, not chewy. Oil is particularly good at this, creating a plusher mouthfeel and softer crumb than butter because it is liquid at room temperature. Butter solidifies as it cools, resulting in a tougher texture.” So there you have it!

Double down by using both bittersweet chocolate and cocoa powder. Then enhance those flavors even further with two of chocolate’s other surprising bedfellows: espresso and lemon. Use espresso powder to amplify chocolate, as its roasty depth underscores the chocolate’s pleasant astringency. And lemon juice balances both with a shot of citrusy brightness.

Please don’t overbake the cake. Be sure to test it by inserting a toothpick into the center; it should come out with a few moist crumbs attached, as if baking brownies. Don’t be alarmed when the center of the cake deflates as it cools; this is normal. We brought it to a party and the guests gushed, giving it rave reviews. So friggin’ fudge-alicious that we made it a few weeks later for another party!

Chocolate Olive Oil Cake

  • Servings: 10-12
  • Difficulty: easy
  • Print

Ingredients

  • 1/3 cup all-purpose flour
  • 1/2 tsp. baking soda
  • 1/2 tsp. table salt
  • 4 oz. bittersweet chocolate, finely chopped
  • 3/4 cup olive oil
  • 1/4 cup cocoa powder, preferably Dutch-processed, plus more to serve (optional)
  • 1 tsp. instant espresso powder
  • 1 cup white sugar, divided
  • 4 large eggs, separated
  • 1/4 cup plus 2 Tbsp. lemon juice

Directions

  1. Heat the oven to 325°F with a rack in the lower-middle position. Mist a 9-inch springform pan with cooking spray. In a small bowl, whisk together the flour, baking soda and salt.
  2. In a medium saucepan over medium, bring about 1 inch of water to a simmer. Put the chocolate in a heatproof large bowl and set the bowl on top of the saucepan; be sure the bottom does not touch the water. Stir occasionally until the chocolate is completely melted. Remove the bowl from the pan. Add the oil, cocoa, espresso powder and 107 grams (½ cup) sugar; whisk until well combined. Add the egg yolks and lemon juice; whisk until smooth. Add the dry ingredients and gently whisk until fully incorporated.
  3. In a stand mixer with the whisk attachment or in a large bowl with a hand mixer, whip the egg whites on medium-high until frothy, 1 to 2 minutes. With the mixer running, gradually add the remaining 107 grams (½ cup) of the sugar, then beat until the whites hold soft peaks, 1 to 2 minutes. Add about one-third of the whipped whites to the yolk-chocolate mixture and fold with a silicone spatula to lighten and loosen the base. Scrape in the remaining whites and gently fold in until well combined and no white streaks remain; the batter will be light and airy.
  4. Gently pour the batter into the prepared pan and smooth the surface. Bake until well risen, the surface is crusty and a toothpick inserted into the center of the cake comes out with a few crumbs attached, 45 to 50 minutes; do not overbake.
  5. Set the pan on a wire rack and immediately run a narrow-bladed knife around the edge of the cake to loosen the sides. Cool in the pan for at least 1 hour before serving; the cake will deflate as it cools. When ready to serve, remove the pan sides and, if desired, dust with cocoa.

http://www.lynnandruss.com

Recipe by Rose Hattabaugh for Milk Street

Strip Steaks with Spicy Tomato-Basil Sauce

In a recent Milk Street article we found this Strip Steaks with Spicy Tomato-Basil Sauce recipe which pairs a meaty steak with the sort of tomato sauce that might typically be used on pizza. There are many ways to prepare the dish, but this simple version is perfect for a weeknight meal.

The sauce is made with canned tomatoes, a punchiness from garlic and pepper flakes, and the umami quotient gets a kick up with a few anchovy fillets (in case you’re worried, the sauce won’t taste fishy at all). Slice and sauce the seared strip steaks, then finish the dish with torn fresh basil and fruity olive oil.

Our steaks were actually grilled because we wanted to take advantage of the nice weather, but either stovetop or hot grill sears the meat nicely. We served ours with orzo treated with olive oil and parsley; another option is thick slices of warm, crusty bread to dip in the sauce. And if you are lucky enough to have any of that fabulous sauce leftover, use it on pasta.

NOTE: Don’t use extra-virgin olive oil to sear the steaks; its smoke point is too low. Use grapeseed or another neutral oil to achieve a deep sear and to avoid the off flavor of overheated olive oil.

Keep in mind, the original recipe from Milk Street indicated this recipe would serve 4 to 6. The portions would be rather paltry if trying to feed six people. Our two strip steaks were smaller and a bit thinner, weighing in at just over a pound for two of them which rendered three servings.

Strip Steaks with Spicy Tomato-Basil Sauce

  • Servings: 2-4
  • Difficulty: easy
  • Print

Ingredients

  • 1 Tbsp. extra-virgin olive oil, plus more to serve
  • 2 medium garlic cloves, thinly sliced
  • 2-3 oil-packed anchovy fillets, chopped
  • 1/2-3/4 tsp. red pepper flakes
  • 28 oz. can whole peeled tomatoes, crushed by hand
  • 1/3 cup lightly packed fresh basil
  • Kosher salt and ground black pepper
  • 2 1-lb. beef strip steaks, each about 1 inch thick, trimmed and patted dry
  • 1 Tbsp. grapeseed or other neutral oil

Directions

  1. In a 12-inch skillet over medium-high, heat the olive oil until shimmering. Add the garlic and cook, stirring, until beginning to turn golden, 30 to 60 seconds.
  2. Add the anchovies and pepper flakes; cook, stirring, until fragrant, 30 to 60 seconds.
  3. Stir in the tomatoes with juices, a few basil leaves and ¼ teaspoon salt. Bring to a simmer, then simmer, stirring occasionally, until a spatula drawn through the sauce leaves a trail, 12 to 14 minutes. Transfer to a small bowl, cover and set aside; wipe out the skillet.
  4. Season the steaks on both sides with salt and black pepper. In the same skillet over medium-high, heat the neutral oil until barely smoking. Add the steaks, reduce to medium and cook until well browned on the bottoms, 5 to 7 minutes.
  5. Using tongs, flip the steaks and cook until the second sides are well browned and the centers register 120°F for medium-rare, another 5 to 7 minutes.
  6. Transfer to a platter, tent with foil and let rest for about 10 minutes.
  7. Transfer the steaks to a cutting board and slice them on the diagonal ¼ to ½ inch thick. Return to the platter and spoon on some of the sauce.
  8. Tear the remaining basil and sprinkle it over the top, then drizzle with additional olive oil. Serve the remaining sauce on the side.

http://www.lynnandruss.com

Recipe by Calvin Cox for Milk Street

Chili-Soy Noodles with Bok Choy and Peanuts

These noodles are an addictive combination of salty, spicy and sweet. For best results, use thick Asian wheat noodles, such as udon or lo mein, that cook up with chewy resilience. We try to include vegetarian dishes into our repertoire of meals, and this recipe is anything but ho-hum. Plus the ease of prep and limited ingredients let you serve dinner in under a half hour.

Chili crisp, a Chinese condiment sold in jars, is chili oil amped up with with red pepper flakes and additional spices. If you can find it, it’s a more flavorful alternative to standard chili oil. We used a chili-garlic paste, including the full two tablespoons. In fact, The Hubs added even more to his portion before tasting it–which probably wasn’t that wise 😉

If you want to amp up the veggies, one reviewer suggested including mushrooms, which we both agreed would be a good addition. Our Udon noodles weighed in at only eight ounces as opposed to the ten ounces the recipe called for. Luckily we didn’t have another mouth to feed because we polished off the entire skillet’s worth!

Chili-Soy Noodles with Bok Choy and Peanuts

  • Servings: 3-4
  • Difficulty: easy
  • Print

Ingredients

  • 10 oz. dried Asian wheat noodles
  • 1 Tbsp. neutral oil
  • 1 lb. baby bok choy, trimmed and sliced crosswise into ½-inch pieces
  • ⅓ cup low-sodium soy sauce
  • 2 Tbsp. packed brown sugar
  • 1-2 Tbsp. chili oil OR chili crisp, plus more to serve
  • ¾ cup unsalted roasted peanuts, finely chopped

Directions

  1. Cook the noodles in a large pot of salted boiling water until tender. Drain, rinse and drain again.
  2. In a 12-inch skillet, heat the neutral oil until shimmering. Add the bok choy and cook, stirring, until the stems are tender; transfer to a plate.
  3. In the same skillet, mix the soy, sugar, chili oil and half the peanuts. Simmer, stirring occasionally, until slightly thickened.
  4. Add the bok choy and noodles, then toss until warmed. Serve sprinkled with the remaining peanuts and drizzled with additional chili oil.

http://www.lynnandruss.com

Adapted from a recipe by Milk Street