I have been an artist and designer all my life incorporating graphic design for websites, gardens, publications, fabrics, interior design and cooking. I am now retired from my professional job, but still create artistic visions in all forms on a daily basis.
View all posts by LynnHoll →
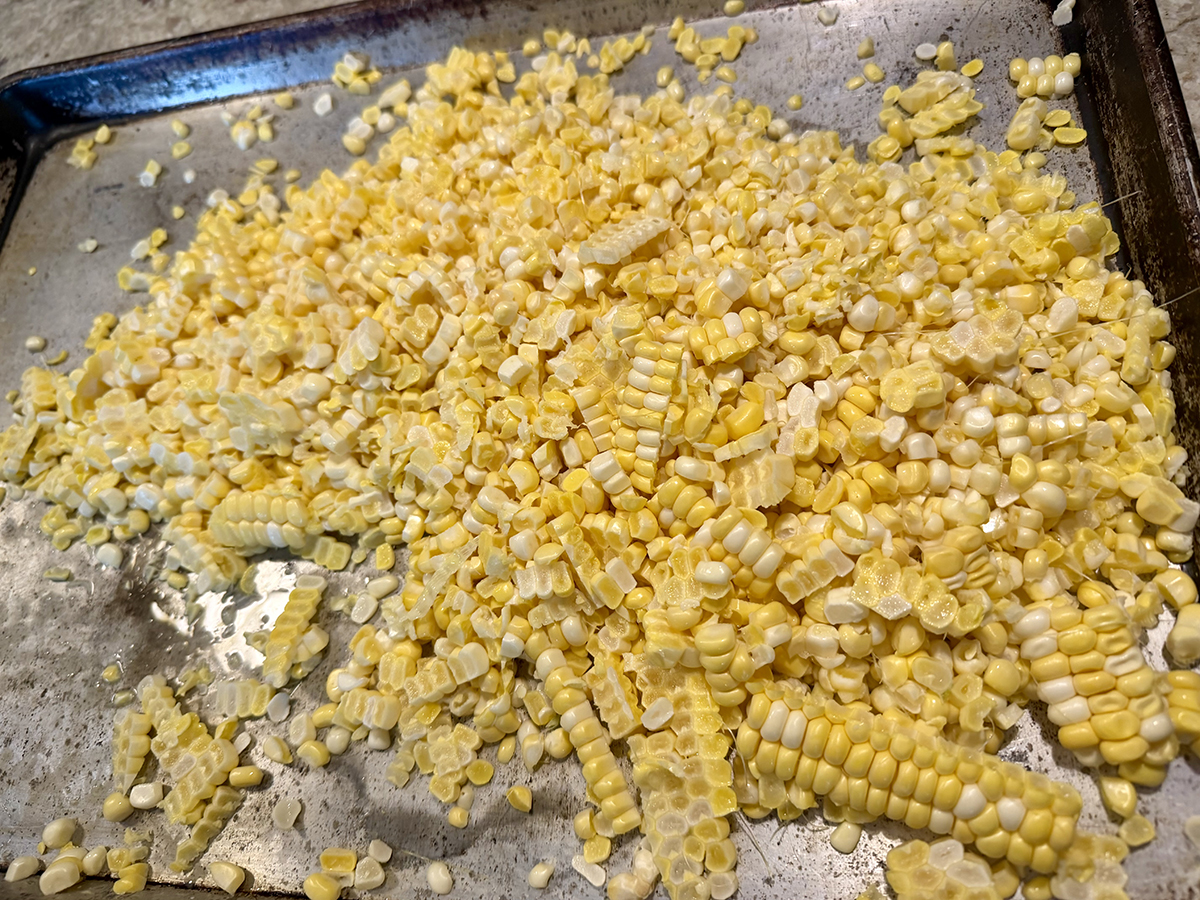
To create this corn side dish with rich, toasted flavor, strip the corn from the cobs when they are raw and then cook the kernels in a nearly smoking skillet. It is important not to stir the corn for a few minutes to give it a chance to brown. Once the corn is cooked, mix in plenty of salty, savory ingredients to balance the sweetness. Finally, an acidic component rounds out the dish. Because fresh corn can vary in sweetness, the seasoning allows for a range of cider vinegar.
The recipe is easily doubled. If doing so, make sure to use a larger skillet.
1 lb. leeks, white and light green parts only, halved lengthwise, sliced thin, and washed thoroughly
Salt
4 ears corn, kernels cut from cobs (4 cups)
¼ cup minced fresh chives
1-2 Tbsp. cider vinegar
Pinch cayenne pepper
Directions
Add leeks and 1/4 teaspoon salt to fat in skillet and cook over medium heat, stirring occasionally, until softened, 7 to 10 minutes. Transfer leeks to large bowl and wipe out skillet.
Heat 1 tablespoon reserved fat in now-empty skillet over medium-high heat until shimmering. Add corn and sprinkle with ¼ teaspoon salt. Cook, without stirring, until corn is browned on bottom and beginning to pop, about 3 minutes. Stir and continue to cook, stirring once or twice, until corn is spotty brown all over, 2 to 3 minutes longer. Transfer corn to bowl with leeks.
Stir in chives, 1 tablespoon vinegar, cayenne, and bacon. Season with salt and remaining vinegar to taste. Serve.
This cilantro lime shrimp is the kind of dish that disappears fast — plump shrimp tossed in a bright, garlicky herb sauce that does all the heavy lifting. It’s quick enough for a weeknight but impressive enough for guests, and endlessly adaptable: no cilantro on hand? Swap in basil, parsley, or mint without missing a beat.
Serve it as a crowd-pleasing appetizer, skewered with toothpicks and a bowl of extra sauce for dipping, or turn it into a full meal spooned over Greek lemon rice or couscous. Craving pasta night? Double the sauce and toss it with a pound of spaghetti or orzo for a dinner that comes together in minutes.
NOTE:You have two options to thaw shrimp:
Put the frozen bag of shrimp into a bowl and leave it in the fridge overnight.
Place the (sealed) bag of frozen shrimp in a bowl of water in your sink. Stir every 5 or so minutes to break up any ice. The shrimp should be thawed in about 20 minutes. Be sure to pat it dry thoroughly before cooking.
We opted to serve ours with 10 ounces of angel hair pasta which provided three servings as an entrée, and necessitated doubling the sauce.
3 to 4 Tbsp. extra virgin olive oil, plus more for coating the shrimp
2 Tbsp. harissa (or your favorite chili paste)
1 1/2 lbs. peeled and deveined large shrimp (pre-peeled thawed frozen shrimp work well, see above note)
Kosher salt
Black pepper
Directions
Preheat your oven to 400°F.
Use a serrated knife to trim the top off the whole head of garlic, exposing the cloves but keeping the bunch intact. Set on a large sheet of foil, drizzle generously with olive oil, and close the foil to wrap. Roast in the heated oven for about 20 minutes or until slightly tender and fragrant, then remove from the oven and let cool briefly. (I roasted the garlic the night prior.)
Once cool enough to handle, peel and crush or chop the roasted garlic as finely as possible.
In a small bowl, combine the roasted garlic, cilantro, lime juice, white wine, extra virgin olive oil and harissa. Whisk together and set aside.
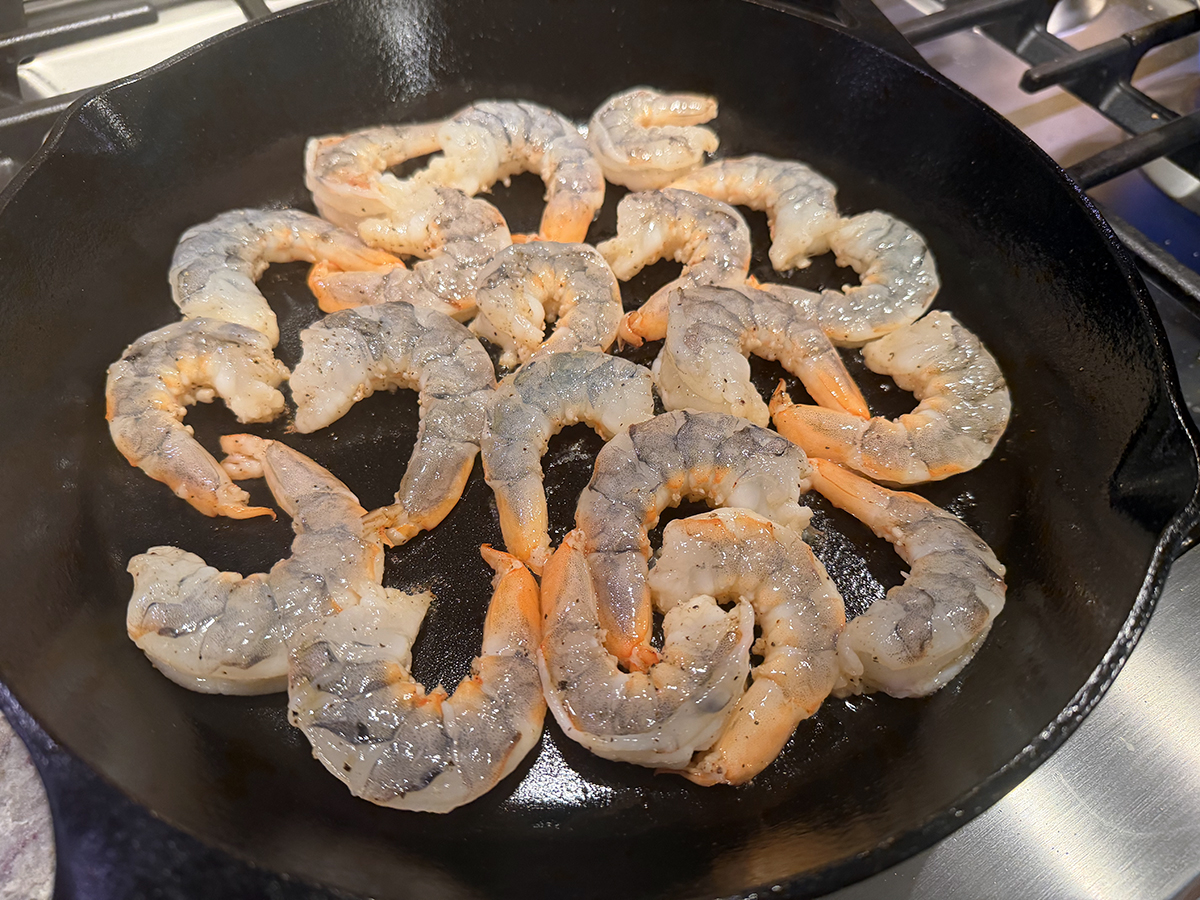
Heat a cast iron skillet, grill, or indoor griddle over high heat. Pat shrimp dry and season with salt and pepper, drizzle a little extra virgin olive oil and toss. Arrange on the preheated surface and cook for about 2 minutes per side, or until the shrimp turns just pink. Even the largest shrimp will be ready within about 5 minutes, so be careful not to overcook it. Remove skillet from heat.
Immediately toss the delicious roasted garlic sauce with the grilled shrimp and serve immediately either as an appetizer, or over pasta, rice or couscous.
Here is a riff on a classic French salade niçoise. Traditionalists drape anchovy filets across the finished salad, but here, they’re minced and used only in the dressing. Anchovy admirers can certainly add more for garnish — and anchovy avoiders can simply leave them out.
The only cooking is boiling the potatoes and haricots verts, which can be done together in the same pot. Add a jammy egg or two if you like. Dressing the vegetables while warm helps them absorb all the good flavors more deeply, making this a salad that manages to be intense and light at the same time.
Niçoise Salad with Basil and Anchovy-Lemon Vinaigrette
8 radishes, cut into wedges, or 1 slender cucumber, peeled and sliced
2 large, ripe tomatoes, cut into wedges, or 1 pint cherry tomatoes, halved
2 (6 or 7-oz.) cans tuna packed in olive oil, drained
4 hard-boiled eggs
½ cup pitted kalamata olives, sliced
Black pepper, for serving
Flaky sea salt, for serving
Torn basil leaves, for serving
Directions
Make the vinaigrette: Using the flat side of a knife, smash garlic clove, anchovy fillets and salt into a paste. Transfer to a small bowl and stir in lemon juice, zest and mustard. Using a whisk, slowly pour in olive oil while stirring constantly. Adjust seasoning as needed.
Place potatoes in a medium pot and cover them with 2 or 3 inches of cold water. Salt the water and bring to a boil. When water comes to a boil, continue cooking potatoes until fork tender, 10 to 15 minutes more. Add haricots verts during the last 1 minute of cooking (if using regular green beans, add them during the last 2 to 3 minutes of cooking depending on how thin they are). Drain vegetables and let sit until cool enough to handle but still quite warm. Halve potatoes, transfer to a small bowl along with the haricots verts and dress everything to coat with some (but not all) of the vinaigrette. When completely cool, toss in chopped basil.
On a large platter or four individual plates, arrange potatoes and haricots verts, radishes or cucumbers, tomatoes and tuna, and hard-boiled eggs, if using. Scatter olives over the top and drizzle with remaining vinaigrette. Serve garnished with black pepper, flaky sea salt and torn basil leaves.
Filipino chicken barbecue, “inihaw na manok” (which translates simply as “grilled chicken”) is one of the most beloved street foods and backyard staples across the Philippines. Unlike its American counterpart, which leans smoky and savory, this version is distinctly sweet-savory, with a glossy, caramelized char that makes it instantly recognizable.
The magic is in a marinade that sounds unusual but works beautifully together. Lemon-lime soda (Sprite or 7Up) is the secret weapon — the carbonation helps tenderize the meat while the sugar contributes to deep caramelization on the grill. It also brightens the overall flavor.
With sweetness tempered by tangy vinegar, salty soy sauce and savory garlic and black pepper, the marinade infuses bone-in, skin-on chicken parts and produces nicely lacquered skin. Together, these create a marinade that hits sweet, salty, tangy, savory, and aromatic all at once.
Bone-in, skin-on pieces are essential — thighs and drumsticks are most common, though whole spatchcocked chicken appears at larger gatherings. The bones keep the meat moist over the long, slow cook, and the skin is the canvas for that prized lacquered crust. The chicken typically marinates for a few hours, so the flavors penetrate deeply. The finished chicken should have deep mahogany, almost burgundy skin, visibly sticky, caramelized exterior and juicy, fully cooked meat that pulls cleanly from the bone.
NOTE: Gas grills vary in heat output; check the browning on the chicken when you uncover the grill for the first basting—if the bottoms threaten to scorch, shut off the burners under the chicken. If you cook both breasts and legs, make sure to take the internal temperatures of the different parts and remove the pieces as they are done cooking, as white meat is done at about 160°F and dark meat at about 175°F.
TIP: Don’t flip the chicken or place the pieces directly over the fire until the final minutes of cooking. The basting sauce contains a good dose of sugar and will burn if it gets too much direct heat.
It has been six years since we made this dish up in Cape Cod while on vacation, and can’t figure out why it took us so long to make it again! Pretty much anyone who’s ever had it says “That is damn good chicken!” This recipe can easily be doubled for larger gatherings (which is what we did all three times).
In a blender, combine the vinegar, ketchup, soy sauce, sugar, garlic, bay, peppercorns and 1 1/2 teaspoons salt. Blend until well combined and the bay leaves are broken into tiny bits, 15 to 30 seconds. Pour the mixture into a large bowl, then stir in the soda.
If using chicken breasts, use a sharp chef’s knife to cut each in half crosswise. Cut 2 or 3 diagonal slashes about 1/2 inch deep through the skin and meat of each piece of chicken. Add the chicken to the marinade and turn to coat. Cover and refrigerate for 1 hour or up to 2 hours.
Prepare a charcoal or gas grill for indirect cooking. For a charcoal grill, spread a large chimney of hot coals evenly over one side of the grill bed; open the bottom grill vents and the lid vent. Heat the grill, covered, for 5 to 10 minutes, then clean and oil the grate. For a gas grill, turn all burners to high and heat, covered, for 15 minutes, then clean and oil the cooking grate; leave the primary burner on high and turn the remaining burner(s) to low.
While the grill heats, transfer the chicken to a large plate, allowing the marinade to drip off. Pour the marinade into a medium saucepan, bring to a simmer over medium and cook, stirring occasionally, until reduced to 1 cup, about 20 minutes. Stir in the lime juice and set aside. Set aside 1/3 cup for serving; use the remainder as a basting sauce.
Place the chicken skin side up on the cooler side of the grill. Cover and cook for 15 minutes. Generously brush the pieces with basting sauce, then re-cover and cook until the thickest part of the breast, if using, reaches 160°F or the thickest part of the thighs and drumsticks, if using, reach 175°F, another 15 to 20 minutes. Brush the chicken with the reduced sauce, thenflip the chicken skin side down onto the hot side of the grill. Cook until deeply browned, about 1 minute. Brush the bone side with basting sauce, then flip a final time and cook until deeply browned, about 1 minute. Transfer skin side up to a platter and let rest for about 5 minutes. Serve with the reserved sauce.
A perfectly grilled tuna steak is one of the ocean’s most refined offerings. The exterior yields a gloriously caramelized crust — faintly smoky, kissed with the umami depth of soy and the warm whisper of ginger — while the interior remains luxuriously silky, almost buttery in its tenderness. It is meaty without being heavy, rich without being indulgent.
The marinade weaves its magic throughout: the brightness of lemon cuts through the steak’s natural richness, garlic adds an earthy warmth, and sesame oil lends a toasted, nutty undertone that lingers pleasantly on the palate. Each bite delivers a layered experience — first the satisfying sear of the crust, then the yielding, almost velvety pink center that melts rather than chews. It is the rare fish that eats like a fine steak, commanding the plate with confidence and elegance.
Beyond its extraordinary flavor, tuna is among the most nutritionally distinguished fish in the sea:
Exceptional protein source — A single steak delivers around 40g of lean, complete protein, supporting muscle repair, satiety, and sustained energy.
Rich in Omega-3 fatty acids — These essential fats actively support cardiovascular health, reduce inflammation, and promote brain function and cognitive clarity.
Loaded with B vitamins — Particularly B12 and niacin (B3), which are vital for nerve function, energy metabolism, and red blood cell production.
High in selenium — A powerful antioxidant mineral that protects cells from oxidative stress and supports thyroid health.
Excellent source of potassium and magnesium — Both essential for healthy blood pressure regulation and muscle function.
Low in saturated fat — Making it a heart-friendly alternative to red meat, without any sacrifice in satisfaction or substance.
In short, grilled tuna is that rare culinary treasure: a dish that feels like a treat, yet nourishes the body as thoroughly as it delights the senses.
NOTES:Tuna doneness: Medium-rare (120-125°F) is ideal — the center should be deep pink. Fully cooked tuna can become dry and chalky. If you prefer it more done, add 30–45 seconds per side. Grill alternative: A cast-iron skillet works beautifully if you don’t have a grill. Get it very hot before adding the fish.
Our sides were as simple, pairing the fish with steamed fresh corn on the cob and a side salad.
2-4, 20 min + marinating time
Ingredients
2 tuna steaks (about 1 inch thick)
3 Tbsp. olive oil
2 Tbsp. soy sauce
1 lemon, juiced
2 garlic cloves, minced
1 tsp. fresh ginger, grated
1 tsp. sesame oil
1/2 tsp. black pepper
1 Tbsp. sesame seeds (optional)
1 scallion, sliced thinly on a diagonal, for garnish
Directions
Marinate the tuna: Whisk together 3 tablespoons olive oil, 2 tablespoons soy sauce, 1 lemon, juiced, 2 garlic cloves, minced, 1 teaspoons fresh ginger, grated, 1 teaspoons sesame oil, and 1/2 teaspoons black pepper. Place the 2 tuna steaks (about 1 inch thick) in the marinade, turning after 20 minutes. Let rest at room temperature for another 10 to 20 minutes.
Preheat the grill: Heat your grill or grill pan over very high heat until smoking hot. Brush the grates with a little oil. Remove tuna from marinade and pat lightly dry.
Grill the tuna: Place the tuna steaks on the hot grill. For medium-rare (recommended), grill without moving them for 3 minutes.
Flip & finish: Flip the tuna steaks and grill the second side for an additional 3 minutes. The center should still be pink and slightly translucent — tuna dries out quickly, so don’t overcook! Internal temperature should register 120-125°F.
Rest & serve: Let the tuna rest for 1 minute. Squeeze a little fresh lemon over everything, sprinkle with sesame seeds, garnish with sliced scallions and serve immediately.
This Cantonese-style Eggplant Stir-Fry with Chicken lets the eggplant take center stage, its silky texture soaking up all the savory goodness of garlic, scallions, and ginger, while tender velveted chicken rounds out the dish into a satisfying, one-pan meal. It’s quickly become our favorite way to cook Chinese eggplant, and once you try it, I think it’ll become one of yours too.
If you’ve only ever cooked with the big, glossy globe eggplants from the grocery store, Chinese eggplant is worth seeking out. Slender and lavender-streaked, these eggplants have noticeably fewer seeds, thinner skins, and a more tender bite—which means they also cook faster and never turn bitter or spongy the way globe eggplant can. Summer is peak season for them, so farmers markets and Asian grocery stores alike tend to be overflowing with these beautiful eggplants right now, making it the perfect time to put them to good use.
The technique here follows classic Cantonese stir-fry logic: velvet the chicken first in a quick cornstarch-and-oyster-sauce marinade so it stays juicy and tender through the cook, then stir-fry the eggplant in batches so it browns and softens without turning greasy or waterlogged. A fragrant hit of ginger, garlic, and scallion whites builds the aromatic base, and a savory sauce of oyster sauce, soy sauce, and Shaoxing wine ties everything together into something deeply comforting yet simple enough for a weeknight.
A couple of issues we had with the original recipe from Woks of Life included the amount of sauce. We decided to double it and glad that we did. The ingredients list below is altered to reflect the increased amounts. Additionally, we barely got three servings from the dish. If you are counting on four portions, be prepared to serve another course along with it.
2 tsp. oil (any neutral oil, such as vegetable or canola oil)
2 tsp. oyster sauce
For the rest of the dish:
1 pound Chinese eggplant (2-3 eggplants)
4 Tbsp. neutral oil (such as canola, vegetable, or avocado oil, divided)
3 Tbsp. oyster sauce
2 Tbsp. light soy sauce
1⁄2 tsp. sesame oil
1⁄2 tsp. salt
1⁄2 tsp. white pepper
3 thin slices ginger
3 cloves garlic, chopped
3 scallions, whites cut into 1-inch lengths; green parts sliced thin on a diagonal, divided
4 Tbsp. Shaoxing wine
2 Tbsp. water
Directions
Thinly slice the chicken breast against the grain. Transfer to a small bowl and toss with the water, cornstarch, oil, and oyster sauce until the chicken has absorbed all the liquid. Set aside while you prepare the other ingredients.
Cut the Chinese eggplant on a sharp angle into chunks, turning the eggplant a quarter turn with each cut, so you end up with triangular shapes.
Premix the sauce: the oyster sauce, light soy sauce, sesame oil, salt, and white pepper. Set aside.
Heat your wok over medium-high heat until it’s lightly smoking. If you’re using a skillet, use a stainless steel skillet and preheat it until a drop of water beads on the surface.
Add 3 tablespoons of oil and the eggplant. Stir immediately to coat the eggplant (it absorbs oil quickly). Cook over medium heat for 5-6 minutes. Don’t turn the heat too high, as it can scorch the eggplant. When the eggplant is slightly softened but not so soft that you can mash it, transfer it to a dish.
Next, wash the wok/pan. (This step may not be necessary.) You can use water to cool it down before you scrub. The goal is to remove any eggplant residue and moisture from the wok that could burn or cause sticking when you sear the chicken next.
Place the wok over medium-high heat until all the water has evaporated and the wok is lightly smoking once again. Add the remaining tablespoon of oil to the wok and swirl to coat. Add the chicken in a single layer. Let it sear undisturbed for about 2 minutes. Flip and cook for another minute. Stir-fry until the chicken is about 80% cooked. Transfer back to the marinating bowl.
Add the ginger, garlic, and white parts of the scallions. Stir-fry until fragrant. Add the wine around the perimeter of the wok to deglaze. Then return the eggplant and chicken back to the pan, along with the premixed sauce and the green parts of the scallions. If the wok seems dry, add 2 tablespoons of water. Stir-fry to coat the chicken and eggplant in the sauce. Serve immediately with steamed rice garnished with scallion greens
These classic Red Velvet Cupcakes are a crowd-pleaser! There’s nothing better than red velvet cupcakes made from scratch with cream cheese frosting. Every bite is soft, tender, and deliciously sweet. The batter gets its signature look from a lot of red food coloring, while a touch of cocoa, a glug of buttermilk, and a splash of vinegar give the crumb its distinct, slightly tangy flavor.
Instead of using all vegetable oil, I used a combination of oil and full-fat mayonnaise that keeps the familiar texture while adding mayo’s moisture. This is noted in the list of ingredients below.
The cream cheese frosting — rich, smooth, and just sweet enough — is the perfect complement. You’ll get about 20 cupcakes from this batch, but the recipe is easy enough to scale up or down.
With two July 4 parties on the horizon, I took a patriotic approach when it came to the visual aspect, starting with US flag motif cupcake holders and ending with red, white and blue sprinkles with stars.
NOTE: Depending on the make and size of your red food coloring, you may, or may not need a full bottle. Use enough to make the batter a rich red color.
1/2 cup full-fat mayonnaise (no light or olive oil mayo)
2 eggs
1 tsp. vinegar
1 tsp. vanilla extract
Red food coloring (you can use beet root powder as well)
Cream Cheese Frosting
1 package (8 oz.) cream cheese, at room temperature
1/2 cup butter or margarine, at room temperature
1 lb. confectioner’s sugar
1 tsp. vanilla extract
Directions
In a medium bowl, stir together the flour, cocoa powder, baking soda, and salt.
In a separate large bowl, mix together the sugar, buttermilk, oil, eggs, and vinegar. Add the dry ingredients to the wet ingredients and beat on medium speed until well blended.
Add the vanilla and the entire bottle of red food coloring to the cake batter and mix again on low speed until well blended and uniform in color.
Line 2 12-cup muffin tins with papers. Fill each cupcake liner about 3/4 full with the cake batter. You will end up with 18-20 cupcakes.
Bake at 350 for 20-25 minutes, or until the center springs back when pressed lightly with your finger. Allow the cupcakes to cool completely before icing.
For Cream Cheese Frosting
Cream together the cream cheese and butter. Add the sugar and vanilla and beat with an electric mixer until smooth and creamy, scraping down sides as needed. Ice the cooled cupcakes. (I used a pastry bag with a large tip opening to create a swirled effect.)
Buttercream cupcakes can be safely left out at room temperature for 2 to 3 days, provided they are stored in an airtight container and the room is cool and dry. They’ll also keep well in the fridge for 3–5 days in an airtight container. Just let them sit out for 20–30 minutes before serving so the frosting softens back up.
This Strawberry Spinach Salad is the kind of dish that makes people stop mid-bite and ask for the recipe. Tender baby spinach and peppery arugula form the base, layered with juicy sliced strawberries, creamy crumbled goat cheese, and fresh torn basil for an herby brightness that ties everything together. A touch of red onion adds just enough bite to keep things interesting.
What really sets this salad apart is the balsamic poppy seed dressing — a simple blend of olive oil, balsamic vinegar, maple syrup, and a hint of vanilla that sounds unexpected but tastes absolutely right. It’s the kind of dressing you’ll want to drizzle on everything.
And then there’s the pecan brittle — maple-glazed pecans toasted with poppy seeds and a pinch of salt and pepper — which adds a satisfying crunch and a caramelized sweetness that makes this salad feel genuinely special.
Whether you’re serving it as a light lunch, bringing it to a summer gathering, or just looking for a reason to eat more strawberries, this salad delivers every single time.
NOTES: Strawberries – If using tender small, farmer’s market strawberries, halve or quarter them so they hold up better. White Balsamic vinegar – if using, reduce maple syrup to 1 tablespoon. Brittle can be made 3 days ahead and stored uncovered on the counter. Goat cheese is most easily crumbled when it is very cold- crumble it ahead (small crumbles) and store it in the fridge. Prep strawberries the same day as serving. Assemble and dress the salad right before serving.
1 lb. fresh strawberries, trimmed and sliced ( 1/4 inch thick)
1/4 cup fresh basil leaves, torn
1/4 cup up to 1/2 cup red onion, thinly sliced
2/3 cup goat cheese, crumbled, more for sprinkling
Salad Dressing:
1/4 cup extra virgin olive oil
3 Tbsp. balsamic vinegar (or use white balsamic for the best flavor- see notes)
1 1/2 Tbsp. maple syrup
1/2 tsp. vanilla extract
2 tsp. poppy seeds
1/2 tsp. salt
1/2 tsp. black pepper
1 clove garlic, finely minced (use a garlic press)
Pecan Brittle:
1 cup pecans
1 tsp. poppyseeds
2 Tbsp. maple syrup (enough to coat)
1 pinch each, salt and pepper
Directions
Make the pecan brittle (if using) and let it cool.
Whisk dressing ingredients together in a small bowl or small jar- or use a mini blender adding the poppy seeds after it is blended.
If sensitive to onions, soak the sliced onions in a bowl of cold salted water until ready to use. Drain before using.
Place the spinach, sliced strawberries, basil, drained onions, and pecans (save some for the top) in an extra-large bowl. Re-whisk the dressing and add enough to lightly coat the salad, tossing well. Toss in the crumbled goat cheese, saving a couple of tablespoons for the top.
Pour the salad onto a platter or large serving bowl. Sprinkle with the remaining goat cheese and pecans.
Pecan Brittle:
Toast pecans in a medium non-stick skillet, stirring over medium heat, until toasty and warmed through, about five minutes.
Season with salt and pepper. Pour in 1-2 tablespoons of maple syrup (enough to coat) and a teaspoon of poppy seeds if you like.
Let this bubble and cook for 30-60 seconds. Turn off heat.
Fluff it up a bit, place on a small plate, and let it cool. It will harden as it cools. Alternatively, you can use toasted pecans.
If gochujang isn’t already a permanent fixture in your fridge, this stir-fry is about to change that. The fermented Korean chili paste is the kind of ingredient that does everything at once — lending deep, complex heat, a rich umami backbone, and that signature rusty-red color that makes the whole dish look as good as it tastes. It is most definitely a staple in our fridge.
The best part? This is a stir-fry that doesn’t actually make you work like one. Once everything hits the pan, no split-second timing, no stress, just straightforward, high-heat cooking that comes together fast. Boneless country-style spareribs are the cut to reach for here, delivering the ideal ratio of tender meat to well-marbled fat.
One thing before you dive in: give that sauce a good re-whisk right before it goes in the pan. Cornstarch sinks fast, and a quick stir is all that stands between you and a silky, perfectly thickened sauce — versus a lumpy one. Serve over steamed rice if desired.
Word to the wise, it would be hard-pressed to get 4 decent-sized servings, especially if not served with rice. We even added some baby bell peppers for added color and volume.
3 medium celery stalks, thinly sliced on the diagonal
Thinly sliced scallions, for garnish
Toasted sesame seeds, to serve
Steamed rice (optional)
Directions
In a medium bowl, toss the pork with 1 tablespoon soy sauce, 1 tablespoon oil, 1 teaspoon cornstarch and ¼ teaspoon each salt and pepper. In a small bowl, whisk together ½ cup water, the remaining 2 tablespoons soy sauce, the remaining 1 tablespoon cornstarch, the sugar, gochujang and ½ teaspoon pepper.
In a 12- to 14-inch wok or a 12-inch skillet over medium-high, heat the remaining 1 tablespoon oil until barely smoking. Add the pork and cook, stirring, until no longer pink, about 2 minutes. Add the garlic and ginger, reduce to medium and stir until fragrant, about 30 seconds.
Add the celery and cook, stirring, until slightly wilted, about 1 minute. Whisk the sauce mixture to recombine, then add it to the pan. Bring to a simmer over medium-high and cook, stirring, until the sauce thickens, about 2 minutes. Off heat, taste and season with salt and pepper. Transfer to a serving dish, then sprinkle with scallions and sesame seeds.
Shrimp have a narrow window between perfectly cooked and overdone, but this Venetian-inspired dish has a clever solution. Rather than cooking them all the way through in the pan, the shrimp are quickly seared on just one side — golden on the bottom, still slightly translucent on top — before being set aside while a deeply flavored sauce comes together.
That final brief simmer in a tomato sauce spiked with dry vermouth and fennel seeds is all they need to finish cooking gently and evenly, staying plump and tender throughout. The sauce itself punches well above its weight. Vermouth adds a subtle herbal complexity, fennel seeds lend a gentle anise warmth, and shallots and garlic round everything out into something that tastes far more involved than the short time it takes to make.
Serve it with crusty bread to soak up every last drop, or spoon it over soft polenta, creamy white beans or a small pasta like orzo (our choice), and serve with a side salad for a more substantial meal. Garnish with a little fresh oregano for color and additional flavor.
Super easy. Super simple. Super tasty. It was so good, we got only 3 servings out of it!
1½ lbs. extra-large (21/25 per lb.) shrimp, peeled, deveined and patted dry
Kosher salt and ground black pepper
3 Tbsp. extra-virgin olive oil, divided
2 medium shallots OR ½ medium yellow onion, finely chopped
6 medium garlic cloves, thinly sliced
1 tsp. fennel seeds, crushed, OR ¼ to ½ tsp. red pepper flakes OR both
½ cup dry vermouth OR dry white wine
28 oz. can whole peeled tomatoes, crushed by hand
Fresh oregano for garnish, optional
Directions
Lightly season the shrimp on all sides with salt and black pepper. In a 12-inch nonstick skillet over medium-high, heat 1 tablespoon oil until shimmering. Add half the shrimp in an even layer and cook without disturbing until golden brown on the bottoms, 1 to 2 minutes; transfer to a large plate. Repeat with 1 tablespoon of the remaining oil and the remaining shrimp, transferring the shrimp to the plate.
In the now-empty skillet over medium-high, heat the remaining 1 tablespoon oil until shimmering. Add the shallots, garlic and fennel seeds; cook, stirring, until the garlic is lightly golden, about 30 seconds. Add the vermouth and cook, stirring, until almost evaporated, about 2 minutes. Add the tomatoes with juices and ¼ teaspoon each salt and black pepper. Cook, stirring occasionally, until the sauce is slightly thickened, 6 to 7 minutes. Add the shrimp and accumulated juices; cook, stirring, until the shrimp are opaque throughout, 1 to 2 minutes. Taste and season with salt and black pepper.
Optional garnish: Fresh oregano OR finely chopped fresh dill, parsley OR tarragon
This is summer cooking at its most effortless and elegant. A generous fillet of salmon is draped in a luscious, aromatic dressing of silky coconut cream, bright lemon zest and juice, a touch of brown sugar and mustard, and a generous handful of feathery fresh dill — then sealed snugly in foil and laid directly on a screaming-hot grill. Inside that packet, the fish steams in its own juices, absorbing every bit of that fragrant, tropical-herbal sauce until it’s impossibly tender and flavorful.
While the salmon does its thing on the grill, green beans get their own foil treatment — a quick toss in oil, salt, and pepper before being wrapped up and charred alongside the fish. Once off the heat, they’re tumbled into a bright, no-fuss salad with sweet fresh corn, juicy cherry tomatoes, and another generous shower of dill, all brought together with the reserved coconut-dill dressing.
The result is a dish that feels special without demanding much of the cook. It’s equally at home served straight off the grill, still warm and fragrant, or made hours ahead and brought to the table at room temperature or straight from the fridge — making it an ideal centerpiece for a laid-back backyard gathering or an elegant dinner party where you’d rather be with your guests than stuck in the kitchen.
TIP: Alternatively, cook the fish and green beans in a 450-degree oven. Place the packets on a baking sheet and cook for 13 to 15 minutes.
Coarse kosher salt (such as Morton) and black pepper
1 cup unsweetened coconut cream or coconut milk
2 Tbsp. dark brown sugar
1 Tbsp. sherry vinegar
1 tsp. Dijon mustard
1 lemon
1 cup chopped fresh dill
8 oz. green beans, trimmed and halved crosswise
1 cup fresh corn kernels (from 1 to 2 ears corn)
1 pint cherry tomatoes, lightly crushed open or sliced into halves
Directions
Heat an outdoor grill to high (see Tip). Pat the fish dry with paper towels and place on a large strip of heavy-duty aluminum foil (or 2 stacked sheets of regular foil) on a sheet pan. Drizzle with 1 tablespoon oil and sprinkle lightly with salt.
In a small bowl, combine the coconut cream, brown sugar, vinegar, mustard, 1 tablespoon oil, 1 teaspoon salt and ½ teaspoon pepper. Zest the lemon right into the bowl and squeeze in 2 tablespoons juice. Stir in ½ cup dill. Pour half of the dressing over the fish and set the other half aside. Wrap the fish in the foil by turning up the sides and crimping them together to form a packet. Use another strip of foil if necessary to make a tight seal.
On another large strip of foil, toss the green beans with the remaining teaspoon of oil and a pinch each of salt and pepper. Wrap the beans in the foil to form a packet.
Place both the salmon and green bean packets on the grill and cover if using a gas grill. Grill until the green beans and salmon are cooked through, about 10 minutes. To test the fish for doneness, remove the packet from heat, cut a slit in the top with a knife and slide the knife into the fish. It should be tender. Using two tongs or wearing oven mitts, carefully transfer the fish packet to a large serving platter and open the top.
Open the green bean packet, transfer the beans to a large bowl and add the corn, tomatoes, remaining ½ cup dill, half of the reserved dressing and a pinch of salt. Toss to coat.
To serve, top the fish with some of the vegetables and remaining dressing. Serve immediately with the remaining vegetables and dressing or refrigerate until ready to serve.
There’s a brief, restless stretch between winter and spring — that in-between moment where you’re not quite ready to let go of comfort food, but you’re already craving something fresher and lighter. This pasta was made for exactly that feeling. And yet, the dish is good anytime of year!
It marries the richness of a wintry pasta with the verdant vibrance of spring. It is built on the bones of a rich, cold-weather pasta: savory sausage, butter, and a glossy, silky sauce that coats every strand. But then spring shows up — bright asparagus, sweet frozen peas, a generous hit of lemon, and a full cup of basil that perfumes the whole dish. The result is something that feels simultaneously cozy and alive.
And despite how indulgent it tastes, the vegetables are actually the main event here. There’s more asparagus and peas than there is sausage or pasta — the sausage plays a supporting role, lending depth and richness without taking over. Think of it less as a meat pasta with vegetables, and more as a vegetable dish that happens to have pasta and sausage in it.
The shallot anchors the base with a gentle, slightly sweet bite, but this is a great recipe to riff on as the season progresses. Leeks, spring onions, or ramps all work beautifully in its place — coarsely chopped so they hold their own in the pan. Use whatever looks best at the market, and let the season lead.
We realized too late that we did not have any frozen peas on hand. Our substitute was frozen edamame, and we both agreed it was quite good as an alternate. Two changes we would make in the future is cut the pasta back to 12 ounces, and add some grated parmesan along with the water in Step 3.
1 lb. fusilli, or a similar style such as cavatappi
2 Tbsp. extra-virgin olive oil
1 lb. hot or sweet Italian sausage, casings removed
2 large shallots, coarsely chopped
5 garlic cloves, coarsely chopped
1 bunch asparagus, trimmed, cut into 1-inch pieces
1½ cups frozen peas, not thawed
1 lemon
2 Tbsp. unsalted butter
1 cup basil leaves, torn if large
Pinch of red pepper flakes, optional
Grated Parmesan, for serving
Directions
Bring a large pot of generously salted water to a boil. Add the pasta and cook until al dente. Reserve 2 cups of the pasta cooking water, then drain the pasta.
Meanwhile, in a large Dutch oven, heat the oil over medium-high. Add the sausage and cook, breaking into smaller pieces and stirring occasionally, until browned and crisp, 6 to 8 minutes. Add the shallot and garlic and stir until fragrant and softened, 2 to 3 minutes. Add the asparagus and peas, season with salt, and stir until bright green and crisp-tender, 2 to 4 minutes. Use the moisture from the vegetables to scrape the browned bits off the bottom of the pot. Turn off the heat and finely grate the zest of half the lemon over the sausage and vegetables. Set aside until the pasta is ready.
Add 1 cup pasta water, the pasta, and the butter to the Dutch oven. Set over medium and stir vigorously until the pasta is coated. Add more pasta water as needed until glossy.
Off the heat, add the juice from half the lemon and stir to combine. Stir in the basil and red pepper flakes, if using, then taste for salt and lemon and season as desired. Top servings with Parmesan, if desired.
Four heads of garlic sounds like a lot — until you taste it. Slow-cooked until sweet, nutty, and pleasantly caramelized, garlic confit loses all its sharpness and transforms into something rich and almost buttery. Mashed with olive oil and fresh parsley, it becomes the kind of sauce that makes people ask what your secret is.
Boneless chicken thighs are seared until golden, then finished in the oven — simple technique, serious results. The whole dish is bold but never harsh, savory but never heavy.
A few things worth knowing before you start: The garlic confit comes together fastest in the microwave at 50% power, which gives you the same gentle, even cooking as a long stovetop simmer — in a fraction of the time. And when it comes to the skillet, a well-seasoned cast iron or nonstick pan isn’t optional — the garlic mixture will stick and scorch in a conventional pan, so don’t skip this one.
Finish the plate with warm flatbread or a crusty loaf to catch every bit of sauce, and a crisp, leafy salad to keep things bright. We paired ours with a cucumber, dill and sour cream salad.
NOTES: Don’t microwave the garlic heads in oil on high. Use 50 percent power so the oil doesn’t overheat and scorch the garlic. Also, don’t crank up the burner when browning the garlic-coated chicken in the skillet. Use moderate heat so the garlic does not burn. And when flipping the chicken, use a spatula to scrape them up so the garlic stays with the chicken rather than sticks to the pan.
Pour the oil into a large microwave-safe bowl. Place the garlic heads cut side down in the oil. Cover tightly and microwave on 50 percent power until the garlic heads feel soft and yielding when pressed on the sides with the back of a fork, 13 to 15 minutes. Cool, covered, until barely warm to the touch.
Measure 2 tablespoons of the oil into a small bowl and reserve for browning the chicken. Squeeze the garlic cloves out of their skins and into the oil remaining in the bowl in which the garlic was cooked. To the bowl, add the parsley, lemon zest and juice, 1 teaspoon salt and ½ teaspoon pepper. Mash with the fork to a coarse paste. (Alternatively, use a mini food processor.)
Add the chicken thighs and garlic confit to a large bowl, and mix until thoroughly coated. Let stand at room temperature while you heat the oven to 425°F with a rack in the middle position.
Set a rimmed baking sheet near the stovetop. In a 12-inch cast-iron or nonstick skillet over medium, heat 1 tablespoon of the reserved garlic oil until shimmering. Place half of the chicken in a single layer; do not scrape the garlic mixture off the thighs, but do not slather on any more, either. Cook, without disturbing, until spottily browned on the bottom and the chicken releases easily from the pan, 5 to 7 minutes. With a thin metal spatula (if using a cast-iron pan) or a silicone spatula (if using nonstick), scrape up each thigh, along with any garlic mixture under it that clings to the skillet, and flip. Cook until spottily browned on the second sides, 3 to 4 minutes. Using the spatula, transfer the thighs to the baking sheet. Using the remaining 1 tablespoon reserved garlic oil, brown the remaining thighs in the same way and transfer to the baking sheet.
Slather any garlic mixture remaining in the bowl onto the thighs, distributing it evenly. Place in the oven and cook until well browned and the thickest part of the largest thighs reach 175°F, 10 to 13 minutes. Transfer the chicken to a platter, then drizzle on any juices from the baking sheet. Sprinkle with additional chopped parsley and serve with lemon wedges.
Microwave Garlic Confit
Start to finish: 20 minutes Makes 3 or 4 heads garlic
Pour ½ cup extra-virgin olive oil into a large microwave-safe bowl. Remove the outer papery skins from 3 large or 4 medium heads garlic (9 to 10 ounces total weight), then cut off the top one-third of each head to expose the cloves. Place the garlic heads cut side down in the oil.
Cover tightly and microwave on 50 percent power until the garlic heads feel soft and yielding when pressed on the sides with the back of a fork, 13 to 15 minutes. Let the garlic cool, covered, in the oil.
These deviled eggs have a wonderfully tangy, creamy character. The filling starts with a rich, velvety base of sour cream and mayonnaise in equal measure — the sour cream lending a subtle tartness and lighter texture than mayo alone, while the mayo brings body and that classic richness. Together they create a silkier, slightly airier filling than the traditional all-mayo version.
The Dijon mustard adds a sharp, grown-up bite — more nuanced and complex than yellow mustard, with a gentle heat that lingers at the back of the palate. It pulls the whole filling together and gives it backbone.
The dill pickle relish is the surprise delight here — it introduces little bursts of briny, vinegary sweetness and a whisper of fresh dill herbaceousness. It also adds the tiniest bit of textural intrigue in an otherwise smooth filling.
Piped or spooned back into the cool, firm egg white cups, the filling is finished with a dusting of smoked paprika — that gorgeous rust-red powder bringing a gentle smokiness and just a touch of earthy sweetness, while making the eggs look absolutely stunning on a platter.
The overall flavor profile is tangy, creamy, and gently smoky, with a pleasant sharpness from the mustard and little pickle-bright pops throughout. These would be a welcome upgrade at any gathering — familiar enough to feel classic, but just distinctive enough to prompt “ooh, what’s in these?”
There are weeknight dinners, and then there are weeknight dinners that taste like you know exactly what you’re doing. This Szechuan pork stir-fry is firmly, unapologetically the latter. Stir-fries are one of our favorite go-tos, especially when time is limited.
Wok cooking rewards confidence and punishes hesitation. The heat is high, the timing is quick, and the results — when you trust the process — are spectacular. If you’re new to stir-fry technique, this recipe is a masterclass in the fundamentals: proper oil selection, batch cooking for a true sear, and the discipline of having everything prepped and within reach before the first drop of oil hits the pan.
Serve it over steamed jasmine rice or alongside lo mein noodles, with an extra spoonful of chili garlic sauce on the side for those who like to live boldly. Either way, dinner is going to be very, very good tonight.
While the list of ingredients may seem daunting, don’t sweat it, the recipe is just a starting point with a lot of versatility. Feel free to switch out the protein and vegetables at whim.
After the recipe below, I’ll describe in-depth the ingredients used and why.
NOTE: The option to “velvet” the pork before stir-frying is up to you. The process is noted below the stir-fry recipe and requires additional time to do this step.
Szechuan Pork, Asparagus, Bell Pepper and Mushroom Stir-Fry
1 Tbsp. chili garlic sauce or sambal oelek or more to taste
1/2 tsp. Chinese Five Spice
1 Tbsp. cornstarch to thicken
The Meat and Veggies:
Peanut oil, divided
1 1/4 lbs. of boneless pork loin chops, halved horizontally, then sliced into 1/4″ strips
1 1b, med. thick asparagus, woody bottoms removes and sliced at a diagonal in 1-ich pieces
1 large red bell pepper, stemmed, seeded and sliced into 1/4″ strips
1 red onion, ends remove, and cut vertically into 1/4″ slices
8 oz. shiitake mushrooms, stems removed and cut into 1/4″ slices
1-2 scallions, sliced thin on a diagonal, for garnish (optional)
Directions
For the sauce:
Toast szechuan peppercorns in a hot dry skillet over medium heat, until fragrant, about 1-2 minutes. Crush.
Place all ingredients in a medium bowl or small jar and whisk until well combined. To thicken it, whisk in 1 tablespoon cornstarch.
For the Stir-Fry:
Heat peanut oil in a wok until searing. Working in two batches, sear the pork, constantly stirring for ??? minutes each batch. Remove to a side bowl.
Add more oil (??) to wok and when hot toss in the bell pepper and onion, stirring constantly until crisp tender, about ?? minutes. Add the asparagus and continue stir-frying for about ?? minutes. Remove all of these vegetables from the wok into the bowl with the pork.
More oil? Next, stir-fry the mushroom slices for about ?? minutes. Return the bowl of pork and vegetables to the wok with the mushrooms and stir to combine. Whisk the sauce again before adding along the inside edges of the wok. Stir-fry for a few minutes until sauce thickens.
Spoon over hot steamed rice garnished with thinly-sliced scallion greens.
Through the process of velveting, meats retain their moisture and take on a soft and velvety texture that is a signature quality of Chinese cuisine. The cornstarch and oil form a barrier that locks in juices and protects the meat from the hot cooking medium, and additional seasonings in the marinade add flavor.
Ingredients
Use pork from above recipe
1 Tbsp. water
1 1/2 tsp. Shaoxing wine
1 1/2 tsp. oyster sauces
3/8 tsp. baking soda
1 1/2 tsp. cornstarch
1 tsp. vegetable oil
1/4 tsp. sesame oil
1/8 tsp. white peppers
Directions
In a medium bowl, add the pork, water, Shaoxing wine, oyster sauce, and baking soda.
Mix with your hands until the pork is well coated and the liquid is absorbed into the meat. Add the cornstarch, vegetable oil, and optional sesame oil and white pepper. Mix again until everything’s well incorporated. Set aside and let the pork marinate for at least 30 minutes or overnight. If marinating overnight, let the pork come up to room temperature before starting your dish.
To sear the pork, place your wok over high heat. When it starts to smoke lightly, add 2 tablespoons oil around the perimeter of the wok to coat the surface. Add the pork in one layer, allowing it to sear for 30 seconds. Stir-fry until it has turned opaque, remove from the wok, and set aside.
Now your pork is ready to be added to your stir-fry. Remember, whether searing or blanching, you will cook the pork again in your stir-fry, so avoid overcooking it during the pre-cook step.
The Sauce: Building Layers of Flavor
The soul of this stir-fry lives in its sauce — a carefully balanced blend of bold, aromatic, and umami-rich ingredients that draws on the classic pantry of Chinese cooking.
Szechuan Peppercorns are the dish’s defining character. Unlike black pepper, these aren’t truly “hot” — instead, they deliver a singular má (麻) sensation: a floral, citrusy tingle that numbs the lips and electrifies the palate. Toast and lightly crush them before adding to unlock their full fragrance.
Soy sauce forms the backbone of the sauce, bringing deep, fermented saltiness and the savory umami that makes stir-fries so satisfying. It also contributes color, giving the finished dish its rich, lacquered glaze.
Brown sugar balances the salt and heat with gentle sweetness and a hint of molasses depth. It also encourages caramelization in the high heat of the wok, helping the sauce cling to the pork and vegetables rather than pool at the bottom of the pan.
Sesame oil is used here as a flavoring, not a cooking fat — its low smoke point makes it unsuitable for high-heat frying. Added to the sauce, it weaves in a deep, nutty, toasted richness that is unmistakably Chinese in character.
Rice wine vinegar or black vinegar introduces a necessary brightness. Rice wine vinegar is mild and clean; black vinegar (Chinkiang) is earthier and more complex, with a slightly smoky depth reminiscent of balsamic. Either works beautifully here, but black vinegar is the more traditional Szechuan choice and worth seeking out.
Shaoxing wine is a aged Chinese rice wine that adds an aromatic, slightly sweet complexity you simply can’t replicate with a substitute. It tenderizes the pork, lifts the other flavors, and contributes the subtle fermented backbone that distinguishes an authentic stir-fry from a merely good one. Dry sherry is the closest stand-in if needed.
Garlic and ginger, both finely minced, form the aromatic foundation of virtually every great stir-fry. Garlic brings pungent savory heat; ginger contributes bright, peppery warmth and a freshness that keeps the sauce from feeling heavy. Mince both as finely as possible so they melt into the sauce rather than dominate any single bite.
Chili garlic sauce or sambal oelek is where you control the fire. Chili garlic sauce is slightly more complex, with fermented depth and visible garlic throughout; sambal oelek is purer, brighter chile heat. Start with a tablespoon and adjust boldly — this dish is meant to have presence.
Chinese Five Spice adds an almost mysterious, warm complexity: a ground blend of star anise, cloves, Chinese cinnamon, Szechuan pepper, and fennel seeds. Just half a teaspoon is enough to infuse the entire dish with that distinctively fragrant, slightly sweet-and-spiced quality that sets Chinese braised and stir-fried pork apart from anything else.
Cornstarch, whisked into the sauce before adding it to the wok, performs two essential functions: it thickens the sauce into a glossy, restaurant-style coating, and it helps the flavors cling to every piece of pork, asparagus, bell pepper, and mushroom rather than sliding to the bottom of the pan. The result is that signature, satiny stir-fry finish.
The Meat & Vegetables: Technique is Everything
In stir-fry cooking, how you prepare your ingredients matters just as much as what you put in the sauce. Every cut here is deliberate — designed to maximize surface area, ensure even cooking, and create a finished dish where every component is perfectly tender, never soggy, and beautifully glazed.
Peanut oil is the ideal fat for wok cooking. Its exceptionally high smoke point allows it to withstand the fierce, sustained heat that a proper stir-fry demands — the kind of heat that sears rather than steams, creating those lightly charred, caramelized edges that define great wok food. Its flavor is clean and neutral with just the faintest hint of nuttiness that complements the sesame and Szechuan flavors beautifully. The oil is divided intentionally: you’ll cook the pork and vegetables in separate batches, adding fresh oil as needed so that the wok temperature stays high and nothing stews in its own juices.
Boneless pork loin chops, halved horizontally and sliced into quarter-inch strips, are an excellent choice for stir-fry. Loin is lean enough to cook quickly without becoming greasy, yet has just enough fat marbling to stay juicy under high heat. Halving the chops horizontally first — essentially butterflying them into thinner slabs — makes the subsequent slicing easier and ensures the strips are a consistent, delicate thickness that will sear and cook through in a matter of minutes. Cut against the grain wherever possible for the most tender result. Pat the strips dry before they hit the wok: moisture is the enemy of a good sear.
Asparagus, sliced on a diagonal into one-inch pieces with the woody bottoms snapped away, brings grassy, vegetal freshness and a satisfying crunch that holds up beautifully against the bold, assertive sauce. Medium-thick spears are ideal here — thin asparagus risks going limp too quickly, while very thick spears may not cook through in time. The diagonal cut isn’t merely decorative: it exposes more surface area to the heat, accelerating cooking and giving the sauce more to cling to.
Red bell pepper, sliced into thin quarter-inch strips, contributes sweetness, color, and a crisp bite that provides textural contrast throughout the dish. Red peppers are the ripest and sweetest of the bell pepper varieties, and their natural sugars caramelize beautifully in a screaming-hot wok. Their vivid color also makes the finished dish as visually striking as it is delicious.
Red onion, cut vertically into quarter-inch slices, softens and sweetens as it cooks, its sharpness mellowing into something almost silky under high heat. Cutting vertically — from root end to tip along the natural lines of the onion — helps the slices hold together in the wok rather than falling apart into individual rings. Red onion also brings a subtle purple hue that adds to the dish’s visual appeal.
Shiitake mushrooms, stems removed and sliced into quarter-inch pieces, are among the finest mushrooms for stir-fry. Their caps are meaty, dense, and remarkably absorbent, soaking up the Szechuan sauce like little flavor sponges while contributing their own deep, woodsy umami to the dish. The stems are fibrous and tough even when cooked, so removing them entirely is worth the small extra effort. If your shiitakes are particularly large, a rough chop rather than a slice works equally well.
Scallions, sliced thin on the diagonal and scattered over the finished dish just before serving, are more than garnish. Their mild, grassy onion flavor adds a final fresh note that cuts through the richness of the sauce, and their bright green color signals to every diner that something vibrant and carefully made has just arrived at the table. The diagonal slice, echoing the asparagus cut, gives the dish a visual coherence and exposes just enough of the scallion’s interior to release its fragrance without wilting.