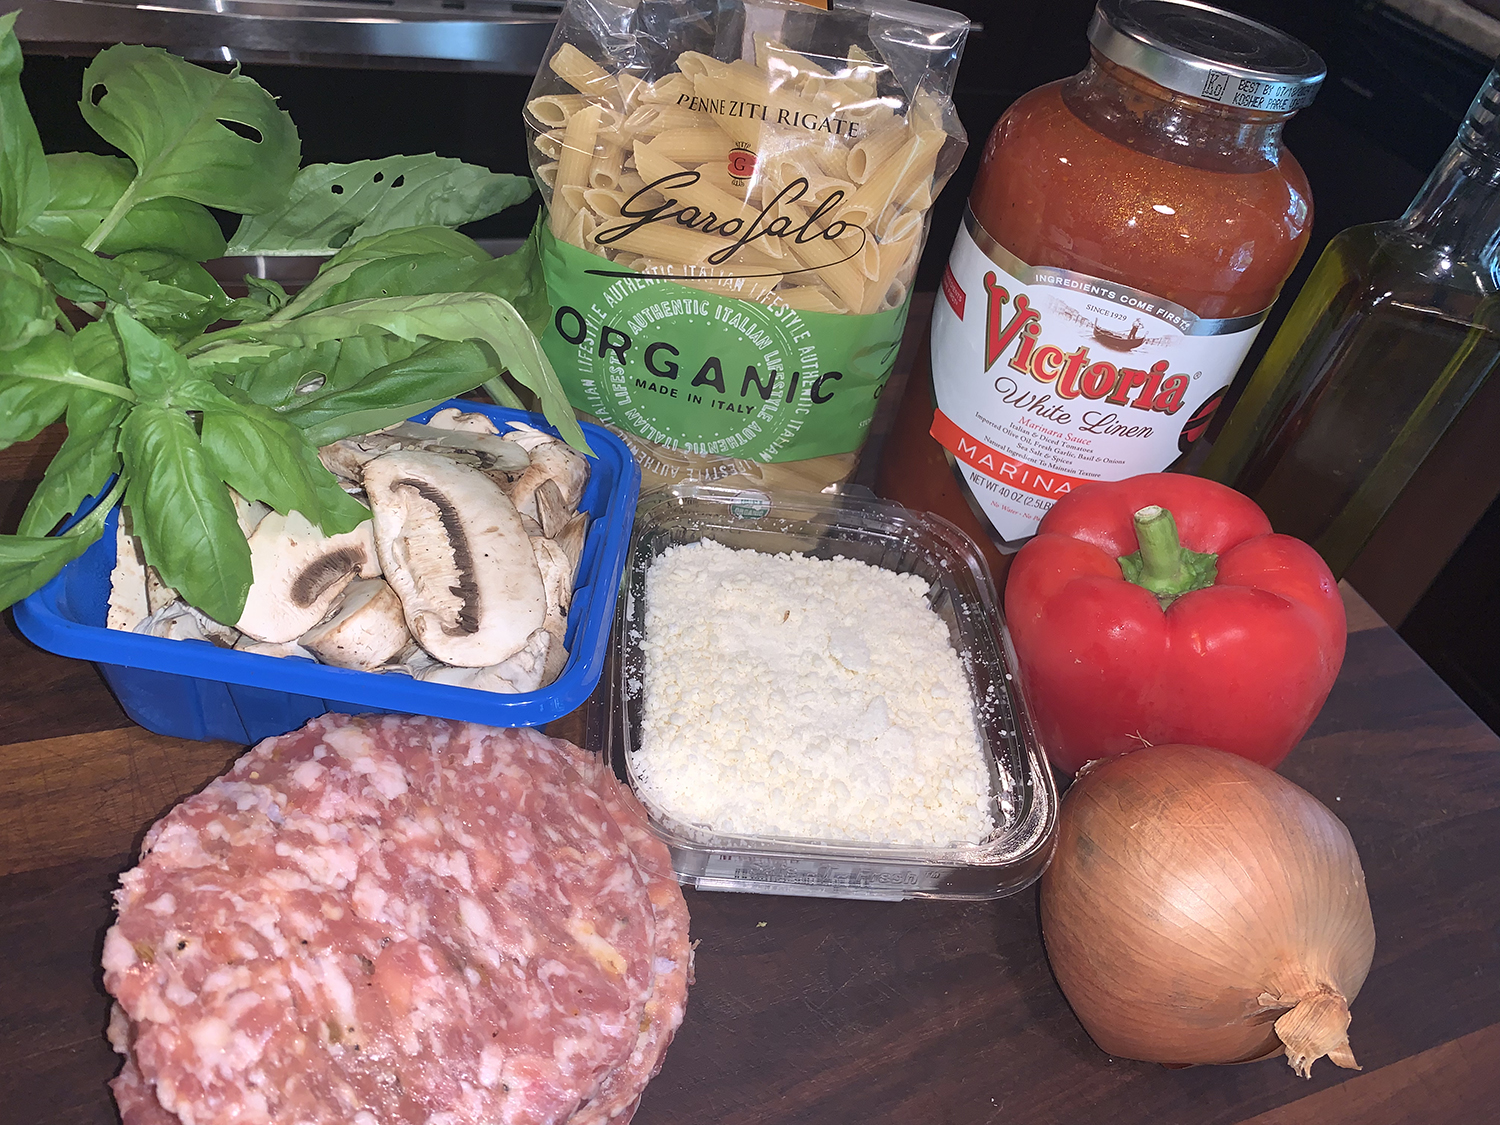
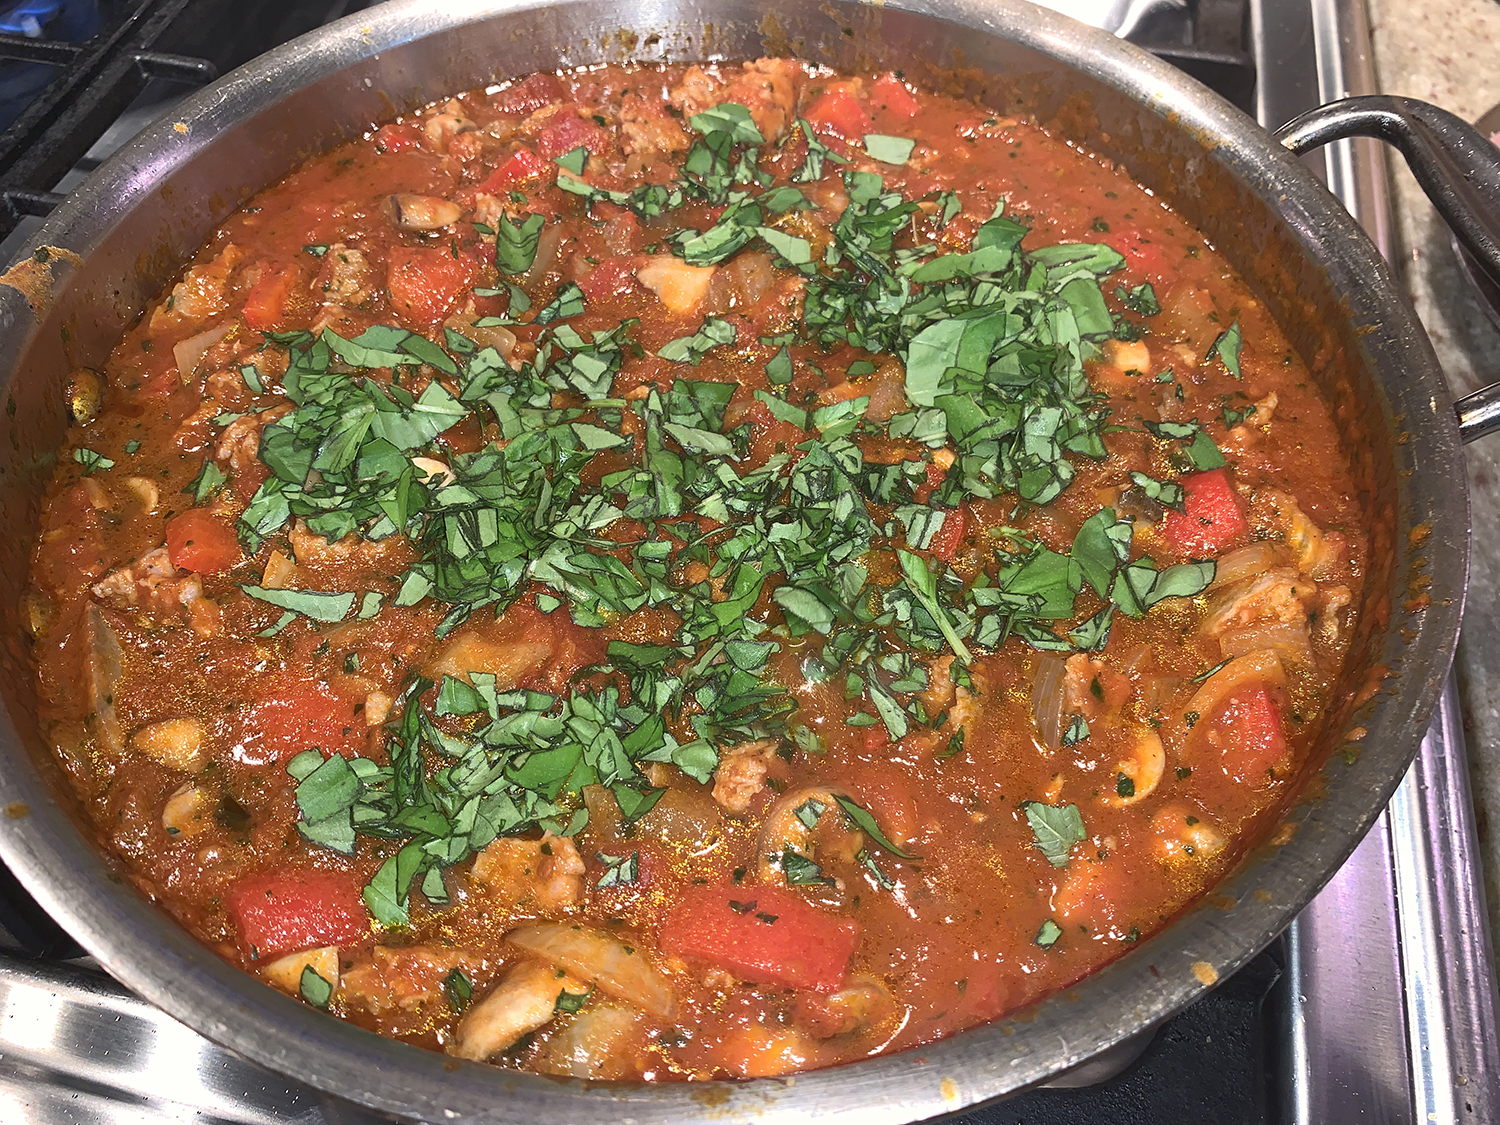
What is one of your fall-back dinners when you really have nothing planned but need to get dinner on the table in 30 minutes or so? One of our go-to recipes is based on pasta. We pretty much always have some in the pantry, and with a ground meat of some type such as beef, turkey, lamb, or sausage this becomes the basis for dinner.
And if there is no homemade red sauce in our freezer, we always have a commercial jar or two in the cupboard. Our current choice happens to be the great tasting White Linen brand with a low-sugar content which can be found at Costco. It weighs in at a hefty 40 ounces allowing for lots of add-ins.
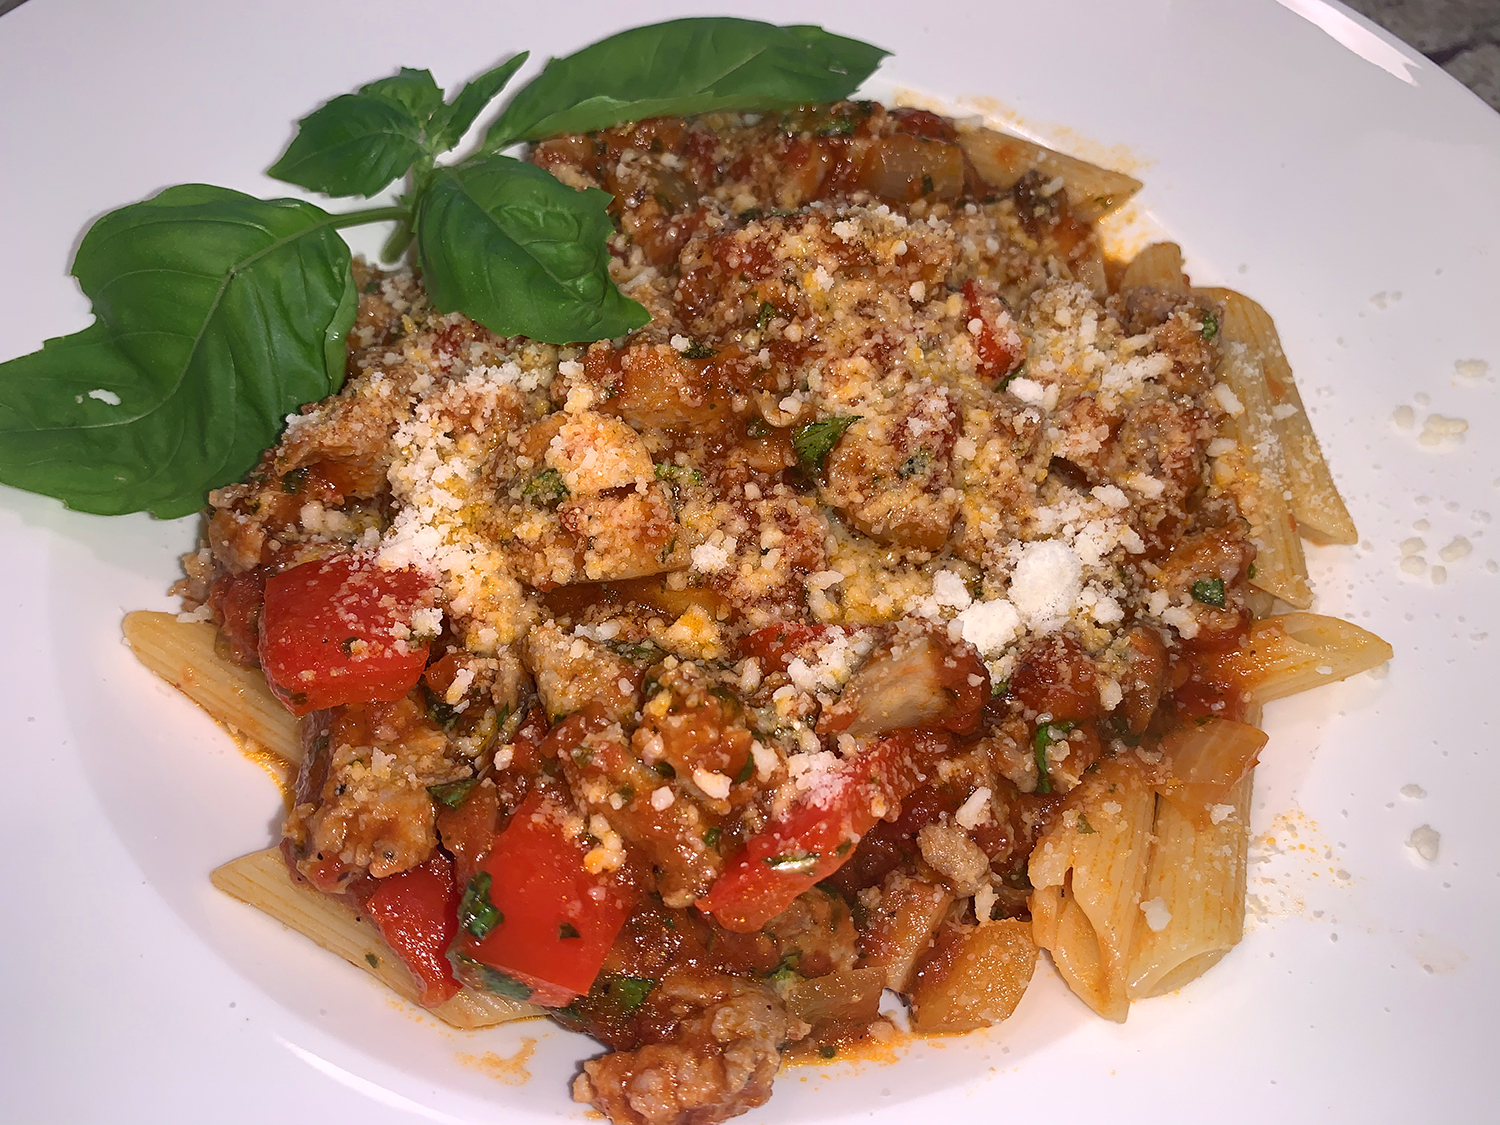
We start with about a pound of pasta cooked to package directions, brown up a pound of ground meat, sauté chopped veggies and add some fresh herbs like basil or oregano. Top with grated Pecorino Romano or Parmesan Reggiano, pair with a side salad, dinner done!
There is so much flexibility with this meal concept. With a plethora of jarred sauce options, just select your favorite. However, you may have to use more than one jar’s worth if the volume is much less than 32 ounces. The following list of ingredients is for reference only—adjust the amounts according to your own preferences.
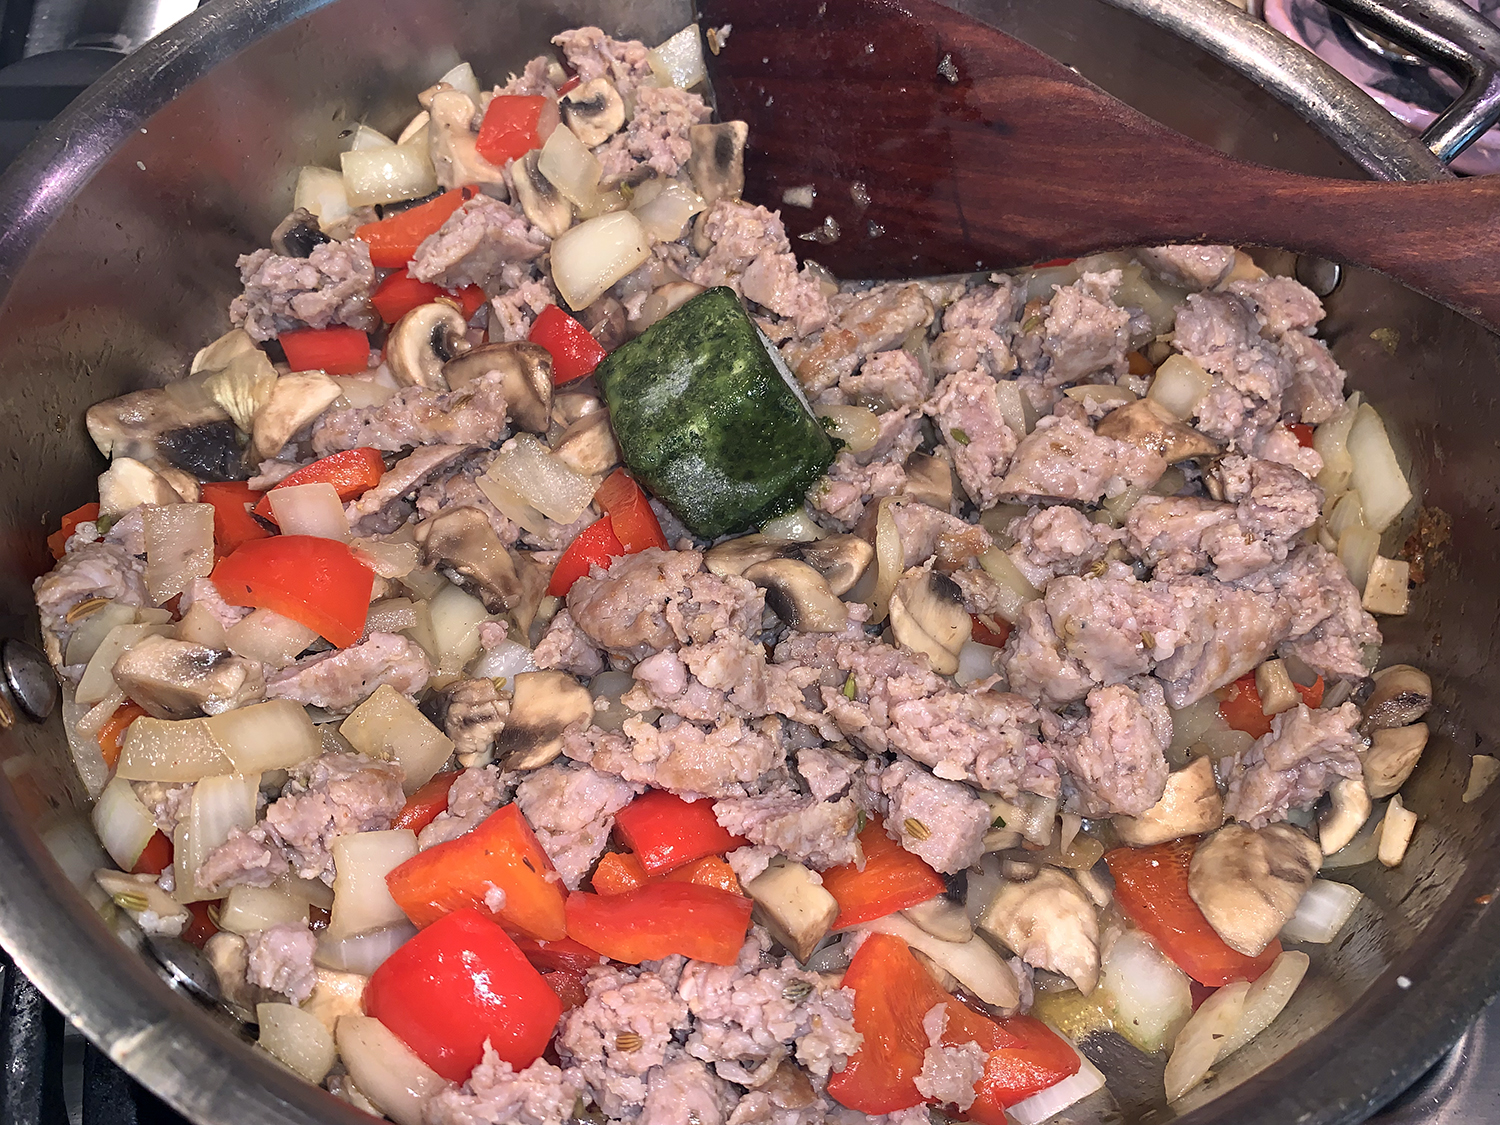
Every autumn we always harvest any leftover basil from our herb garden and blend it with some olive oil, fill silicone ice cube trays with the mixture, and freeze the cubes. They come in handy when making soups, dips, and sauces. We threw one in this sauce along with the jarred marinara.
1 lb. ground meat such as beef, turkey, lamb or sausage
1 Tbsp. olive oil
1 large red bell pepper, 3/4″ chop
1 large onion, roughly chopped
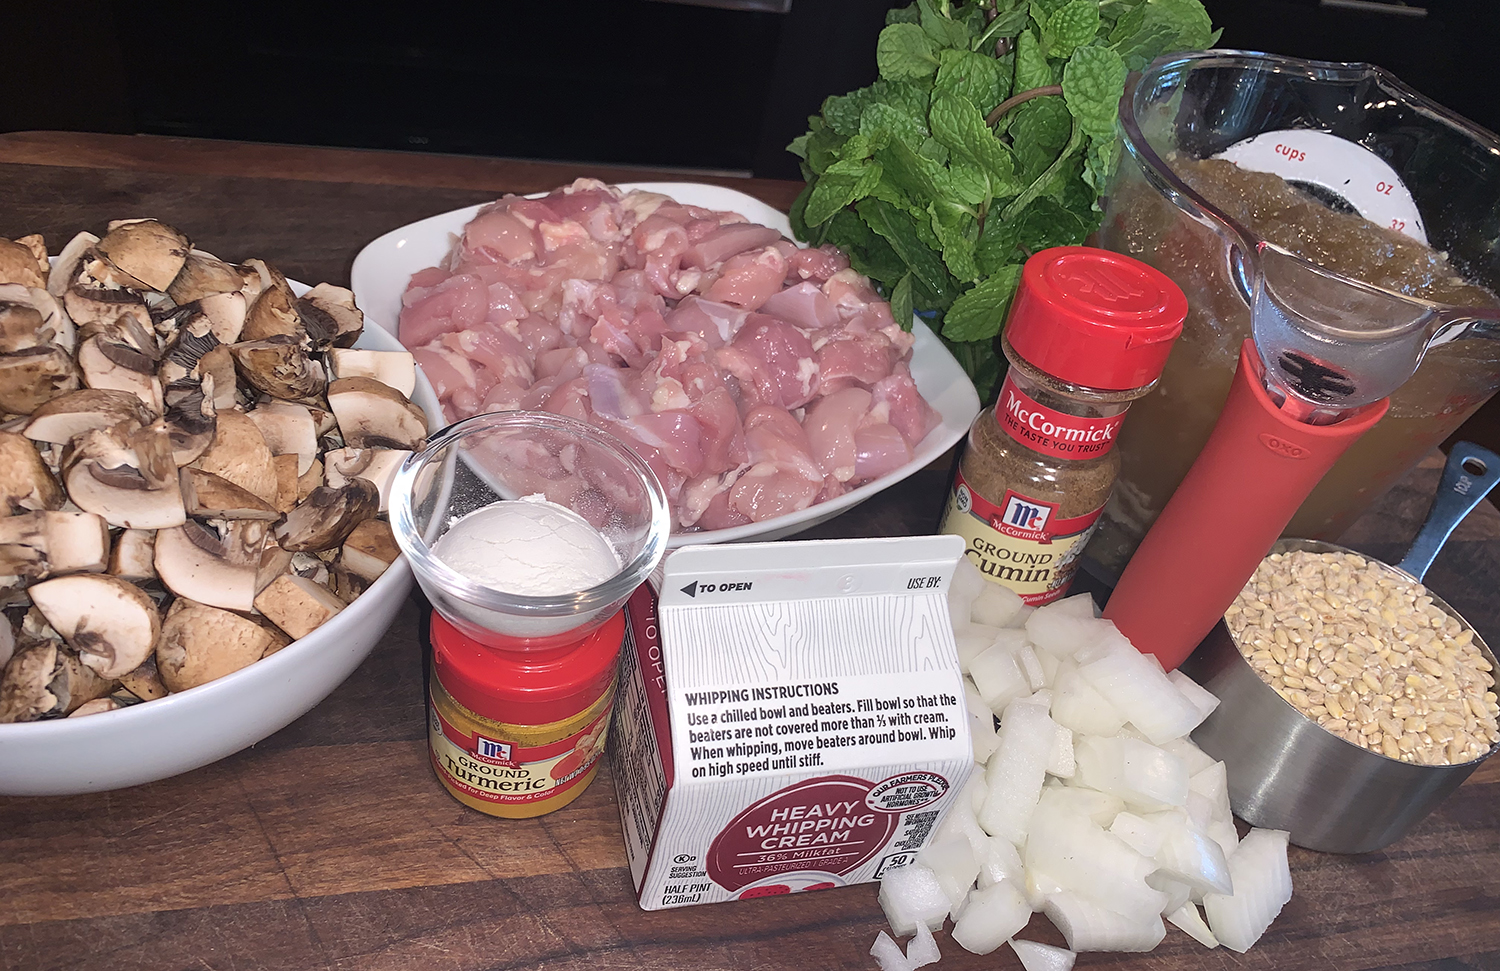
8-12 oz. mushrooms, cremini or white, roughly chopped
1 lb. pasta, cooked according to package directions
Grated Parm or Pecorino for topping
1/4 cup fresh basil or oregano, chopped, more for for garnish
Directions
Cook the pasta according to package directions.
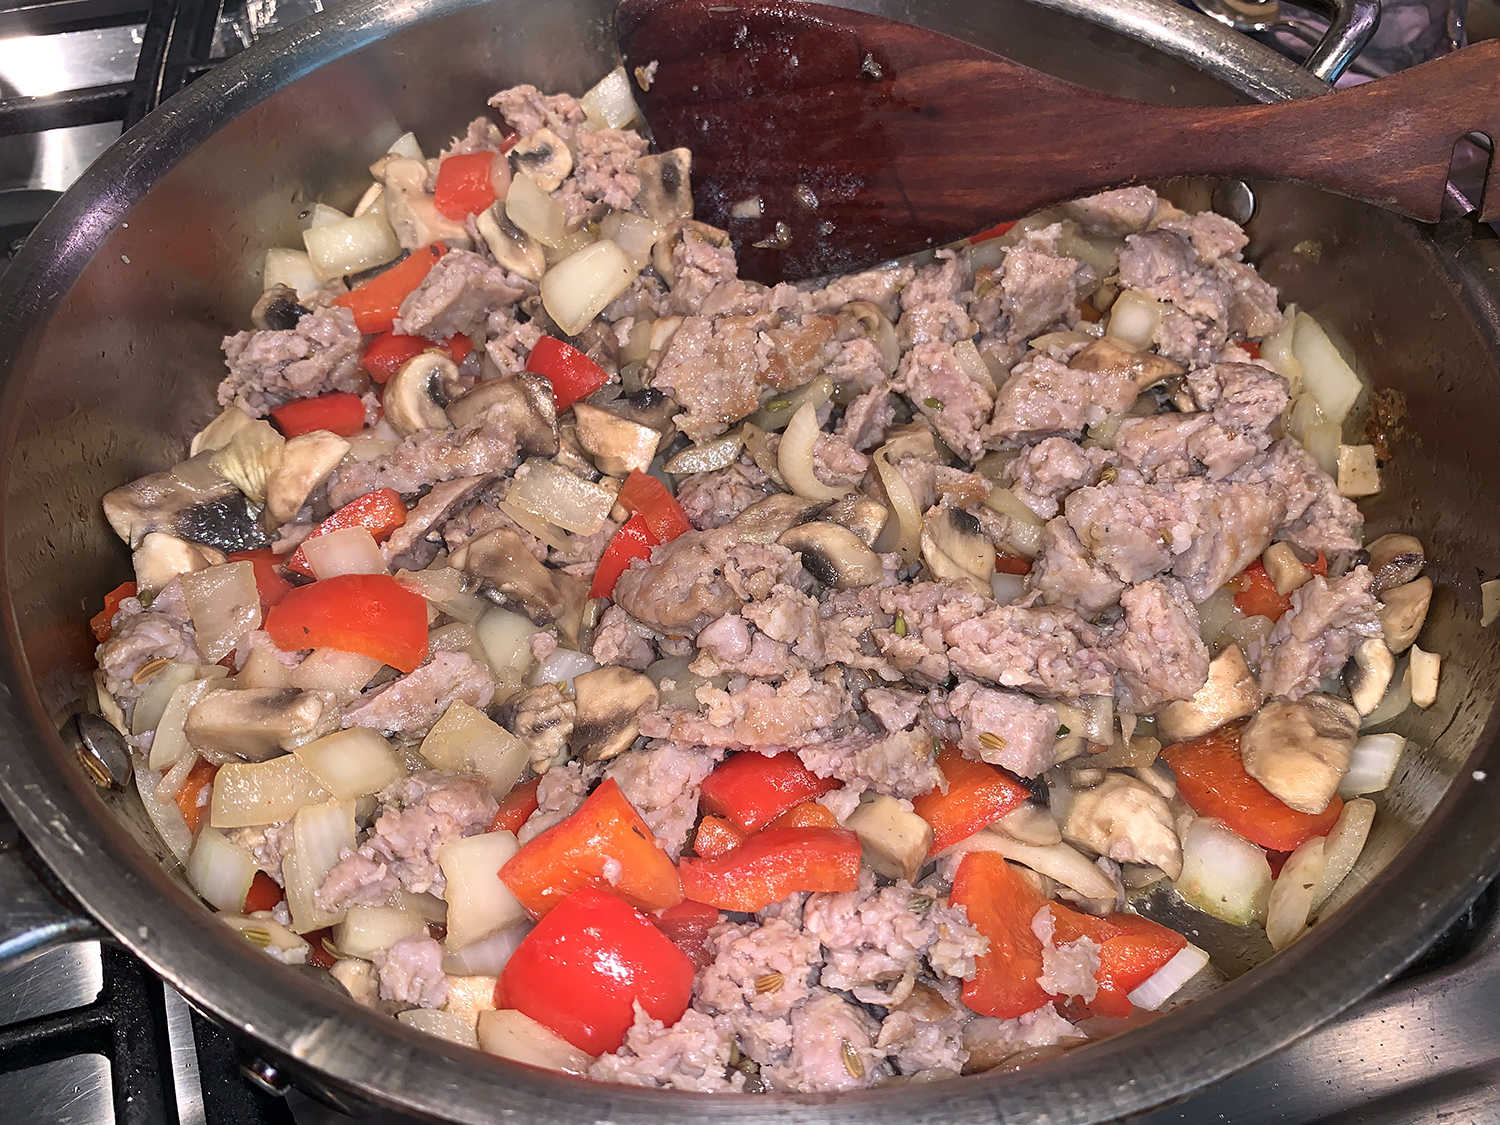
Pour olive oil into a large sauté pan and when hot, add the ground meat. Cook until no longer pink, stirring often, about 8 minutes (depending on your meat of choice). Remove meat from pan to a cutting board and chop smaller if necessary.
Add the chopped pepper and onion to the meat drippings, cook until starting to soften, about 5 minutes. Add the mushrooms and continue cooking another 5 minutes.
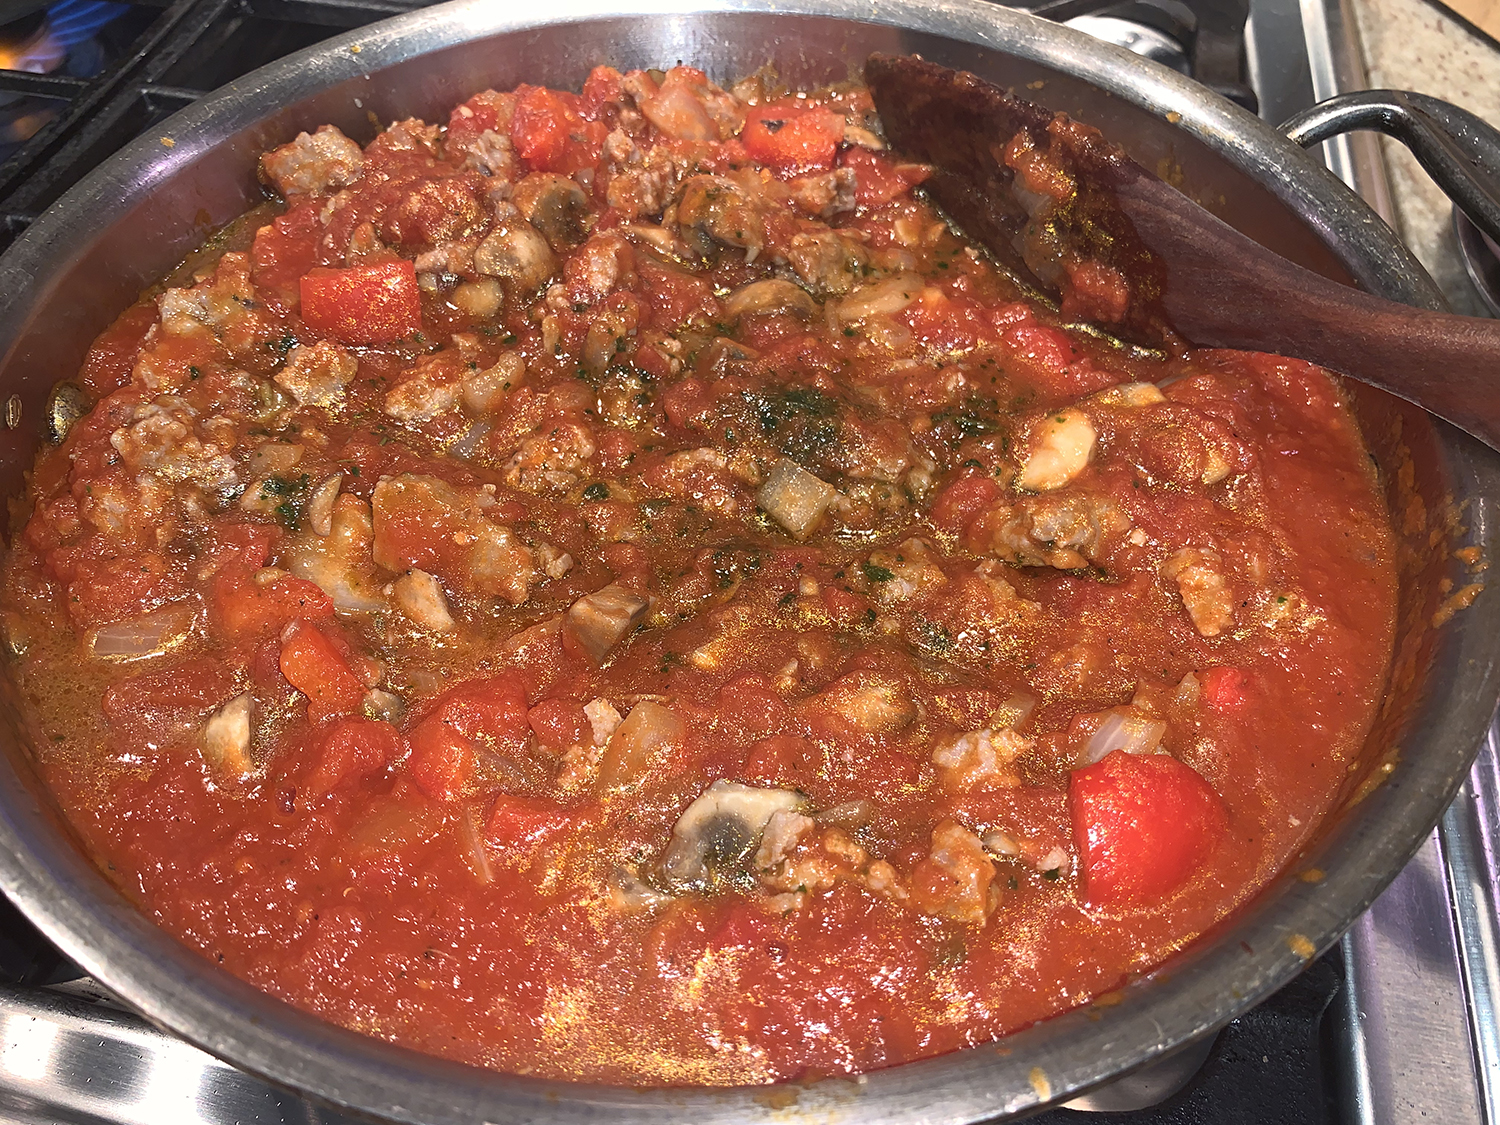
Return the ground meat to the pan with the vegetables and pour in the jarred marinara sauce. Over medium heat, cook the sauce mixture until hot while the pasta finishes cooking.
Drain the pasta when done. Stir the fresh herbs into the sauce and plate each serving in large bowls, topping each with grated cheese and more fresh herbs.
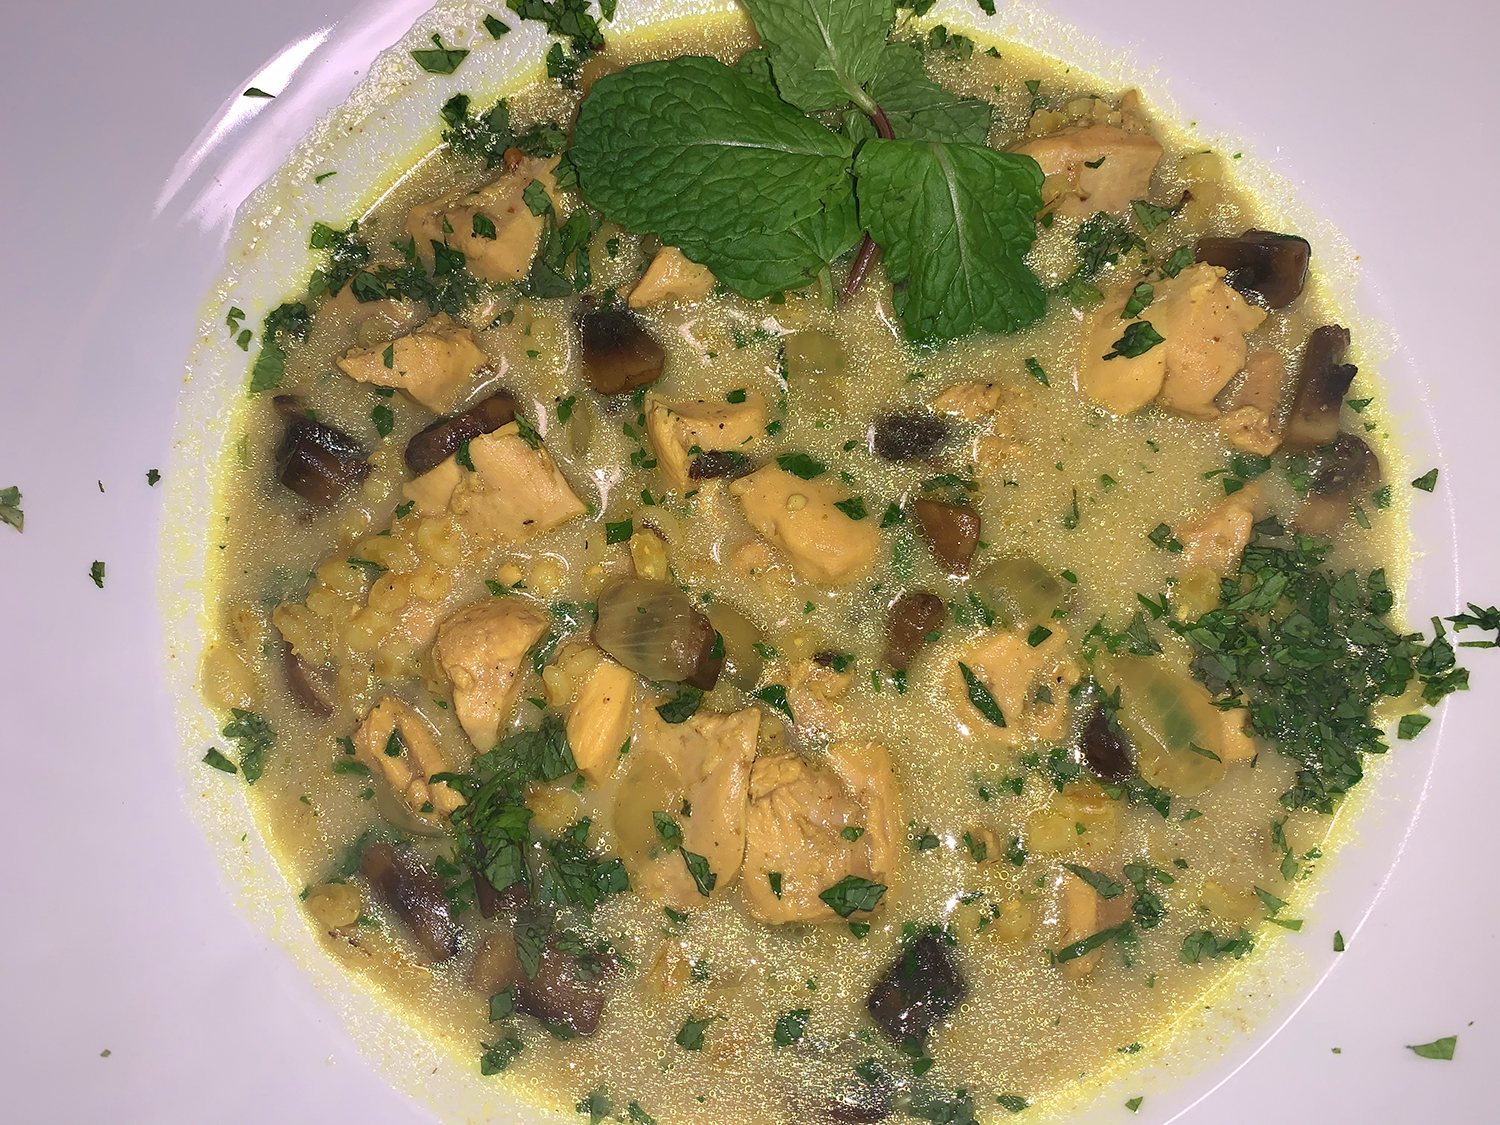
Soup season always gets us excited because the options are endless—they can range from light and brothy, to heavy and creamy, and about everything in between. Here, this satisfying meal-in-a-bowl is a riff on the Persian dish called soup-e jo and came to us from Milk Street Magazine.
Though barley’s natural starch lends the soup body, béchamel, a mixture of butter, flour and milk, also is traditional for added richness and thickening. For ease, the béchamel is skipped and instead a tablespoon of flour is simply mixed into the sautéed onion and mushrooms, with a swirl of a little cream at the very end.
Fragrant spices give the soup color and complexity, and the fresh mint lifts and brightens the flavors. If you so choose, you can also include dill. The soup was hearty enough as a meal on it’s own, but a side salad would be a welcome addition.
TIP: Don’t use whole-grain barley, as it requires a significantly longer cooking time than pearled barley.
12 oz. cremini mushrooms, trimmed and quartered if small or medium, cut into eighths if large
2 tsp. ground cumin
1 tsp. ground turmeric
1 Tbsp. all-purpose flour
Kosher salt and ground black pepper
1 cup pearled barley
2 lbs. boneless, skinless chicken thighs, trimmed and cut into 1-inch chunks
2 qts. low-sodium chicken broth
1/2 cup heavy cream
1 cup lightly packed fresh mint, dill or a combination, chopped
Directions
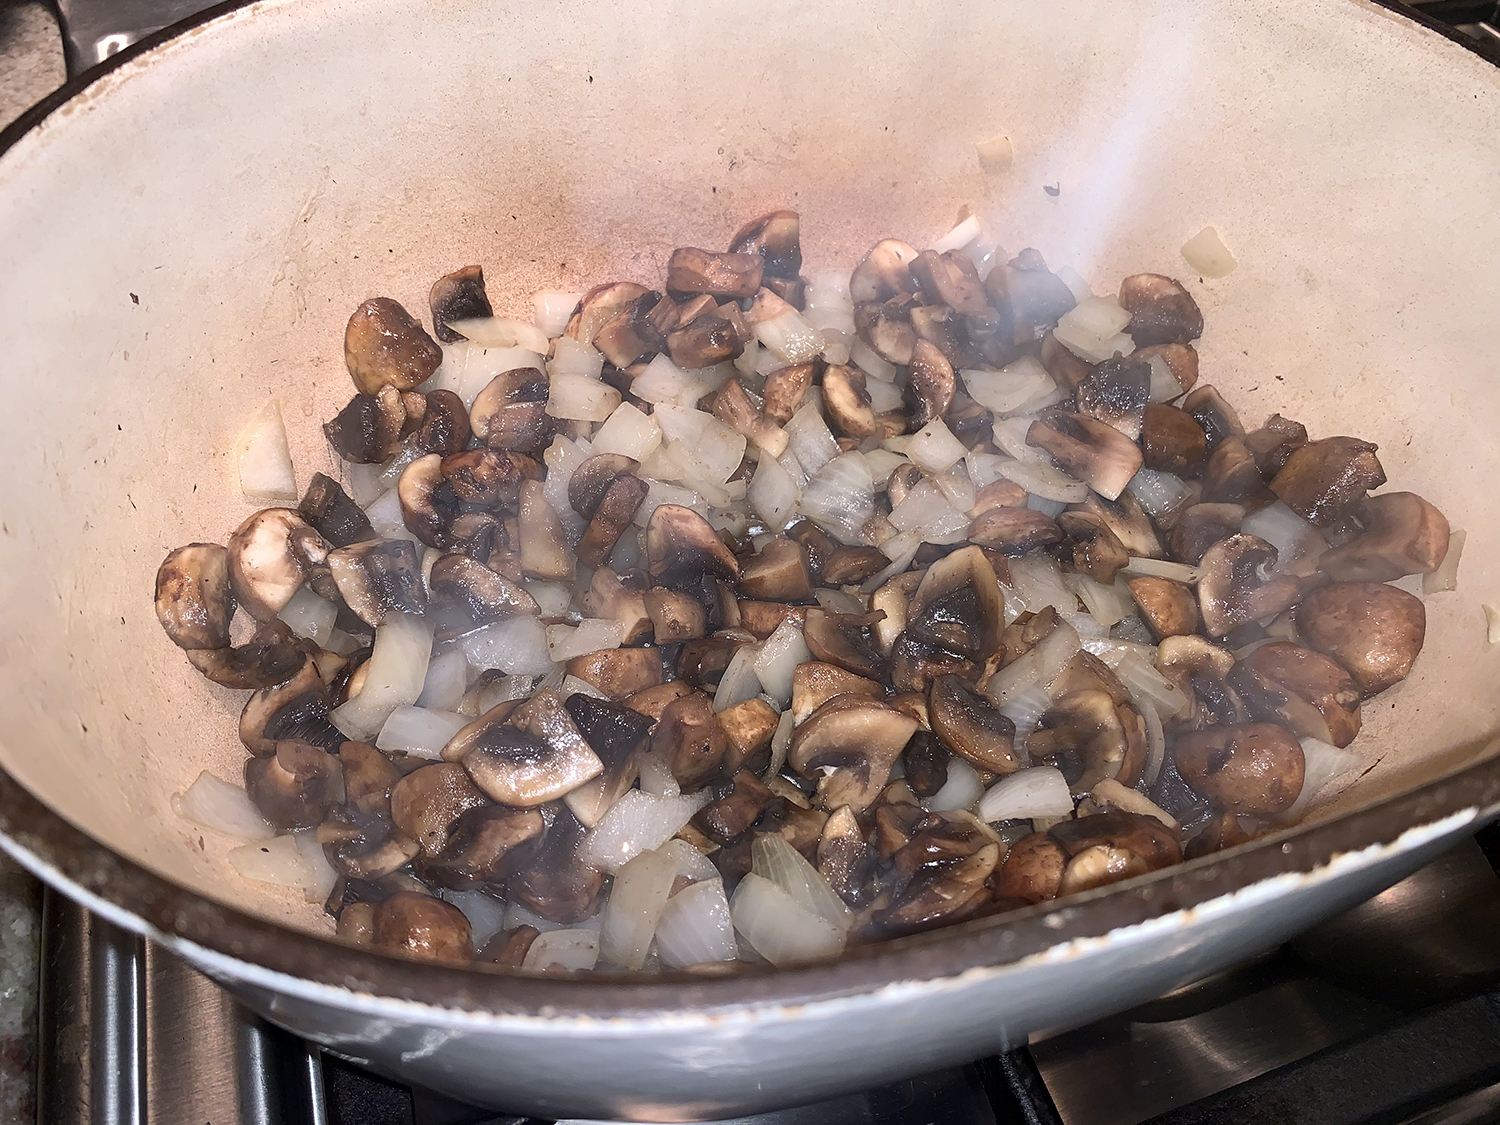
In a large pot over medium-high, heat the oil until shimmering. Add the onion and mushrooms; cook, stirring occasionally, until the onion is softened and the mushrooms release moisture, 6 to 8 minutes.
Add the cumin, turmeric, flour, 1 teaspoon salt and ½ teaspoon pepper; cook, stirring, until well combined, about 30 seconds.
Stir in the barley and chicken, followed by the broth. Bring to a simmer over medium-high, then reduce to medium-low and simmer, uncovered and stirring occasionally, until the barley is tender, about 40 minutes.
Off heat, stir in the cream and half of the herbs. Taste and season with salt and pepper. Ladle into bowls and sprinkle with the remaining herbs.
Yes, you could just order a pizza and have it delivered, but how fun is that? Been there, done that, right—like at least 5,000 times? Why not throw one together at home for a change and exercise that creative muscle.
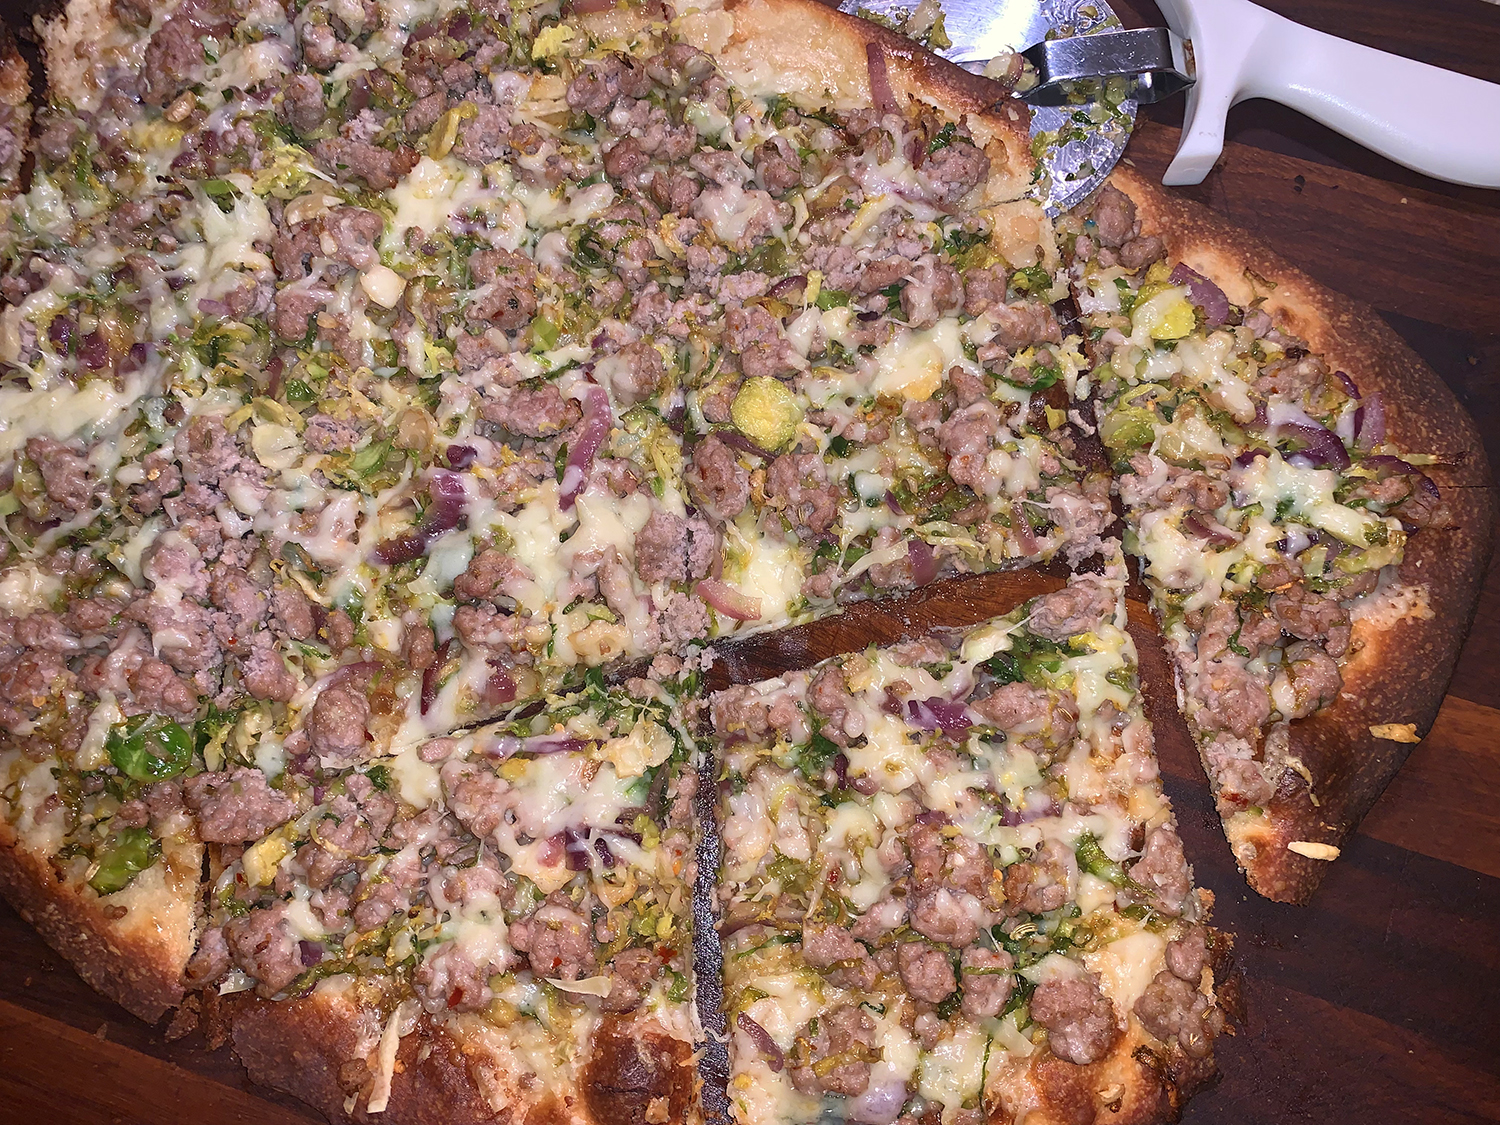
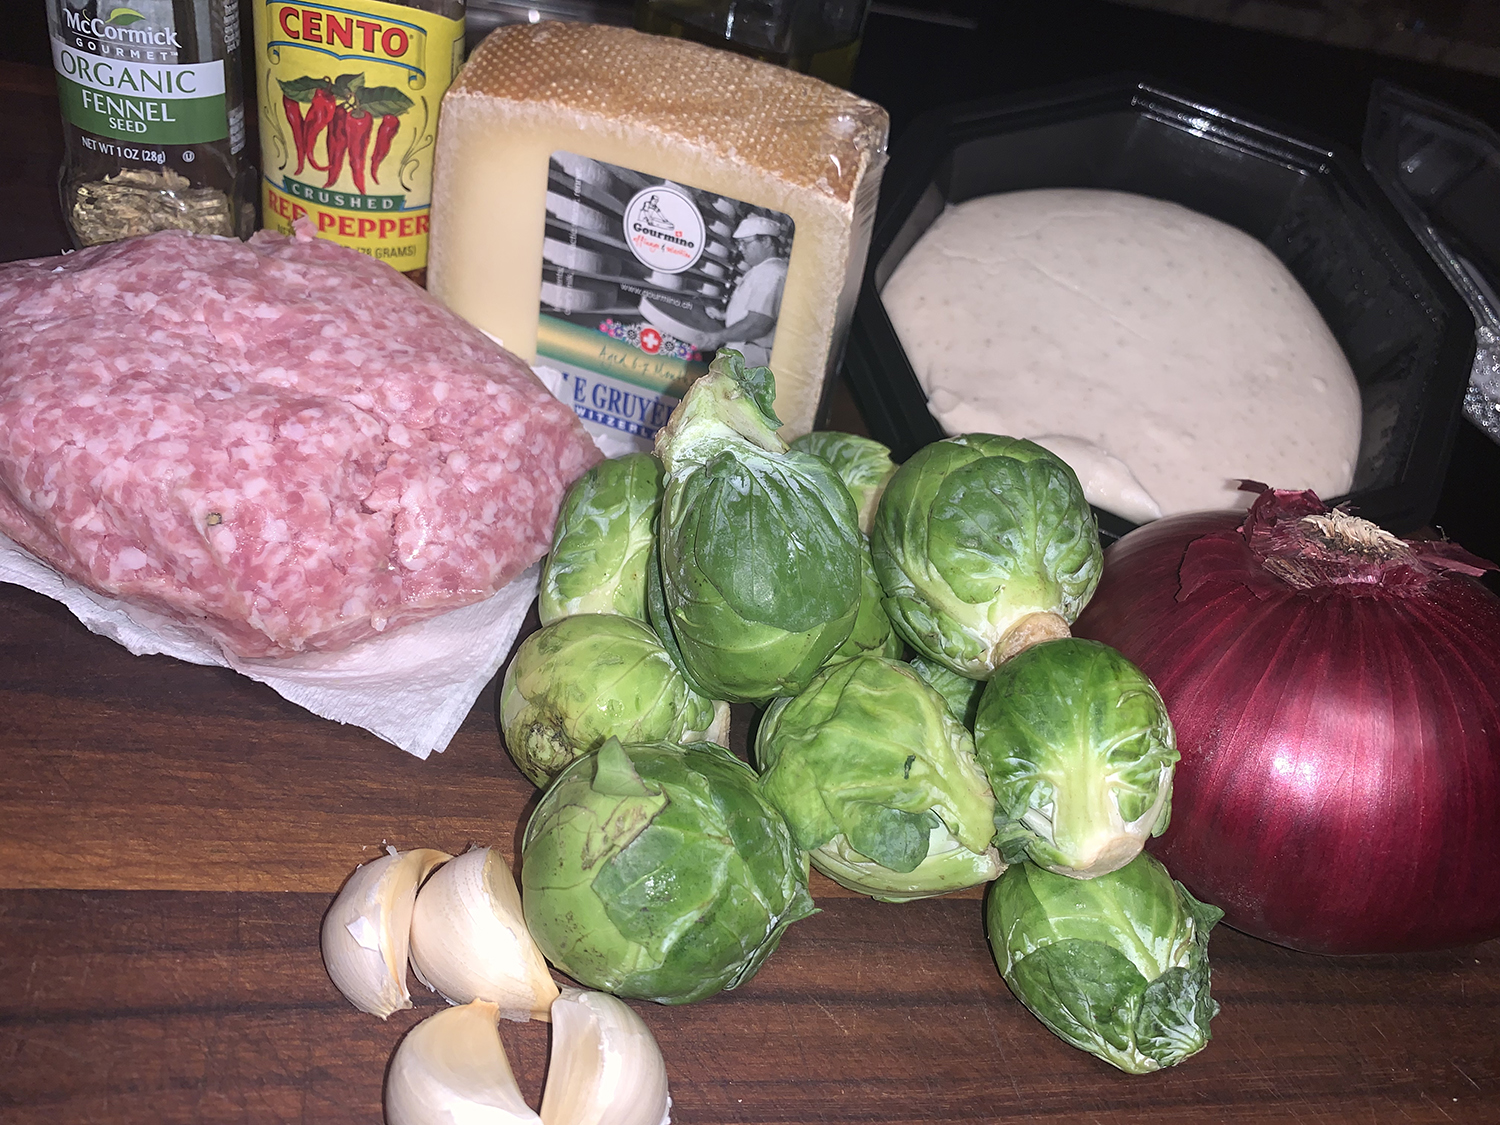
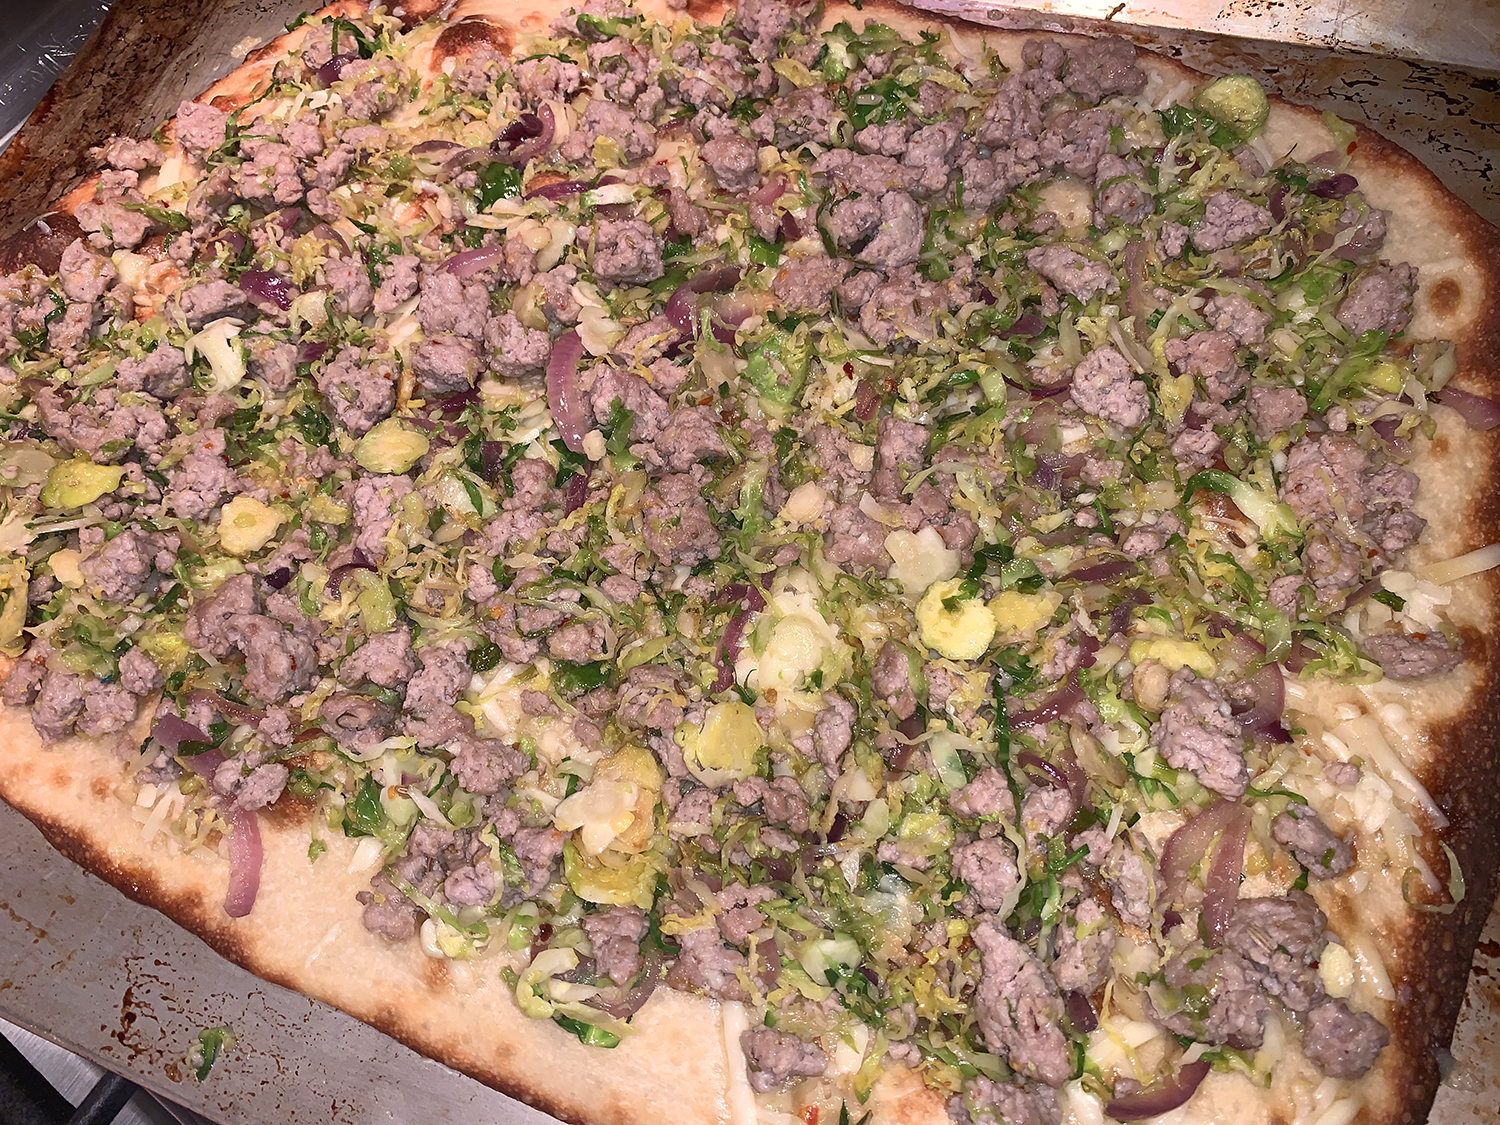
We first saw this version in a recent Fine Cooking Magazine article. Now I must admit, Brussels sprouts is not the first topping I think of, nor is it in even in the top ten! And why make the “sausage” yourself when you can buy it already flavored? Truth is, we like a culinary challenge. Plus, you can adjust the seasonings to suit your personal preferences.
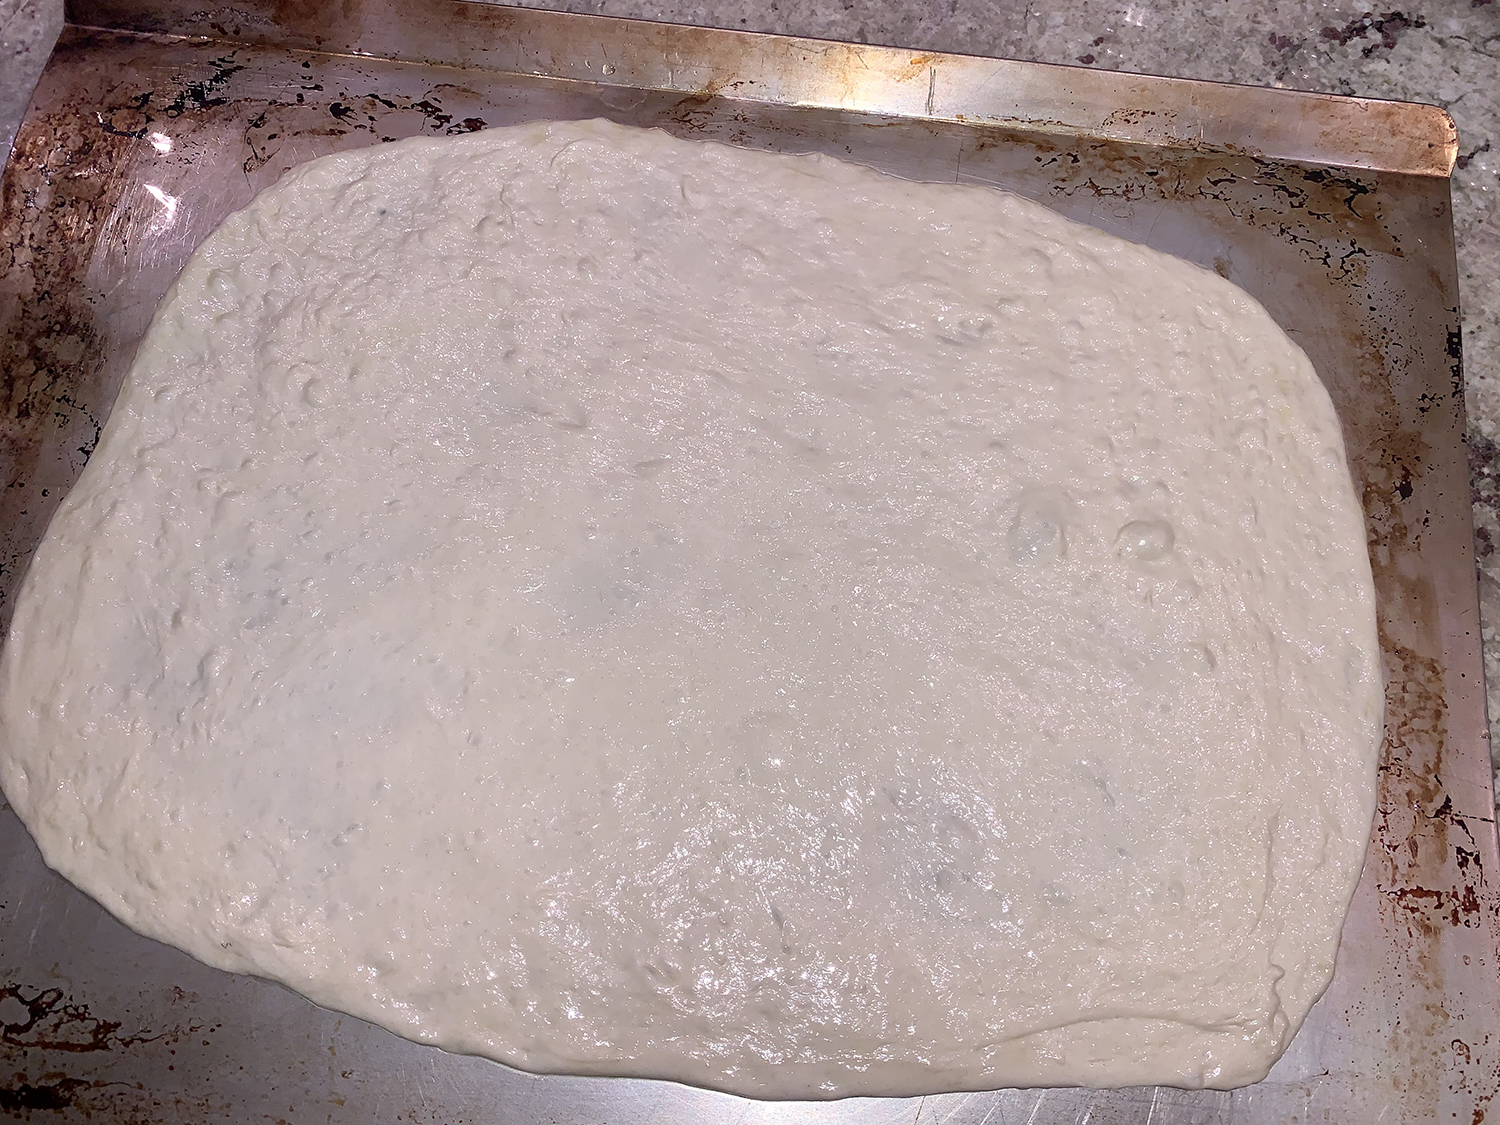
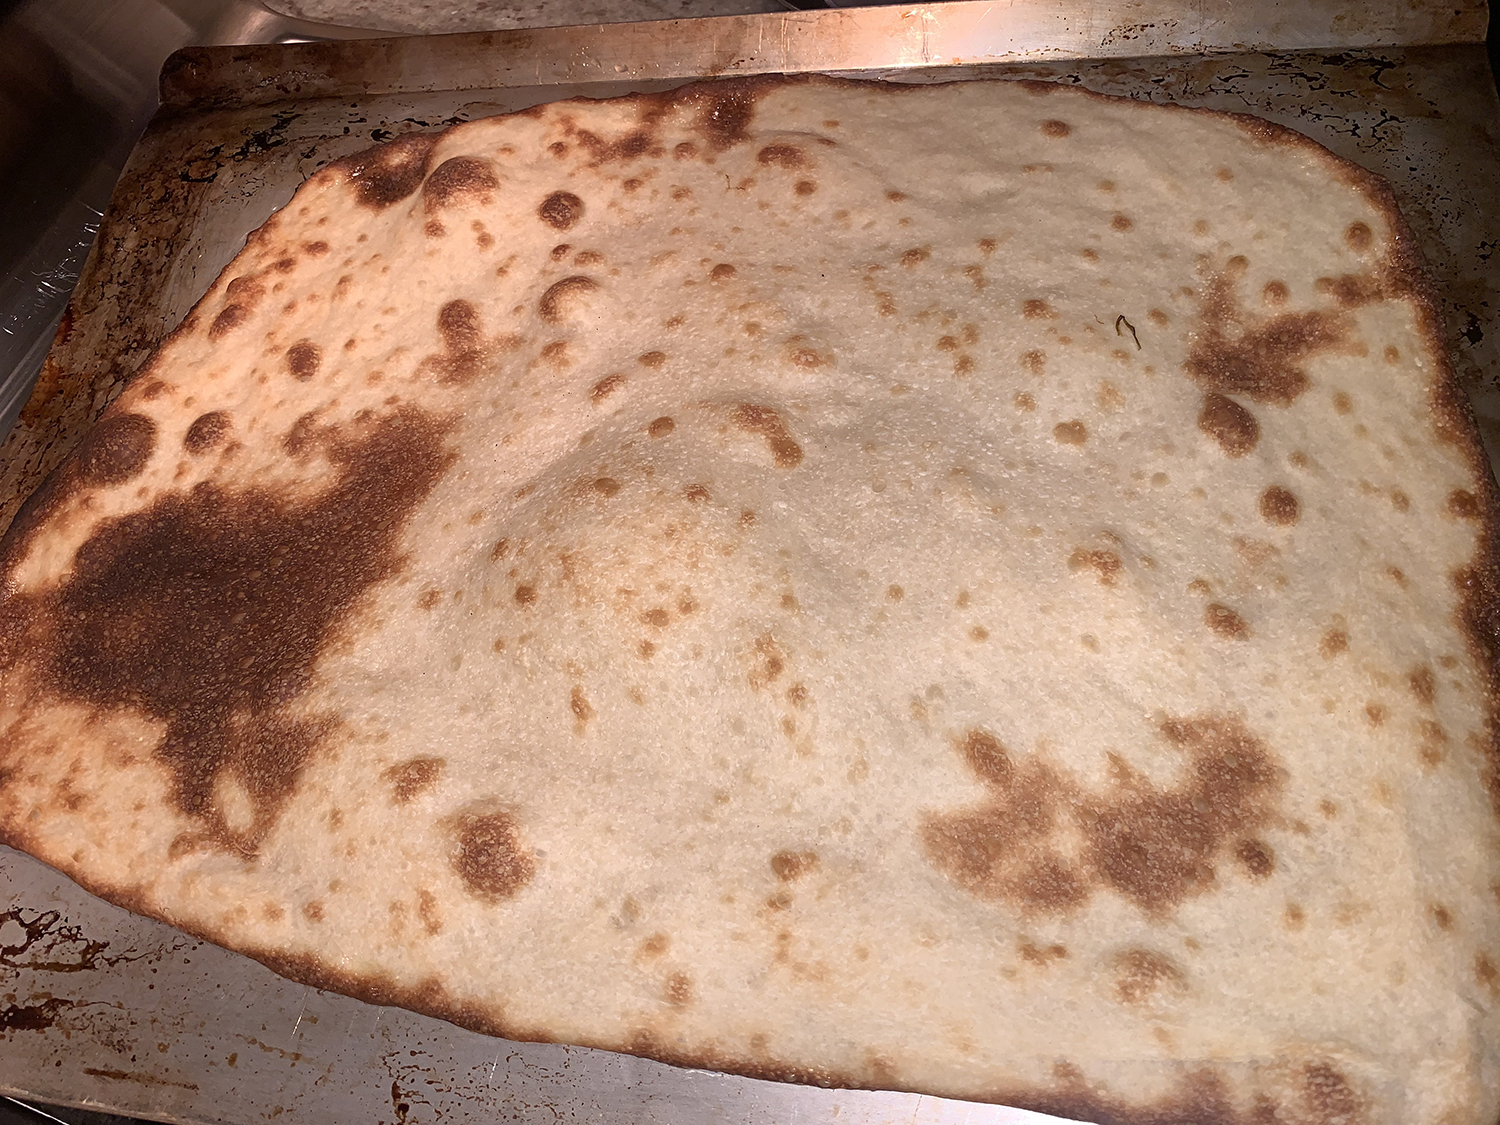
It starts with the pizza dough which we bought at the supermarket, but go ahead and make one if you’re so inclined. The recipe calls for one pound, but ours weighed in at about 2/3 of a pound, which, because we prefer thin crust, was not an issue for us. We just knew we’d have to make a few adjustments.
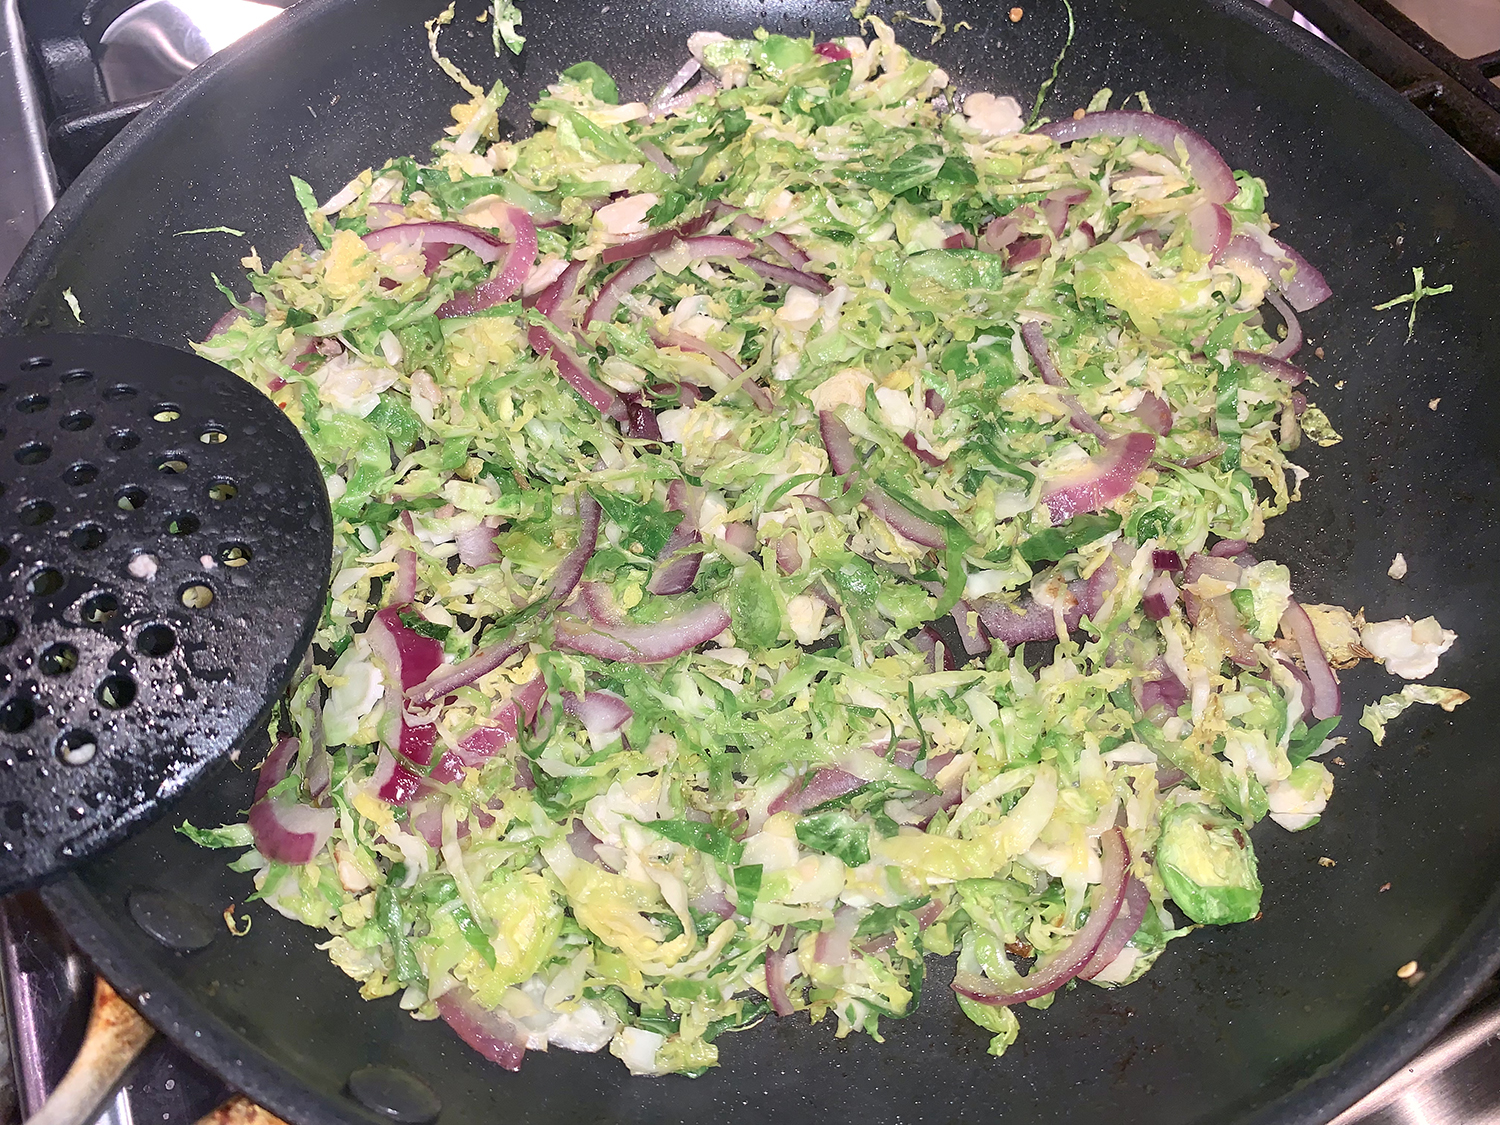
What was bothering me, was putting the veggies slices on the pie without cooking them first. I knew there was no way they’d be tender enough in just a few short minutes in the oven. Therefore I had the brilliant idea to sauté them briefly in the hot sausage fat. Then I returned the cooked sausage to the veggies and kept them all warm while the crust got happy in the oven.
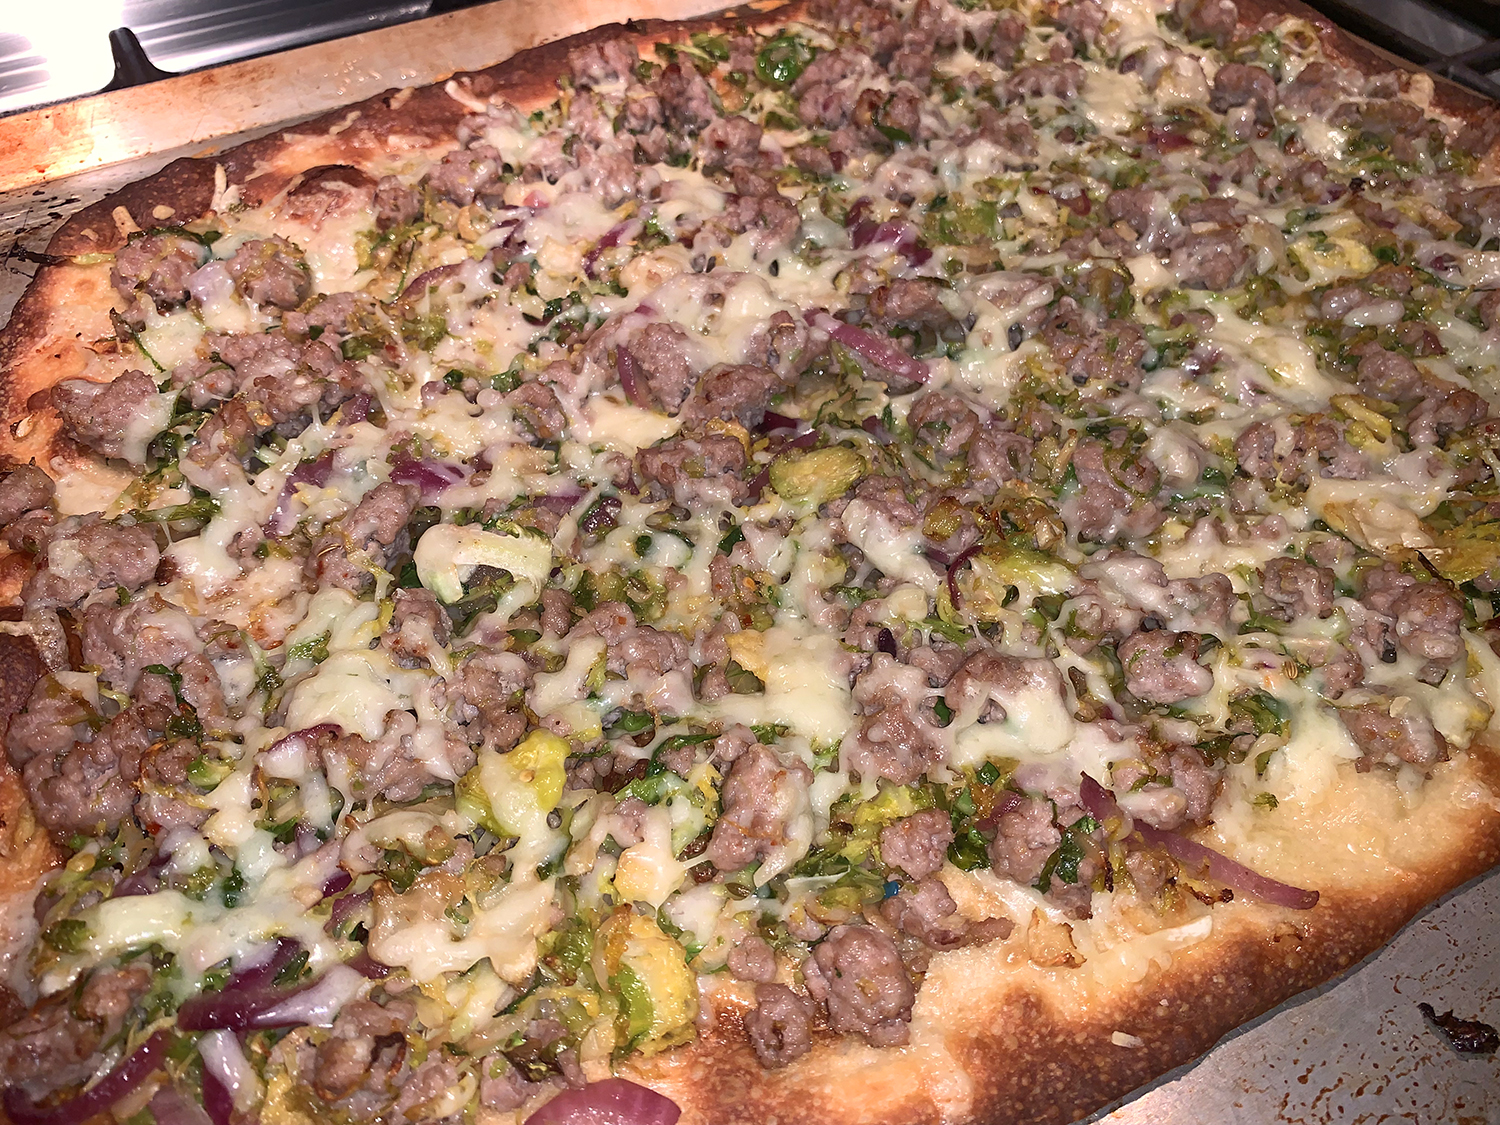
Verdict? It was real good! Now we won’t be so hesitant to think of Brussels sprouts as a pizza topping… Our changes are included in the directions below.
TIP: Sausage can be made ahead and stored in a covered container in the refrigerator for up to 3 days. Make sure to rewarm it before topping the pizza.
Preheat oven to 500°F. Adjust oven rack to lowest position.
Place dough on a well-oiled 17×13-inch baking pan or a 14-inch pizza pan. Press and stretch the dough to the edges of the pan. Let dough rest 5 minutes. If necessary, stretch dough again to cover pan. (This took me several attempts and at least 30 minutes to accomplish.)
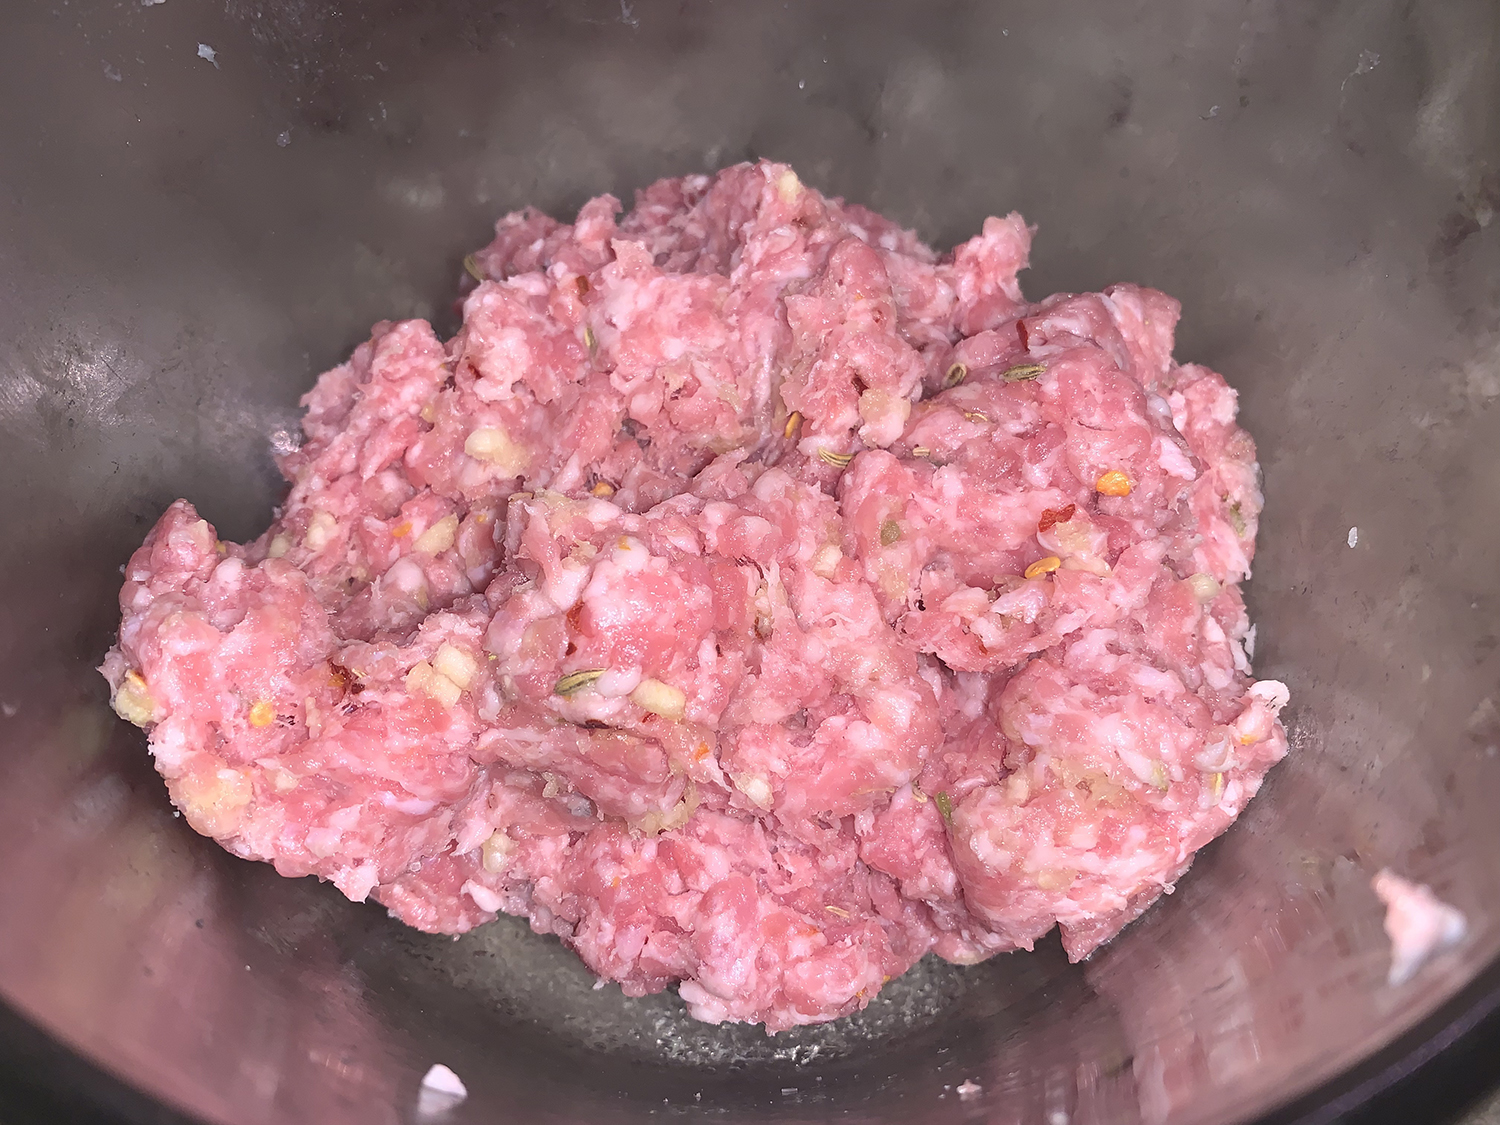
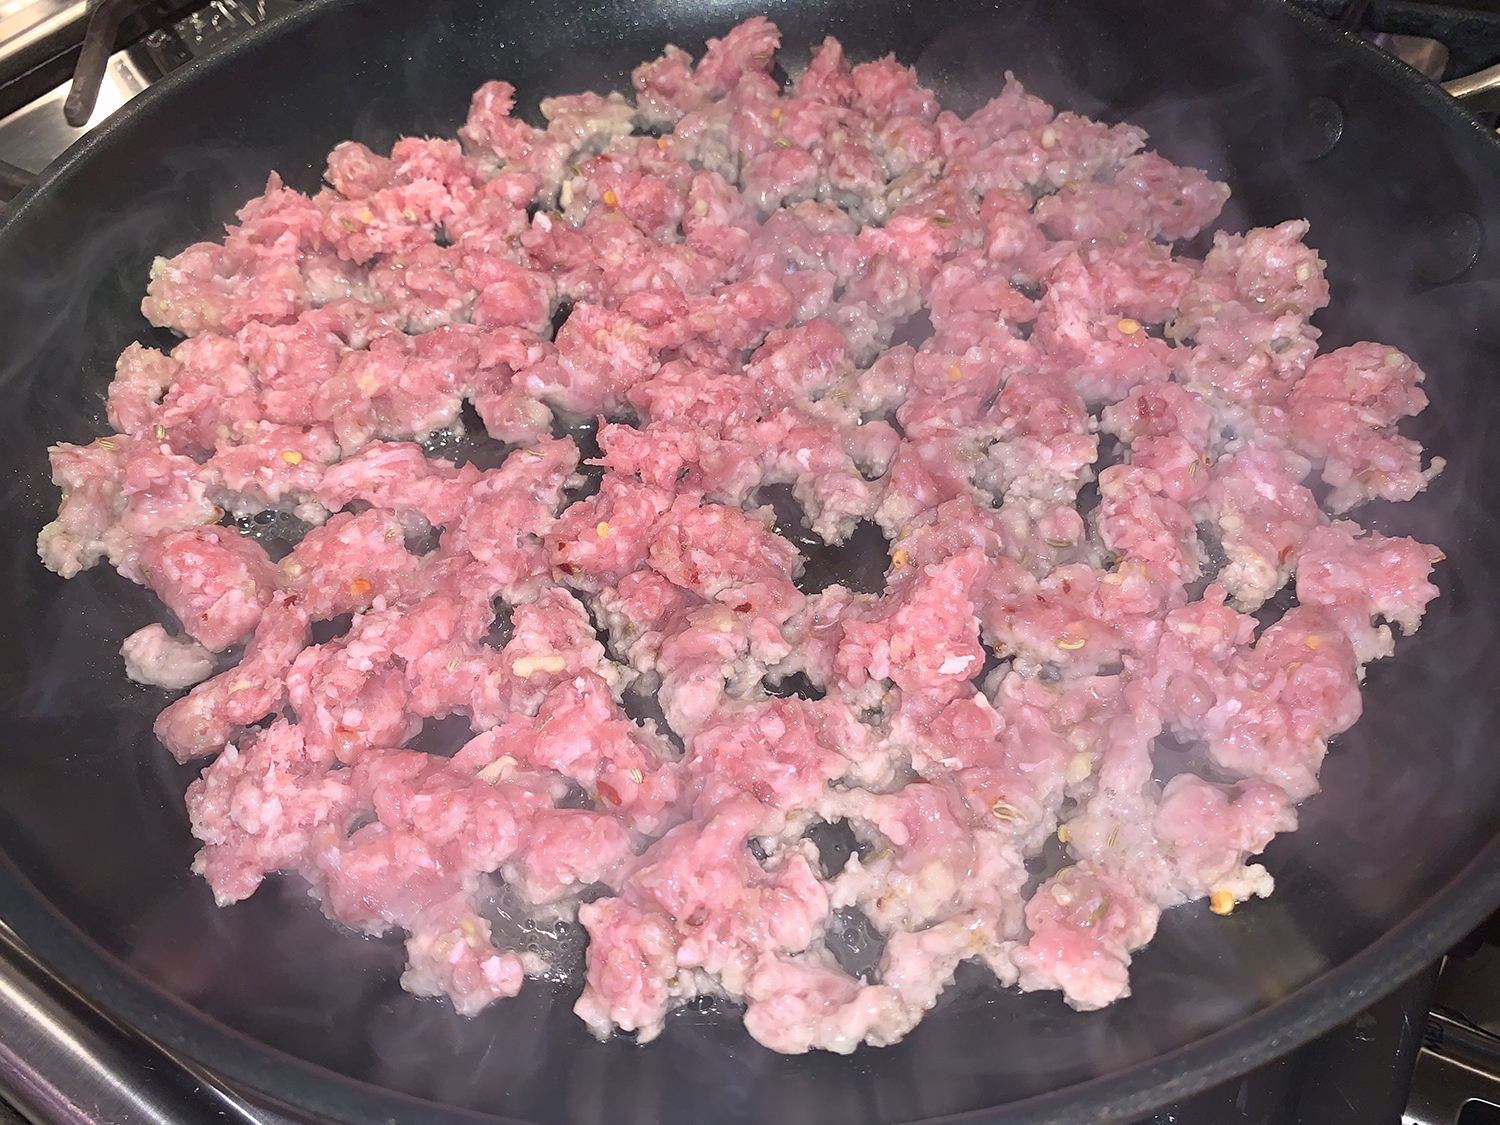
In a large bowl combine pork, fennel seeds, salt, and crushed red pepper. Preheat a large nonstick skillet over medium-high heat. Drop 1/2-inch pieces of meat mixture into the hot skillet. Cook until meat is no longer pink, stirring occasionally.
Meanwhile, trim bottoms from Brussels sprouts and remove any browned outer leaves. Thinly slice the sprouts.
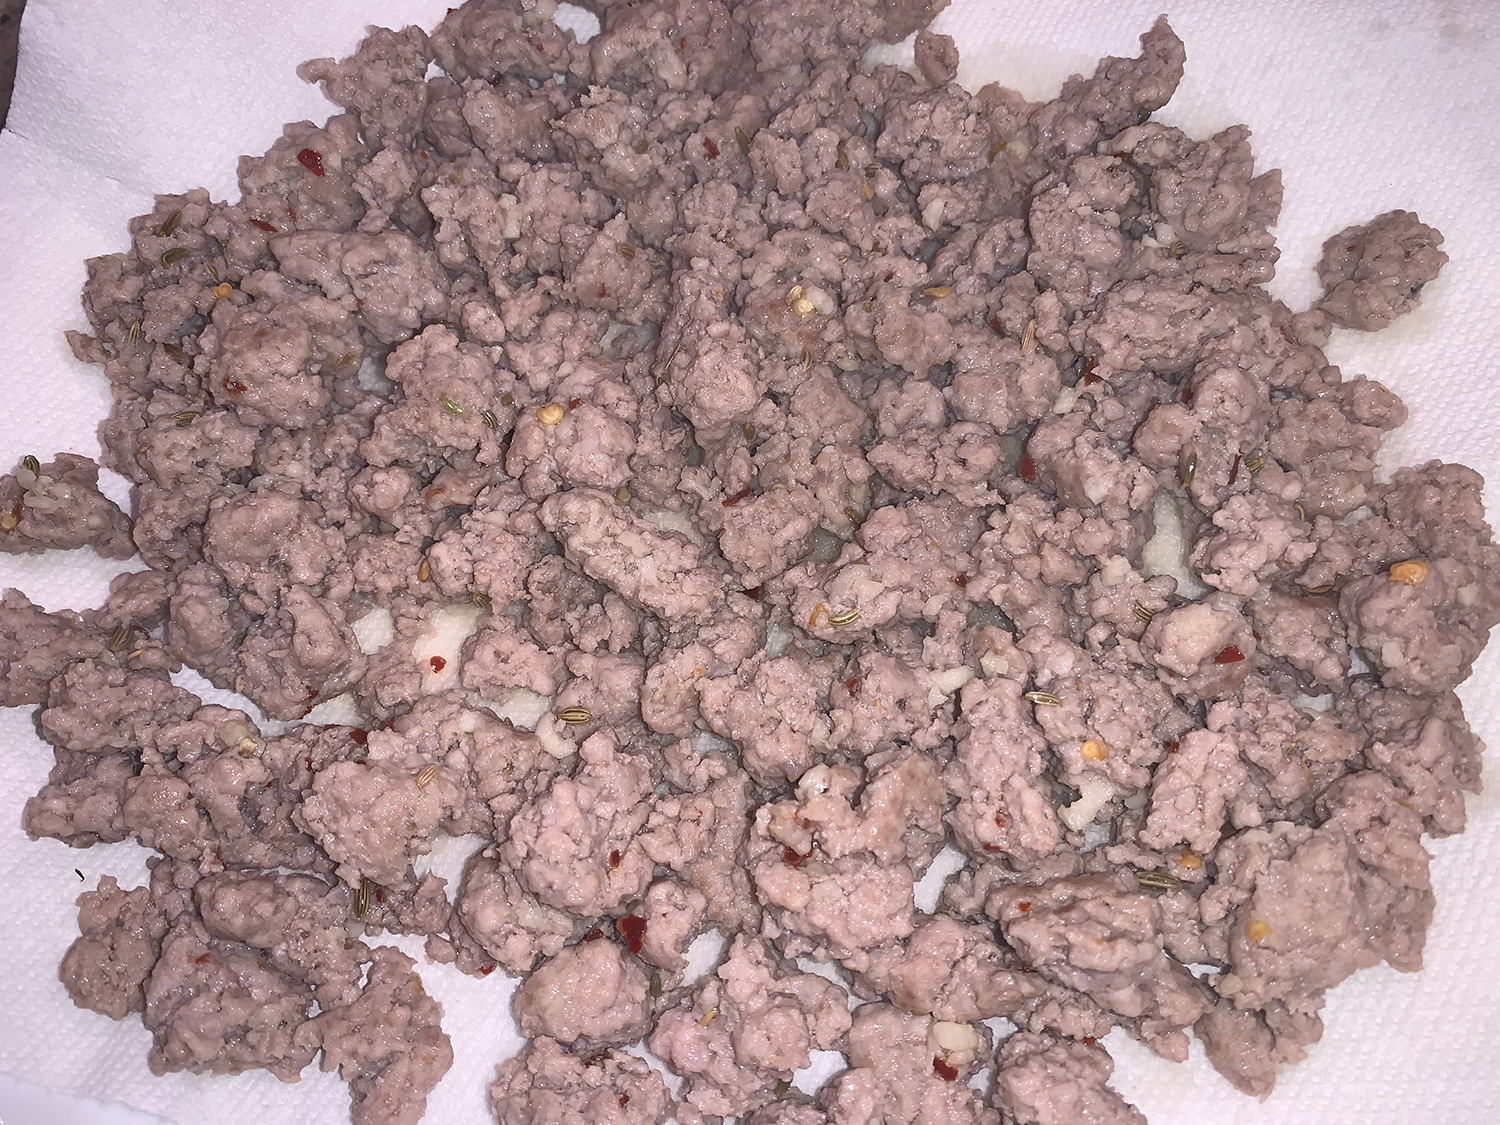
Remove sausage from skillet with a slotted spoon to a paper towel lined plate. Add the Brussels sprouts and onion slices to the hot sausage fat. Cook for several minutes until they begin to soften. Place sausage back into skillet with the veggies, turn the heat to low and keep warm.
Bake the pizza dough on lowest oven rack for 8-10 minutes, until the edges start to brown. Remove crust from oven.
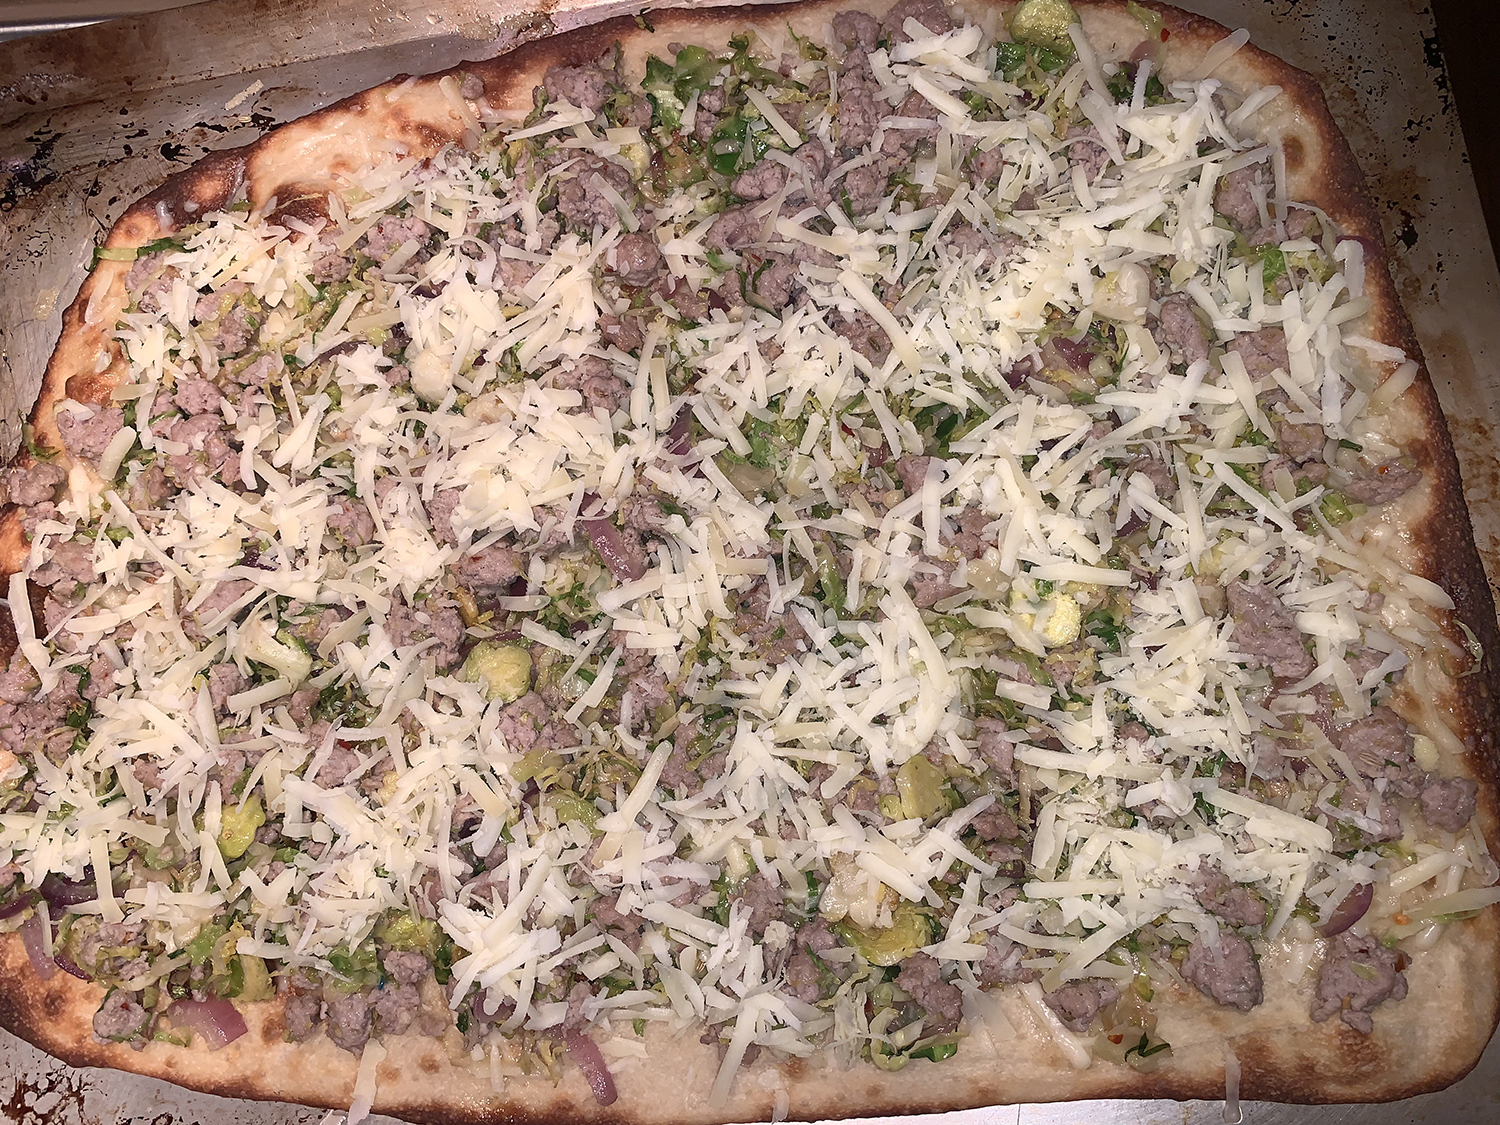
Top with half the cheese, sausage, Brussels sprouts, onion, and garlic. Add the remaining cheese and drizzle with 1 Tbsp. oil. Bake 10 to 12 minutes more or until edges are crisp and toppings are browned, turning pan once to ensure even browning. (Because our crust was so thin, and the toppings were warm when we assembled the pie, our pizza only took 5 minutes.)
If desired, drizzle with additional olive oil before serving.
Turkey Day dinner is not one of those quick throw together meals. It takes plenty of planning, shopping and cooking to make the meal come together, and on time. Hopefully, this posting will help you line up your game plan for the big day so that you’re not sweating it last minute.
How about a Thanksgiving turkey that has more flavor, is juicier, AND cooks in less time? Well, we’ve made this Cook’s Illustrated (CI) version several times and swear it’s the best. CI updated Julia Child’s Stuffed Turkey recipe from her 1989 cookbook, The Way to Cook.
In their version of T-Day turkey, CI brines the breast to keep it juicy and flavorful. Jump-starting the cooking of the breast at 425 degrees decreases the overall cooking time, which also helps the meat retain moisture. And to make even more stuffing, they increase the amount of bread, and swap the sausage for the brighter flavor of dried cranberries (although we omitted them altogether—not my idea.)
For the gravy, we pre-make turkey stock in a pressure cooker using 4 pounds of turkey parts (necks, backs, wings). We get the extra parts from the Amish Farmer ‘s Market where we preorder the fresh turkey. The Hubs procures the extra parts on Tuesday morning when the bird is picked up because those pieces can’t be pre-ordered.
Here’s a schedule I put together several years ago. In it, we made the turkey stock on the Sunday prior, but have since changed that to the Tuesday beforehand when we pick up the bird and the extra turkey parts at the Amish Market. The outline also describes timing details for soup, mashed potatoes, pre-dinner cocktails, squash and green bean sides and pumpkin pie.
You may find this overkill, but even a truncated version removes the guessing game worries and lets you enjoy the day and your company. Start backwards with the time you plan to sit at the dinner table, then work your way up.
One or two days before the big feast, roast the parts on a large rimmed baking sheet in a 450° oven for 35-40 minutes until nicely browned (not necessary to turn). Alternatively, you could brown them directly in the pressure cooker, but it would have to be done in batches because there is only so much room in the bottom of the pot. In the oven, you can spread the pieces out over a rimmed baking sheet, and also roast the veggies (onion, celery, carrot) on another baking sheet all at the same time.
Instead of adding 4 eggs to the stuffing mixture, we only included 3 eggs, but then added 3/4 cup of our turkey stock to ensure it would be moist enough. The amount of ingredients was altered a bit (4 onions instead of 3; 7 celery stalks instead of 6).
CI TIPS: This recipe calls for a natural, unenhanced turkey and requires brining the turkey breast in the refrigerator for 6 to 12 hours before cooking. • If using a self-basting turkey or a kosher turkey, do not brine in step 3 and omit the salt in step 2. • Remove any large pockets of fat from the neck cavity of the bird to ensure that the stuffing doesn’t become greasy. • The bottom of your roasting pan should be 7 to 8 inches from the top of the oven. • Leave the stuffing in a warm oven while the turkey rests. • If you need your oven during this time, you may opt to leave the stirred stuffing in the uncovered roasting pan at room temperature while the turkey rests and then reheat it in a 400-degree oven for 10 minutes before reassembling your turkey.
Last year, son David and fiancée Vikki surprised us with a simple yet elegant and very tasty appetizer: Ricotta Stuffed Dates Wrapped in Bacon. We savored every morsel while sipping a Knob Creek Ginger Sour.
1 (12- to 15-pound) turkey, neck and giblets removed and reserved for gravy
1 tsp. plus 2 tablespoons minced fresh sage
Salt and pepper
4-6 small wooden or metal skewers (to close the deboned thighs)
1 ½ pounds hearty white sandwich bread, cut into 1/2-inch cubes
1 Tbsp. vegetable oil
3 Tbsp. unsalted butter
4 onions, chopped fine
7 celery ribs, minced
3 large eggs, beaten
3/4 cup turkey stock for stuffing, more to make gravy
1/2 cup parsley, chopped
2 Tbsp. fresh thyme, minced
1 1/2 tsp. salt
1 tsp. pepper
Directions
With turkey breast side up, using boning or paring knife, cut through skin around leg quarter where it attaches to breast. Bend leg back to pop leg bone out of socket. Cut through joint to separate leg quarter. Repeat to remove second leg quarter. Working with 1 leg quarter at a time and with skin side down, use tip of knife to cut along sides of thighbone to expose bone, then slide knife under bone to free meat. Without severing skin, cut joint between thigh and leg and remove thighbone. Reserve thighbones for gravy.
Rub interior of each thigh with ½ teaspoon sage, ½ teaspoon salt, and ¼ teaspoon pepper. Truss each thigh closed using wooden skewers and kitchen twine. Place leg quarters on large plate, cover, and refrigerate for 6 to 12 hours.
Using kitchen shears, cut through ribs following vertical line of fat where breast meets back, from tapered end of breast to wing joint. Using your hands, bend back away from breast to pop shoulder joint out of socket. Cut through joint between bones to separate back from breast. Reserve back for gravy. Trim excess fat from breast. Dissolve ¾ cup salt in 6 quarts cold water in large container. Submerge breast in brine, cover, and refrigerate for 6 to 12 hours.
Adjust oven racks to upper-middle and lower-middle positions and heat oven to 300 degrees. Spread bread cubes in even layer on 2 rimmed baking sheets and bake until mostly dry and very lightly browned, 25 to 30 minutes, stirring occasionally during baking. Transfer dried bread to large bowl. Increase oven temperature to 425 degrees.
While bread dries, remove breast from brine and pat dry with paper towels (leave leg quarters in refrigerator). Tuck wings behind back. Brush surface with 2 teaspoons oil. Melt butter in 12-inch nonstick oven-safe skillet over medium heat. Add onions and cook, stirring occasionally, until softened, 10 to 12 minutes. Add celery, remaining 2 tablespoons sage, and 1½ teaspoons pepper; continue to cook until celery is slightly softened, 3 to 5 minutes longer. Transfer vegetables to bowl with bread and wipe out skillet with paper towels. Place turkey breast skin side down in skillet and roast in oven for 30 minutes.
While breast roasts, add eggs to bread mixture and toss to combine. Add parsley, thyme, turkey stock (preferably homemade), salt and pepper to bread mixture. Transfer stuffing to 16 by 13-inch roasting pan and, using rubber spatula, pat stuffing into level 12 by 10-inch rectangle.
Remove breast from oven and, using 2 wads of paper towels, flip breast and place over two-thirds of stuffing. Arrange leg quarters over remaining stuffing and brush with remaining 1 teaspoon oil. Lightly season breast and leg quarters with salt. Tuck any large sections of exposed stuffing under bird so most of stuffing is covered by turkey. Transfer pan to oven and cook for 30 minutes.
Reduce oven temperature to 350 degrees. Continue to roast until thickest part of breast registers 160 to 165 degrees and thickest part of thigh registers 175 to 180 degrees, 40 minutes to 1 hour 20 minutes longer. (Ours took exactly 1 hour to come to temp at this stage.) Transfer breast and leg quarters to cutting board and let rest for 30 minutes. While turkey rests, using metal spatula, stir stuffing well, scraping up any browned bits. Redistribute stuffing over bottom of roasting pan, return to oven, and turn off oven.
Meanwhile, make your gravy the way you like it using the turkey stock, and include any pan drippings to ramp up the flavor.
Before serving, season stuffing with salt and pepper to taste. Mound stuffing in center of platter. Place breast on top of stuffing with point of breast resting on highest part of mound. Remove skewers and twine from leg quarters and place on each side of breast. Carve and serve.
Adapted from a recipe for Cook’s Illustrated “Julia Child’s Stuffed Turkey, Updated”
Dorie Greenspan’s Pancetta Green Beans
Another side dish we often make are these lovely green beans. They are simple, yet festive enough to adorn a holiday table. Blanching the beans a day or so ahead saves time on the big day. Usually, even the pickiest of eaters will eat green beans!
Bring a large pot of salted water to boil, and fill a bowl with ice cubes and cold water. Toss the beans into the boiling water and cook just until crisp-tender, about 5 minutes. Drain, transfer to the ice-water bath, and cool for 2 minutes; drain and pat dry.
Heat a large skillet over medium heat. Add the pancetta and sauté until frizzled and crisp, about 2 minutes. Using a slotted spoon, transfer the pancetta to a plate lined with paper towels and pat dry. Drain all but 1 tbsp of fat from the skillet.
Return the skillet to medium heat and add the butter. When the fat is hot, toss in the beans and cook, stirring until heated through. Remove from heat and drizzle the beans with a little oil. Season with salt and pepper.
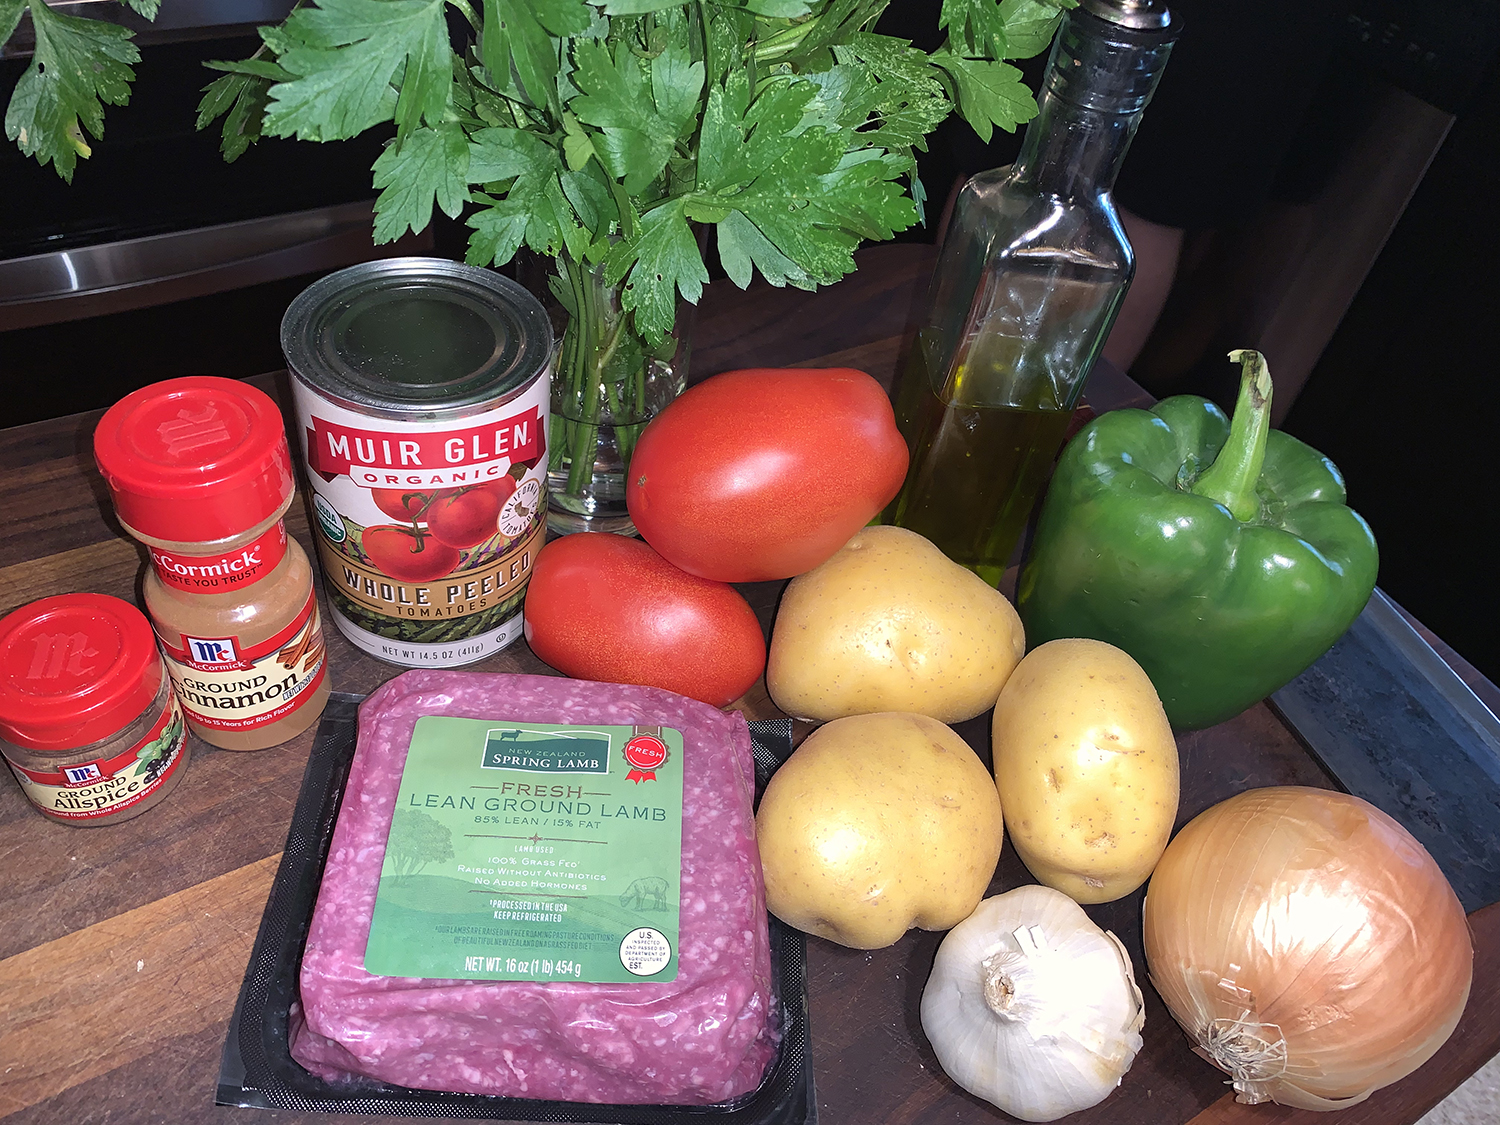
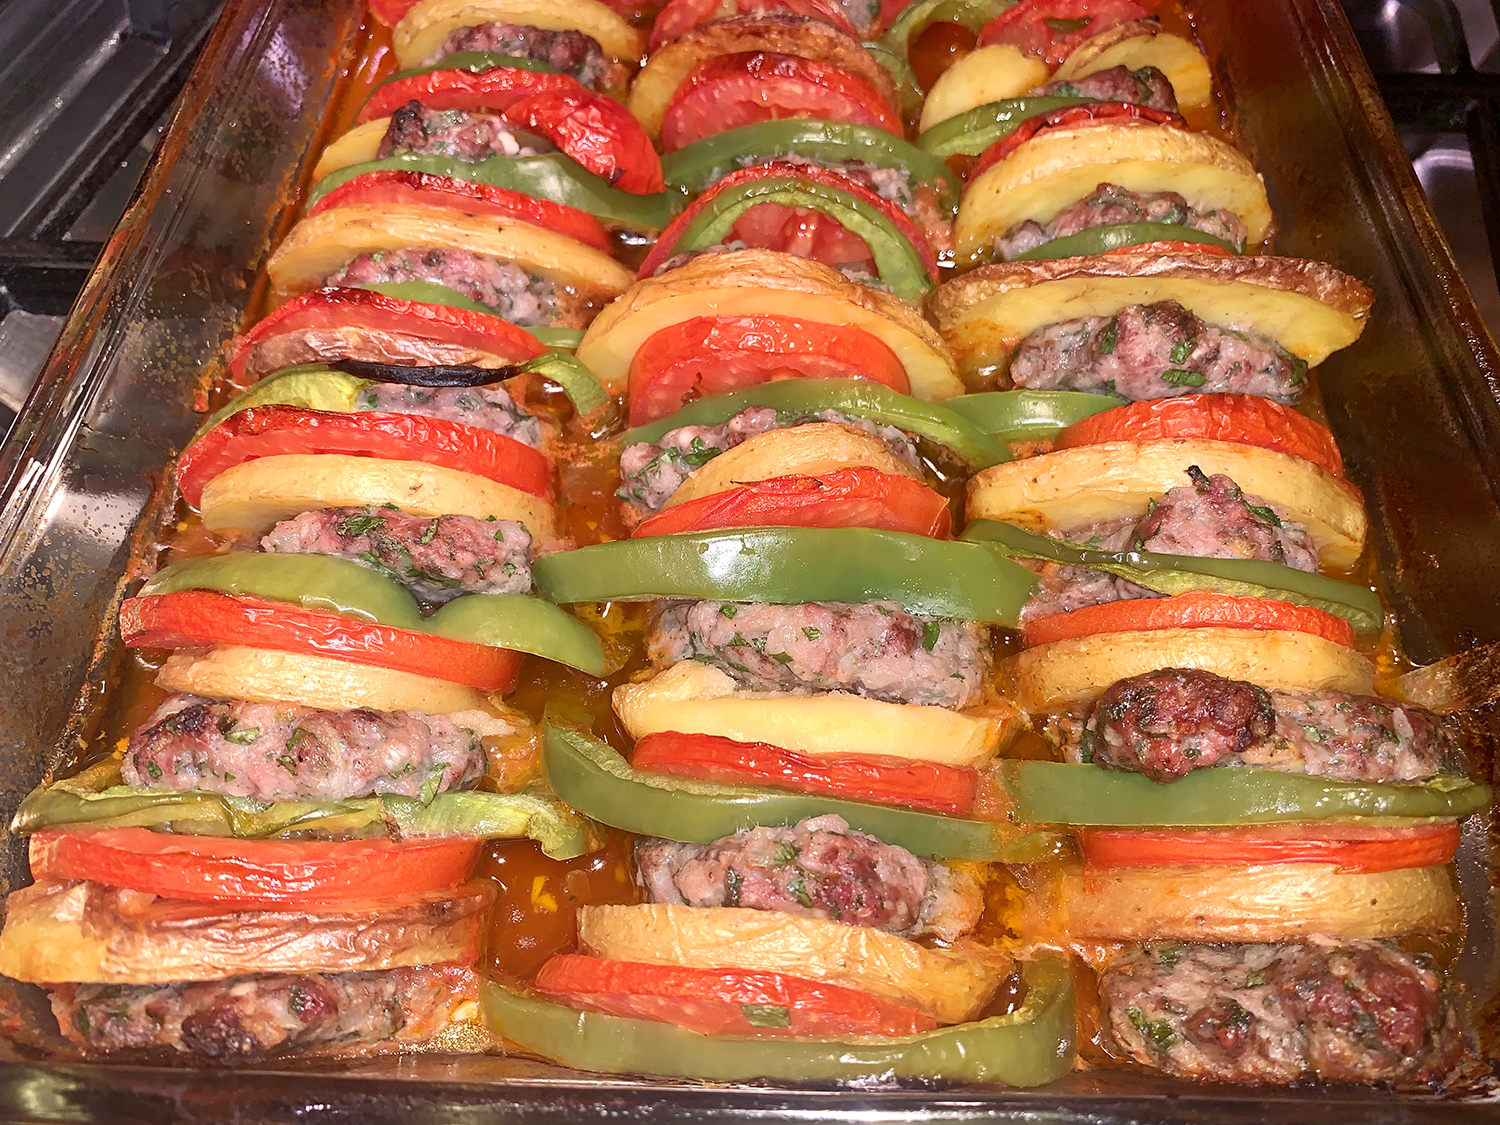
“It’s easy to see why kafta bil sanieh, a casserole, if you will, of sliced potatoes, rounds of tomatoes and flavorful kafta (seasoned meatballs or meat patties), is Lebanese comfort food. The ingredients are shingled into a baking dish and baked until the flavors meld and the textures become deliciously succulent and tender.”
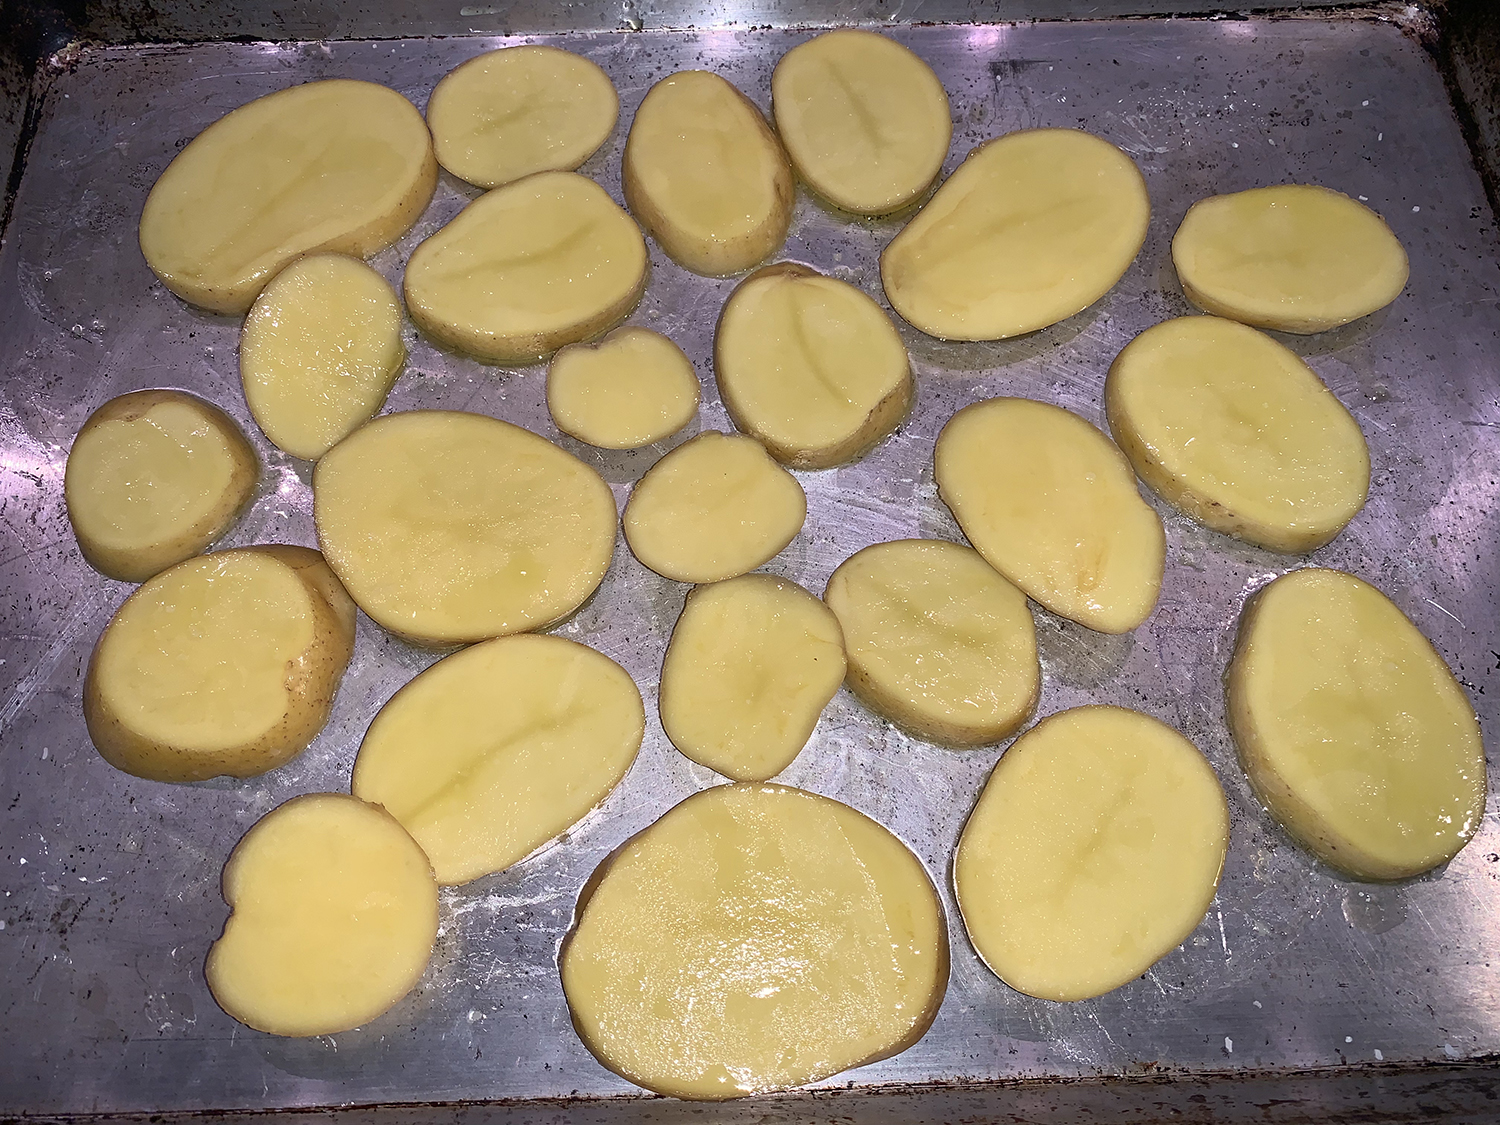
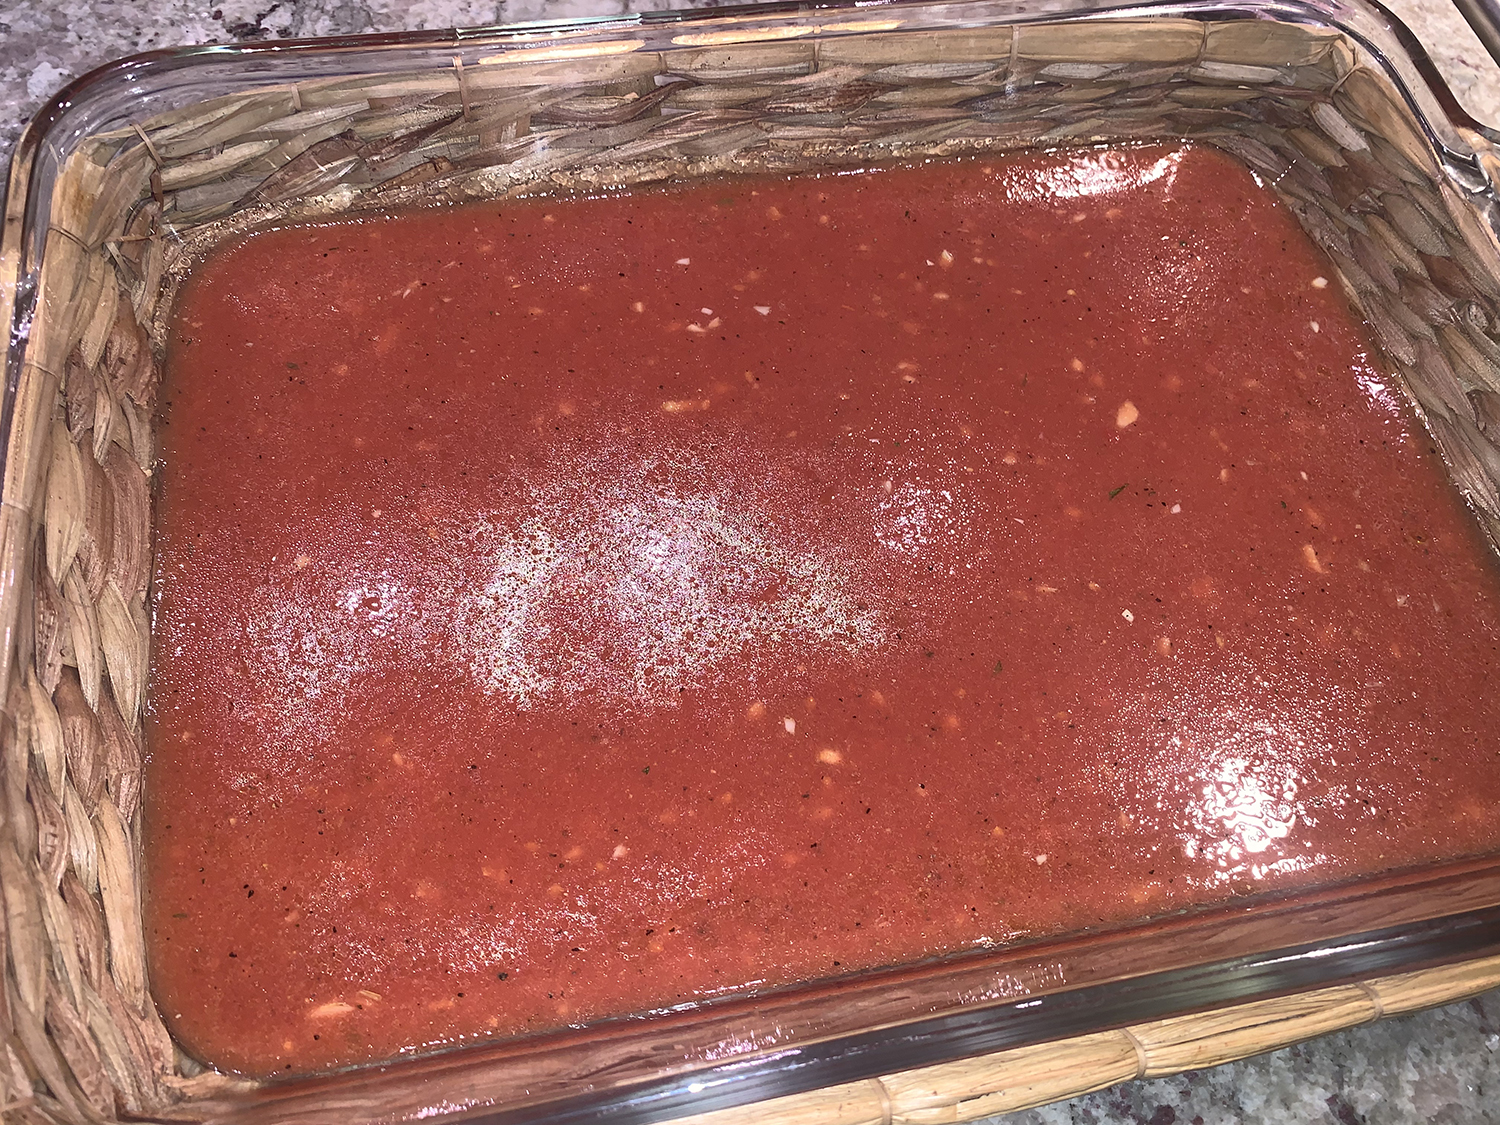
This Milk Street rendition, based on a recipe from “The Palestinian Table” by Reem Kassis, starts with a simple no-cook tomato sauce in the bottom of the baking dish, where juices collect during baking and form a delicious sauce. To ensure the potatoes cook evenly and thoroughly, precook them by roasting them for about 10-15 minutes, enough time to begin making the kafta. If you are squeamish about lamb, use 80 percent lean ground beef instead. You can serve it with rice pilaf, but we did not.
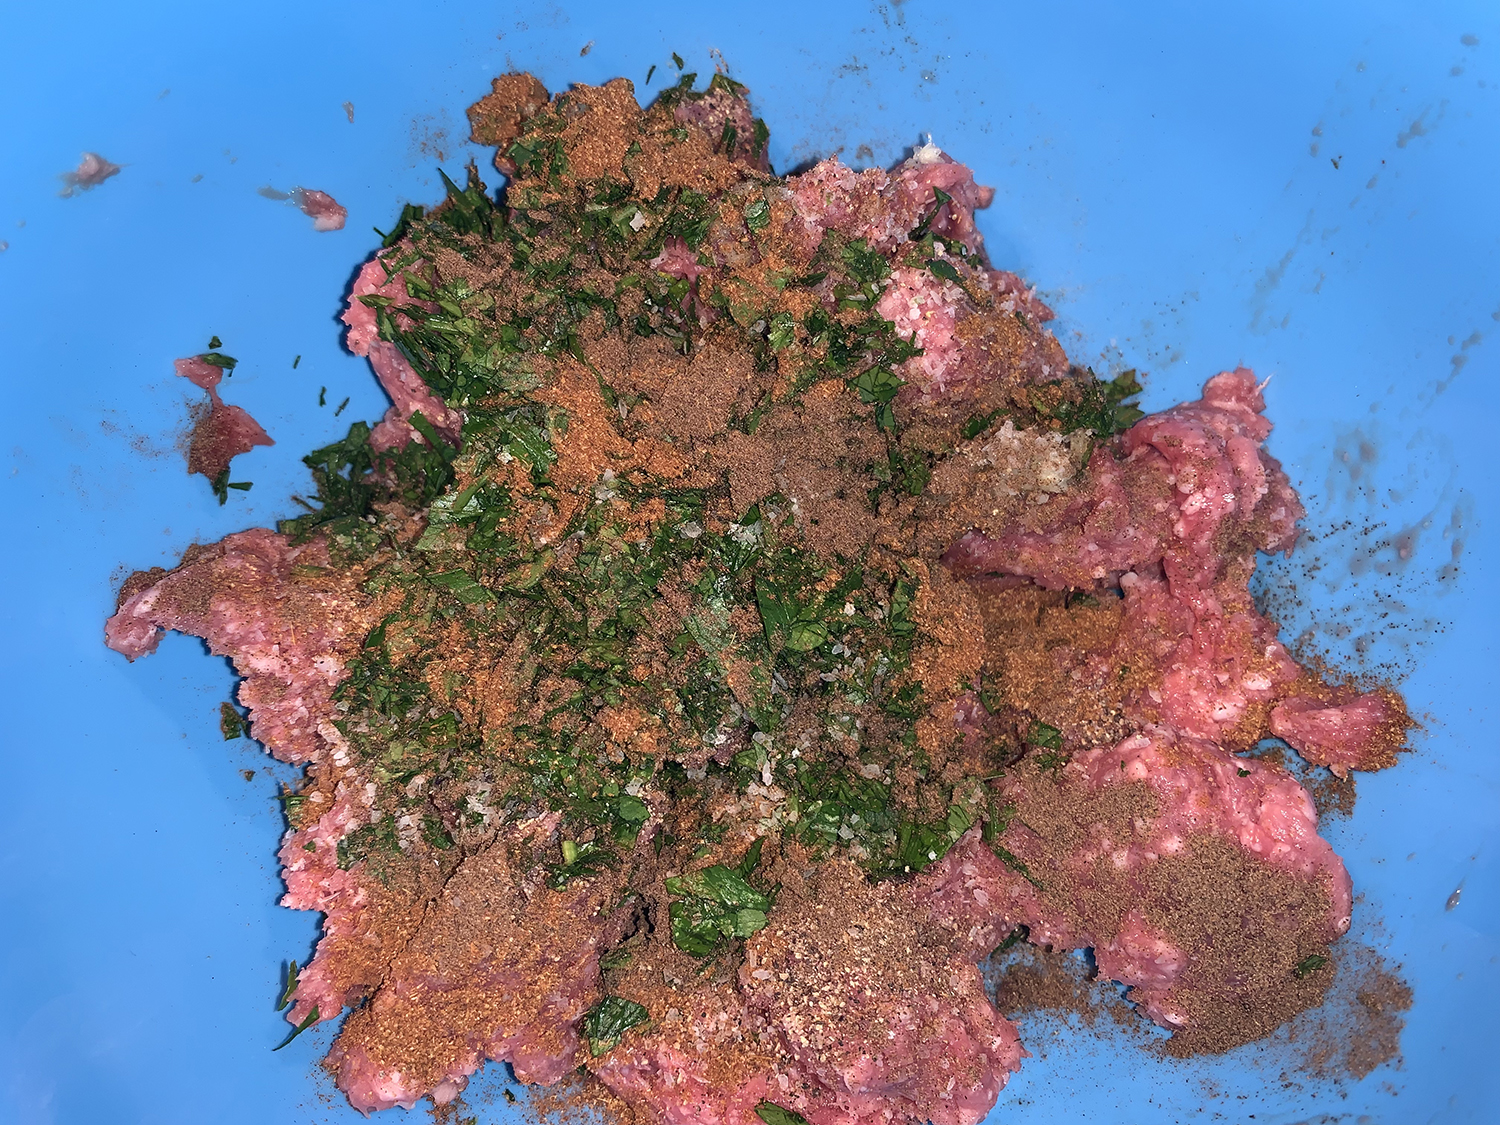
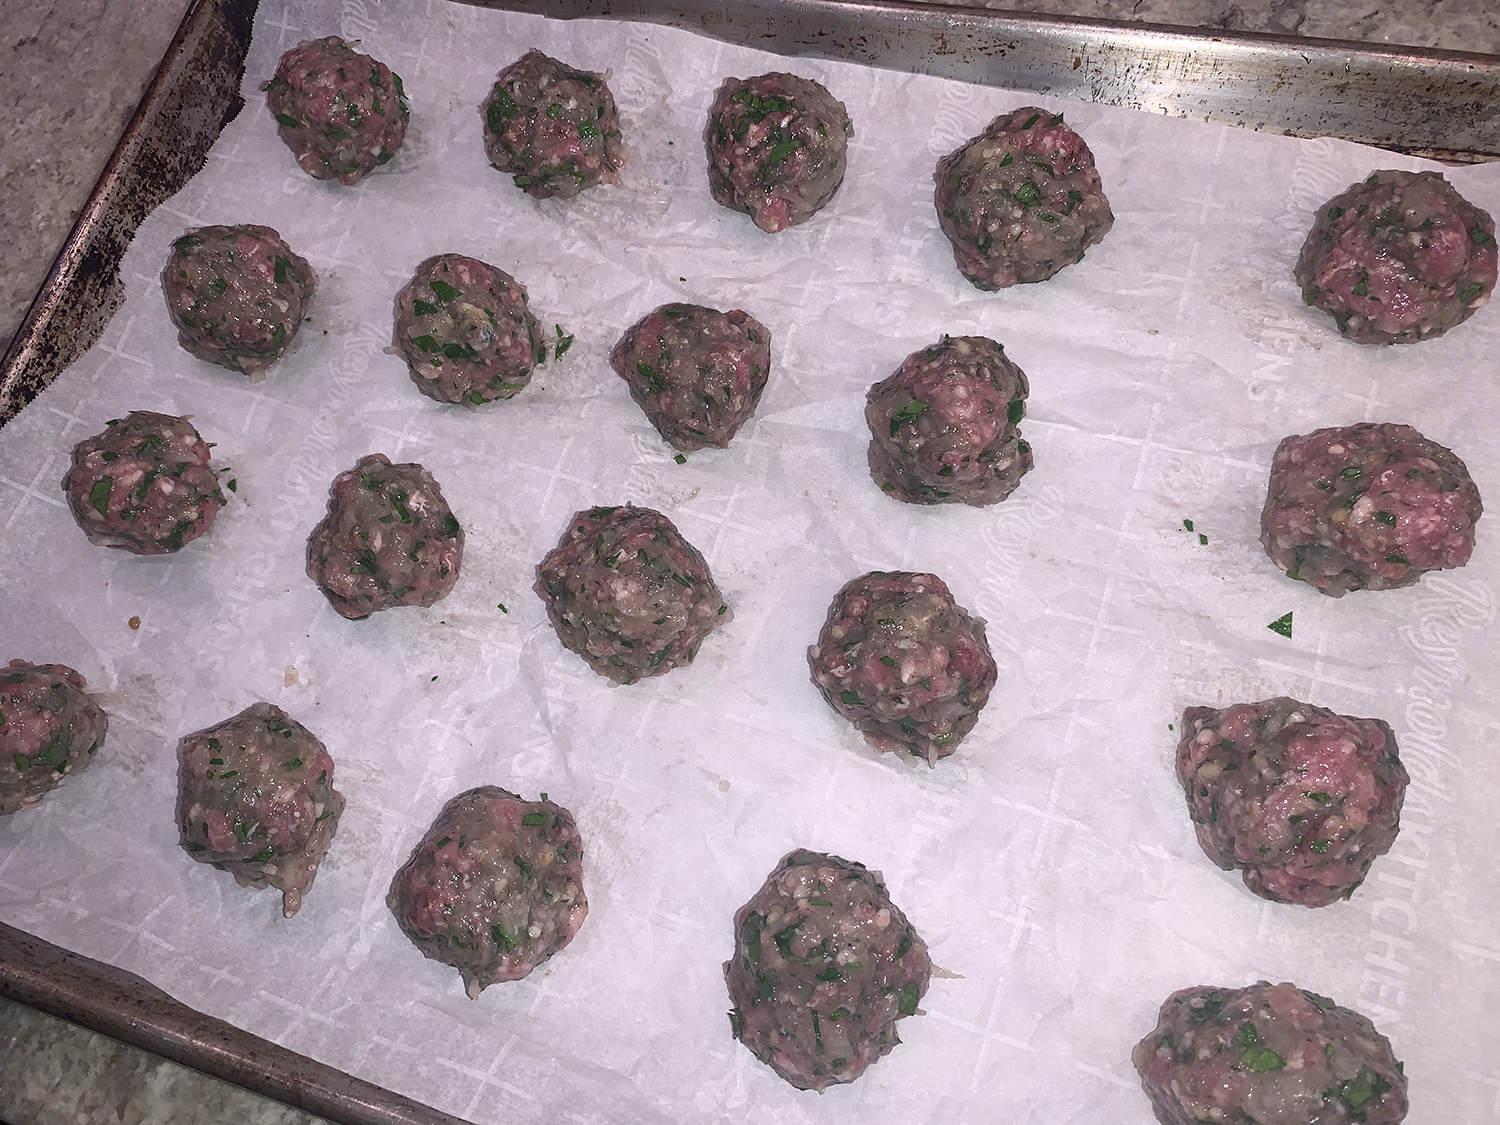
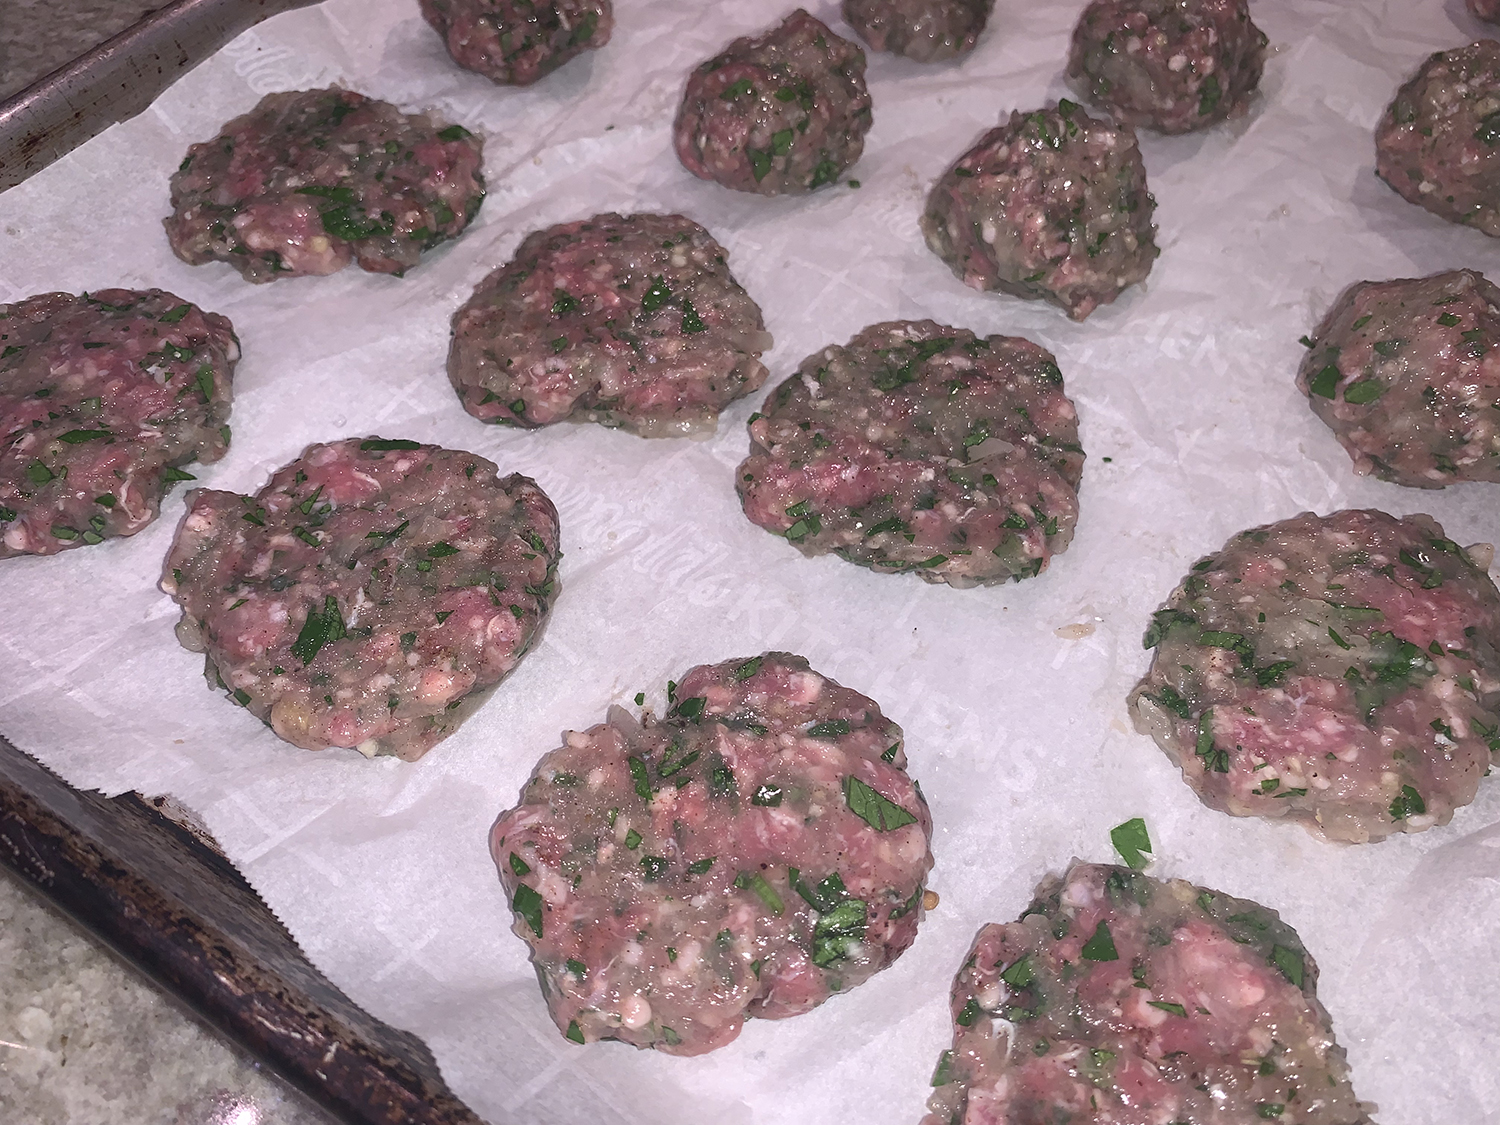
I doubled the garlic, putting half of it in the meat mixture, the other half in the tomato sauce. To press the meat balls into 1/4″ thick discs, I used a flat-bottomed glass that was dipped into cool water between each smashing. Then I put the entire tray into the freezer for 10-15 minutes to firm up while the potatoes cooled. This made it easier for assembly.
Speaking of assembly, it helps to start with uniform sizes for the potatoes, tomatoes and peppers. In the end, there was not enough ingredients to make 3 full rows from front to back in the baking dish, but any left over slices of veggies were just positioned in the back. Unable to buy a small can of crushed tomatoes, we chose whole peeled tomatoes and crushed them with an immersion blender.
1 lb. Yukon Gold potatoes, not peeled, sliced into ¼-inch rounds
2 Tbsp. plus ¼ cup extra-virgin olive oil, divided
Kosher salt and ground black pepper
1 lb. ground lamb or 80 percent lean ground beef
1 medium yellow onion, halved and grated on the large holes of a box grater
1/2 cup finely chopped fresh flat-leaf parsley
1/2 tsp. ground allspice
1/2 tsp. ground cinnamon
14 ½ oz. can crushed tomatoes
4 medium garlic cloves, minced, divided
1 lb. plum tomatoes, cored and sliced into ¼-inch rounds
2 small green bell peppers or Anaheim chili, stemmed, seeded and sliced into thin rings
Directions
Heat the oven to 450°F with a rack in the middle position.
On a rimmed baking sheet, toss the potatoes with 1 tablespoon of oil and ¼ teaspoon salt. Distribute in a single layer and roast without stirring just until a skewer inserted into the potatoes meets no resistance, 10 to 13 minutes (ours took 16 min). Remove from the oven and set aside to cool slightly. Leave the oven on.
While the potatoes cook, line a second baking sheet with kitchen parchment. In a medium bowl, combine the lamb, onion, half the minced garlic, parsley, allspice, cinnamon, ¾ teaspoon salt and ¼ teaspoon pepper. Using your hands, mix gently until just combined; do not over-mix.
Divide the mixture into about 20 golf ball-size portions (1½ to 1¾ inches in diameter) and place on the prepared baking sheet. Flatten each ball into a patty about 2½ inches wide and ¼ inch thick (it’s fine the patties are not perfectly round); set aside until ready to assemble.
In a 9-by-13-inch baking dish, combine the crushed tomatoes, garlic, the ¼ cup oil, ½ teaspoon salt and ¼ teaspoon pepper. Stir well, then distribute in an even layer.
Shingle the potatoes, tomato slices, green pepper rings and meat patties in 3 or 4 rows down the length of the baking dish, alternating the ingredients. Drizzle with the remaining 1 tablespoon oil and sprinkle with pepper.
Bake, uncovered, until the kafta and potatoes are browned and the juices are bubbling, 25 to 35 minutes. Cool for about 10 minutes before serving.
This is a quick-and-easy version of the Spanish tapa known as Fabada Asturiana, a hearty stew of dried beans, sausage and other smoky, porky ingredients. Typically morcilla—which is blood sausage—and pork belly are main ingredients but Milk Street pared back on the meats, using only chorizo and ham, both of which lend deep flavor to the broth.
Once a simple country dish, fabada is now a venerated symbol of the Asturias region of Spain. The dish gets its name from the large beans that are traditionally used in its preparation, but here canned white beans such as cannellinis work well—and save time. No soaking beans or cooking for hours!
Milk Street prefers the relatively large size and creamy texture of cannellinis, but they say great northern and navy beans are fine, too. A pinch (make that a large pinch) of saffron adds a very Spanish flavor and fragrance, while giving the stew an alluring golden hue. Fabada is a hot and heavy dish and for that reason is most commonly eaten during winter, or cool months.
One huge misstep for us was not using our homemade ham stock in place of chicken broth. Either one, it was super tasty, and even better the next day when the flavors had a chance to marry (and go on a honeymoon 😉 )
RULE No. 18: Don’t Let Neutral Ingredients Stand Alone.
8 oz. Spanish chorizo, casings removed, halved and thinly sliced
8 oz. ham steak, cut into ½-inch cubes
1½ qts. ham or chicken broth, preferably homemade
3 15½-z. cans white beans, rinsed and drained
3 bay leaves
4 scallions, thinly sliced
Warmed crusty bread, to serve (optional)
Directions
In a large pot over medium, heat the oil until shimmering. Add the onion, garlic, saffron and ½ teaspoon each salt and pepper. Cook, stirring occasionally, until the onion is slightly softened, 5 to 8 minutes.
Add the chorizo and ham, then cook, stirring, just until the chorizo begins to release its fat, about 1 minute.
Stir in the broth, beans and bay leaves. Bring to a simmer over medium-high, then reduce to medium and cook, stirring occasionally and adjusting heat as needed to maintain a simmer, for 10 to 15 minutes.
Remove and discard the bay leaves, then stir in the scallions. Taste and season with salt and pepper. Serve with bread.
Tip: Don’t overcook the chorizo and ham after adding it to the sautéed onion mixture. If the pieces begin to sear or brown, they’ll be chewy and rubbery in the finished dish. Cook only until the chorizo begins to release some of its fat.
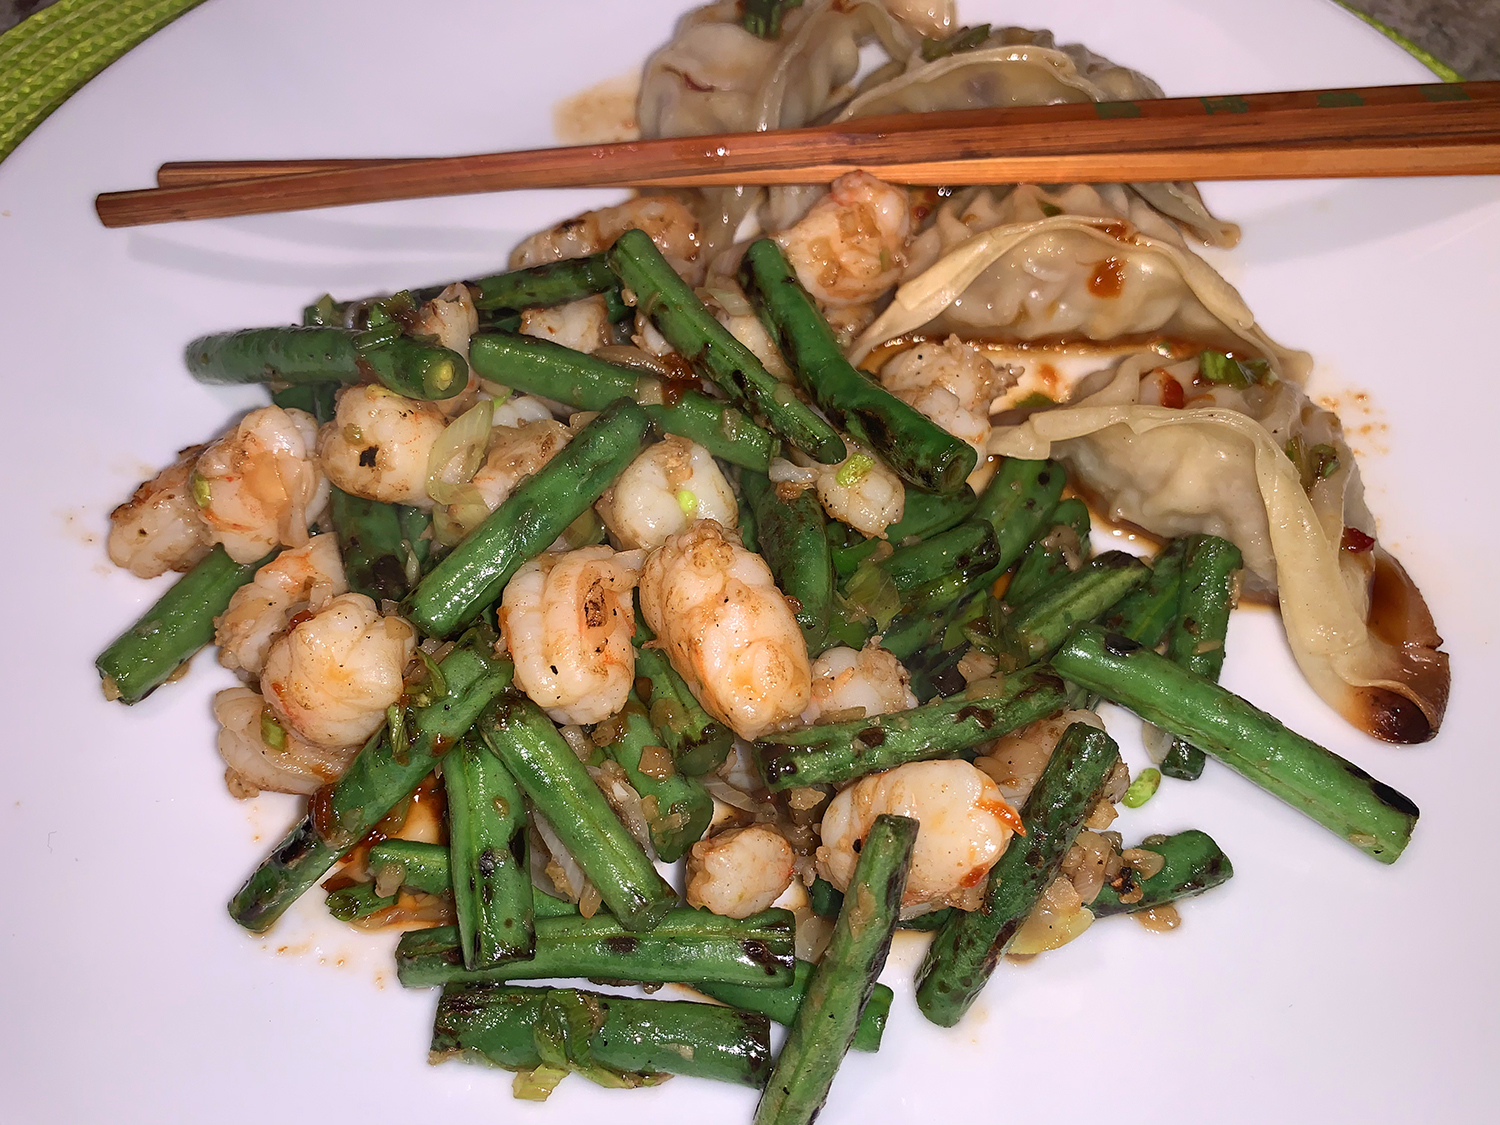
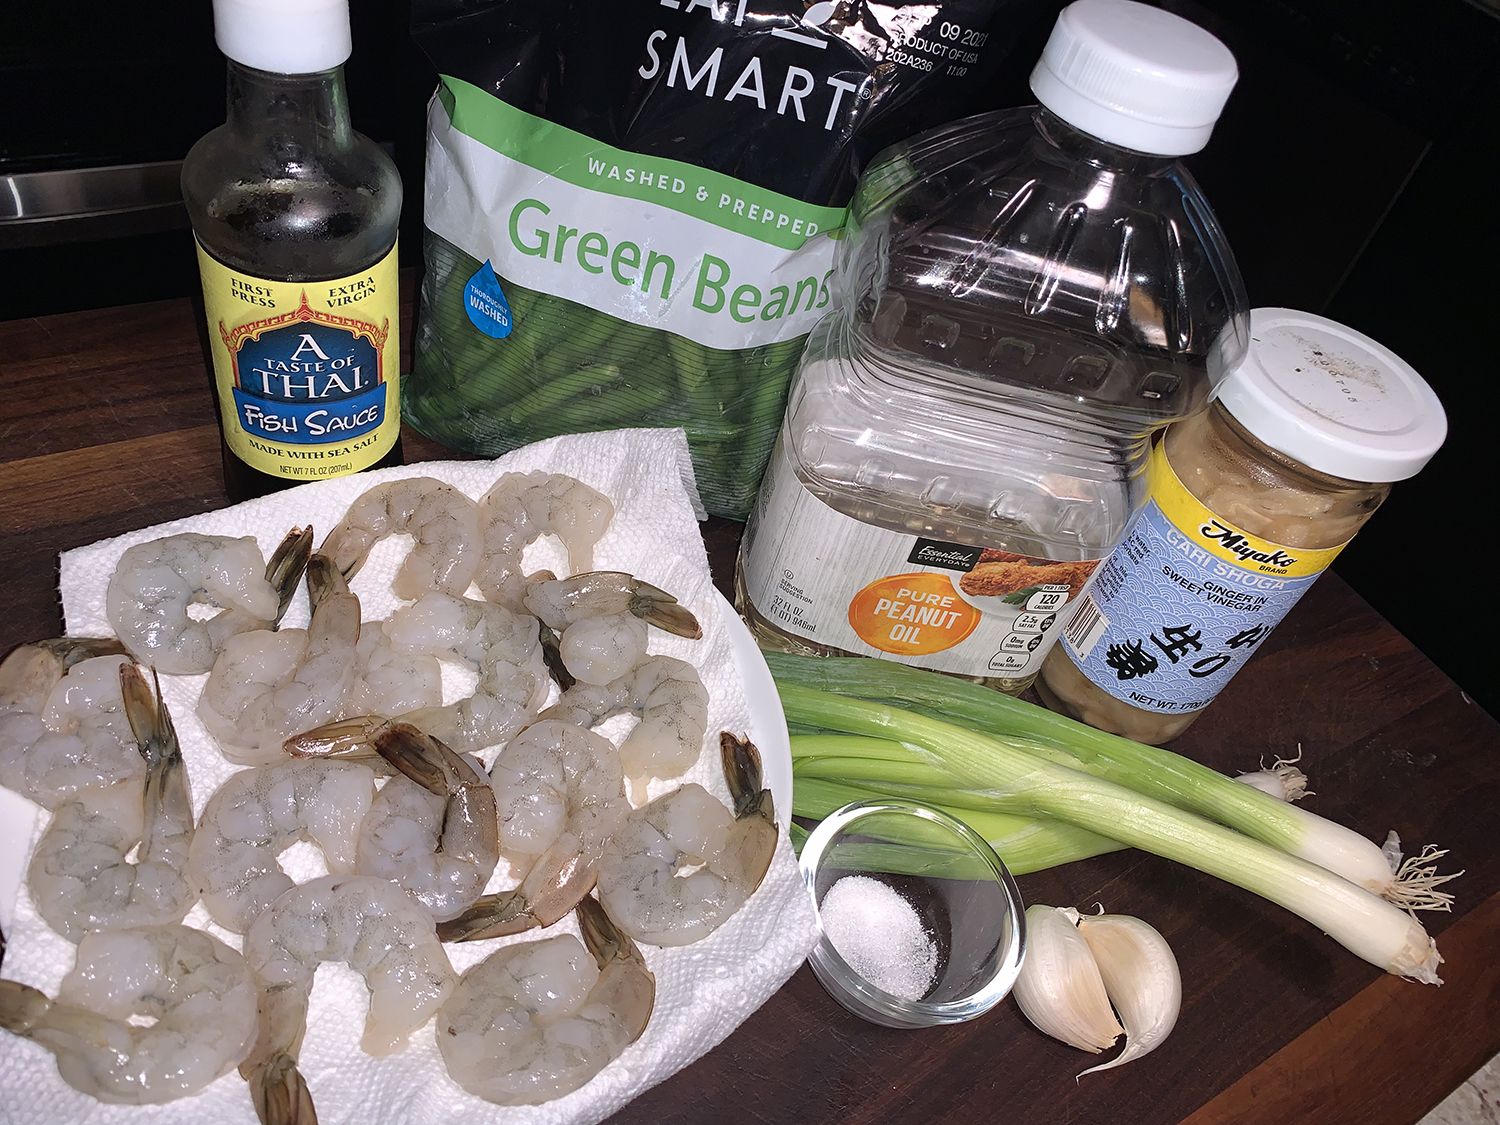
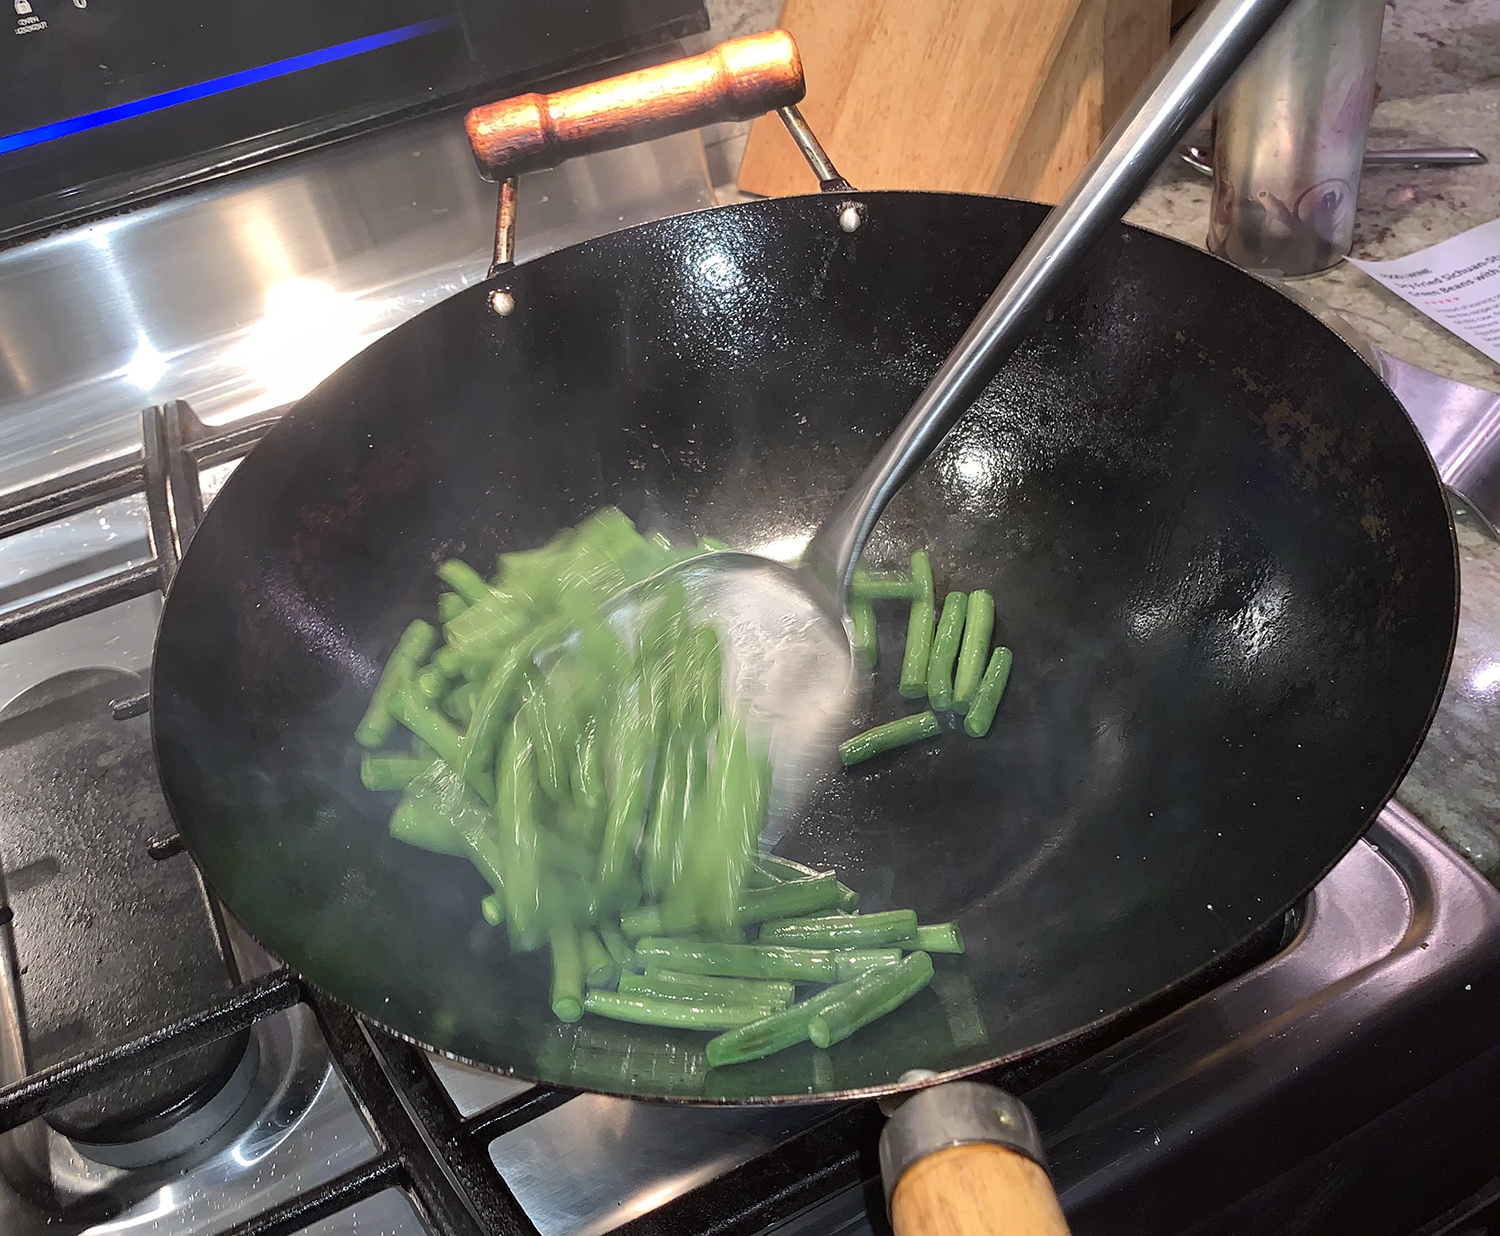
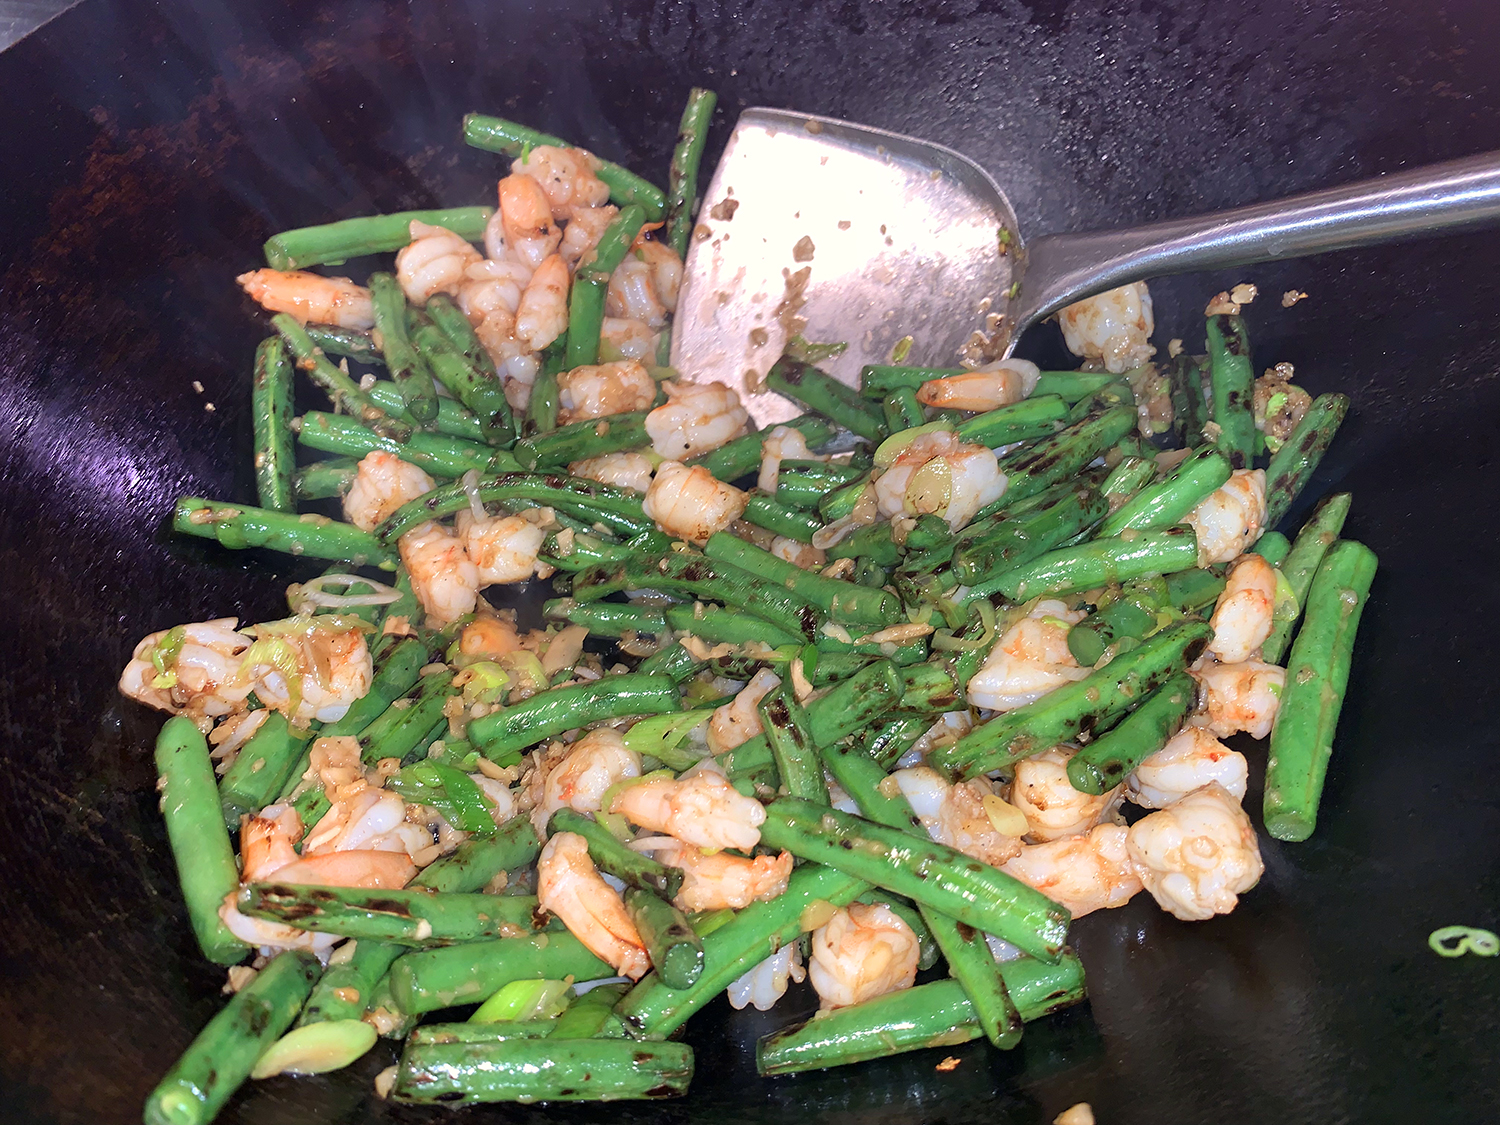
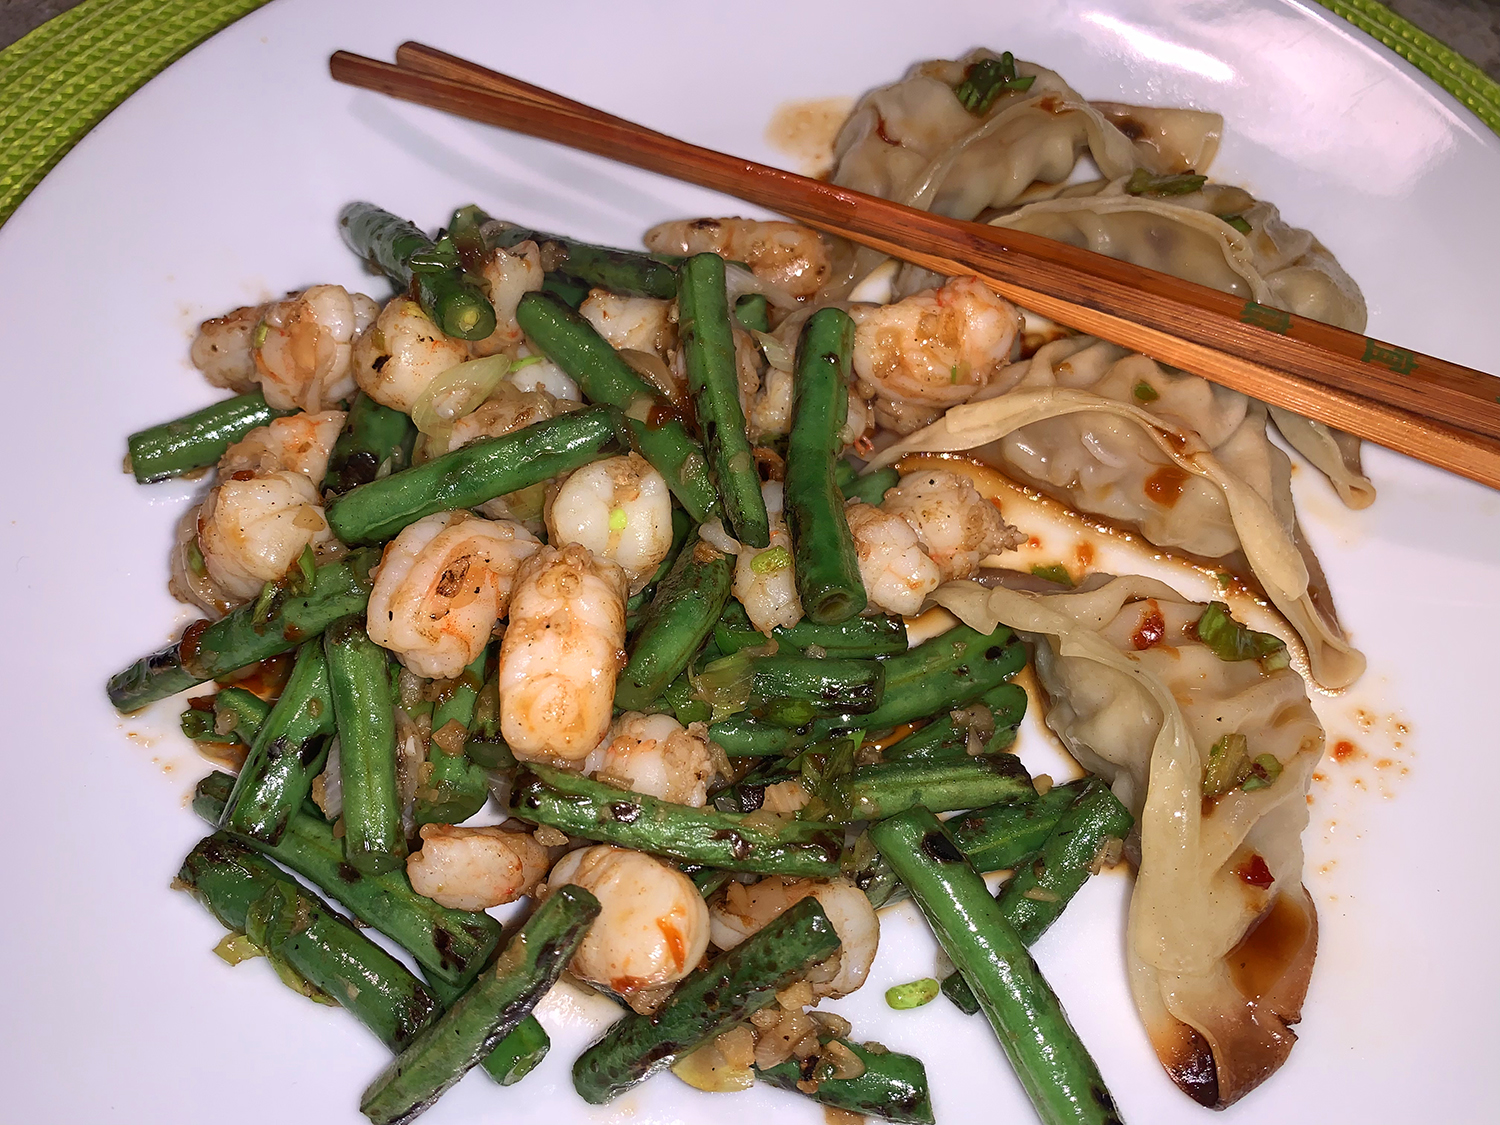
Instead of leaning on a sauce, “dry” stir-fries like this recipe use a small amount of liquid (in this case, fish sauce), relying on heat and movement in the wok to intensify each ingredient’s flavors. To ensure that the beans blister, dry them thoroughly with a kitchen towel before cooking. Pickled sushi ginger adds mild, well-balanced sweetness and a hint of spice.
Where we took fault with this recipe as written, were the quantities. There is no way only 6 shrimp and the remaining ingredients would serve four adult portions, no way! So we doubled the shrimp from 6 to 12, and that amplified the volume enough for two decent servings. Those changes are noted in the recipe below.
Since this sauce-less dry-fry wouldn’t necessarily require a bed of rice, we opted for pan-fried dumplings. Trader Joe’s has a nice selection and we just happen to have some in our freezer. Russ whipped up a simple, yet tasty, dumpling dipping sauce (recipe below), and dinner done!
8 oz. peeled and deveined raw large shrimp (about 12 shrimp)
2 Tbsp. peanut oil or vegetable oil, divided
12 oz. green beans, trimmed and cut into 2-inch pieces (about 3 cups)
¼ tsp. kosher salt
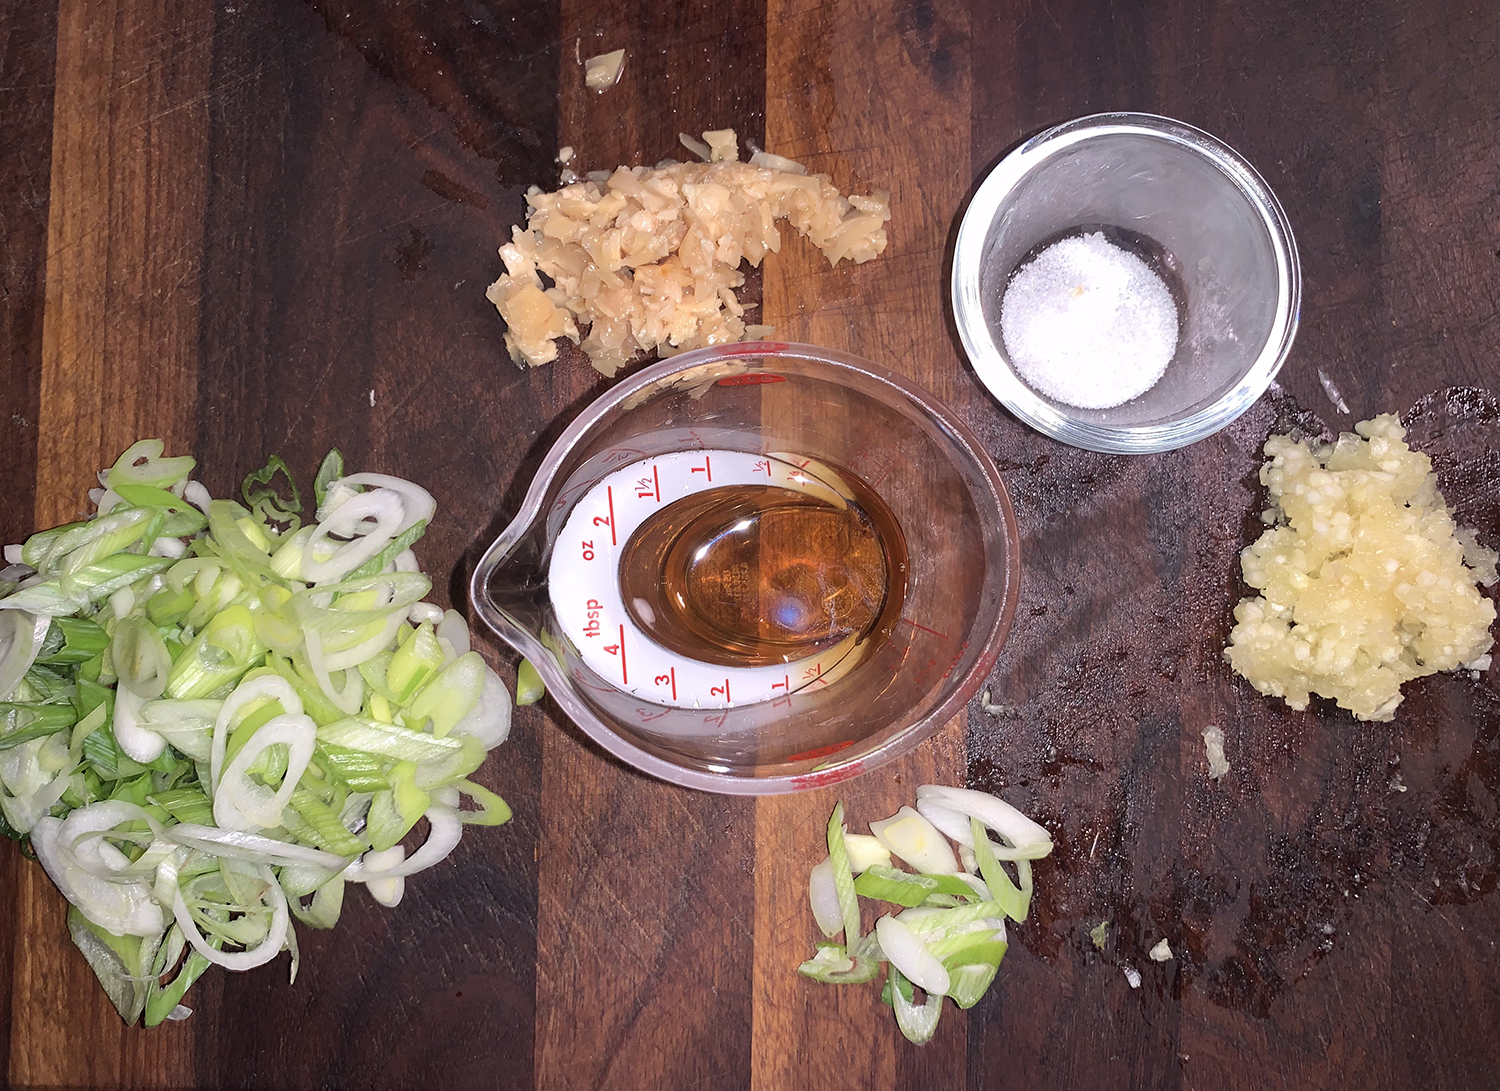
1 Tbsp. minced garlic
¼ cup thinly sliced scallions
1Tbsp. fish sauce
1 Tbsp. yellow pickled ginger, minced
¼ tsp. granulated sugar
Directions
Pat shrimp dry using paper towels. Chop shrimp into 1/2-inch pieces; set aside.
Heat a 14-inch flat-bottomed wok or 12-inch skillet over high until a drop of water evaporates within 1 to 2 seconds of contact. Swirl in 1 tablespoon oil. Add beans, and sprinkle with salt; reduce heat to medium-low so that beans are barely sizzling.
Cook, making quick scooping motions with a metal spatula, constantly tossing and tumbling (stir-frying) the beans until they just begin to blister and brown in spots and are almost tender, 3 to 6 minutes. Transfer beans to a plate.
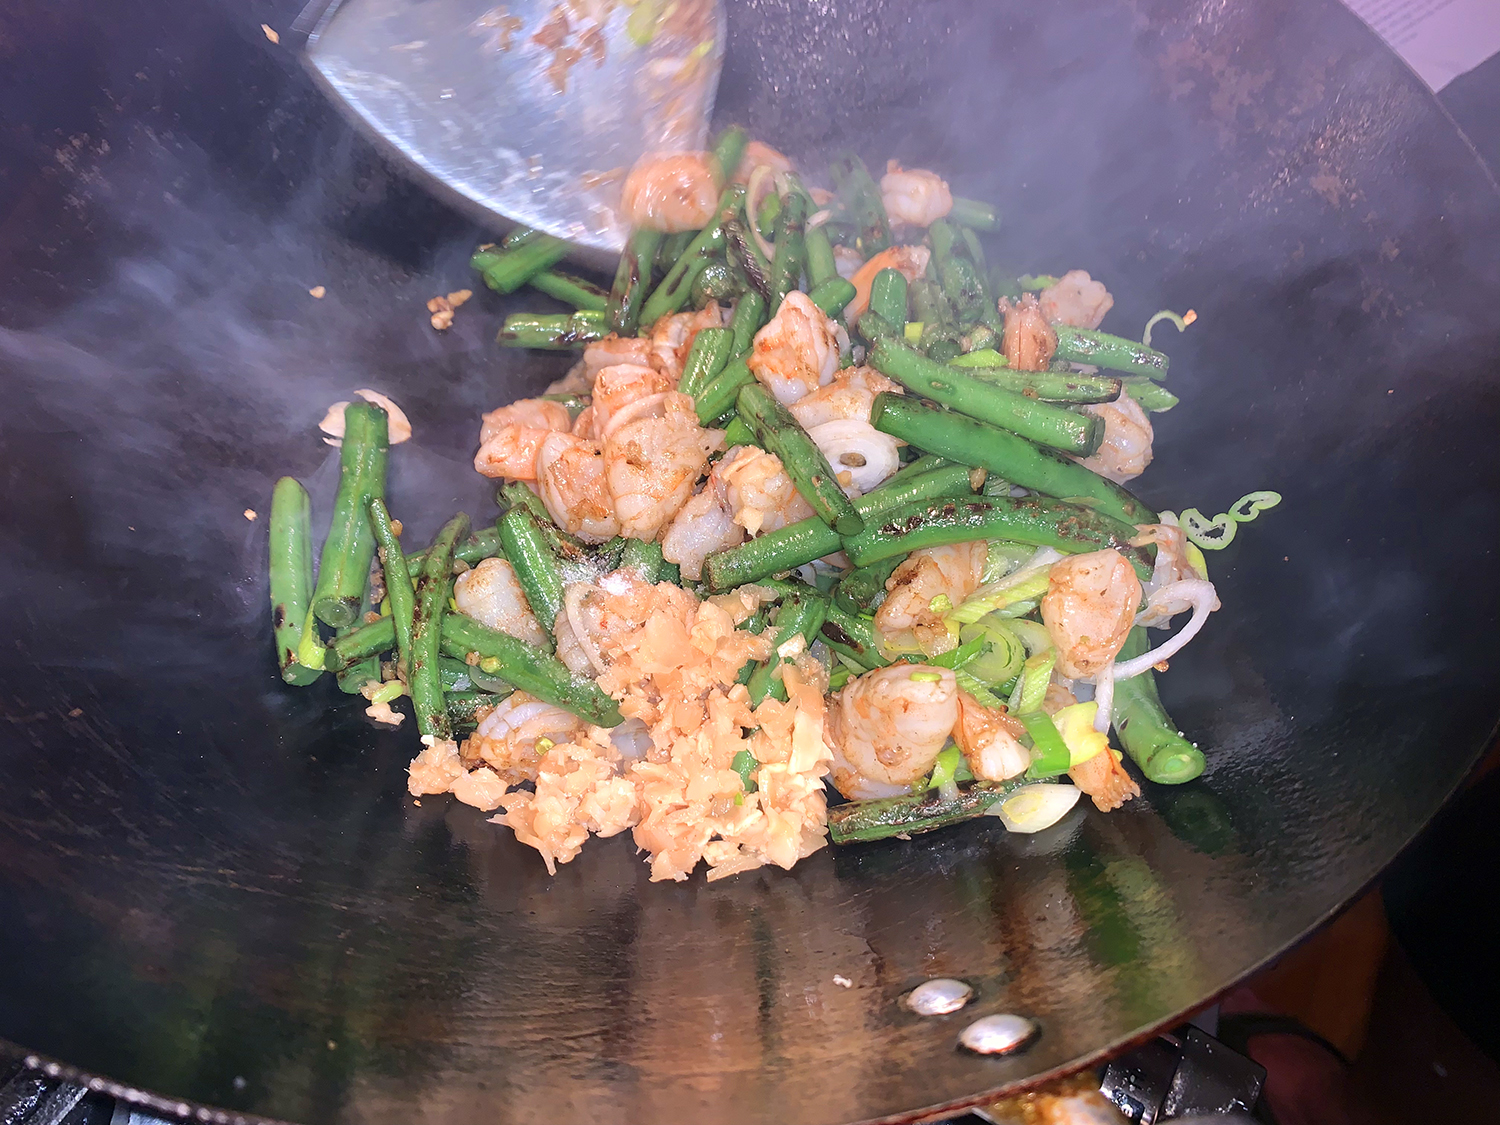
Increase heat under wok to high, and swirl in remaining 1 tablespoon oil. Add garlic; cook, stir-frying constantly, until fragrant, about 10 seconds.
Add chopped shrimp, and break up any clumps using a metal spatula; cook, stir-frying constantly, until shrimp just take on an orange-pink hue, about 1 minute.
Return beans to wok, and add scallions, fish sauce, pickled ginger, and sugar; cook, stir-frying constantly, until shrimp are just cooked through and beans are tender, 30 seconds to 1 minute.
This easy, flavorful dipping sauce is the perfect condiment for a range of homemade or store-bought dumplings. It can be refrigerated for up to 3 days.
Ingredients
½ cup soy sauce
½ cup rice vinegar
1 Tbsp. Chinese chile garlic sauce
1 tsp. toasted sesame oil
1 Tbsp. chopped scallion slices
Directions
In a small bowl, whisk the soy sauce with the rice vinegar, chile-garlic sauce and sesame oil.
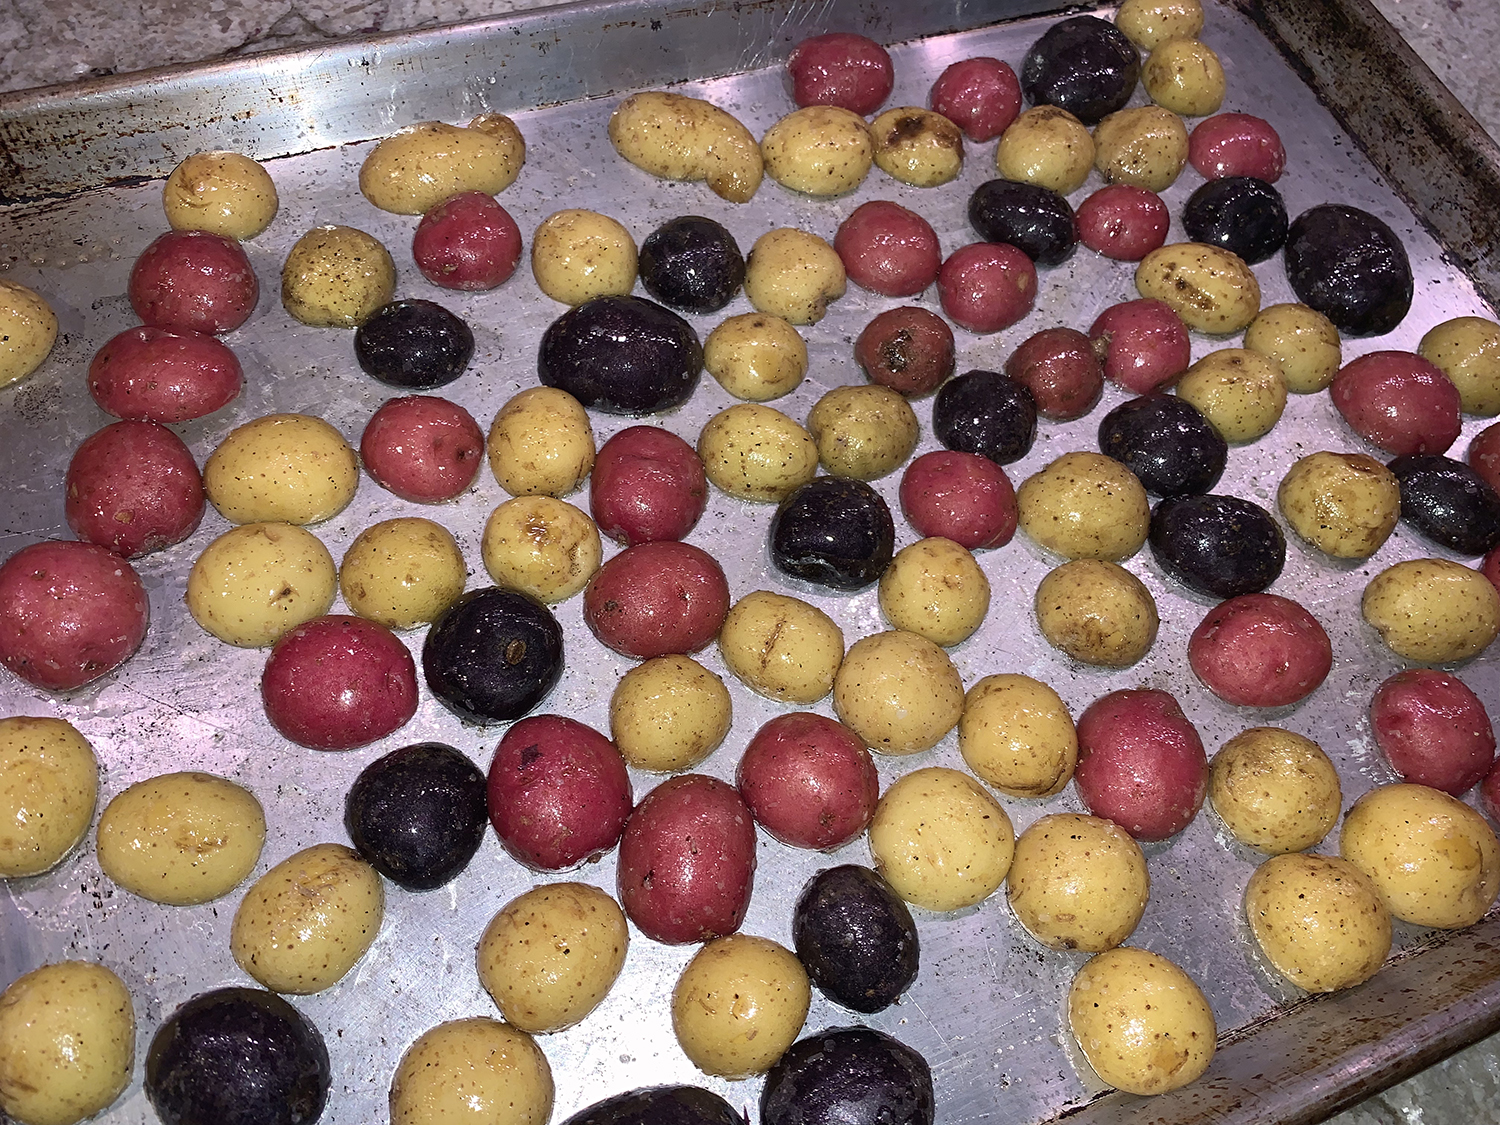
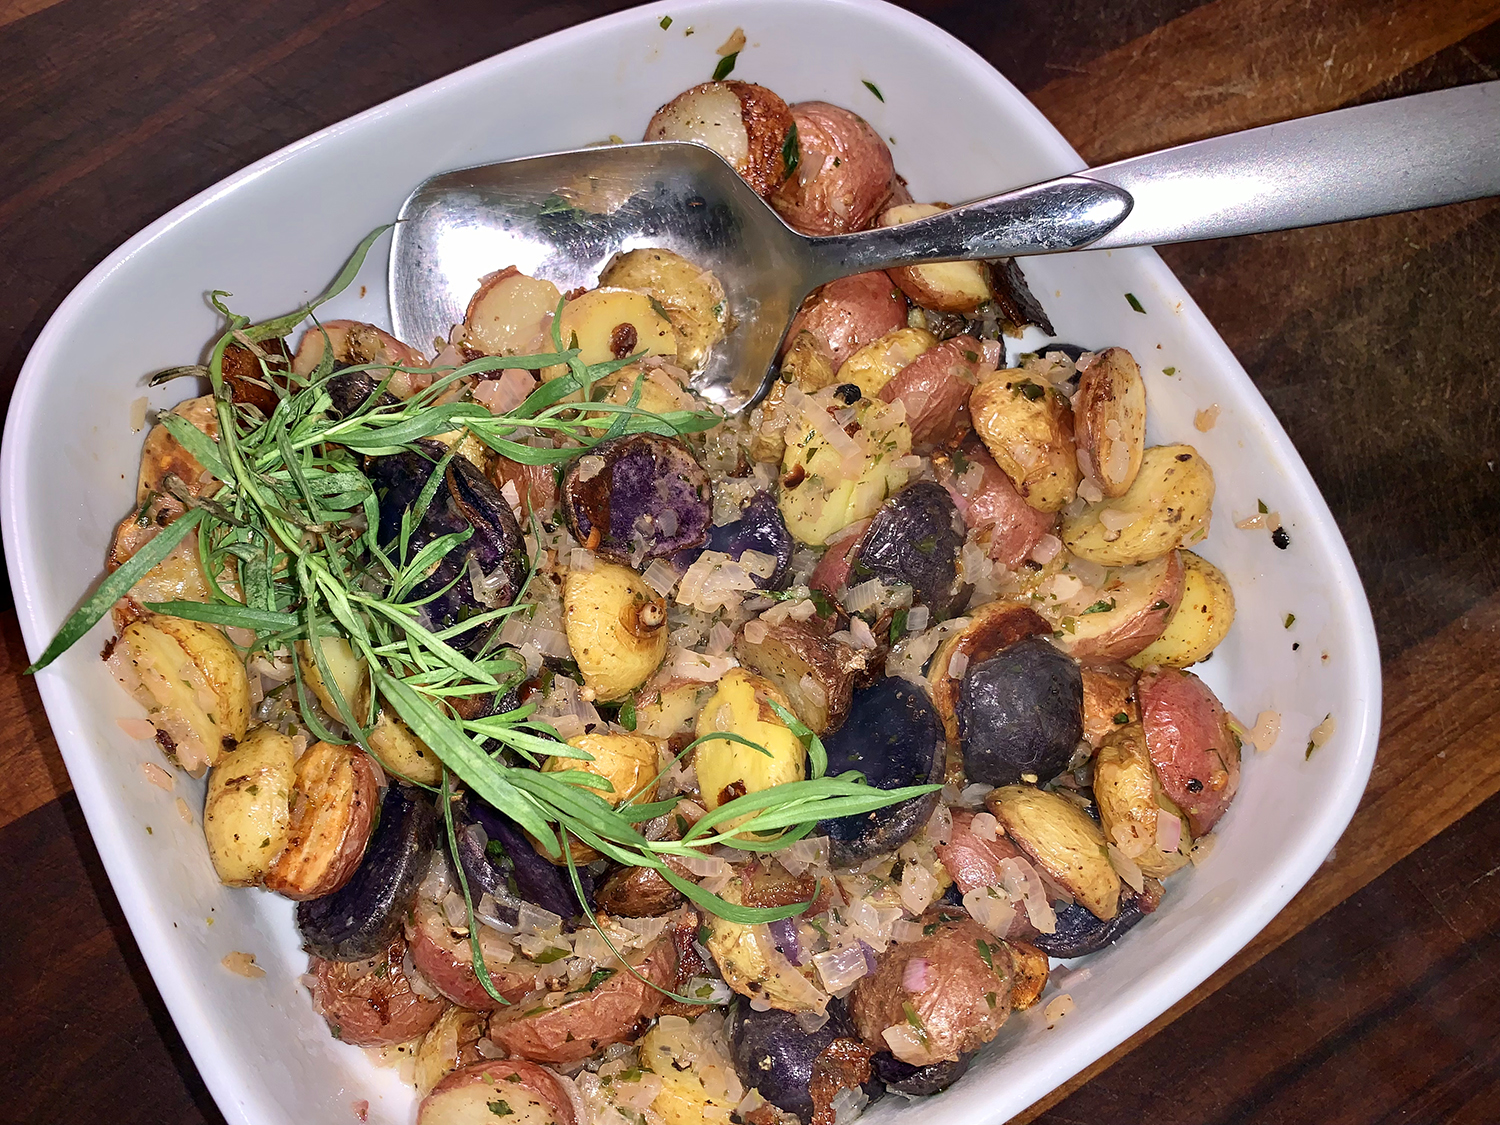
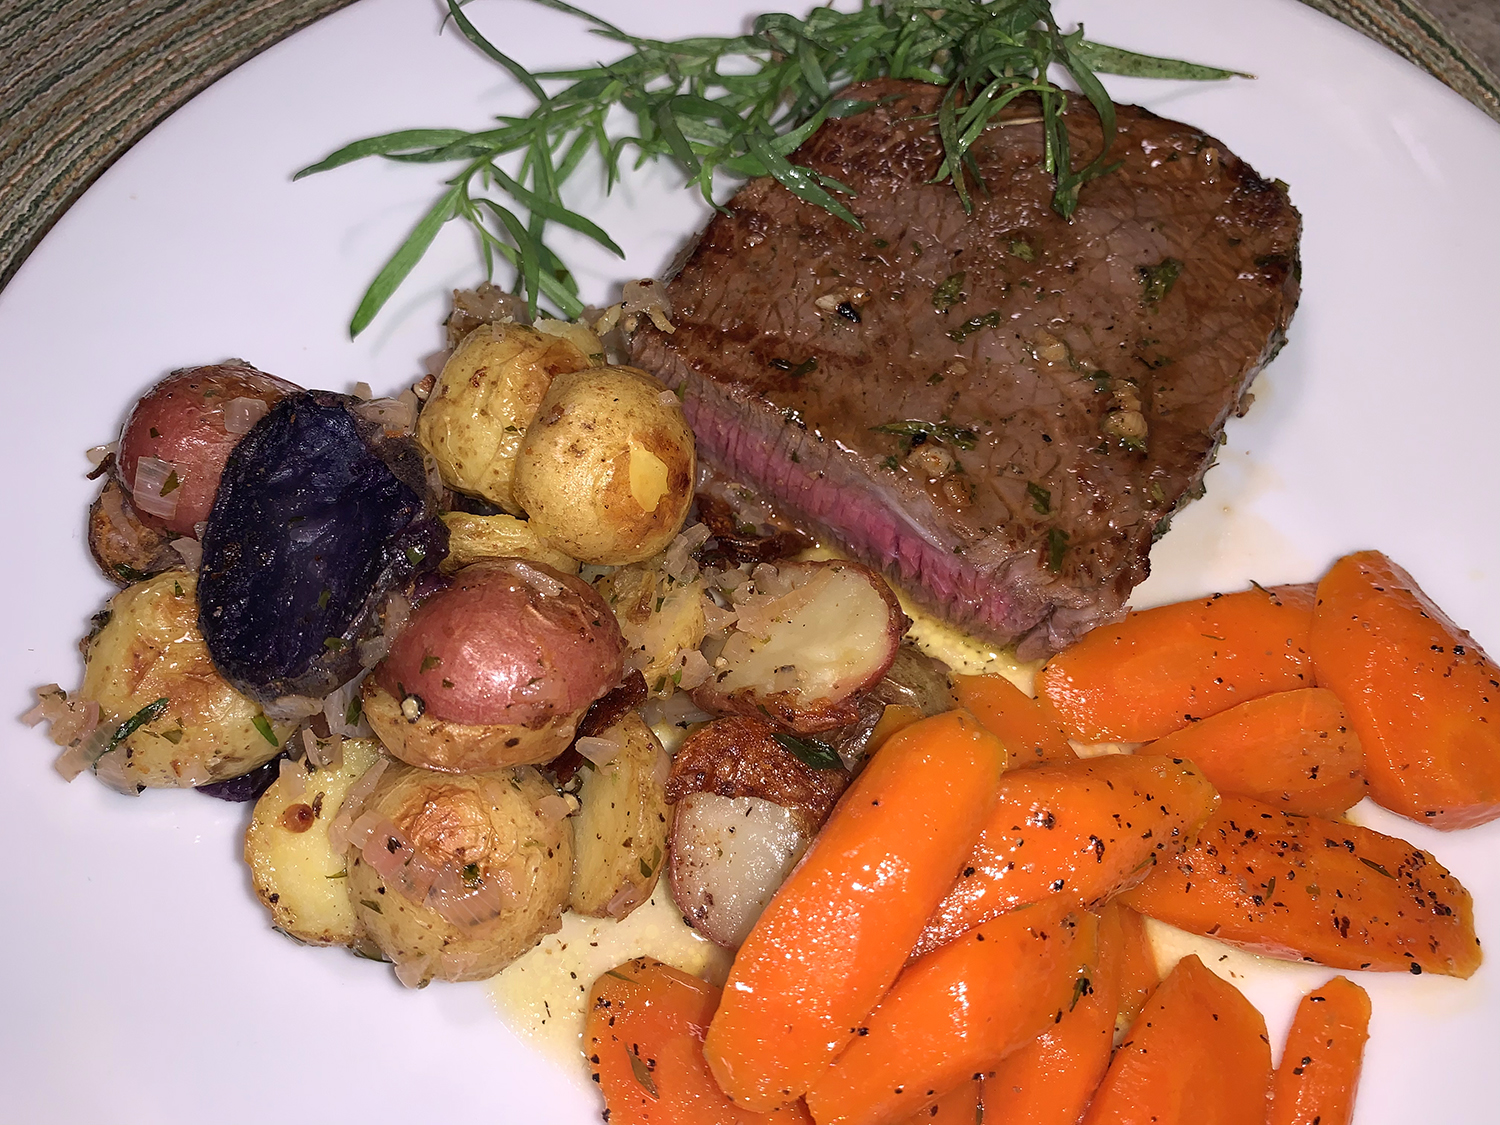
Potatoes are one of my favorite sides, no matter how they are cooked. And, this recipe is one I’ve never tried before, but will be sure to make again. Paired with a sirloin steak that marinaded in a sauce also containing fresh tarragon, they made great dinner companions.
The original recipe called for mixed-color fingerling potatoes, but the grocery store was plum out of any type of fingerlings. However, there were some tri-colored baby spuds available. And I mean “baby” to the point of almost preemies! Thus I knew the cooking time was going to be drastically reduced.
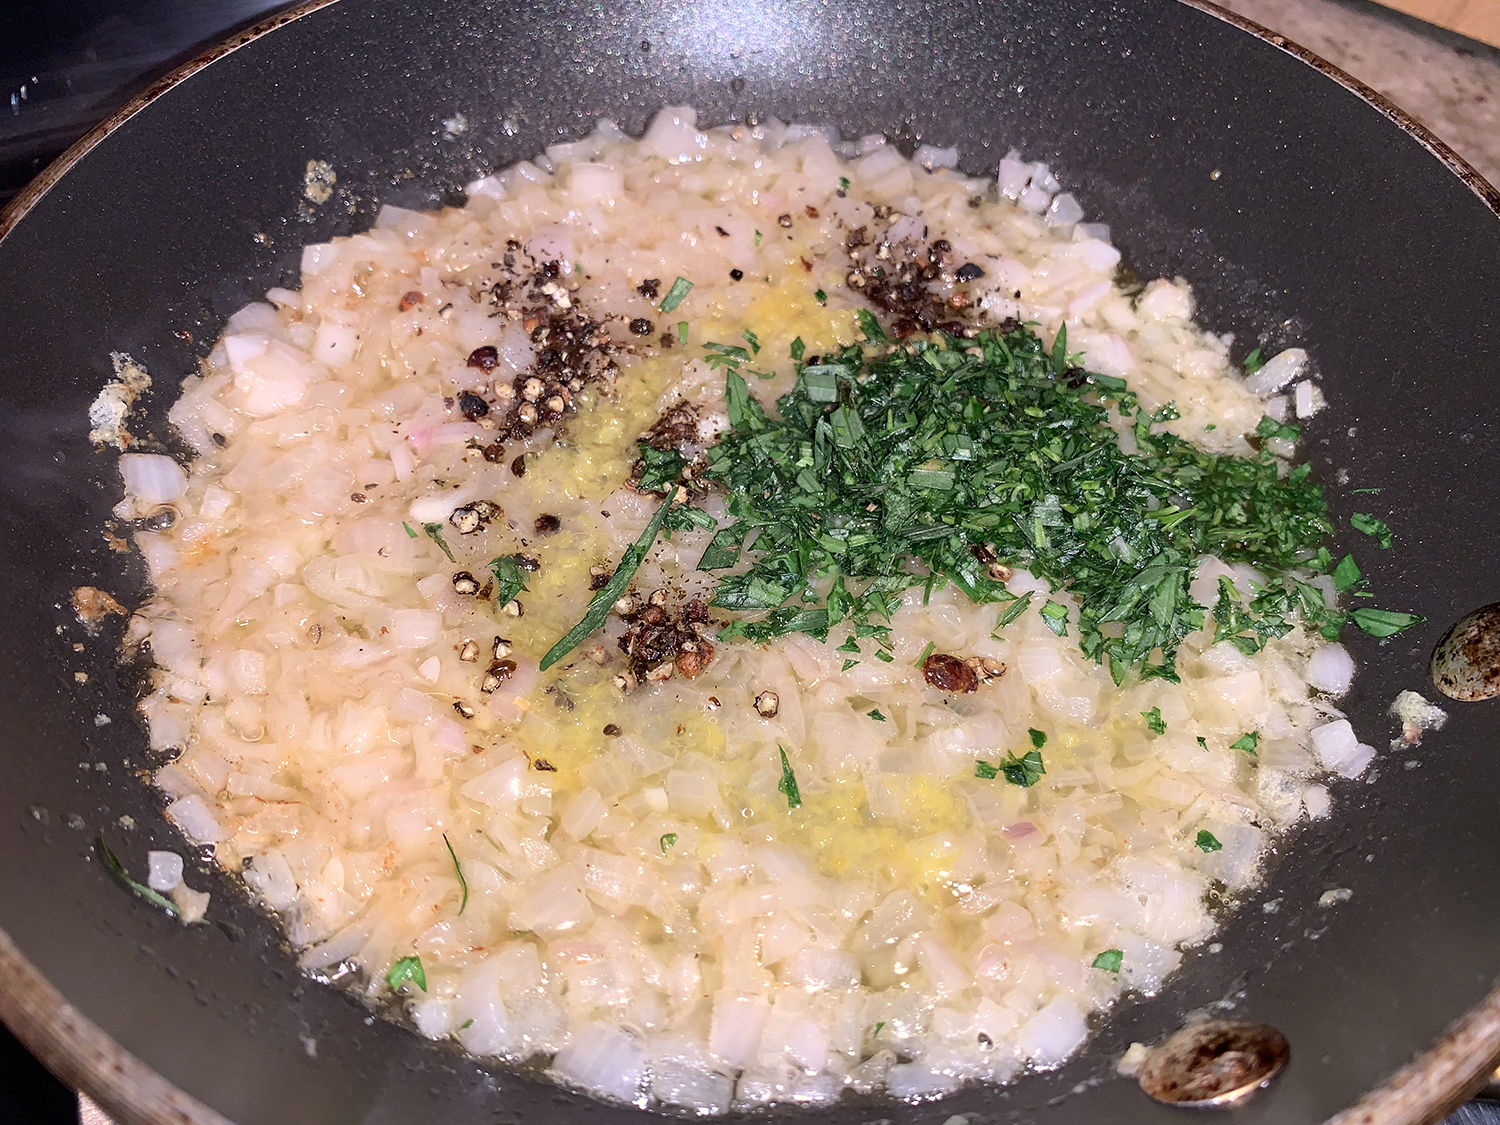
As your potatoes are finishing roasting, make the luscious tarragon-shallot sauce. The actual sauce is made up of only five ingredients: unsalted butter, finely chopped shallot, crushed black peppercorns, lemon zest and juice, and finely chopped tarragon. But boy, it delivers flavor in spades!
Roasted Fingerling Potatoes with Tarragon Shallot Butter
1½ lbs. fingerling potatoes, mixture of yellow, red, and blue, if possible
1 Tbsp. extra virgin olive oil
Kosher salt
Freshly ground black pepper
Tarragon Shallot Butter:
3 Tbsp.unsalted butter
1 large shallot, finelydiced
½ tsp. whole black peppercorns, coarsely crushed
2 tsp. fresh lemon zest
3 large sprigs fresh tarragon, plus more for garnishing leaves removed and finely chopped
Juice of ½ lemon
Fosher salt
Directions
Roast Fingerling Potatoes: Preheat oven to 450°F (232°C) with a rack in the center position. Rinse and dry the potatoes thoroughly. Slice the fingerling potatoes in half lengthwise. Toss on a large baking sheet with the olive oil and a generous sprinkling of salt and pepper.
Place the potatoes cut-side down on the sheet pan and spread them out evenly on the baking sheet. Roast for 15 minutes. Flip the potatoes and roast for an additional 10 minutes, or until the potatoes are caramelized, crispy, and fork-tender. Remove the potatoes from the oven, place on a rack, and allow them to cool slightly while you prepare the tarragon shallot butter.
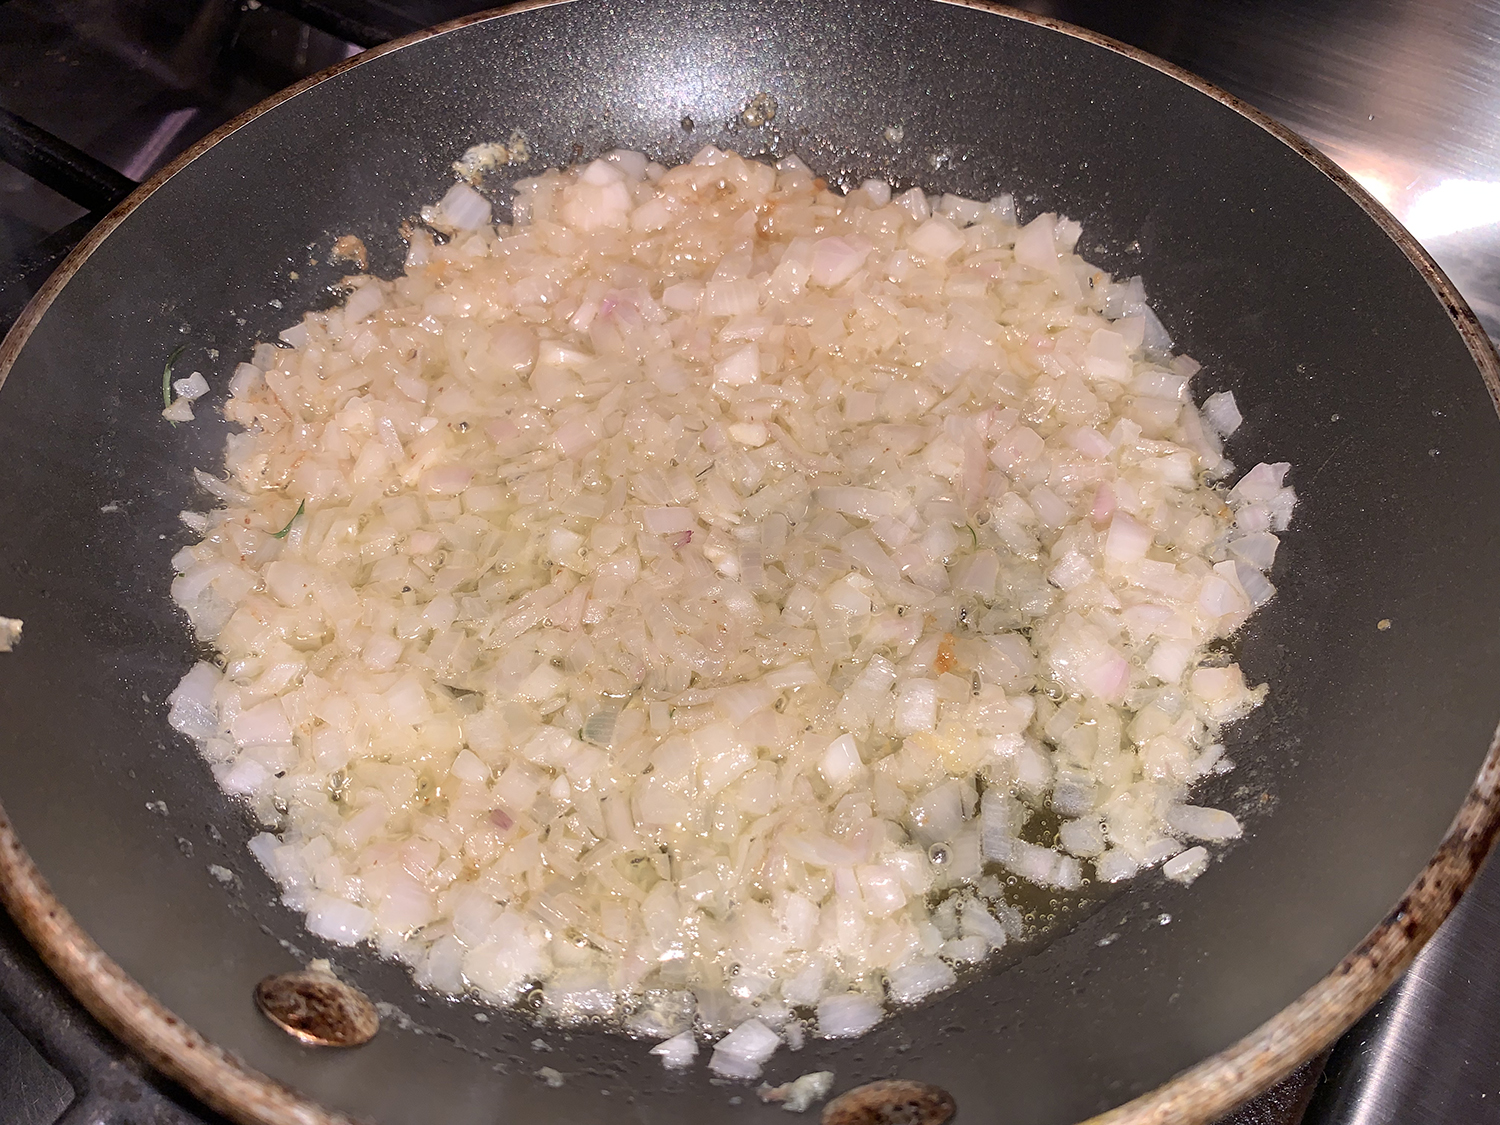
Prepare Tarragon Shallot Butter: In a small skillet, heat the butter over medium heat. Once the butter has melted fully and is bubbling slightly, add the shallot and sauté, stirring frequently, for 1 to 2 minutes, or until soft and translucent.
Add the crushed peppercorns, lemon zest, chopped tarragon leaves, and lemon juice. Reduce heat to low, and continue to reduce the sauce for an additional minute or so. Season sauce to taste with salt and pepper.
Place the roasted potatoes in a shallow heat-proof bowl. Pour the warm tarragon shallot butter (scrape the skillet with a spatula to remove any bits) over the potatoes, and toss them gently with a spoon until they are evenly coated. Season to taste with salt and pepper. Garnish with additional tarragon and serve immediately.
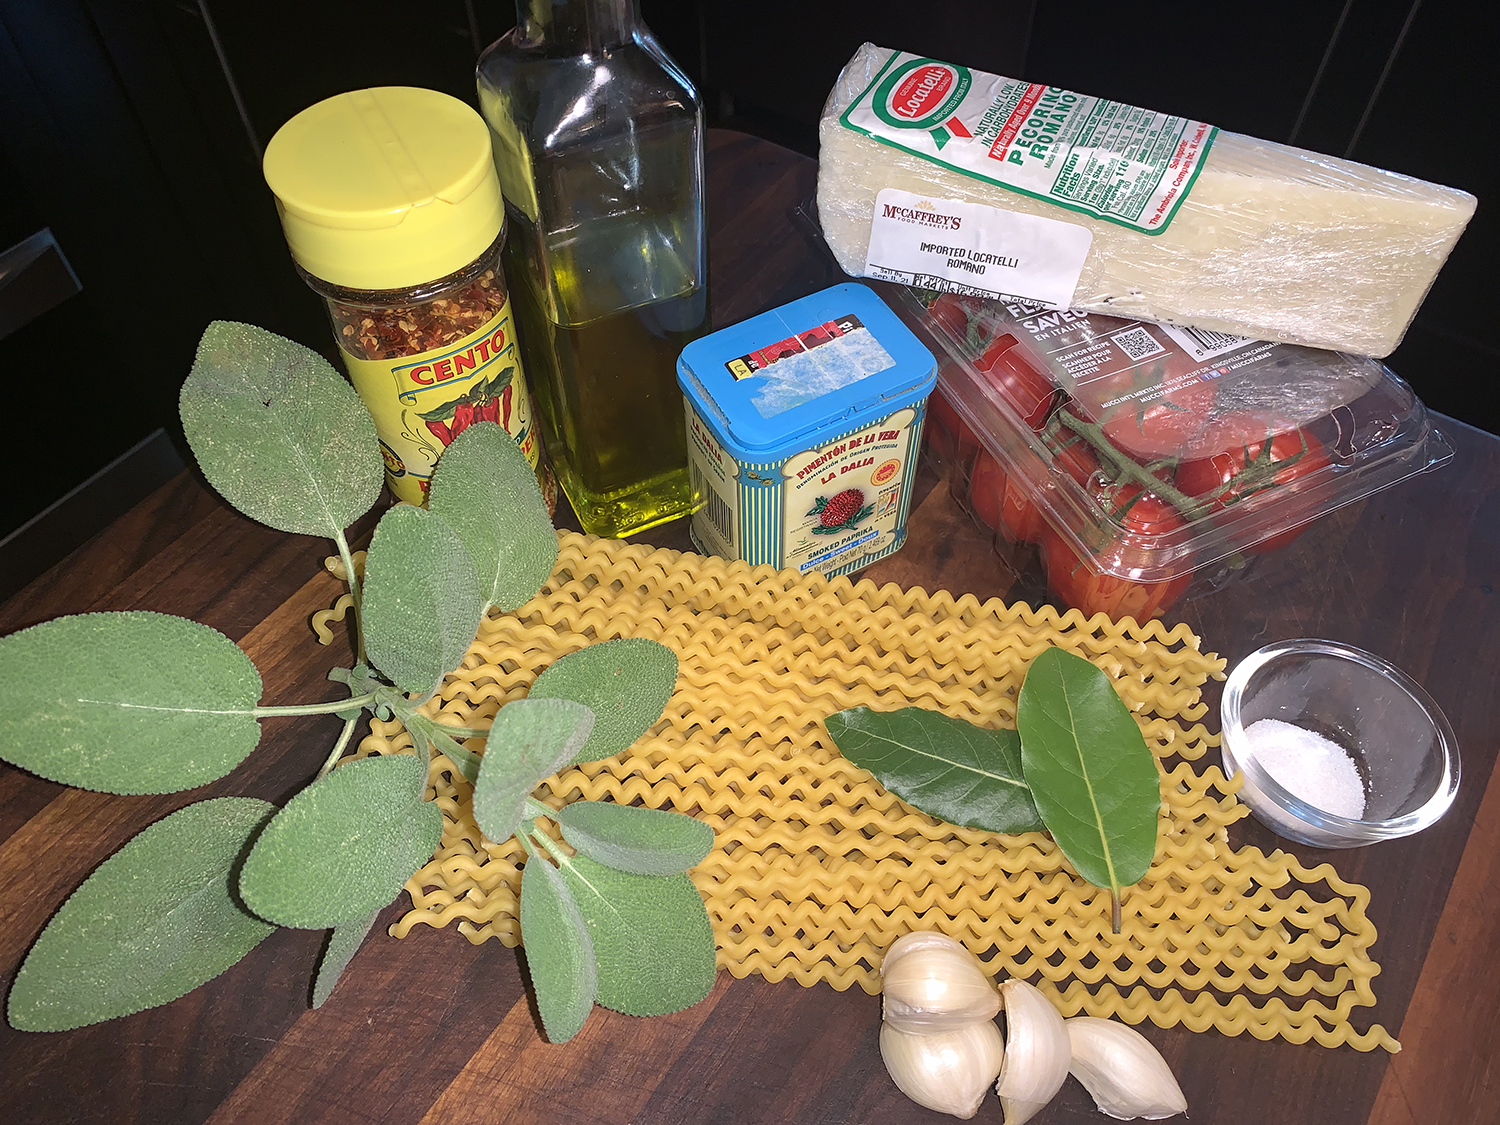
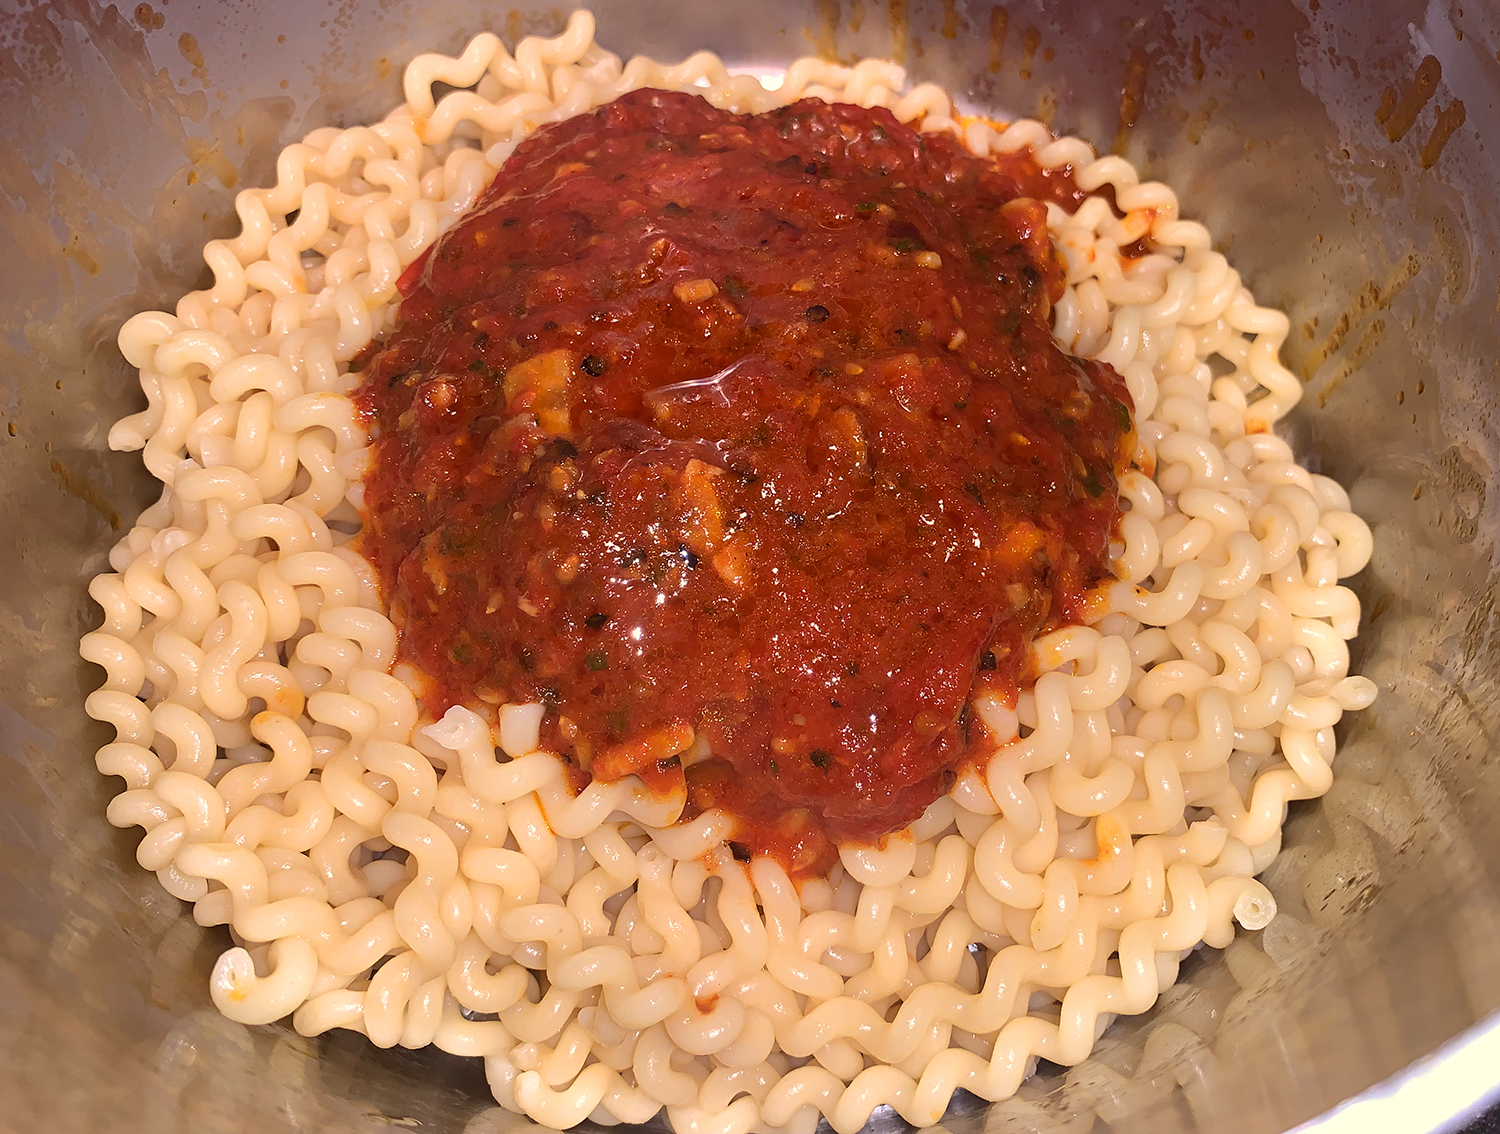
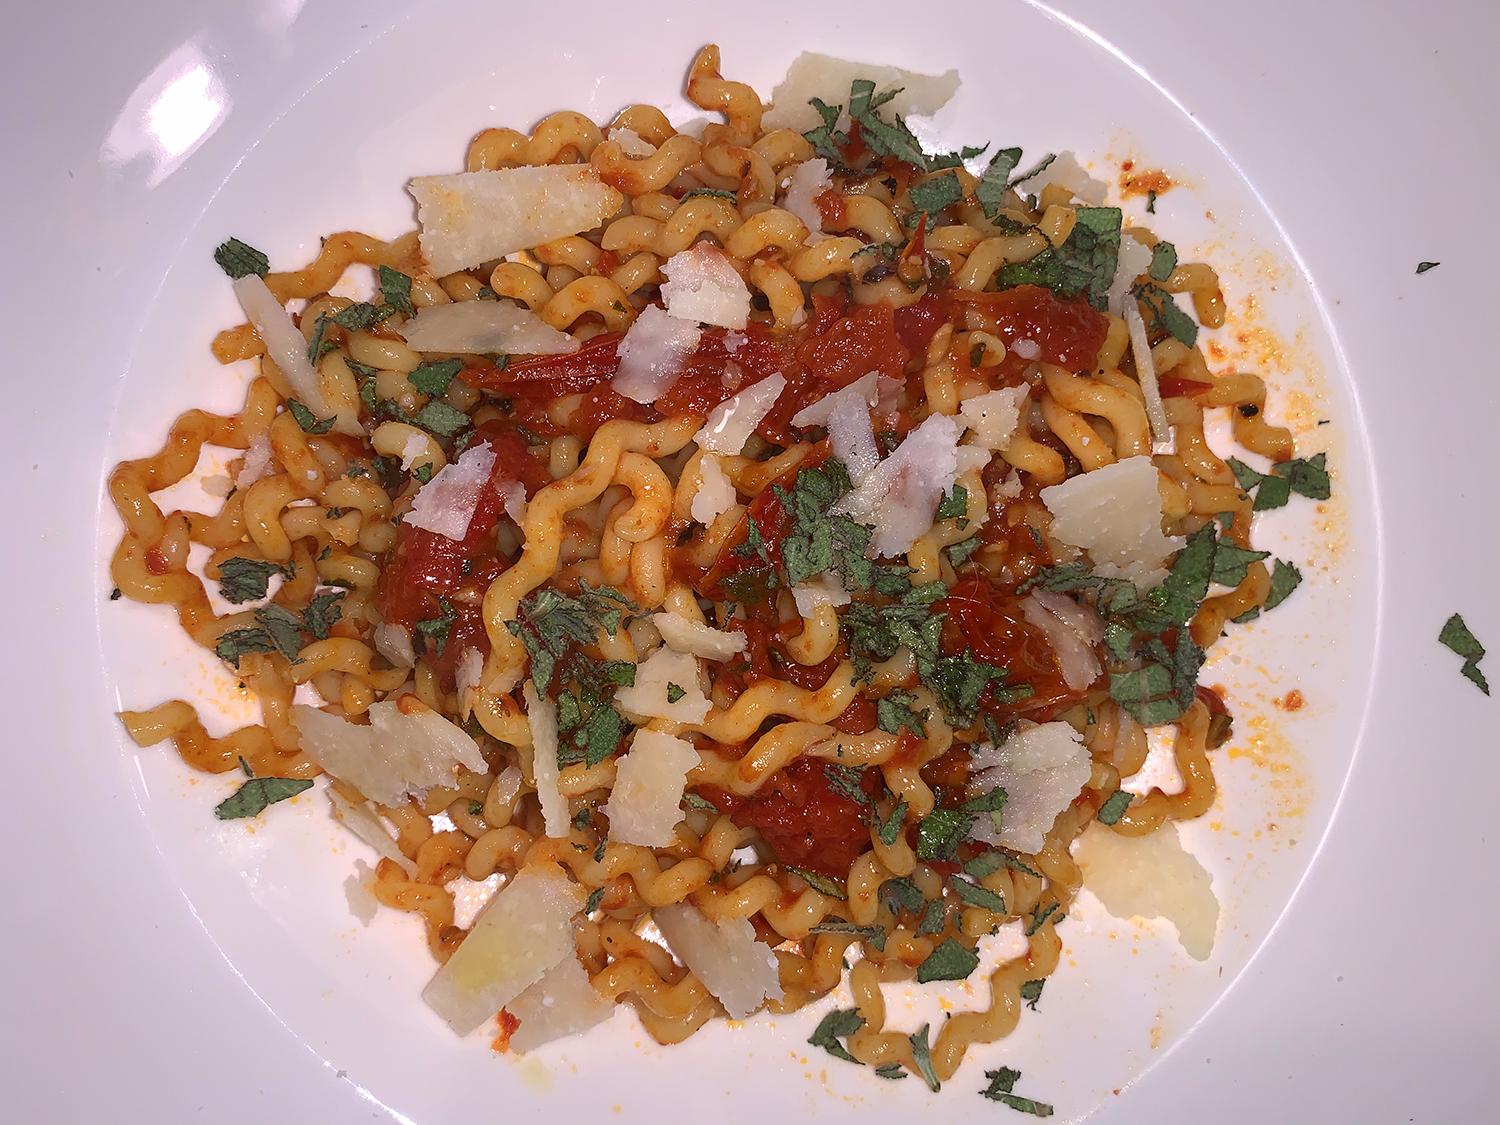
As we were eating this lovely pasta dish, The Hubs exclaimed how much he liked it. I responded “And the list of ingredients was short for such depth of flavor and it was simple to boot!” Then he looked at the Milk Street recipe print out and saw that this adaptation hailed from Yotam Ottolenghi’s cookbook titled “Simple”—how serendipitous!
That being said, I cut back the pasta from 12 to 8 ounces because it did not seem that the amount of sauce would be sufficient for the larger quantity. With gentle simmering and a bit of water to facilitate cooking, cherry or grape tomatoes are transformed into a bold pasta sauce. To ratchet up the flavor, herbs, red pepper flakes and pecorino Romano are added. Try to get a block of the cheese to create shavings as opposed to the already grated variety.
Fusilli was our choice, but spaghetti or bucatini (a tubular pasta resembling thick spaghetti) also pairs particularly well with the sauce. Be aware that you do not want to simmer the tomatoes until there is no liquid remaining. Some moisture is needed for the sauce to cling to the pasta.
8 oz. fusilli, bucatini pasta or spaghetti, cooked according to package directions
¾ tsp. smoked paprika
Shaved pecorino Romano, to serve
Directions
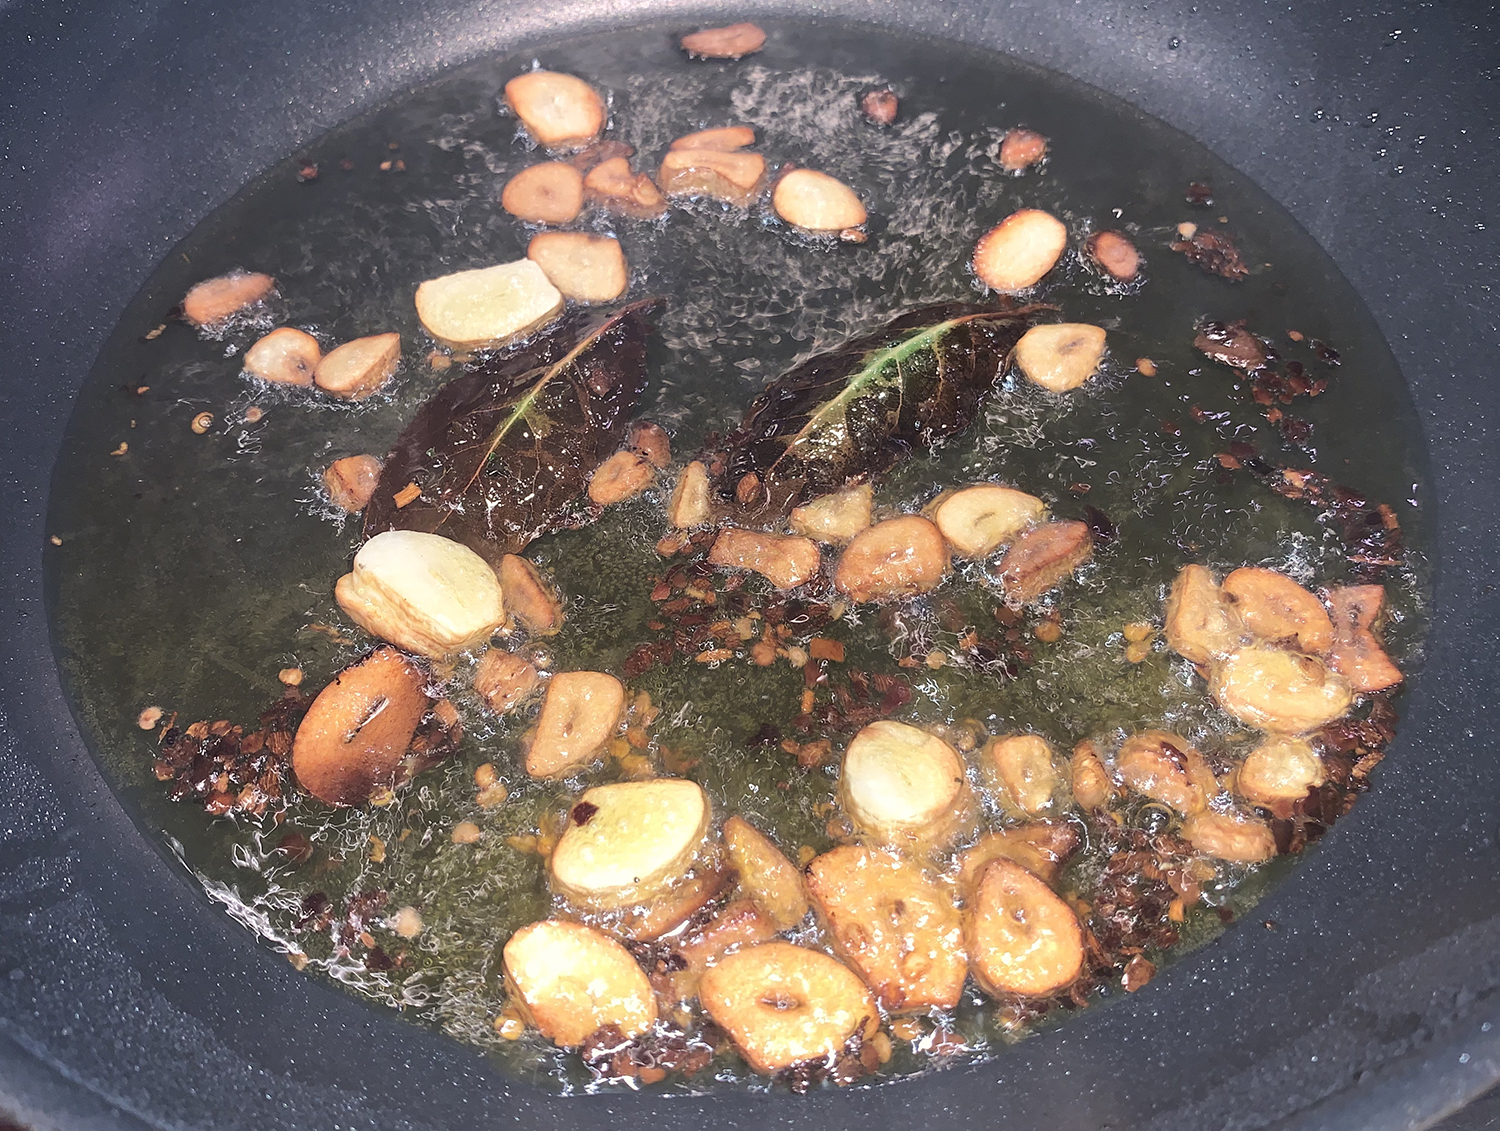
Add the oil to a 12-inch skillet. Turn the heat to medium-high, and add the garlic, pepper flakes and bay, then cook, stirring, until fragrant, about 1 minute.
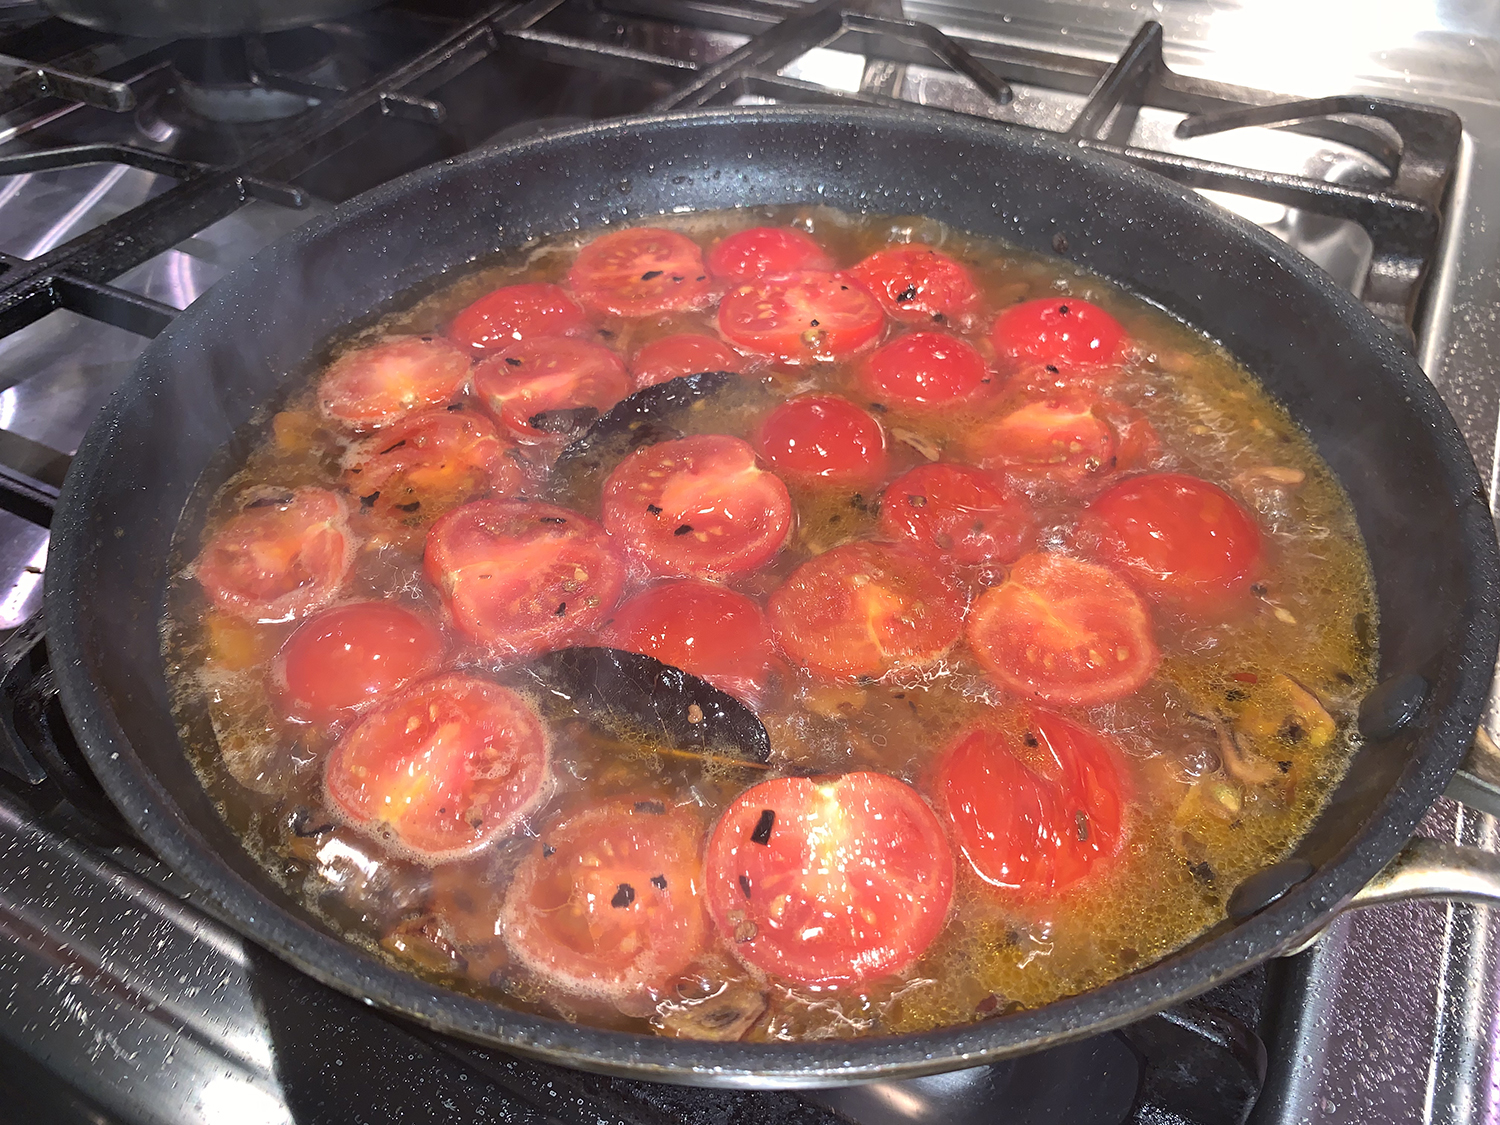
Add the tomatoes, sugar, 1 teaspoon salt and 1 cup water. Bring to a simmer and cook, stirring occasionally, until the tomatoes begin to break down, about 4 minutes.
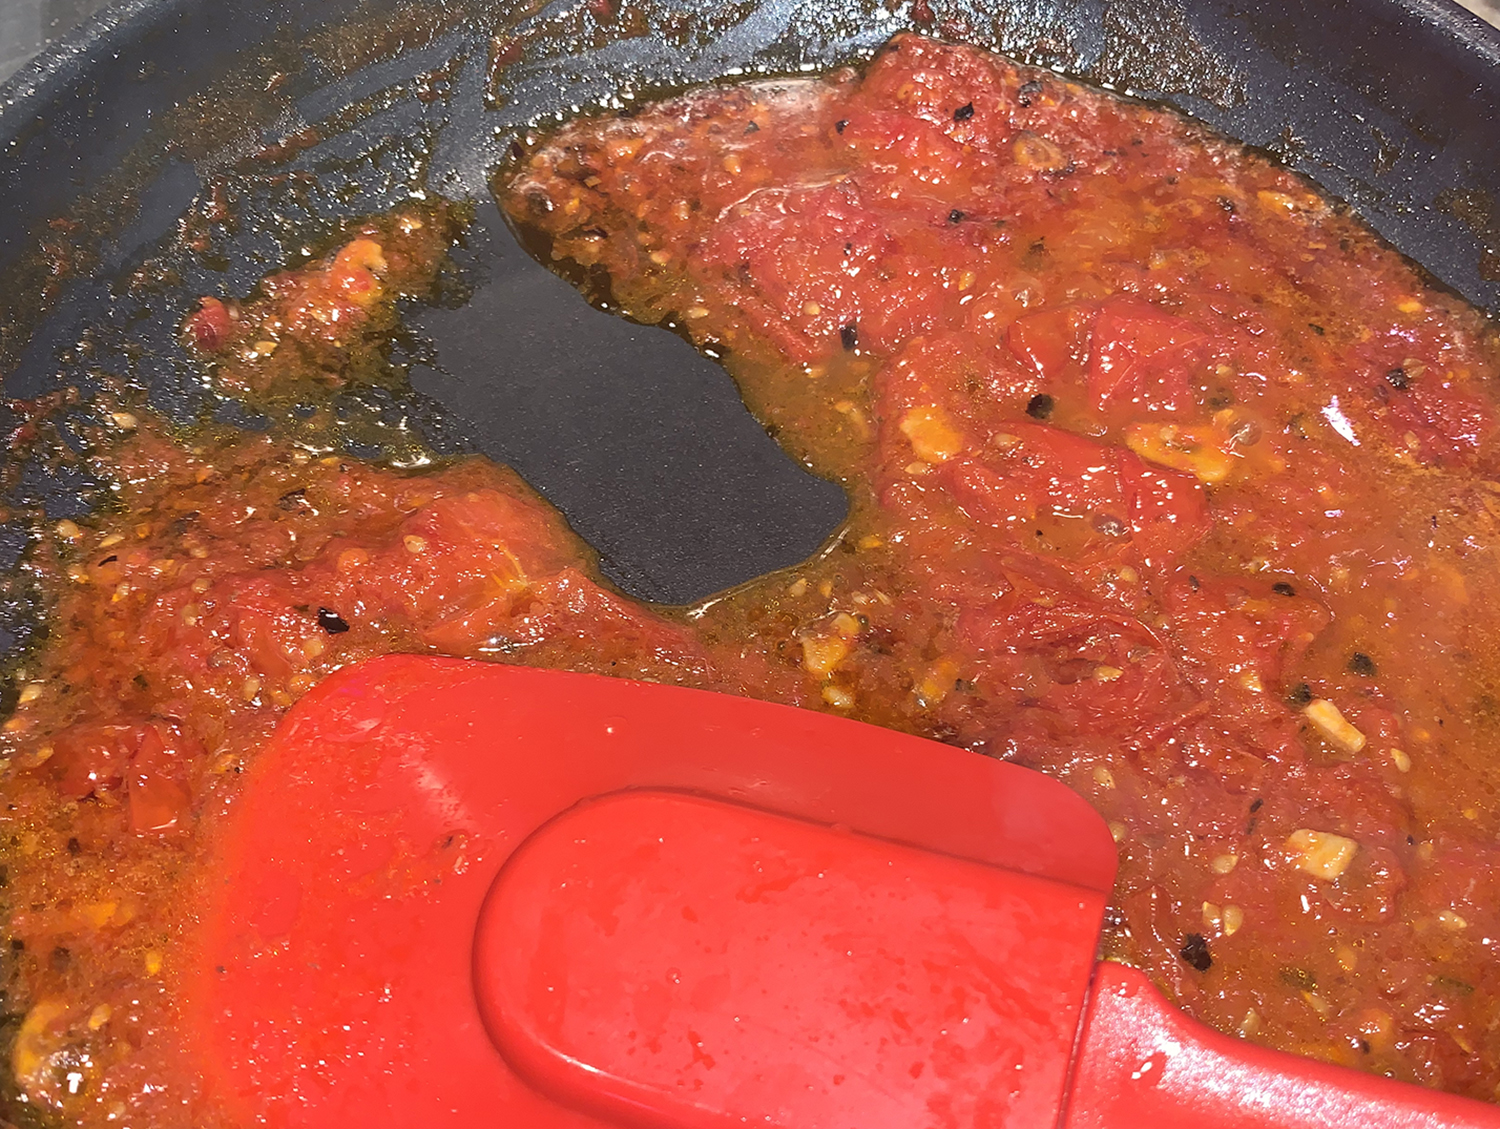
Reduce to medium-low and cook, uncovered and stirring occasionally and adjusting the heat as needed to maintain a steady simmer, until the tomatoes have fully broken down and the sauce is thick enough that a spatula drawn through it leaves a trail, 40 to 50 minutes.
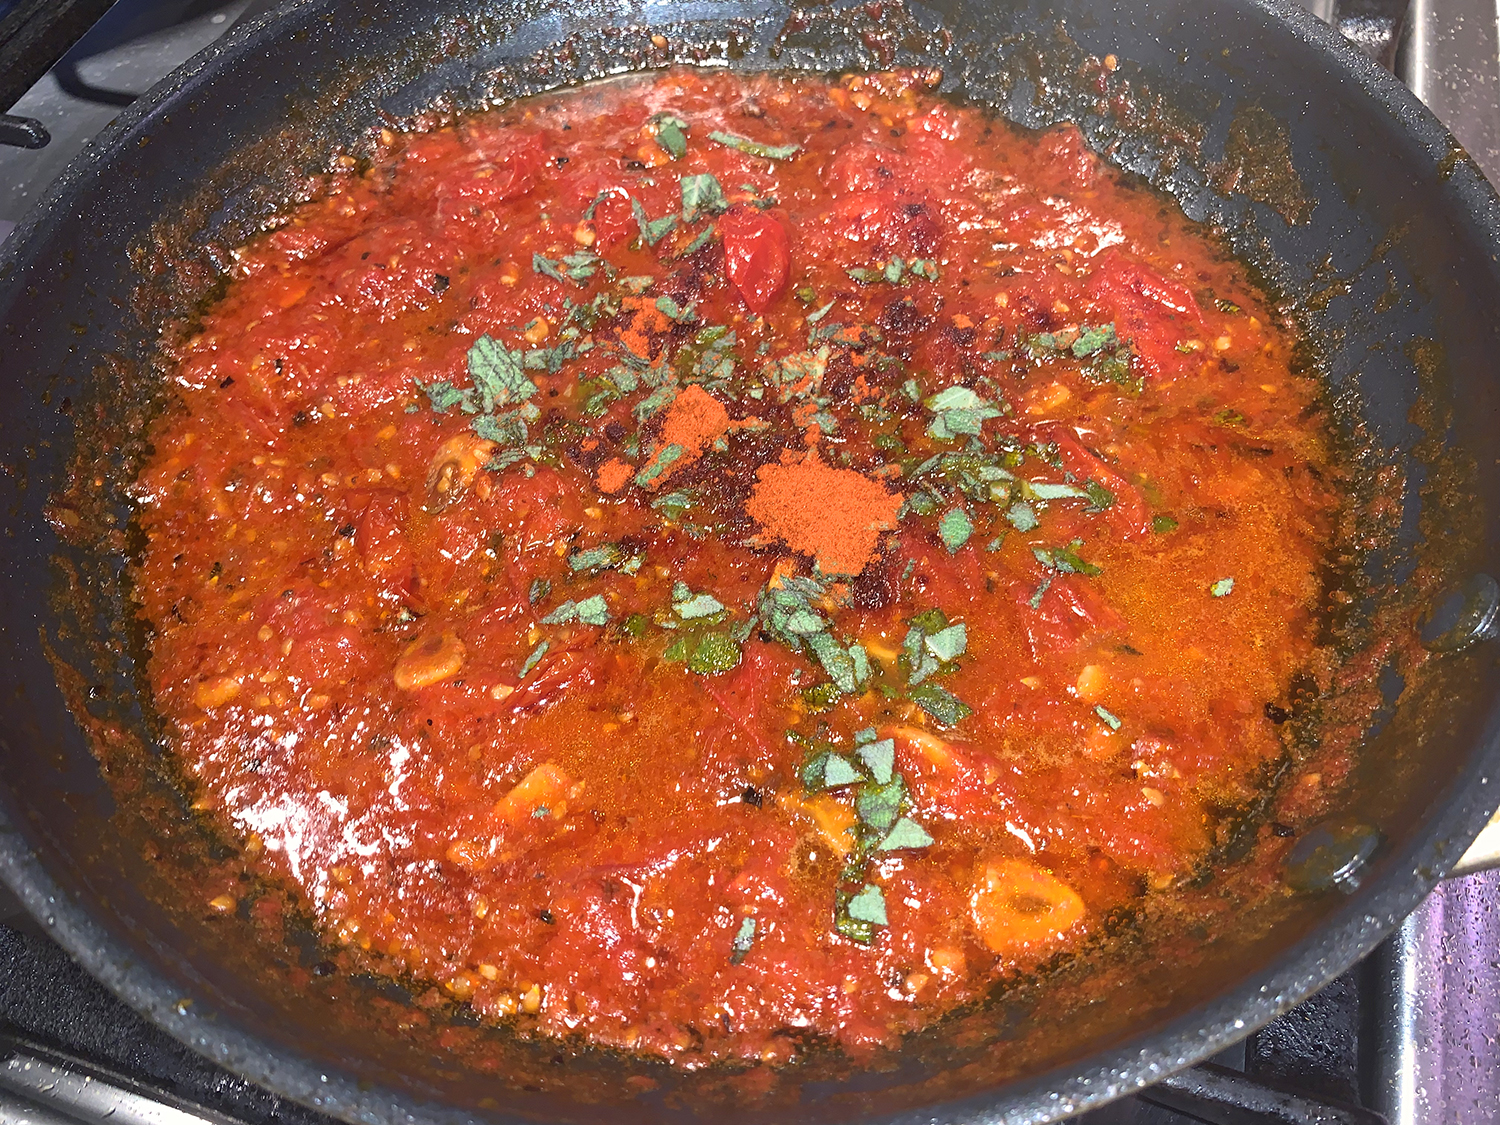
Remove from the heat and remove and discard the bay. Stir in 1 tablespoon of sage and the smoked paprika, then cover to keep warm.
When the sauce is almost ready, in a large pot, bring 4 quarts water to a boil. Add 2 tablespoons salt and the fusilli, then cook, stirring occasionally, until al dente.
Drain the pasta, then return to the pot. Add the sauce and toss until well combined. Transfer to a serving bowl. Sprinkle with the remaining 1 tablespoon sage and shaved pecorino, then drizzle with additional oil.
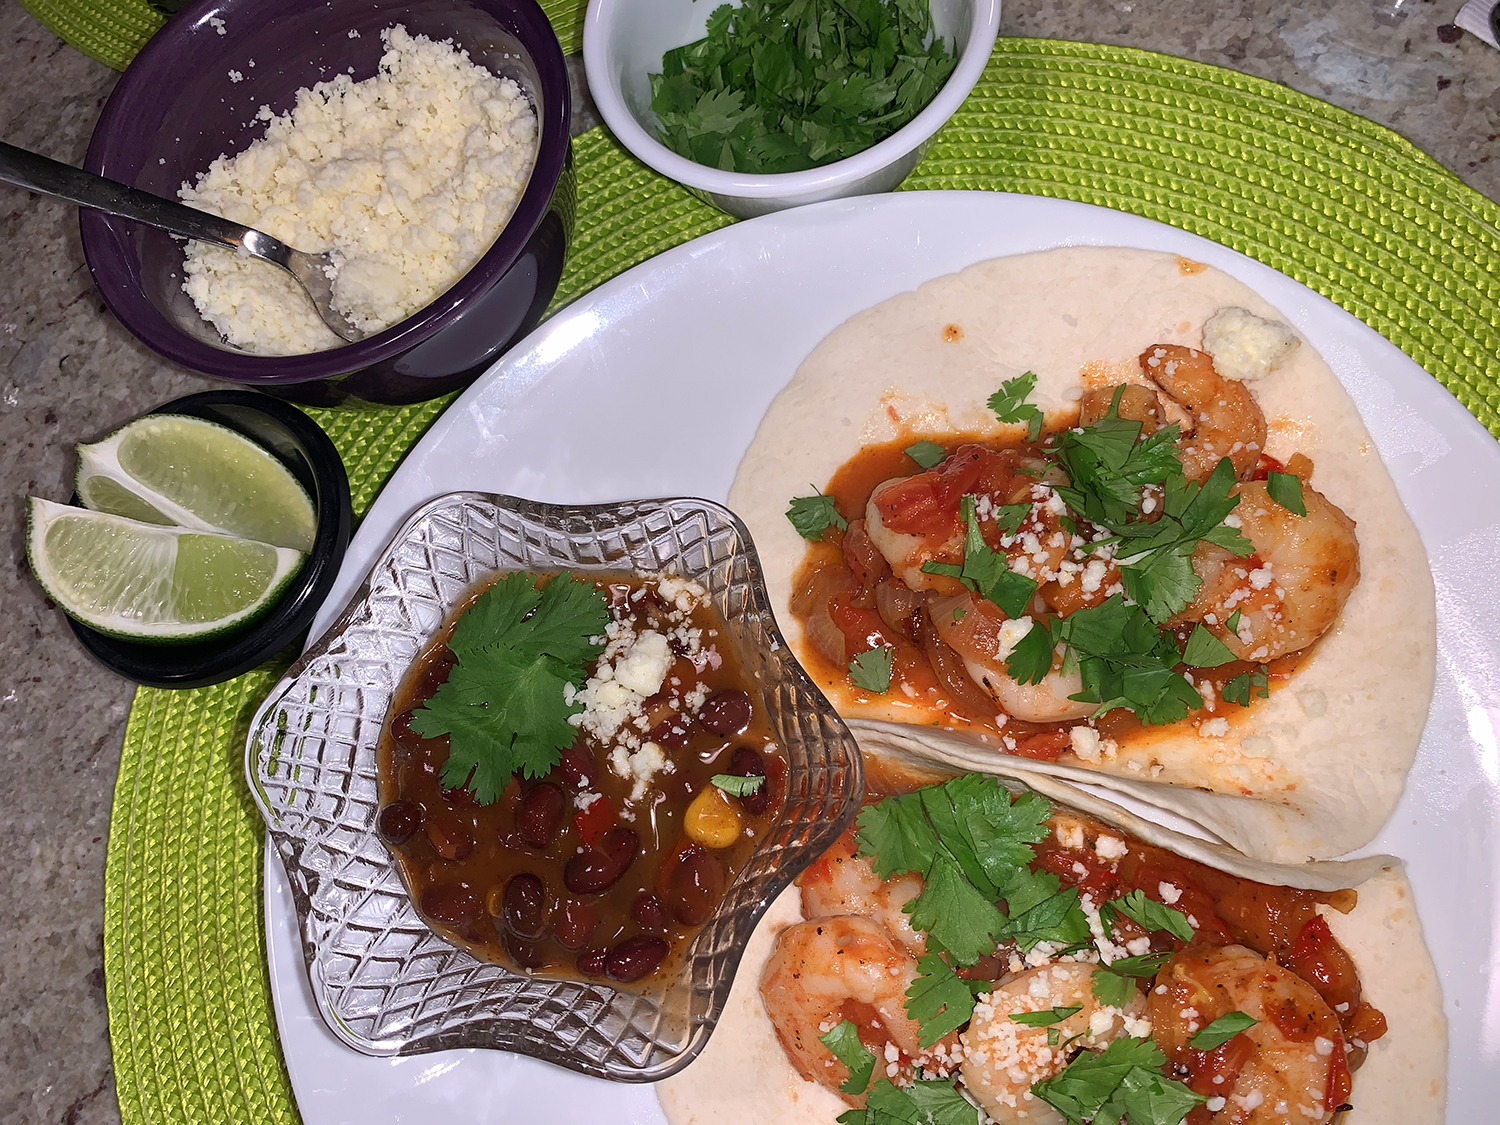
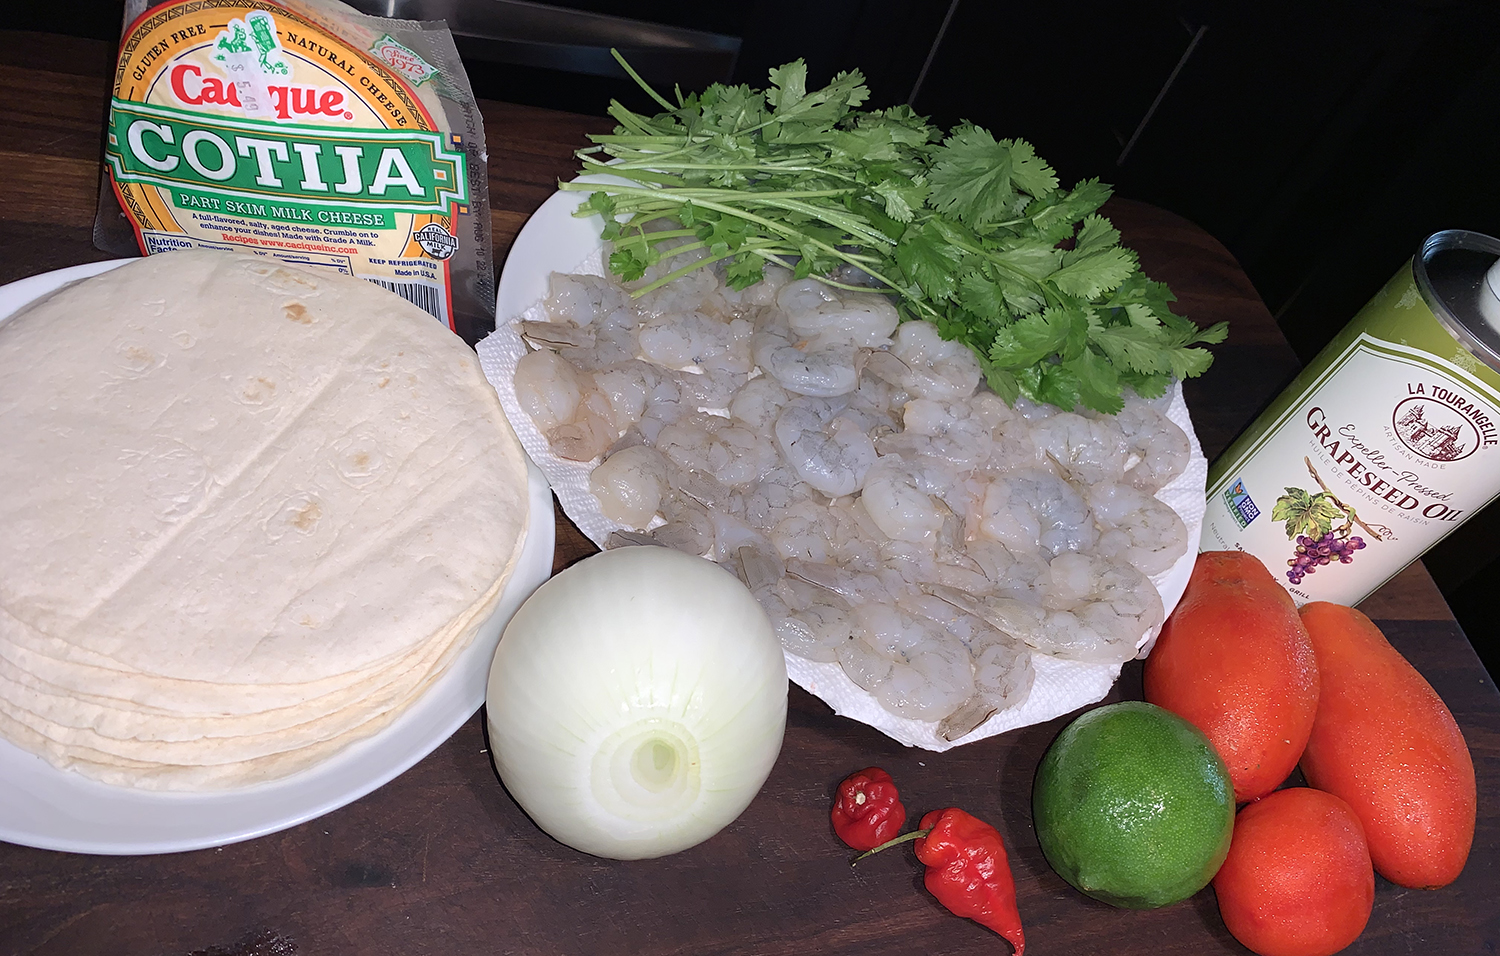
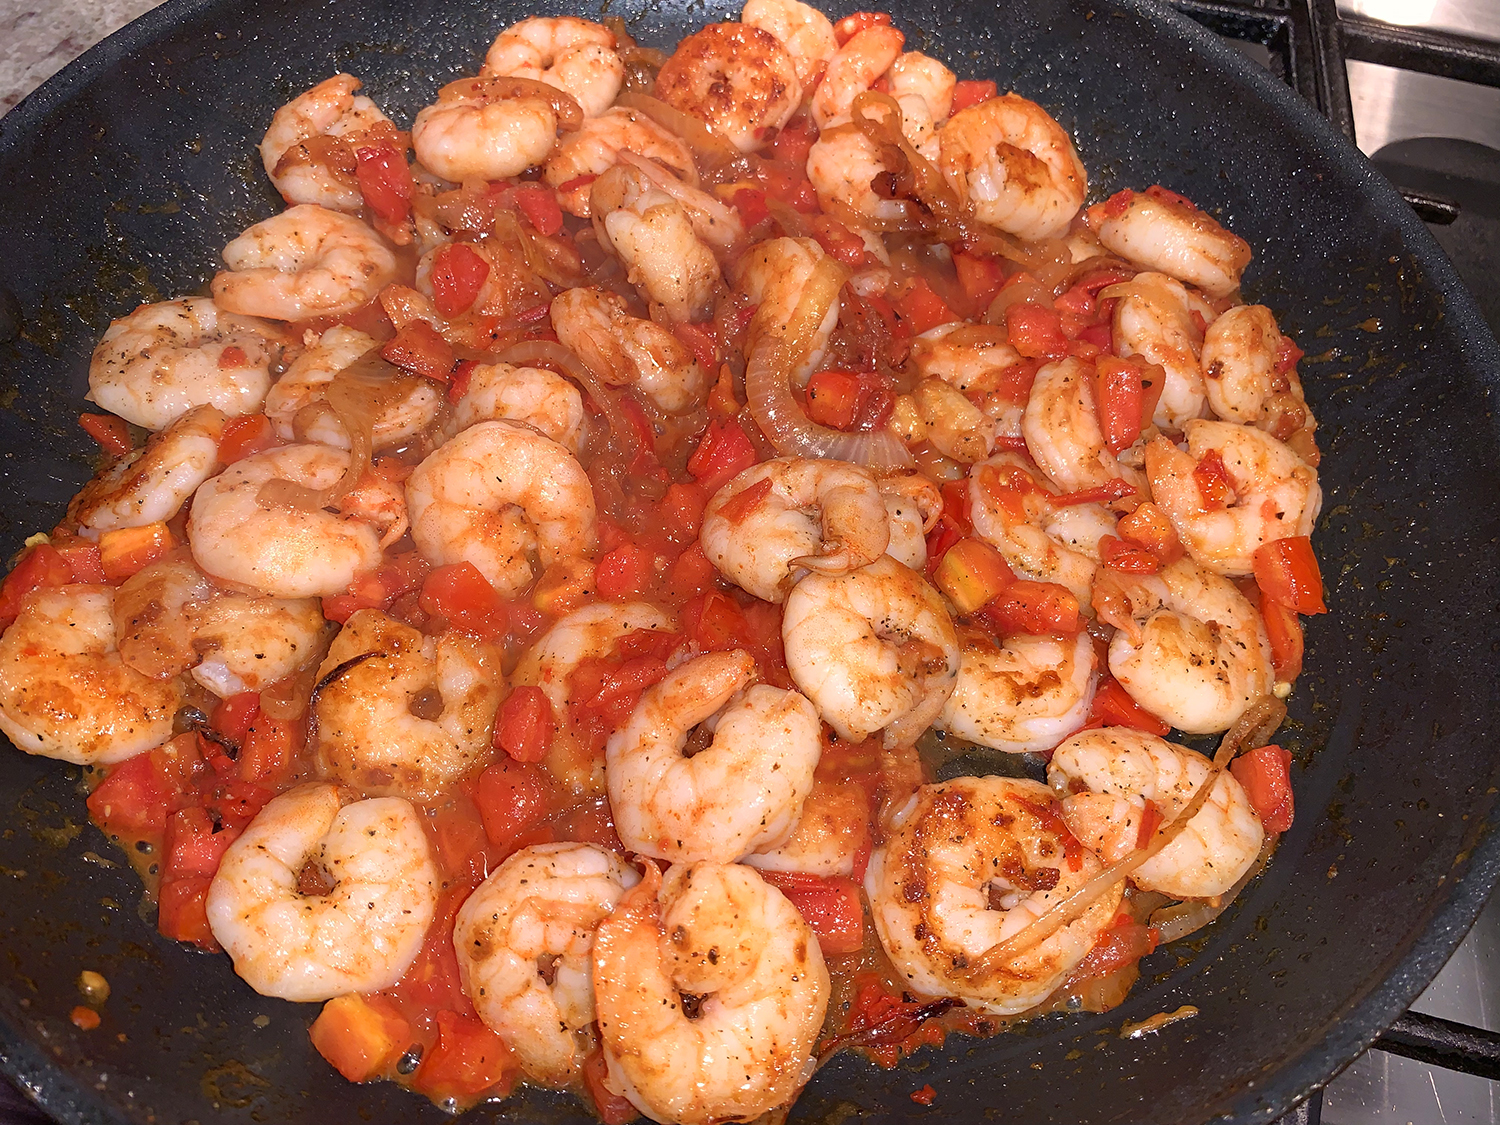
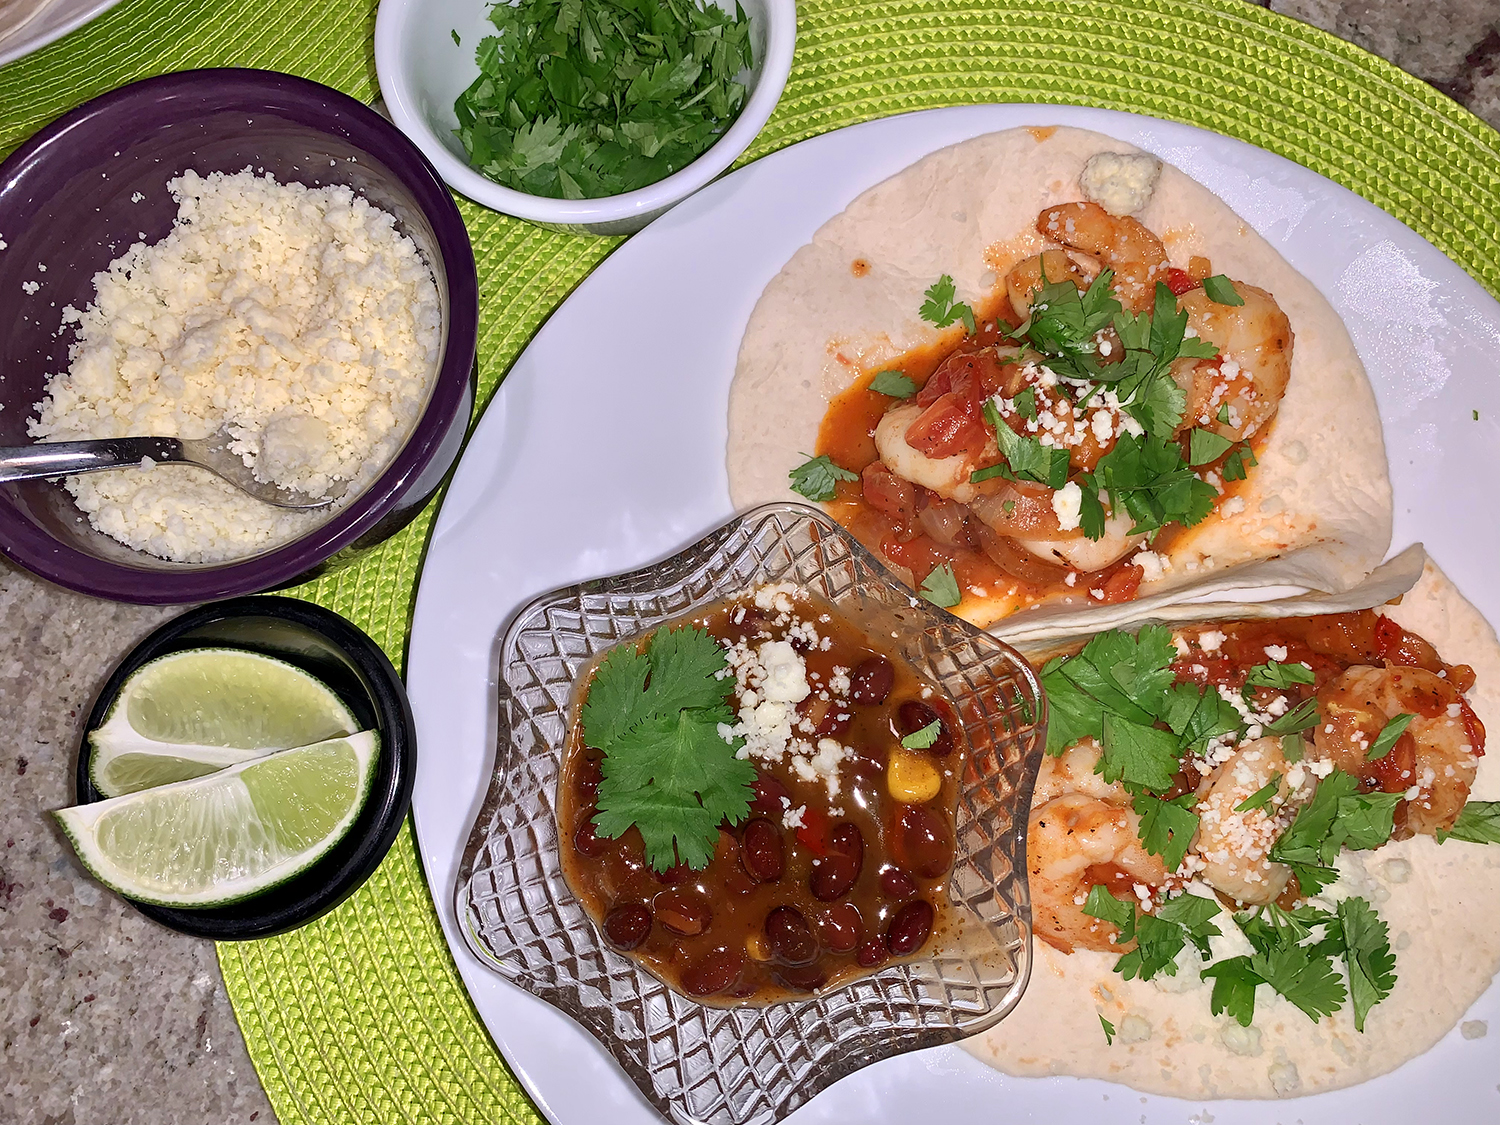
Tacos gobernador is a modern Mexican classic that combines a sauté of shrimp, fresh tomatoes and chilies with quesillo, a stringy cheese not unlike mozzarella, that’s melted onto the tortillas before assembly. In this recipe, Milk Street morphs those tacos into something simpler but equally delicious and in the same spirit.
The shrimp is seared, then combined with sautéed onion, fresh tomatoes and a minced charred habanero chili. Instead of melting a mild, milky cheese onto the tortillas before filling them, this recipe simply garnishes the tacos with crumbled cotija, a dryish Mexican cheese that packs lots of salty, savory flavor, along with fresh cilantro.
The shrimp filling gets a fair amount, but not scorching heat from the habanero chili; to tame the spiciness, Milk Street suggests seeding the chili after charring, before finely chopping it.
With no corn tortillas available at two different stores, we ended up with the flour variety. And for some odd reason our two small habaneros hardly had any kick to them, even when keeping the seeds. Thus, an added 1/4 teaspoon of cayenne provided the heat we desired, but not overly so.
With a side of fiesta black beans, it was one tasty dinner!
Don’t forget to pat the shrimp dry before searing. Removing surface moisture helps prevent steaming and ensures good, flavorful browning. Also, don’t brown the shrimp on both sides—the point is for them to be only parcooked after searing. They will fully cook—to a plump, tender finish—when returned to the pan with the tomatoes.
1 1/2 lbs. extra-large (21/25 per pound) shrimp, peeled (tails removed) and deveined, patted dry
Kosher salt and ground black pepper
1/2 medium white onion, thinly sliced
3 ripe plum tomatoes, cored and chopped
1 Tbsp. lime juice, plus lime wedges to serve
3 oz. cotija cheese, crumbled (¾ cup)
1/2 cup lightly packed fresh cilantro, chopped
12 (6-inch) corn tortillas, warmed
Directions
Heat a 12-inch nonstick skillet over medium-high until water flicked onto the surface immediately sizzles and evaporates. Add the chili and cook, turning every 1 to 2 minutes, until well charred on all sides, 5 to 6 minutes total. Transfer the chili to a cutting board.
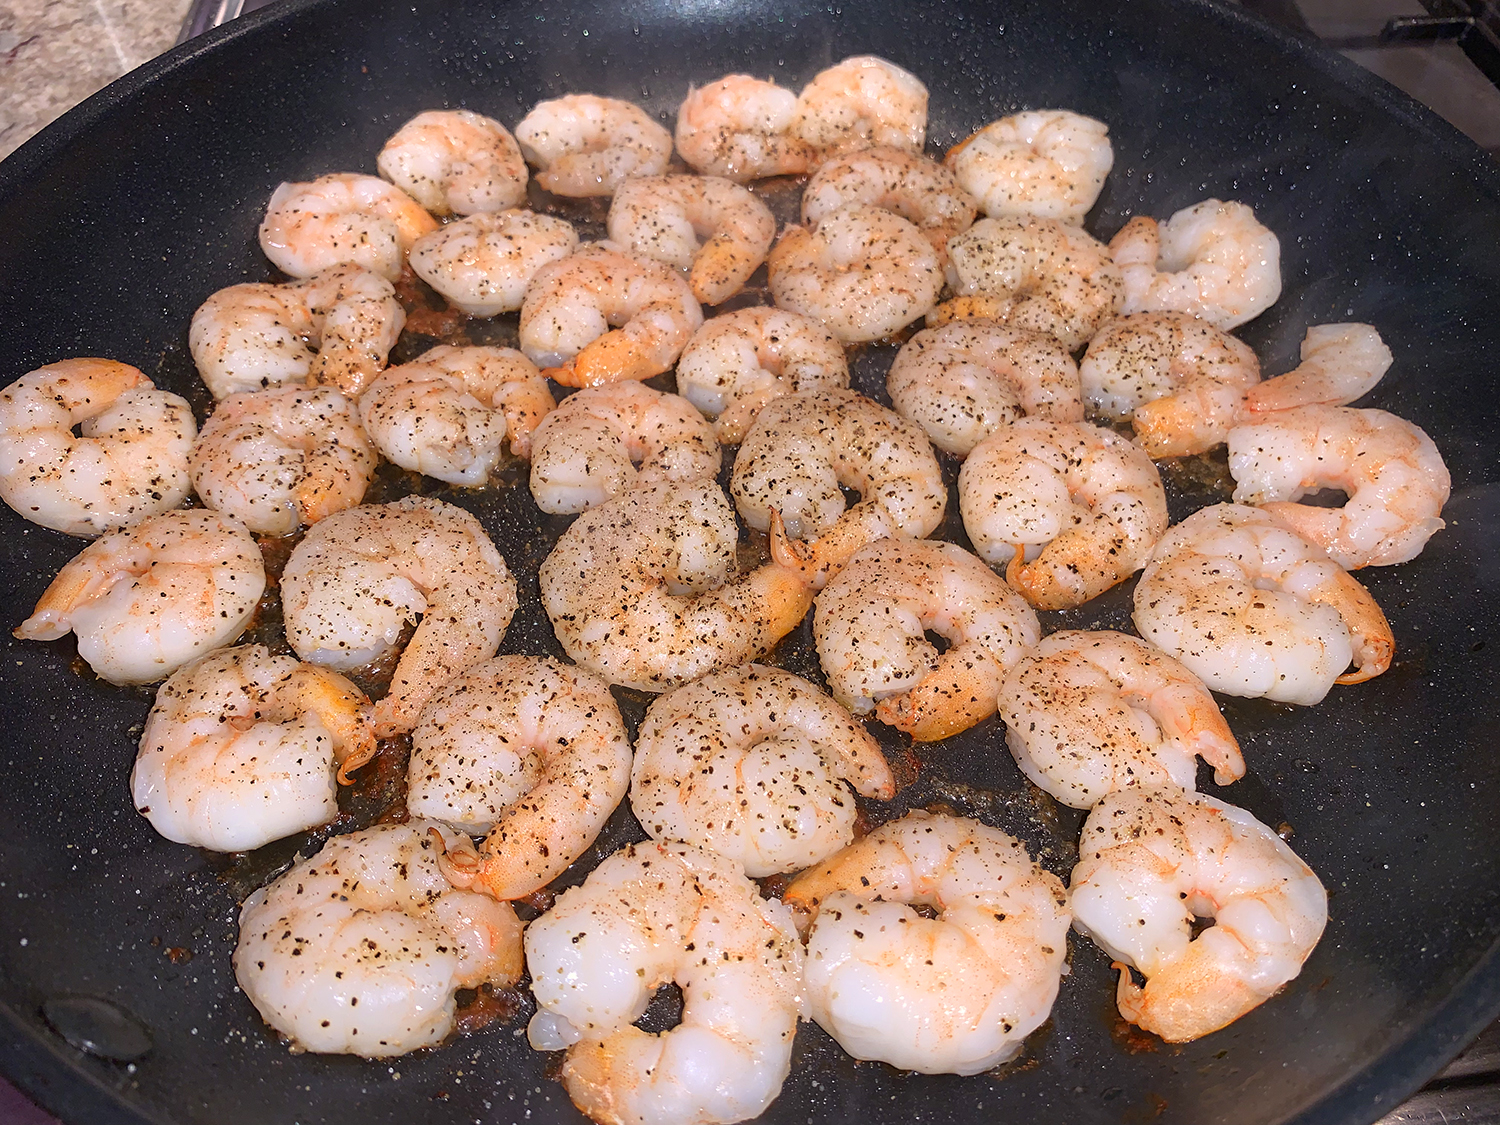
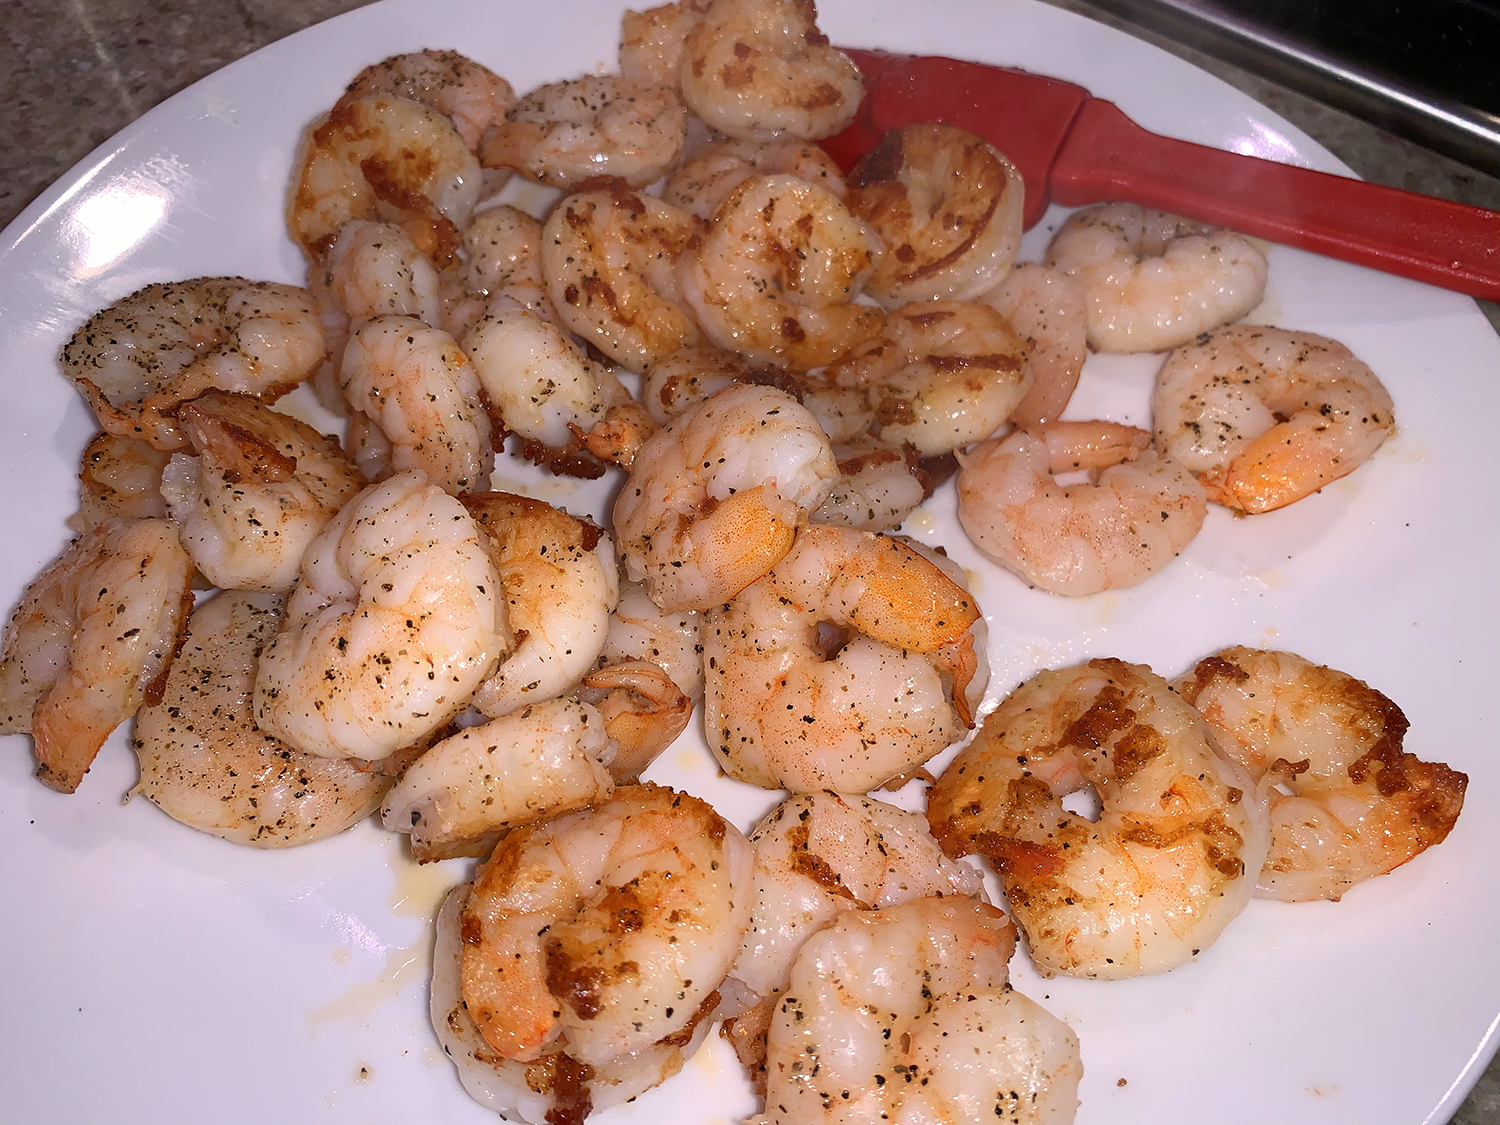
In the same skillet over medium-high, heat 1 tablespoon oil until shimmering. Add the shrimp in an even layer and sprinkle with ½ teaspoon each salt and pepper. Cook without stirring until the bottoms of the shrimp are browned, 5 to 6 minutes. Transfer to a large plate and set aside; reserve the skillet. Finely chop the chili.
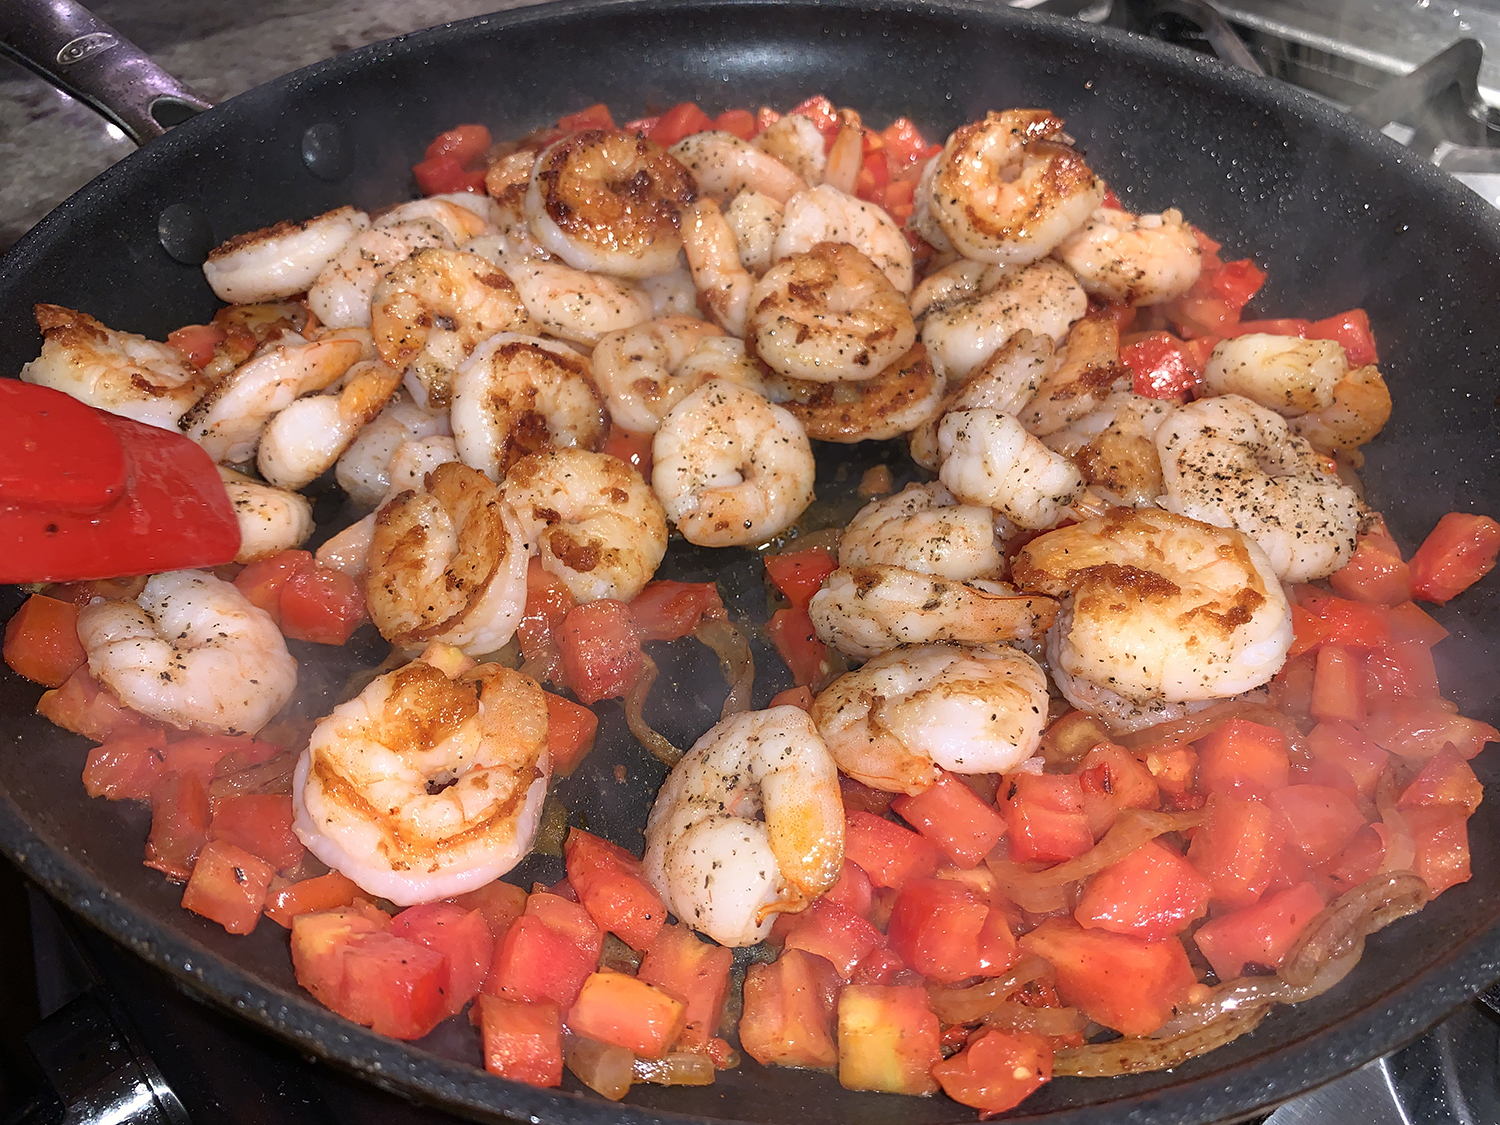
In the same skillet over medium-high, heat the remaining 1 tablespoon oil until shimmering. Add the onion and cook, stirring occasionally, until softened and beginning to brown, 3 to 4 minutes.
Stir in the shrimp and any accumulated juices, the tomatoes and chili; cook, stirring, until the shrimp are opaque throughout, 1 to 2 minutes. Off heat, stir in the lime juice, then taste and season with salt and pepper.
To serve, put the cotija, cilantro and lime wedges into small bowls. Transfer the shrimp mixture to a serving dish, then serve with the tortillas and garnishes for making tacos.
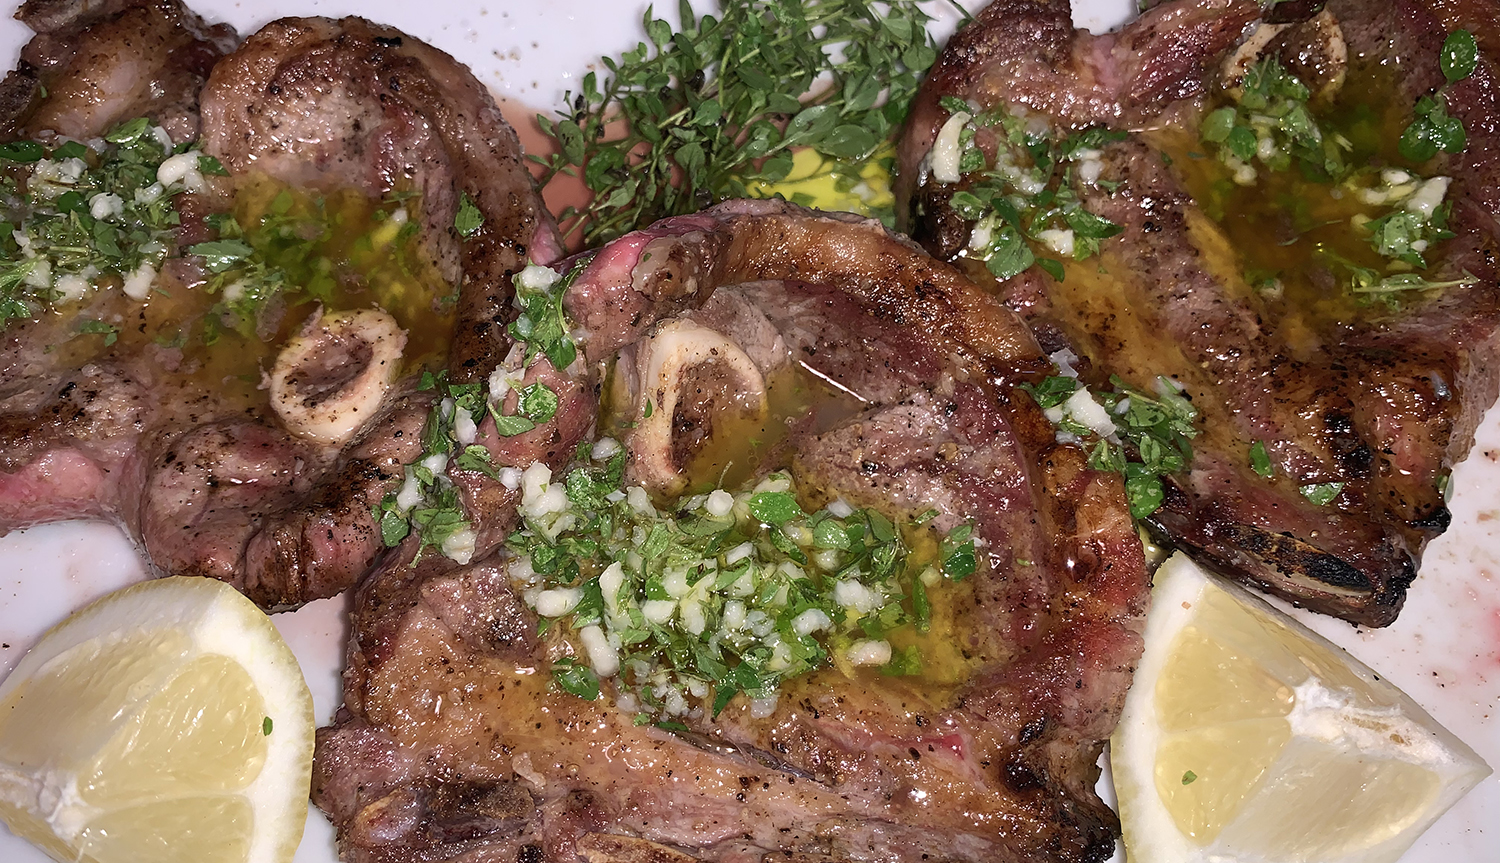
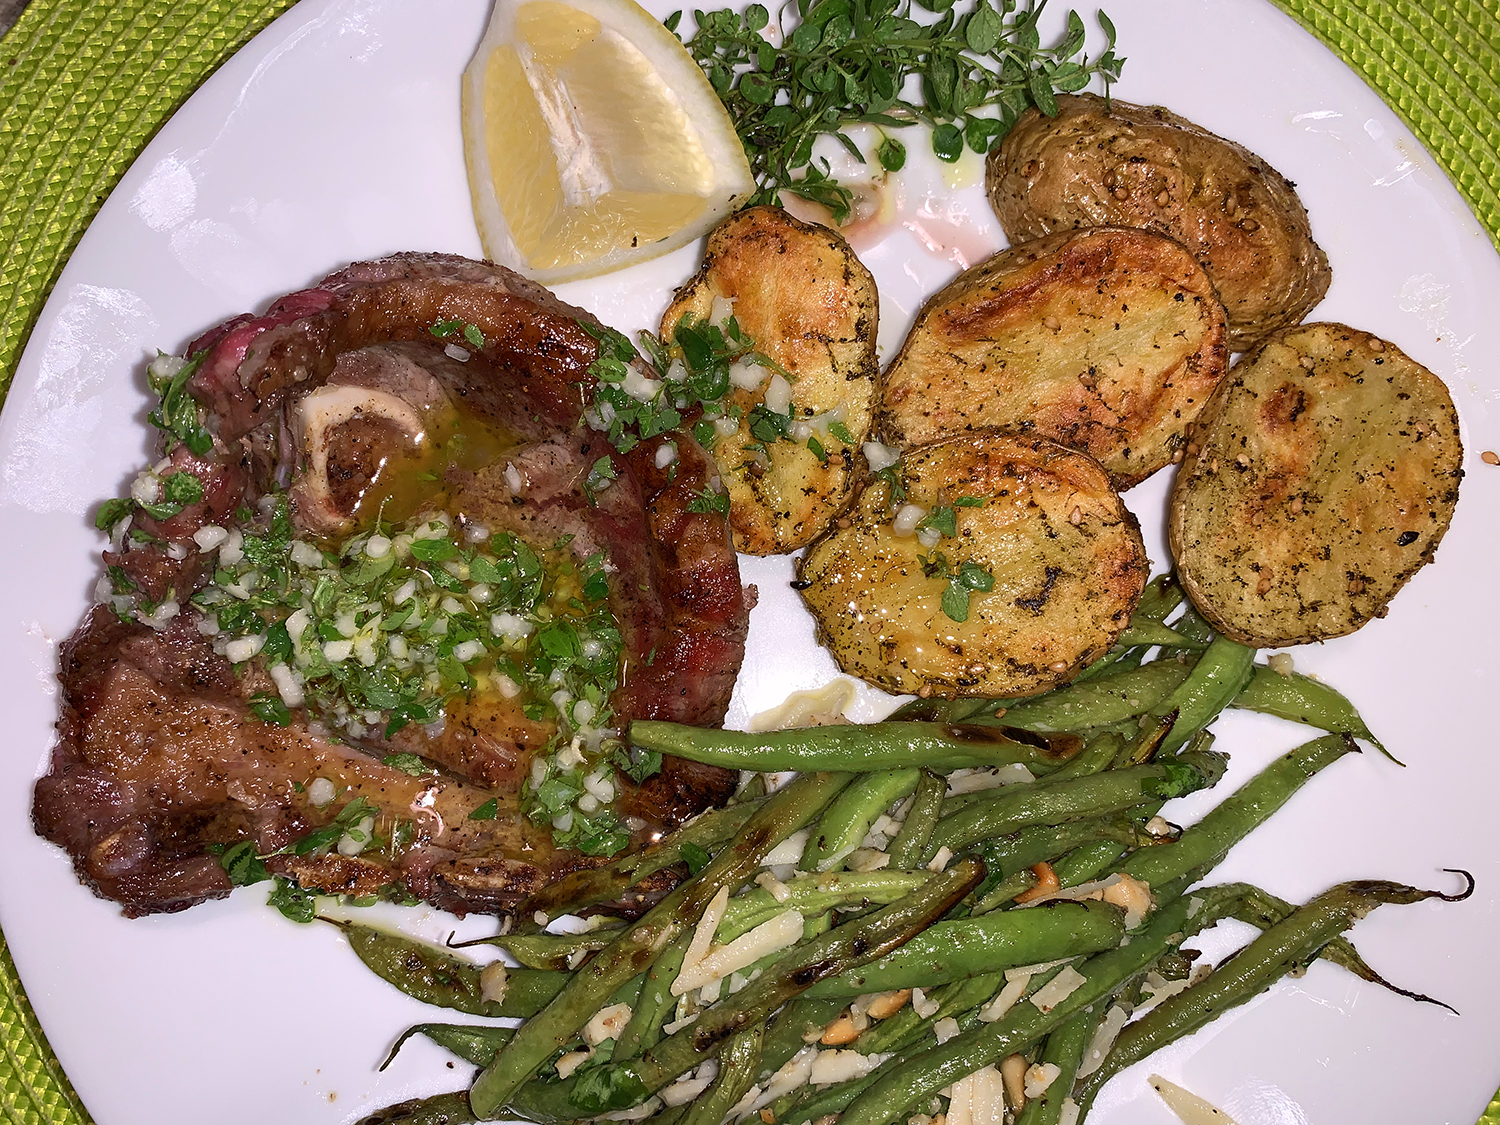
Shoulder chops aren’t the most tender, but they truly have great lamb flavor. Plus, they are far less expensive than other types of lamb chops. The steaks are usually rather thin, therefore make sure you have a hot fire ready so they get a good sear on the outside before they have a chance to overcook on the inside.
Lamb and grilling are a classic combination in Greek cookery. In just minutes over a hot fire, they are nearly ready to serve with that quintessential Greek flavoring combination of fresh oregano, fresh lemon juice, really good olive oil, and just a touch of garlic. Simple is, as simple gets.
To complete the meal we roasted some baby Yukon potatoes which benefited from some of that oregano-garlic sauce; and a side of Roasted Green Beans with Pecorino and Pine Nuts which are mixed with oil, salt, pepper, and a tad of sugar to enhance caramelization.
Four 10- to 12-ounce lamb shoulder blade chops, 1/2 inch to 1/4 inch thick
Kosher salt and freshly cracked black pepper to taste
1/4 cup extra-virgin olive oil
2 Tbsp. roughly chopped fresh oregano
1 tsp. minced garlic
1/2 lemon
Directions
Preheat grill to hot.
Dry the chops with paper towels and sprinkle them generously with salt and pepper. Place the chops on the grill and cook until well seared, 3 to 4 minutes per side. To check for doneness, use an instant-read thermometer. The chops are rare at 120°F, medium rare at 125°F, medium at 130°F, and well done at 145°F and higher. FYI, lamb can take on a gamey flavor when cooked past medium.
When the chops are done, remove them from the grill, cover them loosely with foil, and let them rest for 5 minutes.
Meanwhile, in a small bowl, combine the olive oil, oregano, and garlic and mix well.
Spoon the garlic mixture over the lamb chops, squeeze the lemon on top of them, and serve hot.
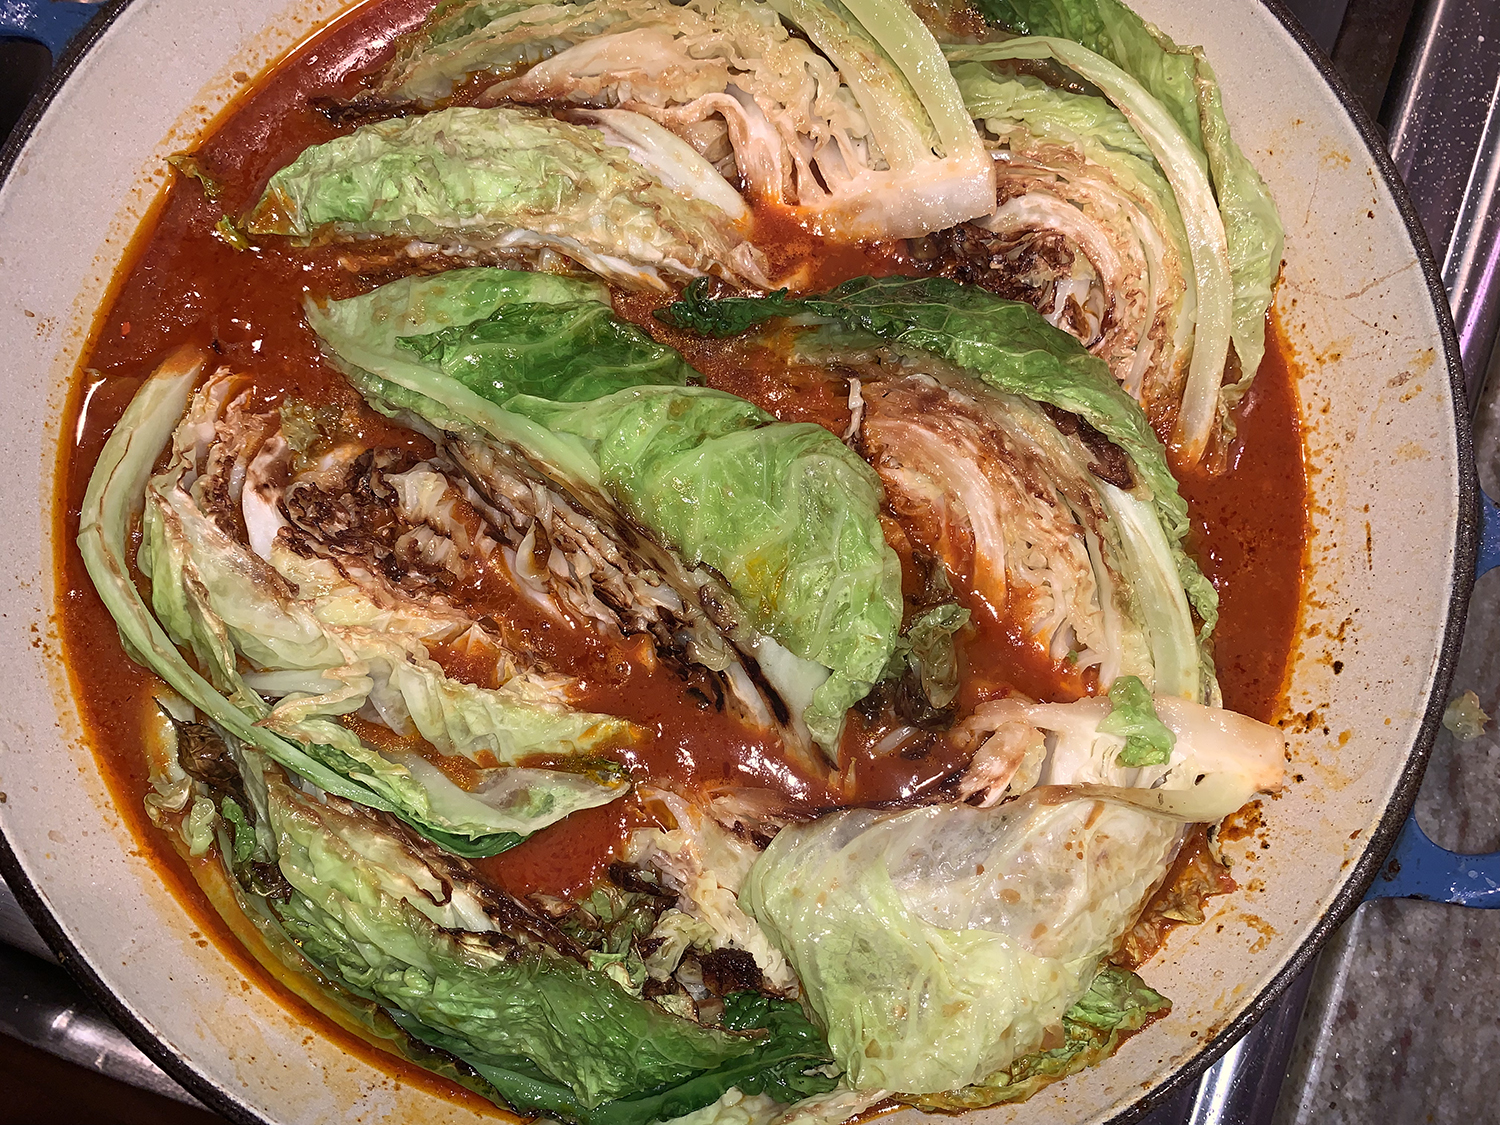
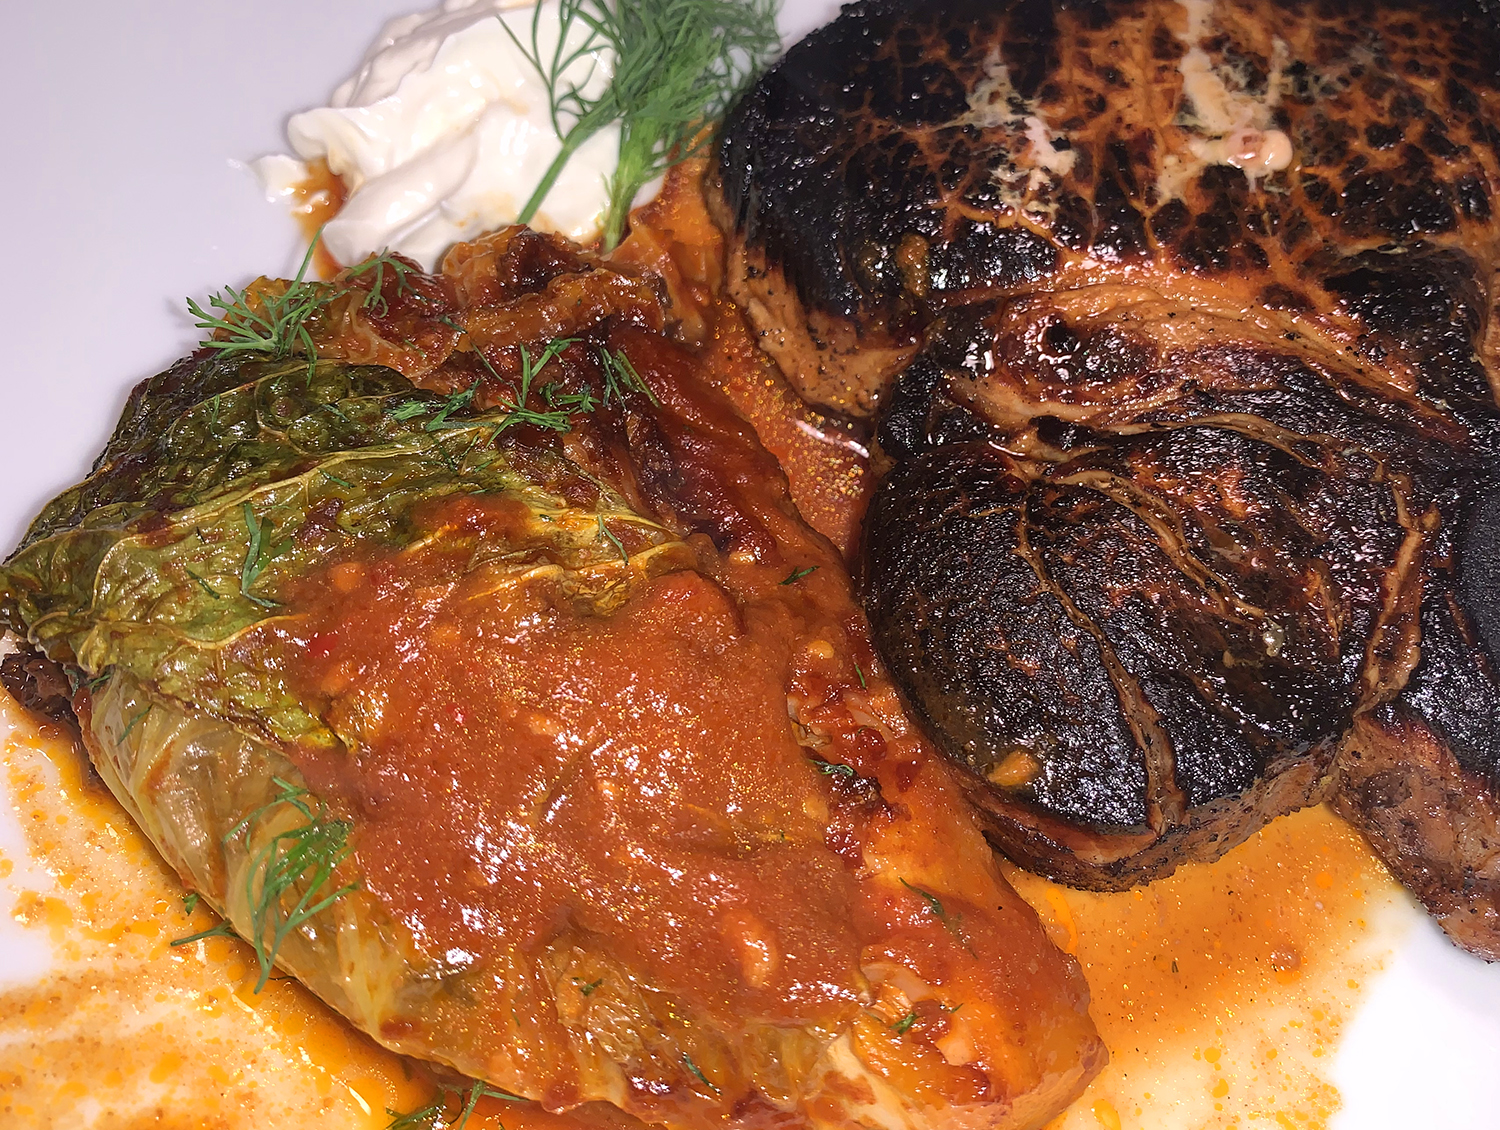
According to Bon Appétit, this is one of the easiest, most delicious ways to cook down a whole head of cabbage until it’s falling-apart tender. And those gorgeous Autumn colors welcome you to a new cooler season.
Numerous reviewers mentioned they had, or wished they had, doubled the sauce, therefore I went ahead with that suggestion. I also added some smoked paprika, just enough to give it a slightly smoky kick. Finally, homemade chicken stock was subbed for the water. Of course, if you are vegetarian you could keep the water or use vegetable stock.
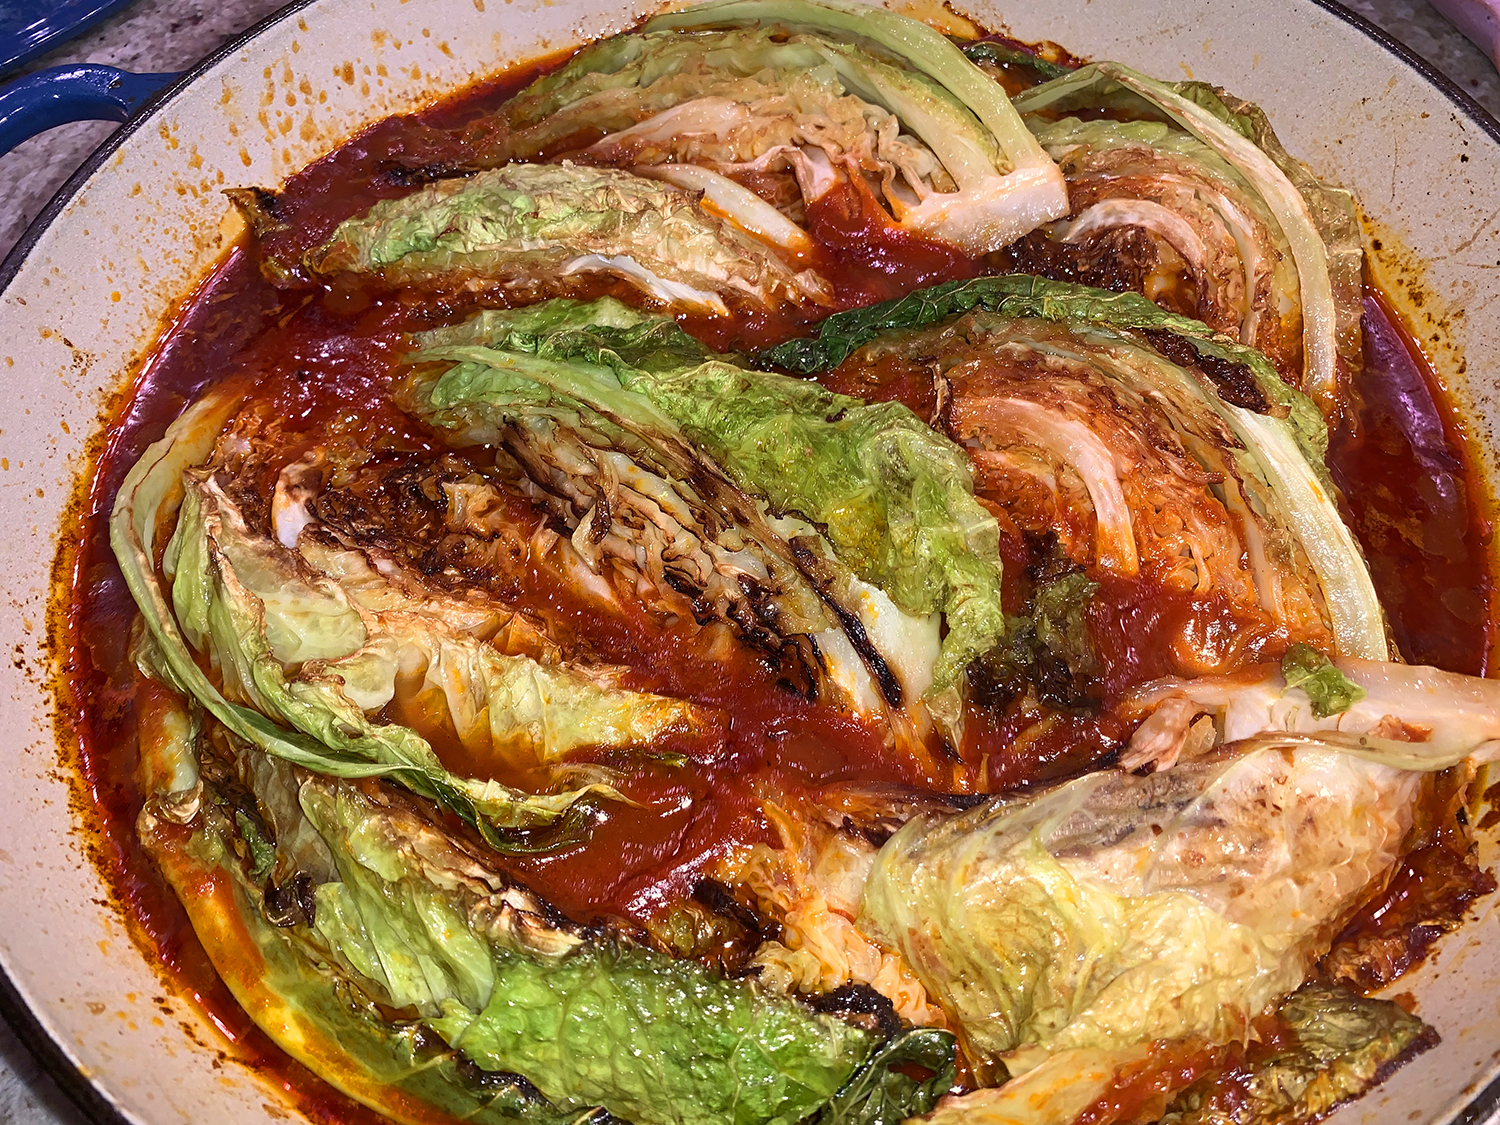
If the spiced tomato paste has reduced and the pan starts getting dry and dark before the cabbage is ready, just add a splash of water to loosen and let it keep going.
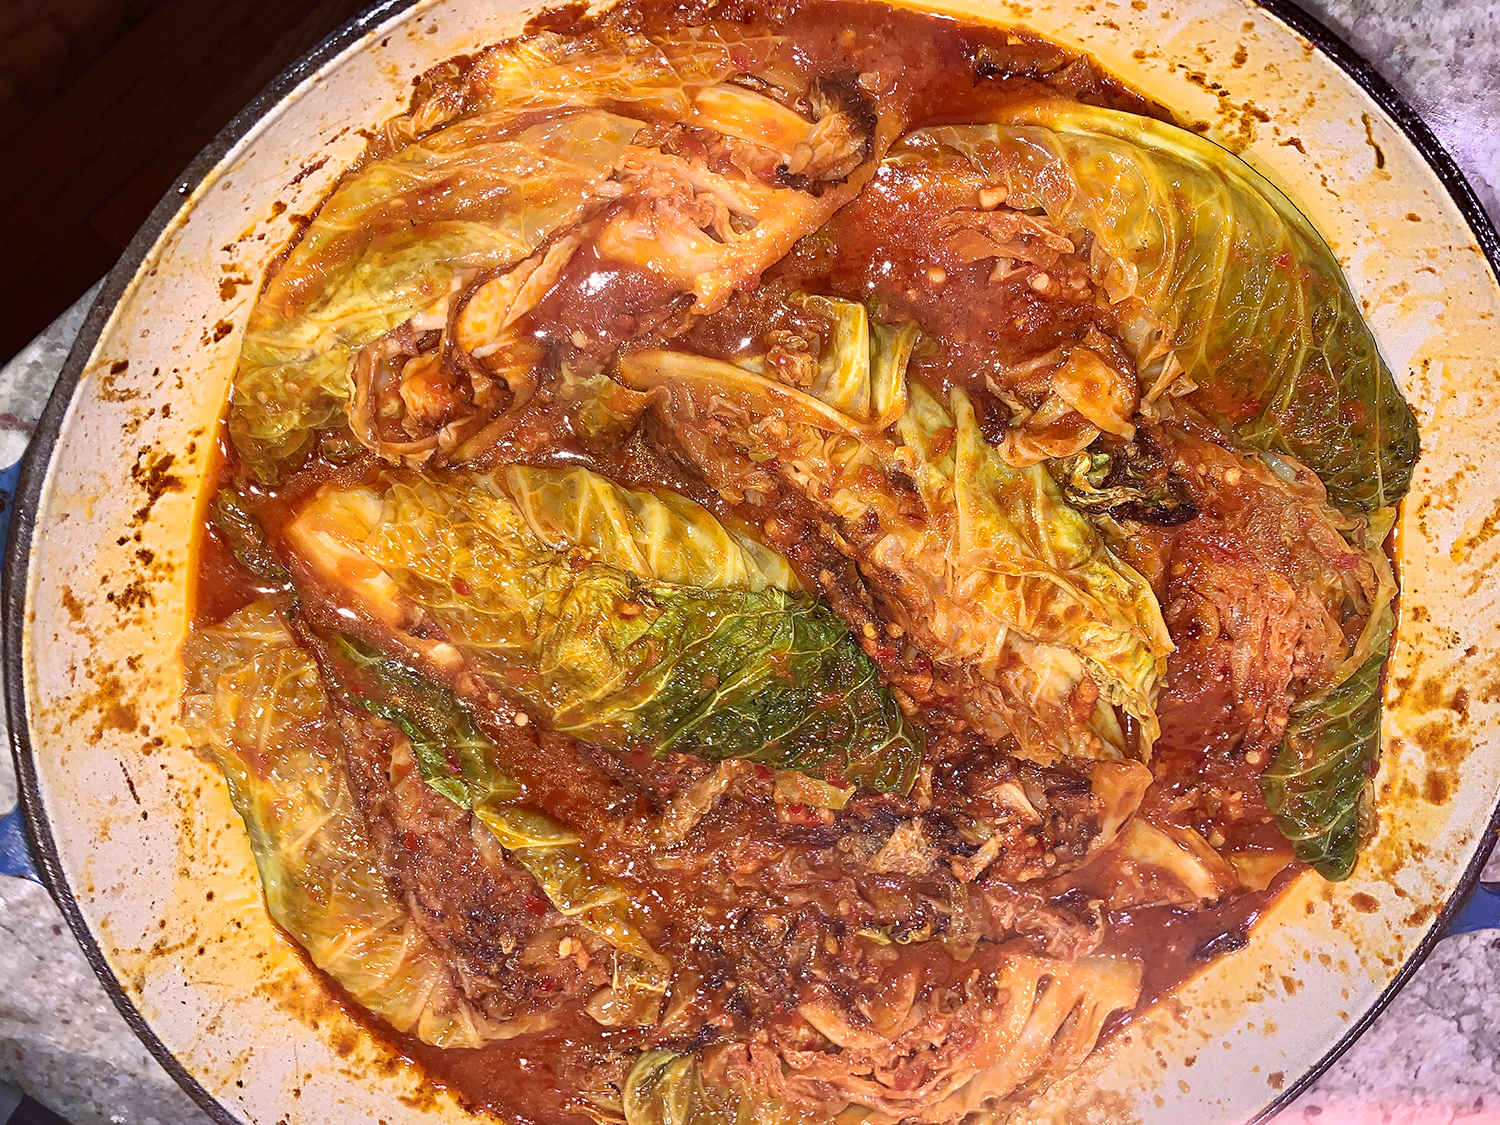
The Hubs couldn’t get enough, he even wanted to drink any leftover sauce—good thing I doubled it! He said the aroma and taste reminded him of Gołąbki without the filling. Smacznego!
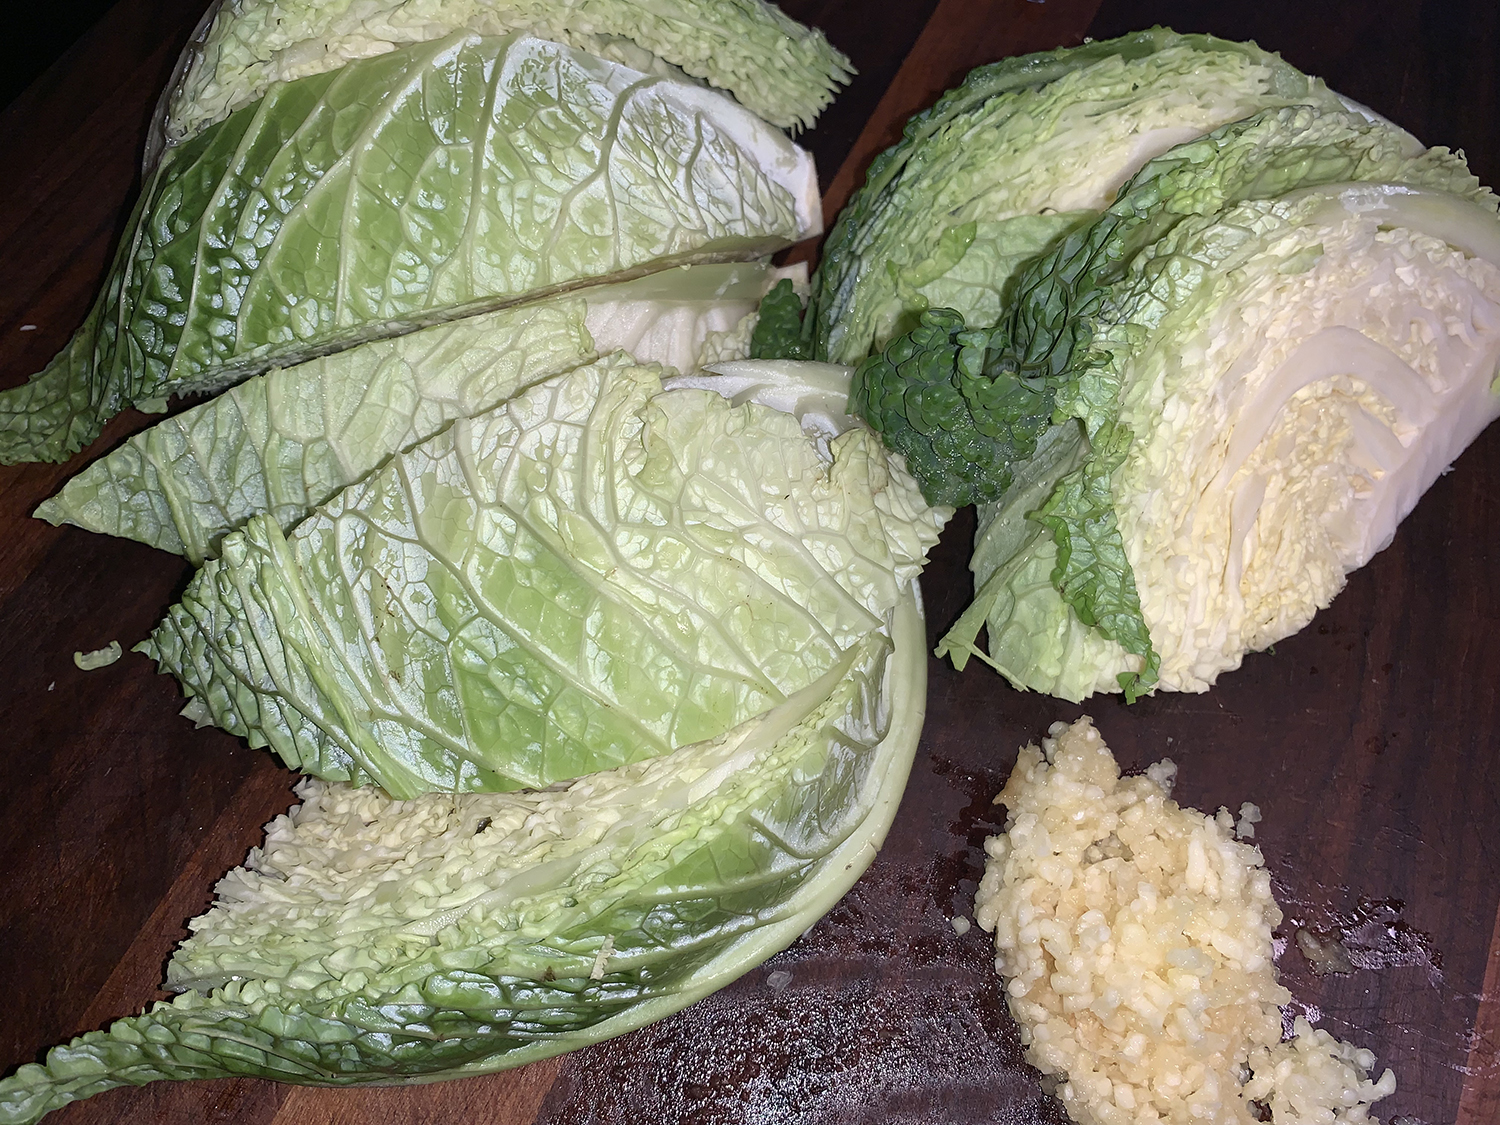
1 medium head of savoy cabbage (about 2 lb. total)
½ cup extra-virgin olive oil, divided
Kosher salt
2 cups chicken stock, preferably homemade (or water to keep it vegetarian)
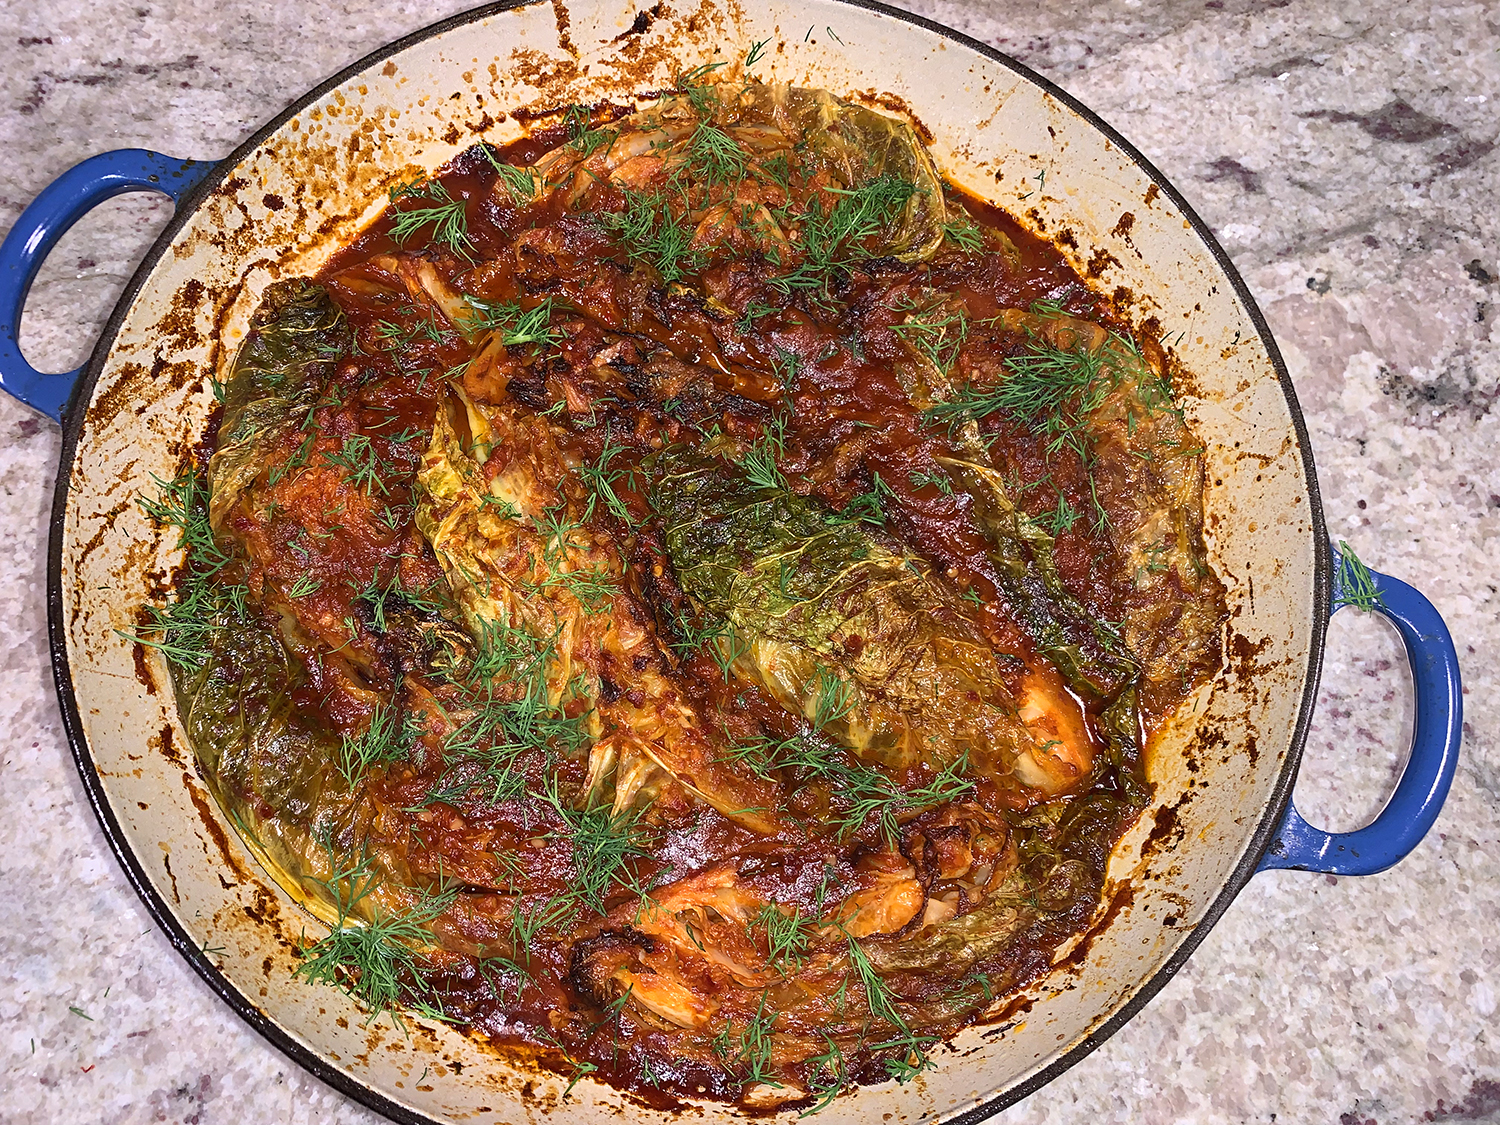
3 Tbsp. chopped dill, parsley, or cilantro
Full-fat Greek yogurt or sour cream (for serving)
Directions
Preheat oven to 350°. Mix tomato paste, garlic, coriander, cumin, and red pepper flakes in a small bowl.
Cut cabbage in half through core. Cut each half through core into 4 wedges, so that the core remains on each piece.
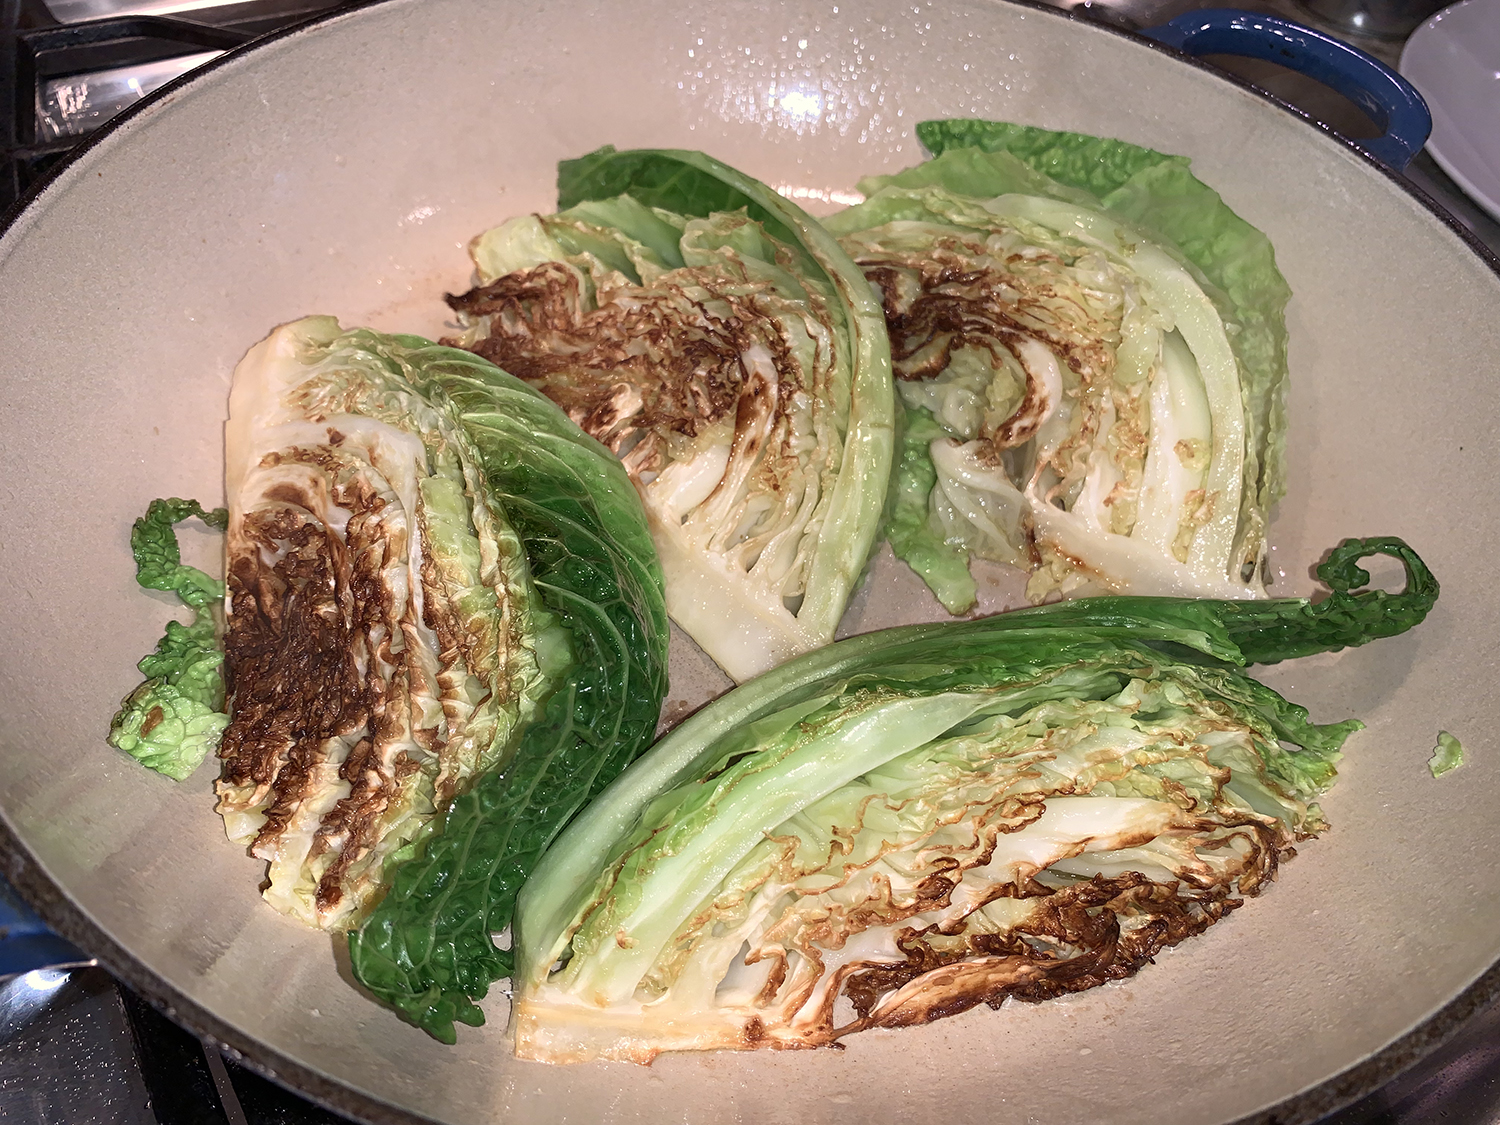
Heat ¼ cup oil in a large cast-iron skillet over medium-high. Working in batches if needed, add cabbage to pan cut side down and season with salt. Cook, turning occasionally, until lightly charred, about 4 minutes per side. Transfer cabbage to a plate. You may have to add a bit more oil to the pan if doing a second batch.
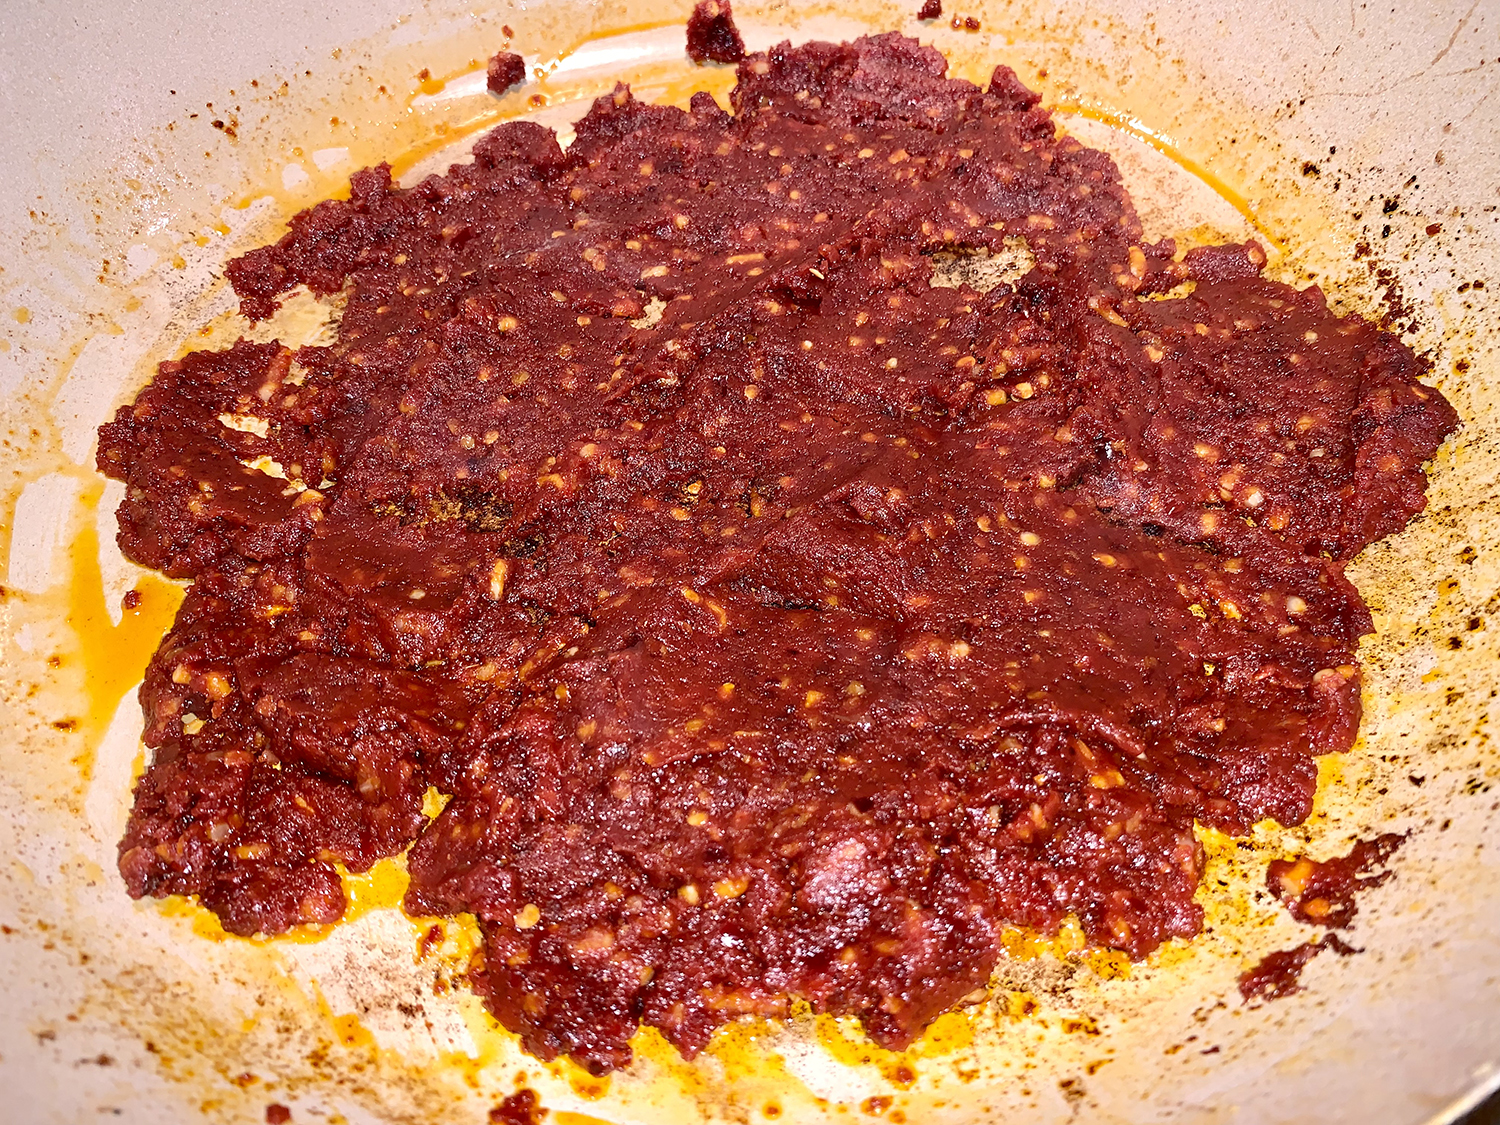
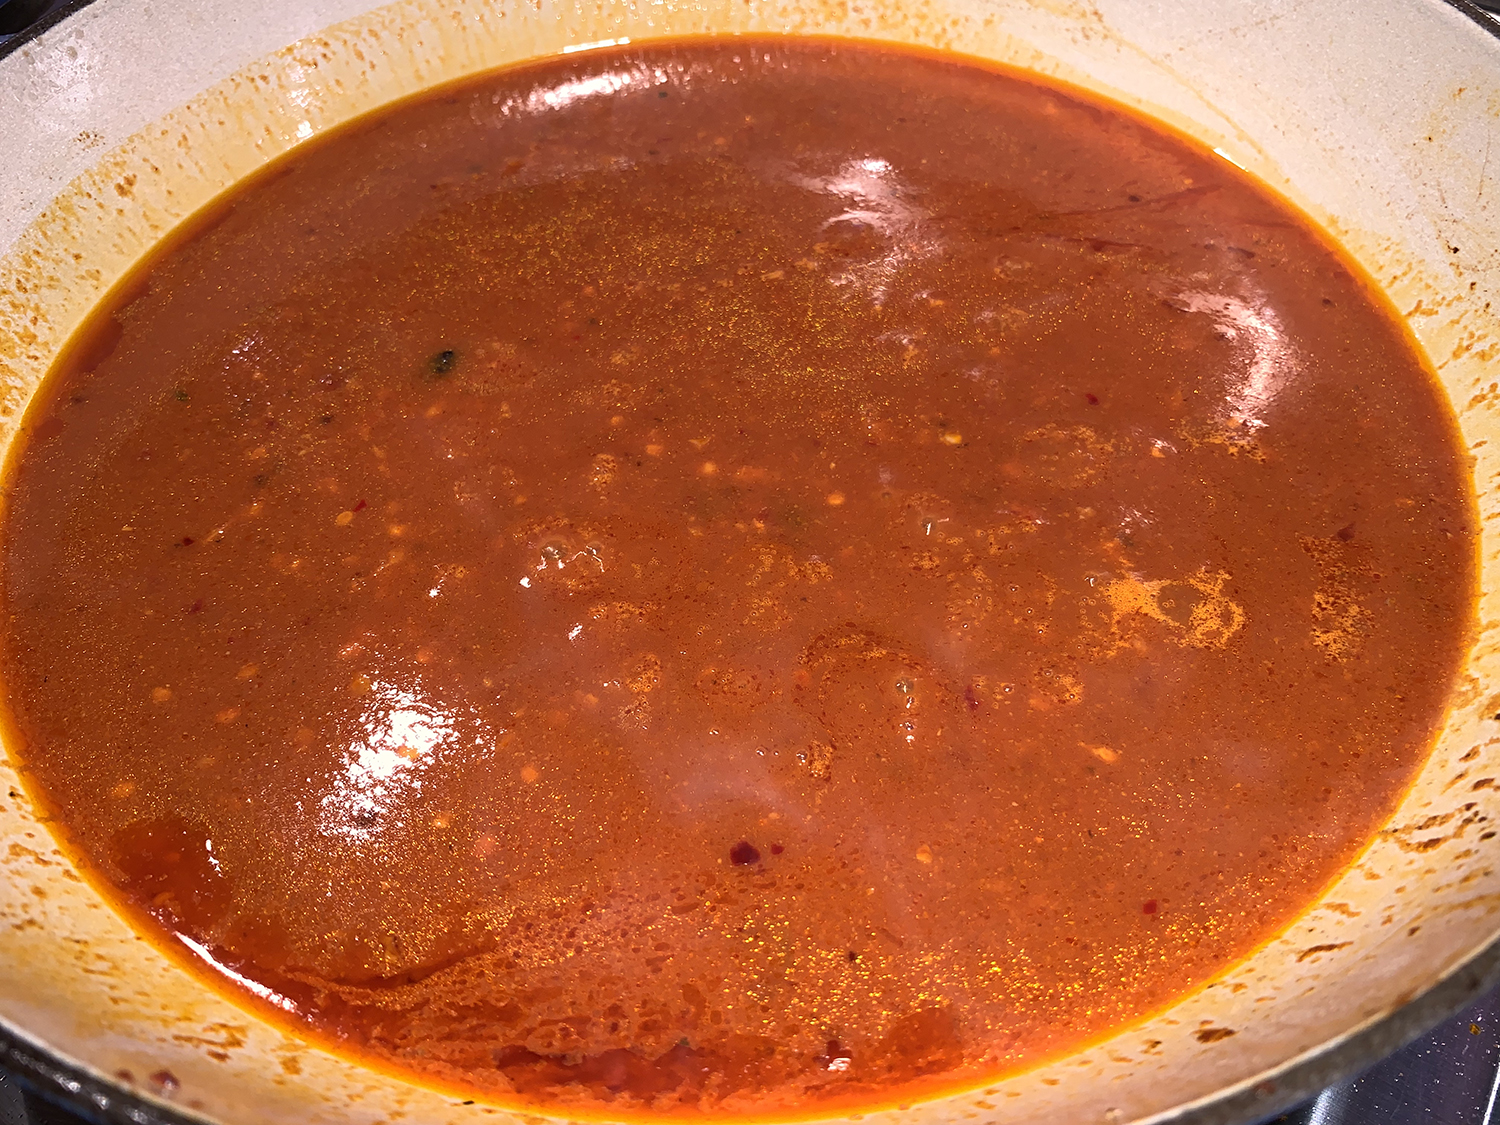
Pour remaining ¼ cup oil into skillet. Add spiced tomato paste and cook over medium heat, stirring frequently, until tomato paste begins to split and slightly darken, 3–4 minutes. Pour in enough chicken stock (or water) to come halfway up sides of pan (about 2 cups), season with salt, and bring to a simmer.
Nestle cabbage wedges back into skillet (they should have shrunk while browning; a bit of overlap is okay). Transfer cabbage to oven and bake, uncovered and turning wedges halfway through, until very tender, liquid is mostly evaporated, and cabbage is caramelized around the edges, 40–50 minutes.
Scatter dill over cabbage. Serve with yogurt alongside.