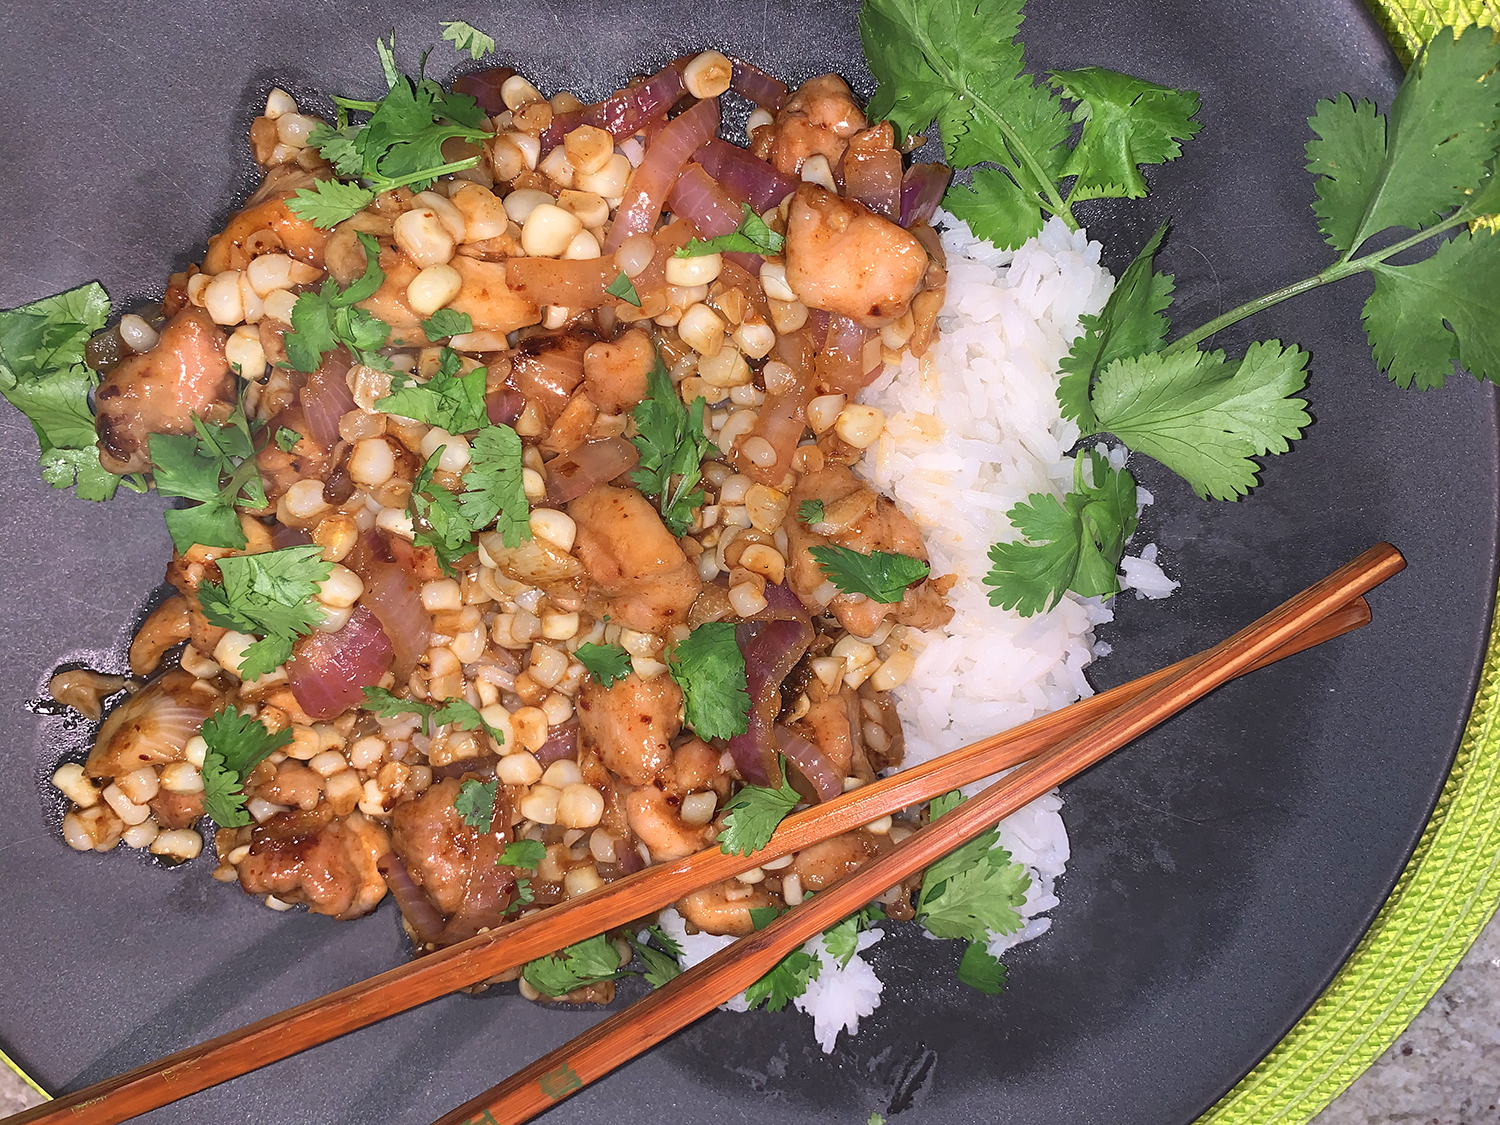
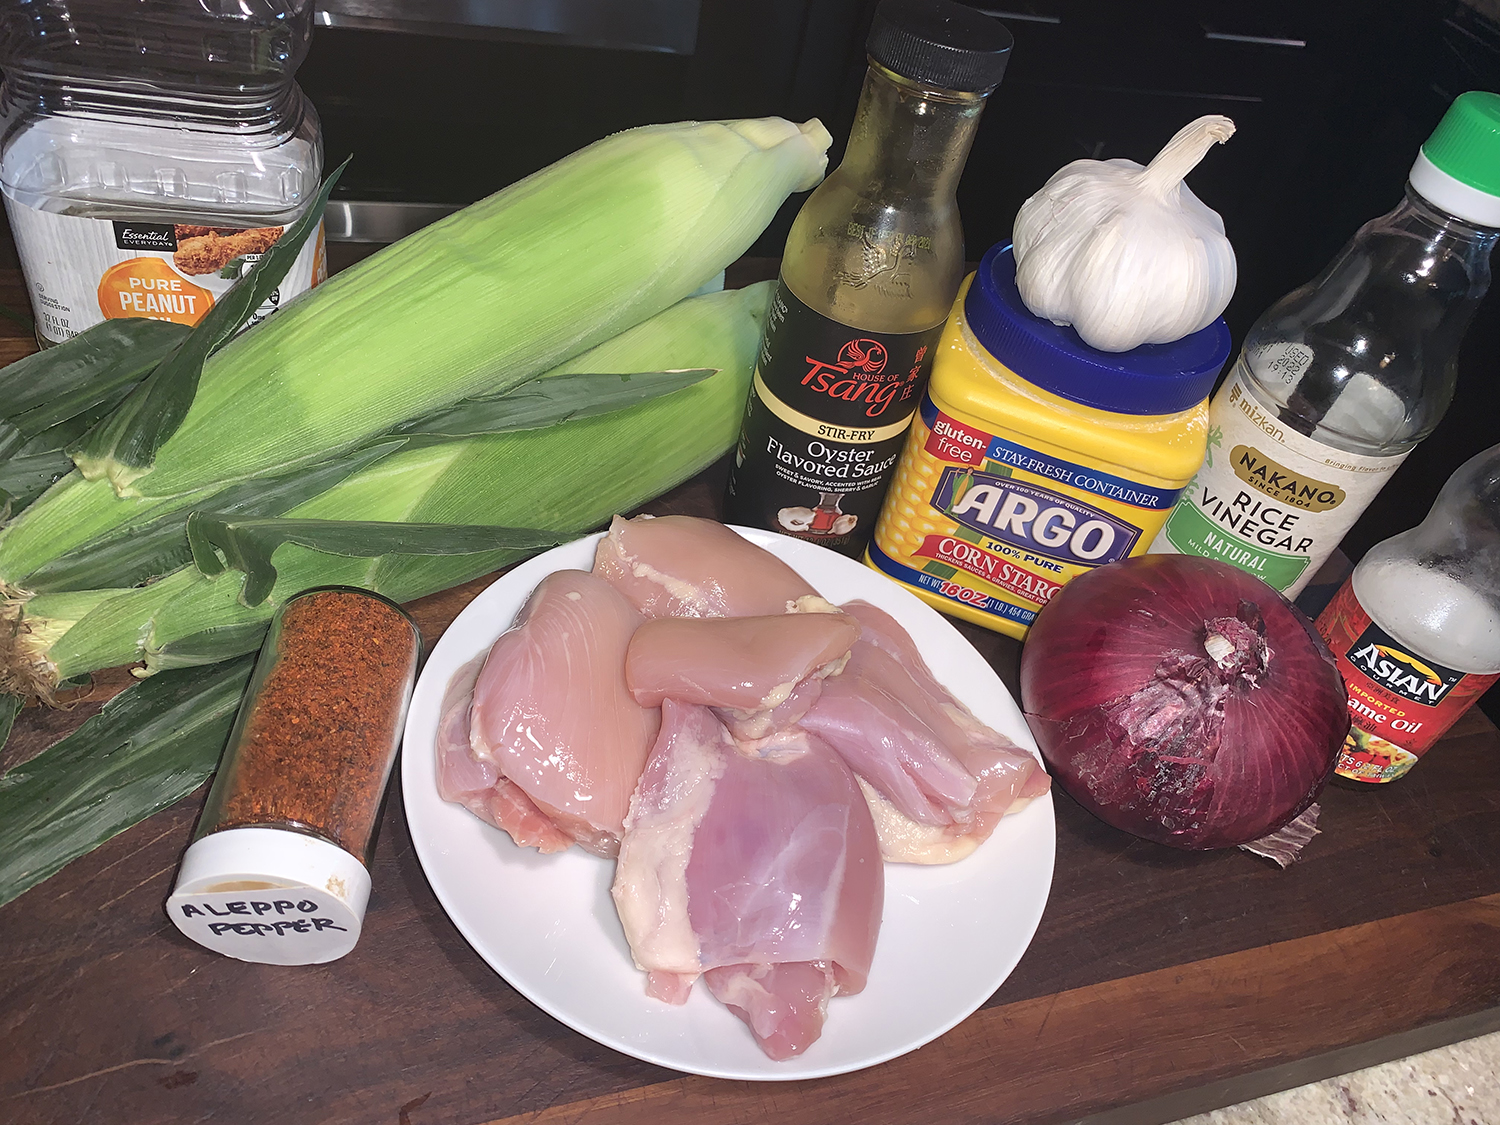
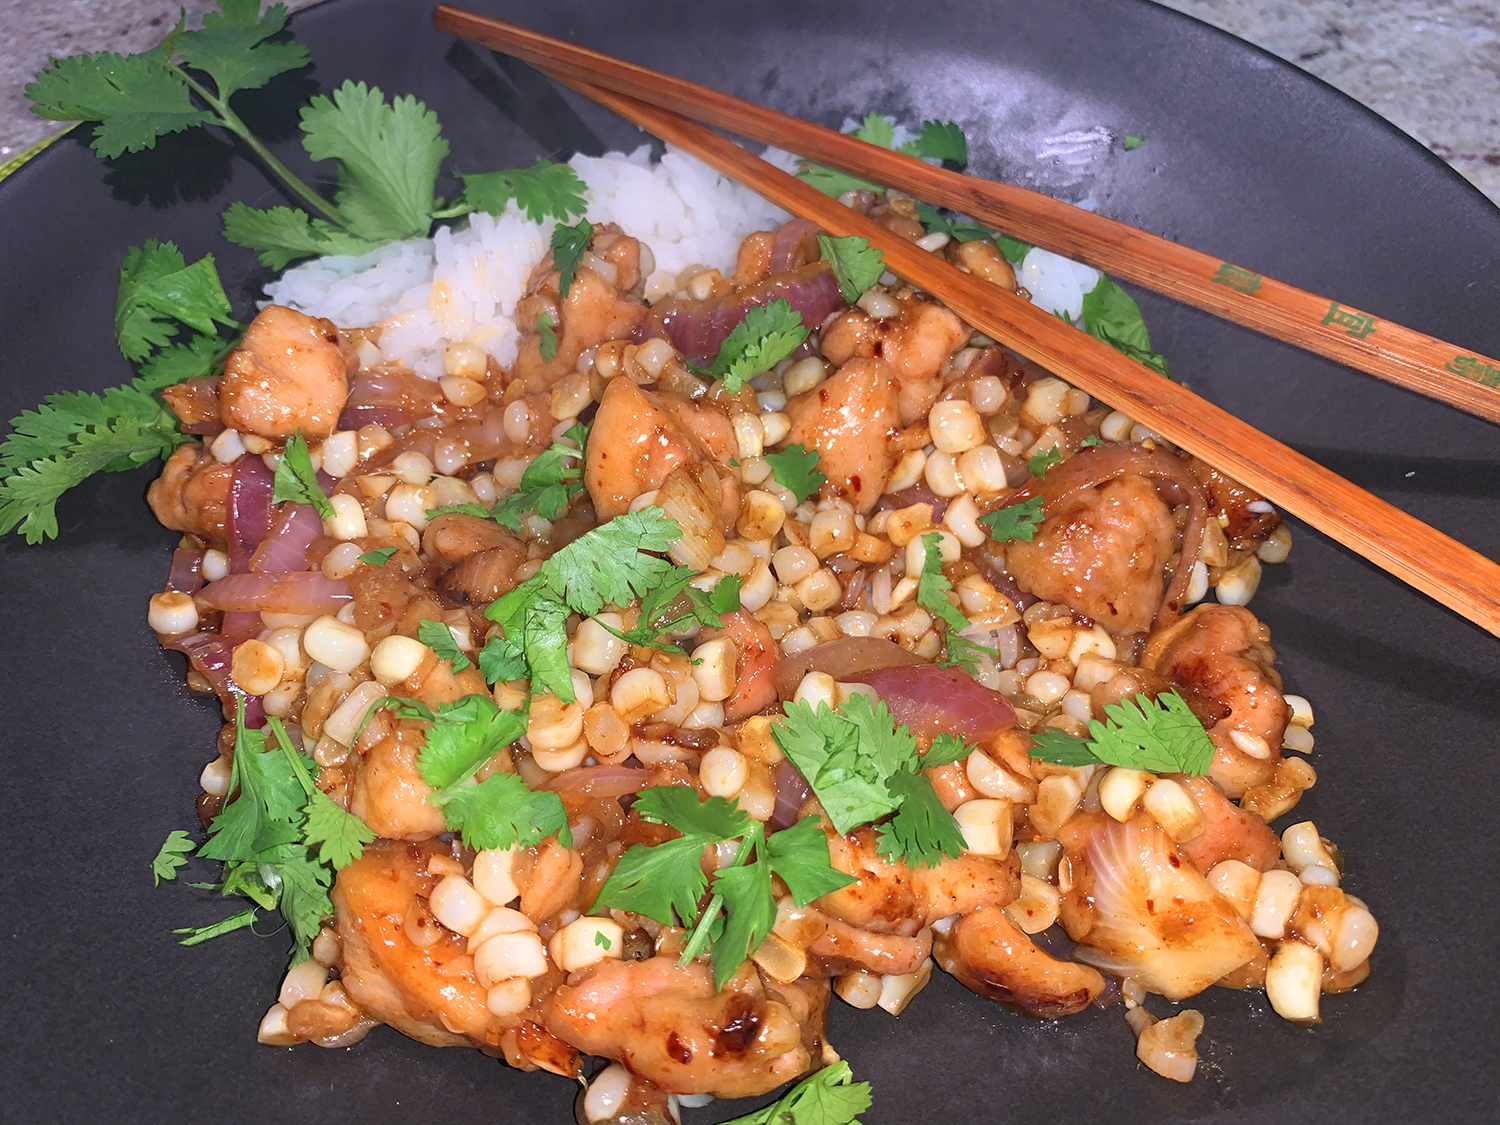
You’ll enjoy this unusual stir-fry combination utilizing fresh corn kernels cut from the cob. The corn, along with rice, does lean toward a carb-heavy meal, but it is so satisfying and full of flavor. Coating the chicken pieces in cornstarch thickens the sauce at the end so that it clings to the meat and veggies.
Rarely overpowering, oyster sauce is packed with umami and adds tons of depth to stir-fries like this one, boosting flavor in marinades, and just being all-around incredibly delicious. No ripe corn at the market? Bon Appétit suggests to swap in peppers, peas, mushrooms, or summer squash.
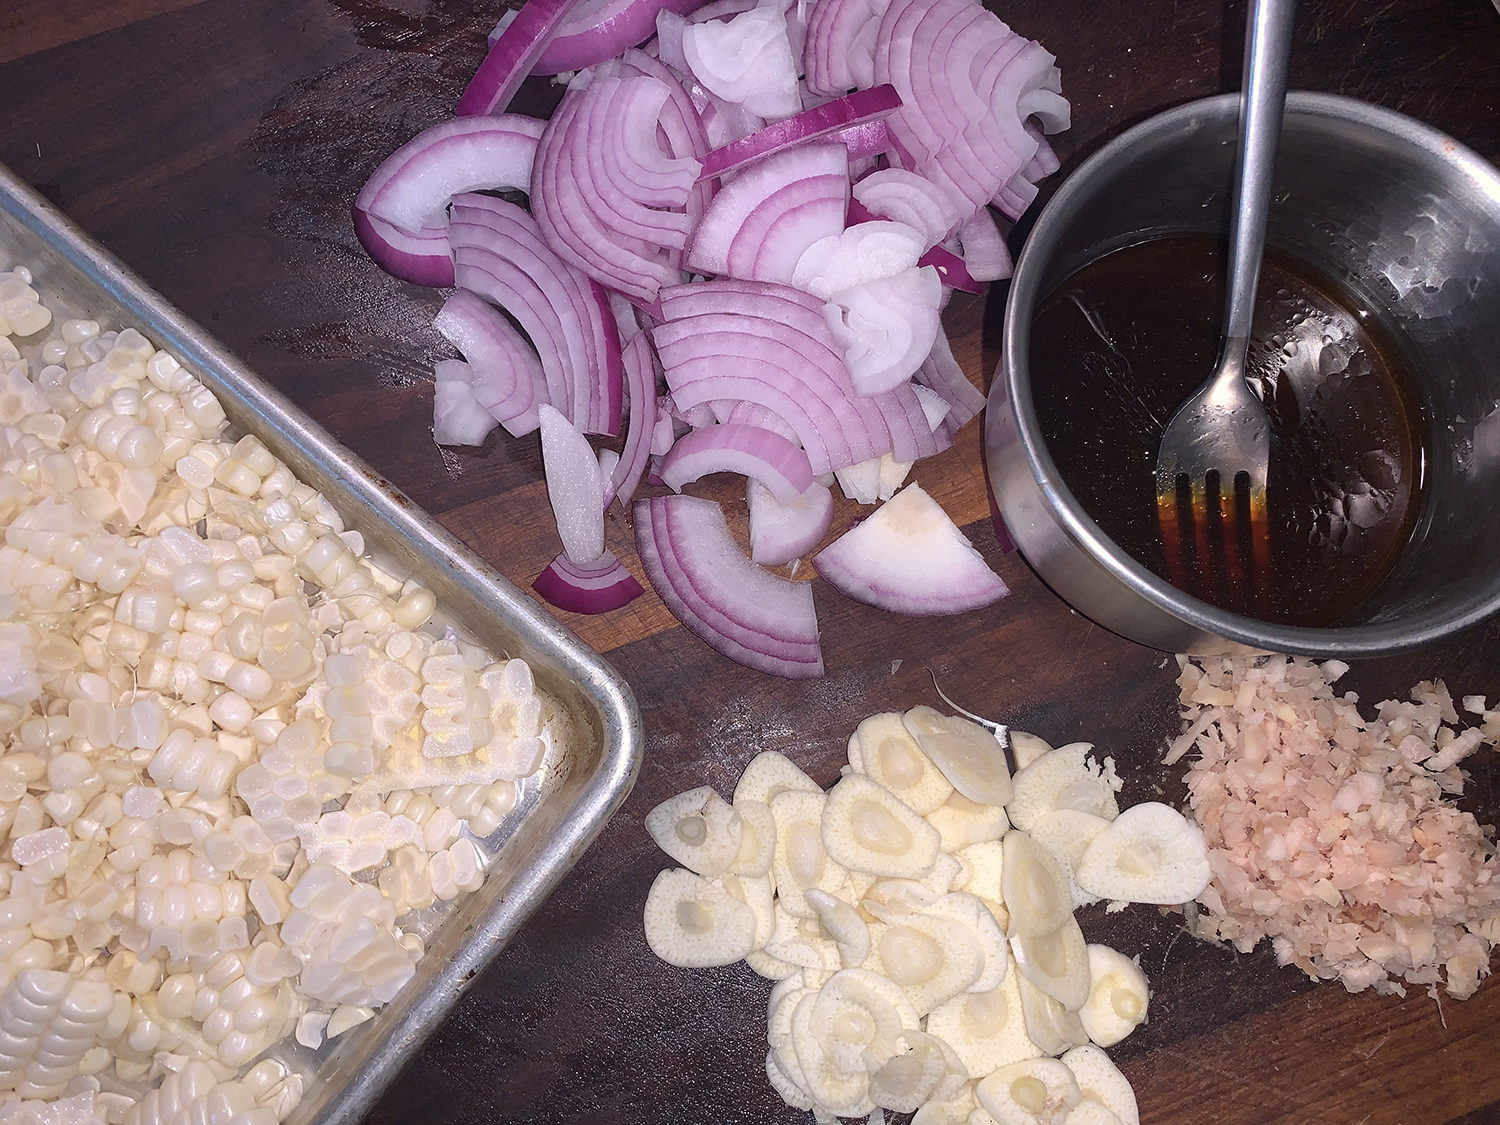
As with any stir-fry, make sure to chop and prep all of the ingredients ahead of time because once you start cooking, the process goes incredibly fast and you need to keep swinging that metal spatula around.
½ tsp. (or more) Aleppo-style pepper or other mild chile flakes
3 ears of corn, kernels cut from cobs
Steamed rice and cilantro leaves with tender stems (for serving)
Directions
Stir together oyster sauce, vinegar, sesame oil, and 2 Tbsp. water in a small bowl. Set aside.
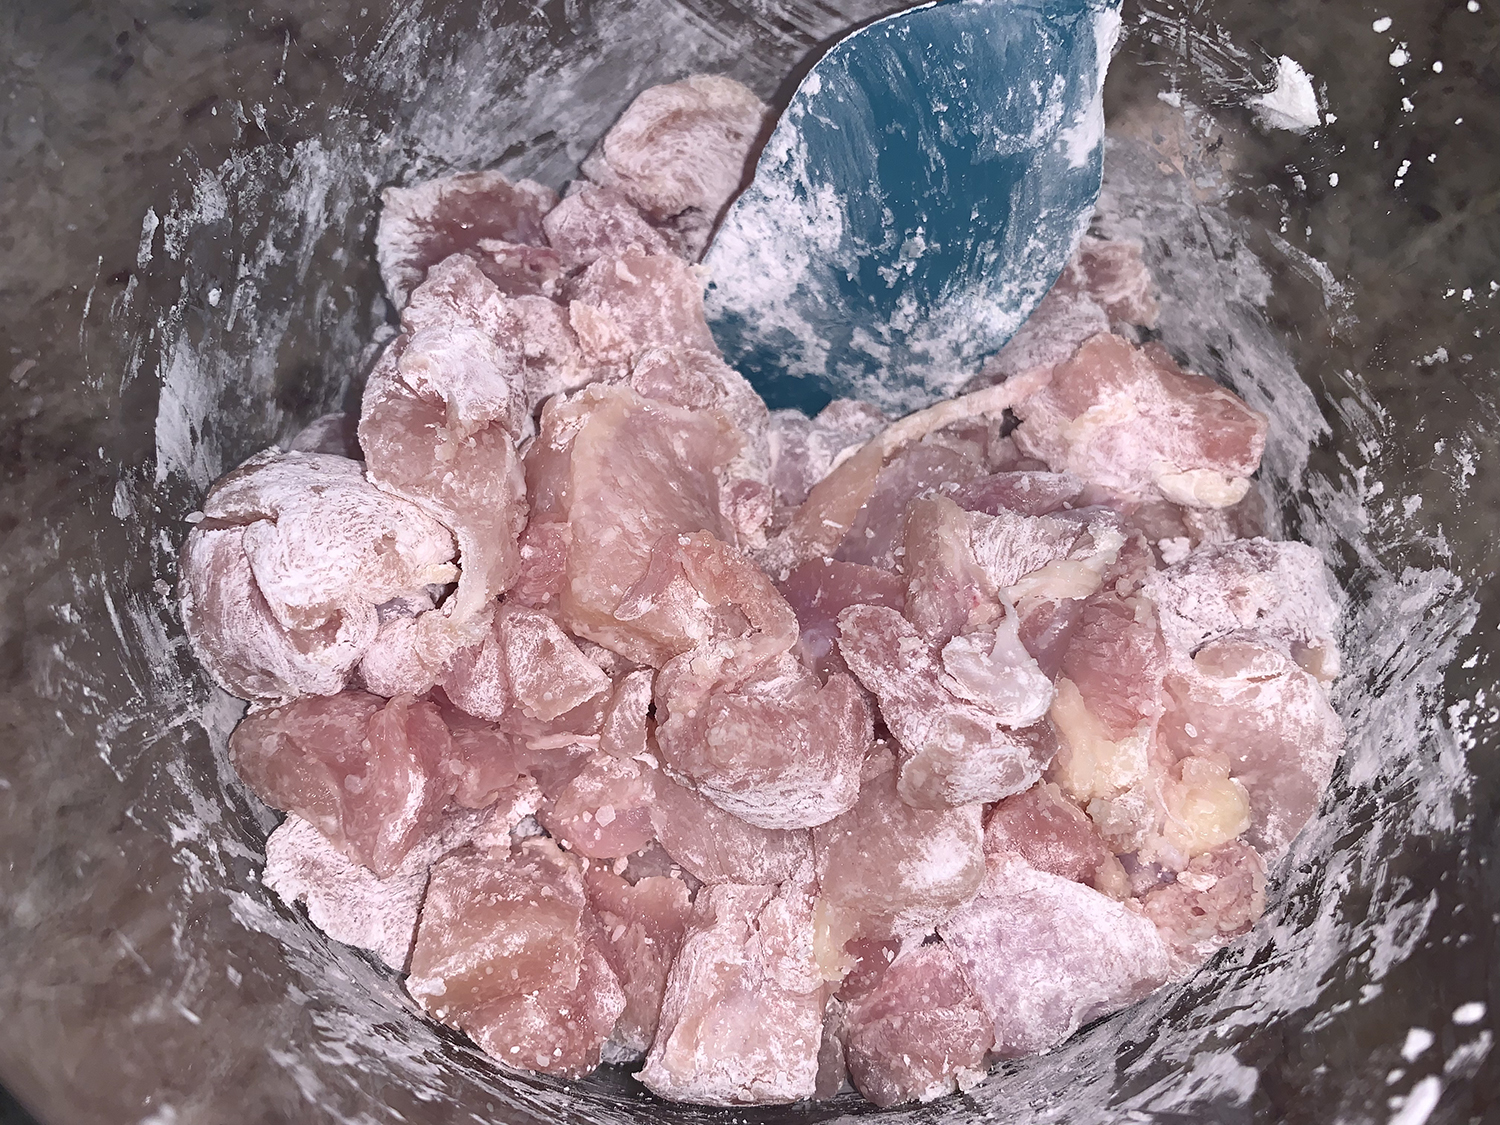
Place chicken in a medium bowl. Season with salt and sprinkle with cornstarch; toss lightly to coat.
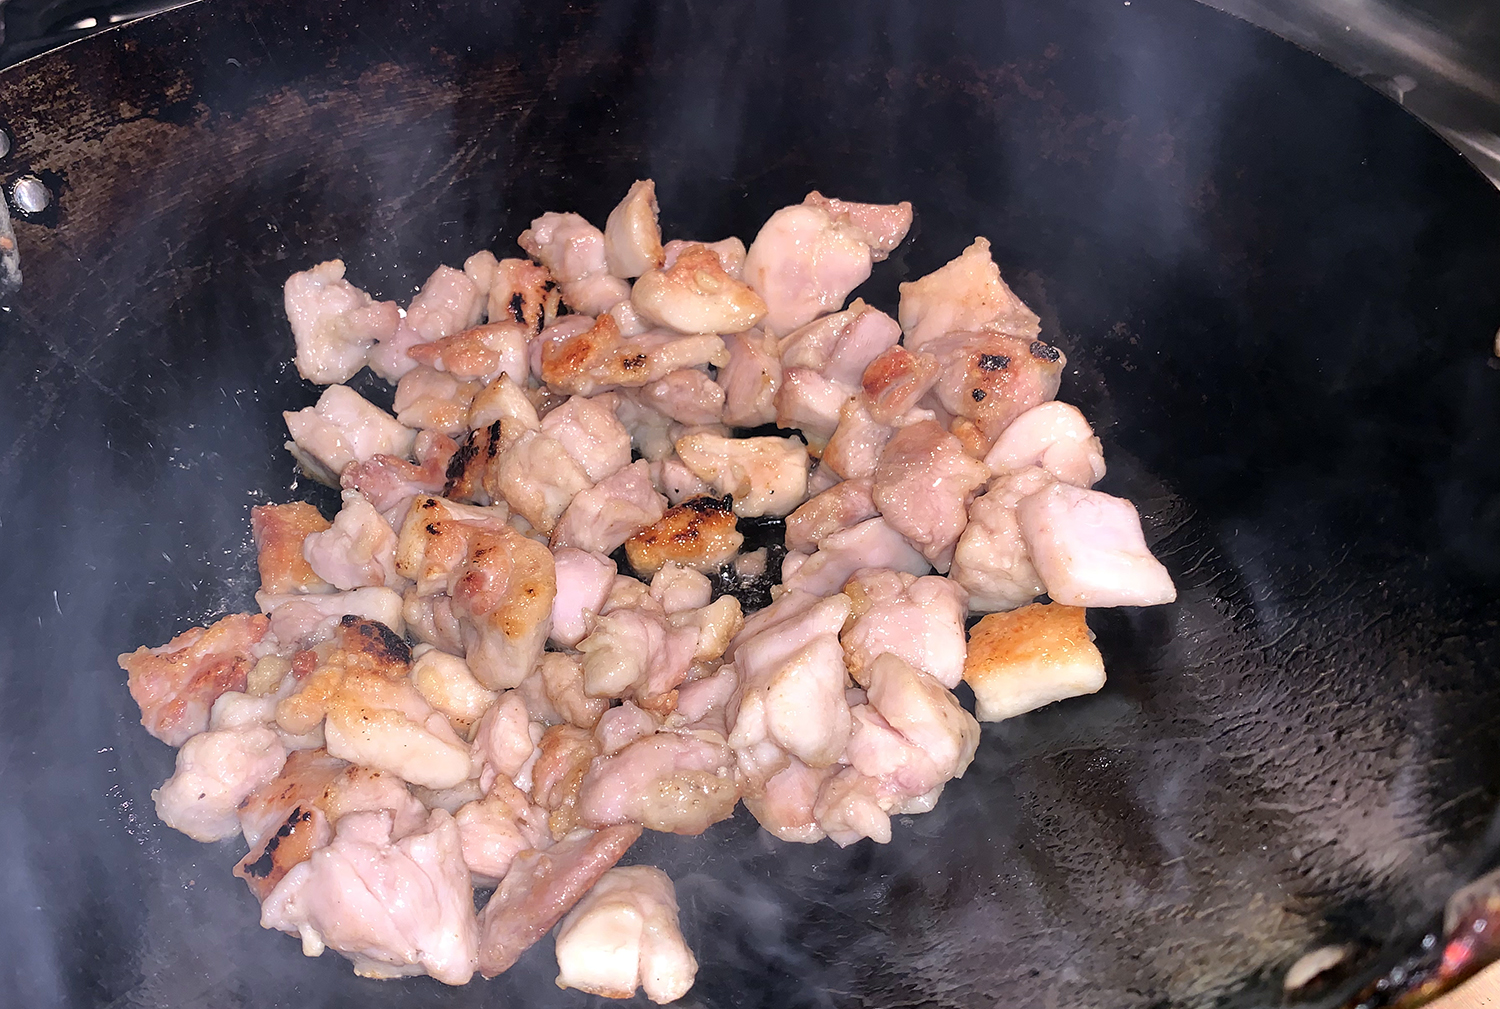
Heat 2 Tbsp. vegetable oil in a large well-seasoned wok or nonstick skillet over medium-high. Cook chicken, tossing occasionally, until golden brown and nearly cooked through, 6–8 minutes. Transfer to a large bowl.
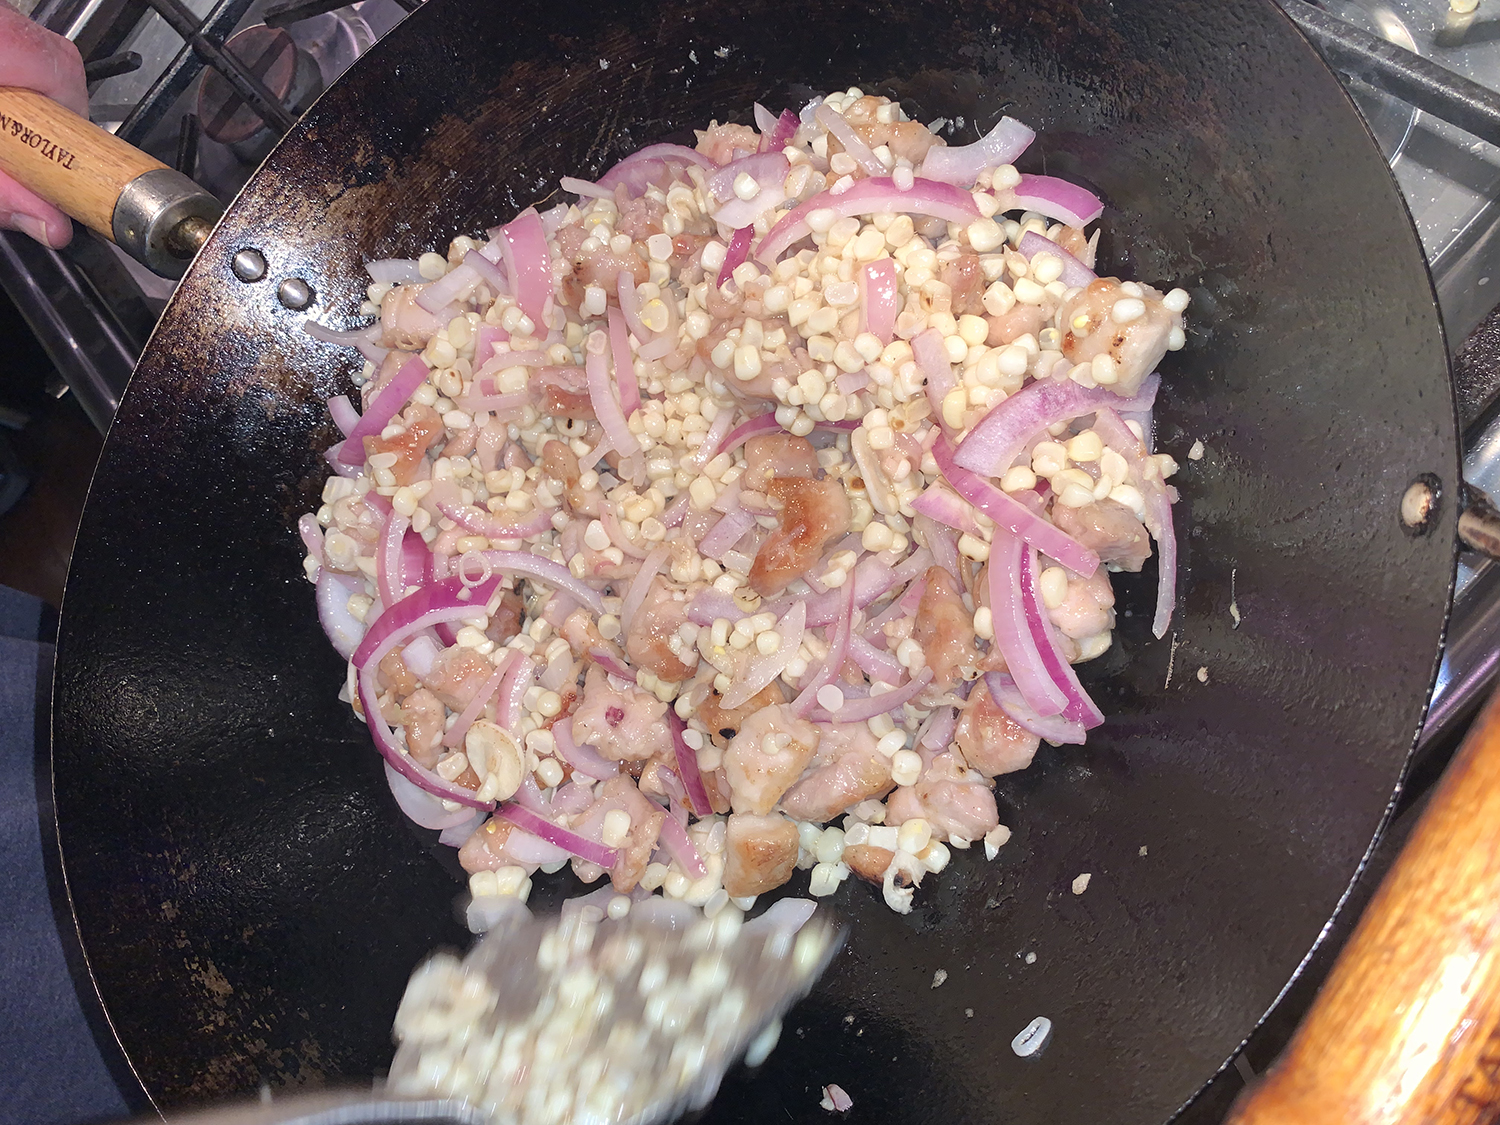
To the wok, add red onion, garlic, ginger, Aleppo-style pepper, and remaining 2 Tbsp. oil. Cook, tossing, until vegetables are softened, about 2 minutes.
Add corn and cook, tossing often, until tender, about 3 minutes.
Return chicken to wok with vegetables.
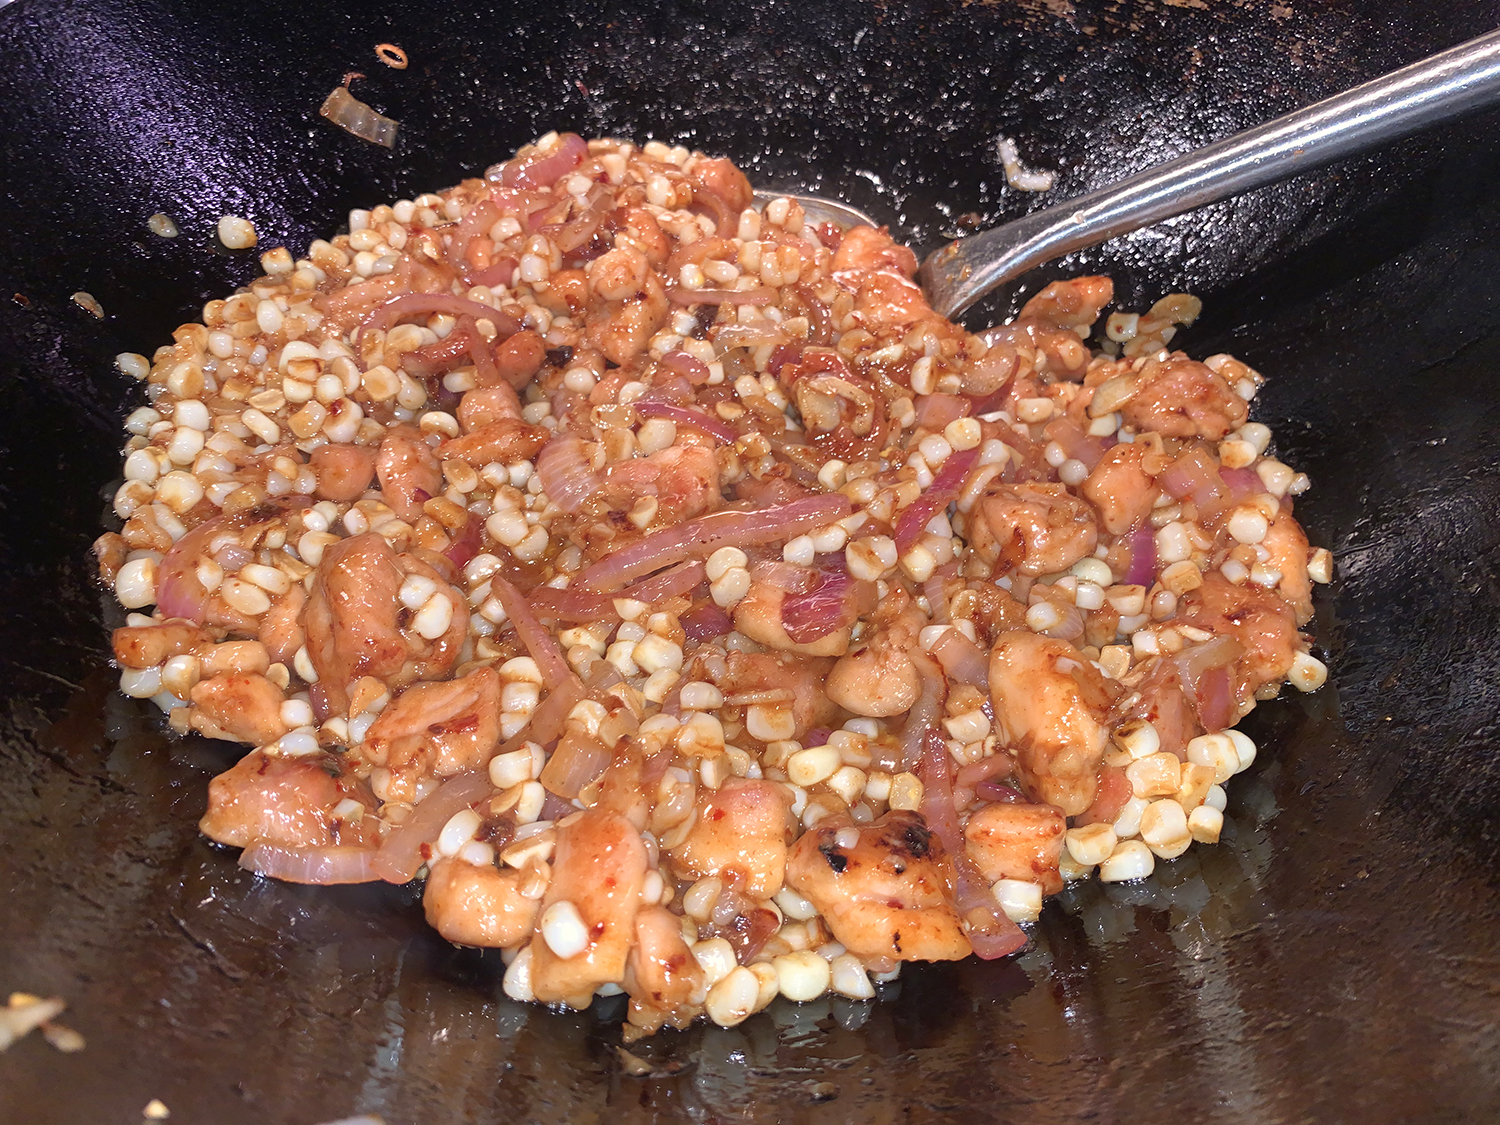
Stir in reserved oyster sauce mixture and cook, tossing often, until reduced nearly to a glaze, about 2 minutes. Taste and season with salt if needed.
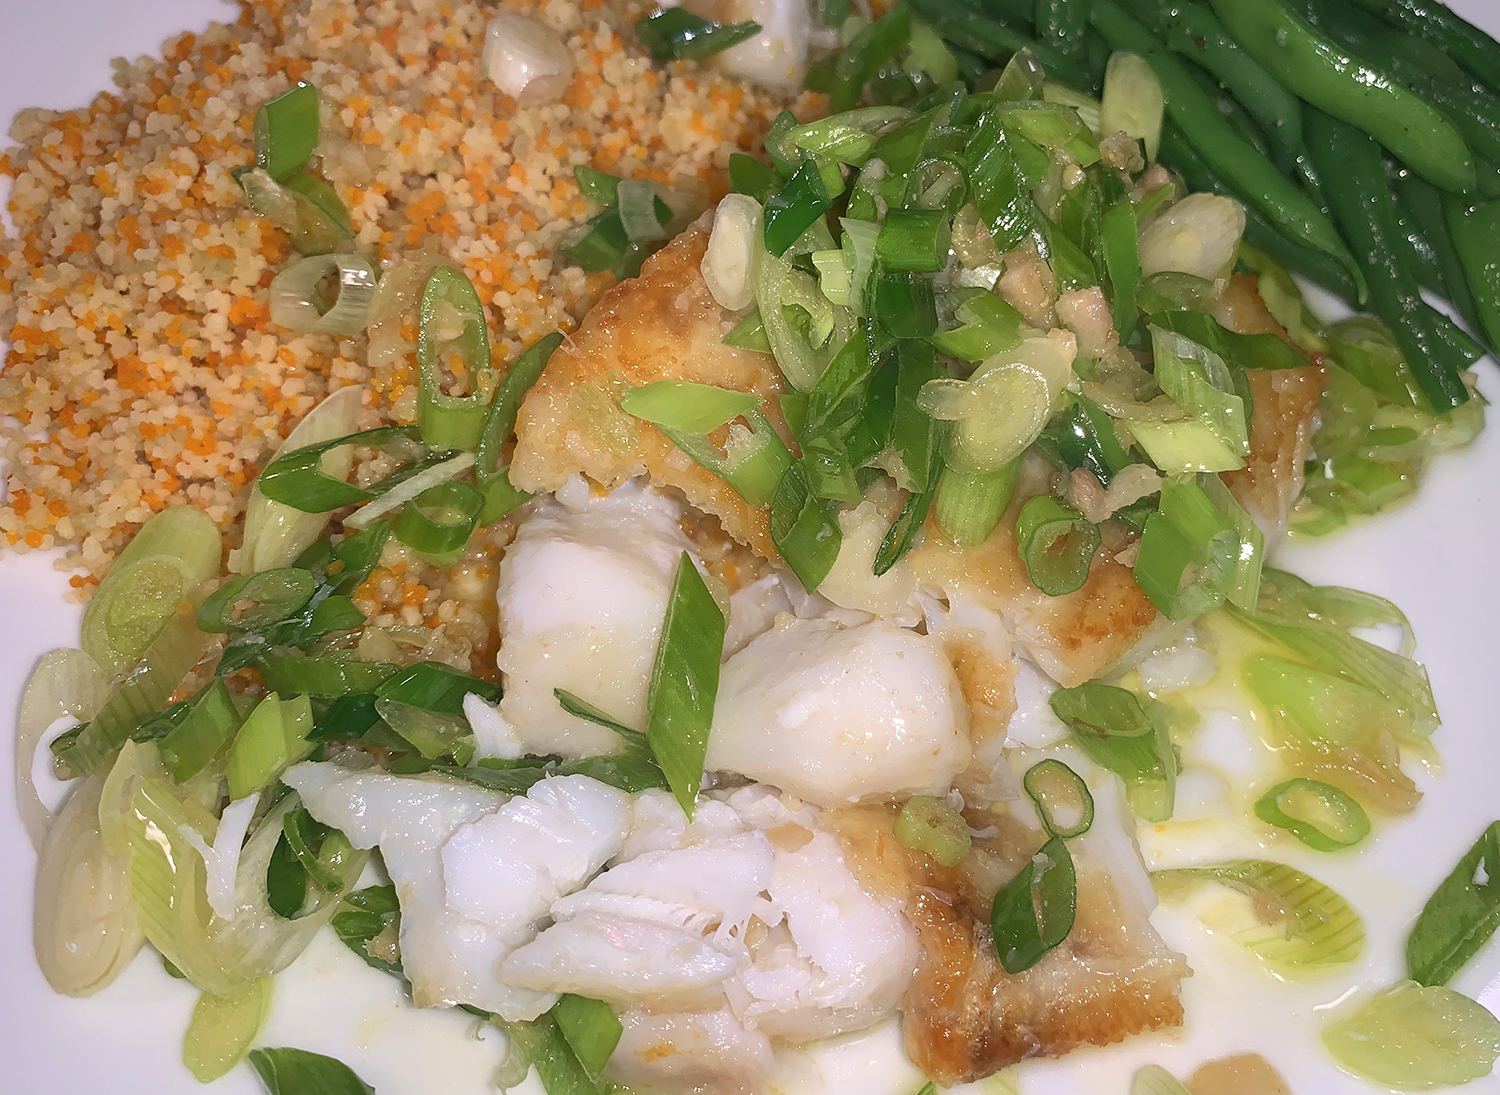
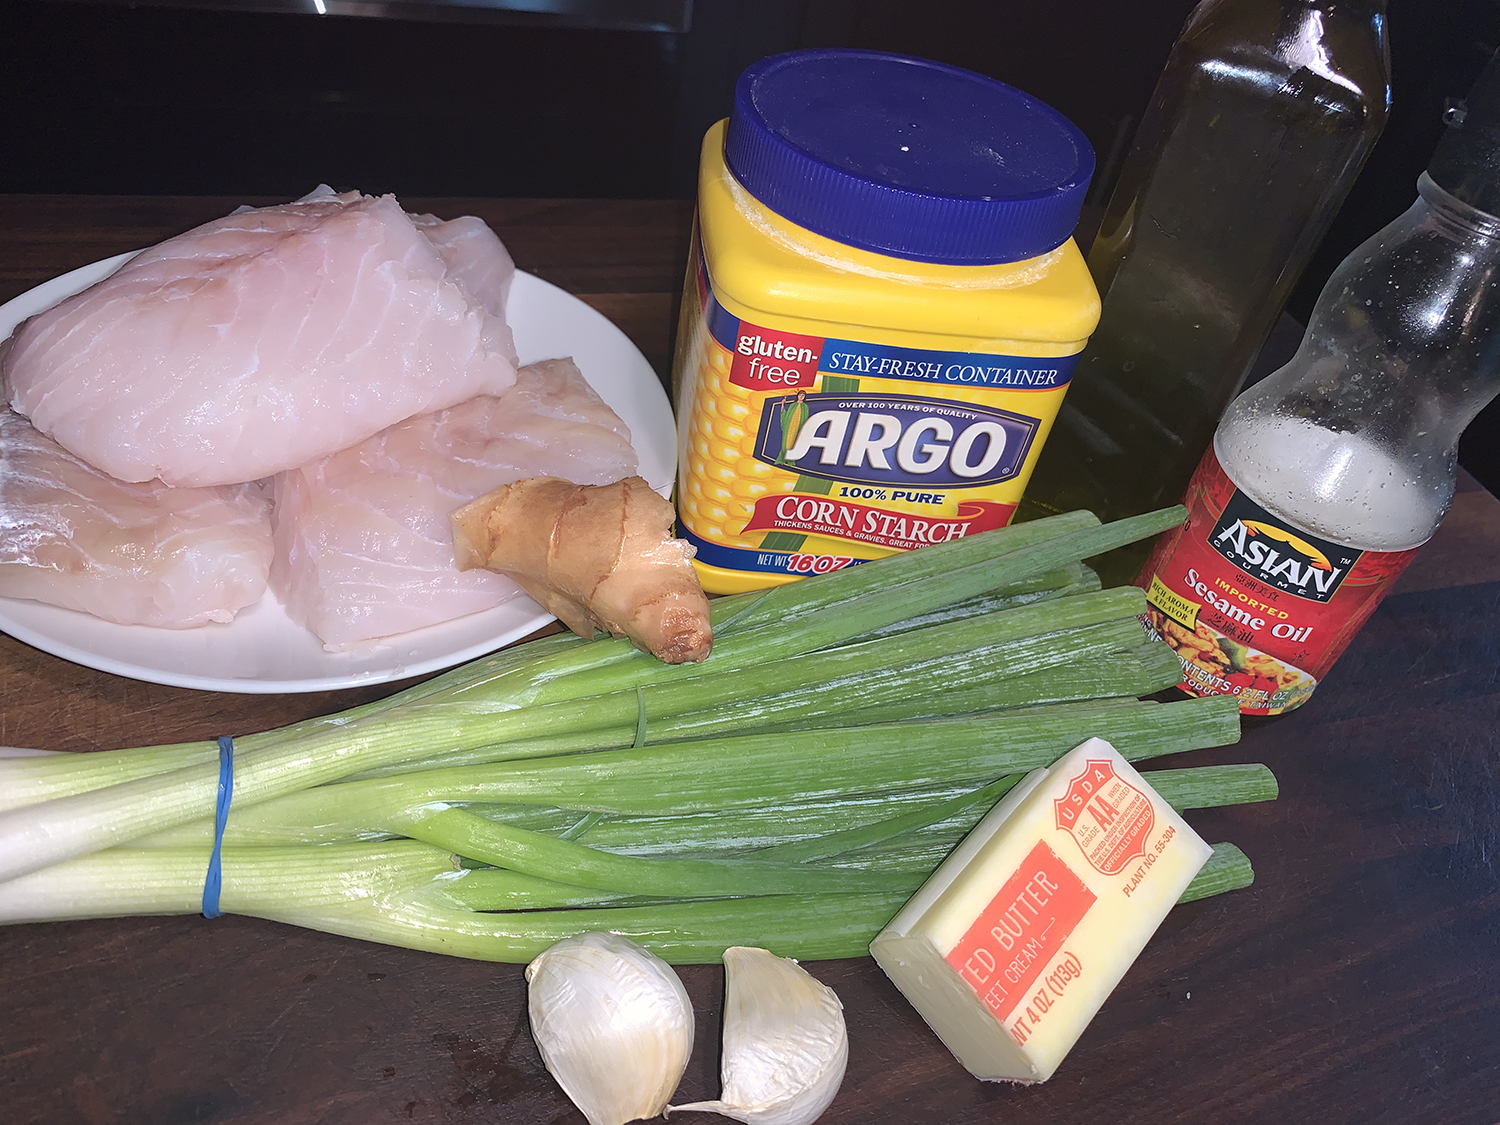
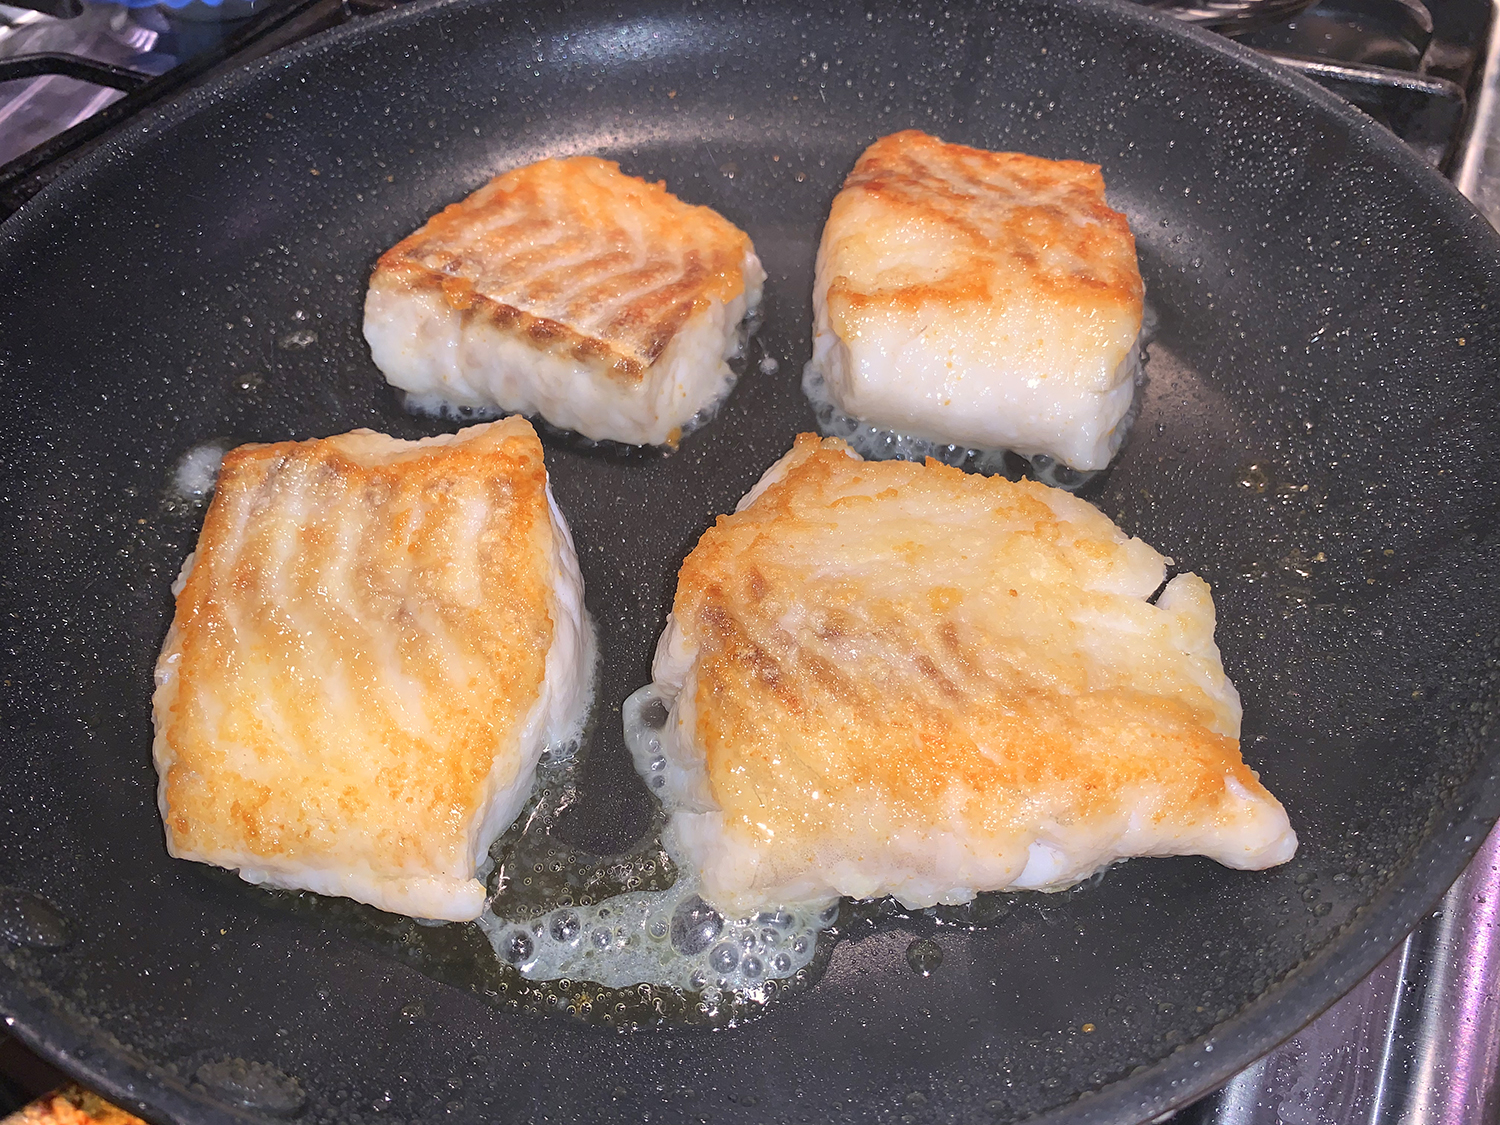
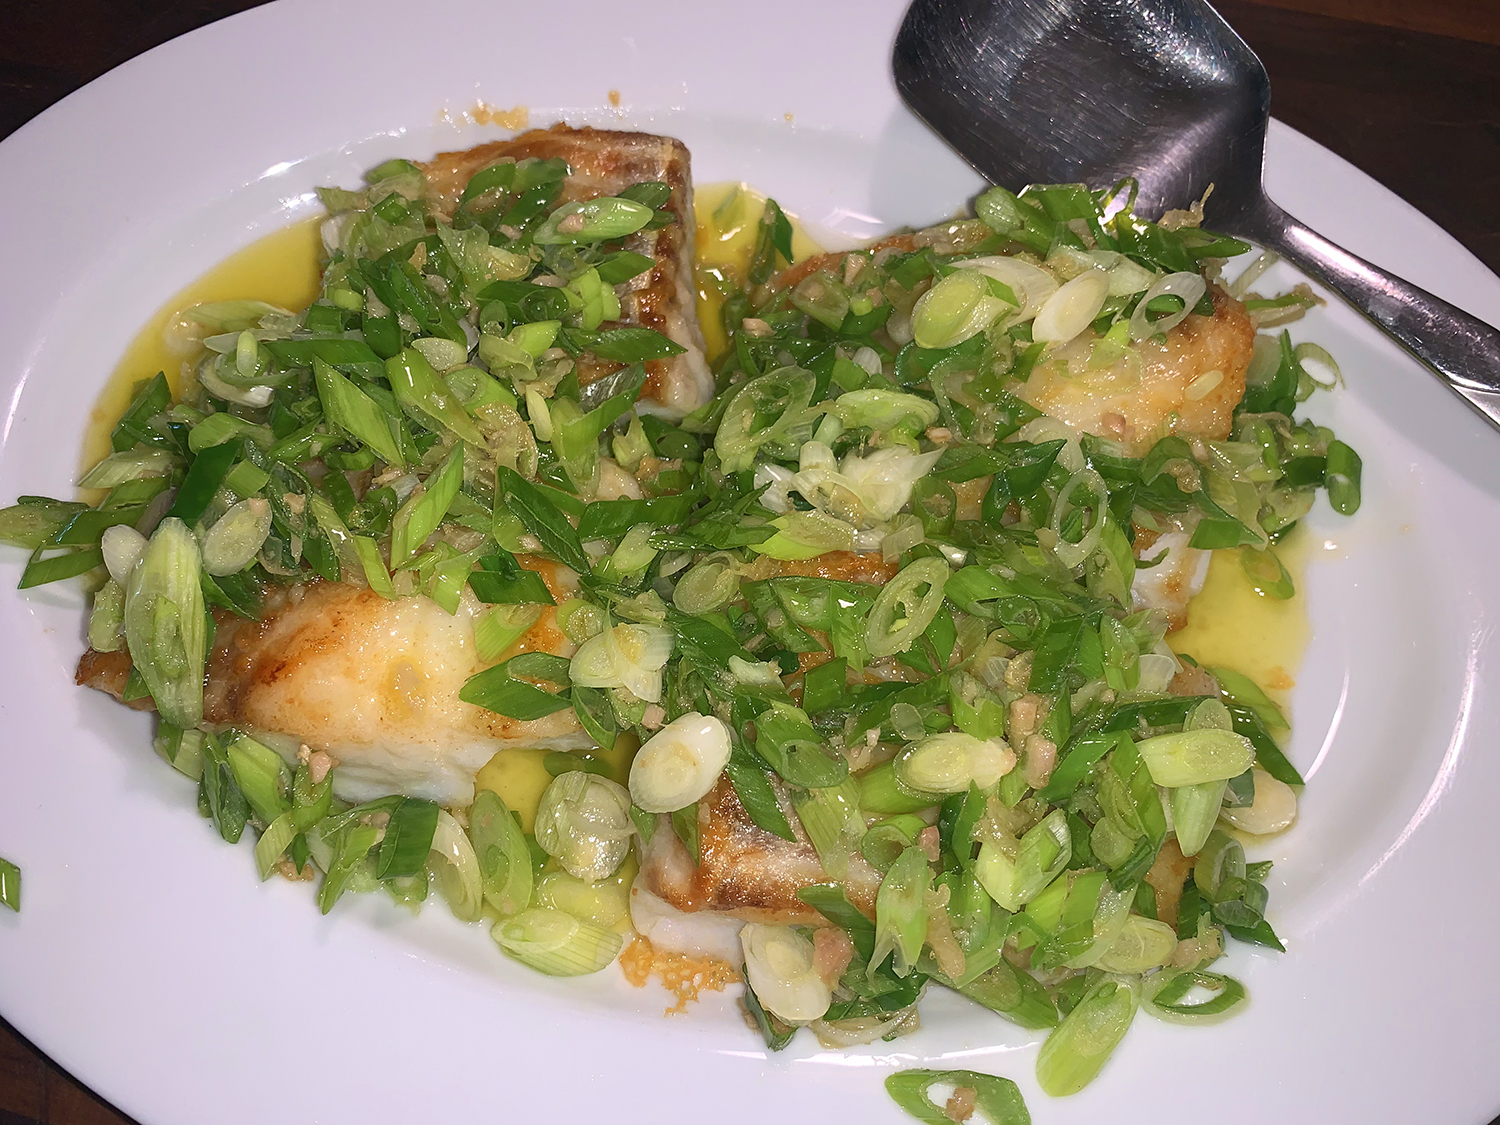
WOW, what a refreshing and surprising fish dish from Bon Appétit! This nod to scallion-ginger sauce uses both butter and olive oil, giving extra richness to lean whitefish. A dusting of cornstarch, which I added using a sifter for uniformity, imparts that restaurant-style golden crisp.
Our cod was paired with tri-colored couscous and fresh green beans, both of which made happy with the scallion-butter sauce. Seeing as how olive oil is an integral ingredient, use a high-end EVOO, you’ll definitely taste the difference. It seems almost too simple with the short list of common ingredients to end up so tasty!
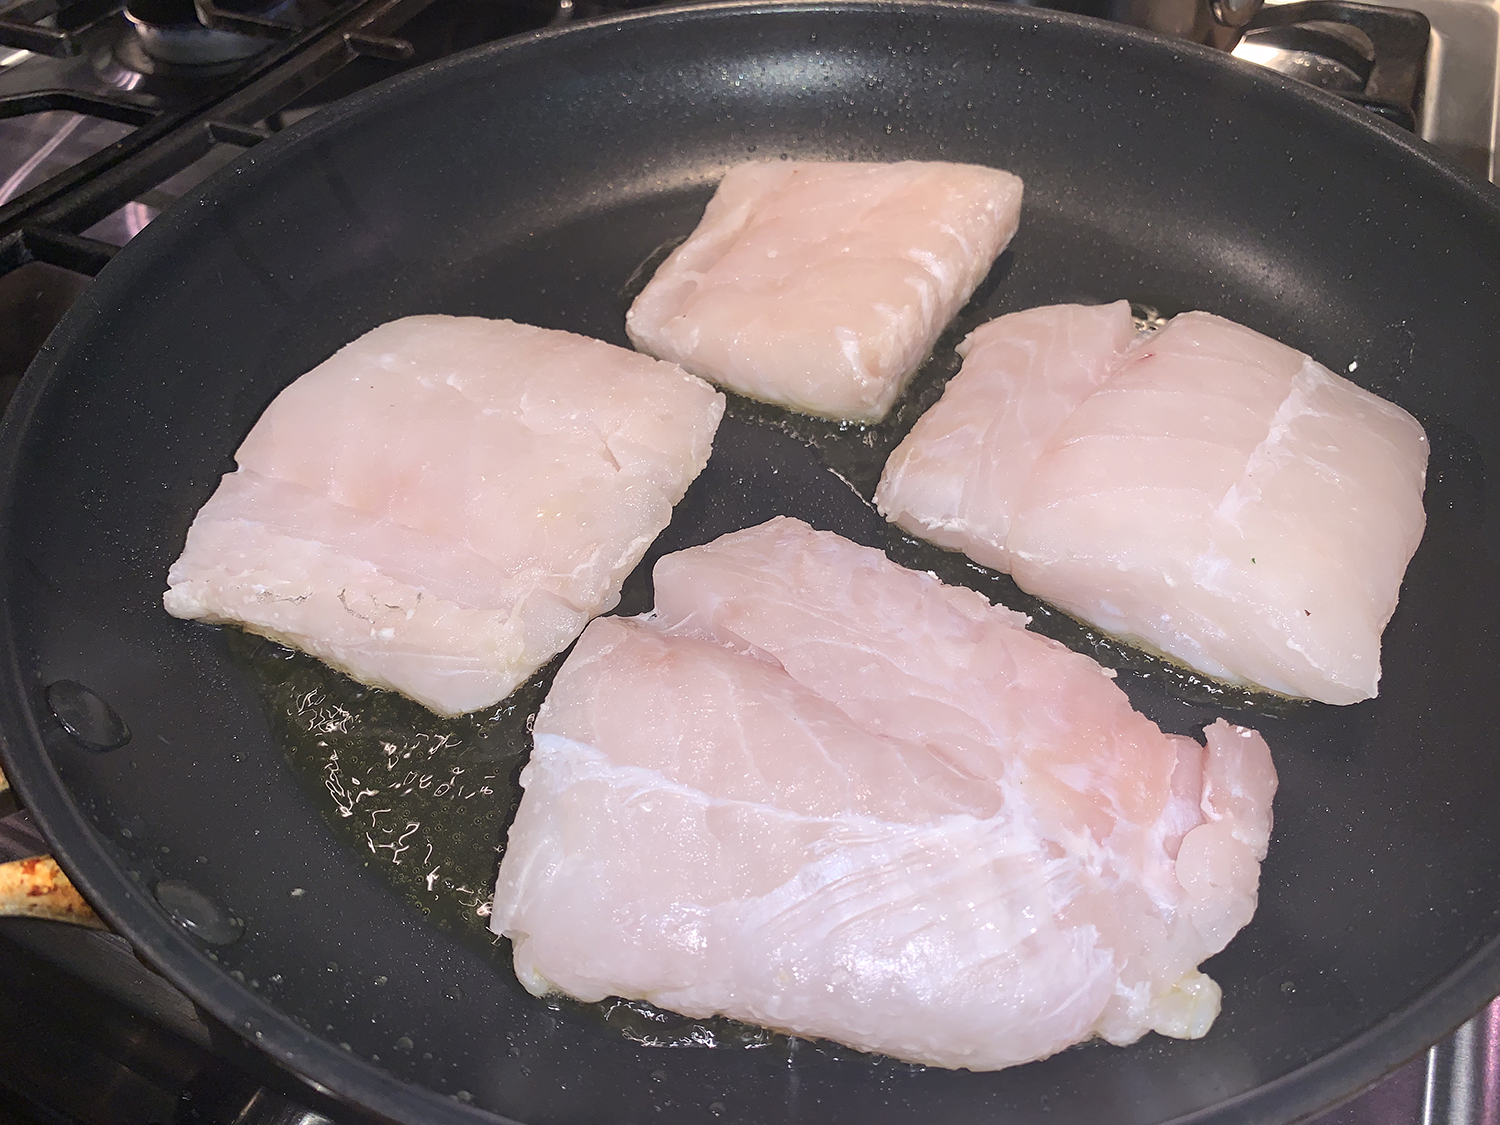
Pat fish dry with paper towels; season with salt. Sprinkle one side with an even layer of cornstarch; brush off excess.
Heat 2 Tbsp. olive oil in a large nonstick skillet over medium-high. Lay fish, cornstarch side down, in skillet and cook, shaking pan occasionally, until golden, crisp, and opaque around the edges, 6–8 minutes. Turn fish over and cook just until fillets are cooked through and flake easily with a fork, 1–2 minutes.
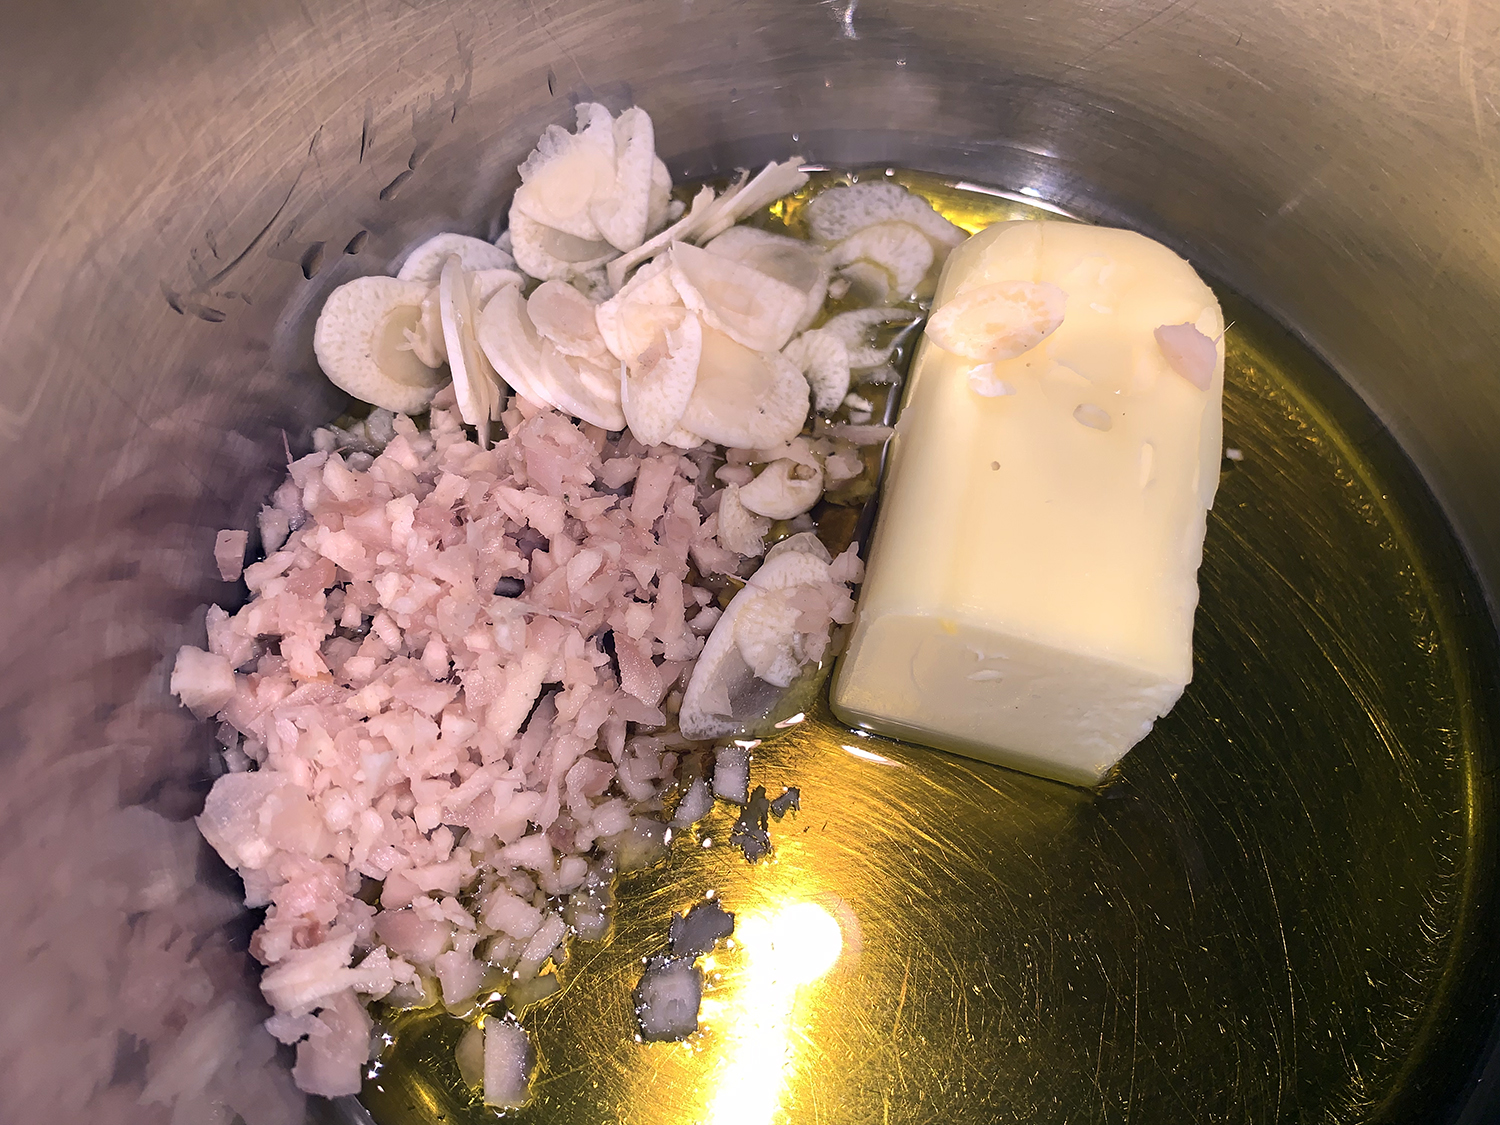
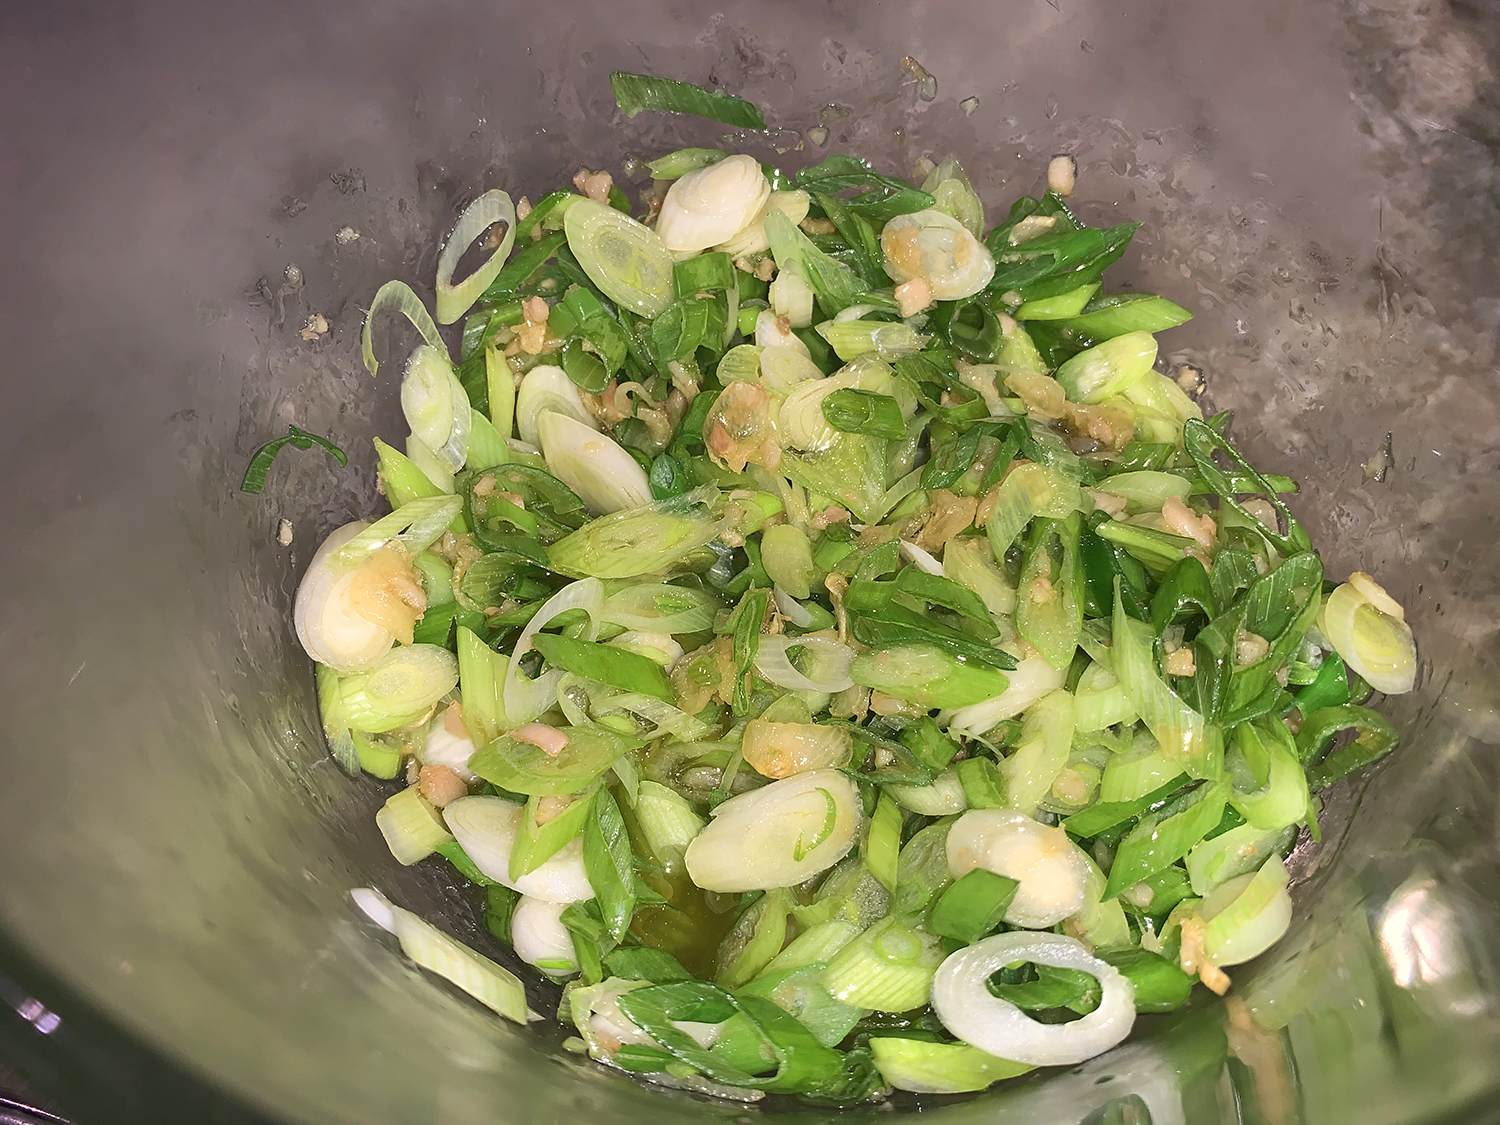
Meanwhile, place scallions in a medium heatproof bowl. Combine butter, sesame oil, ginger, garlic, and remaining 4 Tbsp. olive oil in a medium saucepan over medium heat. Cook until butter begins to foam and garlic turns light golden, about 4 minutes.
Pour over scallions, stirring to wilt. Let cool 1 minute, then season with salt.
Serve fish with scallion-sesame butter spooned over.
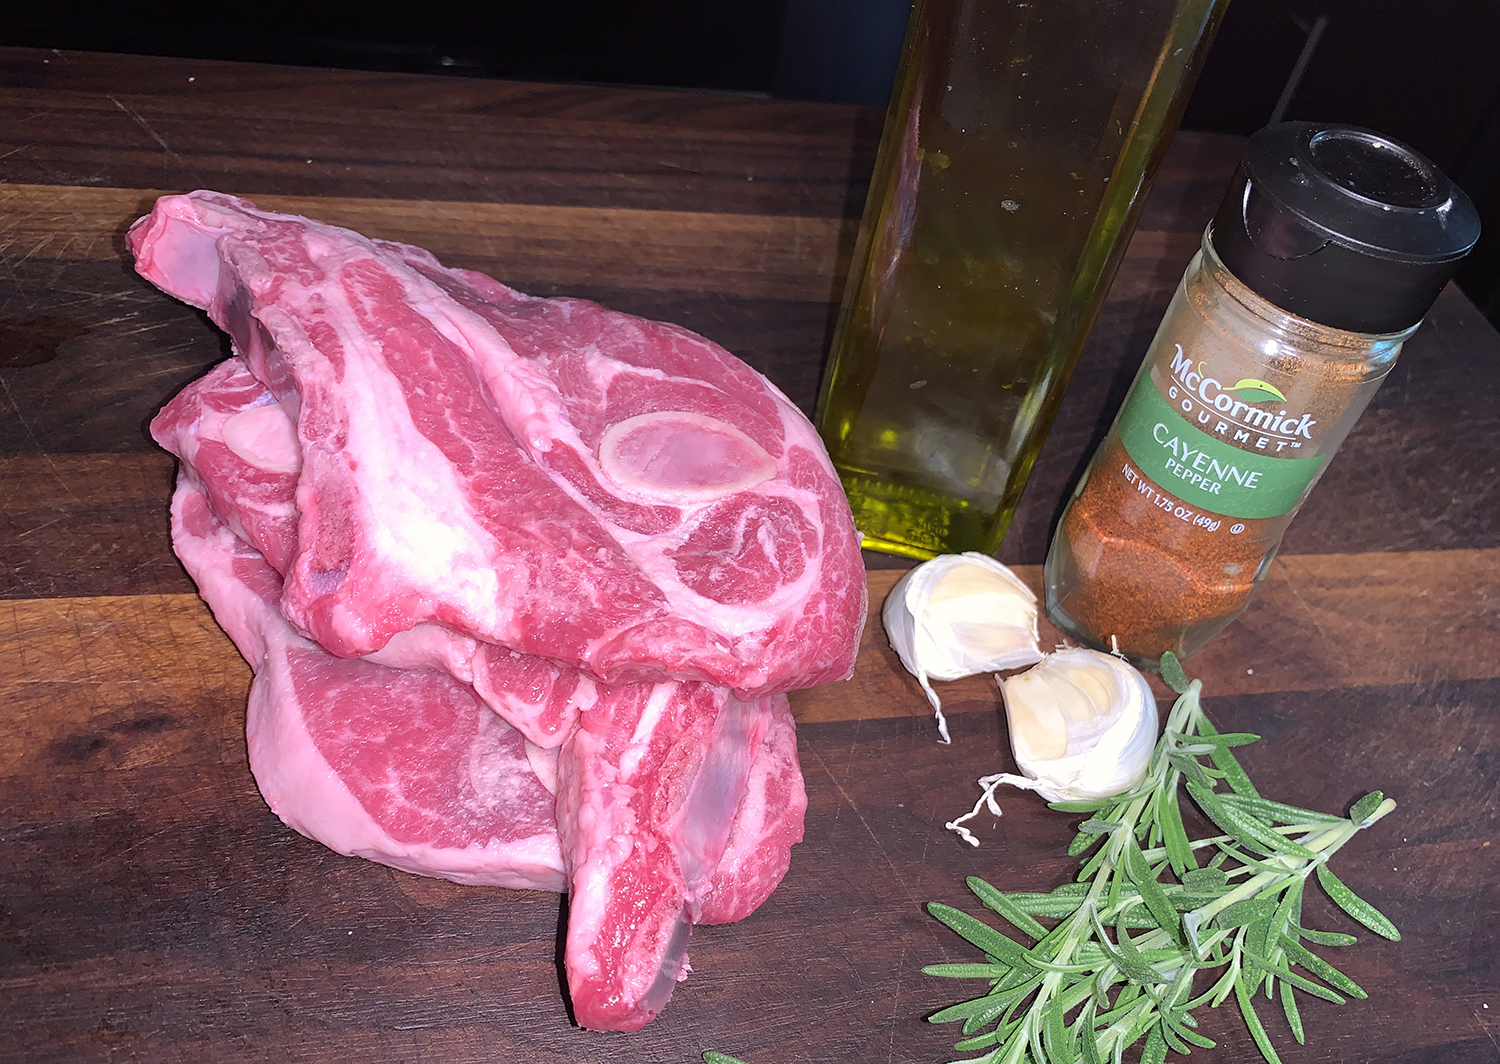
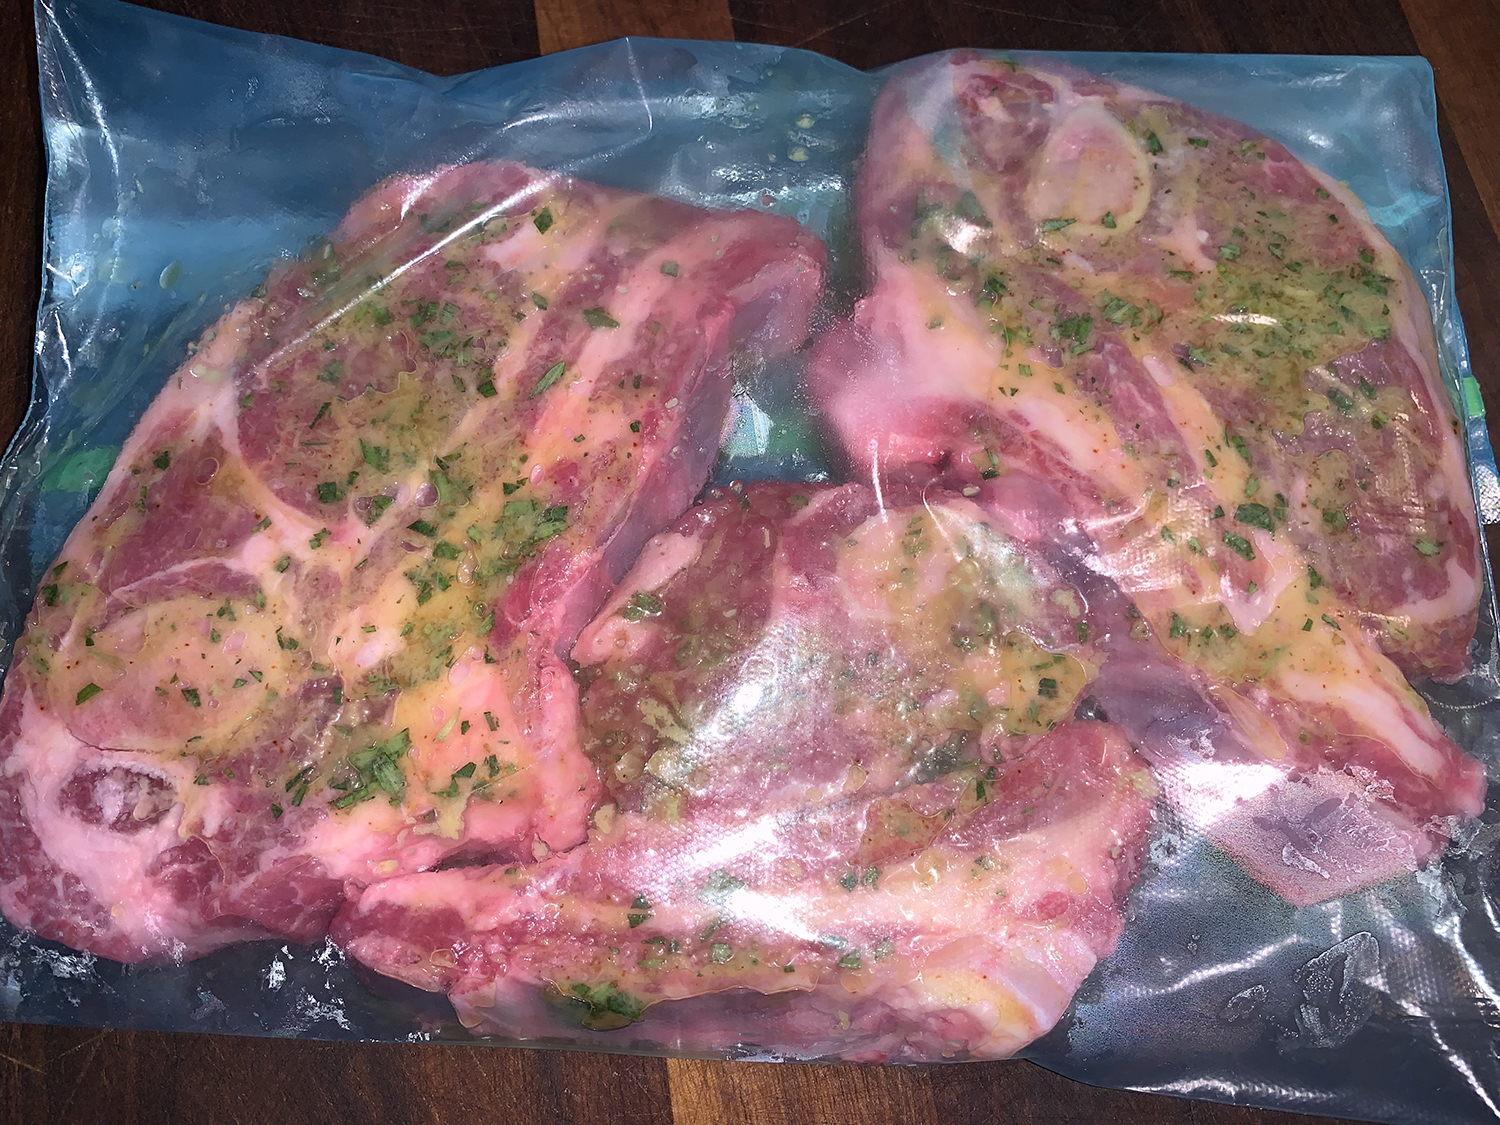
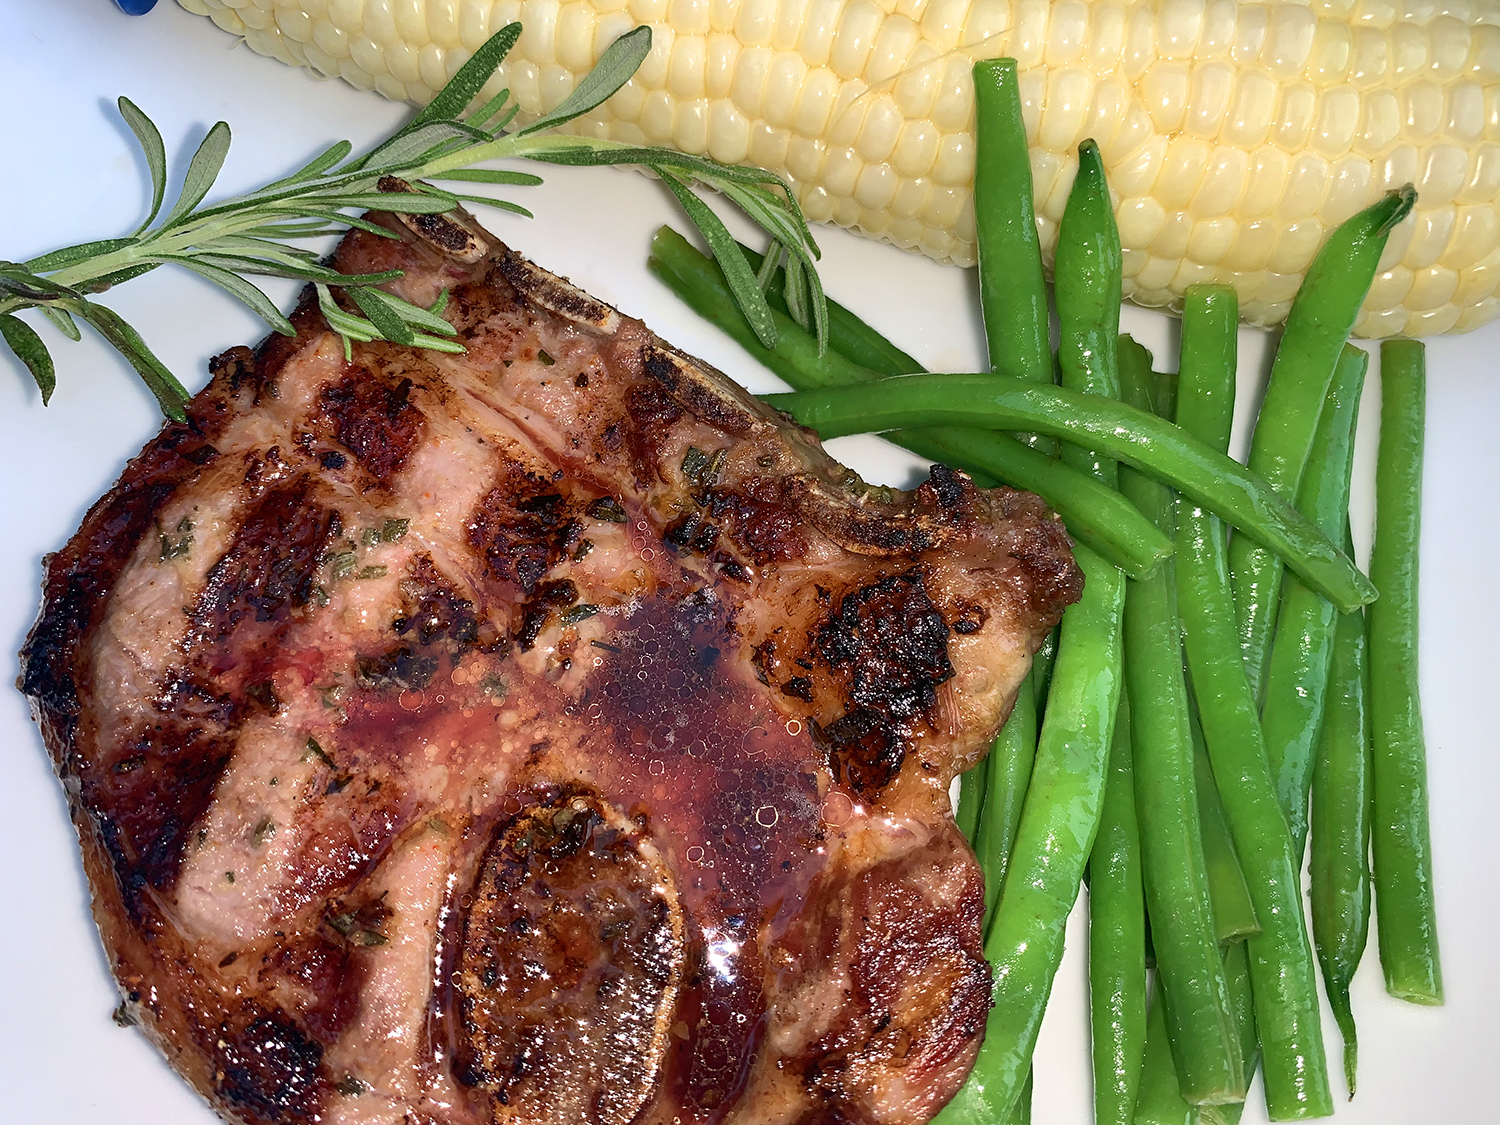
Growing up, I distinctly remember my mom making grilled shoulder lamb chops, and even though I was a very picky eater, I loved those chops. Fast forward many decades and I am a fan of just about any type of lamb, yet the shoulder chops don’t seem to be as common anymore (at least where we live). So when I spotted them at Costco recently, I knew they had to find their way into the grocery basket.
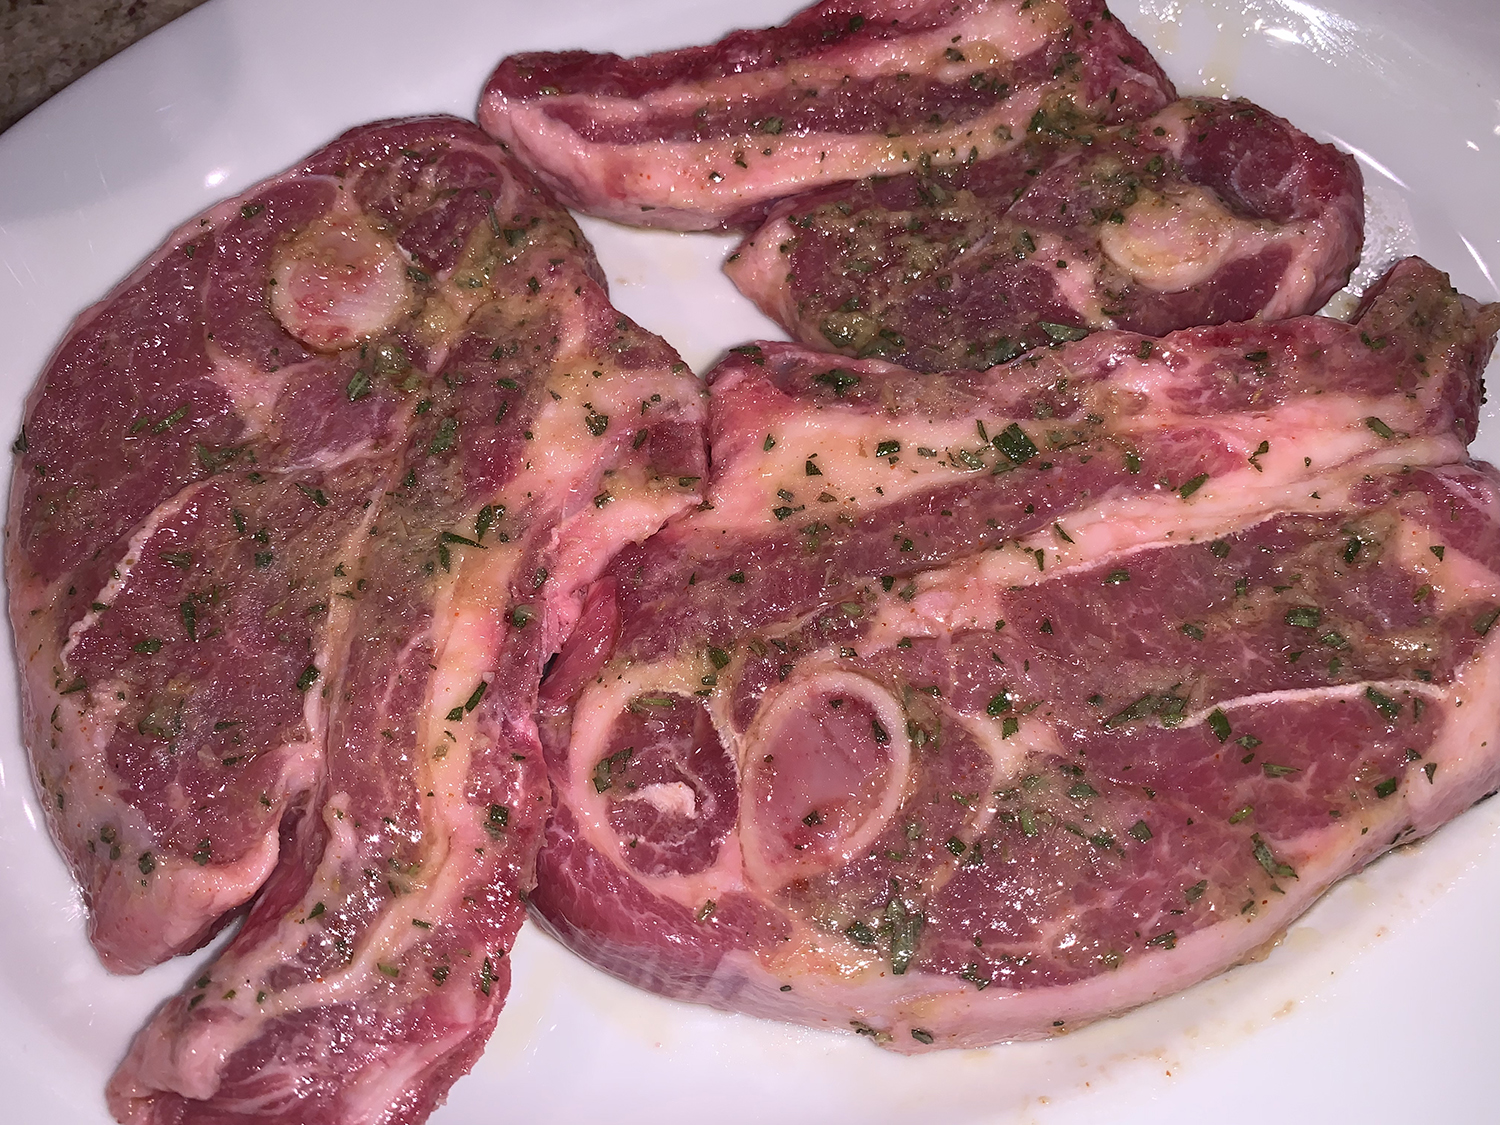
They tend to be less pricey than many other lamb options—a plus in most people’s thinking. And this recipe can’t be any simpler. With a few common ingredients , and precious little cooking time, you’ll be wanting to add these babies to your regular rotation. Even though you can marinate them in a s little as 30 minutes, I highly suggest you do so for at least 8 hours, and up to overnight.
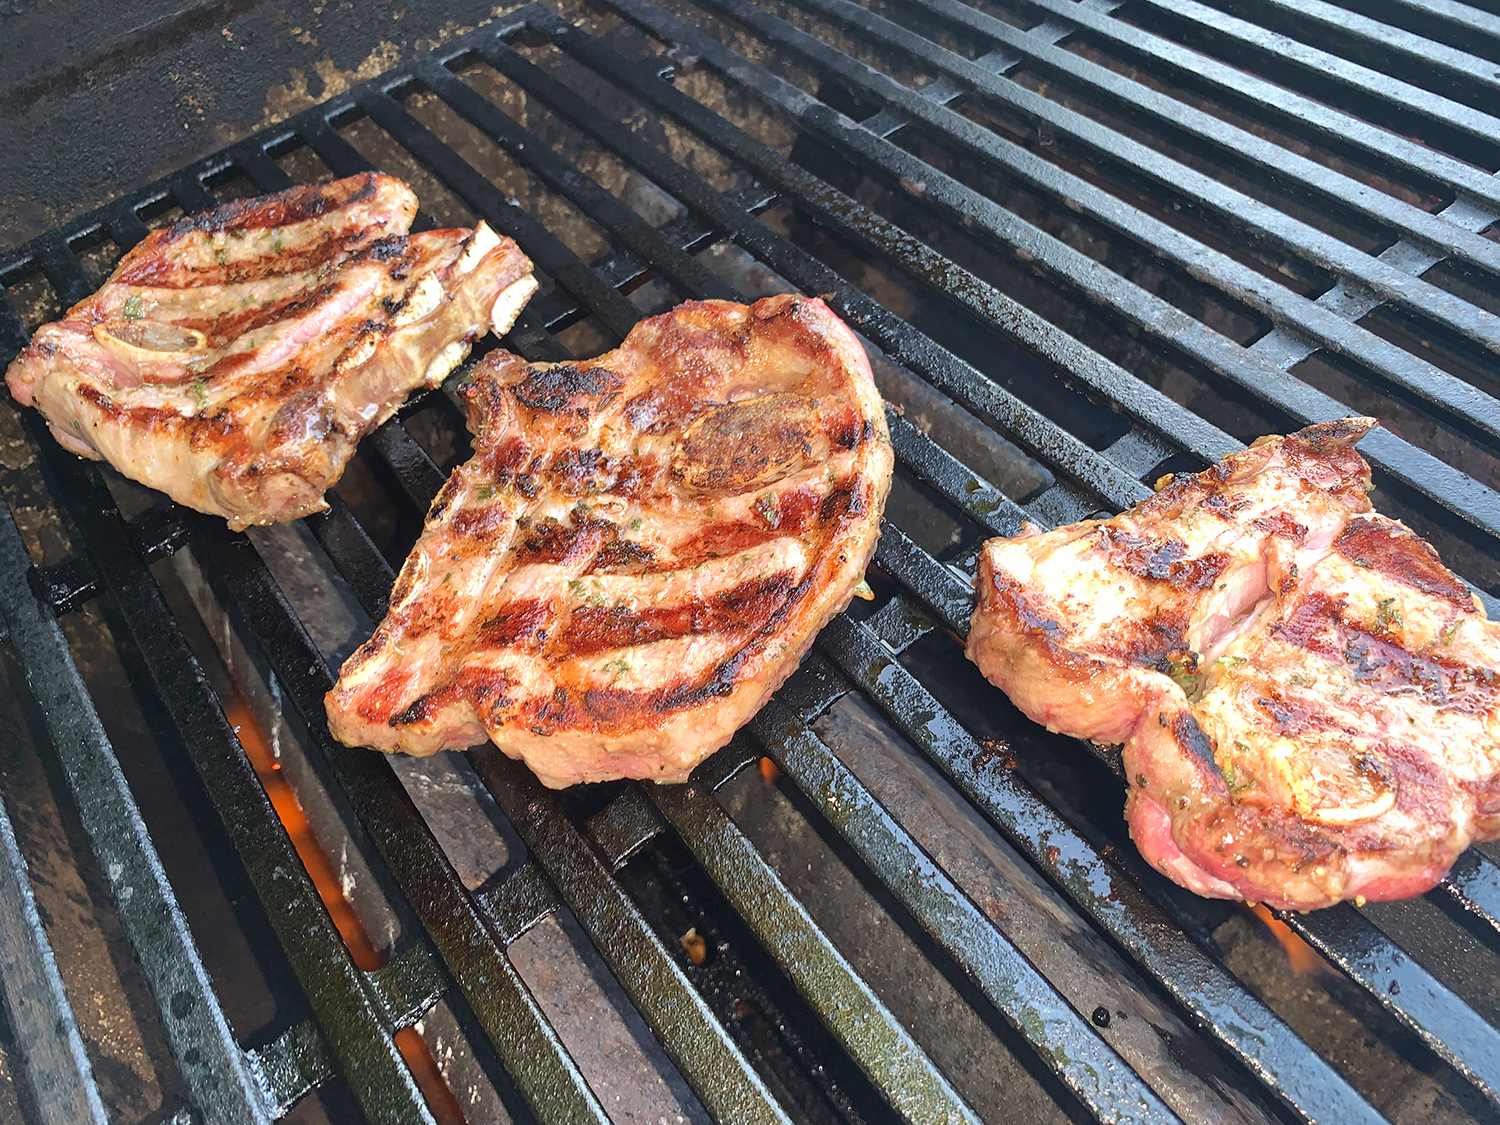
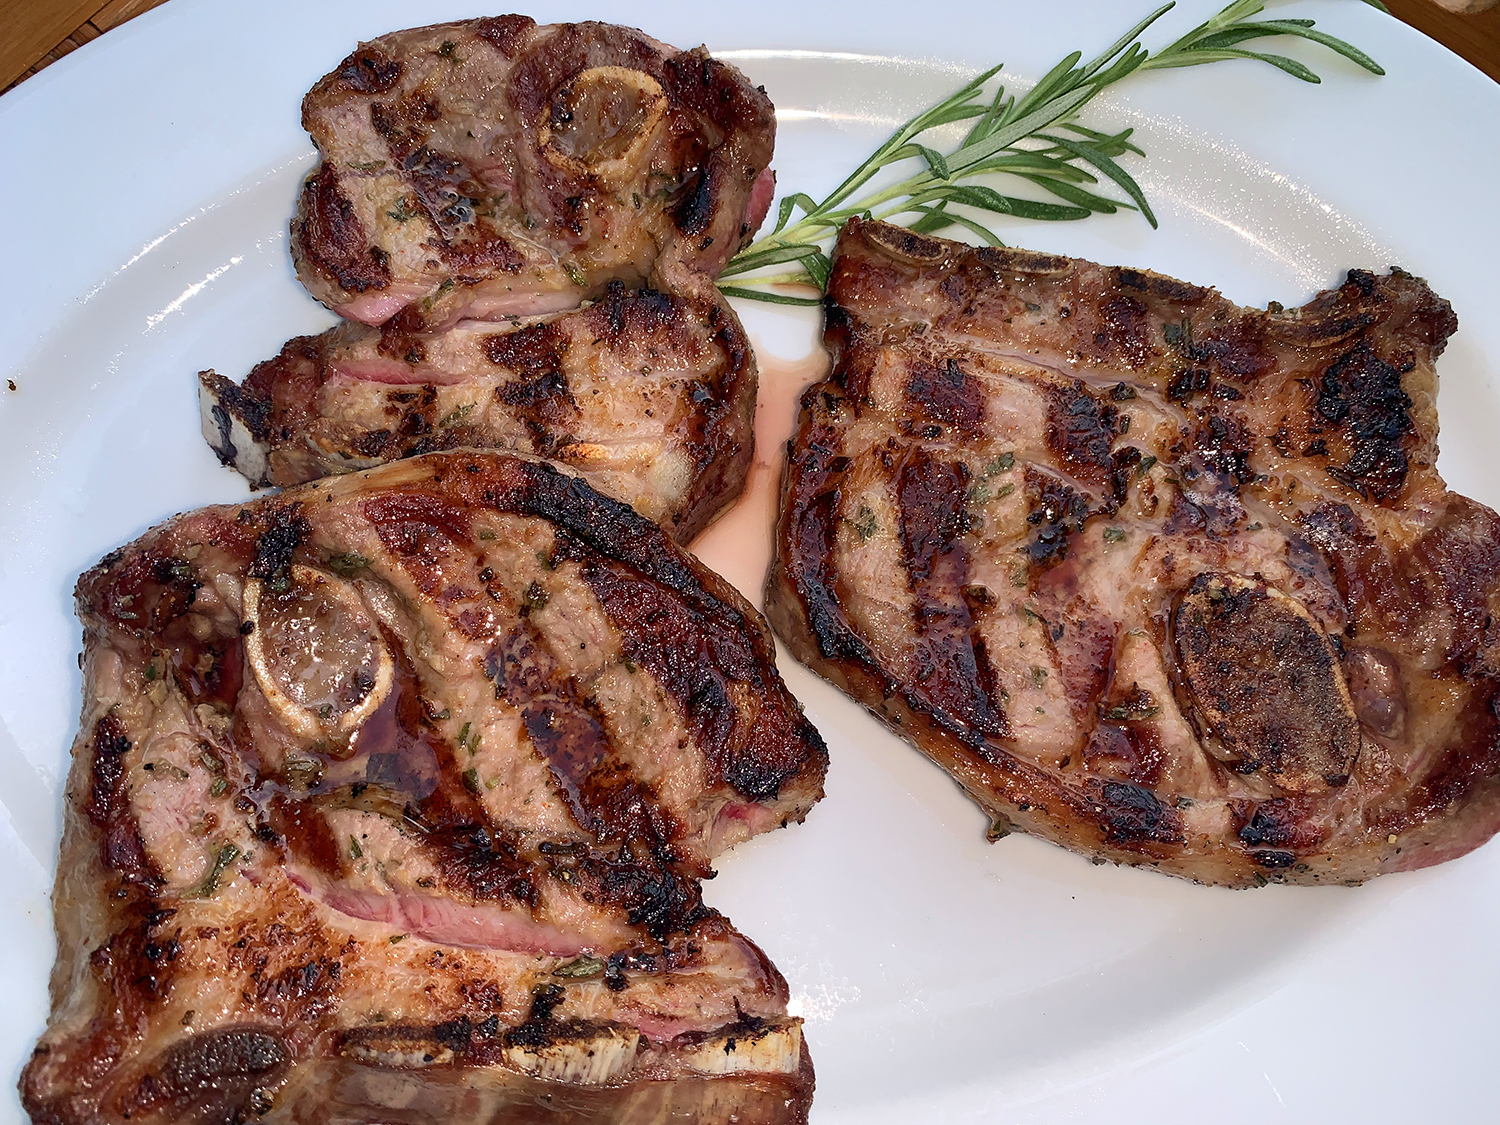
Our three steaks were a bit thinner than the suggested 3/4″ so they took only a total of 4 1/2 minutes to reach medium-rare, just how we like them, and in no time at all! Use an instant-read thermometer after 4 minutes to get an idea of the internal temp. We barely had time to cook the accompanying fresh green beans and corn on the cob while the lamb rested.
Grilled Shoulder Lamb Chops with Garlic-Rosemary Marinade
1 Tbsp. roasted garlic paste, or 2 large cloves minced
1 Tbsp. minced fresh rosemary
1 pinch cayenne pepper
2 Tbsp. olive oil
LAMB
4 shoulder lamb chops, about 3/4 inch thick (blade or round bone)
Salt & fresh ground pepper
Directions
Mix marinade ingredients in small bowl. Rub both sides of each chop with the paste; add to an air-tight ziploc bag for at least 30 minutes. (Can be refrigerated overnight.)
Turn all burners on gas grill to high, close lid, and heat until grill is very hot, about 15 minutes. Leave one burner on high and turn other burner(s) down to medium.
Rub grill grates with oil. Sprinkle lamb with salt and pepper to taste.
Grill chops, covered, over hotter part of grill, turning them once, until well browned, about 4 minutes. Move chops to cooler part of grill and continue grilling, turning once, to desired doneness, about 6 minutes for rare (about 120 degrees on instant-read thermometer), about 8 minutes for medium (about 130 degrees), or about 10 minutes for well-done (140 to 150 degrees).
Remove chops from grill and let rest for 5 minutes. Serve immediately.
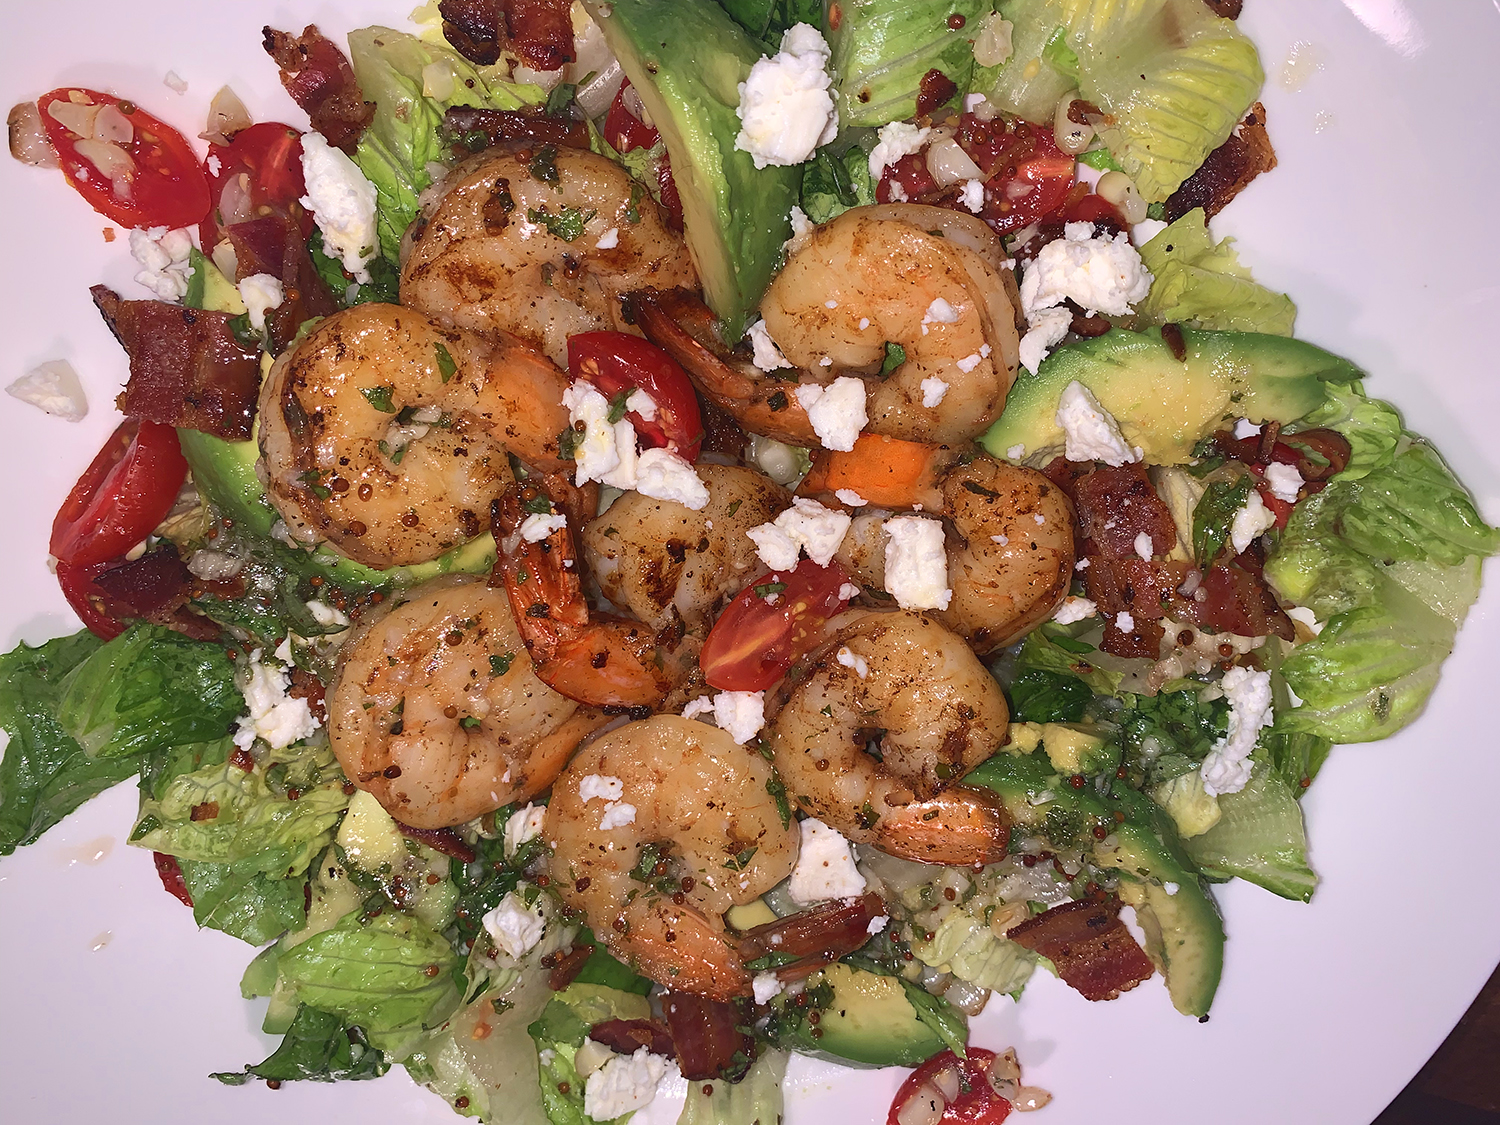
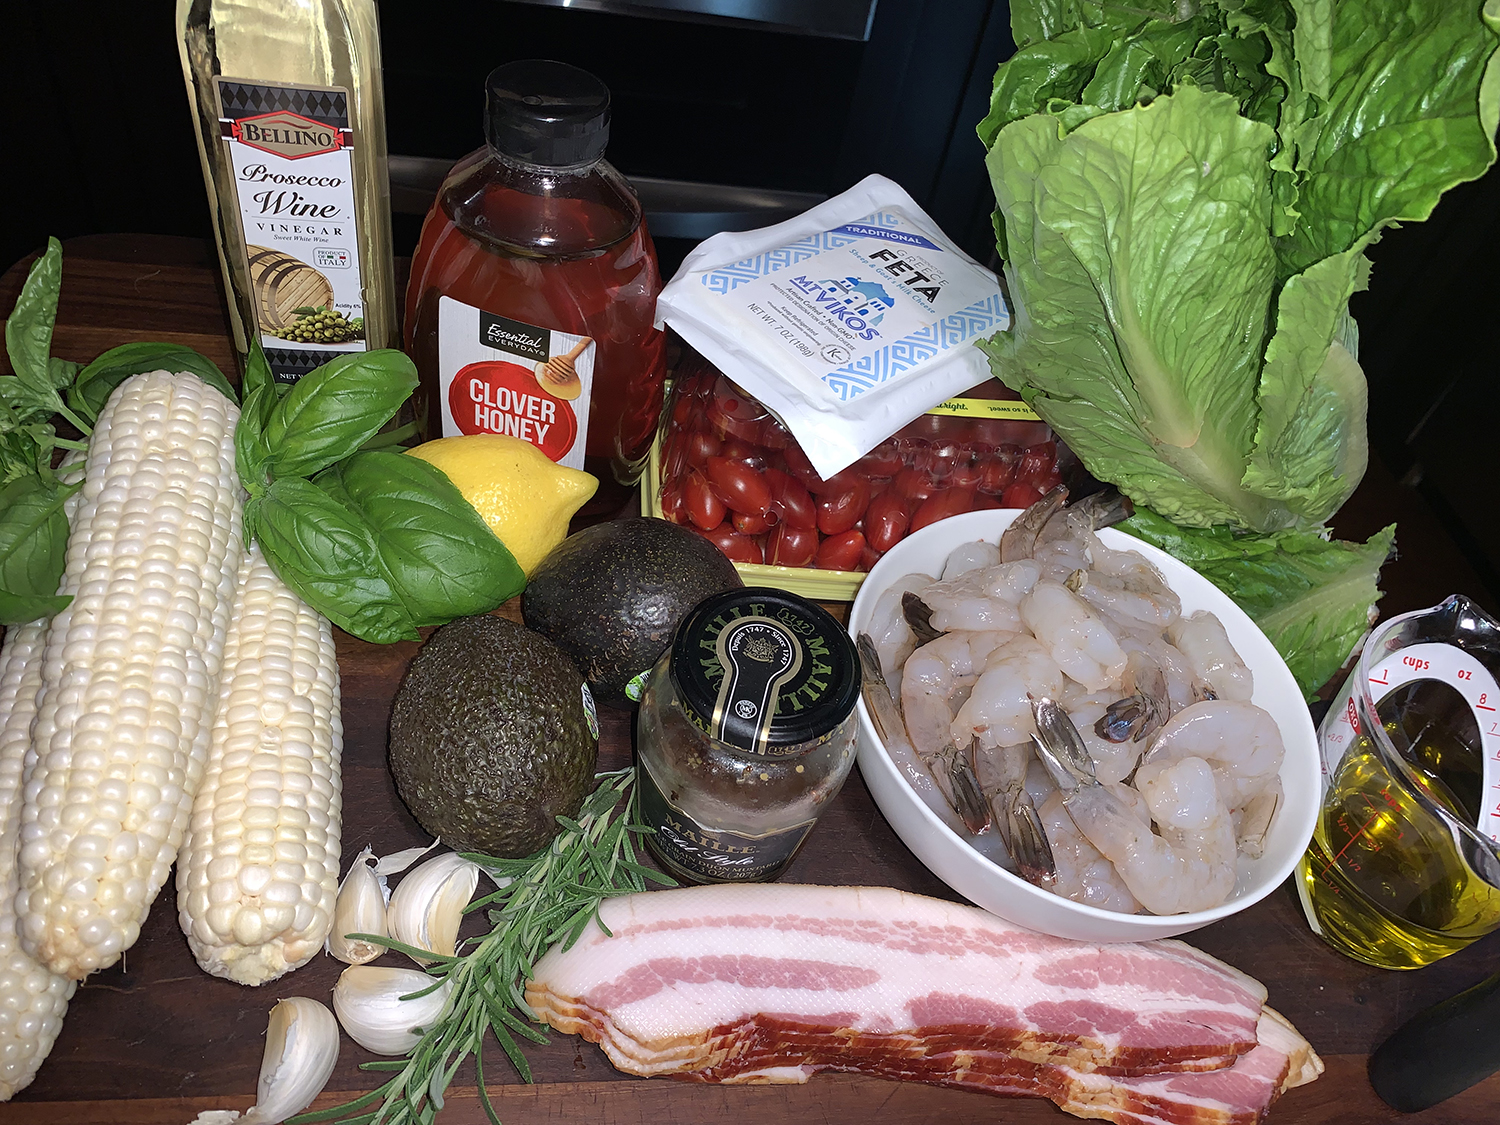
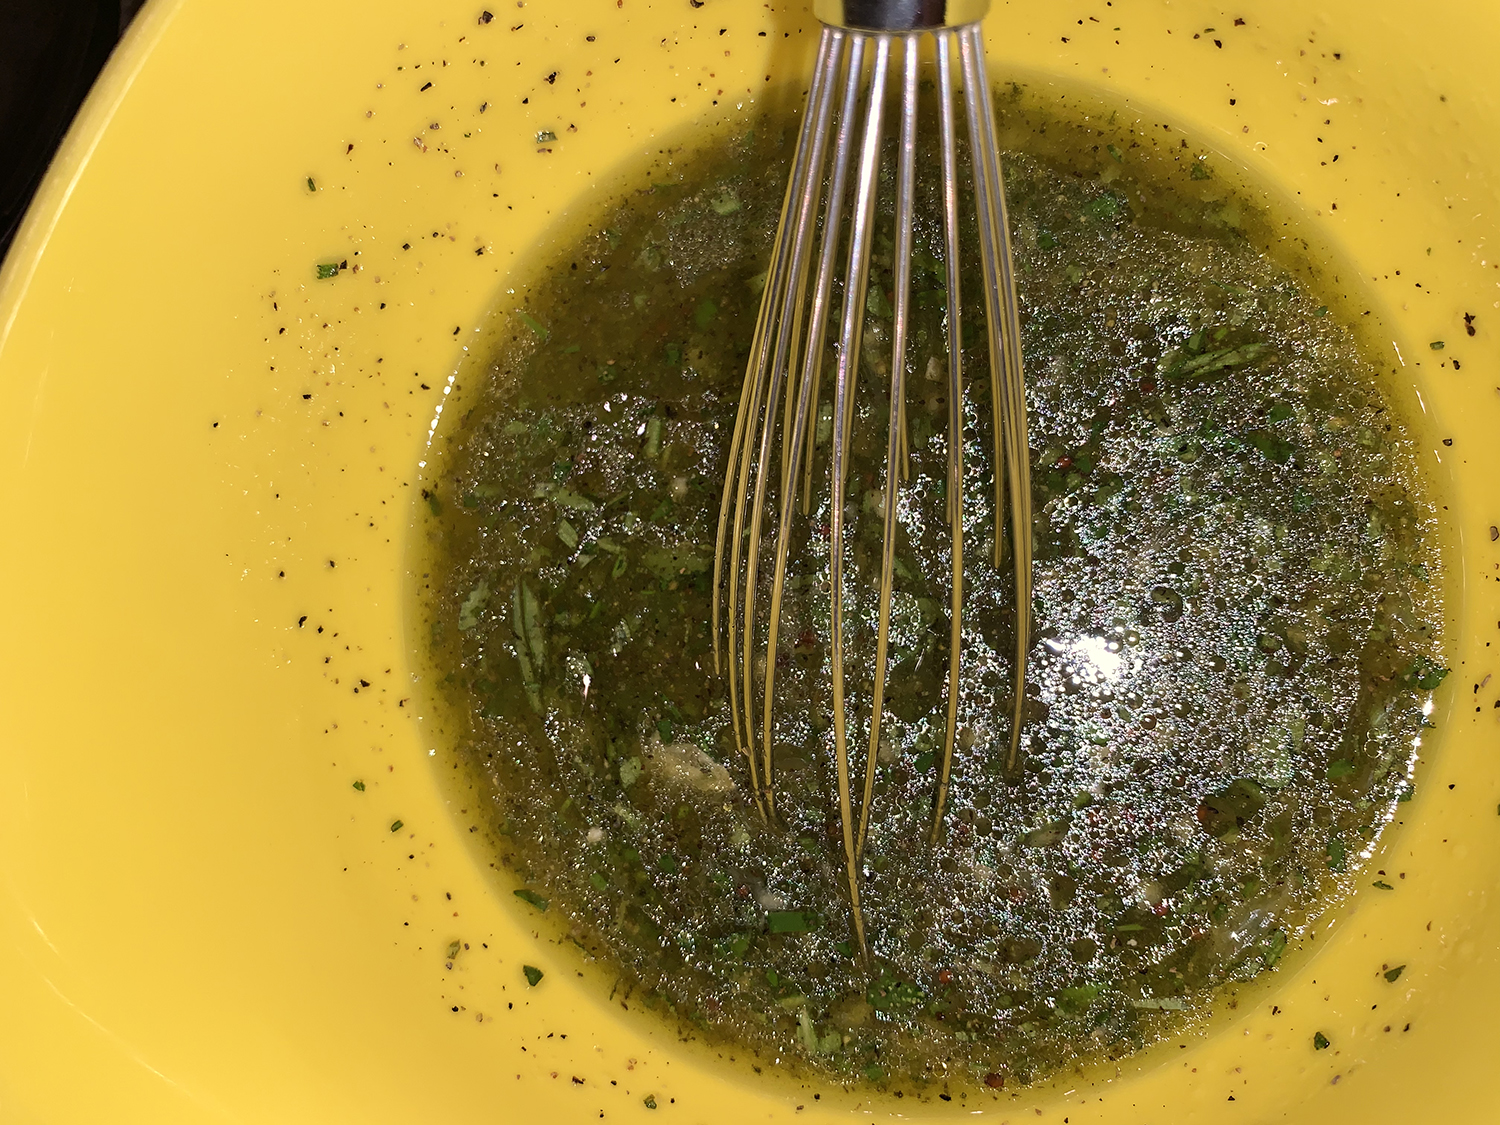
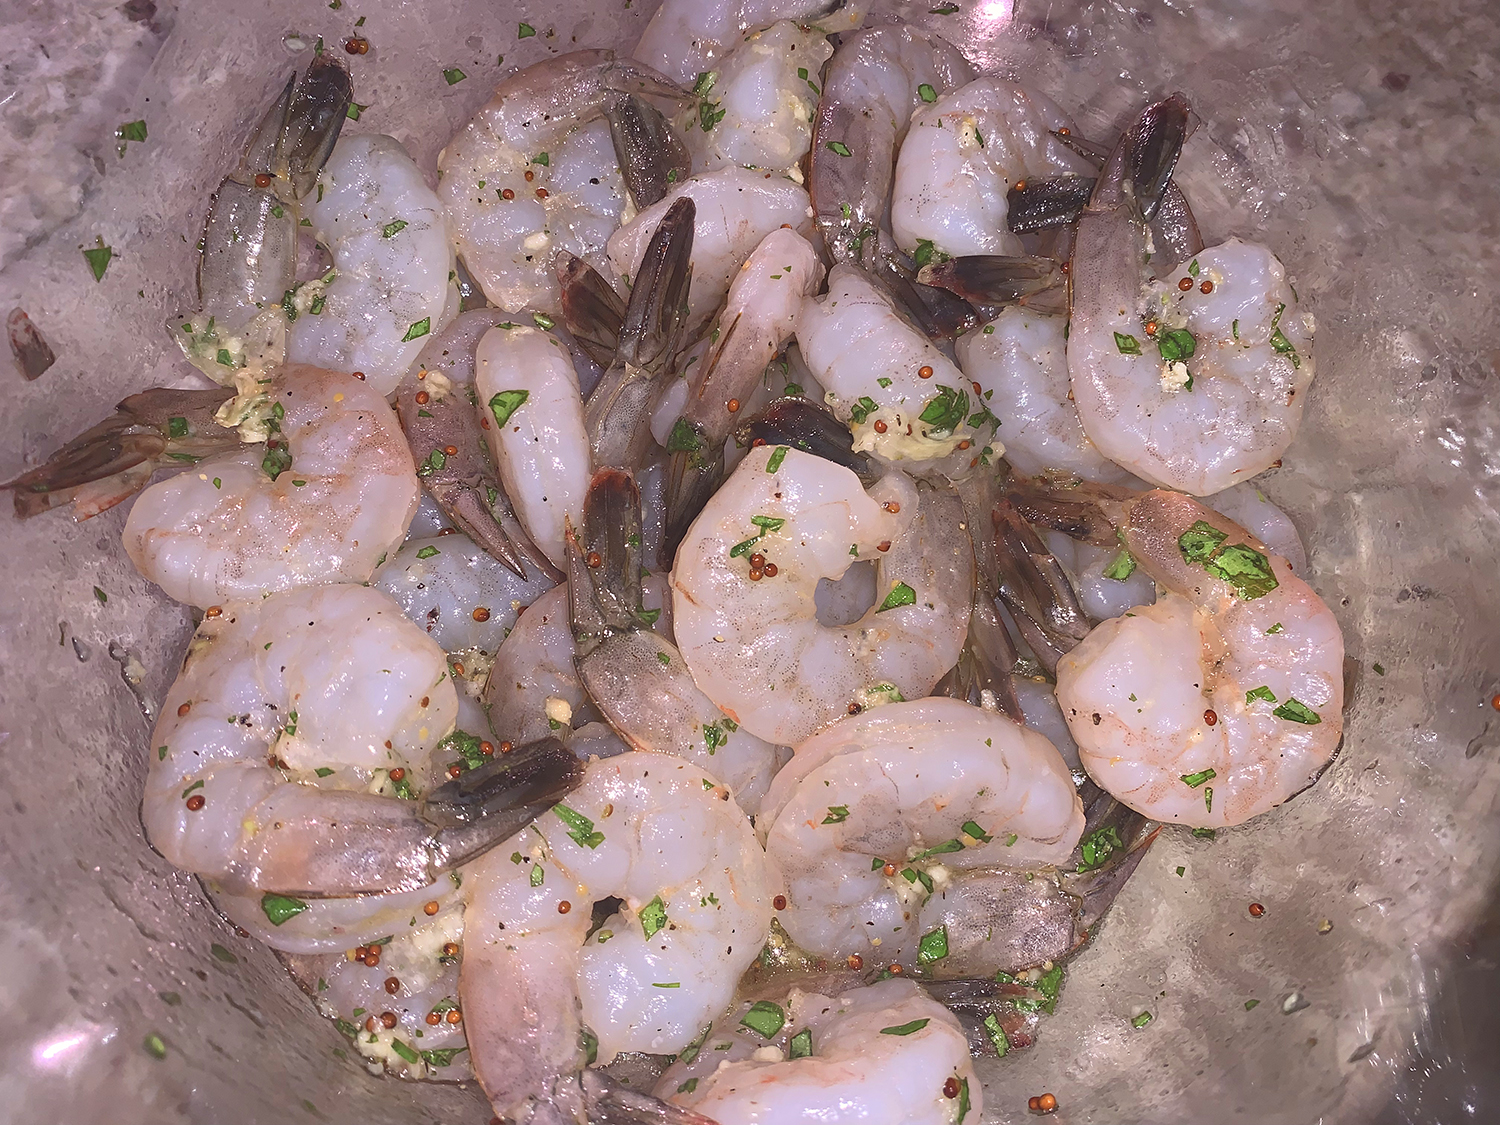
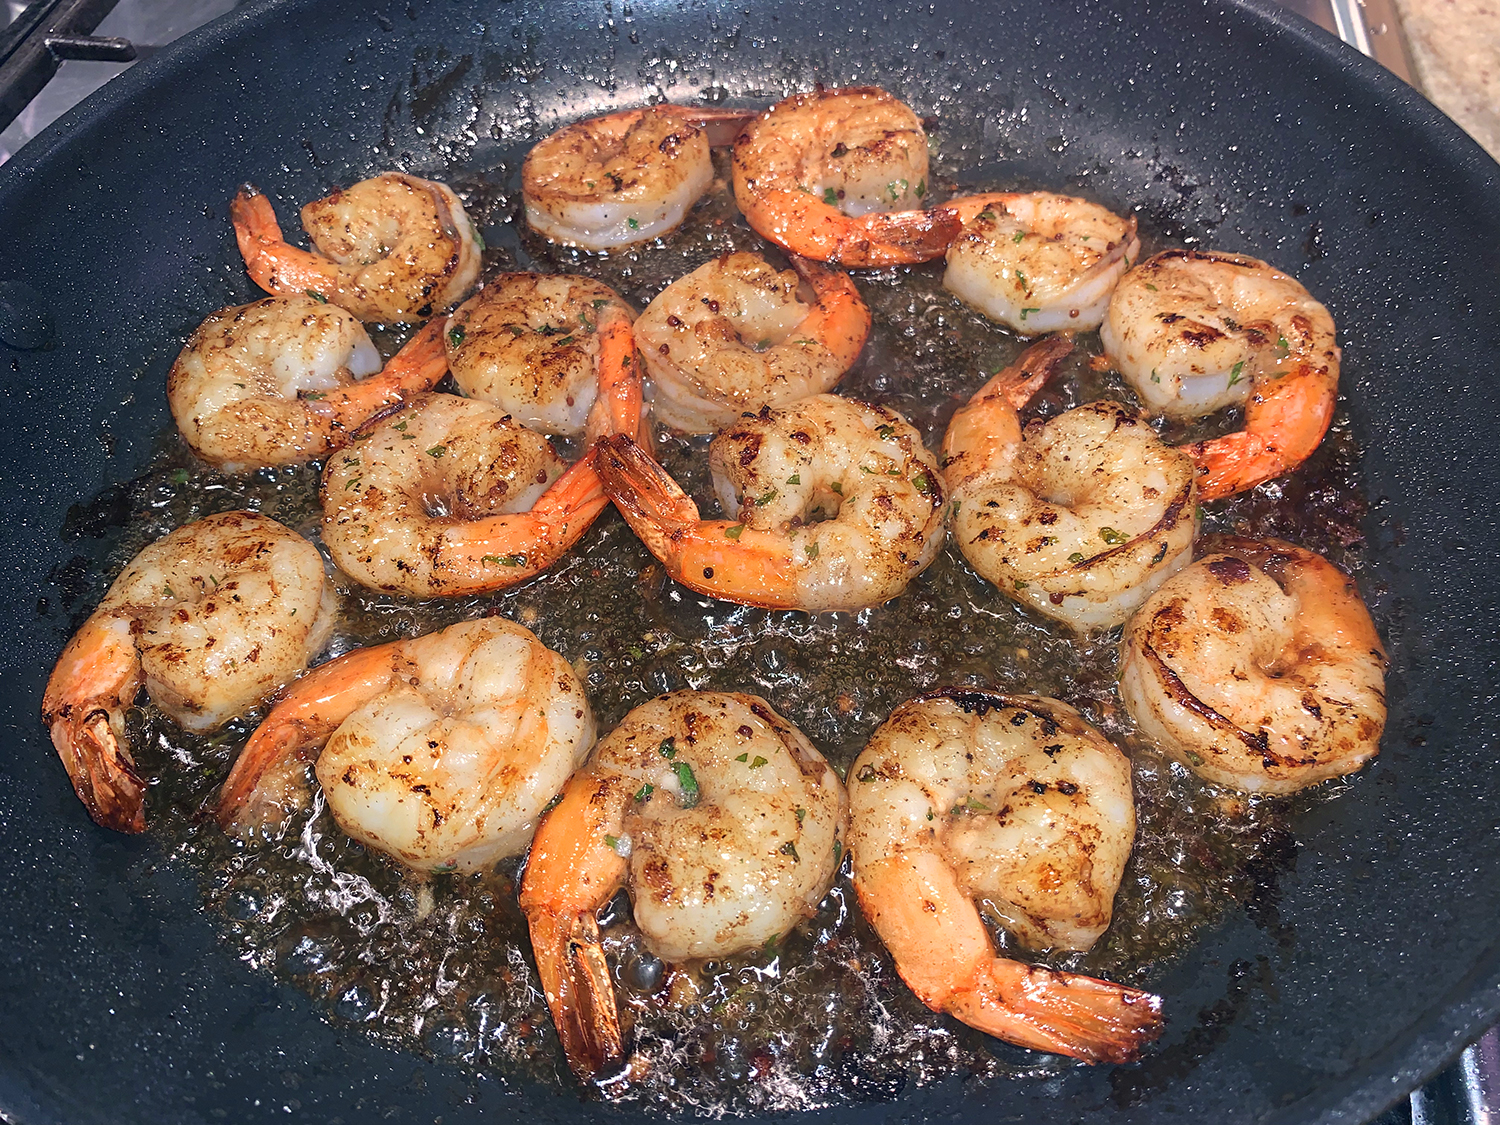
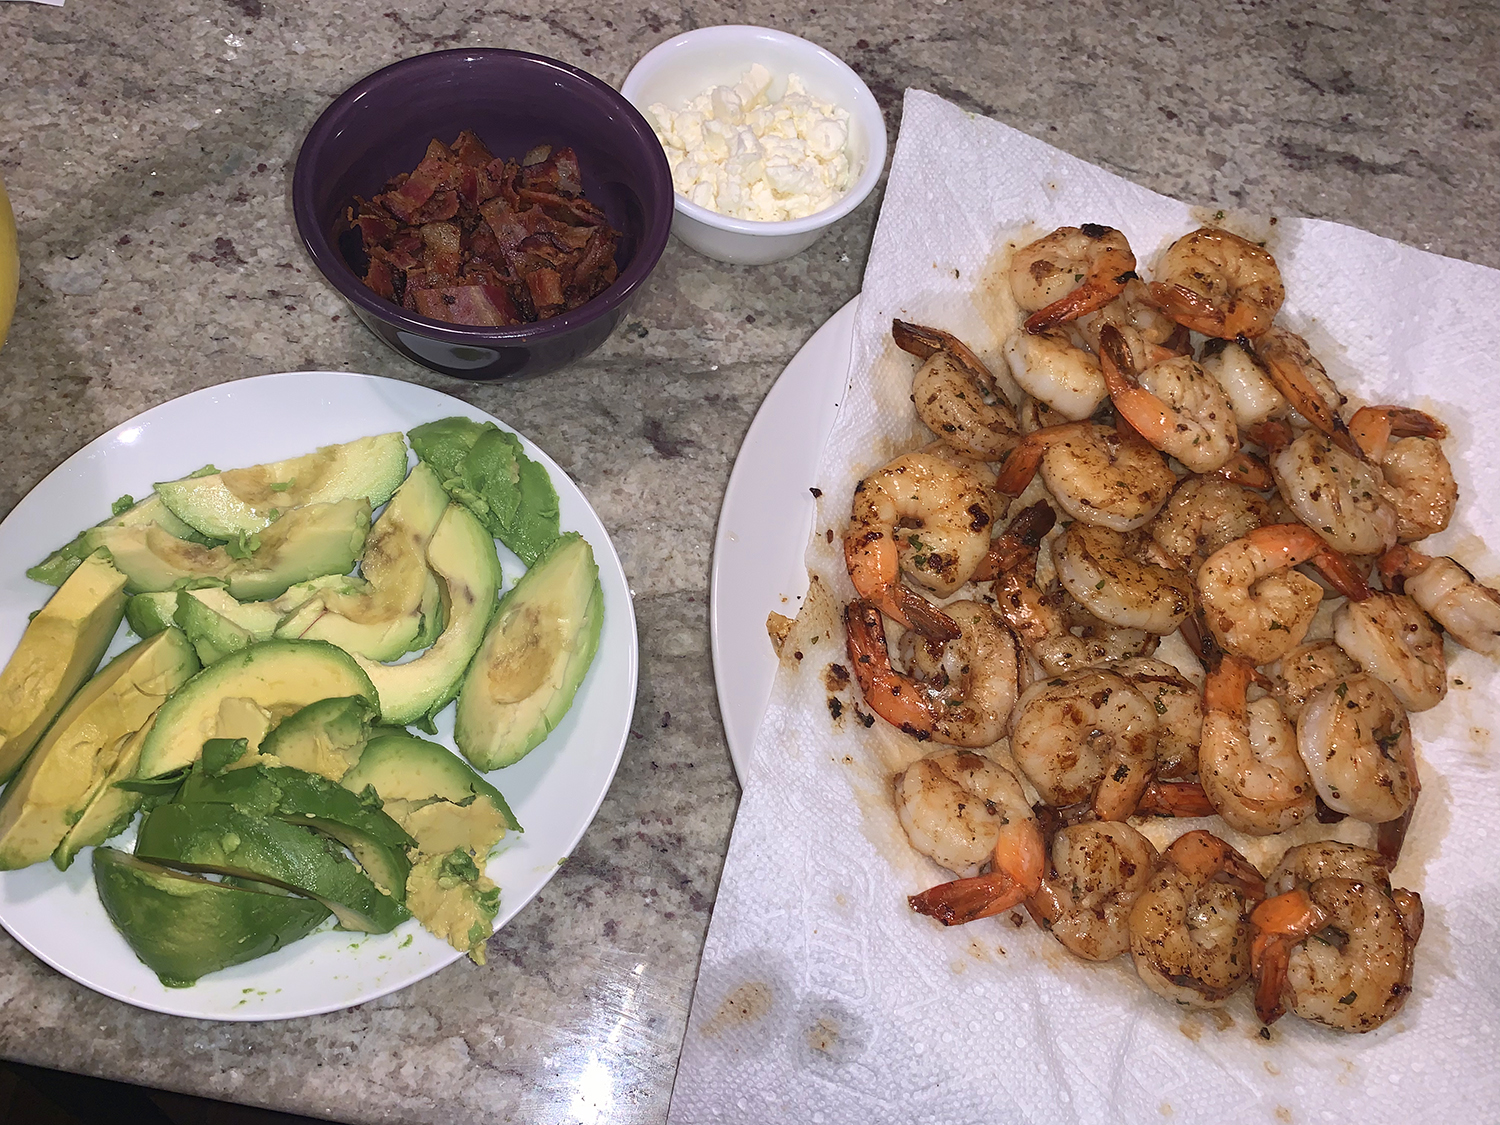
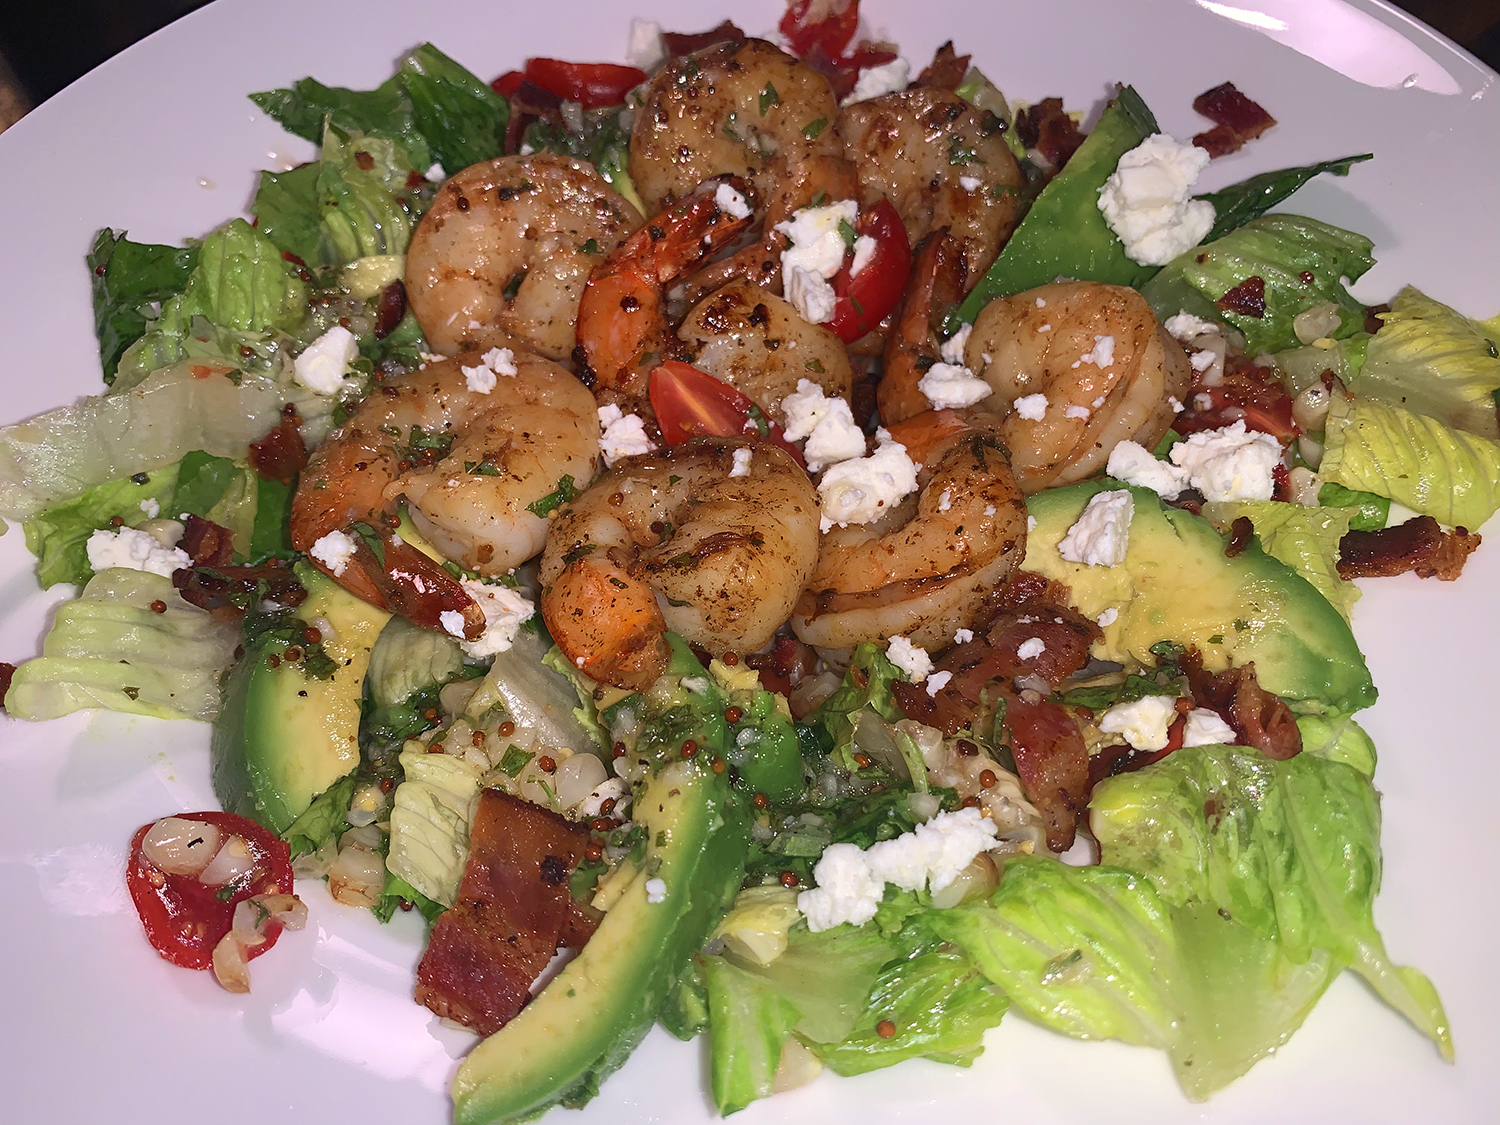
The love affair begins with the dressing, which is the key to adding unforgettable flavor. Just like a romance, it is sweet, spicy, tangy—with a jolt of garlic thrown in. Although I had to laugh at the notion that this Honey Garlic Shrimp, Corn, and Avocado Bacon Salad recipe from Half-Baked Harvest was supposed to feed six. Including daughter Julia who was in for a visit, the three of us polished it off entirely—yes, it was THAT good!
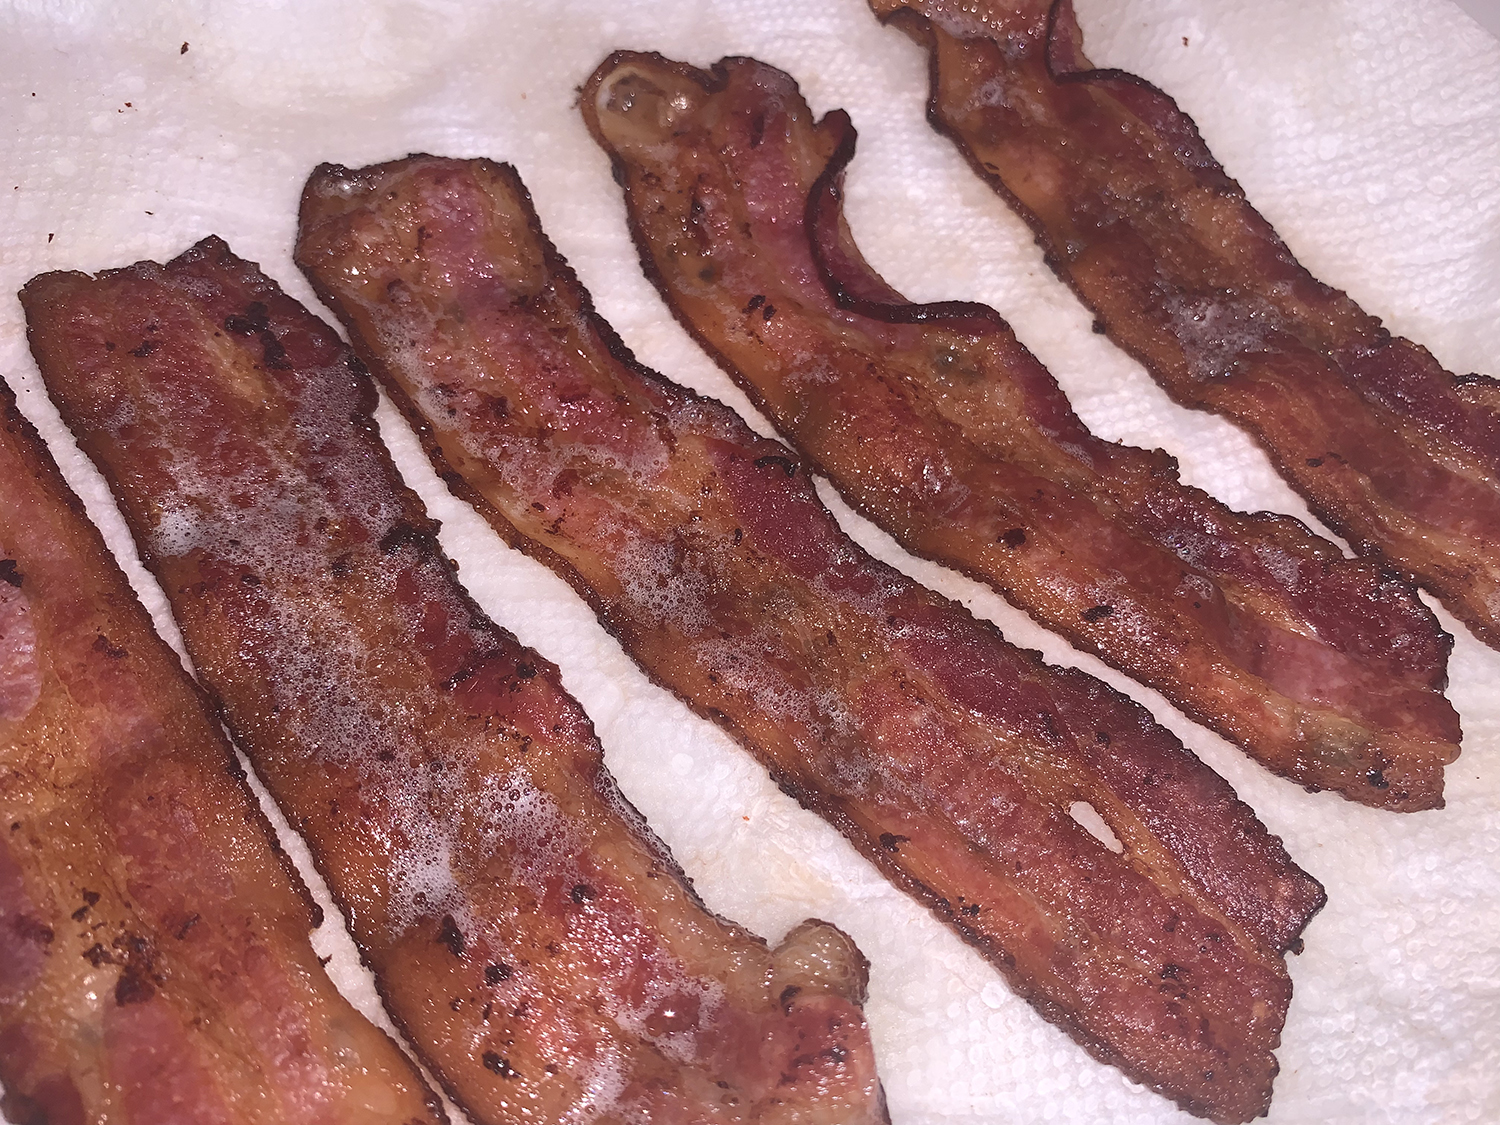
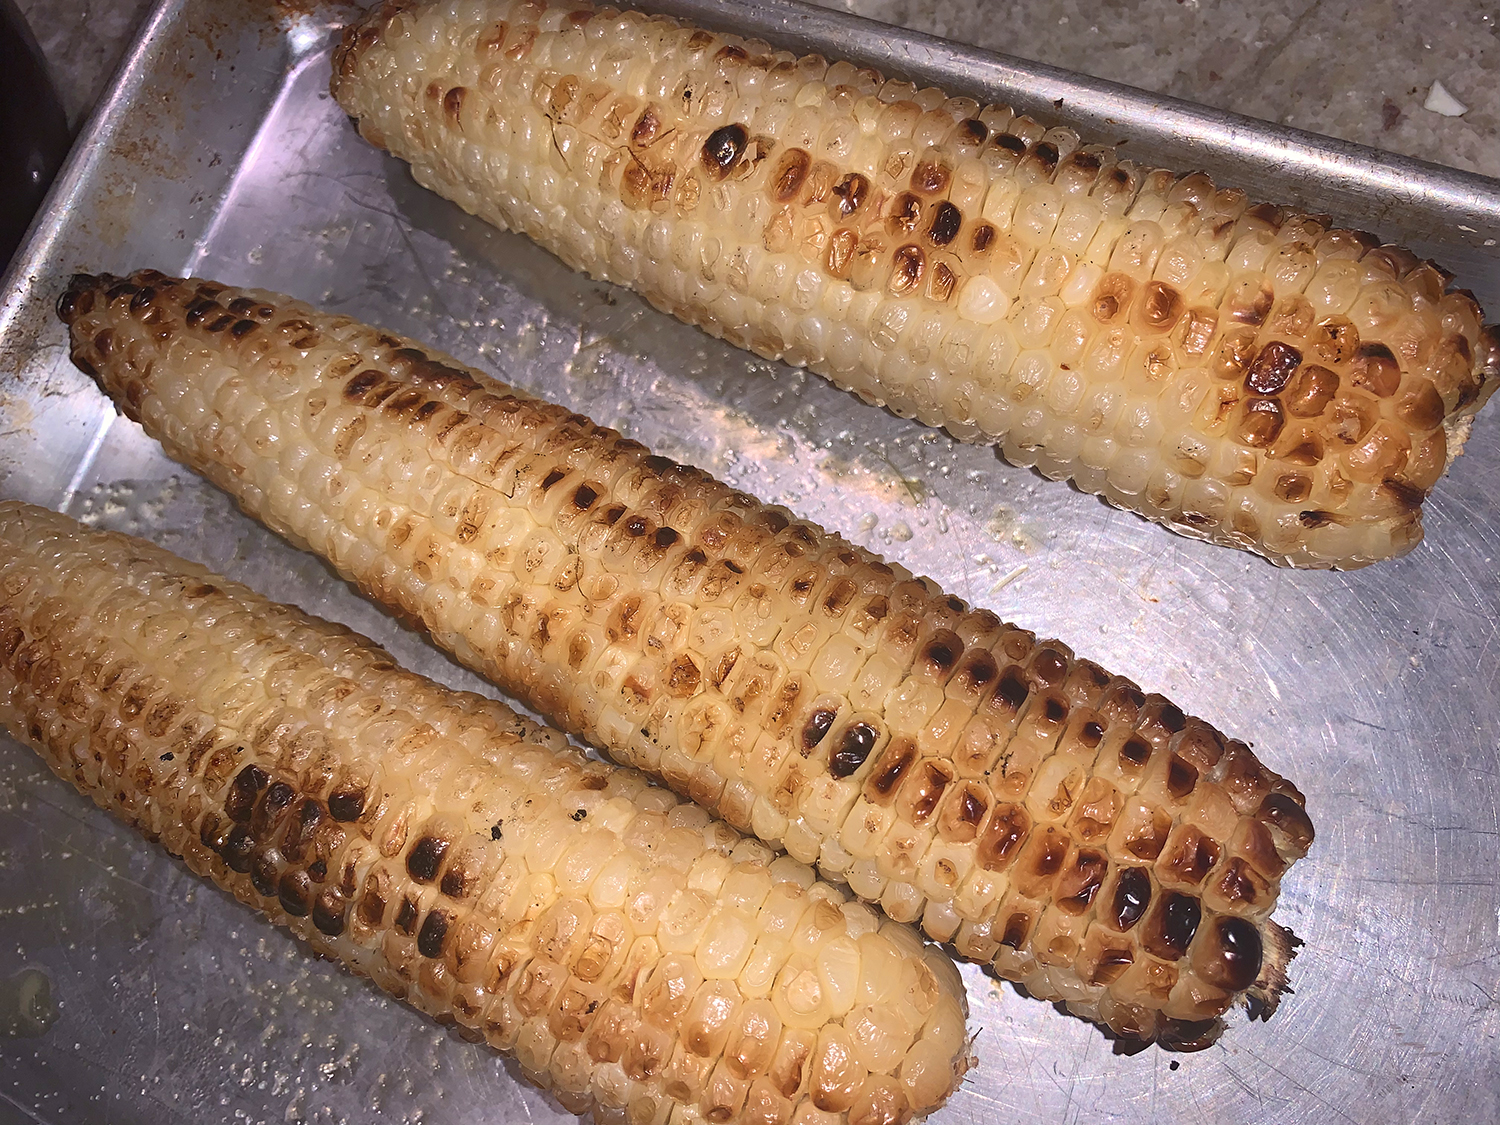
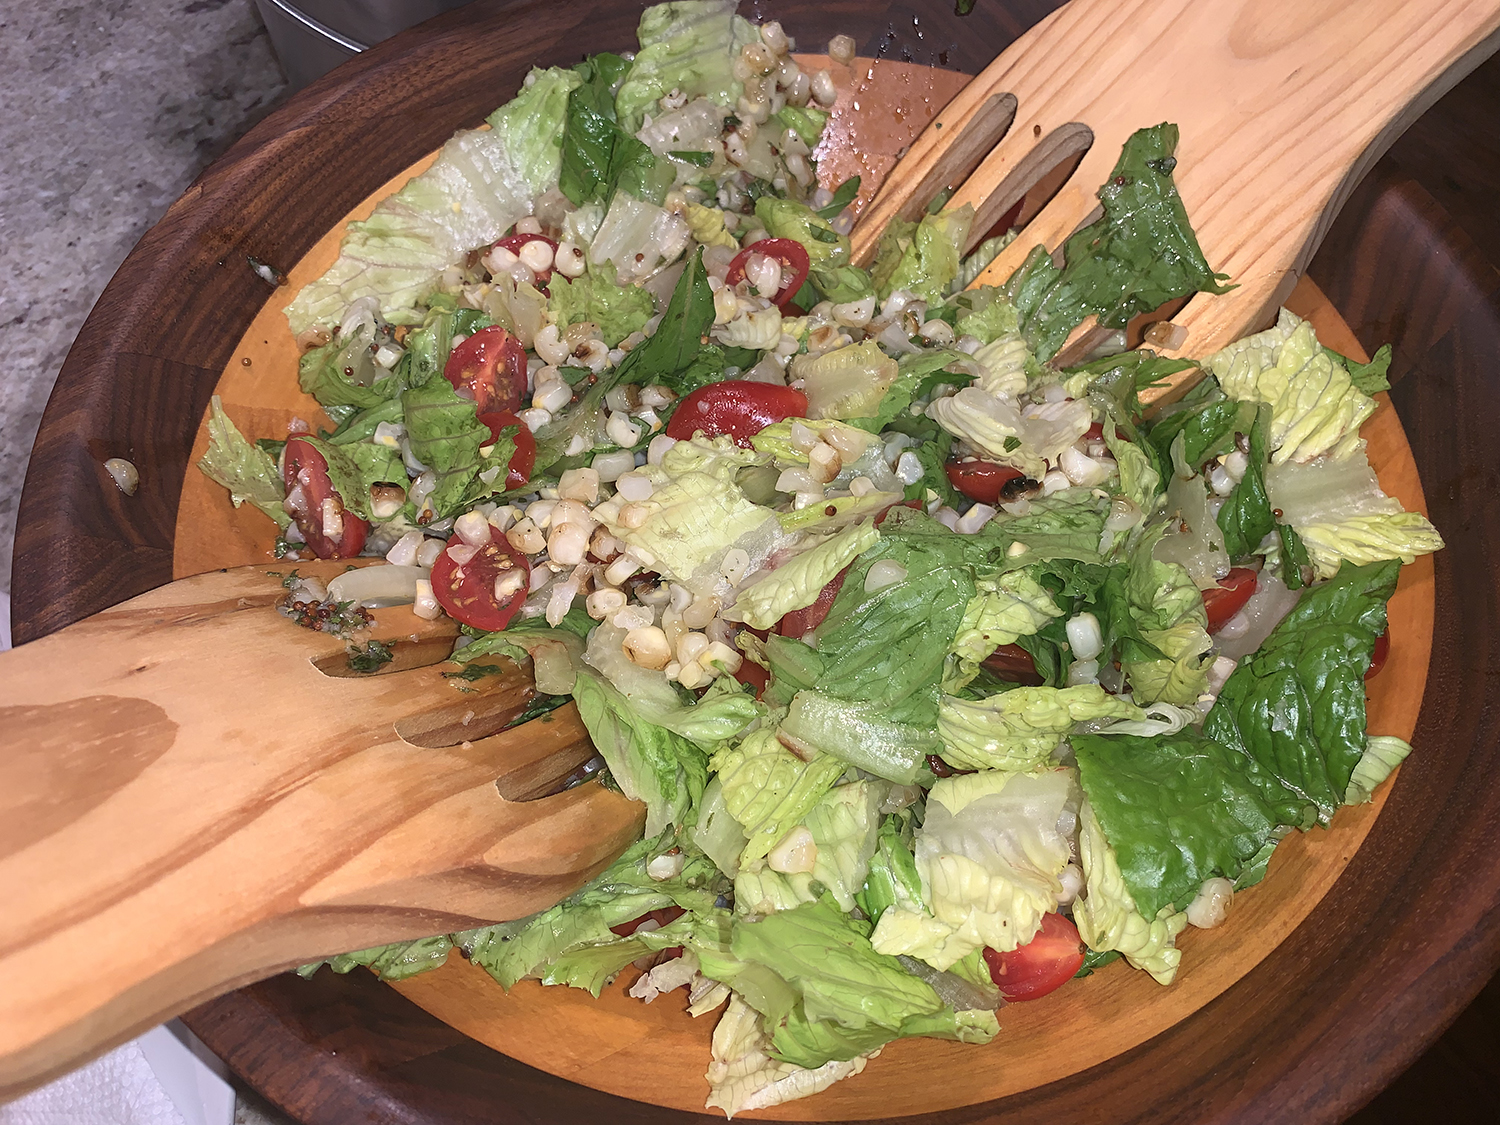
While there is not much cooking, you do need to char the ears of corn, crisp the bacon and sear the shrimp. Afterward, it comes together in minutes. Honey garlic seared shrimp cooked together with the bacon drippings is then tossed up in a fresh salad of romaine, grilled corn, salty feta, and creamy avocado. The herby dressing is so deliciously flavorful and pulls it altogether. You will be pining for more 💜…
To simplify things on dinner night, pre-prep by making the crispy bacon pieces and charred corn ahead of time, let cool, and store until ready to use.
1/2 cup feta cheese, crumbled (don’t buy the pre-crumbled variety)
Directions
To make the dressing. Combine all ingredients in a medium mixing bowl and whisk until smooth. Taste and adjust the salt and pepper.
In another bowl, toss the shrimp with 1/3 of the dressing. Let sit 10 minutes.
Heat a large skillet over medium-high heat and cook the bacon until crisp. Remove the bacon from the pan. Roughly chop when cooled.
Add the shrimp to the hot bacon fat and cook on both sides until seared, about 2 minutes per side. Remove from the heat. You will need to do this in two batches.
To make the salad, combine the greens, corn, and tomatoes in a salad bowl and toss with a little dressing. Add the shrimp, bacon, and avocados. Spoon the dressing overtop. Top with feta. Season with freshly cracked pepper and salt. Serve warm or cold.
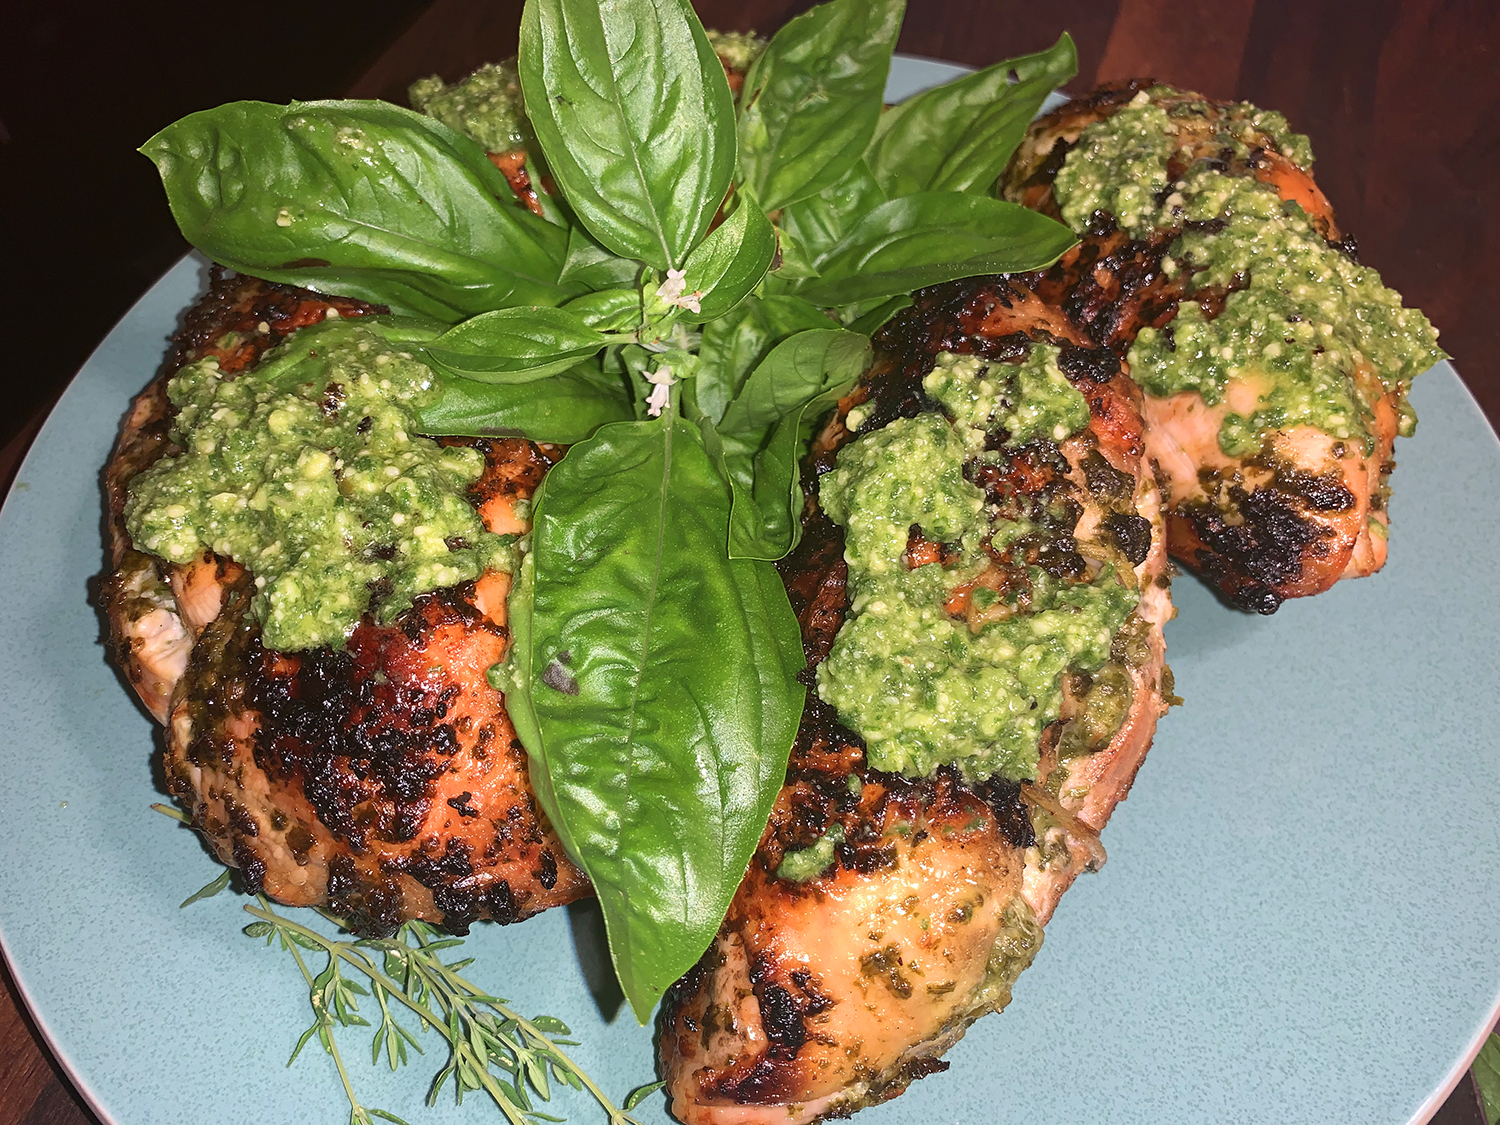
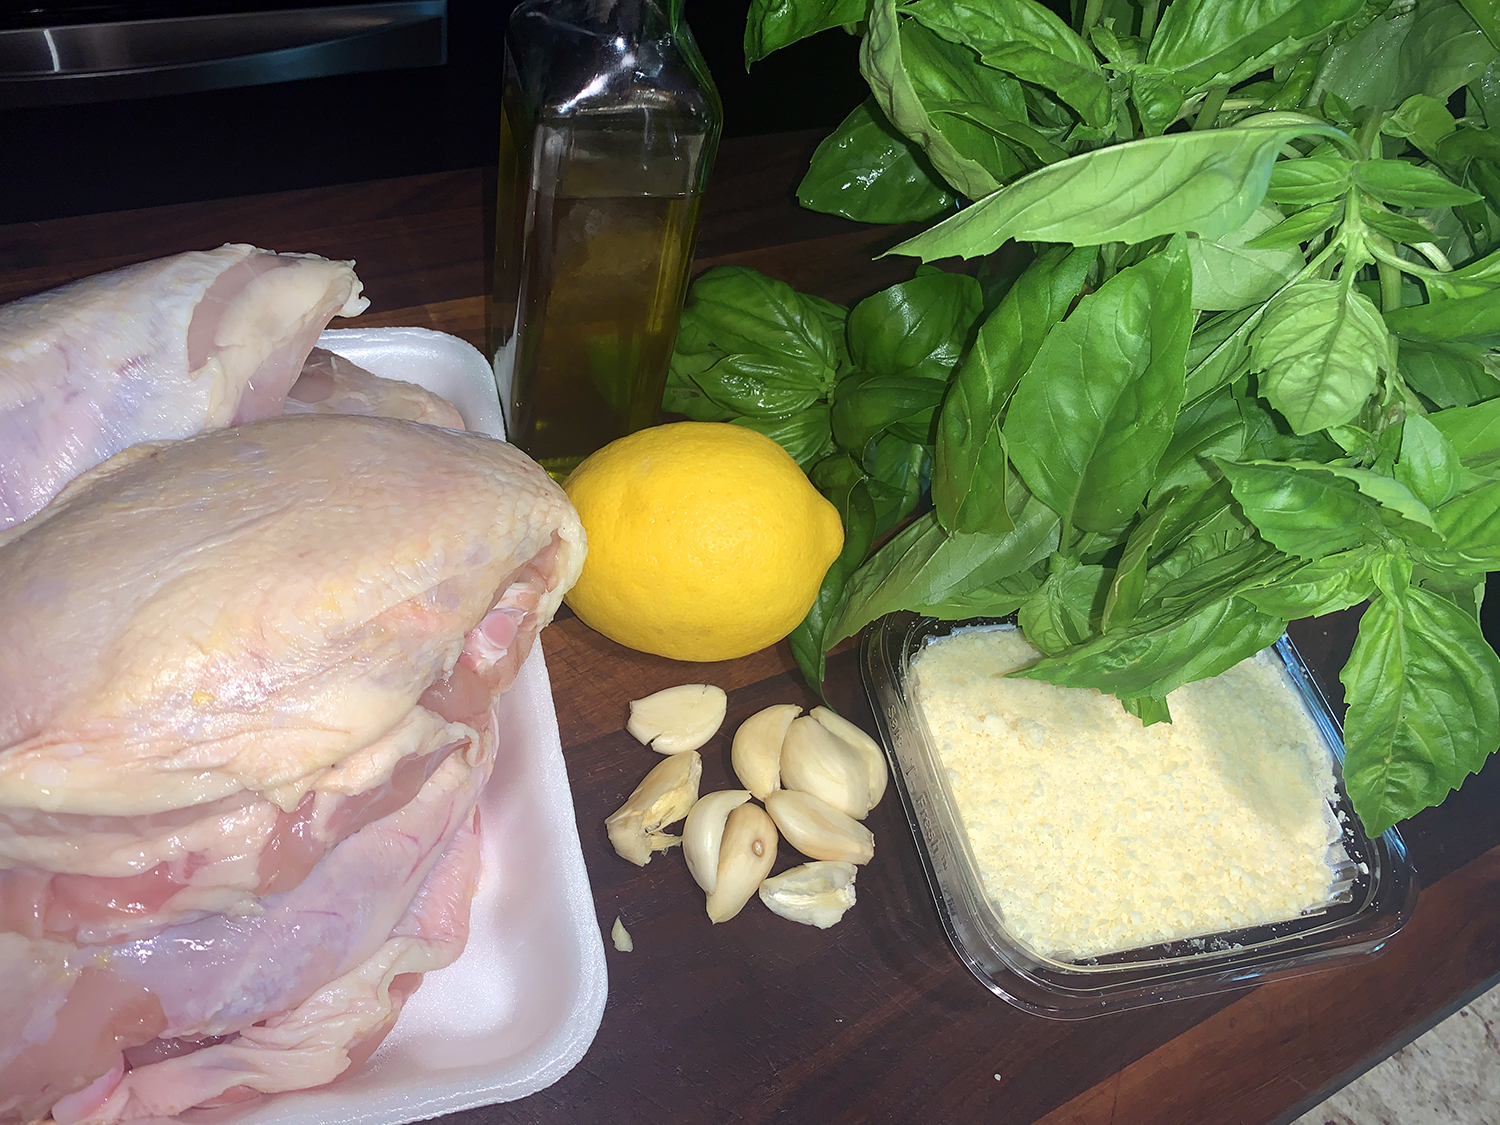
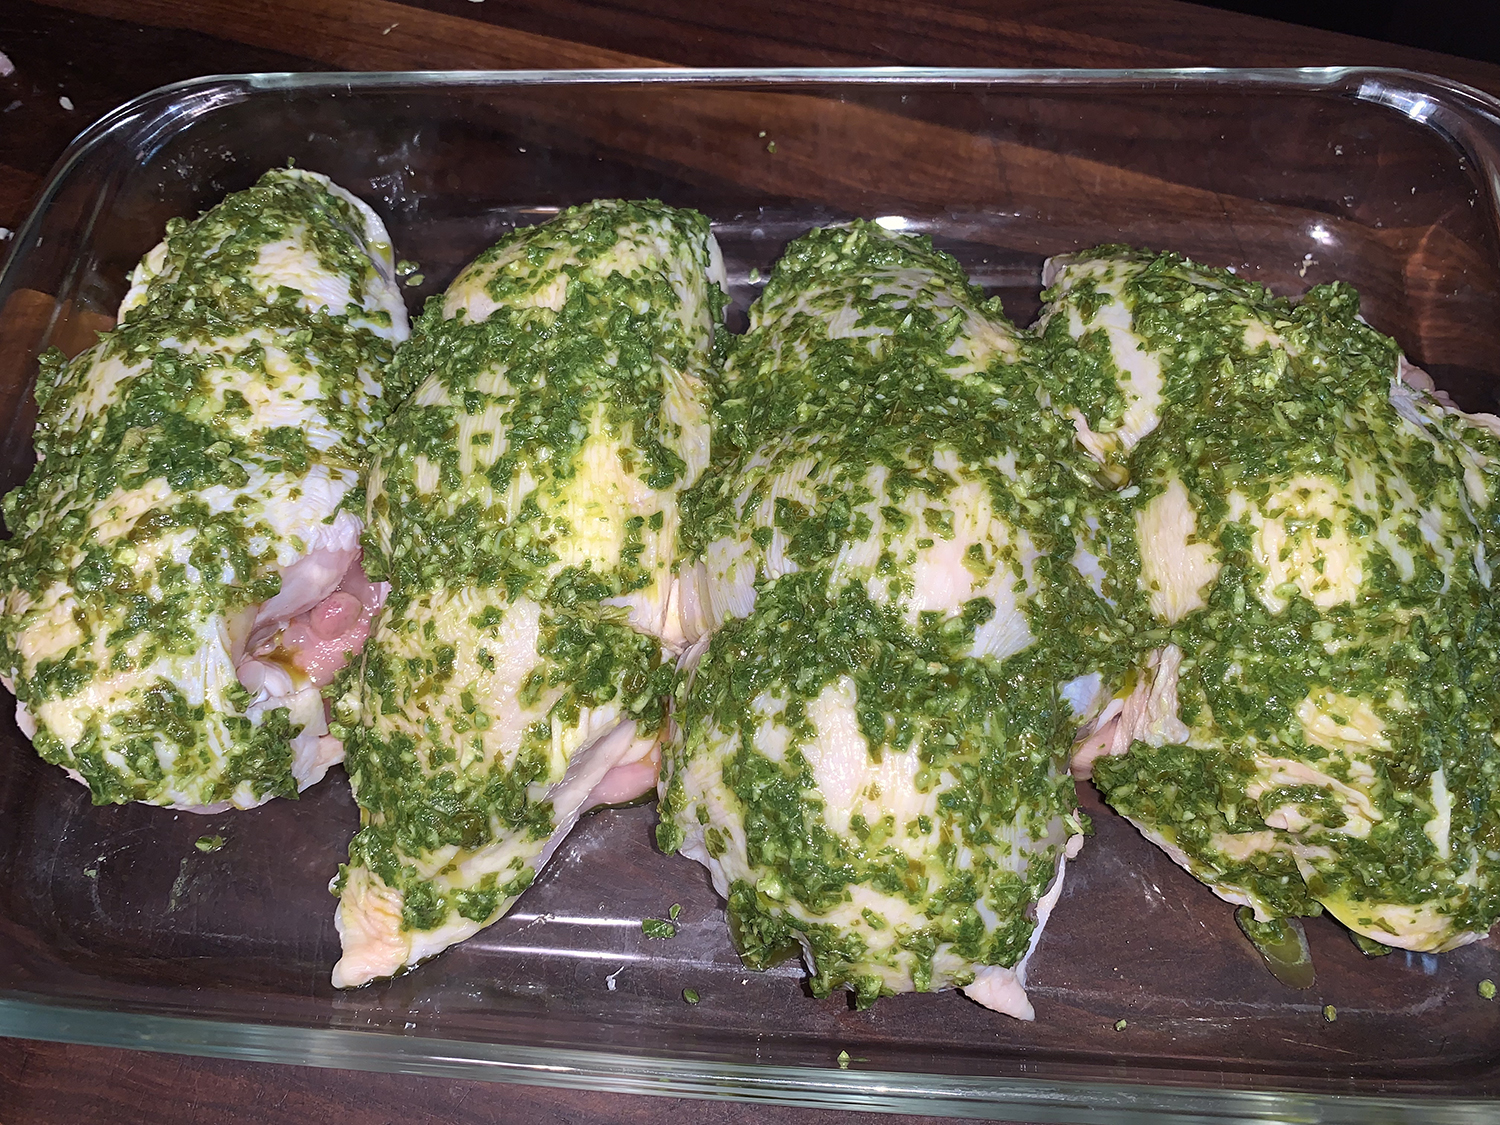
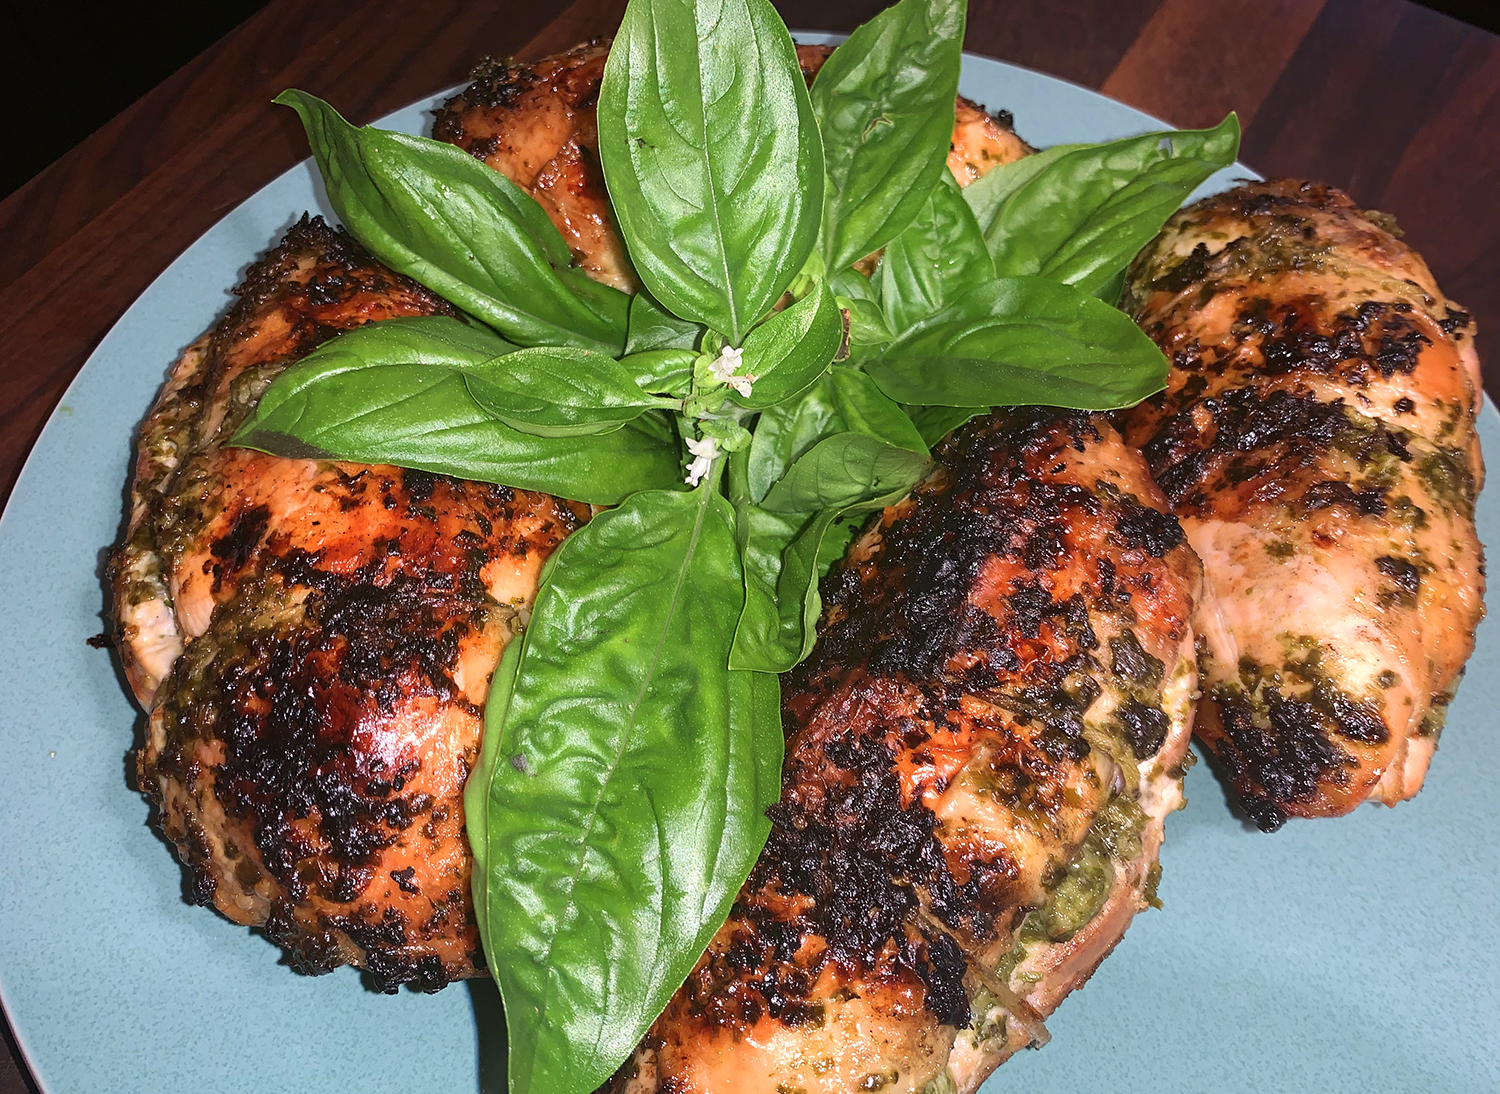
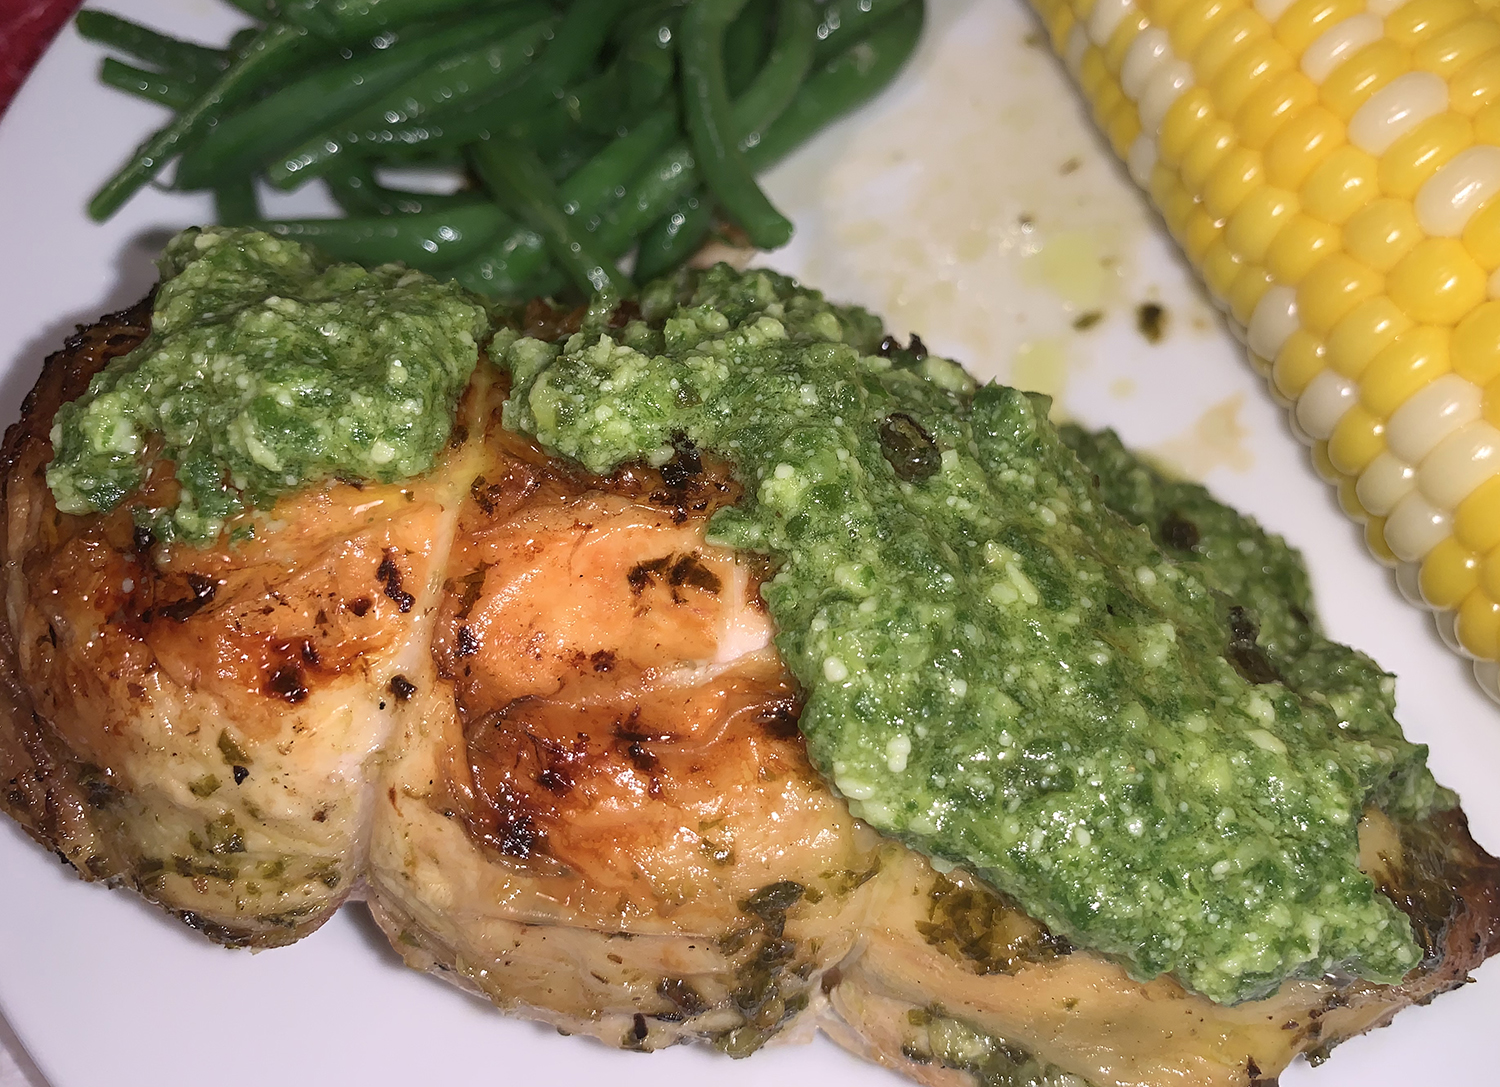
This pesto chicken recipe takes a three-pronged approach, compliments of Cook’s Country. Starting with a batch of homemade pesto, a portion is thickened with extra Parmesan cheese to make a stuffing for the bone-in, skin-on breasts. A cheese-less portion of the pesto functions as a marinade, flavoring the outside of the meat. Finally, cheesy pesto, thinned out to sauce consistency, is served with the chicken for one final hit of fresh basil flavor.
I am a white meat fan when it comes to chicken, while The Hubs prefers the dark meat which he believes to be juicier. While I can’t always argue with that logic, I do know that with the skin and bones of the breast pieces intact, the more succulent the meat will be.
Our poultry breasts weighed in at 15 ounces or so, a bit more than the 12-ounce pieces listed in the ingredients. In fact, one of them was larger than the other three and actually took an additional 7 minutes to come to temperature, so keep a close eyeball on the internal temps with an instant-read thermometer, especially if they are varying sizes.
Brimming with fresh basil, this recipe was a perfect opportunity to cut it back mid-season from our herb garden, encouraging robustness for the remainder of the season. And while the directions indicate to marinate the breasts in the pesto sauce in a bowl for one hour, I let them get happy in a large glass baking dish for three hours in the refrigerator wrapped tightly with saran wrap.
Results? The Hubs LOVED them! That’s big praise coming from a guy who steadfastly prefers the dark meat of the thighs and legs. He couldn’t believe how moist the white meat remained and how flavorful the overall pesto approach was. “Let’s make this for company” he sang, and I thought yes, let’s!
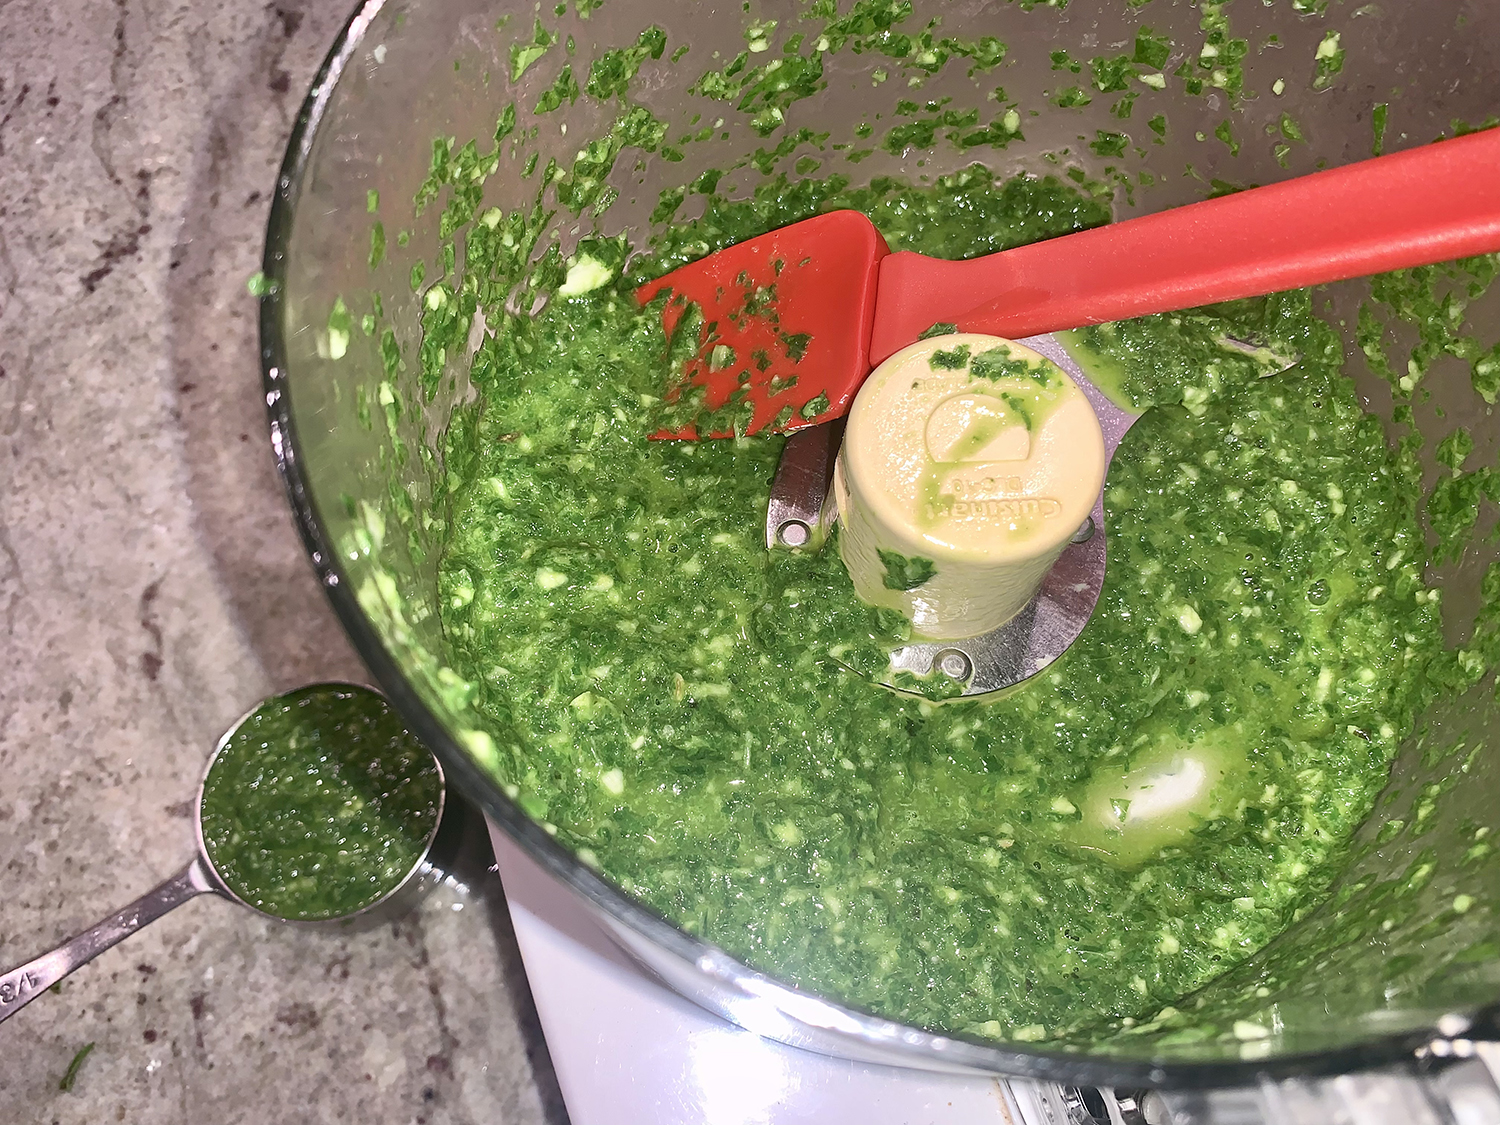
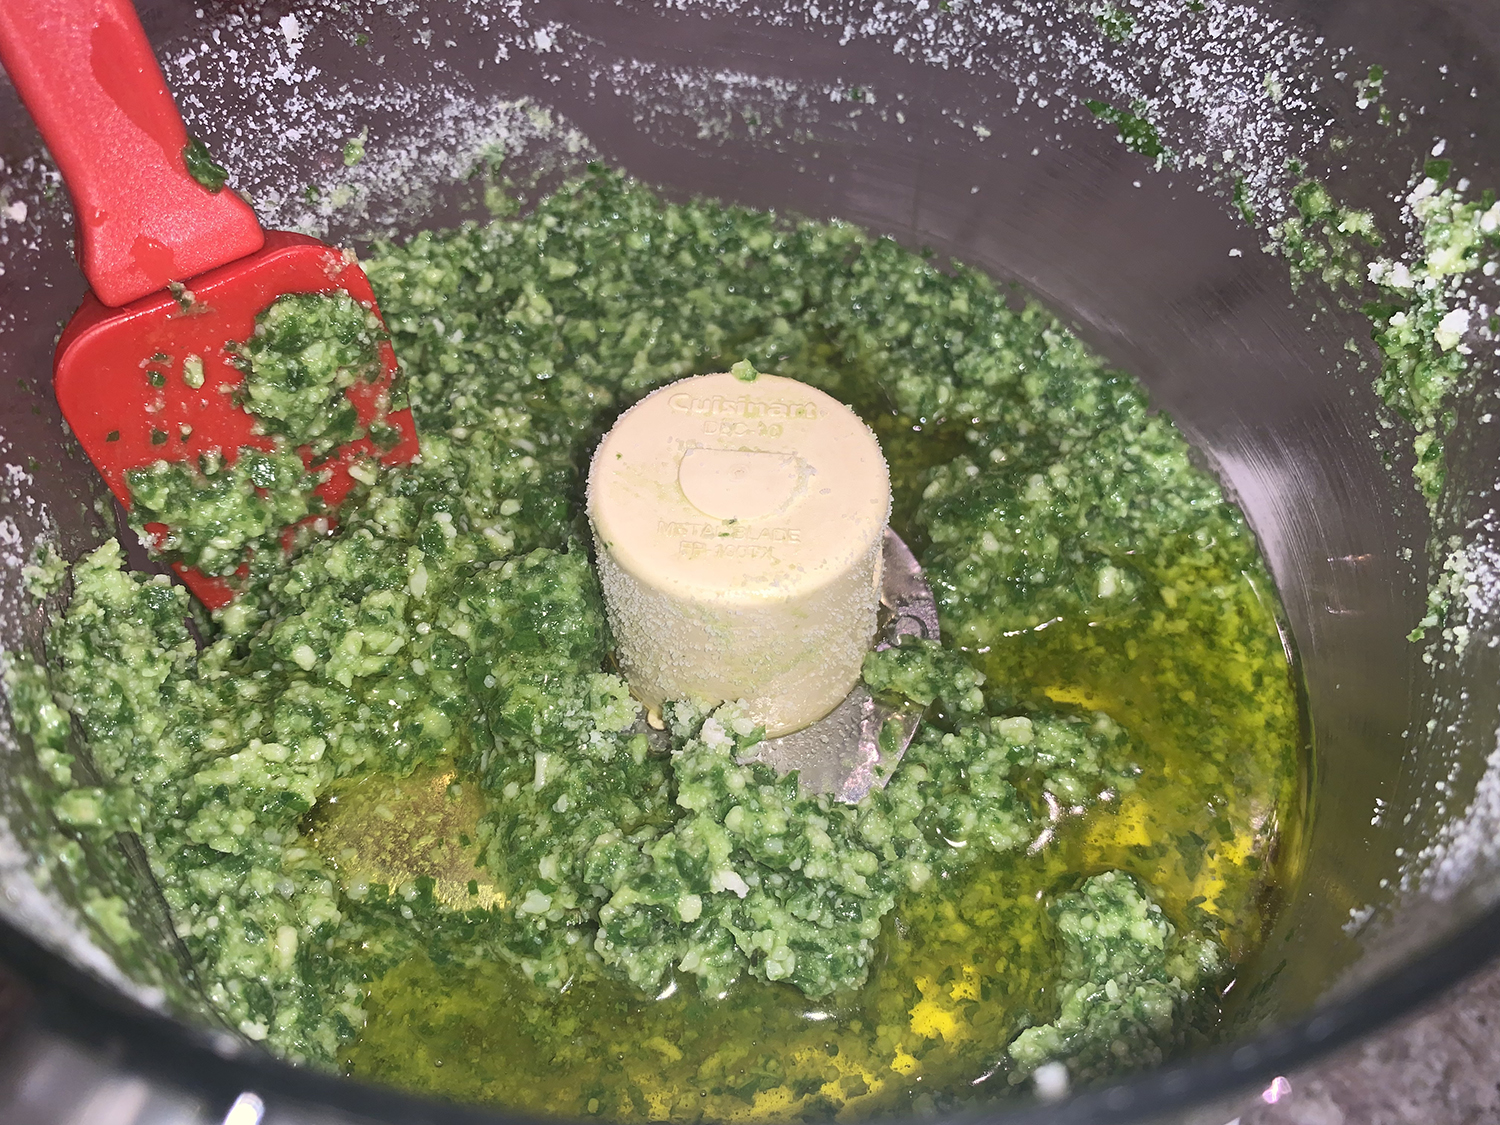
Note: that the pesto base is divided into three separate mixtures for marinating, stuffing, and saucing the grilled chicken.
Process basil, ½ cup oil, garlic, lemon juice, and ¾ teaspoon salt in food processor until smooth, about 1 minute, scraping down bowl as needed. Remove ¼ cup pesto from processor and reserve for marinating chicken.
Add Parmesan to pesto in processor and pulse until incorporated, about 3 pulses. Remove ¼ cup Parmesan pesto from processor and reserve for stuffing chicken.
Add remaining ¼ cup oil to Parmesan pesto in processor and pulse until combined, about 3 pulses; set aside for saucing cooked chicken.
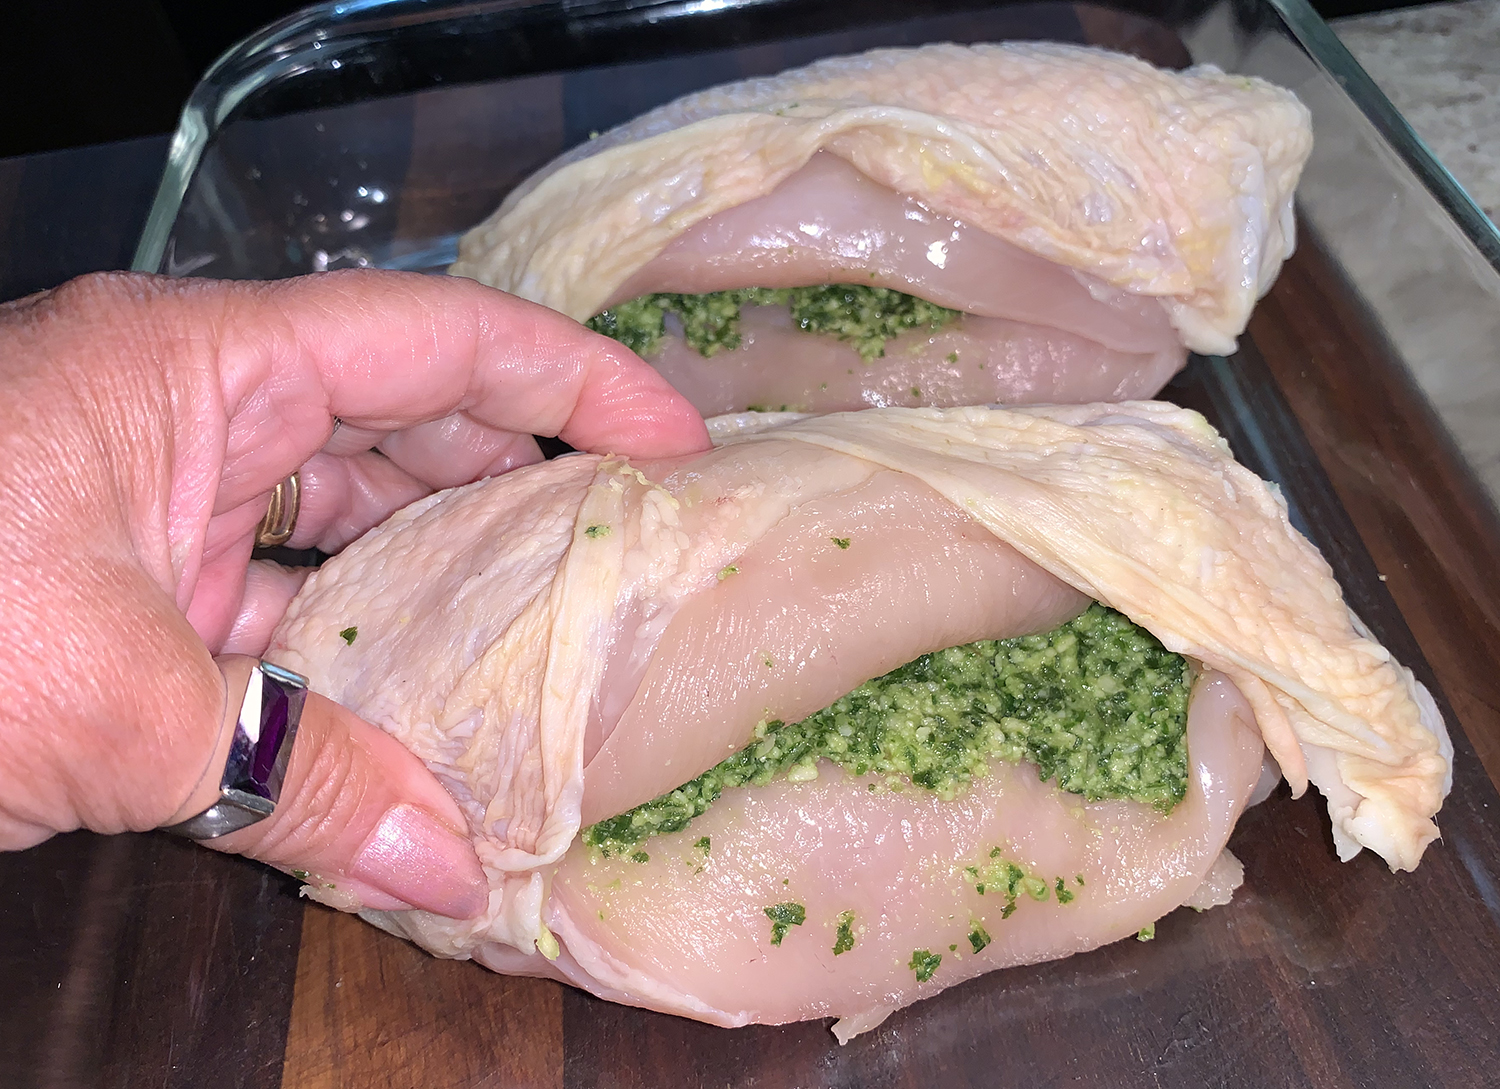
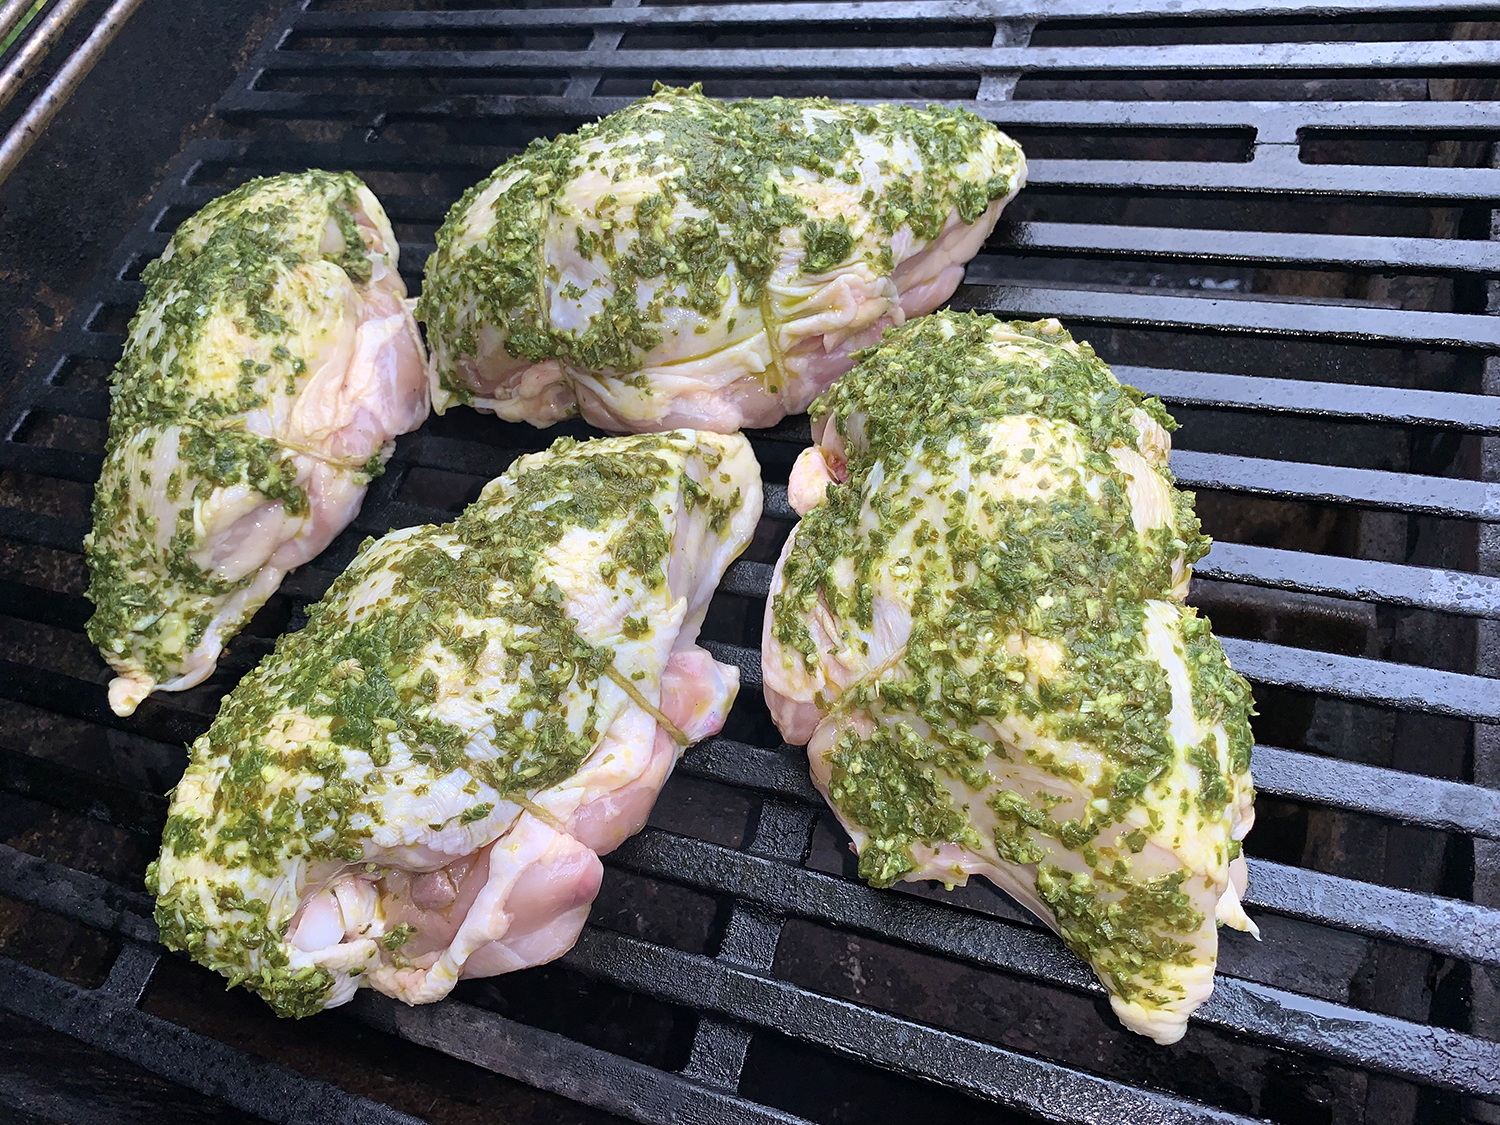
Starting on thick side of breast, closest to breastbone, cut horizontal pocket in each breast, stopping ½ inch from edge so halves remain attached. Season chicken, inside and out, with salt and pepper.
Place 1 tablespoon of Parmesan pesto reserved for stuffing in pocket of each breast. Evenly space 2 pieces of kitchen twine (each 12 inches long) beneath each breast and tie to secure breast, trimming any excess twine.
Place stuffed breasts in bowl and add pesto reserved for marinating. Rub pesto all over chicken, cover, and refrigerate for 1 hour.
FOR A CHARCOAL GRILL: Open bottom vent completely. Light large chimney starter filled with charcoal briquettes (6 quarts). When top coals are partially covered with ash, pour evenly over half of grill. Set cooking grate in place, cover, and open lid vent completely. Heat grill until hot, about 5 minutes. FOR A GAS GRILL: Turn all burners to high, cover, and heat grill until hot, about 15 minutes. Turn all burners to medium-low. (Adjust burners as needed to maintain grill temperature of 350 degrees.)
Clean and oil cooking grate. Place chicken, skin side up, on grill (over cool side if using charcoal). Cover and cook until chicken registers 155 degrees, 25 to 35 minutes.
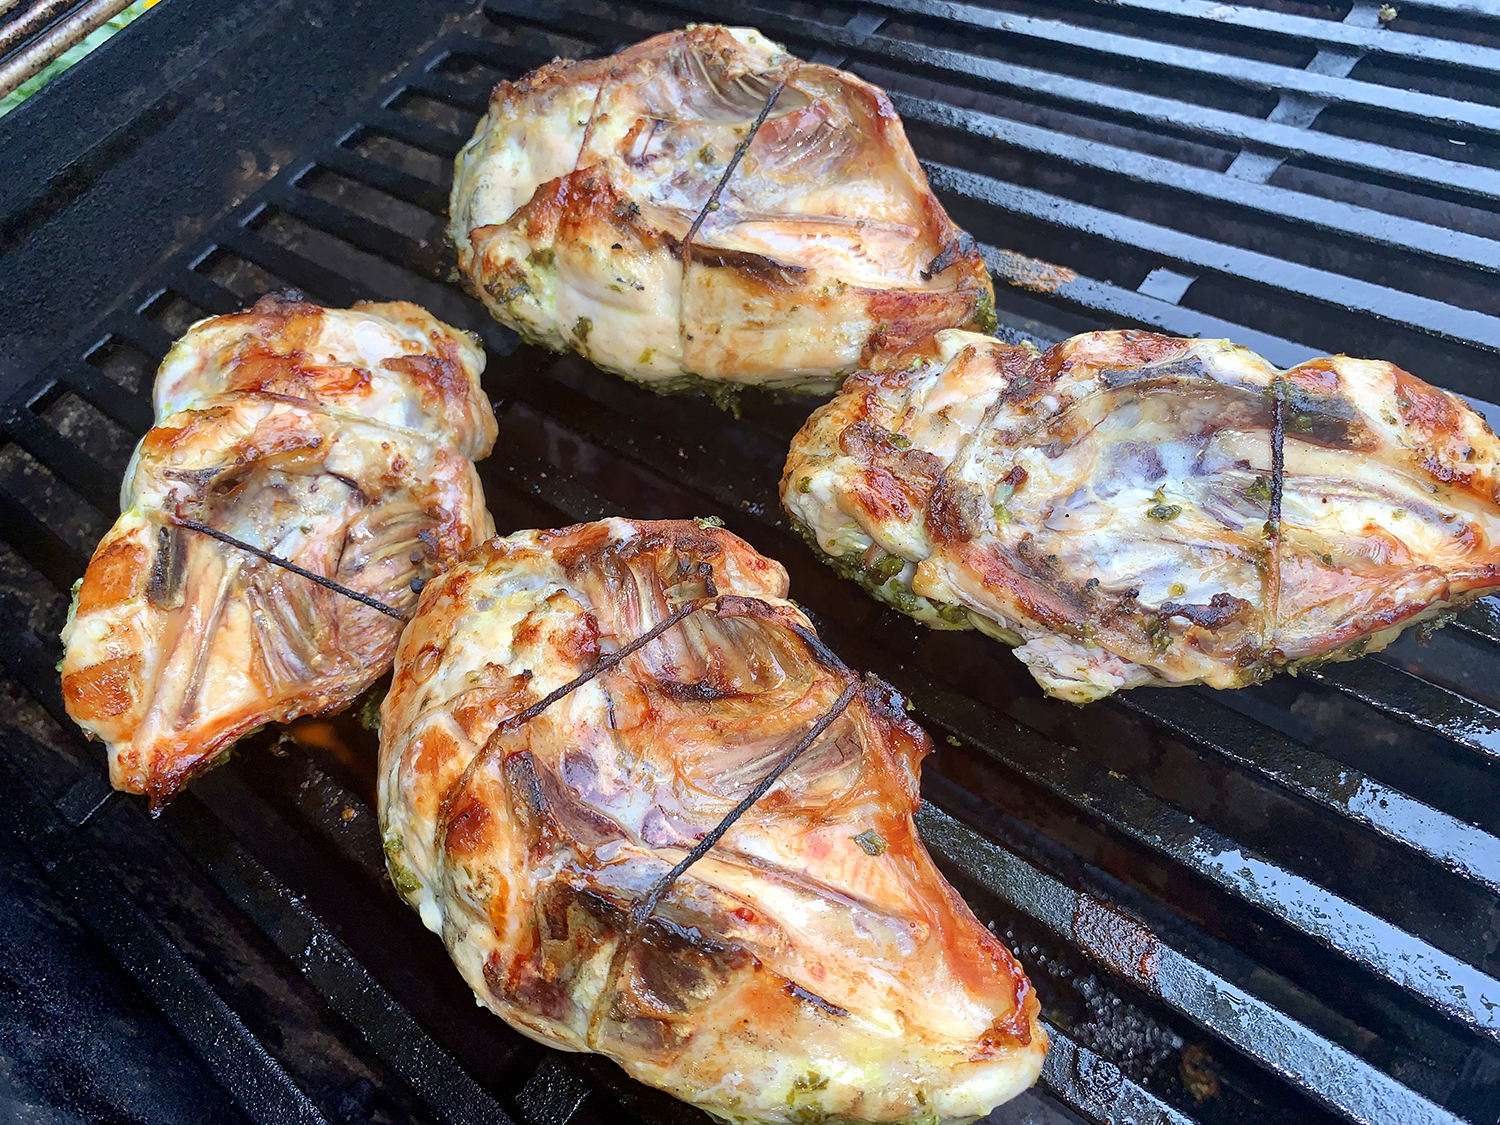
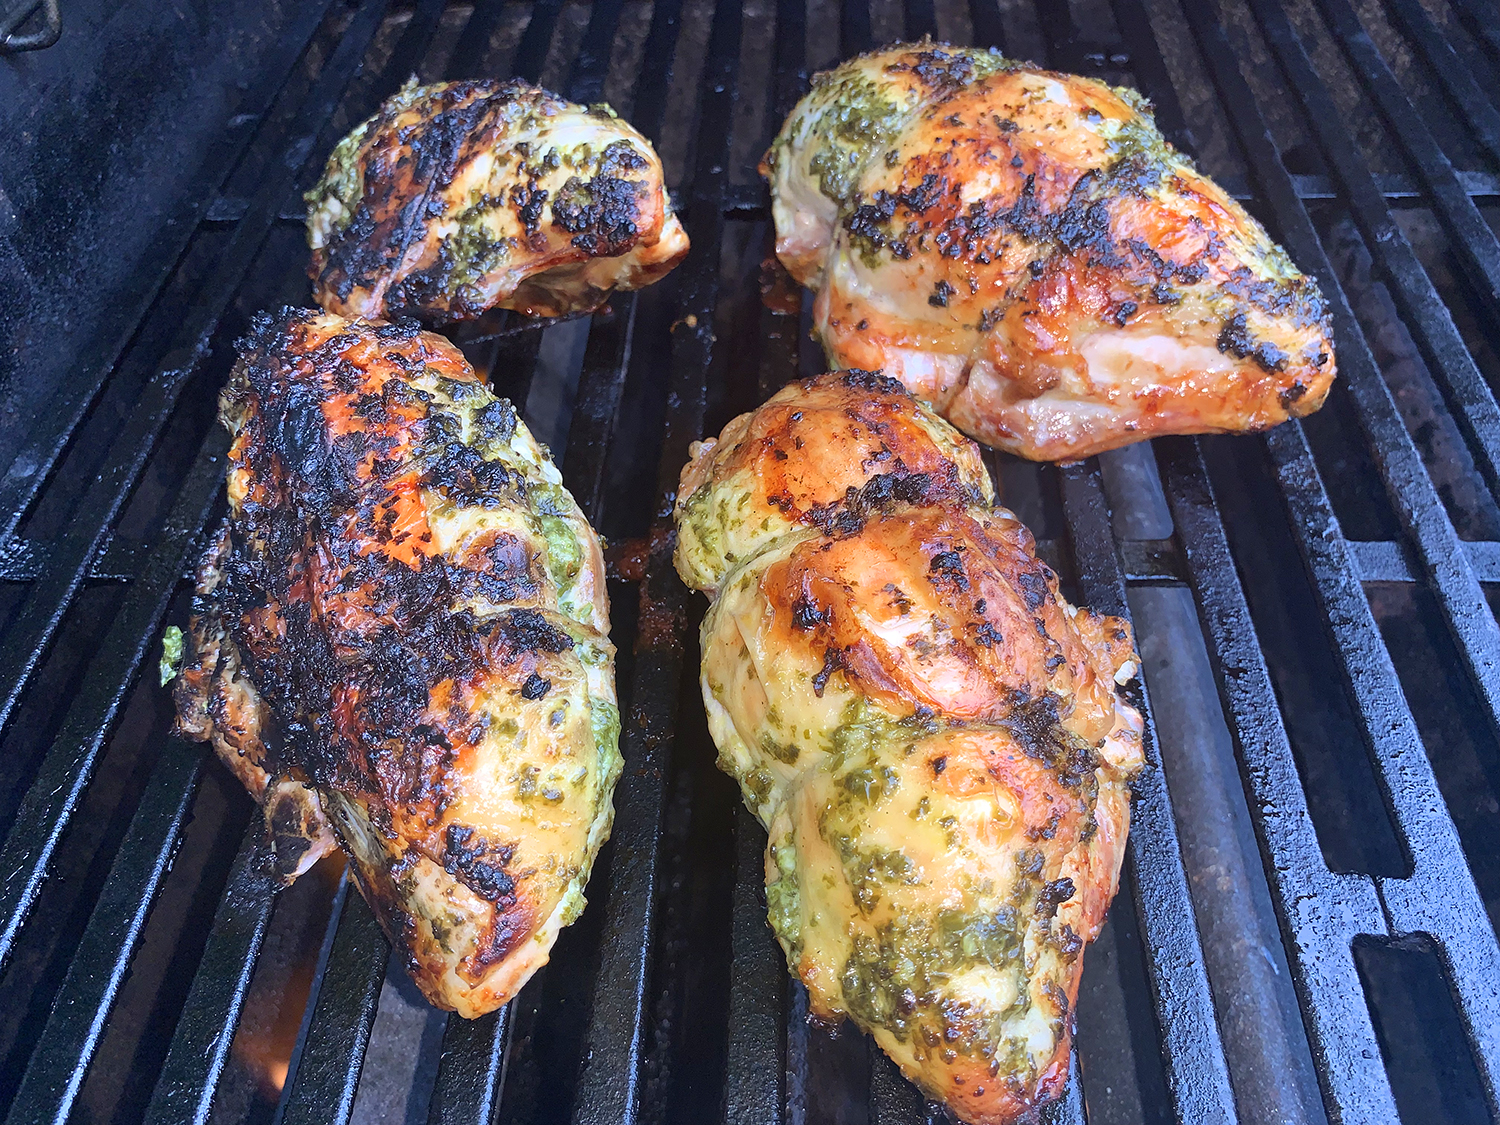
Flip chicken skin side down. If using charcoal, slide chicken to hot part of grill. If using gas, turn all burners to medium-high. (Our grill is very hot, so I only turned up the heat to medium.) Cover and cook until well browned and chicken registers 160 degrees, 5 to 10 minutes.
Transfer chicken to platter, tent loosely with foil, and let rest for 5 minutes. Remove twine from chicken and carve meat from bone. Serve, passing Parmesan pesto sauce separately.
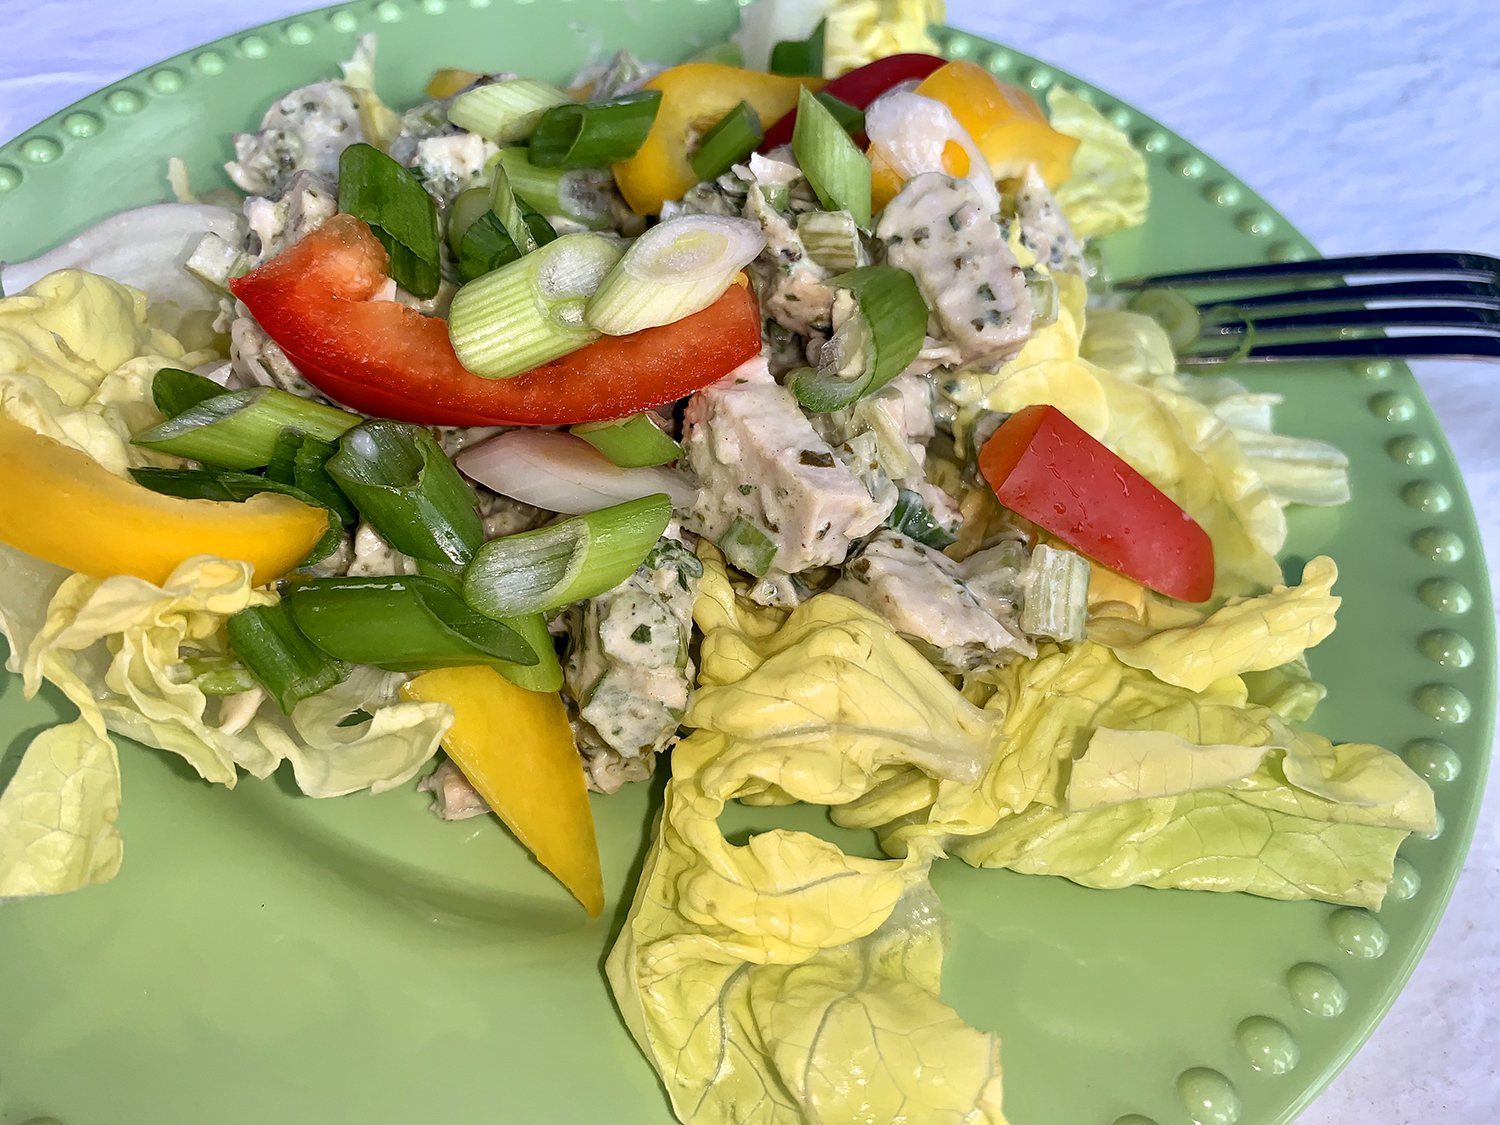
BTW, if you are lucky enough to have some leftover breasts, make a chicken pesto salad. When cooled, remove the cooked meat from the skin and bones. Either shred it, or cut it up in small chunks (it will still contain the pesto stuffing).
In a mixing bowl, add the chunked chicken, small diced celery, thinly sliced scallions, mayonnaise and more of the pesto topping. Salt and pepper to taste. Refrigerate until ready to use. We served ours the next day for lunch over Bibb lettuce and topped with sliced yellow and red bell peppers and more sliced scallions.
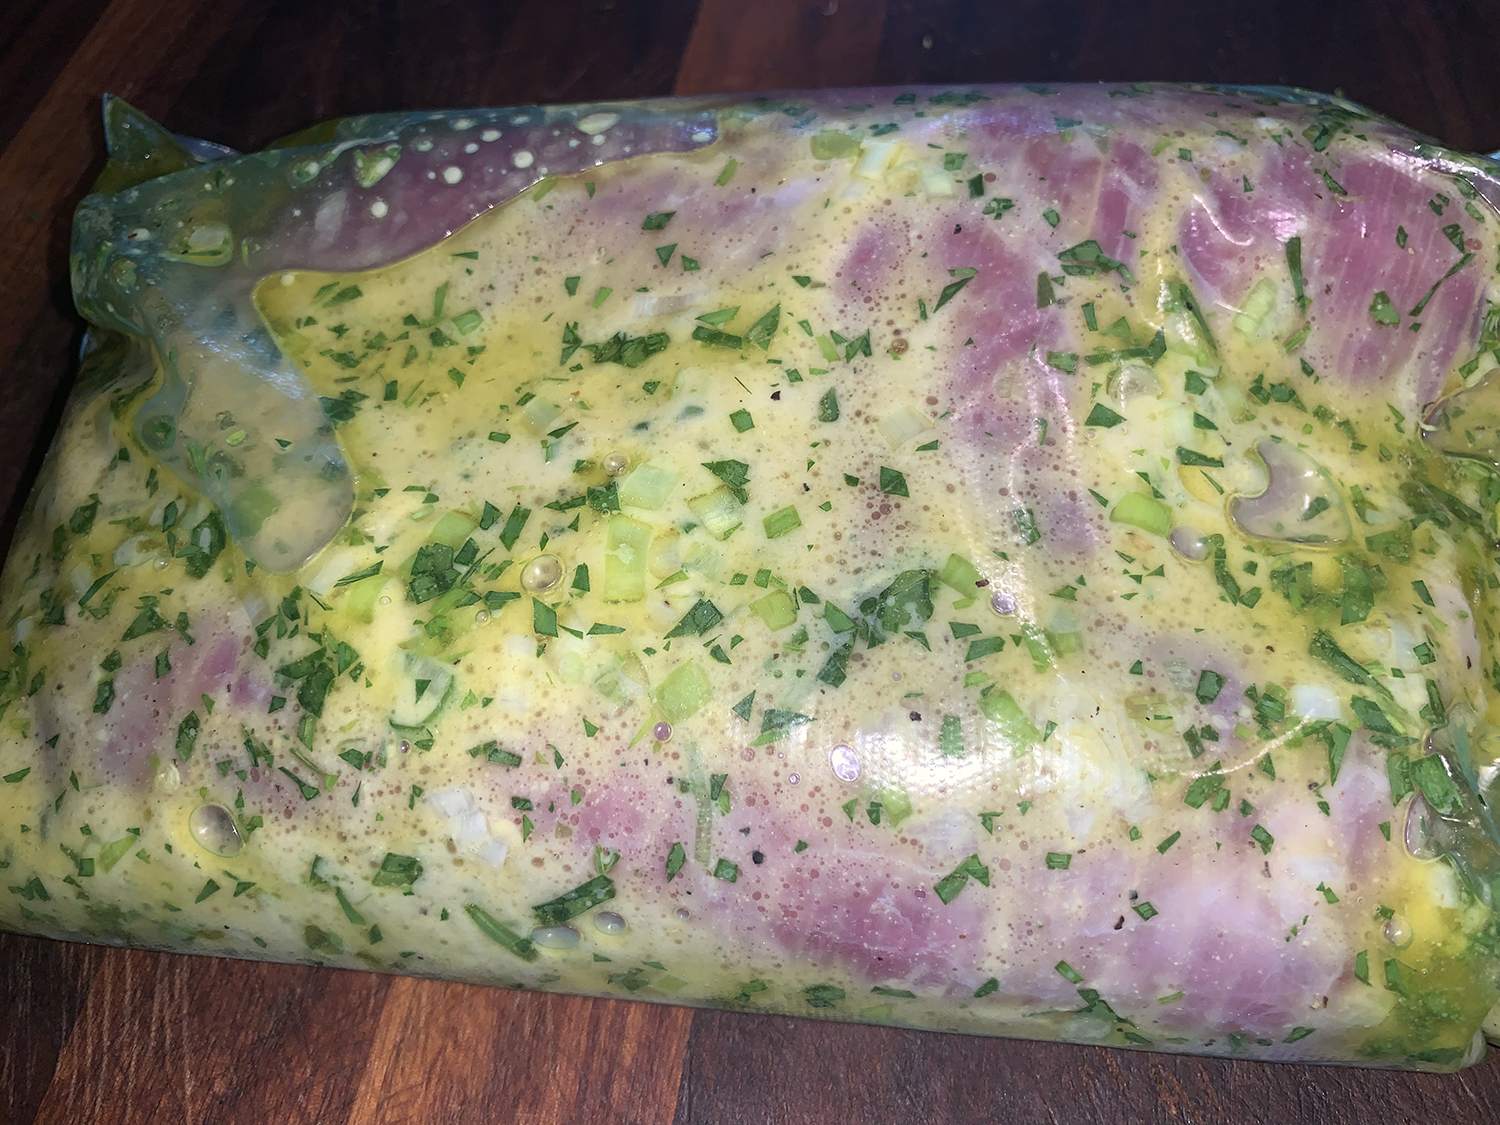
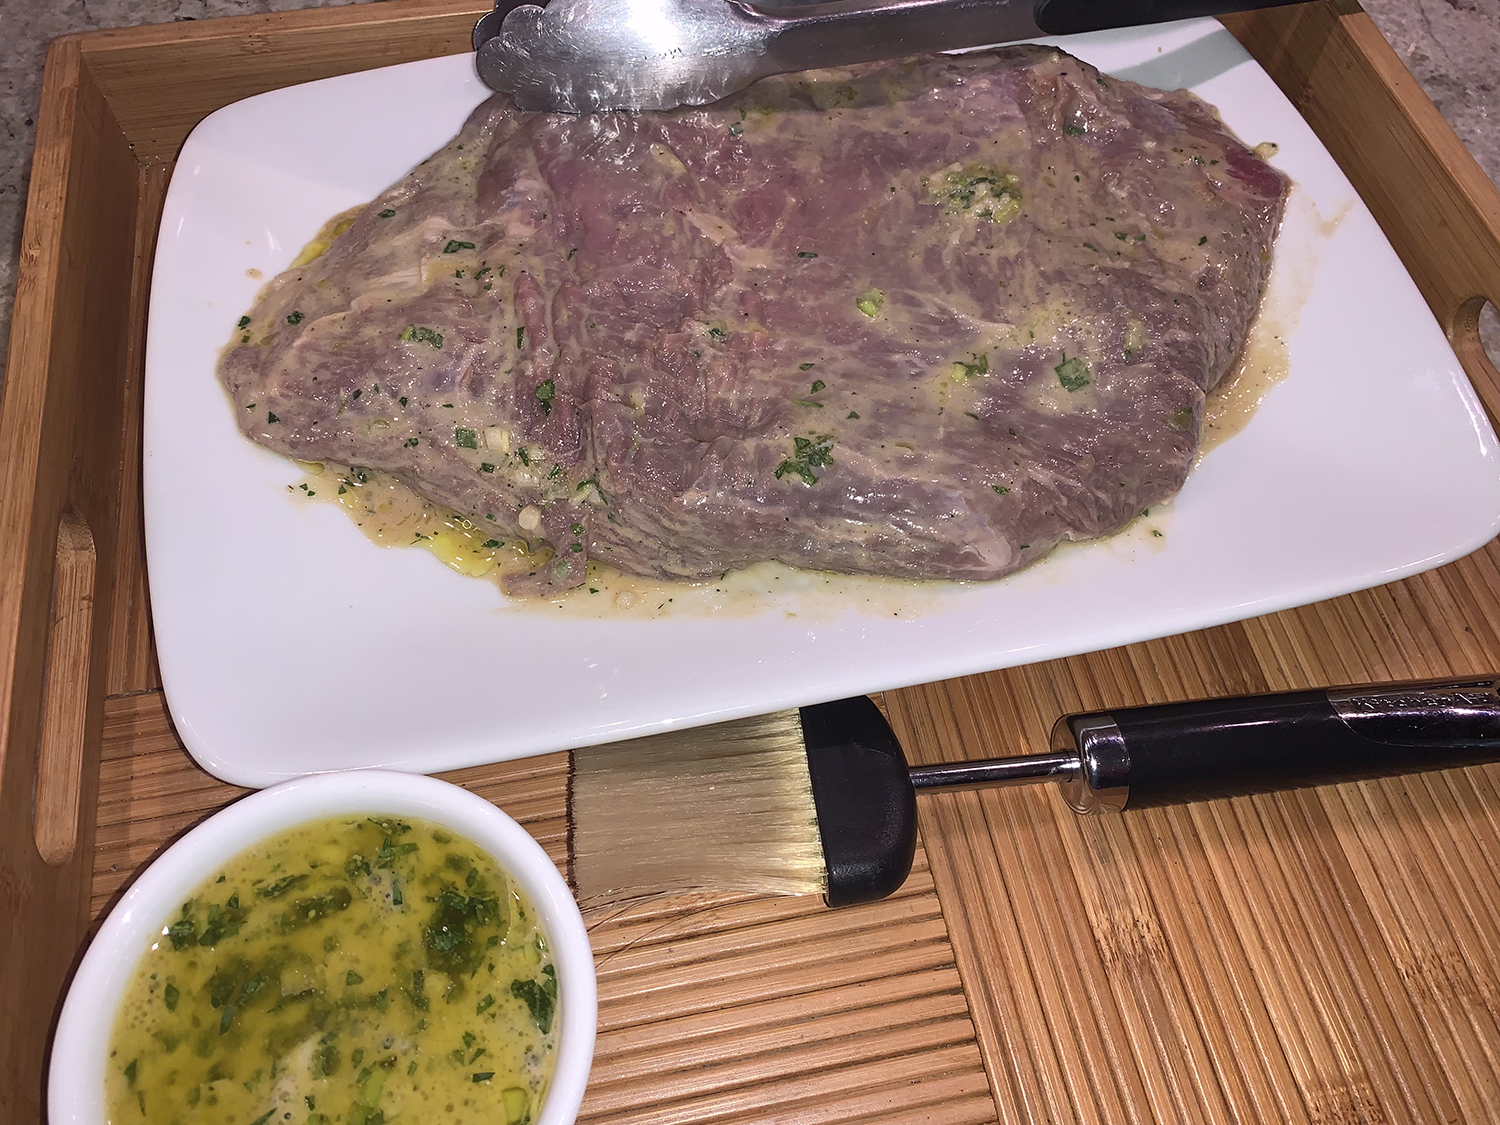
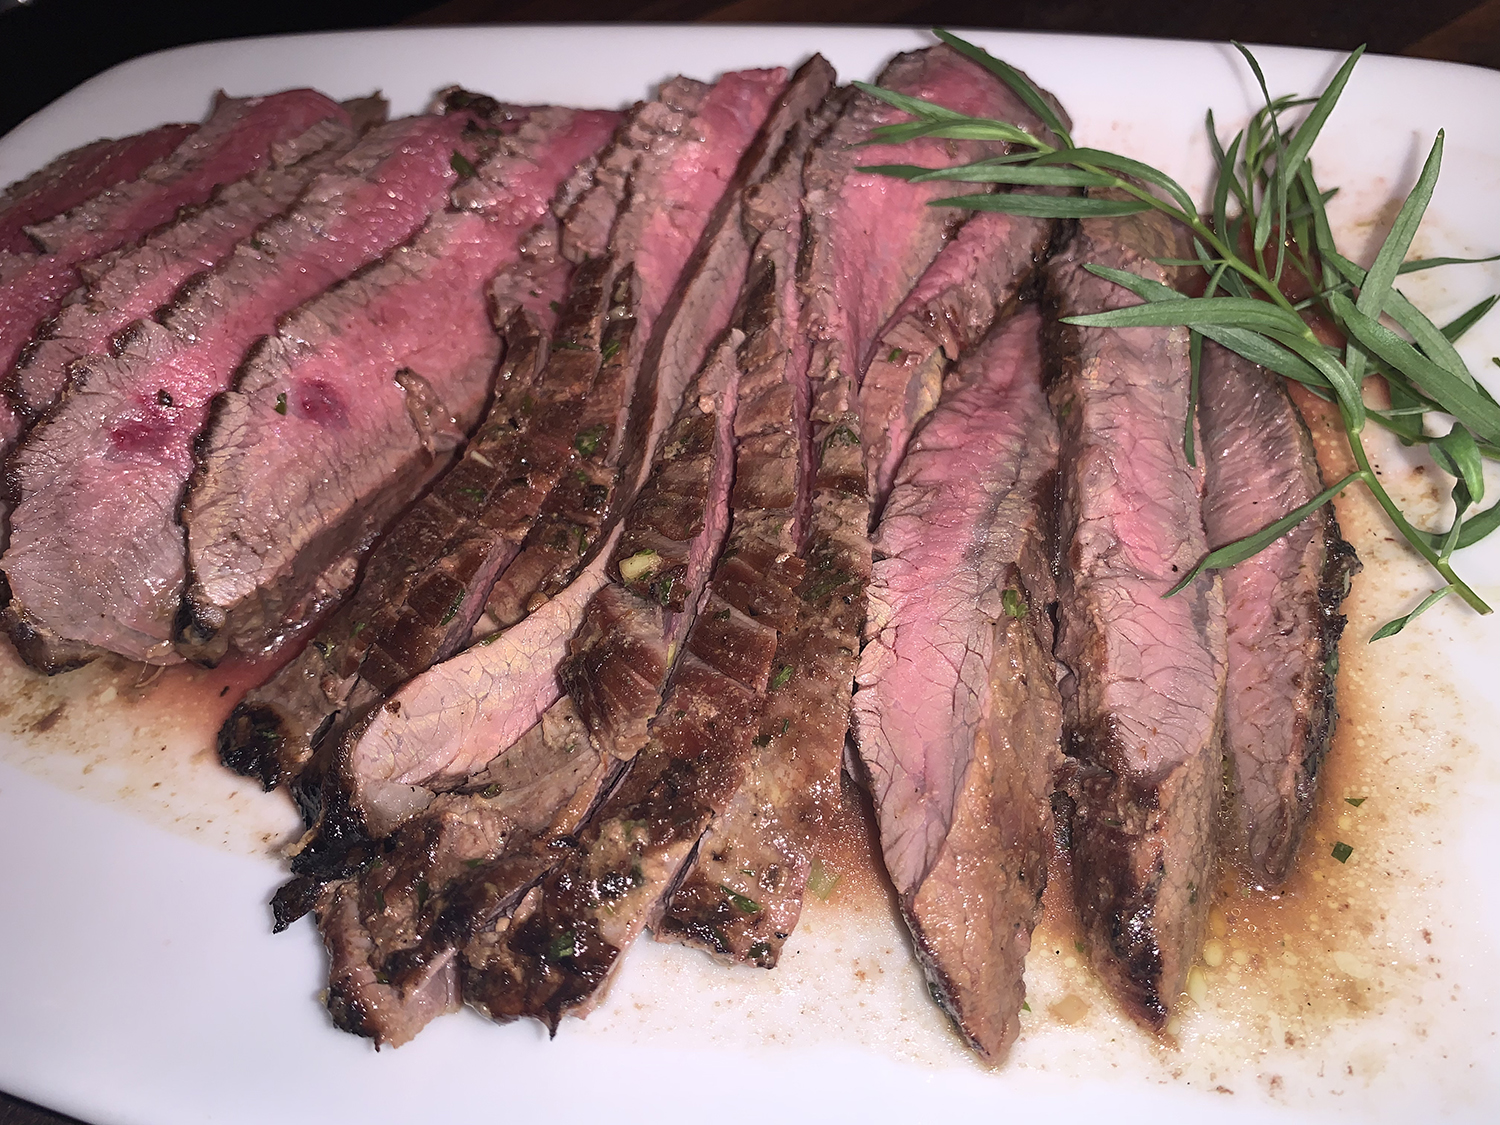
Our vegetable garden was brimming with an assortment of aromatic herbs and one of them that exploded recently was the tarragon. We often pair tarragon with chicken but thought perhaps steak might make a good companion for a change.
Never used tarragon? It is a leafy green herb that is highly aromatic with a subtle licorice flavor. It adds a fresh, spring taste and a bit of elegance to a variety of recipes, including salad dressings, sauces, fish, chicken, and in this case, a steak dish. In France, it is referred to as “the king of herbs” because of its ability to elevate a dish, and is one of the four herbs in the French mixture fines herbes, a combination of parsley, tarragon, chervil, and chives.
While the cooking time for this recipe is minimal, you want to make sure you leave ample time to marinate the meat so that it gets all happy in those flavors of mustard, white wine, scallions and of course, tarragon.
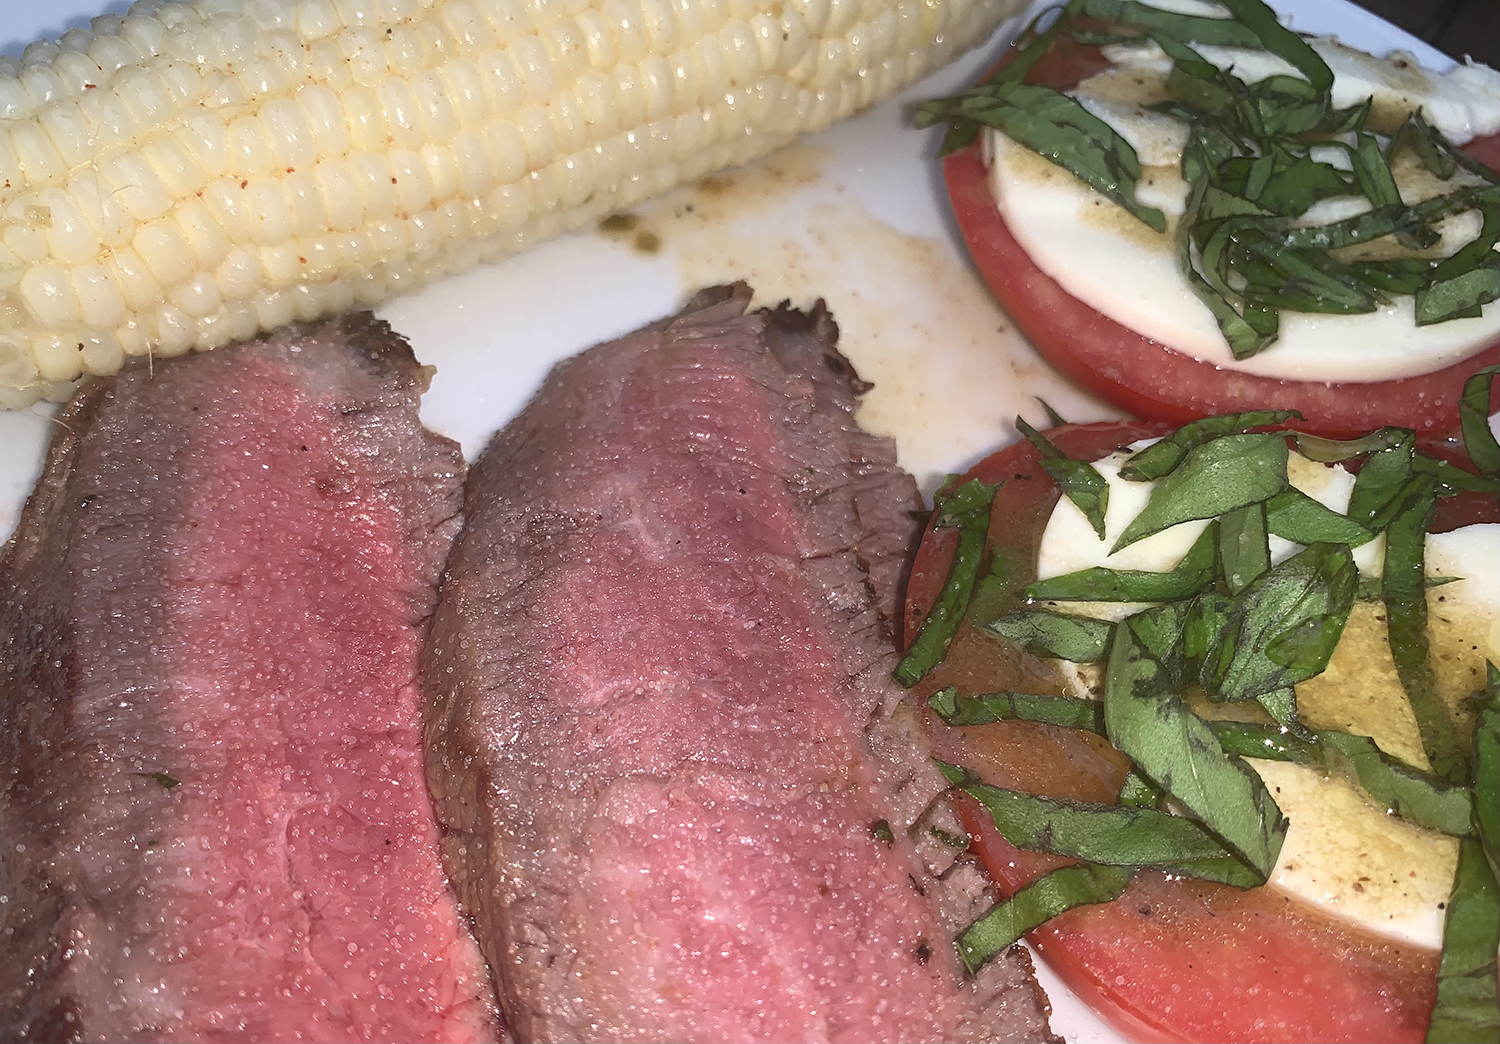
From mid- to late-summer we often pair our grilled entrées with fresh picked corn and locally grown tomatoes, and this was no exception. The basil was just plucked from our herb garden for the caprese salad, which is also where the tarragon came from.
1/4 cup mustard (Dijon or grainy Dijon mustard work really well for this)
3 scallions, chopped
3 Tbsp. chopped fresh tarragon, plus extra for garnish
Coarse salt and fresh ground pepper
Directions
Combine oil, wine, mustard, scallions and chopped tarragon in a zipper plastic bag. Add steak, seal bag and rotate until steak is coated.
Marinate in refrigerator for 2 hours and up to overnight, turning the bag over occasionally.
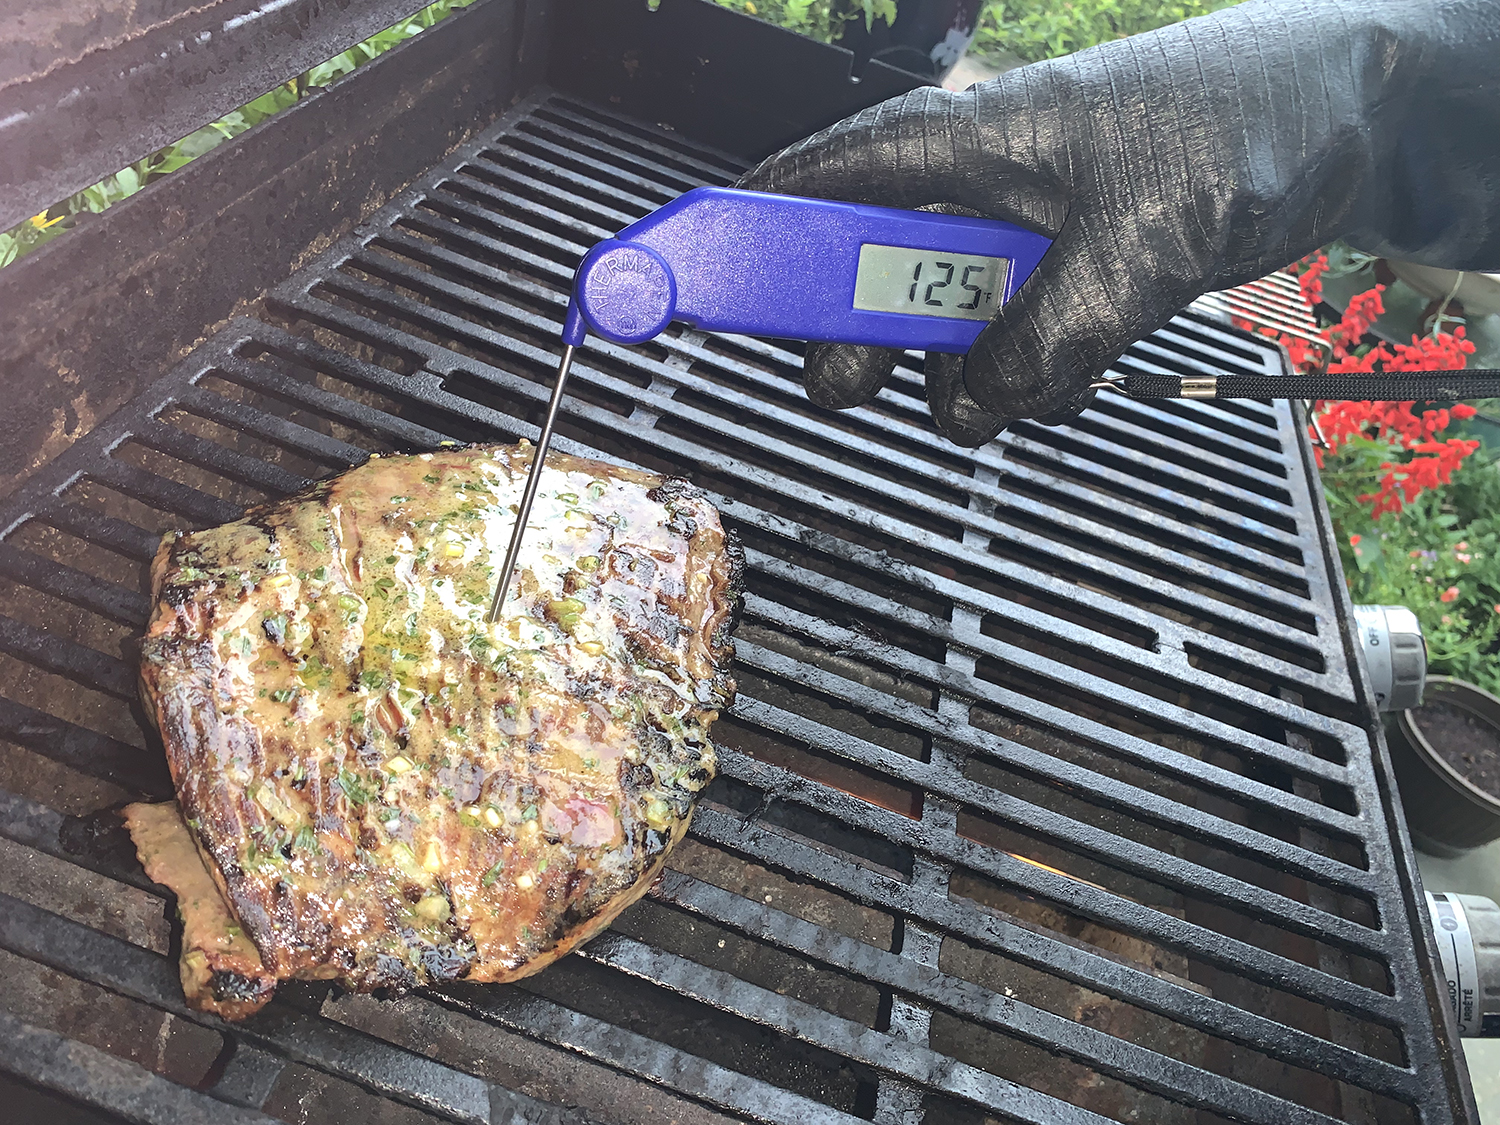
Heat grill to high. Reserve some marinade for basting, discard the rest. Grill steak for 5 minutes per side for medium rare, 125° on an instant-read thermometer.
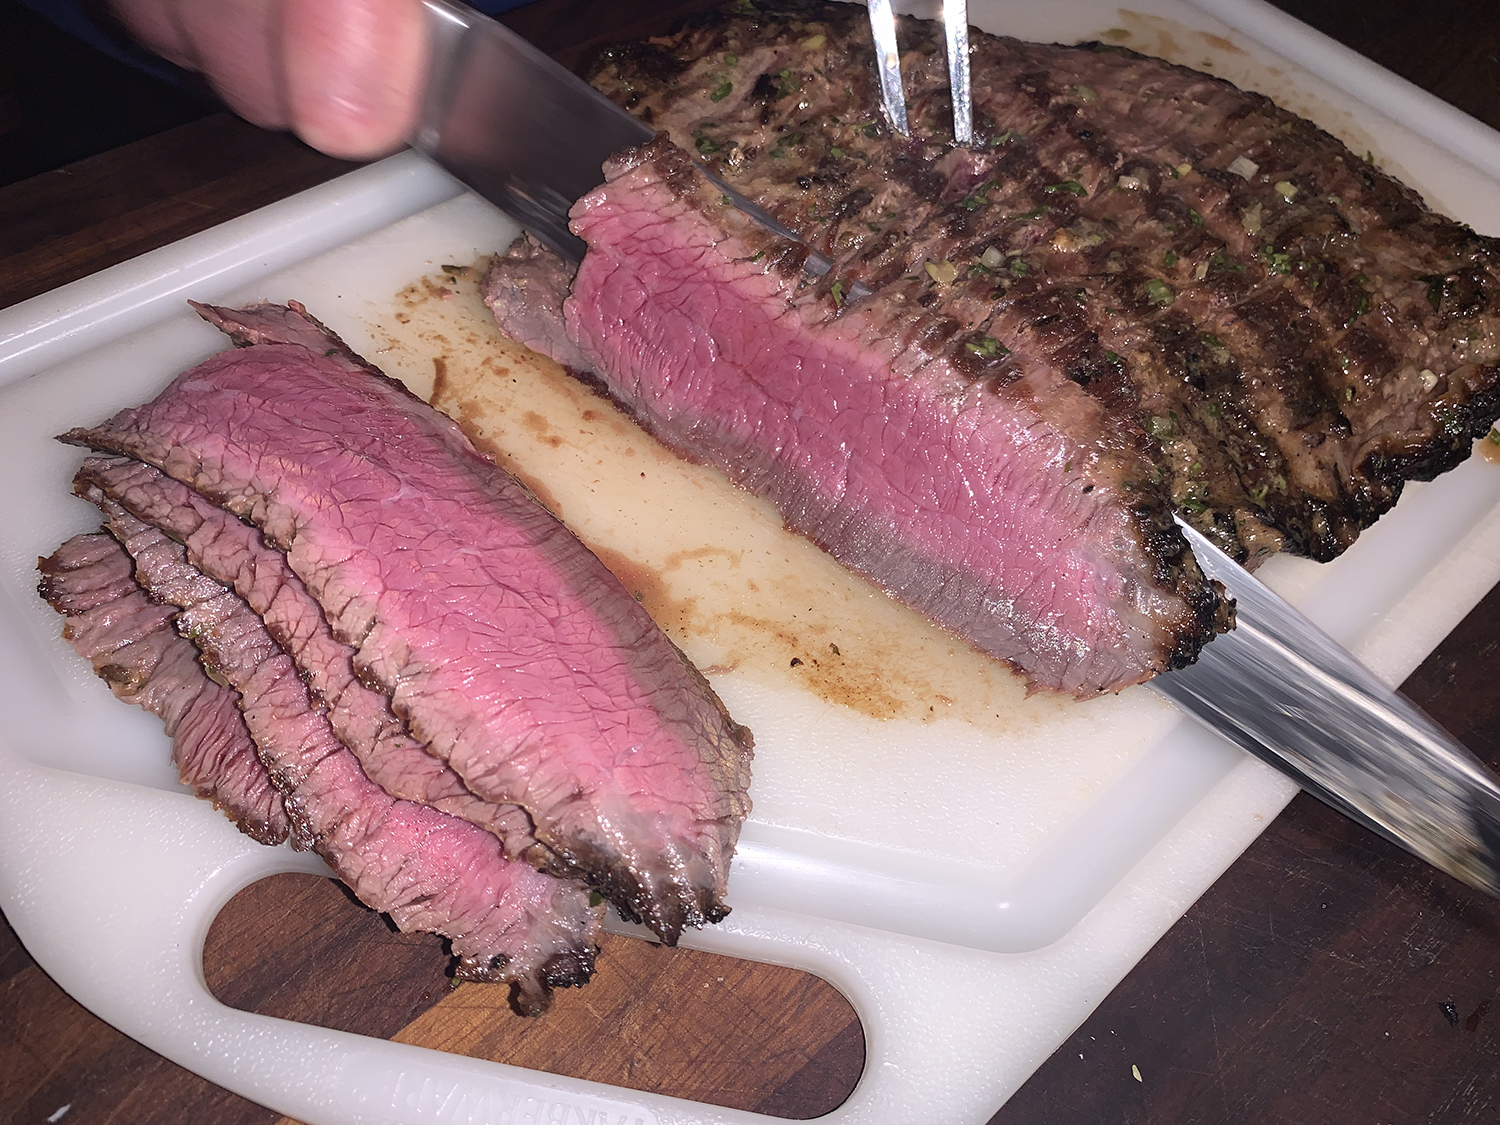
Rest steak on a moated carving board under foil for 10 minutes (don’t skip this step) and then thinly slice at an angle and against the grain. Arrange on a platter and drizzle any accumulated juices over meat. Serve at once.
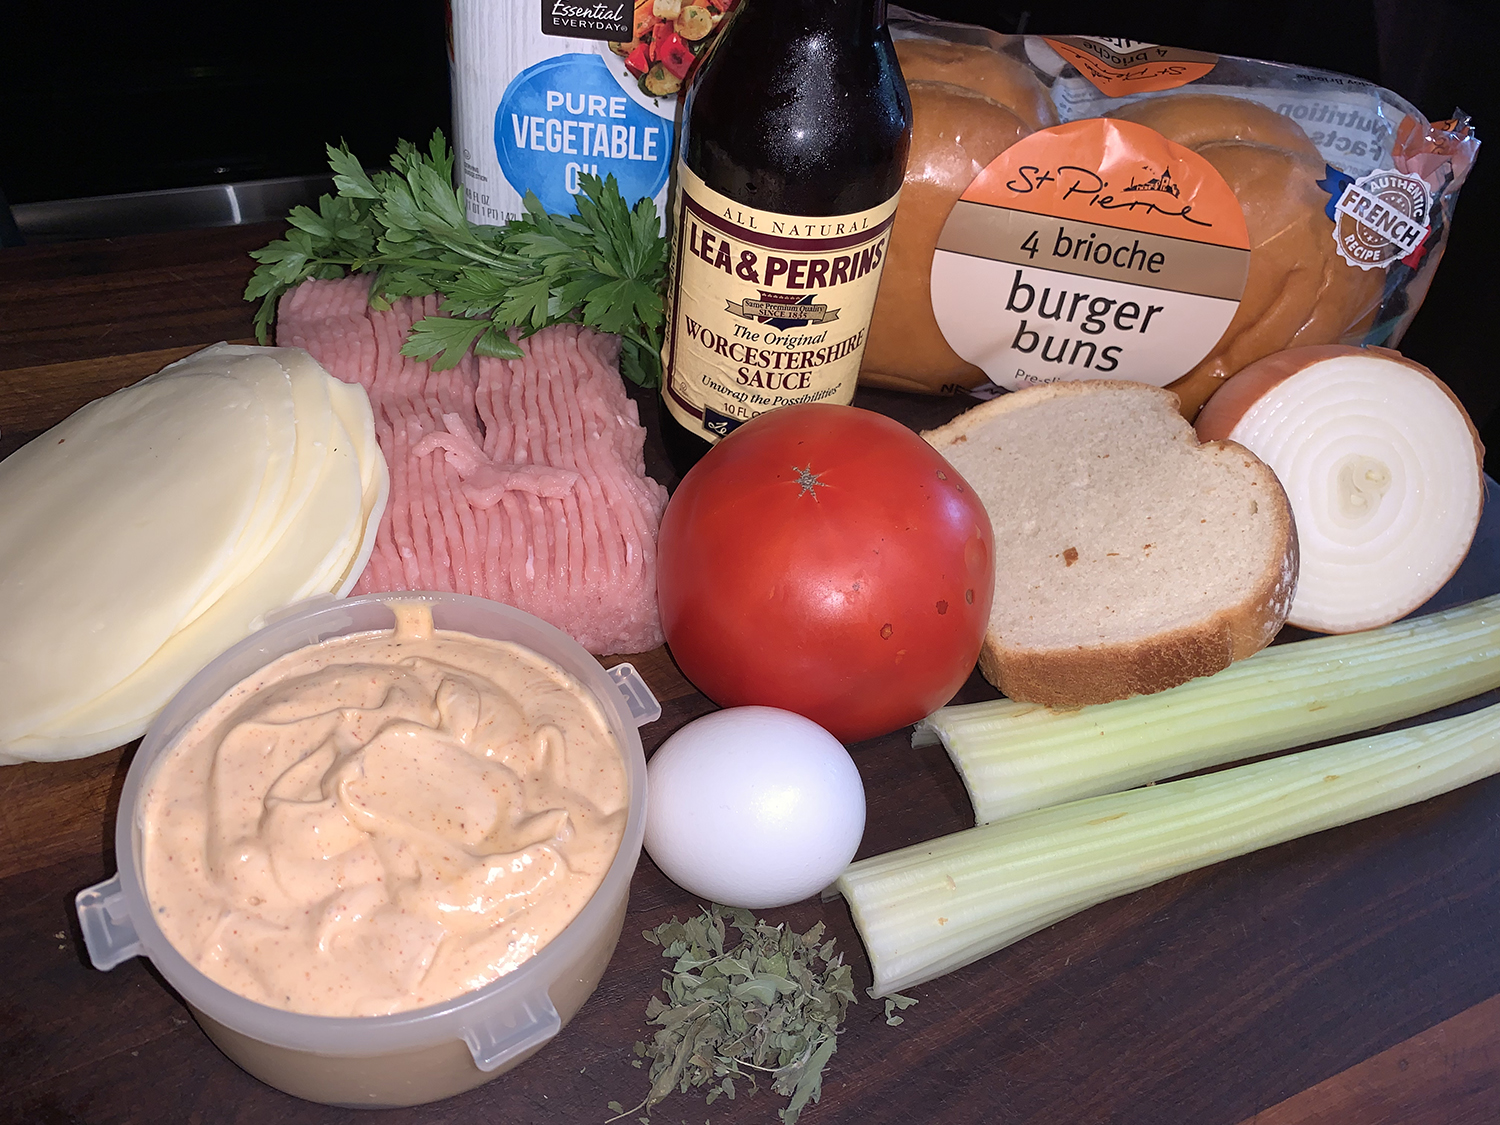
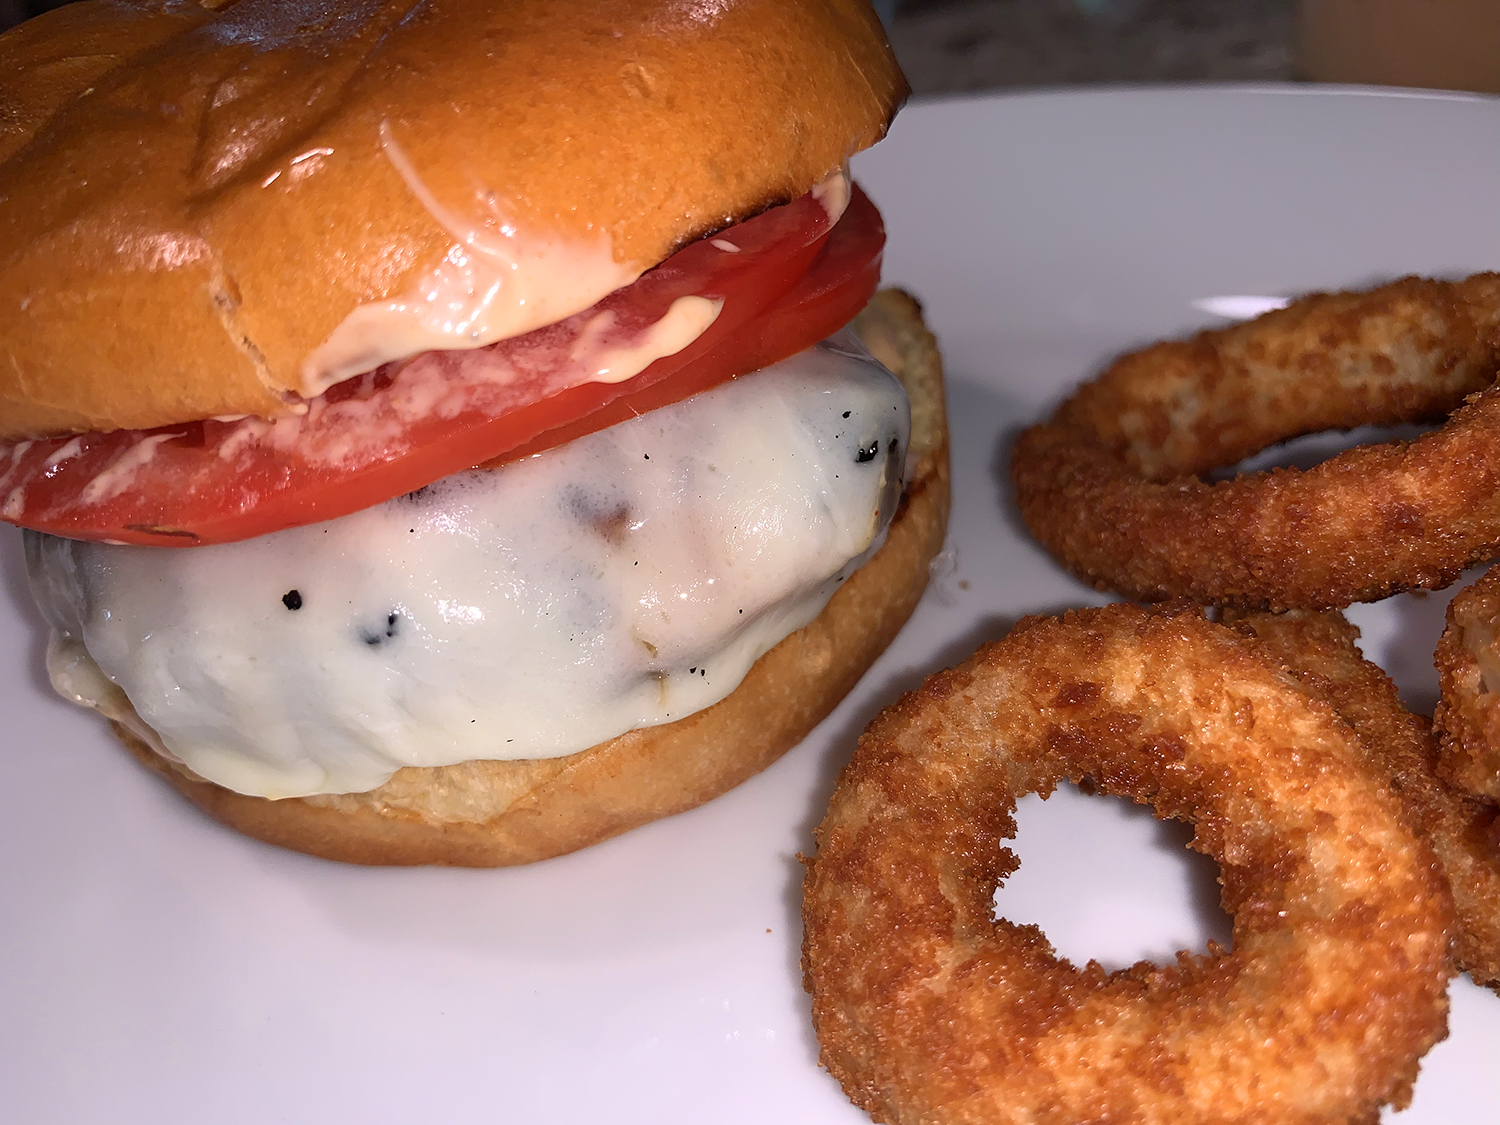
Who remembers attending (or perhaps hosting?) an event that served those horrible-excuse-for-a-turkey-burger—more like hockey pucks as I recall. My mind conjures up patties that were pre-frozen, tasteless and overcooked by the time they made it to a bun. I still shudder at the thought…
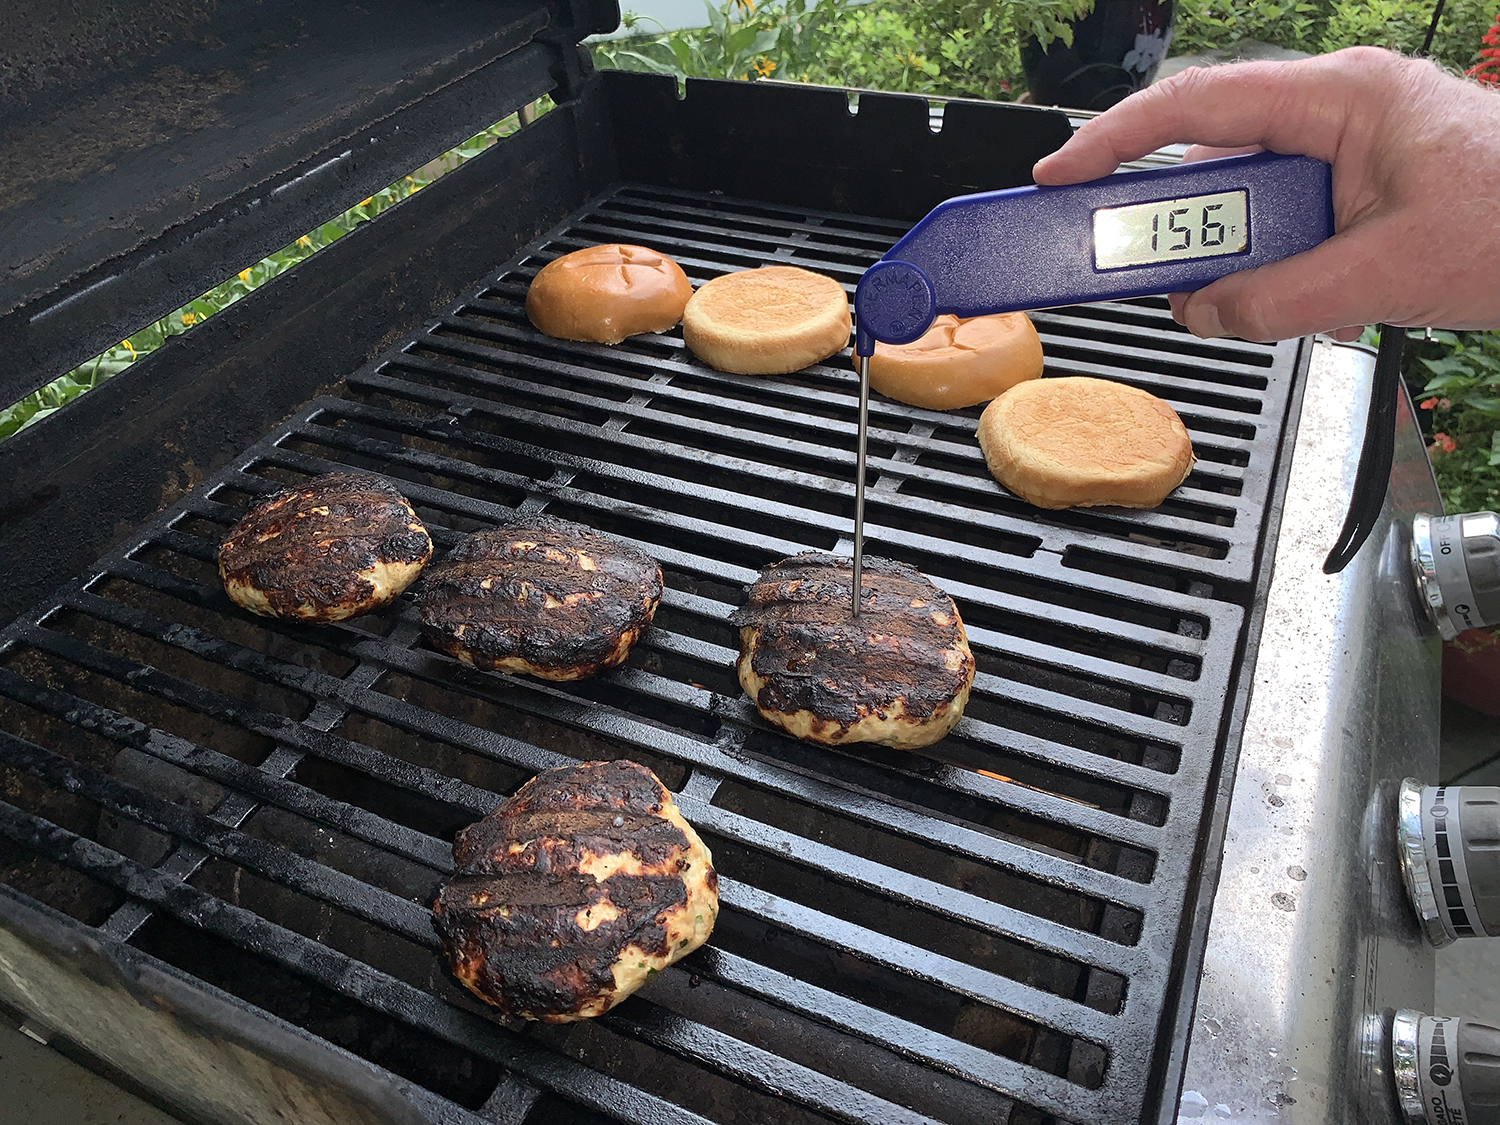
Turn those disadvantages into positives by making your own turkey burgers at home. Remember that ground turkey meat is lower in fat than ground beef and because of this you have to keep your eyes balls on them while grilling. Overcooked turkey burgers will be dry and flavorless—exactly what we’re trying to avoid here. Pull the burgers as soon as a thermometer reads 165° and juices run clear. Ours took only 9 minutes total.
In a clever sort of way, this mixture includes your veggies inside as well as on top of the burger. Not necessarily a whole salad’s worth, but with celery, onion, parsley, tomato and lettuce, in the ingredients, you get my drift. (Although we were unfortunately out of Bibb lettuce 🙁 )
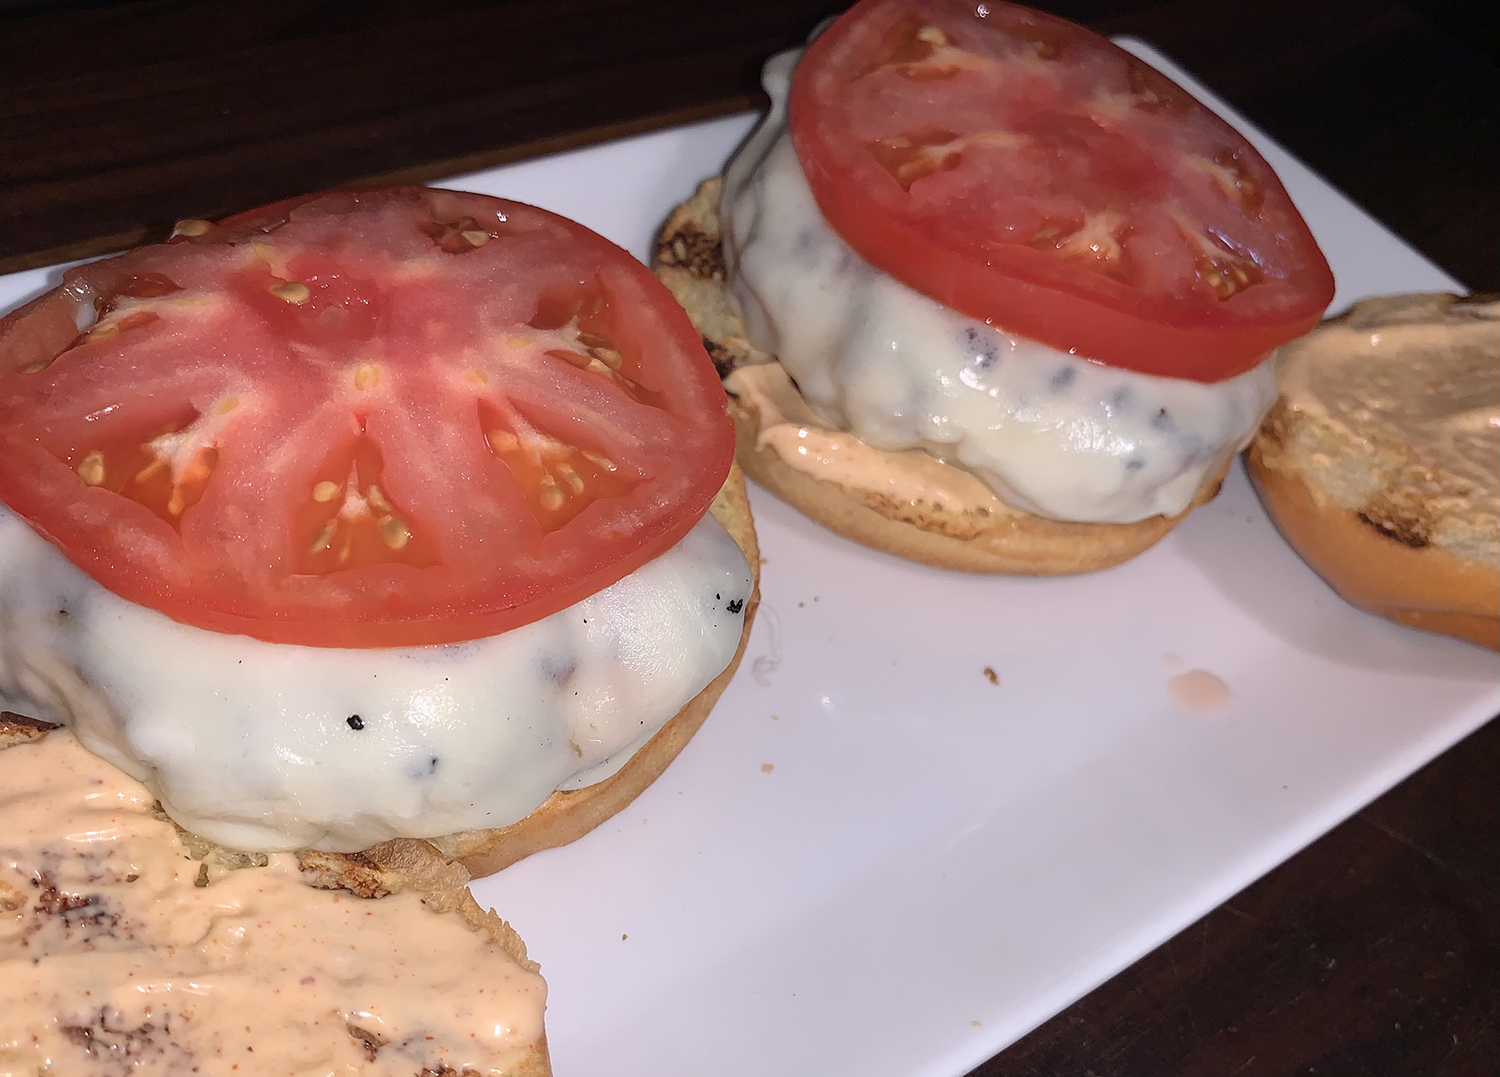
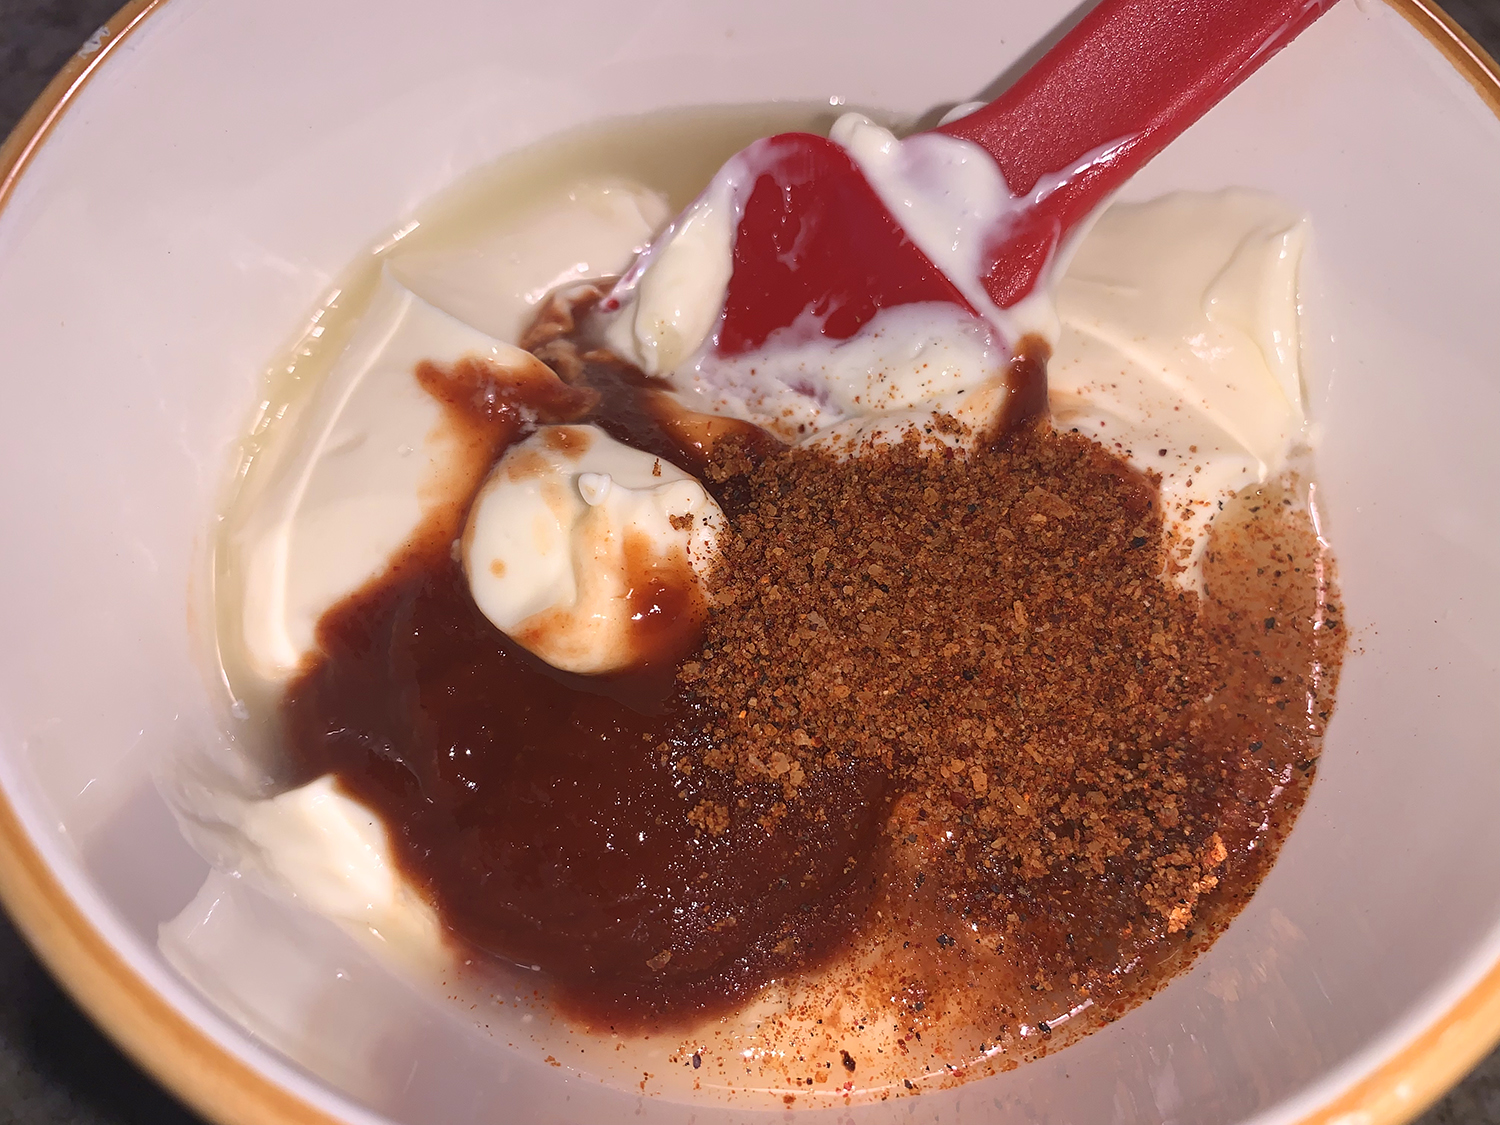
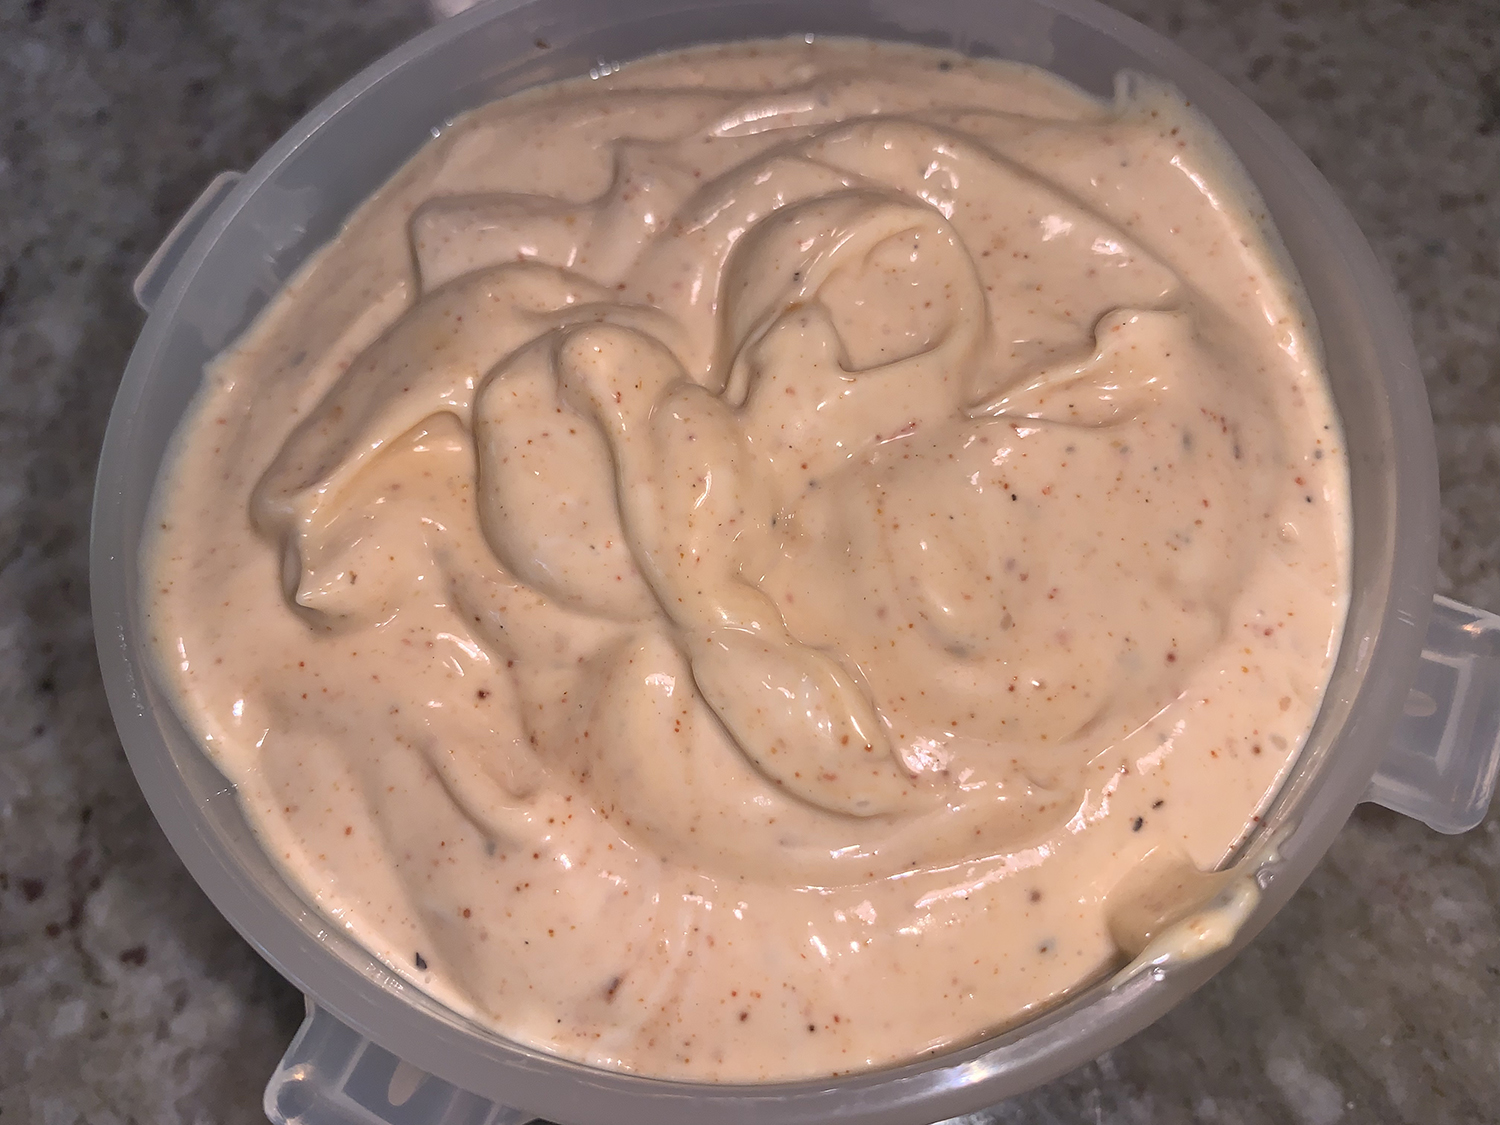
And don’t forget to make the spicy mayo condiment. Not only does it enhance the turkey burgers, but there’s plenty leftover to dredge your french fries, onion rings or use as a vegetable dip; and is a great spread on sandwiches the next day or two…
Over the course of this blog, I have posted a few other turkey burger recipes. For instance, the Parmesan and Herb Turkey Burgers were moist, pillowy, flavorful patties with a panade that was a hydrating binding mixture of dairy and breadcrumbs. Then there was the THE BEST EVER Turkey Burger! where the key was choosing the right mix-ins and using as little of them as you could get away with.
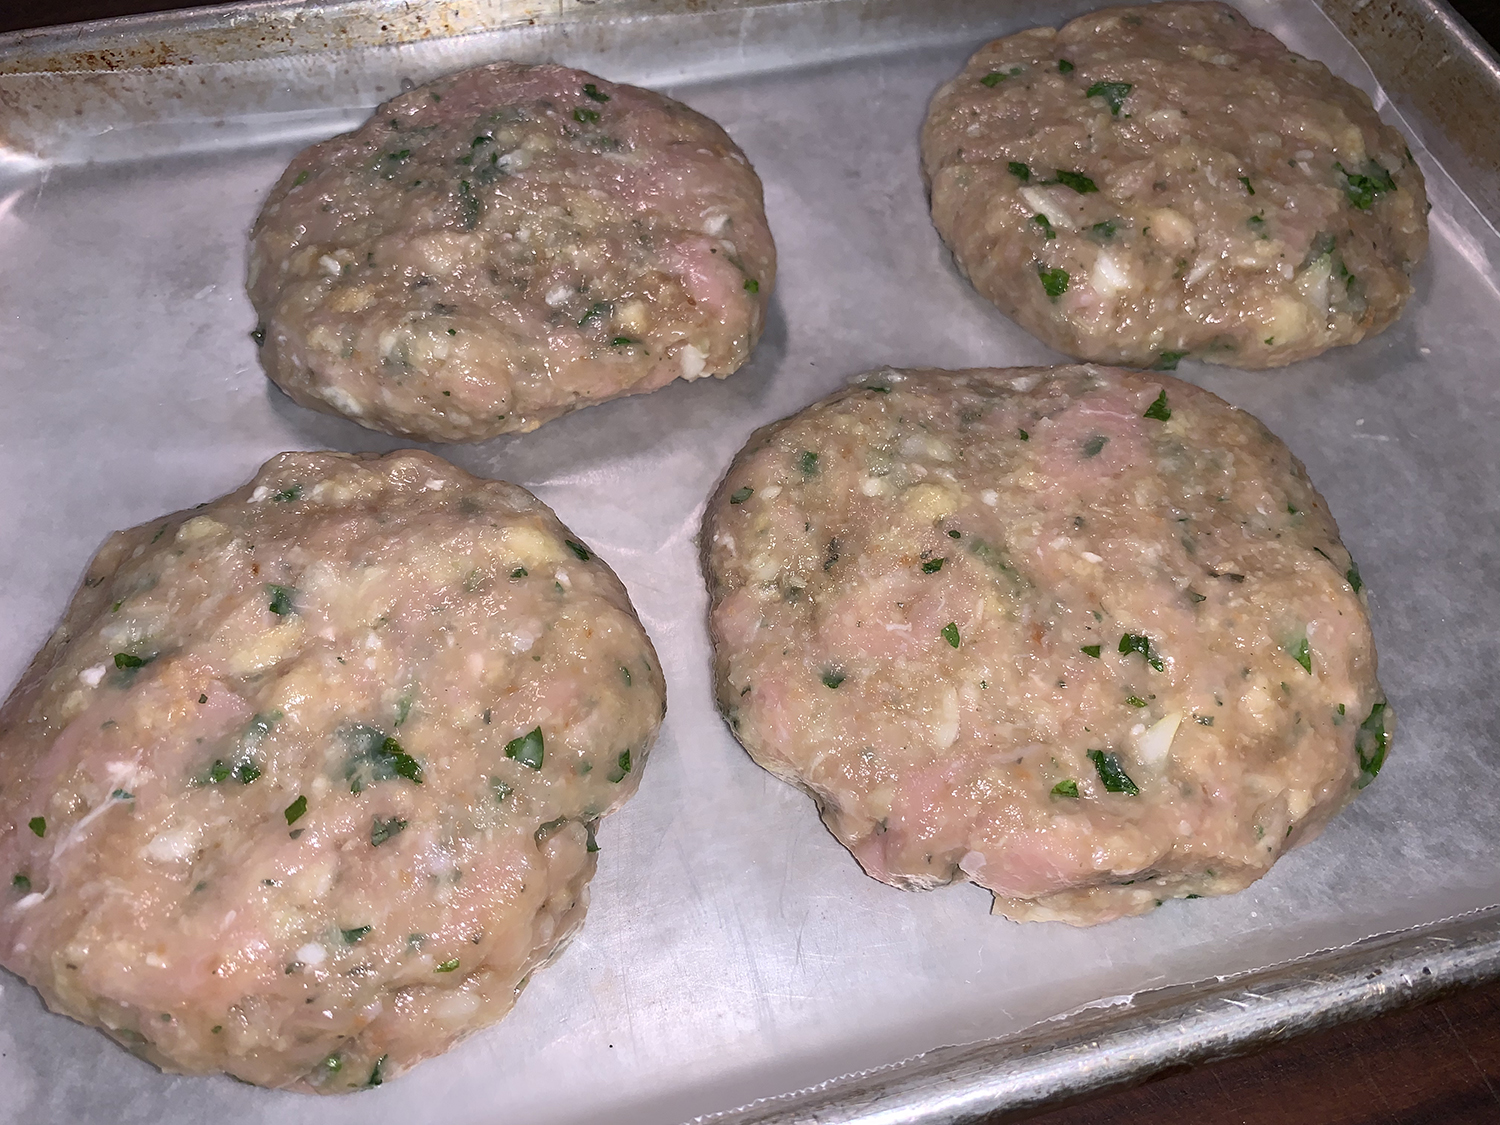
NOTES: Make the spicy mayo a day ahead to save time on dinner night and for the flavors to meld. The patties can be shaped ahead of time, covered and refrigerated if needed. When forming the patties I find it helpful to keep a small bowl of tepid water nearby so that I can keep my hands moist preventing the turkey mixture from sticking to my fingers.
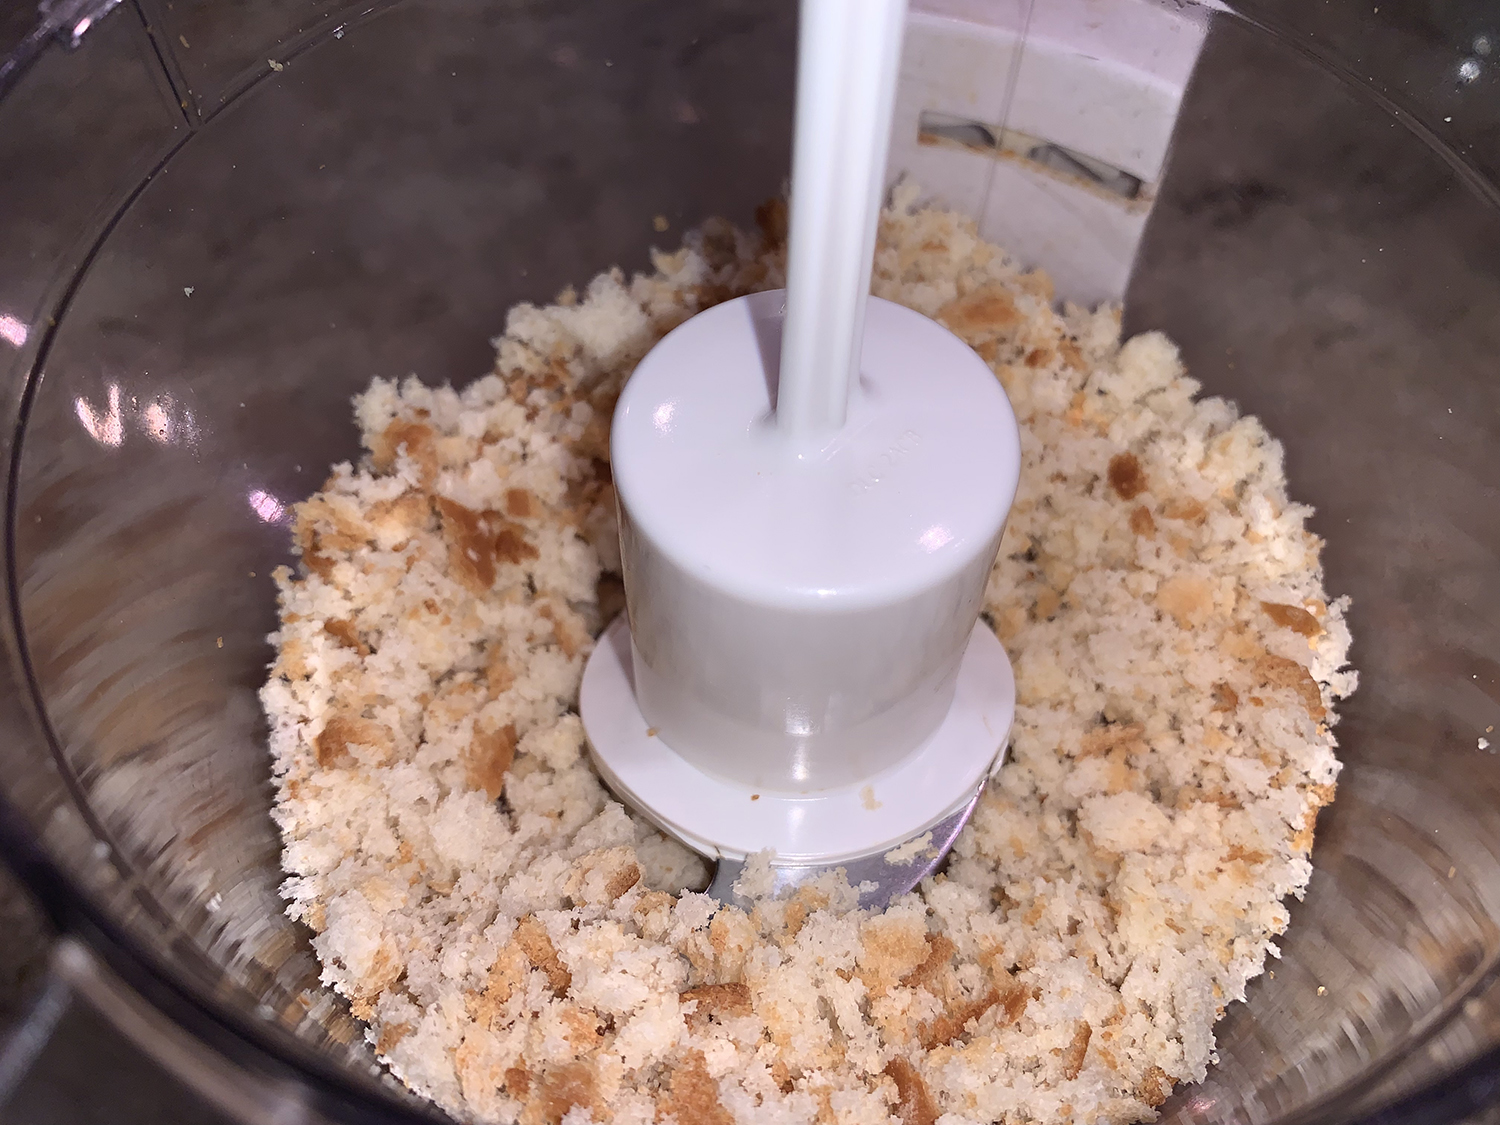
In a small food processor, grind white bread, transfer to large mixing bowl.
In same food processor, combine celery, onion, parsley, oregano, salt and pepper. Grind until thoroughly mixed.
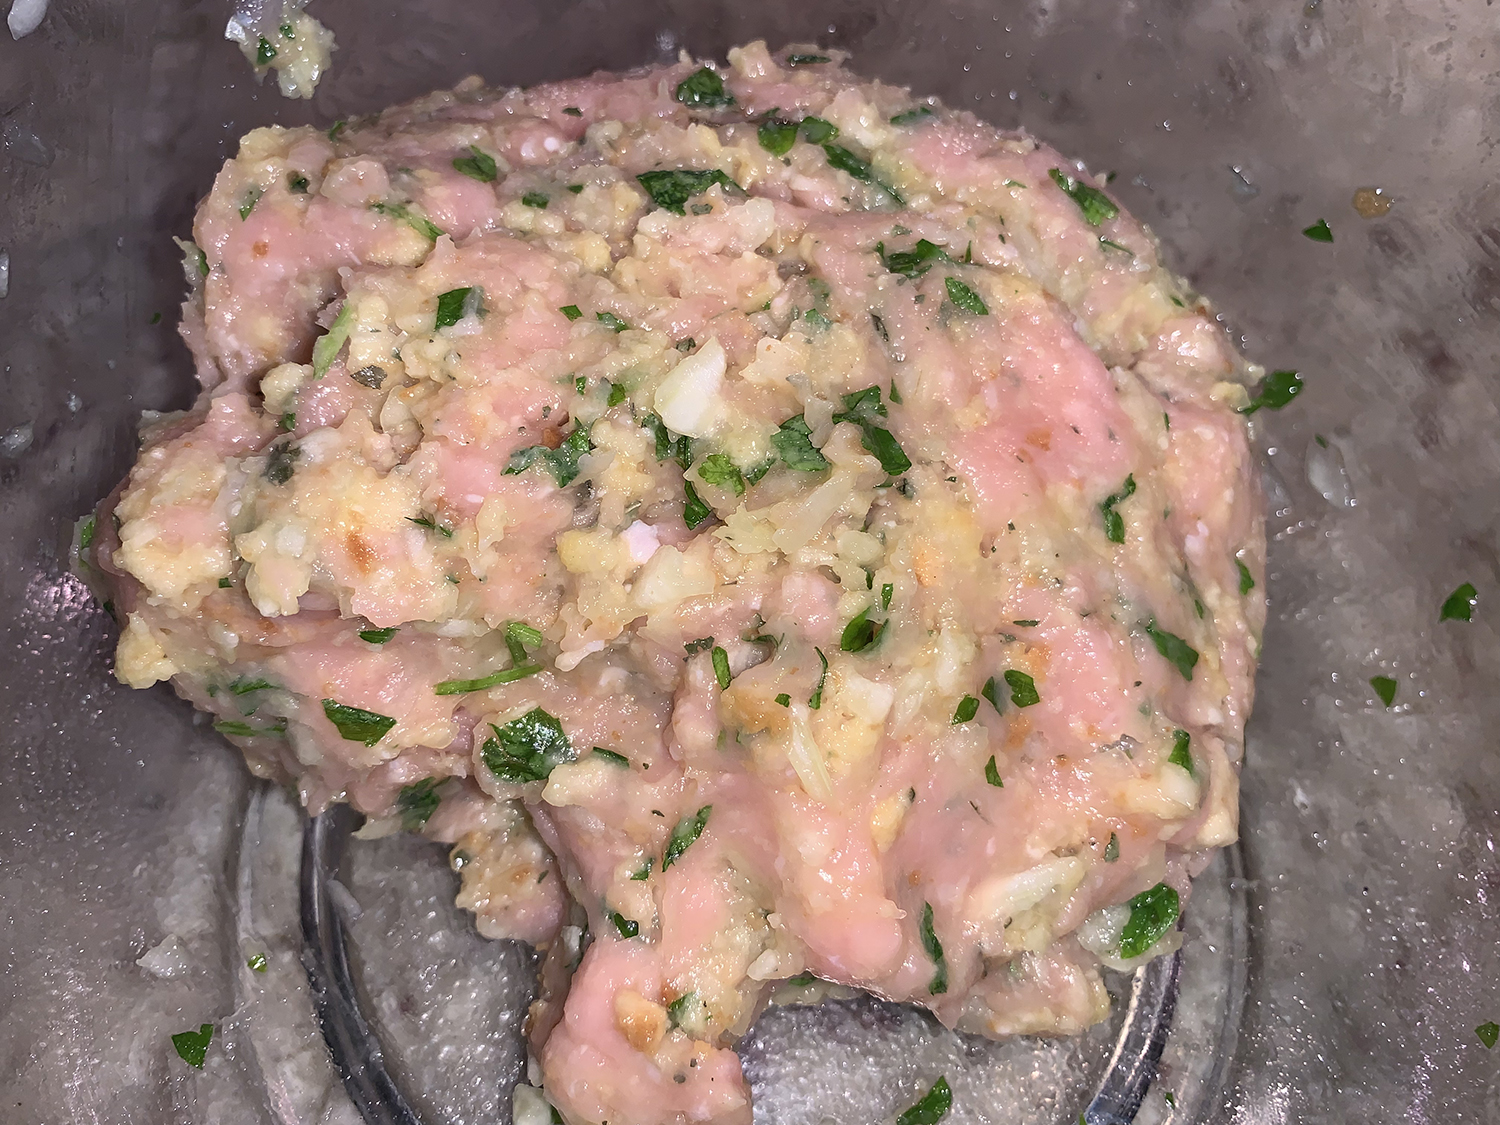
In mixing bowl with the bread crumbs, add the egg, Worcestershire sauce, and celery/onion mixture. Crumble turkey over mixture and mix well. Shape into four patties.
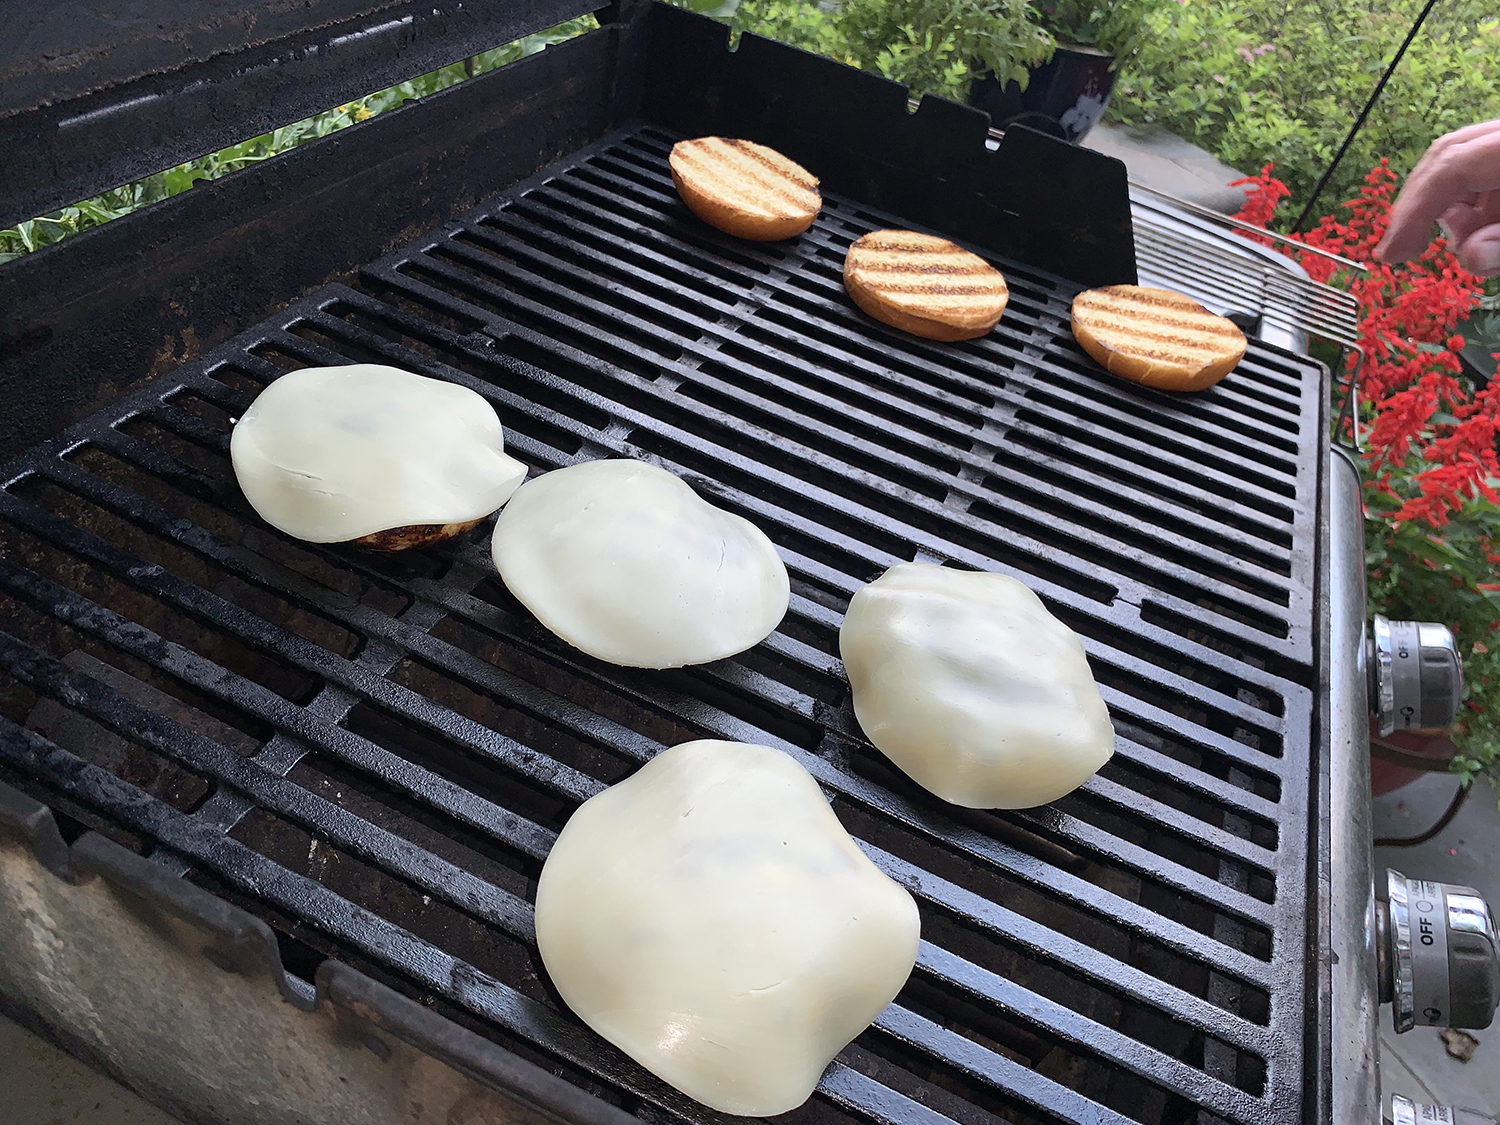
On a greased grill, cook, covered, over medium heat for 4-5 minutes on each side (9-10 minutes total) or until a thermometer reads 165° and juices run clear. 30-45 seconds before done, add a slice of provolone to each patty, close the lid while the cheese melts.
Optional: Toast your buns on grill at the same time your cheese melts.
Serve on buns smothered with spicy mayo, preferably tops and bottoms. Top with a slice of beef steak tomato and Bibb lettuce, if desired.
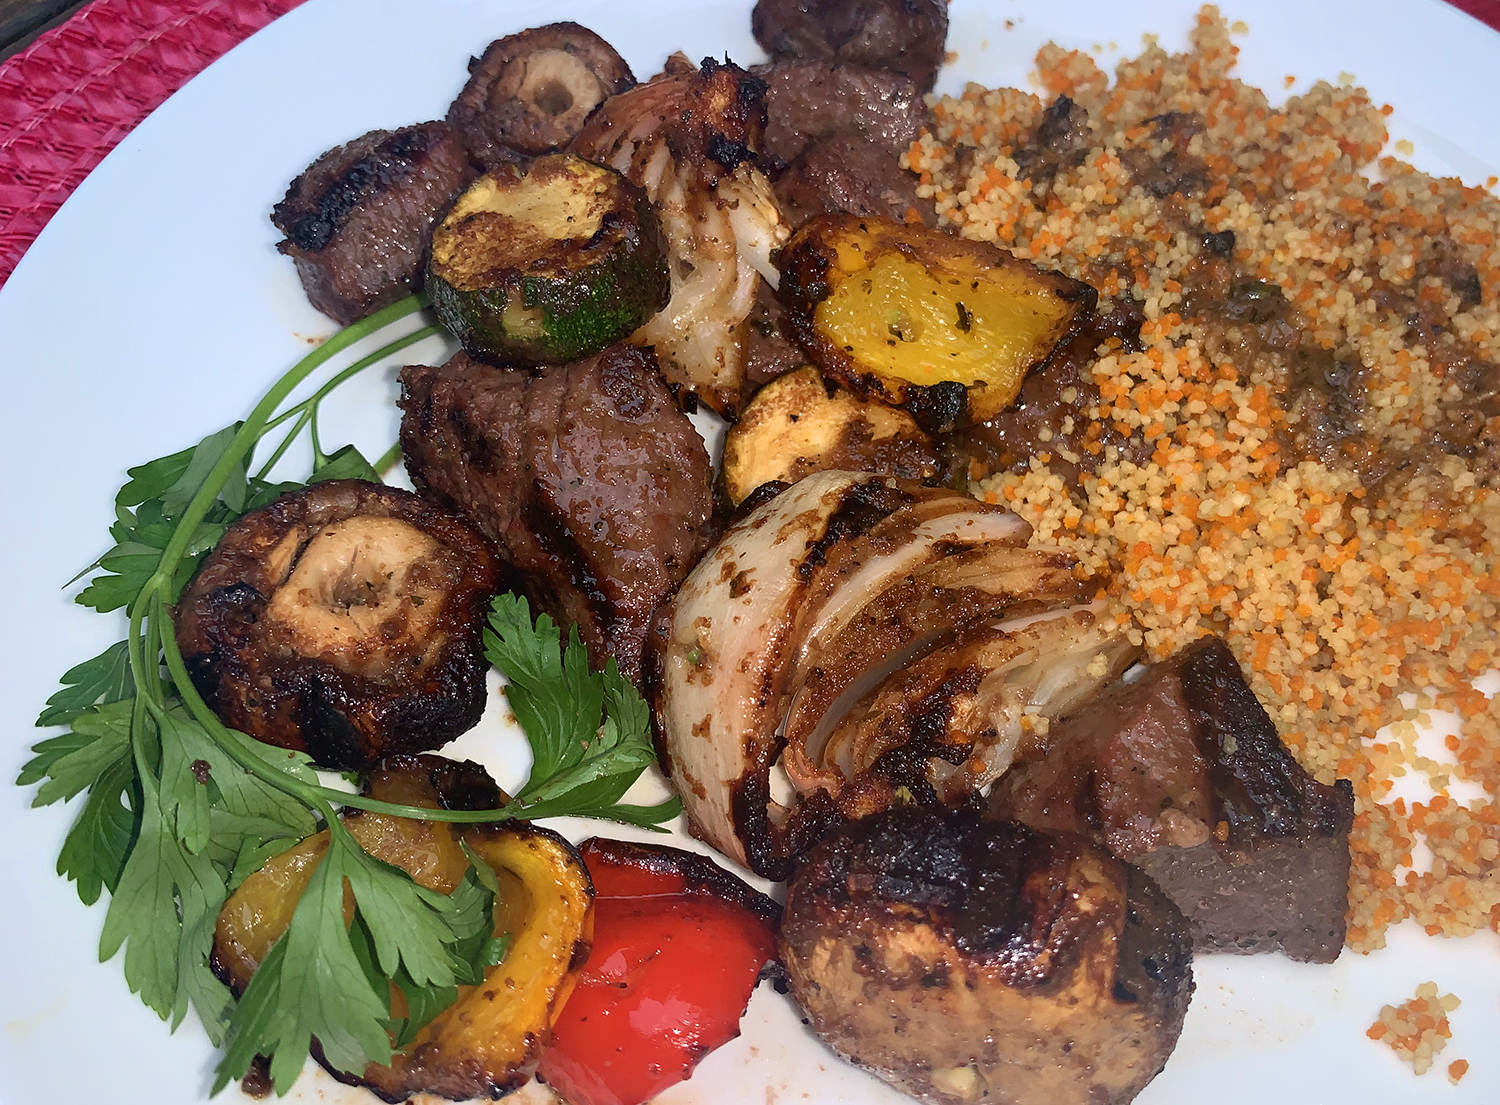
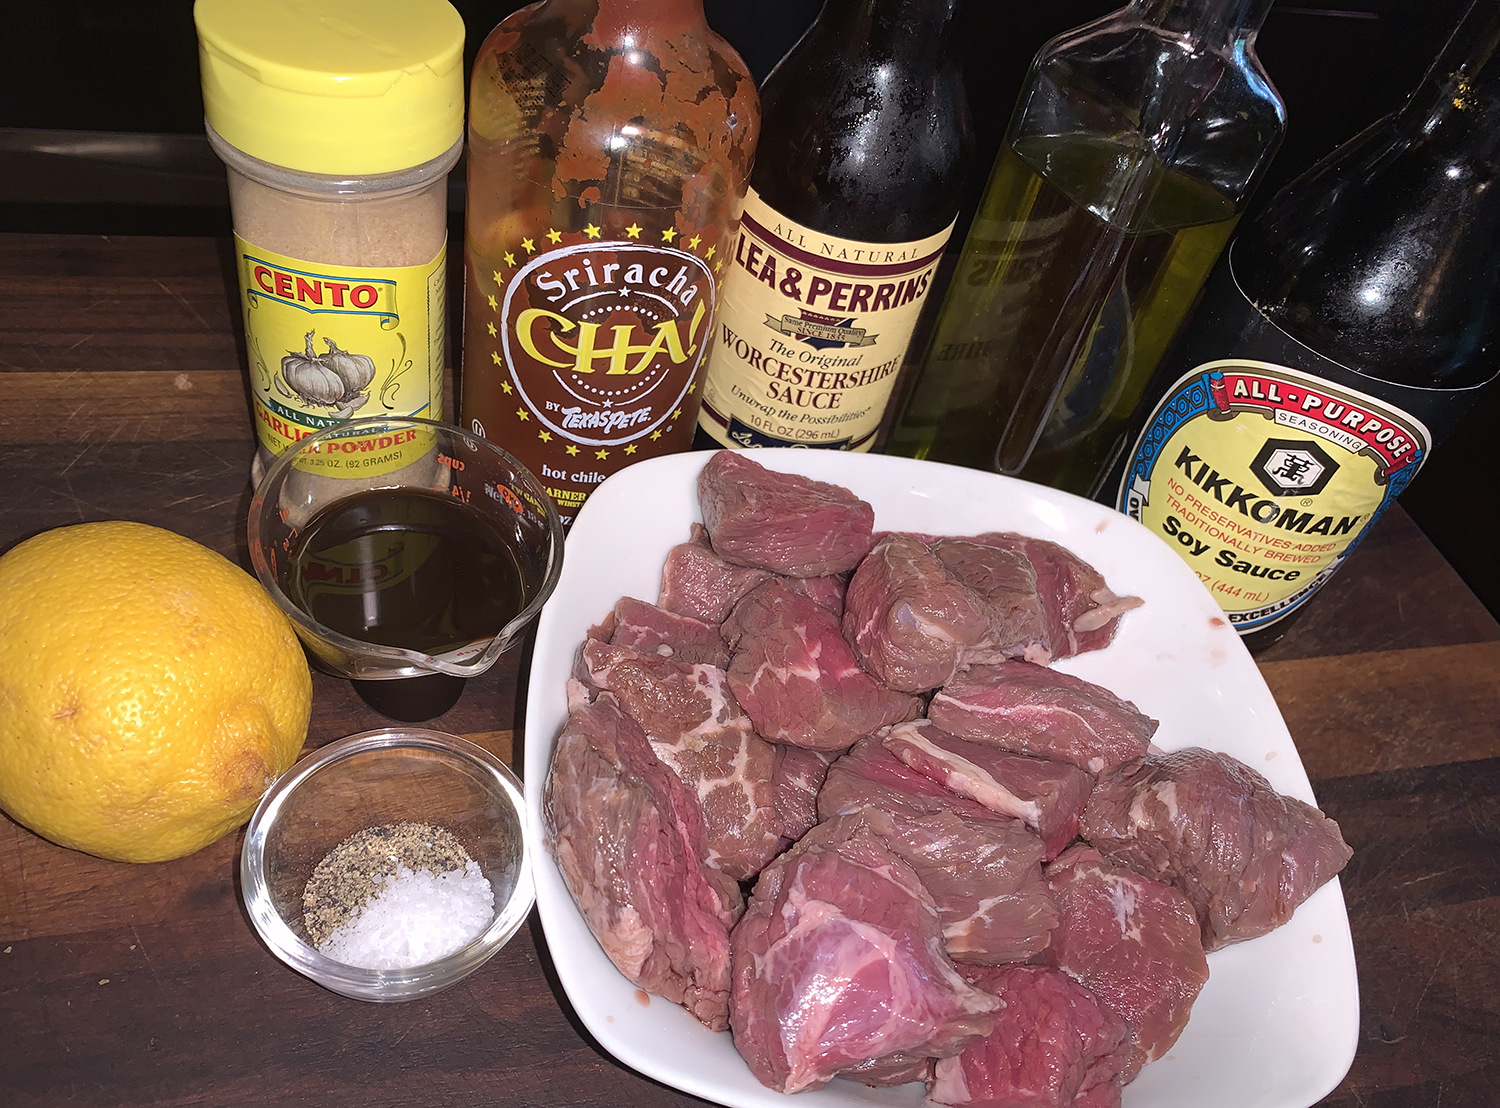
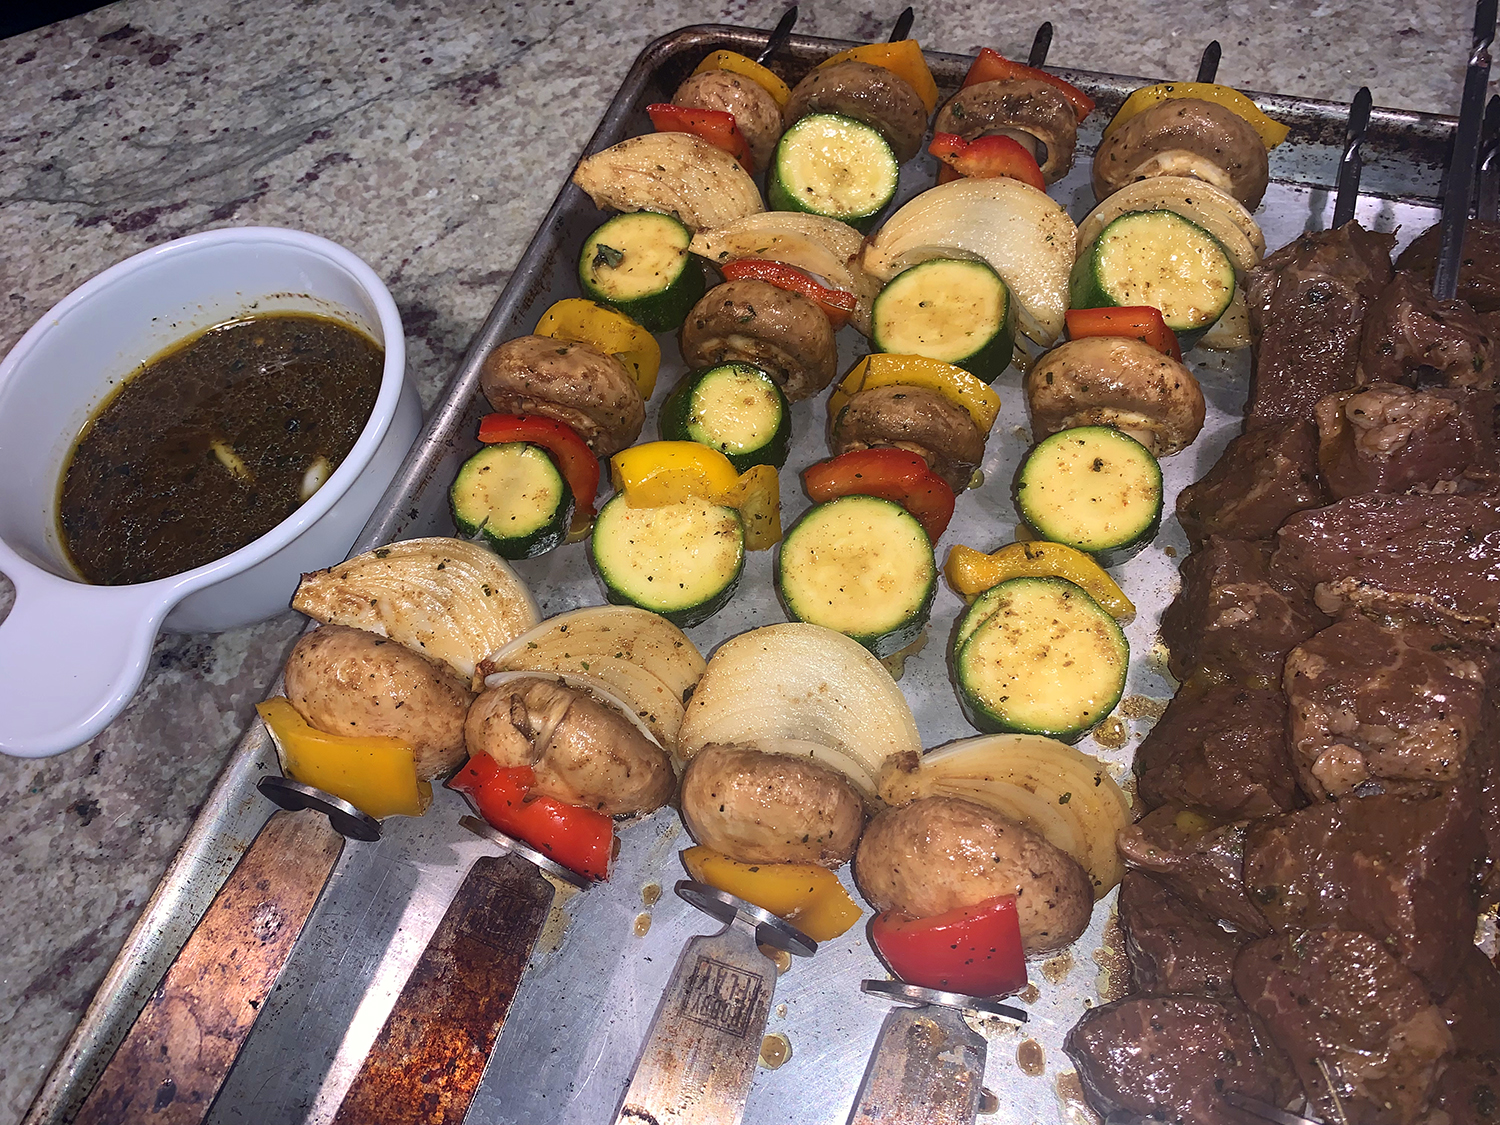
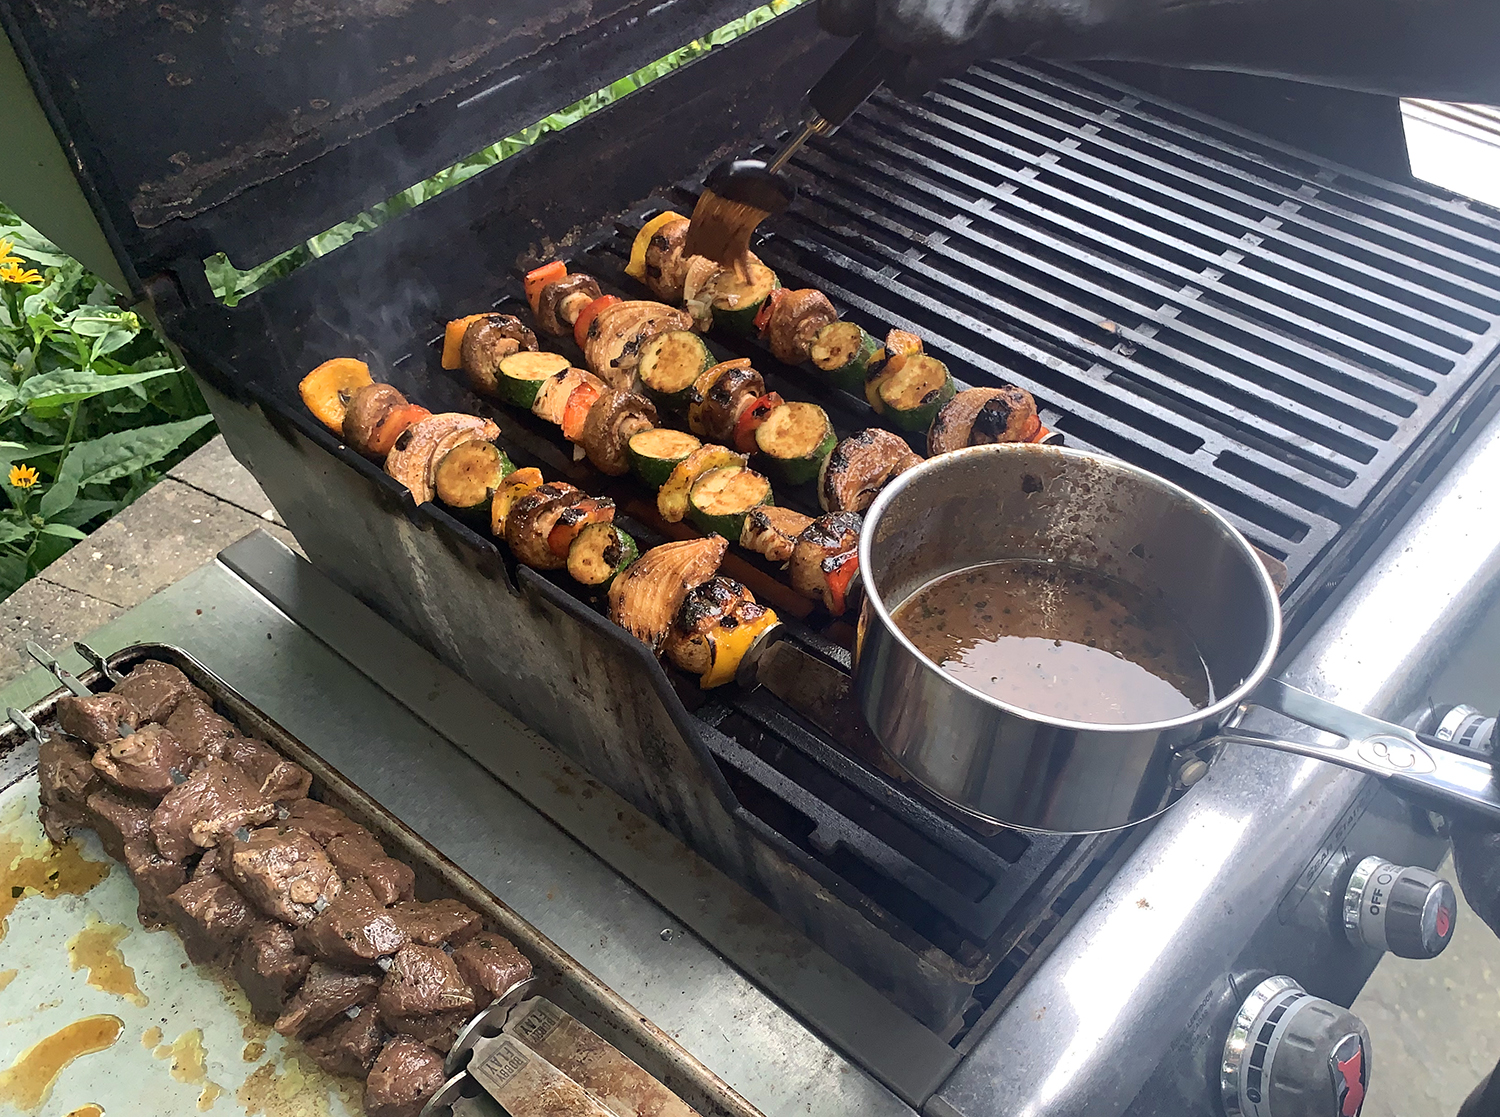
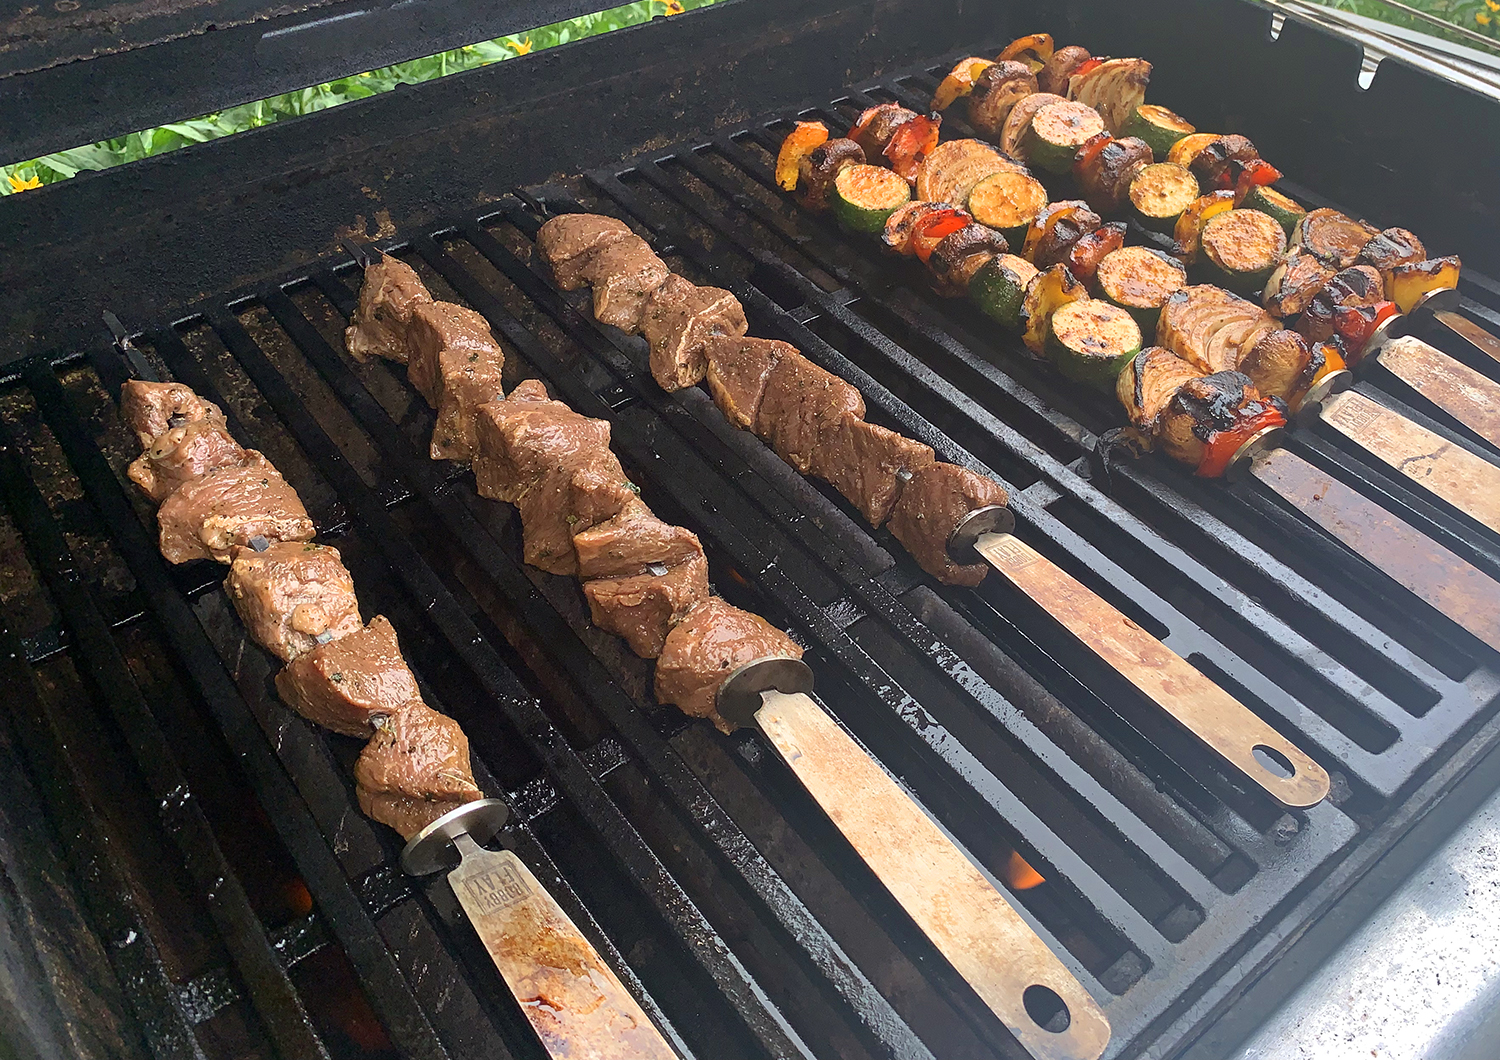
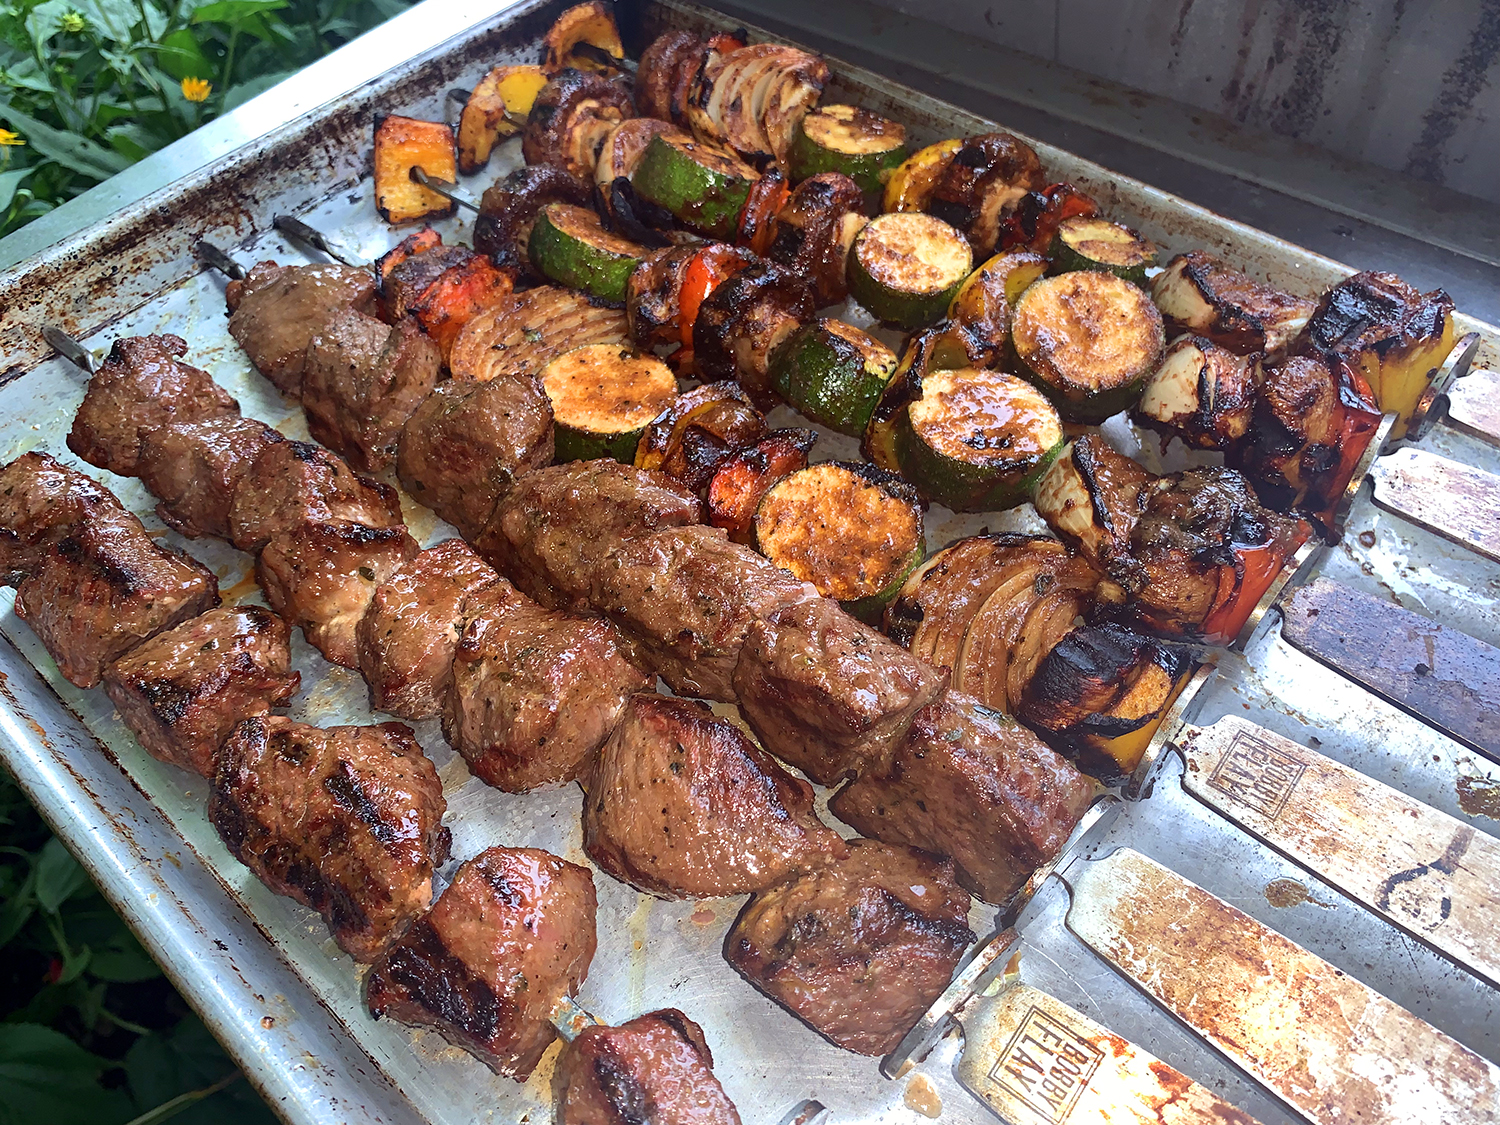
The beauty of this marinade recipe is that it is used for both the meat and vegetable skewers. We almost always thread the meat on separate skewers from the vegetables because the cooking times are so drastically different. The veggies will take about 20 minutes, while the beef is done in 5-8 minutes, depending on your preference.
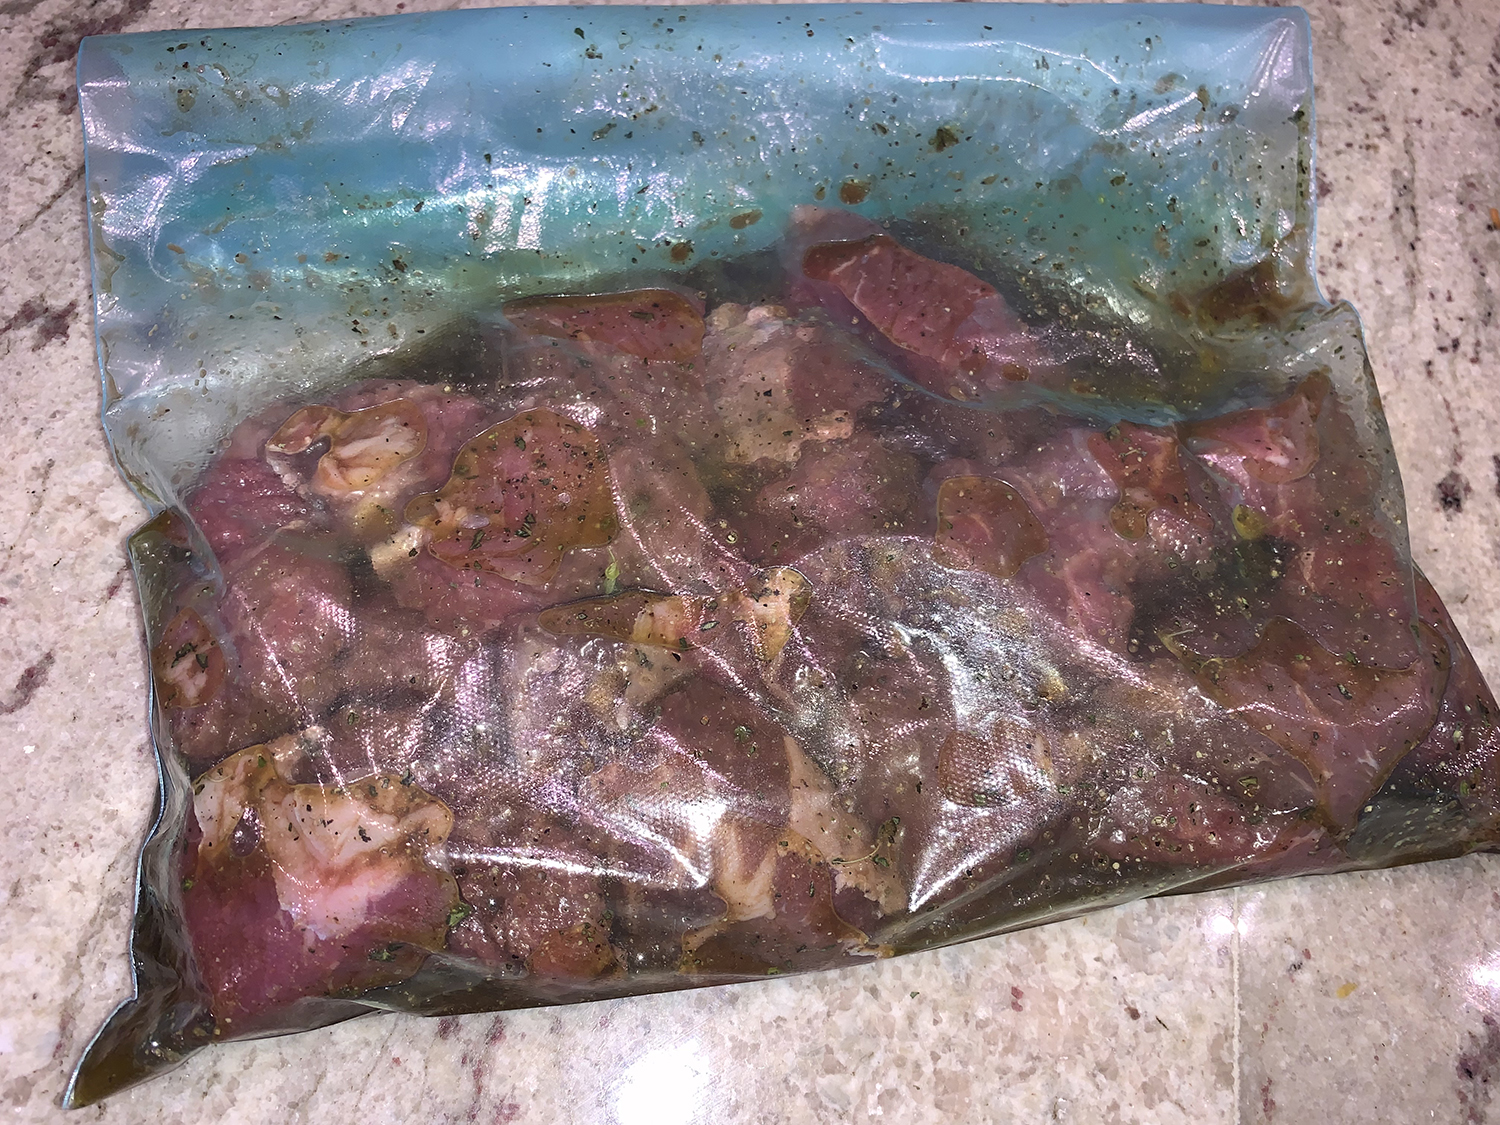
And while you can get away with only marinating the meat for one hour (that’s the time limit for your veggies), the flavor penetrates the beef at a much more satisfying taste if you leave it in a ziploc overnight—or say, at least 8 hours.
If you’re not counting carbs, tri-colored couscous makes a fine dining companion for the skewers of meat and vegetables. Make it with beef bullion instead of water for an even beefier taste!
1 red or yellow bell pepper (or 1/2 of each), cut into 1 1/2″ chunks
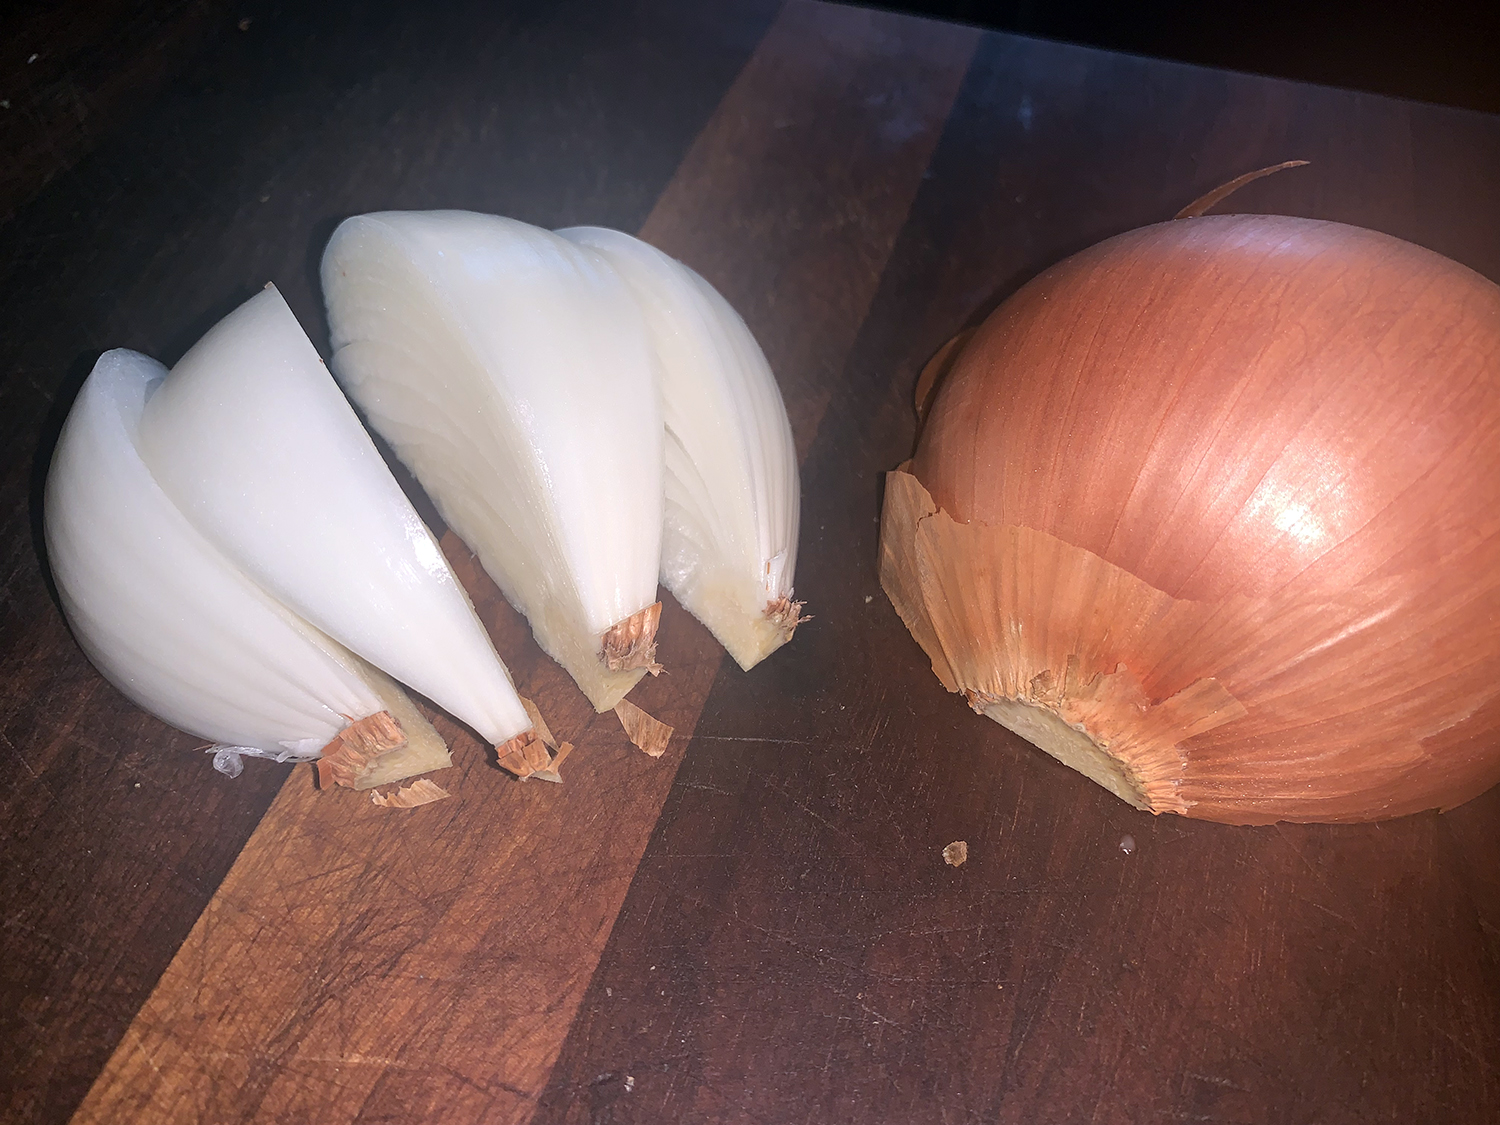
1 onion, peeled with root intact, cut into 8 wedges
1 medium zucchini, cut into 1″-thick rounds
12 large button mushrooms, stems removed
MARINADE
1/2 cup olive oil
1/3 cup soy sauce
1/4 cup fresh lemon juice
1/4 cup Worcestershire sauce
1 Tbsp. garlic powder
1 Tbsp. dried oregano
1 tsp. black pepper
1/2 tsp. salt
Sriracha, a few dashes to taste
Directions
Mix all marinade ingredients together in a medium bowl, then divide into two ziploc gallon-sized bags.
Add the chunks of beef to one bag, seal and refrigerate overnight. Reserve the other bagged marinade for the veggies, store in refrigerator until ready to use.
One hour before preheating grill, put cut vegetables into remaining marinade. If using wooden skewers, soak in water for one hour.
Preheat grill to high on all burners.
Thread beef chunks onto 3-4 skewers. Alternate the vegetables on 4 skewers. Place all skewers on a large rimmed baking sheet. Reserve leftover marinade for basting purposes.
Grill the veggie skewers for 15 minutes, turning and basting occasionally with leftover marinade. Leave on grill until meat is done, continuing to baste with marinade.
Now place beef kebabs on grill, turning and basting occasionally. With an instant-read thermometer, check after 4 minutes for doneness. Ours were perfectly medium-rare after only 4 1/2 minutes!
Remove skewers from grill to baking sheet and cover loosely with foil for 5 minutes allowing the juices to redistribute.
The meat can be removed from skewers onto a platter and passed around the table, while each diner gets one skewer of vegetables.
Not one, not two, but three fabulous recipes for lamb chops. The first, Glazed Lamb Chops, is done in a cast iron skillet and came from FineCooking.com by Arlene Jacobs. The second was based on a sauce we used for our fabulous Bistecca with Fishy Herb Sauce. The third is by Giada De Laurentiis which Russ found using the In the Kitchen App, and is meant for a grill pan—although we haven’t gotten around to making this version yet…
Prepare to be bowled over by the first recipe. The Glazed Lamb Chops sauce is an unusual mix of pantry ingredients including Worcestershire sauce, anchovy paste, Angostura bitters, and honey. Totally worth making and not very difficult, this rich glaze provides sweet and tangy flavors and is very rich, savory and complex.
A small pet peeve of mine is when, if water is being used as an ingredient, than please itemize it. I added it to the list below because I accidentally omitted it when making the sauce. This became an issue when reducing the mixture to a thin glaze. Instead of 10 minutes, ours became almost a thick glaze in a minute—the taste was still fabulous however. From now on I plan to list water as an element if the recipe calls for it.
One small time saver is, instead of mashing raw garlic cloves, use garlic paste if you have some on hand. I always keep some homemade roasted garlic paste in the fridge for mashed potatoes or for instances such as this. On another note, we substituted some gorgeous loin chops in place of lamb rib chops. Keep in mind, they are thicker and therefore take longer to cook to a temperature of 130° for medium-rare.
In a small bowl, combine the garlic, Worcestershire sauce, bitters, honey, vinegar, anchovy paste, oregano, and 1/3 cup water.
Pat the lamb chops dry and season lightly with salt and pepper. Heat the oil in a heavy-duty (such as cast iron) 12-inch skillet over medium-high heat until shimmering hot.
Cook the lamb chops, flipping once, until browned and medium rare (130°F), 4 to 6 minutes total per batch. (Lamb loin chops are thicker and will take closer to 6-7 minutes per side.) You may have to cook them in two batches. Transfer to a platter and tent with foil to keep warm.
Pour off the fat from the skillet, add the Worcestershire mixture, and bring to a boil over medium-high heat. Cook, stirring, until the mixture thickens into a light glaze, about 10 minutes.
Return the chops to the pan and cook, turning them to coat with the glaze, about 1 minute more. Serve the chops with any remaining glaze poured over them.
Originally this meal was going to be prepared for two of Russ’ former coworkers, Barb and Lorraine. Let’s just say the “winds of change” blew in and we had to postpone the party by a month. Good things come to those who wait, correct? Check out this link, Bistecca with Fishy Herb Sauce for the recipe.
Marinating sliced heirloom tomatoes in salt, pepper, olive oil, and fresh oregano intensifies their flavor and brings out their rich juices. With the addition of sliced shallot and red wine vinegar, it knocks this side dish out of the park. Be sure to use a high quality EVOO.
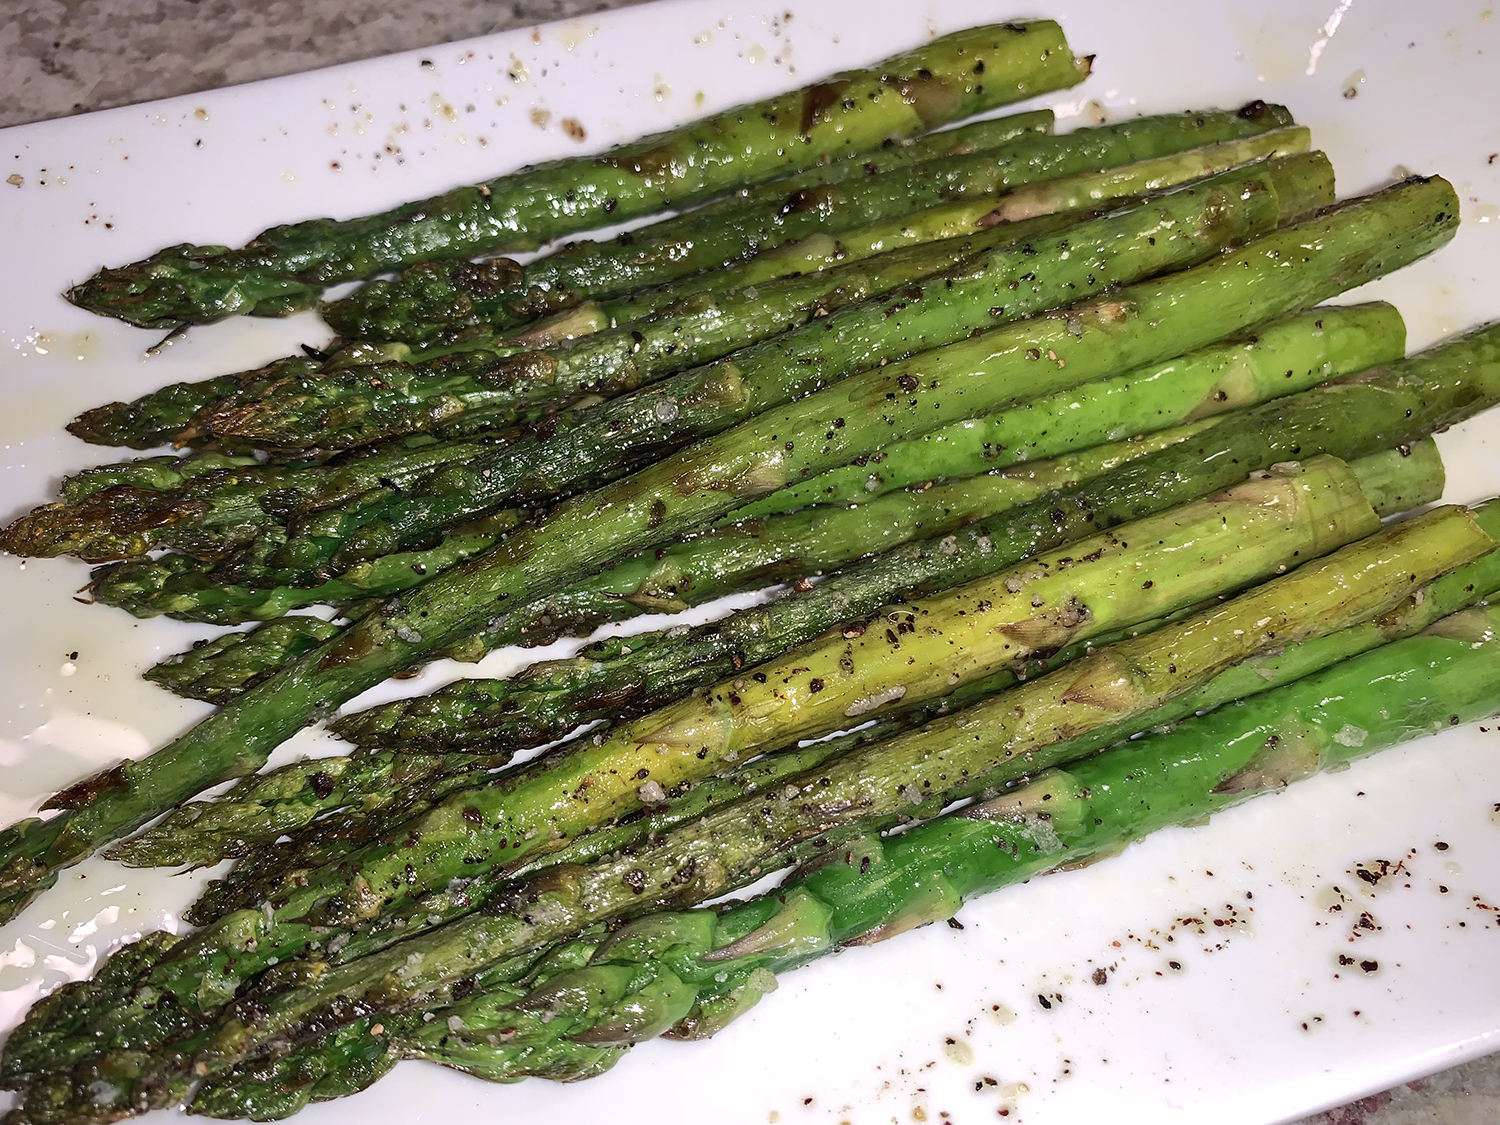
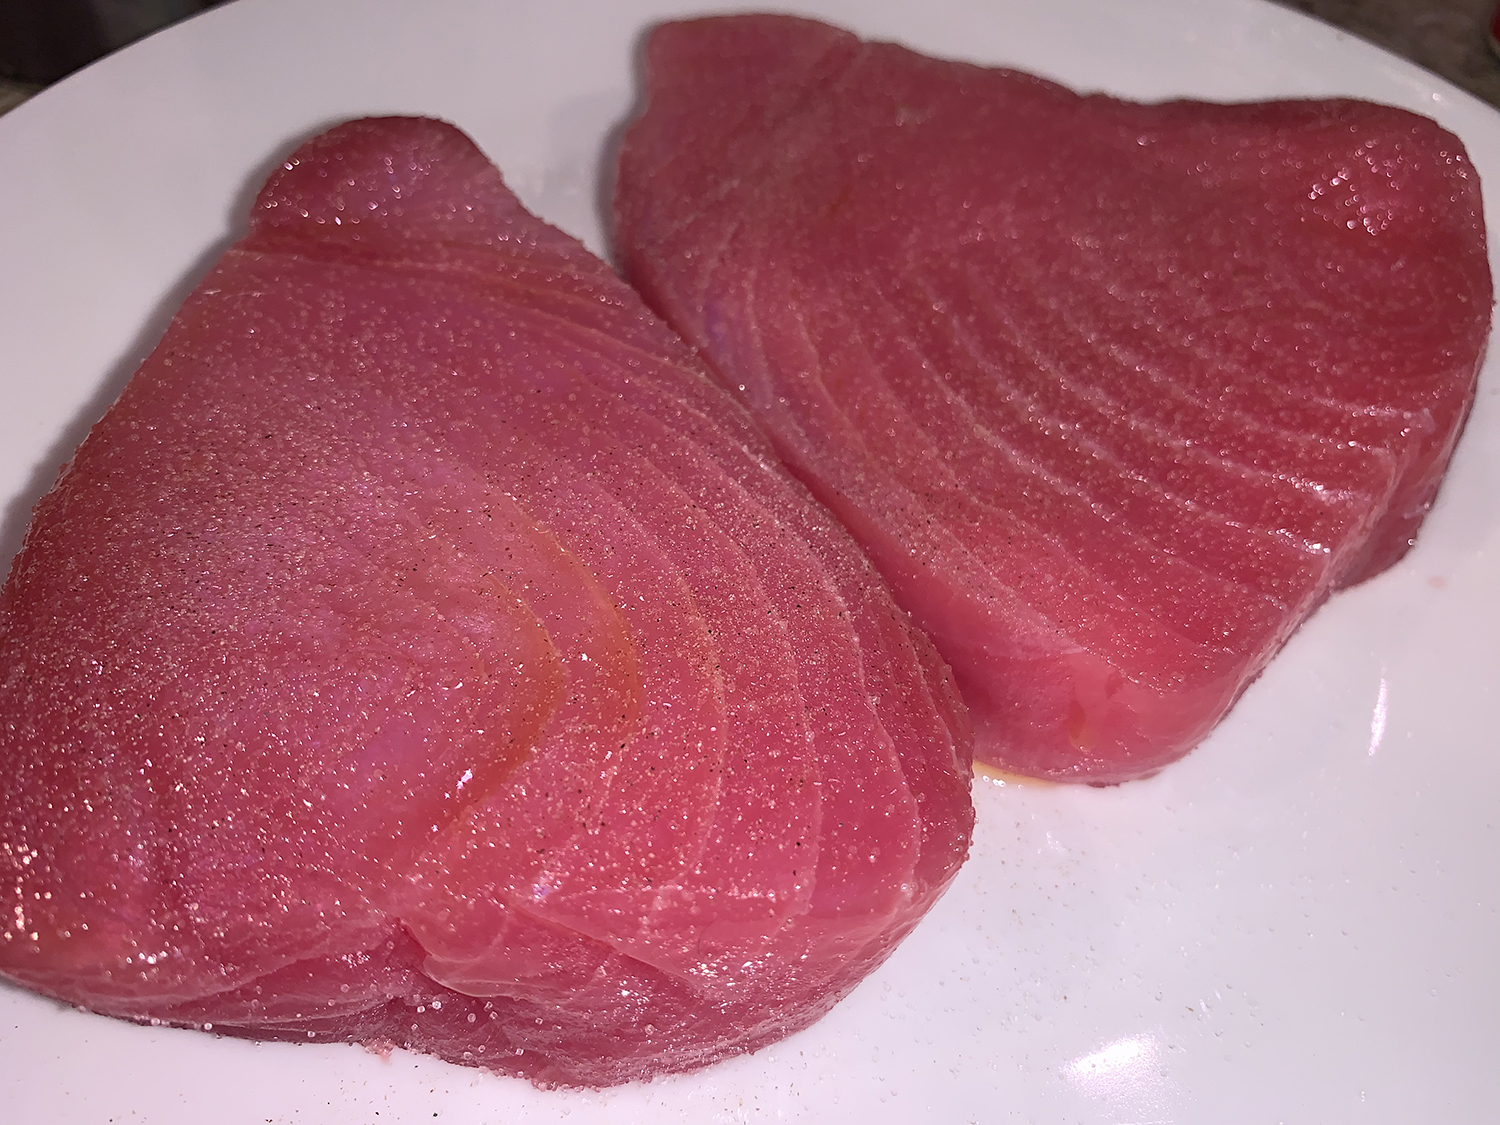
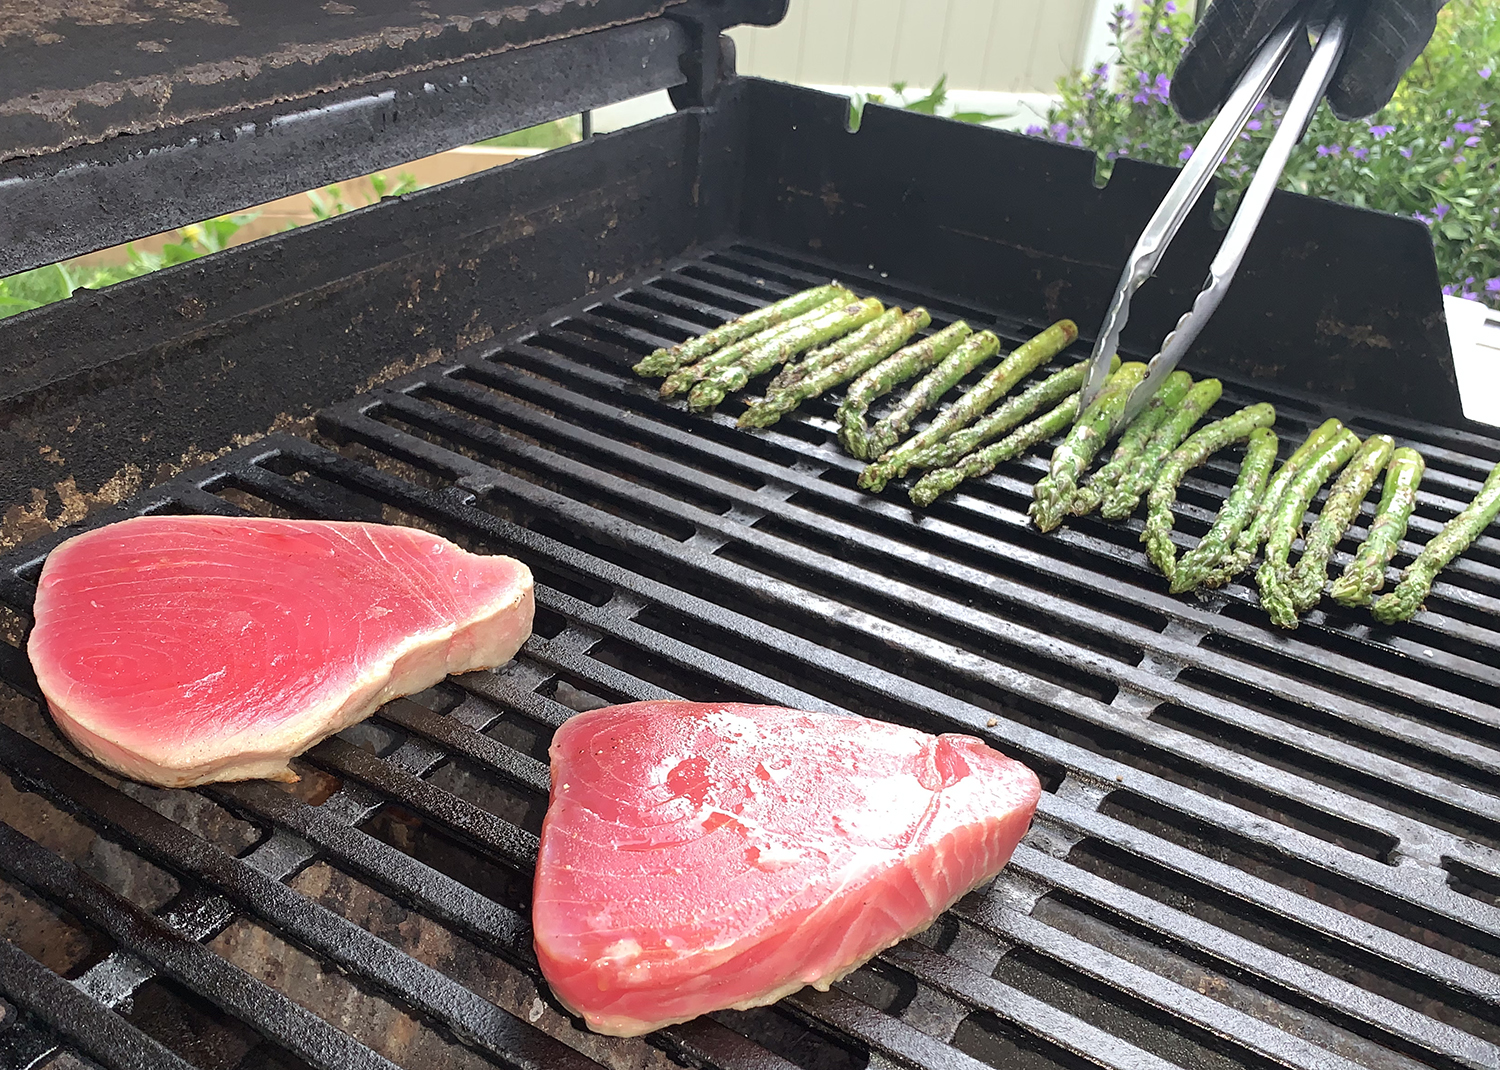
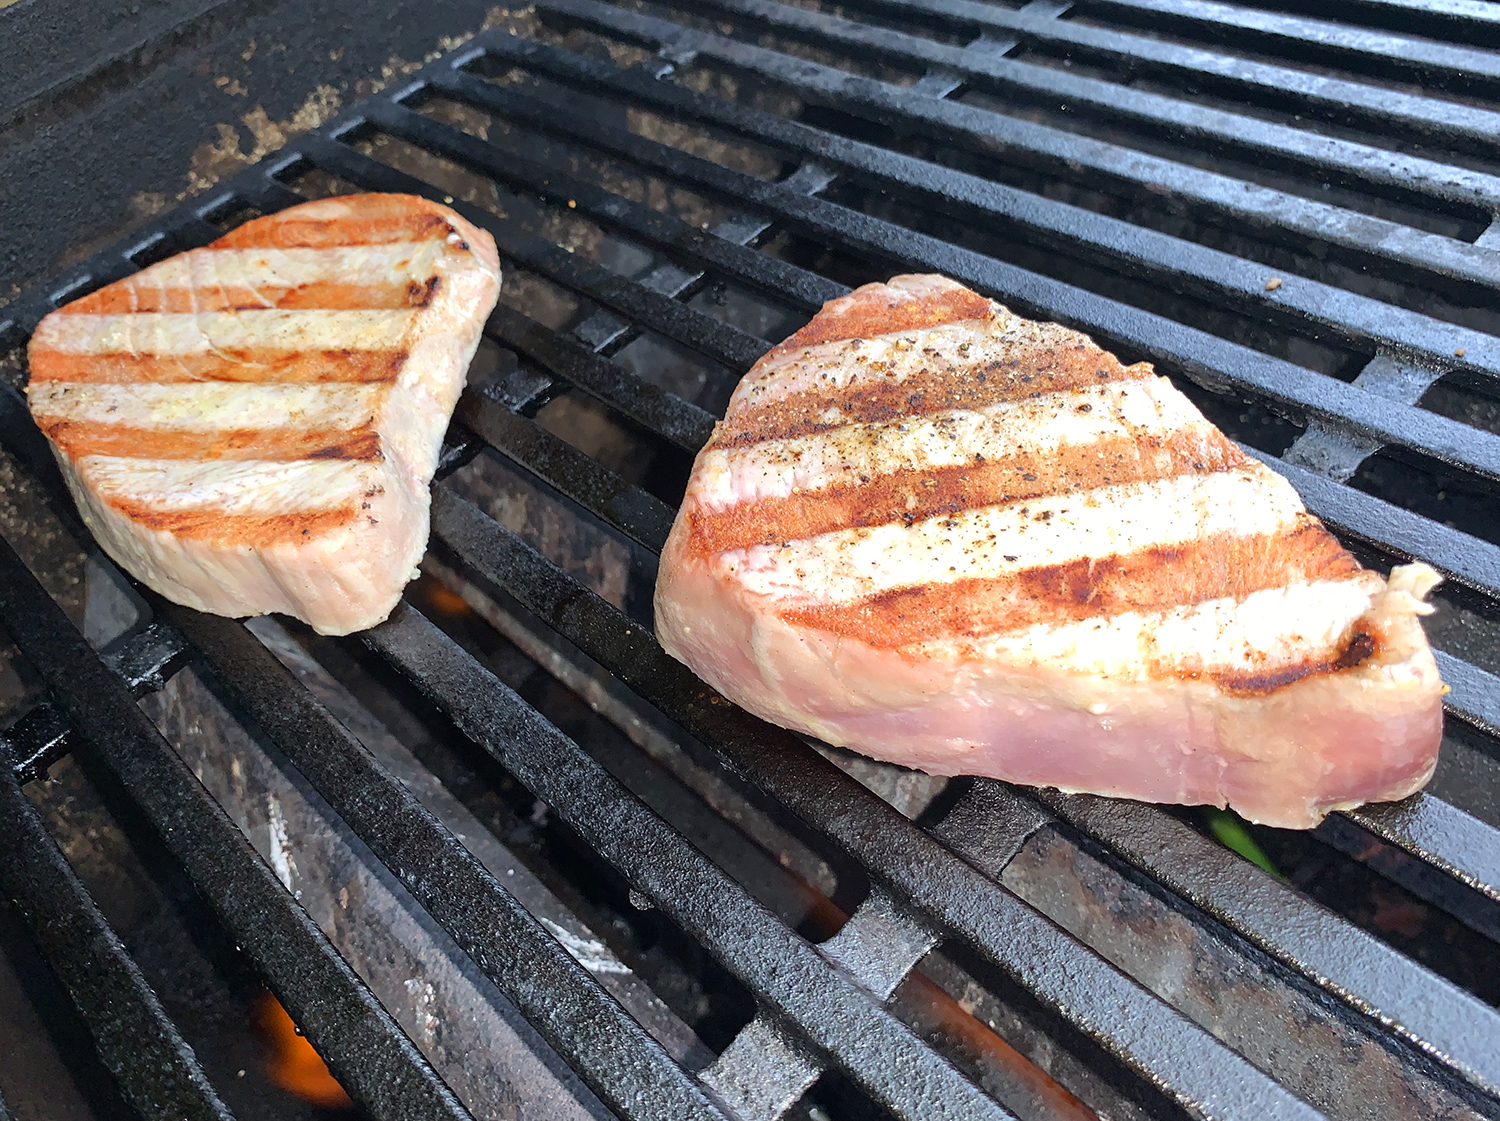
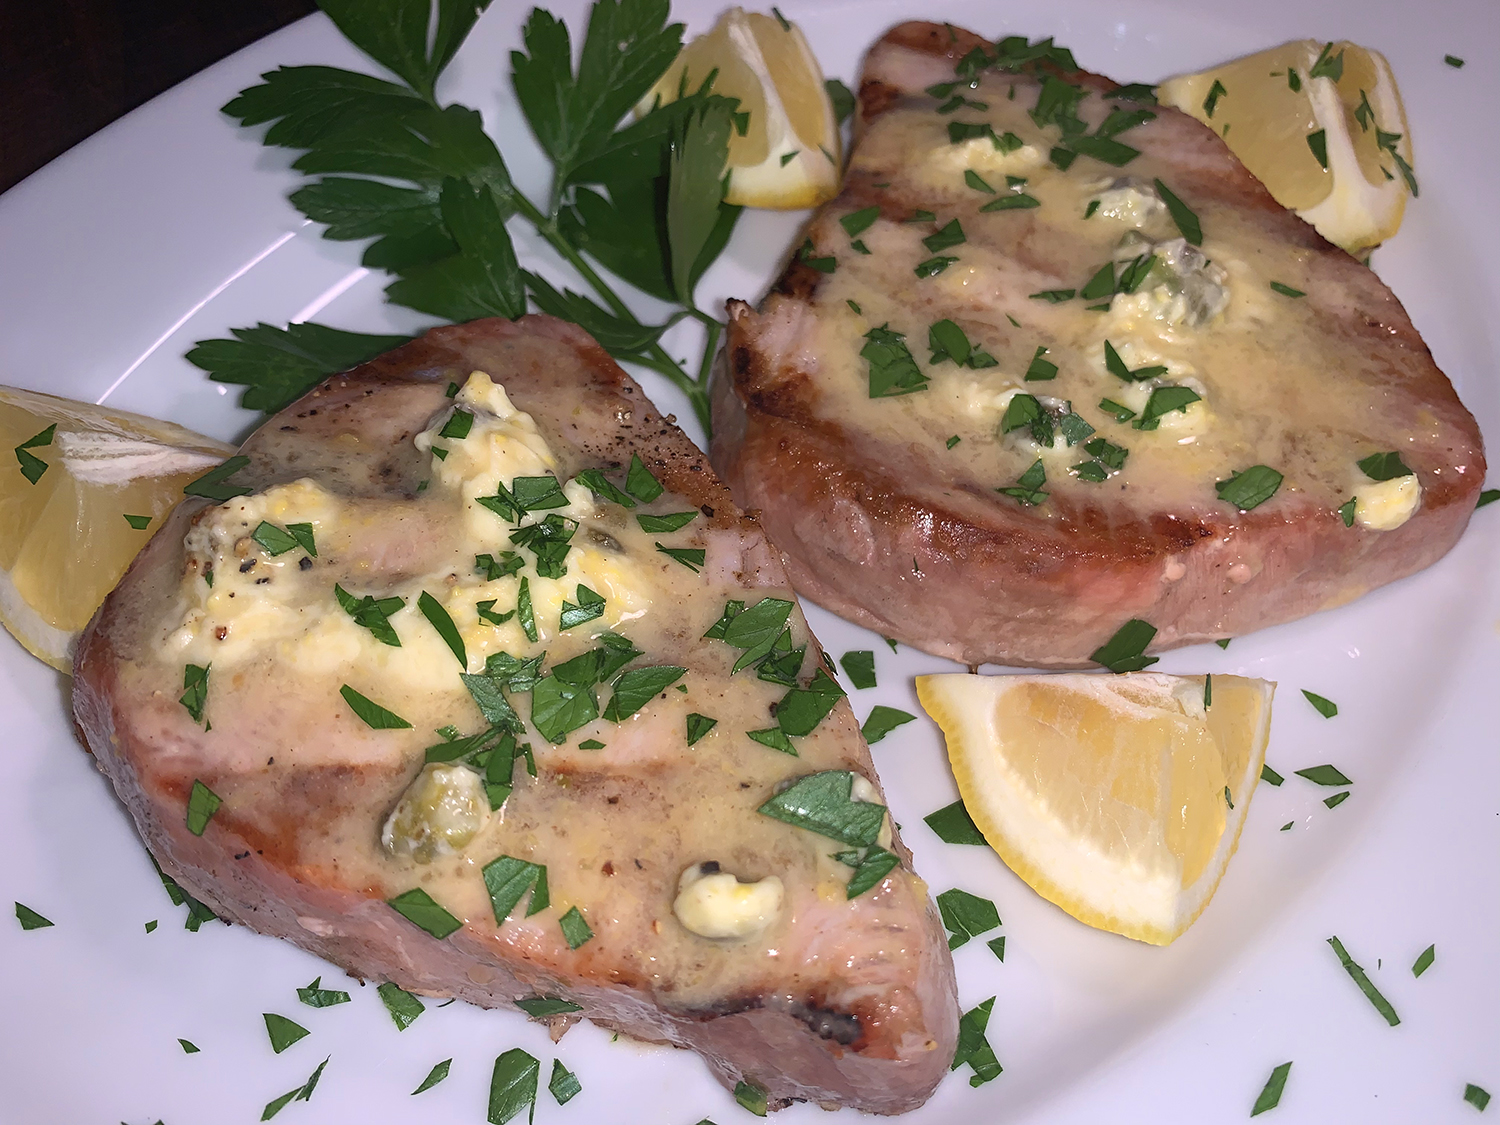
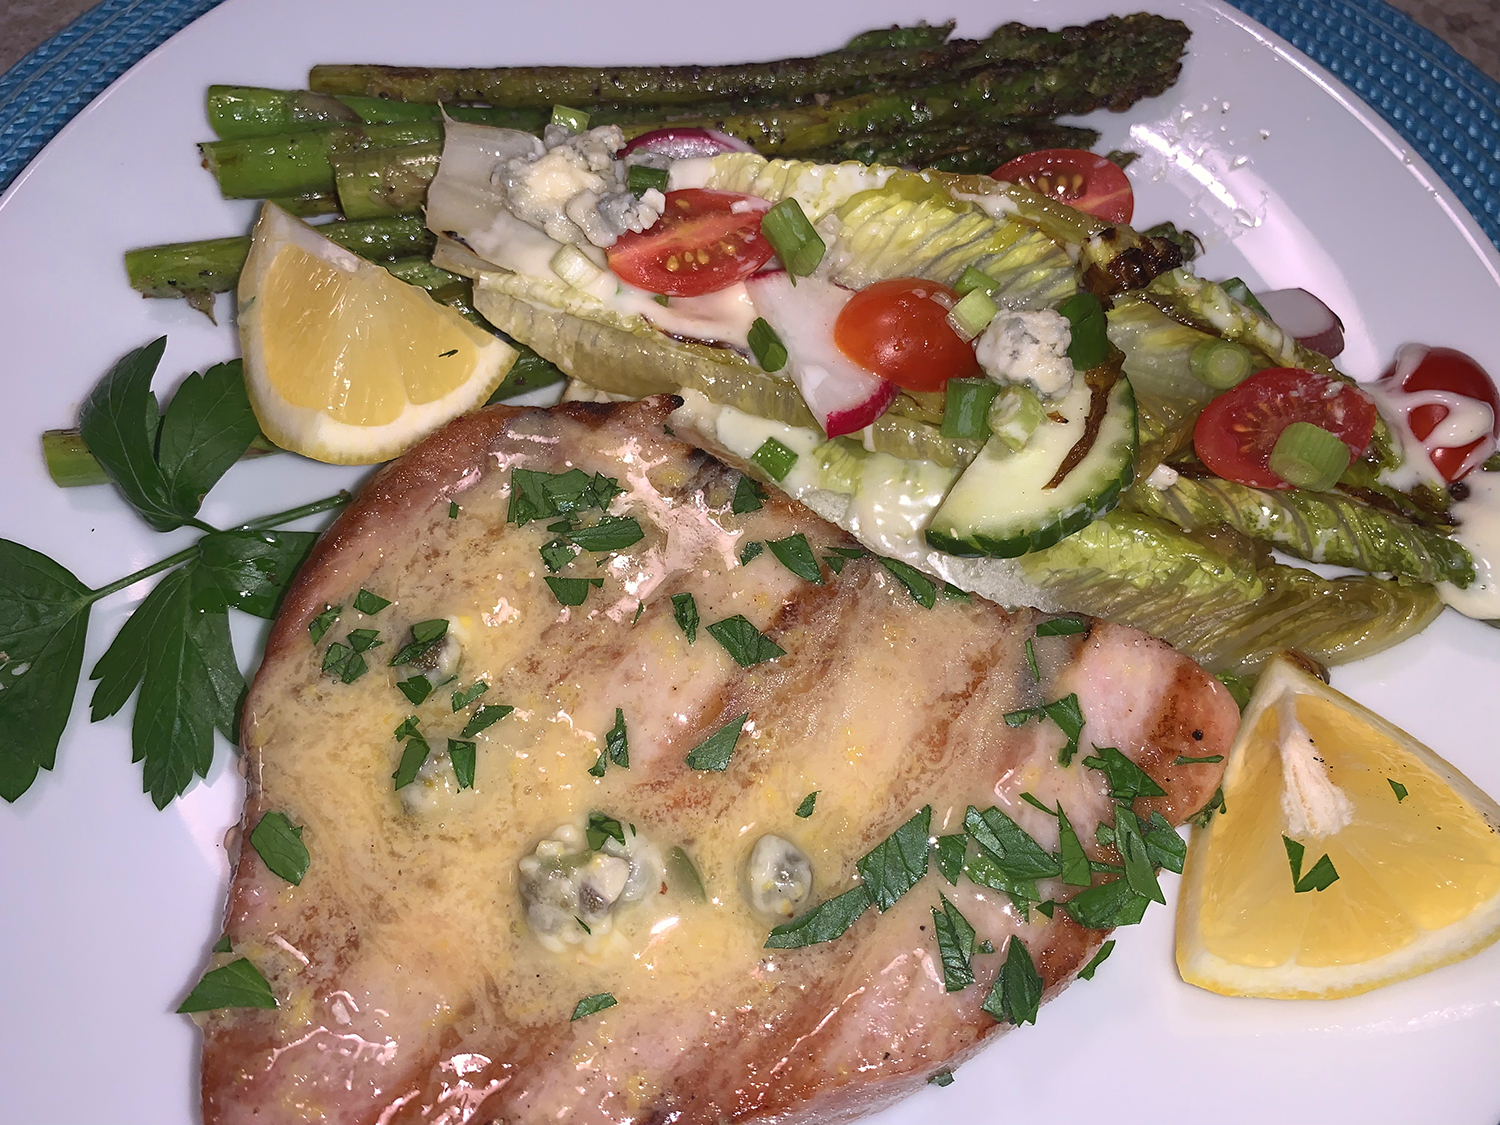
There’s just something about grilled tuna steaks that screams summer to me. This super-easy, no-fuss, dinner is perfect for a couple—but if doubled or tripled, fancy enough for company. Because it’s ready in 30 minutes from start-to-finish, you have ample time leftover to chill with a glass of wine, and/or enjoy your guests.
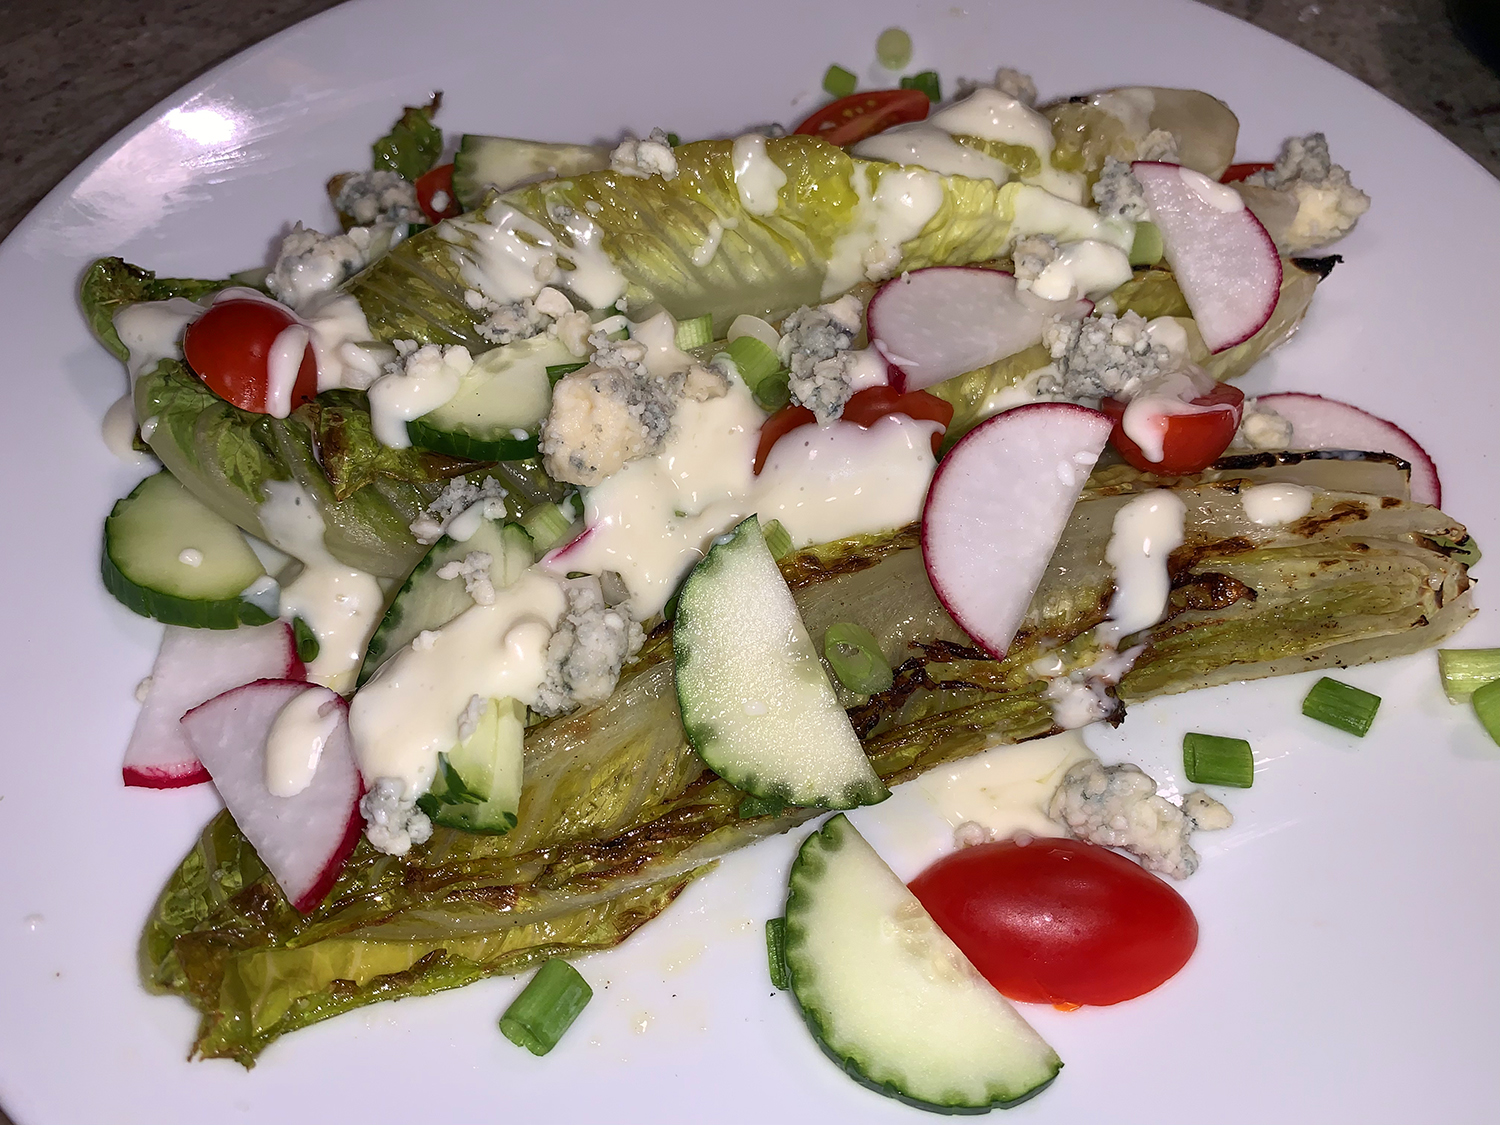
Then, how about a grilled romaine salad as a side dish? Slice a head in half, brush with olive oil, sprinkle with salt and pepper and place the cut-side down over high heat for two minutes. Dress with grape tomatoes, radish and cucumber slices, sliced scallions and your favorite dressing. I think ranch or blue cheese adds a nice counterpoint to the salty tartness of the butter sauce. Serve immediately.
Completing the meal was some grilled asparagus, making the meal healthy, low-carb, with added fiber and protein—not to mention great taste!
Grilled Tuna Steaks with Lemon-Caper Mustard Sauce
Thinking outside the box for a good plan to use up a couple of ground veal patties, I concocted this Veal Pattie Pita Pockets with Olive Red Pepper Tapenade. And as a side, I paired them with this Celery Root Salad with Celery, Flat-Leaf Parsley and Capers found in a recent issue of Fine Cooking Magazine. The meal is quick, and there’s not a lot of prep.
One multi-grain pita pocket split in two afforded the perfect bed to nestle in the tapenade and veal patty. For a soft warm pita, first wrap the pocket in foil and heat in a 325° oven for about 15 minutes.
Consider it a hearty lunch or an evening meal, either way it’s a tasty diversion from the norm.
Olive Roasted Red Pepper Tapenade (Yields about 1 cup, 10 min)
1/2 cup kalamata olives, chopped
1/2 cup roasted red peppers, chopped
1 Tbsp. capers
3 cloves garlic, chopped
2 Tbsp. lemon juice
1 tsp. fresh parsley
1 tsp. freshthyme
2 Tbsp. olive oil
Salt and pepper to taste
Directions
Preheat oven to 325°. When temperature is reached, insert foil-wrapped pita pocket for 15 minutes, remove from oven and keep wrapped until veal patties are ready.
Heat olive oil in a medium-sized nonstick skillet over med-high heat. Sprinkle each patty all over with Adobo Seco seasoning (if using), or simply salt and pepper.
When skillet is hot, add the two veal patties and cook without disturbing for 5-6 minutes.
Turn the patties over, cover the skillet and cook another 5-6 minutes until the internal temperature reaches 135°-140°F.
Meanwhile, process all of the tapenade ingredients in a food processor, pulsing just until finely chopped, but not at paste consistency. Taste, and adjust seasonings to taste.
Spread a couple tablespoons of tapenade into each warm pita pocket and insert veal patty. Serve with a side of Celery Root Salad with Celery, Flat-Leaf Parsley and Capers (recipe follows).
Celery Root Salad with Celery, Flat-Leaf Parsley and Capers
A hearty salad made with celery root—that peculiar-looking hairy knob. All gnarly and off-putting, it’s amazing how good it can be both cooked as in our Celery Root Purée, or raw as julienned in this recipe. We loved it and enjoyed the leftovers for several days in a row.
Celery Root Salad with Celery, Flat-Leaf Parsley and Capers
In a large bowl, whisk together the vinegar, mustard 1 teaspoon salt, 1/2 teaspoon pepper, and the sugar. In a thin steady stream, whisk in the olive oil until incoporated. Set aside.
Make the Salad
Use a sharp knife to cut off the gnarly base of the celery root, and cut a thin slice off the top.
Use a paring knife to remove the thick outer peel. Slice in half vertically and julienne-cut on a mandoline into matchsticks and immediately add to the dressing, tossing to coat thoroughly to prevent browning.
Add the celery, parsley, and capers to the bowl and mix well. Cover and let stand at room temperature for 45 minutes to allow flavors to blend.
TIP: The salad can be prepared up to 1 day ahead. Cover the bowl and store in the refrigerator until about 45 minutes before serving.
The rich flavor and firm texture of salmon, one of our favorite fish, pair perfectly with sweet peppers made into pipérade, a Basque relish-like stew of peppers, tomatoes, onion and garlic. Piment d’esplette is the authentic seasoning for pipérade, but instead a combination of sweet paprika and cayenne is used, both of which are probably already in your pantry.
And for smoky, meaty flavor, sauté slices of Spanish chorizo; the rendered fat helps cook the vegetables and the browned chorizo simmers with peppers for a few minutes at the end. We prefer salmon at medium-well doneness—that is, cooked until the center is no longer translucent. To cook the fish until opaque throughout, simmer the fillets for a few minutes longer, or until the center reaches 130°F to 135°F. Serve with warm, crusty bread if desired.
Tip: Don’t forget to place the salmon skin side up in the pan. This way, while the fillets cook gently in the pepper mixture, the skin, which we remove before serving, protects the surface from drying out. Also, don’t allow the pepper mixture to simmer vigorously while the fish is in the skillet. Medium heat should ensure a gentle simmer, but adjust the burner as needed.
3 Tbsp. extra-virgin olive oil, plus more to serve
2 oz. Spanish chorizo, quartered lengthwise and thinly sliced
2 medium red or orange bell peppers (or 1 of each), stemmed, quartered lengthwise, seeded and thinly sliced crosswise
1 medium red onion, halved and thinly sliced
1 tsp. sweet paprika
¼ tsp. cayenne pepper
¼ cup dry vermouth or white wine
14½ oz. can diced tomatoes
3 large thyme sprigs
Directions
Season the salmon on both sides with salt. In a 12-inch skillet over medium, combine the oil and chorizo and cook, stirring occasionally, until the oil has taken on a reddish hue and the chorizo begins to brown, 3 to 4 minutes. Using a slotted spoon, transfer the chorizo to a small plate and set aside.
Set the skillet over medium-high and heat the fat until shimmering. Add the bell peppers, onion, paprika, cayenne and ½ teaspoon salt. Cook, stirring occasionally, until the vegetables are wilted and tender, 5 to 8 minutes.
Add the vermouth and cook, scraping up any browned bits, until the wine has evaporated, about 1 minute.
Add the tomatoes with juices along with the thyme, then bring to a simmer. Nestle the salmon fillets, skin-side up, in the mixture. Reduce to medium, cover and simmer, until the thickest parts of the fillets reach 115°F to 120°F, 6 to 8 minutes. If you want your salmon opaque throughout, cook a few minutes longer.
Remove the pan from the heat. Using tongs, carefully peel off and discard the skin from each fillet. Using a wide metal spatula, transfer the salmon to serving plates, flipping each piece so the skinned side faces down.
Bring the pepper mixture to a simmer over medium-high, add the chorizo and cook, stirring occasionally, until slightly thickened, 2 to 4 minutes. Taste and season with salt and pepper. Remove and discard the thyme, then spoon the mixture over and around the salmon and drizzle with additional oil.
Waste not want not, right? I occasionally have leftover buttermilk and wanted to figure out how to use up some of the remainder before spoilage occurs. Not one to consume most baked goods, I discarded any notion of making buttermilk pancakes or the like. But salads we eat, so The Mr. immediately thought about concocting a buttermilk ranch dressing (which BTW is also great with crudités, chips or even wings!)
At first glance you may cringe at the lengthy list of ingredients—luckily most are staple pantry items. All of the herbs we had growing in our garden, but they are easy enough to obtain from a local farmer’s market or the grocery store (or your neighbor’s garden??).
This version was found on garlicandzest.com but actually hails from a Chicago restaurant, The Publican. It’s cool, creamy, tangy, garlicky and, honestly, good enough to eat straight from the jar—but please use a spoon. Once you’ve made ranch dressing from scratch, you may never go back.
Kosher salt and fresh ground black pepper to taste
Directions
In a small bowl, combine the mayonnaise, buttermilk, garlic powder, onion powder, Worcestershire sauce, vinegar, cayenne, Dijon, sugar, fish sauce, lemon zest, lemon juice, parsley, chives, tarragon and oregano. Whisk together until smooth and creamy.
Taste for seasonings and add salt and pepper as needed.
Transfer the dressing to a glass container with a lid such as a canning jar, and refrigerate for several hours so the flavors can marry and the dressing thickens. Serve over salad or with crudite.
Dressing will keep up to one week in the refrigerator.
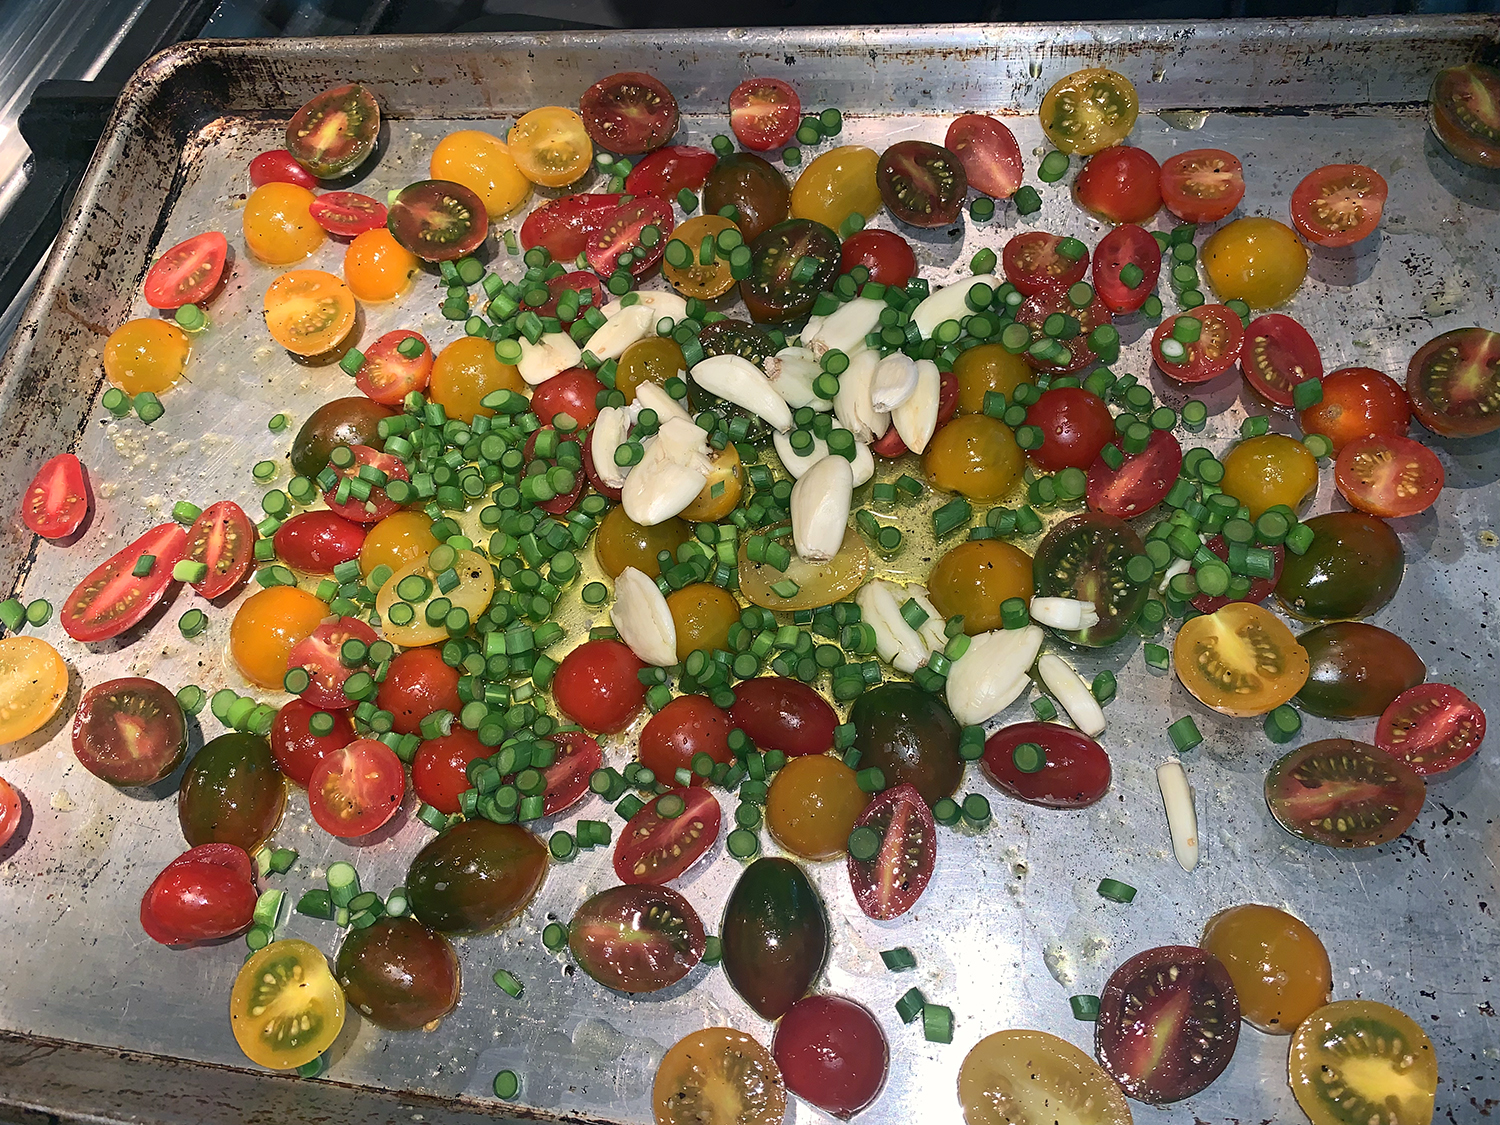
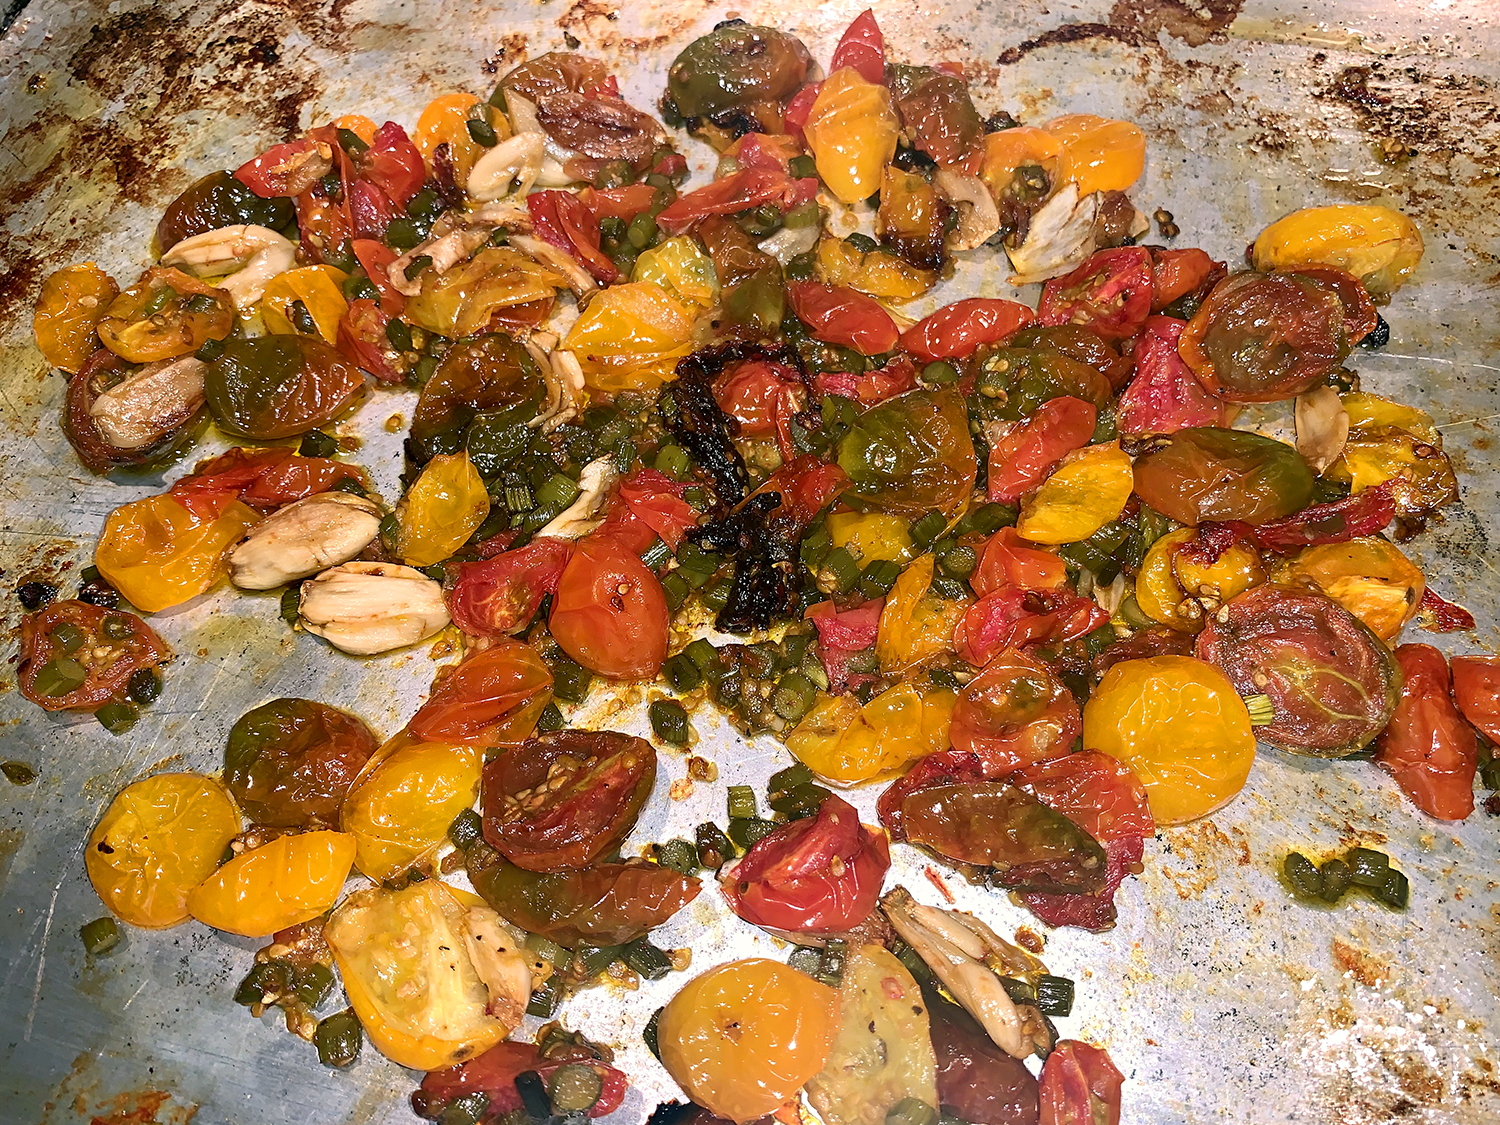
Lots of grape and/or cherry tomatoes? A great way to use them up before they go bad is to roast them with garlic and olive oil. All you need are tomatoes, olive oil and garlic cloves. However, we happen to have some organic garlic scapes on hand and decided to chop them up and add to the mix. Jammy describes the way these tomatoes collapse, thicken and sweeten when they’re roasted in the oven.
While exact measurements don’t make much of a difference, I sliced up just over a pound of multi-colored grape tomatoes, peeled and smashed about a head of garlic cloves, and chopped 6 garlic scapes. Then arranged in a single layer on a large rimmed baking sheet, tossed with about 1/4 cup of good olive oil and sprinkled with salt and pepper. The pan went into a preheated 325° oven for 30 minutes, then tossed everything with a spatula and spread back into an even layer. After another 30 minutes in the oven, the pan was removed.
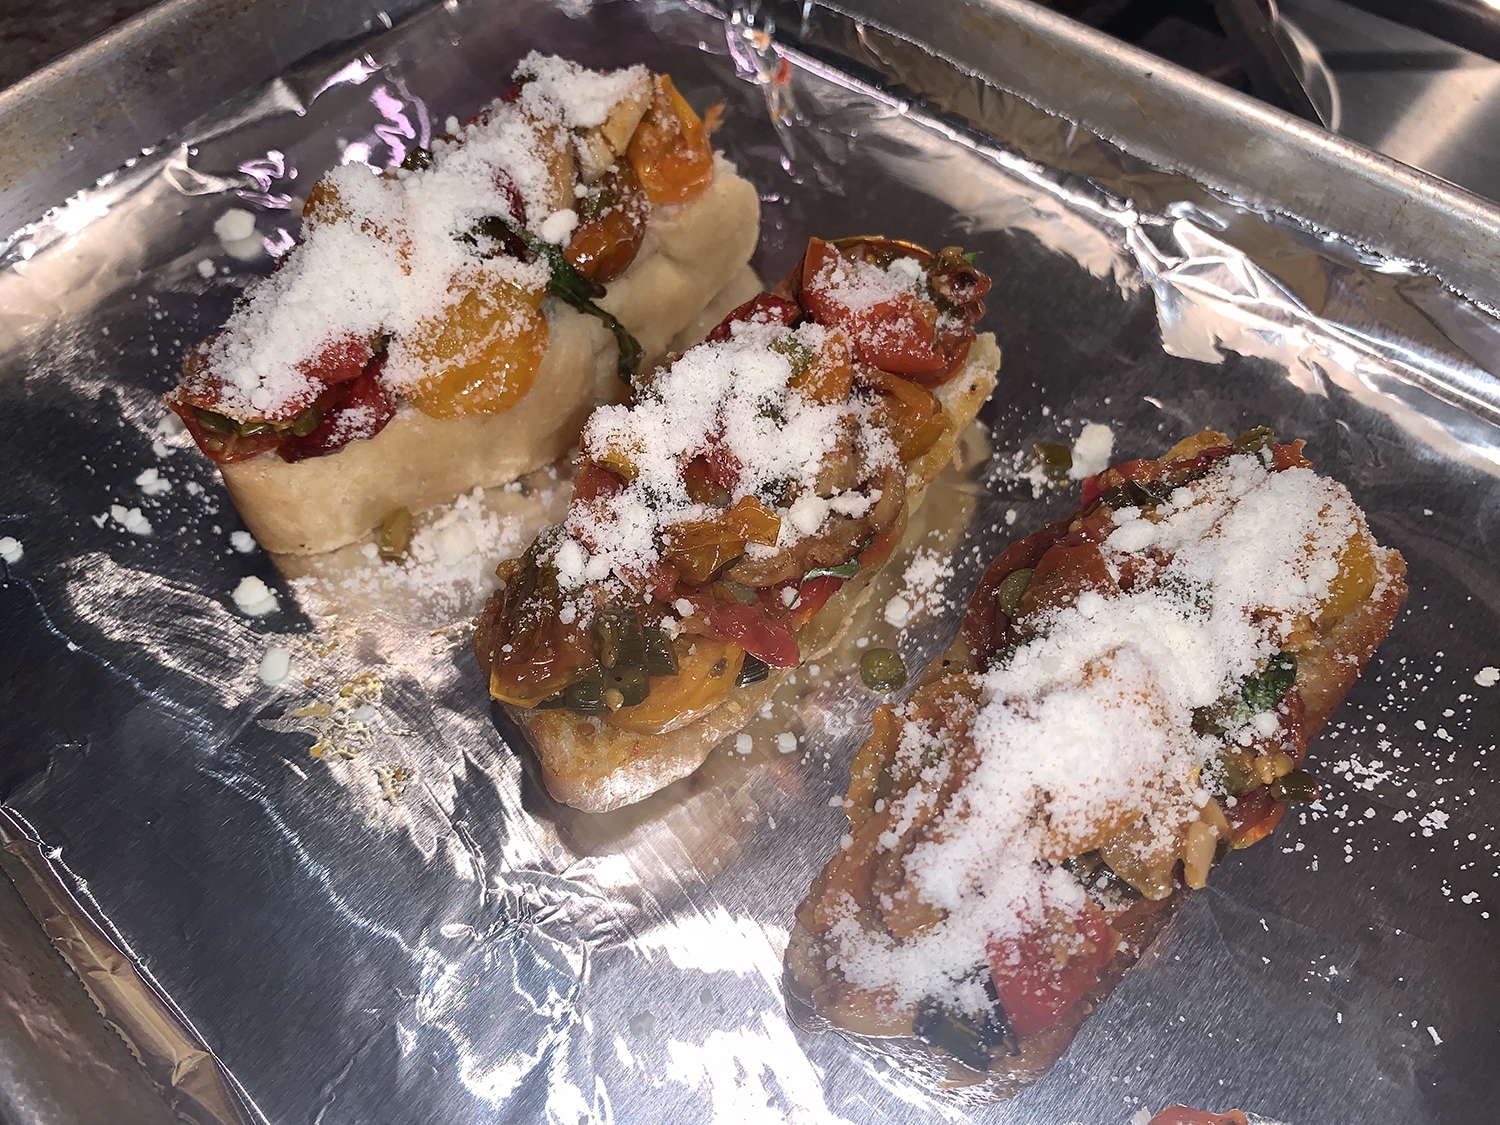
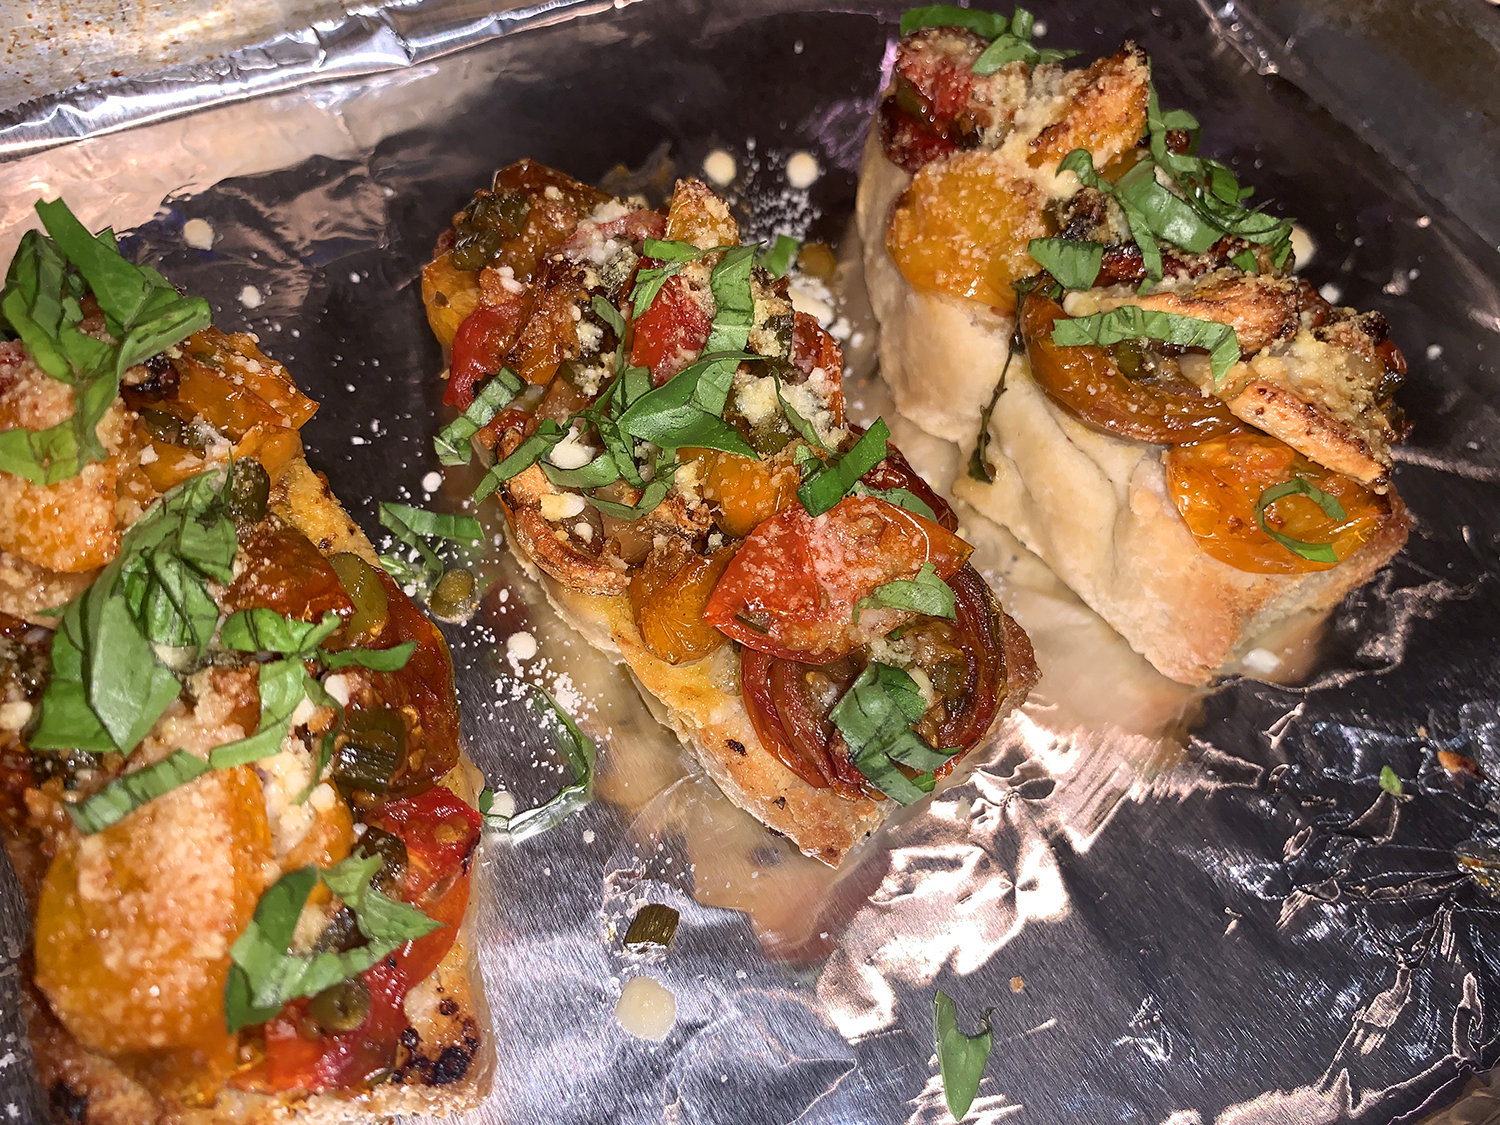
Let cool completely. You can store in an airtight container for up to five days in the refrigerator, or use immediately as a spread on crusty bread, tossed with cooked pasta, or use as an accompaniment to fish, steak or chicken.
As a special treat, we spread some on thick focaccia slices, topped with shredded parm and put under the broiler for several minutes, then topped with a chiffonade of fresh basil from our garden. In a word, divine!