Monthly Archives: September 2014

Composting

Think of food as dirt.

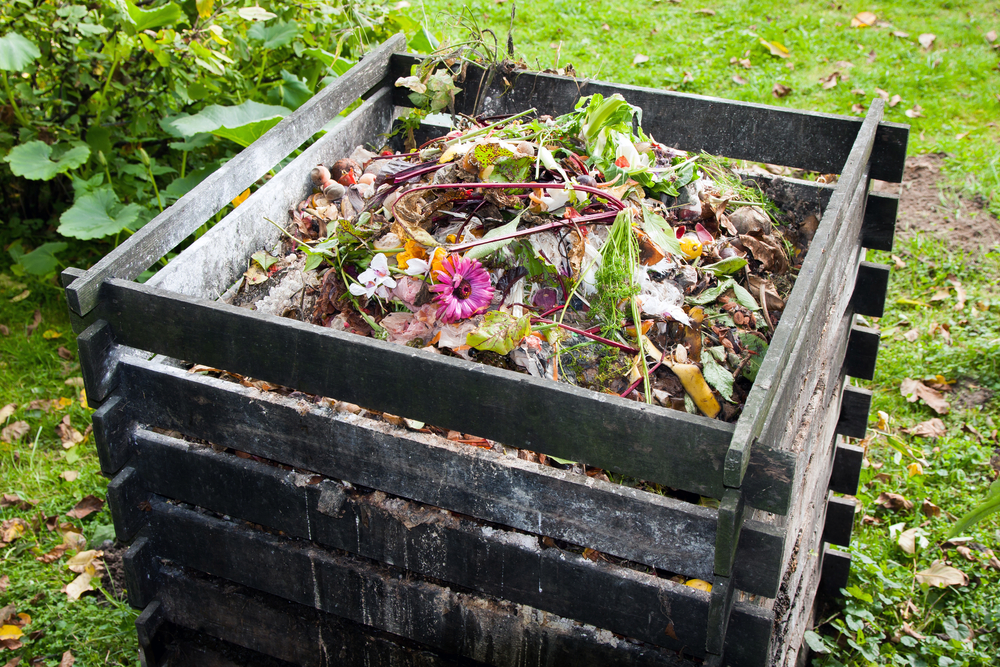
Not too appetizing is it? But when you compost (fruit peels, coffee grounds — and the paper filters — eggshells, leftover vegetables…), you can feed your lawn and nourish your gardens by mixing it into the soil. And if you’re growing an edible garden, it comes back to you full circle!

The fact is, the average American household throws away about 25% of its food. Now stop and think if you composted that stuff, it would tremendously lighten landfill loads. Maybe you don’t have any outdoor space to compost? You can still recycle food scraps starting with a kitchen bucket and unloading it somewhere weekly, just check with your local department of public works or a farmer’s market for details. In between drop-off hauls, if your bucket fills up, stash scraps in the freezer in a sealed container lined with newspaper.

fruits.veggies.for.compost

What not to compost: meat, cheese or fish because they attract animals and skip the cooking oil which draws insects.

It usually takes four to six months for compost to turn into dark brown or black soil with a nice, earthy aroma. We started ours the Spring we moved in, and worked it all through that Winter which produced our “black gold” — nutrients for the garden.

compost.bin

According to some experts, any and all organic matter can be composted but most of it should be made up of dry materials like dead leaves, twigs, torn-up newspaper and paper plates. These items apparently contain carbon which feed the microbes that decompose the pile the necessary energy to work their magic, while the food and other moisture-rich items like grass clippings, supply the the protein that microbes need to produce. The ratio of three-to-one of dry to wet, yields the best results. I have to say, Russ and I don’t necessarily heed that advice. The only time we add a lot of dry material to our compost is in the Fall season after raking leaves and cutting down spent plants, but we still generate very rich compost.

handful.worms

It is not necessary to add earth worms to your compost because they often find their way to your bin. But when we moved to our Langhorne house a few years ago, one of the first things we did is order (yes, through the mail) a shipment of worms and dumped them into the heap. This is called vermicomposting, which is the process of using worms and micro-organisms to turn kitchen waste into a black, earthy-smelling, nutrient-rich humus. Over the years, the worms have been multiplying and happily churning away.

Basically, an “ordinary” compost bin or heap works by the waste being continually added, stirred up or turned over which introduces air. The bugs, bacteria, fungi and all sorts of other micro life breed and multiply so they need this air, as they are multiplying and decaying the waste they produce heat. This is called aerobic composting, when any heap or bin is generating heat in this way it is properly composting, if the heap or bin has gone cold, this means that the population of bugs bacteria etc, have used up all the oxygen and are now dying off and effectively the composting has slowed or stopped altogether. Keep in mind, that very often if everything is stirred up, introducing more air, the whole lot will start again.

Oxygen is needed to support the breakdown of plant material by bacteria. To supply oxygen, you will need to turn the compost pile so that materials at the edges are brought to the center of the pile. Turning the pile is important for complete composting and for controlling odor. Wait at least two weeks before turning the pile, to allow the center of the pile to “heat up” and decompose. Also, keep an eyeball on the moisture level. The pile should be damp, like a wrung-out sponge (not soaking like a swamp.) If it’s too dry, spritz it with the hose. Too wet? Add shredded newspaper or wood chips.

So what are you waiting for? Create your own “black gold.”

Cedar Plank Grilled Salmon

Admittedly, salmon is one of our all-time favorites, whether it’s grilled, pan-fried, roasted, poached, baked, or made into patties. And if you have a penchant for salmon like us, try the grilled cedar plank method. It’s super-easy, and is a plus for a healthy diet.

You can buy cedar planks in many grocery stores, at home centers such as Lowes, or online. Just make sure you soak it submerged in water for a minimum of one hour. In our latest attempt, we filled the kitchen sink with several inches of clean water, and put a heavy object on top of the plank to keep it submerged in the water instead of just floating on top.

soaking.cedar.plank

Our salmon filet was 1 1/2 pounds, plenty for three people (possibly four depending on what else you are serving.) The fish was patted dry and then sprinkled with a store-bought McCormicks rub mix of Sweet Citrus and Spice, and it got “happy” while the wood soaked in the sink. While chef guru Bobby Flay says to remove the skin, we did not; however we probably will try that advice next time to see if it makes any difference.

raw.rubbed.salmon

Set grill for indirect grilling and heat to medium-high. When ready to cook, place the plank on the hot grate and leave it until there is a smell of smoke, about 3 to 4 minutes. Turn the plank over and place the fish on top. Place the cedar plank in the center of the hot grate, away from the heat. Cover the grill and cook until cooked through, around 30 minutes, turning the plank 180 degrees after 15 minutes. The internal temperature should read 135 degrees F. Check the plank occasionally. If the edges start to catch fire, mist with water, or move the plank to a cooler part of the grill. There should be a nice char to both the plank and the fish exterior.

salmon.on.grill

We served the salmon directly from the plank, but if you desire a more formal approach, certainly transfer to a platter. Serve with lemon wedges.

grilled.salmon.closeup

Dining Out on the “Mother’s” Trip

In early September we traveled to Western Pennsylvania and Western Michigan to visit our mother’s. The entire trip was about eight days and over 1500 miles by car. During those visits, we had the opportunity to try out a few restaurants with some pleasant results.

Stop I: To lay some groundwork, Russ’ mother Mary Cochrane lives in Butler, PA, which was the first stop on our way. It is approximately 340 miles from our Langhorne home and so by the time we get to her house, we’re usually ready for a little relaxation and cocktail hour. And just a few days into our visit, it was Mary’s friend Janet’s birthday–they’ve been friends since 1970–nearly 45 years! To celebrate, Mary made reservations at the Saxonburg Inn for the four of us.

janet.mary
Janet Sipych and Mary Cochrane dining at the Saxonburg Inn

History of the Saxonburg Inn & Hotel:

In 1832, John A. Roebling of Mulhausen Germany purchased Saxonburg with a vision to create a German community in America whose foundation would be agriculture and light manufacturing. Roebling laid out this land with a broad main street running east to west with the parcels fronting on Main Street. The parcels were sold to Mulhausen families who ventured to America to seek fortune.

Roebling, in his Saxonburg shop, developed and patented the process for the manufacture of “wire rope” in 1842.  This led to Roebling finding fame and fortune as a designer and builder of suspension bridges such as the “Brooklyn Bridge” throughout the world. The late 1840’s saw Roebling’s cable in demand. To capitalize and access better transportation the “Cable Works” was moved to Trenton, New Jersey…. The new owner, Judy Ferree, purchased and renovated the “Hotel” in July of 2010, bringing back Executive Chef Alan Green.

Along with a fixed menu, the Saxonburg offers an enticing array of daily specials. Here’s a rundown of what we ordered: Janet got the Panko Fried Shrimp, panko breaded, crispy fried jumbo shrimp served with cocktail sauce and a side of french fries; and Mary’s choice was Pork Porterhouse accompanied by a raspberry applesauce (neither entree is pictured.) Lynn’s dinner was the Salmon with Corn Two Ways special with a fabulous corn and jalapeño relish and a side salad of corn and black beans (after all, it was still corn season!)

But perhaps most interesting of all was Russ’ choice from the Specials Menu “City Chicken” which is a unique Pittsburgh-area offering. In fact, it’s not chicken at all—it’s actually skewered veal and pork cubes!! This City Chicken was a new twist on an old recipe. Instead of braising the skewers, this dish was coated in a tempura batter and deep-fried and served over mashed potatoes and gravy n’at. Yinz would love it!

salmon.with.corn.jalapeno.relish

city.chicken

*************************

Stop II: Several days later, we arrived in Middleville, Michigan—420 miles further west—at the house of Paul and Kathy (aka Lolly) Harris, on beautiful Payne Lake. We determined beforehand that we would all go out to eat our first evening in, so Lolly made reservations at a local favorite, the Terrace Grille at the Bay Pointe Inn on Gun Lake. To our detriment, a torrential rain and lightening storm rolled in just as we were heading out for dinner, so we did not get waterfront seating, though our high-top table still afforded us a lovely view of the lake—and an unfortunate bridal party outside in a tent.

at.restauarnt
Russ, Paul and Lolly at the Terrace Grille on Gun Lake

Dinner choices included the Apricot Chicken with green beans and carrots (Paul); Stuffed Salmon—Boursin stuffed salmon atop wild rice with green beans and a blood orange glaze (Lolly); Filet of Beef —Beef Tenderloin topped with dauphinoise potatoes served with candied carrots, shallot jam, crispy onions and cabernet demi-glace (Russ); and Hawaiian Ahi Tuna atop cilantro lime rice with peach cabbage salad and coconut sauce (Lynn).

apricot.chicken

salmon.dinner

steak.dinner

hawaiin.ahi.tuna

Our next two dinners at the Harris’s were grilled whole chicken and those zesty Chipotle Salsa Burgers mentioned in a previous blog. Finally it was time to pack up and start heading East again.

**********************************

Stop III: Back in Butler, PA for only one night before returning home to Langhorne, Russ, his mother and I took a road trip out to nearby Rachel’s Roadhouse for dinner. While nothing fancy or special, the food was quite good—although the noise level was much too loud, especially for a Monday night!

rachel's.menu.cover

For starters we all shared the Pork Potstickers with stir-fried vegetables in a Thai chili sauce, and Russ also got a bowl of their very tasty French Onion Soup. For entrees, both Mary and I chose the perfectly done NY Strip Tip Skewer Char Grilled with truffled mushrooms, roasted garlic honeycomb and cipollini onions, caramelized butternut squash and roasted garlic thyme-infused olive oil (Heavenly!); while Russ savored a 12-oz. Center Cut Strip Steak, medium-rare, with onion rings and a side of haricot vert green beans.

pot.stickers

french.onion.soup

kebab

steak.onion.rings

Alas, it was time to head back to reality. But thanks to all of our family members for extending their homes and their companionship. We only wish we could spend more time with you!

American Craft Beer Cookbook

By John Holl:
John Holl, an enthusiast who believes that there’s a perfect beer for every meal, conducts an exciting tour of delicious food designed to eat with fine craft beer. Thinking beyond standard burgers and nachos, talented brewpub chefs offer pairings such as Pistachio-Crusted Salmon Sandwiches served with a bright hefeweizen, and Curried Pumpkin Chicken Soup paired with — what else? — a pumpkin stout. Craft beer never tasted so good.

craft.beer.book

This cookbook, authored by the son of my first cousin John G. Holl, was laying around the house when I visited sister Lolly and her husband Paul in western Michigan a few weeks ago. Our visit occurred on an absolutely stunning, 75-degree, early September weekend, and we therefore determined a BBQ was in order. I believe it was Paul who thumbed through his copy of The American Craft Cookbook and found the recipe for the Roasted Chipotle Salsa Burger, and then a shopping trip ensued to purchase the perfect ingredients. Alas, we did not have access to the suggested beers from John’s book, but for those of us who like a hefty spice note, this burger was for us!

burger.recipe

Not everybody dining with us that evening, which included Lisa Samson, Desi Samson and Betty Ann Holl, had a penchant for spicy food, so they ate their burgers without the salsa and with mild colby cheese slices as opposed to the pepper-jack cheese for the zesty burger crew. The addition of ripe avocado sections atop the salsa provided a smooth counterbalance to the smoky chipotle flavor.

chipotle.salsa.burger

Roasted Chipotle Salsa Ingredients

  • 7 plum tomatoes, chopped
  • 3 dried chipotle chiles, chopped
  • 1/4 cup minced white onion
  • 1/4 cup finely chopped fresh cilantro leaves
  • 2 garlic cloves, minced
  • 1/2 cup water
  • Salt

Make the salsa

  1. Combine the chiles, tomato, onion, cilantro and garlic in a medium saucepan. Cook over med-high heat, stirring occasionally, until the tomatoes break down and the mixture comes to a simmer.
  2. Add the water and bring to a boil. Reduce the heat to low and simmer until the mixture begins to thicken, about 5 minutes.
  3. Remove the saucepan from the heat. Mash the ingredients together with a potato masher for a thicker salsa or an immersion blender for a finer salsa, adding salt to taste. Allow the mixture to cool in an airtight container in the refrigerator for at least 1 hour, or for up to 3 days before serving.

Burger Ingredients

  • 2 lbs. lean ground beef
  • 1 tsp cumin
  • 1 tsp freshly ground black pepper
  • 1/2 tsp garlic powder
  • 8 buns
  • 8 slices monterey jack cheese
  • 2 ripe avocados, pitted and thinly sliced
  • Tortilla chips for serving

Mix beef through garlic powder in bowl and form into 8 patties. Grill according to your preference. Add cheese slices and cover grill until cheese melts. Add to buns and layer mixture and avocado slices on top. Mangia!

To purchase John’s book visit his website at http://johnholl.com

About Those Avocados—
Although most avocados you find at the store are hard, some stores carry ripe, ready-to-eat avocadoes for their customers. An avocado is ripe when its skin turns from green to a dark brown-green color and “gives” slightly when it is gently squeezed. You can select the best, ripe and ready-to-eat avocado by looking for one that is slightly soft, without dark sunken spots or cracks. Obviously, these signs apply not only to avocados that are ripe in the store, but to those at home, giving you signs as to when your fruit has reached the perfect time to be eaten. Be sure not to purchase avocados that rattle when you shake them. This means the pit is pulled away from the flesh and it is overripe.

How to Store Avocados After You Bring Them Home
Never refrigerate unripened (hard) avocados because they will not ripen in cold temperatures.
Unripened (hard) avocados are best stored in a cool dark place until they have ripened.

If Your Avocados are Not Ripe, Here’s How to Ripen Them
Place unripe avocados in a brown paper bag to ripen. This traps the ethylene gas they produce and helps them to ripen. A firm avocado placed in a paper bag will ripen at room temperature in about three to six days. As the fruit ripens, the skin color will darken.

How to Speed Up the Ripening of Your Avocados
Add a tomato, apple or banana to a paper bag in which you have placed an avocado. This will produce more ethylene gas and speed up the ripening process. It will usually only take one to three days to ripen.

When to refrigerate avocados
Only refrigerate ripe avocados. Avocados will keep for up to 5 days when refrigerated but leaving them too long in the refrigerator will cause them to lose their flavor and begin to turn dark in color. Avoid slicing avocados before refrigerating as they will turn brown after they are cut.

Fabulous Fresh Corn Side Dishes

It’s no secret, it’s a banner year for this season’s corn crop! It is soooo good that I’ve eaten it right off the cob without adding anything at all. While there is still fresh corn available, you may want to try these tasty side dishes from Cooks Illustrated • Sept/Oct 2014 issue.

To create corn side dishes with rich, toasted flavor, strip the corn from the cobs when they are raw and then cook the kernels in a nearly smoking skillet. A useful tool to strip the corn off the cob is a Corn Cutter, which we actually bought this year at B B & B, but it’s easy enough to use a sharp chef’s knife. In the skillet, it is important not to stir the corn for a few minutes to give it a chance to brown. Once the corn is cooked, mix in plenty of salty, savory ingredients to balance the sweetness. Finally, an acidic component rounds out the dish.

Sautéed Corn with Bacon and Leeks

bowl.of.salad

INGREDIENTS

  • 6 slices bacon, cut into 1/2-inch pieces
  • 1 pound leeks, white and light green parts only, halved lengthwise, sliced thin, and washed thoroughly
  • Salt
  • 4 ears corn, kernels cut from cobs (4 cups)
  • 1/4 cup minced fresh chives
  • 1-2 tablespoons cider vinegar
  • Pinch cayenne pepper

cooked.bacon

chopping.leeks

INSTRUCTIONS

  1. Cook bacon in 12-inch nonstick skillet over medium heat until crispy, 5 to 7 minutes. Transfer bacon to paper towel–lined plate. Pour off and reserve all but 2 tablespoons fat from skillet.
  2. Add leeks and 1/4 teaspoon salt to fat in skillet and cook over medium heat, stirring occasionally, until softened, 7 to 10 minutes. Transfer leeks to large bowl and wipe out skillet.
  3. Heat 1 tablespoon reserved fat in now-empty skillet over medium-high heat until shimmering. Add corn and sprinkle with ¼ teaspoon salt. Cook, without stirring, until corn is browned on bottom and beginning to pop, about 3 minutes. Stir and continue to cook, stirring once or twice, until corn is spotty brown all over, 2 to 3 minutes longer. Transfer corn to bowl with leeks.
  4. Stir in chives, 1 tablespoon vinegar, cayenne, and bacon. Season with salt and remaining vinegar to taste. Serve.

Sautéed Corn with Cherry Tomatoes,
Ricotta Salata and Basil

mixed.corn.salad

If ricotta salata is unavailable, substitute feta cheese.

ingredients2

INGREDIENTS

  • 2 tablespoons vegetable oil
  • 3 garlic cloves, sliced thin
  • 4 ears corn, kernels cut from cobs (4 cups)
  • Salt and pepper
  • 6 ounces cherry tomatoes, halved
  • 1 1/2 ounces ricotta salata cheese, crumbled (1/3 cup)
  • 1/4 cup shredded fresh basil
  • 1 – 2 tablespoons lemon juice

INSTRUCTIONS

  1. Heat oil and garlic in 12-inch nonstick skillet over medium heat. Cook, stirring frequently, until garlic is light golden brown and fragrant, 2 to 3 minutes. Using slotted spoon, transfer garlic to large bowl, leaving oil in skillet.
  2. Return skillet to medium-high heat and heat until oil is shimmering. Add corn and sprinkle with 1/2 teaspoon salt. Cook, without stirring, until corn is browned on bottom and beginning to pop, about 3 minutes. Stir and continue to cook, stirring once or twice, until corn is spotty brown all over, 2 to 3 minutes longer. Transfer corn to bowl with garlic.
  3. Stir in tomatoes, half of ricotta salata, basil, 1 tablespoon lemon juice, and 1/4 teaspoon pepper. Season with salt, pepper, and remaining lemon juice to taste. Sprinkle with remaining ricotta salata and serve.