Monthly Archives: December 2019

Vietnamese Tapas?

Papaya is redefining an Asian cuisine with a contemporary flare, fusing Vietnamese with other cuisines for bolder, more experimental dishes that aren’t at the typical Vietnamese restaurants. I can’t tell you how stoked I was to experience this BYO located on Garden Golf Blvd, in North Wales, PA.

“French-inflected, American-influenced, borderless and worldly and weird”
— that’s what chef Patrick Le does at Papaya.

Our dining companions Paula and Mike had patronized the restaurant on numerous previous occasions and graciously told us to order the menu selections, where we zeroed in on the Tapas. Unfortunately, one of the Tapas that I was most excited to try, Banh Mi Xiu Mai consisting of pork meatballs and minced tomato broth (can you mince broth??), was no longer available that evening. BUT, everything we did choose was fantastic!

IMG_2123
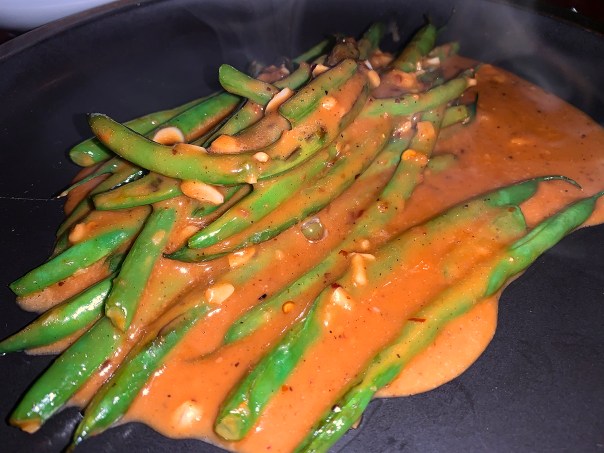
String Beans
Garlic & Spicy Peanut Sauce

IMG_2121
Brussels Sprouts
Flash Fried with Pork Belly & Sweet Chili Sauce

IMG_2130
Roasted Duck Tacos
—Corn Tortilla, Cucumber, Scallions & Tangy Hoisin Sauce

IMG_2128
Filet Mignon
Over Watercress Salad

IMG_2127
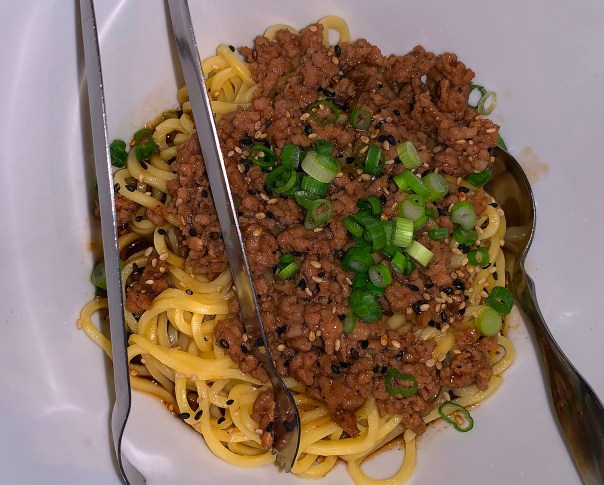
Dan Dan Noodles
—Minced Pork, Sesame Seeds, Scallions & Spicy Szechuan Sauce

IMG_2120
Crispy Shiitake Mushrooms
Sesame Seeds & Sweet Chili Remoulade

In addition to the Tapas menu, they also have mouth-watering selections under Appetizers, Vegetables, Entrées, Rolls and Sliders, plus Specials that change every two weeks. Although we did not partake, Papaya also serves homemade desserts that change weekly.

With a 30-minute commute from our house, sadly, it’s not exactly in the ‘hood, but it sure is worth the drive. Yes, I want to go back ASAP!


Santa Claus is Cumin to Town

The versatile meatball comes through again. Invited to a Christmas Eve dinner at our friends, Barb and Brad’s house, we were asked to bring an appetizer. As many of you know, it’s not uncommon for us to try something new when hosting/dining with guests—a big no-no in most culinary circles. But we’ve been down that road numerous times and weren’t afraid to take the path less traveled.

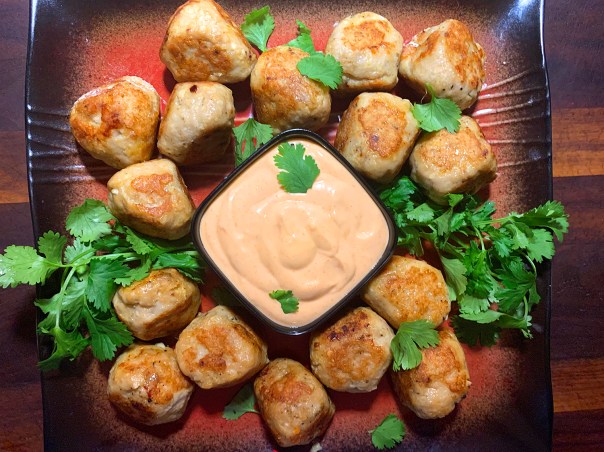
With few exceptions, I can pretty much look at a recipe and tell if it will be successful, or need some tweaking to address our own personal preferences. These party-friendly Cumin Spiced Chicken Meatballs, found on delish.com, spoke to me at first glance. They were touted as being perfectly light with just the right amount of spice from cumin.

IMG_2354

The fact that they were a breeze to throw together rated high points with me during the busy holiday season. However, the original directions instructed you to cook the meatballs in a 400° oven or in an air fryer (which we didn’t have). But I thought I could get a more consistent overall browning on a stovetop skillet. (The directions below indicate my changes.)

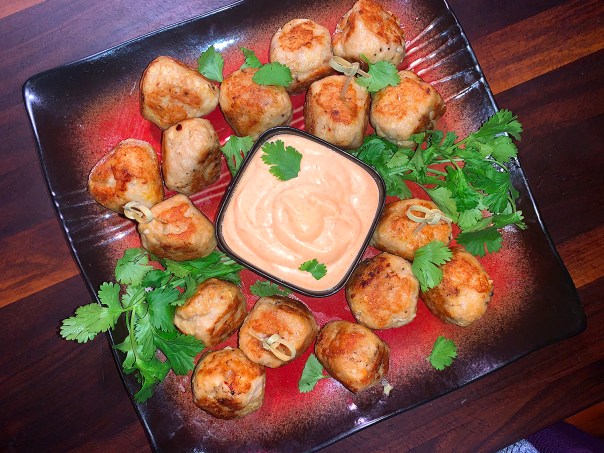
We all enjoyed the spicy mayo dipping sauce which, if not careful, could become completely addicting. My only issue might be the girth of the balls, which required a fork to eat. I might cut them in half next time to a more manageable cocktail size that can be stabbed with a toothpick and chewed in one bite. Keep in mind though, cooking times would have to be adjusted…

Cumin Spiced Chicken Meatballs

  • Servings: 16 meatballs
  • Difficulty: easy
  • Print

Ingredients

IMG_2342

FOR THE MEATBALLS

  • Cooking spray
  • 1 lb. ground chicken
  • 1 large egg
  • 1/2 cup freshly grated Parmesan
  • 1/4 cup panko breadcrumbs
  • 2 Tbsp. soy sauce
  • 3 cloves garlic, minced
  • 1 tsp. cumin
  • Kosher salt
  • Freshly ground black pepper
  • Pinch crushed red pepper flakes

IMG_2340

FOR THE DIPPING SAUCE

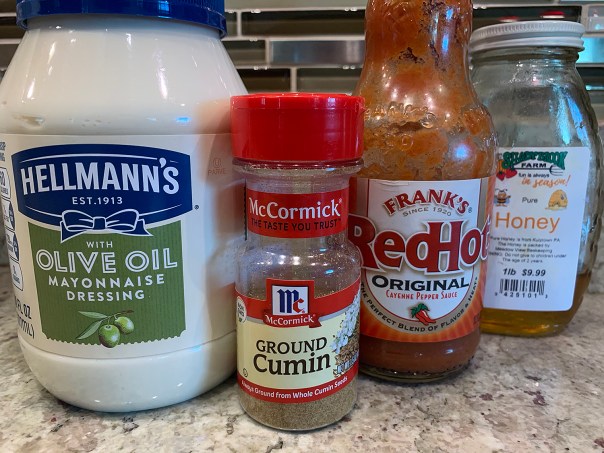
  • 1/2 cup mayonnaise
  • 2 Tbsp. hot sauce
  • 2 tsp. honey
  • 1/2 tsp. cumin

Directions

  1. Grease a large nonstick skillet with cooking spray over medium heat.
  2. In a large bowl, combine chicken, egg, Parmesan, panko, soy sauce, garlic, and cumin. Season with salt, pepper, and a pinch of red pepper flakes.
  3. Divide mixture into 4 equal quarters, then make 4 equal-sized meatballs from each. to total 16 meatballs. Place in prepared skillet.
  4. Cook, turning occasionally, until golden brown on all sides. Cover with lid for 3-5 minutes then check the internal temperature with an instant read thermometer. They will be done at 160° in about 18-20 minutes total. (If you do them in the oven, check the temp at 15 minutes.)
    IMG_2352
  5. Move meatballs to serving platter with dipping sauce and greens for garnish.
    IMG_2358

FOR SPICY MAYO

  1. In a medium bowl, combine mayonnaise, hot sauce, honey, and cumin until incorporated.
  2. Serve meatballs with spicy mayo for dipping.

http://www.lynnandruss.com

Adapted from a recipe by Makinze Gore from Delish.com

I have to give a shout out to our hosts Barb and Brad who made a scrumptious Christmas Eve dinner of prime rib, scalloped potatoes and roasted Brussels sprouts, along with a very decadent peanut butter and dark chocolate bundt cake. No one went away hungry that night!


Fork This.

Seems to be a lasting trend as home cooks confront an increasing variety of restricted diet plans when planning meals. And true to trend, that was our dilemma for the family Christmas dinner gathering. Not only were we hosting a non-red meat eater, one who dislikes fish/seafood, a gluten-free diet, a low-carb connoisseur, but also someone who primarily focuses on plant-based meals. Martini anyone??

But we persevered and realized everyone but Vikki, our family vegan, liked ham, so that was the highlight of the meal for most. After a little online research prior to the big day, I found a plethora of stuffed butternut squash recipes and finally zeroed in on Vegan Stuffed Butternut Squash with Mushroom and Couscous from honestcooking.com. The prep appeared easy (although it takes quite a while to bake), and the ingredients were appealing.

The sweet, soft butternut squash is filled with a subtle spicy heat from the chili and packed with porcini, couscous, and herbs. Alternatively, it can also be filled with rice and pine nuts. The best part is the rice or couscous cooks in the squash using only the moisture from its flesh, which surprised me.

IMG_2262I instructed Vikki on the “forking” technique.

One trick I learned a few years back was to “fork” a squash around the perimeter lengthwise, prior to cutting it in half. Trust me, it makes the job soooo much easier to slide a knife through the tough outer skin. Oddly, the original directions indicated to put the two halves of filled squash together and then wrap with foil. No way José. There was too much mixture mounded in each, so I left them flat on the baking tray before covering with foil.

IMG_2266Vikki, right, is pleased that she learned how to slice, clean out, and cook a butternut squash.

Vegan Stuffed Butternut Squash with Mushroom and Couscous

  • Servings: 2-4
  • Difficulty: easy
  • Print

Ingredients

  • 1 butternut squash, about 3 lbs., cut in half lengthways, scoop out the seeds and soft fibers
  • 1 small handful dried porcini mushroom
  • 1 red onion, finely chopped
  • 2 cloves garlic, finely chopped
  • 5 pieces sun-dried tomatoes, chopped
  • 3 oz. couscous
  • 2 sprigs of fresh rosemary, leaves picked and finely chopped
  • 1/4 tsp. chili powder
  • 1/4 tsp. ground coriander seeds
  • 1/2 handful walnuts, very coarsely chopped
  • olive oil
  • salt, black pepper

Directions

  1. In a bowl soak the porcini in 1/2 cup water for about 5 minutes. (Do not discard the water as it is part of the recipe.)
  2. Preheat the oven to 400°F.
  3. Using a spoon, score and scoop out some extra flesh from the neck of the squash. Finely chop this flesh and set aside.
    IMG_2265
  4. Heat 2 tablespoons of olive oil in a frying pan and add chopped red onion and garlic. Sauté them for a few minutes, then add coriander, chili, rosemary, the chopped butternut squash flesh and the sun-dried tomatoes.
  5. Cook for 5 minutes until tender. Add the porcini and soaking water, season with salt and black pepper and cook for another 2 minutes.
    IMG_2270
  6. Stir in the couscous and walnuts. Rub the outer skin of the squash with olive oil and place them on a small baking sheet.
    IMG_2271
  7. Spoon the mixture tightly into the 2 halves of the squash.
  8. Wrap the baking tray in foil and bake in the preheated oven for about 1 1/2 hours, or until the squash is “fork” tender.

http://www.lynnandruss.com

The rest of the meal was a family affair.

Son Dan and his girlfriend Tina put together their specialty, a Charcuterie Platter.

Dad watches over daughter Julia as she makes her famous Mac ‘N Cheese casserole.

And the star of the show (for most) was the Spiral Ham, in which we took a shortcut and used a jarred Boar’s Head ham glaze.

While son David didn’t actually do any food prep, his contribution was a few bottles of Cabernet Sauvignon—much appreciated. And the dogs Bentley and Olive, well, they made sure the kitchen floor was clean at all times.

IMG_2299Merry Christmas from our family to yours!

Hear Me Roar

Lion’s Head Meatballs—As Cooks Illustrated writes, “Don’t let their ferocious name intimidate you. They’re as big as tennis balls and boast a seemingly paradoxical combination of spoon-tenderness and sausage-like spring and juiciness.” These giant, savory, tender-yet-springy pork meatballs from eastern China are pure comfort food.

They are emblematic of the cuisine of Jiangnan, which is known for its gentleness, or qing dan—a term meaning “light” to convey the food’s simple, unadulterated quality. Chef/author Annie Petito says “the dish is the Chinese equivalent of matzo ball soup: simple, soothing, and deeply savory.”

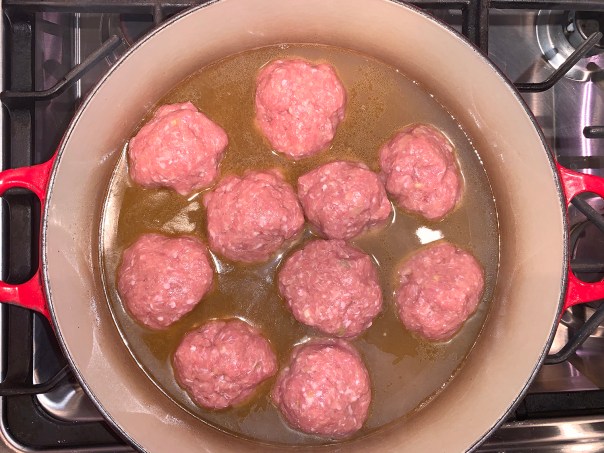
There was going to be a trio of us for supper so I planned on three meatballs per person. And since this recipe calls for making eight, I purposely created smaller balls, and then ended up with 10! But let me tell you, two per diner was plenty—and plenty big—plus now we had four leftover for another meal or two.

For a streamlined approach, start with commercial ground pork. Treat the meat with a baking soda solution before cooking, which helps retain juices over the relatively long cooking time. Lightly season the meat with soy sauce, sugar, Shaoxing wine, ginger, scallions, and white pepper for well-rounded savory flavor that still tastes distinctly porky.

According to CI, beating the pork mixture in a stand mixer causes its sticky proteins to link up into a strong network that traps fat and moisture, resulting in a texture that is resilient and unctuous. I was hesitant to drag out my heavy KitchenAid mix master for a 60-second whirl, but knew making the meat mixture by hand would not fully incorporate the ingredients.

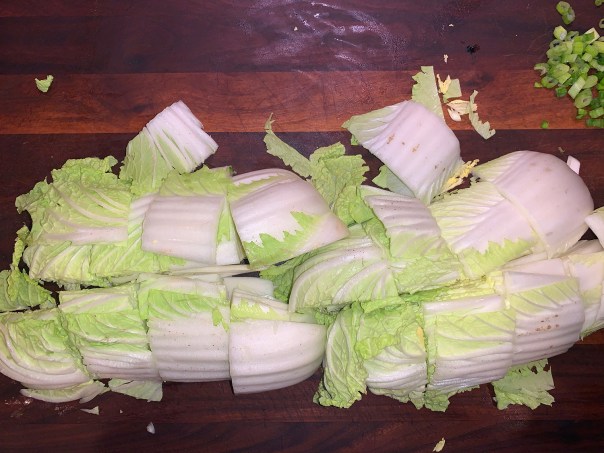
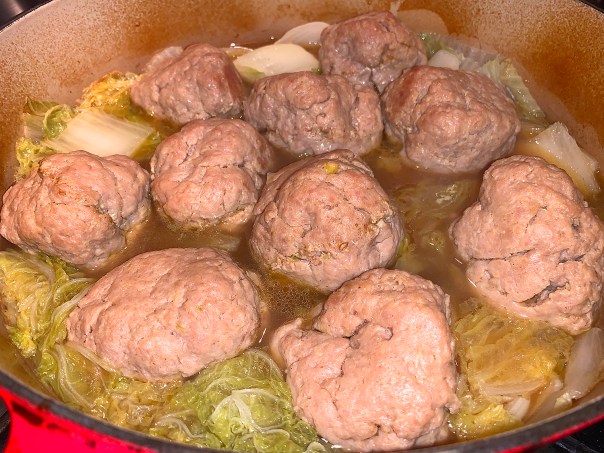
Braising the meatballs for 1½ hours in the oven breaks down the pork’s collagen so that the meatballs are tender. Adding the cabbage for the last 30 minutes of cooking allows it to soften and absorb the flavor of the chicken broth (preferably homemade) without turning mushy. If using boxed or canned broth, you may want to toss in a bit of fish sauce for more flavor. Soaking your rice vermicelli in just-boiled water softens the noodles but doesn’t overcook them.

NOTE: Shaoxing is a Chinese rice wine that can be found at Asian markets. If you can’t find it, use dry sherry.

Lion's Head Meatballs

  • Servings: 4
  • Difficulty: moderate
  • Print

Ingredients

  • ¾ tsp. baking soda
  • ½ tsp. table salt
  • 2 lbs. ground pork
  • 1 large egg, lightly beaten
  • 2 scallions, white parts minced; green parts diagonally sliced thin
  • 2 Tbsp. soy sauce
  • 2 Tbsp. Shaoxing wine or dry sherry
  • 4 tsp. sugar
  • 2 tsp. grated fresh ginger
  • ½ tsp. white pepper
  • 4 cups chicken broth, preferably homemade
  • 1 head napa cabbage, quartered lengthwise, cored, and cut crosswise into 2-inch pieces
    IMG_2141
  • 4 oz. rice vermicelli

Directions

  1. Adjust oven rack to lower-middle position and heat oven to 325°F.
  2. Whisk baking soda, salt, and 2 tablespoons water together in bowl of stand mixer. Add pork to baking soda mixture and toss to combine.
  3. Add egg, scallion whites, soy sauce, wine, sugar, ginger, and white pepper.
  4. Fit stand mixer with paddle and beat on medium speed until mixture is well combined and has stiffened and started to pull away from sides of bowl and pork has slightly lightened in color, 45 to 60 seconds.
    IMG_2137
  5. Using your wet hands, for about ½ cup (4½ ounces) pork mixture into 3-inch round meatball; repeat with remaining mixture to form 8 meatballs.
  6. Bring broth to boil in large Dutch oven over high heat. Off heat, carefully arrange meatballs in pot (7 around perimeter and 1 center; meatballs will not be totally submerged). Cover pot, transfer to oven, and cook for 1 hour.
    IMG_2140
  7. Transfer meatballs to large plate. Add cabbage to pot in even layer and arrange meatballs over cabbage, paler side up. (The meatballs do swell, so make sure there is room in your pot.)
    IMG_2143
  8. Cover, return pot to oven, and continue to cook until meatballs are lightly browned and cabbage is softened, about 30 minutes longer.
    IMG_2148
  9. While meatballs and cabbage cook, bring 4 quarts water to boil in large pot. Off heat, add vermicelli and let sit, stirring occasionally, until vermicelli is fully tender, 10 to 15 minutes.
  10. Drain, rinse with cold water, drain again, and distribute evenly among 4 large soup bowls.
  11. Ladle meatballs, cabbage, and broth into bowls of noodles. Sprinkle with scallion greens and serve.
    IMG_2150

http://www.lynnandruss.com

Adapted from a recipe by Annie Petito from Cooks Illustrated

A Better Turkey Burger. No, Make that THE BEST EVER Turkey Burger!

There’s a lot to like about a well‑made turkey burger, but most people (especially red meat eaters) tend to think of them as subpar, second class, or something they grudgingly eat as a more “healthy” alternative. But if you want perfection, make peace at the start by admitting that ground turkey is NOT ground beef, and should therefore be treated differently.

So let’s get real—to make an extraordinary burger, ground turkey needs, in the words of Joe Cocker, “a little help from my friends.” And one of those friends is Cooks Illustrated’s Annie Petito who notes the key is to choose the right mix-ins and use as little of them as you can get away with.

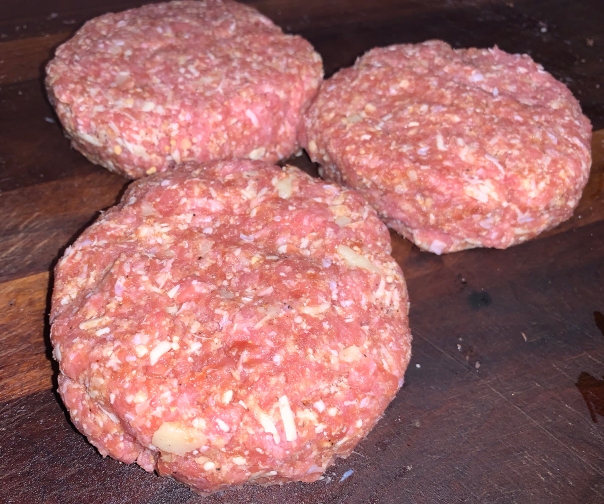
With three of us for dinner, I shaped the meat mixture into as many patties, which were larger than the indicated four burgers, and required just a touch longer to cook to the appropriate temperature. Please keep in mind, when mixing and shaping the patties, do not overwork the meat, or the burgers may become dense—ours were anything but.

Because The Hubs was going to be home later that evening, I cooked just two of the burgers for me and stepdaughter Julia, who BTW, does not eat red meat and therefore has consumed her fair share of turkey burgers. Well to say we were impressed is an understatement, we absolutely loved them! And they take absolutely no time at all to whip up and cook.

Julia declared they had so much flavor and were surprisingly juicy compared to her experience of past dried-out disappointments. I got to thinking, maybe I could fashion meatballs out of the same mixture (with the addition of a few Italian seasonings said Julia) for a spaghetti and meatballs dinner. Hmmm, food for thought…

IMG_2167

Oh, and don’t forget to make them extra-special with a creamy addition that also contributes tang, by topping the burgers with Pickled Avocado Slices. (See recipe below.) It’s just a good idea to mash the avocado onto the top of the burger, otherwise your slices may come squeezing out when you take a bite—as mine did.

What did Pops think when he got home and had his turkey burger? After his first bite he exclaimed “WOW, this IS good! Yes, the BEST turkey burger I’ve ever eaten!” No I know it wasn’t any scientific poll, but 3 out of 3 thought they were indeed THE BEST.

Skillet Turkey Burgers

  • Servings: 4
  • Difficulty: easy
  • Print

Ingredients

  • 2 teaspoons vegetable oil
  • 1 teaspoon water
  • ¼ teaspoon baking soda
  • 1 pound 93 percent lean ground turkey
  • 1 ½ tablespoons soy sauce
  • 1 tablespoon unsalted butter, melted
  • 3 tablespoons panko bread crumbs
  • 3 tablespoons grated Parmesan cheese
  • ½ teaspoon unflavored gelatin
  • ¼ teaspoon pepper
  • ⅛ teaspoon table salt
  • 4 slices cheese (optional)
  • 4 soft hamburger buns
  • Garnishes such as ketchup, mayo, mustard, lettuce leaves, etc.

Directions

  1. Place oil in 12-inch nonstick skillet and set aside. (Do NOT preheat the pan.) Combine water and baking soda in small bowl.
  2. Place turkey in large bowl. Using your hands, break up meat into rough ½-inch pieces. Drizzle baking soda mixture evenly over turkey, followed by soy sauce and melted butter.
  3. Evenly sprinkle panko, Parmesan, gelatin, pepper, and salt over turkey mixture. Using your hands, gently toss to combine.
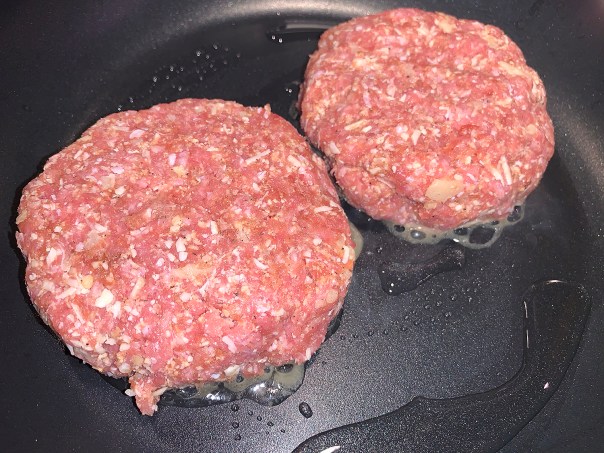
  4. Divide meat into 4 lightly packed portions, about 4 ounces each. Gently flatten 1 portion into patty about ½ inch thick and about 4 inches in diameter. Transfer patty directly to prepared skillet and repeat with remaining portions.
    IMG_2158
  5. Heat skillet over medium heat. When patties start to sizzle, cover skillet and cook until patties are well-browned on bottom, about 2½ minutes (if patties are not browned after 2½ minutes, increase heat).
    IMG_2159
  6. Carefully flip patties, cover, and continue to cook until second side is well browned and burgers register 160 degrees, 2½ to 3 minutes longer.
    IMG_2160
  7. If using cheese, place 1 slice on each burger about 1 minute before burgers finish cooking. Transfer burgers to plate and let rest for 5 minutes, then transfer to buns and serve with your choice of condiments.
    IMG_2162
    IMG_2165

http://www.lynnandruss.com

Pickled Avocado Slices

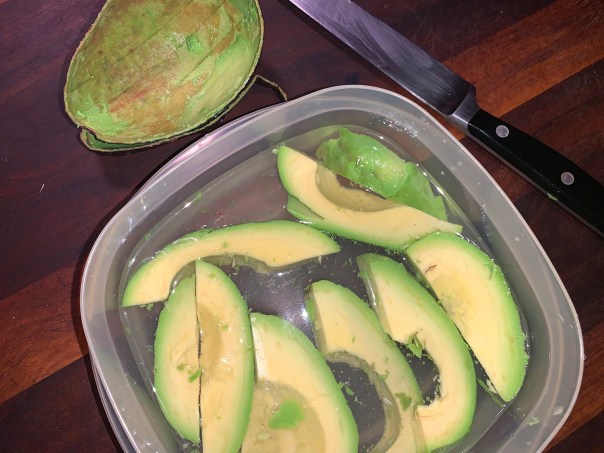
Use a ripe-but-firm avocado to ensure that it won’t be too soft to slice for pickling. Pat the avocado dry after pickling to make sure that it doesn’t sog out the burger when added on top. After placing on burger, mash down so slices don’t accidentally pop out when biting down.

Ingredients

  • ½ cup distilled white vinegar
  • ½ cup water
  • 1 Tbsp. sugar
  • 2 tsp. table salt
  • 1 ripe but firm avocado, halved, pitted, and sliced ¼ inch thick

Directions

  1. Combine vinegar, water, sugar, and salt in medium bowl and whisk until sugar and salt are dissolved, about 30 seconds.
    IMG_2155
  2. Add avocado (avocado should be submerged) and refrigerate for at least 30 minutes or up to 2 hours.
  3. Drain and pat dry before using.
    IMG_2163

http://www.lynnandruss.com

[/recipe]

Recipes by Annie Petito from Cooks Illustrated

Whiskey-Glazed Carrots

“Oh, how I love Glazed Carrots—they’re so easy to make and yield such a delightful and impressive result. Bright, colorful, and scrumptious, they’re equally appropriate for a Tuesday evening dinner by yourself or for an elegant Thanksgiving or Christmas Spread.” — The Pioneer Woman

With a “heads up” from a good friend and fellow foodie, we decided to make these Whiskey-Glazed Carrots as one of our sides for Thanksgiving dinner. Just a word to the wise, as my husband was adding the booze to the pan, huge flames erupted that visually appeared to engulf the range hood (but didn’t) while our guests gasped in amazement, and I nearly keeled over. I was too stunned to take a photo opp…

Once the flames subsided and we assessed there was no damage to the kitchen (or my husband), we proceeded to set the table with the feast and gather around the table. The carrots were a hit so we’ll be making them again, but doing so a bit more carefully when incorporating the whiskey.

IMG_1853

Whiskey-Glazed Carrots

  • Servings: 6-8
  • Difficulty: easy
  • Print

Ingredients

  • 1 stick (8 tablespoons) butter
  • 2 lbs. carrots, peeled and cut into 1/2-inch pieces
  • 3/4 cup whiskey
  • 3/4 cup packed brown sugar
  • Salt and freshly ground black pepper
  • 2 sprigs fresh thyme

Directions

  1. Melt 1/2 stick (4 tablespoons) of the butter in a large skillet (with a lid) over high heat.
  2. Add half the carrots and stir them around to brown them quickly, about 1 minute. Remove to a plate and repeat with the remaining carrots.
  3. Pour the whiskey into the skillet, taking care if you’re cooking over an open flame. Let the whiskey bubble up and cook until slightly reduced, about 3 minutes.
  4. Reduce the heat to medium low, add the other 1/2 stick of butter and stir it around until it’s melted. Stir in the brown sugar and some salt and pepper.
  5. Add the leaves from 1 of the sprigs of thyme, then add the carrots. Reduce the heat to low, place the lid on the skillet and cook for 5 minutes. Remove the lid and cook for another 5 minutes.
  6. Serve garnished with the remaining thyme sprig.

http://www.lynnandruss.com


Tex-Mex Chicken with Chile and Cheese

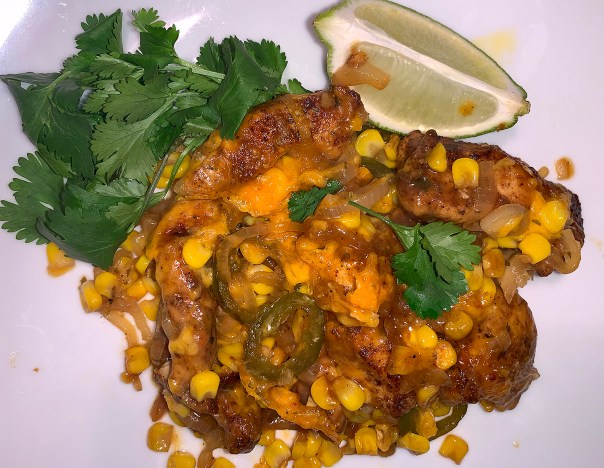
“Grab your skillet, your chicken breasts, and kick dinner up a spicy notch tonight.” So says Fine Cooking’s “Make-It-Tonight” series where we found this scrumptious dish. And while yes, it did have a slight kick, it was by no means over the top. You can always raise the bar in that arena by increasing the spices and/or adding more jalapeño.

And as is my usual, I did make a few changes. For starters I increased the quantity of the chicken breasts (you could also use thigh meat), used 2 cloves of garlic instead of 1, added an onion, and replaced the water with chicken stock—all of which deepened the flavor profile. It was unfortunate that it was not fresh corn season, but frozen worked out just fine.

OMG, was it good! No actually, the meal was fabulous! With any leftovers, you can turn this Tex-Mex dish into a wrap.

IMG_2062

Tex-Mex Chicken with Chile and Cheese

  • Servings: 4
  • Difficulty: easy
  • Print

Ingredients

  • 1-1/2 lb. boneless, skinless chicken breast halves, trimmed and sliced 1/4 inch thick
  • 1-1/2 tsp. chili powder
  • 1/2 tsp. ground cumin
  • Kosher salt and freshly ground black pepper
  • 1/2 cup all-purpose flour
  • 3-1/2 Tbs. unsalted butter, more as needed
  • 1-1/2 cups fresh or thawed frozen corn kernels
  • 1 small onion, halved vertically, then thinly sliced horizontally
  • 1 medium jalapeño, seeded if desired and thinly sliced
  • 2 large cloves garlic, minced
  • 1/2 cup chicken stock, preferably homemade
  • 2–3 medium limes, 1 or 2 juiced to yield 3 Tbs. and 1 cut into wedges
  • 1 Tbs. chopped fresh oregano
  • 1 cup grated sharp cheddar

Directions

  1. Position a rack about 4 inches from the broiler and heat the broiler to high.
  2. Toss the chicken with the chili powder, cumin, 3/4 tsp. salt, and 1/2 tsp. black pepper. Lightly dredge the chicken in the flour and shake off any excess.
  3. Melt 2-1/2 Tbs. of the butter in a very large ovenproof skillet (preferably cast iron) over medium-high heat. Add the chicken and cook, stirring occasionally, until browned, about 5 minutes. Transfer to a plate. You may need to do this in 2 batches, otherwise you’ll steam the chicken instead of browning it.
    IMG_2051
  4. Add the remaining 1 Tbs. butter, onion slices and a pinch of salt. Cook for 2 minutes to start softening, stirring occasionally.
    IMG_2053
  5. Add the corn, jalapeño, garlic, and 1/2 tsp. salt. Cook, stirring, until the corn begins to brown lightly, 2 to 3 minutes.
    IMG_2055
  6. Add the chicken, lime juice, oregano, and 1/2 cup chicken stock. Cook, stirring, until the chicken is just cooked through, about 2 minutes.
    IMG_2058
  7. Sprinkle with the cheddar and transfer the skillet to the broiler. Broil until the cheese melts and browns on top, about 3 minutes.
  8. Serve with lime wedges.
    IMG_2067

http://www.lynnandruss.com

Adapted from a recipe by Tony Rosenfeld from Fine Cooking

Stir-Fried Cumin-Scented Beef with Vegetables

This is a robust Hunan-style stir-fry of beef with cauliflower, carrots and tomatoes. The seasoning of cumin, garlic and red pepper flakes not only is wonderfully fragrant, but kicks it up a notch without taking it over the edge.

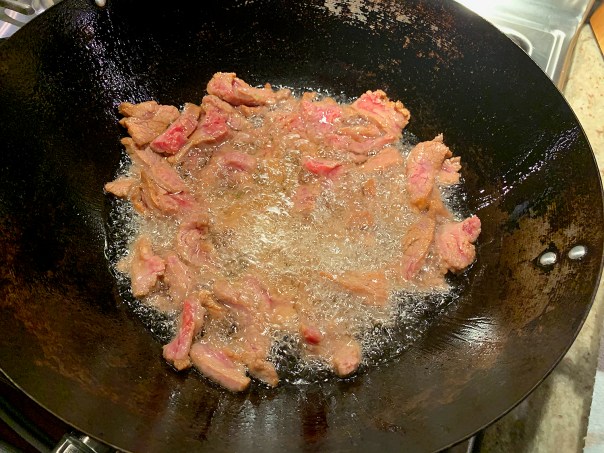
Nearly 4 years ago I blogged on this recipe and talked about the the “jau-yau” advanced Chinese stir-frying technique. It may seem like a heck of a lot of oil for only 15 seconds, but this process of bite-size pieces of beef “passing through oil” ensures that the ingredients will be more succulent and flavorful. And there is no denying, the meat is very tender and juicy.

Do yourself a favor and make sure to prep everything before you begin because you won’t have any extra time to do so between steps.

In this repeat process, I decided not to wash and clean the wok after removing the beef to a plate (the cooking oil was reserved for another use). The remaining tablespoon, along with any browned bits (which add  flavor) was enough to continue to Step 7, thus saving a bit of time. As before, we needed to more than double the amount of time to get the veggies crisp-tender from 2 to 5 minutes (it also may be the fact that I almost double the amount of vegetables).

Typically, we tend to favor stir-fries with more of a saucy base so I was a little skeptical. But we both loved the dish, and feel a sauce wasn’t at all necessary.

IMG_1253

Stir-Fried Cumin-Scented Beef with Vegetables

  • Servings: 2-3
  • Difficulty: moderately easy
  • Print

Ingredients

  • 12 oz. Flank Steak, cut into 2-inch wide strips with the grain, then cut against the grain into ¼ in wide strips
  • 1 Tbsp. Corn Starch
  • 1 Tbsp. Soy Sauce
  • 2 tsp. Shao Hsing rice wine (or Dry Sherry)
  • 1 Tbsp. Peanut Oil
  • 1 ½ cups Canola Oil
  • 1 Tbsp. Garlic, Minced
  • ½ tsp. Red Pepper Flakes
  • 1 cup Cauliflower Florets, cut into bit-sized pieces
  • ½ cup Carrots, thinly sliced
  • ½ cup Cherry Tomatoes, halved
  • ¾ tsp. Salt, divided
  • 1 tsp. Cumin
  • ½ cup Green Onions, thinly sliced
  • 2 cups Cooked White Rice

Directions

  1. Prepare steamed rice according to packaged directions.
  2. Combine the beef, corn starch, soy sauce, sherry, and peanut oil in a bowl and mix well.
    IMG_1258
  3. Heat the canola oil in a flat-bottomed wok over high heat until the oil is 280°F. Add the beef to the oil and spread it evenly in a single layer on the bottom of the wok. Cook until the outside surface of the beef is just starting to change color, about 15 seconds, and then remove the wok from the heat.
    IMG_1259
  4. Carefully extract the beef from the oil with a kitchen skimmer and place on a paper-towel-lined plate. Pour the oil into a large cup or bowl and set aside.
    IMG_1261
  5. Clean and thoroughly dry the wok and the return to the stove over high heat. (I omitted this step this time with no adverse affects.)
  6. Add 1 tablespoon of the reserved oil along with the garlic and red pepper flakes and stir fry for 20 seconds or until aromatic.
    IMG_1263
  7. Add the cauliflower, carrots, tomatoes, and ¼ teaspoon of the salt and stir fry 2-3 minutes.
    IMG_1264
  8. Add in the cumin and stir fry for 5 seconds. Return the beef to the wok and stir in the remaining ½ teaspoon salt and green onions. Stir fry for 30 seconds to 1 minute until beef is cooked through and ingredients are well combined.

    Serve with rice and enjoy!
    IMG_1271

http://www.lynnandruss.com

Adapted from Grace Young’s cookbook “Stir-Frying to the Sky’s Edge”

You Had Me at Botanical

As a Master Gardner, the word “botanical” is a trigger word that always catches my eye. Therefore the “Not Not Martini,” an interesting cocktail name to be sure, which I came across while thumbing through our latest issue of Fine Cooking Magazine, uses botanical gin, so I was more than intrigued. However, despite our rather extensive liquor cabinet collection, we did not have any botanical gin—and that my friends is the KEY ingredient. But it wasn’t long before I made the purchase.

IMG_2034

According to the chef/author, “this takes the classic gin martini—gin, vermouth, extra olives—out of its unwieldy and aesthetically deficient glass (I love this phrase!), sets it over ice, and adds fino sherry and orange liqueur. The final drink ends up as something not quite martini but also not not martini. Don’t worry: The extra olives are nonnegotiable.”

It’s a very sophisticated, adult-like drink—and ALL liquor other than the olives—so plan on leisurely sipping one in front of a fireplace some weekend evening.

Not Not Martini

  • Servings: 2
  • Difficulty: super easy
  • Print

Ingredients

  • 2 oz. botanical gin, such as The Botanist
  • 1 oz. fino sherry
  • 1 oz. dry vermouth
  • 1/2 oz. orange liqueur
  • 2 2-inch strips lemon peel, one for each glass
  • 3 to 6 pitted Castelvetrano olives per glass, threaded onto two toothpicks

Directions

  1. In a cocktail shaker filled with ice, combine the gin, sherry, vermouth, and liqueur.
    IMG_2031
  2. Put on the top and shake (or stir vigorously with a long-handled spoon) until the mixture is very cold, about 15 seconds. Strain into two ice-filled lowball glasses.
    IMG_2033
  3. Hold the lemon peel with two fingers by its long edges, skin facing down into the glass. Pinch the peel to express the citrus oils into the glass, rub the peel along the rim, and discard the peel.
  4. Add the olives, serve and relax.

http://www.lynnandruss.com

Adapted from a recipe by Rebekah Peppler


Eggs-Tra-Ordinary Turning Point

Turning Point restaurant chain, a breakfast and lunch joint with numerous locations in NJ, PA and DE? Never heard of it. Then this past summer, while hanging at the community pool, a review from my friend who had gone there with her husband, was not very promising, so I put it on the back burner. However, when son Dan and girlfriend Tina were passing through on their way back to Massachusetts the Sunday after Thanksgiving, I thought it might be an interesting place to meet up.

Seems like so did everyone else in town! It was spilling-out-the-door-and-beyond packed, and we were told there would be a half hour wait. Although I was dubious about that estimate, they were spot on. But then it was another 45 minutes before we got any food. Was it worth the wait? Hands down YES.

One big focus is their coffee. They brew a selection of regional coffees like Jamaican Blue Mountain, Hawaiian Kona Blend, Kenya AA, Costa Rican, and then then have their own blends, as well as a house coffee.

We caffeine on the mind, we all placed orders for drinks, a tremendous task in itself with a multitude of offerings from Heavenly Hot Chocolate, an Espresso Bar, French Press Coffee, to Loose Leaf Hot Teas; all served with a swizzle stick of candied brown sugar. And if that isn’t enough to get your interest, there’s a huge assortment of Cold Press Juices… although we didn’t go there.

If you want decadent, then Tina’s beverage choice of S’MORES Hot Chocolate, with toasted marshmallow syrup, whipped cream and crushed graham crackers, is the way to go.
IMG_1865

Personally, I like it simple and unadorned and opted for the Organic Green Dragon—Organic wok-fired green tea with a delicate chestnut like flavor delivered in a nice little covered crock.
IMG_1869

Dan and Dad had no qualms in choosing French Press Coffee. About a half dozen blend options, ground per order and infused with purified water, a coffee connoisseurs dream in regular or decaf.
IMG_1866

Once we got our liquid nourishment, it took us quite some time to examine all of the menu options. It was early afternoon already so some of us couldn’t decide whether to order breakfast or lunch. With so many tantalizing breakfast selections, we all settled in that arena.

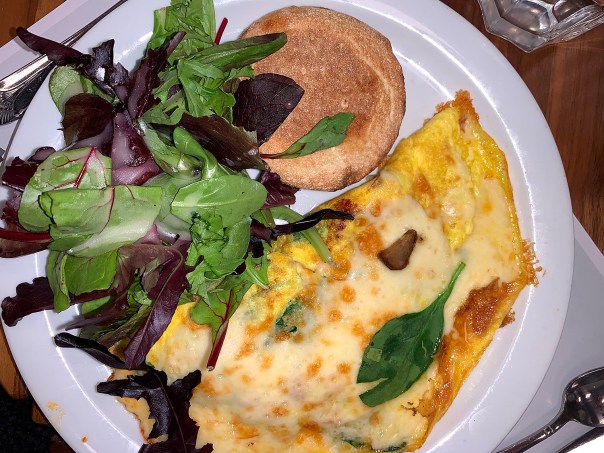
Not having eaten a thing yet, I was by now famished and decided on one of their three-egg omelettes served with english muffin and choice of breakfast potatoes or tossed greens in a light citrus vinaigrette. The TUSCANY with roasted red peppers, baby fresh spinach, spiced sausage and fresh sliced mozzarella (I switched my cheese option) was calling my name.
IMG_1876

Daughter Julia had dined at one of the franchises before and was familiar with the menu so she zeroed in on a fave from the EGGS-TRA-ORDINARY DISHES. It was the LOW COUNTRY SHRIMP HASH BOWL comprised of Cajun seasoned potatoes, sautéed shrimp, chopped bacon, caramelized onions, roasted peppers topped with a sausage gravy and two poached eggs with a side of cornbread.

IMG_1872

The EGGS-TRA-ORDINARY DISHES section was popular with the rest of the crowd too because Dad, Dan and Tina also ordered from there.
IMG_1870
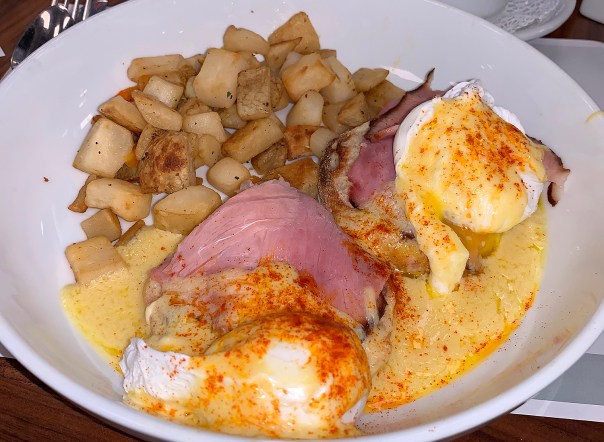
Dan chose the Classic Eggs Benedict consisting of a toasted english muffin with slices of Virginia ham, plum tomato and two poached eggs, then topped with hollandaise sauce and served with potatoes.IMG_1873Tina was on a similar page with BIG EASY BENEDICT assembled with cornbread topped with avocado, creole seasoned onions, peppers and chicken chorizo, then topped with two poached eggs and creole spiced hollandaise, also served with potatoes.

IMG_1877And Dad got the same as Julia, only his photo looks different because he already stirred in the eggs and layered on the sauce before a picture could be taken. I guess someone was hungry!

There are so many other “fresh, healthy, fun and decadent” choices beginning with Appetizers (Bacon Lollipops anyone?); a plethora of Pancakes (Bourbon/Walnut/Banana got your attention?); Waffles (Salted Caramel ring your bell?); French Toast (the OMG, seriously?); plus Salads, Bowls, Wraps, Sandwiches, Shakes and Smoothies, along with a Create-Your-Own. They also list gluten-free and vegan options.

Every item is made from ‘scratch’ from its soups to its salsa. Oh, and I can’t forget to mention a seasonal menu that changes quarterly. When we were there, the Fall Menu was still in play and offered a Pumpkin Pie Mocha Latte, Caramel Apple French Toast and a Crossfit Kale Omelette, to name a few.

Most of us wiped our plates clean, but Dad had to finally surrender. With closing at 3 p.m., it was just a few minutes beforehand when we finally shuffled off to our respective cars and agendas. While I wasn’t thrilled with the wait, the food was EGGS-TRA-ORDINARY and was a real Turning Point for determining brunch choices in the future.

IMG_2042

In fact… Russ and I returned for breakfast about 10 days later and were seated immediately in the comfortable sunroom (although it was a rainy day 😦 ). I loved my omelette so much, that I got another one, this time the WESTERN. With diced Virginia ham, fresh peppers and red onion, it was scrumptiously smothered with a blend of cheddar and jack cheeses.
IMG_2037

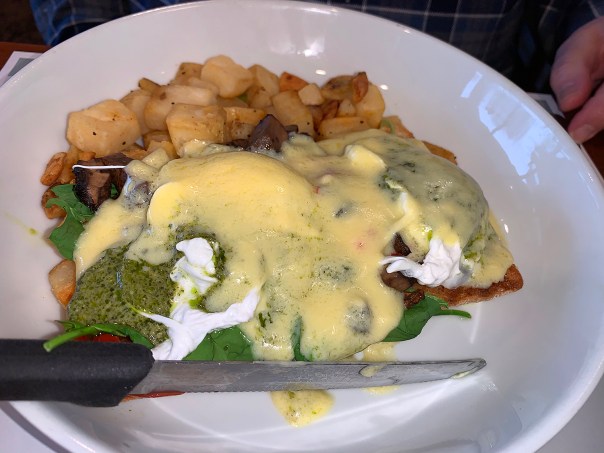
Because it was vying for his attention the first time, Russ ordered the EGGS BENEDETTO, once again from the EGGS-TRA-ORDINARY DISHES.  It was a toasted ciabatta topped with plum tomato, fresh baby spinach, roasted peppers, portobellos, pesto glazed poached eggs with hollandaise, and served with cubed breakfast potatoes.  For beverages, he again got the decaf French Roast and I chose a different green tea.

In the words of Arnold Schwarzenegger, “I’ll be baaaaack!”

Turning Point was founded in 1998 in Little Silver, N.J., by husband and wife, Pam and Kirk Ruoff, who wanted to open a restaurant, but be home at night at the end of a long work day. Inside, the atmosphere is reminiscent of the shore with fresh plants, a white wainscoting, a light blue to grey color scheme and high ceilings. Being it was mid-December, they were tastefully decorated for Christmas and Hanukkah.
Calling this Decadent is an Understatement

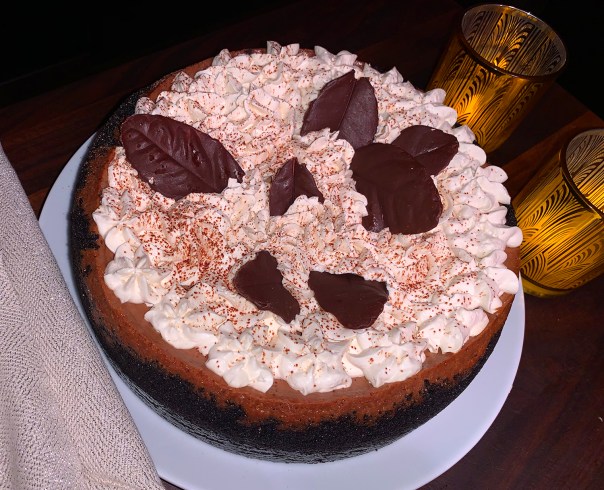
Chocolate Cappuccino Cheesecake. Sinfully rich and velvety smooth—no, that’s not describing me by any stretch—but it sure is the correct moniker for this cheesecake! When you want to impress, this dessert kicks it up a notch and scales a mountainside…

To set the stage, we were invited to the home of friends, Pat and Charlie, who we generally only see in the summertime at the community pool. But we had them over to our humble abode after the pool closed for the season; and a few months later, we received a reciprocal invitation to visit them at their house.

They are well aware we are foodies, because it was often the topic of conversation during our pool get-togethers. For this gathering, Pat designated me as the dessert chef and gave me free reign on what to make, so I channeled something chocolatey, and impressive—it was the holiday season after all.

IMG_2026

I hadn’t made cheesecake in a few years and I was debating about the wisdom of baking it in a water bath; in the end I opted not to. A word to the wise, if you do, make sure to wrap the springform pan in tinfoil first so that no water leaks into the crust. Speaking of the crust, after looking at the ingredients, I felt there wasn’t enough substance to entirely line the pan bottom and sides, so I doubled the crust, and was glad I did (the ingredients listed below are for double the original amounts).

IMG_1940

When prepping, the key is room temperature for dairy ingredients and eggs. Even though I left the stick of butter on the counter overnight, it still was too firm to mix easily with the cookie crumbs. Therefore I plopped the butter in the crumb bowl and zapped it all in the microwave for 30 seconds, perfect!

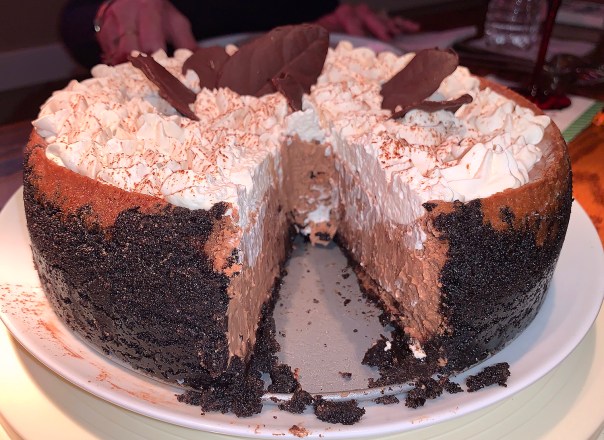
Don’t start wailing and gnashing your teeth when you pull the cheesecake out of the oven and the center is still jiggly and starting to deflate some. It will firm up after its long rest in the fridge. Leave it in the springform pan covered with plastic wrap and refrigerate overnight, at least 12 hours. When ready to remove the pan, always dip the knife in HOT water and wipe it off before make another attempt at loosening the cake.

It was around 24 hours later that I removed the cheesecake from the fridge and freed it from the metal collar. Unfortunately it had developed a few cracks, but I was undeterred because it was going to be topped with whipped cream swirls, dusted with cocoa powder and enhanced with the chocolate leaves. Then into a cake saver it went and we transported it to Pat and Charlie’s.


After we toured their lovely house, we retreated to their comfortably finished basement (all Charlie’s doing) for some wine, conversation and a charcuterie platter. And before long, more food, in the form of stuffed mushrooms and loaded nachos appeared. We scarfed those down in no time! Then, of course, dessert is the natural follow up, so out came the cheesecake… “One of THE BEST cheesecakes I’ve ever had!” was one comment…

IMG_1982


I brought along one of my favorite cake servers, the high heel with the removable magnetic heel for easy serving.

Chocolate Cappuccino Cheesecake

  • Difficulty: moderate
  • Print

Ingredients

Crust

  • 1 9-oz. package Famous chocolate wafers, crumbled
  • 1/2 cup (1 stick) butter, softened
  • 1/4 cup white sugar
  • 1/2 tsp. ground cinnamon

Cheesecake

  • 3 (8 ounce) packages cream cheese, softened
  • 1 cup white sugar
  • 3 eggs
  • 8 oz. semisweet chocolate chips
  • 2 Tbsp. whipping cream
  • 1 cup sour cream
  • 1/4 tsp. salt
  • 2 tsp. instant espresso granules dissolved in 1/4 cup hot water
  • 1/4 cup coffee flavored liqueur
  • 2 tsp. vanilla extract

Topping

  • 1 cup heavy whipping cream
  • 2 Tbsp. confectioners’ sugar
  • 2 Tbsp. coffee-flavored liqueur
  • Optional—1 oz. semisweet chocolate chips (to create leaves)

Directions

  1. Preheat oven to 350°F. Butter one 9 or 10 inch springform pan.
  2. Using a small food processor, grind the cookie wafers into crumbs.
  3. Combine the chocolate wafer crumbs, softened butter, 4 tablespoons white sugar, and the cinnamon. Mix well and press mixture into the buttered springform pan along the bottom and partially up the sides, set aside.
     

  4. In a medium sized bowl beat the softened cream cheese until smooth. Gradually add 1 cup white sugar mixing until well blended. Add eggs, one at a time. Beat at low speed until very smooth.
     

  5. Melt the 8 ounces semisweet chocolate with 2 tablespoons whipping cream in a pan or bowl set over boiling water, stir until smooth.
  6. Add chocolate mixture to cream cheese mixture and blend well. Stir in sour cream, salt, coffee, 1/4 cup coffee liqueur, and vanilla; beat until smooth. Pour mixture into prepared pan.
  7. Bake in the center of oven at 350°F for 50 minutes. Center will be soft but will firm up when chilled. Do not over bake.
  8. Leave cake in oven with the heat turned off and the door ajar for 45 minutes. Remove cake from oven.
    IMG_1960
  9. Refrigerate in the springform pan covered with plastic wrap overnight, at a minimum of 12 hours. (Mine was in for 24 hours.)
     

  10. Use a knife to loosen the cheesecake from the edges of the pan, dipping in hot water with each stroke. Do the same for the bottom after removing the outer rim (or leave the bottom on like I did). Move to a serving platter.
  11. Using a pastry bag, top cake with swirls of flavored whipped cream and garnish with chocolate leaves.
     

To Make Flavored Whipped Cream: Beat whipping cream until soft peaks form, then beat in 2 tablespoons confectioner’s sugar and 2 tablespoons coffee liqueur.


To Make Chocolate Leaves: Melt 1 ounce semisweet chocolate in a pan or bowl set over boiling water, (or microwave in short 30-second spurts) stir until smooth. Brush real non-toxic plant leaves (such as orange or kaffir lime leaves) on one side with melted chocolate. Freeze until firm and then peel off leaves. Freeze chocolate leaves until needed.


http://www.lynnandruss.com

IMG_2023

Cigdem Buke Ugur

Comfort(food) and Joy

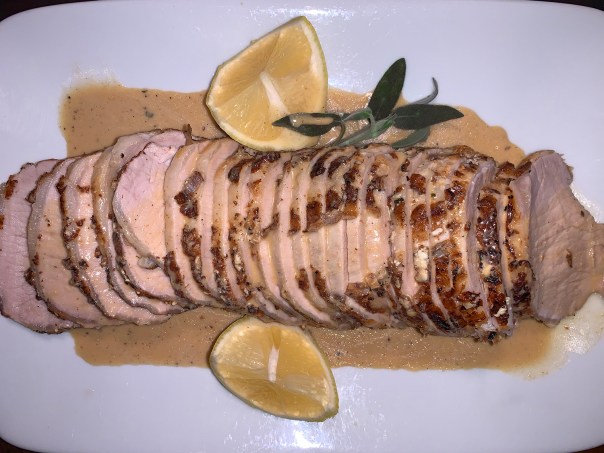
Milk-Braised Pork with Lemon and Sage—A genius technique from a favored chef, Molly Stevens, resulting in tender meat from whole milk which also transforms into a uniquely concentrated sauce. This variation is an alternative to her garlic-studded pork.

IMG_1905

A perfect foil for a cold, rainy/snowy Sunday afternoon. Turkey Day was over, the house was fully decorated for the upcoming Christmas Holidays, so we hunkered down and spent a lazy afternoon making homemade Turkey and Vegetable Soup, followed by this wonderful meal.

To be honest, most of our sides were leftovers from Thanksgiving and paired just fine with the pork; although we did steam up some broccoli for a veg boost. I thought the original herb bundle that gets tossed in with the milk was a bit paltry so I upped the amount of lemon peel and sage for a more pronounced depth of flavor (which I indicated in the ingredients list below).

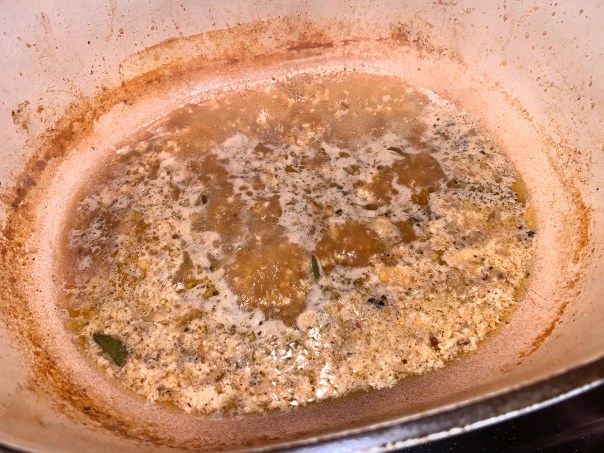
As delicious as the sauce is, you may be put off by its curdled appearance and wish for a creamy-smooth version (we did). If that’s the case, put the finished sauce in a blender with a teaspoon of heavy cream, and whir until completely smooth and a lovely fawn color.

‘Tis the holiday season, so why not whip up this COMFORT food AND bring JOY to your guests!

IMG_1879

PS—With our leftover pork from this dinner and some fennel-studded rice from another meal, we made Pork-Fried Rice and amazed ourselves at how good it was! In fact, we thought it was better than our regular version…

Milk-Braised Pork with Lemon and Sage

  • Servings: 6
  • Difficulty: moderate
  • Print

Ingredients

  • 3 lbs. boned pork loin roast, tied
  • 2 Tbsp. all-purpose flour
  • 1 tsp. coarse salt
  • 2 tsp. fresh-ground pepper
  • 4 Tbsp. extra-virgin olive oil, divided
  • 4 cloves garlic, minced; 1 clove smashed
  • 2 Tbsp. chopped fresh sage leaves; + 1 sprig
  • 3 1/2 cups whole milk
  • 1 1/2 Tbsp. grated lemon zest
  • 2 large strips lemon peel
  • 1 large bay leaf
  • 1 Tbsp. unsalted butter
  • 1 tsp. heavy cream (optional)

Directions

  1. At least 8 hours, or overnight, mix together in a small bowl the sage, lemon zest, minced garlic, 2 Tbsp. olive oil and 1 tsp. salt. Rub the mixture over the entire surface of the tied meat; cover loosely and refrigerate.
    IMG_1882
  2. When ready to start the braise, preheat oven to 275°.
  3. Gather the strips of lemon peel, sage sprig, and bay leaf and tie them into a neat bundle with kitchen string.
    IMG_1887
  4. Remove the pork from the refrigerator and scrape off as much of the seasoning as you can. Choose a heavy-duty Dutch oven that will hold the pork without too much extra space.
  5. Add the oil and butter over medium-high heat. When it stops foaming, add the pork and brown it, turning with tongs to brown all four sides, 12-16 minutes total. (Lower the heat if you start noticing black specks.) Transfer meat to a plate.
  6. If there is more than a tablespoon or 2 of fat in the pot, pour off any extra. Return the pot to medium-high heat and add a smashed garlic clove. Stir and heat until fragrant and just beginning to brown, about 40 seconds.
    IMG_1893
  7. Gradually pour in the milk being careful that it doesn’t foam up and spill over. Insert the herb bundle. Bring to a boil, lower to a simmer, and stir once or twice with a wooden spoon to scrape up any browned bits.
    IMG_1894
  8. Return the pork to the pot along with any of its juices. Cover with the lid and slide into the oven. 10-15 minutes into the braise, lift the lid to check that the liquid is not boiling too vigorously. If it is, lower the temperature by 10-15 degrees.
  9. After 45 minutes, turn the pork with the tongs. The milk will have separated and begun to take on an ivory color. Set the lid slightly ajar to allow steam to escape and the milk to begin reducing down.
    IMG_1898
  10. Continue braising at a gentle simmer with the lid ajar, basting the pork occasionally with a soup spoon, until it reaches an internal temperature of 150°, 35 to 45 minutes more.
    IMG_1900
  11. Transfer to a carving board with a channel that will catch the juices and cover loosely with foil. Remove and discard herb bundle and garlic if still whole.
    IMG_1901
  12. While the meat rests, tilt the pot and spoon off the clear fat that sits on the surface of the curdled milk sauce (this was pretty much impossible). Turn the heat to high and boil the sauce to reduce it and concentrate the flavor, around 10 minutes to a caramel color.
    IMG_1902
  13. If, after only a few minutes there’s very little liquid and mostly milk curds, stir in a few tablespoons of cold water and return to a simmer.
  14. Add salt and pepper to taste, and a few drops of lemon juice.
  15. Optional: Put the finished sauce in a blender with a teaspoon of heavy cream, and whir until completely smooth and a lovely fawn color.
  16. Remove strings from pork. Pour any juices into the sauce and stir in. Cut the meat into 1/4″ slices and serve with sauce spooned on top.
    IMG_1904
    IMG_1909

http://www.lynnandruss.com

Adapted from a recipe by Molly Stevens

M&M Christmas Cookies

I’d say M&M Christmas Cookies are just about as popular as the much-loved chocolate chip cookie, in every age group. The fun advantage here is being able to alter the festive colors depending on the occasion, such as pastel M&Ms for Easter; red, white and blue for patriotic holidays; and of course the red and green ones for Christmas!

They are so simple to make, taste great, and sure to be a crowd pleaser—or even just a “you” pleaser. When baked and cooled, these treats have a slightly chewy center and crisp edges. To make them very soft, bake to the minimum amount of time.

Oh, and these might just be the ticket to leave for Santa as he delivers his packages on Christmas Eve…

IMG_1916

M&M Christmas Cookies

  • Servings: Yields 4 dozen, 3
  • Difficulty: easy
  • Print

Ingredients

  • 1 cup (2 sticks) unsalted butter, softened
  • 1 cup packed brown sugar
  • 1/2 cup white sugar
  • 2 eggs
  • 1 1/2 teaspoons vanilla extract
  • 2 1/2 cups all-purpose flour
  • 1 teaspoon baking soda
  • 1 teaspoon salt
  • 10 oz. red and green M&M’s

Directions

  1. Preheat oven to 350°F.
  2. In a stand mixer, mix sugar and butter until smooth.
  3. Add in the eggs, and vanilla until thoroughly blended.
  4. Add flour, salt, and baking soda to creamed mixture. Blend well.
  5. Remove bowl from mixture and hand-stir in about 7-8 ounces of the M&Ms.
  6. Cover bowl with plastic wrap and refrigerate for at least 15 minutes.
    IMG_1911
  7. Drop dough by teaspoonful at least 2″ apart onto baking sheet lined with parchment paper (which I forgot to do, so the cookies stuck a bit to the pan). Slightly push a few candies on top of each with remaining 2-3 ounces of M&Ms.
  8. Bake for 10 to 12 minutes until a light golden brown.
  9. Remove sheets from oven and let cookies sit about one minute to stiffen some; then move them to a rack to cool completely.
     

  10. Store in an airtight container for up to 2 weeks.

http://www.lynnandruss.com

PB xtraganzas

And if you’re a peanut butter and chocolate fanatic, these festive Peanut Butter and Chocolate Extravaganzas with Ganache Filling cookies sporting Christmas colored M&Ms nestled in the ganache crown, are a must-try. You can find the recipe in my blog “How Sweet It is”, just scroll down toward the bottom of the post. I’ve been making them every holiday season because they are clearly a show-stopping favorite…

Stuff This (or That)

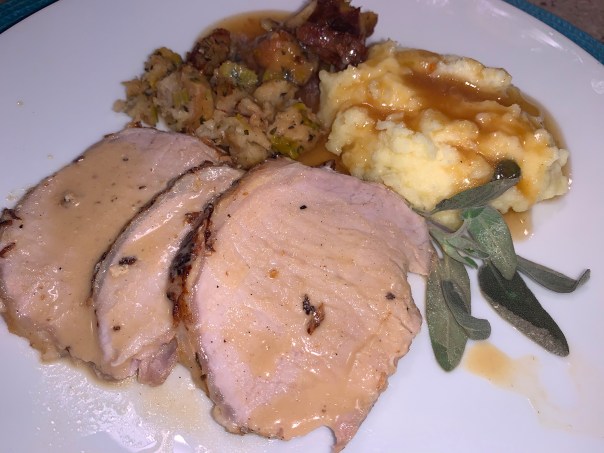
While stuffing is something we typically make at Thanksgiving, and rarely after that, this is one you might want to consider trying over the next couple of months. Instead of waiting until next year, think New Years… Or a special “chase-the-winter-blues-away” house party… Or pairing with a chicken dinner instead of turkey.

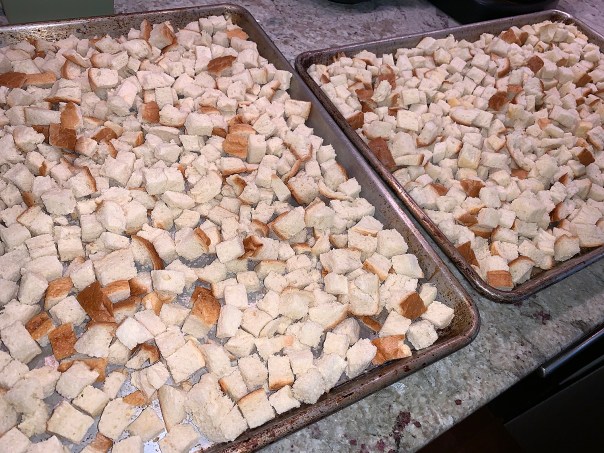
The key here is using ordinary sandwich bread “staled” in a low oven to soak up more liquid and make for a better-tasting bread stuffing recipe. It’s best to buy a freshly made whole loaf from your local supermarket bakery, then cut it down to about 11, 1/2-inch slices yourself, and cubed after that. (If in a pinch, yes you could use pre-sliced.)

IMG_1814

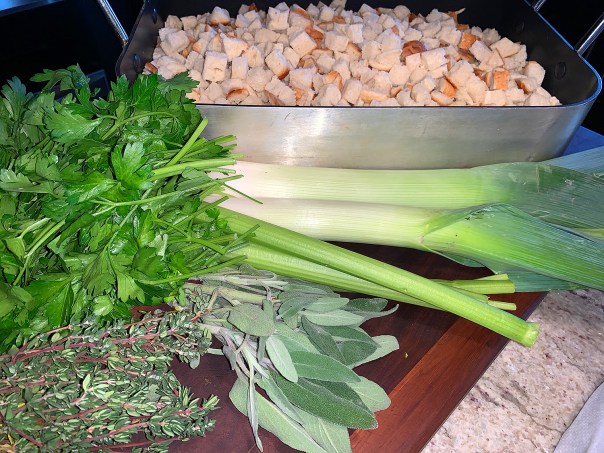
In addition to replacing the aromatic onion with leeks, this Bread Stuffing with Fresh Herbs recipe includes plenty of herbs—and not of the dried persuasion. Perhaps you might want to even add a dose of fresh rosemary along with the thyme, sage and parsley. And you know that using homemade stock/broth makes all the difference too, generating a wonderful depth of flavor not found in boxed or canned varieties.

IMG_1827

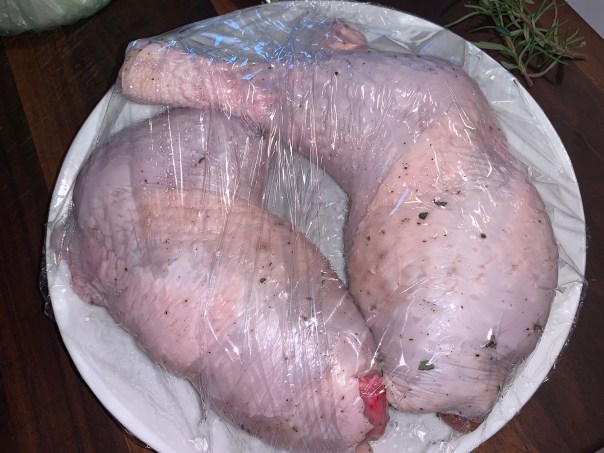
Now let’s talk about the elephant in the room—or in this case, the bird (turkey or chicken). To stuff or not to stuff? Using this method, you don’t have to stuff yet still benefit from all of those flavorful juices from the poultry. Breaking down the turkey before roasting allows every part to cook evenly in less than two hours. (Times would need to be adjusted if cooking a chicken.)

Start by deconstructing the bird—the Julia Child’s way “The Re-assembled Roast Turkey”—detaching the leg quarters, boning the upper part and then trussing the thighs. Next remove the backbone (use, along with neck and wingtips) to make homemade stock. Be sure to brine the breast for 6, and up to 12 hours, which keeps it nice and juicy while roasting. (Ours brined for 12 hours then sat, uncovered, in the fridge until ready to start cooking.)

IMG_1818

IMG_1830

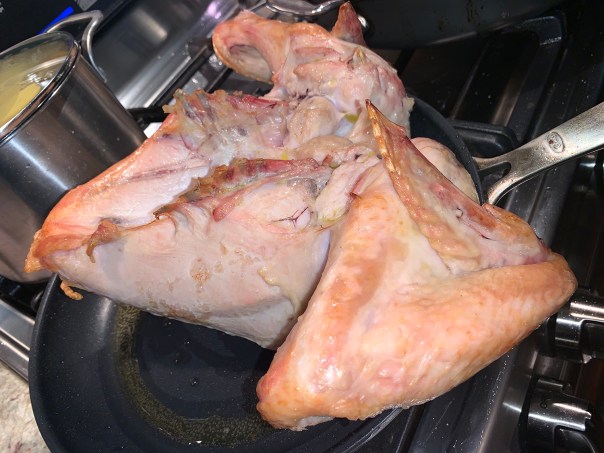
Roast the breast first at 450°F, placed skin side down in an oven-safe skillet, a 30-minute head start and to brown the skin. Mound the stuffing in a roasting pan, placing the partially cooked breast and leg quarters on the stuffing. Reduce the heat down to 350°F after 30 minutes, until turkey (or chicken) is done—about 40 minutes longer for a 14-lb. bird. This method cooks the turkey in about half the time compared to a whole bird.

Just a quick mention about the Homemade Turkey Stock. Use all of the innards (except the liver), the wingtips, neck and back bones from the deconstructed turkey, along with additional parts bought from a Farmer’s or Asian Market. Arrange on a rimmed baking sheet with some carrots and onion, and roast in a hot oven until nicely browned.

IMG_1809

IMG_1810

IMG_1811

Finish in a pressure cooker with 4 quarts of water, garlic cloves and celery stalks and leaves. The BEST stock ever! It comes out pretty concentrated so you can dilute it with more water and set aside for Turkey and Vegetable Soup.

Bread Stuffing with Fresh Herbs

  • Servings: 10-12
  • Difficulty: easy
  • Print

Ingredients

  • 2 loaves (2 lbs.) unsliced hearty white bread, cut down to 22 slices total, then cut into 1/2-inch cubes
    IMG_1796
  • 2 tsp. vegetable oil
  • 6 Tbsp. (3/4 stick) unsalted butter, plus extra for baking dish
  • 2 large leeks, chopped fine (about 2 cups)
  • 4 celery ribs plus some of the leaves, chopped fine (about 1 1/2 cups)
  • 2 teaspoons table salt
  • 2 Tbsp. minced fresh thyme leaves
  • 2 Tbsp. minced fresh sage leaves
  • 1 tsp. ground black pepper
  • 2 ½ cups homemade turkey/chicken broth
  • 3 large eggs
  • 3 Tbsp. chopped fresh parsley leaves

Directions

  1. Adjust oven racks to upper-middle and lower-middle positions and heat oven to 250°F. Spread bread cubes in even layer on 2 rimmed baking sheets.
    IMG_1806
  2. Bake until edges have dried but centers are slightly moist (cubes should yield to pressure), 45 to 60 minutes, stirring several times during baking. (Bread can be toasted up to 1 day in advance.) Transfer to large bowl.
  3. Heat butter in skillet over medium heat. When foaming subsides, add onion, celery, and ½ teaspoon salt. Cook, stirring occasionally, until vegetables are softened but not browned, 7 to 9 minutes.
    IMG_1822
  4. Add thyme, sage, and pepper; cook until fragrant, about 30 seconds.
  5. Add 1 cup broth and bring to simmer, using wooden spoon to scrape browned bits from bottom of pan.
  6. Add vegetable mixture to bowl with dried bread and toss to combine.
    IMG_1825
  7. In medium bowl, whisk eggs, remaining 1½ cups broth, and remaining 1½ teaspoons salt.
  8. Add egg/broth mixture and parsley to bread mixture and gently toss to combine.
    IMG_1826
  9. Roast the turkey breast first at 450°F, placed skin side down in an oven-safe skillet, a 30-minute head start and to brown the skin.
    IMG_1828
  10. Meanwhile, mound the stuffing in a roasting pan, placing the partially cooked breast and leg quarters on the stuffing. Reduce the heat down to 350°F after 30 minutes, until turkey (or chicken) is done—about 40 minutes longer for a 14-lb. bird.
    IMG_1830
  11. Remove bird off of stuffing, and with a spatula, stir stuffing well, scraping up any browned bits.
  12. Let rest on a cutting board for 30 minutes.
  13. Redistribute stuffing over bottom of roasting pan, return to oven, and turn off the oven while the turkey rests.
  14. Carve the bird as desired, garnish the platter with more fresh herbs. Spoon the stuffing into a covered bowl and serve immediately with other side dishes.
    IMG_1848
    IMG_1851

http://www.lynnandruss.com

Adapted from a recipe by Cook’s Illustrated