Monthly Archives: March 2023

Poulet au Vinaigre

This classic Lyonnaise dish calls for using just chicken thighs rather than the usual combination of light and dark meat to ensure that all the meat cooks at the same rate. It hails from America’s Test Kitchen and we were excited to try the recipe.

The chicken thighs are browned to develop flavor and then braised in a flavorful mix of chicken broth (preferably homemade), white wine, and red wine vinegar until it reaches 195 degrees and is meltingly tender and juicy.

To finish the sauce, fortify the braising liquid with tomato paste and reduce it to a luxurious, lightly thickened consistency before adding minced fresh tarragon. The sauce is typically finished with heavy cream, but this version whisks in a couple tablespoons of butter instead to help preserve the vibrancy of the luscious sauce. 

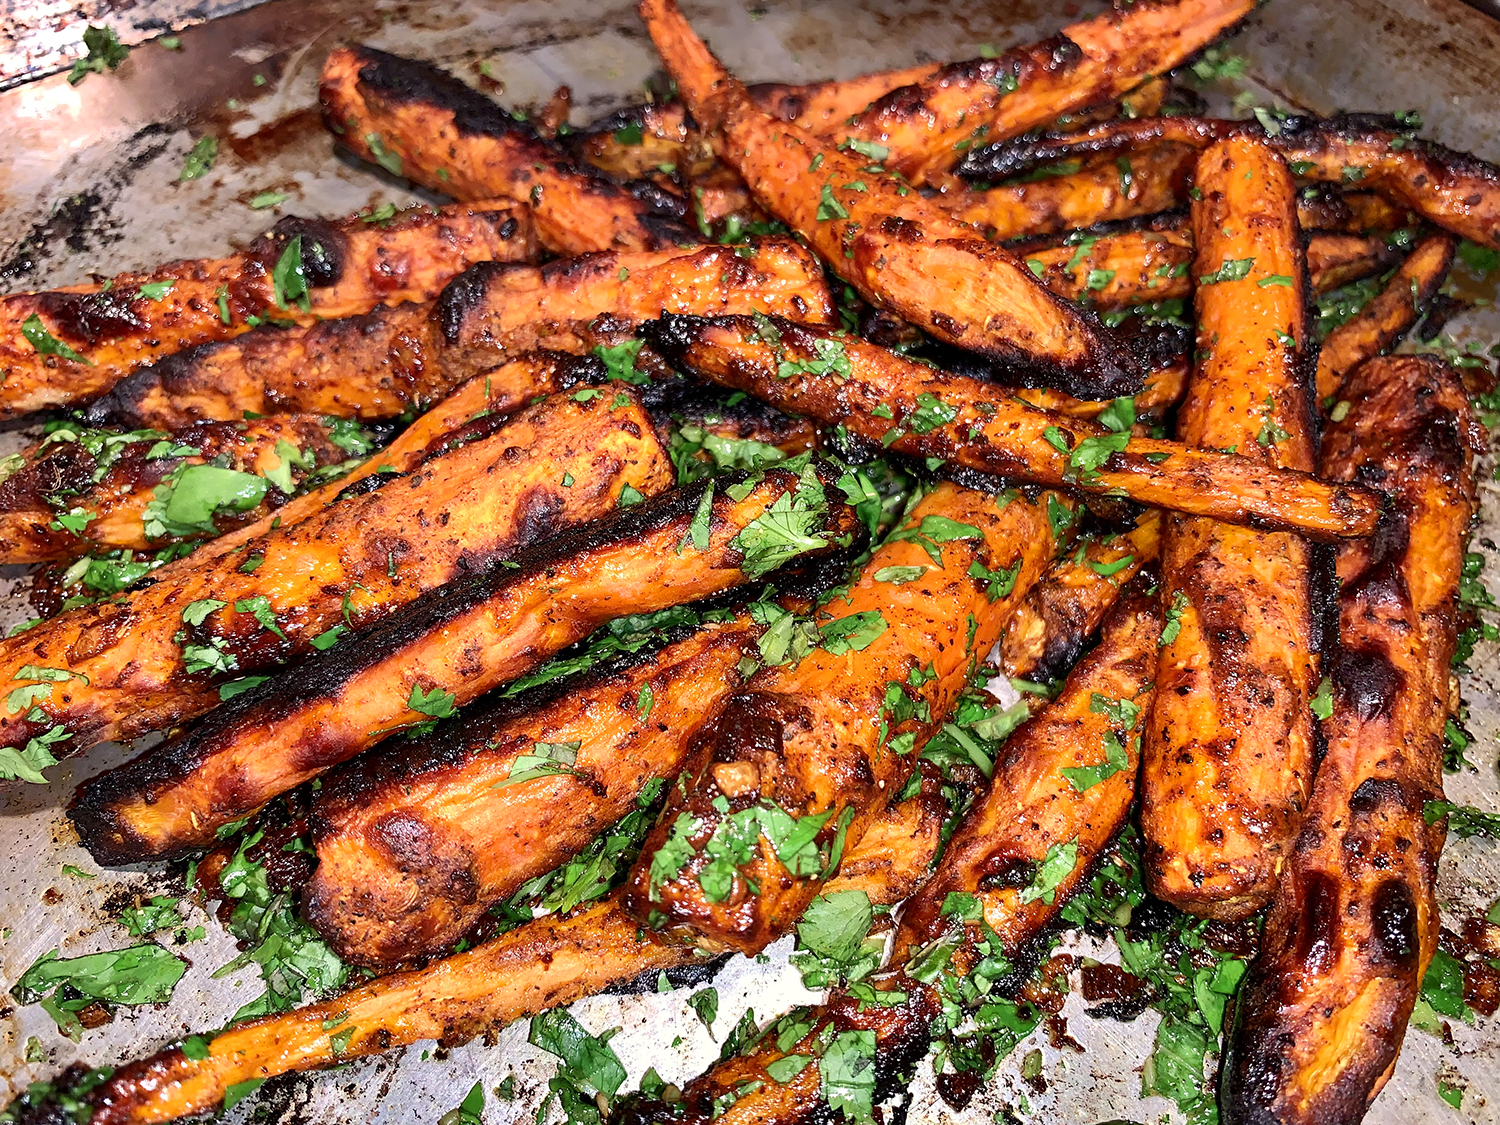
We initially loved the fact that it was a recipe for two. But after dining on the amazing dish, we almost wished we did have leftovers. The sauce alone is so incredibly tasty, you’ll want to lick your plate clean! Our entree was paired with Miso-Orange Glazed Carrots.

NOTE: Use an inexpensive dry white wine here or substitute dry vermouth. Fresh tarragon is traditional for poulet au vinaigre, but parsley can be substituted, if desired.

Poulet au Vinaigre

  • Servings: 2
  • Difficulty: easy
  • Print

Ingredients

  • 4 (5- to 7-oz.) bone-in chicken thighs, trimmed
  • ½ tsp. table salt
  • ¼ tsp. pepper
  • 1 ½ tsp. vegetable oil
  • 2 Tbsp. minced shallot, or more (we doubled it to 1⁄4 cup)
  • 1 garlic clove, sliced thin
  • ½ cup chicken broth, preferably homemade
  • ½ cup dry white wine
  • 2 ½Tbsp. red wine vinegar, plus extra for seasoning
  • 1 ½ tsp. tomato paste
  • 1 Tbsp. unsalted butter, chilled
  • 1 ½ tsp. minced fresh tarragon

Directions

  1. Adjust oven rack to lower-middle position and heat oven to 325 degrees.
  2. Pat chicken dry with paper towels and sprinkle both sides with salt and pepper. Heat oil in 10-inch oven-safe skillet over medium heat until shimmering.
  3. Add chicken, skin side down, and cook, without moving it, until well browned, about 8 minutes. Using tongs, flip chicken and brown on second side, about 3 minutes. Transfer chicken to large plate.
  4.  Pour off all but 1 tablespoon fat from skillet. Add shallot and garlic and cook, stirring frequently, until garlic is golden brown, about 1½ minutes.
  5. Add broth, wine, and vinegar; bring to simmer, scraping up any browned bits. Return chicken to skillet, skin side up (skin will be above surface of liquid).
  6. Transfer skillet to oven and bake, uncovered, until chicken registers 195 degrees, 35 to 40 minutes. Using tongs, transfer chicken to clean serving platter and tent with aluminum foil.
  7. Place skillet over high heat. Whisk tomato paste into liquid and bring to boil. Cook, occasionally scraping side of skillet to incorporate fond, until sauce is thickened and reduced to ⅔ cup, 5 to 7 minutes.
  8. Off heat, whisk in butter and tarragon. Season with salt, pepper, and up to ½ teaspoon extra vinegar (added ⅛ teaspoon at a time) to taste. Pour sauce around chicken and serve.

http://www.lynnandruss.com

Original recipe from America’s test Kitchen

Sichuan Braised Cod

I declared this my favorite cod recipe to date. The flavor profile was spot on for me, although it may be a bit too spicy for some. In that case, cut back on the number of dried chiles.

The Sichuan Braised Cod recipe from Fine Cooking makes a for quick and healthy supper, especially when served with a side salad. Only the two of us were sharing the meal so we bought a smaller piece of fish—just over a pound—and cut it into 3 equal sections.

The original recipe instructs you to flip the cooked cod in the sauce a couple of times. Fearing the fish would fall apart as it was flipped, we spooned the sauce over each fillet instead. To keep it pescatarian, we swapped out the chicken broth for homemade shrimp stock. Serve with steamed rice.

Sichuan Braised Cod

  • Servings: 4
  • Difficulty: easy
  • Print

Ingredients

  • 1⁄2 cup, plus 2 tsp. cornstarch
  • 2 Tbsp. rice vinegar, more to taste
  • 3/4 Shrimp broth
  • 1 1⁄2 Tbsp. soy sauce
  • 1 Tbsp. ketchup
  • 1 1⁄2 lbs. cod fillets, cut into 4 uniform pieces
  • Kosher salt and frhly ground black pepper
  • 2 eggs, beaten
  • 3 Tvbsp. canola oil
  • 10 dried Thai chiles or other small whole chiles
  • 4 scallions, thinly sliced, white and green parts separated
  • 1 1⁄2 Tbsp. minced ginger

Directions

  1. in a small bowl, mix the 2 teaspoons cornstarch with 2 tablespoons vinegar. Add the broth, soy sauce and ketchup.
  2. Season the fish with 1/2 teaspoon salt and 1/2 teaspoon pepper.
  3. Spread the remaining 1/2 cup cornstarch on a plate, and put the eggs in a wide bowl. Dredge the fish in the cornstarch.
  4. Heat 2 tablespoons oil in a 12-inch non-stick pan over medium-high heat until shimmering hot. Soak the fish in the egg for a couple of seconds, then add to the pan.
  5. Cook, flipping every three minutes, until the cod is browned and a little firm to the touch, about 5 minutes total (it should not be cooked all the way through). Transfer the fish to a large plate.
  6. Add the remaining 1 tablespoon oil to the pan, then add the chiles, white parts of the scallions, and ginger. Cook, stirring until the scallions become translucent and browned in a few places, about 2 minutes.
  7. Give the cornstarch mixture a quick stir and then pour it into the pan. It should come to a boil and thicken quickly. Reduce the heat to medium-low, return the fish to the pan, and spoon the sauce over the fillets a couple of times to coat them in the sauce.
  8. Cover the pan, leaving the lid slightly ajar, and cook until the fish is just cooked through and starting to flake, 3 to 5 minutes.
  9. Taste the sauce for salt and vinegar, adding more to taste if needed. Serve immediately with the sauce spooned over the cod and sprinkled with scallion greens.

http://www.lynnandruss.com

Adapted from a recipe from Fine Cooking

Yogurt-Roasted Carrots with Warm Spices

In this tandoori-inspired recipe from Milk Street, garam masala is combined with crushed fennel seed and turmeric for the carrot seasoning. A shallot-infused melted butter topping includes more of the spice mix with fresh cilantro and mint. Full-fat Greek yogurt better facilitates charring due to its lower moisture content.

It is recommended that you buy carrots with their green tops still attached. Even though you discard the greens, they tend to be fresher and on the slimmer side. The greens are super delicious and loaded with nutrients so if you’re not keen on tossing them, consider using them in a variety of ways such as pesto, chimichurri, fritters, or in your homemade vegetable broth.

Don’t forget to coat the baking sheet with cooking spray. The yogurt-covered carrots otherwise will char and stick to the pan. Don’t use large carrots for this recipe. Bunched carrots with tops are thinner and more tender than bagged carrots.

Yogurt-Roasted Carrots with Warm Spices

  • Servings: 4
  • Difficulty: easy
  • Print

Ingredients

  • 2 tsp. garam masala
  • 1 tsp. fennel seeds, lightly crushed
  • 1/2 tsp. ground turmeric
  • Kosher salt and ground black pepper
  • 1/4 cup whole-milk Greek yogurt
  • 2 bunches carrots with tops (1 lb. total), tops removed and discarded, halved crosswise on a sharp diagonal
  • 4 Tbsp. salted butter
  • 1 small shallot, finely chopped
  • 1 medium garlic clove, finely grated
  • 1/3 cup lightly packed fresh cilantro, chopped
  • 1/3 cup lightly packed fresh mint, chopped

Directions

  1. Heat the oven to 500°F with a rack in the middle position. Mist a rimmed baking sheet with cooking spray.
  2. In a small bowl, mix together the garam masala, fennel, turmeric and ½ teaspoon each salt and pepper. In a large bowl, mix the yogurt with 4 teaspoons of the spice mix. Add the carrots and toss to coat. Distribute the carrots in an even layer on the prepared baking sheet.
  3. Roast until well charred and a skewer inserted into the carrots meets no resistance, 25 to 30 minutes; stir the carrots once about halfway through.
  4. Meanwhile, in an 8-inch skillet over medium, melt the butter. Add the shallot and garlic, then cook, stirring, until beginning to brown and crisp, 3 to 5 minutes.
  5. Add the remaining spice mix and cook, stirring, until fragrant, 30 to 60 seconds. Remove from the heat and set aside.
  6. When the carrots are done, add the spiced shallot mixture, cilantro and mint directly to the baking sheet and toss with tongs. Taste and season with salt and pepper, then transfer immediately to a serving platter.
    NOTE: Don’t let them stay on the baking sheet which will char the tender herbs and onions. Cover with foil if your other dishes are not ready.

http://www.lynnandruss.com

Recipe from Calvin Cox for Milk Street

Lazy Chicken-and-Sausage Cassoulet

Cassoulet, a hearty slow-simmered stew of sausage, confit (typically duck), pork, and white beans, is one of the great hallmarks of French country cuisine. The best versions are cooked for hours until the beans and meat meld into a dish of luxuriant, velvety richness. As chef-author Molly Stevens says “There is no single best cassoulet, and, perhaps more importantly, feel free to adapt this rustic dish to suit your own appetite and cooking routines.”

Typically, a traditional French cassoulet should be cooked, then cooled, preferably overnight, then cooked and cooled again — at least three times. Multiple slow simmerings allow the beans to absorb the rich flavors of the sausage and duck confit until they become velvety and plush while still maintaining their shape and integrity. Ideally, it is made over the course of four days, but not here.

This “lazy” version remains the simplest: one that you can get on the dinner table in about an hour. Start with boneless, skinless chicken thighs (unless you have leftover roast chicken, which works great, too). If you have duck fat on hand, which we did, use it to sauté the chicken for an extra flavor boost (and because that’s the fat most used in southwest France), but any neutral-tasting oil will do. Either way, the chicken should be tender, cooked through, and well-seasoned.

Then it’s a matter of sautéing an onion, a healthy amount of garlic, and a heap of smoked sausage to create a flavor base that will carry through the entire dish. A bit of tomato paste ups the umami quotient, and a splash of white wine contributes just enough acid to balance the richness. From there, everything gets gently folded together with cooked white beans (canned or home-cooked), spread in a shallow dish (either a gratin or a heavy skillet), topped with breadcrumbs, and baked until bubbling hot on the inside and crunchy-golden on top. Unbelievably decadent and delicious!

Make Ahead: The dish may be prepared through step 5, covered, and stored in the refrigerator up to 1 day ahead.

FYI, we doubled the andouille sausage because we only had about half the amount of chicken thighs.

Lazy Chicken-and-Sausage Cassoulet

  • Servings: 4
  • Difficulty: easy
  • Print

Ingredients

  • 2 lbs. boneless, skinless chicken thighs, patted dry
  • 1 3/4 tsp. kosher salt, divided
  • 1 tsp. black pepper, divided
  • 1/2 cup olive oil or canola oil, divided
  • 1 medium-size yellow onion, chopped
  • 6 oz. smoked sausage, such as andouille or kielbasa, halved lengthwise and cut crosswise into 1/2-inch pieces
  • 3 garlic cloves, minced
  • 1 Tbsp. chopped fresh thyme, plus more for garnish
  • 1/8 tsp. ground allspice
  • 1/4 cup dry white wine
  • 2 Tbsp. tomato paste
  • 2 15-oz. cans white beans, such as Great Northern or cannellini, drained and rinsed
  • 1 cup chicken stock, preferably homemade
  • 1 1/2 cups fresh breadcrumbs

Directions

  1. Preheat oven to 375°F. Season chicken thighs with 1 teaspoon salt and 1/2 teaspoon pepper. Heat 2 tablespoons oil in a large skillet over medium-high. Add chicken thighs, smooth side down. Cook, undisturbed, adjusting heat as necessary so thighs cook evenly without scorching, until edges turn opaque and bottoms are nicely browned, about 6 minutes. Flip and cook until internal temperature reaches 165°F, 4 to 5 minutes. Set aside on a plate. Do not wipe skillet clean.
  2. Return skillet and any drippings to medium heat. Add 1 tablespoon oil, onion, and sausage. Cook, stirring often, until onion is tender and light golden, about 6 minutes.
  3. Add garlic, thyme, allspice, remaining 3/4 teaspoon salt, and remaining 1/2 teaspoon pepper. Cook, stirring often, until heated through and fragrant, about 2 minutes.
  4. Add wine and tomato paste, and stir to combine. Bring to a simmer; cook, stirring often, 1 to 2 minutes. Add beans, stock, and 2 tablespoons oil; bring to a simmer.
  5. Shred chicken into bite-size pieces; add to onion mixture along with any drippings that have accumulated on the plate. Transfer to an 8- x 11-inch baking dish. Spread into an even layer. (If cooking later, cover the dish with foil and refrigerate until ready to bake.)
  6. Toss breadcrumbs with remaining 3 tablespoons oil in a large bowl. Scatter breadcrumbs over bean mixture.
  7. Bake in preheated oven until heated through, top is browned, and sides are bubbly, about 20 minutes. (If baking from refrigerated, bake an additional 5 to 10 additional minutes.)
  8. Remove from oven and let rest for about 10 minutes. Serve.

http://www.lynnandruss.com

Recipe by Molly Stevens for Food & Wine

Roasted Bell Peppers with Tomato and Garlic

Very versatile, these little gems make splendid hors d’oeuvres eaten out of hand or set atop a crostini, as well as a side dish. A few on a plate make a nice sit-down first course, and they’re great as part of a buffet.

They add a nice pop of color—along with the nutrients—to your plate. The first go-around we served our Roasted Bell Peppers boats with a Parmesan Meatloaf.

Roasted Bell Peppers with Tomato and Garlic

  • Servings: 4-6
  • Difficulty: easy
  • Print

Ingredients

  • 2 garlic cloves, peeled and smashed
  • 2 anchovy filets, chopped
  • Kosher salt
  • 1 Tbsp. unsalted butter, room temperture
  • 2 bell peppers, red and/or yellow
  • 1 med-large tomato
  • Freshly ground blak pepper
  • 2 Tbsp. extra-virgin olive oil
  • 2 Tbsp. chopped fresh flat-leaf parsley

Directions

  1. Position a rack in the center of the oven and preheat to 350°F.
  2. Lightly oil a 13 x 9-inch gratin pan or similar-size baking dish.
  3. Combine the garlic and anchovies in a small mortar, add a pinch of salt, and smash and grind to form a paste. Add the butter and work together with a wooden spoon until well combined.
  4. Half the peppers lengthwise and remove the core, seeds, and soft membrane-like ribs. Cut each half lengthwise into 1 1⁄2″ wide strips. Arrange the strips skin side down on the baking dish. Core the tomato and cut it into the same number of wedges as you have pepper strips. Using a sharp paring knife, carve the juicy seed pockets away from each tomato slice and discard. Season tomato strips on all sides with salt and pepper.
  5. Dived the seasoned butter among the pepper boats, spreading a small amount on each one. Top with a piece of tomato. Drizzle with olive oil.
  6. Roast until the peppers and tomato pieces are tipped with brown and the pepper is just barely tender, 30 to 40 minutes.
  7. Sprinkle the peppers and tomato with parsley and serve warm or at room temperature, with the juices pored over the top.

http://www.lynnandruss.com

Recipes from “All About Roasting” by Molly Stevens

Sesame-Ginger Flap Steak

Flap meat’s coarse grain makes it a champ at holding on to the flavors of a marinade, and this teriyaki(ish) one is a guaranteed crowd-pleaser. Serve suggestion was with blackened sugar snap peas and rice with quick-pickled jalapeños.

The snap peas were in poor condition at the grocery store so we opted for green beans. And instead of charring them, we steamed and dressed the beans with a ginger-garlic butter as a compliment to the meat marinade.

Instead of grilling due to inclement weather, the flap steak was cooked on “Grilliam” our copper enameled grill pan, which does just as nice a job of searing the meat and getting those char marks.

Fine cooking indicated to whisk together the marinade ingredients in a bowl. However, we made the combination in a large ziploc bag and added the steaks directly to the bag and into the refrigerator for 6 hours.

Sesame-Ginger Flap Steak

  • Servings: 4-6
  • Difficulty: easy
  • Print

Ingredients

  • 1/4 cup tamari, or soy sauce
  • 3 Tbsp. peanut oil
  • 2 Tbsp. mirin
  • 1 1/2 tsp. toasted sesame oil
  • 2 large cloves garlic, finely grated
  • 1 piece fresh ginger, (2 inch) finely grated
  • 2 lbs. beef flap meat, cut into pieces of even thickness, if necessary
  • 2 scallions, green parts only, thinly sliced
  • 1 Tbsp. toasted sesame seeds

Directions

  1. In a large ziploc bag, combine the tamari (or soy sauce), peanut oil, mirin, sesame oil, garlic, and ginger. Add the meat and turn to coat. Cover and marinate in the refrigerator for 4 to 6 hours.
  2. Prepare a medium-high (400°F to 475°F) gas or charcoal grill fire. Remove the meat from the marinade and pat dry. Grill, turning every 2 minutes, until cooked to your liking, 6 to 8 minutes for medium (140°F).
    As noted above, if you don’t have access to a grill, use a grill pan and cook indoors, turning every 2 minutes until the meat registers 140°.
  3. Transfer to a cutting board, cover loosely with foil, and let rest for 5 to 10 minutes.
  4. Thinly slice across the grain and pour any accumulated juices over the meat. Serve sprinkled with the scallions and sesame seeds.

http://www.lynnandruss.com

Adapted from a recipe for Fine Cooking

Spicy Korean-Style Shrimp with Zucchini and Scallions

For an adaptation of the Korean stir-fry of squid with a garlicky, umami-loaded, savory-sweet, gochujang-based sauce, the squid here is replaced with plump, briny shrimp. This version includes carrots, scallions and zucchini (or yellow summer squash) for layers of texture and color, as well as to round out the meal.

Look for gochujang, the vivid-red fermented chili paste and workhorse in the Korean kitchen, in the international aisle of the supermarket or in Asian grocery stores. Before cooking, marinate the shrimp for about 10 minutes in a mixture of gochujang, sugar, sesame oil and soy. To be efficient, prep the other ingredients for the stir-fry while the shrimp marinate. Serve with steamed short-grain rice.

NOTE: The seedy section at the core turns soft and slightly squishy when cooked, so remove the seeds in the zucchini or summer squash. To do so, cut the zucchini in half lengthwise, then use a spoon to scrape out the core.

Buying “easy-peel” shrimp is a great option because they are already deveined, all you have to do is easily peel away the shells. Since we make our own shellfish stock, we appreciate having the shells which we then freeze until it’s time to make another batch of stock.

Spicy Korean-Style Shrimp with Zucchini and Scallions

  • Servings: 4
  • Difficulty: easy
  • Print

Ingredients

  • 2-3 Tbsp. gochujang
  • 2 Tbsp. white sugar
  • 2 Tbsp. toasted sesame oil
  • 1 Tbsp. soy sauce
  • Kosher salt and ground black pepper
  • 1 1/2 lbs. extra-large shrimp, peeled (tails removed), deveined and patted dry
  • 2 Tbsp. grapeseed or other neutral oil
  • 1 large carrot, peeled and cut into matchsticks
  • 6 medium garlic cloves, minced
  • 4 scallions, cut into 1-inch lengths
  • 1 medium zucchini or yellow summer squash (about 8 oz.), halved lengthwise, seeded and thinly sliced on the diagonal
  • 2 tsp. sesame seeds, toasted

Directions

  1. In a medium bowl, stir together the gochujang, sugar, sesame oil, soy sauce, ½ teaspoon salt and ¼ teaspoon pepper. Add the shrimp and toss to coat; let stand at room temperature for about 10 minutes.
  2. In a 12-inch skillet over medium-high, heat the neutral oil until shimmering. Add the carrot and cook, stirring often, until wilted, 3 to 4 minutes. Add the garlic and cook, stirring constantly, until lightly browned, about 1 minute. Push the mixture to one side of the skillet and add the shrimp with its marinade, distributing it in an even layer. Cook without stirring until the shrimp are pink on the bottom, about 2 minutes.
  3. Add the scallions and zucchini, then stir to combine with the shrimp and carrot. Cook, stirring often, until the shrimp are opaque throughout and the scallions and zucchini have softened, about 3 minutes. Off heat, taste and season with salt and pepper. Serve sprinkled with the sesame seeds.

http://www.lynnandruss.com

Recipe by Courtney Hill for Milk Street

Cod with Pancetta, Artichokes and Olives

Looking to introduce more seafood dishes into your evening repertoire of family meals? This lovely recipe is easy, is ready in just over a half hour, and contains heart-healthy ingredients.

We served ours over polenta and it was delicious! Our pancetta weighed in at closer to 4 ounces, and we used it all. Are there meatless substitutions for pancetta? Yes, you can try marinated tofu, mushrooms, smoked paprika, olives (already in the dish), and parmesan cheese to substitute for pancetta.

Cod with Pancetta, Artichokes and Olives

  • Servings: 4
  • Difficulty: easy
  • Print

Ingredients

  • 4 6-oz. pieces fresh cod loin fillet
  • Kosher salt and freshly ground black pepper
  • 2 Tbsp. extra-virgin olive oil
  • 2 oz. pancetta, cut into 1/4-inch dice (about 1/4 cup)
  • 1 medium yellow onion, cut into 1/4-inch dice
  • 1 tsp. fresh thyme leaves
  • 1/8 to 1/4 tsp. crushed red pepper flakes
  • 1/2 cup dry white wine
  • 1 15-oz. can diced fire-roasted tomatoes in juice
  • 1 cup marinated artichoke hearts, drained and chopped
  • 1/2 cup large pitted green olives, such as Castelvetrano, halved

Directions

  1. Pat the cod dry and season with salt and pepper.
  2. Heat the oil in a 12-inch nonstick skillet over medium-high heat. Add the pancetta and cook, stirring, until crisp and golden, 2 to 4 minutes. Using a slotted spoon, transfer the pancetta to a paper-towel-lined plate, leaving the fat behind in the pan.
  3. Add the fish to the skillet and cook until slightly golden, about 3 minutes. Flip and transfer to a plate, seared side up. Add the onion, thyme, and pepper flakes to the skillet; cook, stirring, until the onion is soft, about 4 minutes.
  4. Add the wine and cook until the pan is almost dry, about 1 minute. Add the tomatoes and their juice, artichokes, and olives. Simmer, stirring occasionally, to meld the flavors, about 2 minutes.
  5. Lower the heat to medium and nestle the fish into the sauce, keeping the seared side exposed. Cover and cook until the fish is opaque and just cooked through, about 3 minutes.
  6. Sprinkle with the pancetta, divide among rimmed plates or wide, shallow bowls, and serve.

http://www.lynnandruss.com

Original recipe from Fine Cooking

No-Knead Seeded Oat Whole-Wheat Bread

The Hubs and I are recipe testers for America’s Test Kitchen (ATK) and our particular task in this instance was to make the no-knead bread as directed and then fill out a survey. The drawback was, we couldn’t post the recipe until it appeared in their upcoming Everyday Bread book. Well now many months later, it is widely available in a multitude of stores.

ATK’s mission was to take baking all kinds of breads out of the once-in-a-while category and make it easy and accessible for your unique timetable. I’m not so sure I would categorize it as “easy” due to so many steps before you have a finished product. However, the results were fantastic!

The loaf is so superlatively hearty, yet it still maintains the moist texture and appropriate chew of a proper rustic loaf. I’m not a big bread eater so when I do occasionally indulge, I want it to have some healthy attributes, and this loaf delivers!

The flavor that the beer adds is preferred, but you can substitute an equal amount of water if desired. Be sure to score the dough ½-inch deep in step 9, and don’t be afraid to go back and slash the loaf again if the score isn’t deep enough.

No-Knead Seeded Oat Whole-Wheat Bread

  • Servings: 1 loaf
  • Difficulty: moderate
  • Print

Ingredients

  • 3 Tbsp. raw pepitas
  • 3 Tbsp. raw sunflower seeds
  • 4 tsp. sesame seeds
  • 4 tsp. poppy seeds
  • 2 tsp. caraway seeds
  • ⅔ cup (2 oz.) old-fashioned rolled oats
  • ½ cup (4 oz.) boiling water plus 3/4 cup (6 oz.) room temperature water
  • ½ cup (4 z.) mild lager, room temperature
  • 1 Tbsp. distilled white vinegar
  • 2 cups (11 oz.) bread flour
  • ⅔ cup (3 ⅔ oz.) whole-wheat flour
  • 1½ tsp. table salt
  • ¼ tsp. instant or rapid-rise yeast

Directions

  1. Adjust oven rack to middle position and heat oven to 325 degrees. Combine pepitas, sunflower seeds, sesame seeds, poppy seeds, and caraway seeds in bowl. Measure out 6 tablespoons seed mixture, spreading into even layer on rimmed baking sheet, and roast until seeds are lightly golden and fragrant, about 10 minutes. Transfer to wire rack and set aside to cool for 15 minutes. Reserve remaining untoasted seed mixture.
  2. Meanwhile, combine oats and boiling water in medium bowl; let sit until water is absorbed and oats have cooled to room temperature, about 15 minutes. Stir in room temperature water, beer, and vinegar.
  3. Whisk bread flour, whole wheat flour, salt, yeast, and cooled, toasted seed mixture together in large bowl. Using rubber spatula, fold oat-water mixture into flour mixture, scraping up dry flour from bottom of bowl and pressing dough until cohesive and shaggy and all flour is incorporated. Cover bowl tightly with plastic wrap and let sit at room temperature for at least 8 hours or up to 18 hours.
  4. Using greased bowl scraper or your wet fingertips, fold dough over itself by lifting and folding edge of dough toward middle and pressing to seal. Turn bowl 90 degrees and fold dough again; repeat turning bowl and folding dough 6 more times (total of 8 folds). Flip dough seam side down in bowl, cover with plastic, and let rest for 15 minutes.
  5. Lay 18 by 12-inch sheet of parchment paper on counter and spray lightly with vegetable oil spray. Turn out dough (seam side up) onto lightly floured counter and pat into rough 9-inch circle using lightly floured hands. Using bowl scraper or your floured fingertips, lift and fold edge of dough toward center, pressing to seal. Repeat 6 more times (for a total of 7 folds), evenly spacing folds around circumference of dough. Press down on dough to seal then use bench scraper to gently flip dough seam side down.
  6. Using both hands, cup side of dough furthest away from you and pull dough towards you, keeping pinky fingers and side of palm in contact with counter and applying slight pressure to dough as it drags to create tension. (If dough slides across surface of counter without rolling remove excess flour. If dough sticks to counter or hands, lightly sprinkle counter or hands with flour.) Rotate dough ball 90 degrees, reposition dough ball at top of counter, and repeat pulling dough until taut round ball forms, at least 4 more times.
  7. Transfer dough seam side down to center of prepared parchment then spray or gently brush loaf with water. Sprinkle reserved untoasted seed mixture over top and use your hands to gently press seeds onto sides of loaf. Cover with inverted large bowl and let rise until dough has doubled in volume and springs back minimally when poked gently with your finger, 1 to 2 hours.
  8. Thirty minutes before baking, adjust oven rack to middle position, place Dutch oven with lid on rack, and heat oven to 475 degrees.
  9. Using sharp knife or single-edge razor blade, make one 6-inch-long, ½-inch-deep slash with swift, fluid motion along top of loaf. Carefully remove hot pot from oven and, using parchment as a sling, gently transfer dough and parchment to hot pot. Working quickly, reinforce scoring in top of loaf if needed, cover pot, and return to oven. Reduce oven temperature to 425 degrees and bake loaf in covered pot for 30 minutes.
  10. Remove lid and continue to bake until loaf is deep golden brown and registers at least 205 degrees, 10 to 15 minutes. Using parchment sling, carefully remove loaf from hot pot and transfer to wire rack; discard parchment. Let cool completely, about 3 hours, before slicing.

http://www.lynnandruss.com

Recipe from America’s Test Kitchen

Parmesan Meatloaf

Scrolling through Facebook, I saw this “simple” meatloaf recipe, and thought why not? Just as there are loads of meatball recipes, so goes it with meatloaves. And yes, it really was quite simple. If you make up the mix in the morning, you can then just pop it into a preheated oven for one hour before dinner; just make sure to let it rest for 10 minutes afterward.

*A trick I learned ages ago to eliminate some of the fat, is halfway through the cooking time, fold up a few paper towels and pat up the grease that has risen to the top. At this point I add a few ladles of the pasta sauce on top and return it to the oven. Once you cut out the first slice, you can then use a baster to suck up the remaining liquid/fat. Another approach is to form the loaf free-style and place it on a foil-lined rimmed baking sheet.

Whichever method you prefer, do not overwork the meat mixture when combining all of the ingredients, otherwise it will be dense and tough. The key is to keep it loose, soft and airy.

We paired ours with a Roasted Bell Pepper and Tomato side dish which cooked at the same temperature as the meatloaf. With some of the leftovers we combined it with cooked pasta and more of the sauce used for the meatloaf topping.

Parmesan Meatloaf

  • Servings: 1 loaf
  • Difficulty: easy
  • Print

Ingredients

  • 1 lb. ground pork
  • 1 lb. ground beef
  • 2 large eggs
  • 1/4 cup breadcrumbs
  • 1/2 tsp. dried basil
  • 1/2 tsp. dried thyme
  • 1/2 tsp. dried oregano
  • 1 to 2 garlic cloves, finely minced
  • 1 small yellow onion (grated)
  • 1/2 tsp. salt
  • 1/4 tsp. ground black pepper
  • 1/2 cup grated Parmesan cheese
  • 1/2 cup of your favorite pasta sauce (marinara sauce, homemade, meatless)

Directions

  1. Preheat oven to 350 degrees. Lightly grease a loaf pan with cooking spray, set aside.
  2. In a large bowl, combine the ground pork and beef, eggs, breadcrumbs, thyme, oregano, basil, garlic, onion, salt, pepper and Parmesan cheese. Try not over handle the mixture, otherwise it will get tough.
  3. Place the mixture in the greased loaf pan, and form into a loaf. Top the meatloaf with pasta sauce. (*Or follow the approach mentioned above.)
  4. Place filled loaf pan on a baking sheet, and bake for 1 hour.
  5. Remove the meatloaf from the oven and drain any grease from the meats at this time.
  6. Sprinkle the top with the remaining shredded cheese.
  7. Place the meatloaf back in the oven, and bake until the cheese is melted.
  8. Remove the meatloaf from the oven, and let sit for 5-10 minutes before slicing.

http://www.lynnandruss.com

Recipe from Grandma’s Old Recipes

Spanish Braised Chickpeas with Tuna and Olives

This simple and rustic Spanish recipe shows what a perfect match chickpeas and tuna are. Both ingredients have been eaten and enjoyed together throughout Spain for centuries. In this hearty dish they’re combined in a smoky tomato sauce made with garlic and onion, with a healthy measure of extra virgin olive oil to add depth and texture.

Robust ingredients commonly used in Spanish cooking are added, including sliced stuffed olives and red wine vinegar to heighten, but not overpower, the natural flavors of the other ingredients. The pairing of tuna and chickpeas isn’t only flavorsome, it also makes a very filling and nourishing meal that’s rich in both protein and fiber.

Serve this braise with crusty bread on the side to mop up every last bit of the luscious sauce, but you could also serve it with rice instead. Another accompaniment is crispy, golden pan-fried sliced potatoes, which is kind of like another classic Spanish recipe, Patatas Bravas. You could also use this mixture to stuff a baked potato, as a tasty empanada filling, or even served as a pasta sauce.

A rustic and flavorful Spanish dish of chickpeas cooked in a smoky tomato sauce, with canned tuna, and stuffed olives provided two hefty portions. Easily doubled for more diners. Our initial apprehension of too little tuna, was unfounded. We kept the ingredients the same as the original recipe and it was a perfect balance of flavors and textures.

Variations: Instead of canned chickpeas use white beans, or add some chorizo (cooked with the onion) in place of canned tuna. Serve with rice or potatoes instead of crusty bread.

Spanish Braised Chickpeas with Tuna and Olives

  • Servings: 2
  • Difficulty: easy
  • Print

Ingredients

  • 4 Tbsp. extra virgin olive oil
  • 1 red onion, finely diced
  • 3 cloves garlic, finely chopped
  • 14 oz. canned diced tomatoes
  • 1 Tbsp. tomato paste
  • ½ cup water
  • 1 tsp. red wine vinegar
  • ½ tsp. Spanish smoked paprika (or use 1 tsp. regular paprika)
  • 1 tsp. salt
  • ½ tsp. freshly ground black pepper
  • 14 oz. can chickpeas, rinsed and drained
  • 6 o.z can tuna, drained and broken into chunks
  • 10 pimento-stuffed olives, sliced into thin rounds
  • 1 Tbsp. finely chopped fresh flat-leaf parsley

Directions

  1. Heat 3 tablespoons of the oil in a frying pan over medium heat and cook the onion for 6 minutes, stirring occasionally.
  2. Add the garlic and cook 2 minutes.
  3. Add the tomatoes, tomato paste, water, vinegar, paprika, salt and pepper. INCREASE the heat to high and bring to a boil, then cover with a lid, reduce the heat and simmer for 10 minutes.
  4. Add the chickpeas, stir to combine, cover and simmer for 10 minutes, stirring occasionally.
  5. Stir in the tuna, olives, parsley and reserved tablespoon of oil.

http://www.lynnandruss.com

Original receipe by Trudy for Mediterrasian