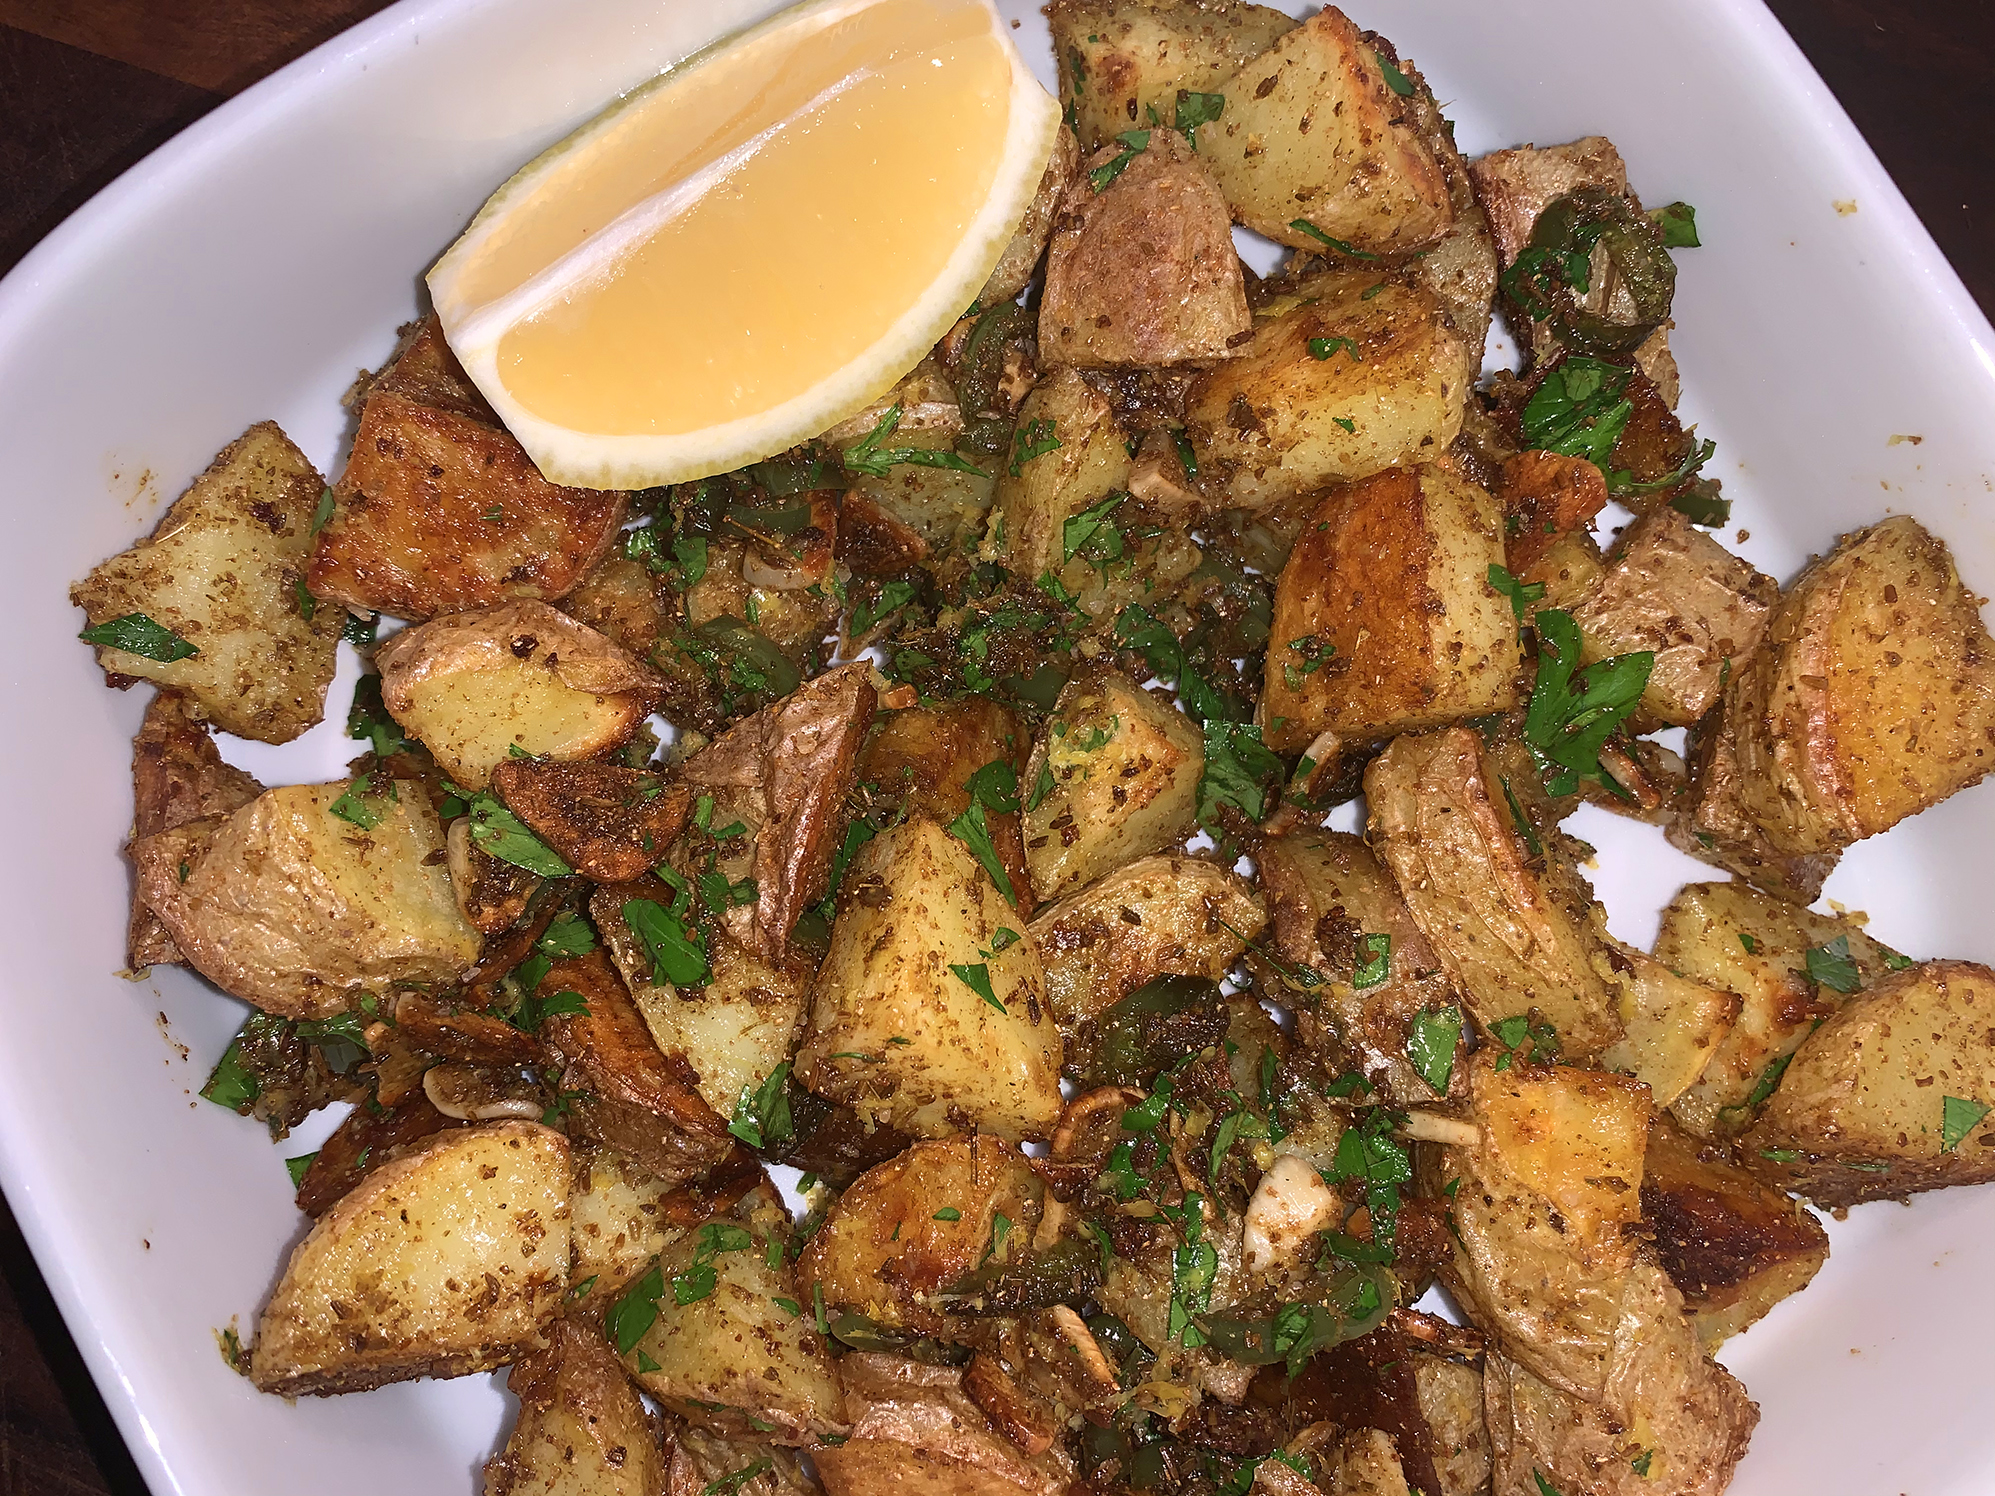
Yummy, right? Inspired by a recipe from “Falastin” a cookbook by Sami Tamimi and Tara Wigley, these Spicy Roasted Potatoes with Cumin, Lemon and Cilantro are chock-full of bold flavors. Milk Street made some adjustments to the original and created the following adaptation. Loving all things potatoes—and robust flavors—these spuds caught my attention immediately.
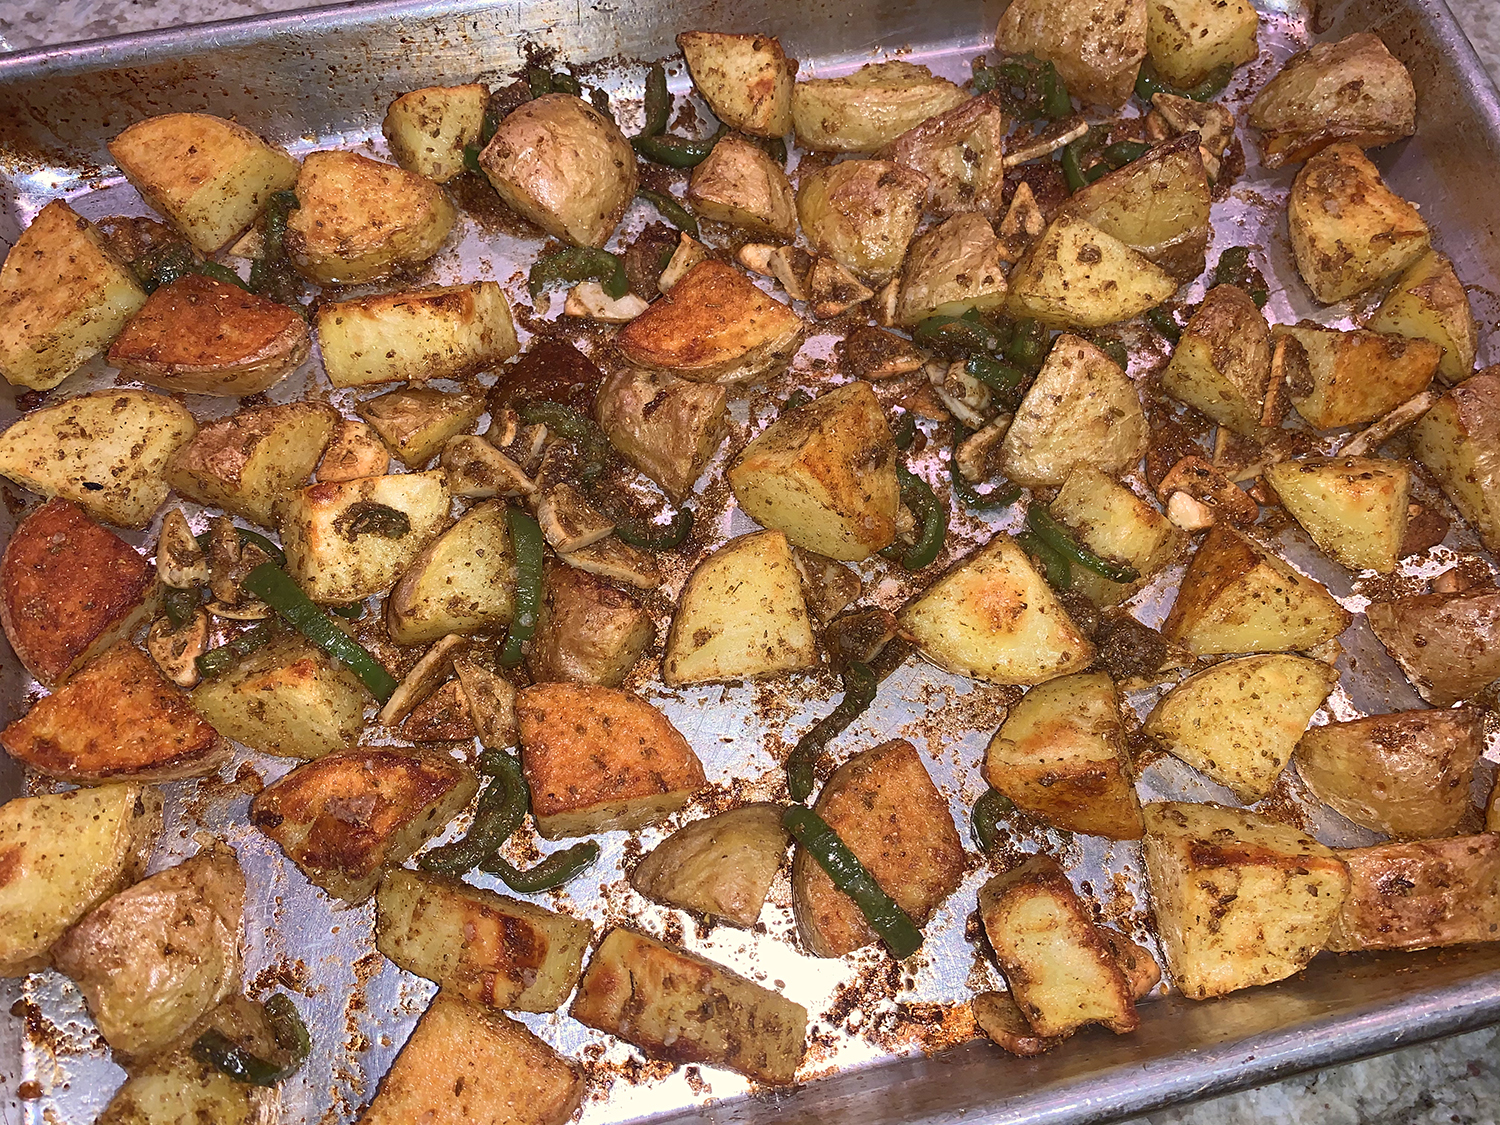
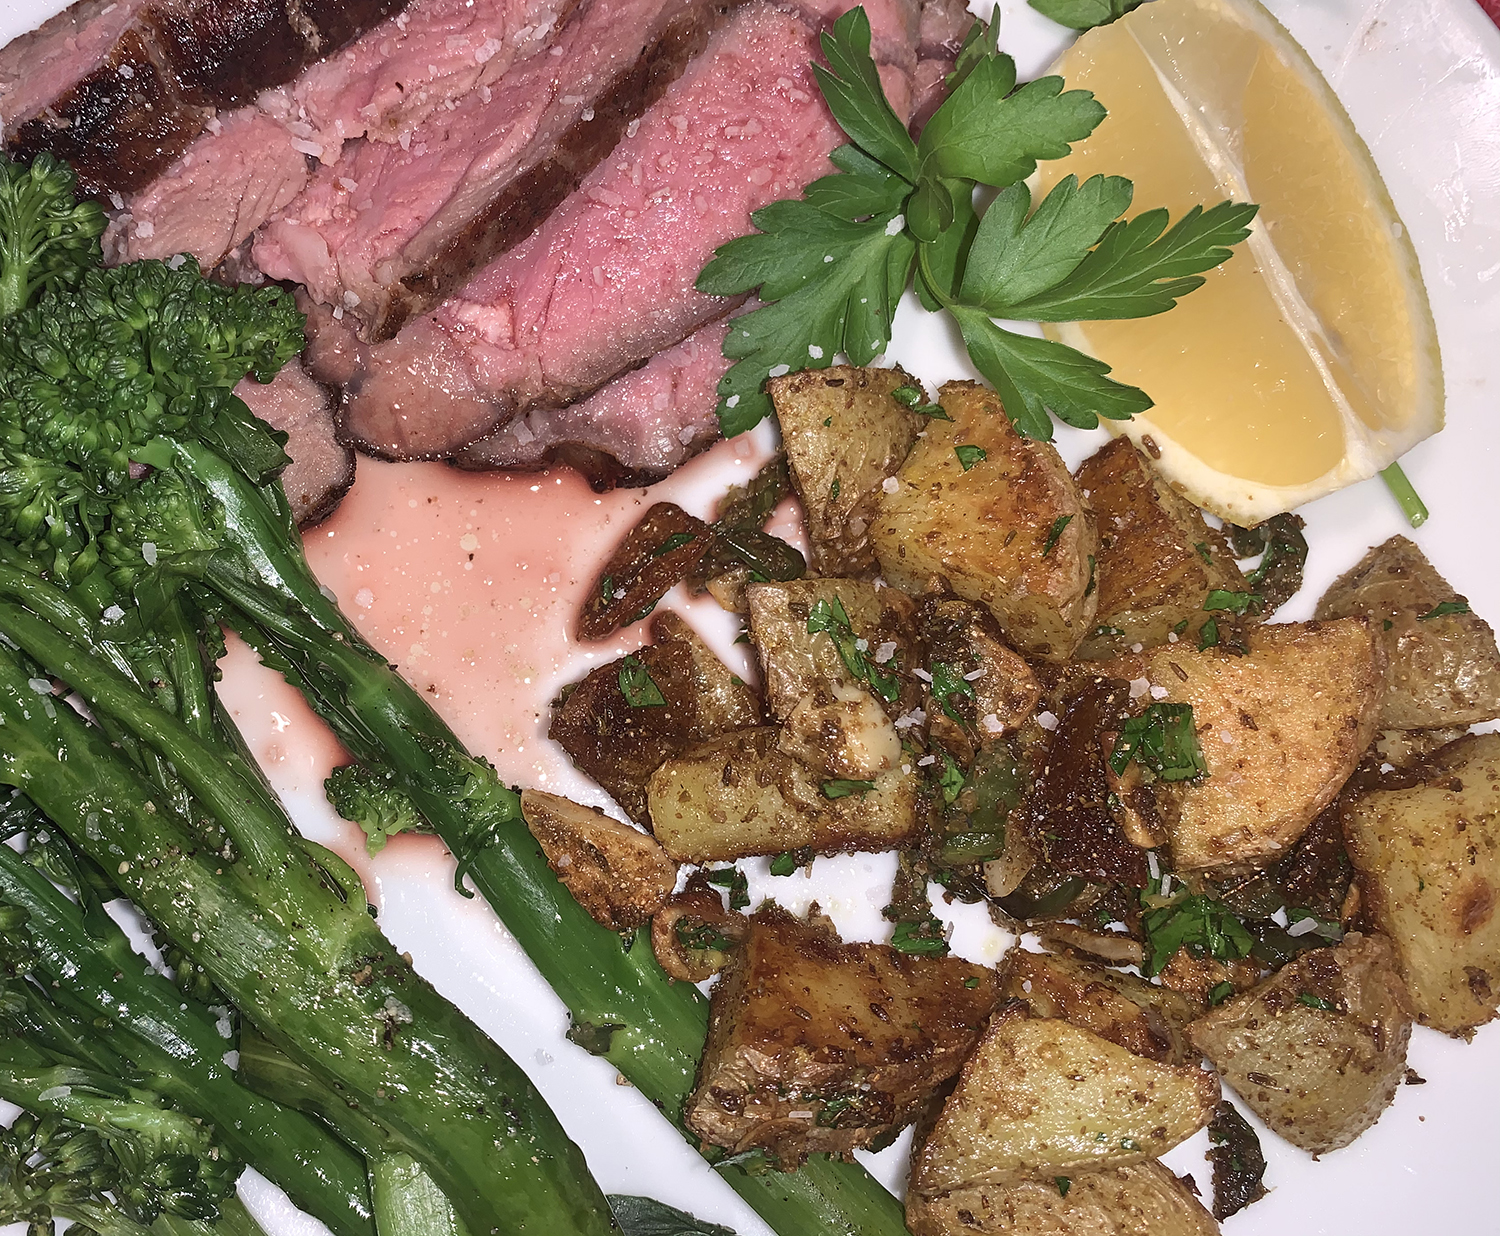
A couple of notations that are worth heeding: So the seasonings don’t scorch in the high heat of the 475°F oven, toss them into the potatoes about two-thirds of the way into cooking. For more heat, leave the seeds in some or all of the chiles. (We used jalapeños, but I did seed them.) A perfect pairing with our reverse-seared strip steak entrée, the potato recipe was halved for just two of us.
Halfway through the meal Russ asked me where the recipe originated from. When I read the excerpt for Milk Street Magazine and mentioned the title of the cookbook “Falastin” he immediately recognized the name because he had heard about it on a podcast and subsequently added to his Christmas wish list. And yes, he did receive it as a gift—he just hadn’t had an opportunity to go through the recipes.
Don’t forget to oil the baking sheet with cooking spray to ensure the potatoes won’t stick to the surface.
Spicy Roasted Potatoes with Cumin, Lemon and Cilantro
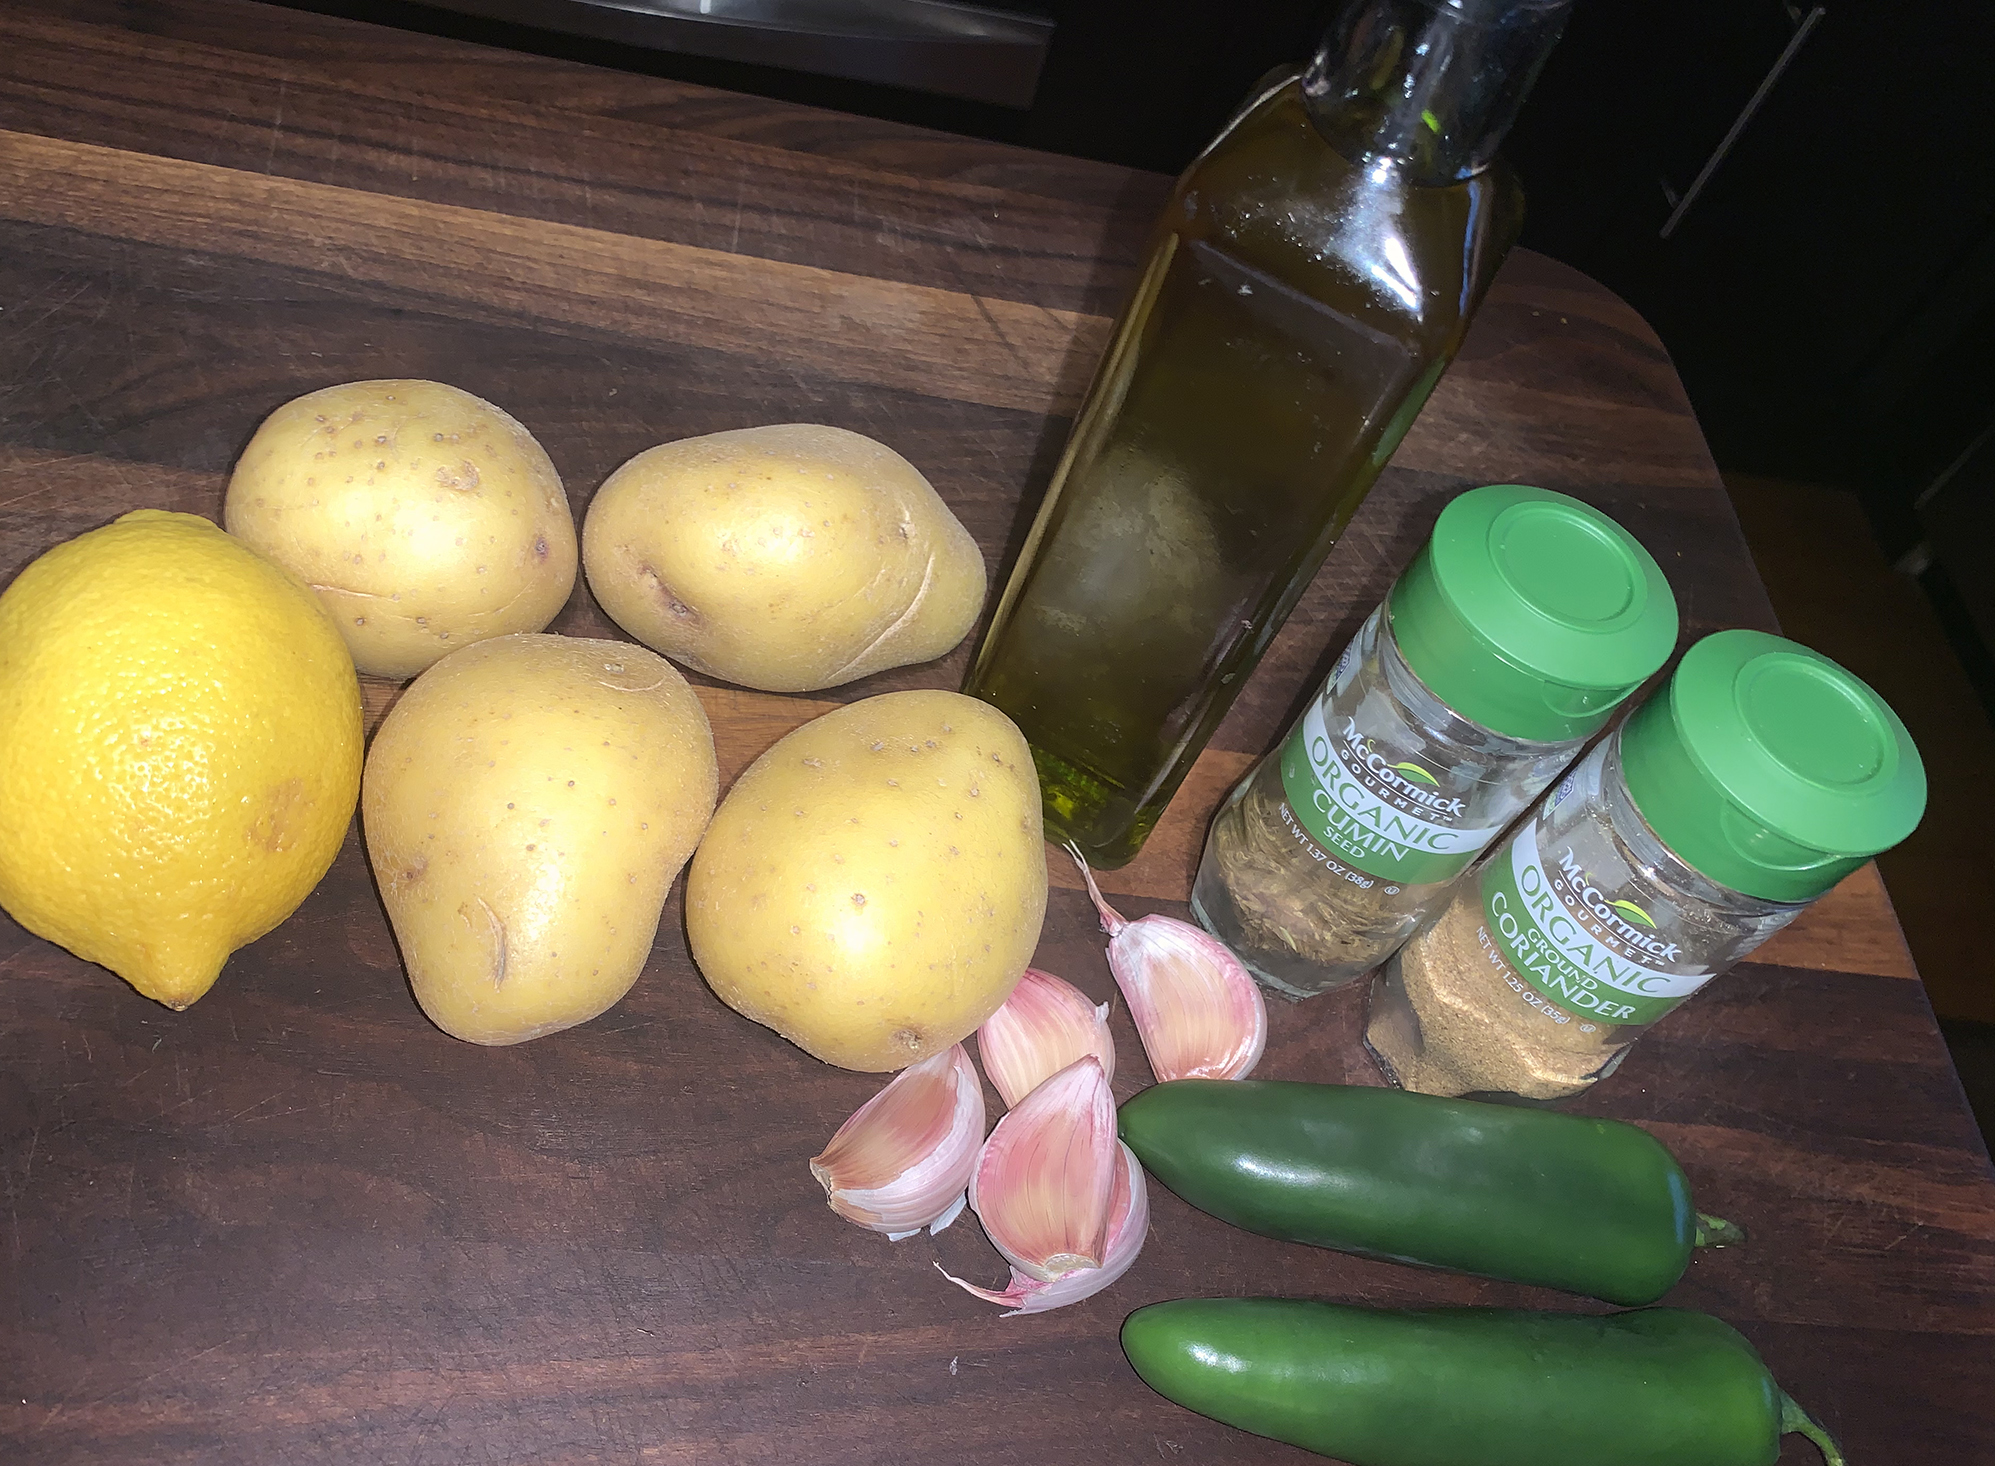
3 lbs. medium Yukon gold potatoes, unpeeled, quartered lengthwise then cut crosswise into 1-inch chunks
3 Tbsp., plus ¼ cup extra-virgin olive oil, divided
Kosher salt and ground black pepper
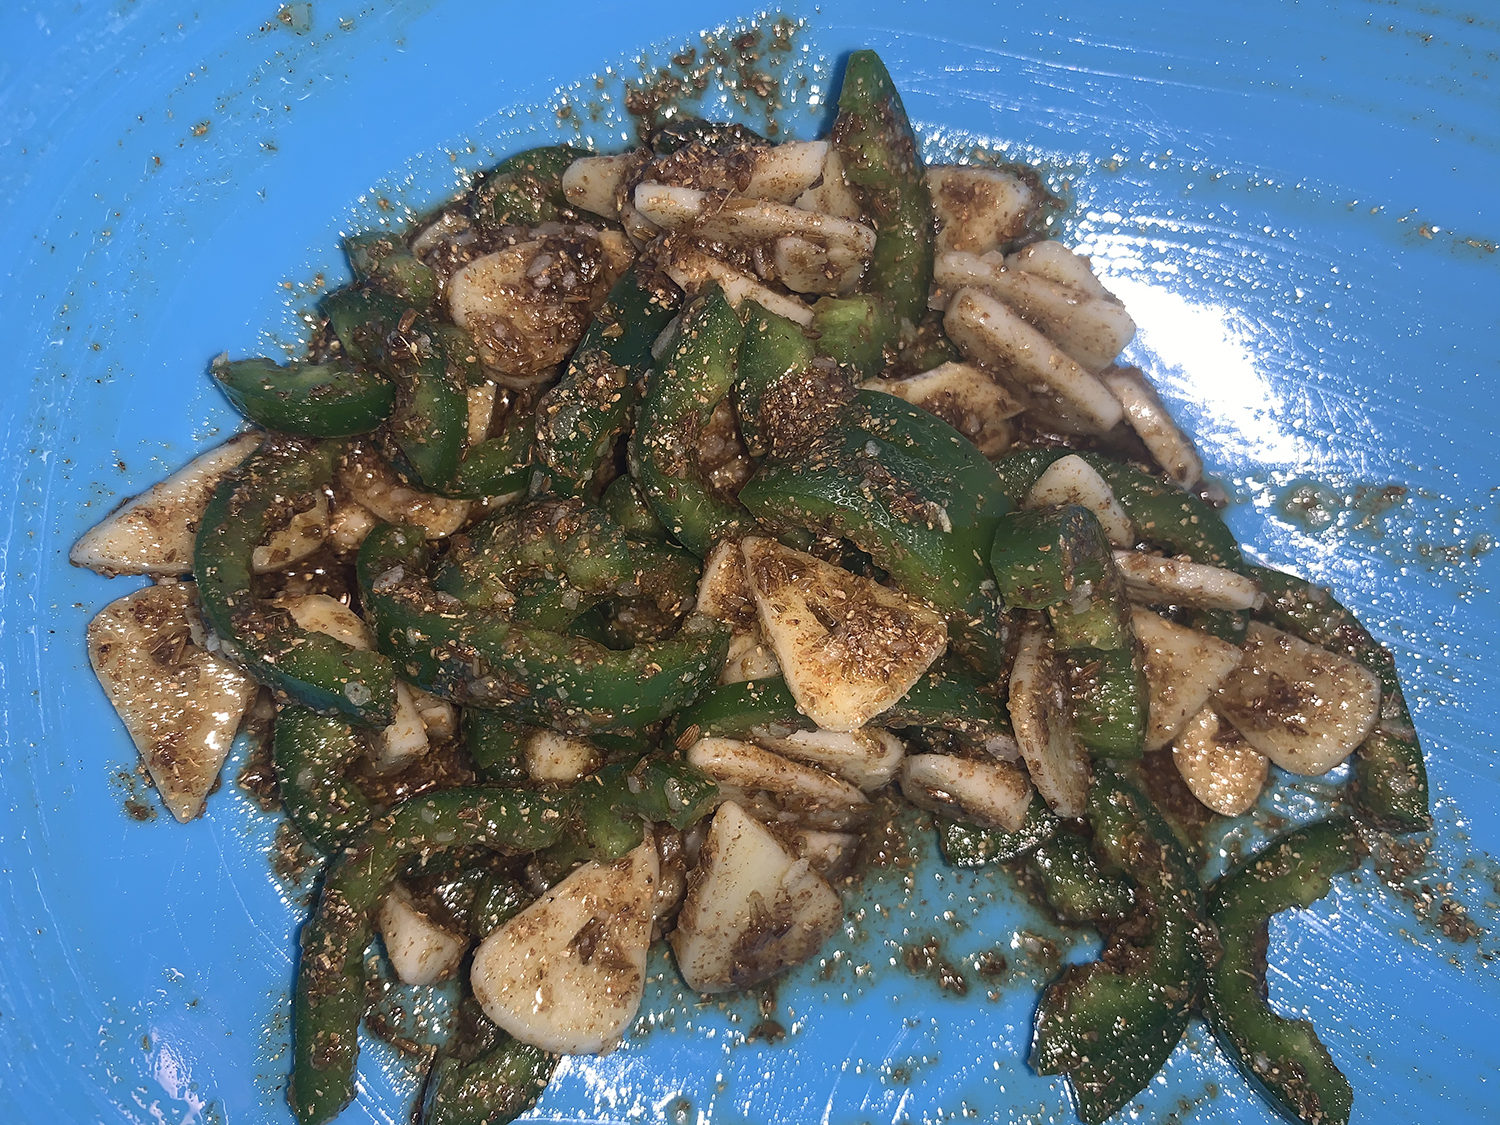
3-4 Fresno or jalapeño chilies, stemmed, halved lengthwise, seeded and thinly sliced crosswise
8 medium garlic cloves, thinly sliced
2 Tbsp. cumin seeds, crushed
1 Tbsp. ground coriander
2 Tbsp. grated lemon zest, plus lemon wedges to serve
¼ cup finely chopped fresh cilantro
Directions
Heat the oven to 475°F with a rack in the middle position.
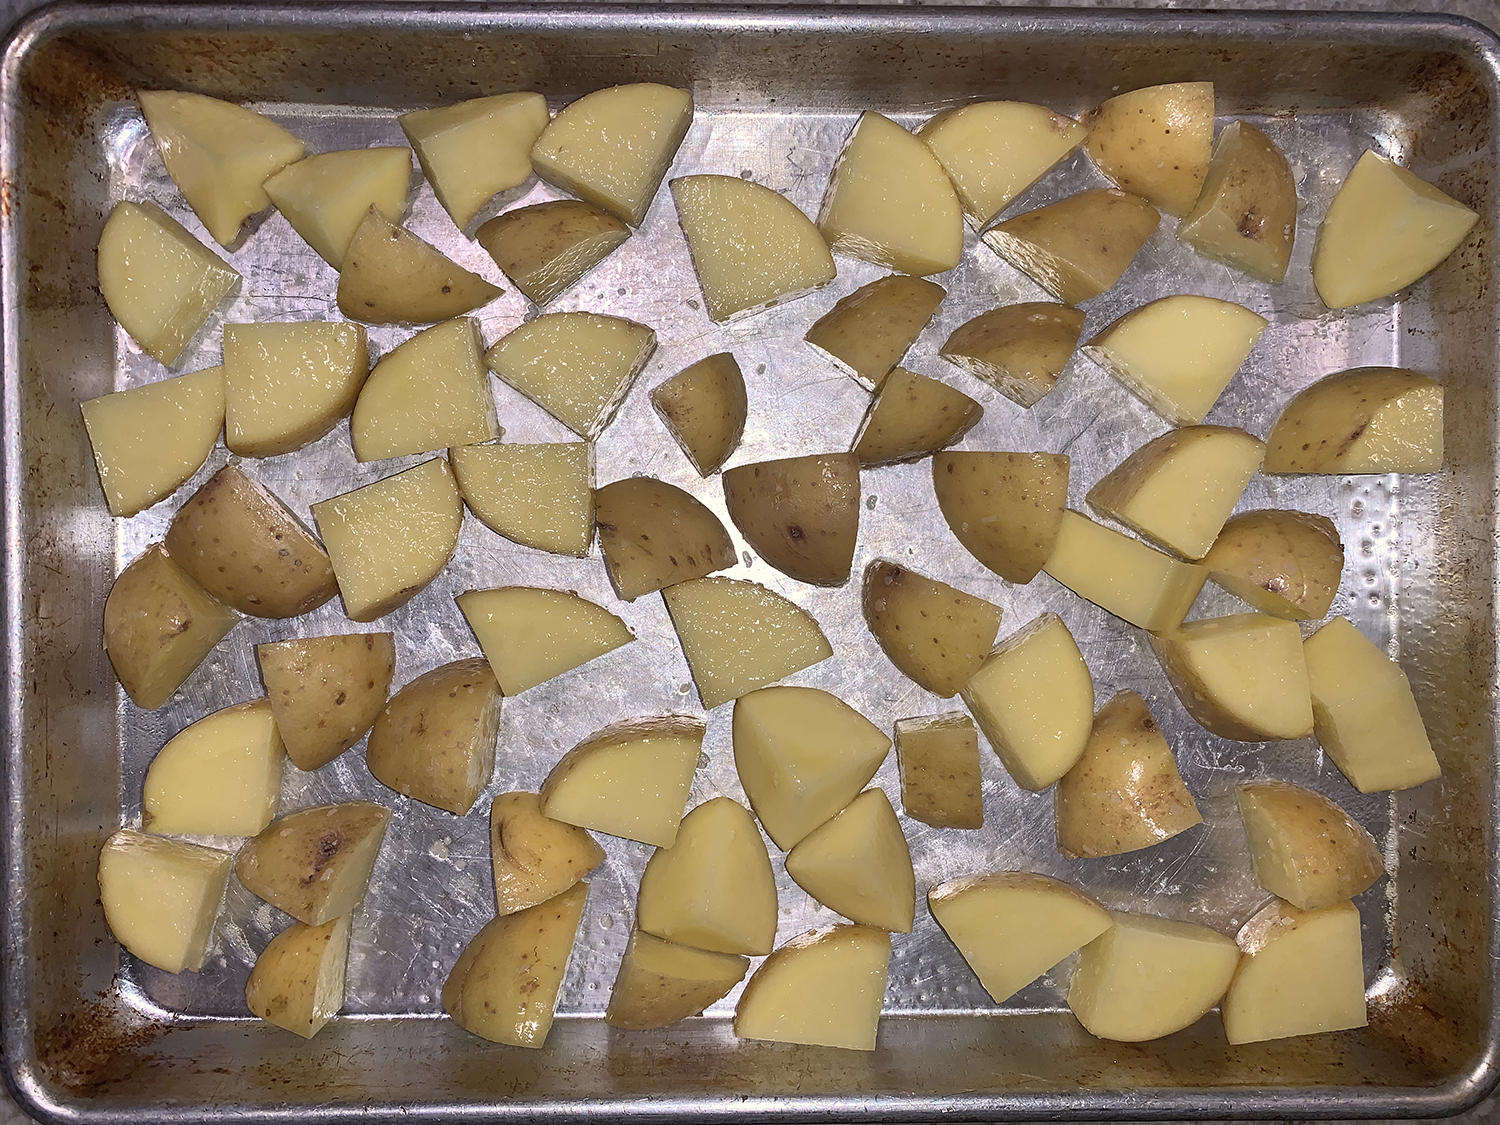
Mist a rimmed baking sheet with cooking spray.
In a large bowl, toss the potatoes with 3 tablespoons oil and 1 teaspoon salt. Transfer to the baking sheet, arranging the pieces cut side down in a single layer; reserve the bowl.
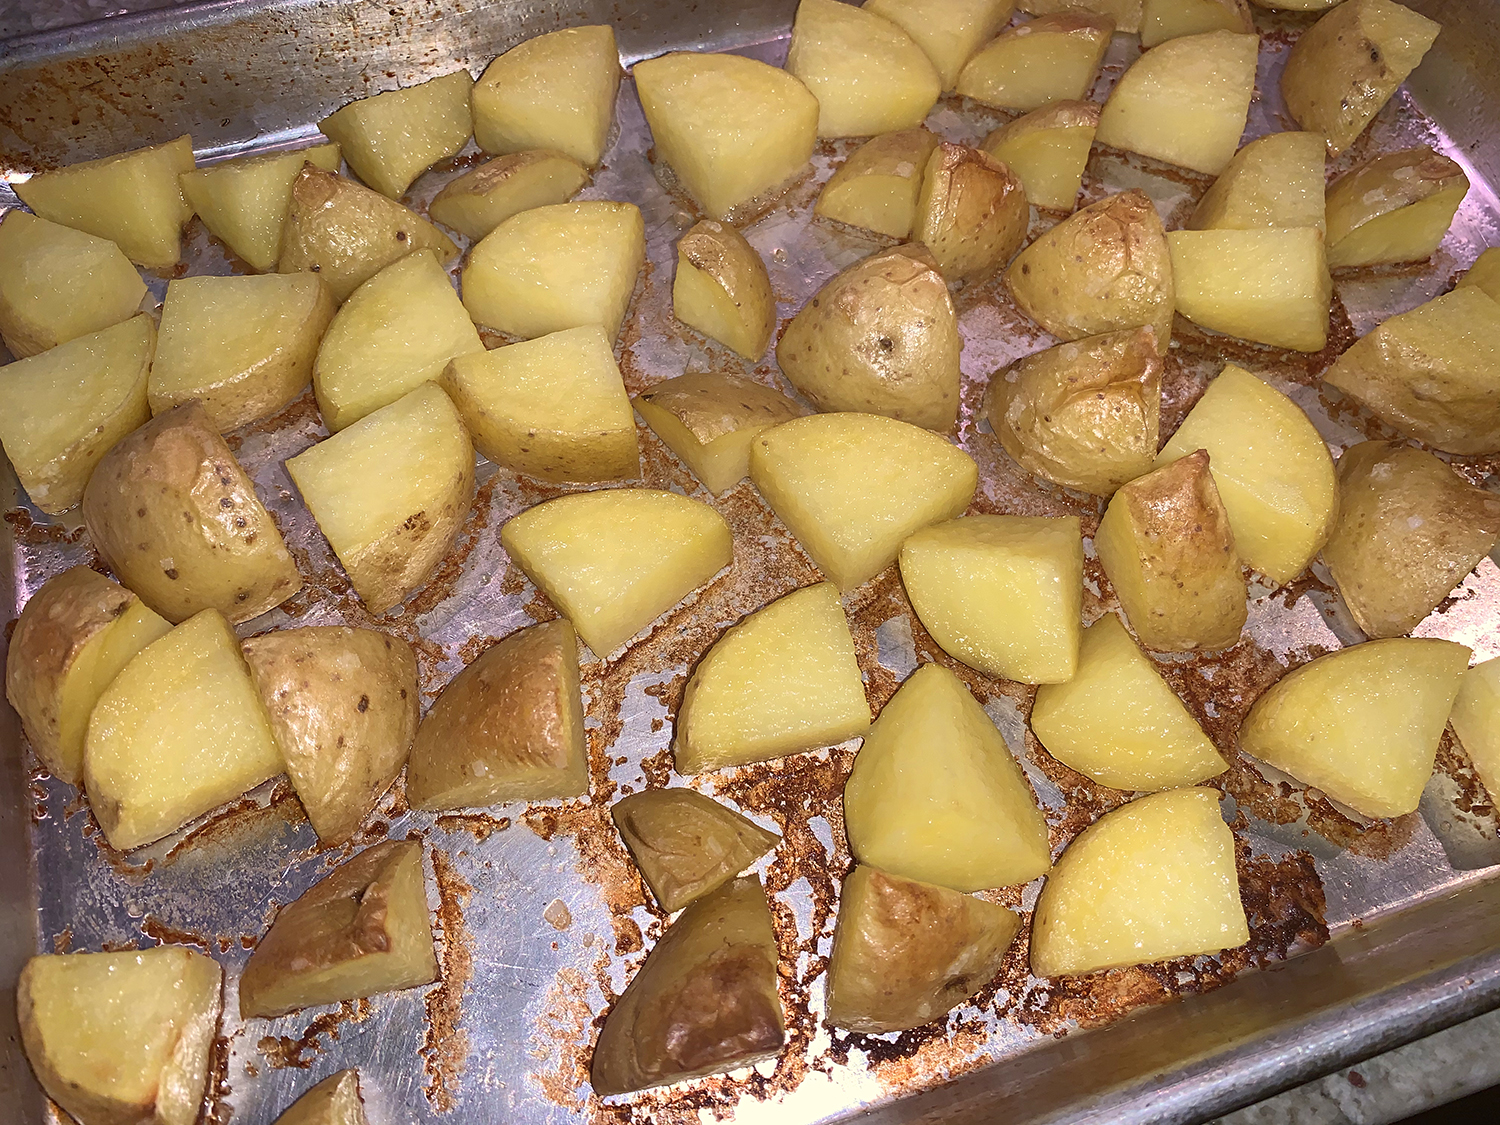
Roast until light golden brown and a skewer inserted into the potatoes meets just a little resistance, about 20 minutes.
Meanwhile, in the reserved bowl, stir together the remaining ¼ cup oil, the chilies, garlic, cumin and coriander.
When the potatoes are almost tender, use a wide metal spatula to transfer them to the reserved bowl; leave the oven on. Gently toss the potatoes until well combined with the seasonings, then scrape the mixture back onto the baking sheet and distribute in an even layer. Roast until the garlic is light golden brown and a skewer inserted into the potatoes meets no resistance, another 10 to 15 minutes. Cool for about 5 minutes.
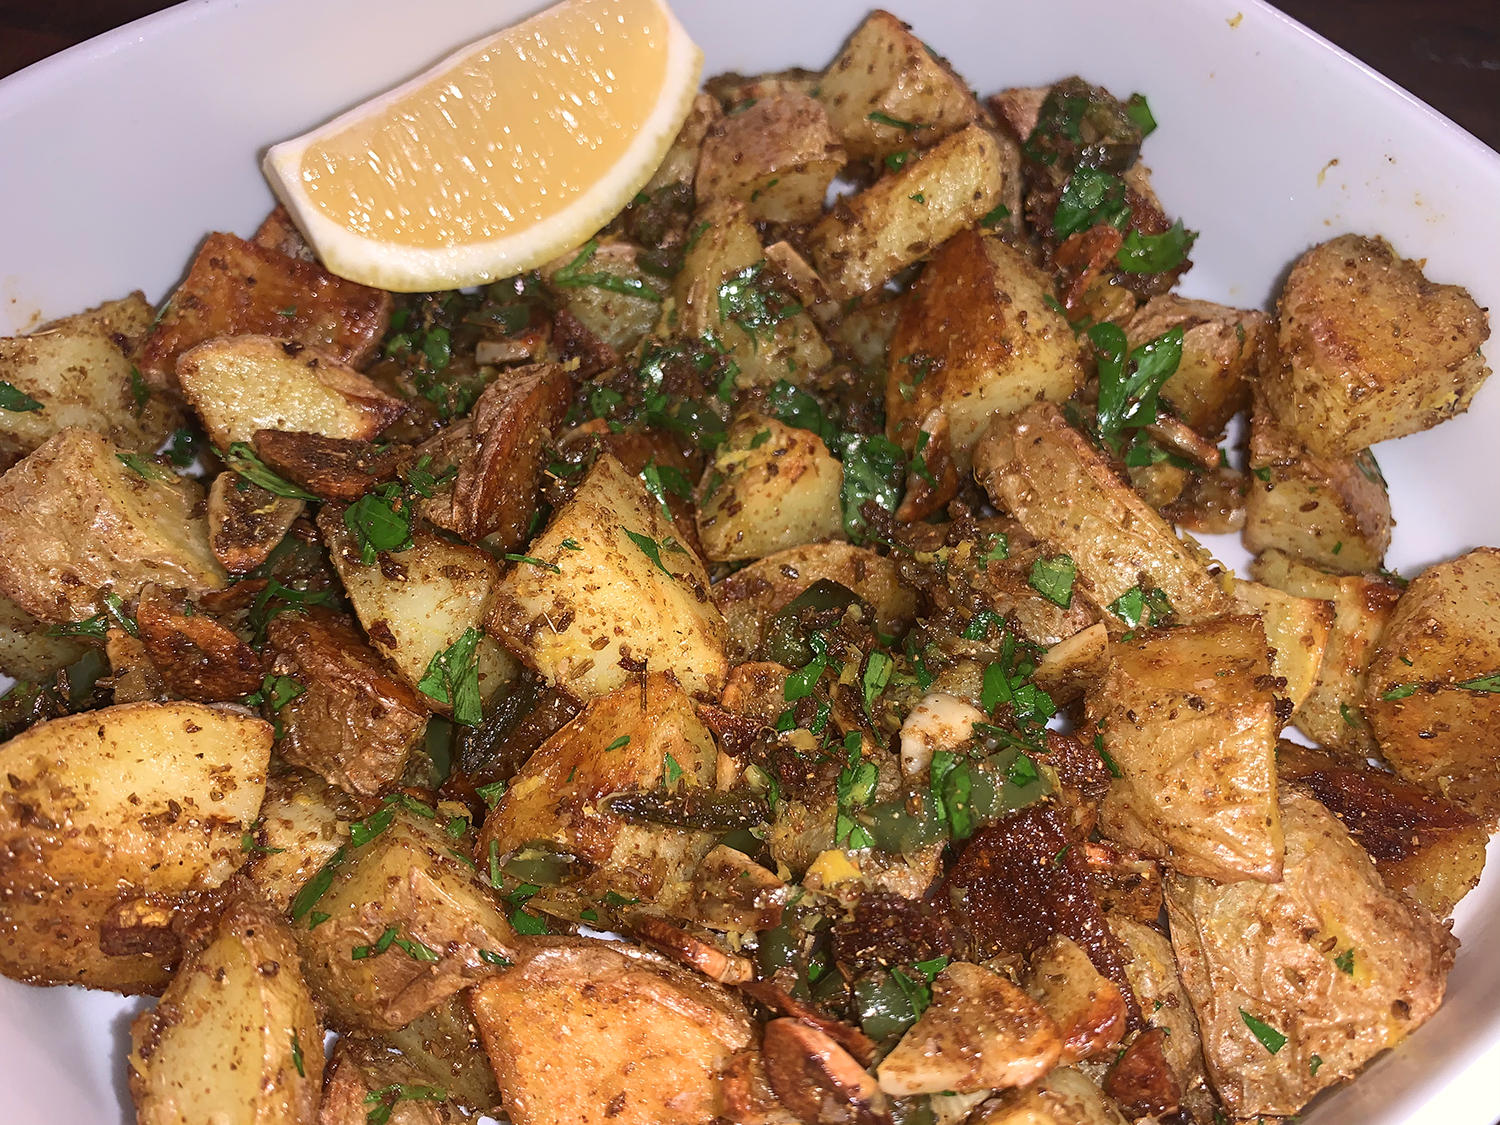
Sprinkle the lemon zest and cilantro over the potatoes, then toss. Transfer to a serving dish. Serve with lemon wedges.
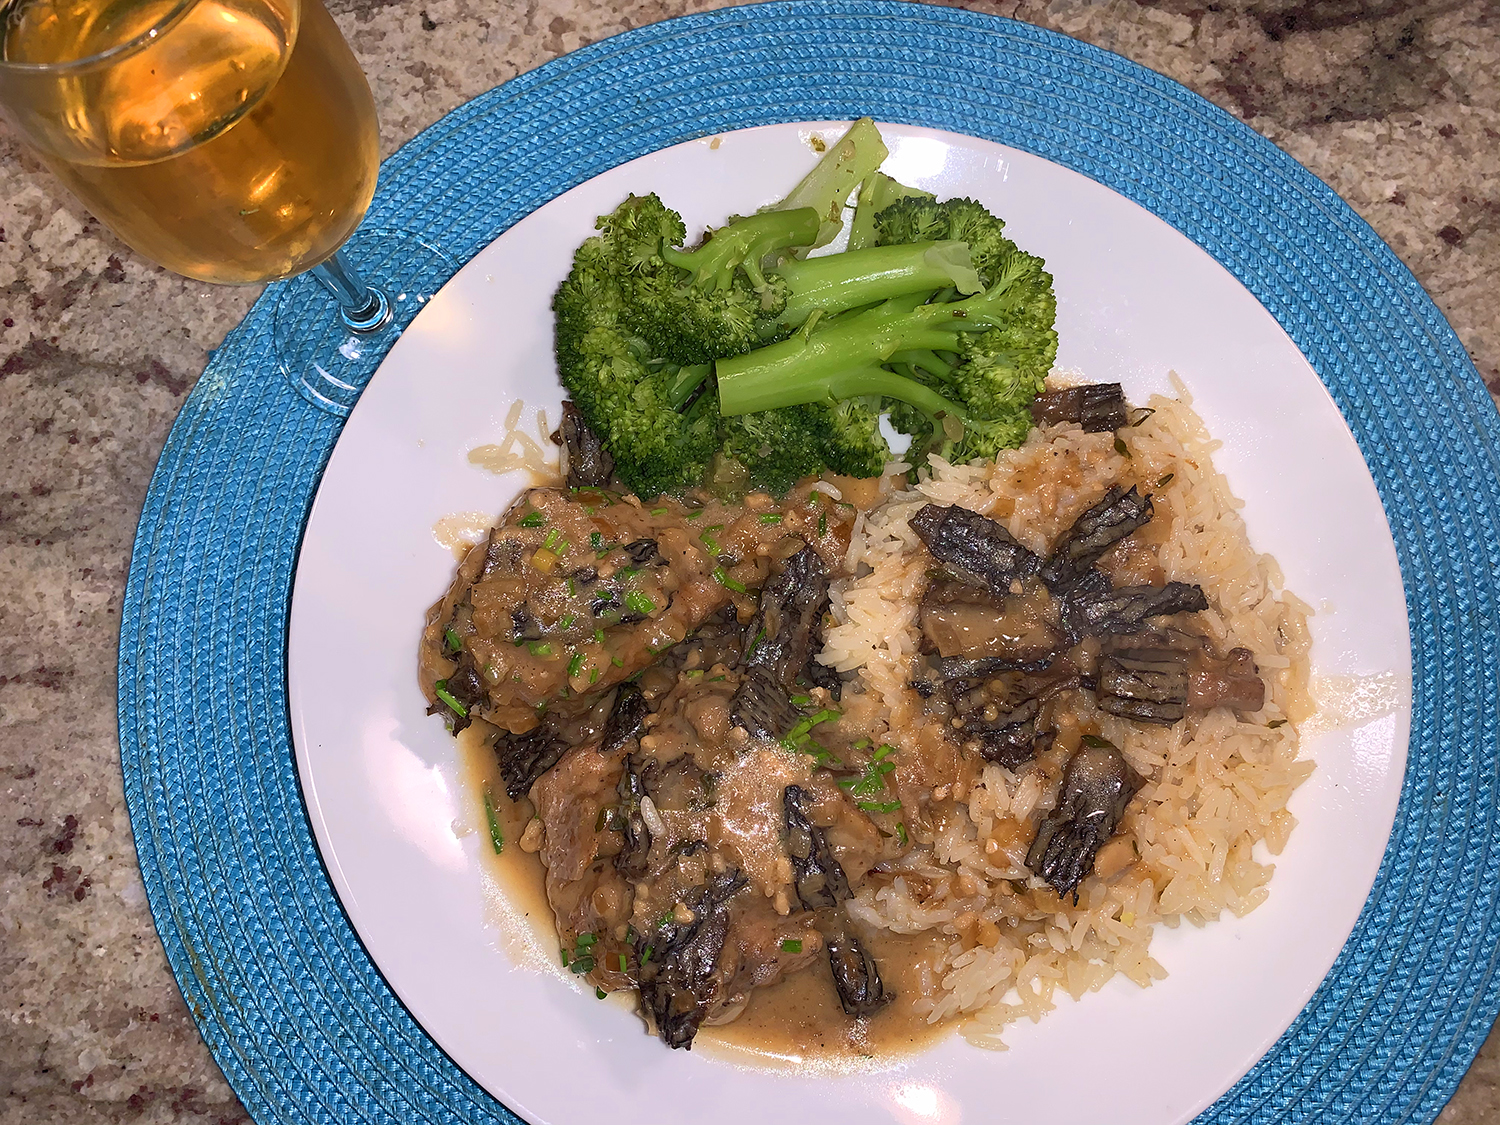
We served ours with a reversed-seared sirloin steak and a side of broccolini.
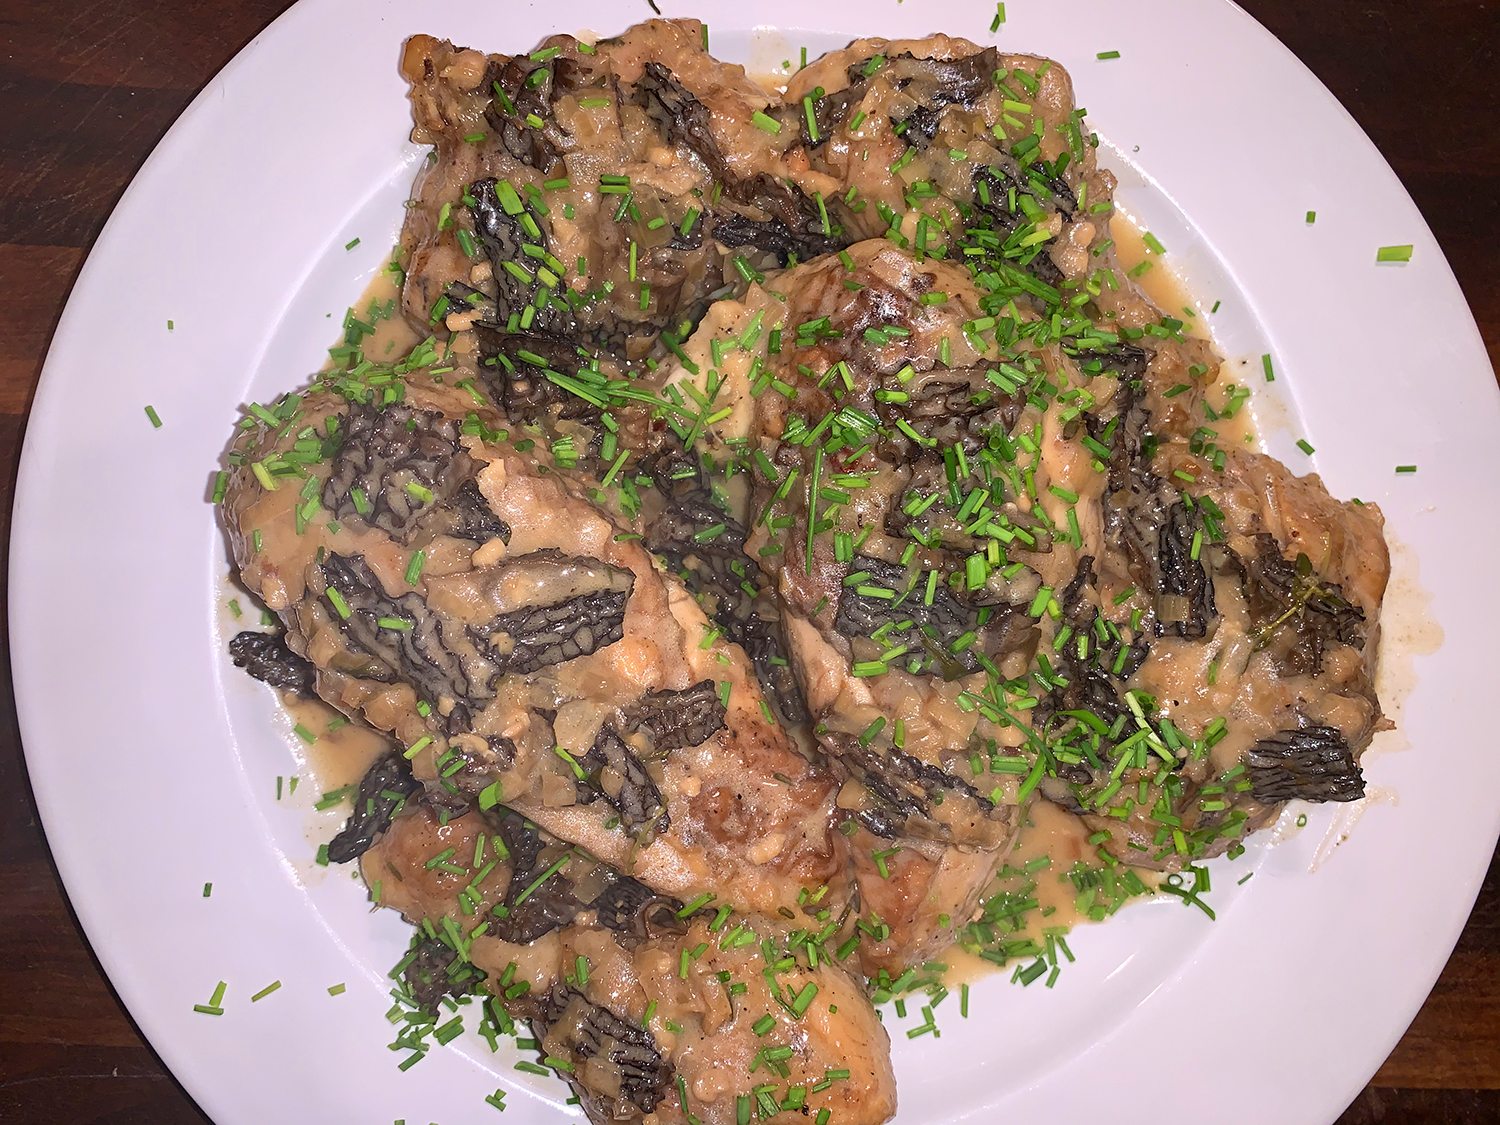
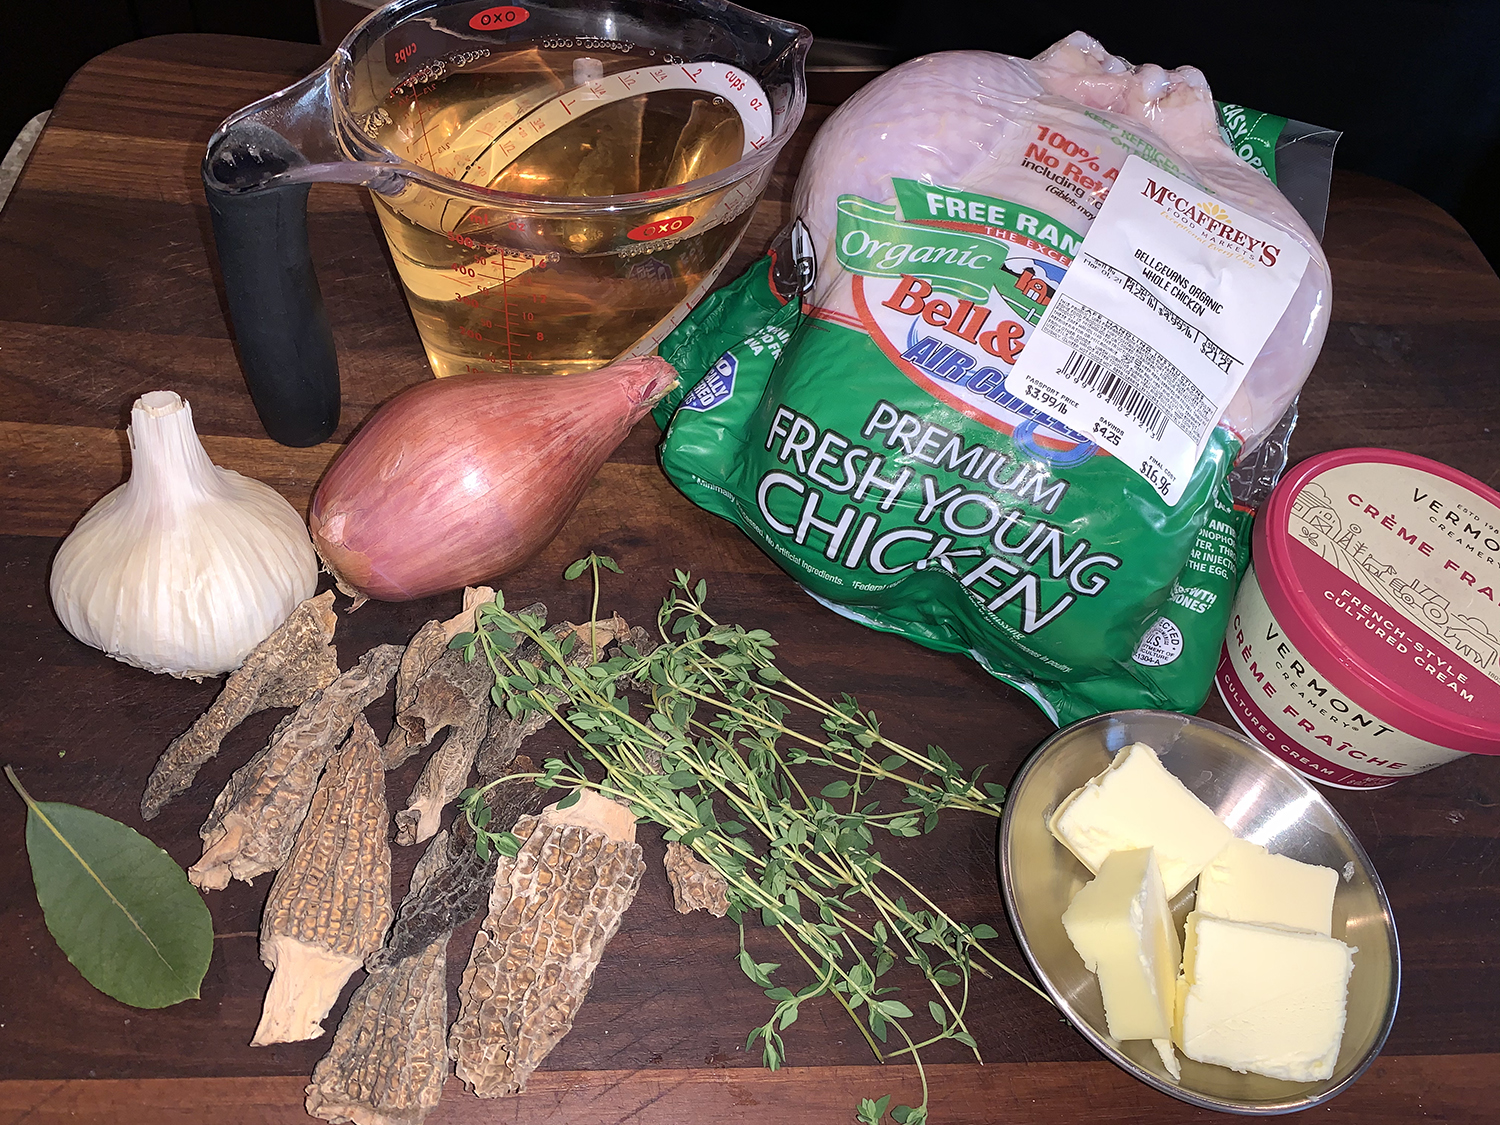
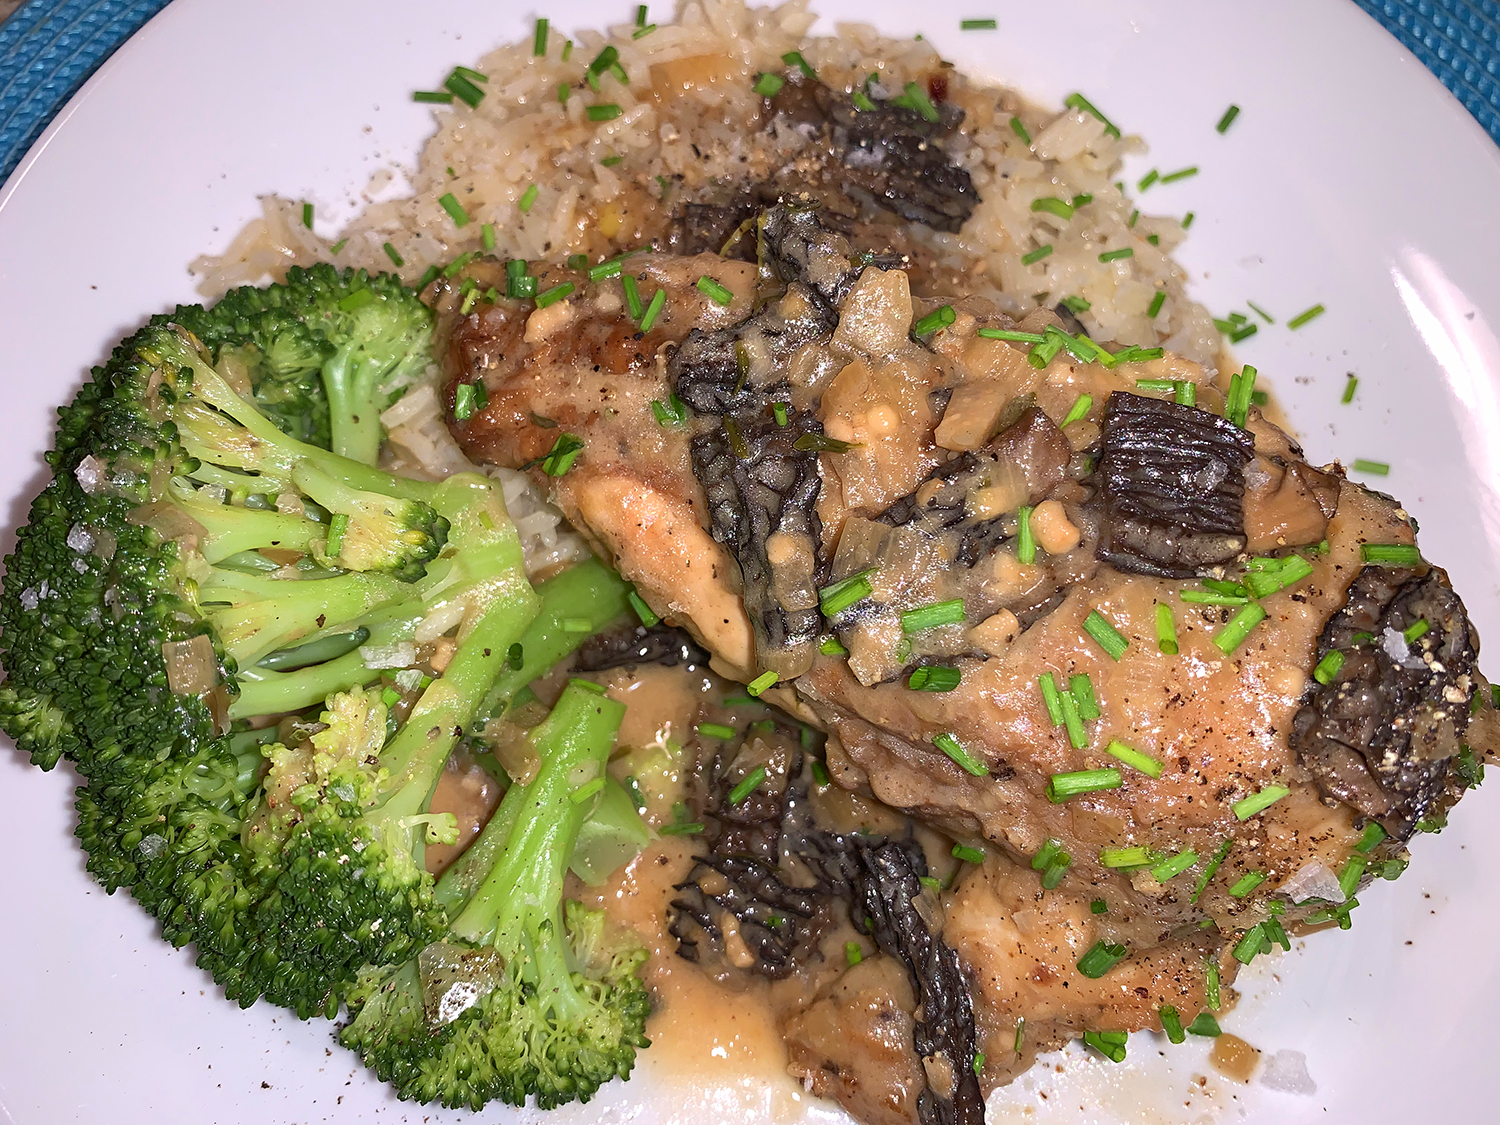
Or, as the French would say “Poulet au Vin Jaune de Jura” — which is the best chicken you can find slowly simmered in wine. Now obtaining the Jura wine was problematic, but we found you can substitute 1 1/3 cups white wine with 2/3 cup dry sherry (fino) for the 2 cups of vin juane de Jura. If the end result was any indication, the Jura wine was not missed at all—the meal was fabulous!
According to the online article that accompanied this recipe “The luxurious recipe typically calls for an AOP Poulet de Bresse, a super-high-quality chicken raised in the Alpine region of the same name. While some American farmers are raising the breed stateside, the original French specimens are rarely available in the United States, so in the absence of the “real deal,” use the nicest free-range chicken you can find.” And so we did…
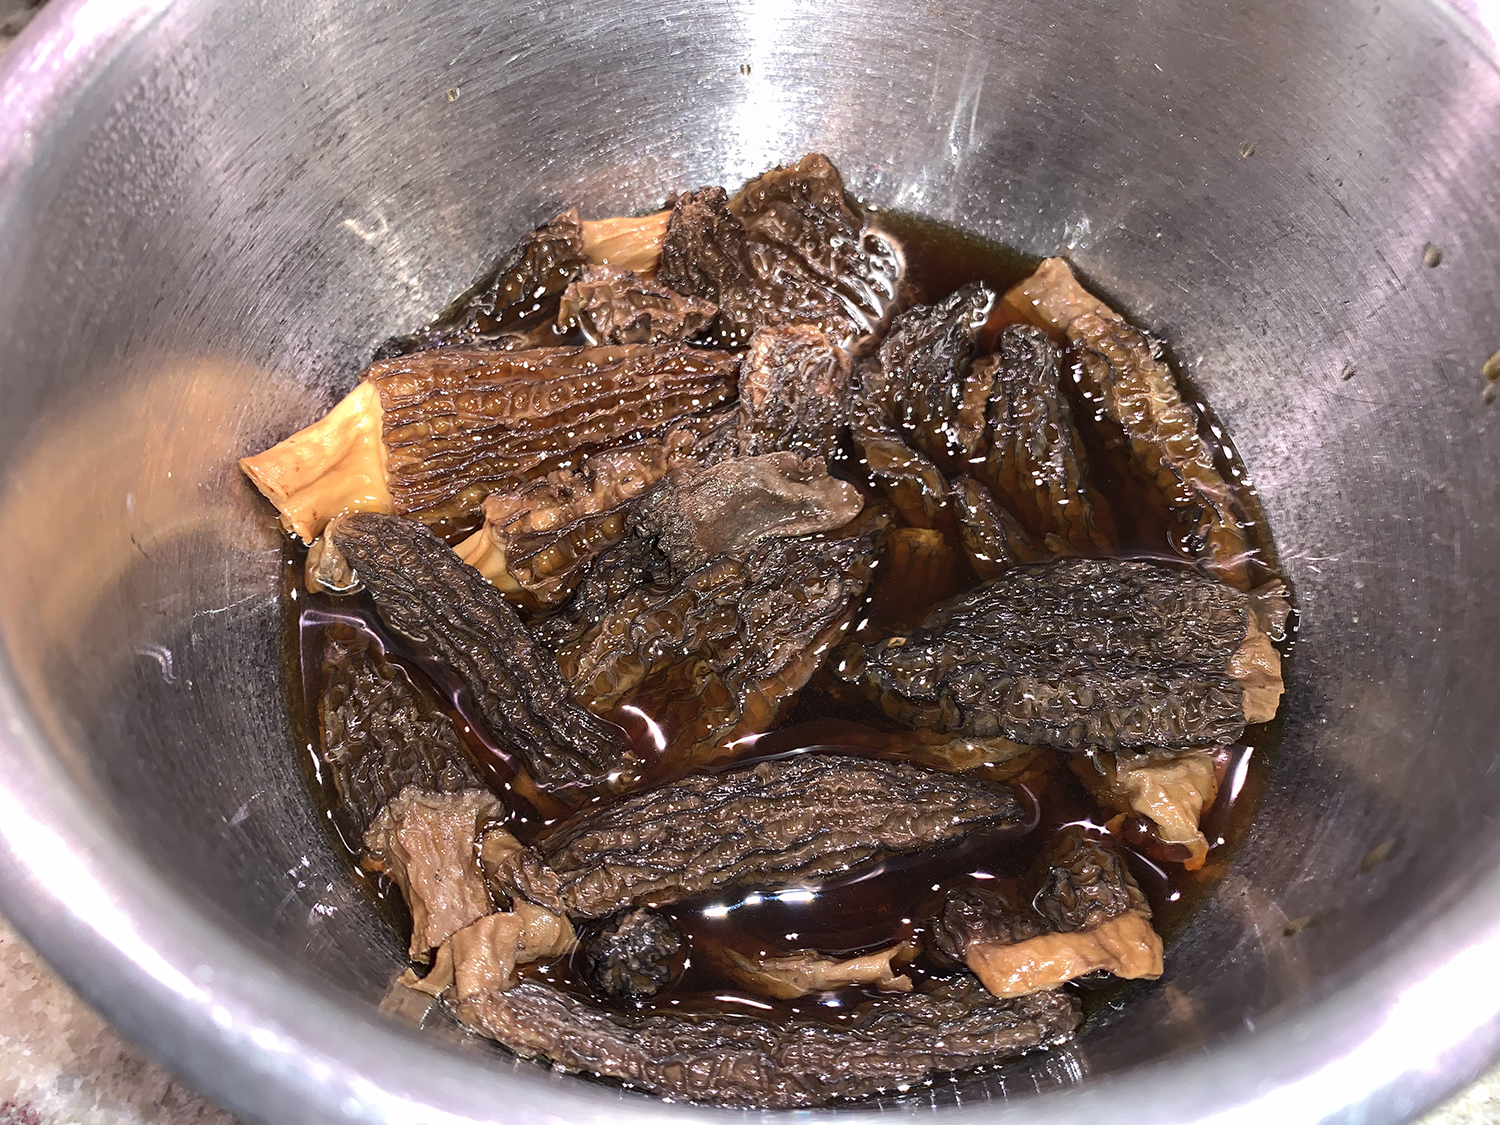
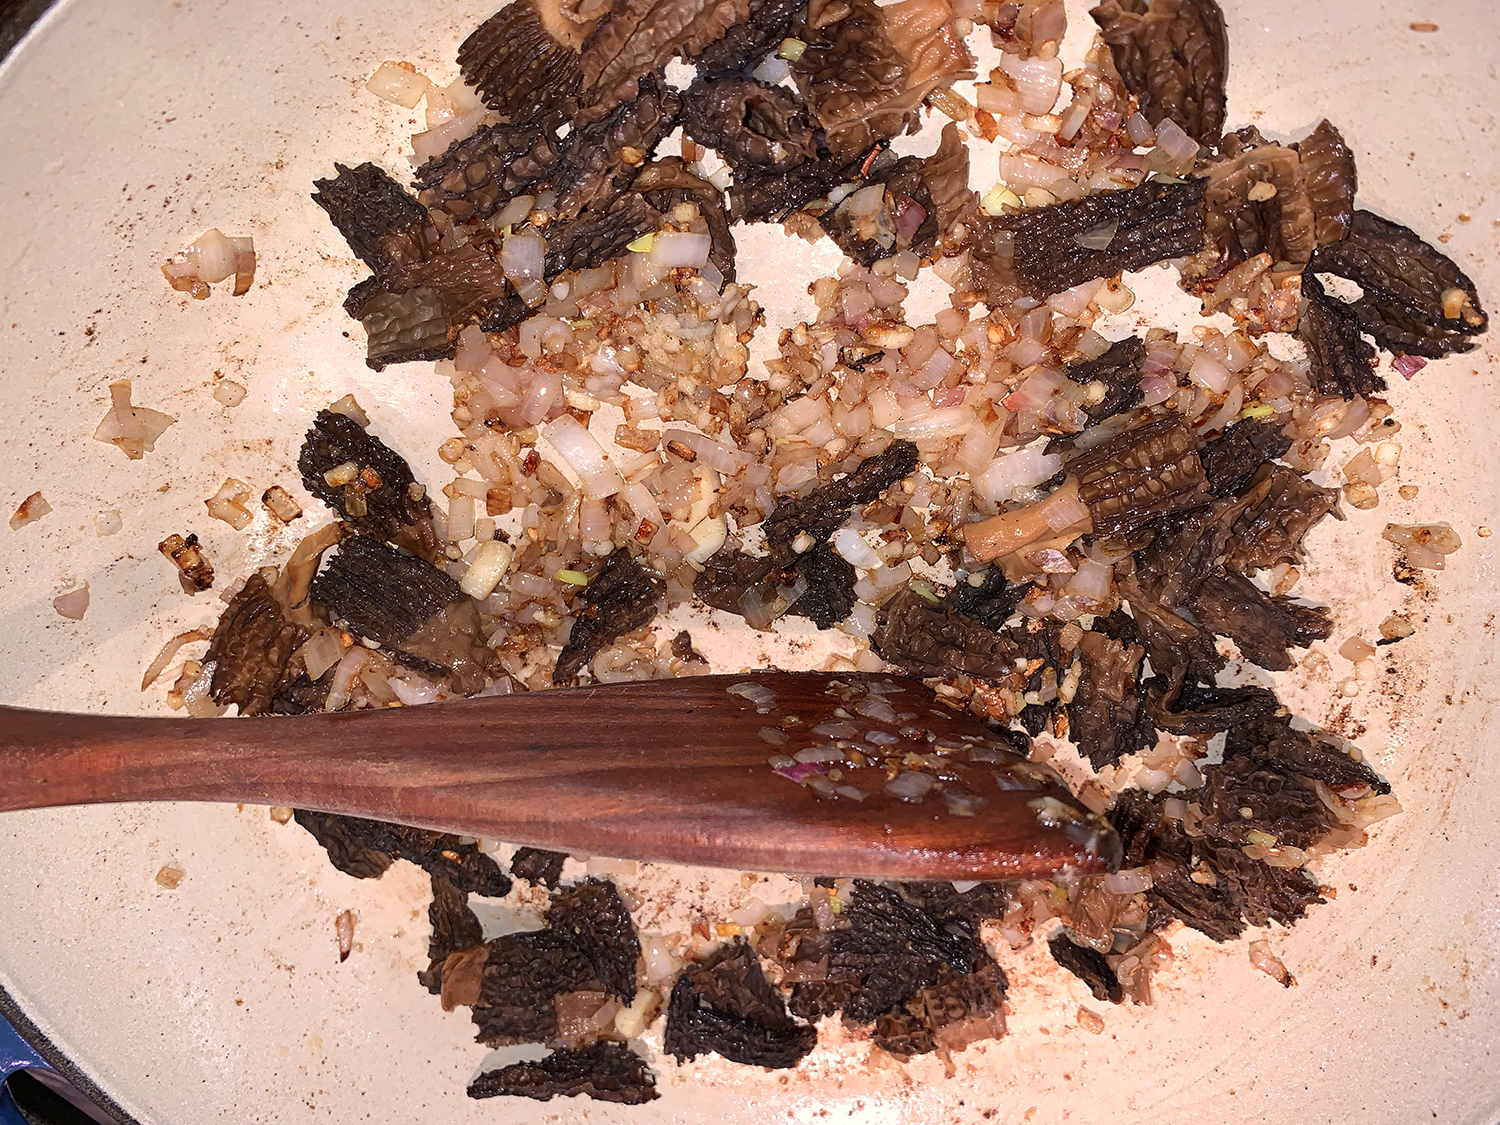
To the sauce, add as many morels as you can afford. When in season, fresh morels are easily substituted for dry—just replace the soaking liquid in the recipe with an equal amount of chicken stock. Well, finding dried morels was easier said than done. After scouring four different grocery stores with no luck, oddly enough it was the least upscale supermarket where we finally scored!
And even though the directions do not indicate to cut the morels, ours were quite large so we quartered them after their 30-minute soak.
Kosher salt and freshly ground black pepper, to taste
Crusty bread, noodles, or rice, to serve
Instructions
In a small pot, bring 1 cup of water to a boil. Inspect the morels for visible dirt or grit, and brush them off with a moist paper towel. Once the water boils, turn off the heat and add the morels to the water, and set aside to soak. (If the morels aren’t fully submerged, stir them occasionally to make sure they all become rehydrated.)
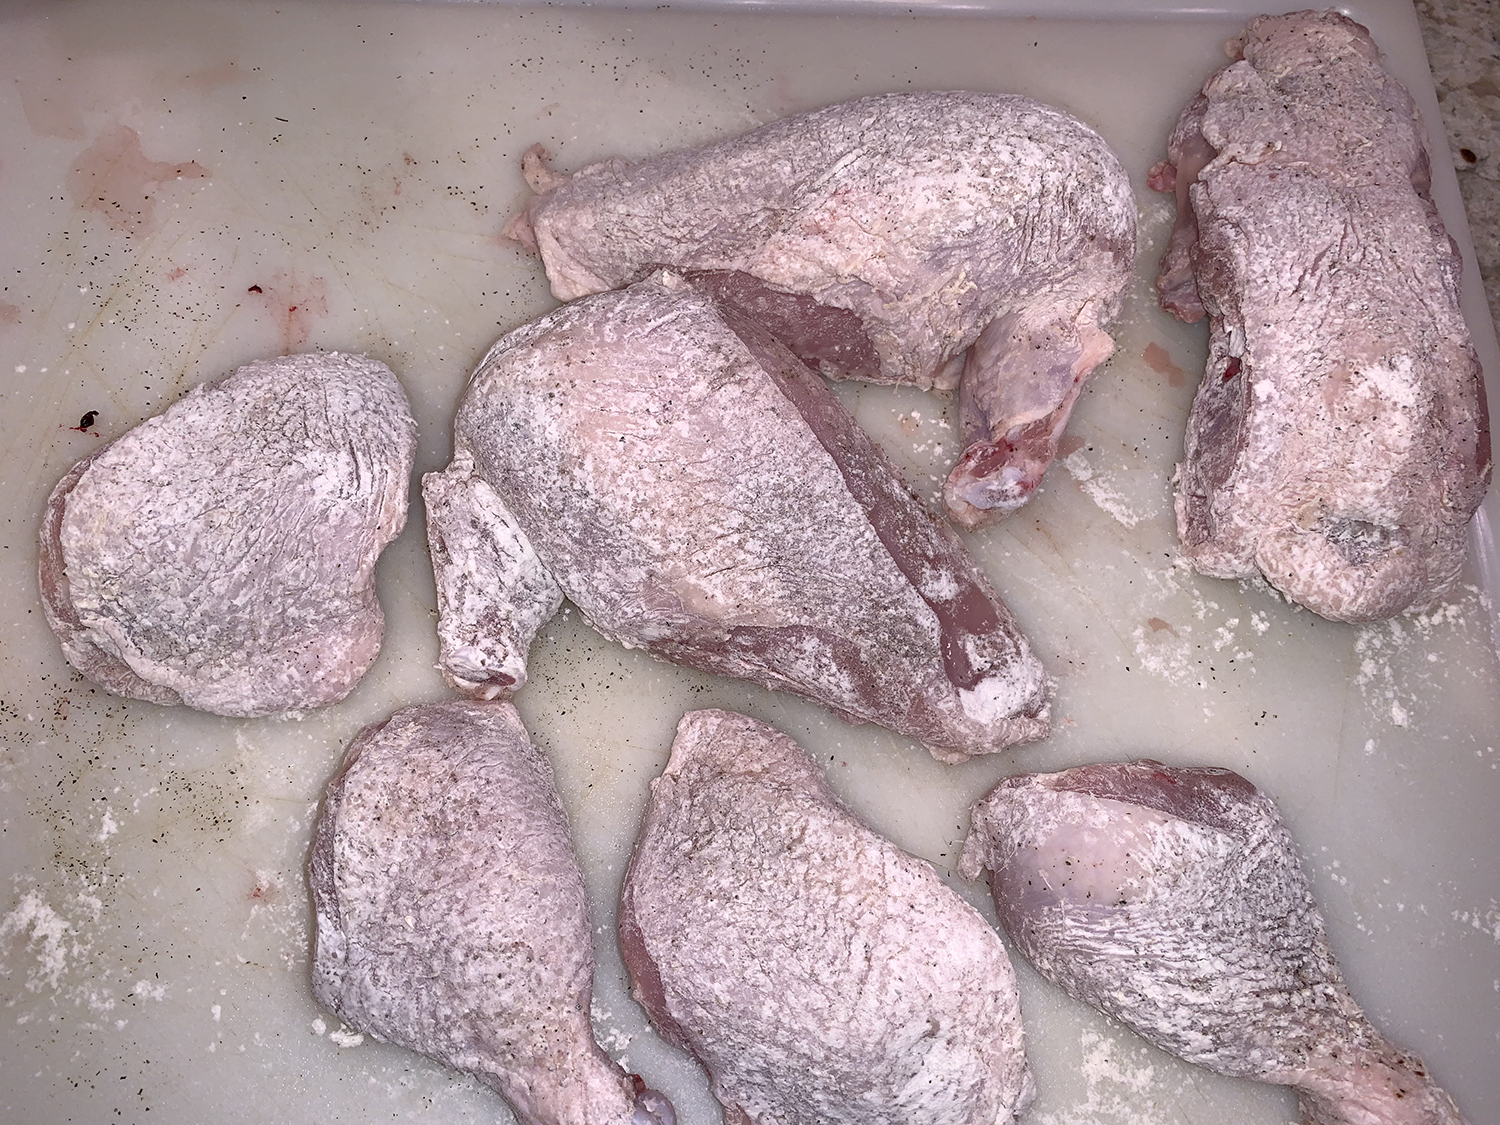
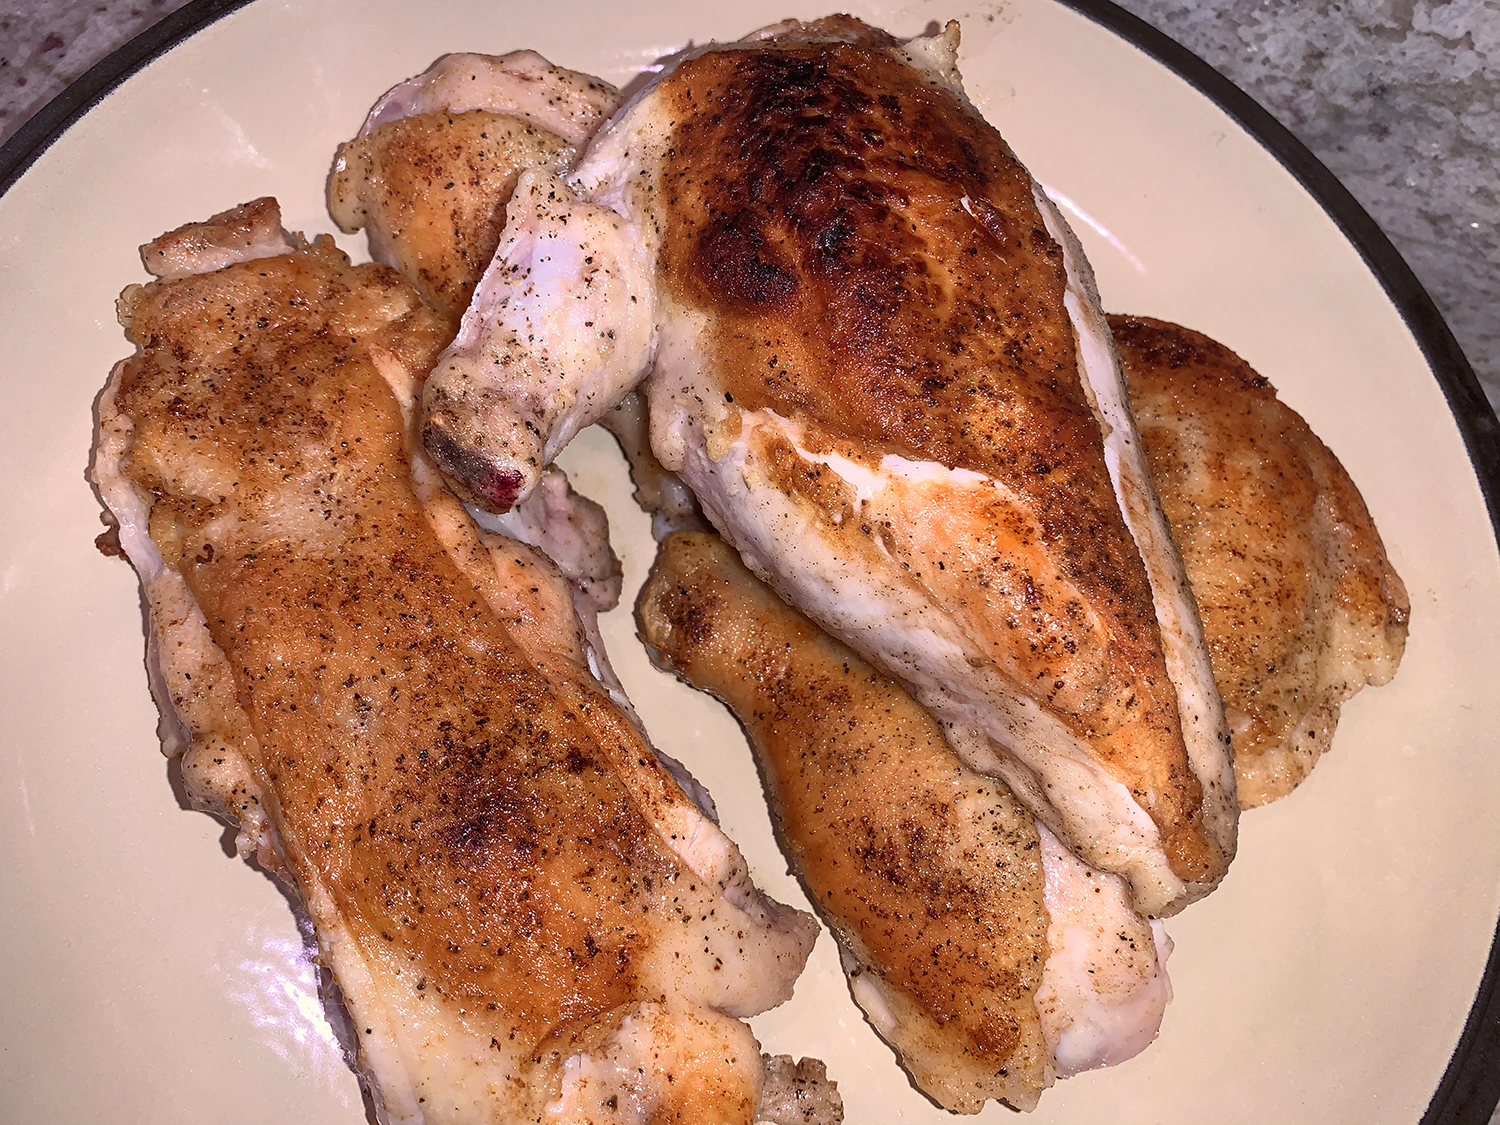
Pat the chicken dry with a paper towel and use kitchen shears or a boning knife to trim off the wing flats and tips, reserving them for another use. Separate the chicken into 7 pieces: 2 breasts (on the bone and connected to the wing drum), 2 thighs, 2 drumsticks and the backbone. Transfer the chicken pieces to a large bowl, season lightly with salt and pepper, then sprinkle with ¼ cup of flour and toss until the chicken is coated evenly on all sides.
In a large pot or Dutch oven, melt 3 tablespoons of butter over medium heat. When the butter begins to bubble, and working in batches as needed so as to not crowd the pan, add the chicken parts (including the backbone) skin side down in one layer and cook, turning occasionally, until browned all over, about 25 minutes per batch. Transfer the chicken to a platter and set aside.
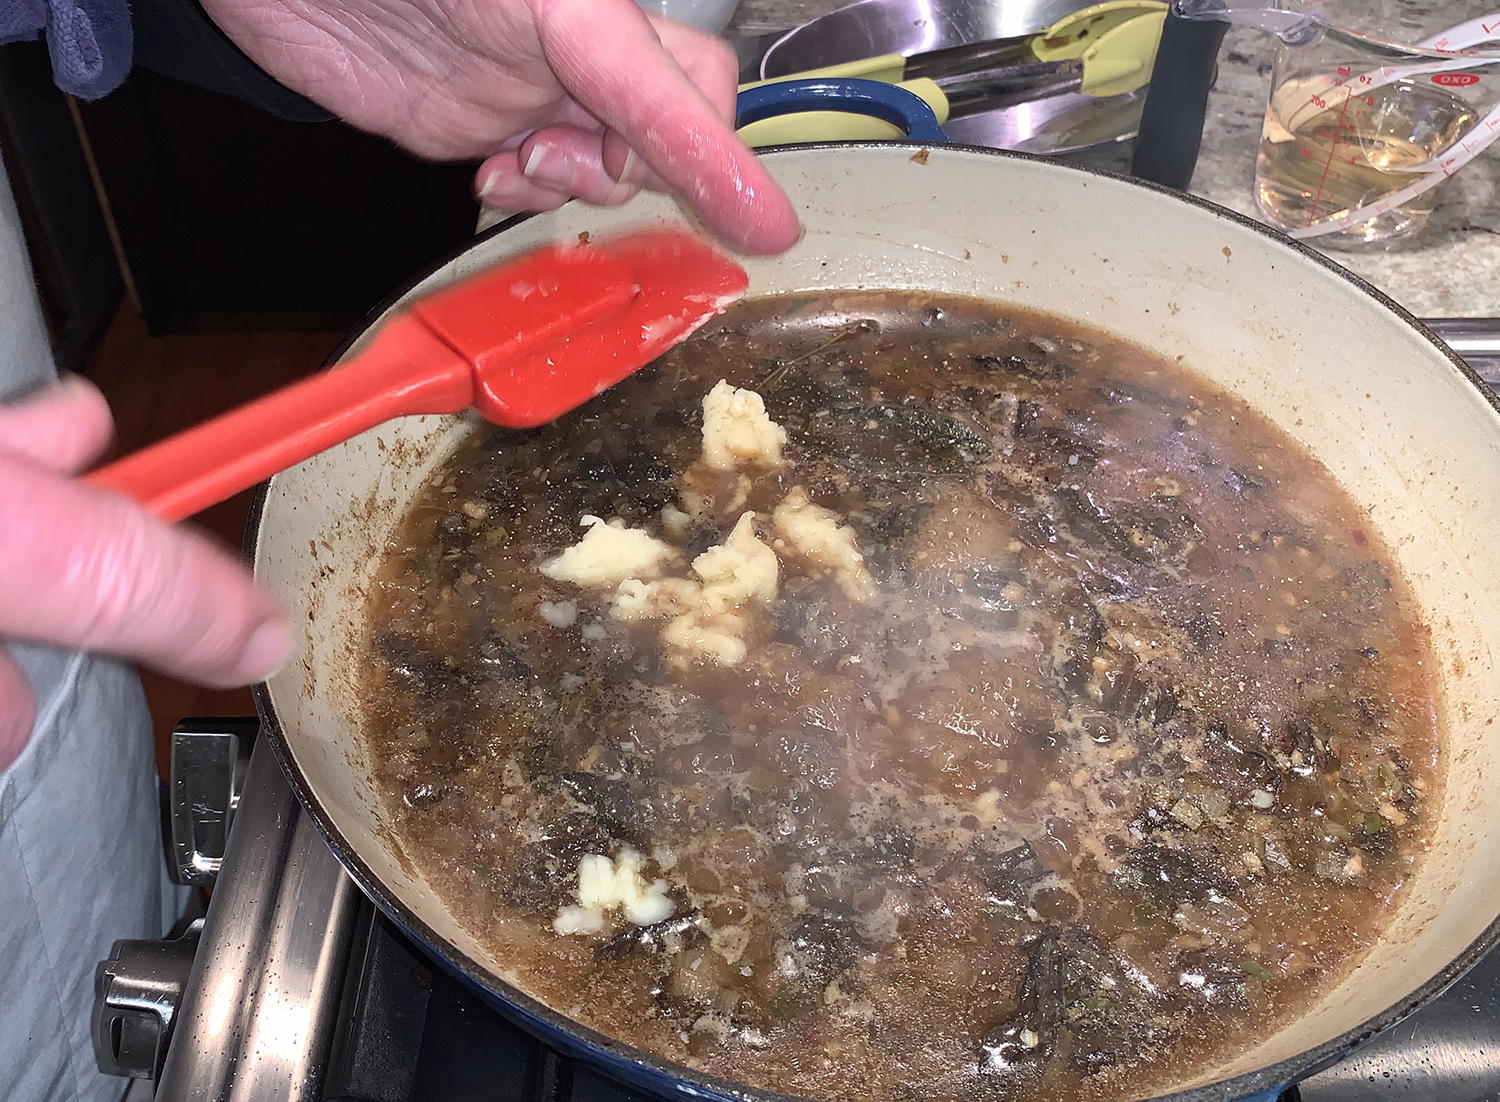
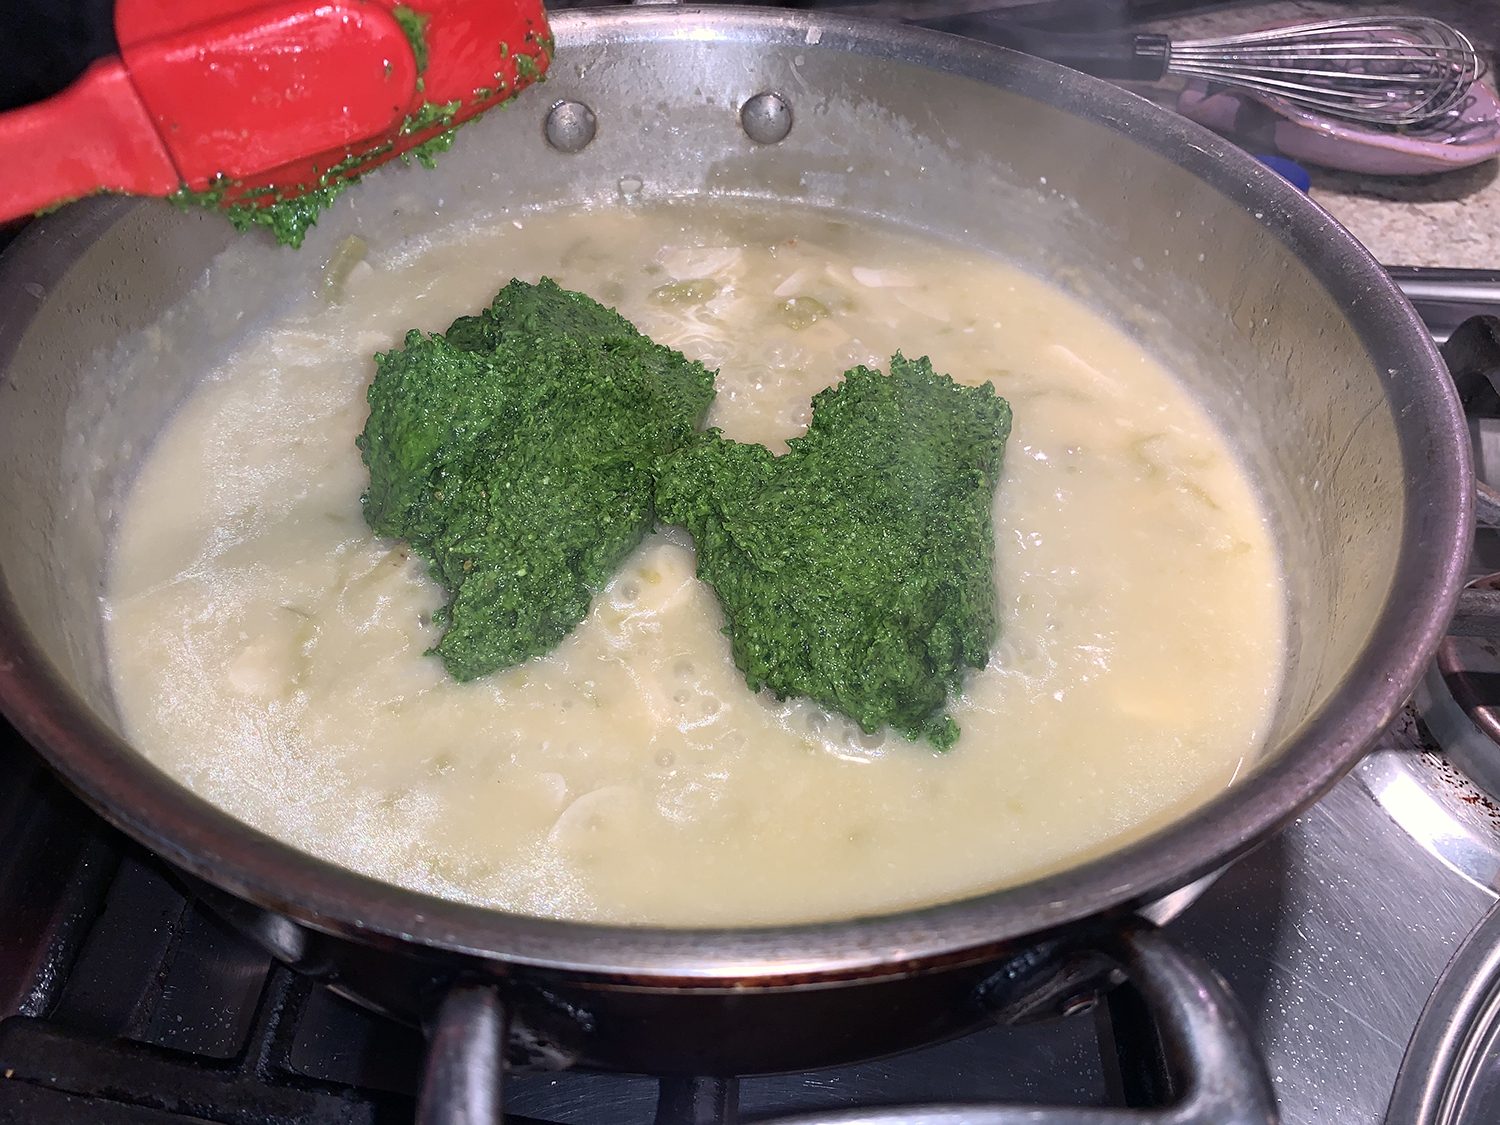
Add the shallots and garlic to the pan and cook, stirring occasionally, until the shallots soften and lose their color, 3–4 minutes. Using your fingers or a slotted spoon, scoop the morels out of their soaking liquid (reserving the liquid), then add them to the pot and continue cooking for another minute.
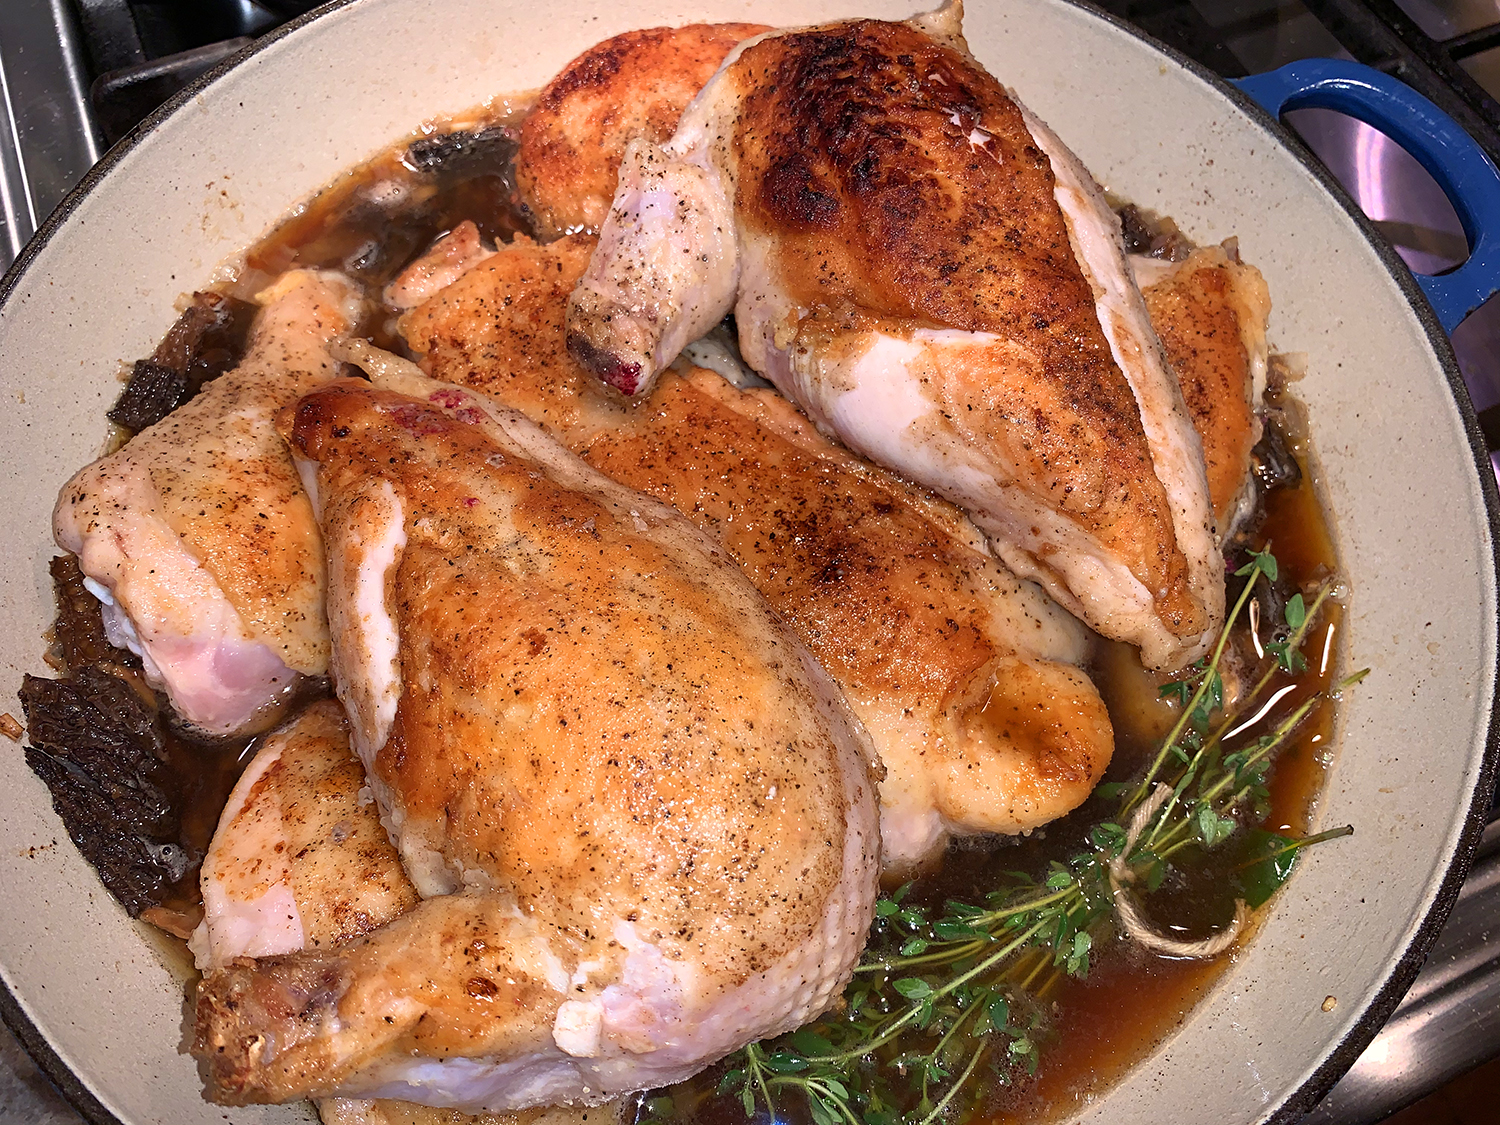
Add 1½ cups of the wine to the pot and cook for a few seconds, stirring and scraping the bottom of the pan. Return the chicken to the pot and bring to a simmer. Strain the reserved morel soaking liquid through a very fine mesh sieve or coffee filter and add it to the pot along with the thyme and bay leaf. Lower the heat to low, partially cover, and cook at a gentle simmer, turning the chicken occasionally until the thigh meat is very tender, 40–50 minutes.
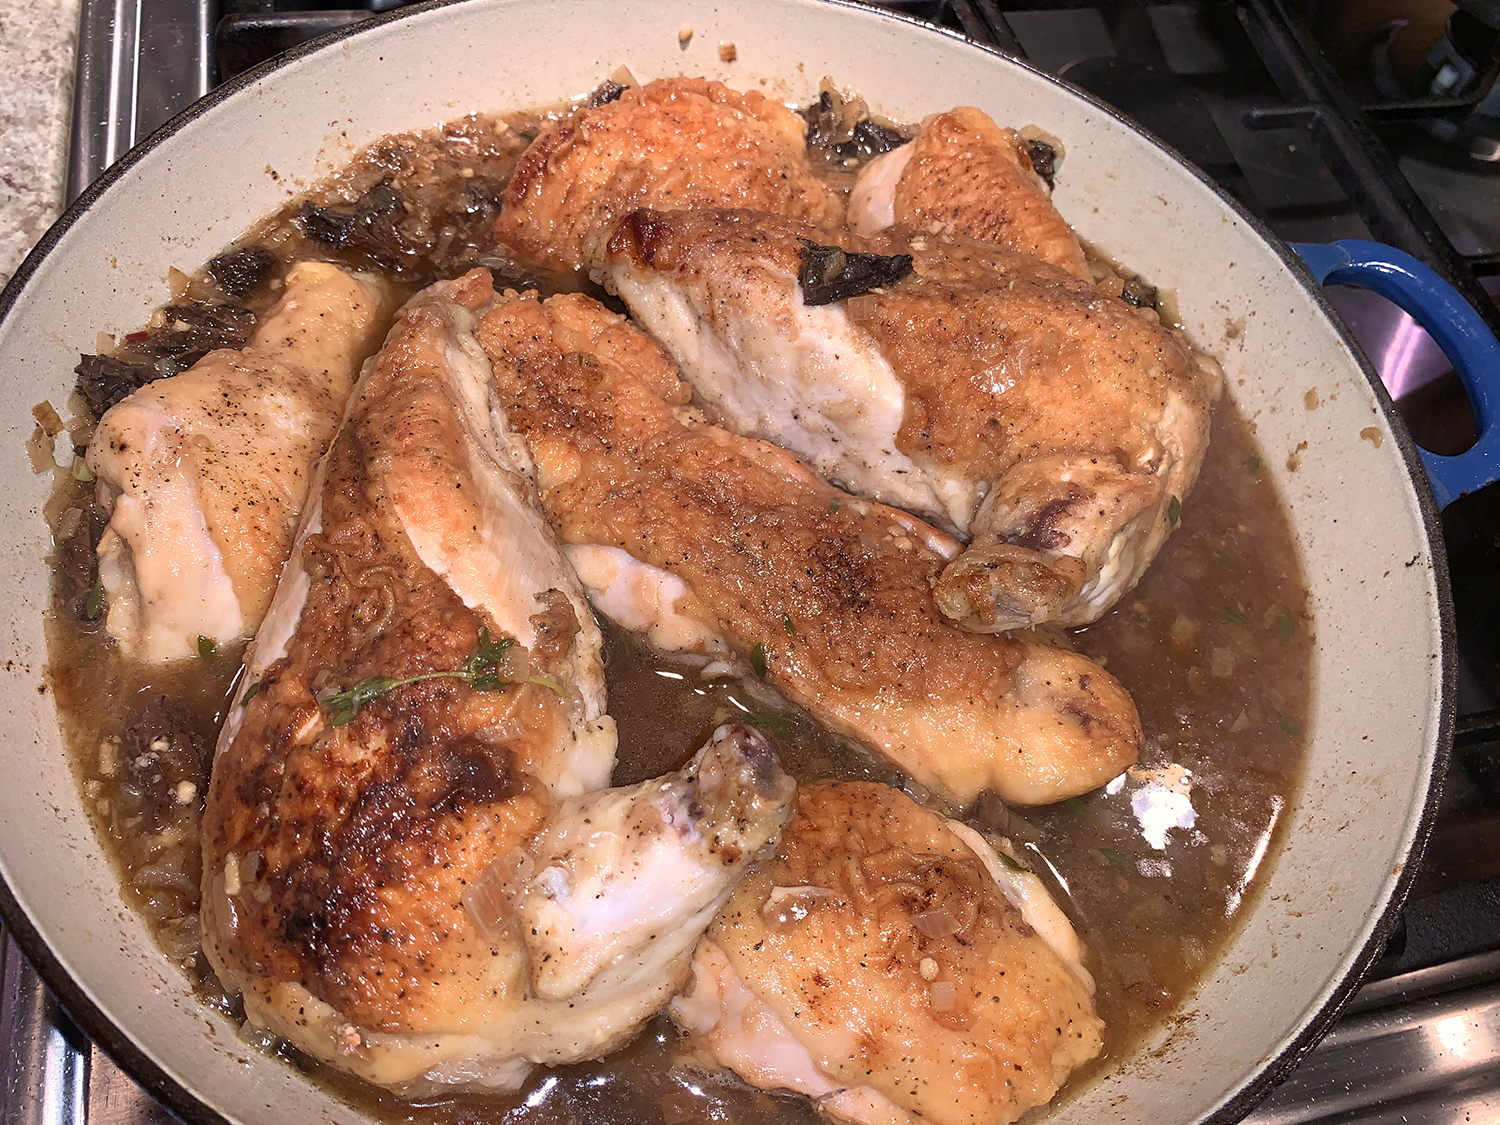
Use tongs to transfer the chicken pieces to the platter and set aside. Return the pan to medium heat and continue simmering the cooking liquid until it has reduced by about a third, 10–12 minutes. Season to taste with additional salt and pepper if needed.
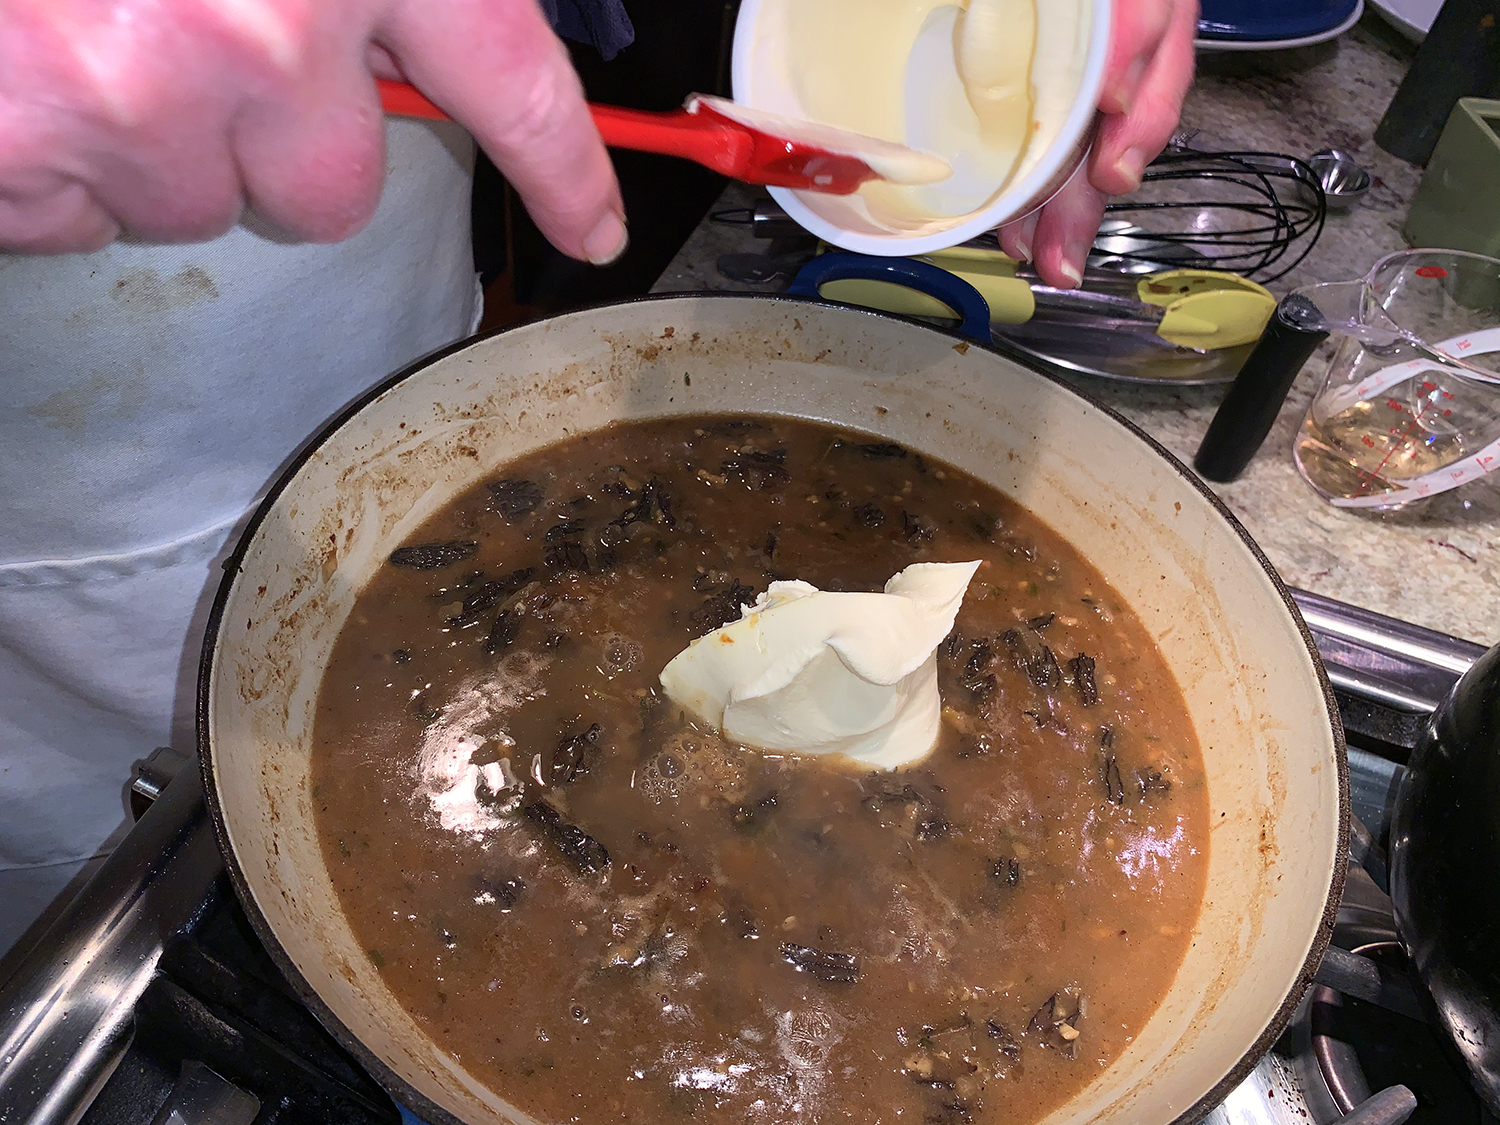
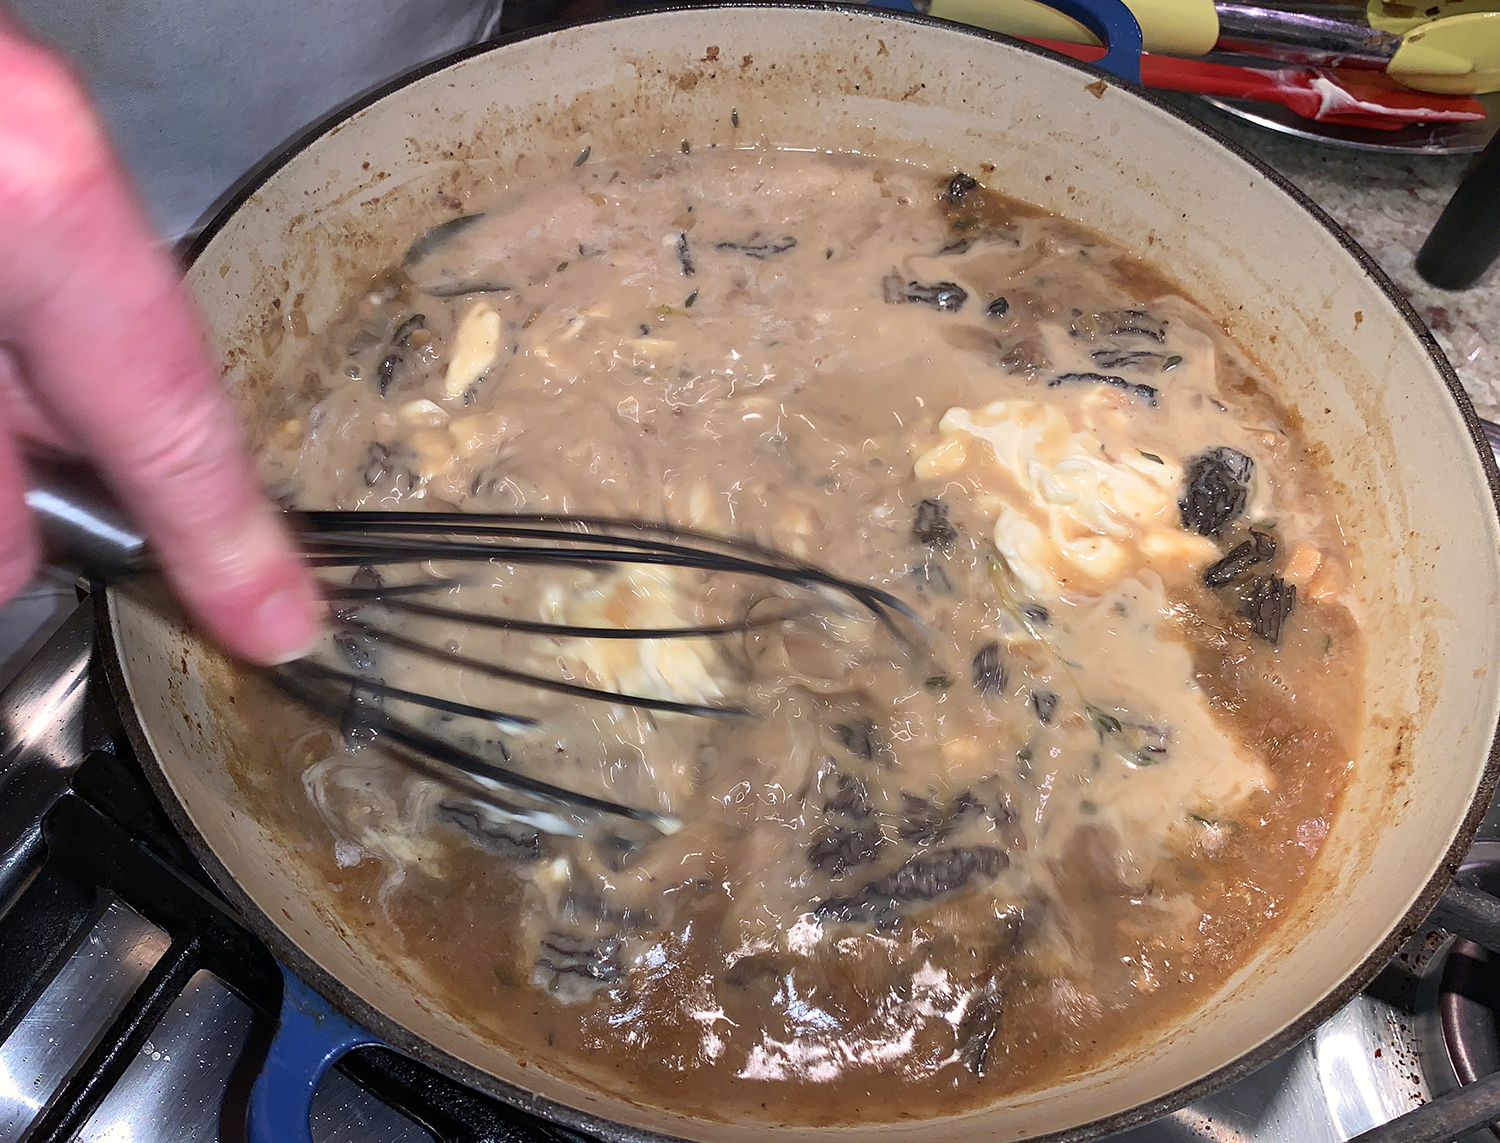
On a cutting board or a plate, use a fork to mash the remaining butter and flour together to form a paste. Whisk the paste into the braising liquid and cook until it begins to thicken, about 3 minutes. Lower the heat to low, then whisk in the crème fraîche and ¼ cup of wine. Return the chicken to the pot and simmer together until the sauce has thickened and coats the back of a spoon, 10–12 minutes.
Remove and discard the bay leaf, thyme stems, and chicken backbone. Add the remaining ¼ cup of wine and cook one more minute more, just to combine the flavors. (Do not cook off the alcohol in this final addition, which is meant to enhance the flavors of the wine added earlier in the process.) Serve hot, with crusty bread, noodles, or rice on the side.
*NOTE: If unable to locate Jura wine, substitute 1 1/3 cups white wine with 2/3 cup dry sherry (fino).
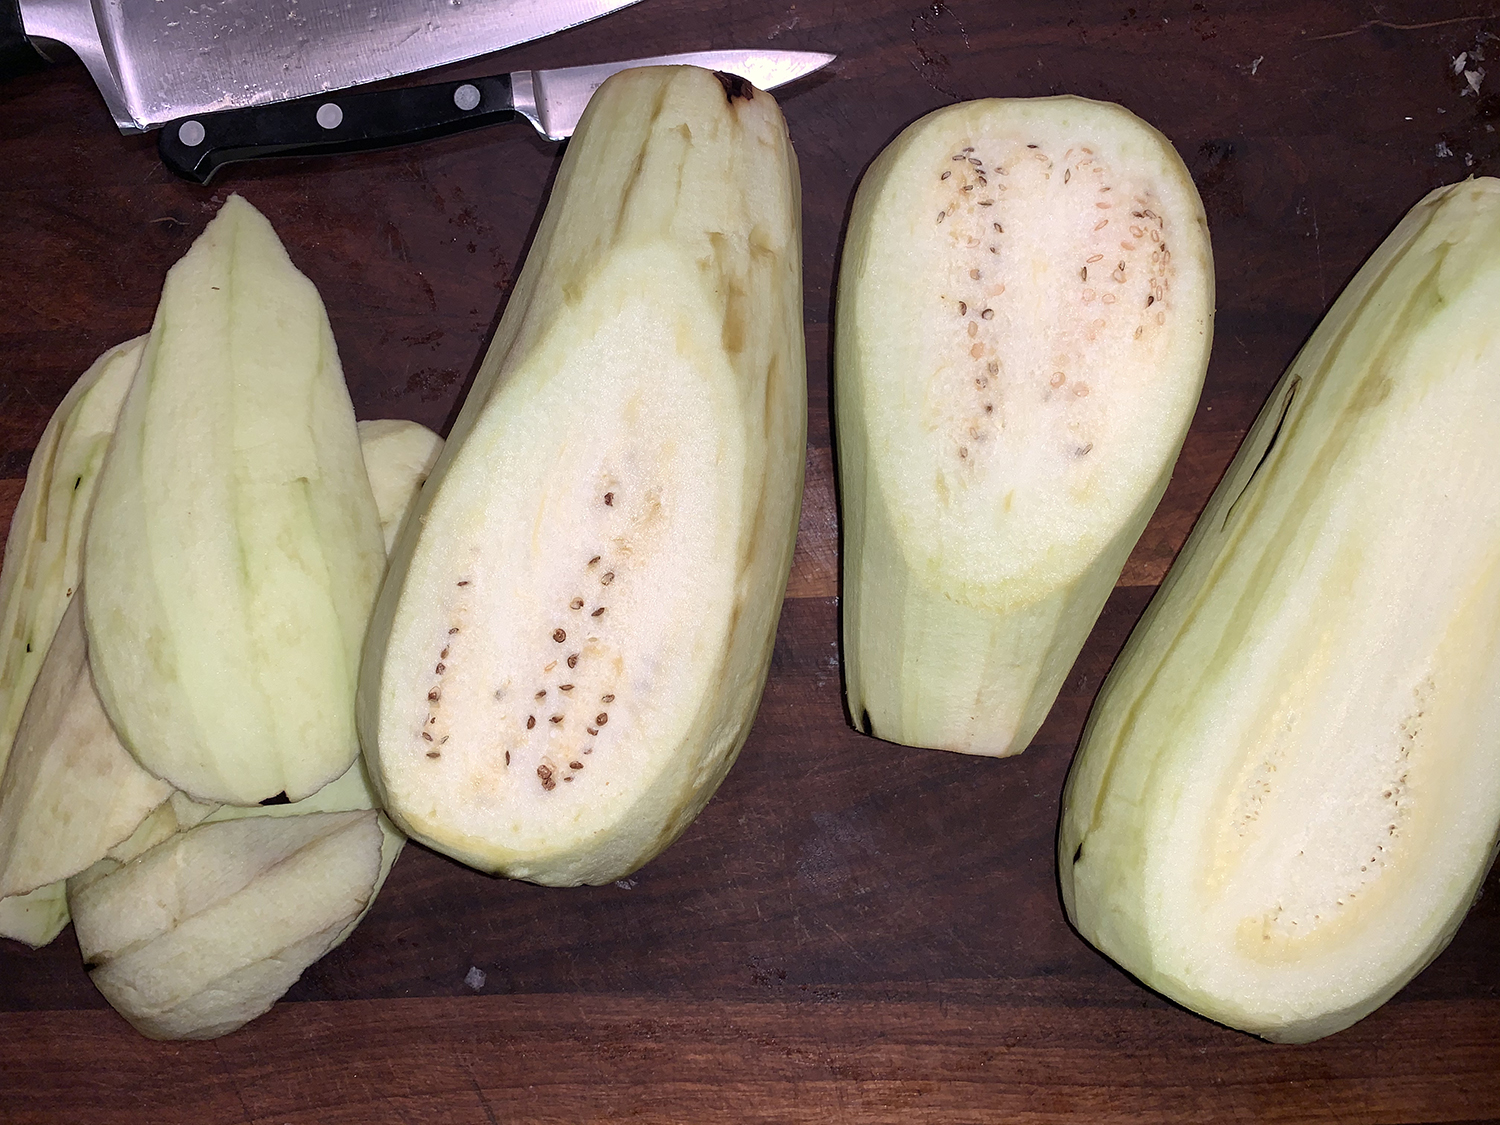
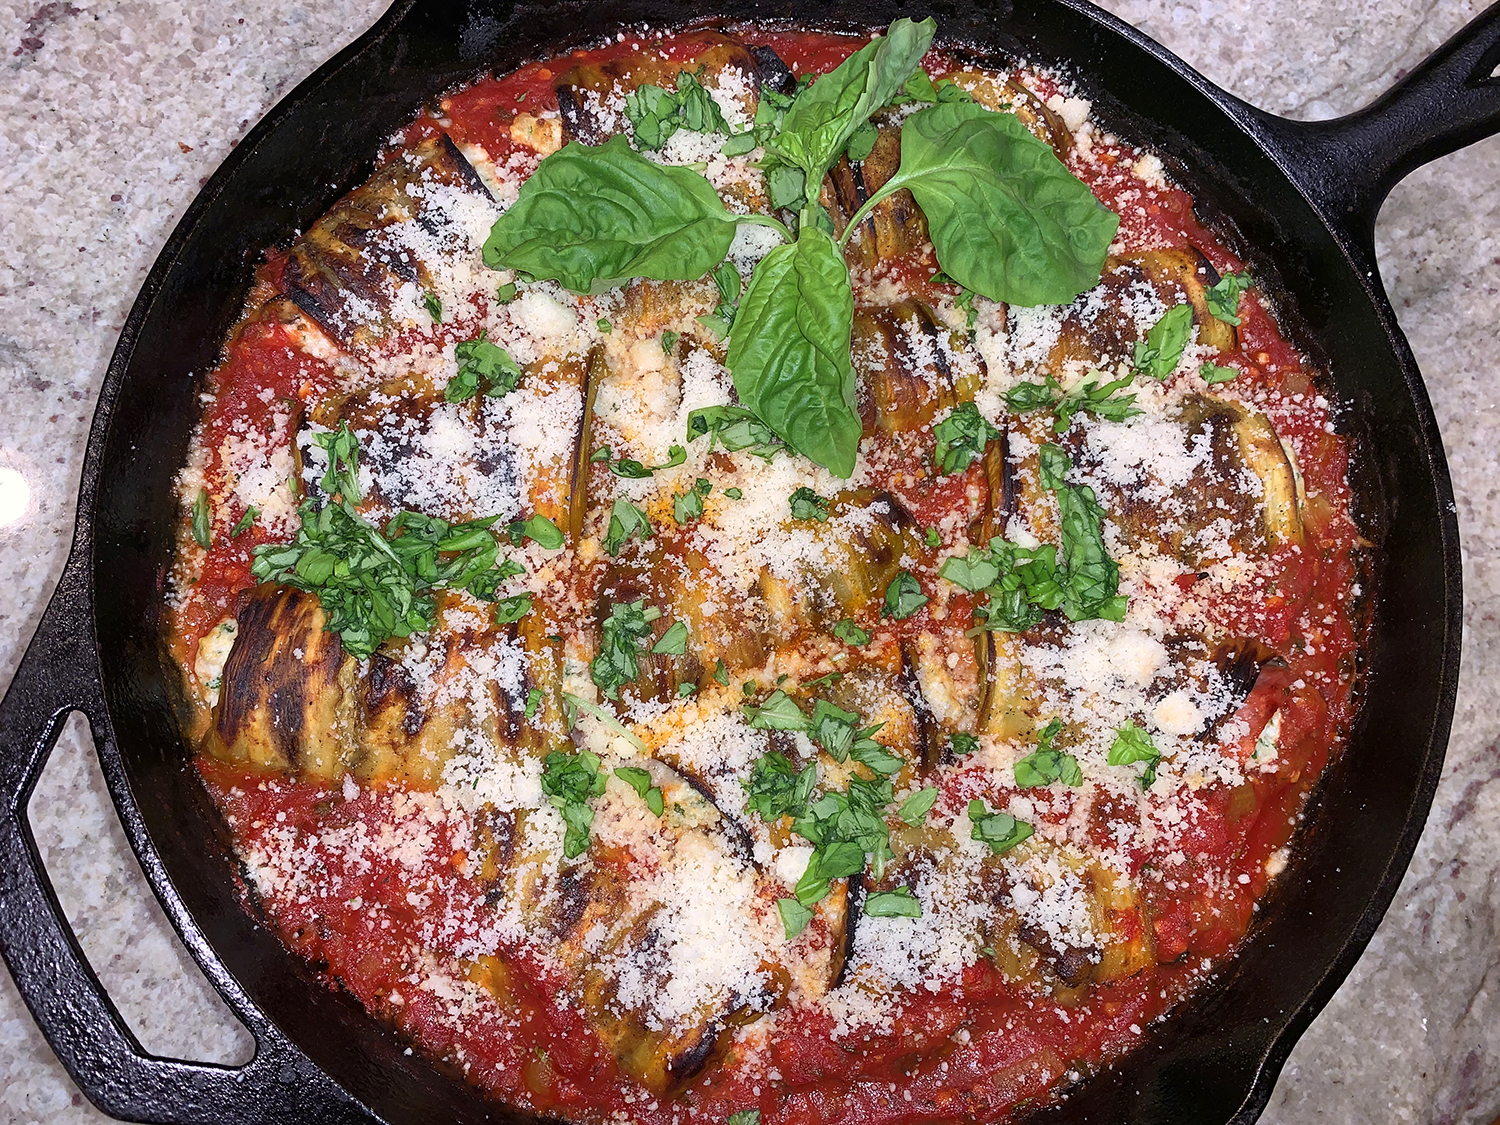
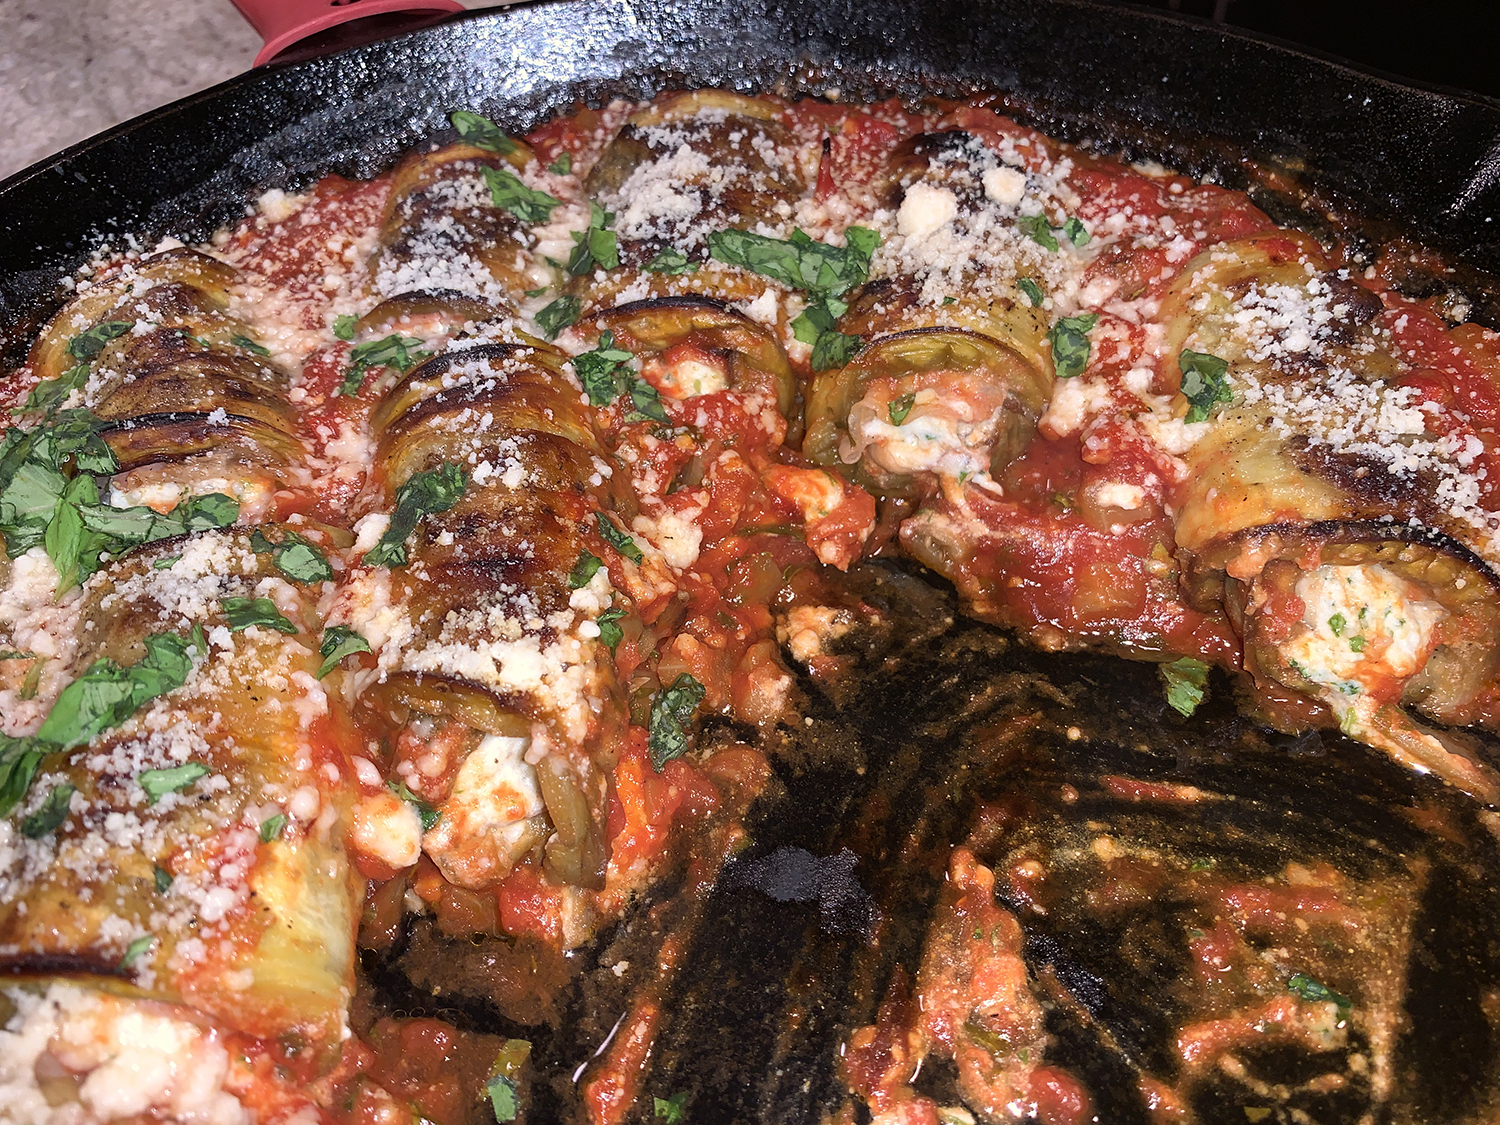
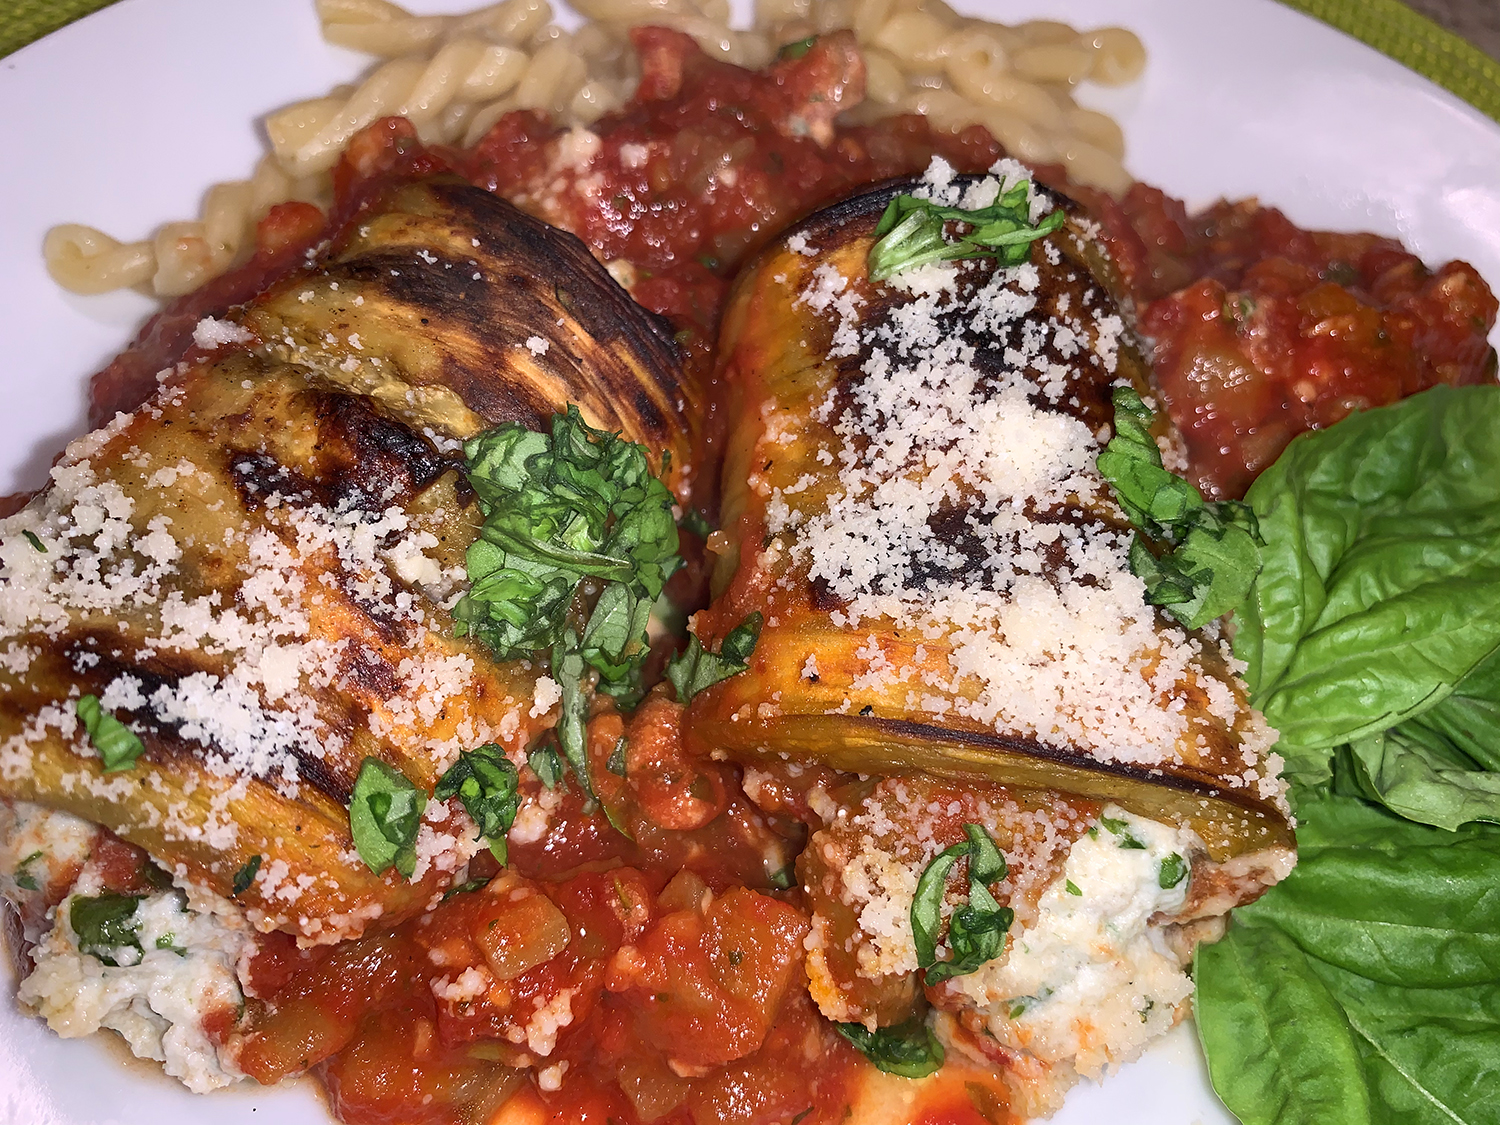
Here’s a lighter version of Eggplant Involtini that focuses on the eggplant. Baking instead of frying allows you to skip the salting and draining step, since the eggplant’s excess moisture evaporates in the oven, and it means that the eggplant’s flavor and meaty texture are not obscured by oil and breading. This was sooo good, we can’t wait to make it again!
Swapping the usual ricotta-heavy filling for one that’s boosted with a generous dose of Pecorino Romano means we can use less filling without sacrificing flavor. Lastly, make a simple but complementary tomato sauce in a skillet, add the eggplant bundles to it, and finish it under the broiler, which decreases the number of dishes required—always a plus in our book!
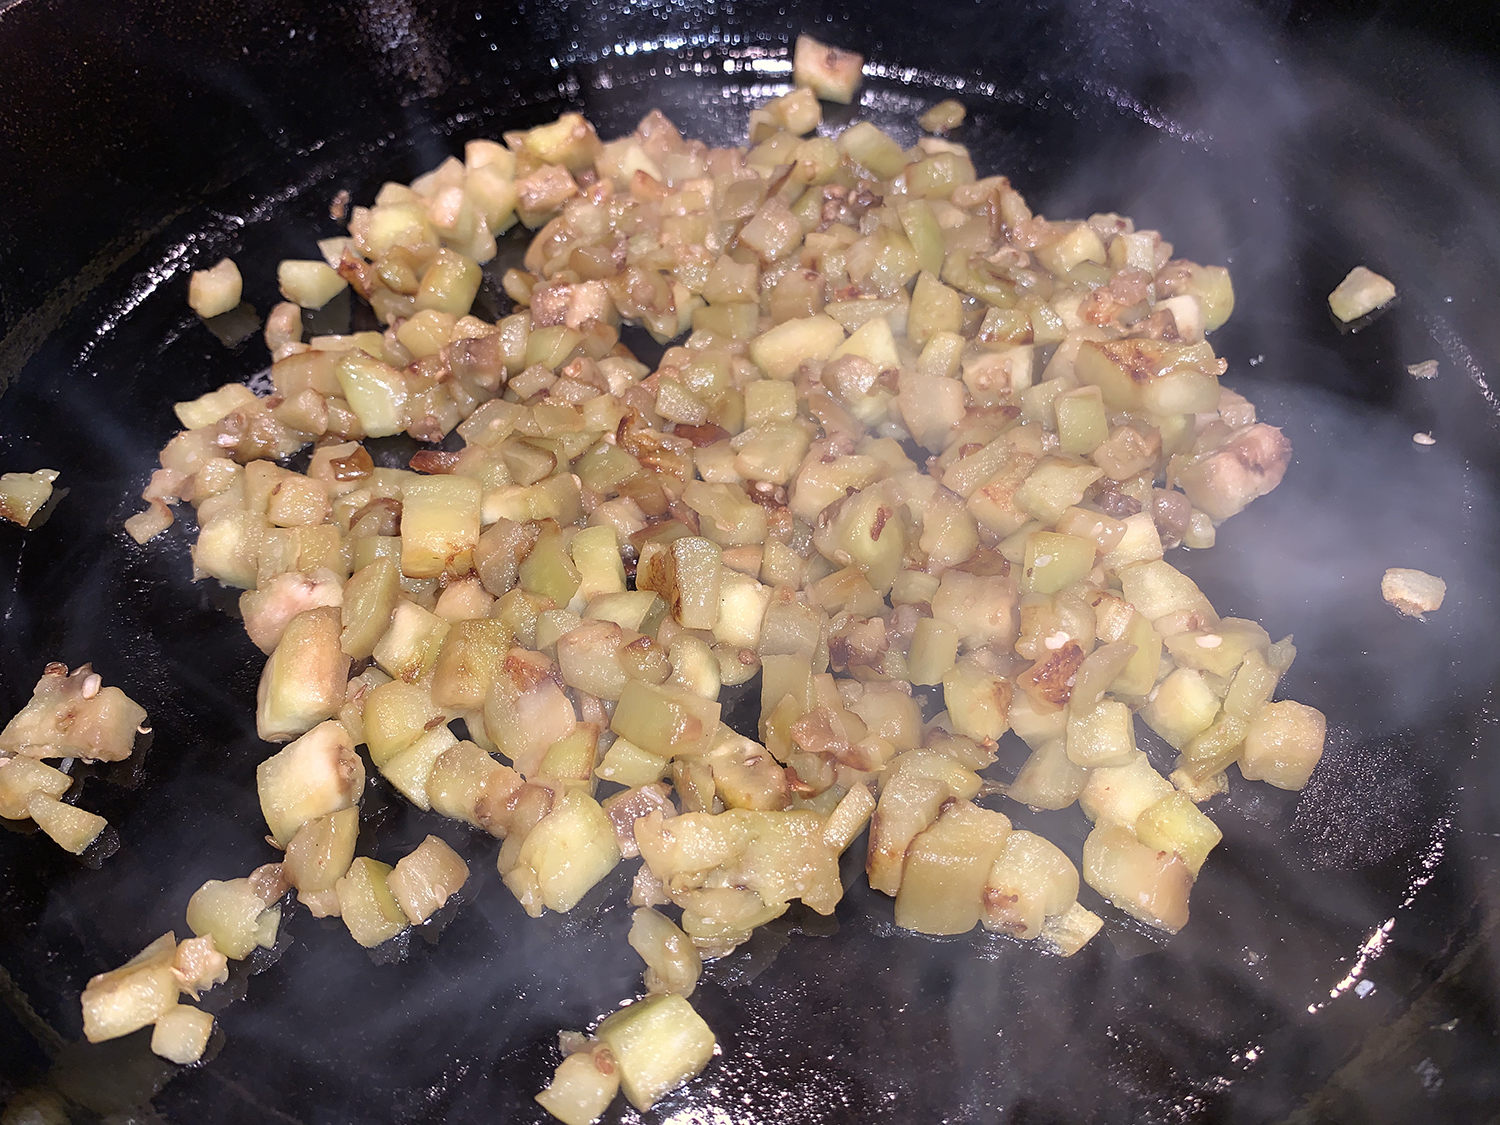
Of course we put our own spin on the dish, first by utilizing the pieces of eggplant cut away before planking them. What a waste it would be to discard all of that—about 3 cups worth! So we cubed those leftover pieces into about a 3/8″ dice and sautéed them in about 3 tablespoons of olive oil until softened before adding the tomatoes to the same skillet.
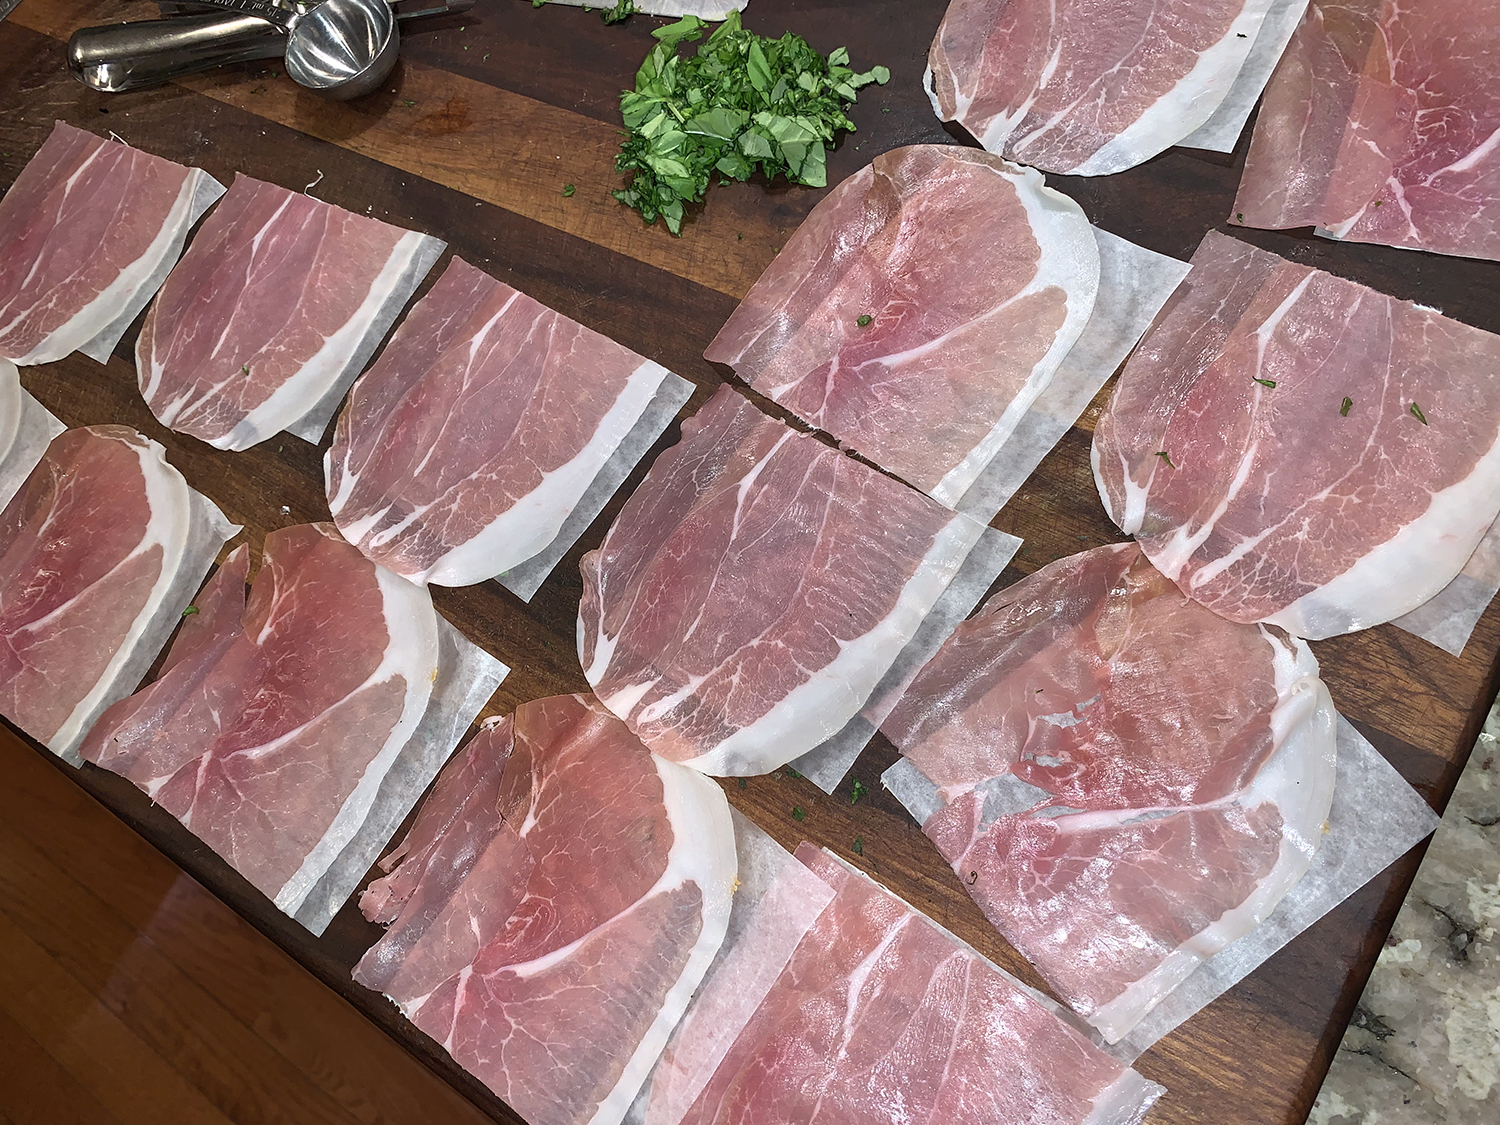
Now here comes the real twist. We added very thin slices of prosciutto on top of the eggplant slices before spooning on the cheese filling. Of course this step makes it no longer vegetarian, but that extra ingredient added even more depth of flavor. And we served ours with a side of gemelli pasta, which negates the low-carb factor, if you’re not concerned with that aspect.
1 28-oz. can whole peeled tomatoes, hand crushed coarsely in their juices
1 slice hearty white sandwich bread, torn into 1-inch pieces
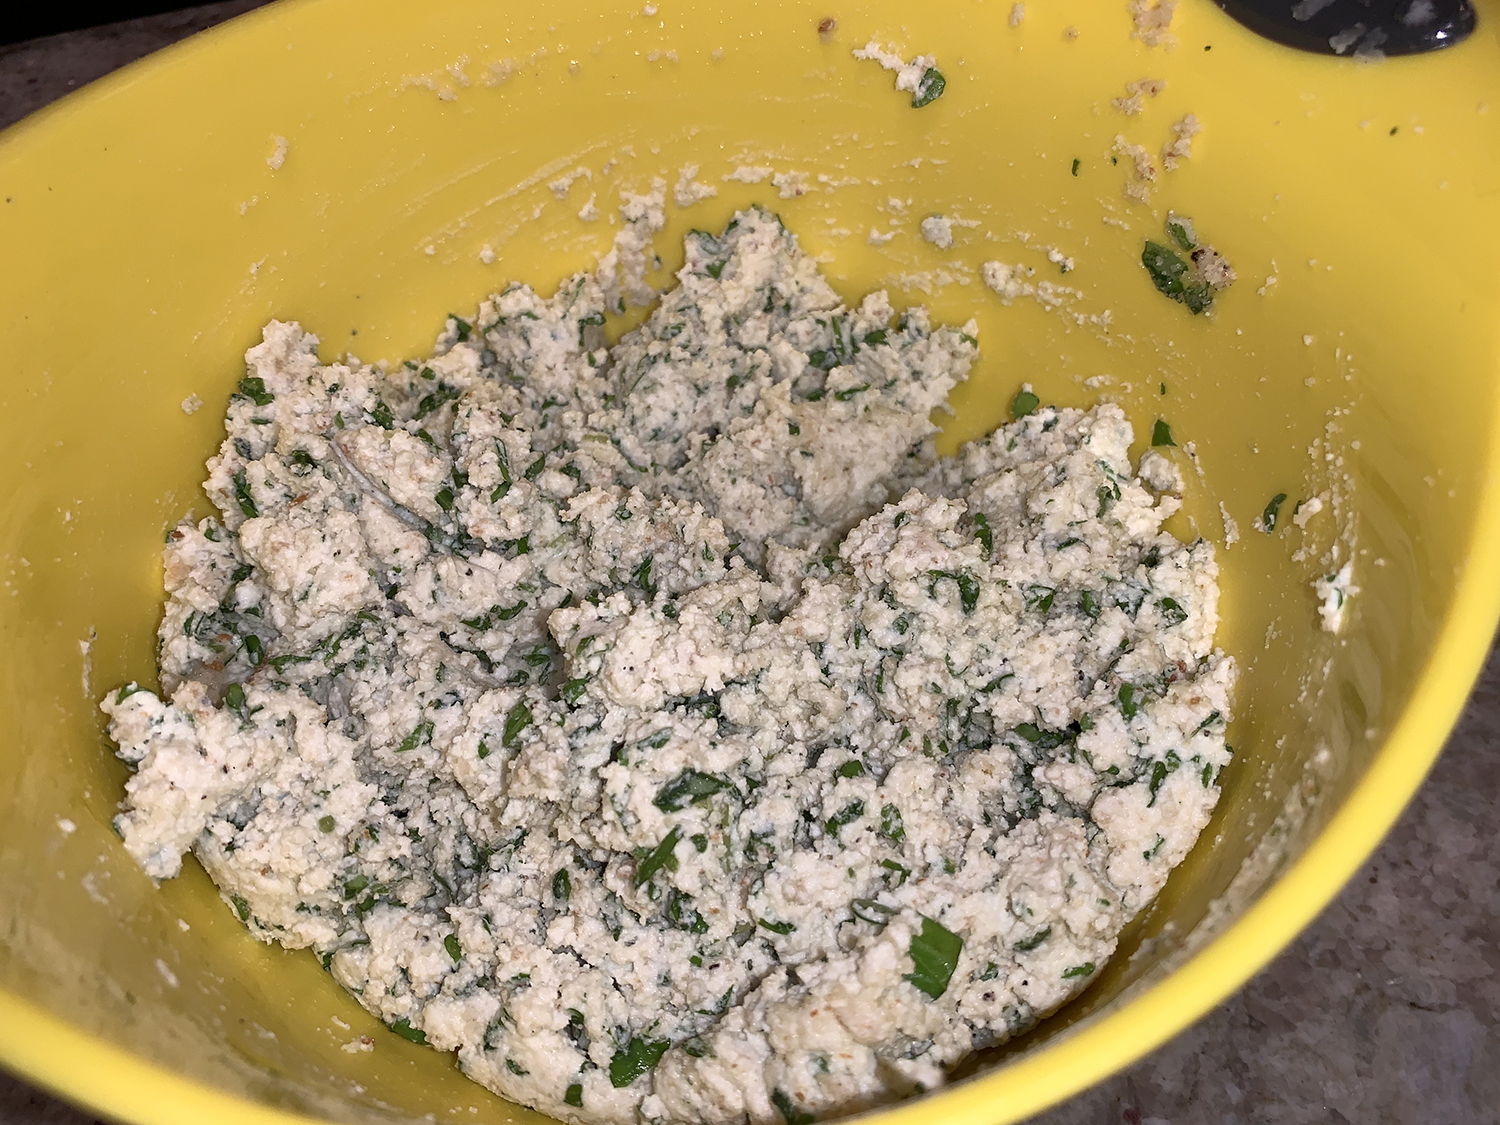
8 oz. whole-milk ricotta cheese
1 ½ oz. grated Pecorino Romano cheese
¼ cup plus 1 Tbsp. chopped fresh basil
1 Tbsp. lemon juice
4 oz. very thin slices of prosciutto, cut in half crosswise (optional)
Directions
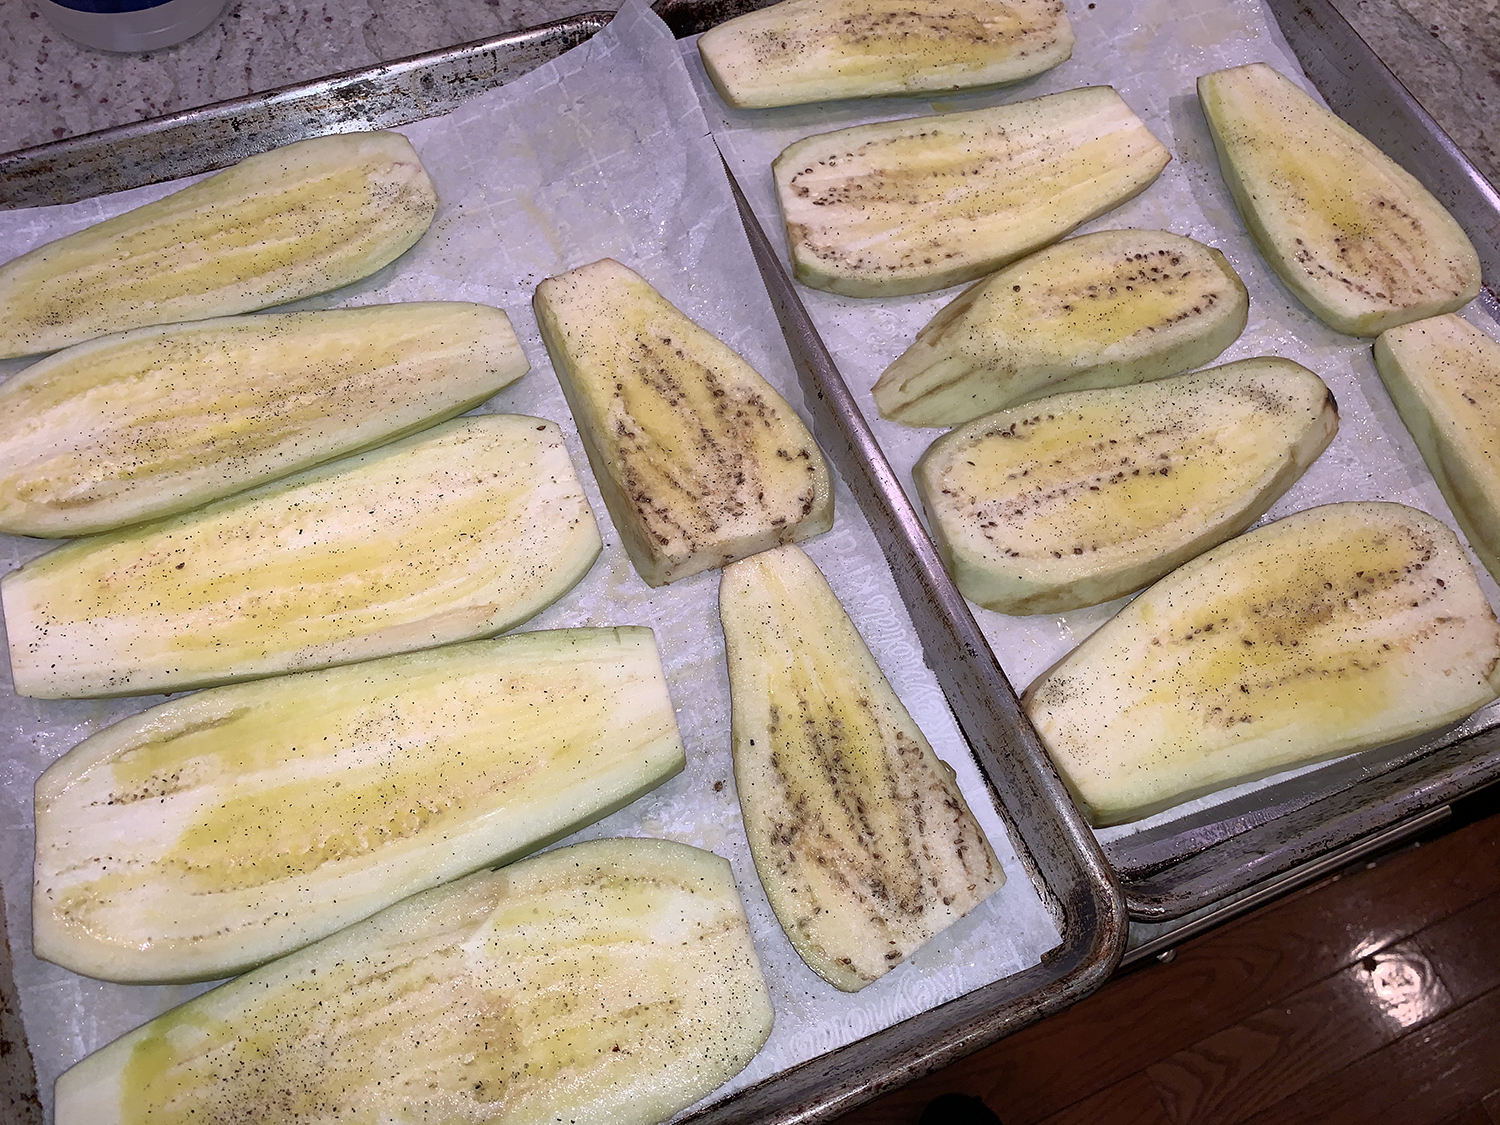
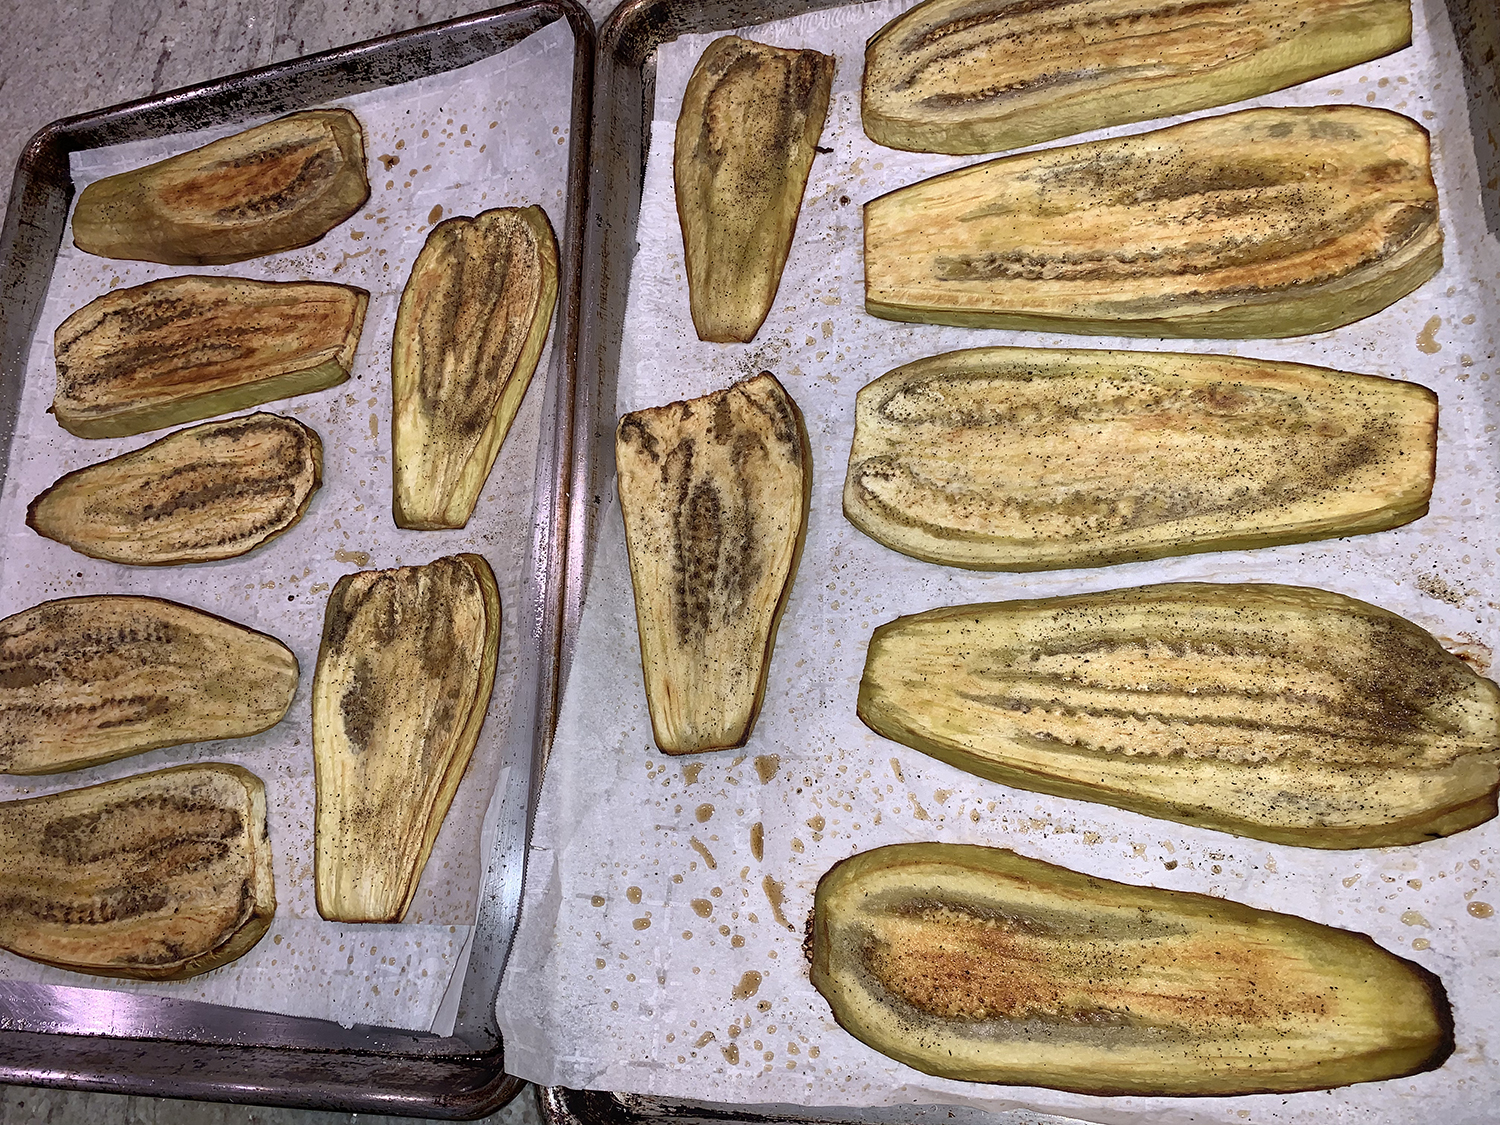
Slice each eggplant lengthwise into 1/2-inch-thick planks (you should have 12-15 planks). Trim rounded surface from each end piece so it lies flat.
Cut up those leftover rounded pieces into a 3/8″ dice and sauté them in about 3 tablespoons of olive oil in your large skillet until softened, about 5 minutes.
Adjust 1 oven rack to lower-middle position and second rack 8 inches from broiler element. Heat oven to 375 degrees. Line 2 rimmed baking sheets with parchment paper and spray generously with vegetable oil spray. Arrange eggplant slices in single layer on prepared sheets. Brush 1 side of eggplant slices with 2 1/2 tablespoons oil and sprinkle with 1/2 teaspoon salt and 1/4 teaspoon pepper. Flip eggplant slices and brush with 2 1/2 tablespoons oil and sprinkle with 1/2 teaspoon salt and 1/4 teaspoon pepper.
Bake until tender and lightly browned, 30 to 35 minutes, switching and rotating sheets halfway through baking. Let cool for 5 minutes. Using thin spatula, flip each slice over. Heat broiler.
While eggplant planks cook, add remaining 1 tablespoon oil to the diced eggplant in same broiler-safe skillet over medium-low heat until just shimmering. Add garlic, oregano, pepper flakes, and 1/2 teaspoon salt and cook, stirring occasionally, until fragrant, about 30 seconds. Stir in hand crushed tomatoes and their juice. Increase heat to high and bring to simmer. Reduce heat to medium-low and simmer until thickened, about 15 minutes. Cover and set aside.
Pulse bread in food processor until finely ground, 10 to 15 pulses. Combine bread crumbs, ricotta, 1/2 cup Pecorino, 1/4 cup basil, lemon juice, and 1/2 teaspoon salt in medium bowl.
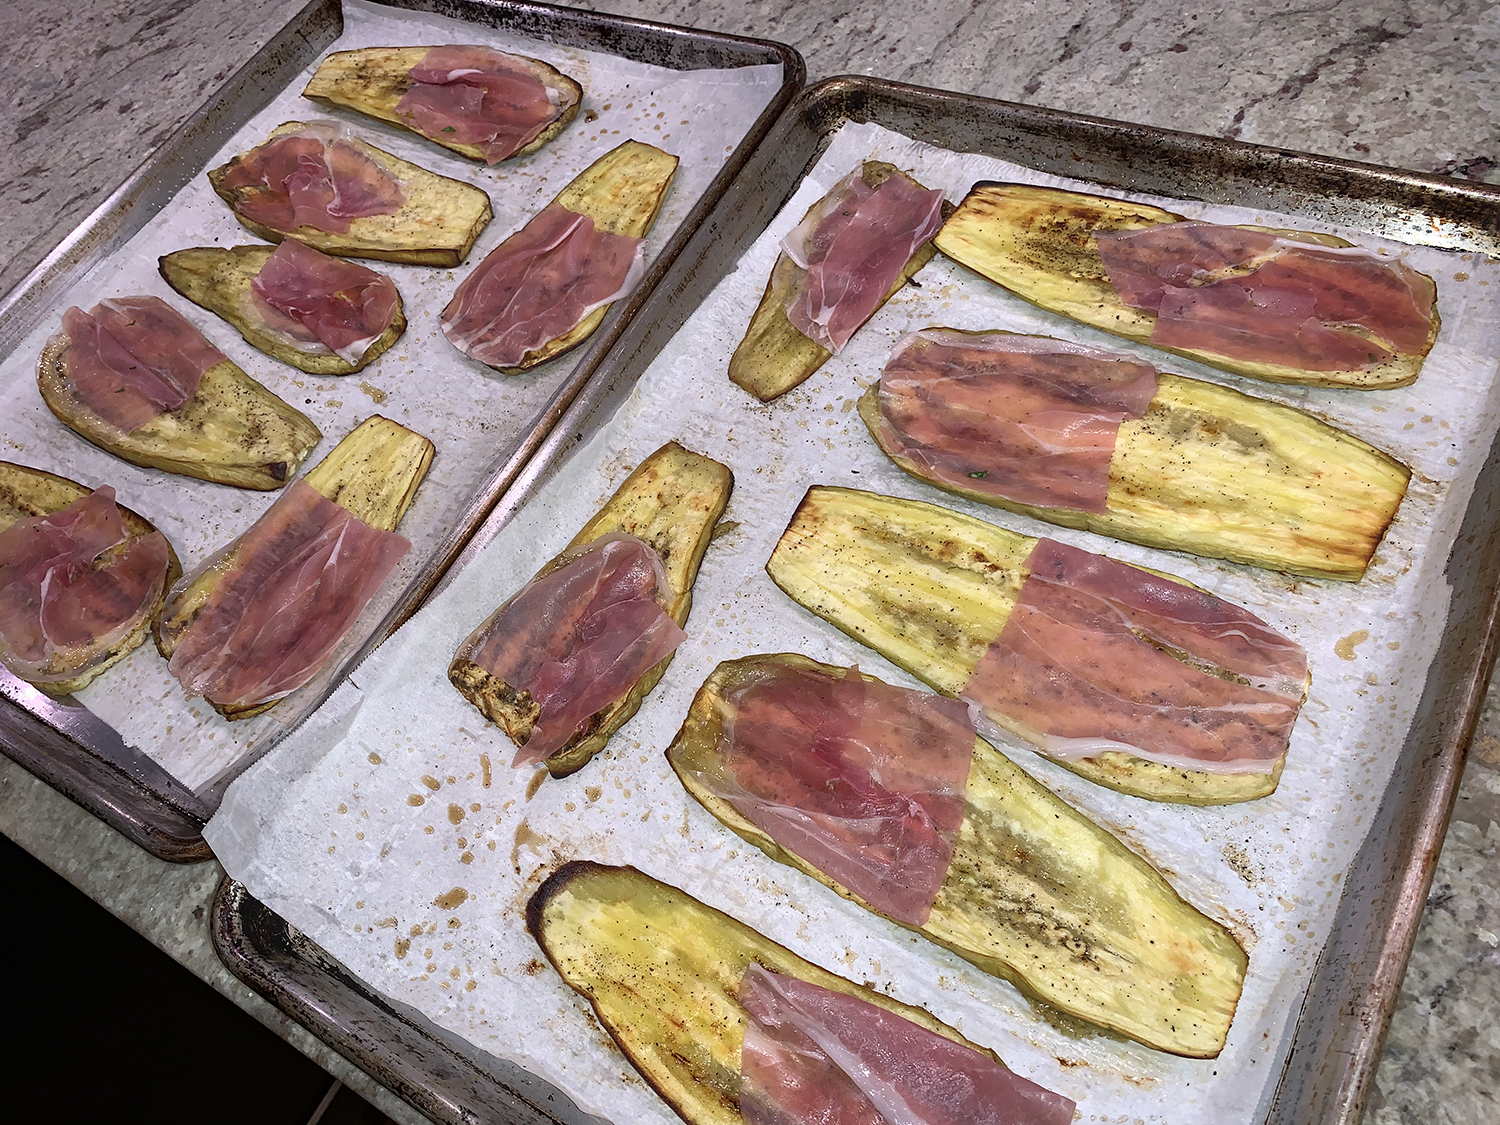
With widest ends of eggplant slices facing you, place a half slice of prosciutto, if using, on the wide end of each plank. Next, evenly distribute ricotta mixture on bottom third of each slice. Gently roll up each eggplant slice and place seam side down in tomato sauce.
Bring sauce to simmer over medium heat. Simmer for 5 minutes. Transfer skillet to oven and broil until eggplant is well browned and cheese is heated through, 5 to 10 minutes. Sprinkle with remaining 1/4 cup Pecorino and let stand for 5 minutes. Sprinkle with remaining 1 tablespoon basil and serve.
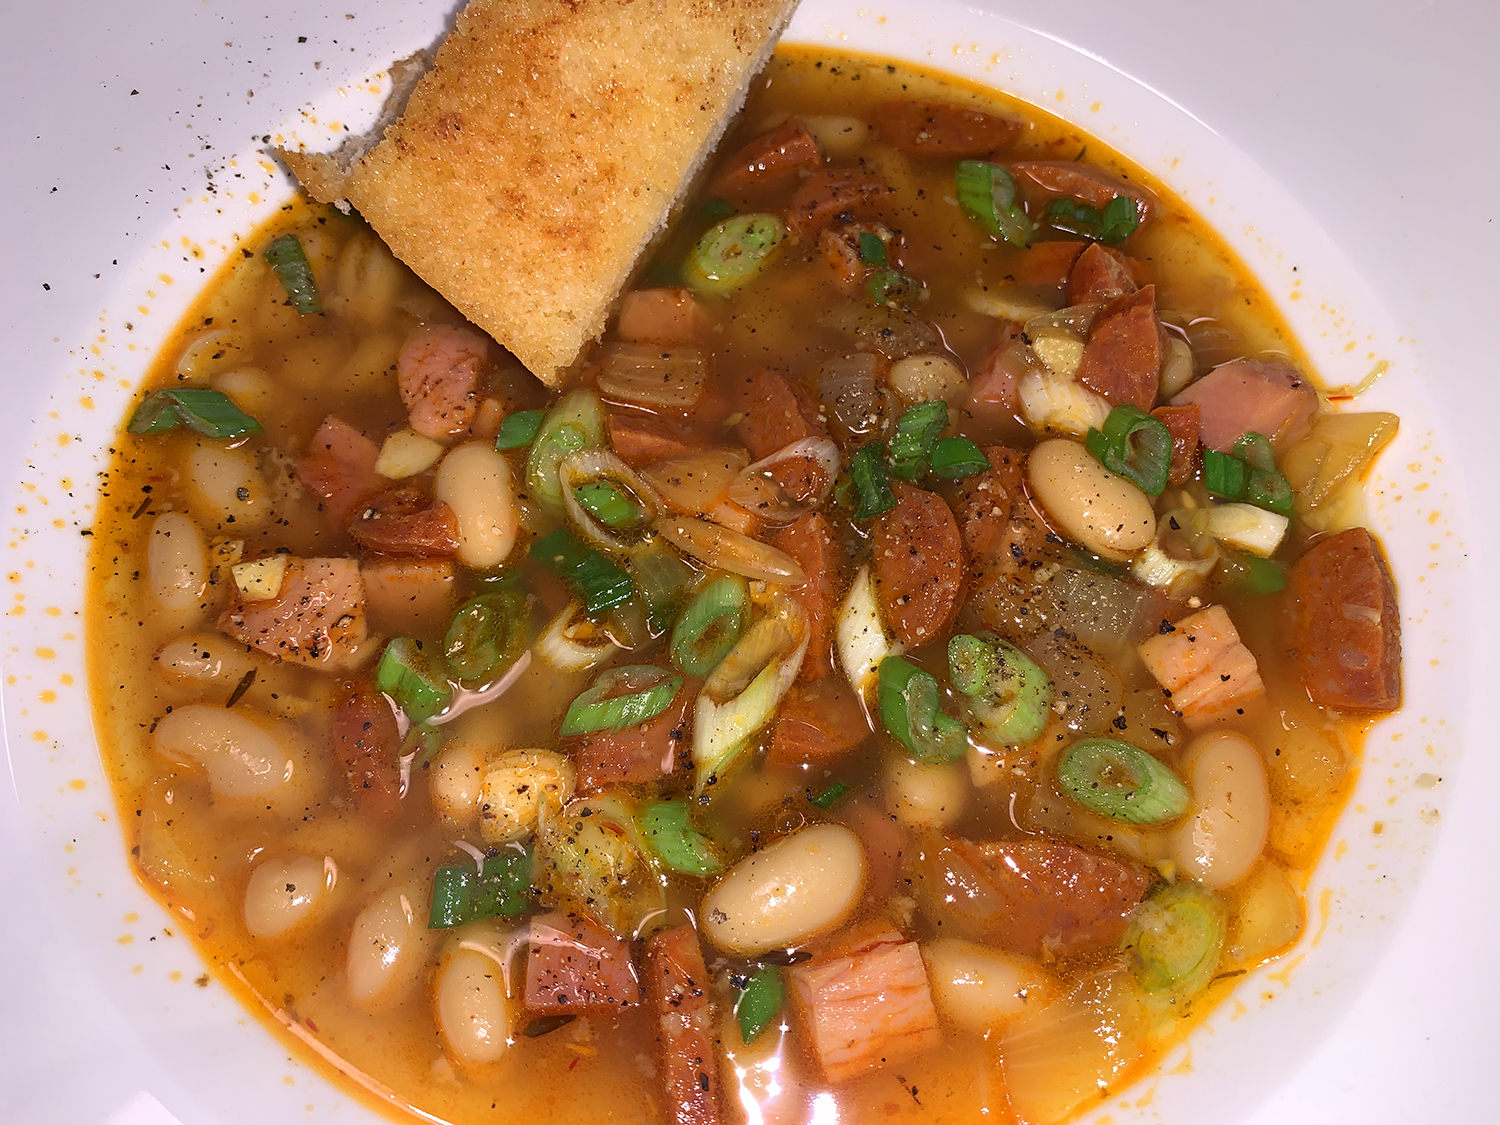
Having made the traditional recipe—which takes hours—we were thrilled to find this quick-and-easy version of the Spanish tapa known as Fabada Asturiana, a hearty stew of dried beans, sausage and other smoky, porky ingredients.
A number of years ago on our first trip to Spain, we were lucky enough to enjoy an authentic fabada, shown above, in the little Austurian town of Cabrales in Northern Spain. The Hubs liked it so much, he bought the ingredients and smuggled them home. Luckily (or not), because I had suffered a broken foot a few days earlier, we were whisked through airport customs back home, preventing our illegal meats and beans from being confiscated. (I don’t advise this tactic as a long term plan 🤣 )
I digress, back to the recipe at hand… Based on the changes from Milk Street, we pared back on the meats, using only chorizo and ham, both of which lend deep flavor to the broth. The dish gets its name from the large beans that are traditionally used in its preparation, but canned white beans work quite well. Preferred are the relatively large size and creamy texture of cannellinis, but great northern and navy beans are fine, too.
A pinch of saffron adds a very Spanish flavor and fragrance, while giving the stew an alluring golden hue. The color and flavor were also amped up from our homemade ham stock, which replaced the chicken broth.
The Hubs was sorely tempted to add a pinch of pimentón, but restrained himself from adding it to the stew. However, he did decide to sneak it onto the toasted crusty bread. BTW, it will serve six as a first course, or four as the main entrée.
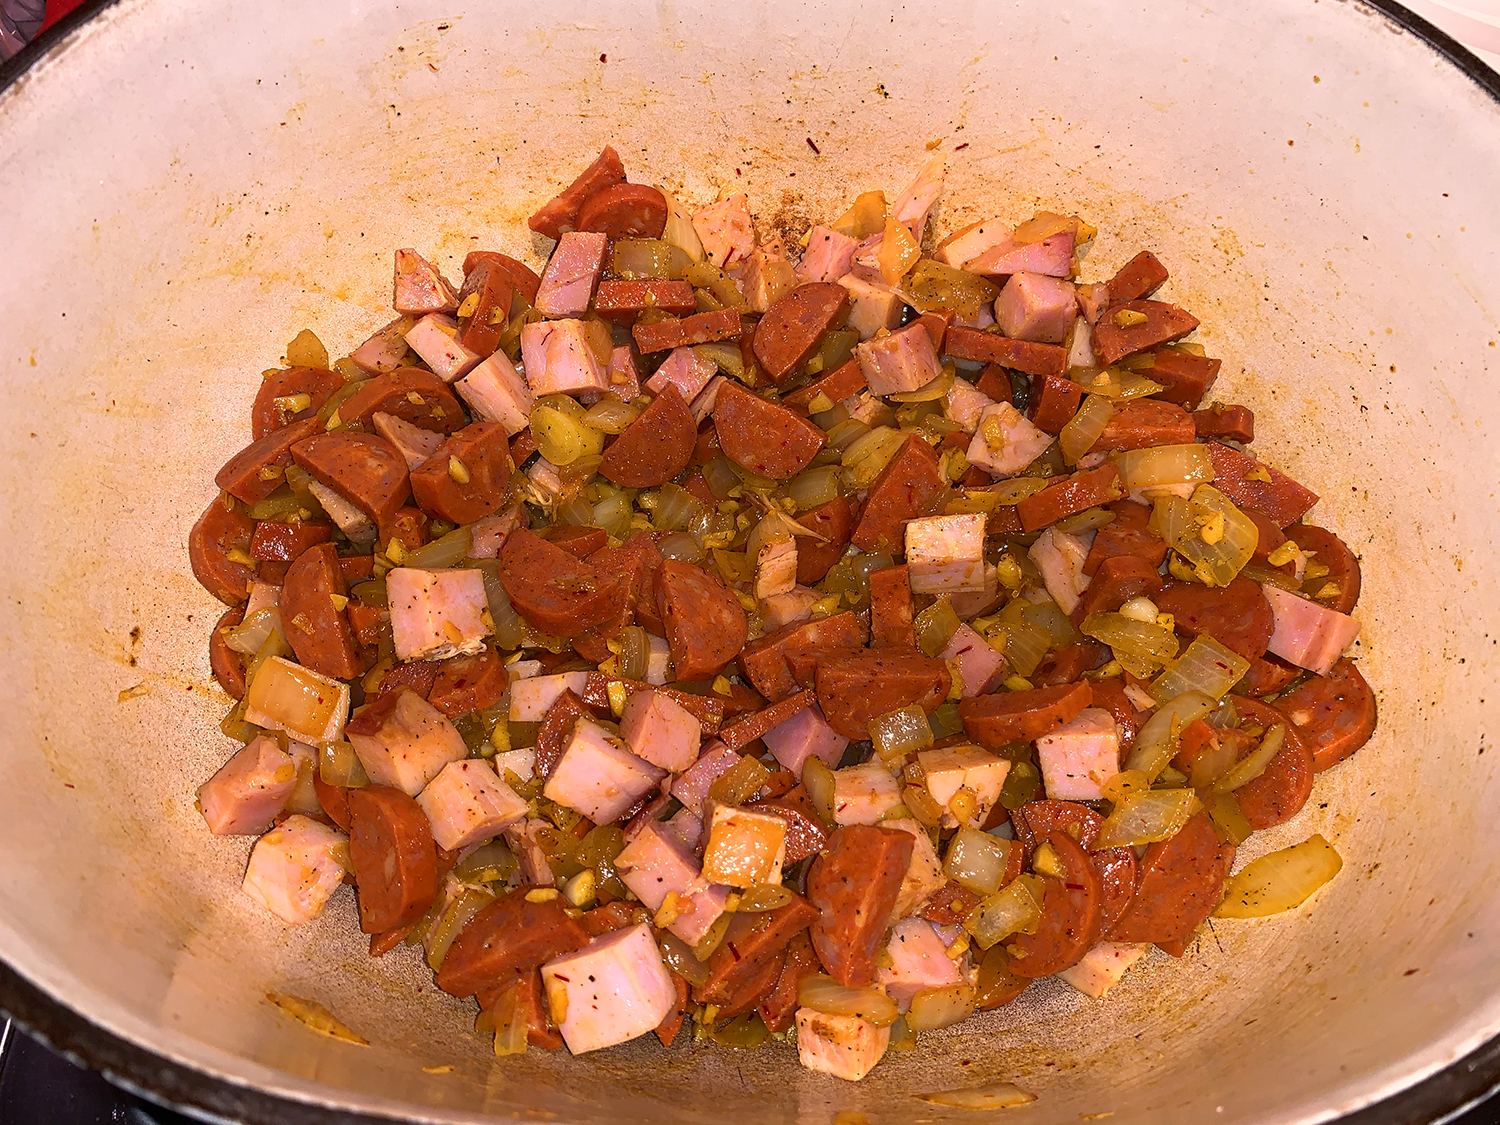
TIP: Don’t overcook the chorizo and ham after adding it to the sautéed onion mixture. If the pieces begin to sear or brown, they’ll be chewy and rubbery in the finished dish. Cook only until the chorizo begins to release some of its fat.
8 oz. Spanish chorizo, casings removed, halved and thinly sliced
8 oz. ham steak, cut into ½-inch cubes
1½ qts. chicken broth, or ham stock, preferably homemade
3 15½-oz. cans white beans, rinsed and drained
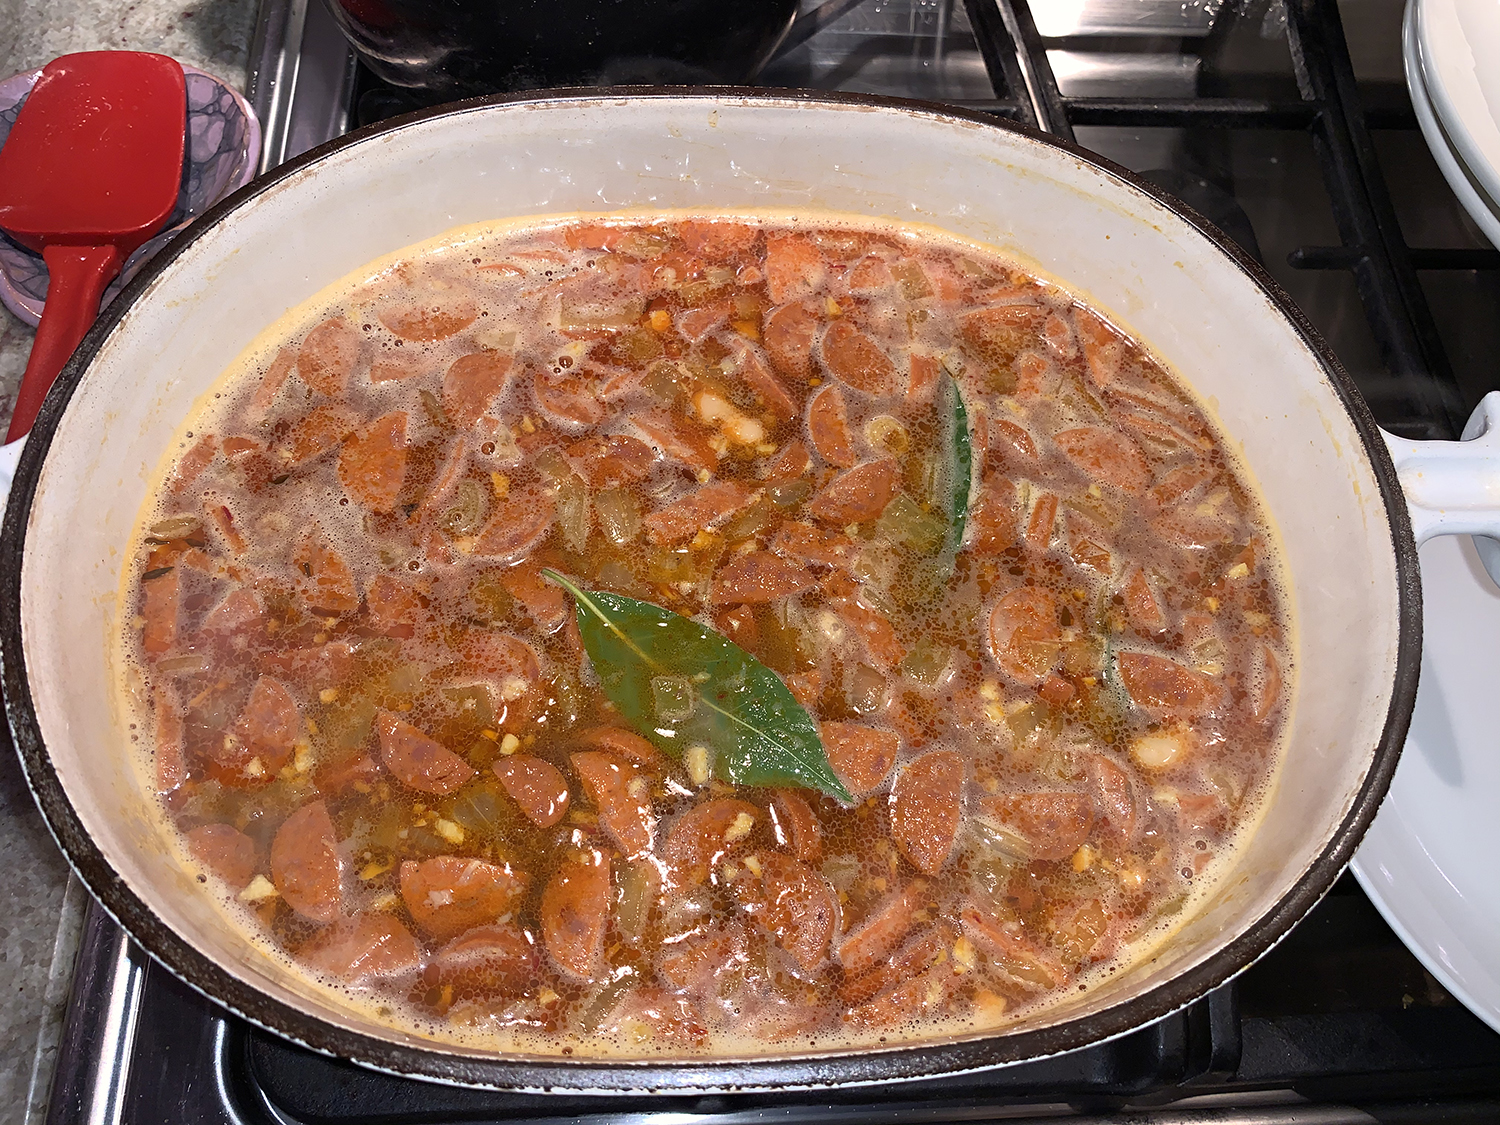
3 bay leaves
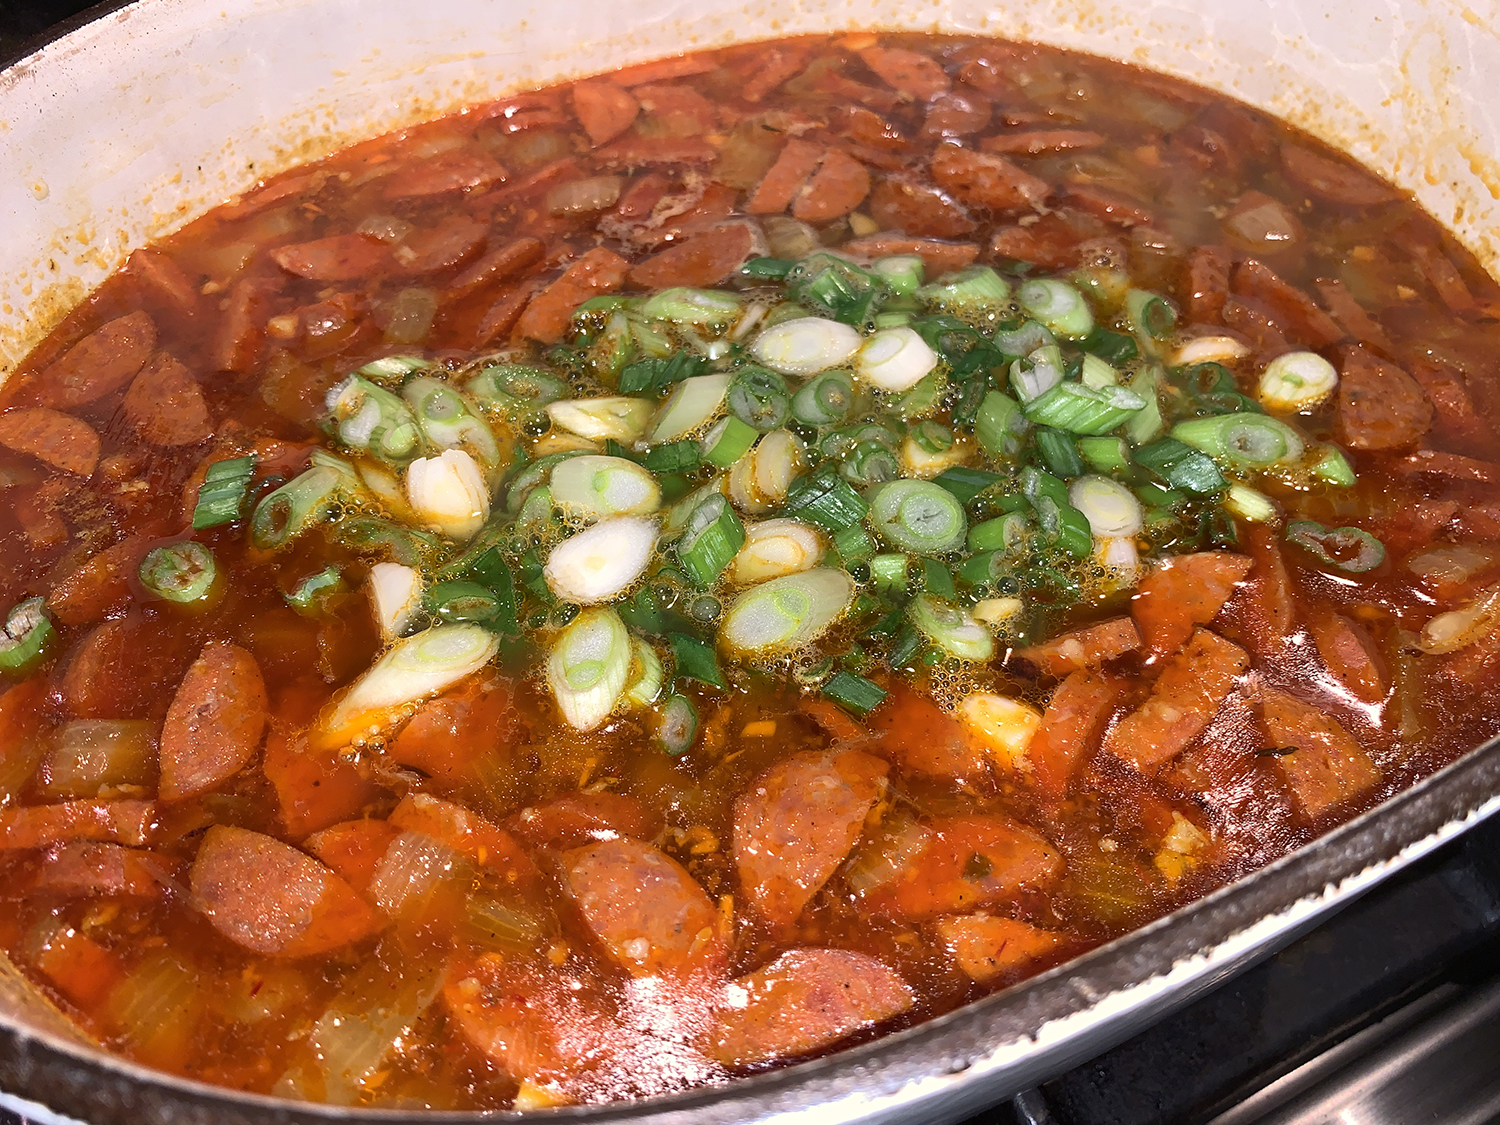
4 scallions, thinly sliced
Warmed crusty bread, to serve
Directions
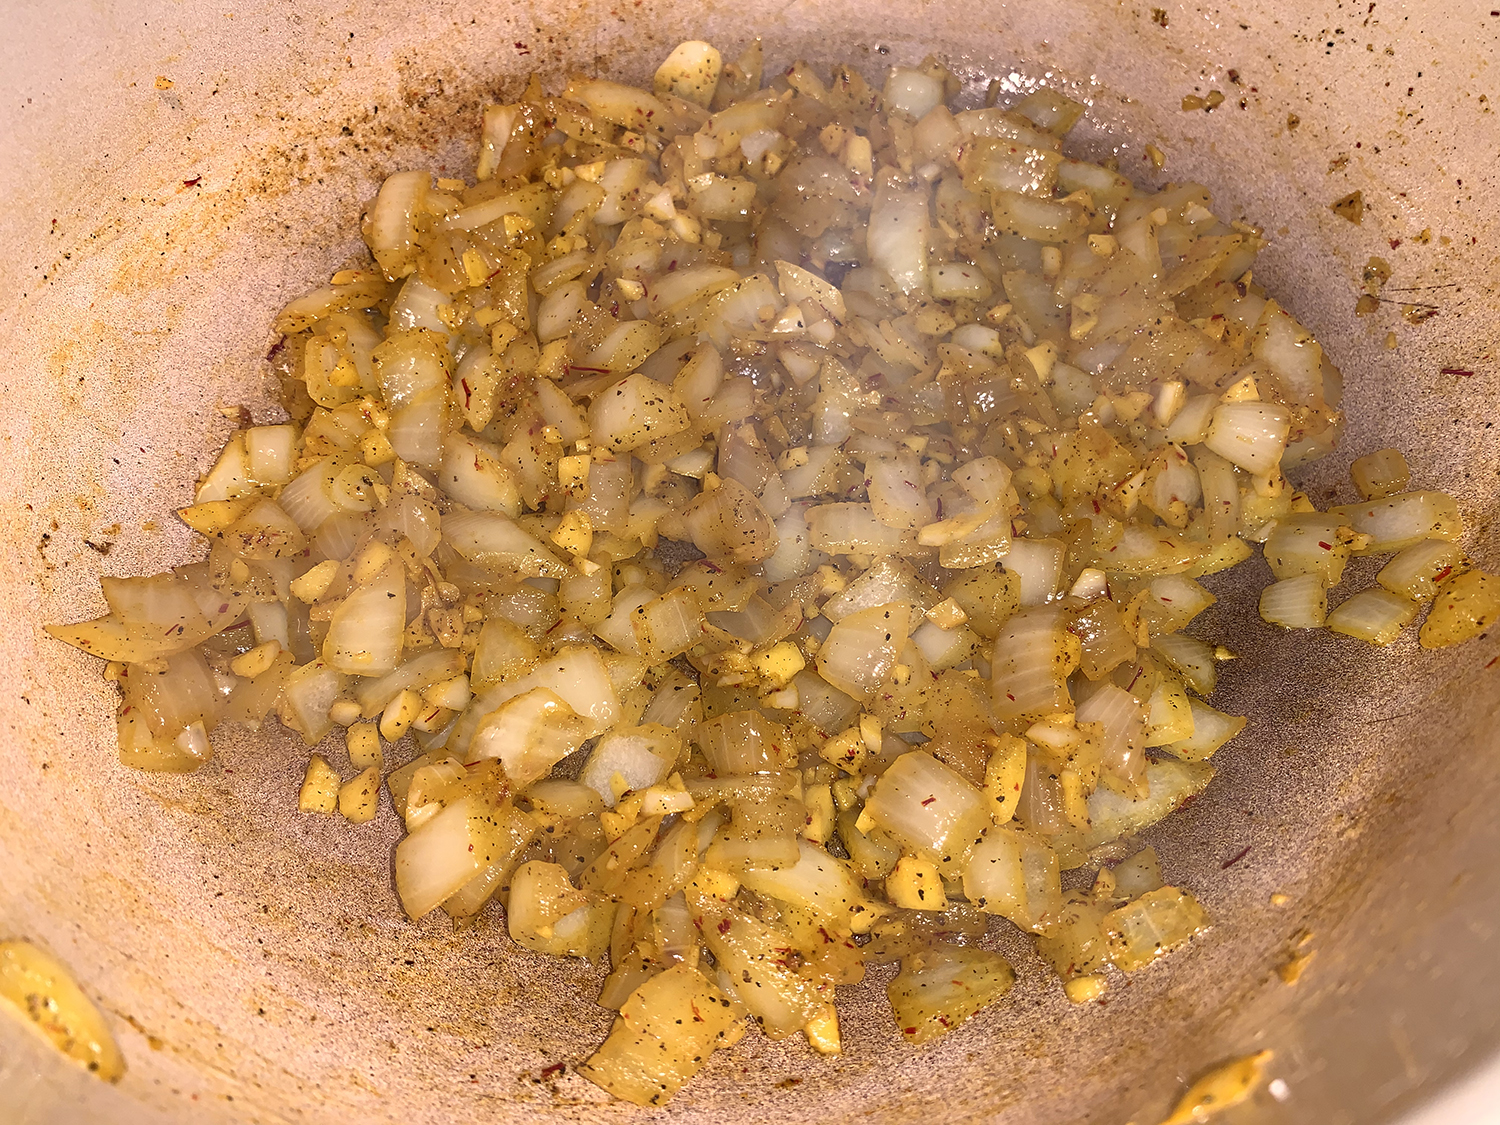
In a large pot over medium, heat the oil until shimmering. Add the onion, garlic, saffron and ½ teaspoon each salt and pepper. Cook, stirring occasionally, until the onion is slightly softened, 5 to 8 minutes.
Add the chorizo and ham, then cook, stirring, just until the chorizo begins to release its fat, about 1 minute. Stir in the broth, beans and bay. Bring to a simmer over medium-high, then reduce to medium and cook, stirring occasionally and adjusting heat as needed to maintain a simmer, for 10 to 15 minutes.
Remove and discard the bay, then stir in the scallions. Taste and season with salt and pepper. Serve with bread.
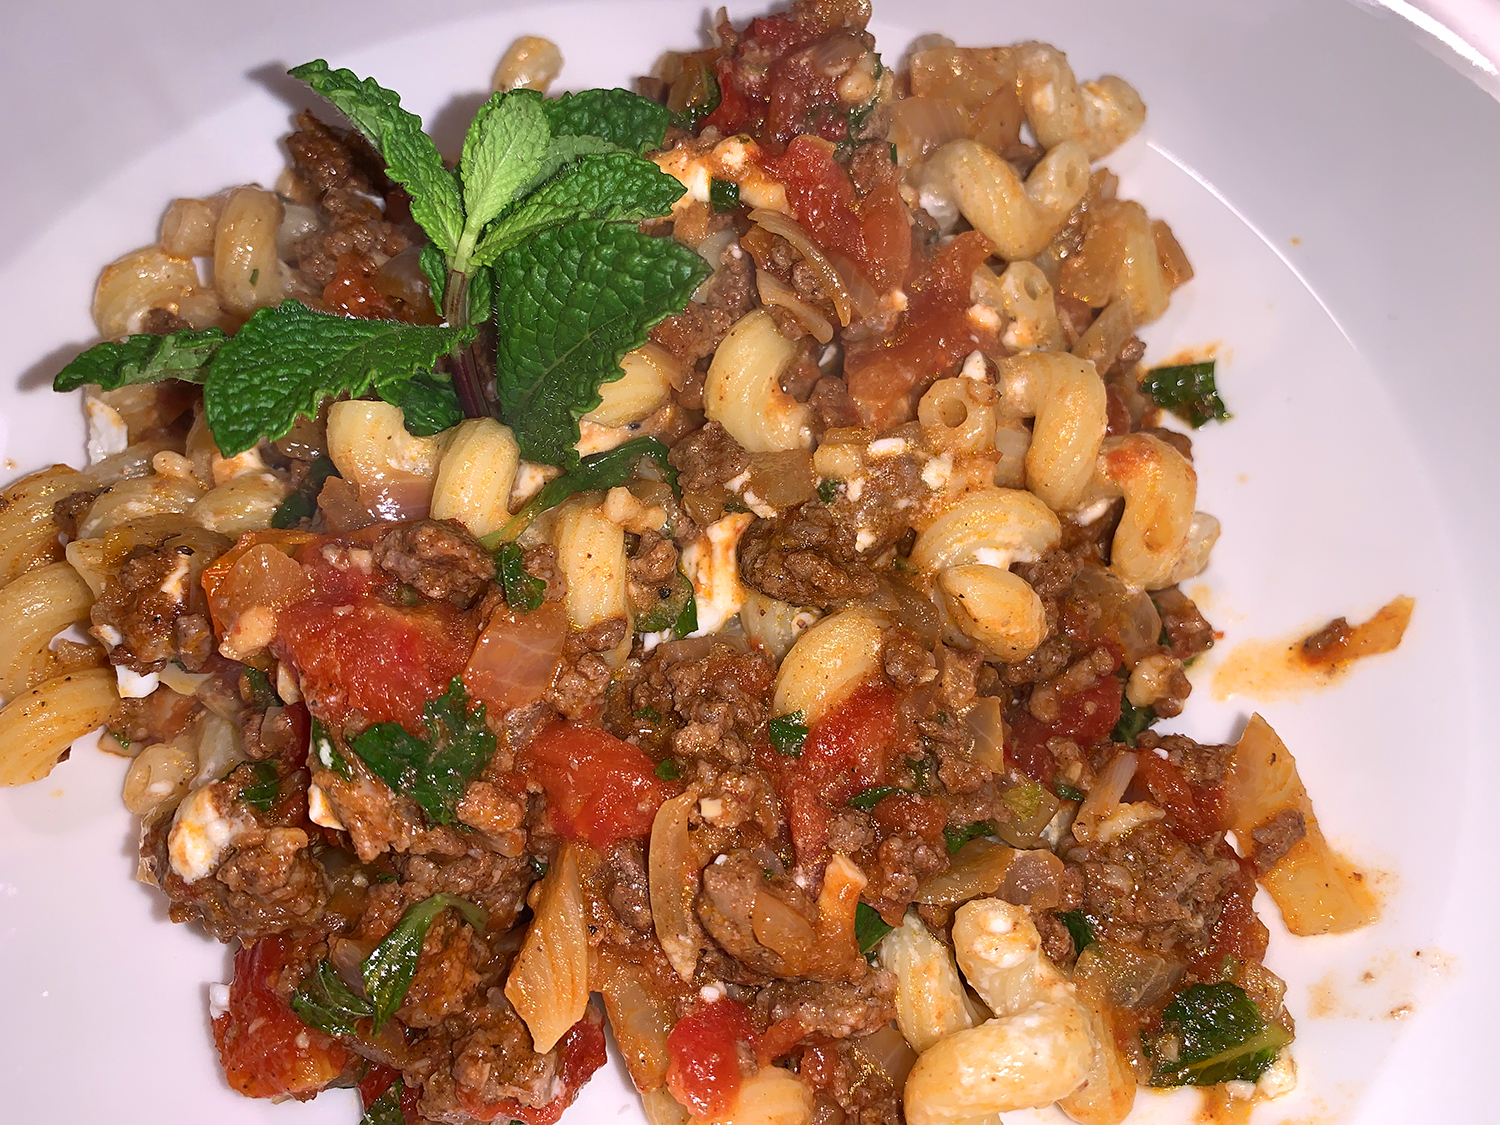
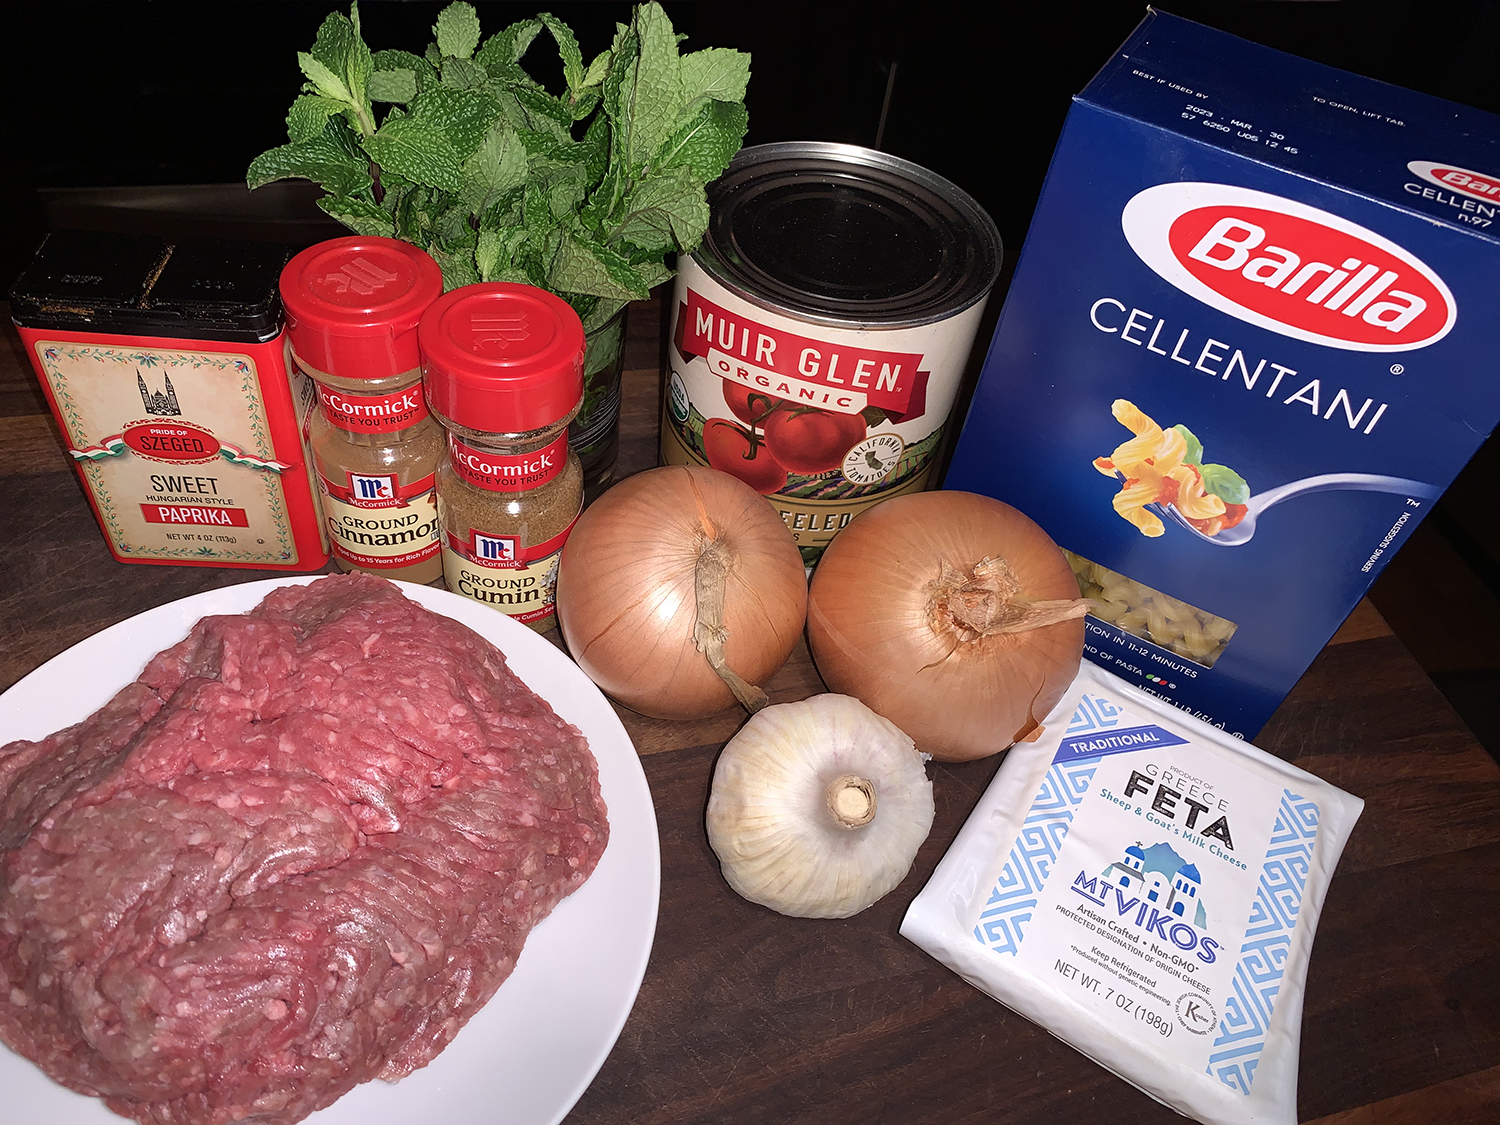
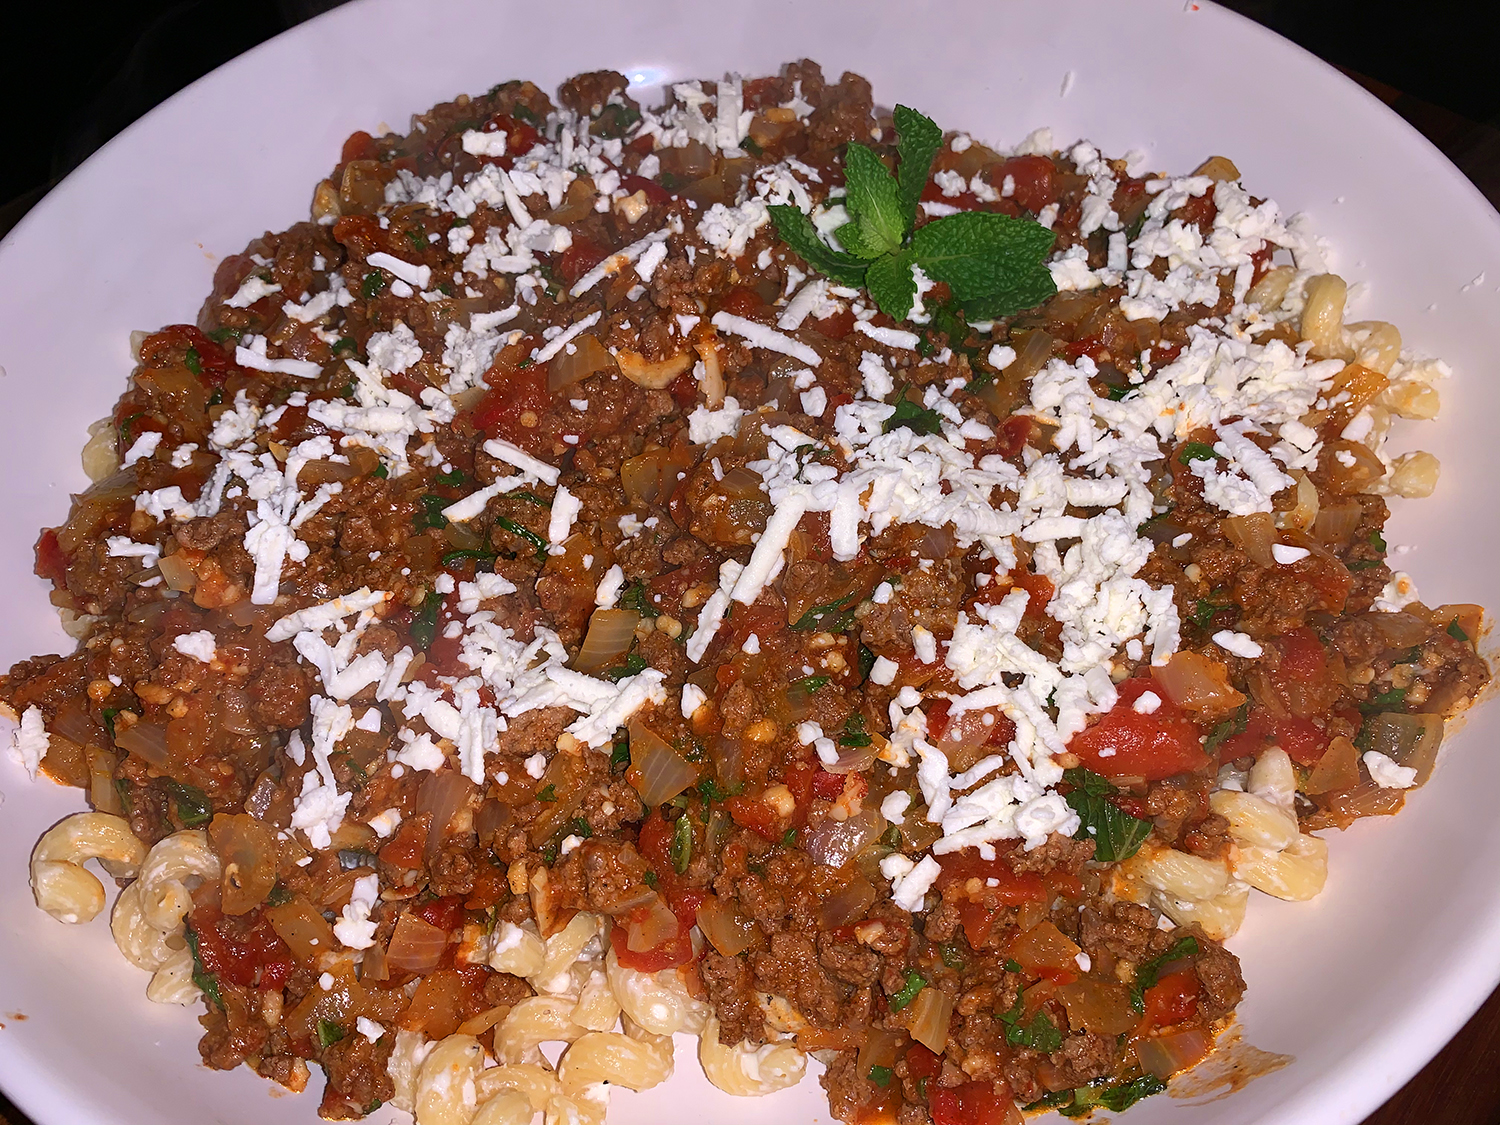
This savory pasta dish was inspired by kawarma, the spicy ground beef topping spooned over hummus in Israel. Milk Street re-envisioned it over pasta with just a few adjustments, resulting in a ground beef sauce seasoned with fragrant spices and generous amounts of onion and garlic, all lightened with a good dose of mint at the end.
I was scratching my head over the ingredients, wondering how they would all come together. Well we were both surprised how delicious the meal was! While we didn’t change anything dramatically, the amount of ground beef was a stretch over the one-and-a-half pounds by another four ounces, no biggie.
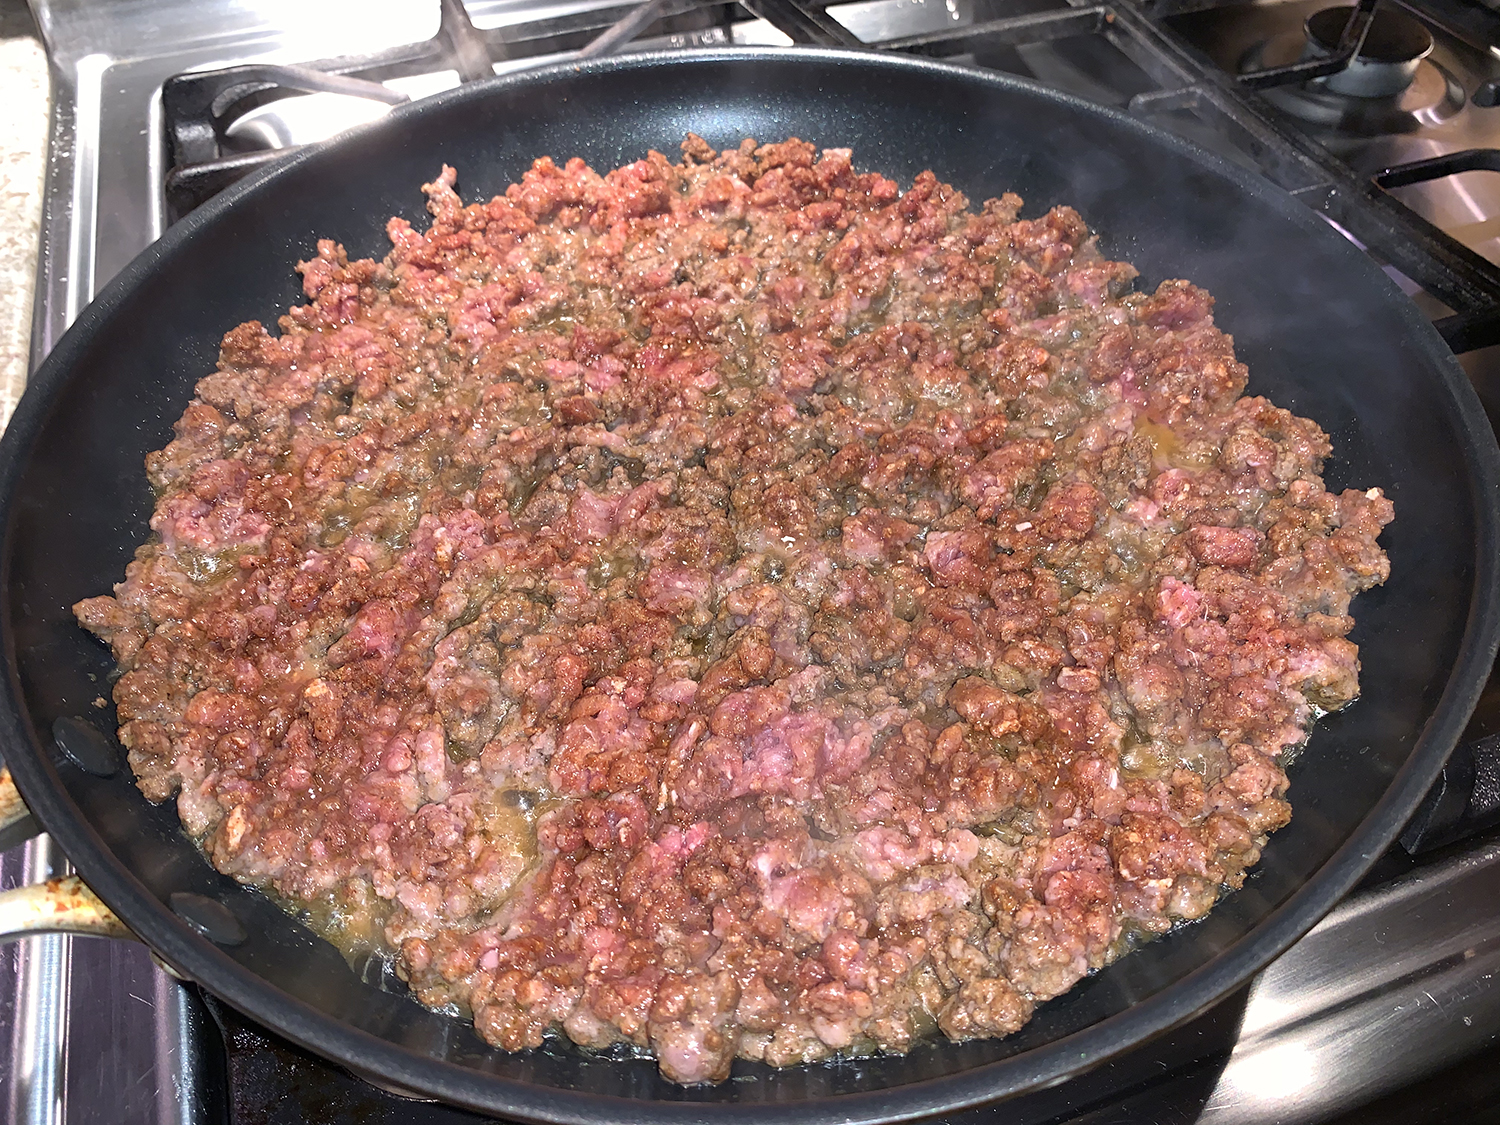
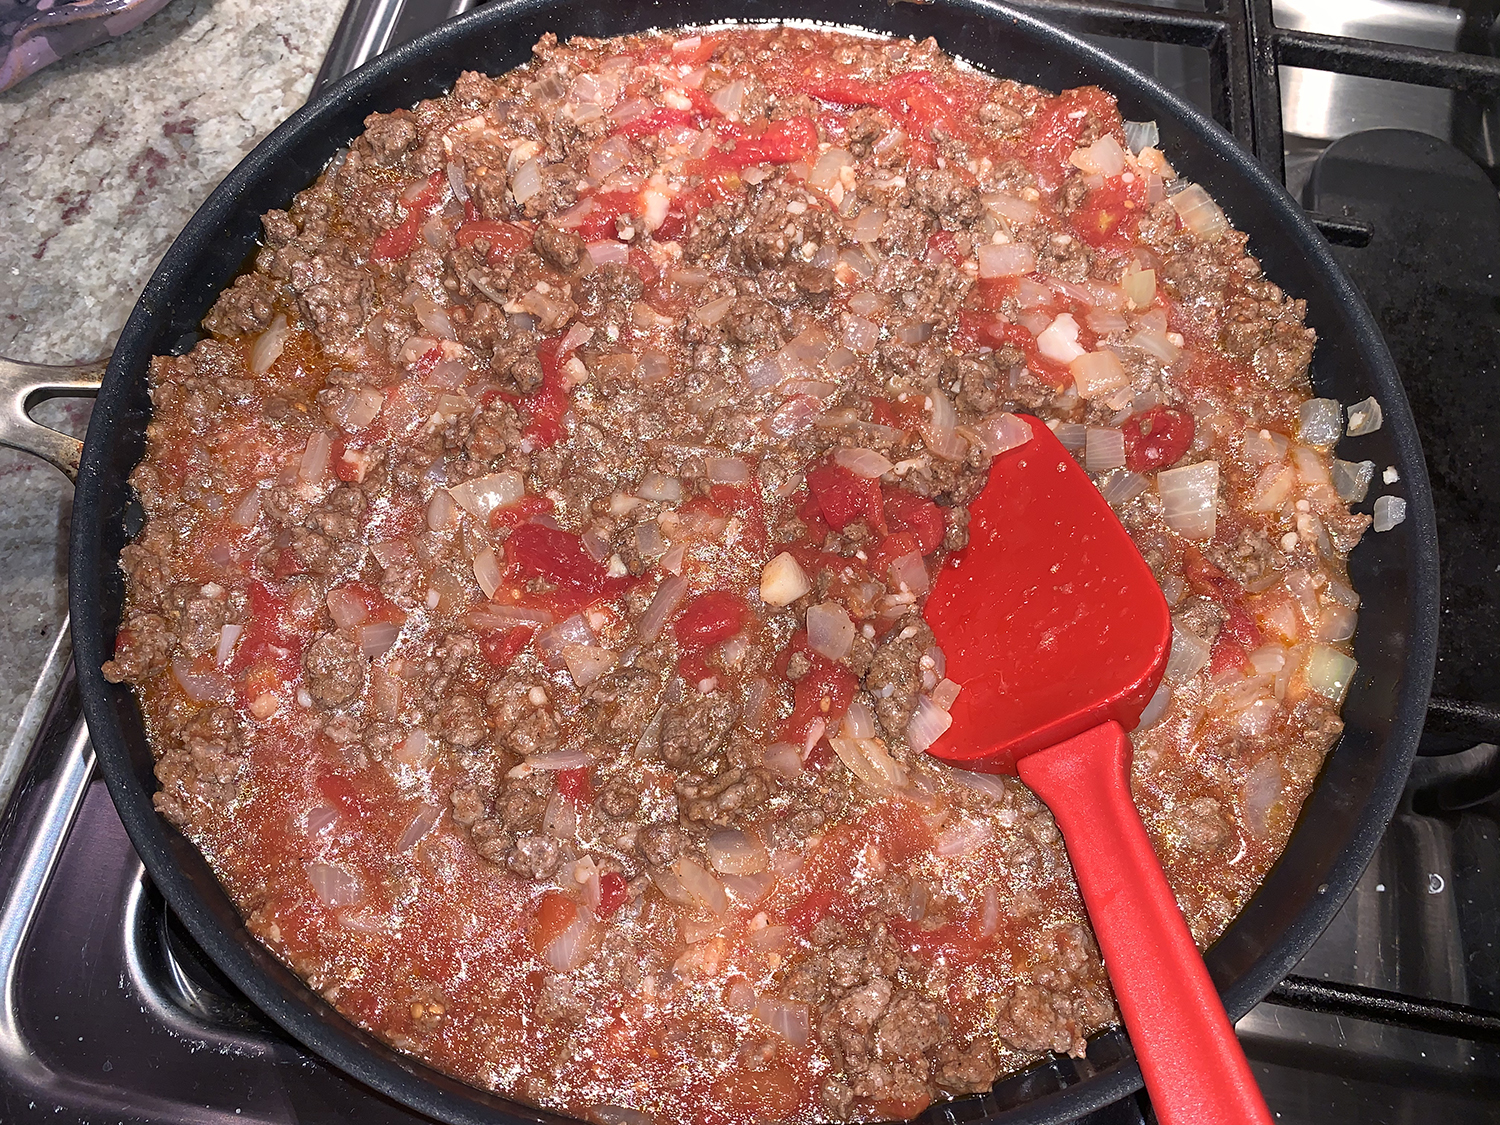
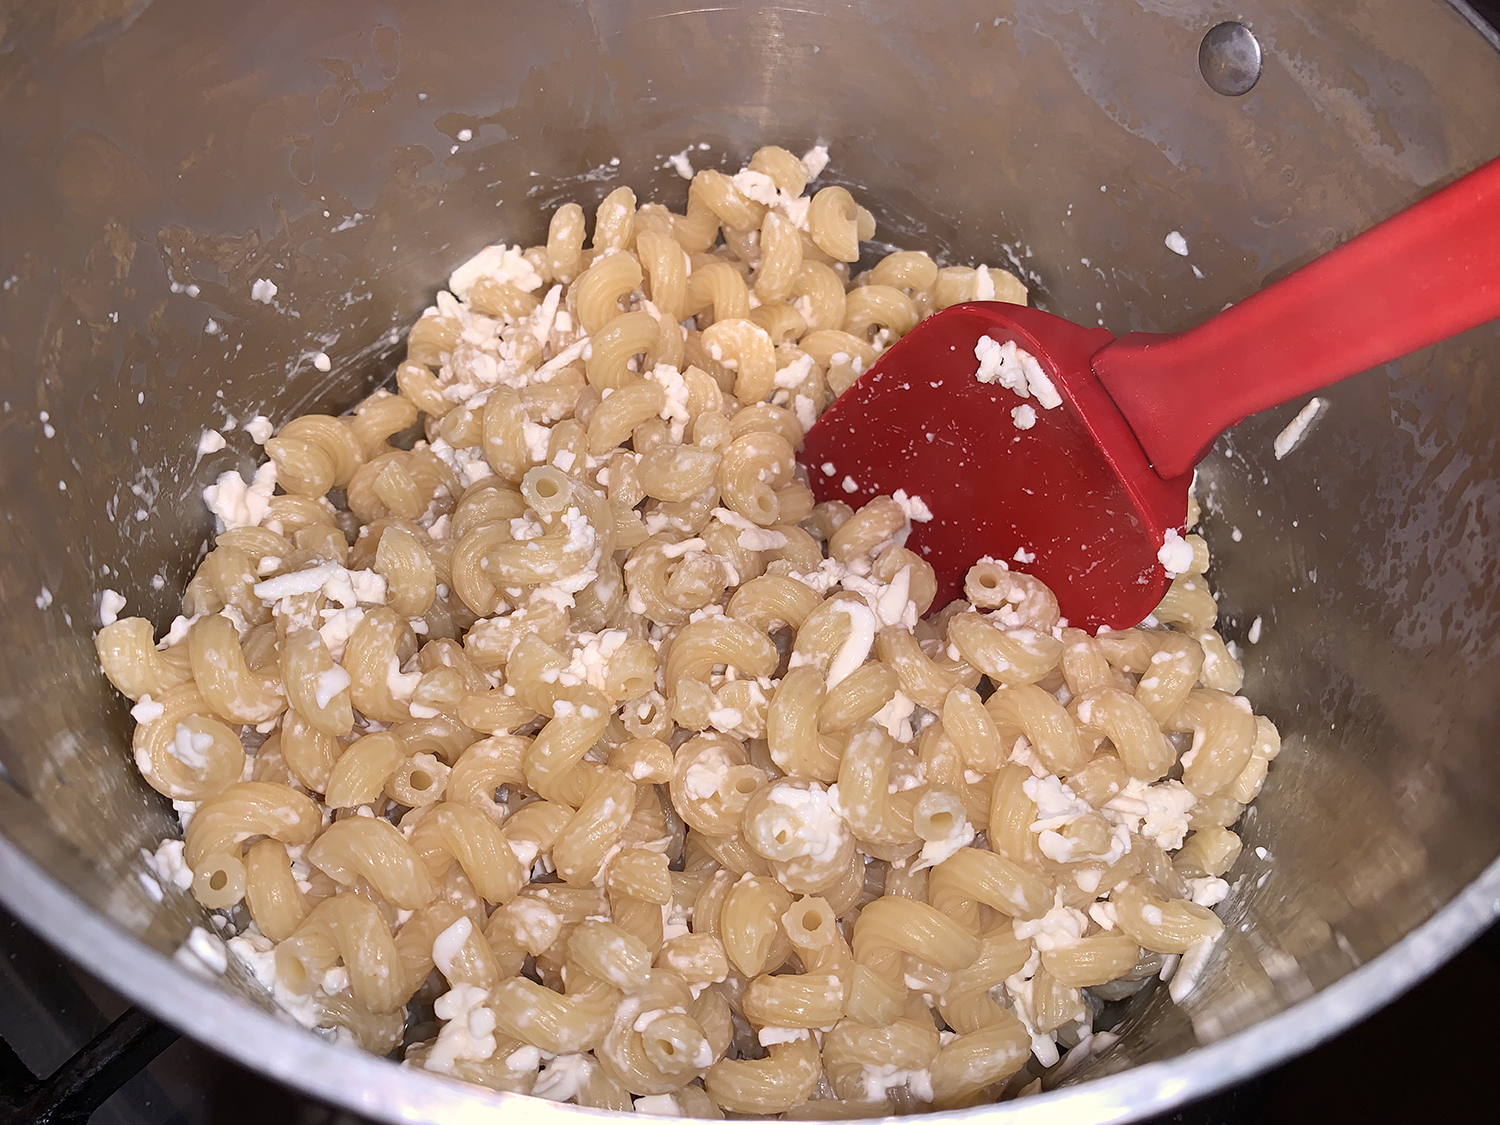
Milk Street warns not use ground beef fattier than 90 percent lean or the sauce will be greasy. However, we happened to have an 85 percent lean ground beef in the house and just made sure to siphon off the grease after Step 2, before adding the tomatoes. The type of pasta was switched from linguine to cellentani because that’s what we happened to have on hand, plus I think the feta clung to those curves more willingly.
And by all means, make sure to use authentic Greek block feta, not the already crumbled bits packaged in plastic containers—the taste is immeasurably more pleasant. Rather than sprinkle the feta as a garnish, it is tossed in with the just-cooked noodles so it melts and coats the strands, or in our case, the cork screws because we used cellentani pasta.
Perhaps because of the extra beef and thicker pasta, our version would easily feed five.
12 oz. cellentani, linguine, or your choice of pasta
8 oz. block feta cheese, shredded on the large holes of a box grater
1 cup chopped fresh mint
Directions
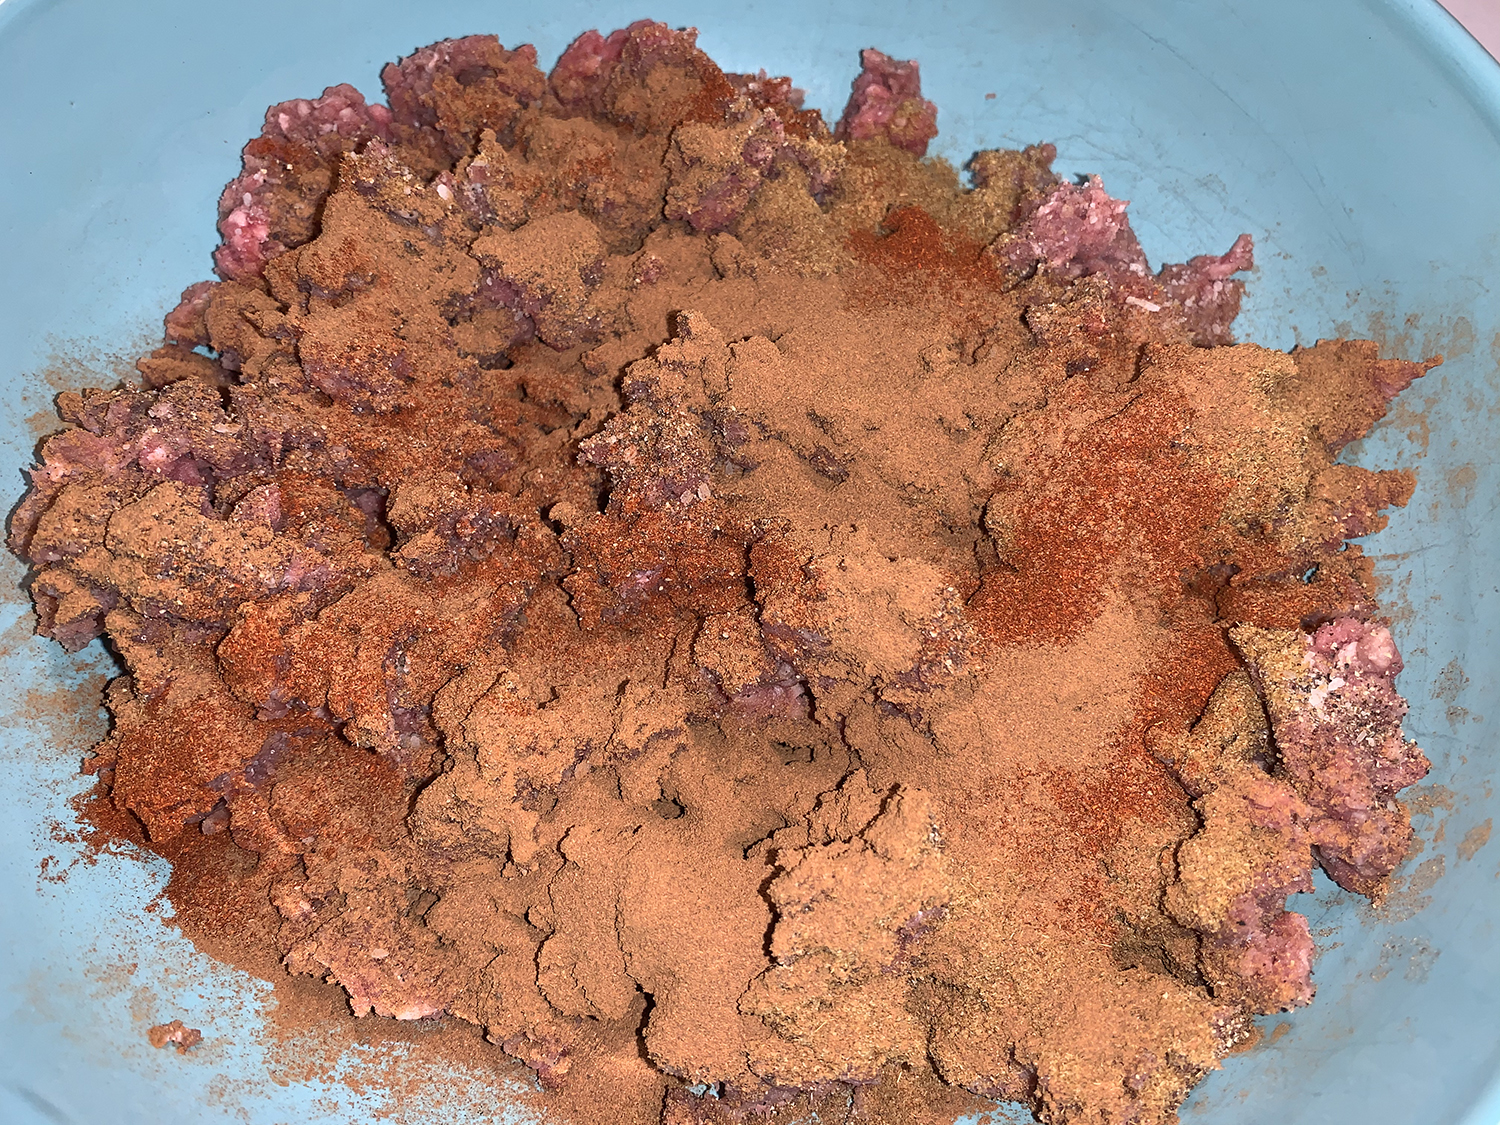
In a medium bowl, combine the beef, cumin, paprika, cinnamon, 1 teaspoon each salt and pepper and ¼ cup water. Mix with your hands until homogenous.
Add the beef mixture, onion and garlic to a 12-inch skillet. Set the pan over medium-high and cook, stirring and breaking up the meat with a spatula, until the onion has softened and the beef is no longer pink, 8 to 10 minutes.
Stir in the tomatoes with juices and bring to a simmer, then reduce to medium and cook uncovered, stirring, until most of the liquid has evaporated and the sauce has thickened, 10 to 15 minutes.
Meanwhile, in a large pot, bring 4 quarts water to a boil. Stir in the pasta and 2 tablespoons salt; cook until the pasta is al dente. Reserve about 1 cup of the cooking water (you probably won’t need it all), then drain the pasta.
Return the pasta to the pot. Add about ¾ of the feta and toss. Taste and season with salt and pepper, add reserved pasta water a bit at a time to loosen if needed, then transfer to a platter.
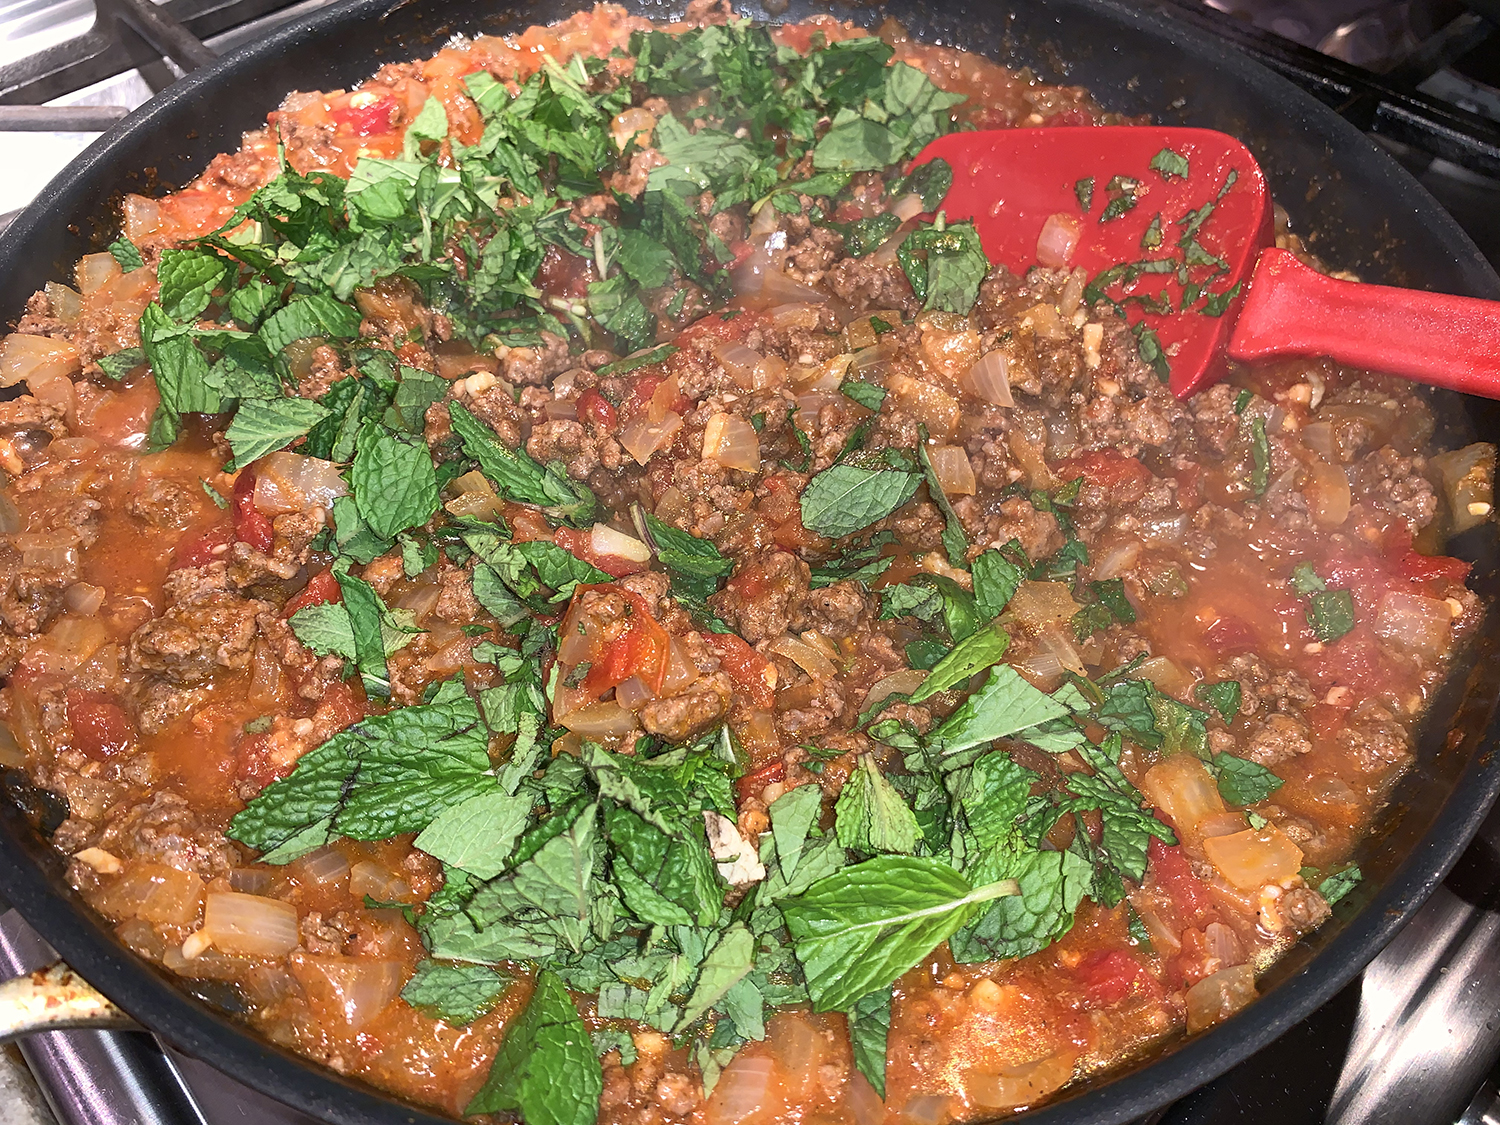
Stir the mint into the sauce, then taste and season with salt and pepper. Pour the sauce over the pasta and sprinkle with the remaining feta.
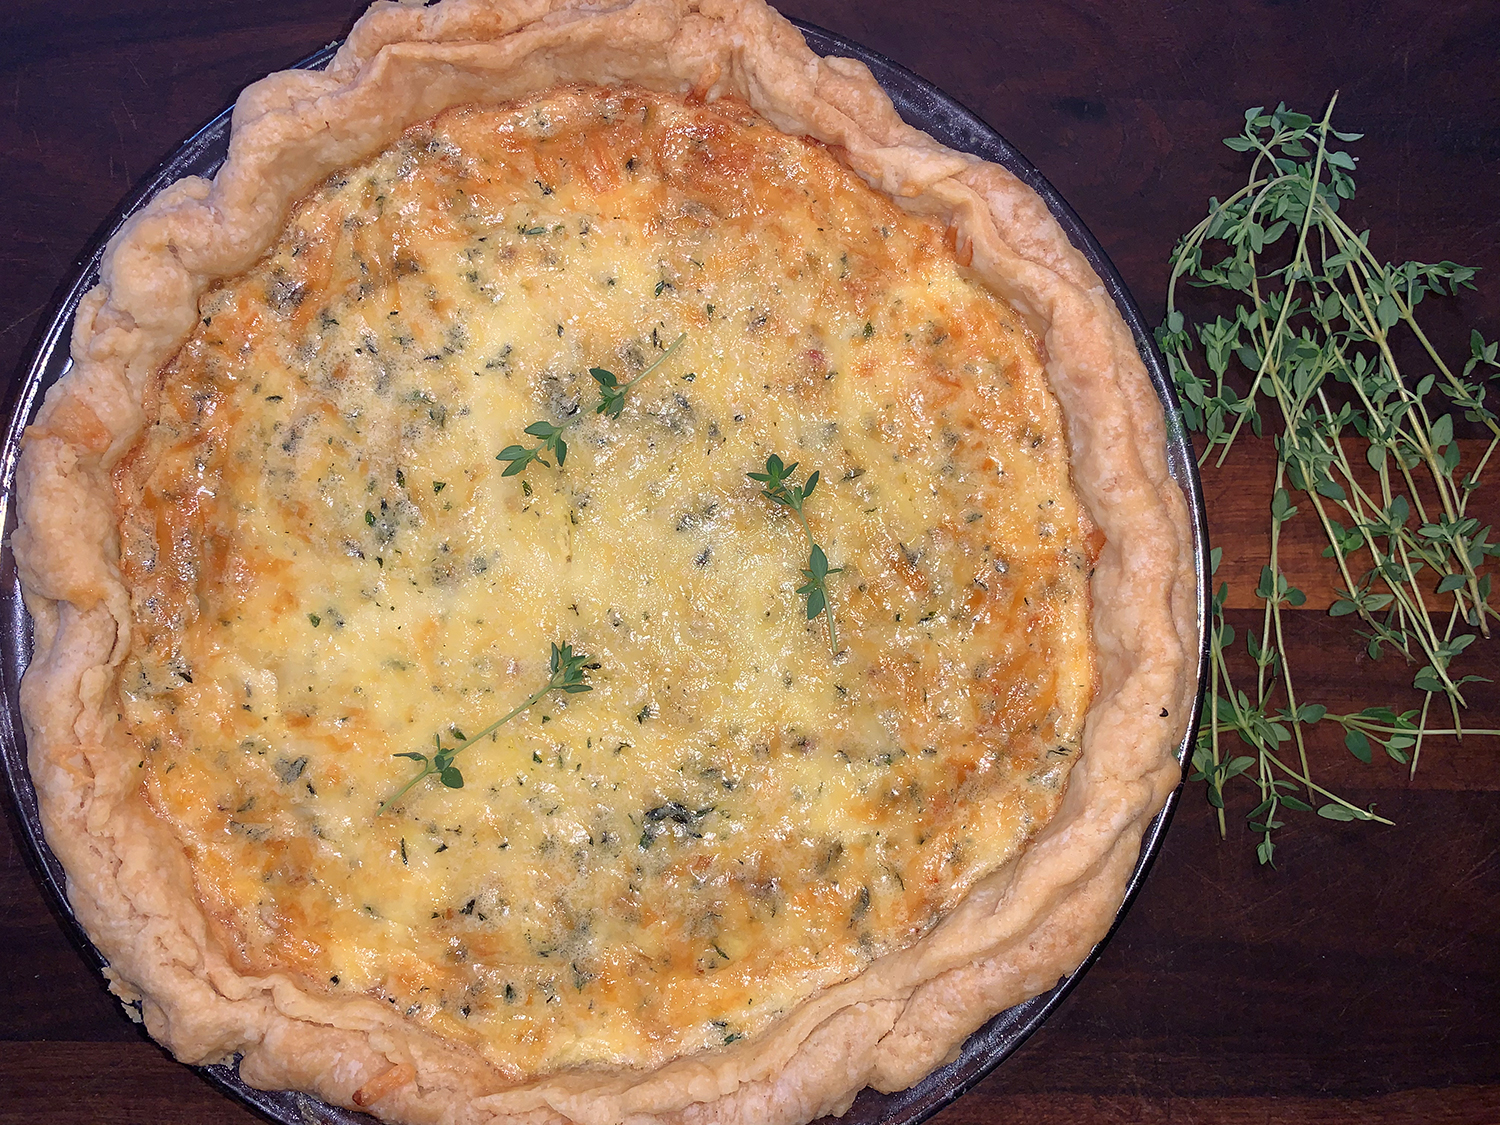
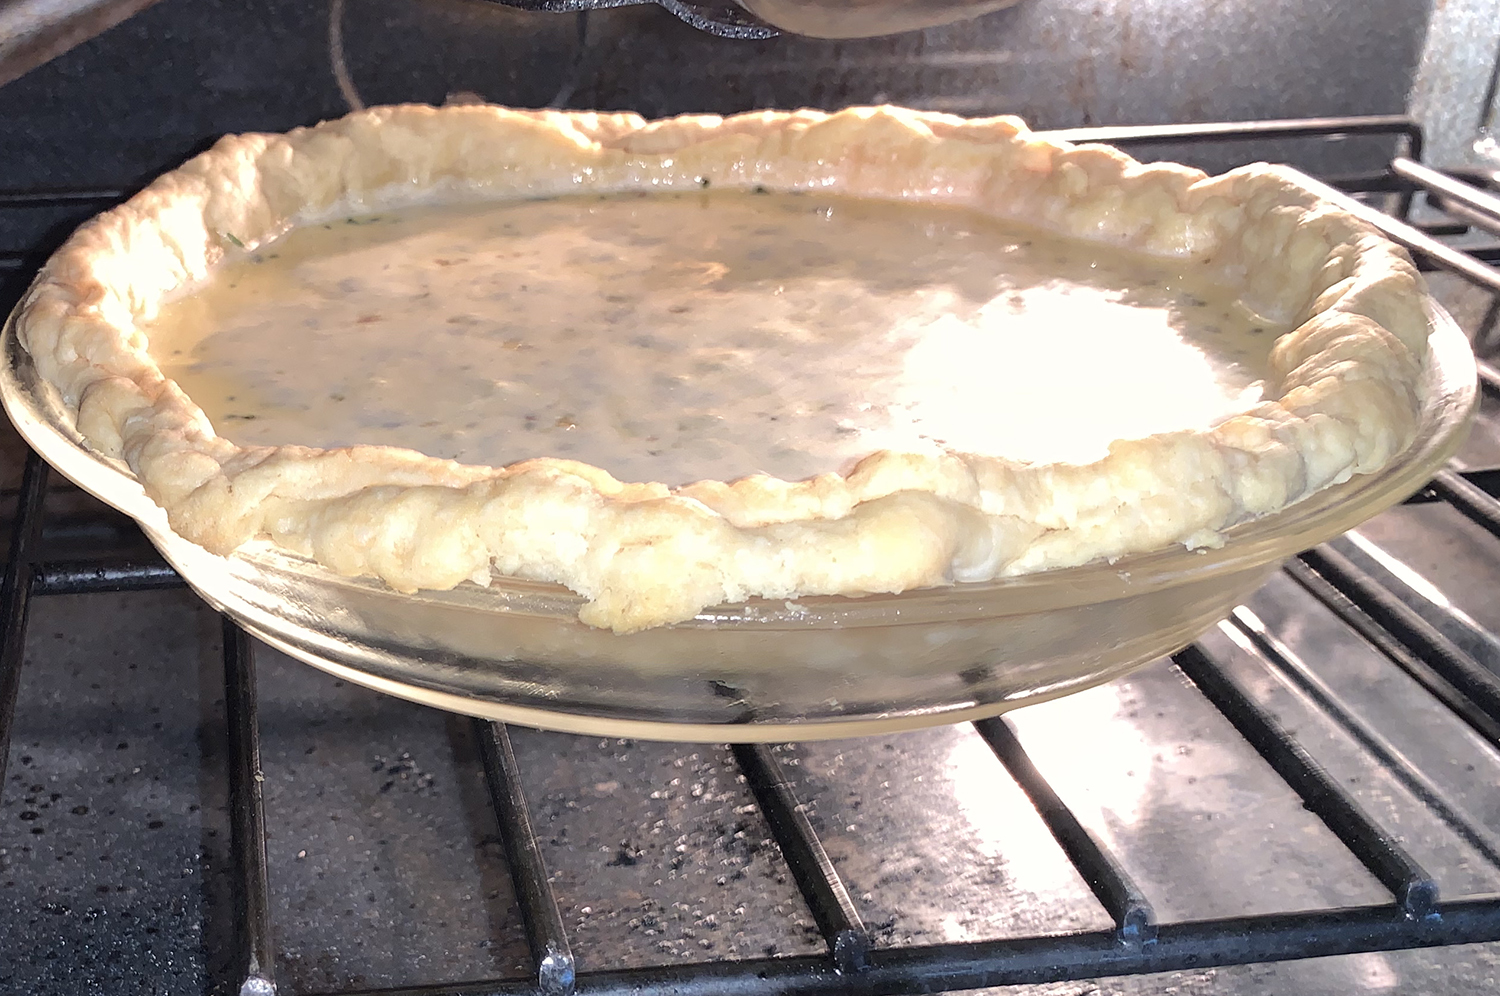
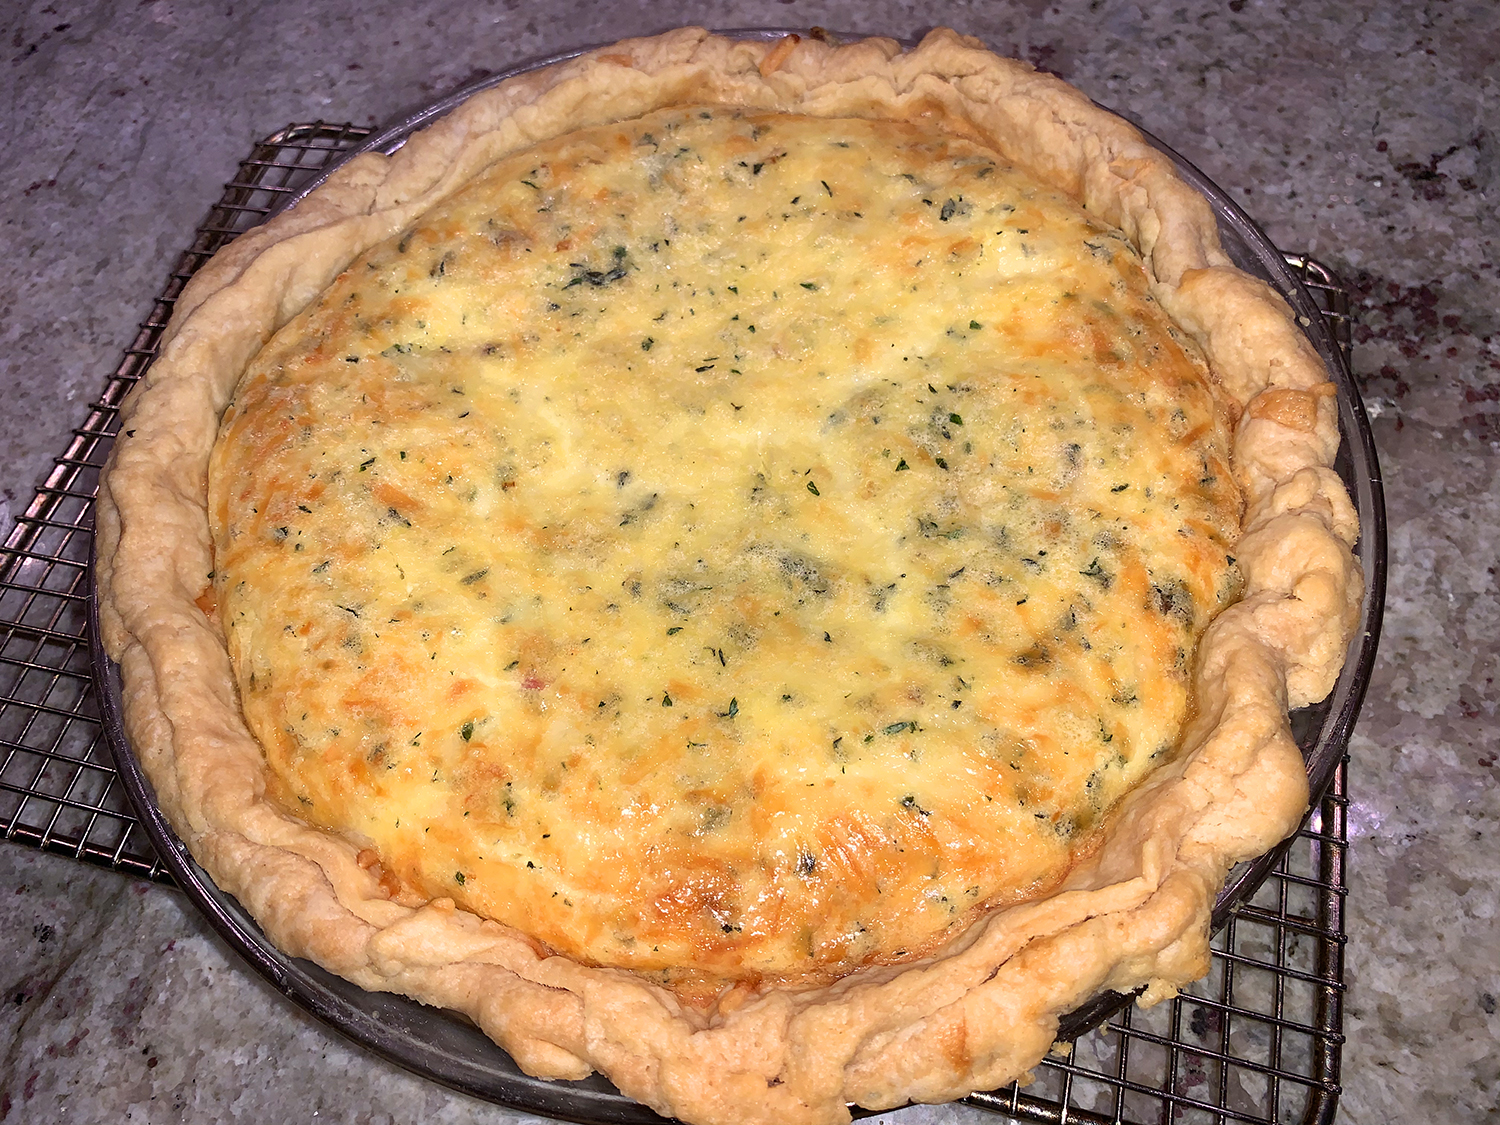
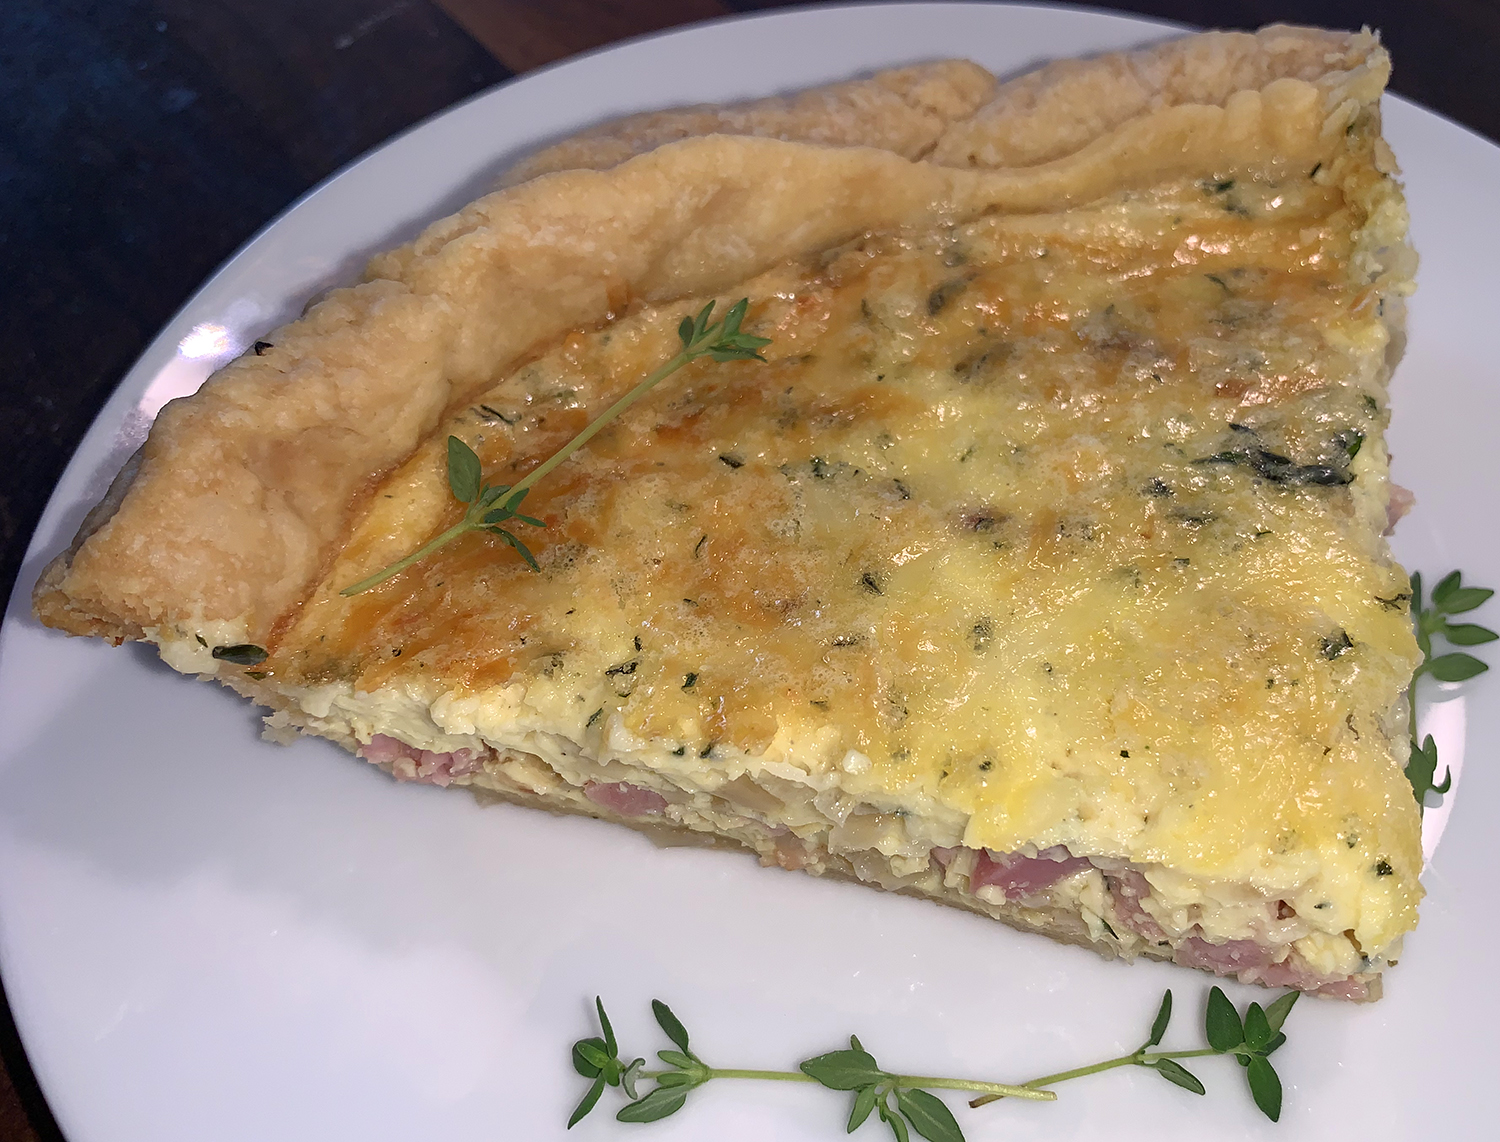
Quiche is one of those versatile dishes that can be served at any meal, be it breakfast, brunch, lunch or dinner. Once baked and cooled slightly, it can be eaten right away, or refrigerated for another time. Using a combination of milk and heavy cream, it yields the richest, creamiest filling ever.
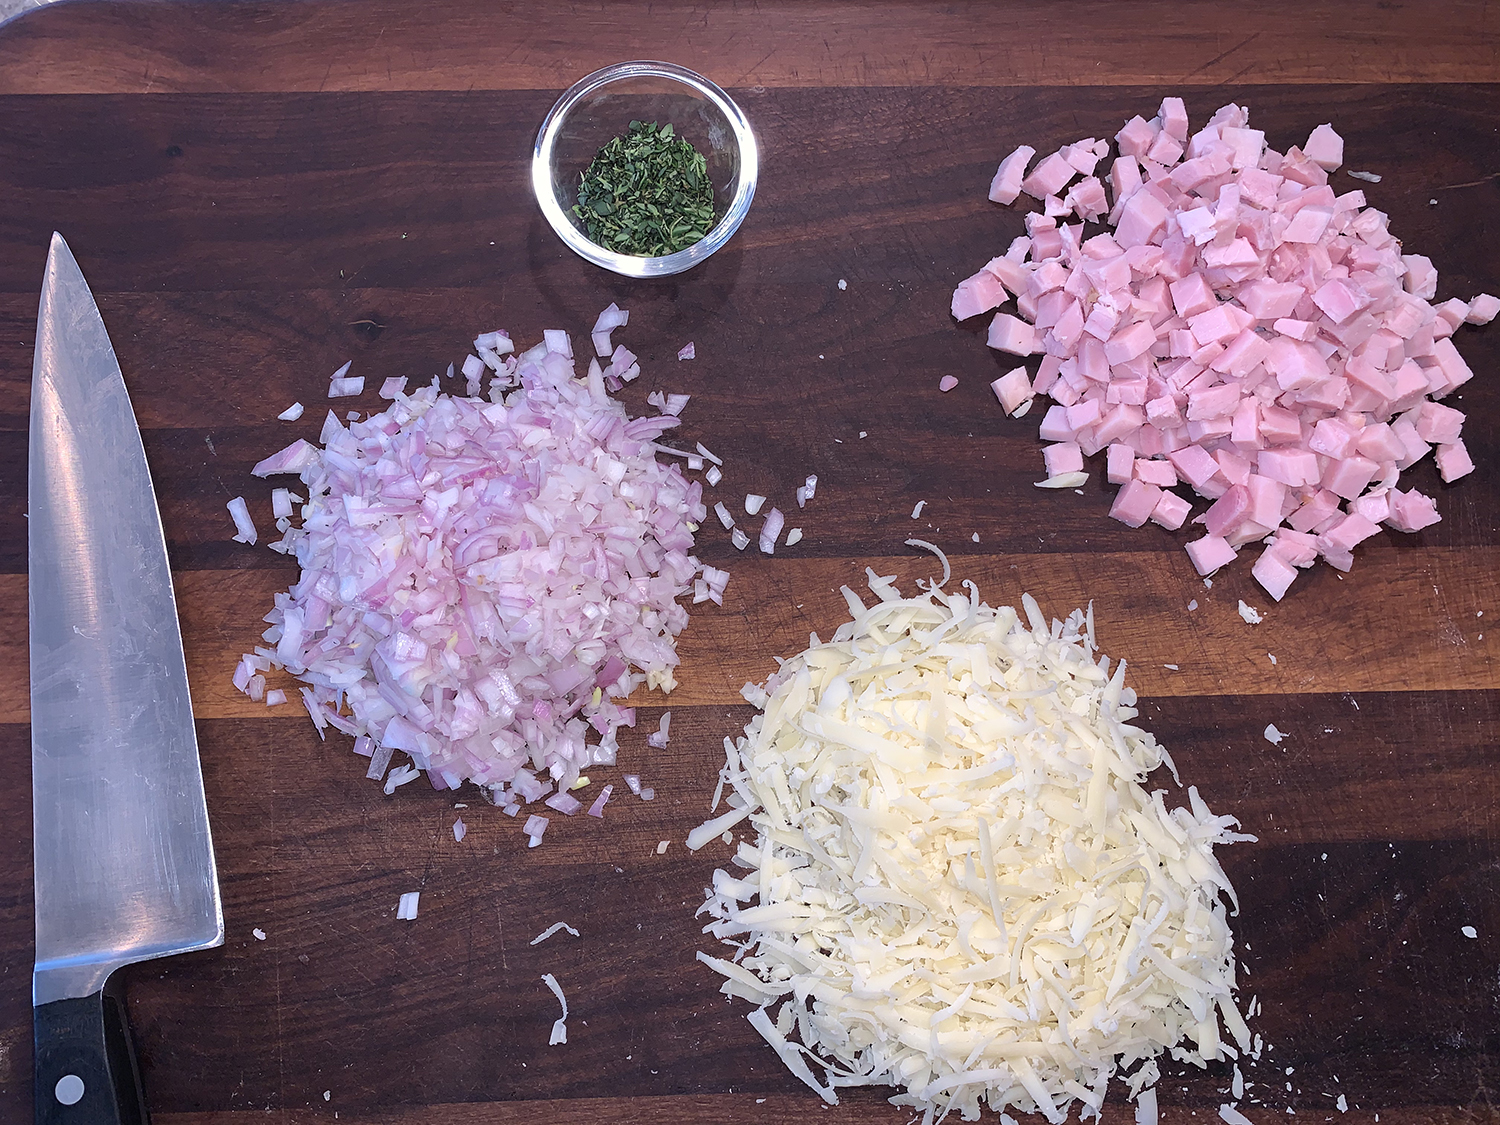
With a large amount leftover from a recent dinner party featuring Ham Braised in Madeira with Rosemary & Peppercorns, and a block of gruyere that never got used, we had the starter ingredients for our filling. To that we included some diced shallot and chopped fresh thyme.
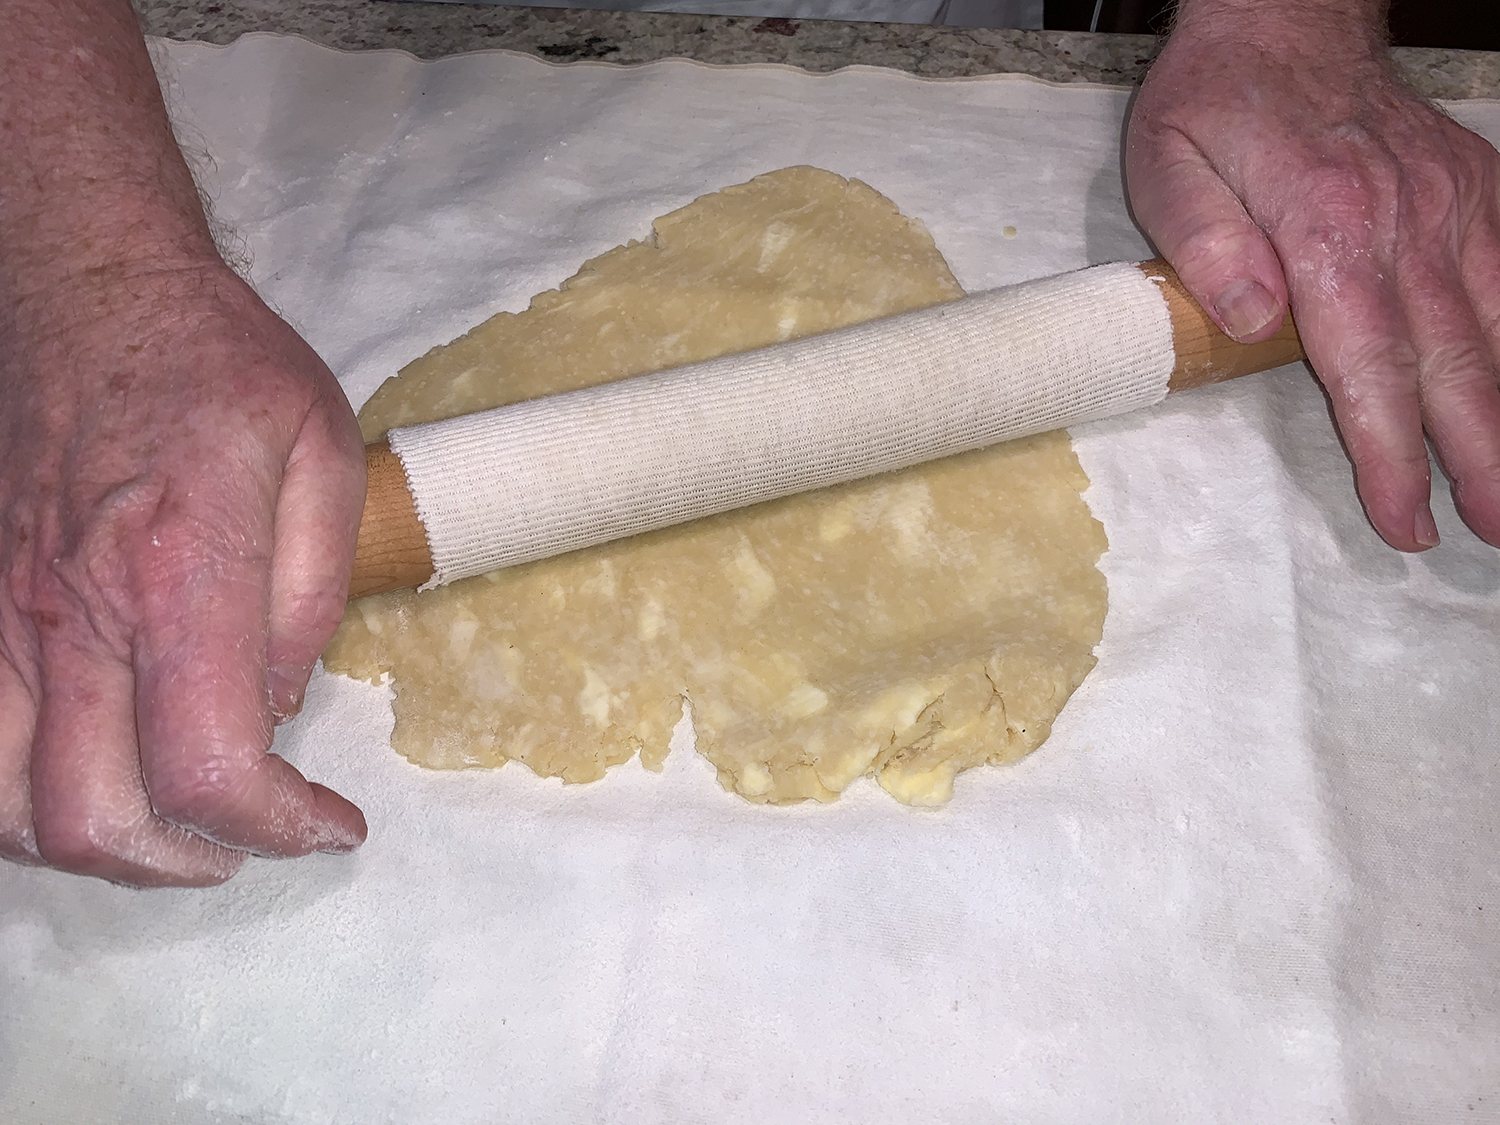
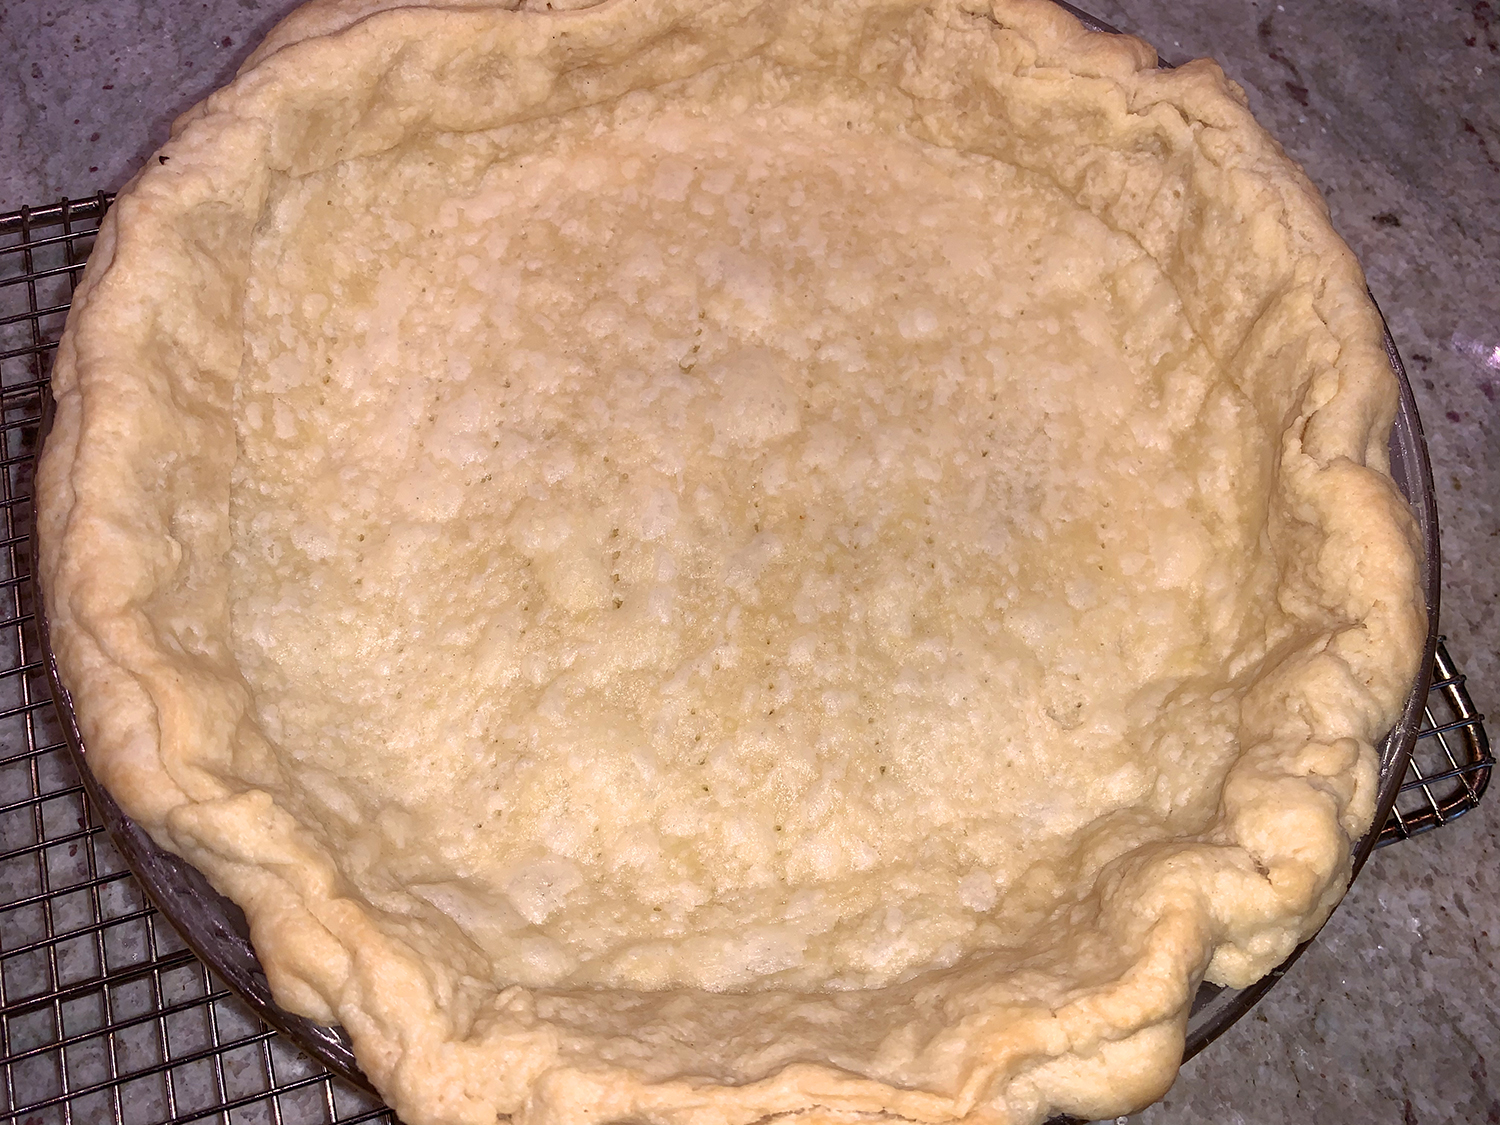
We are “those” people that thrive on culinary challenges, but if you don’t have the time, or the stamina to create your own crust, by all means purchase a pre-made store bought variety. But be forewarned, this crust recipe is fabulous, and according to The Hubs, the best he’s ever made! He really liked the trick of adding the leftover dough to the edges for crimping and fluting. This also helped prevent the crust from sinking down.
NOTE: This recipe is enough for a double crust pie. If you only need 1 crust for your pie, cut this recipe in half OR freeze the other half.
Directions
Transfer the dough to a floured work surface.
Using floured hands, fold the dough into itself until the flour is fully incorporated into the fats.
Form it into a ball. The dough should come together easily and should not feel overly sticky.
Cut the dough in half. Flatten each half into 1-inch thick discs using your hands. Wrap each tightly in plastic wrap.
Refrigerate for at least 2 hours or up to 5 days. Or freeze.
When rolling out the chilled pie dough discs to use in your pie, always use gentle force with your rolling pin. Start from the center of the disc and work your way out in all directions, turning the dough with your hands as you go. Visible specks of butter and fat in the dough are perfectly normal and expected.
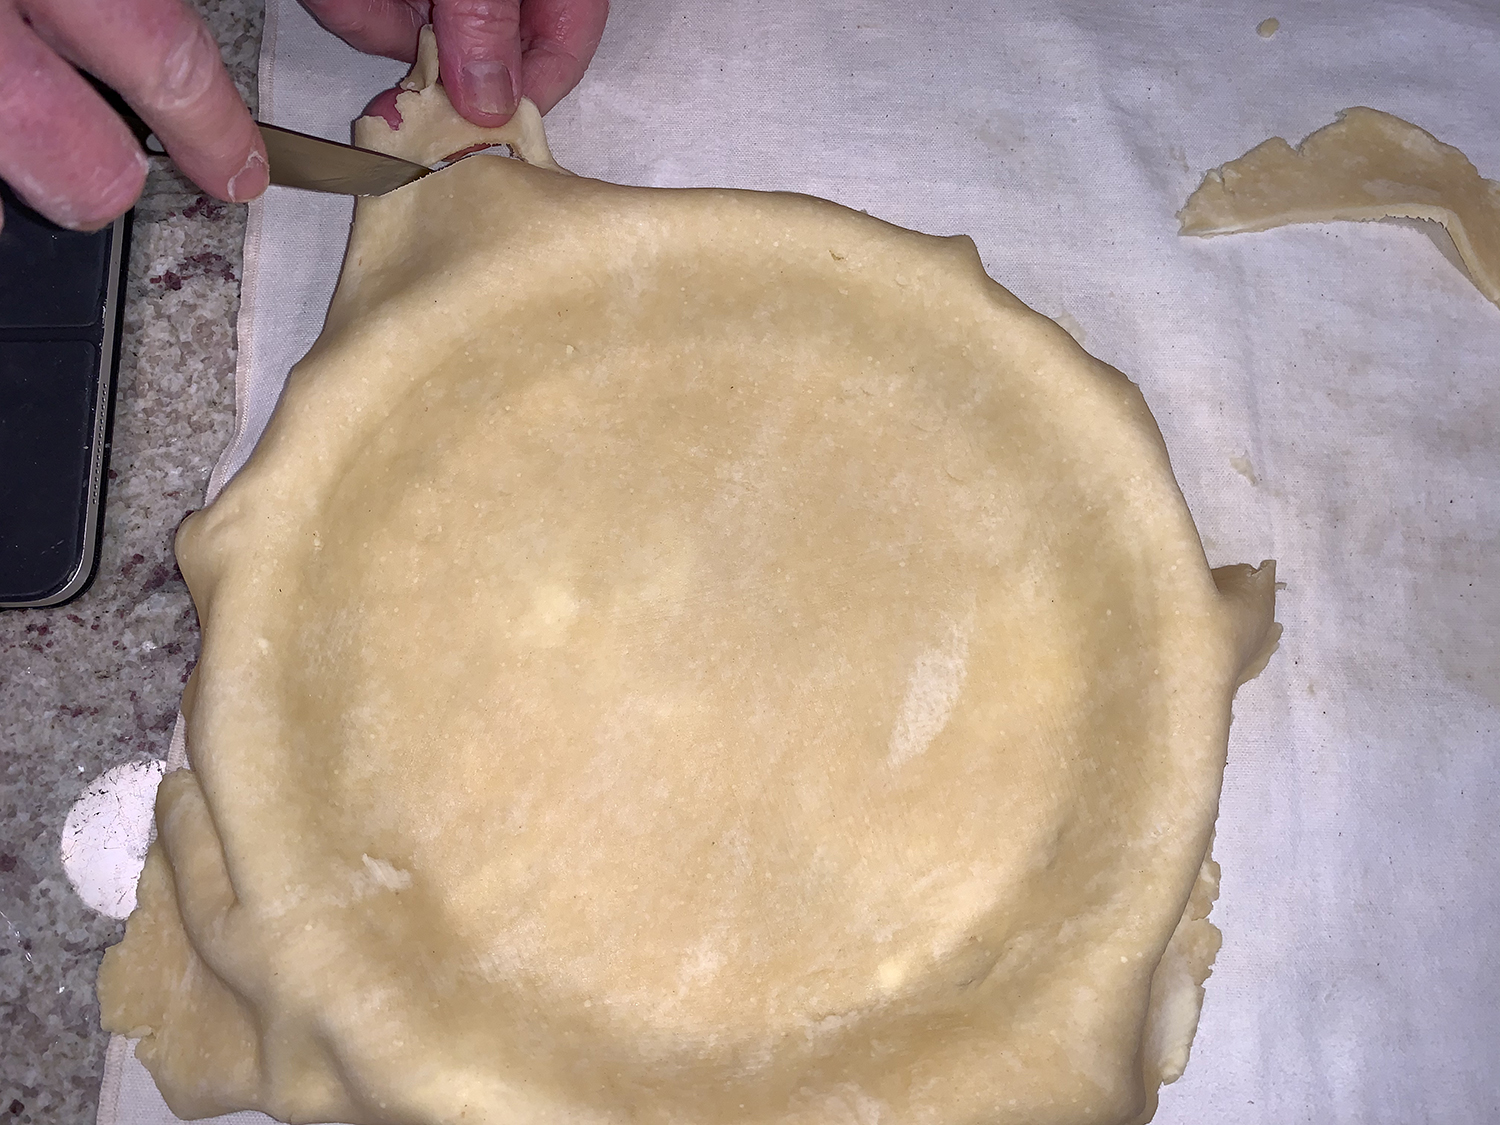
Roll the dough into a 12-inch circle so that there is enough crust to go up the edges of the glass pie dish. Cut away extra dough but leave about an inch overhang.
Gather all of the extra dough pieces, mush together and roll out into a thin rectangle. Cut 1-inch strips and add them to the top edge of the pie crust. Crimp or flute the edges.
Chill the shaped pie crust for at least 30 minutes. This prevents shrinking. Remember that pie dough must be cold.
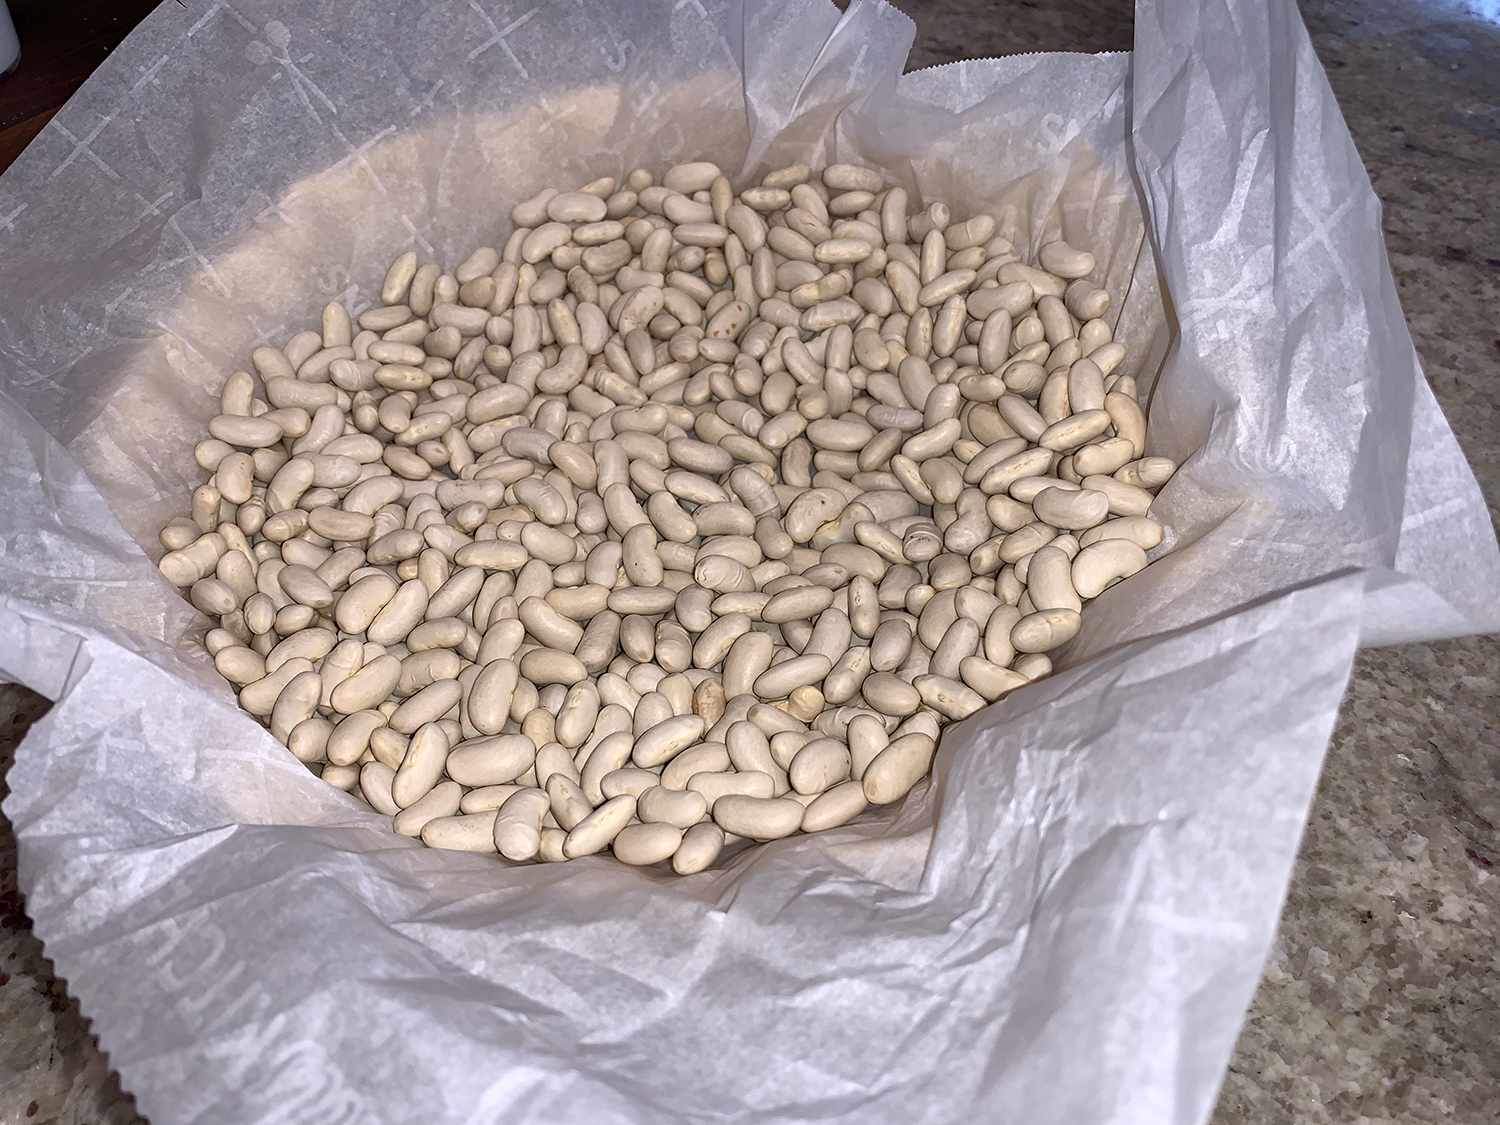
Fill with pie weights (or dried beans). As the pie dough bakes, its fat will melt. The melting fat causes the pie crust to shrink down the sides of the pie dish. To prevent the pie dough from completely losing its shape, weigh it down with pie weights. Carefully line the pie dough with parchment paper first, then pour in pie weights/dry beans.
Bake until the edges are lightly brown, about 15 minutes.
Remove pie weights, then prick the crust with a fork.
Bake crust for about 8 more minutes.
The Perfect Quiche
Ingredients
1 unbaked flaky pie crust (recipe above)
4 large eggs
1/2 cup whole milk
1/2 cup heavy cream or heavy whipping cream
1/4 tsp. each salt and pepper
1 cup shredded Gruyere cheese
1 cup cubed ham
1 Tbsp. butter
1 cup minced shallot
1 1/2 tsp. chopped fresh thyme
Directions
Preheat oven to 375°F.
Partially blind bake your pie crust as indicated above. Crust can still be warm when you pour in the filling. (You can partially pre-bake the crust up to 3 days ahead of time. Cover cooled crust tightly and refrigerate until ready to fill.)
Reduce oven temperature to 350°F.
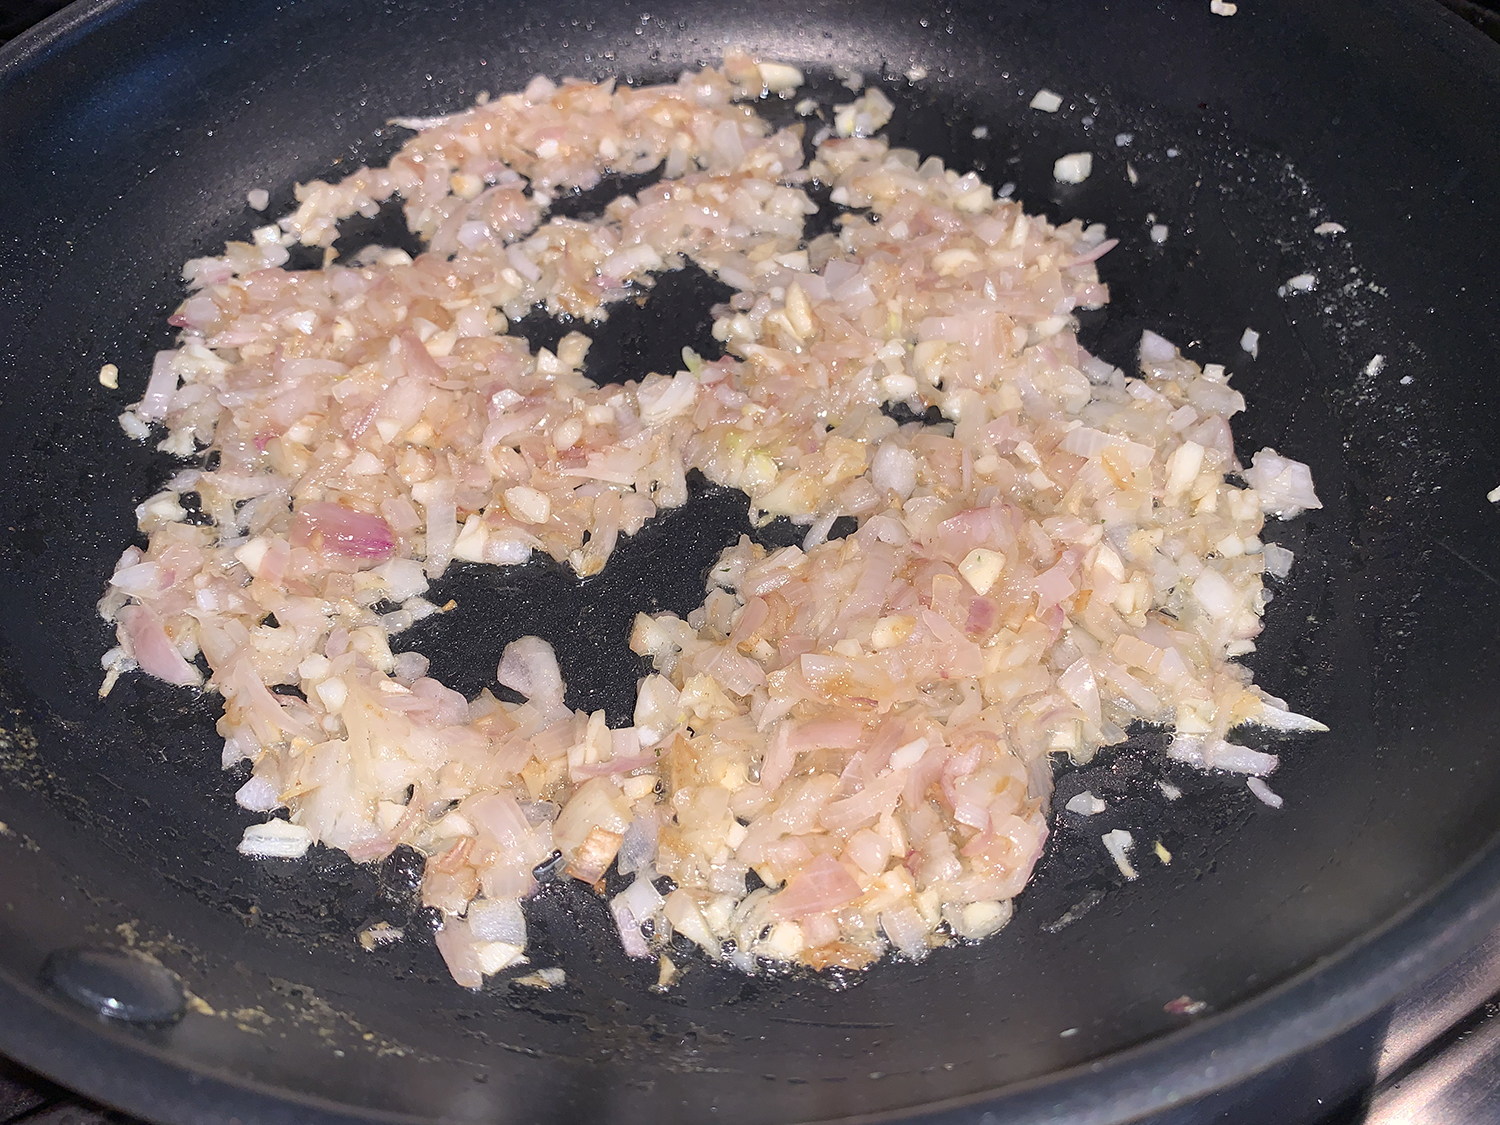
Heat 1 tablespoon of butter in a nonstick skillet over medium heat. When melted, add shallot pieces and cook, stirring occasionally until translucent, about 4-5 minutes.
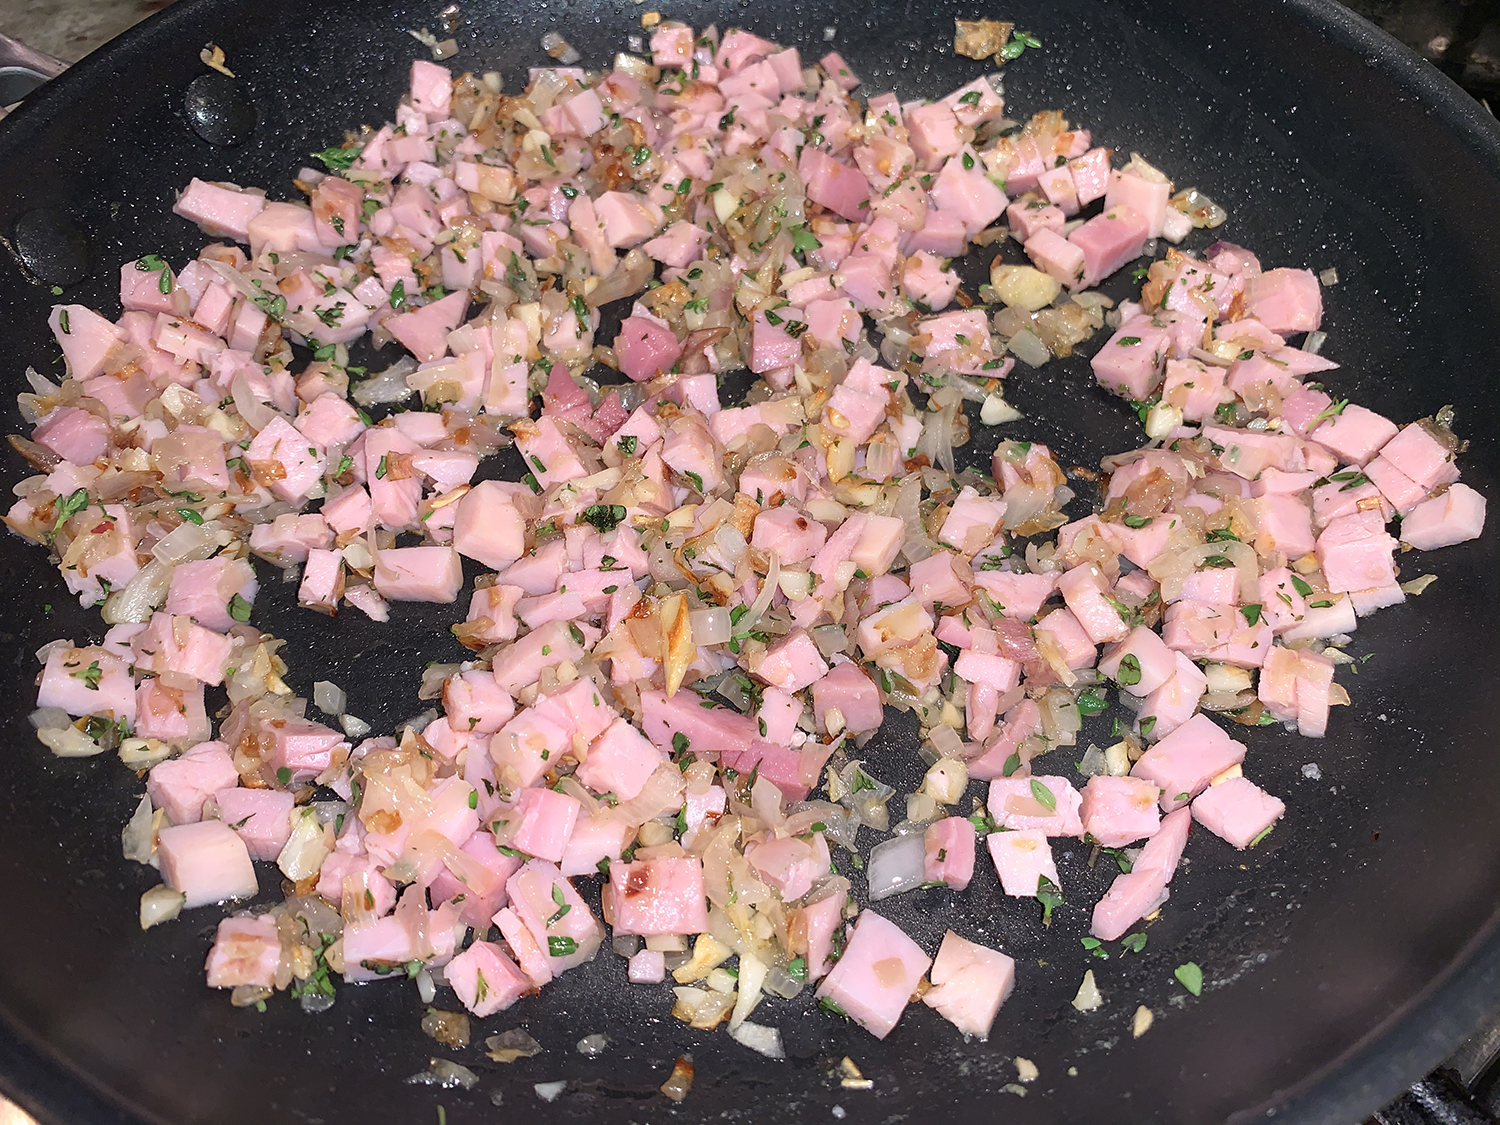
In a large bowl with a handheld or stand mixer fitted with a whisk attachment, beat the eggs, whole milk, heavy cream, salt, and pepper together on high speed until completely combined, about 1 minute. Whisk in ham, cheese, shallot and thyme.
Bake the quiche until the center is just about set, about 45-55 minutes. Don’t over-bake. Use a pie crust shield to prevent the pie crust edges from over-browning. Allow to cool for 15 minutes.
Top with optional toppings before slicing and serving, if desired. Or you can cool the quiche completely before serving– it’s fantastic at room temperature!
This quiche makes great leftovers! Cover tightly and store in the refrigerator for up to 4 days.
Make Ahead & Freezing Instructions: The pie dough can be prepared ahead of time and stored in the refrigerator for up to 5 days or in the freezer for up to 3 months. You can pre-bake the crust ahead of time too. To freeze, cool baked quiche completely, then cover tightly with a couple sheets of aluminum foil and freeze for up to 3 months. Thaw in the refrigerator or on the counter, then bake at 350°F for 20-25 minutes.
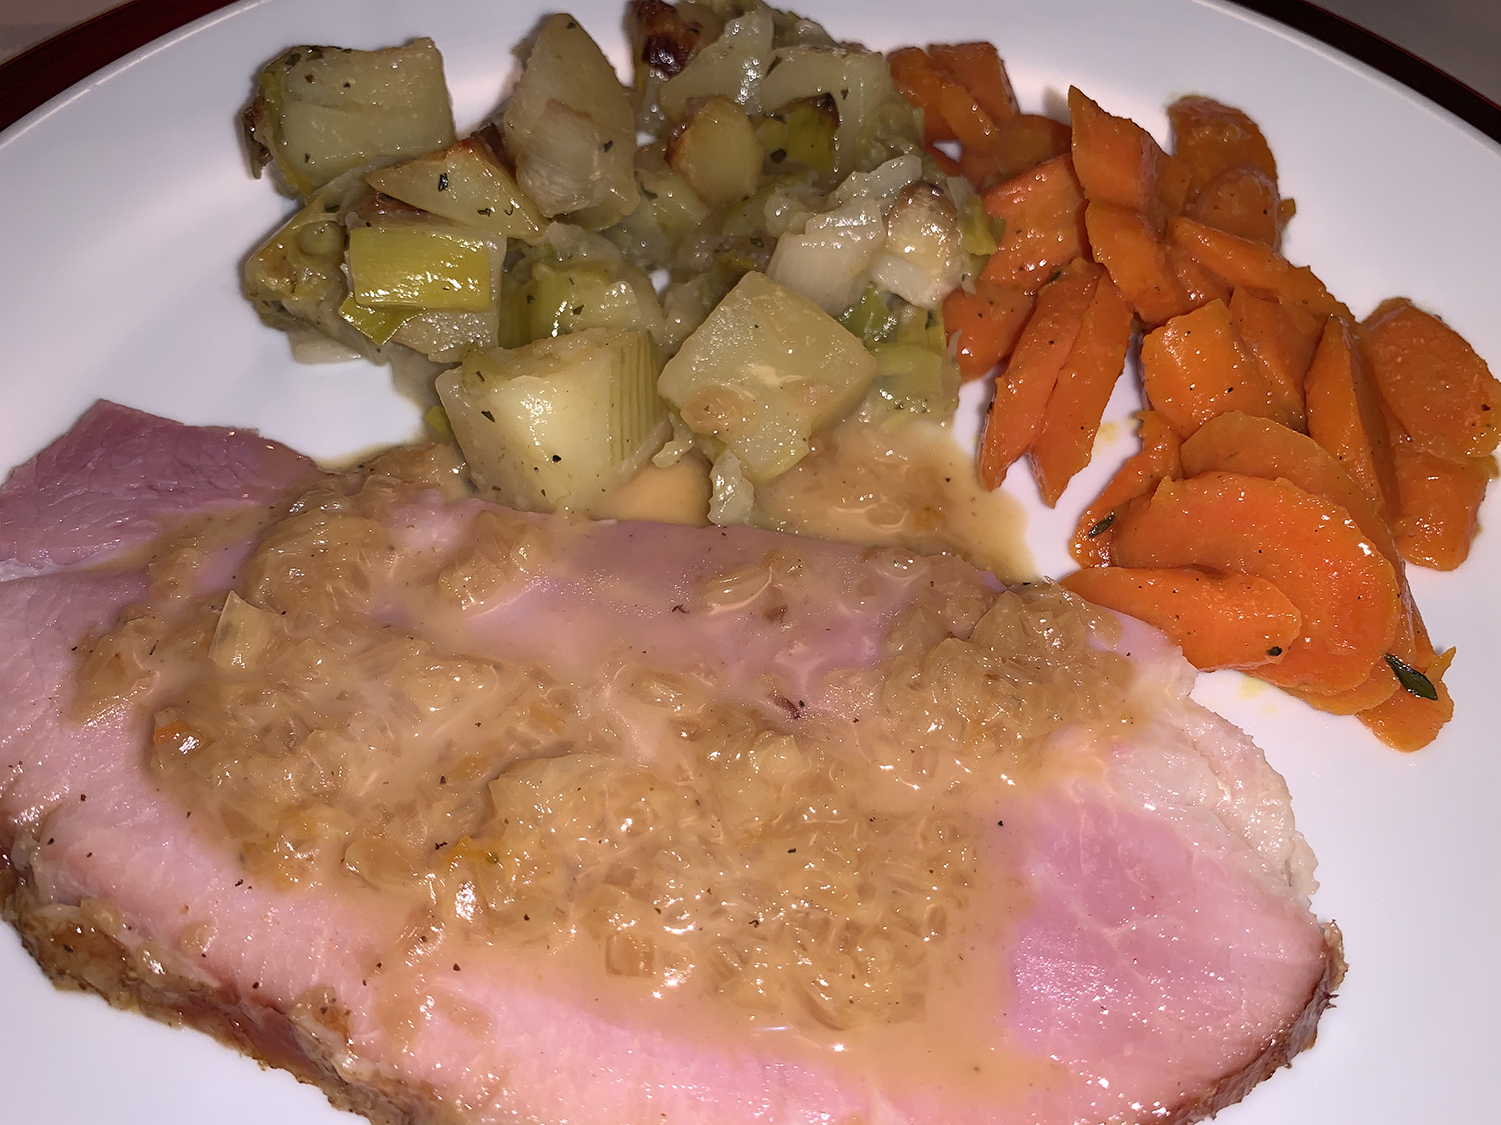
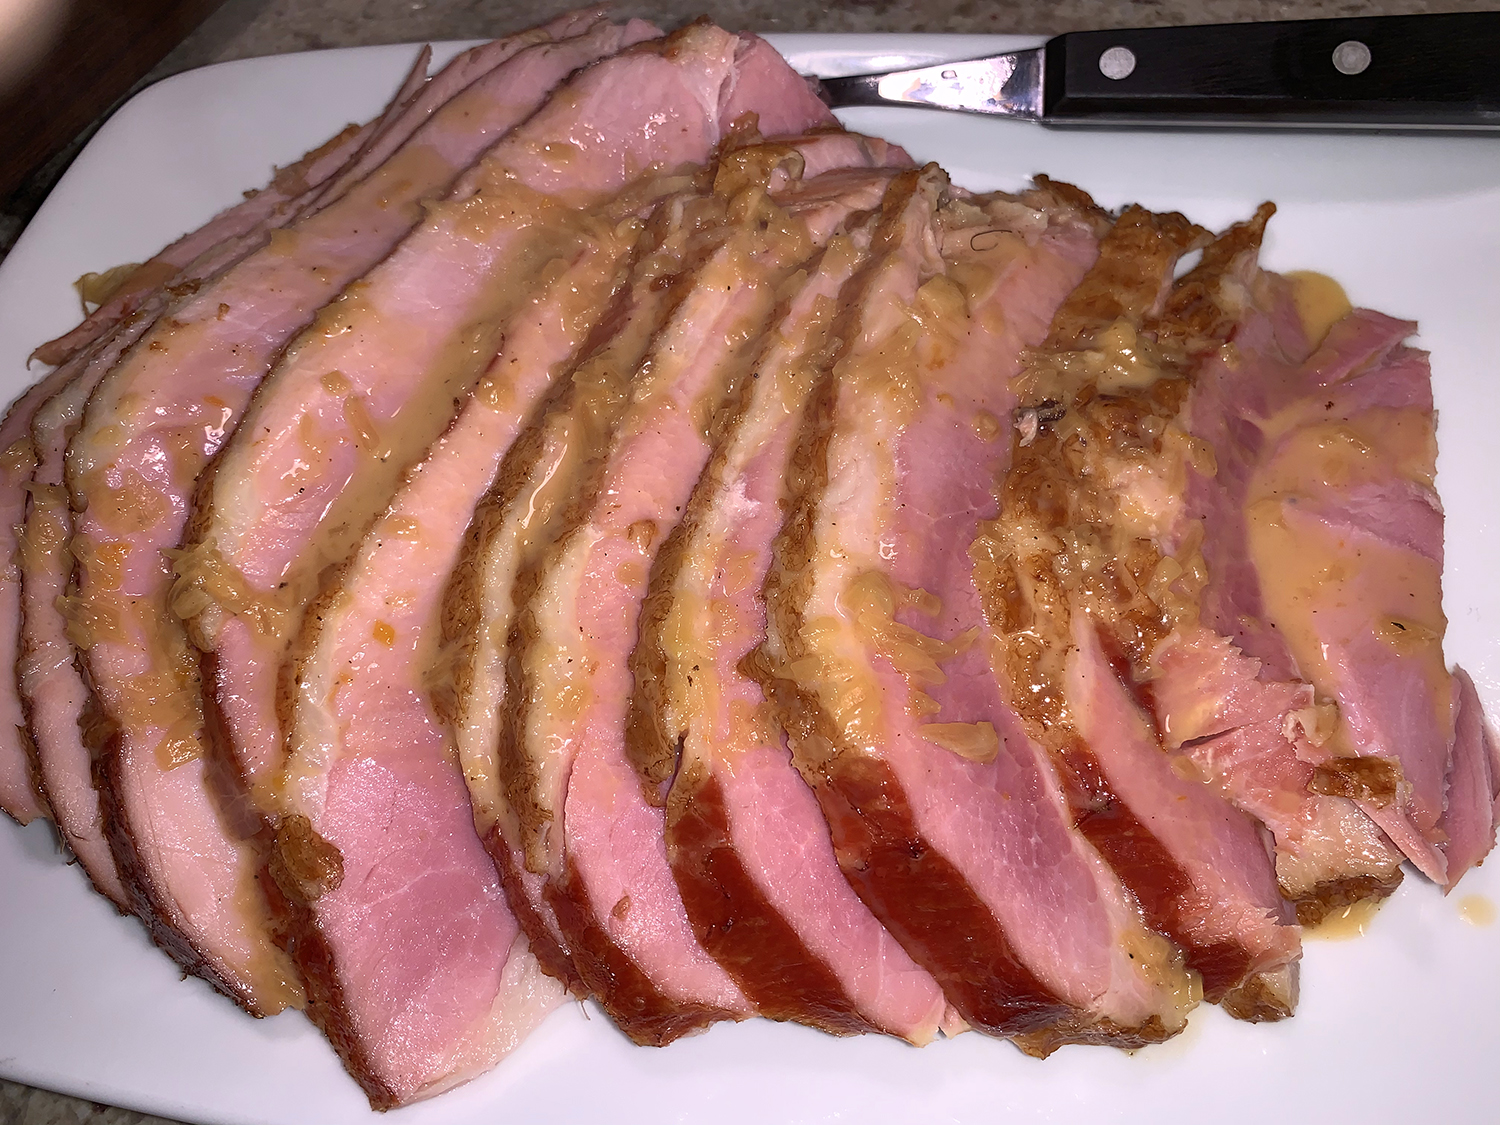
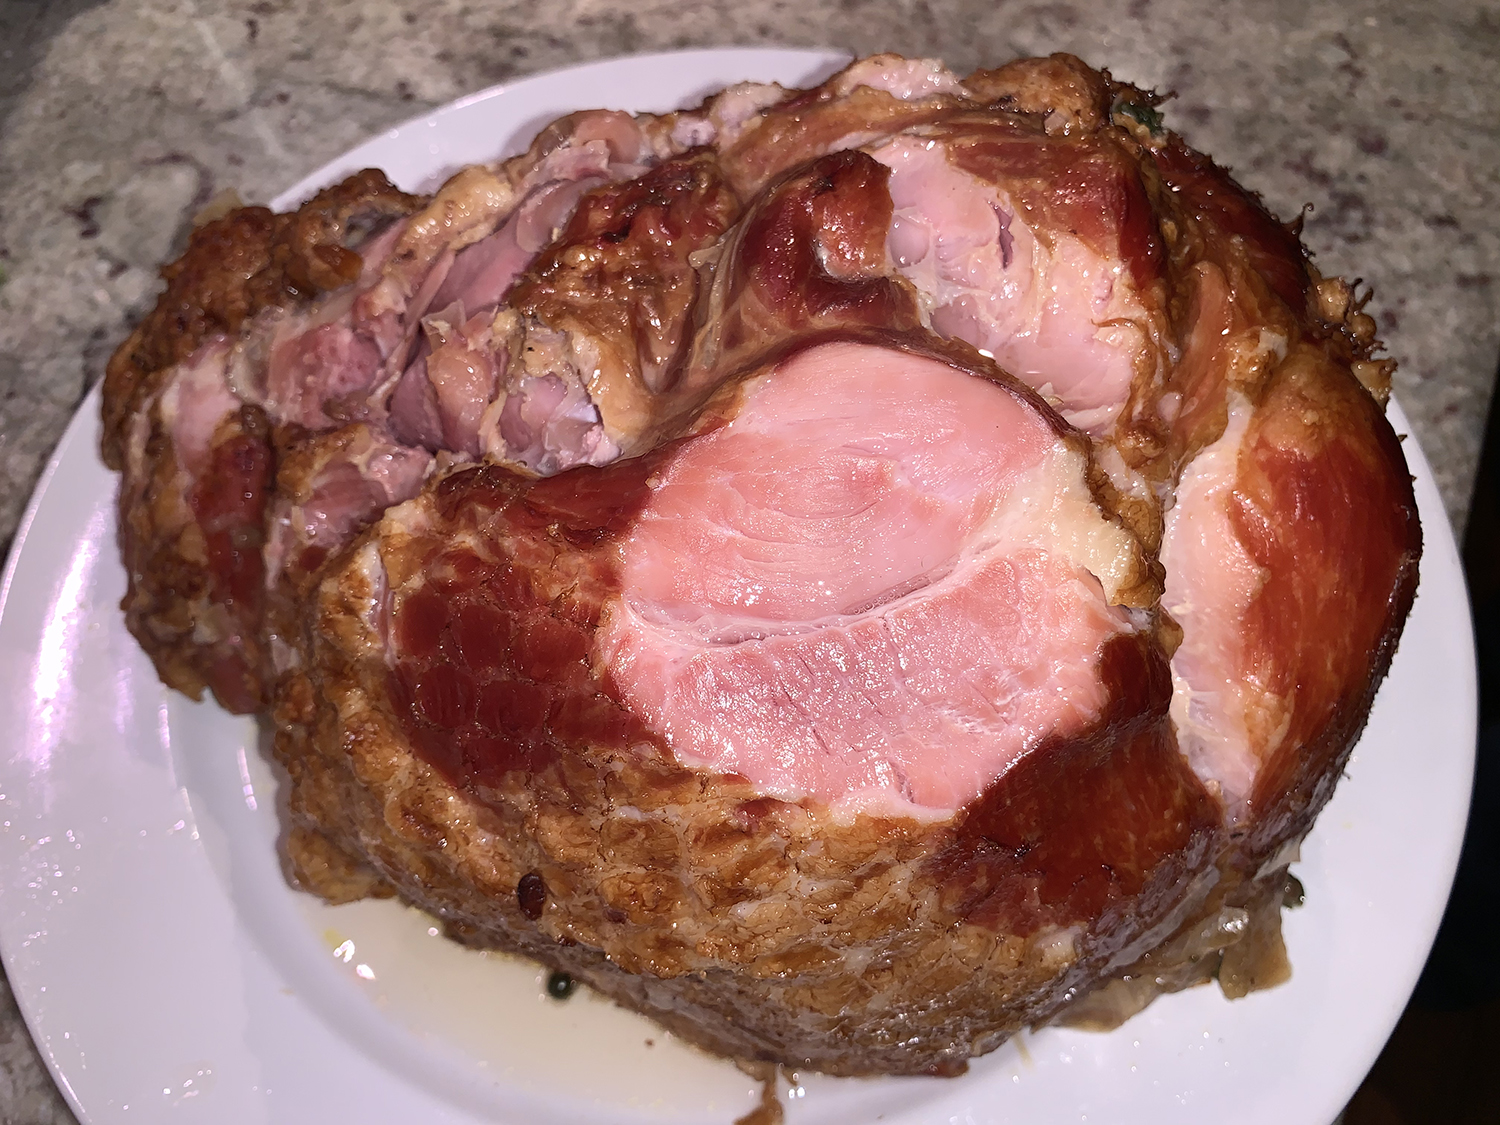
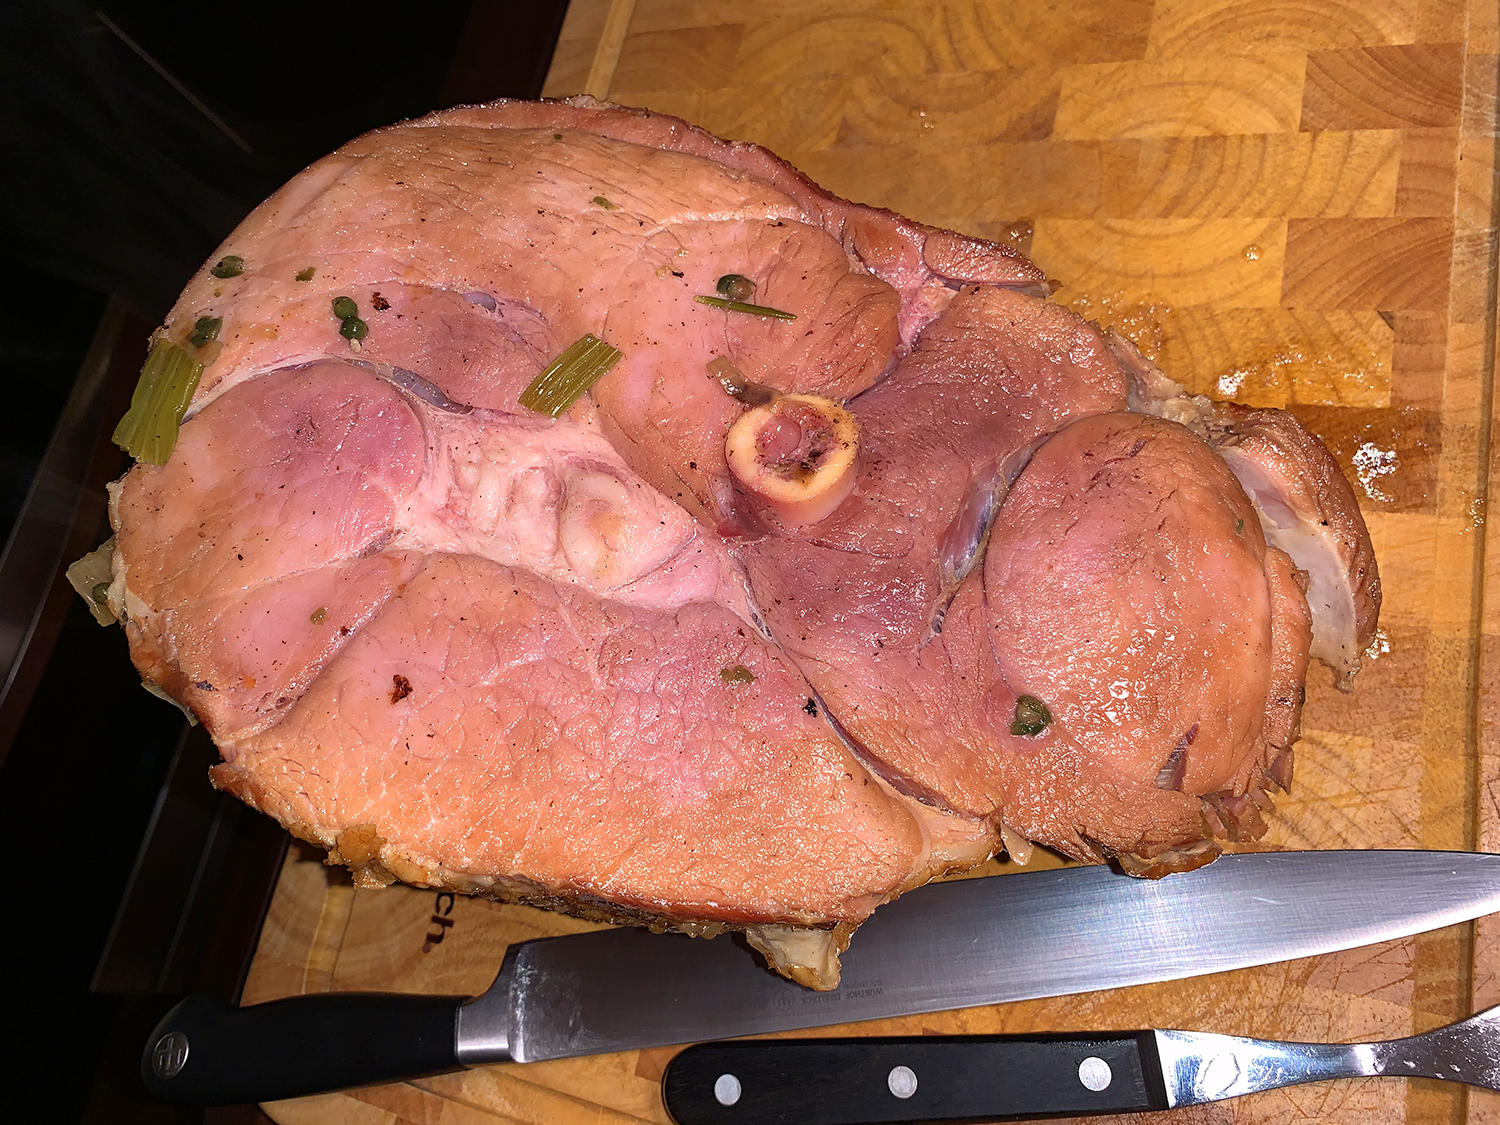
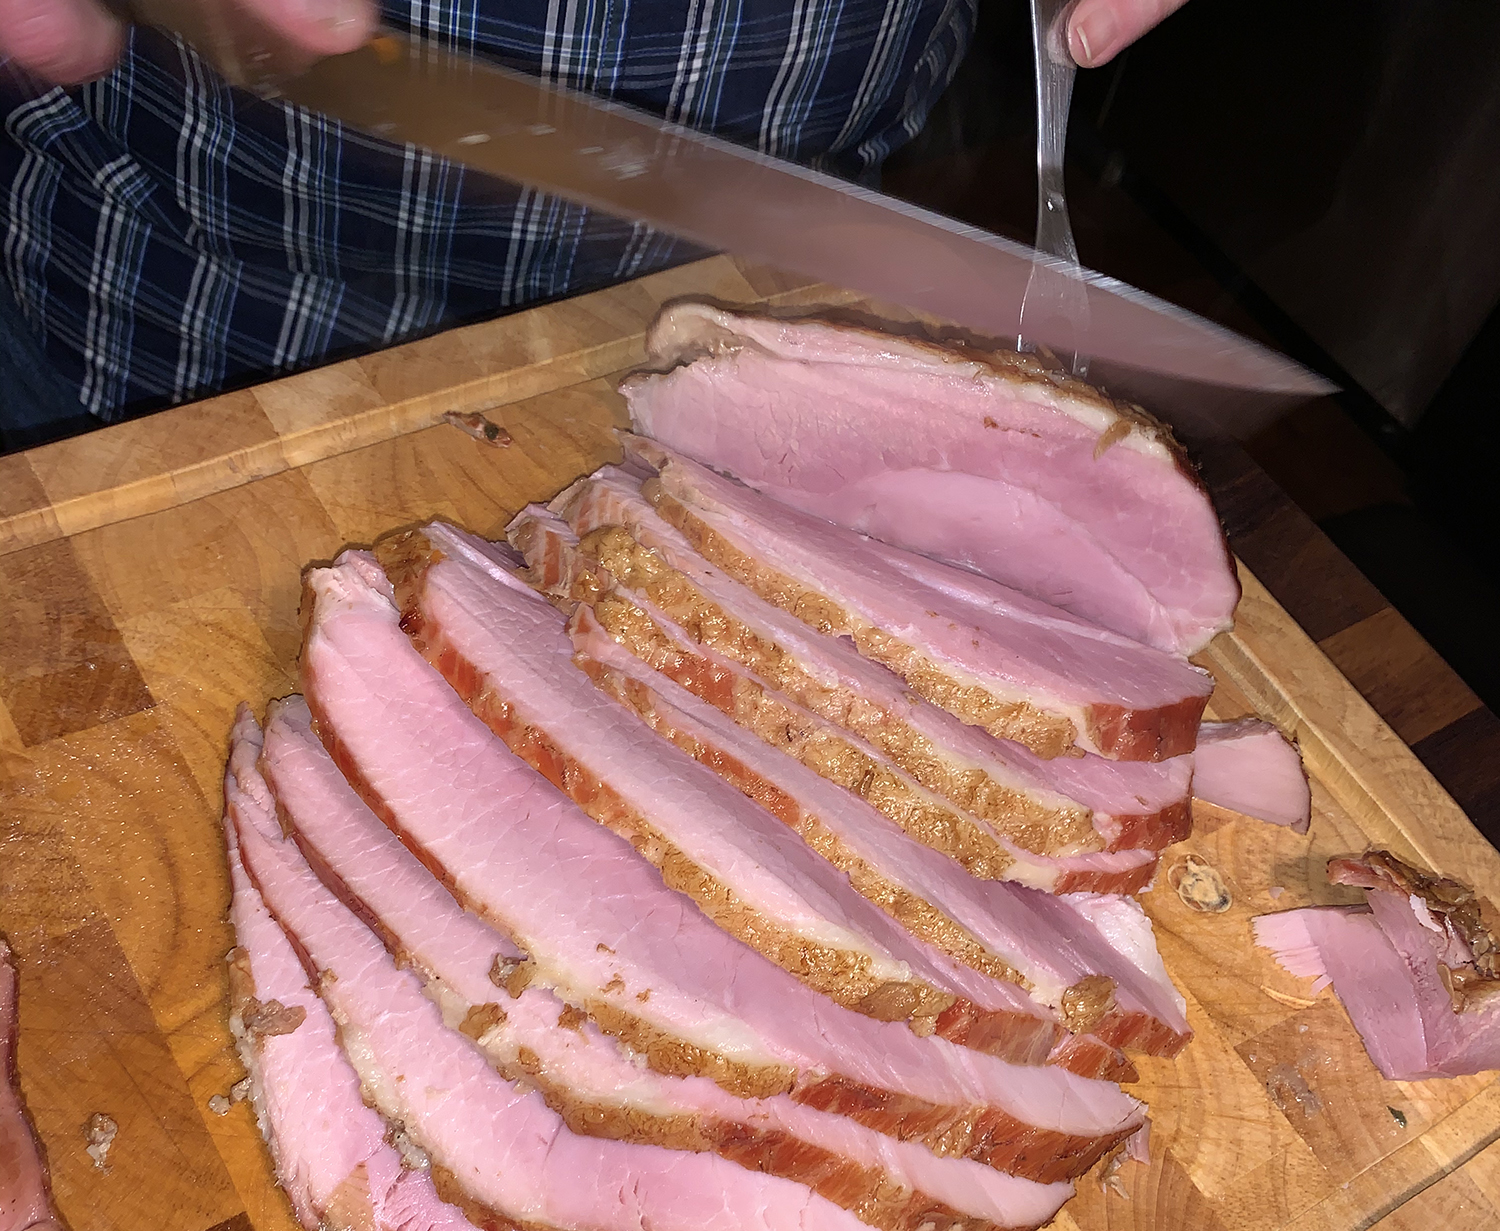
It’s not often we serve a large ham, but when we do, it’s nice to make it a bit special, such as this Ham Braised in Madeira with Rosemary & Peppercorns by Molly Stevens. After 11 months of still dealing with all of the pandemic restrictions and social isolating, we took a plunge and had good friends Rosanne and Gary over for dinner.
One of the main changes we made to this recipe was the use of our homemade ham stock in place of chicken or veal stock. Whichever you choose, make sure it’s homemade and not the bland canned or boxed varieties.
I want to give a shout out to our company Rosanne and Gary for starting the party with a beautifully plated appetizer and a good bottle of red.
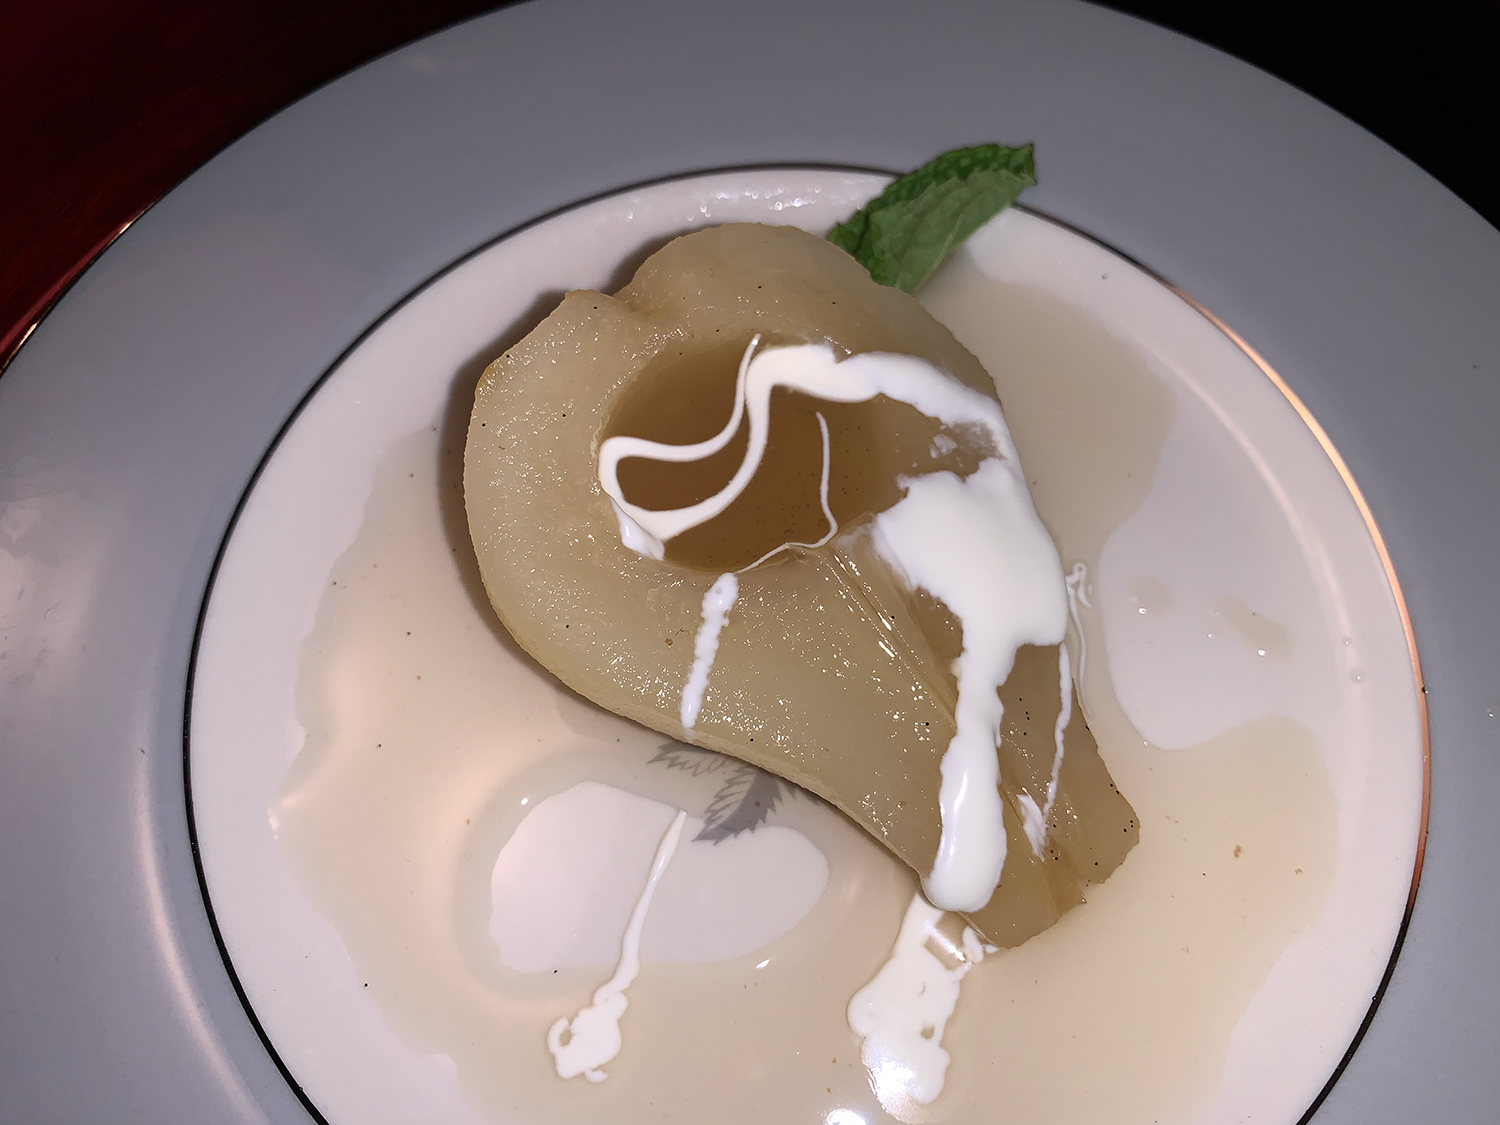
After a first course of Cream of Clery and Celery Root Soup, our sides included Carrots with Maple and Cider Vinegar, and Potato Gratin with Bacon, Gruyere and Leeks. The White-Wine Poached Pears with Lemon and Herbs was just the right light touch to end the feast.
Ham Braised in Madeira with Rosemary & Peppercorns
1 heaping Tbsp. green peppercorns, in brine, rinsed and drained
2 garlic cloves, peeled and smashed
4 3-inch leafy fresh rosemary sprigs
2 small or 1 large bay leaf
1 cup dry madeira wine
1 cup chicken or veal stock, preferably homemade
1 6 to 8 lb. bone in ham, fully or partially cooked, preferably shank or rump
Directions
1. Heat the oven to 300 degrees.
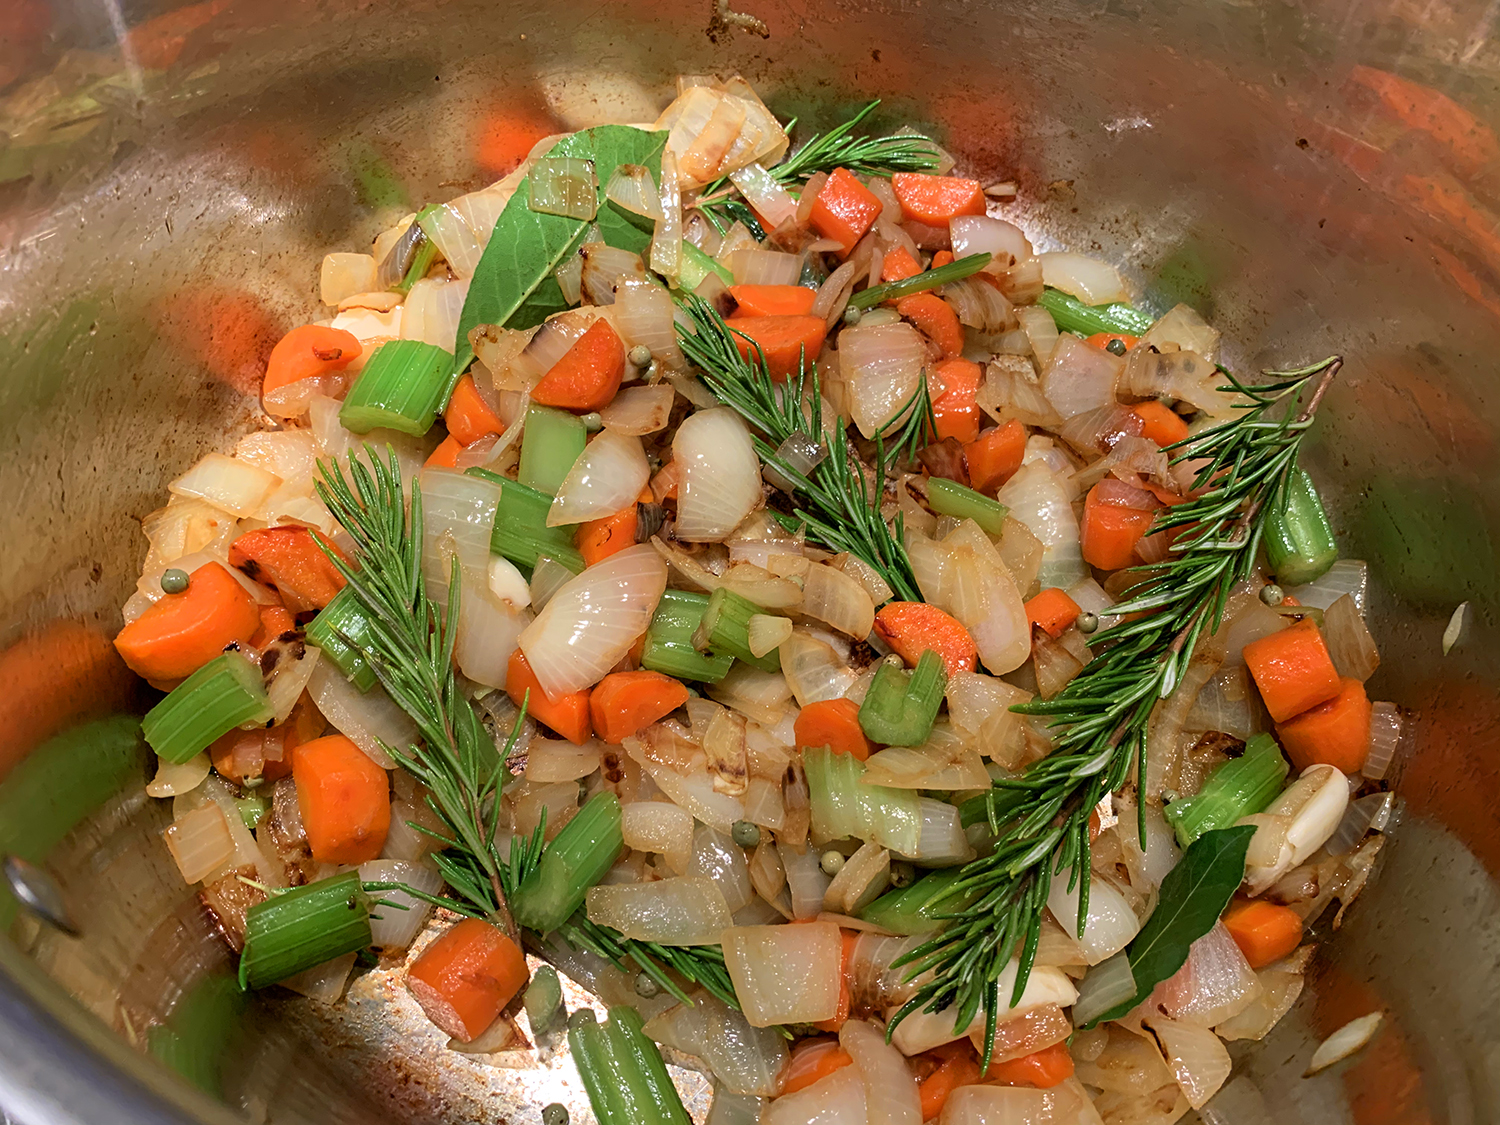
2. The aromatics: In a large dutch oven or deep braising pan large enough to hold the ham, heat the oil over medium high heat. When the oil is shimmering, add the carrot, onions, and celery. Sauté, stirring a few times, until the vegetables brown on the edges and begin to soften, about 10 minutes. Add the peppercorns, garlic, rosemary and bay leaf, stir and sauté for another 2 minutes.
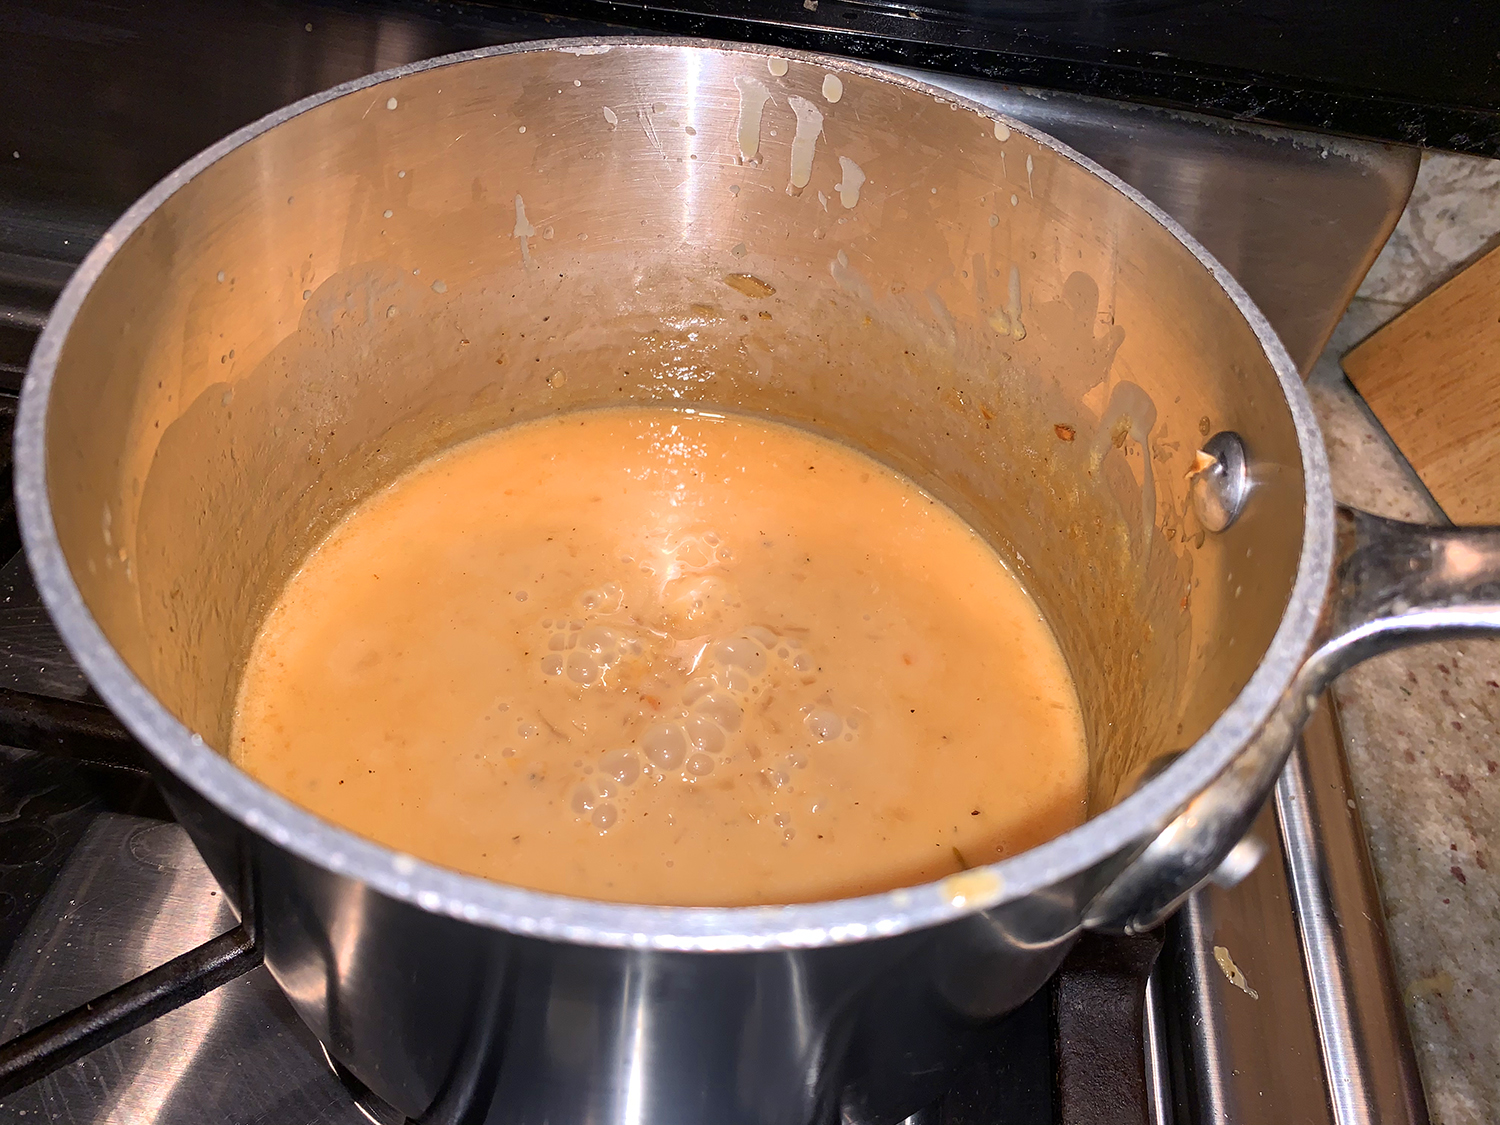
3. The braising liquid: Pour in the madeira and bring to a boil. Lower the heat to medium and simmer for 10 minutes to meld the flavors and reduce the liquid somewhat. Pour in the stock, bring to a simmer and simmer for another 5 minutes.
4. The braise: Whether you bought a fully cooked or partially cooked (sometimes labeled “ready to cook”) ham will affect the cooking time. Lower the ham into the pot, setting it either flat side down or on its side, whichever fits best. Cover tightly with the lid or heavy duty foil and slide the pot into the lower part of the oven. For a fully cooked ham, braise until fork tender and heated all the way through, about 1 hour and 45 minutes. For a partially cooked ham, braise until the ham is fork tender and an instant-read thermometer reads 155 degrees when inserted in the thickest part of the ham, closer to 2 1/2 hours. (Be careful that the thermometer does not hit the bone, which will give you a falsely high reading.)
5. The finish: Transfer the ham to a platter and cover loosely with foil to keep warm. Strain the braising liquid, and discard the vegetables as they will be too salty. Skim as much fat from the surface of the braising liquid as you can without losing patience. Taste, if the liquid tastes a bit weak, pour it into medium saucepan and simmer to reduce until it tastes like a mild broth, 10 to 15 minutes. If the liquid is already tasty as is, set if over a low burner to keep warm. The sauce will not need any salt, in fact, if you do reduce it, be careful not to go too far, as it can quickly become too salty.
6. Serving: Carve the ham into think slices and serve warm or at room temperature with a bit of the warm sauce spooned over the top.
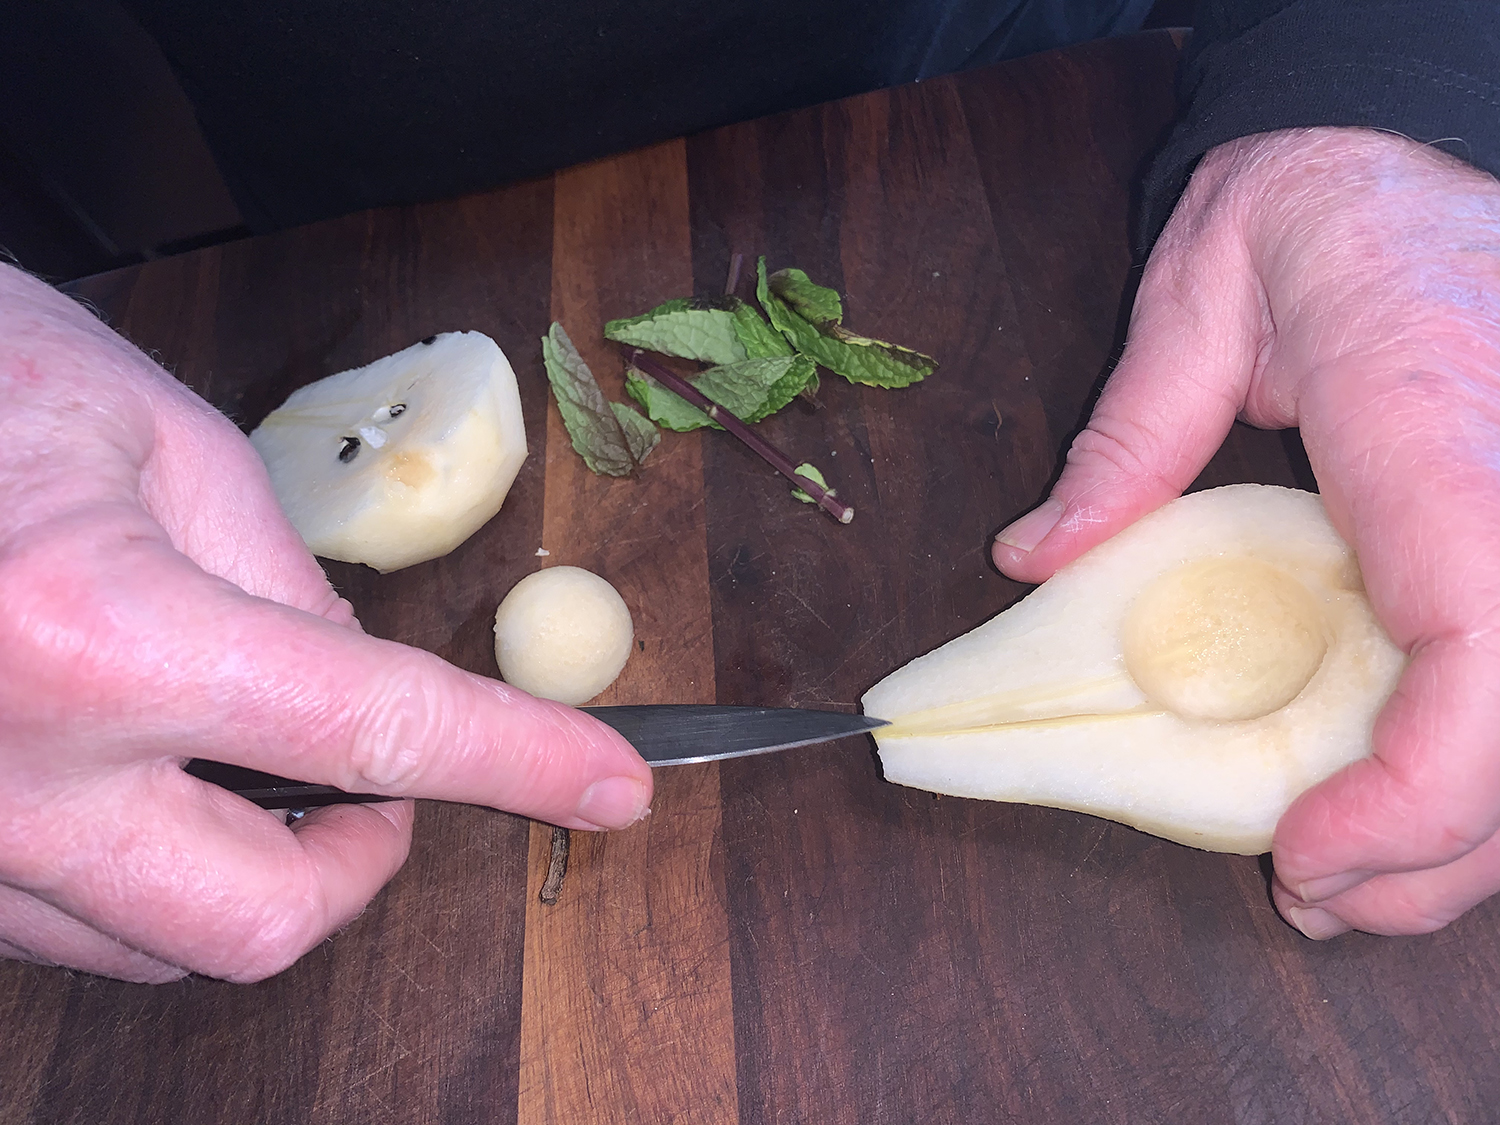
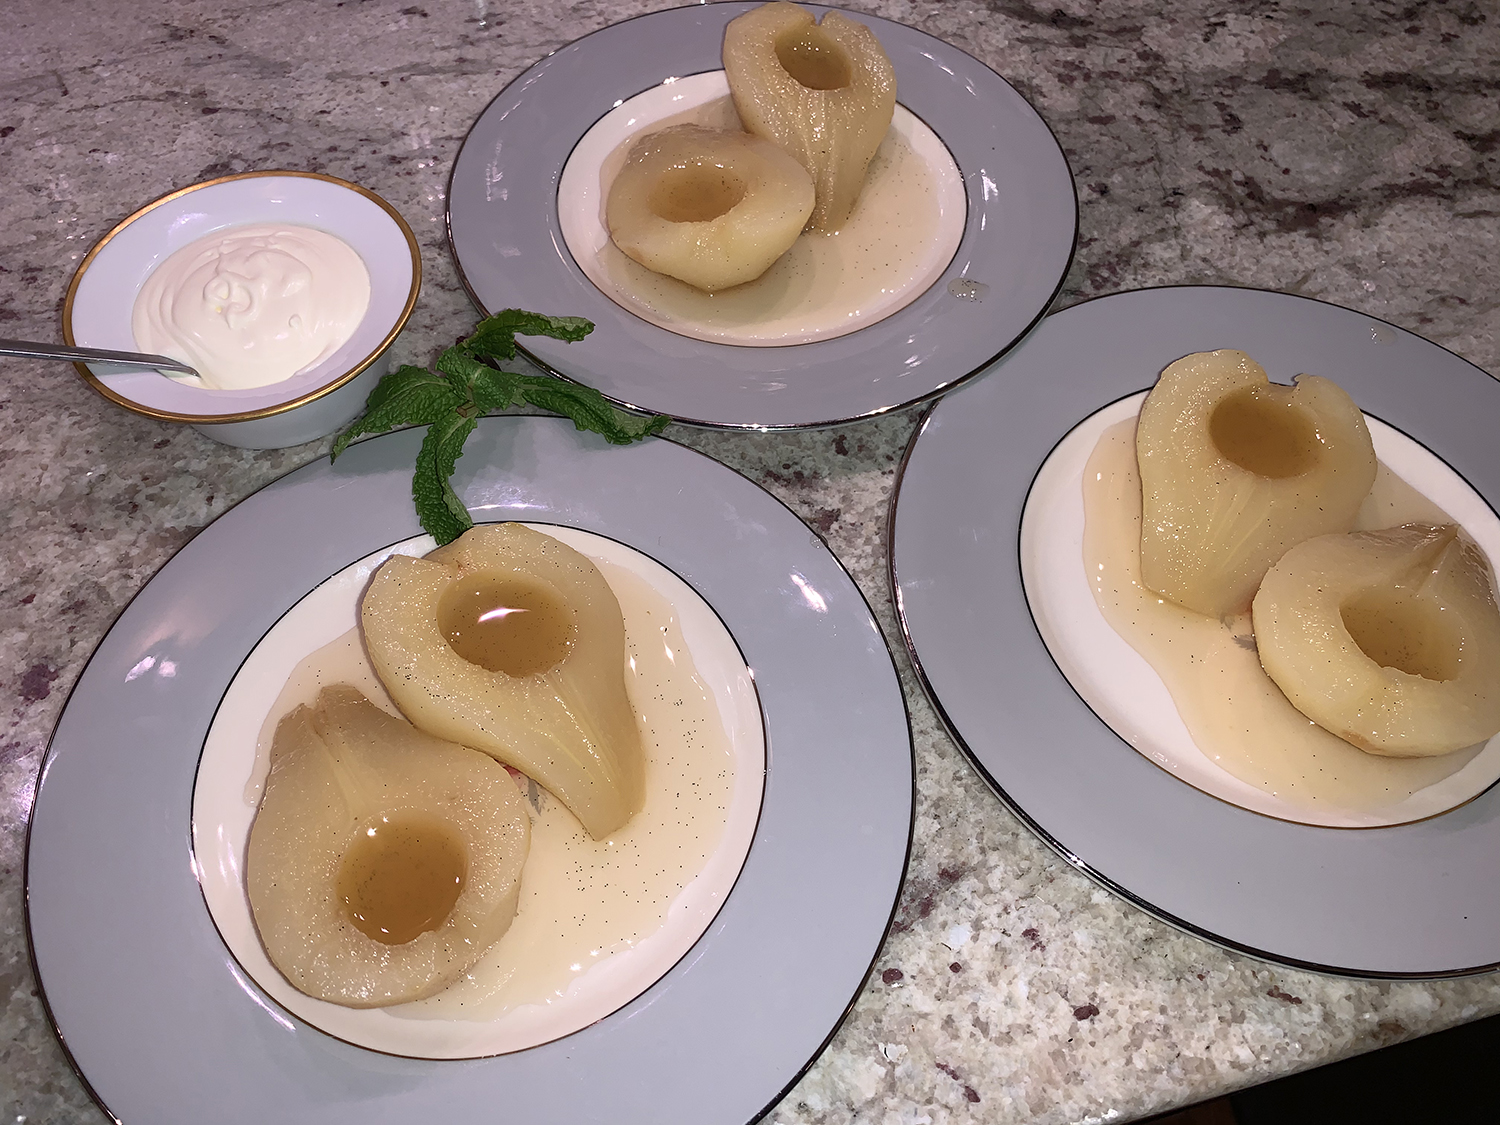
If you’re looking for an easy pear dessert that lets the fruit shine, look no further. The Hubs came across this lovely recipe in his new acquisition by Cook’s Illustrated (CI) “The Compete Mediterranean Cookbook.” Poached pears are a classic French dessert, and yet simple enough to make at home.
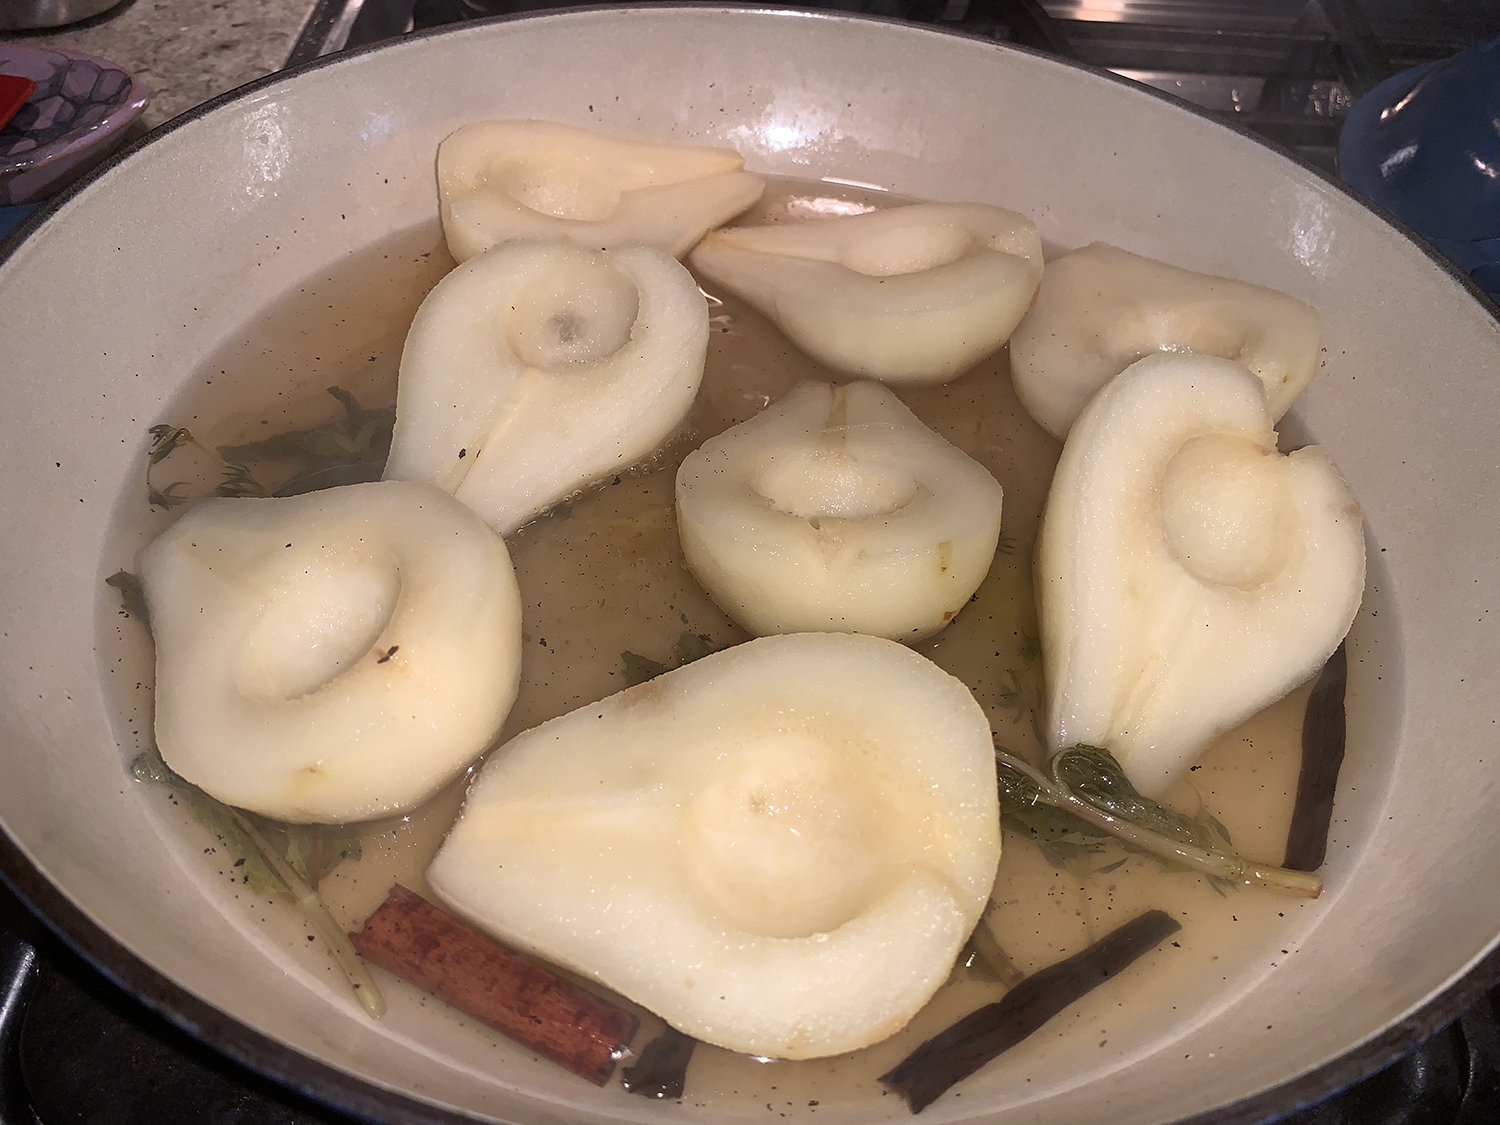
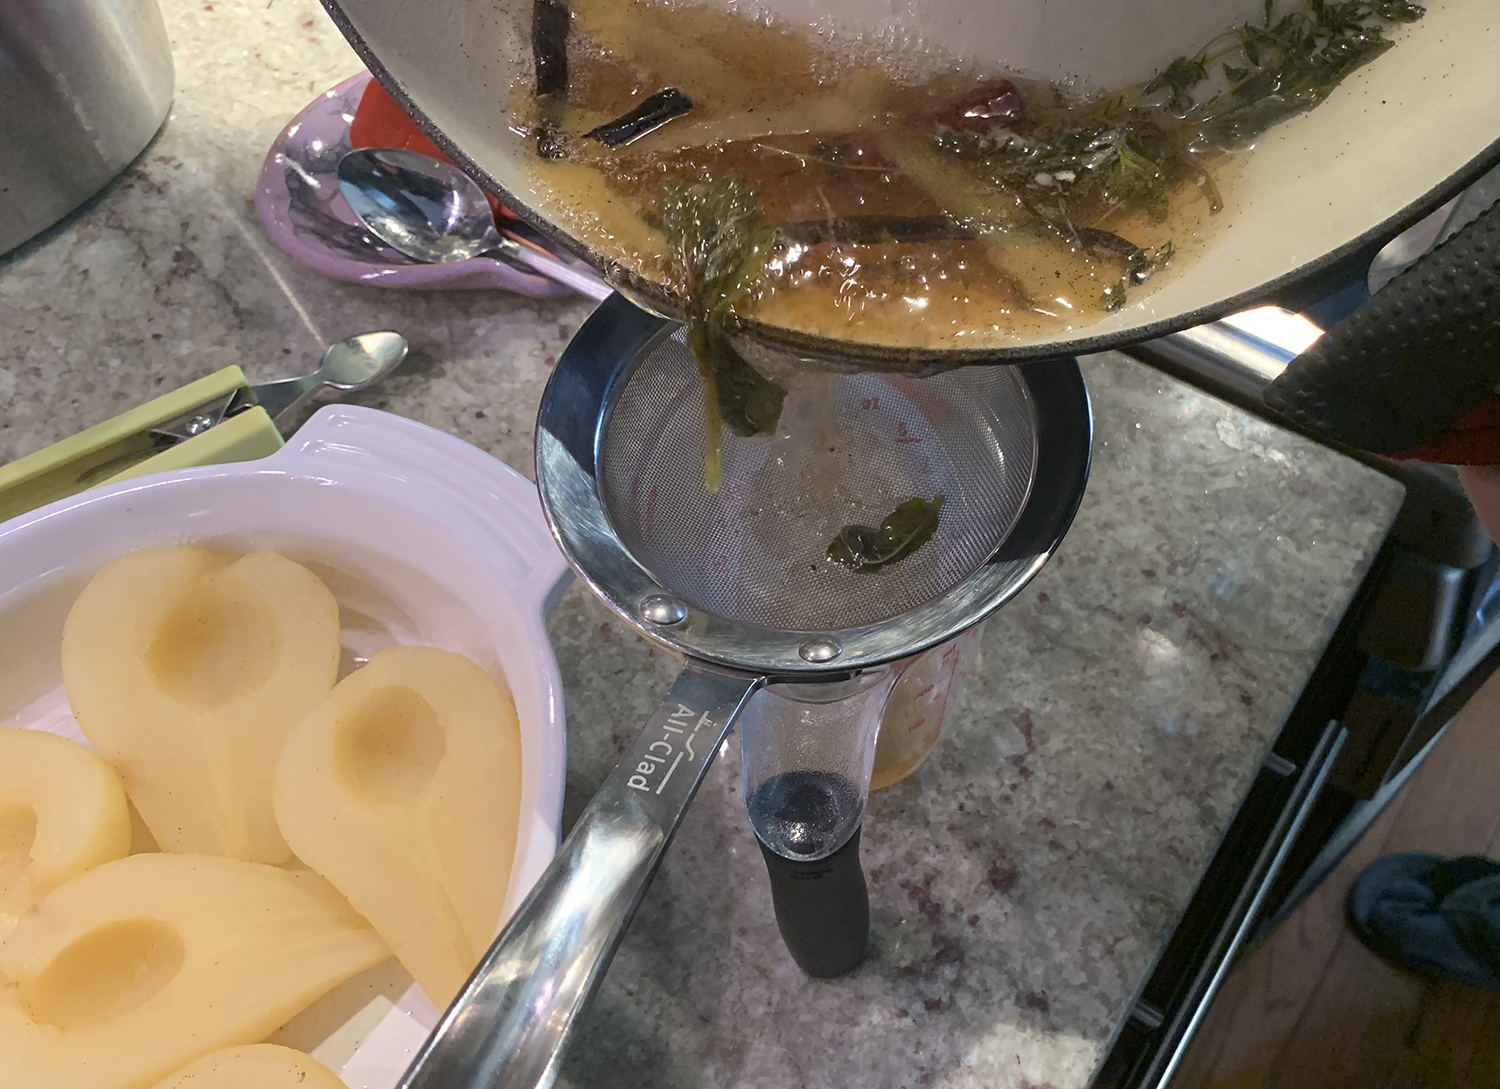
Because our bosc pears were a bit too firm yet, the simmering process took longer to render them tender enough. We also lengthened the sauce reduction time to get the syrup to the correct consistency. Making them the day before our dinner party gave the pears ample time to refrigerate overnight.
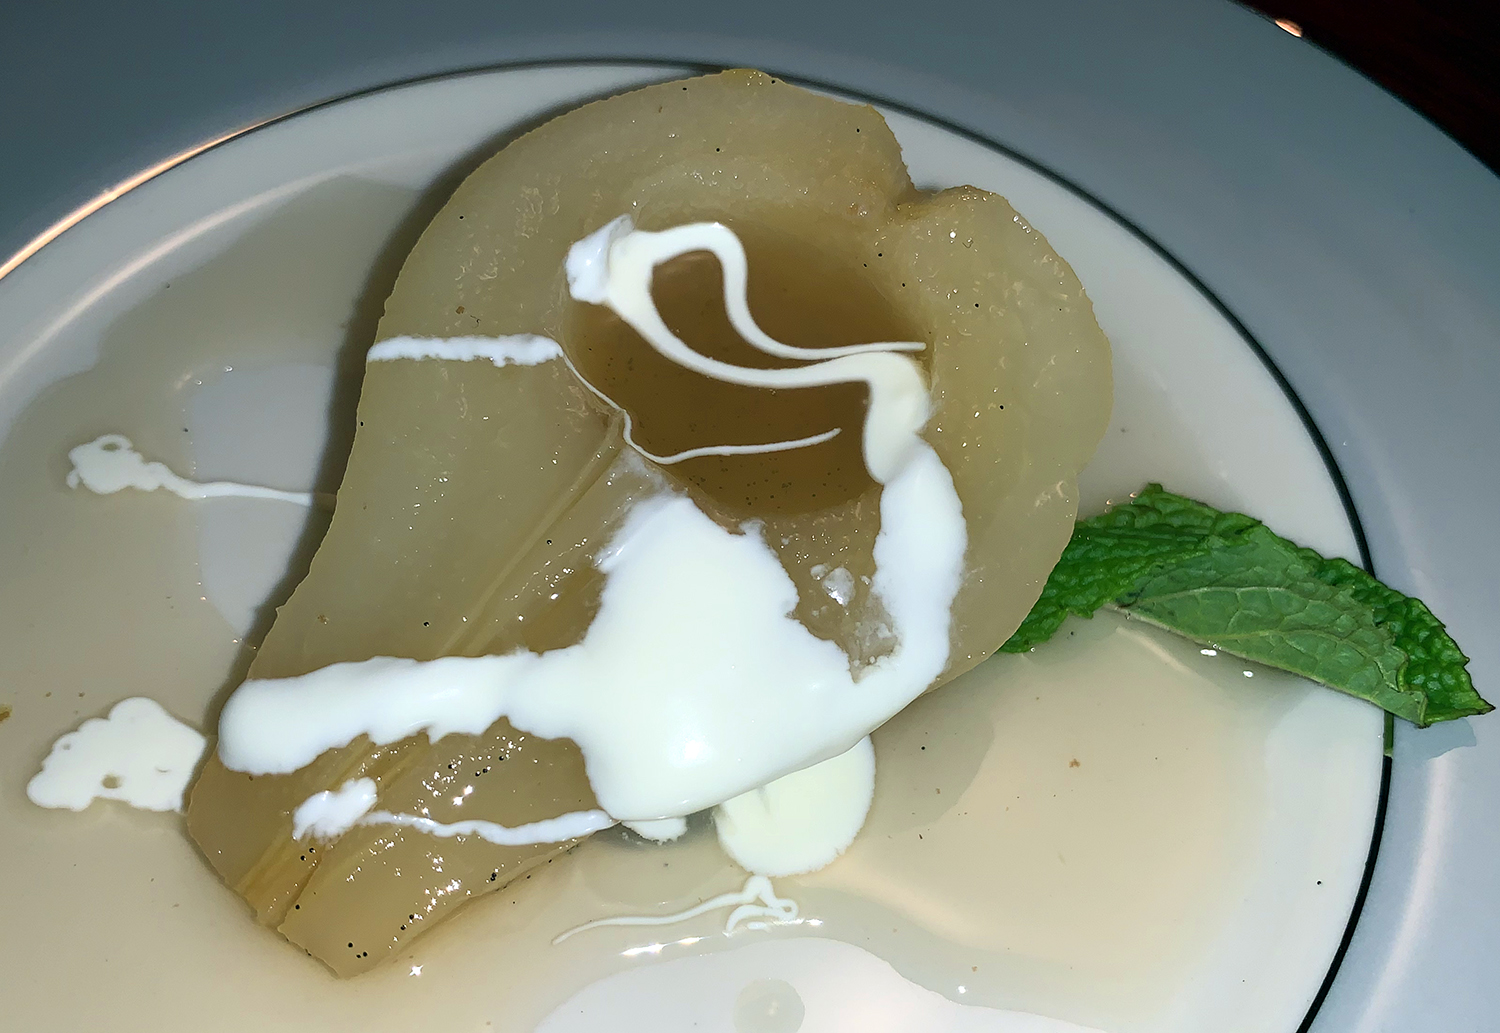
They can be served as is, or with crème fraîche… perhaps even a shortbread cookie on the side…
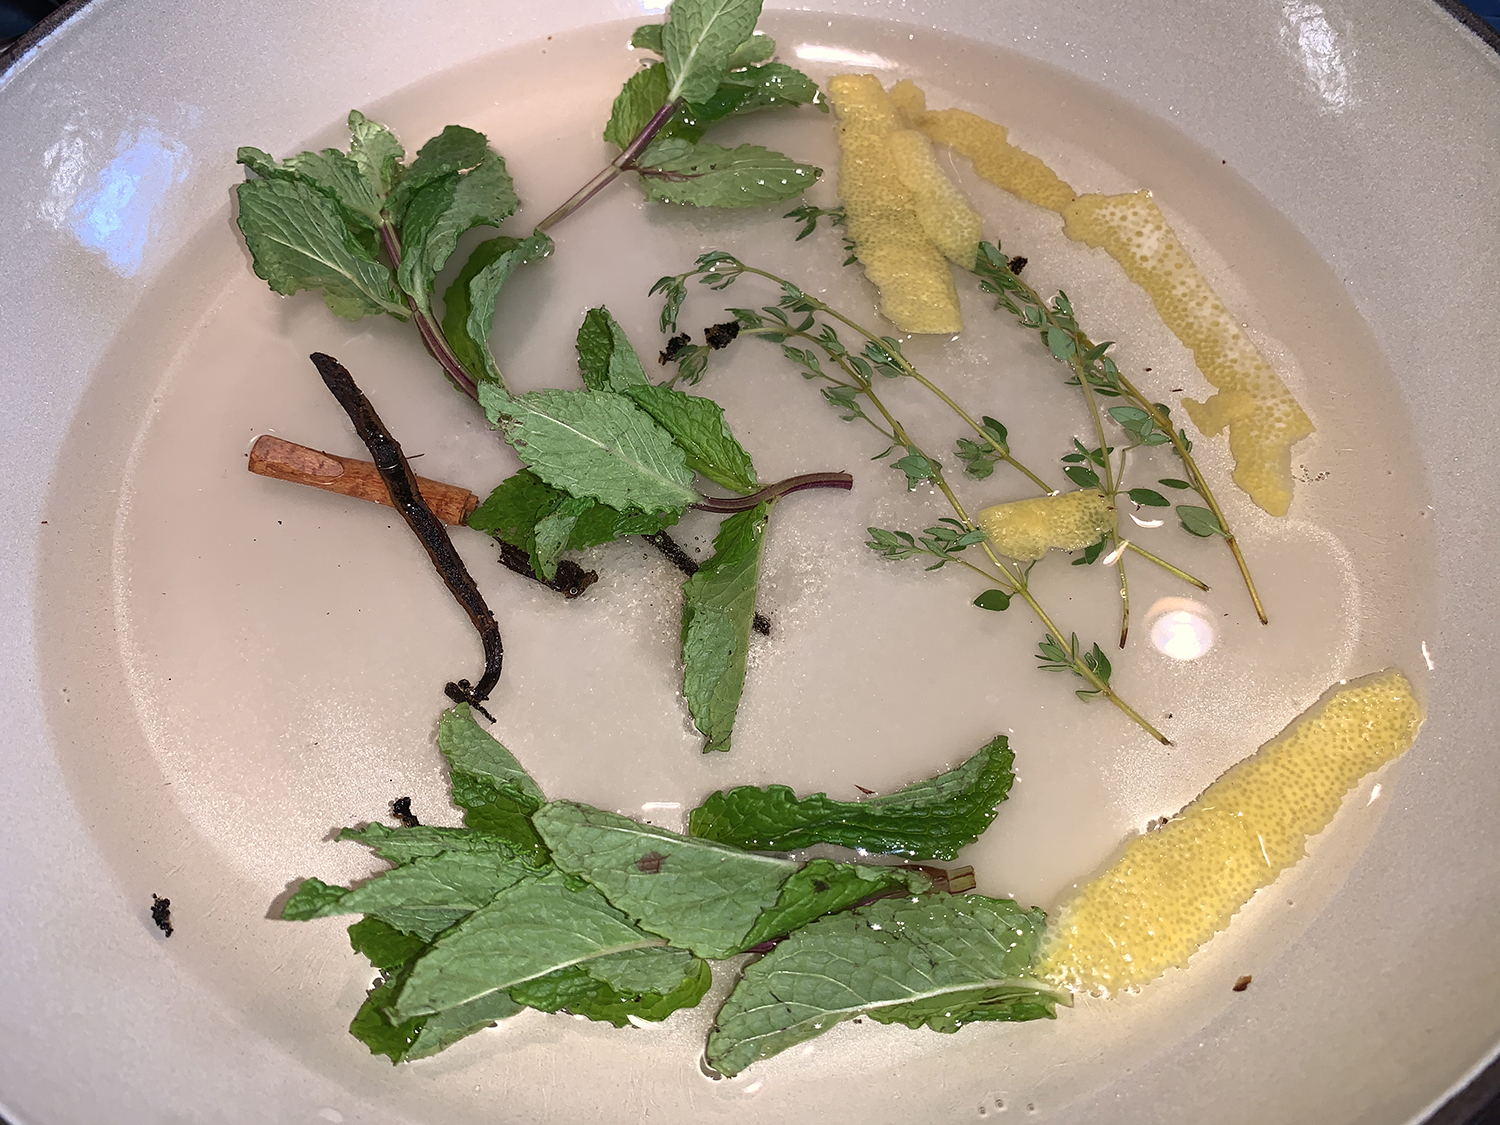
NOTES from CI: For the best texture, try to buy pears that are neither fully ripe nor rock hard; choose those that yield just slightly when pressed. Use a vegetable peeler to peel strips of lemon zest, but take care to avoid the bitter pith beneath the skin. For the white wine, a medium-bodied dry white wine such as Sauvignon Blanc or Chardonnay is recommended.
1 vanilla bean, halved lengthwise, seed scraped out and reserved
½ cinnamon stick
⅛ tsp. salt
2 Tbsp. juice from 1 lemon
6 ripe but firm pears (about 8 oz. each), preferably Bosc or Bartlett
Crème fraîche, for garnish, optional
Directions
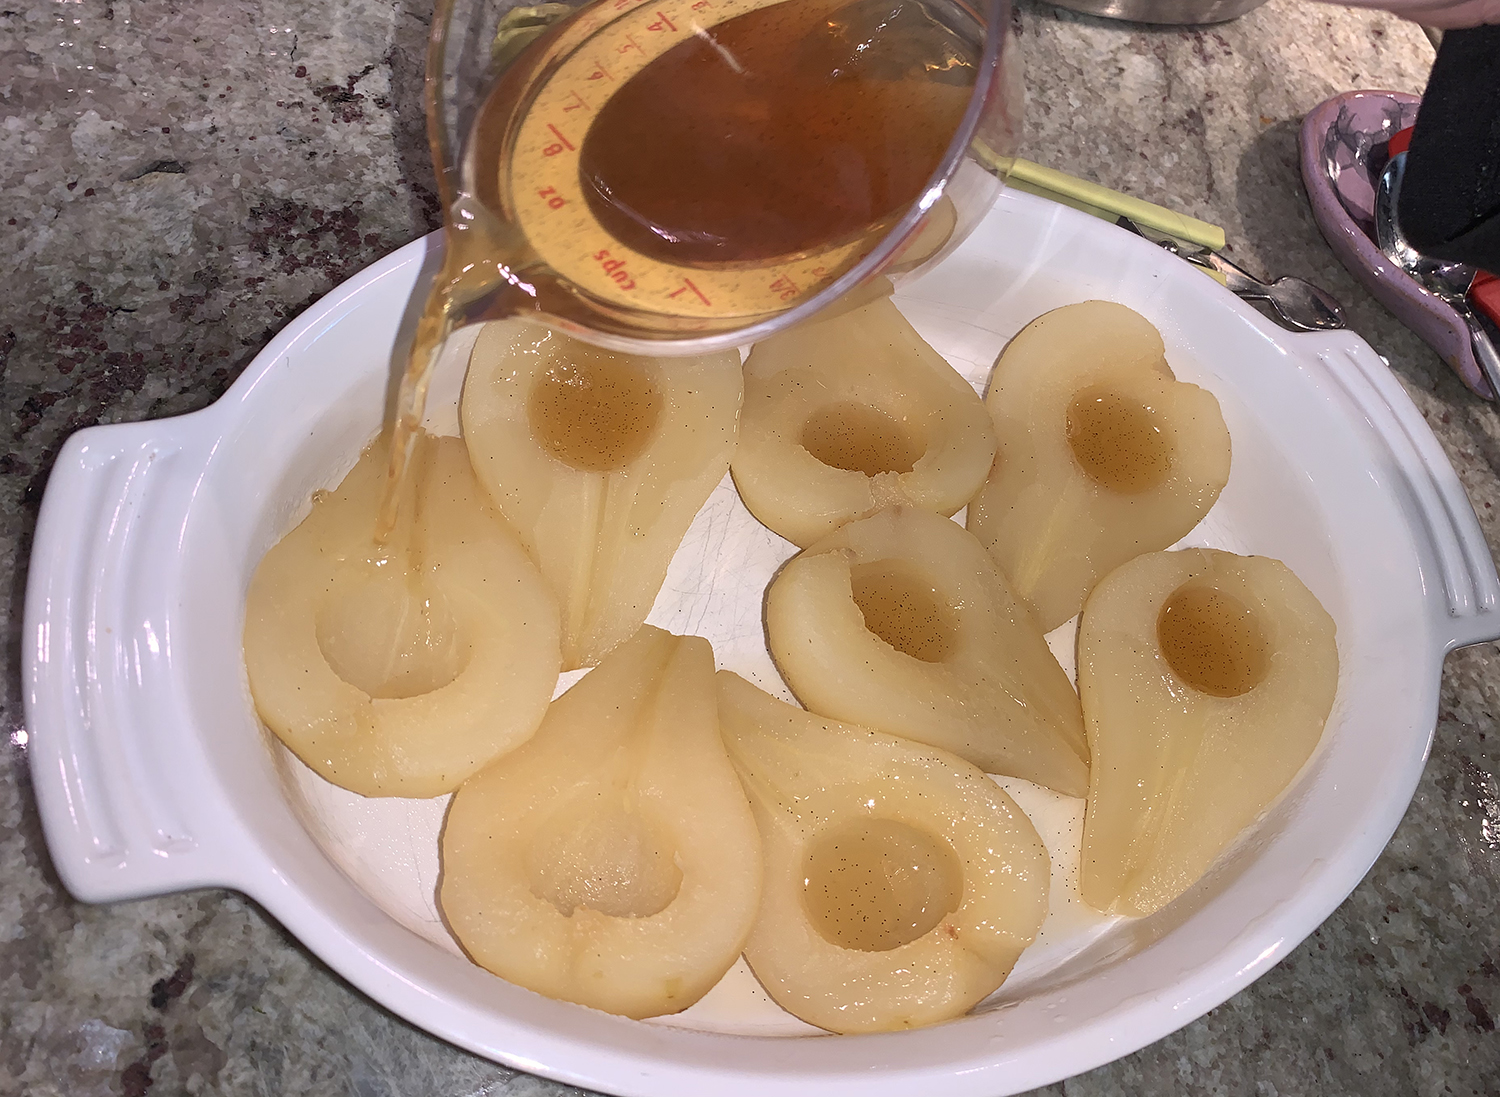
Bring the wine, sugar, lemon zest, mint, thyme, vanilla seeds and pod, cinnamon, and salt to a simmer in a large saucepan over medium heat and cook, stirring occasionally, until sugar dissolves completely, about 5 minutes; cover and set aside until needed.
Meanwhile, fill a large bowl with water and add the lemon juice. Peel, halve, and core the pears following the illustrations in the related quick tips, adding them to the lemon water to prevent browning.
Drain the pears, discarding the lemon water, and add to the wine mixture. Bring to a boil over high heat, then reduce the heat to low, cover, and simmer until pears are tender and a toothpick or skewer can be inserted into pear with very little resistance, 10 to 20 minutes, gently turning the pears over every 5 or so minutes.
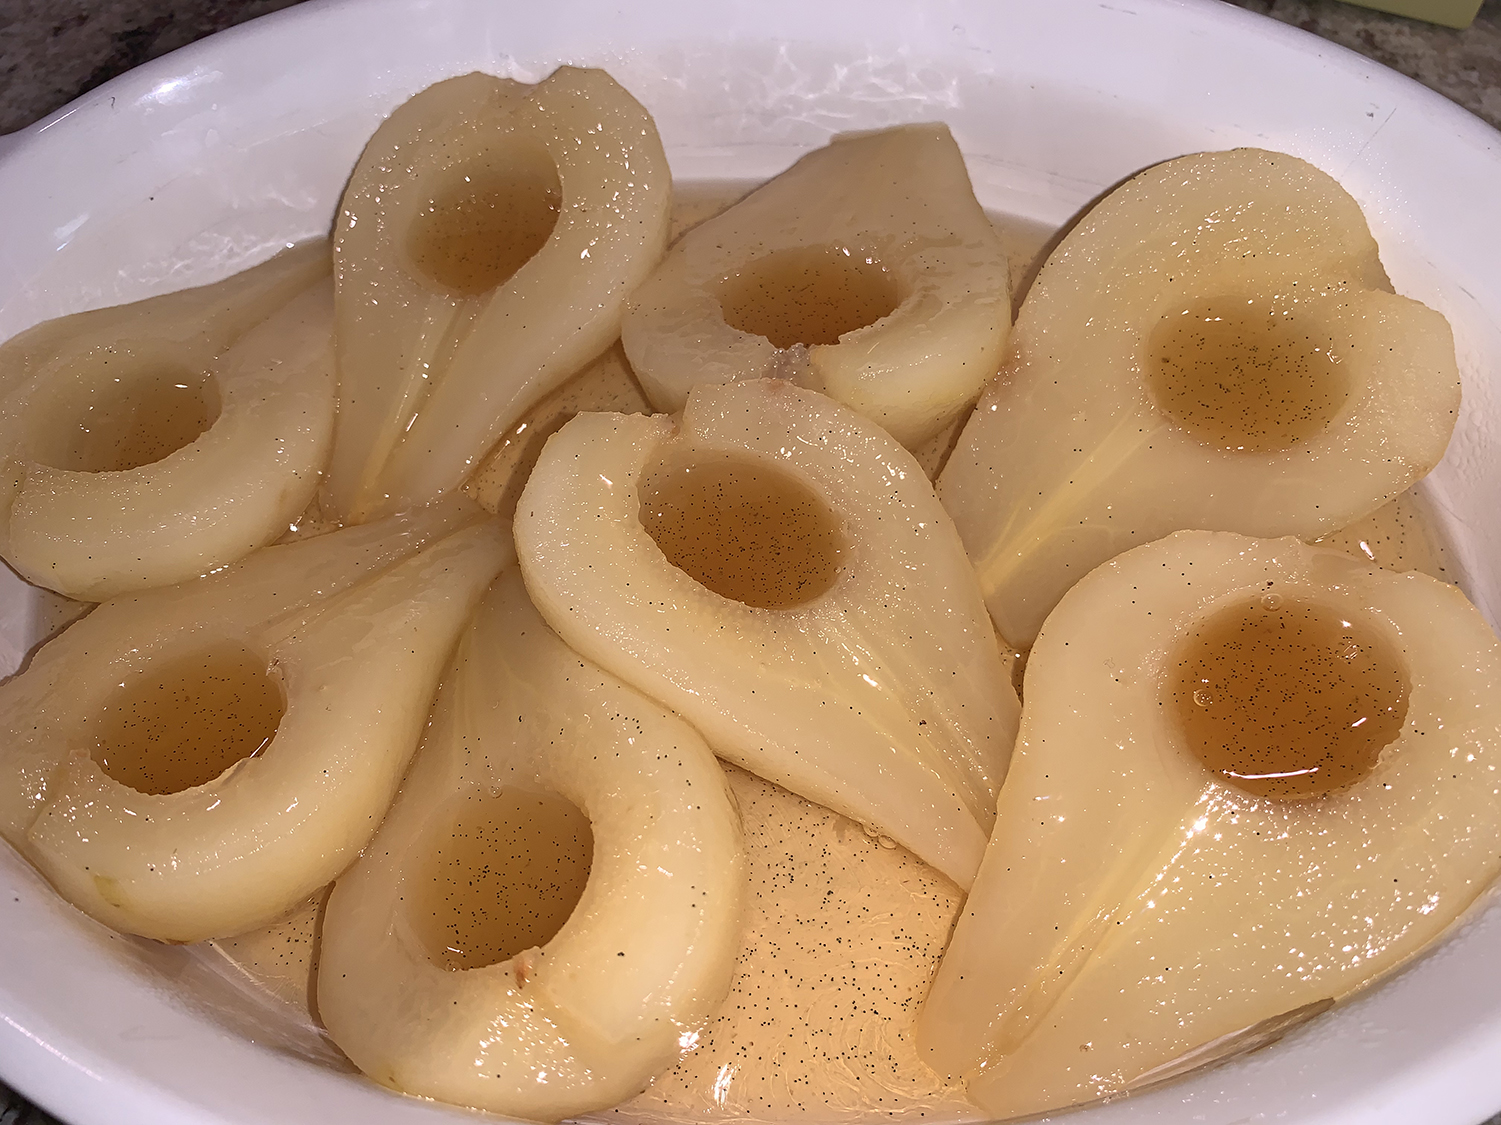
Using a slotted spoon, transfer the fruit to a shallow casserole dish. Return the syrup to medium heat and simmer until it is slightly thickened and measures 1 1/4 to 1 1/2 cups, about 15 minutes. Strain the syrup through a fine mesh strainer, then pour over the pears, discarding the strained solids. Refrigerate the pears until well chilled, at least 2 hours or up to 3 days.
To serve, spoon portions of fruit and syrup into individual bowls or on plates. Drizzle crème fraîche over the tops, if desired.
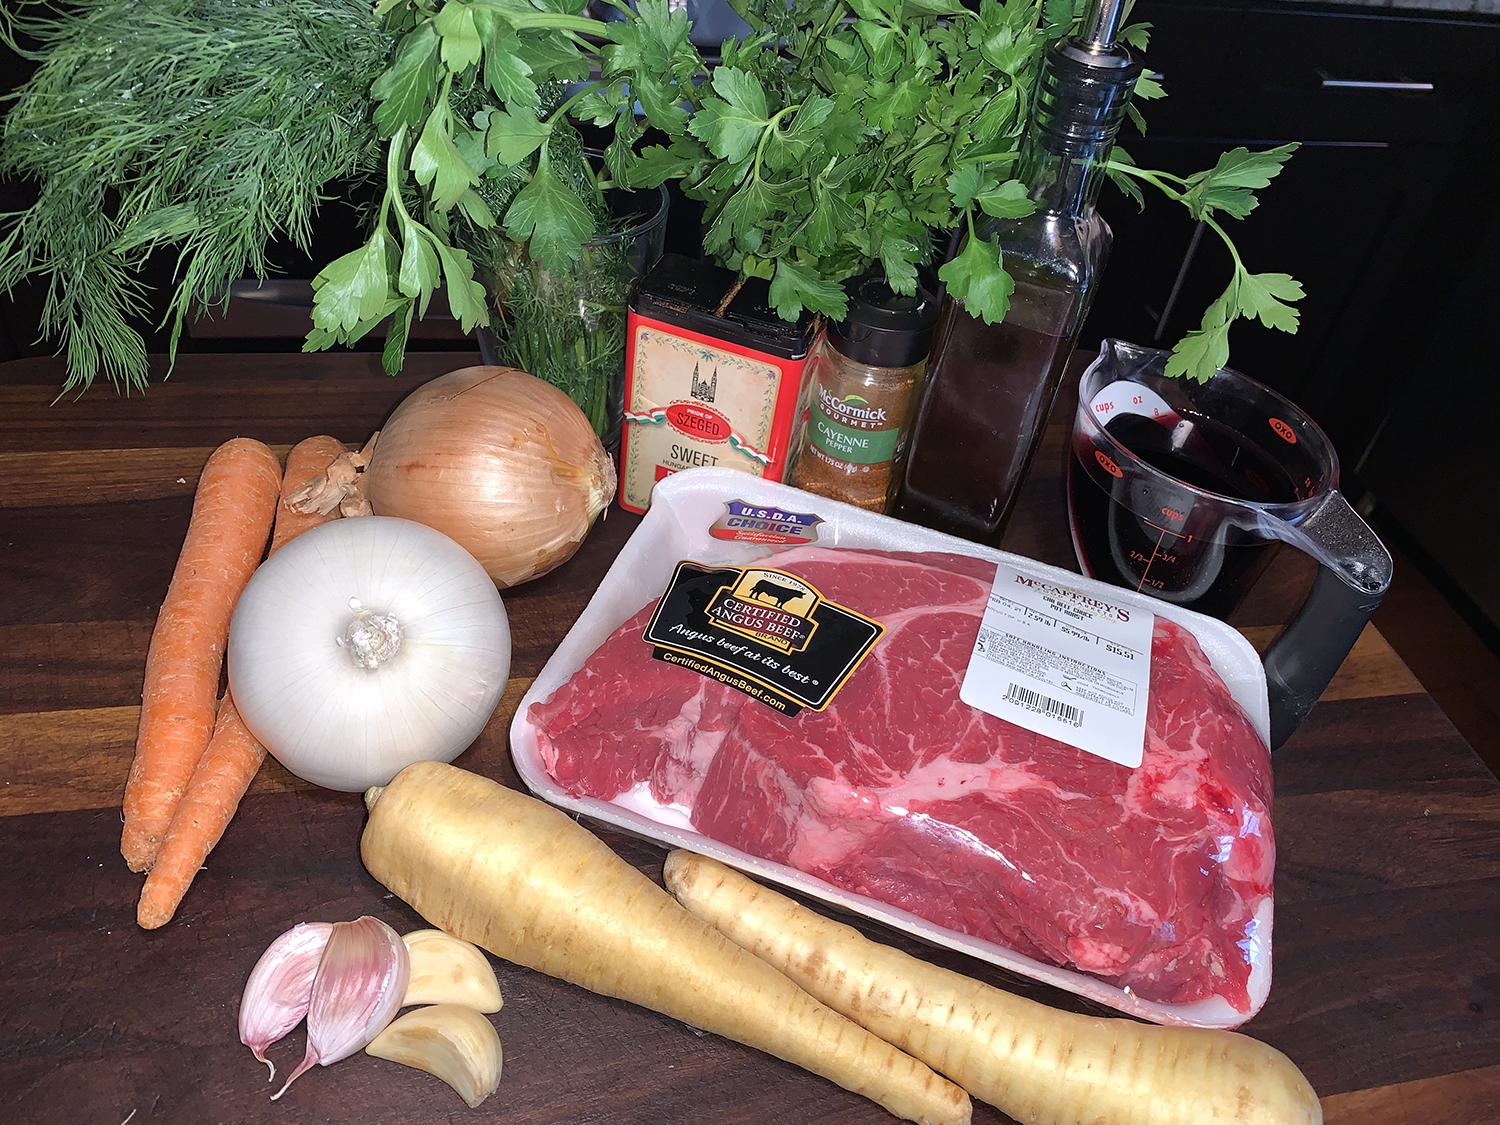
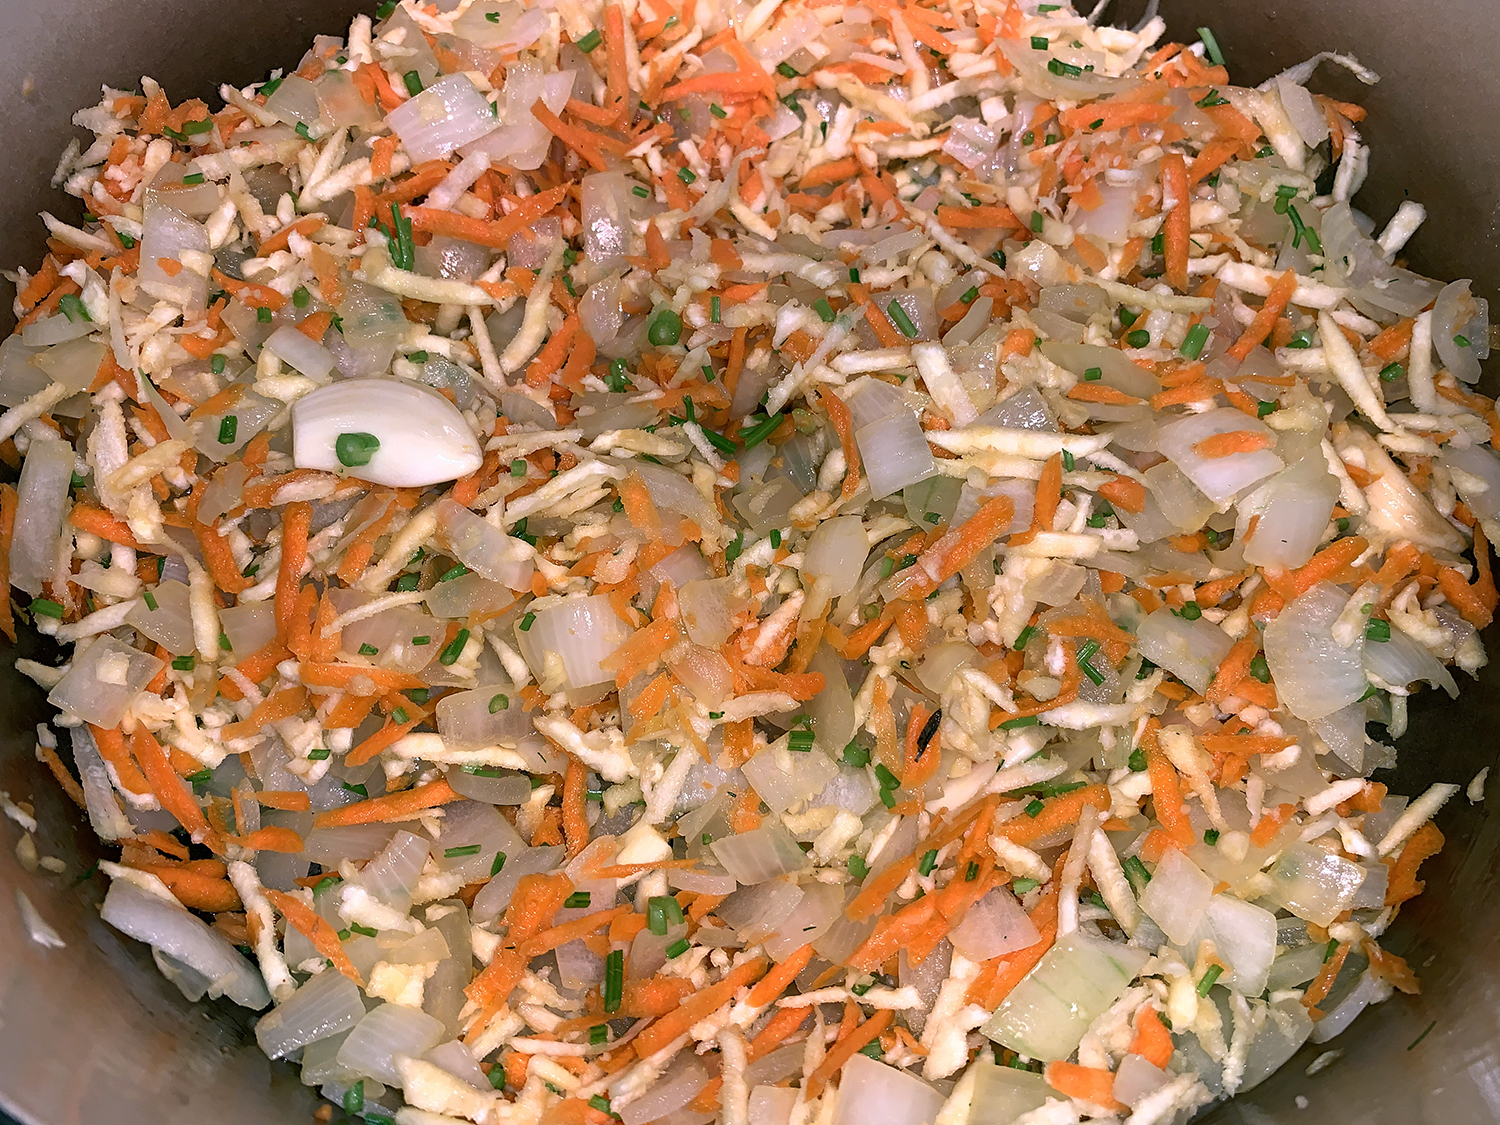
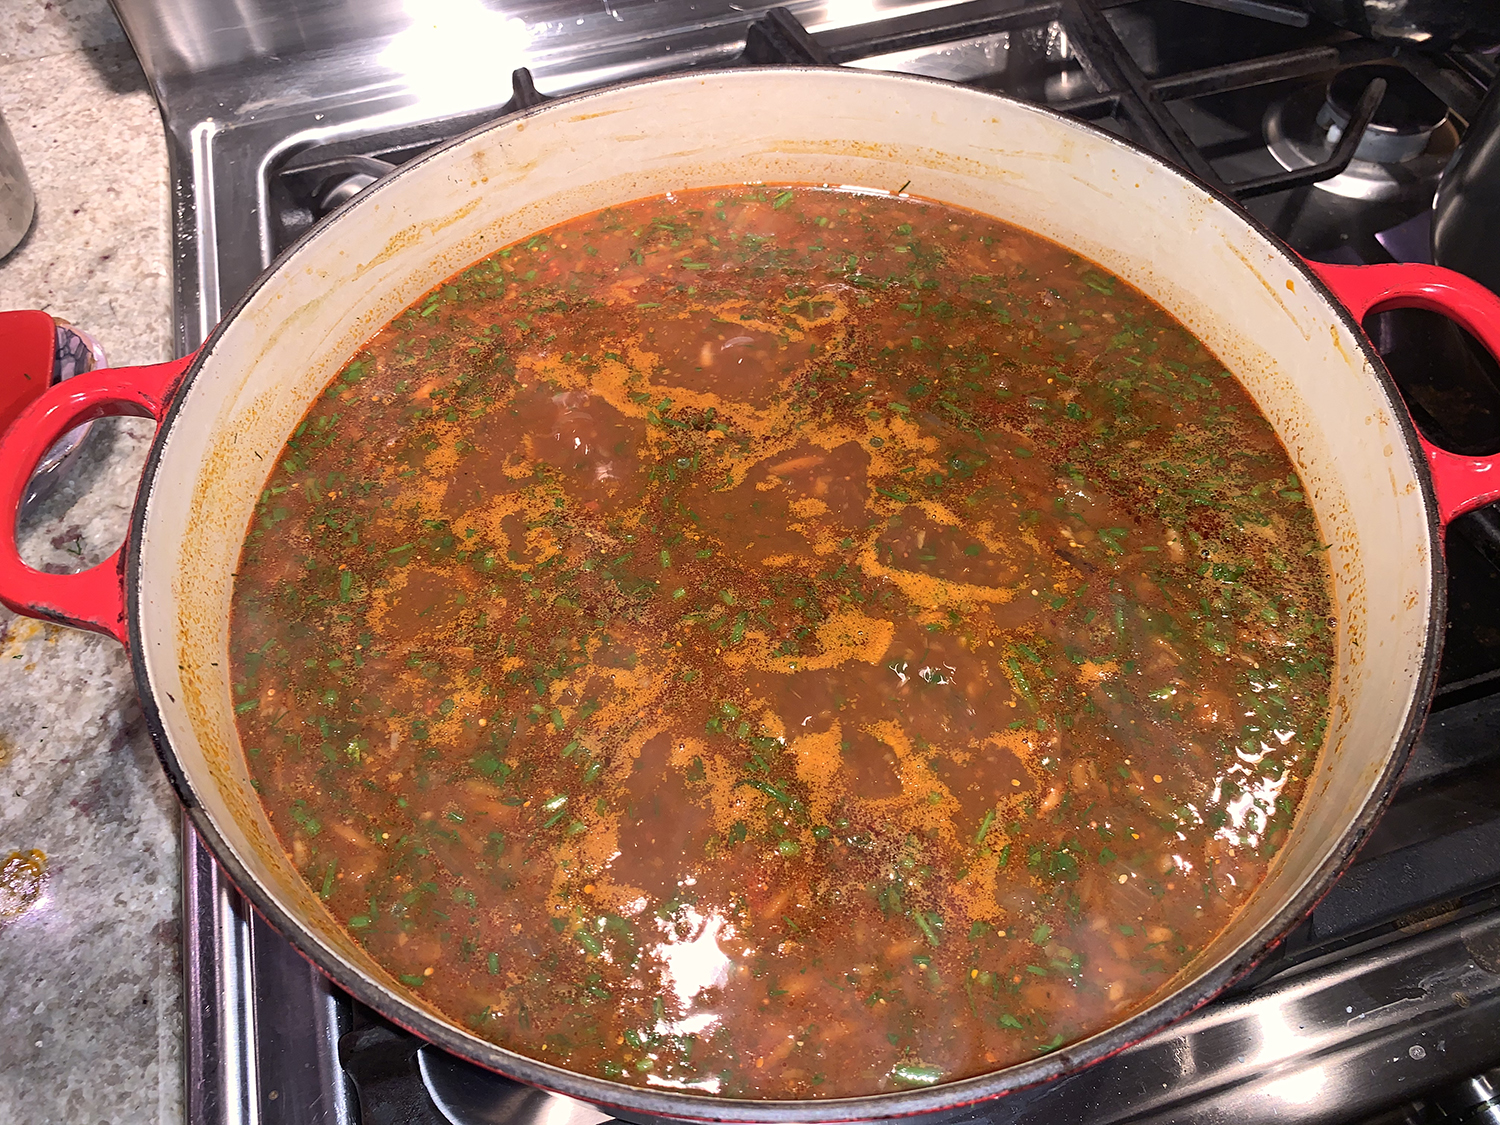
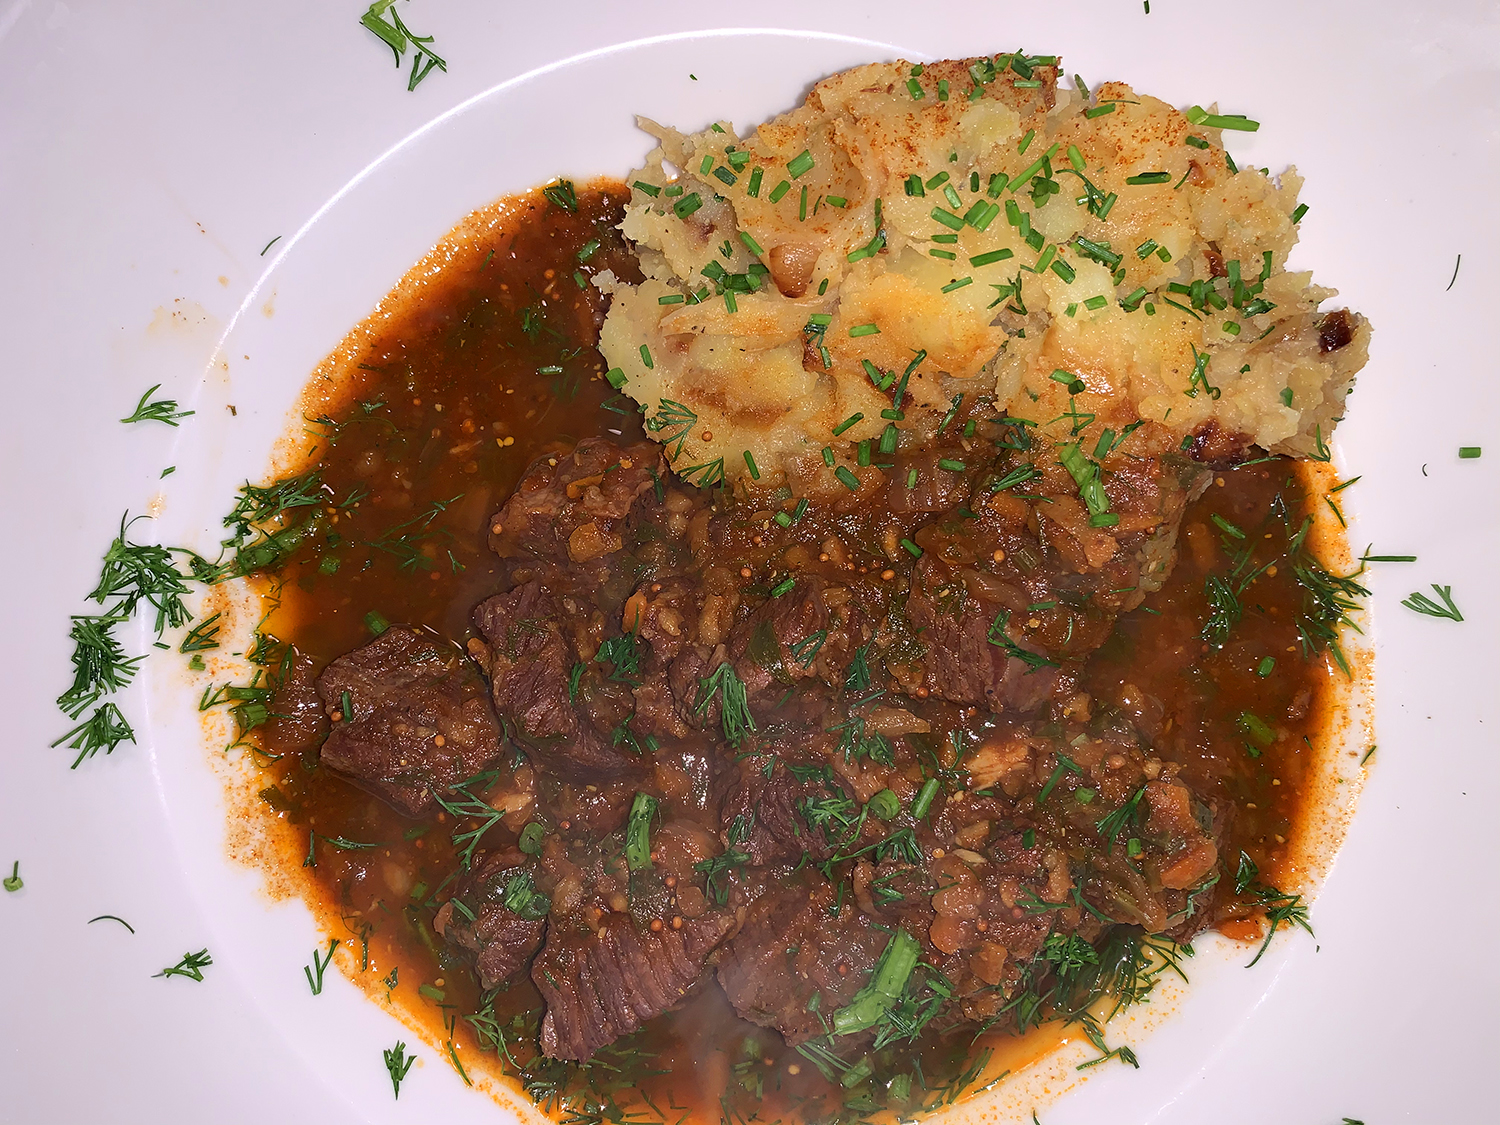
This Slavonian-Style Shepherd’s Stew from the Slavonia region of Croatia, čobanac is a meat-centric stew rich with paprika and thickened in part by shredded root vegetables that break down during a long, slow simmer. Though referred to as shepherd’s stew (čoban translates as shepherd), the dish traditionally is made with not only lamb but also beef, pork and wild game. Milk Street simplified the dish using only beef; with chuck roast as the cut of choice for its meaty flavor, nice marbling and ample connective tissue that helps make a full-bodied broth.
NOTE: To achieve just the right amount of earthy flavor and an undercurrent of spicy heat, use both sweet and hot paprika. We didn’t have hot paprika, so 2 teaspoons sweet paprika plus ½ teaspoon cayenne pepper made a fine substitution. Be aware, this recipe uses a LOT of paprika, so make sure to have enough on hand from the start.
Simple dumplings are a classic—and delicious—addition to this stew, but they are not essential. If you’d like to include them, you can obtain the recipe from Milk Street online. The dough is made and added to the pot at the end of cooking. We chose to make the Croatian Mashed Potatoes instead (recipe follows).
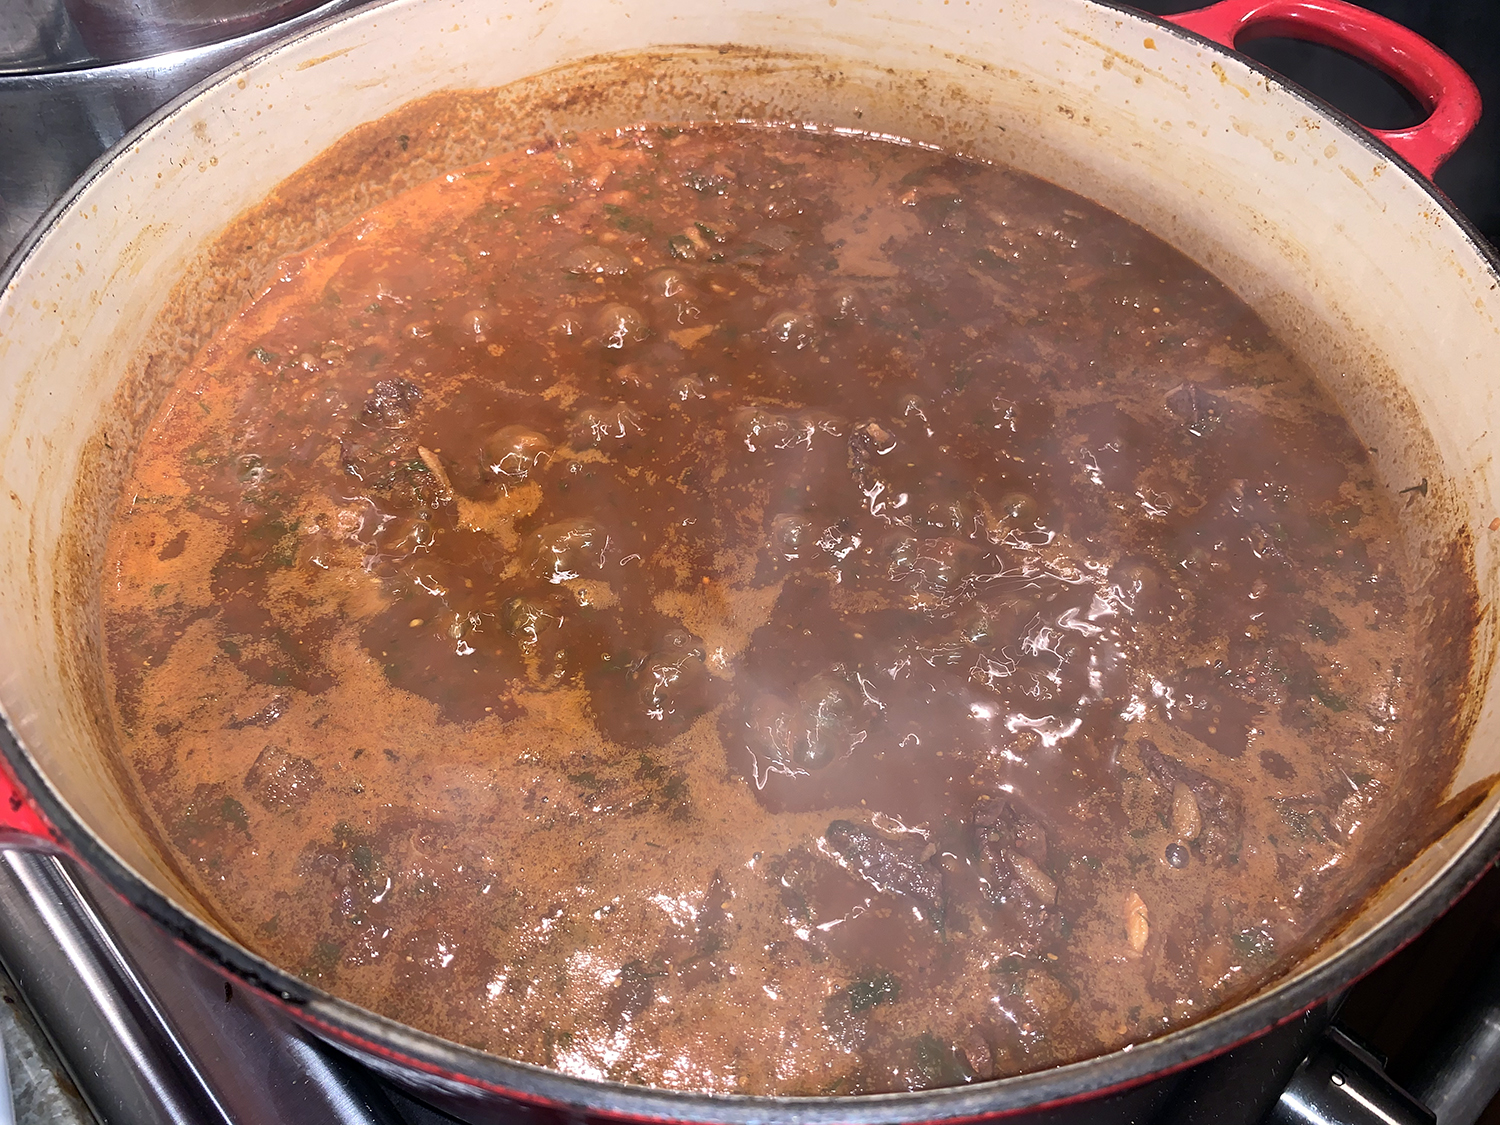
TIP: The original recipe calls for 6 cups of water, but in the end, our broth was very thin and watery so we reduced it, uncovered for an additional 30 minutes. To avoid this, use only 4 cups water, or make and insert the dumplings which help soak up the liquid.
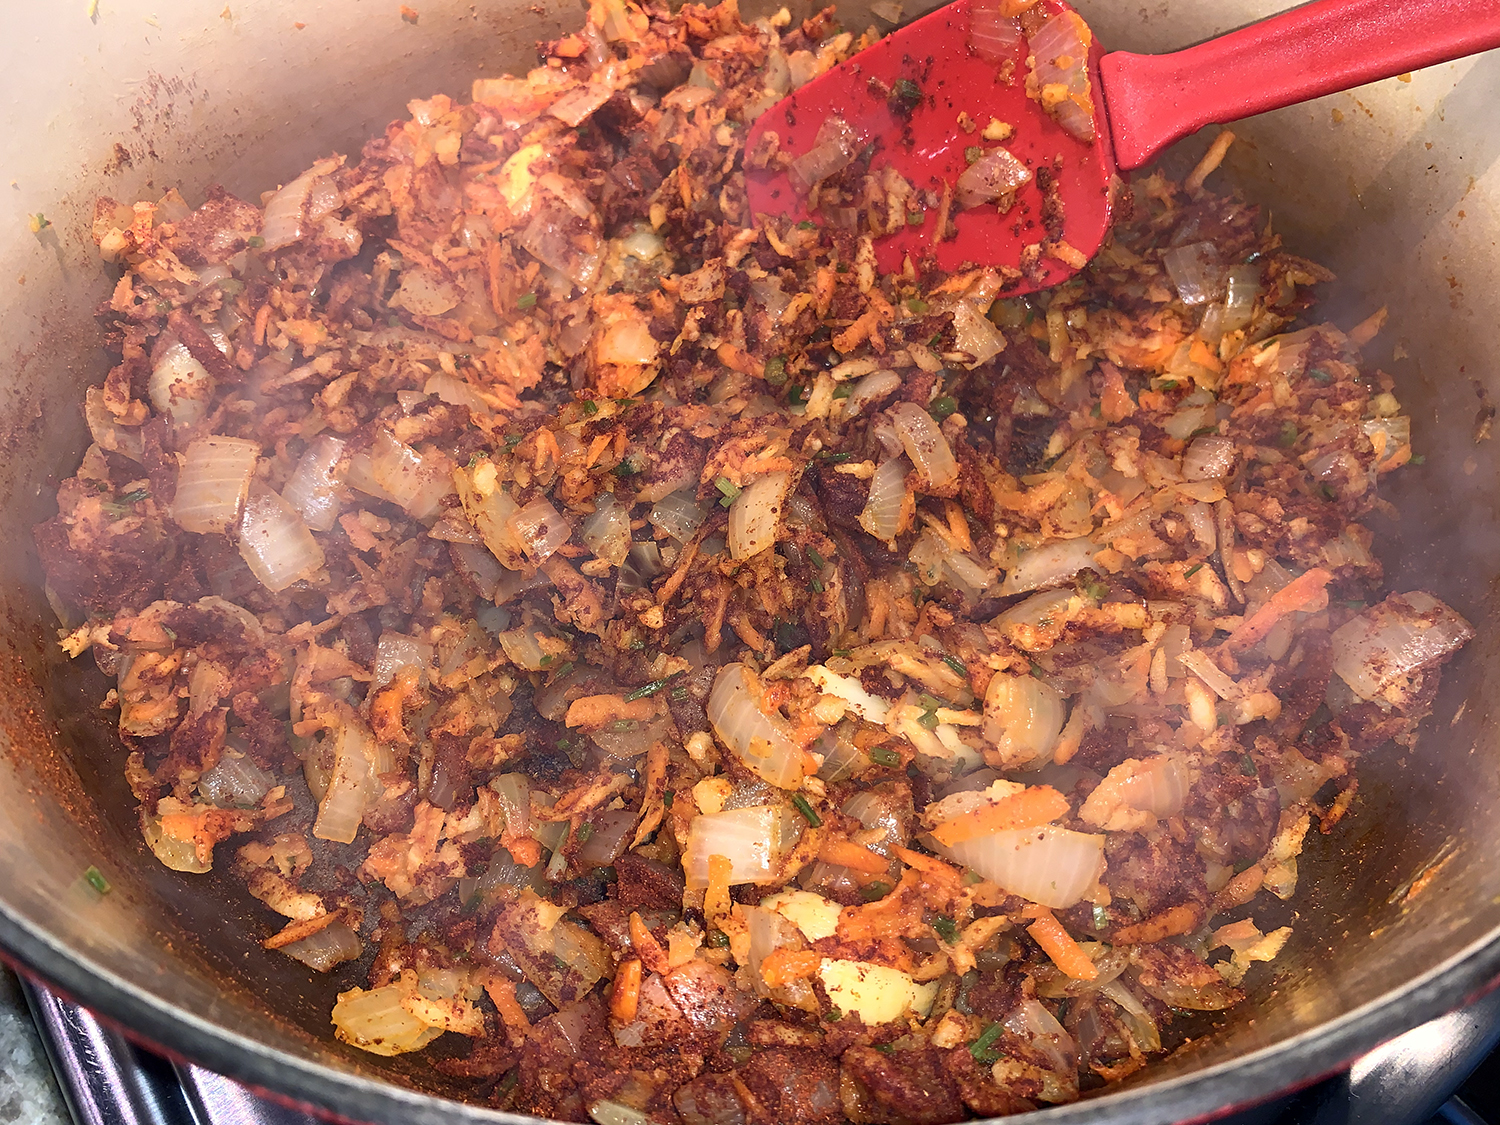
It is recommended not to use double-concentrated tomato paste (the type often sold in tubes) or the stew will end up tasting too tomatoey. As you cook the tomato paste and vegetable mixture, don’t worry if the paste sticks to the pot and begins to darken; this browning helps build depth of flavor.
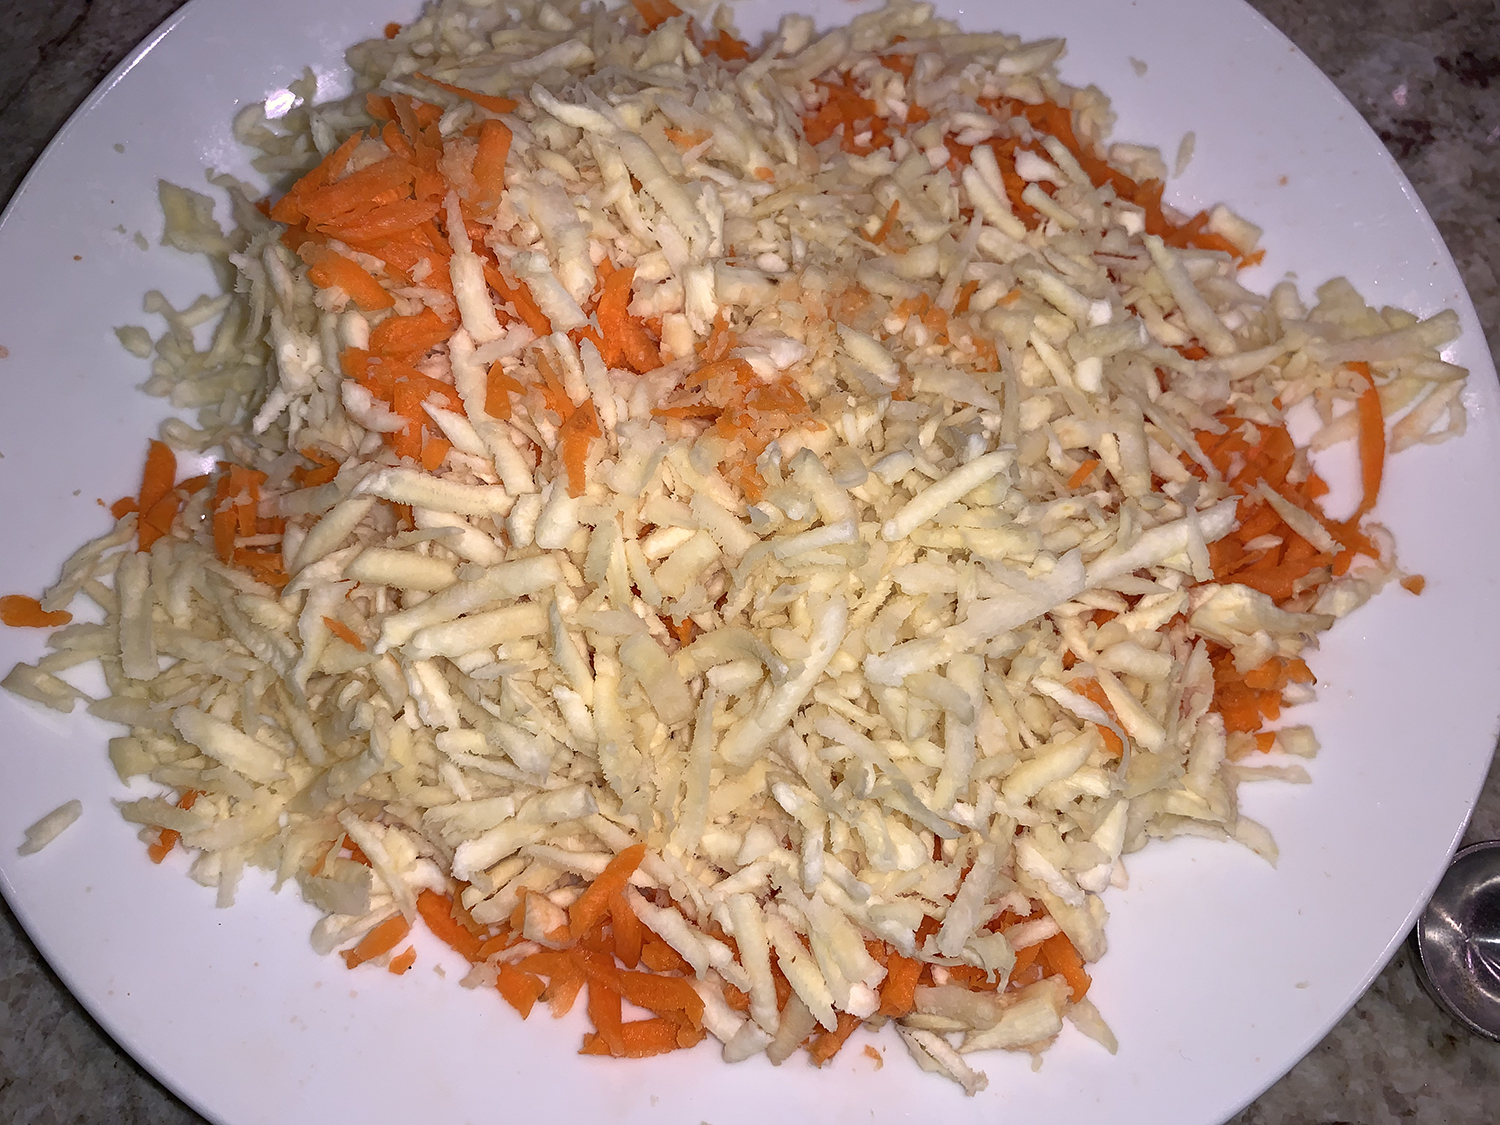
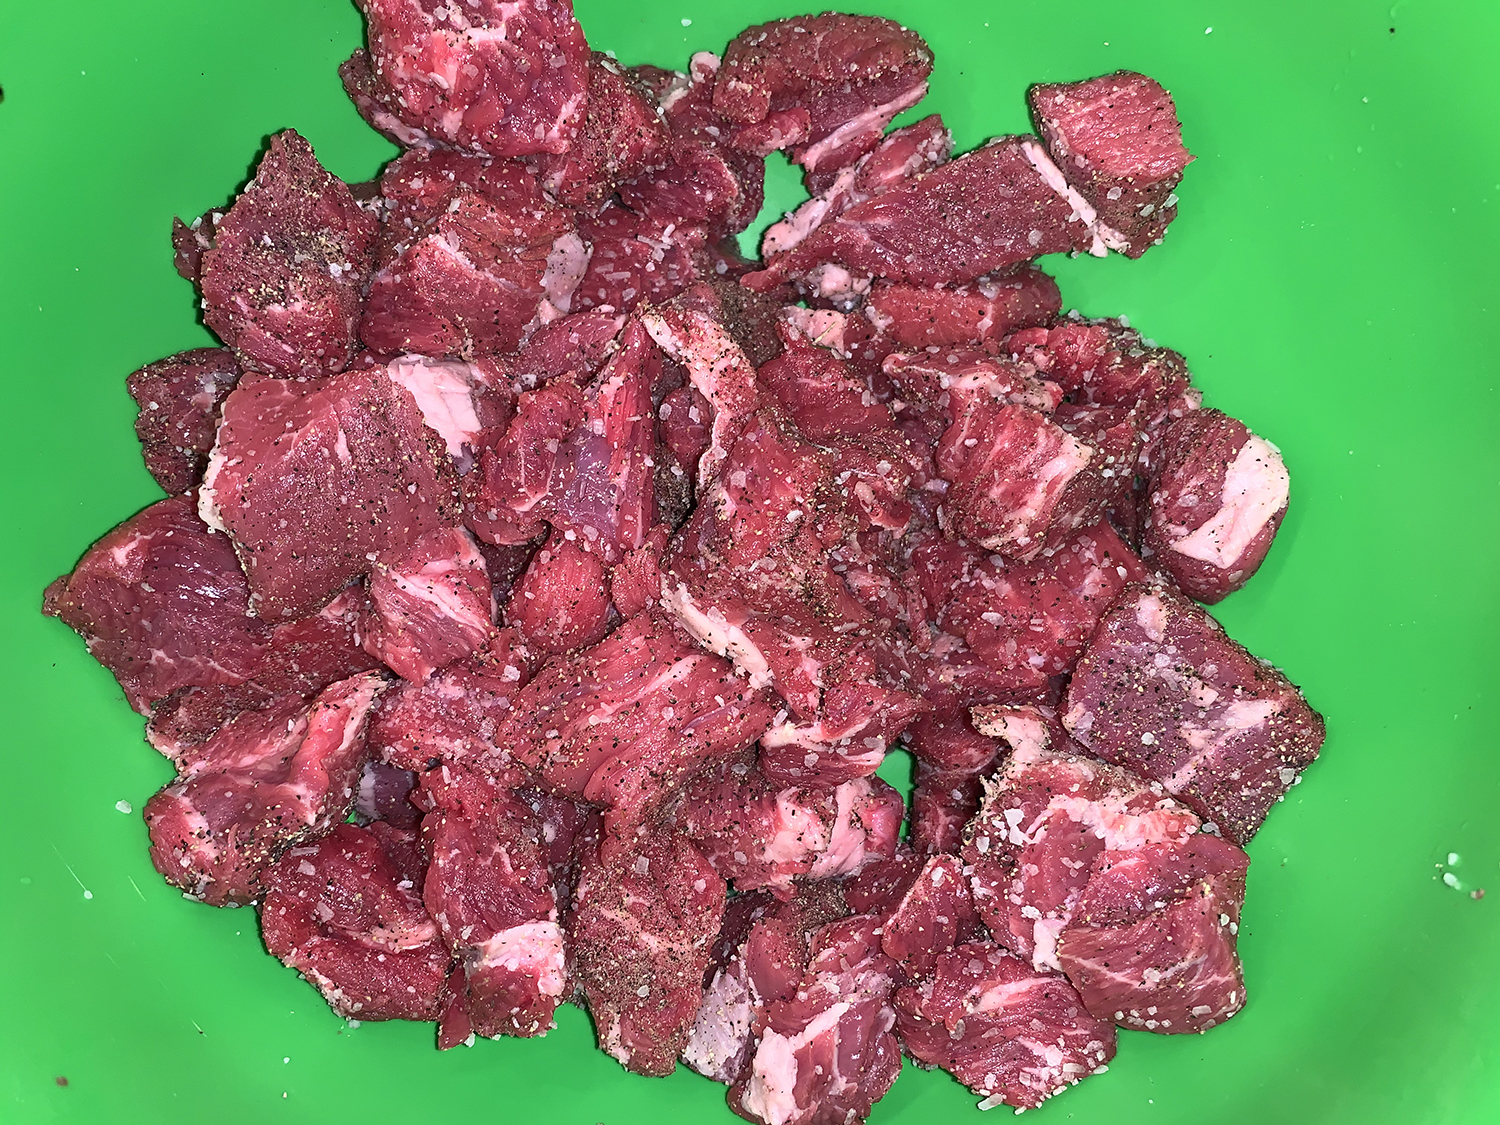
In a medium bowl, toss the beef with 1 tablespoon salt and 1 teaspoon pepper; set aside. In a large Dutch oven over medium, combine the oil, onions and ½ teaspoon salt. Cook, stirring occasionally, until softened but not browned, about 5 minutes. Add the carrots, parsnips, garlic and parsley stems, then cook, stirring occasionally, until lightly browned, 8 to 10 minutes.
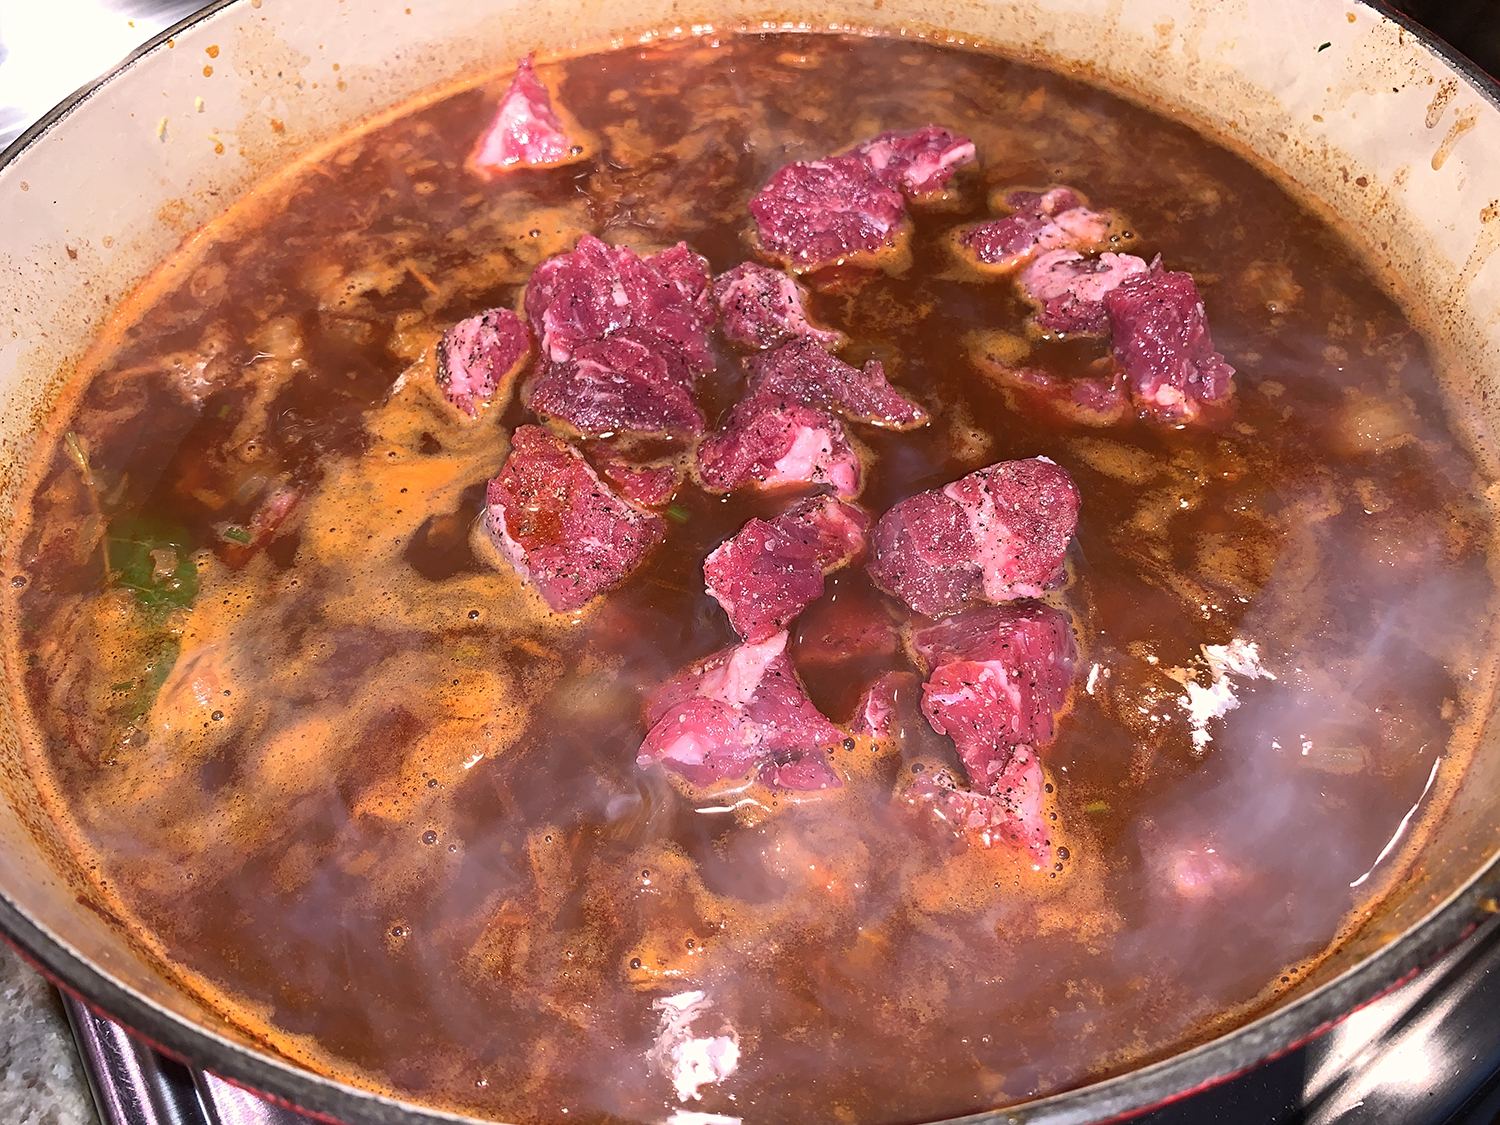
Stir in 2 tablespoons of the tomato paste and cook, stirring often, until it begins to brown and stick to the bottom of the pot, 2 to 4 minutes. Add the ¼ cup sweet paprika, the hot paprika and bay. Cook, stirring, until fragrant, about 30 seconds. Whisk in the wine and 6 cups water, then bring to a simmer over medium-high, stirring often. (If not making the dumplings which help soak up some of the liquid, you may want to use only 4 cups water which will make the broth less thin.)
Stir in the beef and return to a simmer. Reduce to low, cover and cook until a skewer inserted into the beef meets no resistance, about 2 hours, stirring occasionally.
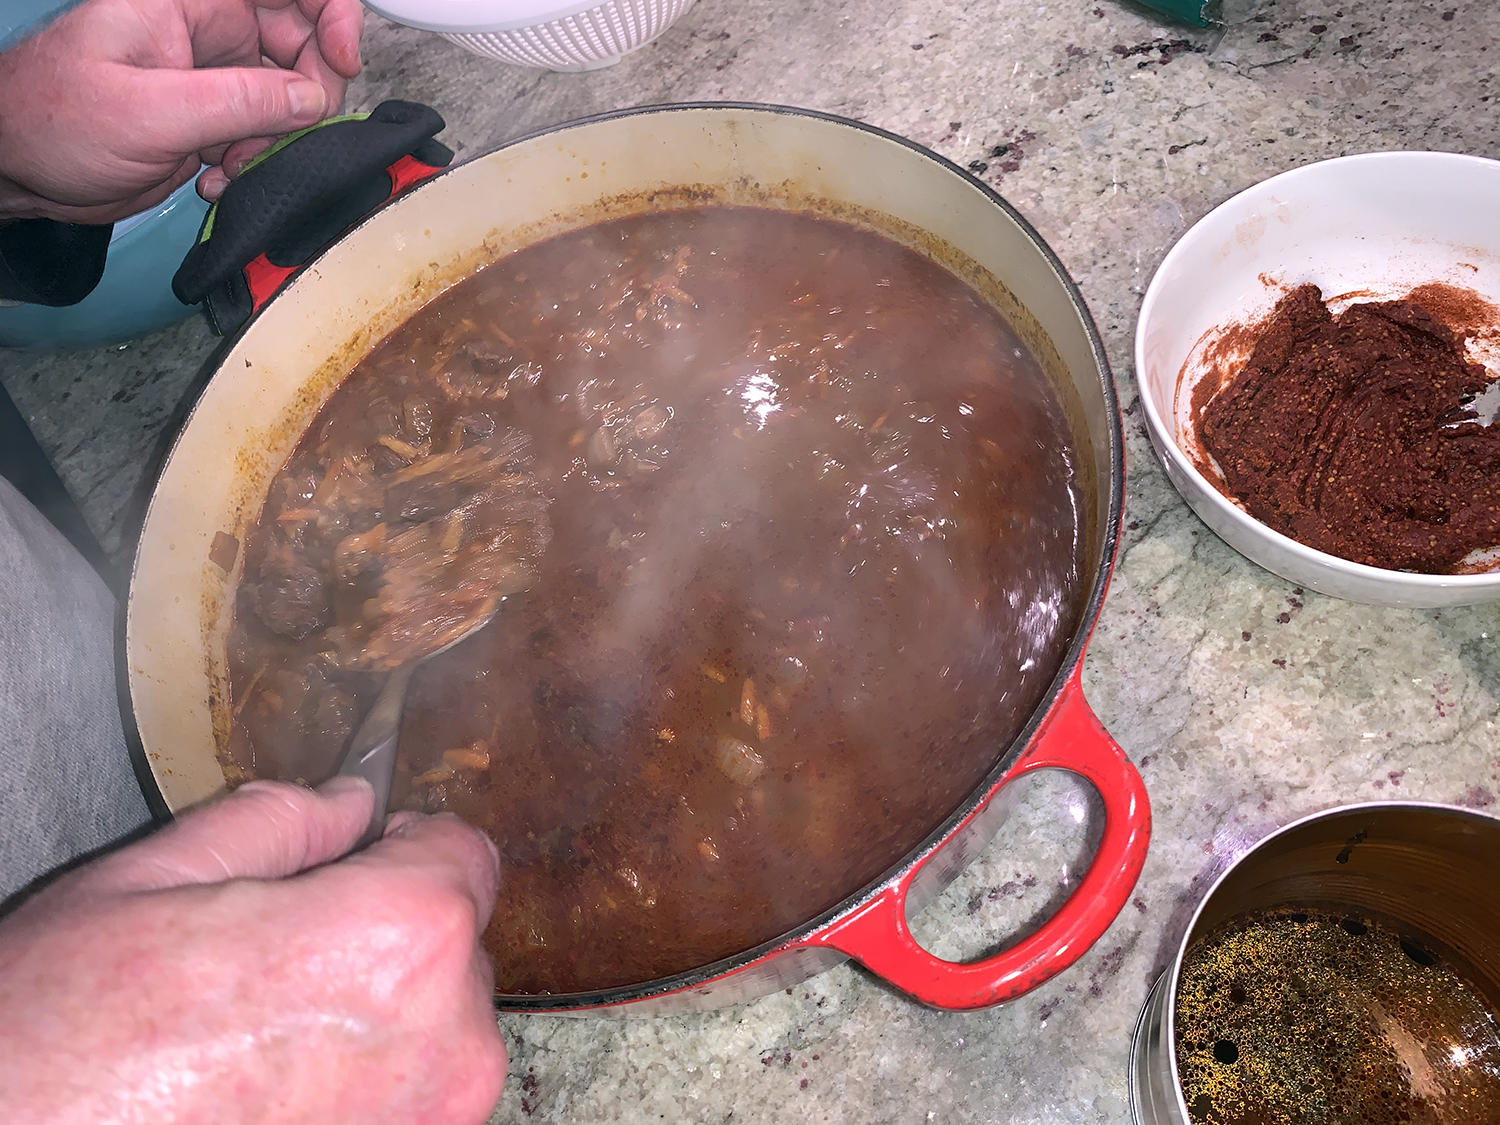
Remove the pot from the heat. Tilt the pot to pool the cooking liquid to one side, then use a wide spoon to skim off and discard as much fat as possible. Remove and discard the bay.
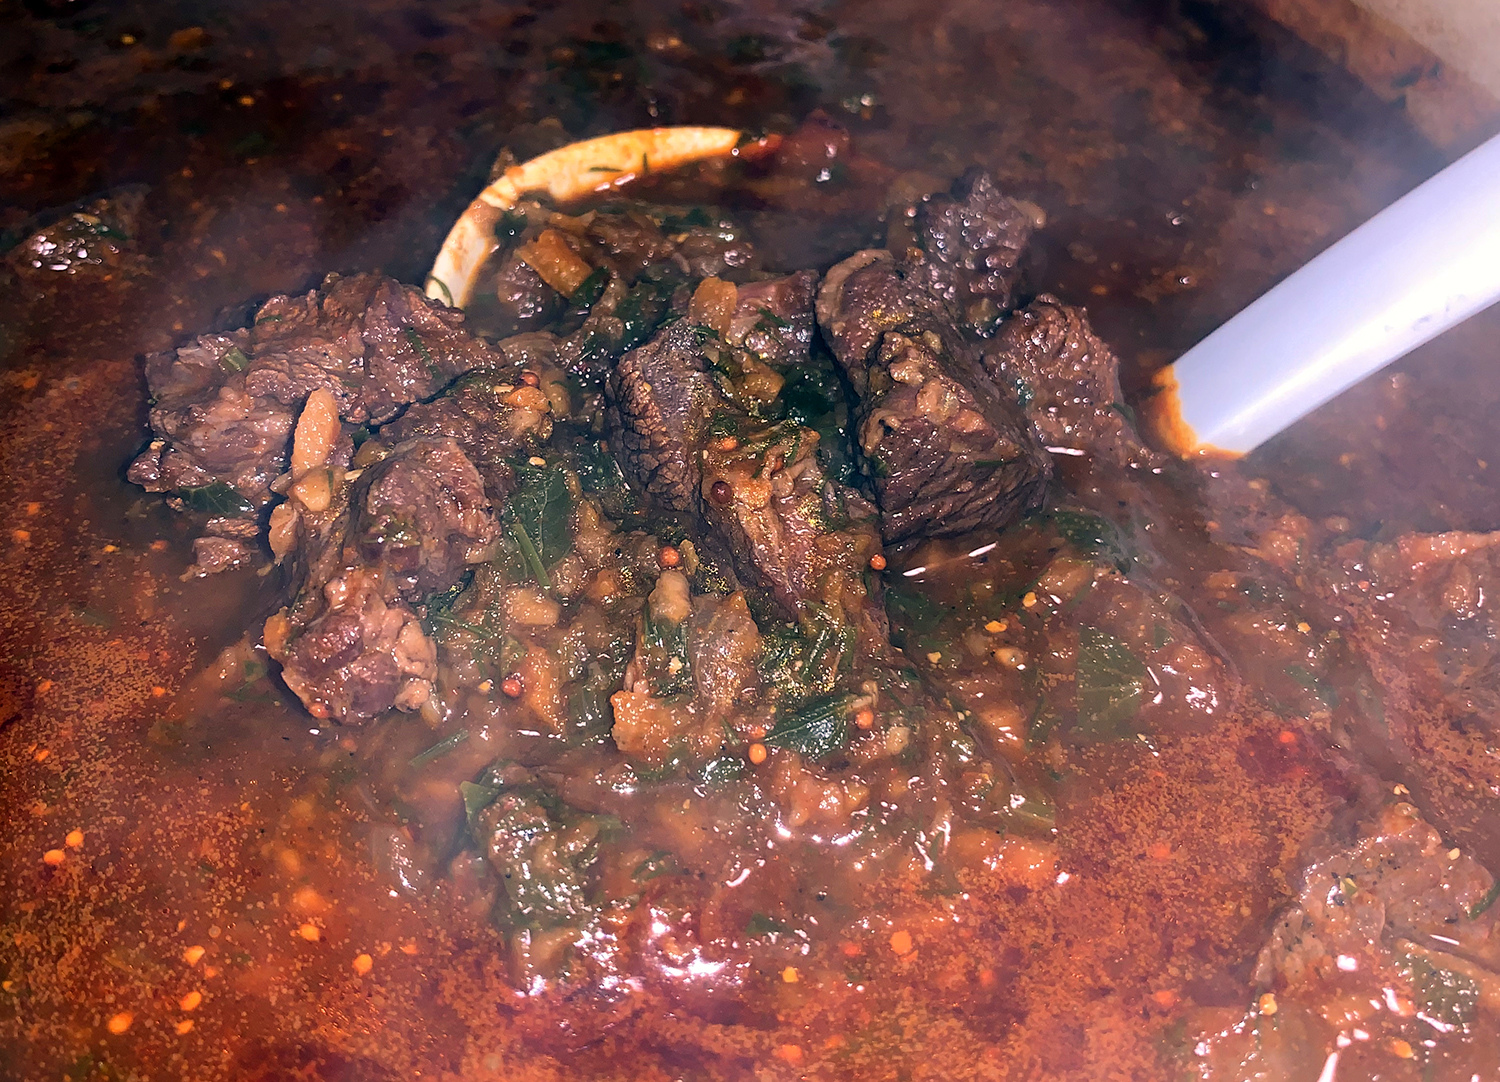
In a medium bowl, stir together the remaining 2 tablespoons tomato paste, the remaining 2 tablespoons sweet paprika and the mustard. Whisk about 1 cup of the cooking liquid into the tomato paste mixture, then stir it into the pot. Return to a simmer over medium-high, then stir in the parsley leaves and half the dill. Taste and season with salt and pepper. Serve sprinkled with the remaining dill.
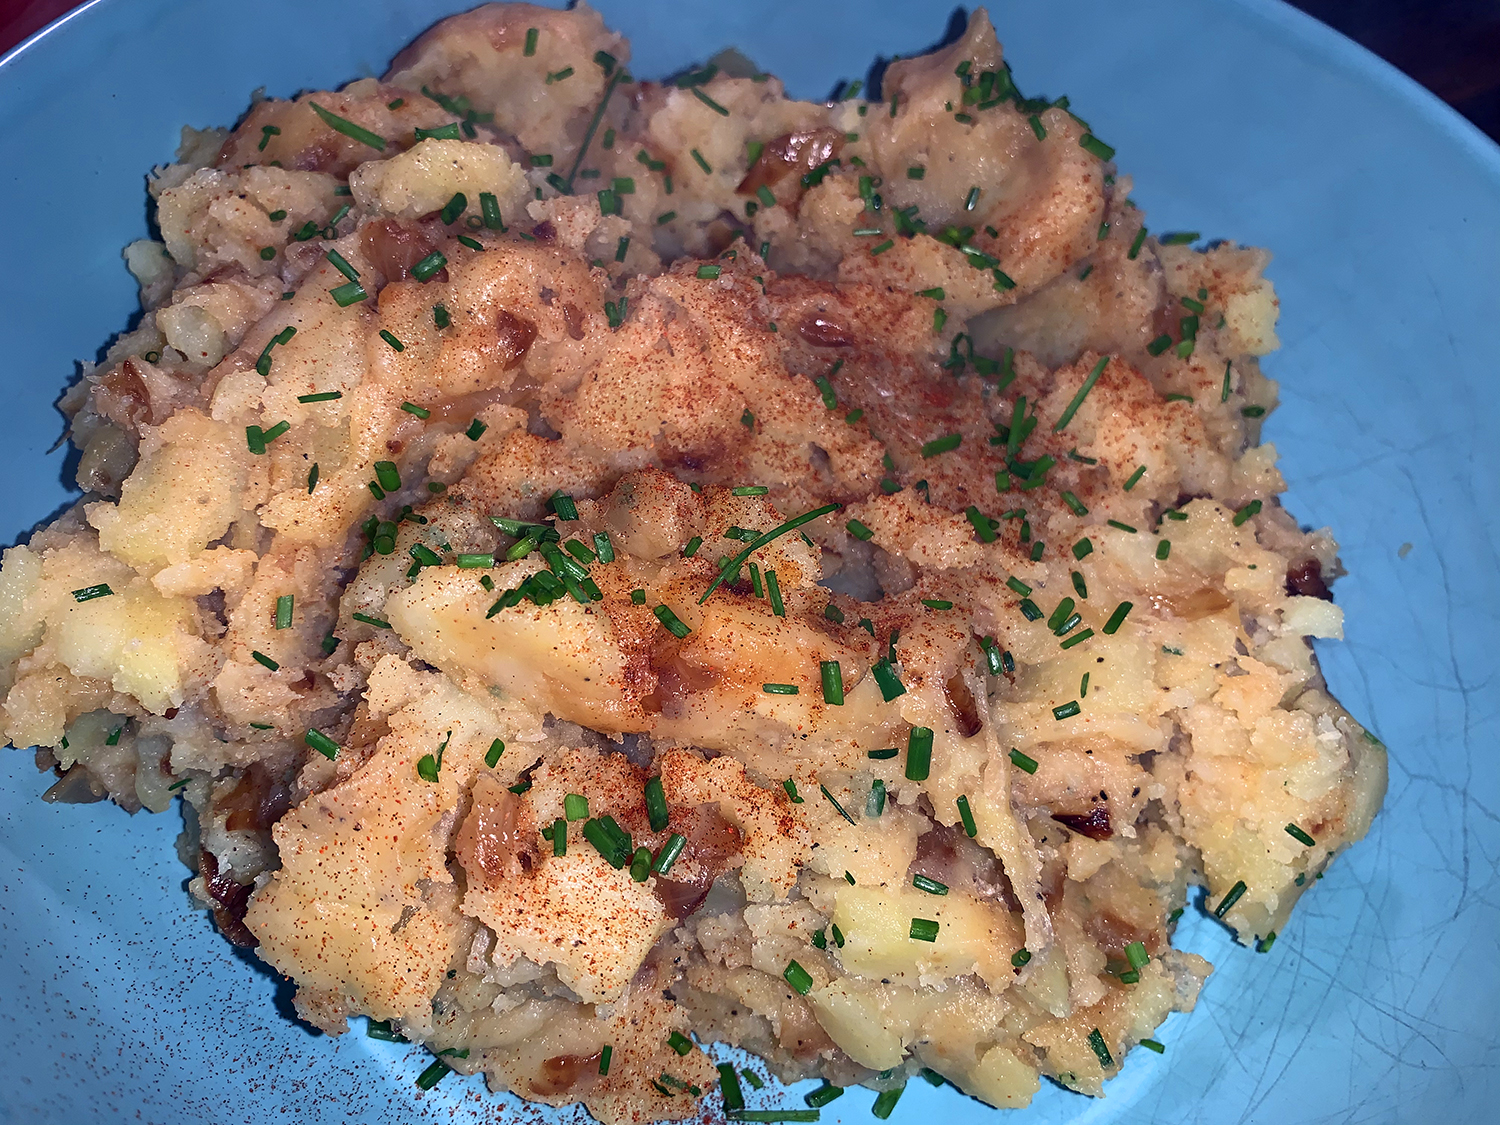
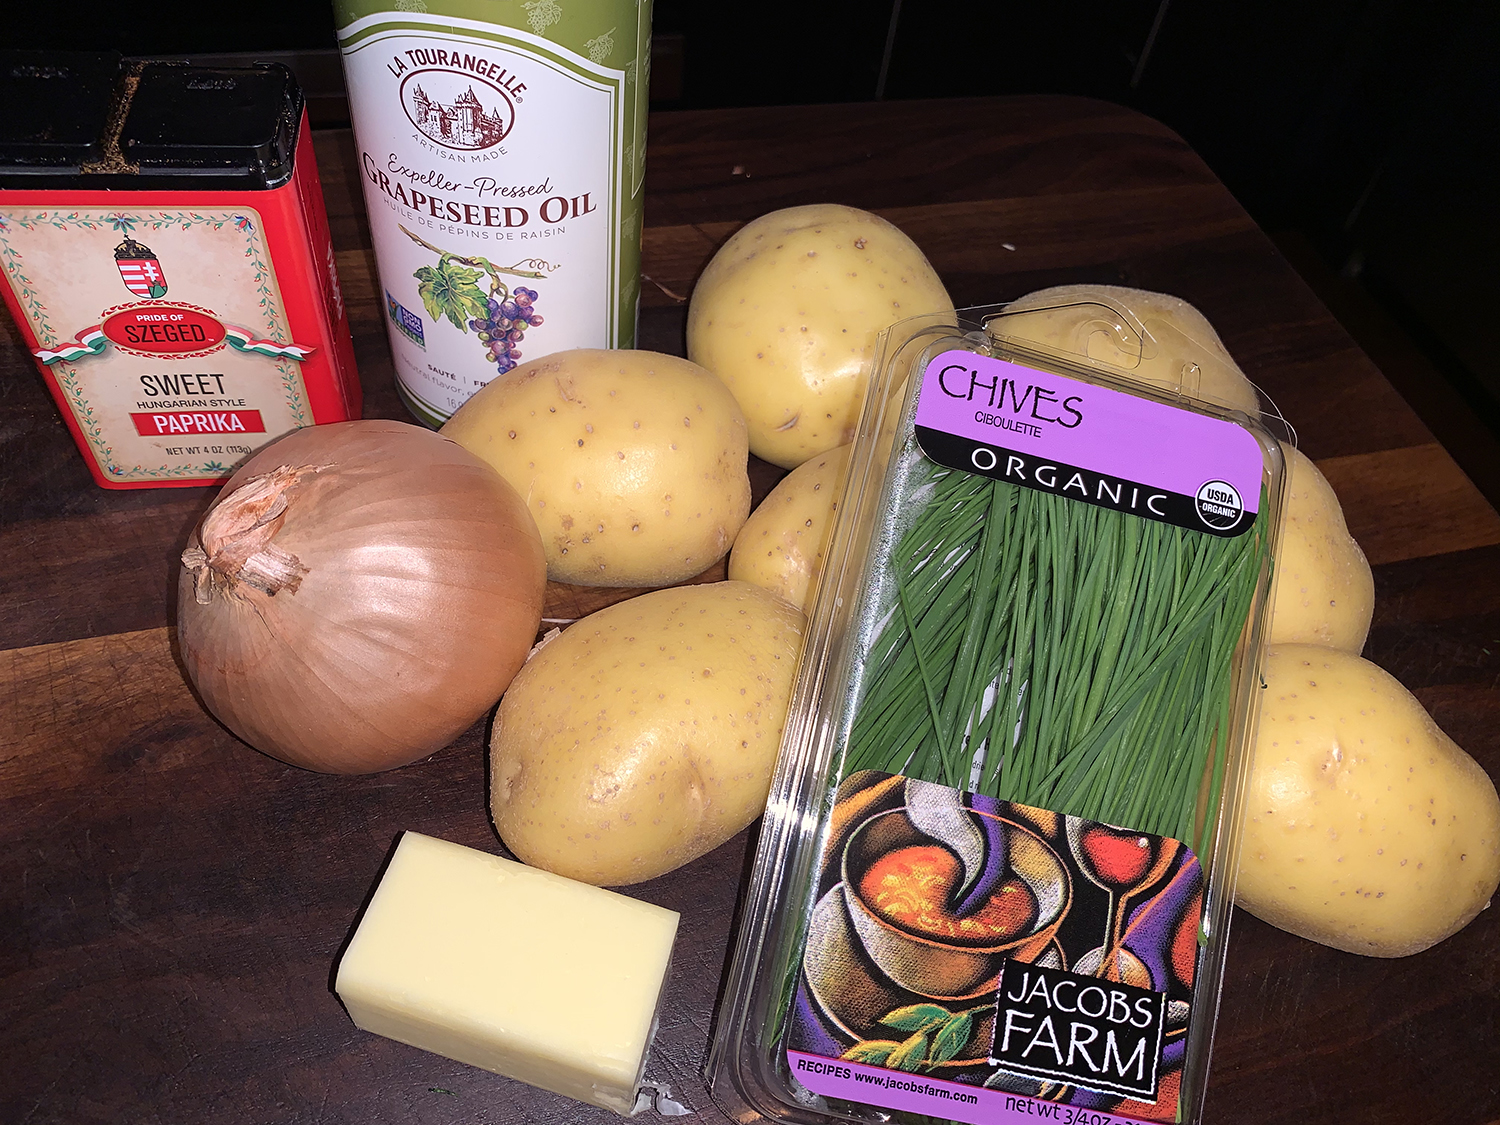
Croatian restani krumpir is a hearty, rustic dish of mashed potatoes studded with onions that are sautéed until soft and sweet, oftentimes seasoned with paprika and brightened with fresh herbs. Milk Street’s version is a one-pot recipe—the onion is caramelized, removed and set aside while the potatoes cook. Rather than boiling whole or chunked potatoes in copious water, instead they are sliced unpeeled and steamed in a covered pot with only enough water to facilitate even cooking and prevent scorching. This keeps the potatoes from absorbing lots of moisture so the finished dish tastes rich and earthy instead of thin and washed-out. This dish is a perfect the Slavonian stew.
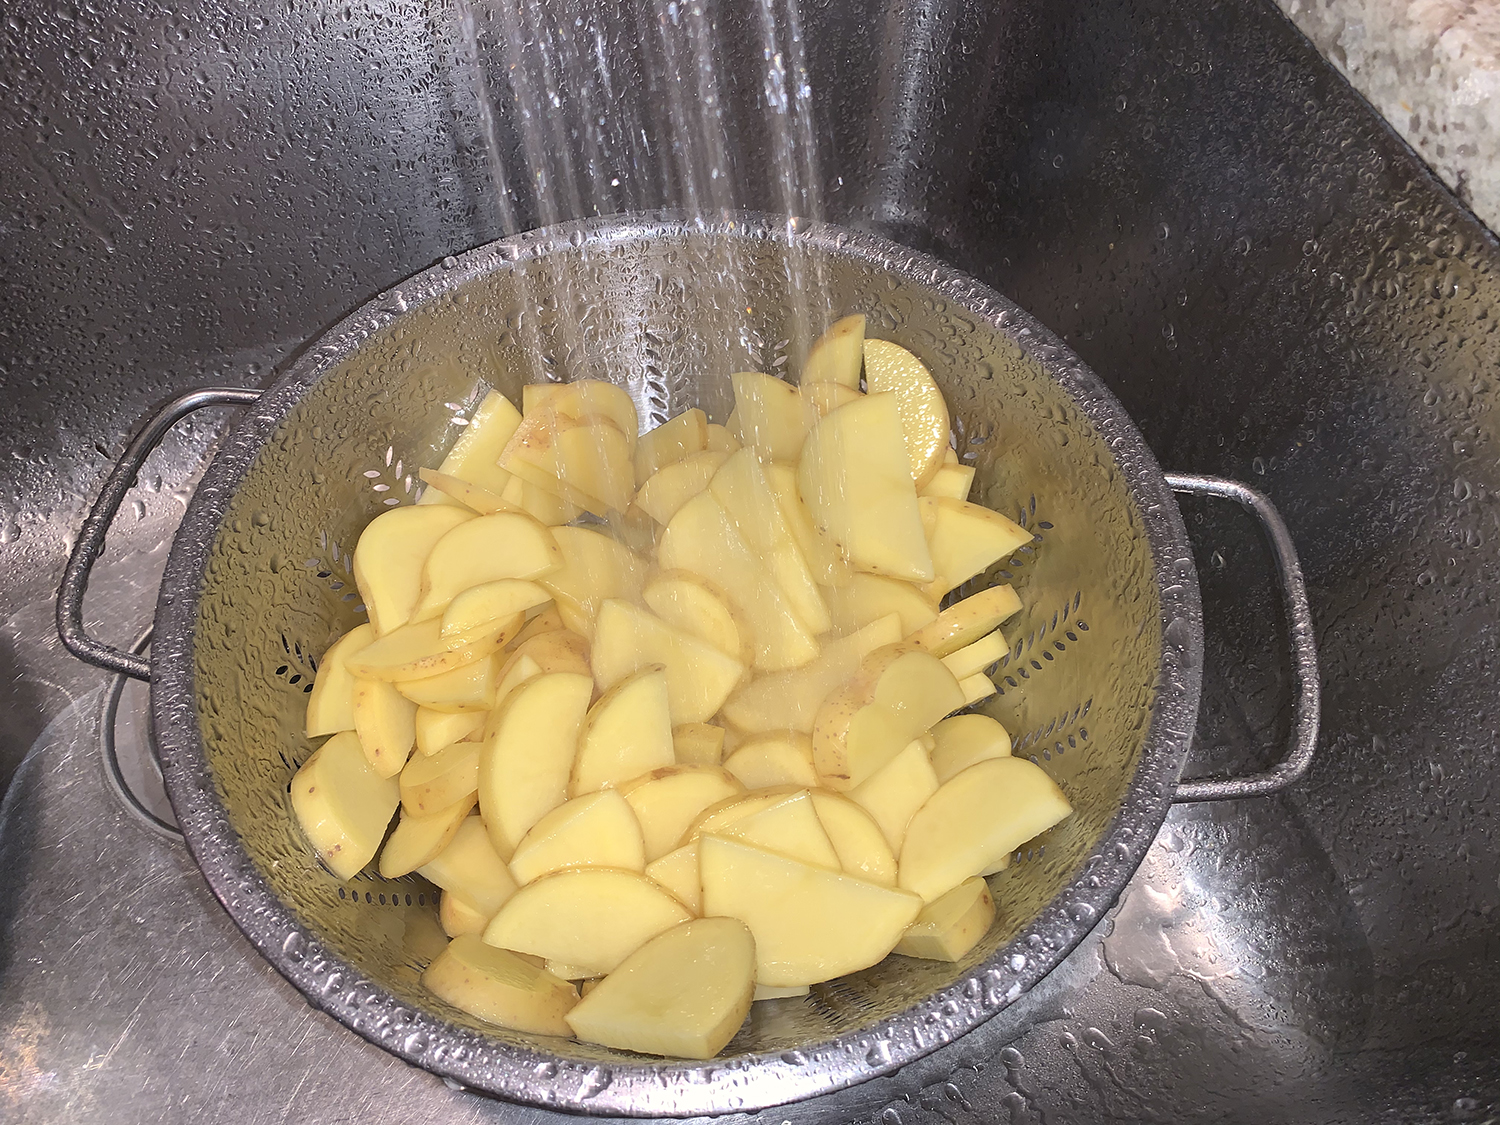
Tip: Don’t forget to rinse the sliced potatoes before cooking. Rinsing washes off excess starch so the finished dish has a creamy consistency and isn’t dense and gluey. Also, don’t undercook the potatoes—they should almost fall apart when poked with a skewer so they can be easily mashed with a wooden spoon.
2 lbs. Yukon Gold potatoes, unpeeled, halved lengthwise and sliced about ¼ inch thick
3/4 cup water
4 Tbsp. (½ stick) salted butter, cut into 4 pieces
¼ tsp. sweet paprika, plus more to serve
2 Tbsp. finely chopped fresh chives, divided
Directions
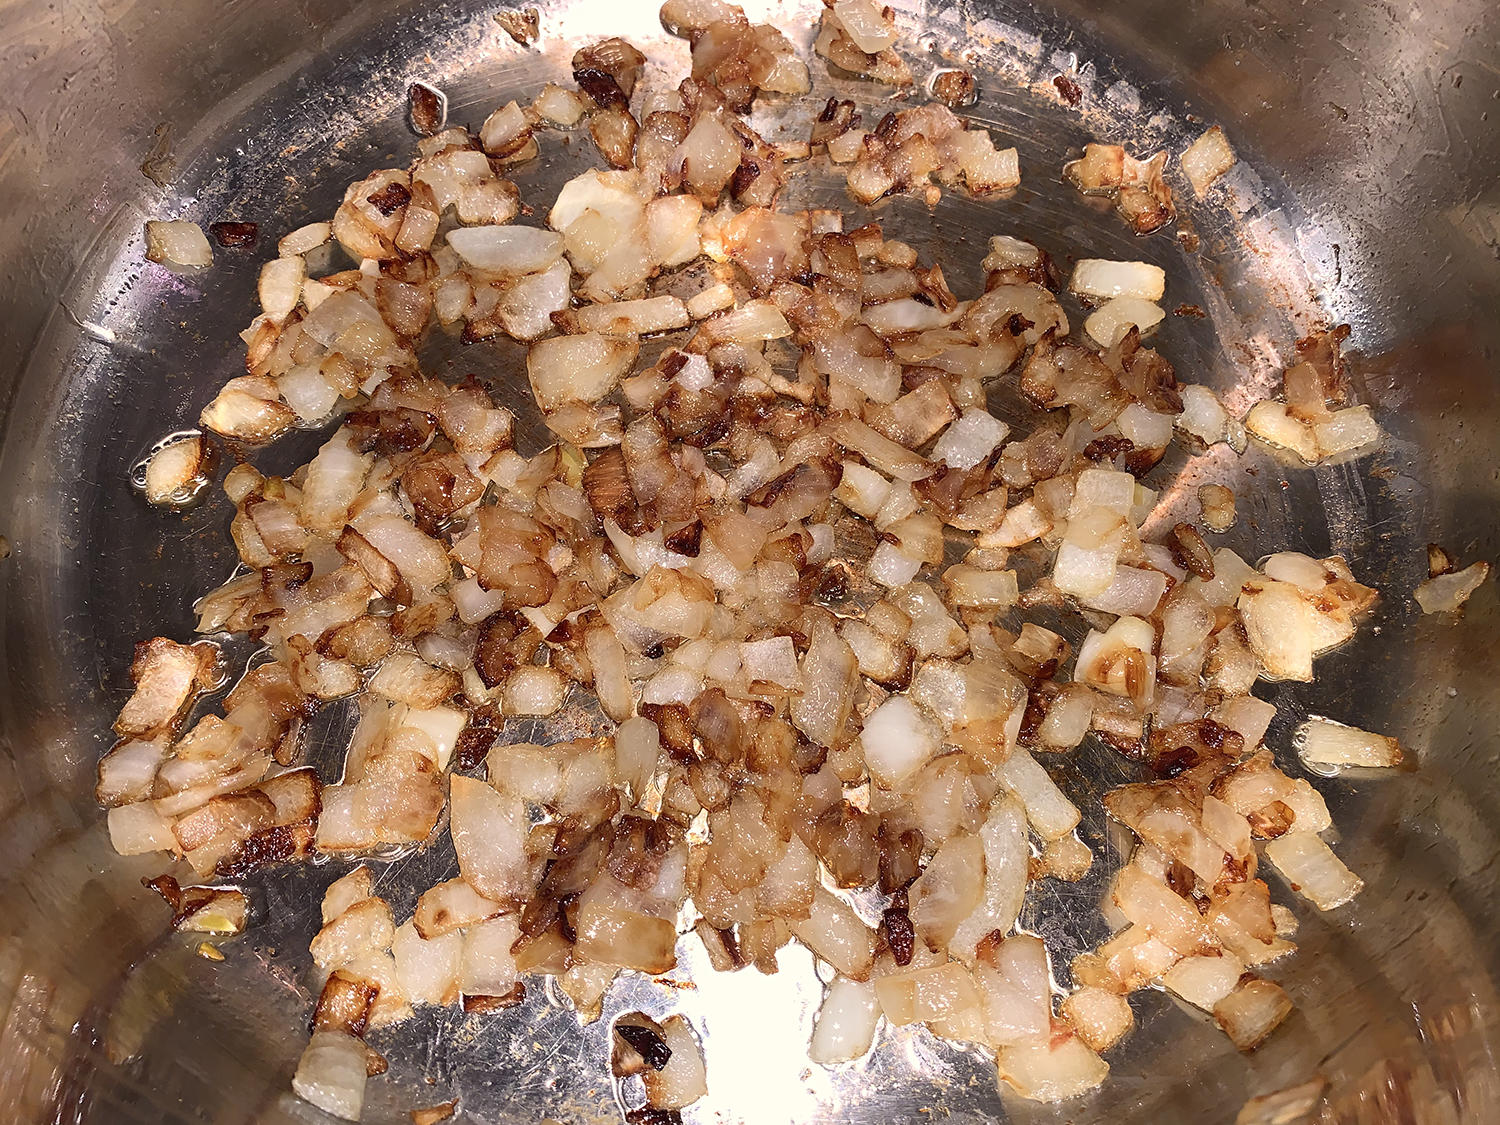
In a large Dutch oven over medium, heat the oil until shimmering. Add the onion and ½ teaspoon salt, then cook, stirring occasionally, until softened and well browned, 22 to 25 minutes. Remove the pot from the heat. Transfer the onion to a small bowl and set aside; reserve the pot.
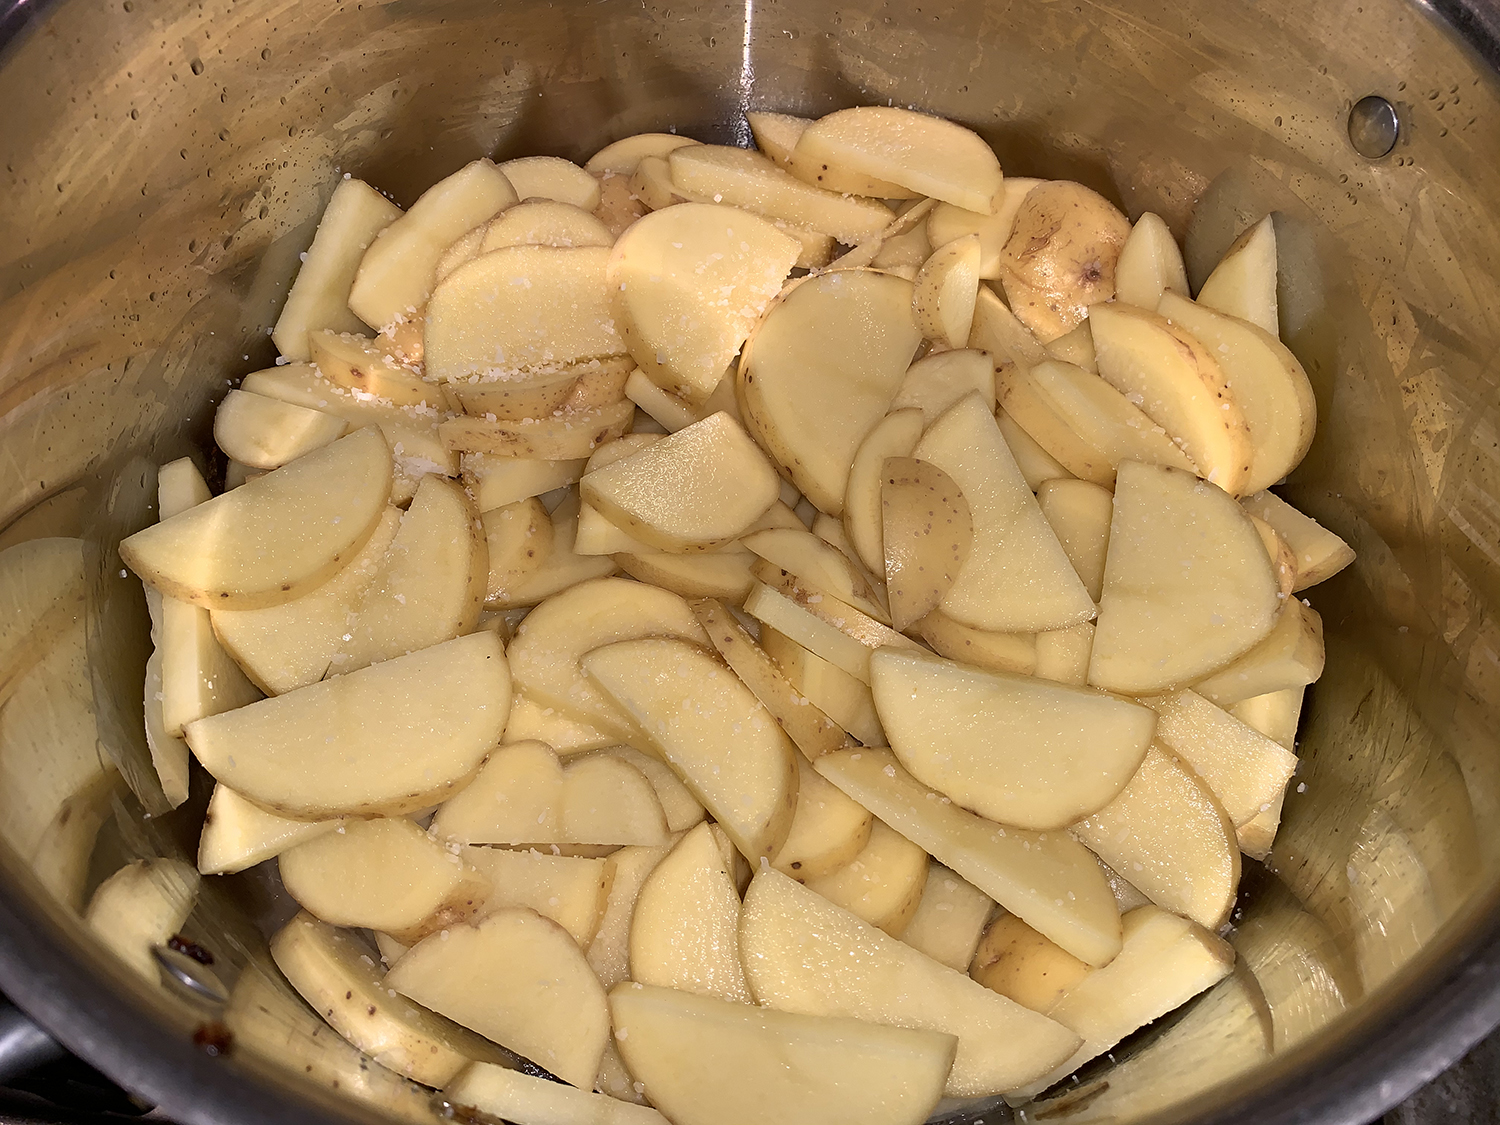
In a colander under cold running water, rinse the potatoes. Drain well, then add to the pot. Stir in ¾ cup water and 1 teaspoon salt, then distribute the potatoes in an even layer. Cover and bring to a boil over medium-high. Reduce to medium and cook at a simmer, stirring occasionally, until the slices almost fall apart when poked with a skewer, 18 to 20 minutes.
If there is water remaining in the pot, increase to medium-high and cook, uncovered and stirring often, until no moisture remains. (We had to cook ours another 7 minutes for the pot to become dry.)
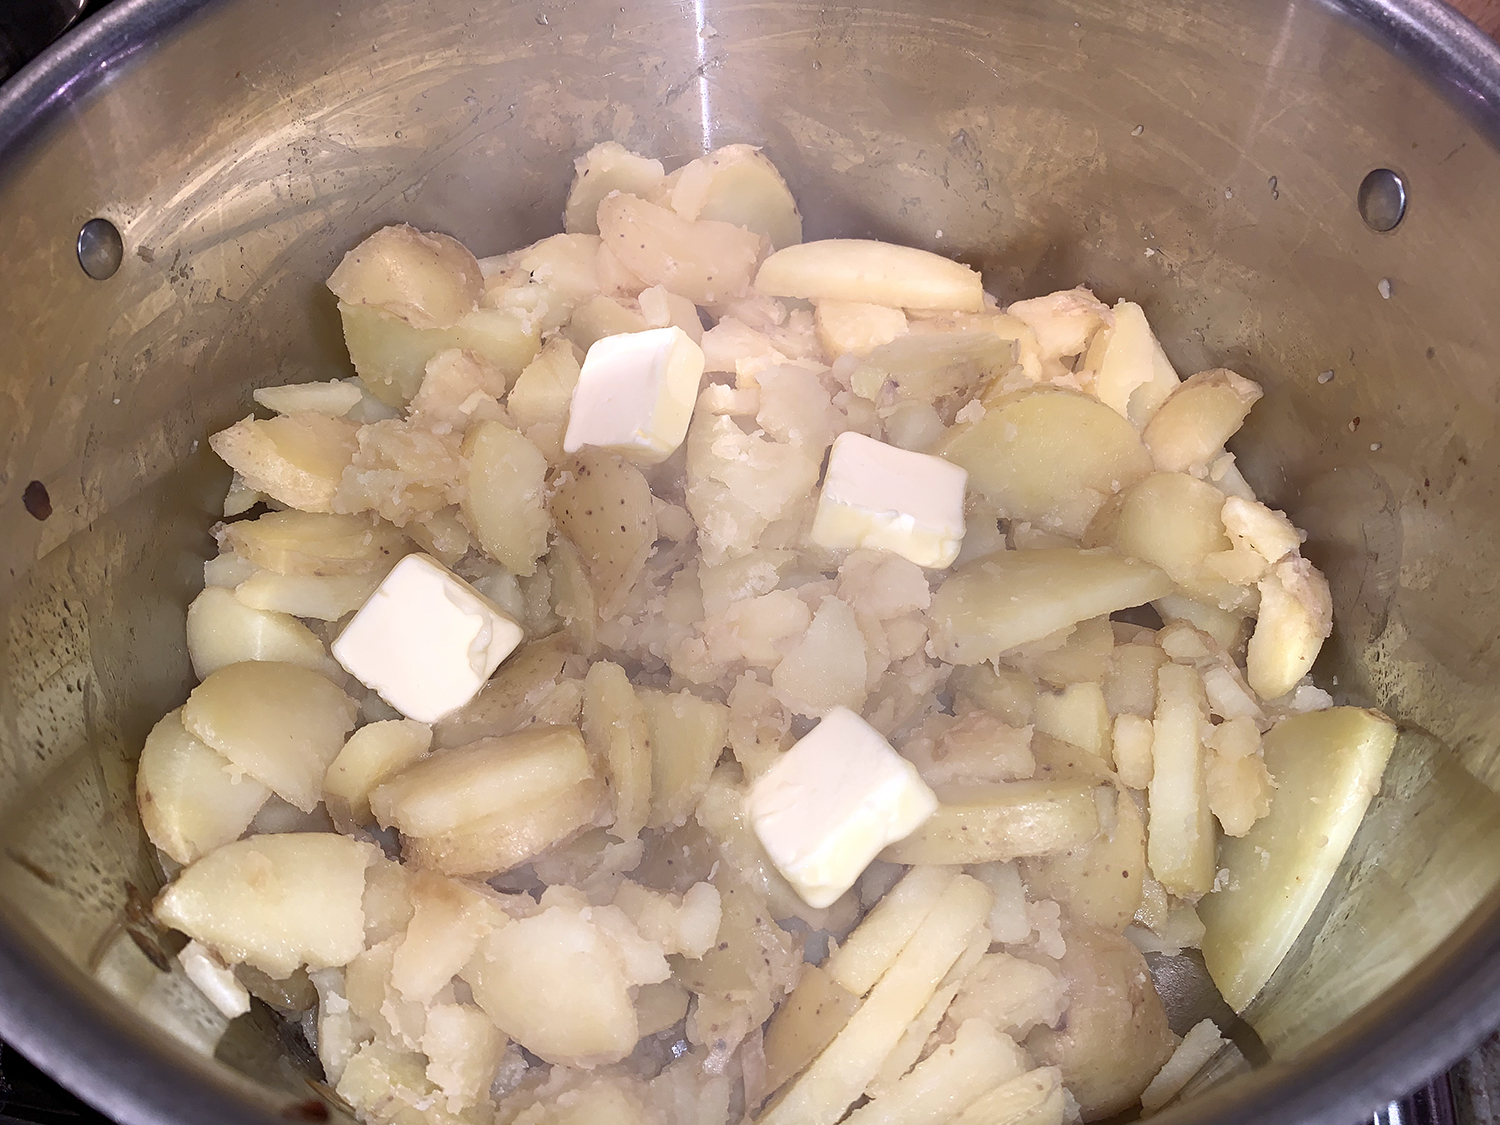
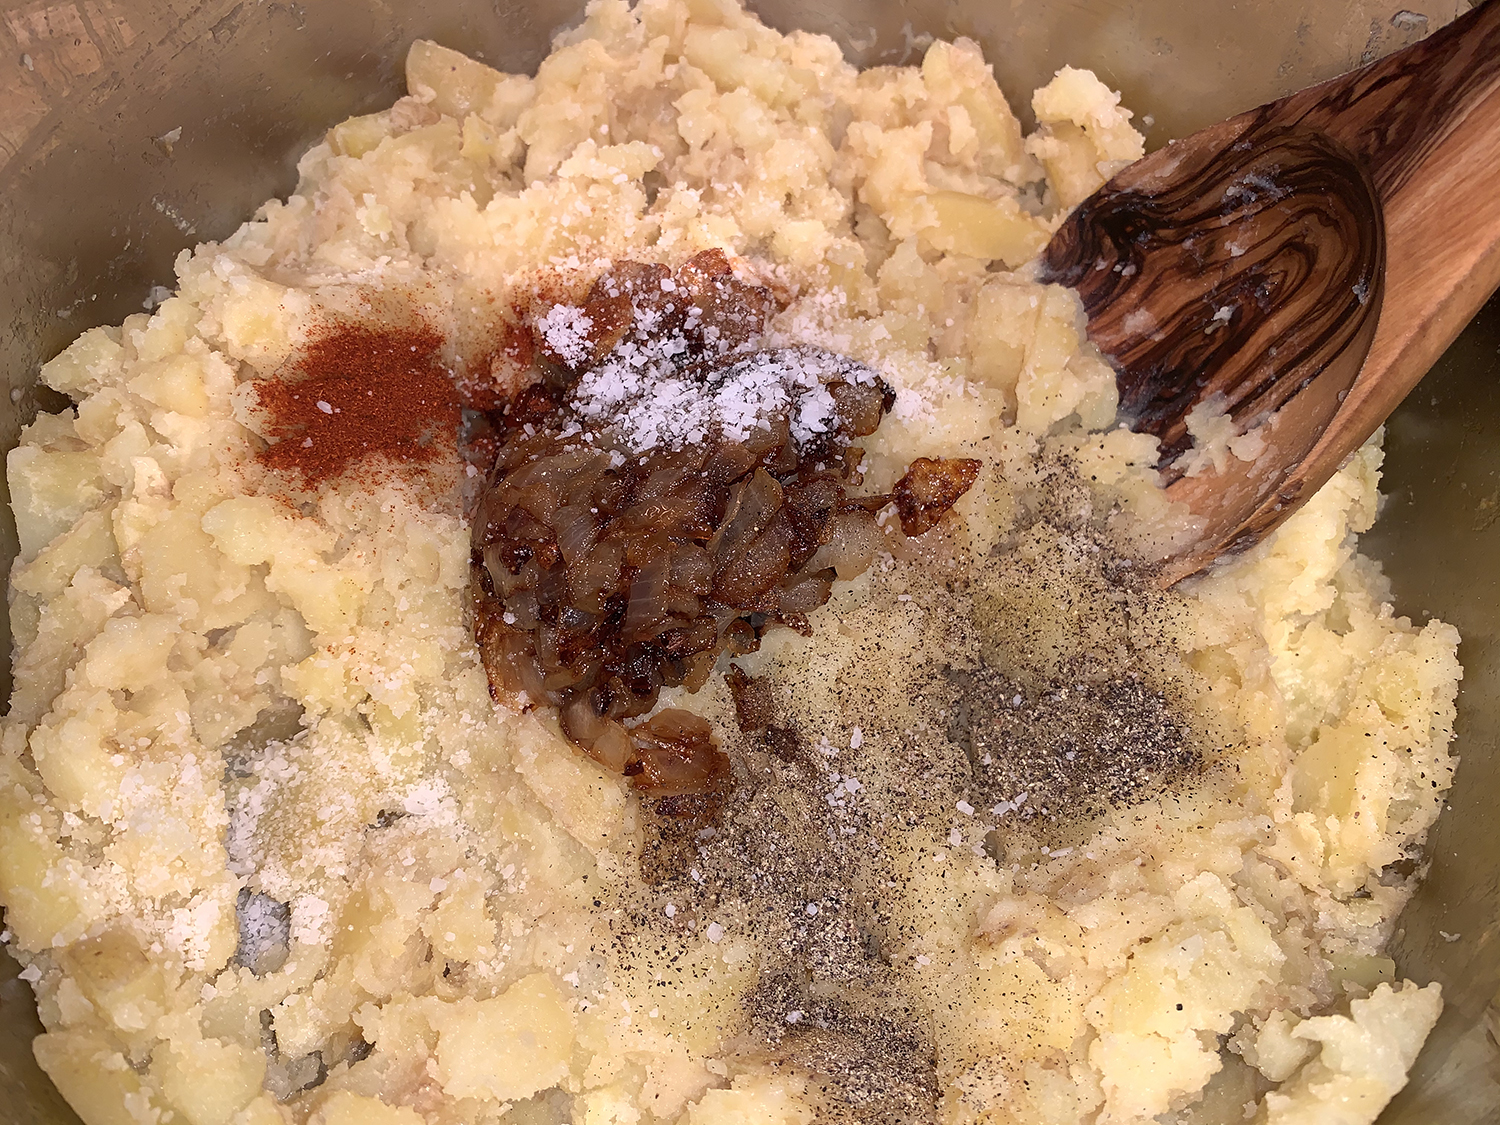
Reduce to low, add the butter and cook, stirring and mashing the potatoes with a spoon, until the butter is melted and incorporated, about 1 minute. Stir in the onion, paprika, ½ teaspoon salt and ¼ teaspoon pepper.
Stir in 1 tablespoon of the chives, then taste and season with salt and pepper. Transfer to a serving dish. Sprinkle with additional paprika and the remaining 1 tablespoon chives.
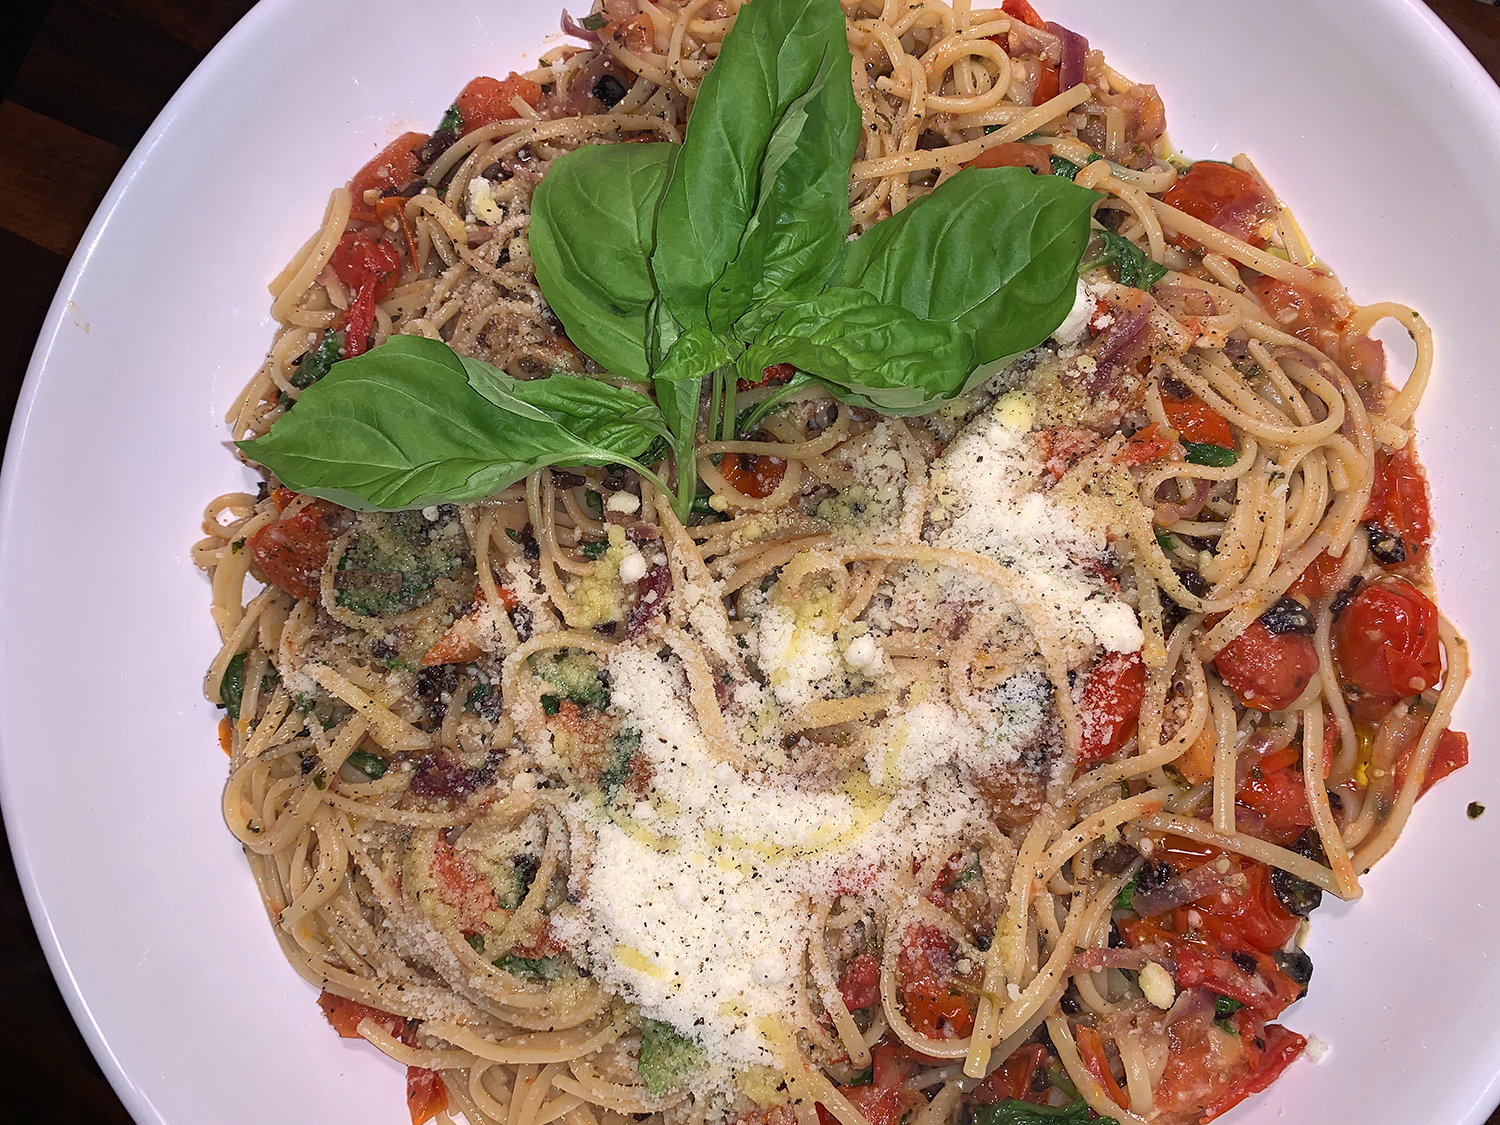
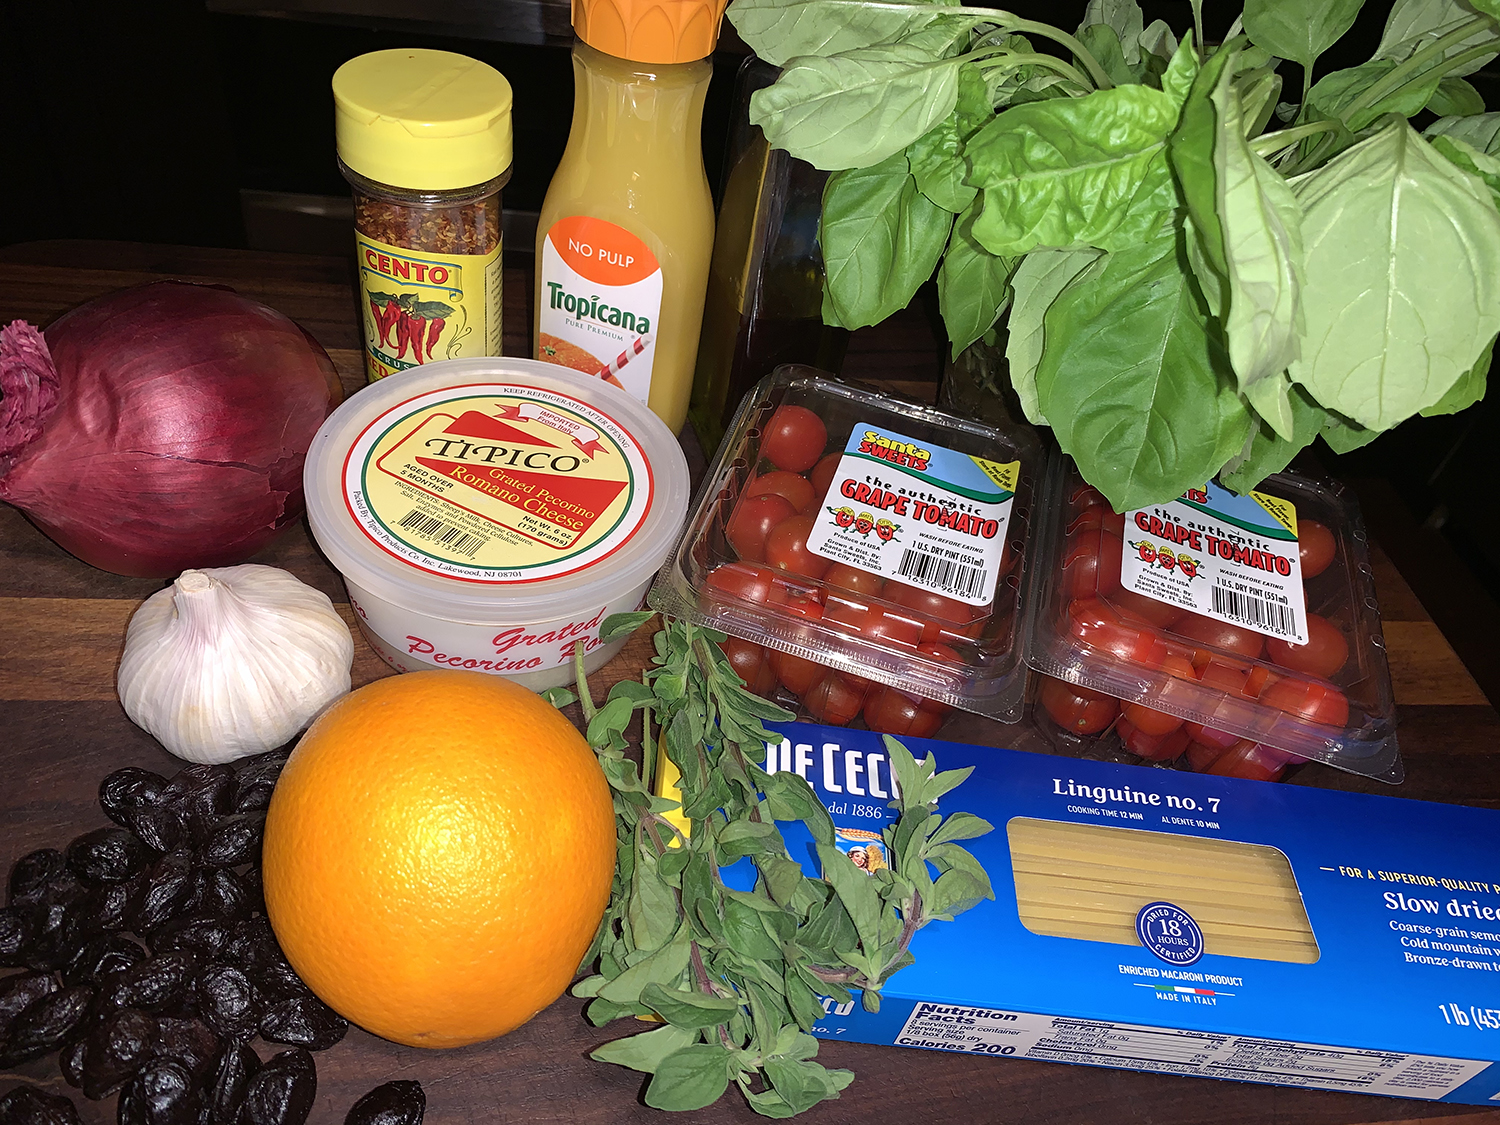
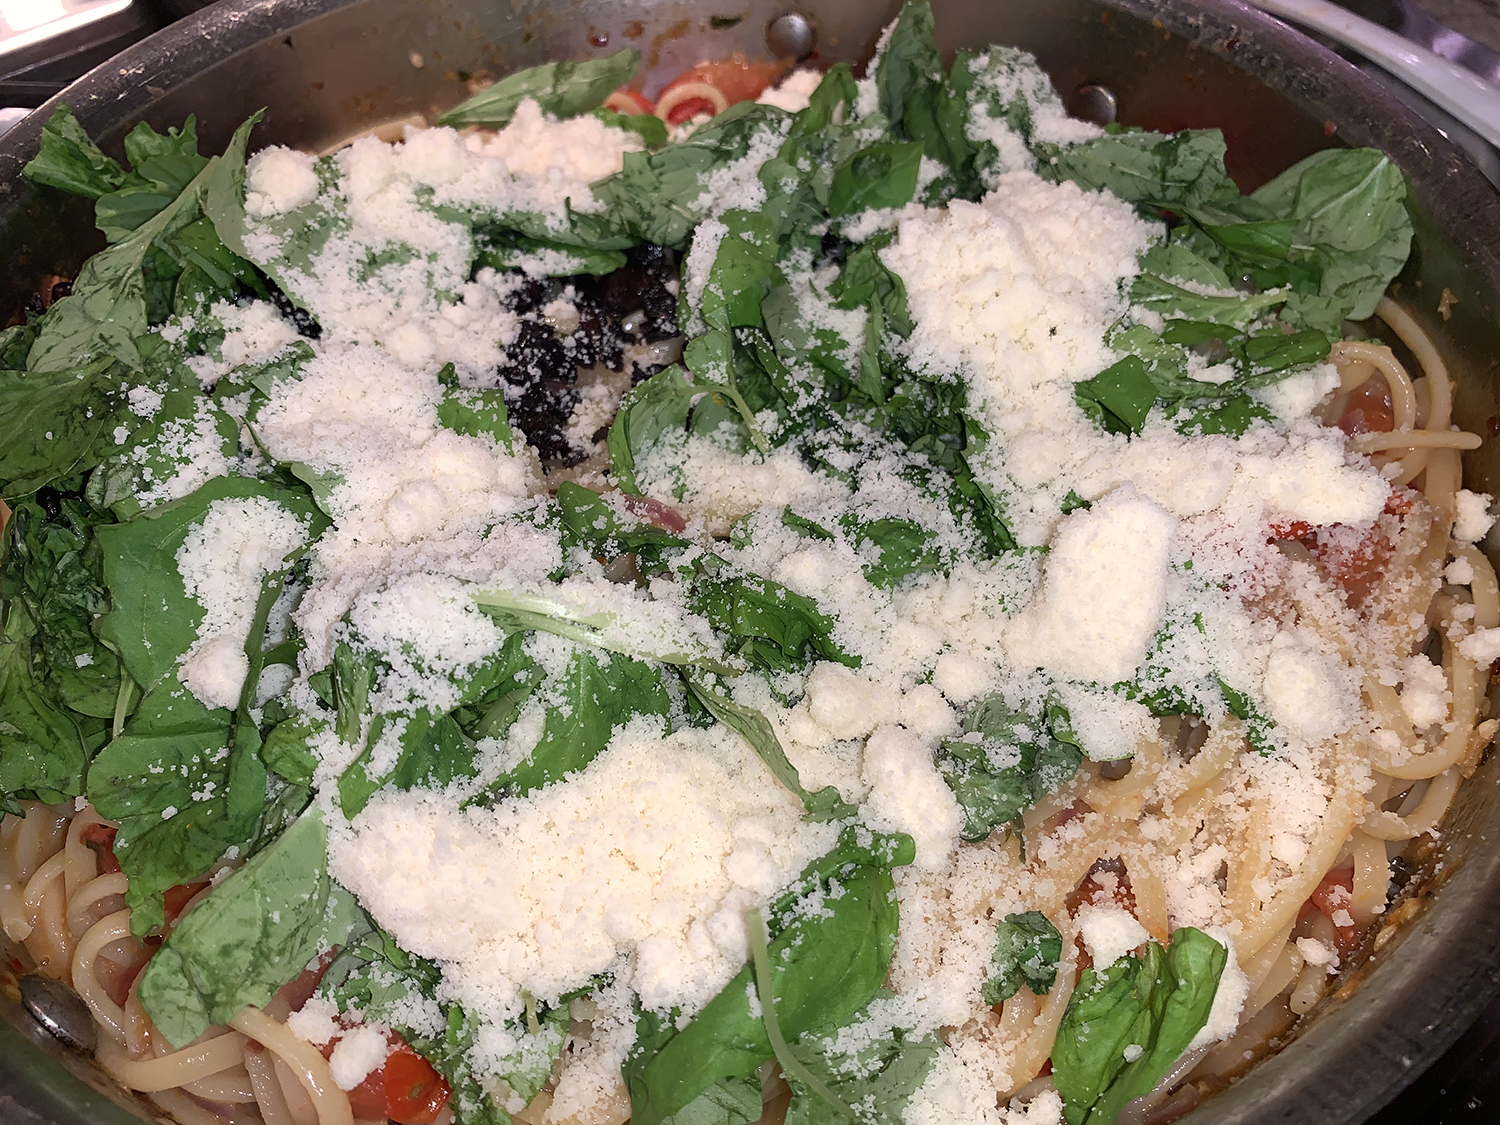
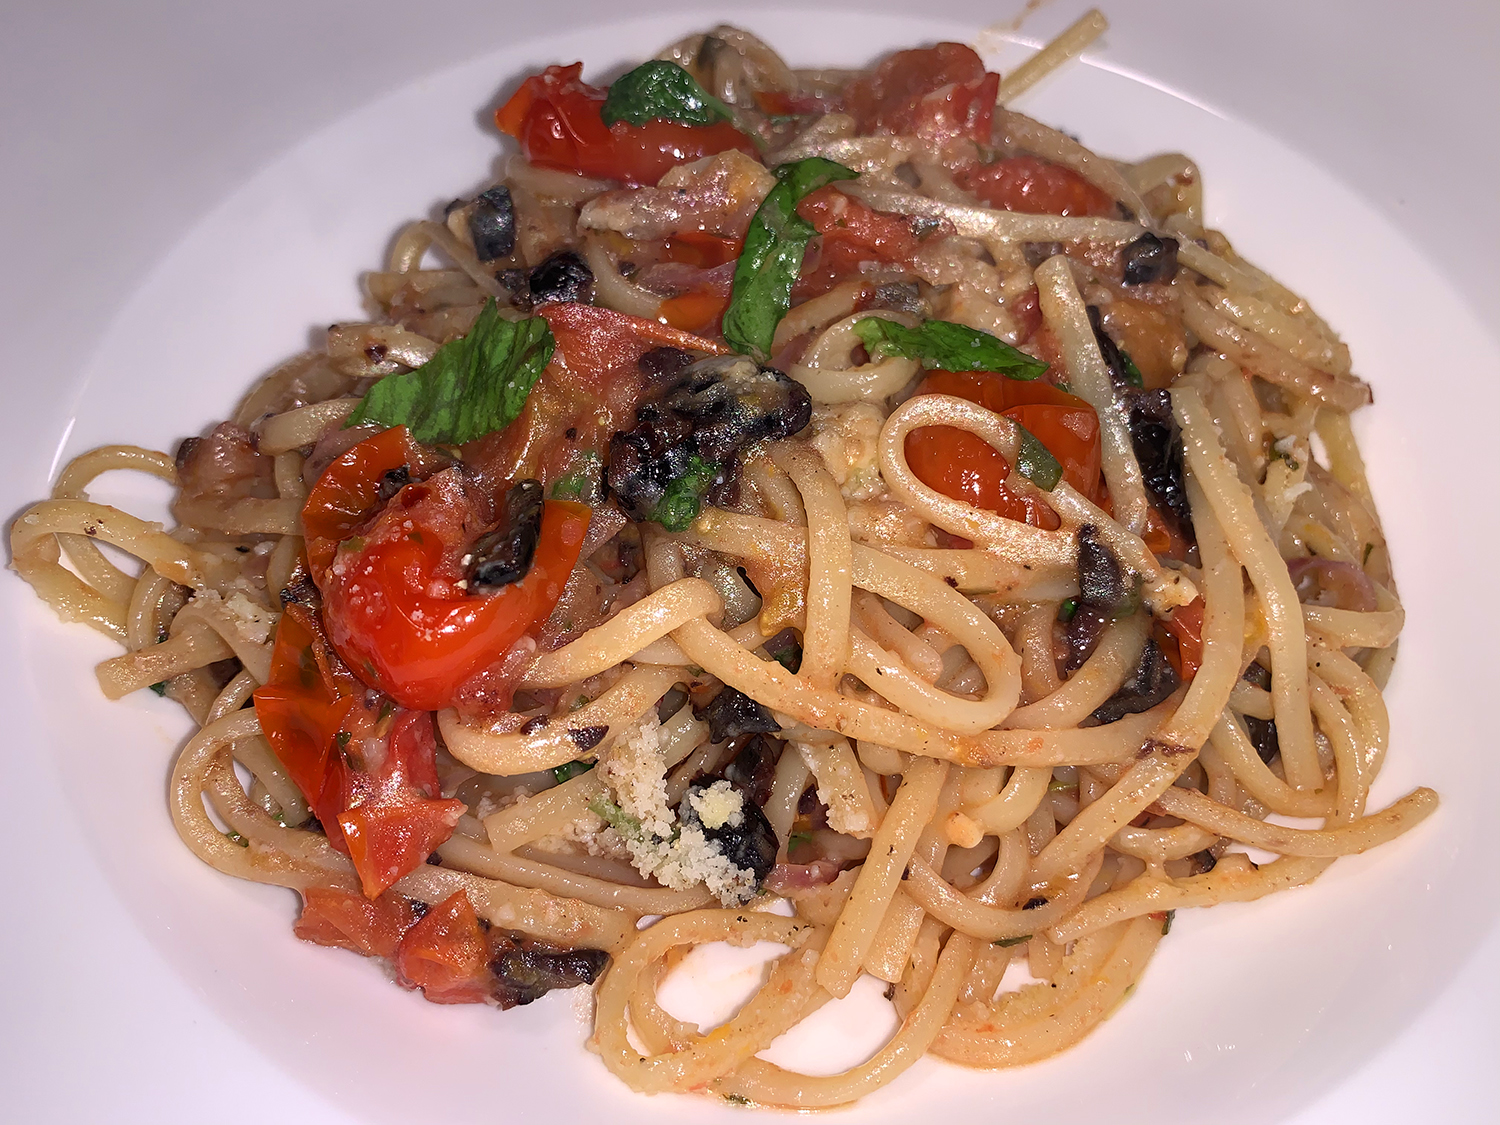
We’ve been particularly enamored of Mediterranean-inspired dishes as of late and this vegetarian pasta dish is loaded with the robust flavors of that region. It’s a riff on a recipe from “The Italian Country Table” by Lynn Rosetto Kasper, who found inspiration for the citrusy, savory tomato sauce in the markets of Siracusa, on the island of Sicily.
We found this recipe in a recent copy of Milk Street Magazine where they prefer the meaty, concentrated flavor of oil-cured black olives, but insist milder green olives (such as Castelvetrano) work well, too. Having oil-cured black olives on hand, we used them. The only major difference we made was to use fresh oregano at a ratio of 3-to-1, that is 1 tablespoon of fresh for the 1 teaspoon of dried.
The sharp tang of pecorino Romano cheese is an especially good match for the fruity, herbal flavors. While warm, crusty bread makes a nice partner to the dish, we opted for less carbs and paired the pasta with a side salad.
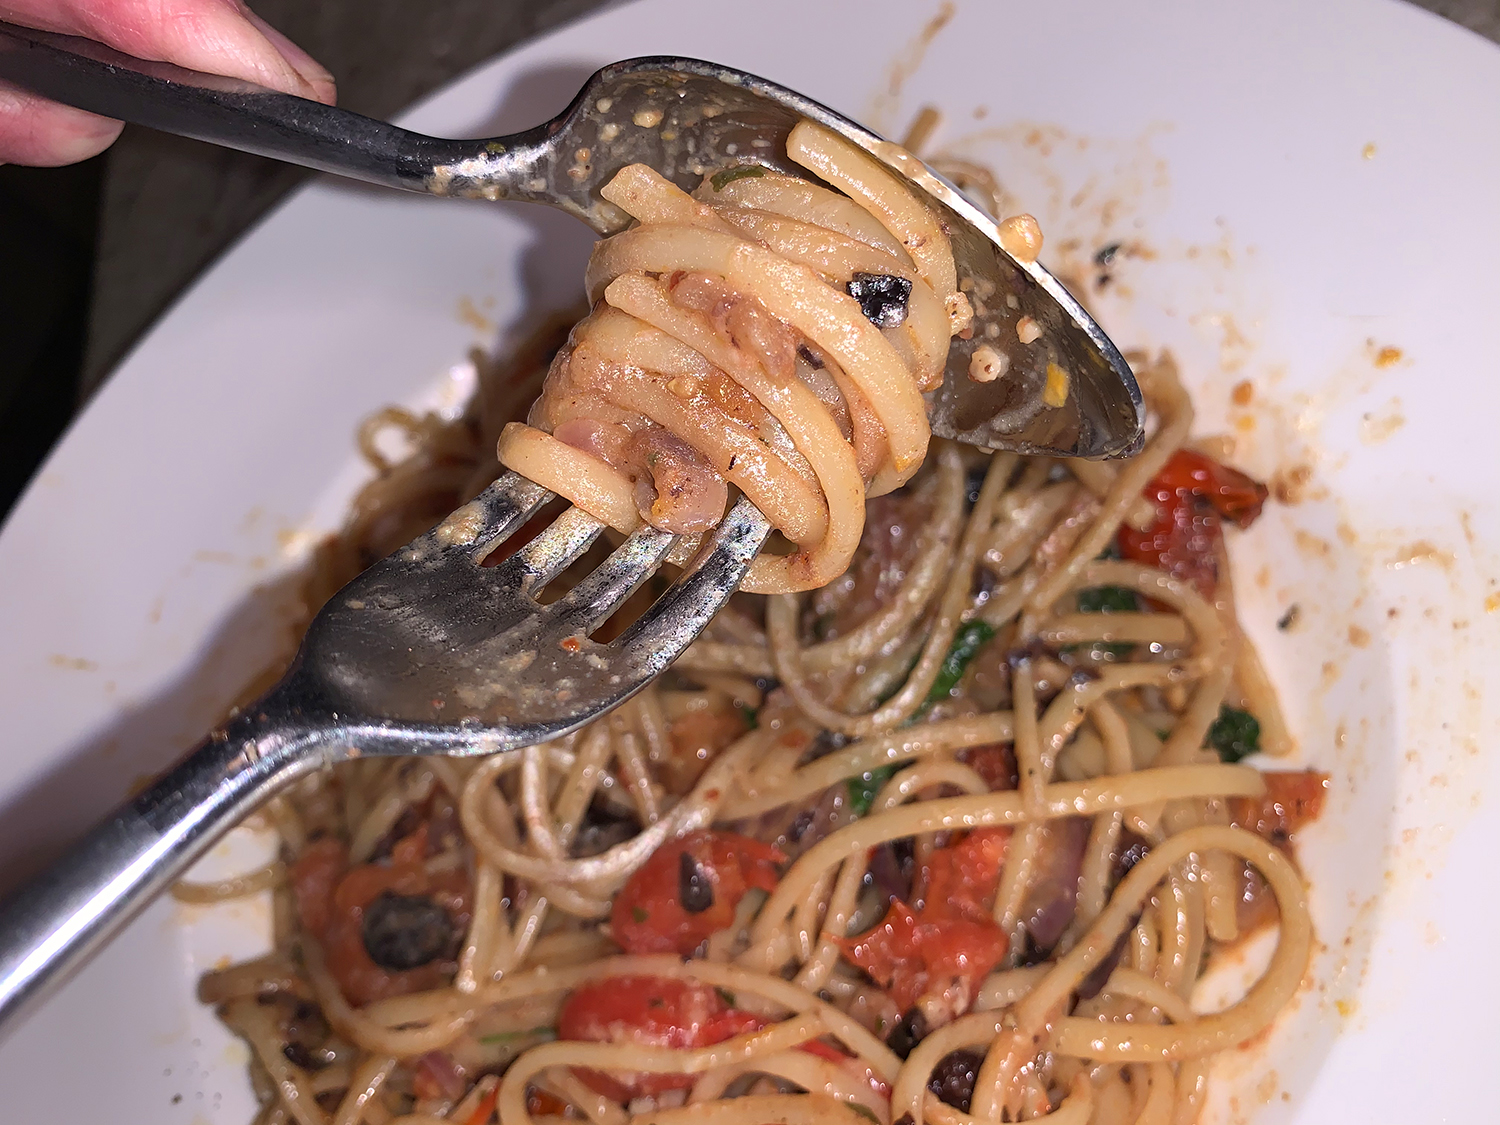
It was wonderful again the next day for lunch. Just drizzle a little EVOO over the top, cover and microwave for a few minutes, top with more grated cheese.
TIP: Don’t boil the pasta until al dente. Drain it when it’s a few minutes shy of al dente, but don’t forget to reserve about 1 cup of cooking water first. The pasta will finish cooking directly in the sauce, which allows the noodles to absorb flavor.
1 Tbsp. grated orange zest, plus ½ cup orange juice
1 tsp. dried oregano
½ tsp. red pepper flakes
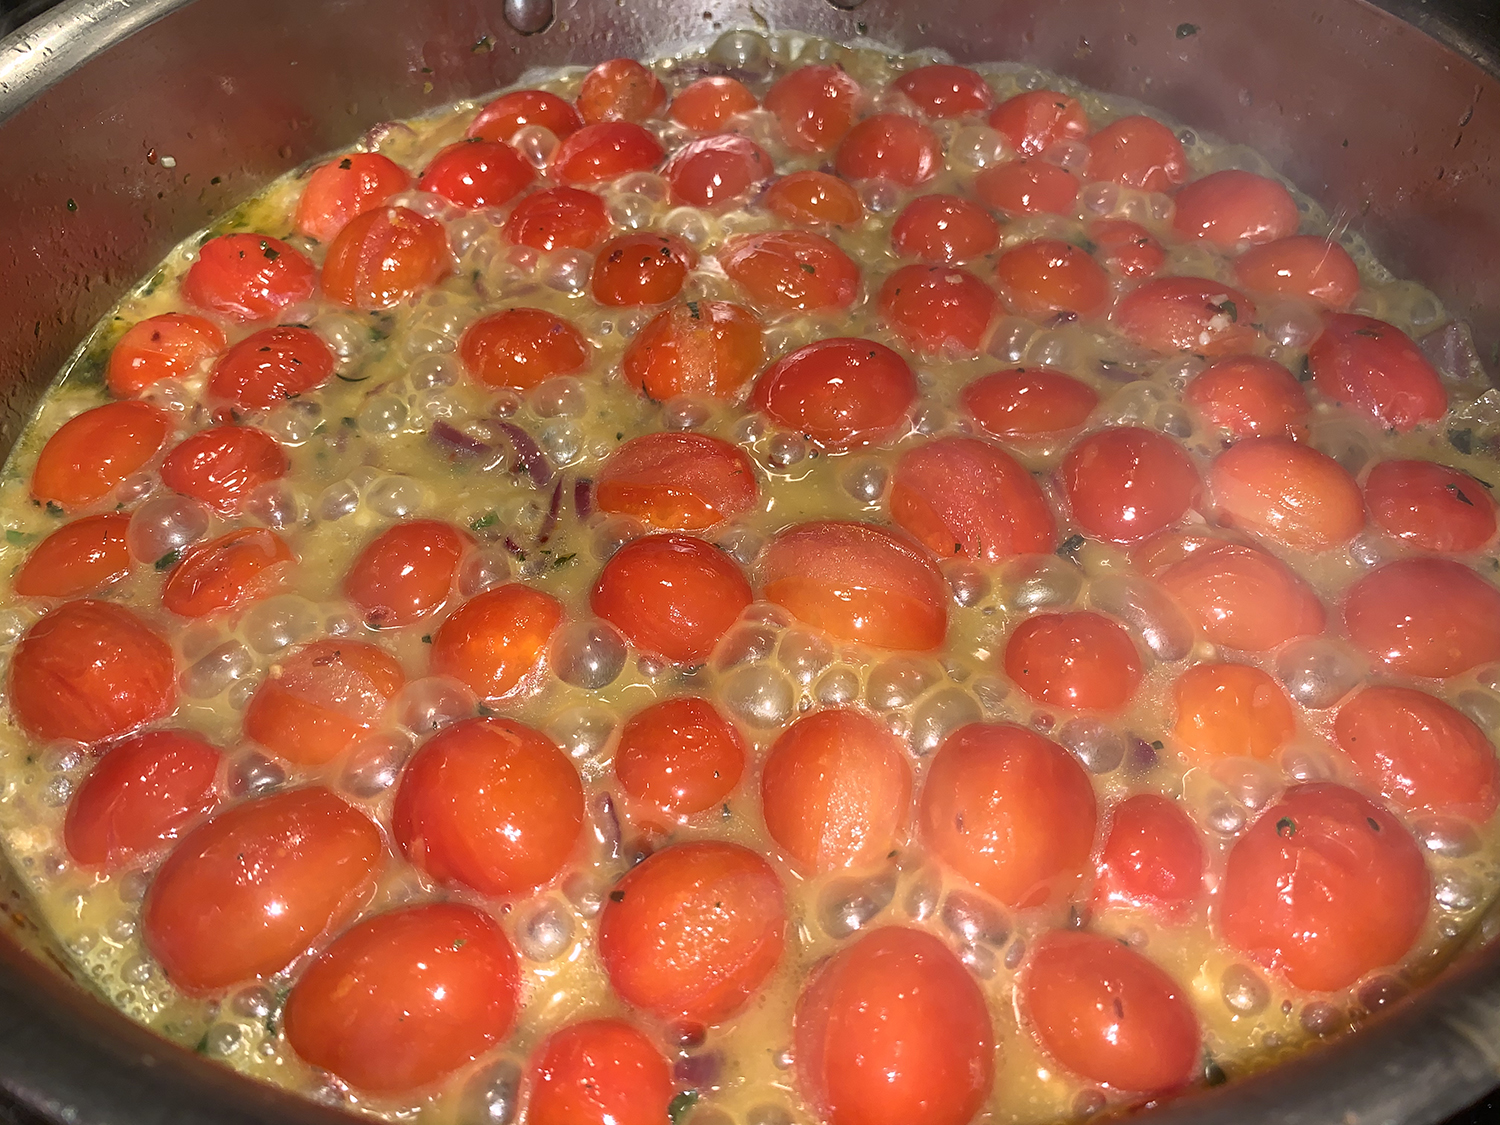
2 pints grape tomatoes
1 cup lightly packed fresh basil, torn into small pieces
½ cup pitted oil-cured black olives or green olives, finely chopped
2 oz. pecorino Romano cheese, finely grated (1 cup)
Directions
In a large pot, bring 4 quarts water to a boil. Stir in the pasta and 2 tablespoons salt, then cook, stirring occasionally, until just shy of al dente. Reserve 1 cup of the cooking water, then drain the pasta and set aside.
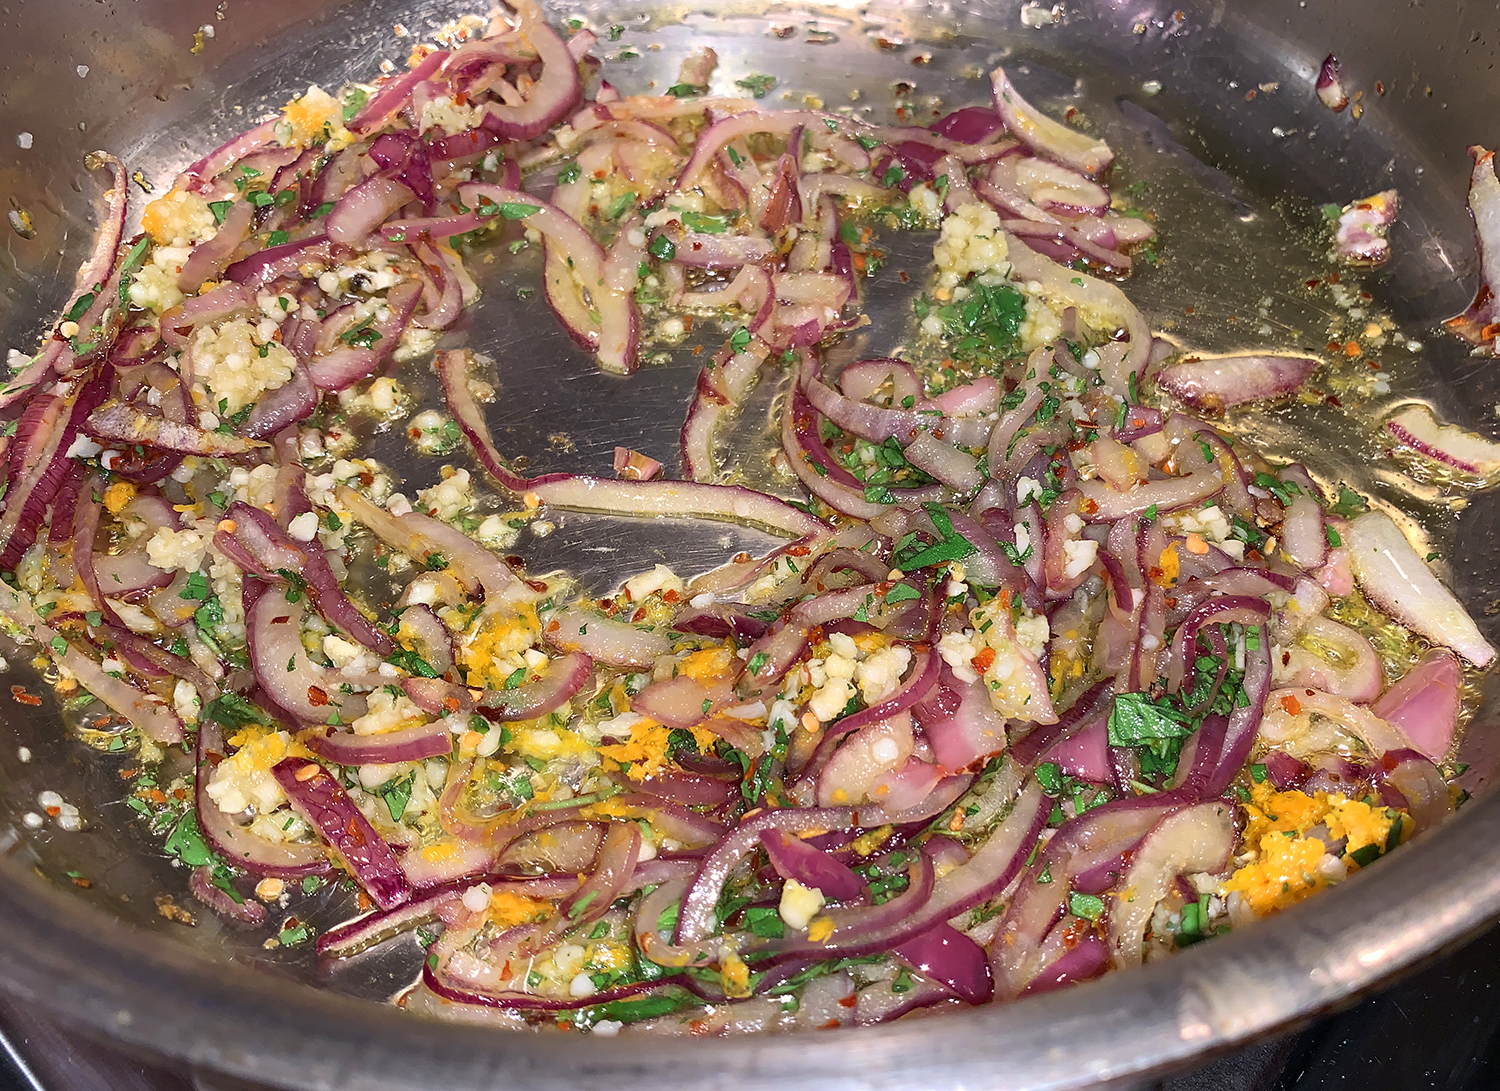
Meanwhile, in a 12-inch skillet over medium-high, heat the oil until shimmering. Add the onion and cook, stirring occasionally, until translucent, 3 to 4 minutes. Stir in the garlic, orange zest, oregano and pepper flakes, then cook, stirring, until fragrant, about 30 seconds. Add the tomatoes and orange juice, cover and cook until the tomatoes begin to burst, about 4 minutes.
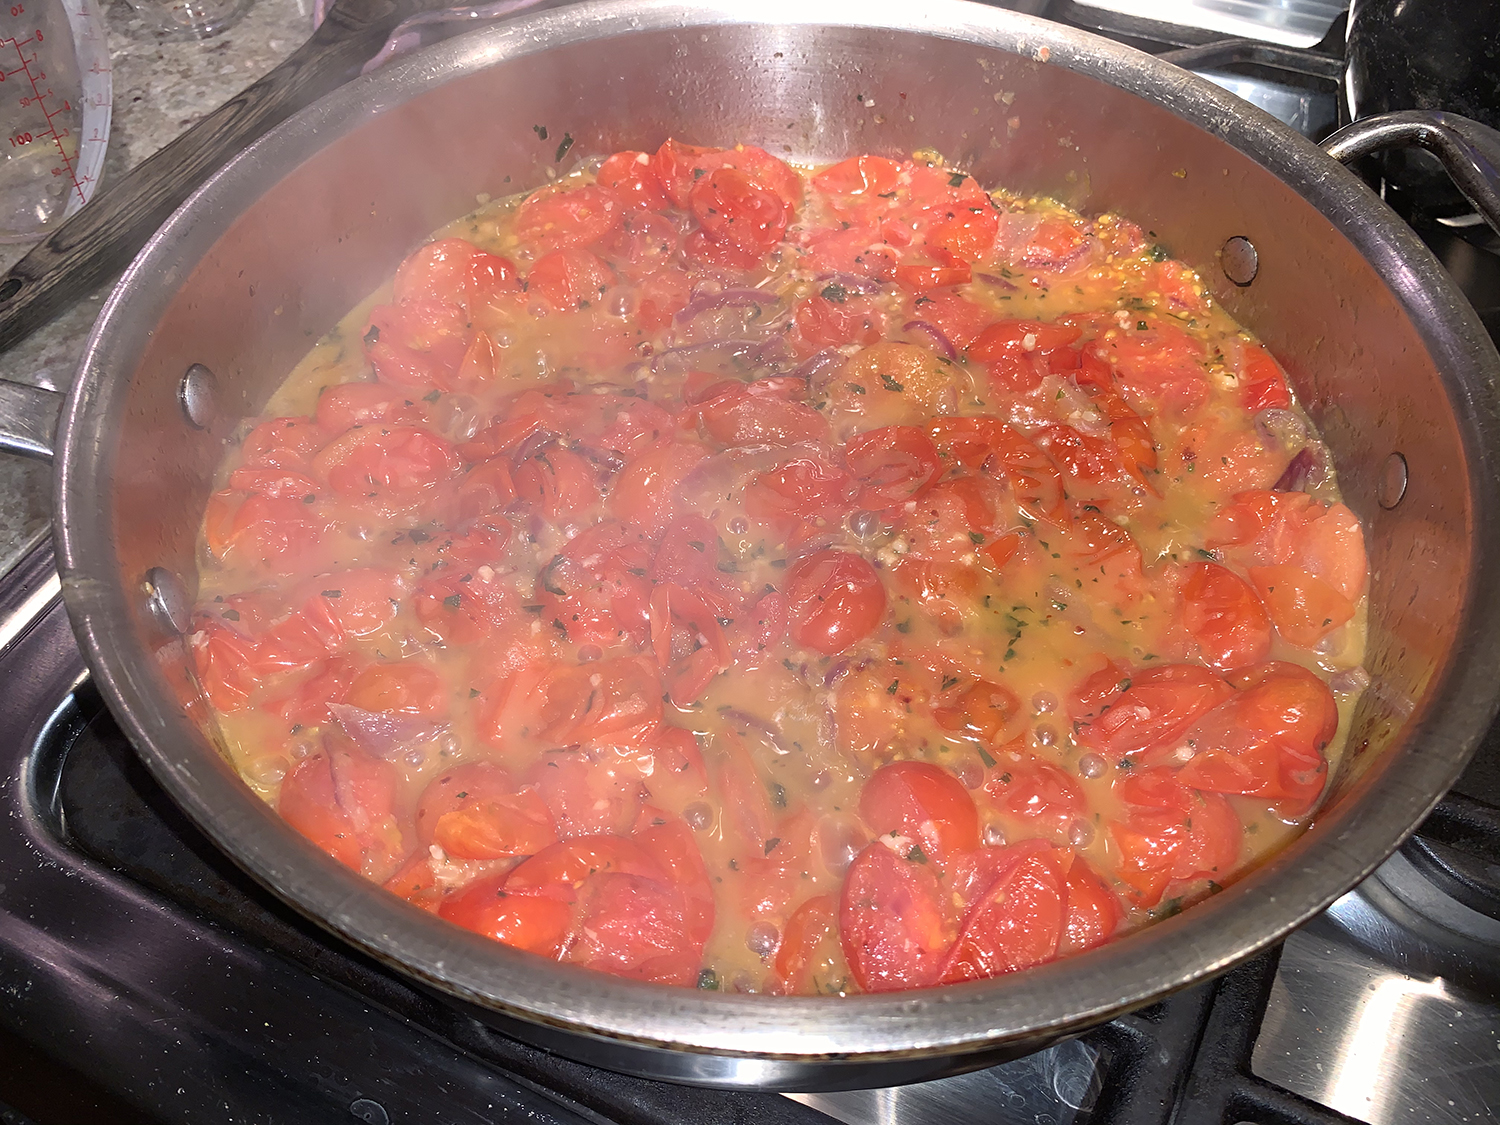
Reduce to medium, then press on any whole tomatoes with the back of a spoon so they burst. If the pasta is not yet done, remove the skillet from the heat, cover and set aside.
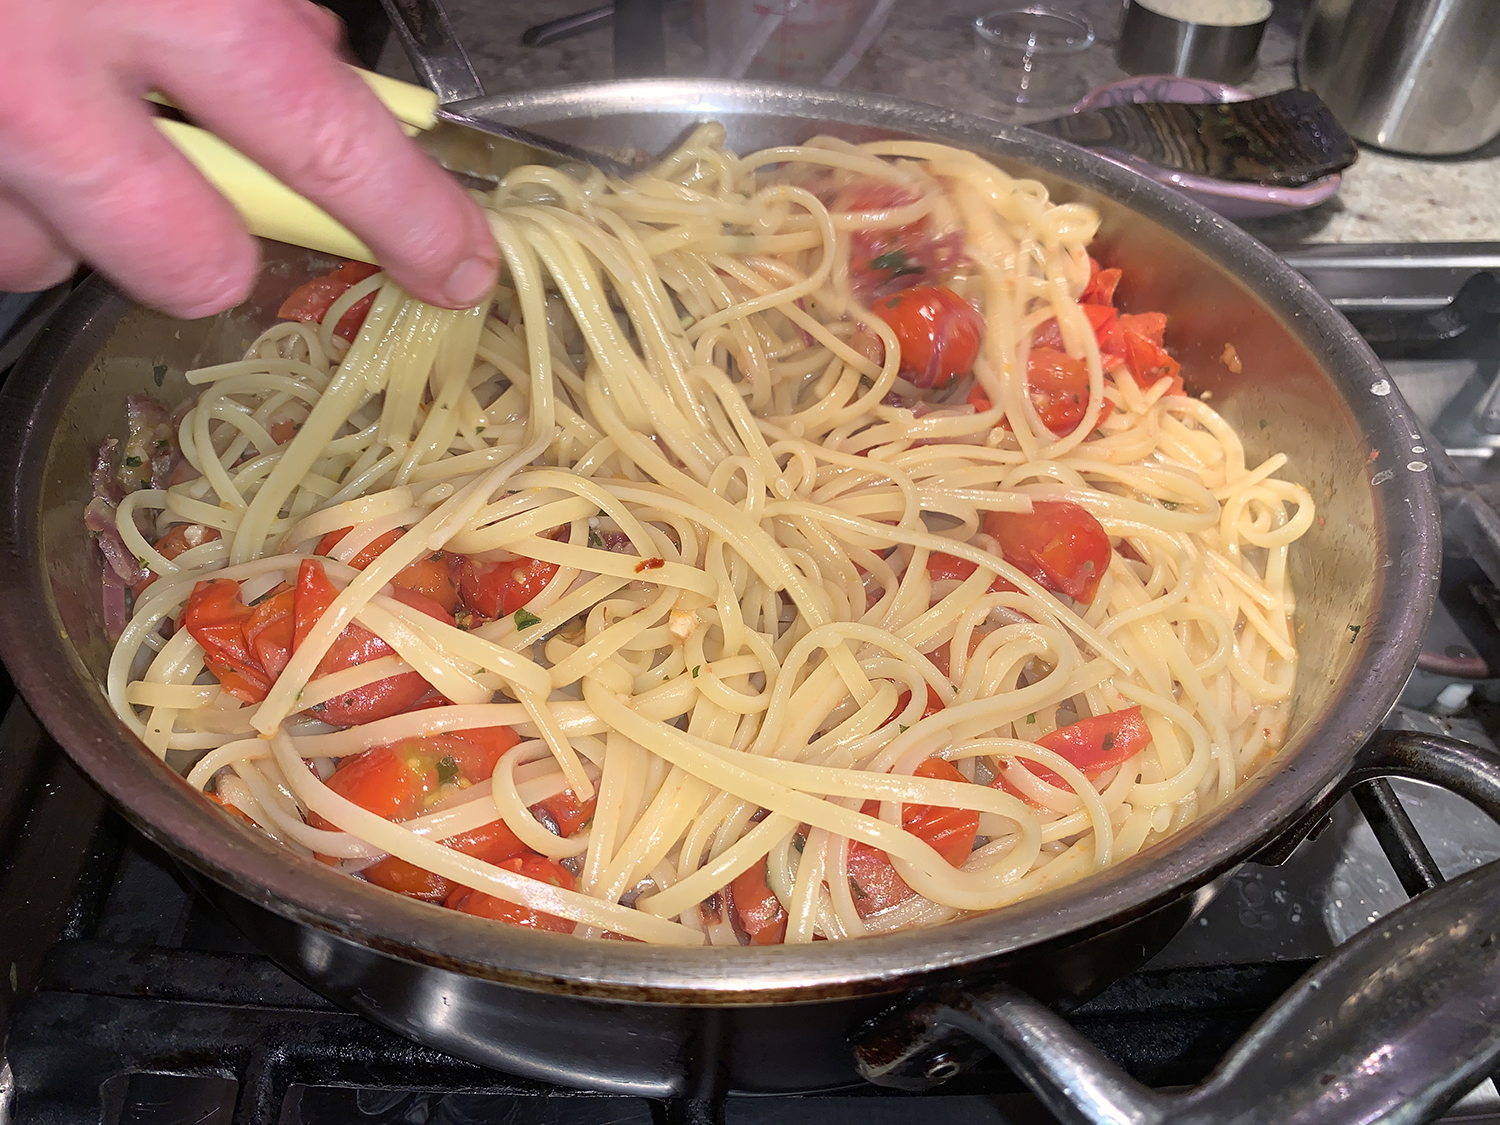
To the skillet, add the drained pasta and ½ cup of the reserved pasta water. Bring to a simmer over medium and cook, tossing with tongs, until the pasta is al dente, about 5 minutes. Taste and season with salt and black pepper.
Off heat, add the basil, olives and half of the cheese, then toss to combine, adding reserved pasta water if needed so the sauce coats the noodles. Transfer to a serving bowl, sprinkle with the remaining cheese and drizzle with additional oil.
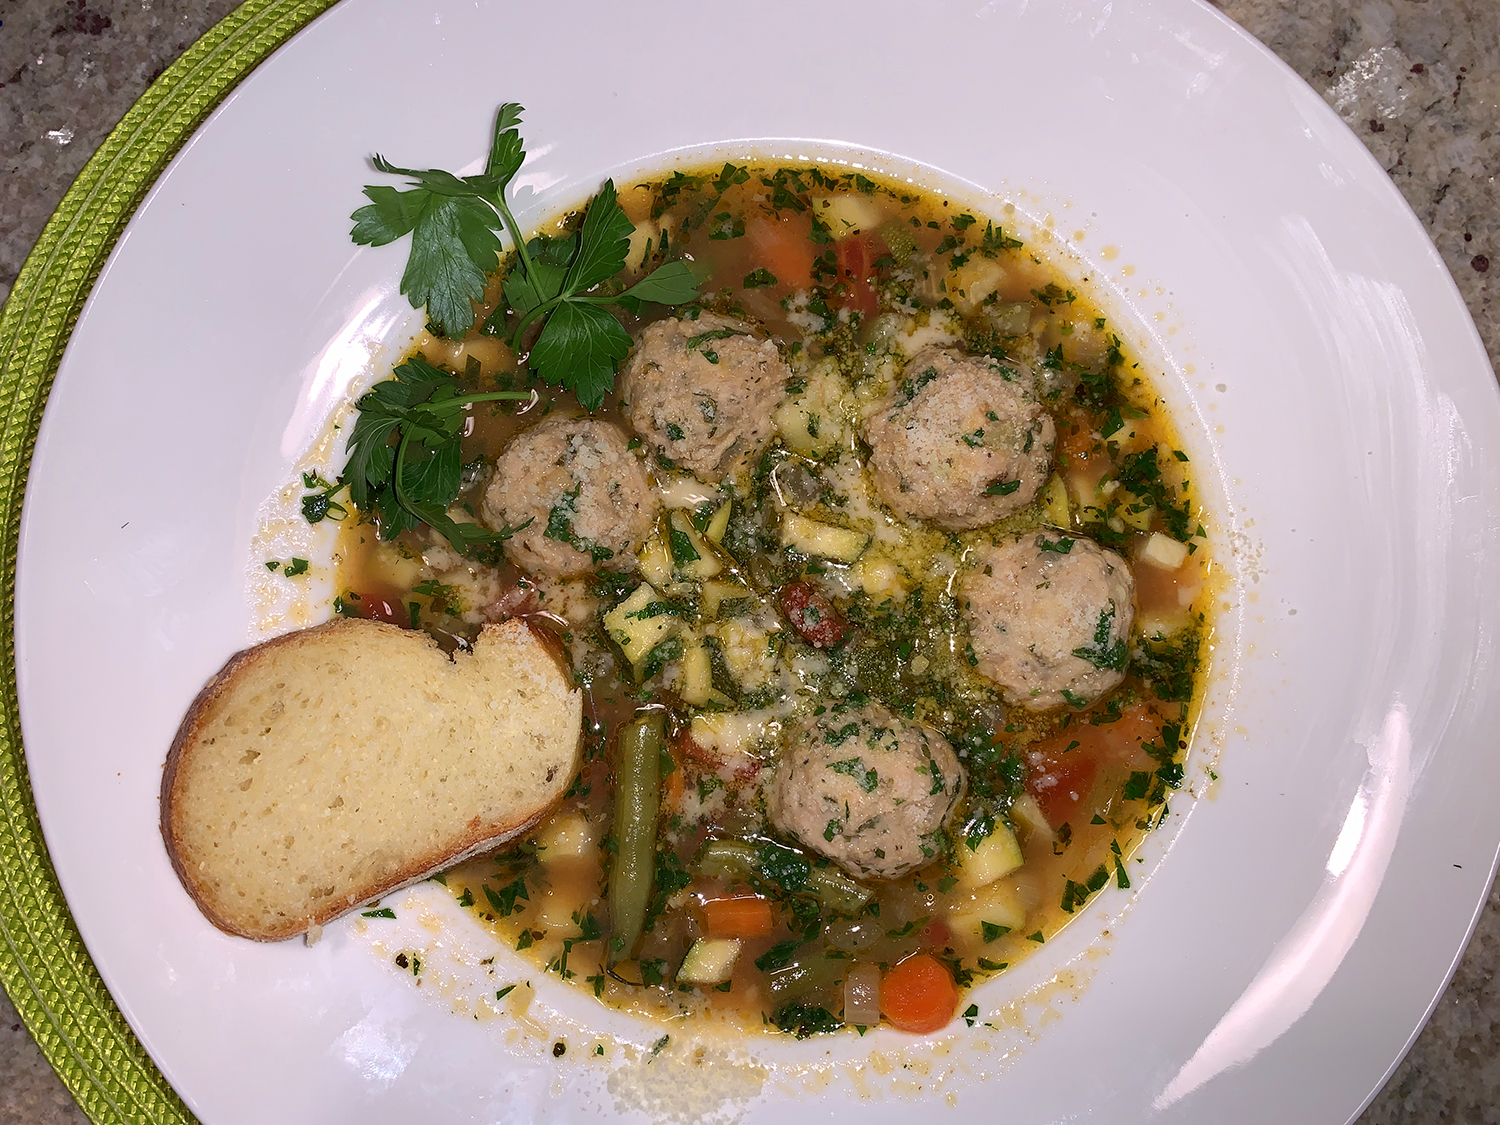
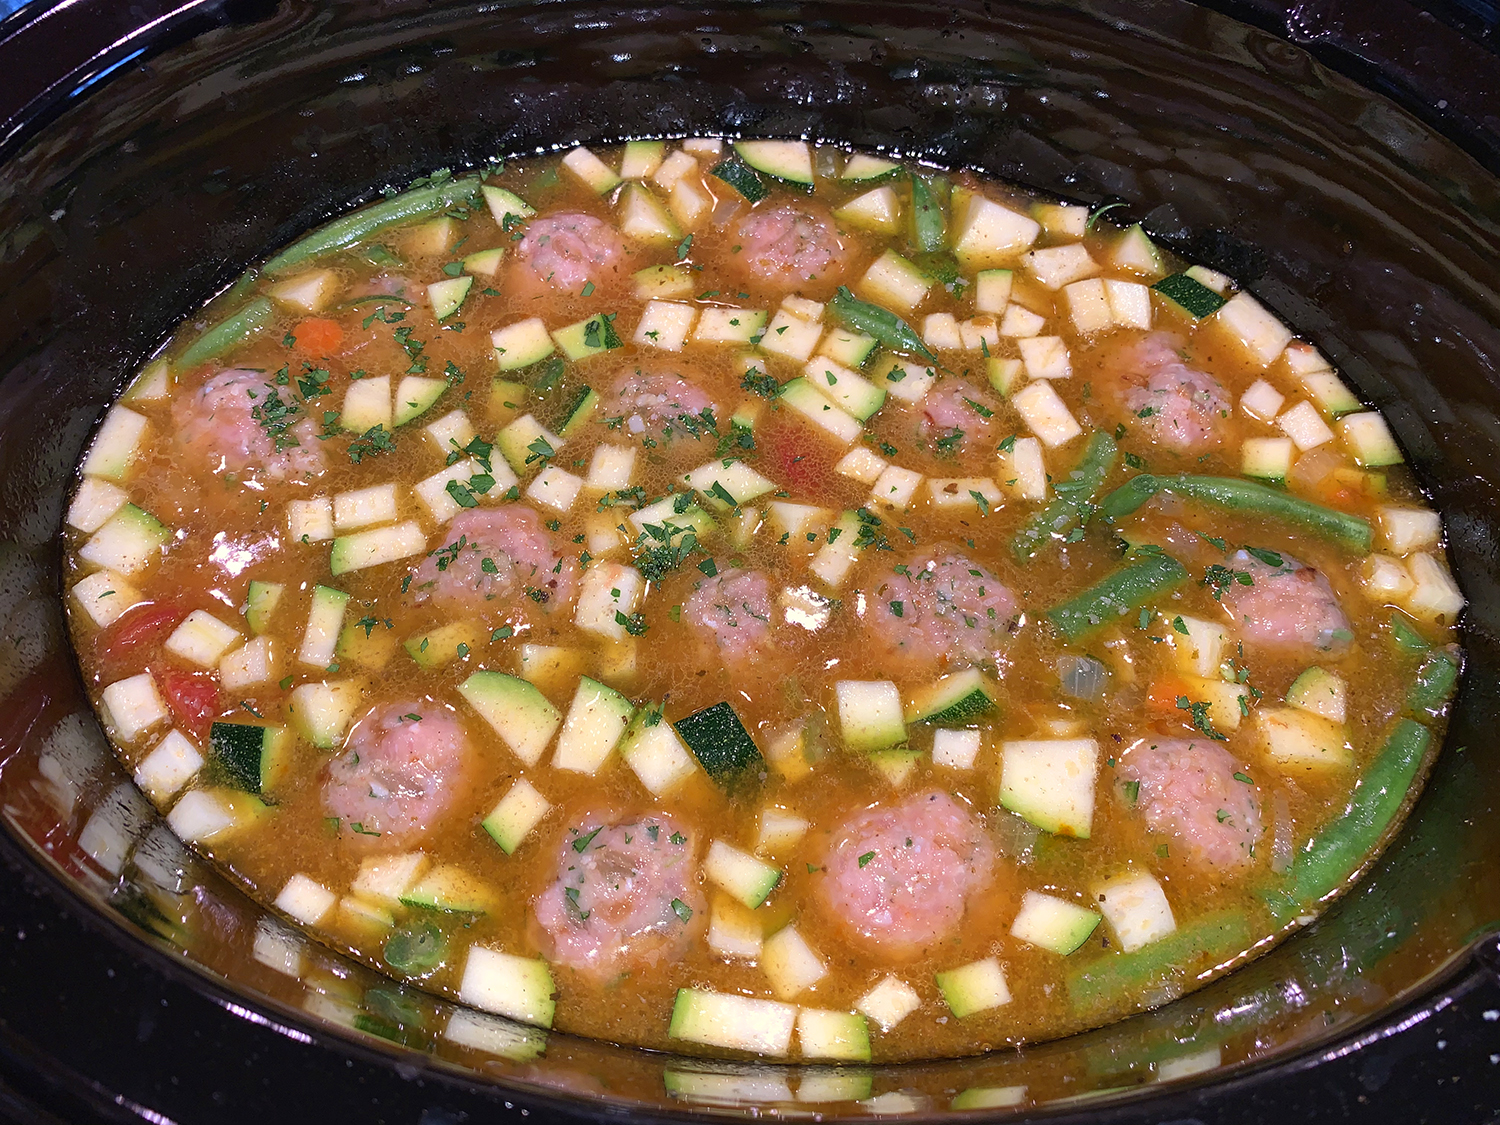
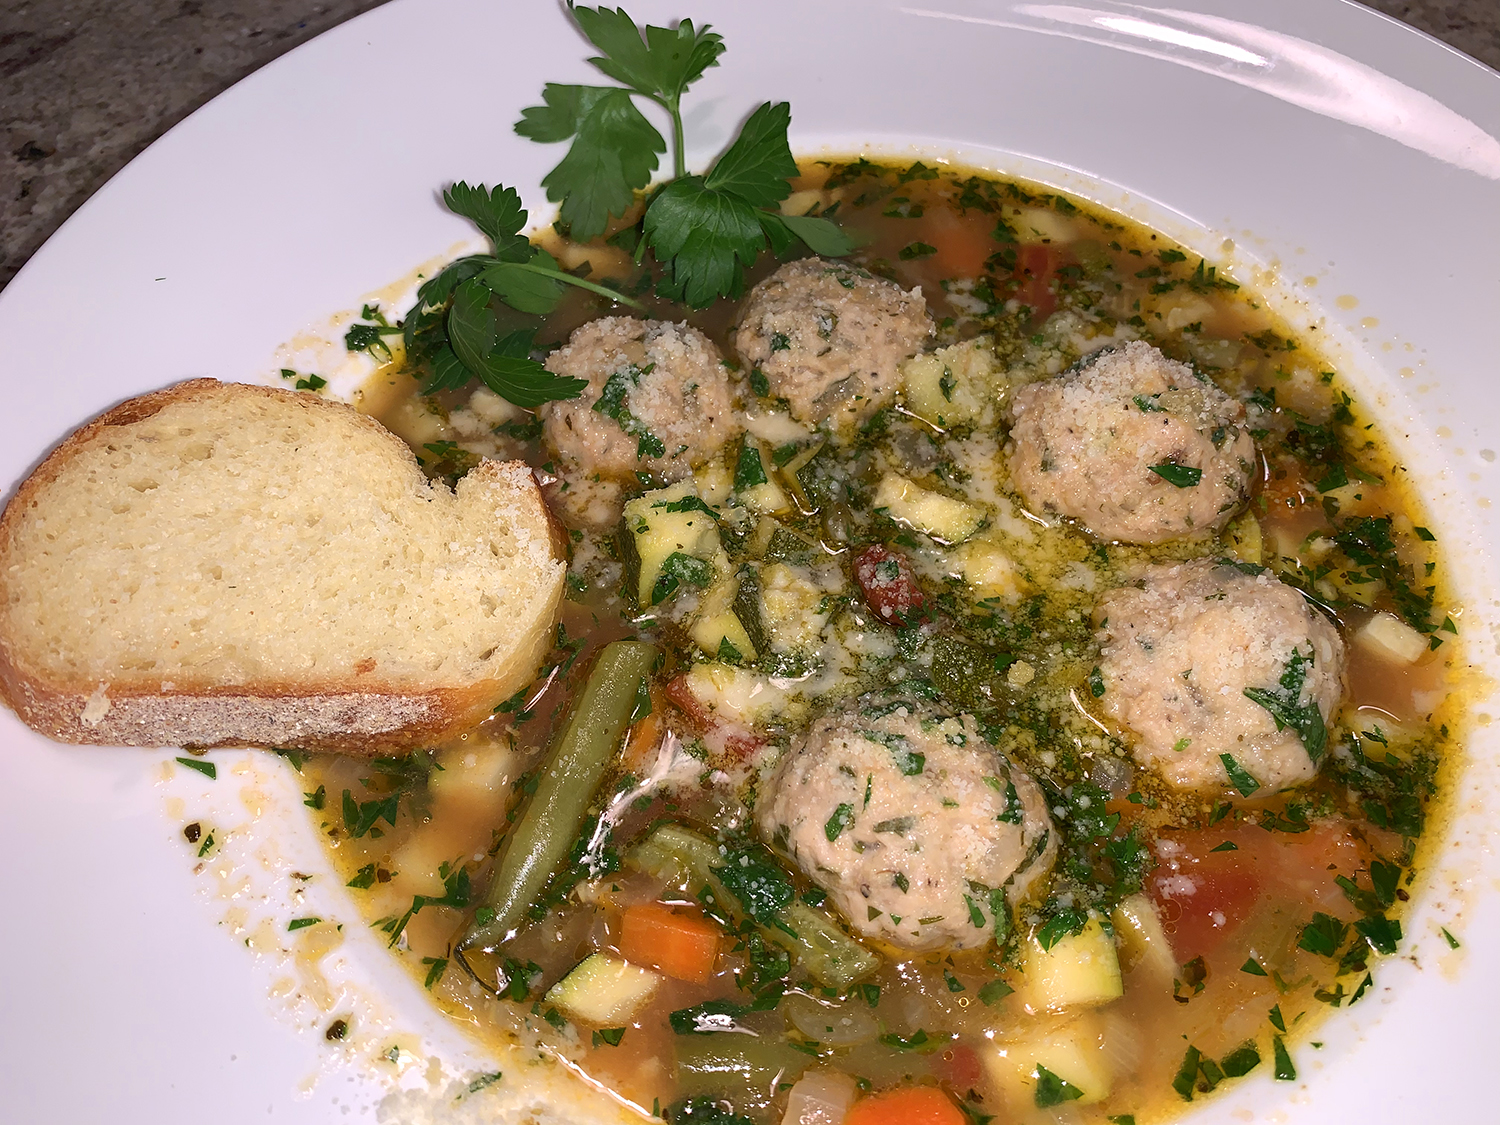
Aren’t meatballs fun? There are so many options as far as which ground meat to use: beef, pork, veal (or a combo of all three), turkey, and finally chicken, as in this healthy soup recipe. And size is another matter because you can make mini, medium, large or colossal, and serve them as appetizers, in soups, with pasta, as a side, in casseroles, as sliders on buns, or the ever-popular meatball sandwich… the options are limitless. Below are links to over a dozen more meatball recipes.
Here, we’ll concentrate on soup which we know can require a fair amount of prep in chopping all of the veggies, and with the addition of forming meatballs it’ll take about 30 minutes of your time in total. The slow-cooker does all the rest for the next two and a half hours, so your free to indulge in other pursuits.
However, don’t skip cooking the onions for the meatballs. This step softens the onions so they more easily add their sweet flavor to the meatball mixture. And as always, use homemade chicken stock if at all possible for the most flavor. I really think it would be too bland if you use canned or boxed store-bought broth. A few other changes we made included slightly increasing the amounts of most vegetables.
Plan on feeding 4 as an entrée or 6 as a first course.
4 oz. green beans, trimmed and cut into 1 1/2-inch pieces
2 celery stalks, thinly sliced
1 14.5 oz. can diced tomatoes
1 lb. ground chicken
⅓ cup panko
2 ½ Tbsp. chopped fresh flat-leaf parsley
2 tsp. chopped fresh oregano
Grated parmesan cheese for garnish, optional
Directions
Heat the oil in a large nonstick skillet over medium-high. Add the onions, garlic, salt, and pepper to the skillet; cook, stirring often, until softened, about 6 minutes.
Remove 1/2 cup of the cooked onion mixture, and place in a medium bowl; set aside. Transfer the remaining onion mixture to a 5- to 6-quart slow cooker.
Add the diced tomatoes and stir up the browned bits to the pan to deglaze. Stir the stock, carrots, zucchini, green beans, and celery into the slow cooker.
Add the chicken, panko, 1/2 tablespoon of the parsley, and 1 teaspoon of the oregano to the reserved 1/2 cup onion mixture in the bowl; stir gently with a fork to combine.
Shape the chicken mixture into 18 (1 1/4-inch) meatballs. Carefully submerge the meatballs into the chicken stock mixture in the slow cooker without stirring.
Cover and cook on HIGH until the meatballs are done and the vegetables are tender, about 2 hours and 30 minutes.
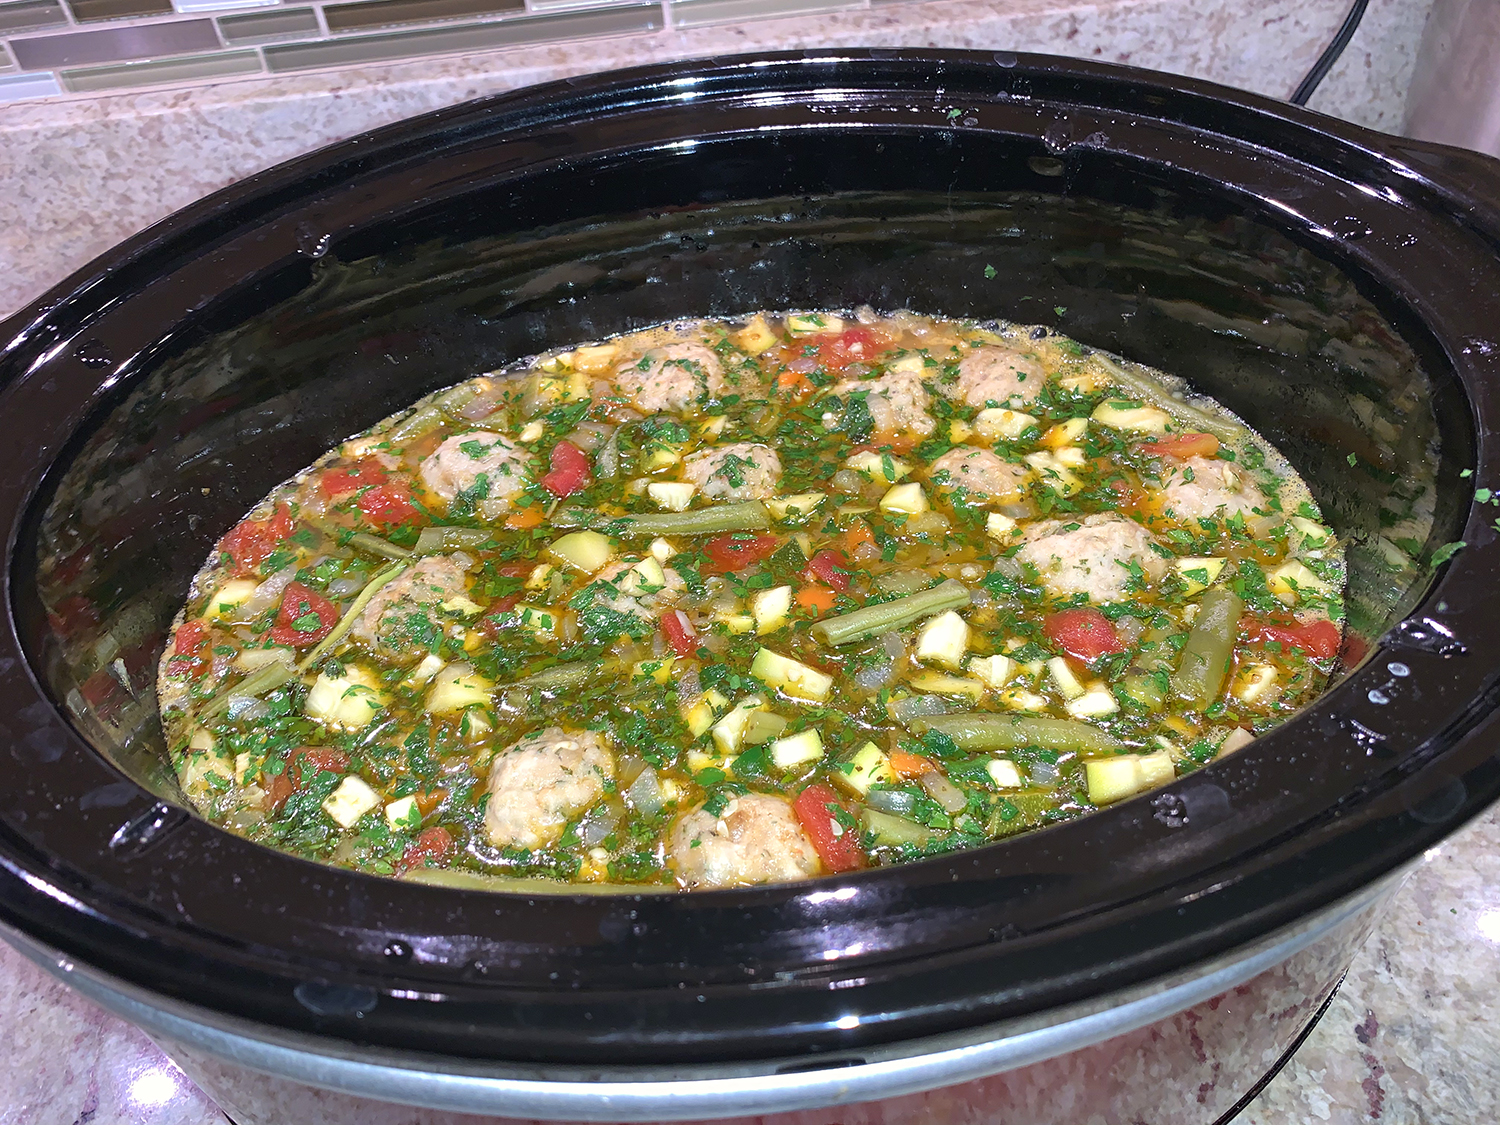
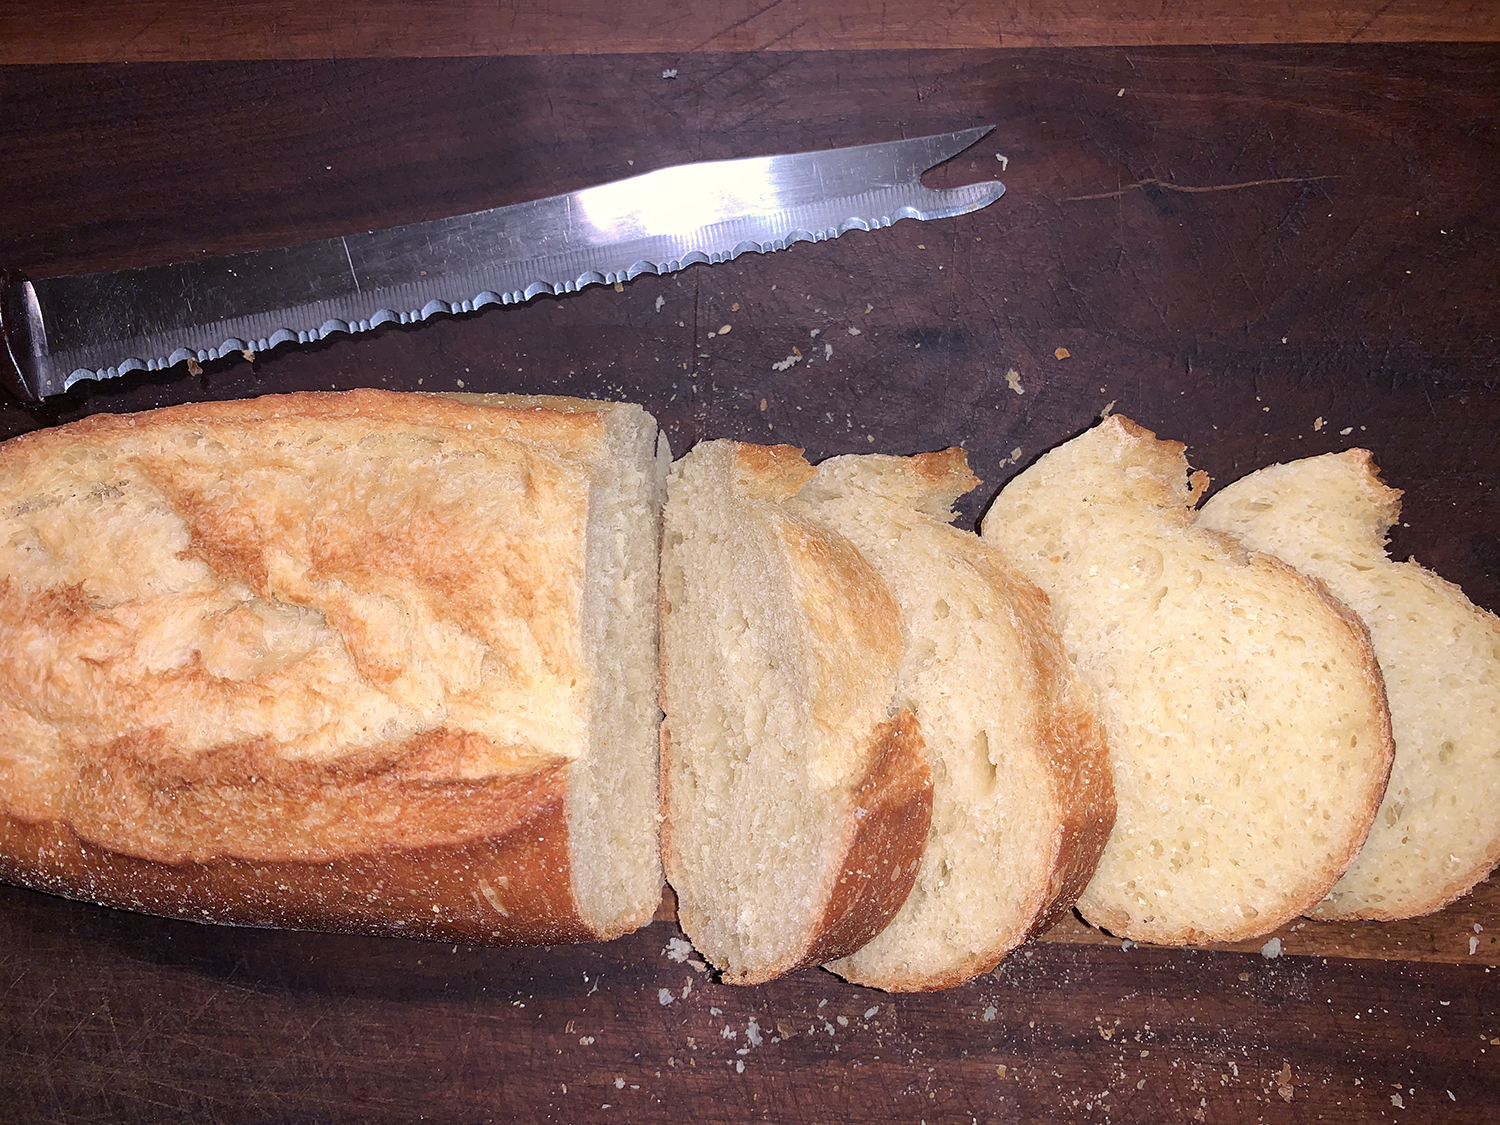
Stir in the remaining 2 tablespoons parsley and 1 teaspoon oregano. Ladle the soup into bowls and top some grated cheese, if desired. And if you’re not counting carbs, serve hot crusty bread too.
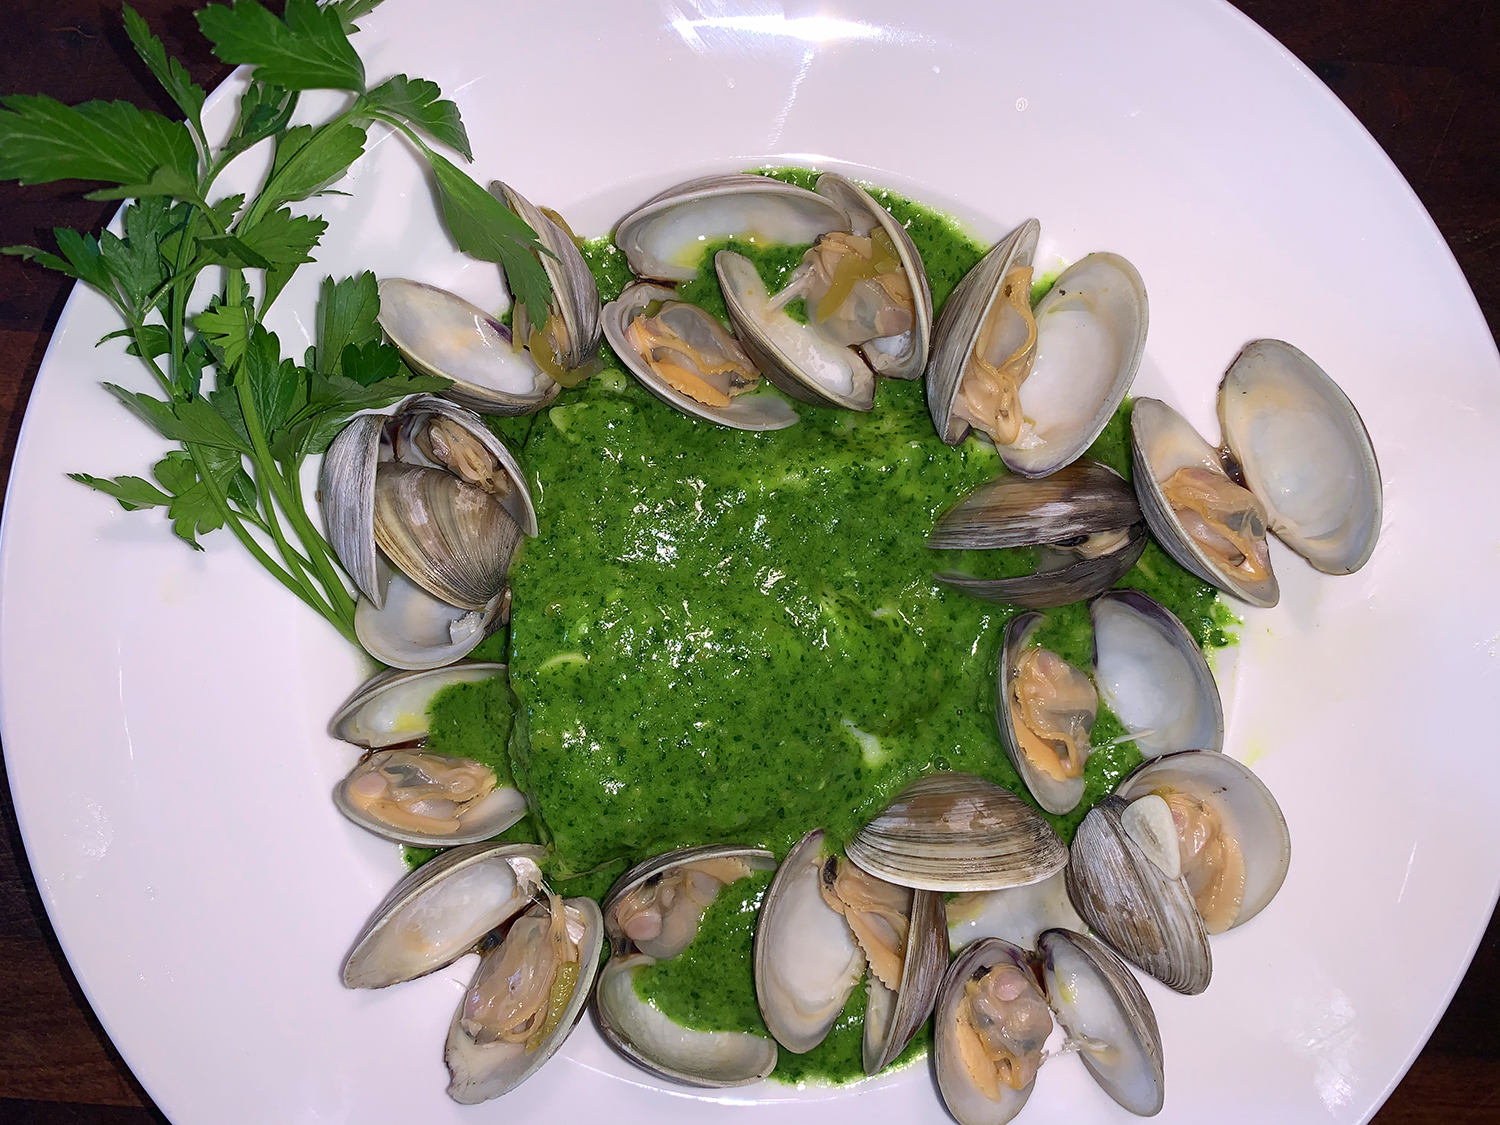
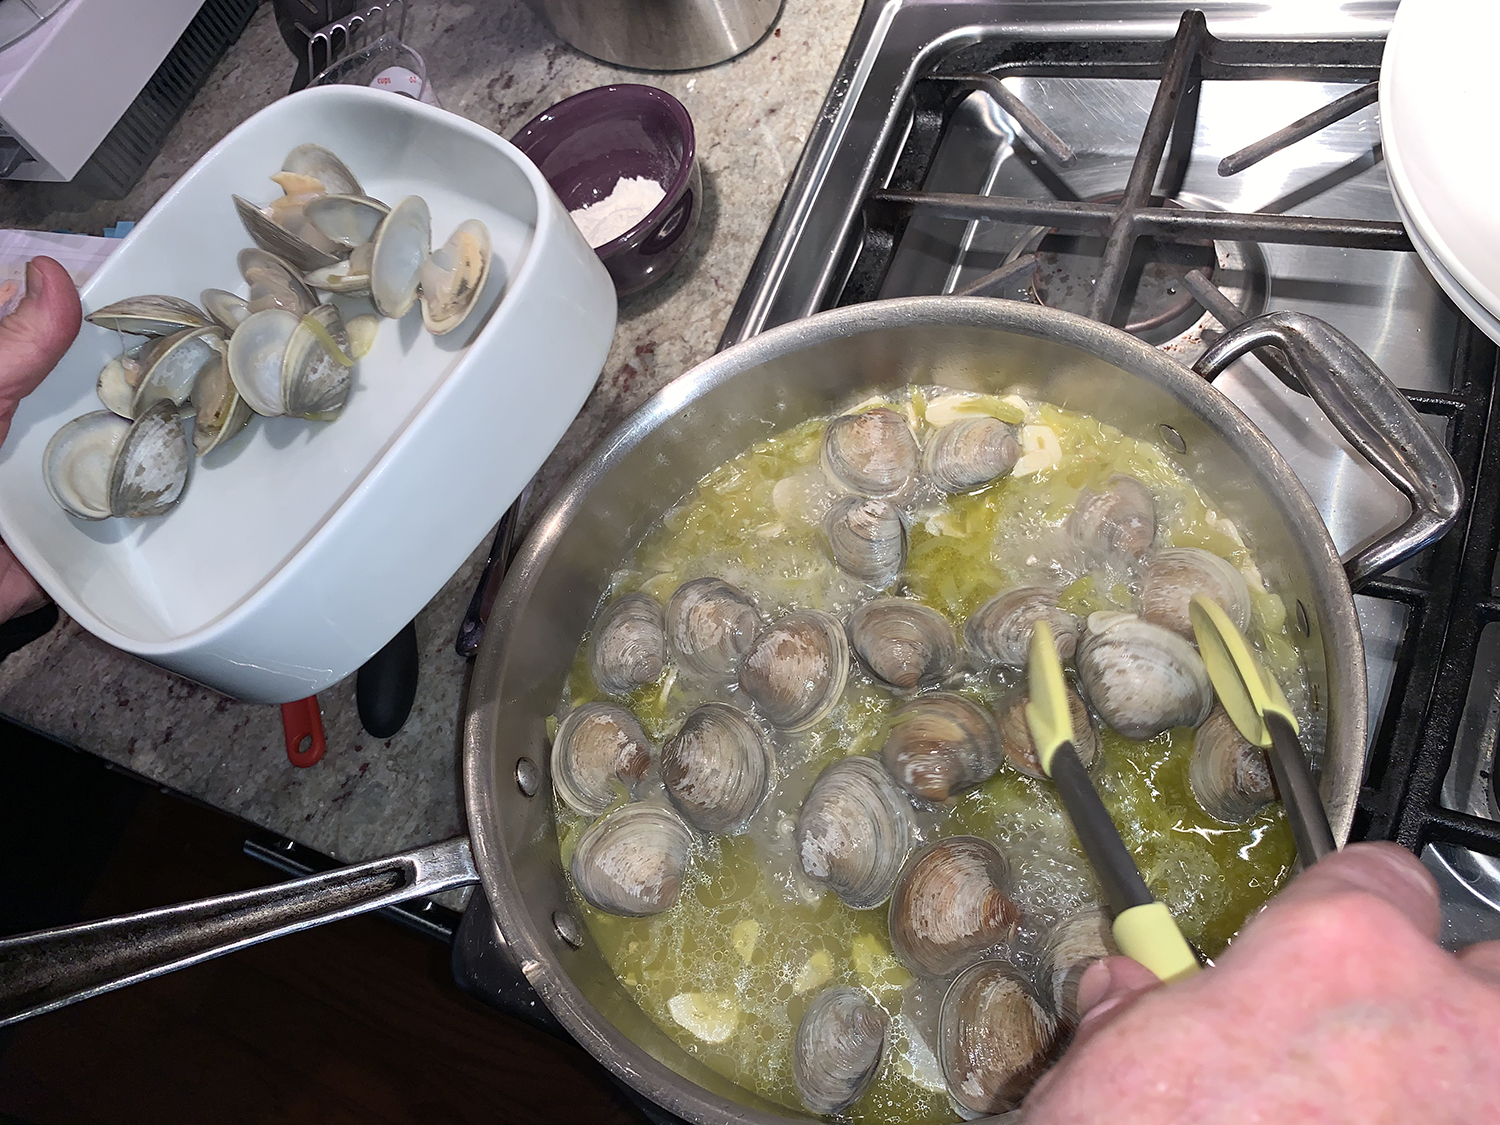
The Hubs was thrilled with this recipe because it has clams, and we rarely cook anything with clams because I don’t eat them. It’s a consistency thing with me. I enjoy their broth, and when they’re cut up and chopped into things, but not whole clams.
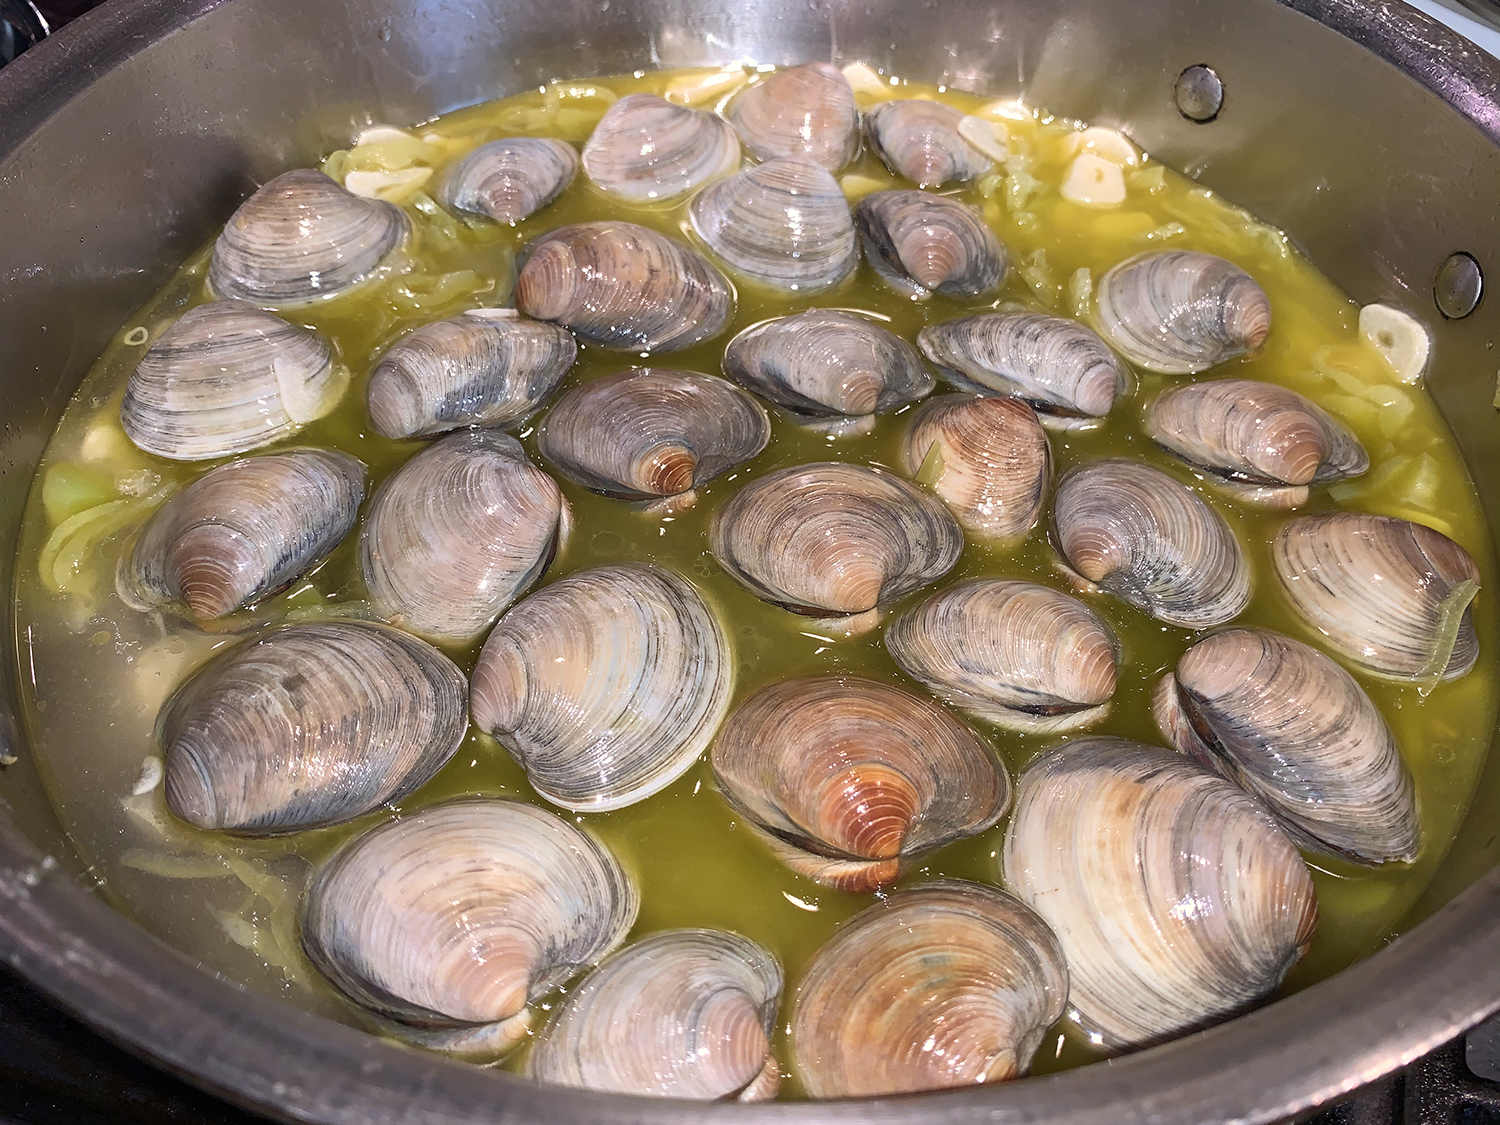
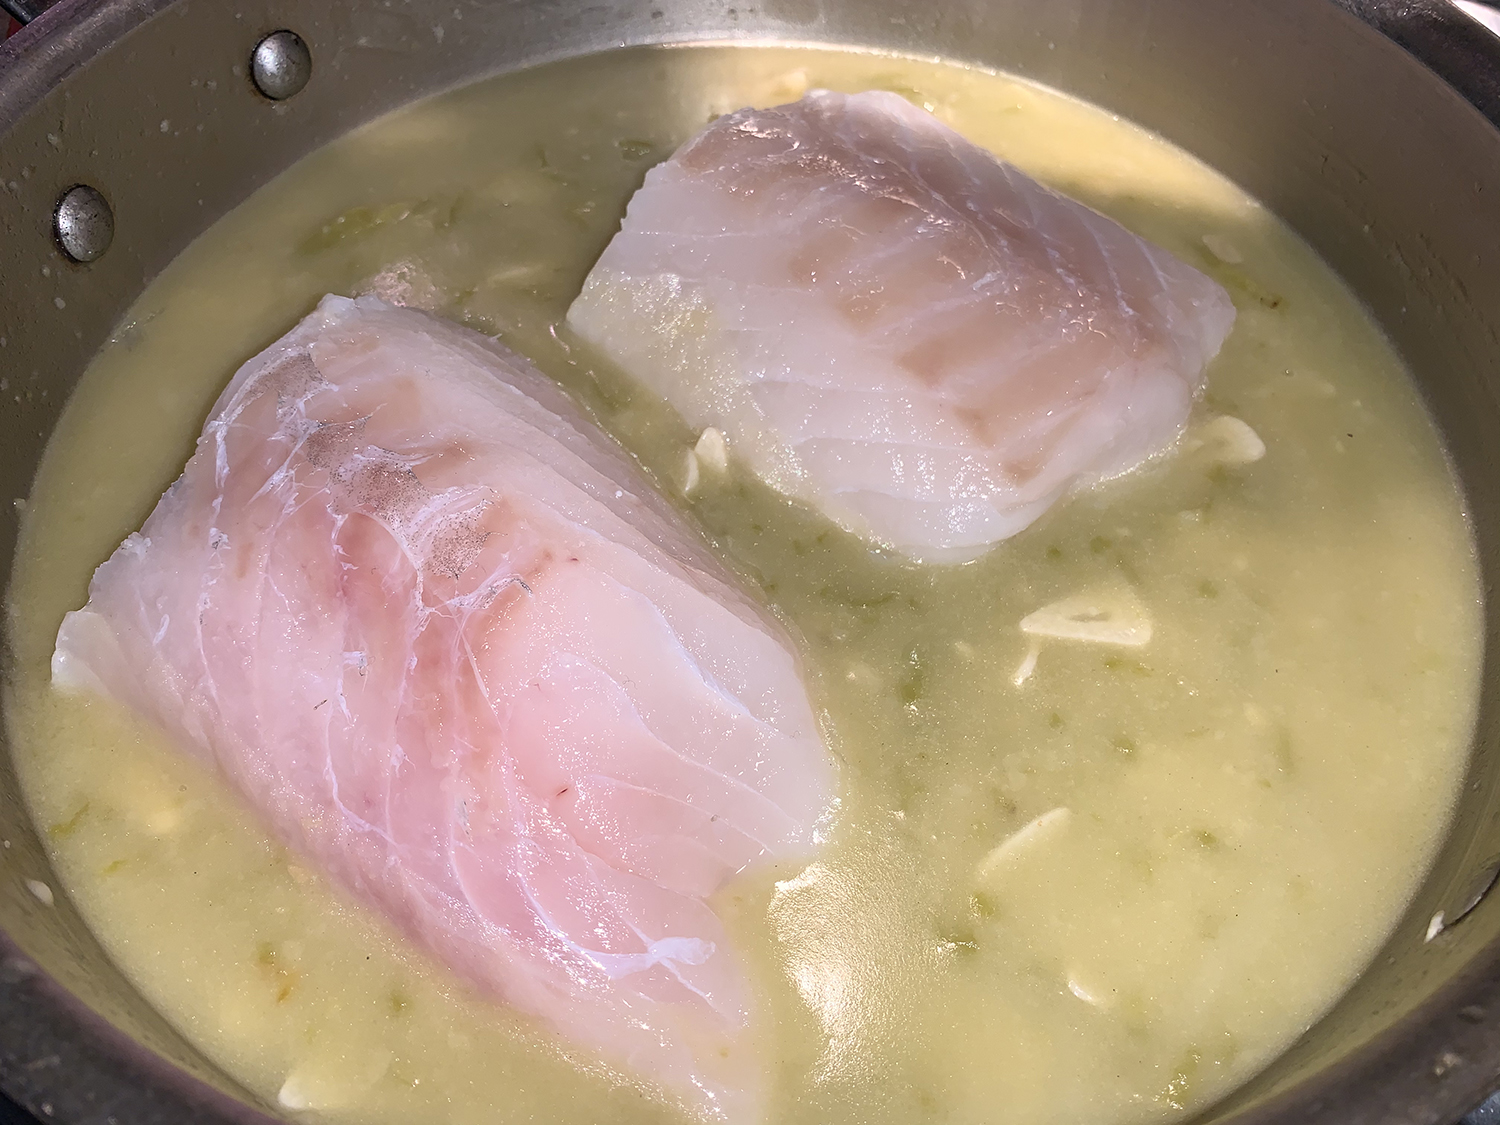
The Spanish dish—Merluza en Salsa Verde con Almejas, or hake in green sauce with clams—is a classic dish from the Basque Country in northern Spain. Hake has been one of my favorite white flaky fishes ever sinceI enjoyed it for the very first time in Northern Spain in 2013.Problem is, it’s near impossible to source in these parts, so cod is a reasonable substitute.
In this recipe, fish fillets are gently simmered until flaky in a parsley, garlic and olive oil sauce, then are finished with cooked clams in their shells. Milk Street adapted this formula from seaside restaurant Txoko Getaria, and devised a method that requires only a food processor and a skillet but yields delicious results in only about an hour.
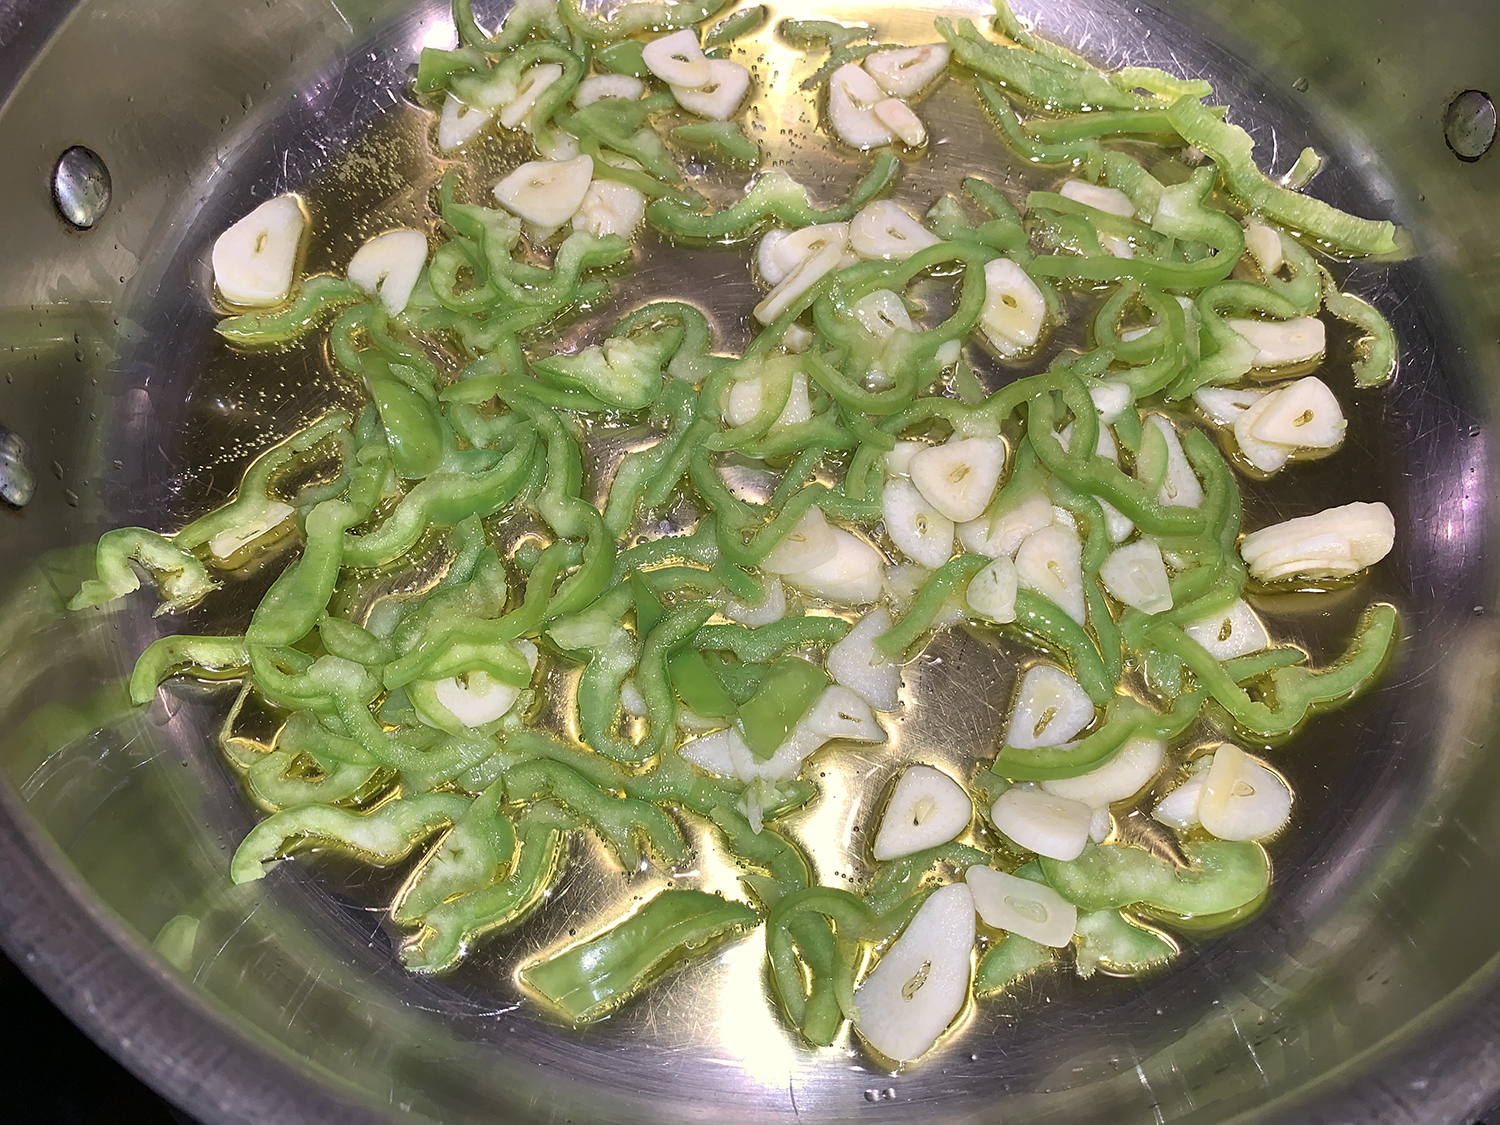
The cubanelle pepper (or jalapeño chili) is a stand-in for hard-to-source Basque guindilla chilies. And if you cannot find Idiazabal cheese, a Basque sheep’s-milk cheese with a subtle smokiness, Manchego is a good substitute.
Don’t omit the cheese. The pairing of fish and cheese is indeed unusual but the Idiazábal lends complex flavor without tasting distinctly cheesy. After adding the fish to the skillet, don’t allow the poaching liquid to reach a full simmer; slow, gentle bubbling is best to ensure the fillets are perfectly cooked.
Basque-Style Fish and Clams in Parsley-Garlic Sauce
4 6-oz. firm white fish fillets (about 1” thick), such as hake, cod or grouper
5 medium garlic cloves, thinly sliced
1 Cubanelle pepper or jalapeño chili, stemmed, halved lengthwise, seeded and sliced into thin half rings
1 cup dry white wine
2 lbs. hardshell clams (about 1½” in diameter), such as manila or littleneck
2 Tbsp. all-purpose flour
Directions
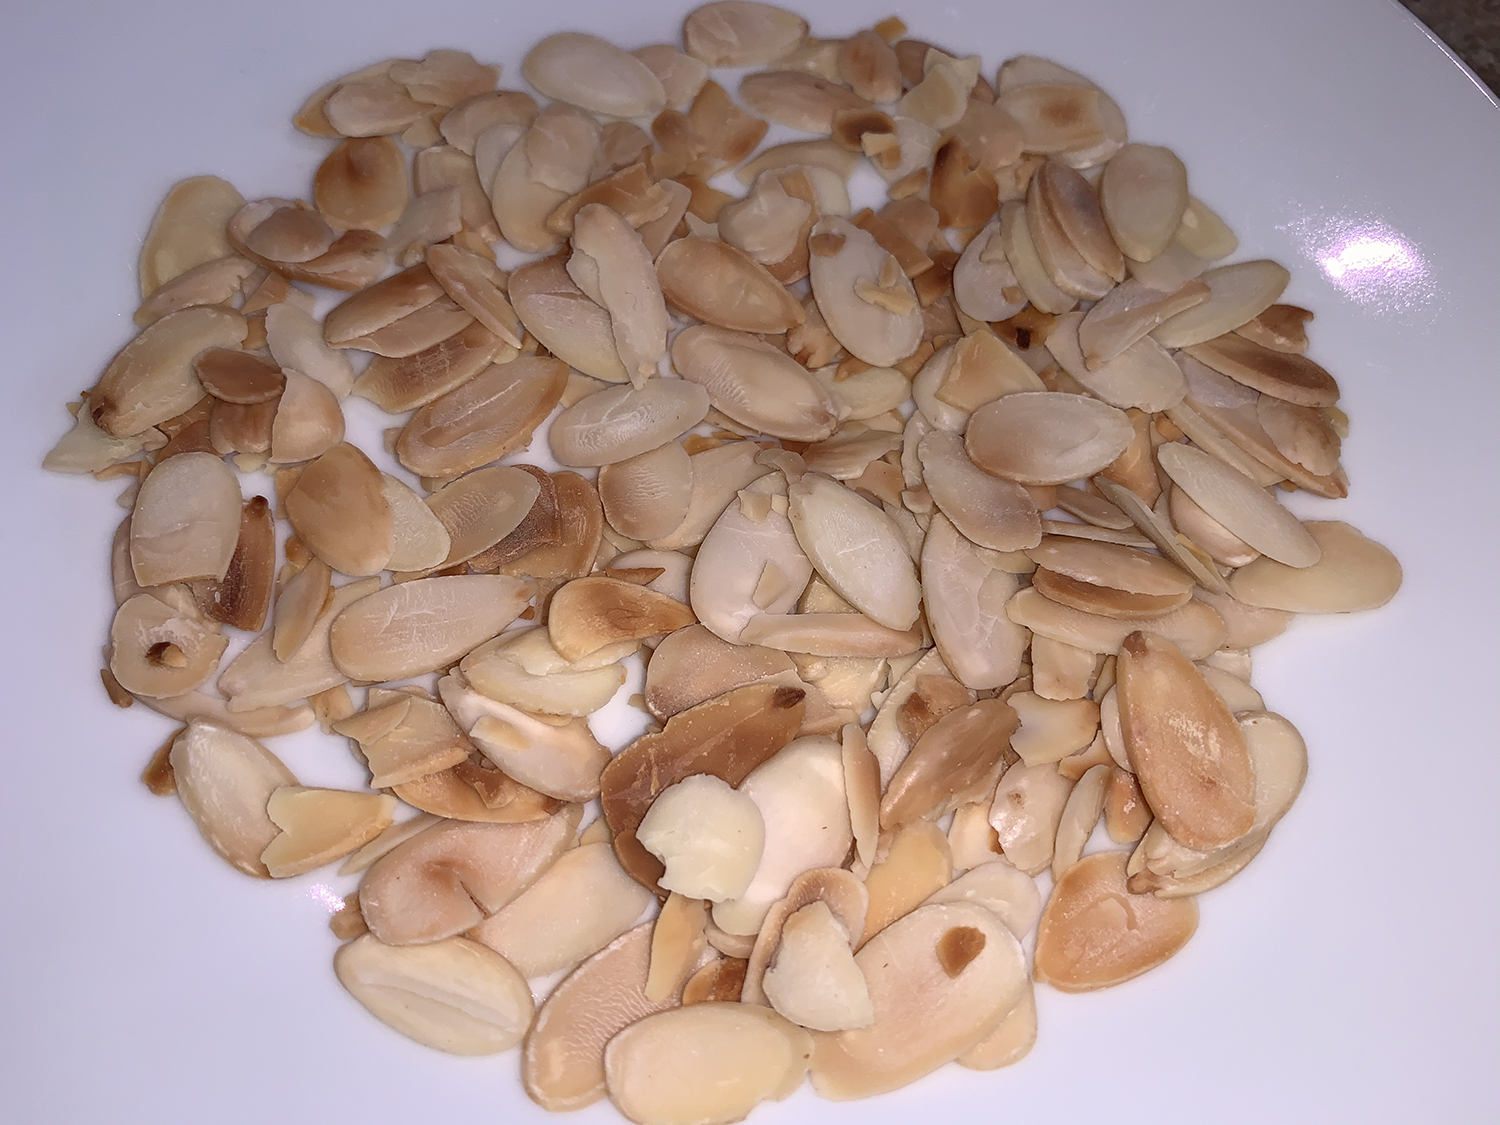
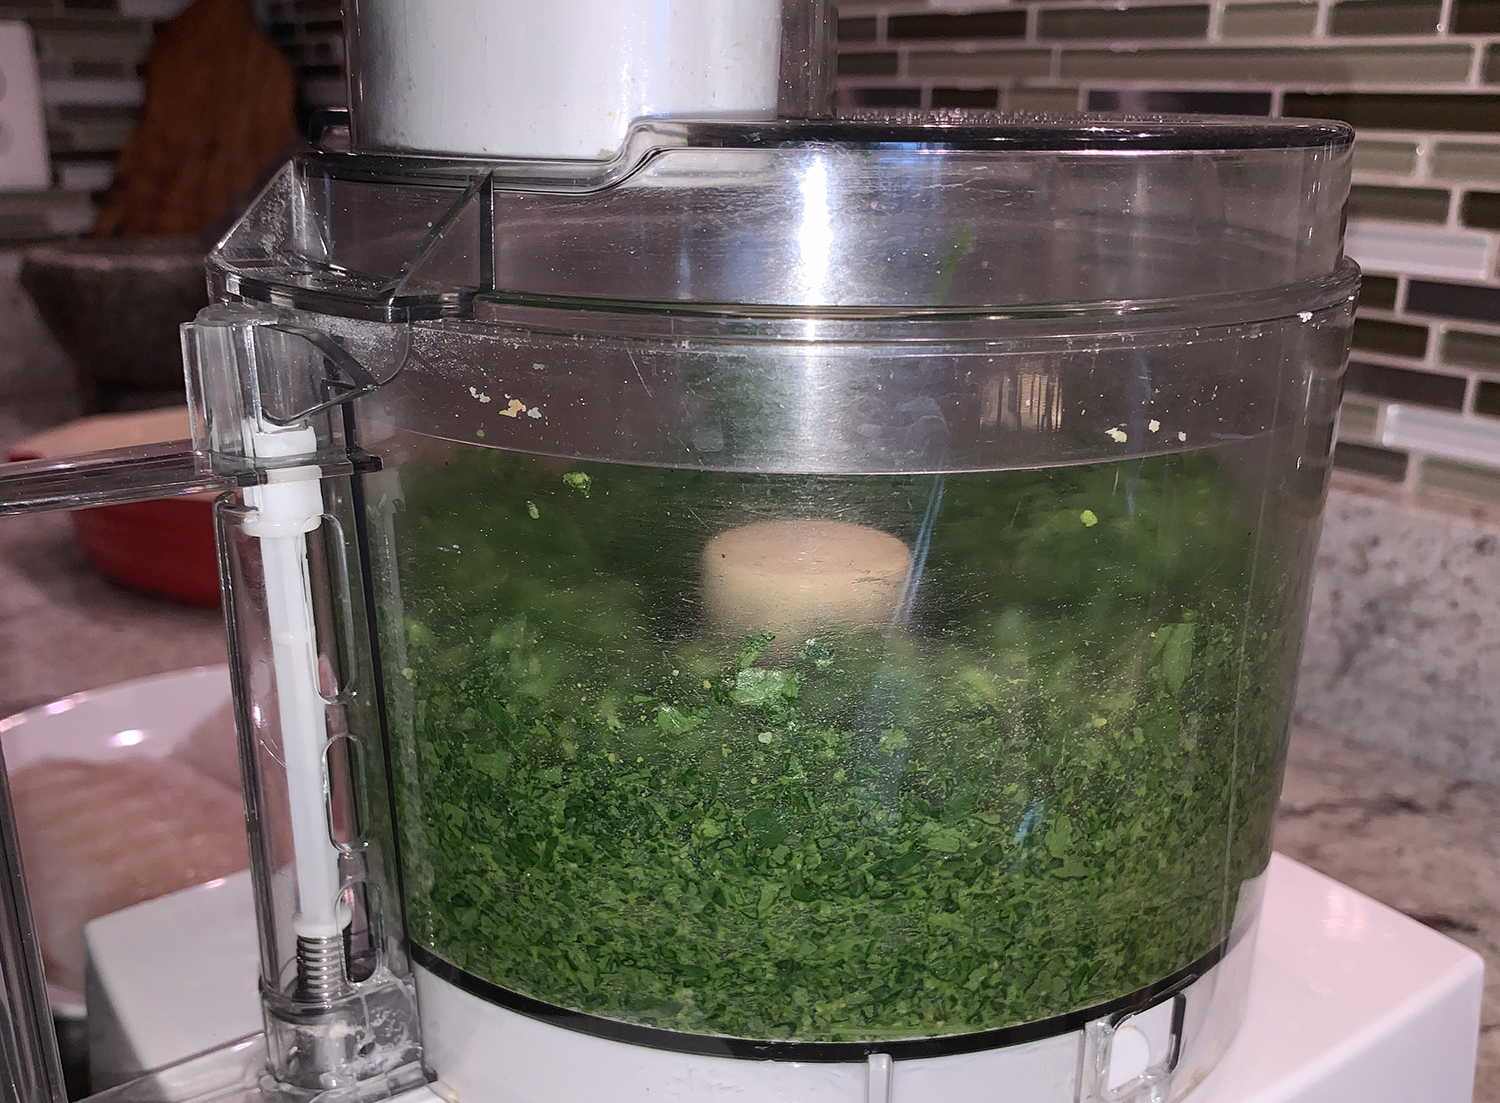
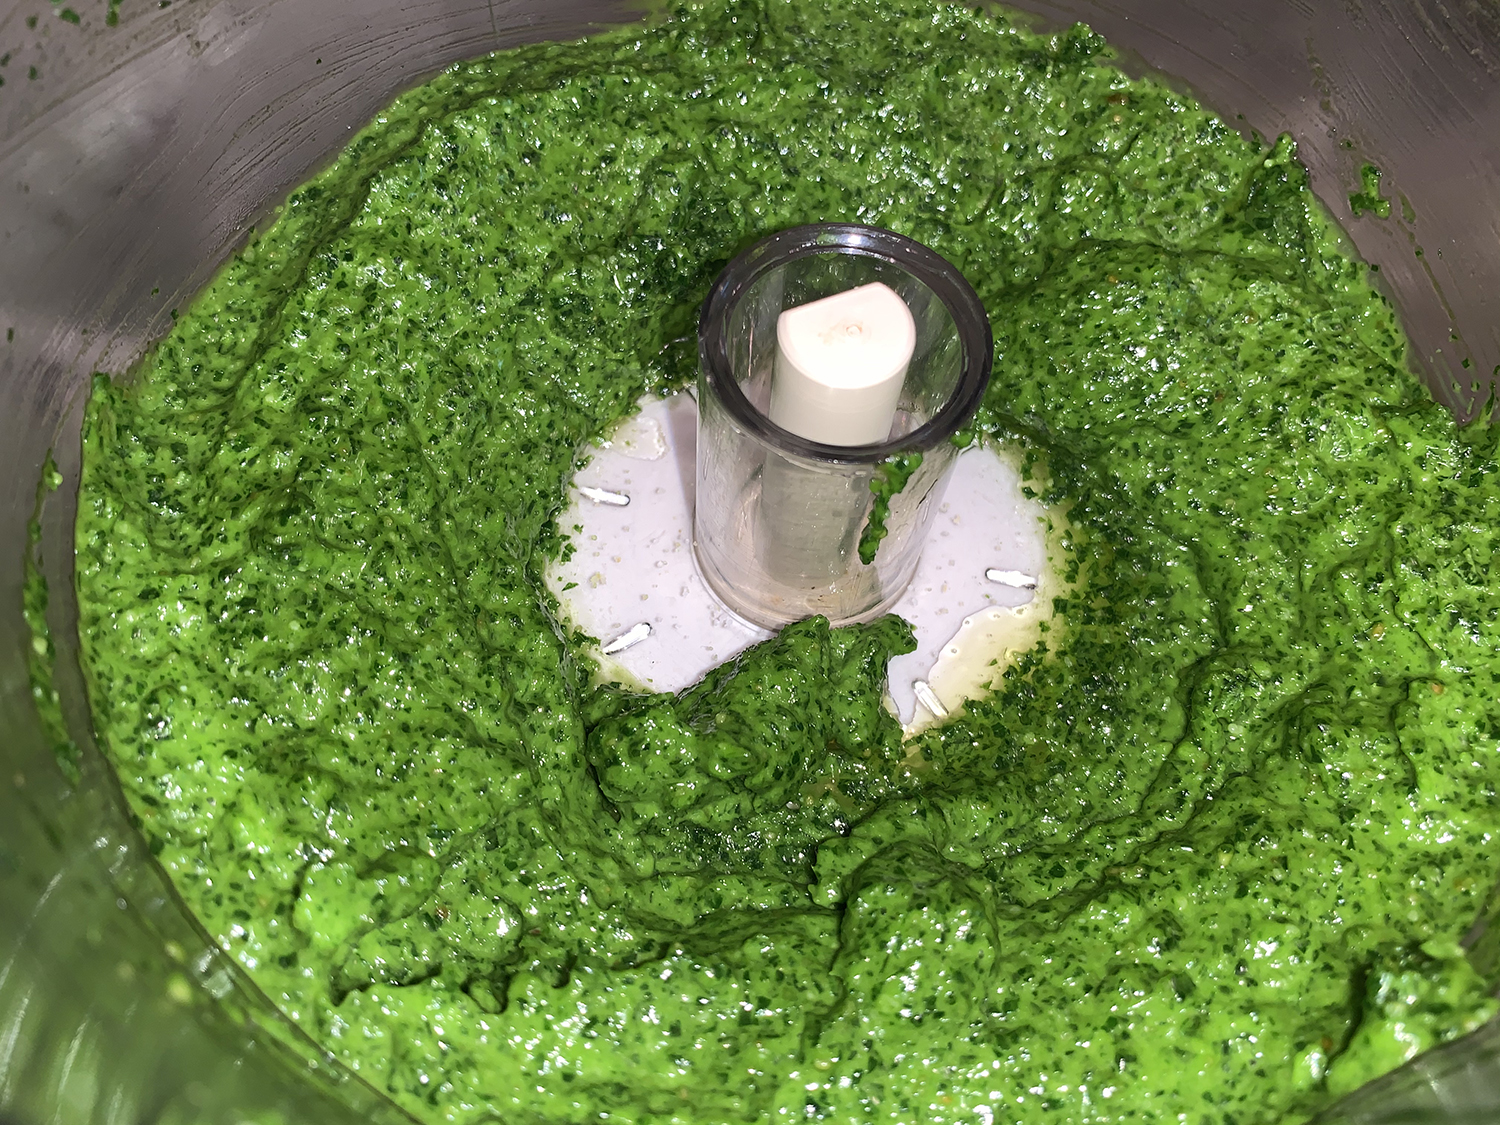
In a food processor, combine the cheese, almonds and ½ teaspoon salt. Process until finely chopped, about 20 seconds. Add the parsley and process until chopped, about 10 seconds. With the machine running, add the ½ cup oil, then process until smooth, about 1 minute, scraping the bowl as needed; set aside.
Season the fish all over with salt. In a 12-inch skillet over medium, combine the remaining ¼ cup oil, the garlic and Cubanelle pepper. Cook, stirring often, until the garlic begins to brown, 5 to 7 minutes. Add the wine and bring to a boil over medium-high. Cook, stirring, until the wine reduces by half, about 4 minutes.
Add 1 cup water and bring to a boil. Add the clams, cover and cook, occasionally shaking the skillet, until the clams have opened, about 4 minutes. Remove the pan from the heat and, using a slotted spoon, transfer the clams to a bowl, discarding any that have not opened; cover to keep warm.
In a small bowl, whisk the flour and ½ cup of the broth mixture until smooth, then whisk the mixture into the broth in the skillet. Bring to a simmer over medium, stirring often; the liquid will thicken. Add the fish skin/skinned side up, then cover, reduce to low and cook for 4 minutes, adjusting the heat as needed to maintain a very gentle simmer.
Using a wide metal spatula, carefully flip the fillets. Re-cover and cook until the centers of the fillets are opaque and reach 120°F, another 2 to 4 minutes. Using the spatula, transfer the fillets to serving bowls.
Return the sauce to a simmer over medium, then stir in the parsley puree and remove from the heat. Taste and season with salt. Pour the sauce over the fish and top with the clams.
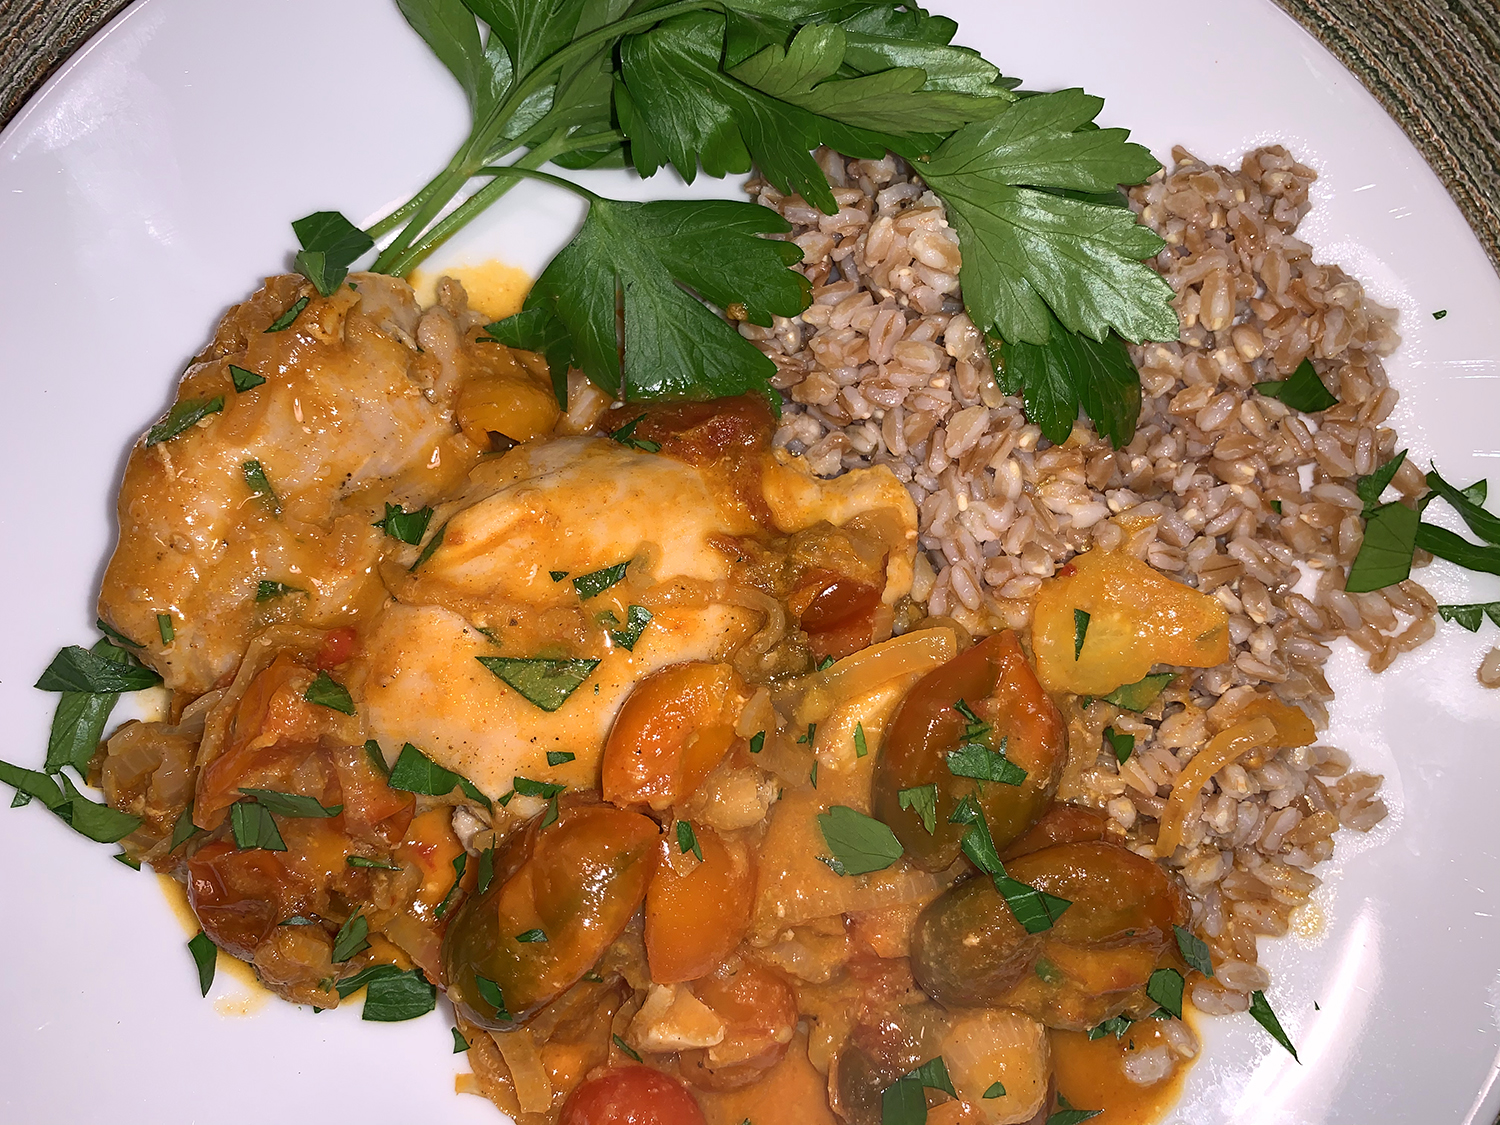
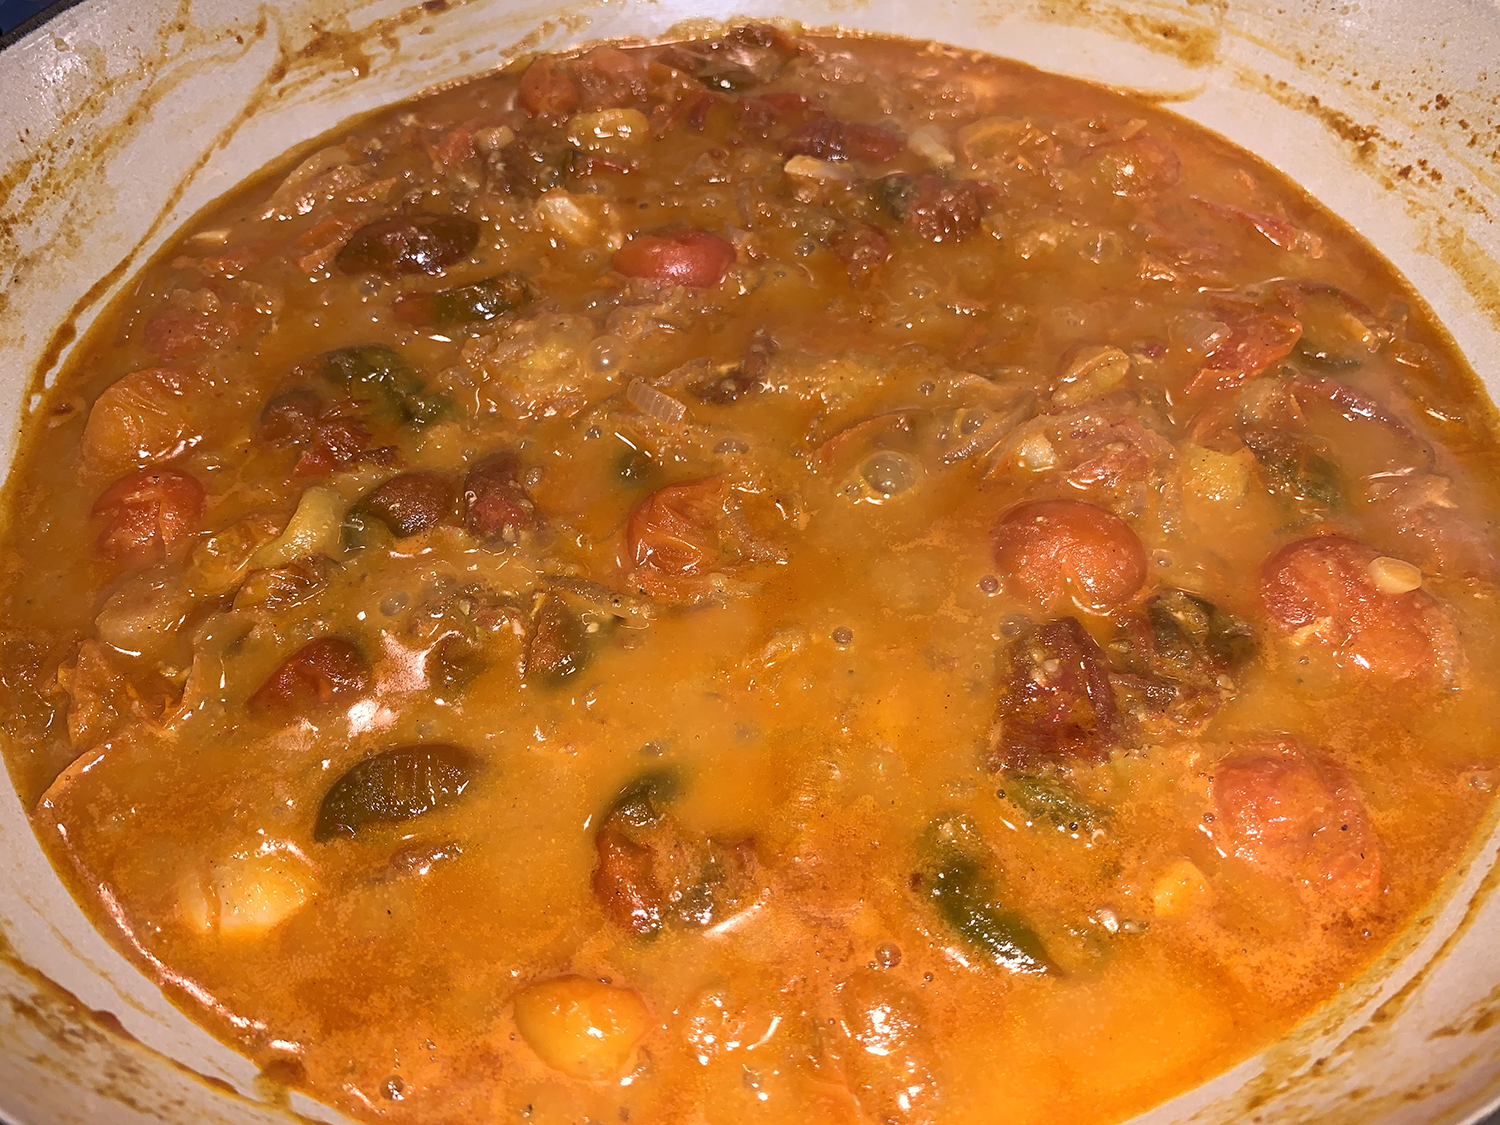
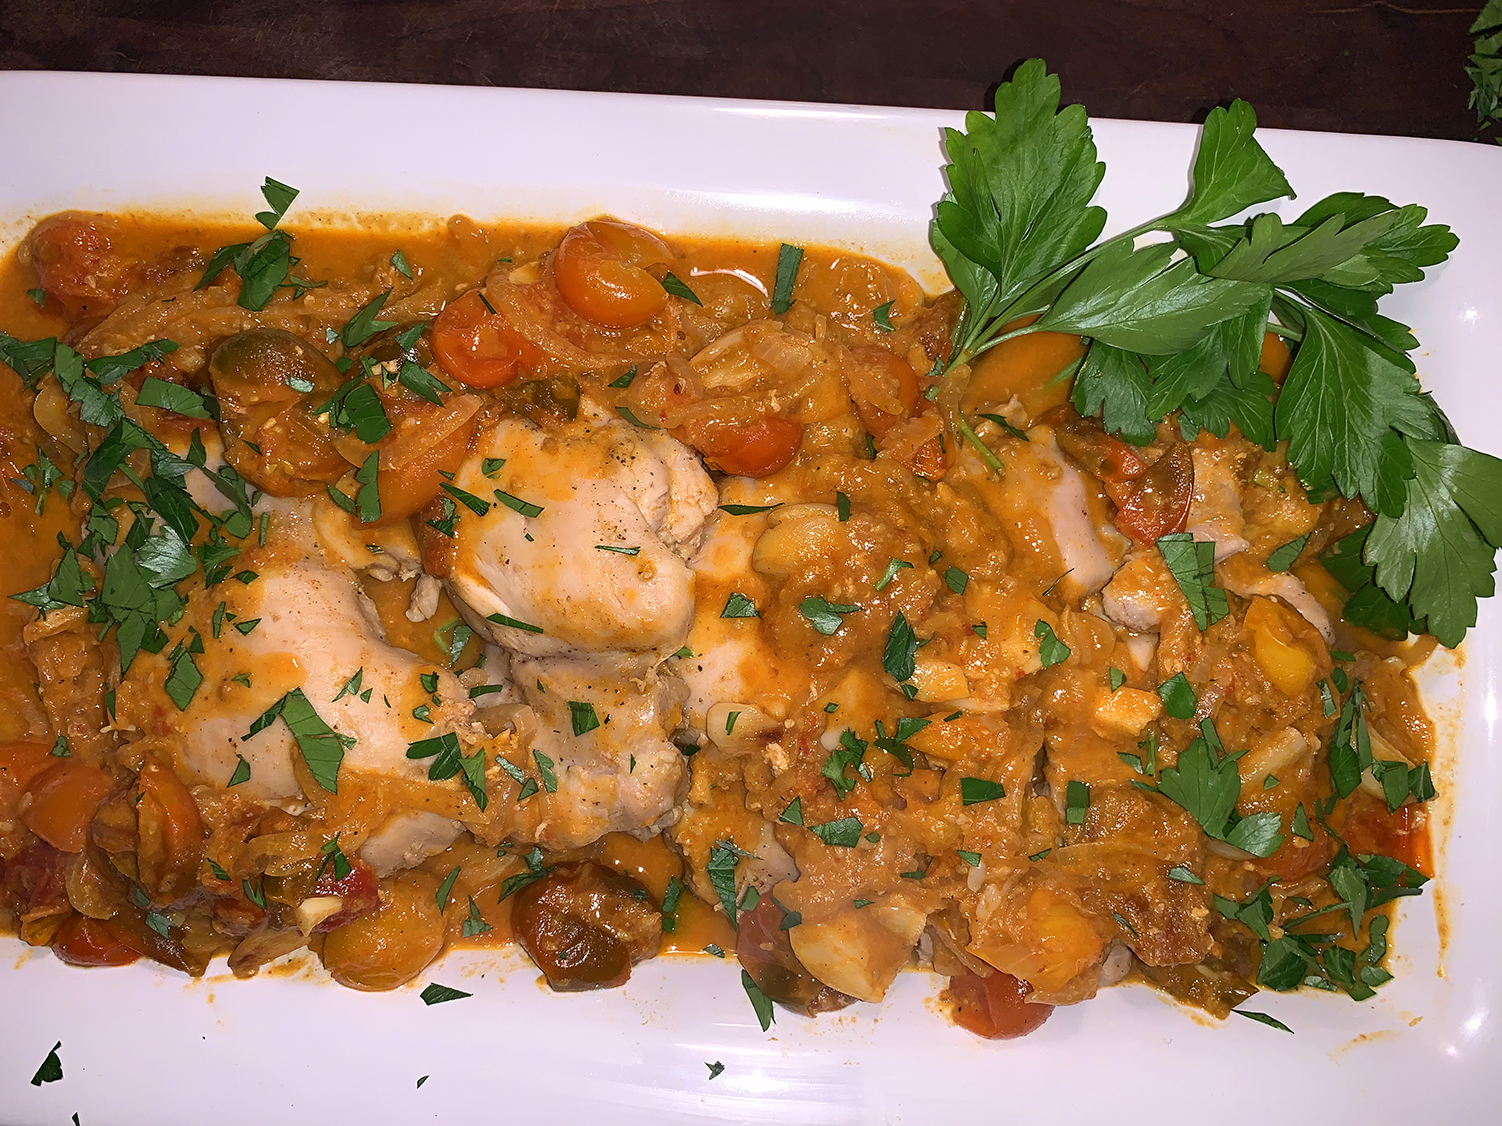
This dish may sound French, but the starting point for Milk Street was the Portuguese classic called frango na púcara, or chicken in a clay pot. For quick and easy weeknight cooking, boneless, skinless chicken thighs are used instead of bone-in parts. All gets cooked in one Dutch oven on the stovetop—always a plus when it comes to clean up.
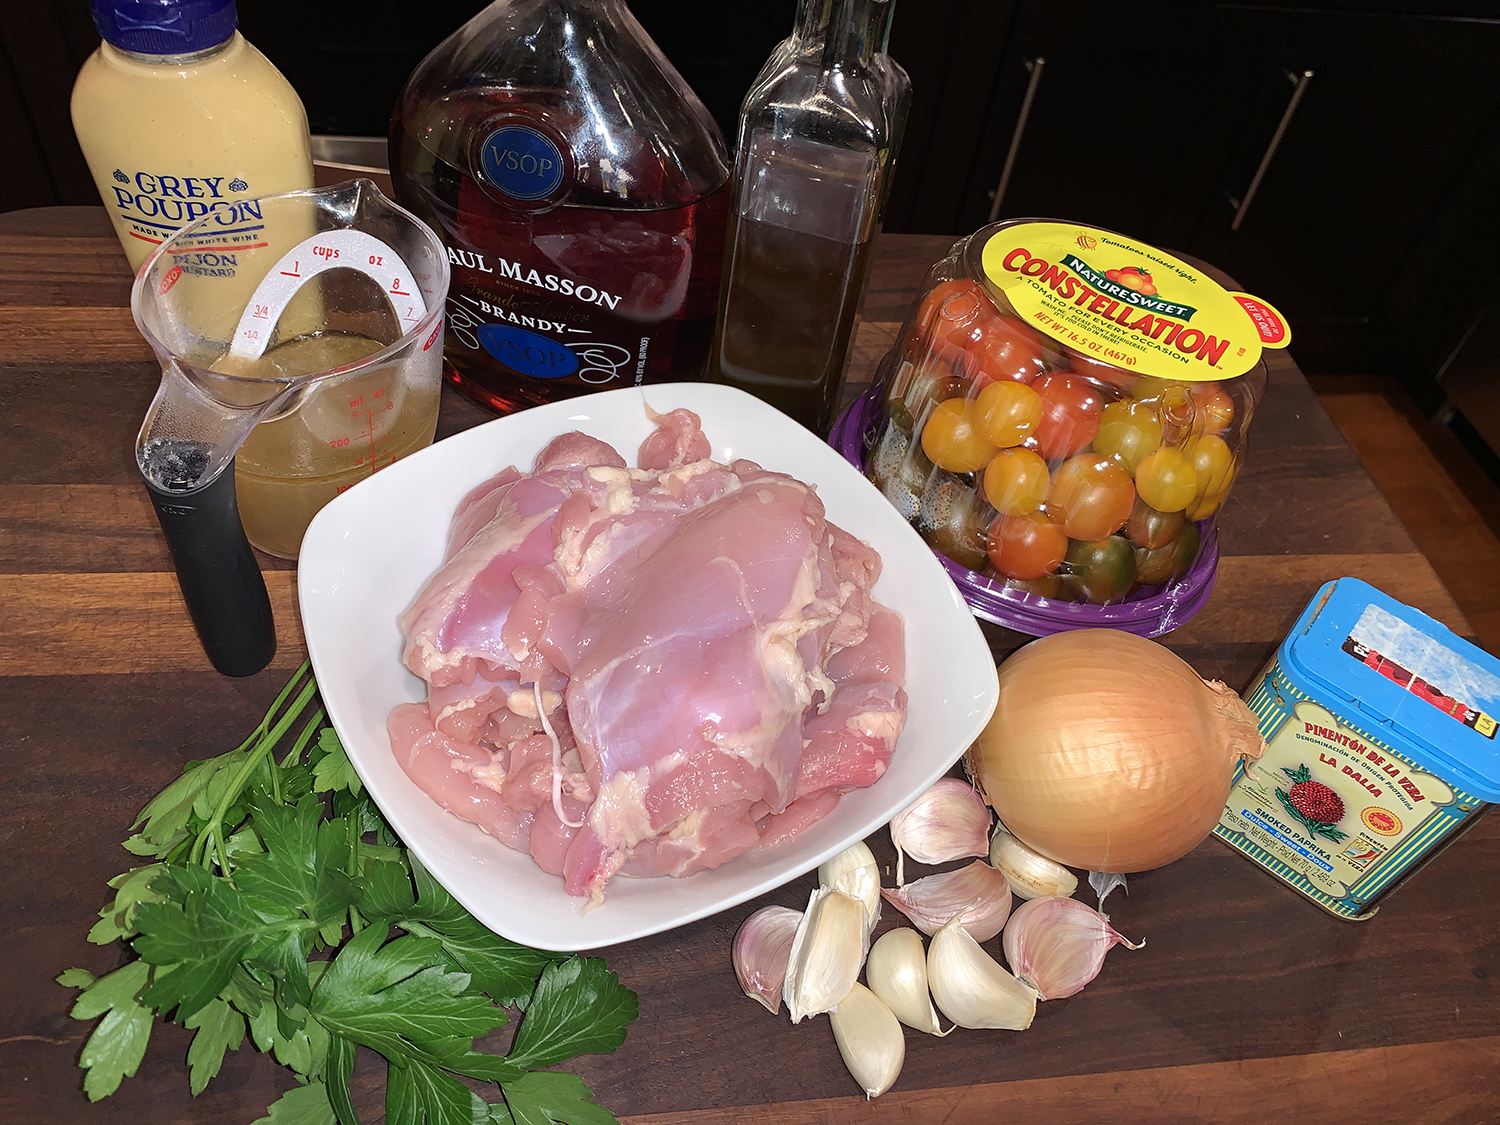
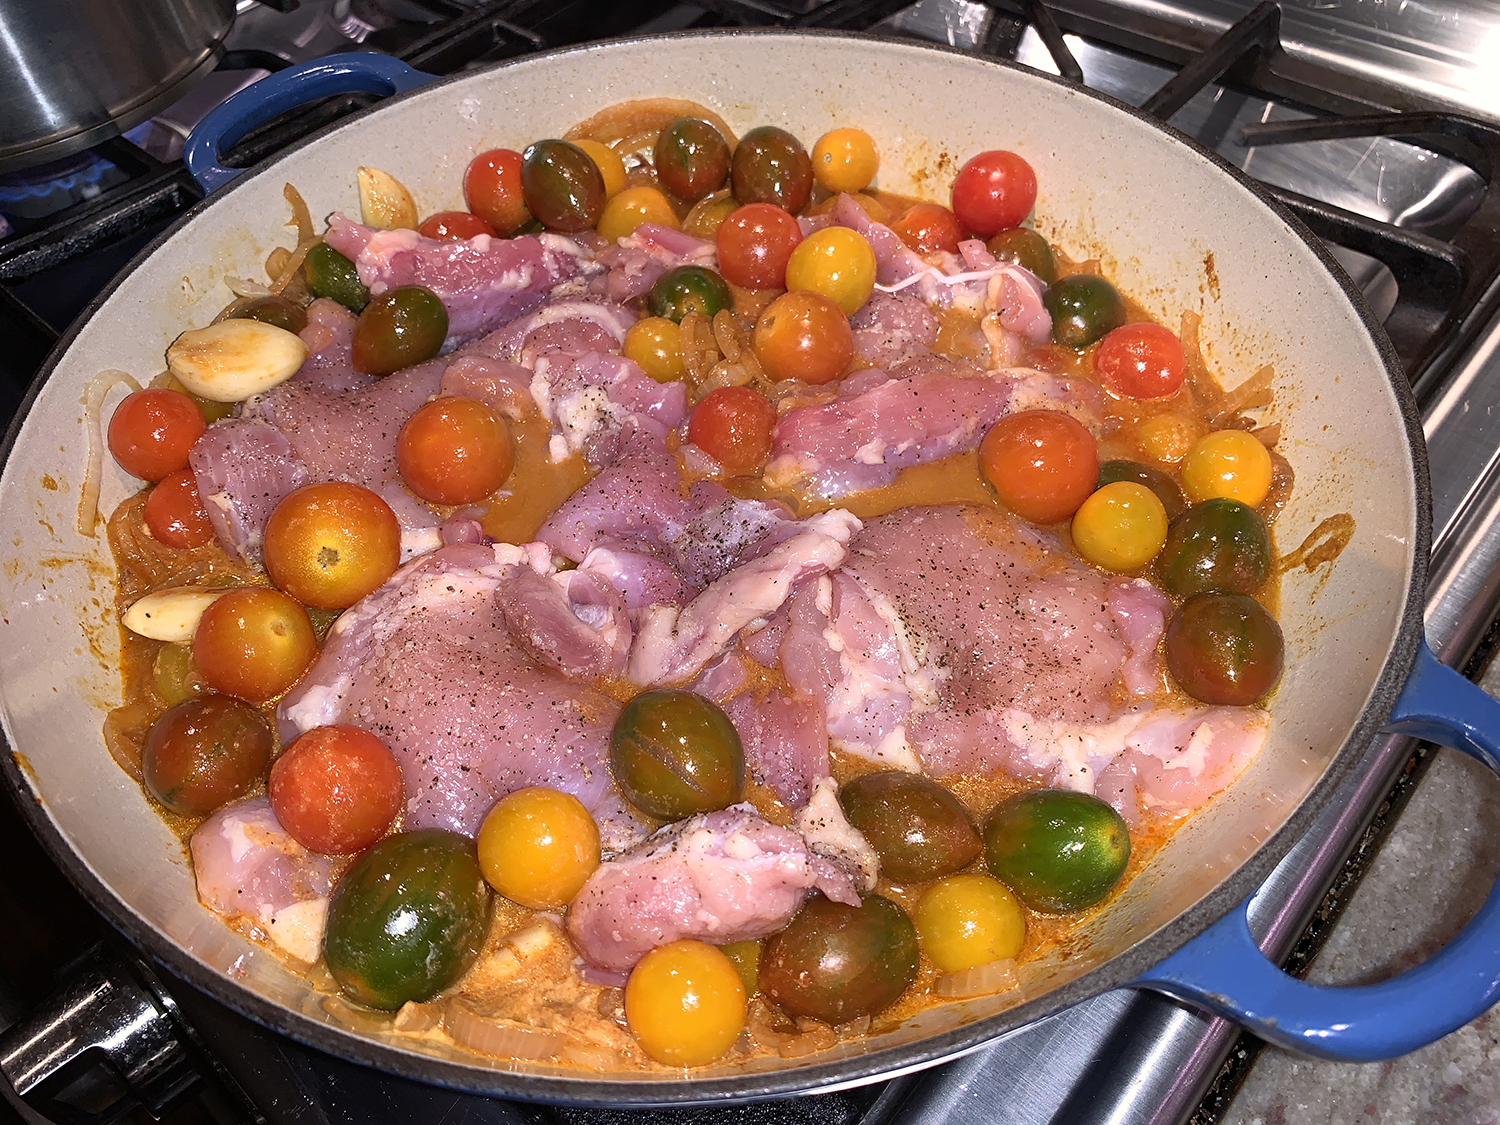
Because our chicken thighs were of two different thicknesses, I had to remove the two smaller pieces to a platter, cover with foil, and let the thicker thighs cook a few minutes longer. And yes, you may have noticed from the ingredients photo below, I did increase the amount of garlic cloves.
Cherry tomatoes can be used in place of grape tomatoes, but they tend to be larger, so cut them in half before adding them to the pot. We used the variety pack of tomatoes that contained four different colors, adding to the overall color palette. Serve with warm, crusty bread, roasted potatoes, rice, or as in our case, farro.
Speaking of farro, the kind that’s most commonly found in the US and Europe is emmer wheat. It’s sold dry and prepared by cooking it in water until it’s soft and chewy. Before it’s cooked it looks similar to wheat berries, but afterward it looks similar to barley. It’s a small, light-brown grain with a noticeable outer layer of bran. Farro is loved for its nutty flavor and unique, chewy texture. It’s a great alternative to other popular grains, such as rice, quinoa, buckwheat and barley, among others.
2 lbs. boneless, skinless chicken thighs, trimmed and patted dry
Kosher salt and ground black pepper
2 Tbsp. extra-virgin olive oil
1 small yellow onion, halved and thinly sliced
6 medium garlic cloves, smashed and peeled
2 tsp. smoked paprika
2 Tbsp. dijon mustard
⅓ cup brandy
1 pint grape tomatoes
½ cup low-sodium chicken broth
1 Tbsp. chopped fresh flat-leaf parsley
Directions
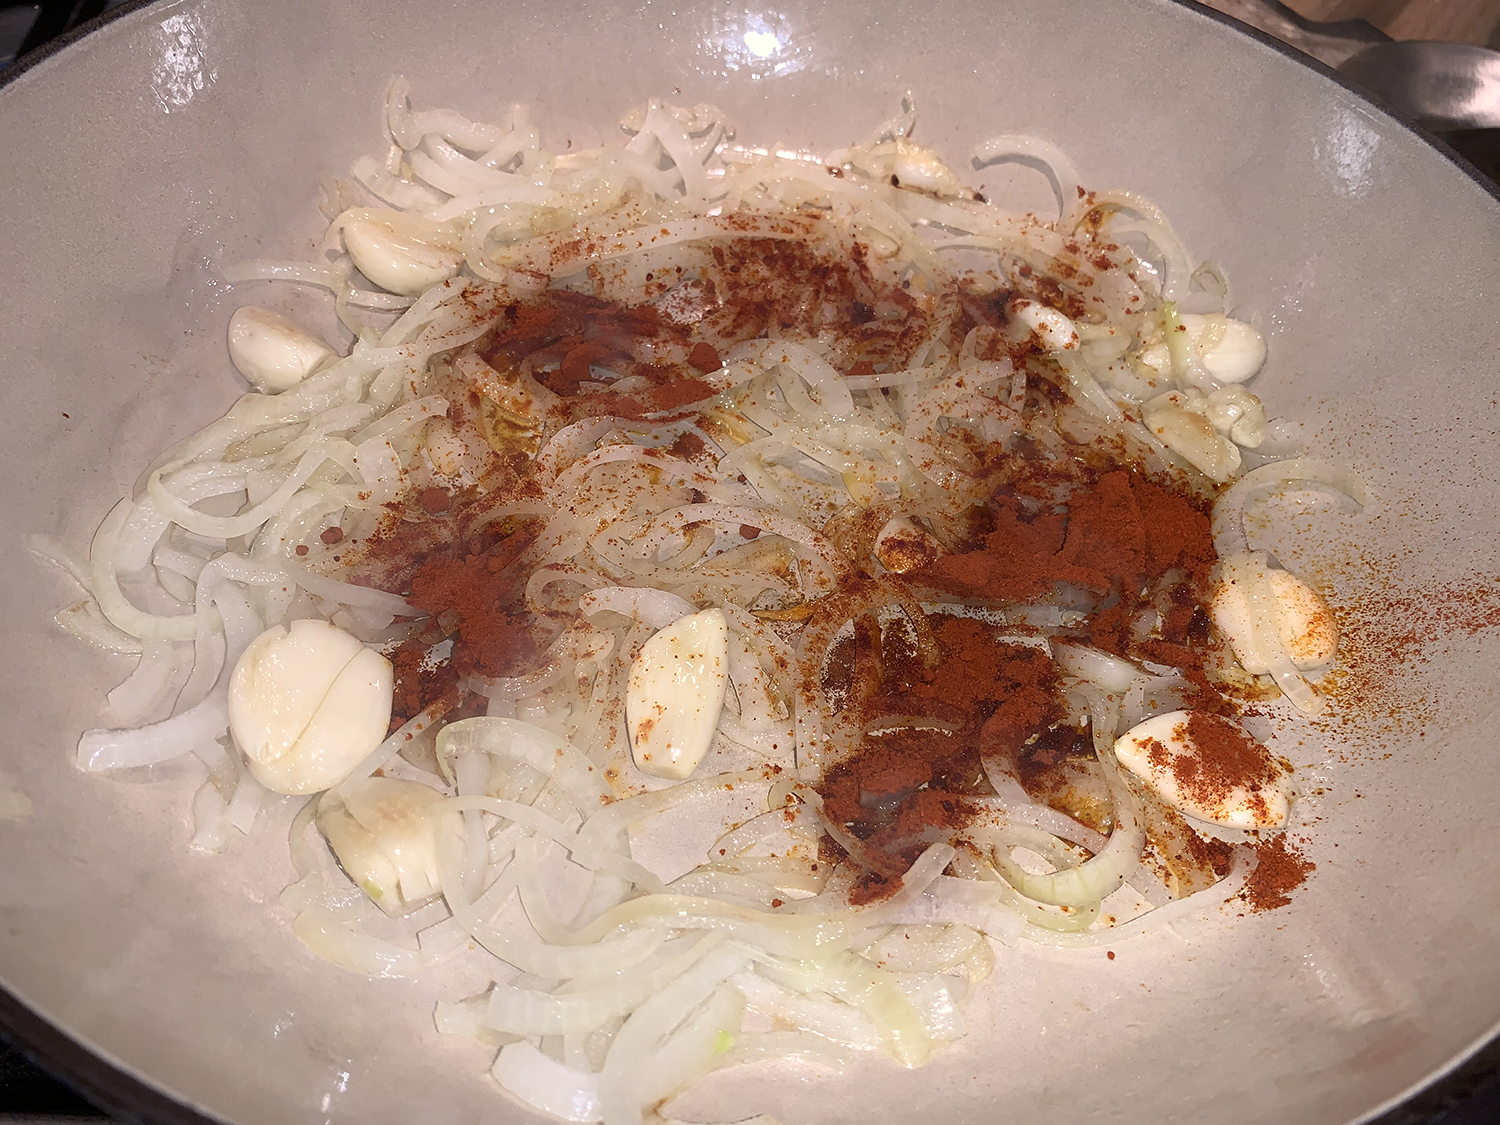
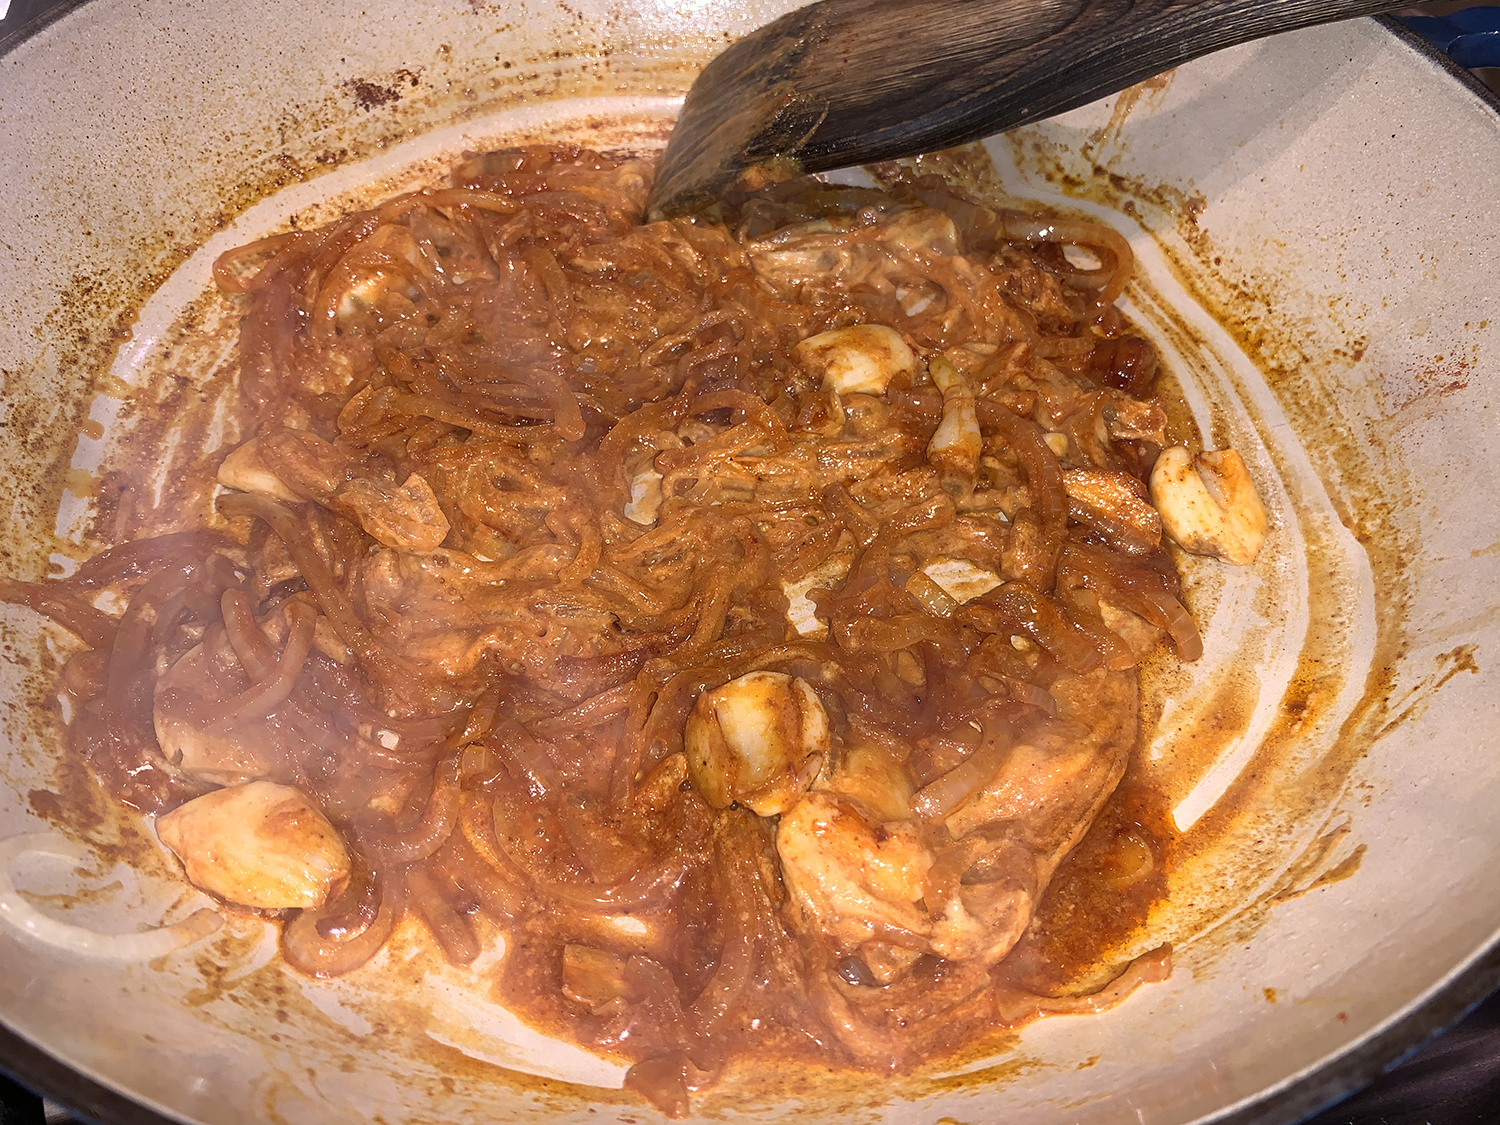
Season the chicken with salt and pepper. In a large Dutch oven over medium-high, heat the oil until shimmering. Add the onion and garlic, then cook, stirring occasionally, until softened, 4 to 5 minutes. Add the paprika and cook, stirring until fragrant, about 1 minute.
Add the mustard and brandy, then cook, scraping up any browned bits, until slightly reduced, about 30 seconds.
Stir in the tomatoes and broth, then nestle the chicken in the liquid. Bring to a simmer, reduce to medium-low, cover and cook for 10 minutes.
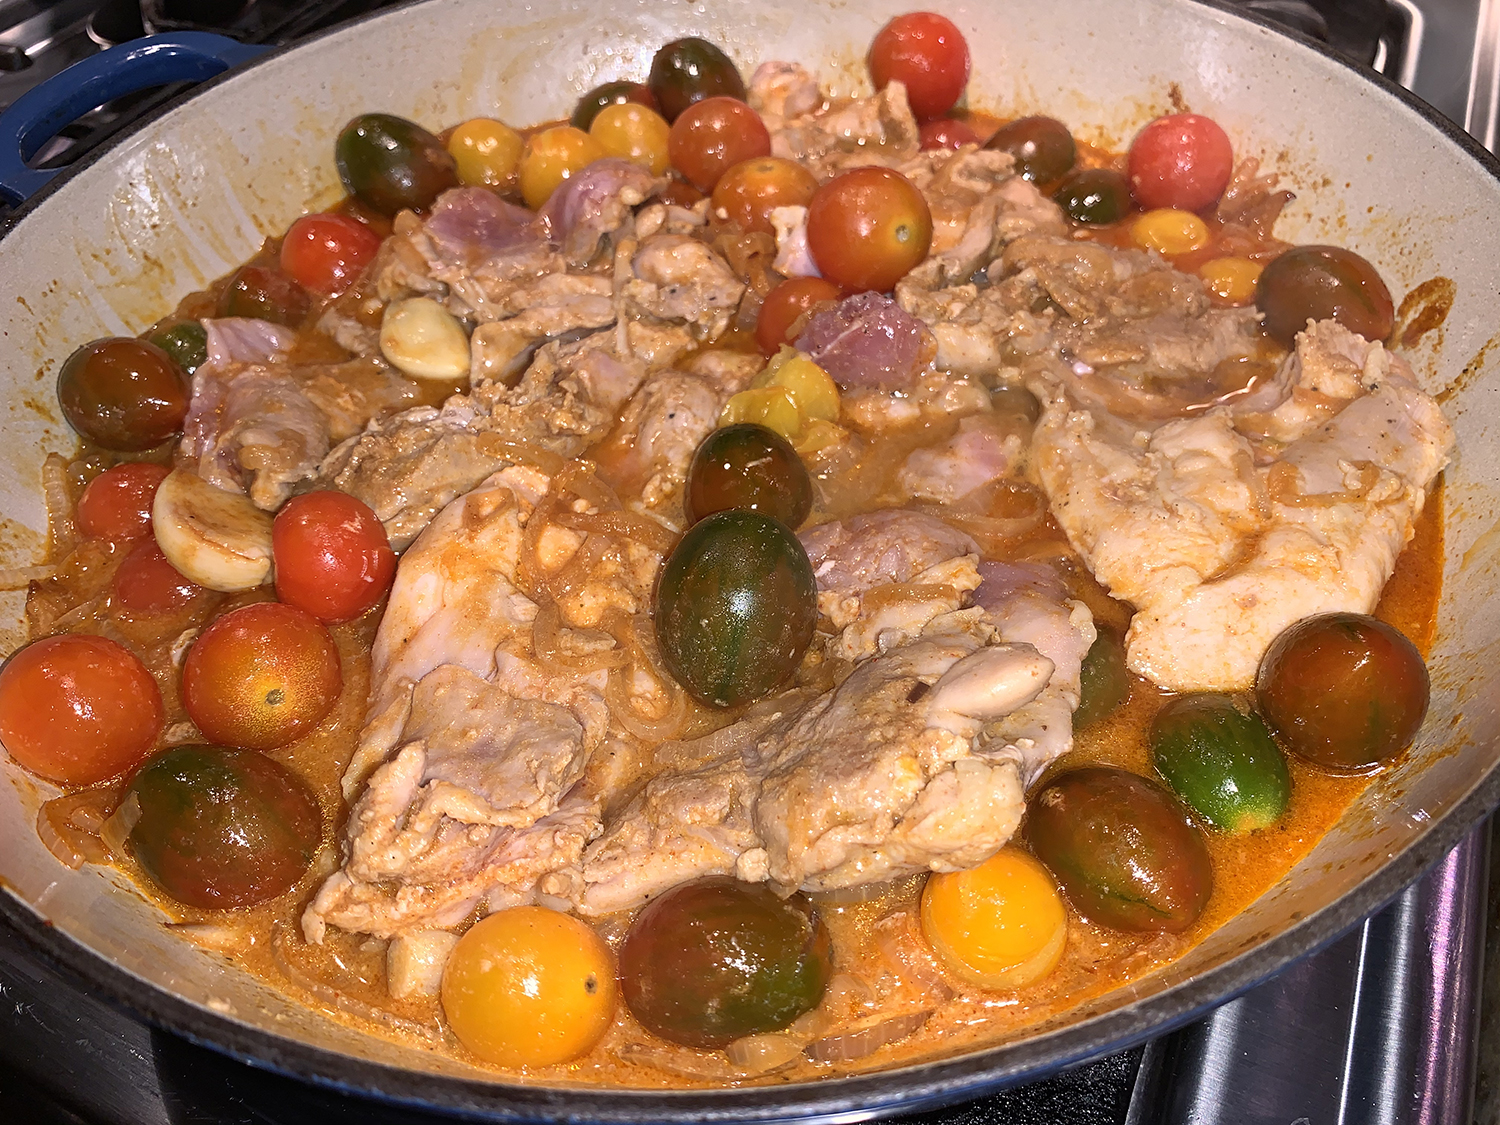
Using tongs, flip the chicken and simmer, uncovered, until a skewer inserted into the chicken meets no resistance, another 5 to 8 minutes.
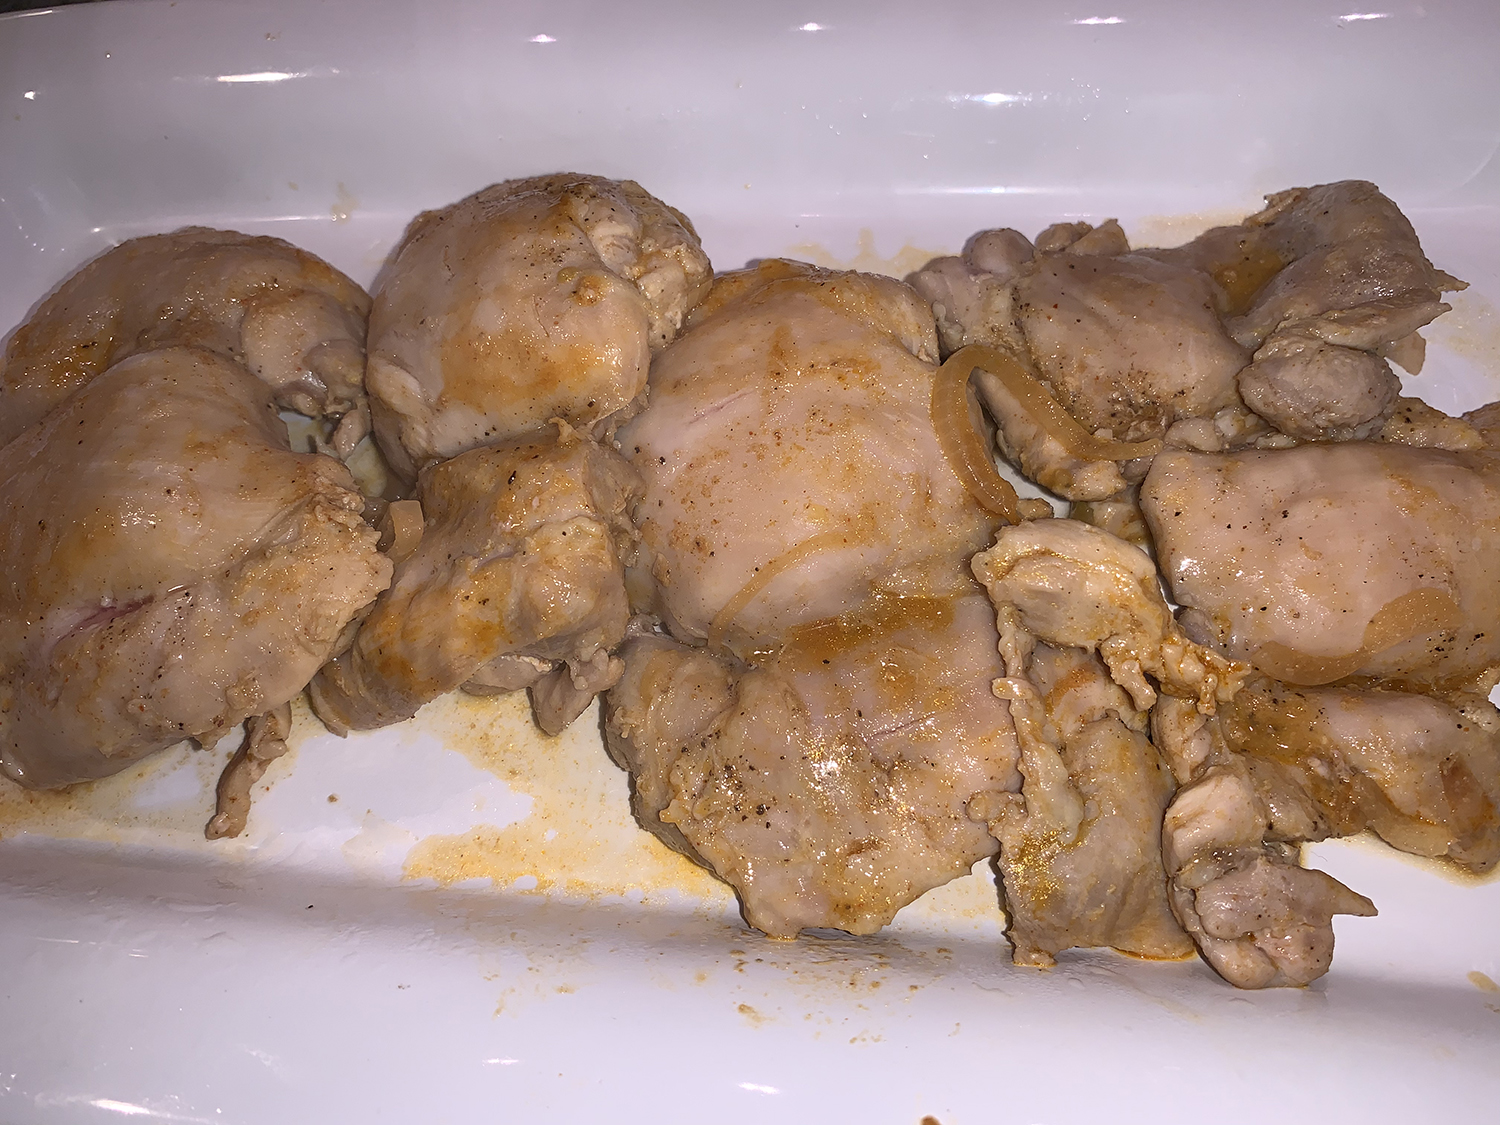
Transfer the chicken to a serving dish and tent with foil. Bring the braising liquid to a simmer over medium-high and cook, stirring often, until thickened and the tomatoes have softened, 5 to 8 minutes.
Taste and season with salt and pepper. Spoon the mixture over the chicken and sprinkle with the parsley.