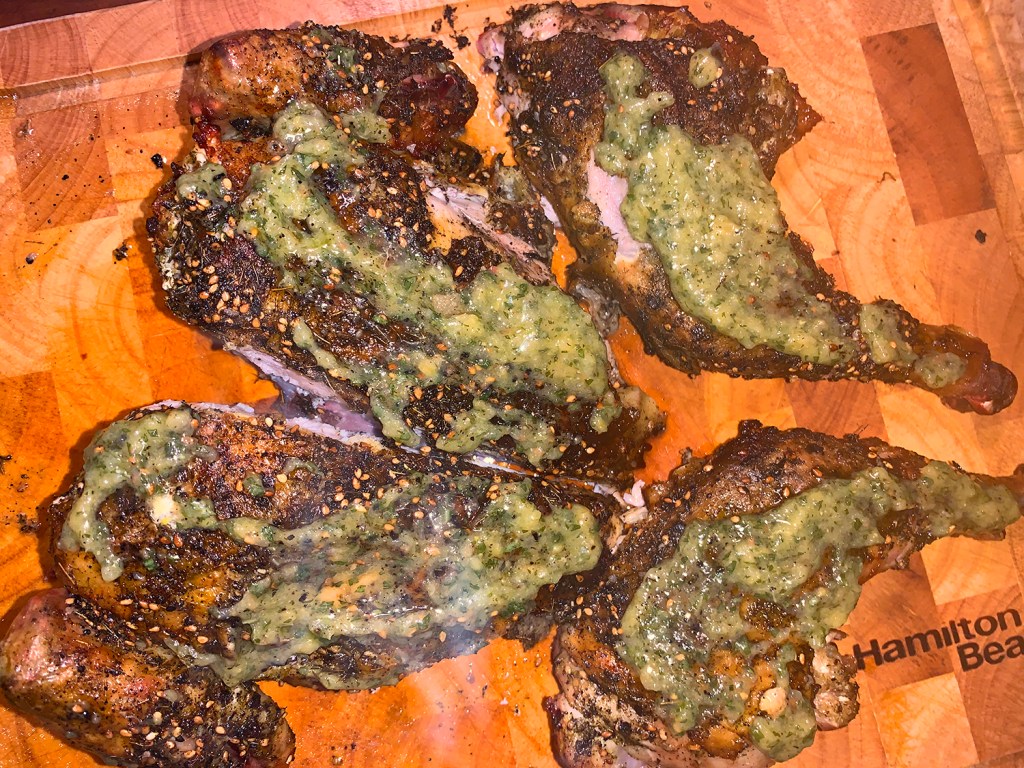
Shoulder chops aren’t the most tender, but they truly have great lamb flavor. Plus, they are far less expensive than other types of lamb chops. The steaks are usually rather thin, therefore make sure you have a hot fire ready so they get a good sear on the outside before they have a chance to overcook on the inside.
Lamb and grilling are a classic combination in Greek cookery. In just minutes over a hot fire, they are nearly ready to serve with that quintessential Greek flavoring combination of fresh oregano, fresh lemon juice, really good olive oil, and just a touch of garlic. Simple is, as simple gets.
To complete the meal we roasted some baby Yukon potatoes which benefited from some of that oregano-garlic sauce; and a side of Roasted Green Beans with Pecorino and Pine Nuts which are mixed with oil, salt, pepper, and a tad of sugar to enhance caramelization.
Four 10- to 12-ounce lamb shoulder blade chops, 1/2 inch to 1/4 inch thick
Kosher salt and freshly cracked black pepper to taste
1/4 cup extra-virgin olive oil
2 Tbsp. roughly chopped fresh oregano
1 tsp. minced garlic
1/2 lemon
Directions
Preheat grill to hot.
Dry the chops with paper towels and sprinkle them generously with salt and pepper. Place the chops on the grill and cook until well seared, 3 to 4 minutes per side. To check for doneness, use an instant-read thermometer. The chops are rare at 120°F, medium rare at 125°F, medium at 130°F, and well done at 145°F and higher. FYI, lamb can take on a gamey flavor when cooked past medium.
When the chops are done, remove them from the grill, cover them loosely with foil, and let them rest for 5 minutes.
Meanwhile, in a small bowl, combine the olive oil, oregano, and garlic and mix well.
Spoon the garlic mixture over the lamb chops, squeeze the lemon on top of them, and serve hot.
Roast chicken with citrus and herbs? It has my name written all over it! As far back as I can remember, Sunday supper with Mom’s Orange Juice Chicken was a meal I looked forward to all week—and I was one picky eater back then.
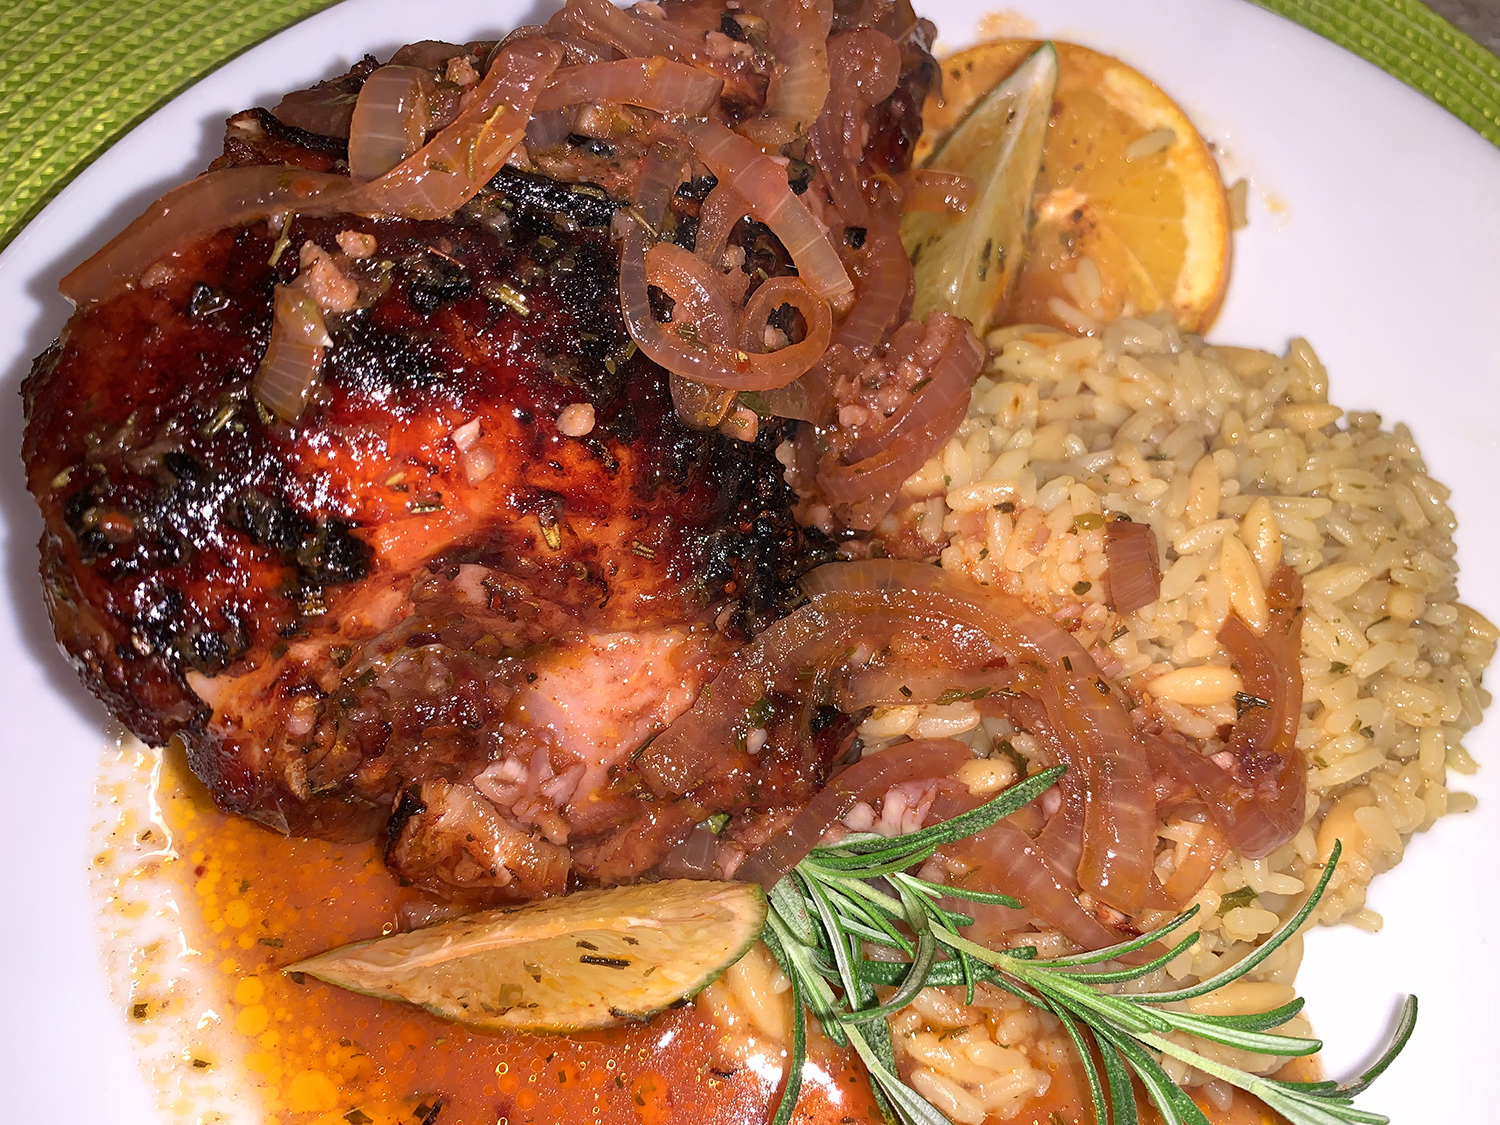
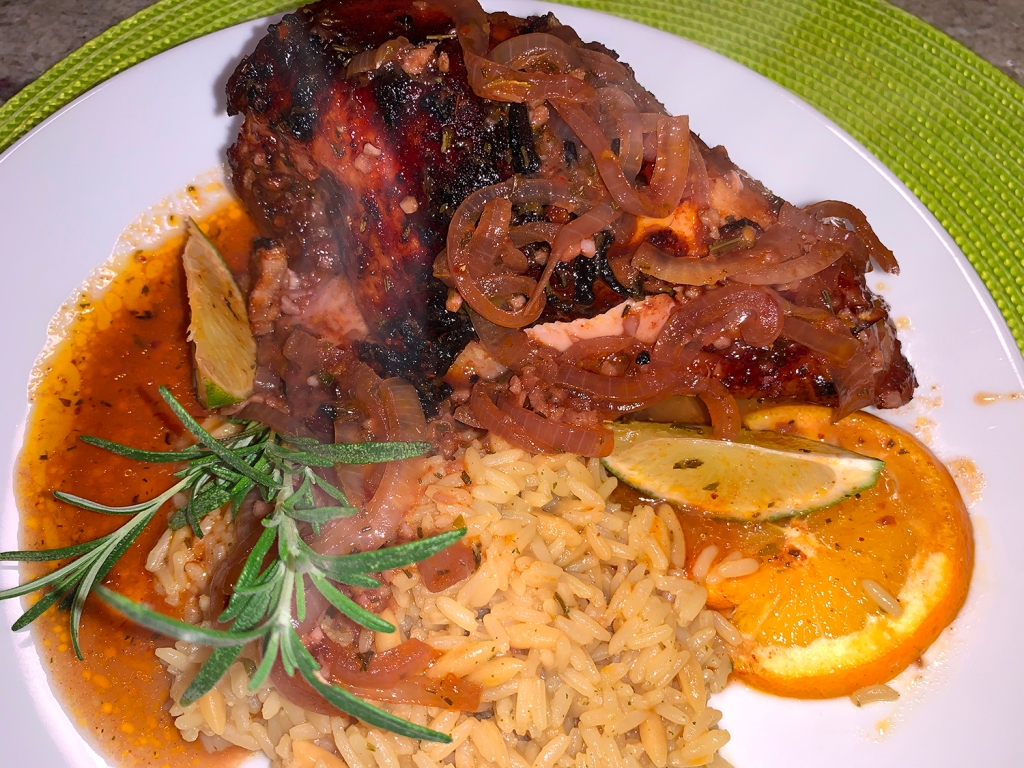
Crisp, tangy, and succulent citrus rosemary chicken, seasoned Mediterranean-style with garlic, rosemary, and oregano, and covered in a bold wine and orange marinade. I mean, what’s not to like? This simple twist on roast chicken makes a dish with the perfect balance of savory, tangy, and warm flavors! Delicious and impressive with little work involved. Who’s not with me now?
The citrus marinade in this recipe is made of a combination of wine, orange juice, lime juice, olive oil, tomato paste for color and umami, and fresh garlic, onions, rosemary, and other Mediterranean spices.
We served ours with a Near East rice pilaf dish and a side salad.
According to chef Suzy Karadsheh of The Mediterranean Dish food blog, “The key to great flavor here is to allow the chicken a good 1 to 2 hours in the marinade (refrigerated), and make sure to lift up the chicken skin to spoon some of the garlicky, citrus marinade underneath. If you only have a few minutes, leave the chicken to marinate at room temperature for 30 minutes or so.”
Now you can use a whole chicken and cut it up saving the neck, back and wingtips for homemade stock—which is our typical rodeo—however, this time we purchased precut bone-in, skin-on breasts and thighs. They were well-salted inside and outside the skin, left uncovered in the refrigerator overnight, and marinated for 2 hours prior to cooking.
Once the chicken is out of the oven, allow it 10 minutes to rest before slicing and serving. Then get ready to be amazed! This dish definitely evokes warm, childhood memories, but at a more advanced level, and with more depth of flavor.
1 whole chicken, split in half through the backbone; or pre-cut parts (about 3 ½ pounds)
Kosher salt
1 cup Pinot Noir
1 orange zested and juiced plus 1 sliced orange
1 lime juiced, plus 1 sliced lime
Extra virgin olive oil
3 Tbsp. tomato paste
1 ½ tsp. dried oregano
1 tsp. dried rosemary
1 tsp. sweet paprika
1 tsp. Aleppo pepper
7 to 8 garlic cloves minced
1 yellow onion halved and sliced
1 Tbsp. honey
Salt chicken inside skin and all around
Refrigerate uncovered overnight
Prepare citrus marinade
Add chicken to mix and marinate for 2 hours
Let chicken sit at room temp in braising pan for 30 min
Directions
Season the chicken with kosher salt on all sides, making sure to season underneath the skin as well. (You can do this one night ahead of time and keep the chicken in the fridge to air-chill uncovered.)
Prepare the citrus marinade. In a large bowl, add the wine, orange juice and zest, lime juice, 3 tablespoons extra virgin olive oil, tomato paste, spices, and a good dash of kosher salt. Add the garlic and onion. Whisk to combine.
Add the chicken and toss to coat, making sure to lift the skin up and spoon some of the marinade underneath (this will give you more flavor). Set aside at room temperature for 30 minutes. Alternatively, cover and refrigerate for an hour or two. (For best results, take it out of the fridge and leave the chicken at room temperature for 30 to 45 minutes before cooking.)
Preheat the oven to 425°F and adjust a rack in the middle.
Transfer the chicken and the marinade to a braising pan. Roast uncovered for 30 minutes, then carefully turn the pan 180 degrees and roast for another 15 minutes or until the chicken is fully cooked and tender (juices should run clear).
In a small bowl, mix together the honey with 1 tbsp of extra virgin olive oil. Carefully remove the chicken from the oven and brush the top with the honey and olive oil mixture.
Switch the oven to the broil function. Return the chicken back to the oven about 6 inches away from the broiler and cook briefly for 3 to 4 minutes, watching for the skin to turn a nice golden brown.
Remove from the heat and finish with lime juice. Add slices of fresh orange and wedges of lime.
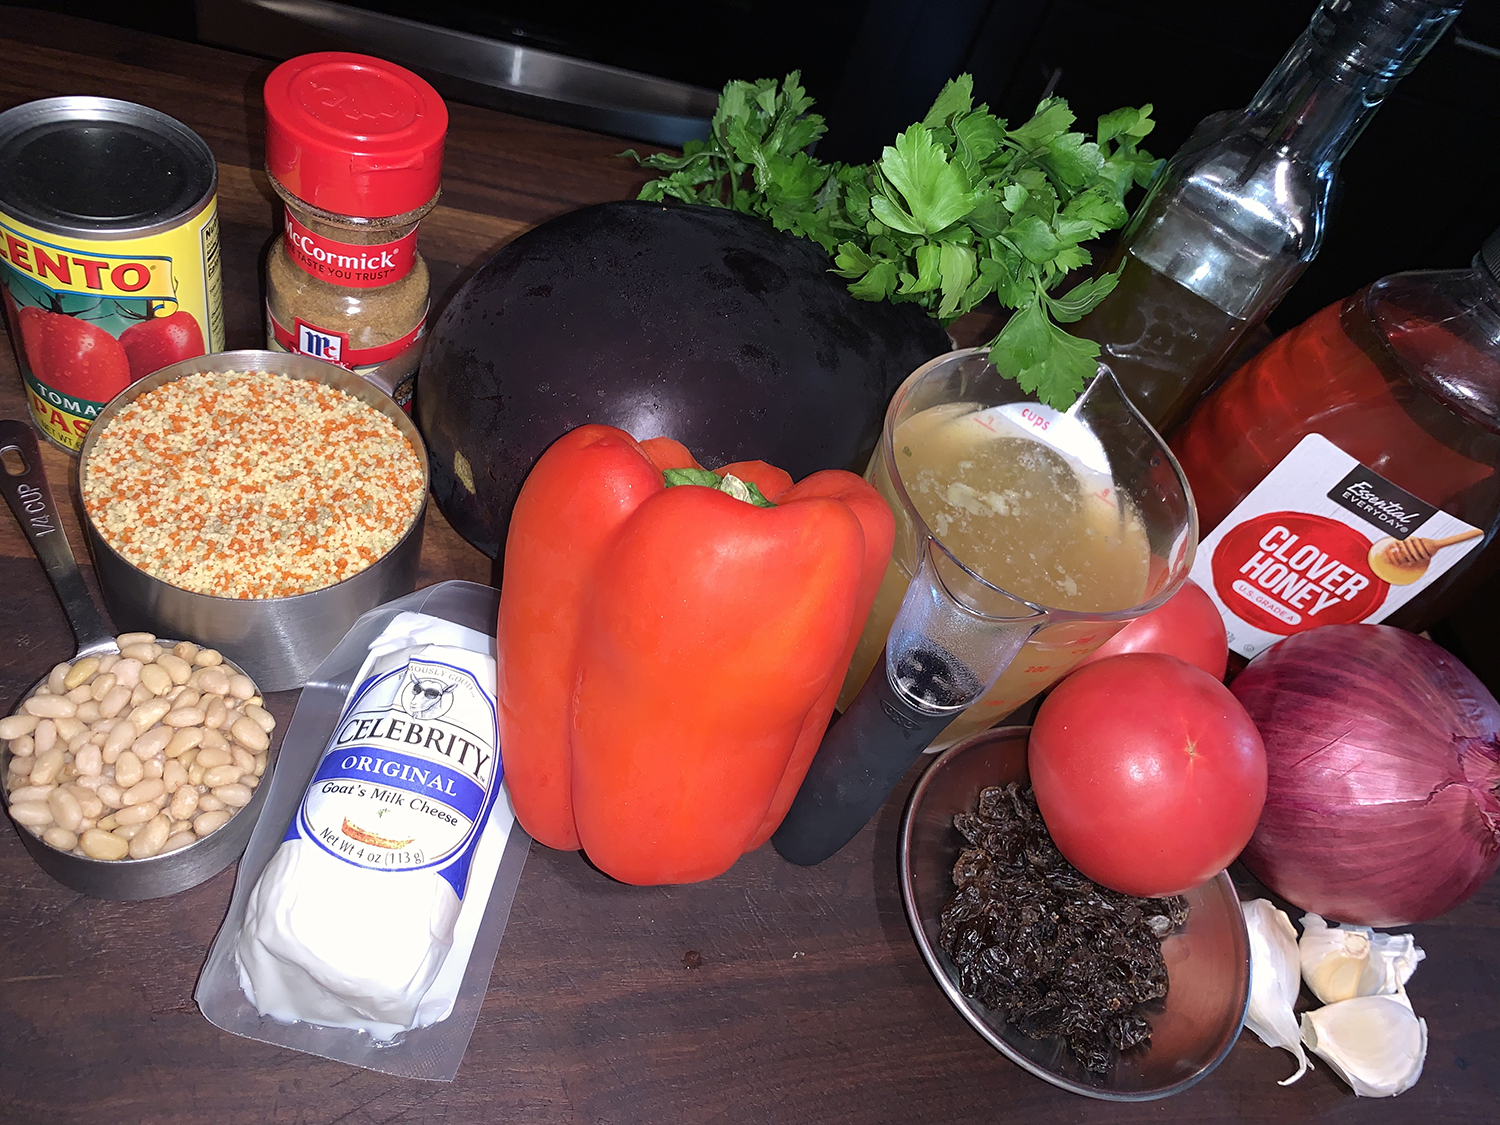
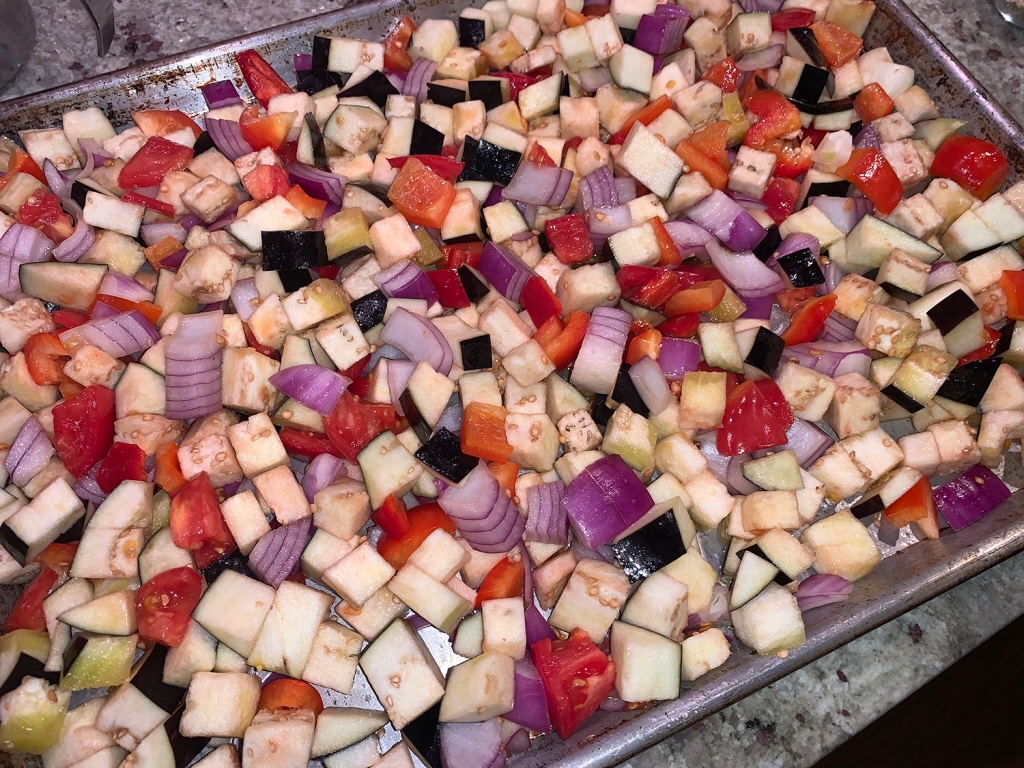
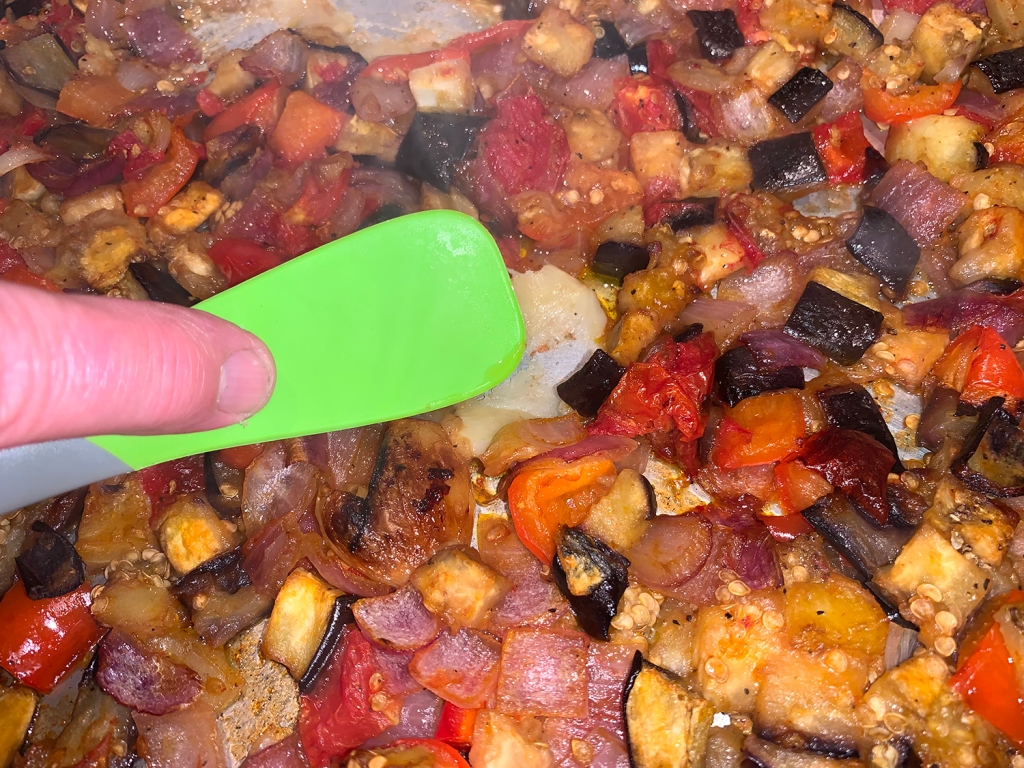
An Italian, Middle-Eastern mash-up if you will. In a twist, this version of Sicilian eggplant dish is roasted on a sheet pan in the oven, so you don’t have to bother with any deep- or pan-frying. The tomato paste and cinnamon give it depth, the sherry vinegar lends brightness, and the raisins and brown sugar offer balance.
This variation on Italian caponata becomes a main course atop fluffy couscous and creamy goat cheese. Buy the freshest eggplant you can find, it should feel heavy and have no soft spots, and you won’t need to peel or salt it to pull out any bitterness. Because pine nuts are traditional in caponata, they’re the first choice, but they can be pricey so pepitas or chopped walnuts make fine substitutions. Finally, if you don’t like goat cheese, substitute ricotta or farmer cheese. But the cheese adds a welcome component, so don’t omit it.
Under the couscous, the goat cheese melts into a creamy, salty, tangy puddle.
G. Daniela galarza
NOTE: Leftovers may be refrigerated in covered containers for up to 4 days.
1 lb. Japanese or globe eggplant, diced into 1/2-inch cubes
1 medium yellow or red onion (8 to 10 oz.), chopped
1 large red bell pepper, chopped
1 medium tomato (6 to 8 oz.), chopped
3 cloves garlic
2 tsp. light brown sugar or honey, or to taste
3/4 tsp. fine sea salt or table salt, or to taste
1/2 tsp. ground cinnamon
1/4 tsp. cracked black pepper, or to taste
1/4 cup tomato paste
1/4 cup raisins (any kind)
1/4 cup toasted pine nuts, pepitas or chopped walnuts
1/4 to 1/3 cup water
2 Tbsp. red wine vinegar or sherry vinegar, or to taste
For the Couscous
1 1/2 cups water or low-sodium chicken stock or vegetable stock
2 Tbsp. olive oil
1/2 tsp. fine sea salt or table salt
1 1/2 cups (about 9 oz.) couscous
For Serving
3 oz. soft goat cheese, or more if desired
1/4 cup torn fresh basil, mint or parsley (optional)
Directions
Position a rack in the lower third of the oven and preheat to 425 degrees.
Pour 3 tablespoons of olive oil onto a large rimmed baking sheet. Add the eggplant, onion, bell pepper, tomato and garlic, and use your hands to toss everything together. Drizzle the remaining 2 tablespoons of olive oil on top, followed by the brown sugar or honey, salt, cinnamon and black pepper. Toss again, then spread into an even layer.
Roast for 20 minutes. Remove the baking sheet from the oven and, using tongs or a spatula, flip and redistribute vegetables so they cook evenly. Return the baking sheet to the oven and roast for another 15 to 20 minutes, or until vegetables are cooked through and browned.
Transfer the pan to a heatproof surface. Mash the garlic cloves into a paste. Push the vegetables aside to expose a small area of the hot metal and place the tomato paste on it. Using a wooden spoon, stir the tomato paste into the vegetables, followed by the raisins, nuts or seeds, water and vinegar; stir to combine. Taste for seasoning, adjusting with more vinegar, sugar, salt and/or pepper as desired.
Make the couscous: About 10 minutes before the eggplant is finished roasting, in a medium lidded saucepan over high heat, bring the water or stock, olive oil and salt to a rolling boil. Immediately pour in the couscous, ensuring it’s moistened throughout, then cover, remove from the heat and let it steam for about 5 minutes, or until all of the liquid has been absorbed.
To serve, portion about a quarter of the goat cheese into the center of each plate. Top with a pile of couscous and some of the caponata. Garnish with the torn herbs and more goat cheese, if desired.
Heart-healthy salmon is paired with jammy tomatoes which get an herby boost from pesto sauce. With very few ingredients and in less than a half hour, you have the makings of a company-worthy dinner.
Cutting the fish into the recommended 4 slices will end up with 6-ounce filets. We decided to divide the salmon into 3 filets weighing in at 8-ounces each. If they have thin “tails” at one end. flip them up and secure with a toothpick while you cook skin side down. Remove the toothpicks before flipping them over. This will help alleviate overdone ends.
Heat two tablespoons of the olive oil in a 12″ non-stick skillet over medium-high heat. Add grape tomatoes, season with 1/4 teaspoon Kosher salt and sauté until soft, about 4 minutes. Stir in pesto and sauté two minutes more. Transfer tomato mixture to a plate and keep warm in a 200°F oven.
Wipe out skillet (although I didn’t find this necessary). Season salmon pieces with 1/2 teaspoon each Kosher salt and pepper. Heat 1 tablespoon olive oil over medium-high heat. Place salmon pieces in skillet, skin side down. Sauté about 4-6 minutes. If you’re pieces are thick you may have to cook them a few minutes longer.
Turn salmon and sauté and additional 4 minutes until salmon is cooked but tender. Serve over tomatoes and with lemon wedges.
Lamb and Veggie Kebabs with an adventurous marinade consisting of onions, garlic, and trio of warm spices give the skewers a bold Middle Eastern flavor that is bound to grab your attention.
When marinating lamb, no need to be shy with flavors that will compliment its rich and assertive flavor. But it is equally important to use a marinade that will also help tenderize the meat while imparting character. This is especially true if you are using lamb shoulder or boneless leg of lamb as opposed to lamb loin fillet, which is more tender.
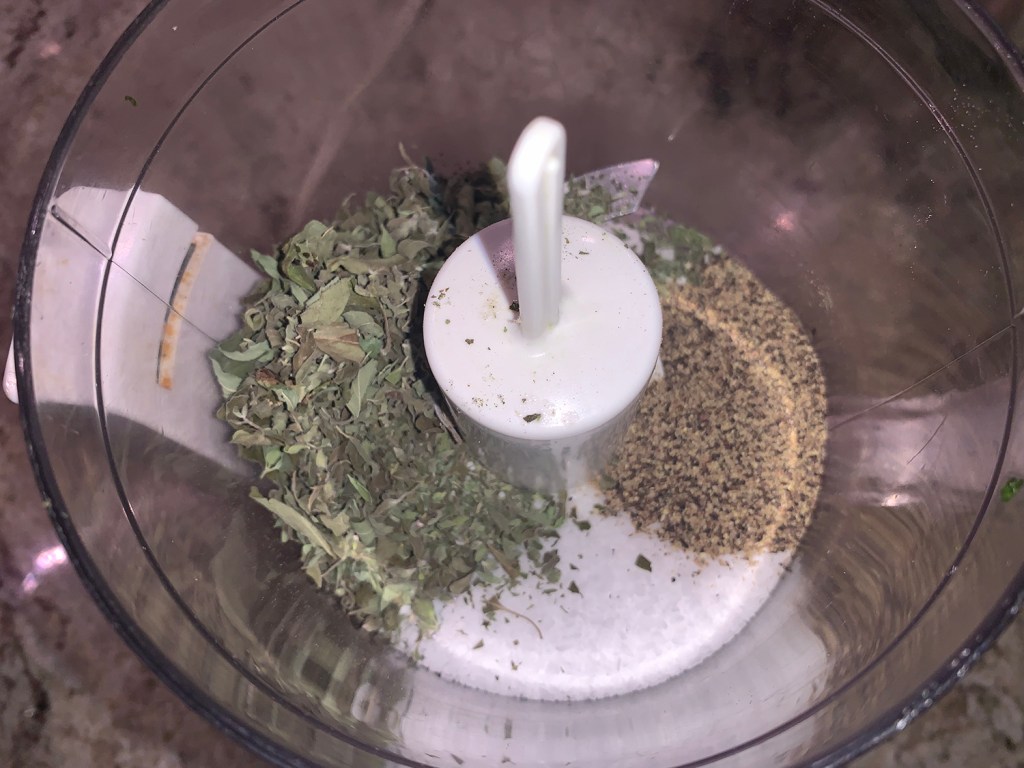
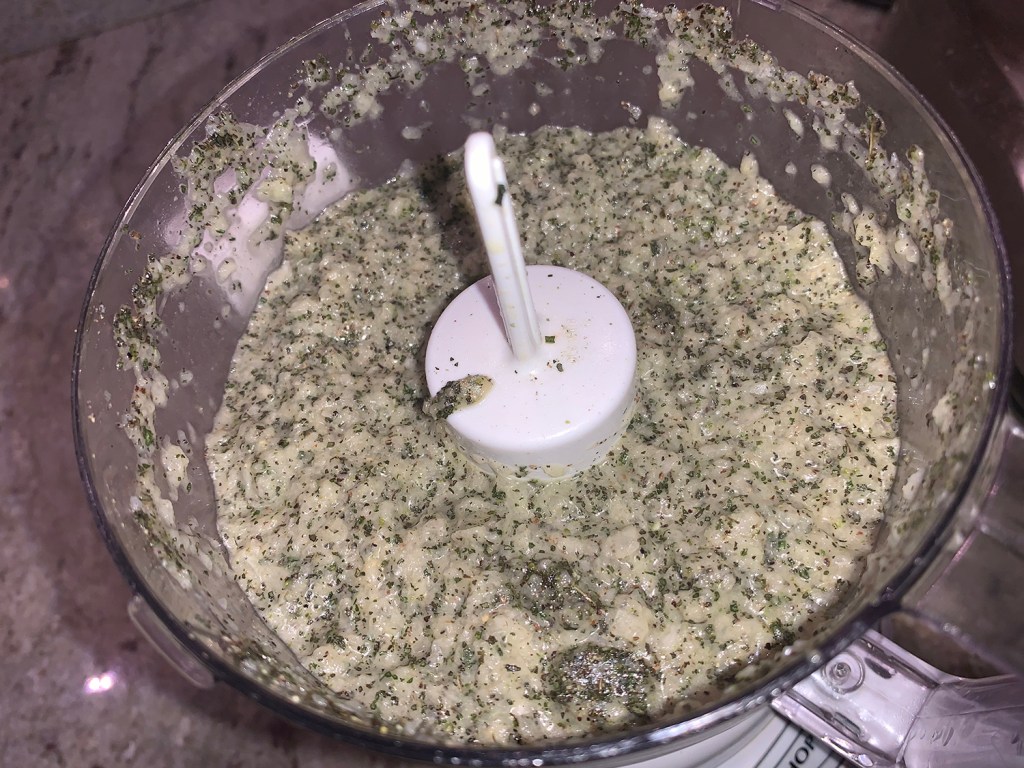
To make the marinade, combine onion, garlic, spices, fresh parsley, olive oil and lemon juice and zest in a food processor. Blitz until everything is well-incorporated and you have a thick onion mixture.
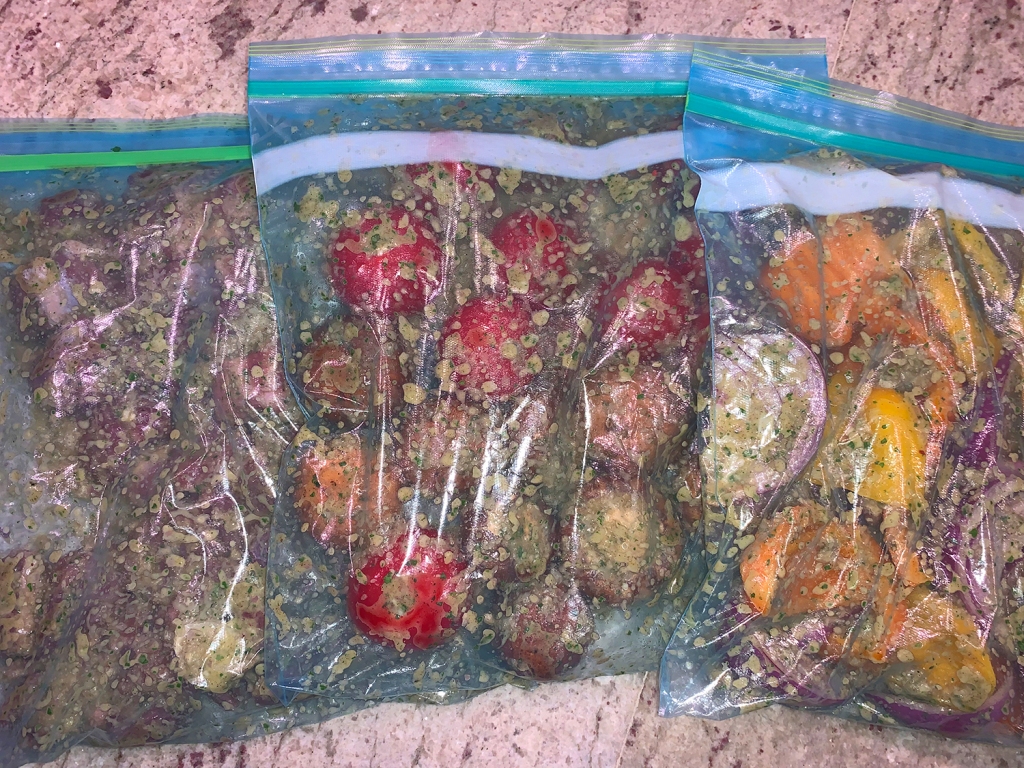
Because the veggies and meat require varying cooking times, I divide them into 3 categories—and 3 ziploc bags. First the meat cubes, then the tomatoes and mushroom caps, and finally the red onion and bell pepper pieces which take the longest to cook. Refrigerate all three bags for up to 2 hours. As the grill heats, thread metal skewers with the bag contents.
We served our skewers over a bed of tri-colored couscous, but if your counting carbs, gluten-free, or following a keto-friendly diet, you may want to skip it. Add lemon wedges for serving.
recipe title=”Mediterranean Lamb and Veggie Skewers” servings=”4-6″ time=”40 min + marinating time” difficulty=”easy”]
Ingredients
2 lbs. boneless leg of lamb
Kosher salt and black pepper
1 lb. cherry (cocktail) tomatoes
8 oz. cremini mushrooms, stems trimmed
1 yellow, 1 orange bell pepper, cut into 8 chucks each
1 red onion, peeled and cut into 8 wedges, root intact
Lemon wedges, for serving
For the Marinade
2 medium yellow onion, peeled and cut into large chunks
10 garlic cloves, peeled and smashed
2 tsp. allspice
1 tsp. nutmeg
1 tsp. cardamom
1 cup packed fresh parsley leaves
2⁄3 cup extra virgin olive oil
Juice and zest of 1 lemon
Directions
Cut the lamb into 1 to 1 ½ -inch cubes or pieces and put them in a large ziploc. Season with kosher salt and black pepper.
In the bowl of a food processor fitted with a blade, combine the onion, garlic, spices, parsley, olive oil and lemon juice and zest. Cover and run the processor until everything is finely chopped (you should end up with a thick onion marinade).
Divide the mixture into three equal portions and pour the first over the lamb and mix well to make sure all the lamb is well coated with the marinade. Repeat with the other two bags of veggies.
Cover and refrigerate all 3 bags for up to 2 hours. (If you do not have time, leave the kebabs to marinate at room temperature for about 30 minutes).
Brush the grates of a gas grill (or an indoor griddle) with oil and heat.
Shake excess marinade off and thread the lamb pieces on some long metal skewers, allowing a little room between pieces. (Flat metal skewers are best, but wooden skewers soaked in water will also work).
Repeat with the tomatoes and mushroom caps, and then the bell pepper and onion pieces.
Assemble the bell pepper/onion skewers on the hot grill first. After 10 minutes, add the tomato skewers. Turn all skewers every few minutes as they begin to char.
After five minutes more, add the lamb kebabs. Grill over high heat, turning each kabob one-quarter turn every couple minutes, until the meat is browned all over, anywhere from 5 to 7 minutes, depending on how well you like your lamb cooked (5 minutes on our grill produced medium-rare kebabs).
Remove all skewers at the same time. Slide all contents onto a large platter and pass around to each dinner guest. Plate with couscous, if using, and lemon wedges.
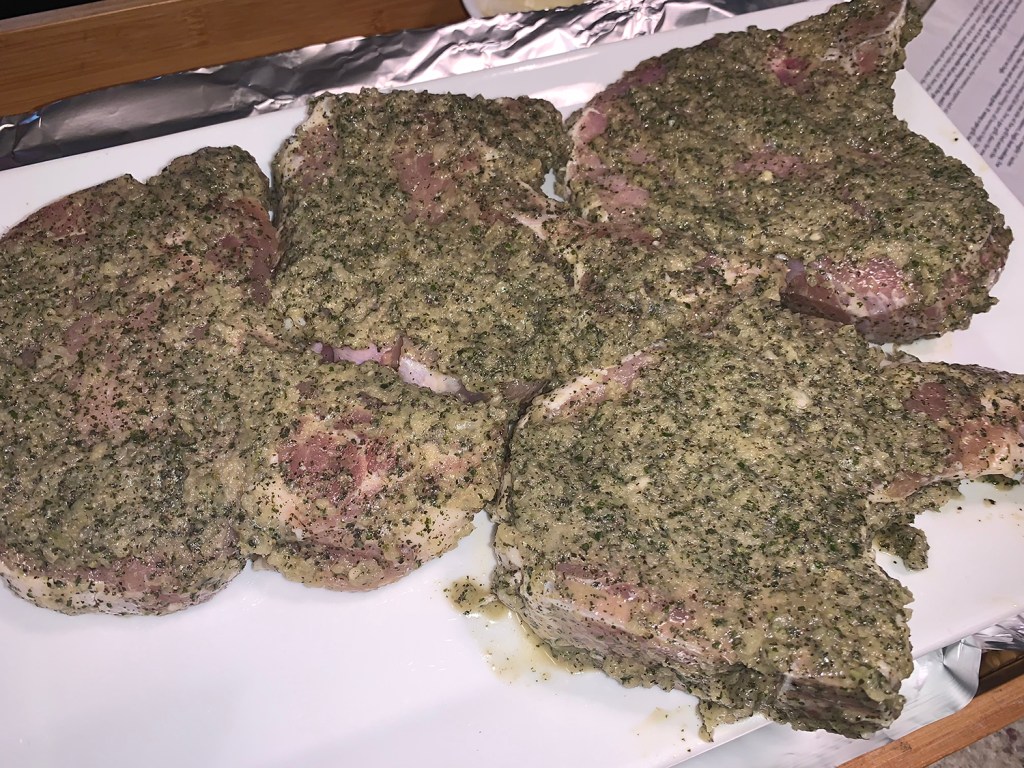
Another one-pan wonder, and who doesn’t like that for ease of clean-up and prep? It works as well for company as it does for a weeknight dinner. According to ATK’s “Complete Mediterranean Cookbook”, cooking the tenderloins until buttery-smooth is key, and roasting them atop a bed of vegetables buffers the heat to ensure juicy meat all the way through, which is rubbed with herbes de Provence, salt, and pepper.
The Mediterranean seasoning inspired the selection of vegetables: sweet, delicately flavored fennel, earthy artichoke hearts (frozen, to keep things easy), and briny olives (which I doubled the quantity). After softening the fennel in the microwave, it was tossed with the other vegetables and olive oil, and the mixture was spread into the roasting pan (or rimmed baking sheet), placing the tenderloins on top.
The vegetables are nearly cooked when the pork is done, so remove the meat to a moated cutting board and tent with foil. To the cooked veggies, add in juicy halved cherry tomatoes and lemon zest, and let them finish in the oven. After 10 minutes, the fennel should be tender, the tomatoes softened and releasing their juices.
NOTE: If using frozen artichoke hearts, be sure to thoroughly thaw and pat them dry; otherwise their moisture will inhibit the browning of the roasted vegetables.
Spice-Rubbed Pork Tenderloin with Fennel, Tomatoes, Artichokes, and Olives
2 large fennel bulbs, stalks discarded, bulbs halved, cored, and cut into ½-inch-thick strips
12 oz. frozen artichoke hearts, thawed and patted dry
½ cup pitted kalamata olives, halved
3 Tbsp. extra-virgin olive oil
18 oz. cherry tomatoes, halved
1 Tbsp. grated lemon zest
2 Tbsp. minced fresh parsley
Season with salt, pepper and herbs de Provence
After microwaving the fennel, drain well
Toss, fennel, artichoke hearts and olives with olive oil
Place seasoned pork on top and tuck under their thin tails
Halfway through, turn the meat over
Add tomatoes and lemon zest and cook another 10 minutes
Directions
Adjust oven rack to lower-middle position and heat oven to 450 degrees. Pat pork dry with paper towels and season with herbes de Provence, ½ teaspoon salt, and ¼ teaspoon pepper.
Combine fennel and 2 tablespoons water in bowl, cover, and microwave until softened, about 5 minutes; drain well. Toss drained fennel, artichokes, olives, and oil together in bowl and season with salt and pepper.
Spread vegetables into 16 by 12-inch roasting pan and lay pork on top, tucking under the thin part of the tail. Roast until pork registers 140 to 145 degrees, 25 to 30 minutes, turning tenderloins over halfway through roasting.
Remove pan from oven. Transfer pork to cutting board, tent loosely with aluminum foil, and let rest for 10 minutes. Meanwhile, stir cherry tomatoes and lemon zest into vegetables and continue to roast until fennel is tender and tomatoes have softened, about 10 minutes.
Remove pan from oven. Stir parsley into roasted vegetables. Slice pork into ½-inch-thick slices, and arrange vegetables and sliced pork on a platter, pouring any accumulated meat juices back over the plated pork and vegetables.
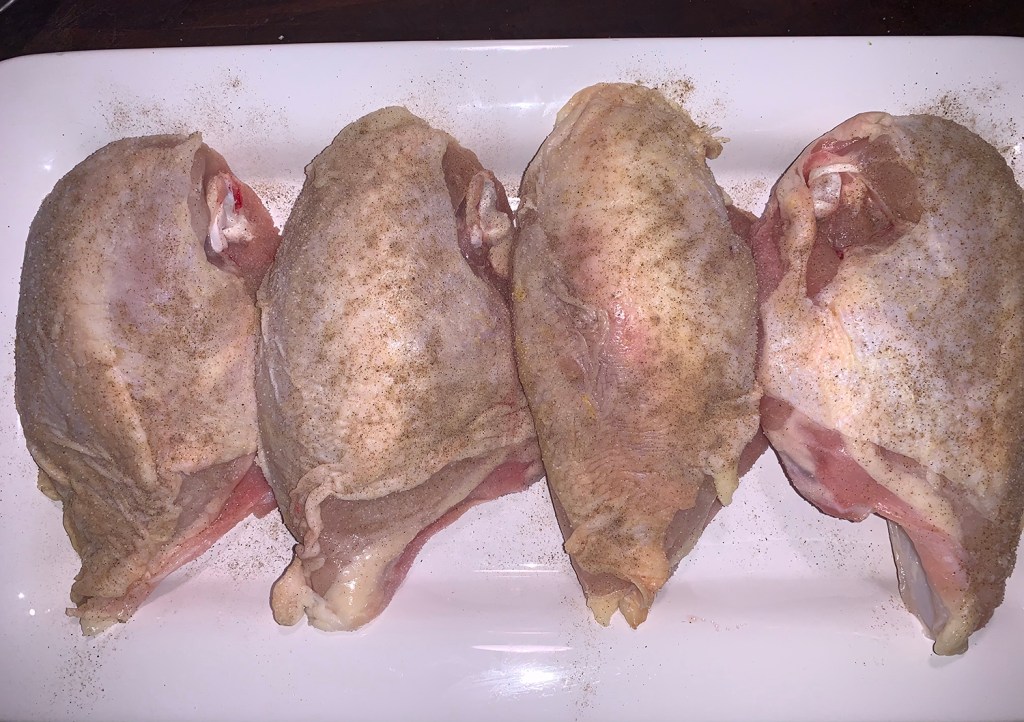
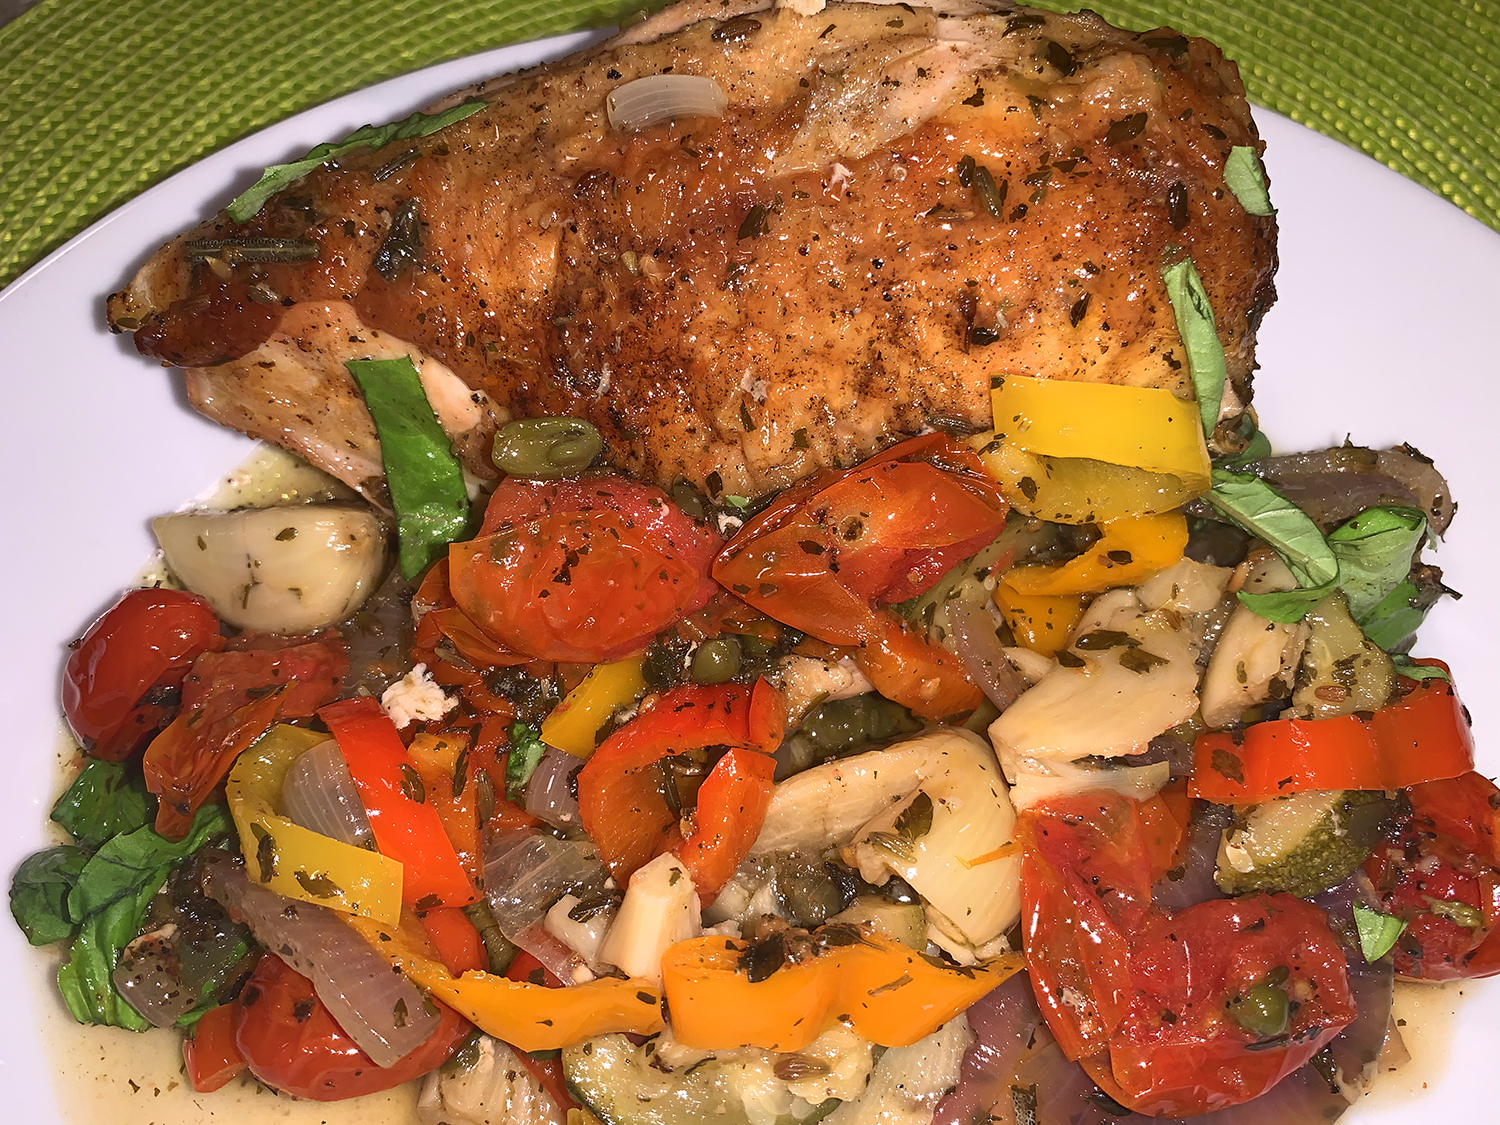
When your dining partner exclaims at least a half dozen times during the course of the meal “This is sooo good, I want to drink the sauce from my plate.” Not surprisingly, after every morsel of food was eaten, that’s exactly what he did. (After leftovers the next day, he did the same thing!) It’s no wonder because in this simple skillet dinner, seared bone-in chicken breasts are roasted on top of a bed of sunny Mediterranean vegetables and topped with a pan sauce that marry the ingredients into a unified delight.
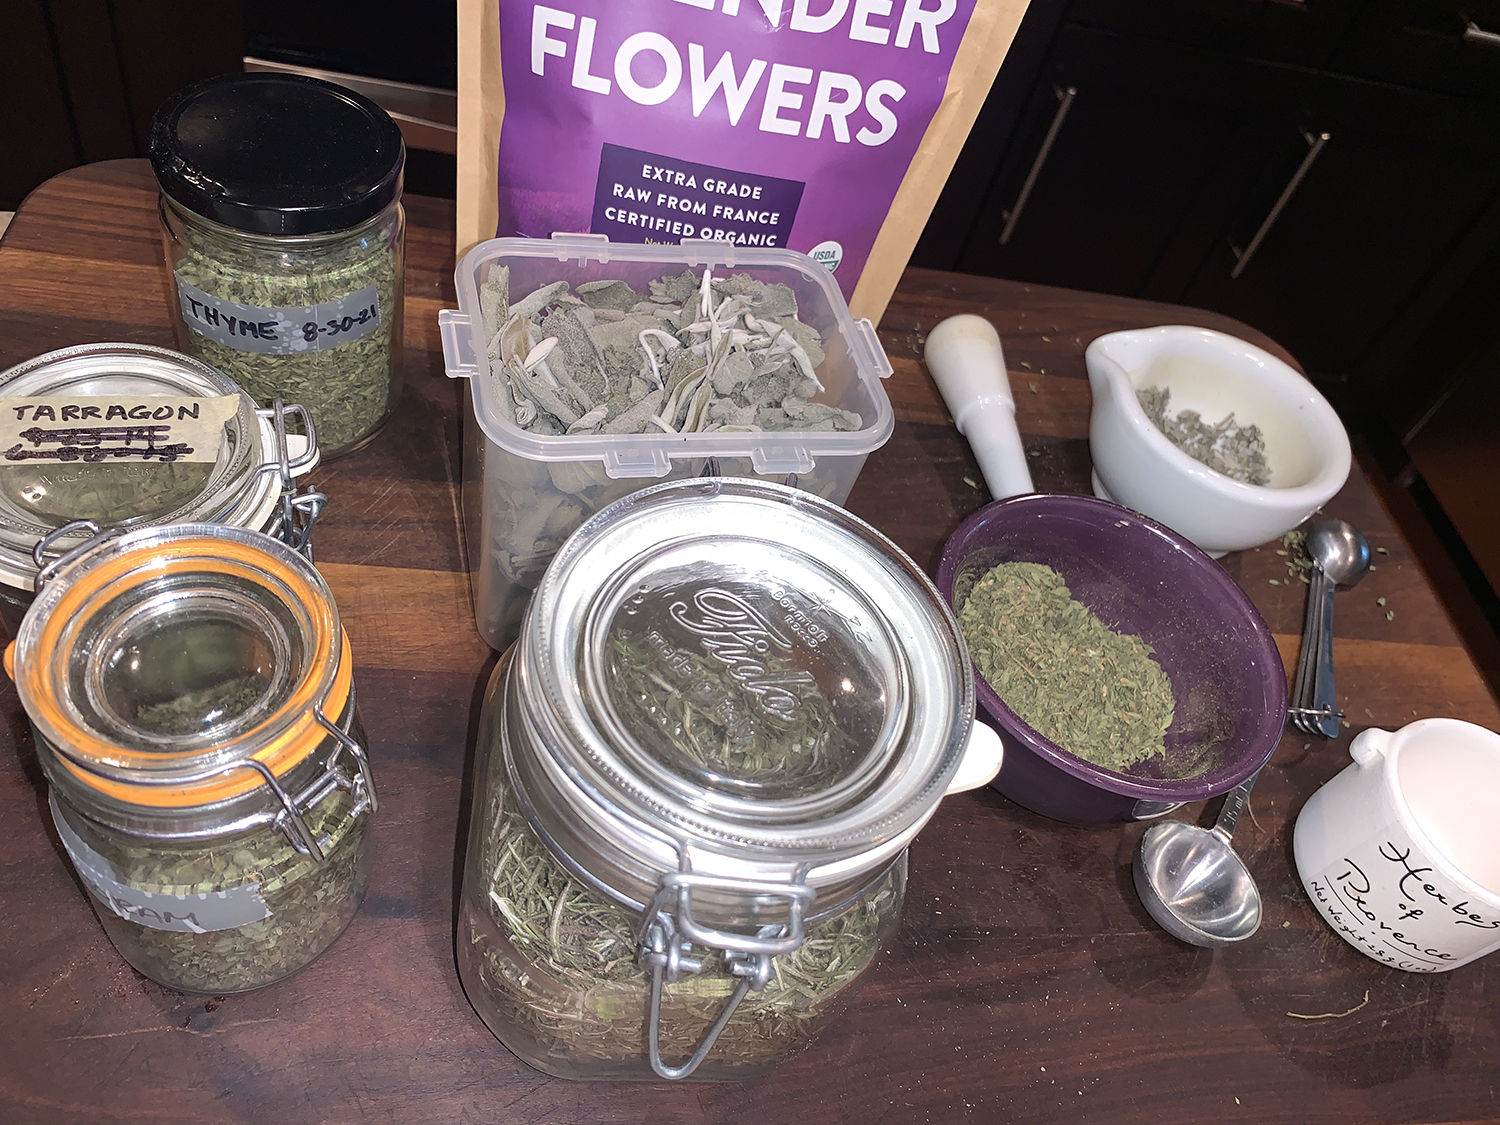
Part of the charm happens before cooking, when the veggies are tossed with herbes de Provence—an aromatic seasoning blend that typically includes rosemary, thyme, savory, marjoram and oregano, and sometimes other spices and herbs such as fennel, sage, lavender and tarragon. Our concoction is listed below, but you can also simplify it, or buy it if you don’t have a lot of the ingredients.
Herbaceous dry white vermouth is an ideal deglazing liquid for the browned bits left in the pan after searing the chicken. It is critical in elevating the dish and adds subtle but unmistakable herbal notes to the final meal. Dry white wine would work in a pinch, but the results won’t be quite the same.
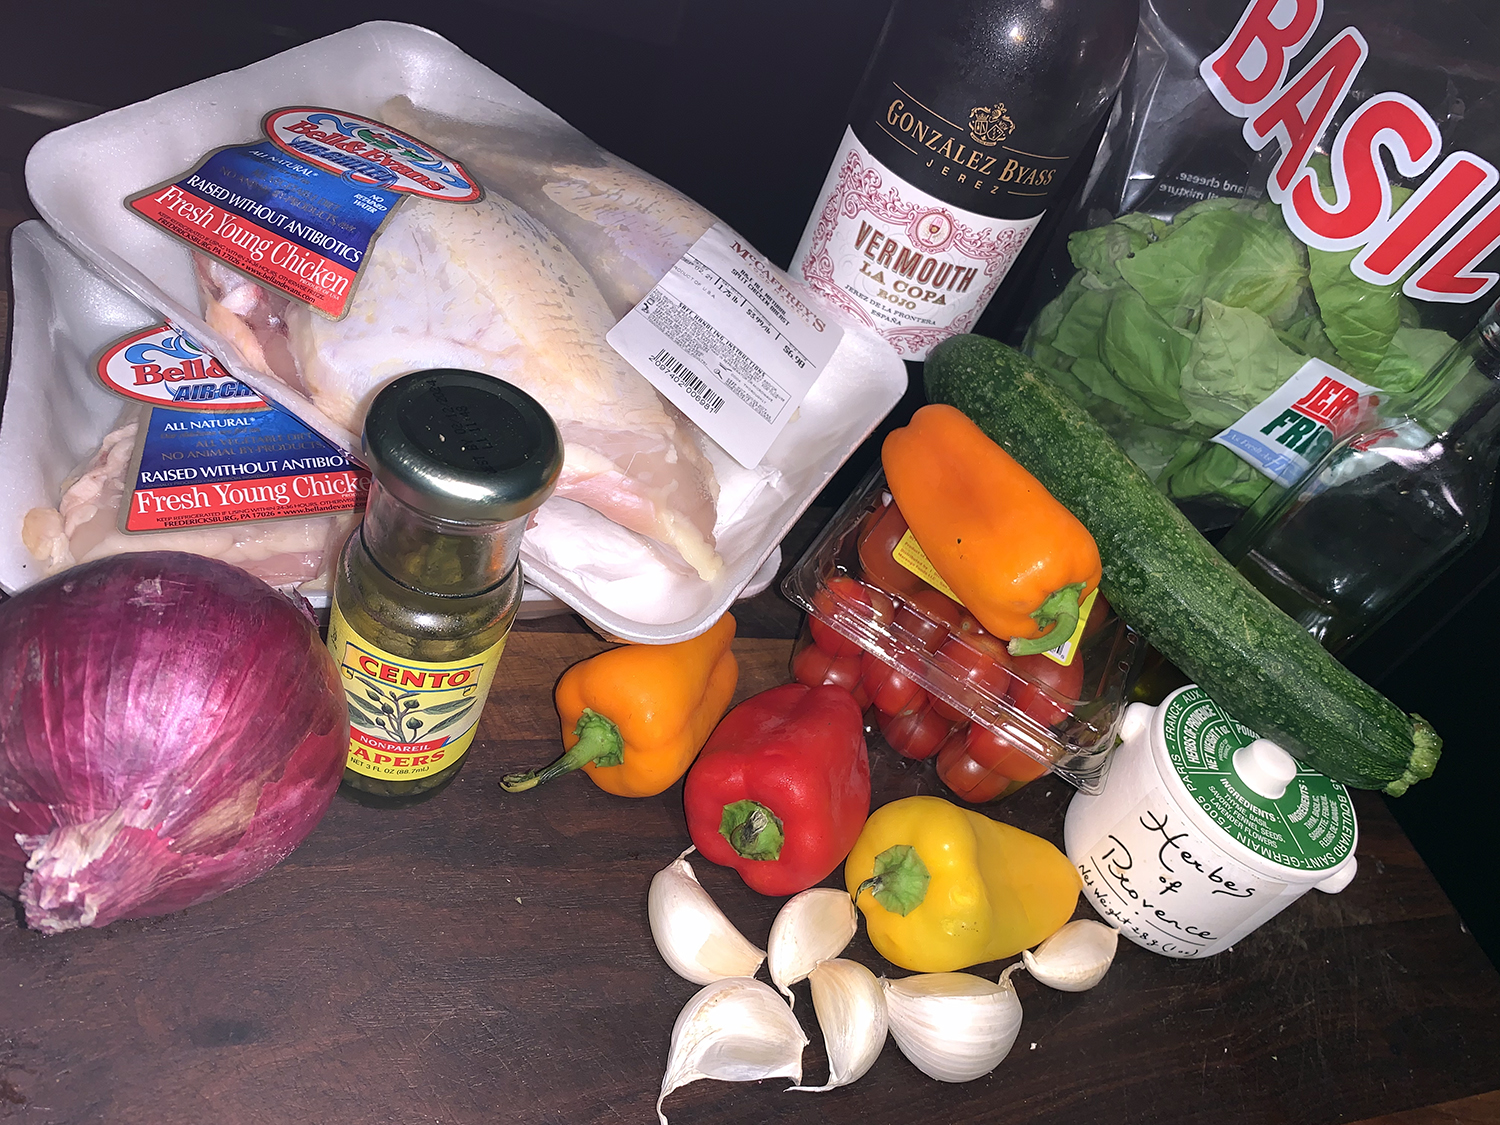
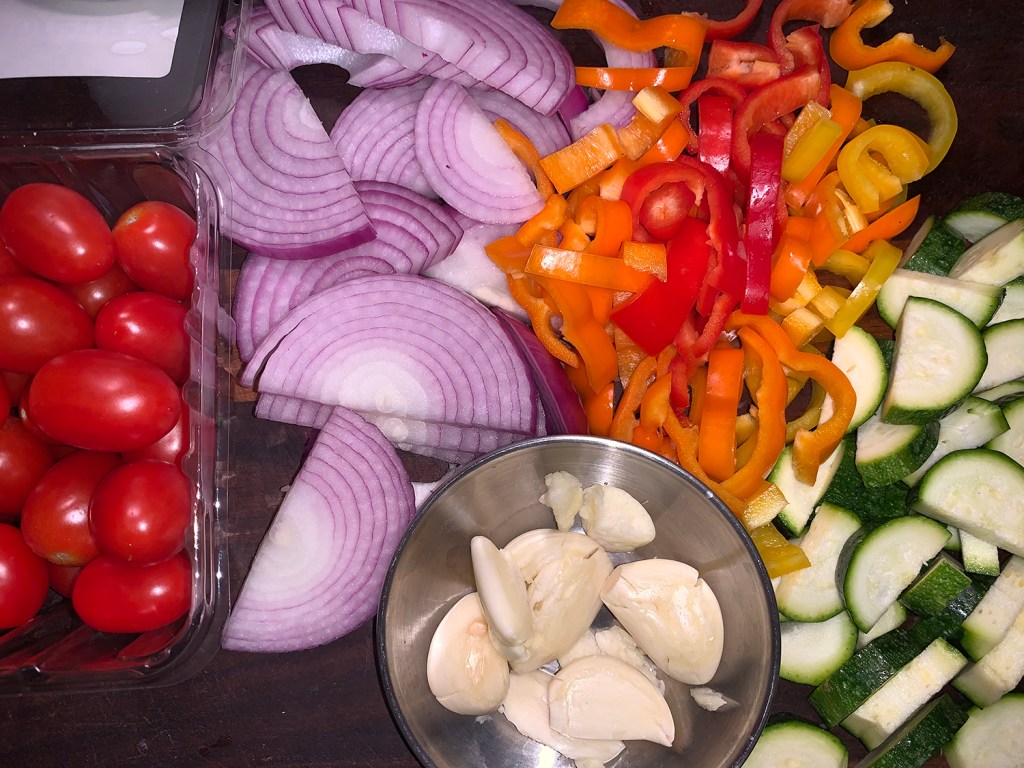
Instead of one bell pepper, we used 4 or 5 small ones in varying colors because that’s what we had on hand. Plus, it lends more pops of color in the overall veggie scheme. Our Le Creuset “Baby Blue” enameled cast-iron braising pot was the perfect vehicle in which to cook the meal.
NOTE: Don’t use oversized chicken breasts; 12-ounce pieces work best. Larger ones require longer cooking, which will result in overdone vegetables. However, if unable to find 12 oz. chicken breasts, and have to use larger (16 oz.), compensate by frying skin-side-down for a full 8 minutes, and then fry an additional 5 minutes skin-side-up before proceeding with the rest of the recipe. When you remove the skillet from the oven, don’t forget that the handle will be hot.
Pan-Roasted Chicken and Summer Vegetables with Herbes de Provence
1 medium red onion, halved and sliced about ¼ inch thick
1 yellow, orange or red bell pepper, stemmed, seeded and thinly sliced
1 pint grape tomatoes
1 small zucchini, halved lengthwise and sliced crosswise ¼ inch thick
¼ cup drained capers, plus 1 Tbsp. caper brine
½ cup dry vermouth
1 cup lightly packed fresh basil, torn
Directions
Heat the oven to 475℉ with a rack in the middle position. Season the chicken on all sides with salt and pepper.
In a large bowl, stir together 2 tablespoons of oil, the herbes de Provence, ¼ teaspoon salt and 1 teaspoon pepper. Add the garlic, onion, bell pepper, tomatoes, zucchini and capers, then toss to combine; set aside.
In a 12-inch skillet over medium-high, heat the remaining 1 tablespoon oil until shimmering. Add the chicken skin down and cook without disturbing until golden brown, 5 to 8 minutes. Using tongs, transfer the chicken skin up to a large plate.
Pour off and discard all but 1 tablespoon fat from the skillet. Add the vermouth, bring to a boil over medium-high and cook, scraping up any browned bits, until reduced to about 2 tablespoons, 1 to 2 minutes.
Add the vegetables and cook, stirring, until just warmed through, about 1 minute, then distribute in an even layer. Nestle the chicken skin up in the vegetables and add any accumulated juices. Transfer the skillet to the oven and cook until the thickest part of the breast reaches about 160°F, 20 to 25 minutes.
Remove the pan from the oven (the handle will be hot). Transfer the chicken skin up to a serving platter. Using a slotted spoon, transfer the vegetables the platter, arranging them around the chicken.
Set the skillet over high, bring the liquid to a simmer and cook, stirring, until slightly thickened and reduced, 1 to 2 minutes. Off heat, stir in the caper brine, then taste and season with salt and pepper. Pour the sauce around the chicken and over the vegetables. Sprinkle with basil.
Herbes de Provence
Ground spices and dried herbs last about a year if kept away from heat and light.
Ingredients
4 Tbsp. dried thyme
1 Tbsp. dried sage
1 Tbsp. dried oregano
1 Tbsp. dried marjoram
1 Tbsp. dried rosemary
1 Tbsp. dried lavender flowers
2 tsp. dried tarragon
2 tsp. fennel seeds, toasted
Directions
Mix all ingredients in a large mortar and finely crush with a pestle.
Store unused mixture in an airtight container away from heat and light.
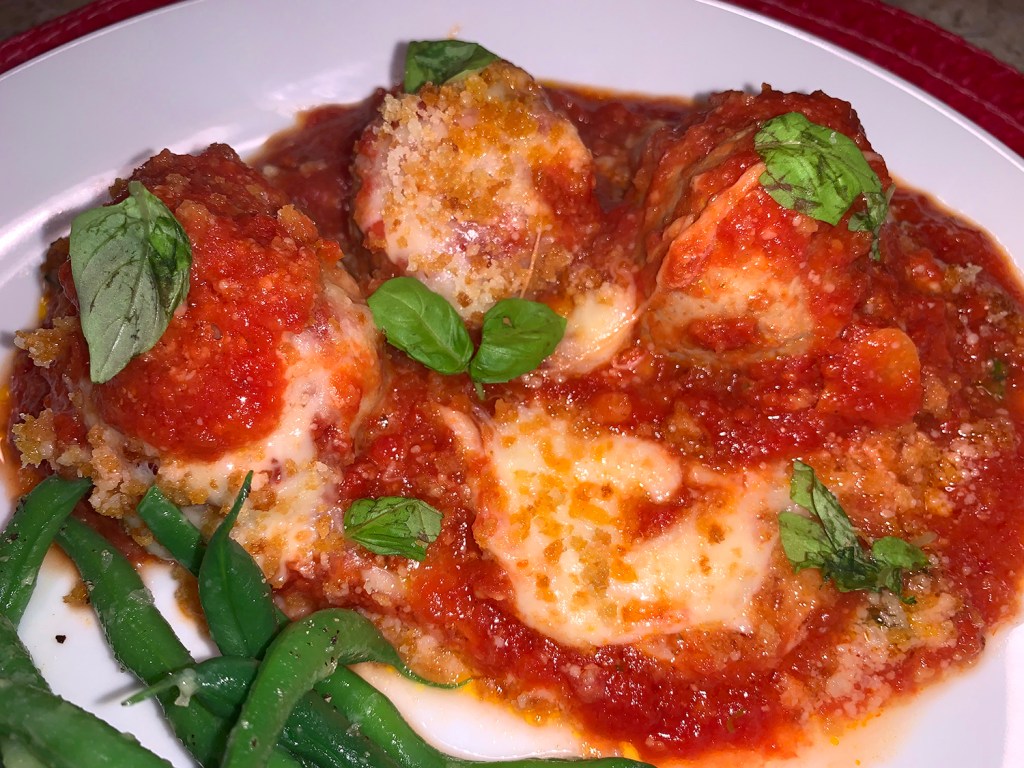
Considering that both chicken Parmesan and meatballs with marinara are popular choices, why commit yourself to just one? Here, Cook’s Country captures the best flavors of both dishes while minimizing the effort—and with fabulous results I must report. The Hubs is already planning to remake them for an upcoming retreat.
Starting with the meatballs, they use a flavorful mixture of Parmesan cheese, dried oregano, garlic powder, salt, and pepper to perk up the flavor of mild ground chicken. When shaping the meatballs, it’s a good practice to keep a small bowl of water nearby to dunk your fingertips in, it helps keep the mixture from sticking to your hands.
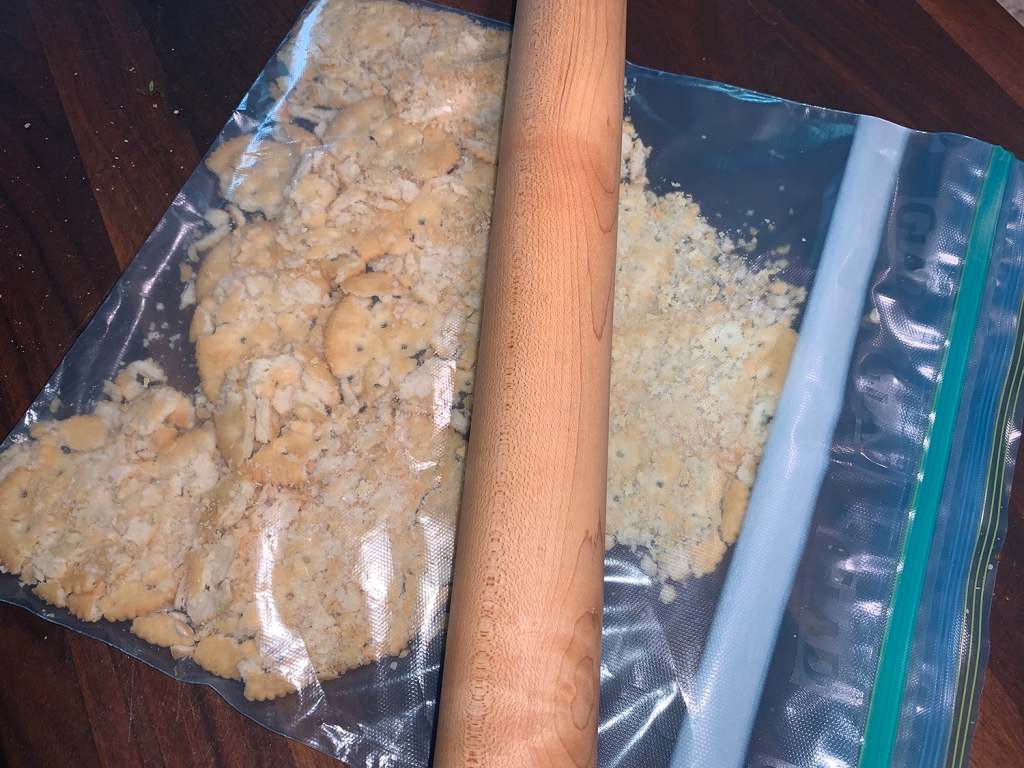
In place of a panade (a seasoned mix of starch and liquid), crushed Ritz Crackers (we used the garlic butter variety) and an egg are stirred into the ground chicken. This paste adds enough structure to skip the browning step (which helps meatballs hold together) and still have meatballs that hold their shape and remain tender.
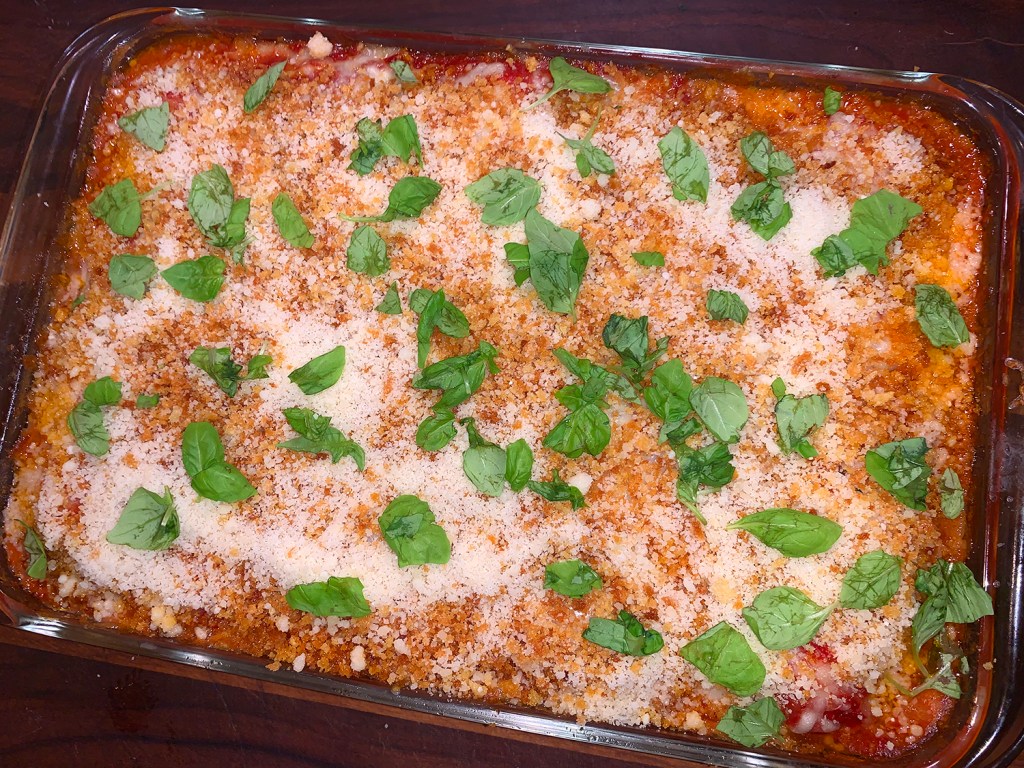
The sauce is kept simple with seasoned crushed tomatoes and tomato sauce with a generous amount of fresh garlic, dried oregano, and pepper flakes. After a brief simmer, pour the sauce over the meatballs and top it with a crown of mozzarella (for its gooey meltability) prior to baking. When the saucy meatballs finally emerged from the oven, a sprinkle of savory Parmesan cheese, crunchy panko, and fragrant basil impart that familiar chicken Parmesan vibe.
You can make this dish ahead up to the point of topping with the shredded mozzarella. Cover and refrigerate until ready to bake. Bring to room temperature as you preheat the oven, then continue with the remaining directions. Remember, the dish will need to rest for 15 minutes before you add the panko/parm topping.
As there was already crushed crackers and panko topping involved, I opted to serve the meatballs simply with a side of fresh green beans and a tossed salad. But if you’re not concerned with carbs, or want to stretch the meal, you can add cooked pasta and some crusty bread to help sop up all of the wonderful sauce.
8 oz. whole-milk block mozzarella cheese, shredded (2 cups)
1 cup panko bread crumbs
¼ cup torn fresh basil
Directions
Heat 3 tablespoons oil in large saucepan over medium heat until shimmering. Add sliced garlic and cook until lightly browned, about 1 minute.
Stir in crushed tomatoes, tomato sauce, ¼ teaspoon oregano, ¼ teaspoon salt, and pepper flakes. Bring to simmer; reduce heat to medium-low; and cook until slightly thickened, 10 to 15 minutes, stirring occasionally. Remove from heat and cover to keep warm.
Adjust oven rack to middle position and heat oven to 350 degrees. Place crackers in large zipper-lock bag, seal bag, and crush fine with rolling pin (you should have about 1 cup crumbs).
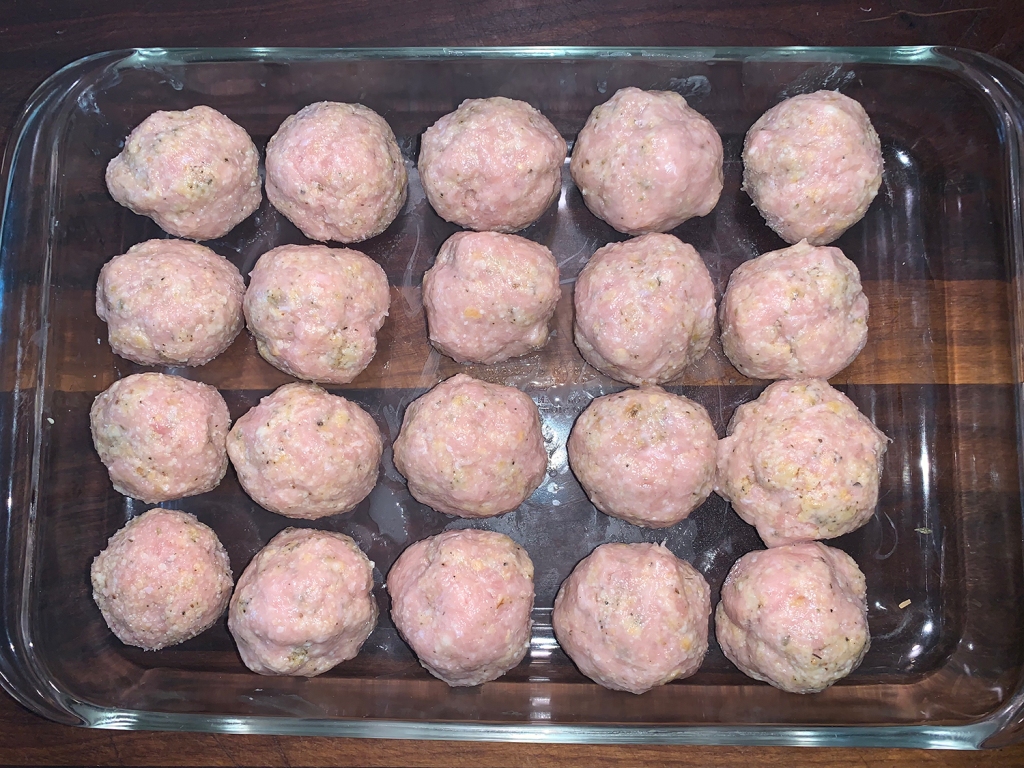
Combine crumbs, 2 cups Parmesan, egg, garlic powder, pepper, remaining 2 teaspoons oregano, and 1 teaspoon salt in large bowl. Add chicken and mix with your hands until thoroughly combined.
Divide mixture into 20 portions (about ¼ cup each). Using your hands, roll each portion into ball, and transfer to 13 by 9-inch baking dish.
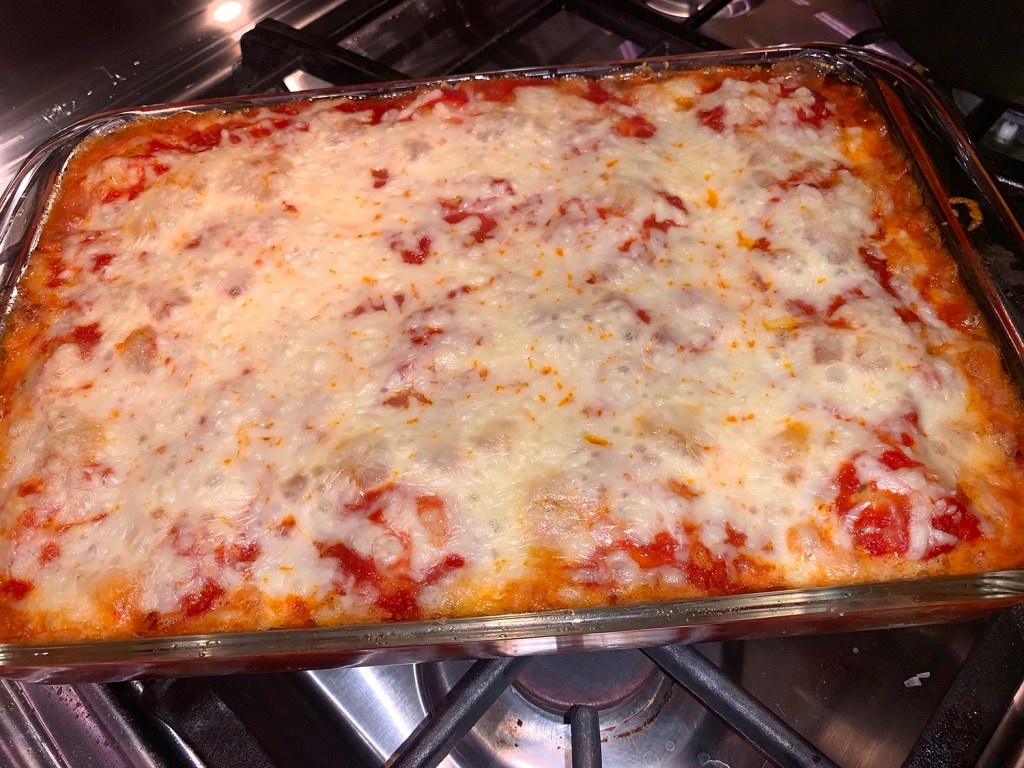
Pour sauce over meatballs, then sprinkle with mozzarella. Bake until meatballs register at least 160 degrees and mozzarella is melted and beginning to brown, 40 to 45 minutes. Let cool for 15 minutes.
Meanwhile, combine panko, remaining 2 tablespoons oil, and remaining ¼ teaspoon salt in bowl. Microwave until panko is light golden brown, 1 to 3 minutes, stirring every 30 seconds.
Sprinkle meatballs with panko mixture, remaining ½ cup Parmesan, and basil. Serve.
With tomatoes at the height of their season, this fabulous salad hits all the right notes. No cooking, easy to prep, and tasty as all get out—providing you use great tomatoes. All we needed was one because the heirloom that we picked up at the local farmer’s market weighed in at a whopping 1 1⁄2 pounds and was bright red all the way through!
According to the Milk Street article where this recipe came from, pipirrana is a summery, tomato-centric salad from Andalusia in southern Spain. Consider it gazpacho in chopped-salad form. Their version of pipirran con atún, includes tuna, and hard-cooked eggs, making the dish hearty enough to be a satisfying main course. The vegetables are left in largish chunks instead of a fine dice, as is common. The onion is thinly sliced and steeped in sherry vinegar for a few minutes to tame its bite.
One thing you want to stay away from here is canned tuna packed in water. The flavor of tuna in olive oil is richer and its texture more velvety. And by all means, when you drain the tuna, do it over a bowl and use it when making the vinaigrette, adding olive oil as needed to make up the difference. Don’t know why most recipes fail to mention this step.
We drained the pickled onions directly over the bowl holding the tuna olive oil. This is used to make the vinaigrette that dresses the salad. We were blown over by how good this simple salad was—made even better with a chilled glass of crisp Spanish white wine.
1½ lbs. ripe tomatoes, cored and cut into 1-inch chunks
1 English cucumber, halved lengthwise, seeded and cut into ½-inch chunks
Kosher salt and ground black pepper
1 small red onion, halved and thinly sliced
3 Tbsp. sherry vinegar
1 medium green or red bell pepper, stemmed, seeded and cut into 1-inch pieces
¼ cup drained capers
2 5-oz. cans olive oil–packed tuna, drained and flaked into small pieces (don’t discard the olive oil from the tuna can, save it to make the vinaigrette)
½ cup extra-virgin olive oil
4 hard-cooked eggs, peeled and quartered
2 Tbsp. finely chopped fresh flat-leaf parsley
Directions
In a large bowl, toss together the tomatoes, cucumber and ½ teaspoon salt. In a medium bowl, stir together the onion, vinegar and ¼ teaspoon salt. Let both stand for about 10 minutes.
Place a large strainer over the bowl containing the oil from the canned tuna. Pour the onion slices and their juices into the strainer, pressing down to remove most of the vinegar. Add the drained onions to the tomato-cucumber mixture.
Add the bell pepper, capers and tuna to the vegetables, lightly stir.
To the vinegar oil mixture, and ¼ teaspoon each salt and pepper. Stir in the parsley. Pour the dressing over the salad and gently toss. Transfer to a serving dish and top with the egg wedges.
For an easy, but impressive weeknight dinner, turn a simple roast chicken into a fabulous poultry dinner by rubbing it with za’atar. Using olive oil to form a paste, spread za’atar and salt underneath the chicken skin and let it rest in the refrigerator for 6 to 8 hours, which has the same effect as brining a chicken.
To cook it, use the Italian technique of cooking under a brick (or a pot in this case). Once the skin is crisp, brush on additional za’atar and olive oil paste. Then finishing the chicken breast side up in a hot oven turns the paste into a crisp crust. While the chicken cooks, create a zesty vinaigrette that brightens up the finished dish.
But exactly what is za’atar? It is so multifaceted and dynamic due to a blend of many different flavors, textures, and fragrances. Even though it varies greatly (specific recipes can be closely-guarded secrets), za’atar is generally a combination of dried oregano, thyme, and/or marjoram (woodsy and floral), with sumac (tangy and acidic) and toasted sesame seeds (nutty and rich).
If za’atar is not available at the grocery/specialty store, make it at home, like us (see below). Play around with different quantities of crushed dried oregano, dried thyme, and dried marjoram, and add sumac, toasted sesame seeds, and, if you want, salt.
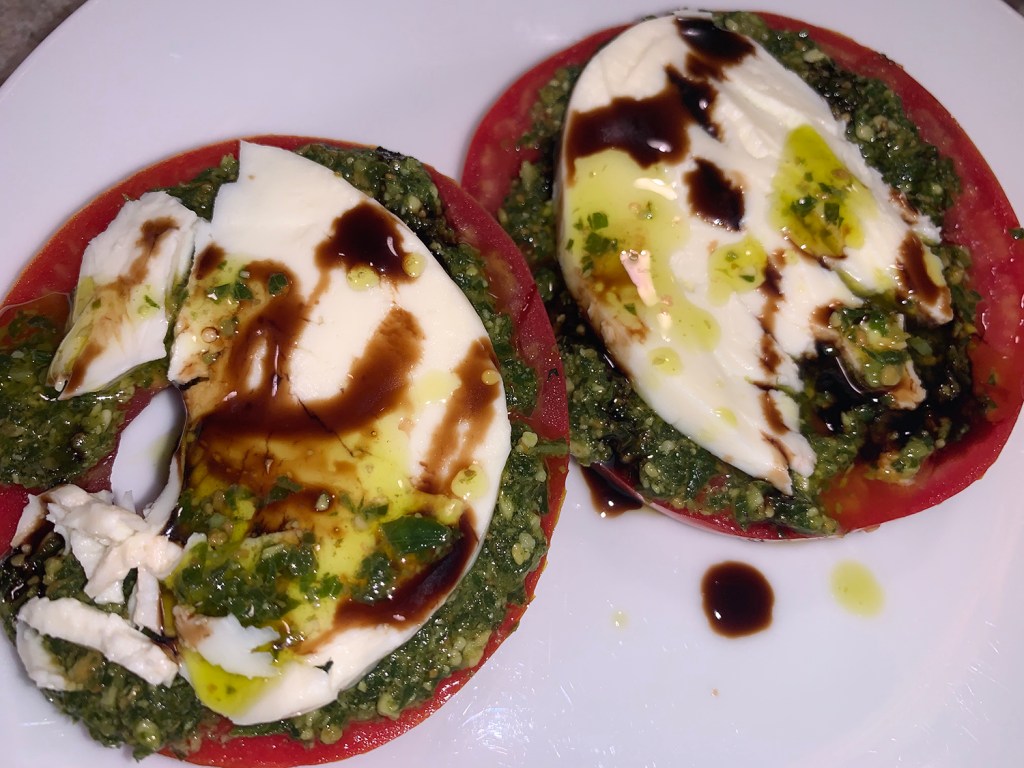
One of our paired side dishes was locally grown organic tomatoes, spread with fresh pesto, topped with slices of mozzarella, and drizzled with balsamic vinaigrette.
TIP: We keep a jar of preserved lemons in our auxiliary refrigerator at most times. If you don’t have or can’t find preserved lemons, you can microwave four 2-inch strips lemon zest, minced, 1 teaspoon lemon juice, ½ teaspoon water, ¼ teaspoon sugar, and ¼ teaspoon salt at 50 percent power until the liquid evaporates, about 1½ minutes, stirring and mashing the lemon with the back of a spoon every 30 seconds.
Because our chicken weighed over 5 pounds—25% bigger than called for—I used more za’atar mix and doubled the preserved lemon vinaigrette. It also took a bit longer to come to temp, but not much because we used a convection roast setting. If at any time while in the oven the skin seems to be getting too dark, rest foil over it while the meat continues to reach temperature. Test both breast and thighs with an instant-read thermometer.
Za’atar-Rubbed Butterflied Chicken with Preserved Lemon Vinaigrette
¼ preserved lemon, pulp and white pith removed, rind rinsed and minced (1 Tbsp.)
2 tsp. white wine vinegar
½ tsp. Dijon mustard
Skin side down in hot pan.
Place heavy pot on chicken to press flat.
Flip browned chicken over.
Spread za’atar mixture all over skin areas, place in hot oven.
After 20 minutes in the oven, and 10 minutes resting, it’s ready to carve.
Make the preserved lemon vinaigrette.
Spread vinaigrette over all pieces of chicken, serving any remainder.
Directions
Combine 1 tablespoon oil, 1 tablespoon za’atar, and 1 teaspoon salt in small bowl.
With chicken breast side down, use kitchen shears to cut through bones on either side of backbone. Discard backbone and trim any excess fat or skin at neck. Flip chicken and tuck wingtips behind back. Press firmly on breastbone to flatten, then pound breast to be same thickness as leg and thigh. Pat chicken dry with paper towels and, using your fingers, gently loosen skin covering breast and thighs.
Rub za’atar-oil paste evenly under skin. Transfer chicken to large plate and refrigerate uncovered for 6 to 8 hours.
Adjust oven rack to lowest position and heat oven to 450 degrees.
Pat chicken dry with paper towels and season with salt and pepper. Combine 1 tablespoon oil and remaining 1 tablespoon za’atar in small bowl. Heat 1 teaspoon oil in 12-inch skillet over medium-high heat until just smoking. Place chicken skin side down in skillet, reduce heat to medium, and place heavy pot on chicken to press flat.
Cook chicken until skin is crisp and browned, 20 to 25 minutes. (If chicken is not crisp after 20 minutes, increase heat to medium high).
Off heat, remove pot and carefully flip chicken. Brush skin with za’atar mixture, transfer skillet to oven, and roast until breast registers 160 degrees and thighs register 175 degrees, 10 to 20 minutes.
Transfer chicken to carving board and let rest for 10 minutes. Meanwhile, whisk mint, lemon, vinegar, mustard, ⅛ teaspoon salt, and ⅛ teaspoon pepper together in bowl until combined. Whisking constantly, slowly drizzle in remaining 3 tablespoons oil until emulsified. Carve chicken and serve with dressing.
Za’atar
Ingredients
2 Tbsp. dried thyme
1 Tbsp. dried oregano
1 ½ Tbsp. sumac
1 Tbsp. sesame seeds, toasted
¼ tsp. salt
Directions
Process thyme and oregano in spice grinder or mortar and pestle until finely ground and powdery.
Transfer to bowl and stir in sumac, sesame seeds, and salt. (Za’atar can be stored at room temperature in airtight container for up to 1 year.)
Here’s an elegant low-carb salad that’s bulky enough to feed four as a main entrée. It was the perfect antidote for lunch on a recent Sunday afternoon when a couple of friends dropped by and our original plans for outside dining fell through due to inclement weather.
Much of the prep can be prepared ahead of time, such as the hard boiled eggs, bacon, and shredded chicken. A rotisserie chicken is so easy, and generally cheaper than buying a whole uncooked chicken—basically a no-brainer. But if you happen to have some breast meat already cooked, go ahead and shred that.
We always keep a homemade sherry-based mustard vinaigrette on hand, thus we used it with the added touch of flavor provided by the bacon fat. Sherry vinegar is now appearing not just in specialty stores but also in many ordinary supermarkets. With its nutty, oaky, savory flavors it is good in applications across the board. While we always buy “Columela” sourced from Spain, Napa Valley Naturals costs just $0.43 per ounce and is sold widely in supermarkets, so it’s a good one to try.
1 rotisserie chicken, breast meat removed and shredded (save the remaining chicken for another use)
2 ripe avocados, halved and cut into 1⁄4″ slices
8 oz. grape or cherry tomatoes, halved
4 hard boiled eggs, cut into 8 wedges each
1 cup blue cheese crumbles
8 strips of bacon, crisped and cut into 1⁄2″ pieces (2 Tbsp. fat reserved for dressing)
1⁄2 cup vinaigrette with 2 Tbsp. bacon fat
Directions
Prepare hard boiled eggs ahead of time. When ready to assemble salad, cut them into wedges.
Make/buy a sherry vinaigrette (don’t use a balsamic version), and measure 1/2 cup; add 2 tablespoons bacon fat to vinaigrette a whisk together.
Line the bottom of a large serving (or pasta) bowl with the torn Bibb lettuce. Toss the lettuce with half of the vinaigrette.
Arrange each of the other items, except bacon, in rows across the Bibb with the chicken in the middle. Sprinkle the bacon across the center on top of the chicken.
Serve salad family-style and pass around the remaining vinaigrette.
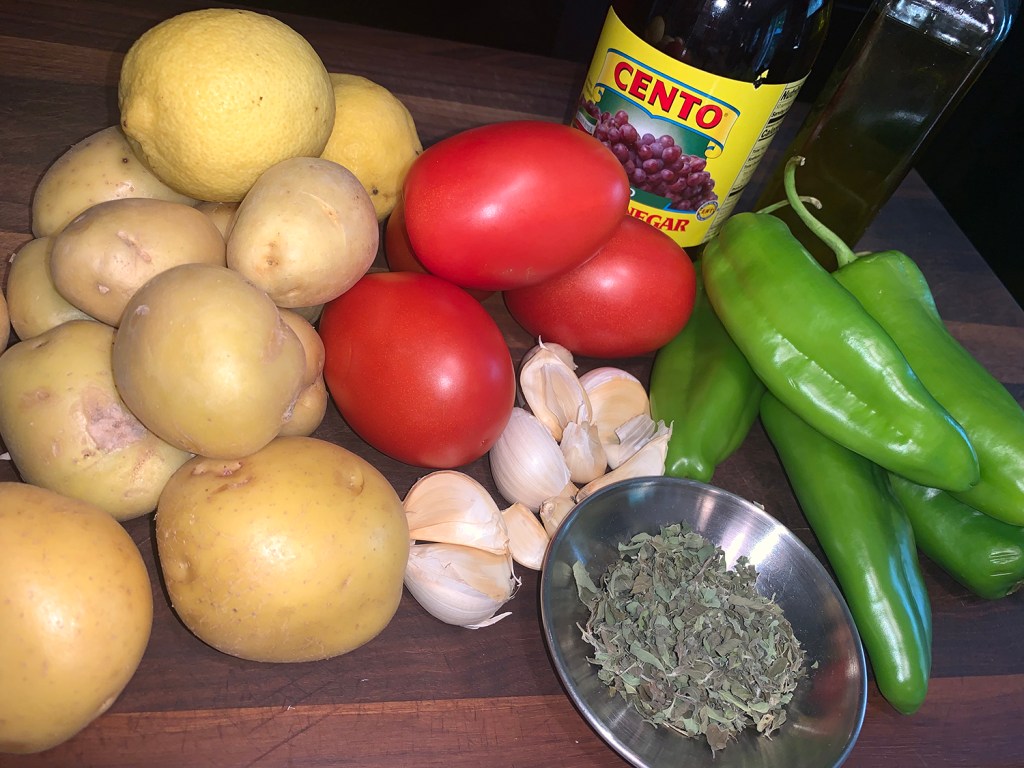
Khorovats is Armenian barbecue. Here, thick-cut, bone-in pork chops, are marinated in a mix of onion and oregano, then grilled with wood chips to infuse the pork with smokiness. According to Milk Street where we found this recipe, bone-in, blade-end pork loin chops are the best cut because they contain a good amount of fat, which keeps the meat moist and flavorful; but rib chops will work, too (because they are leaner, it’s important not to overcook them).
In a nod to son David’s fiancée Vikki, who has Armenian heritage, we decided to make this meal paired with another dish from the same country, Armenian Grilled Potato Skewers(recipe below). It’s pretty important to get spuds that are the same size, but was an impossible task at the time we were grocery shopping. So we had several that were larger and had to preboil them a bit longer as well as grill them several more minutes.
Left, Vikki and David hold dog Olive while they patiently wait for dinner to be served.
The sauce that accompanies these chops is also excellent with any grilled pork or chicken. All-in-all we agreed it was fabulous, our only complaint was that the garlic cloves could have been softer. I admit, I did choose large cloves, so cutting them in half or going smaller would most likely have remedied that issue.
The consensus was unanimous, we all LOVED the dinner!!
Tip: Don’t soak the wood chips before wrapping them in foil. Dry chips smoke more readily, which is desirable for quick-cooking foods such as pork chops. After placing the pork on the grill, don’t open the lid for 10 minutes. This allows the smoke to collect and create a more intense smokiness in the chops.
To prepare the chops, in a food processor, combine the oil, onion, oregano, 2 tablespoons salt and 1 tablespoon pepper. Process to form a coarse paste, about 1 minute, scraping the bowl as needed. Transfer the mixture to a large bowl. Using a paring knife, make verticals cuts spaced about ½ inch apart into the fat on each chop. Add the chops to the onion paste and turn to coat, rubbing the mixture into the meat. Cover and refrigerate for at least 2 hours or up to 24 hours. Remove from the refrigerator 30 minutes before heating the grill.
Loosely wrap the wood chips in a 12-by-18-inch sheet of foil, forming a flat packet roughly 7 inches square. Poke several holes in each side of the packet. Prepare a grill for indirect, high-heat cooking. For a charcoal grill, pour a heaping chimney of hot coals evenly over one side of the grill bed and set the wood chip packet on the coals; open the bottom grill vents and lid vents. For a gas grill, place the wood chip packet directly on one burner that will remain on during cooking; turn all burners to high. Heat the grill, covered, for 5 to 10 minutes, then clean and oil the cooking grate. If using a gas grill, turn off one burner, leaving the remaining burner(s) on high.
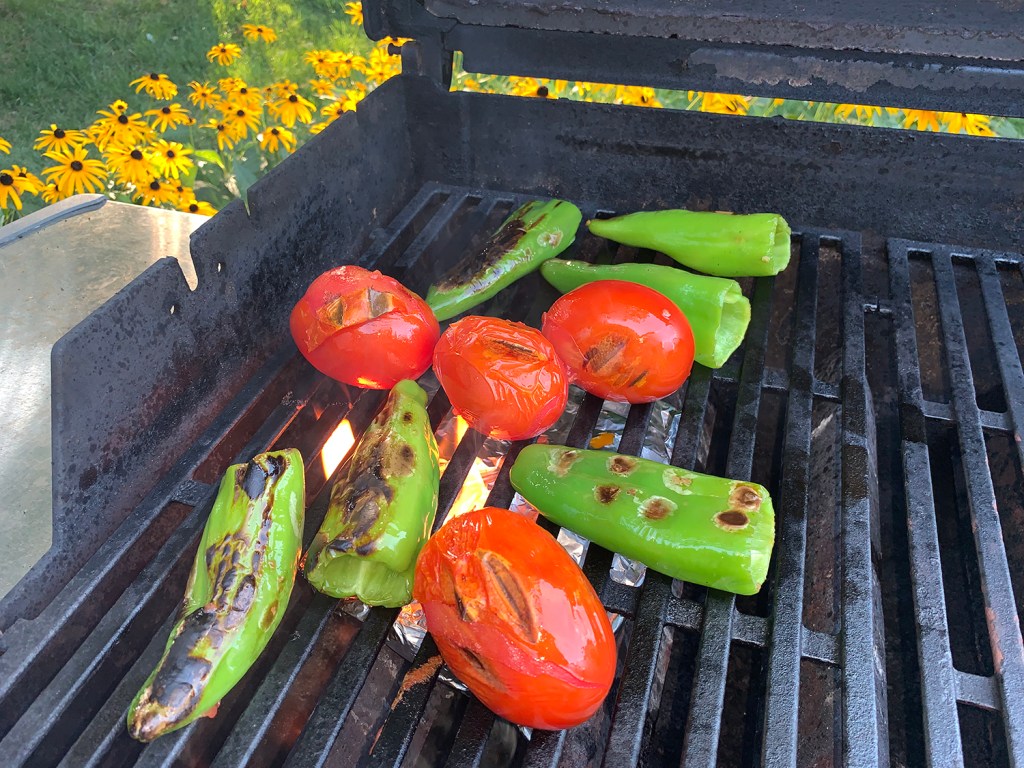
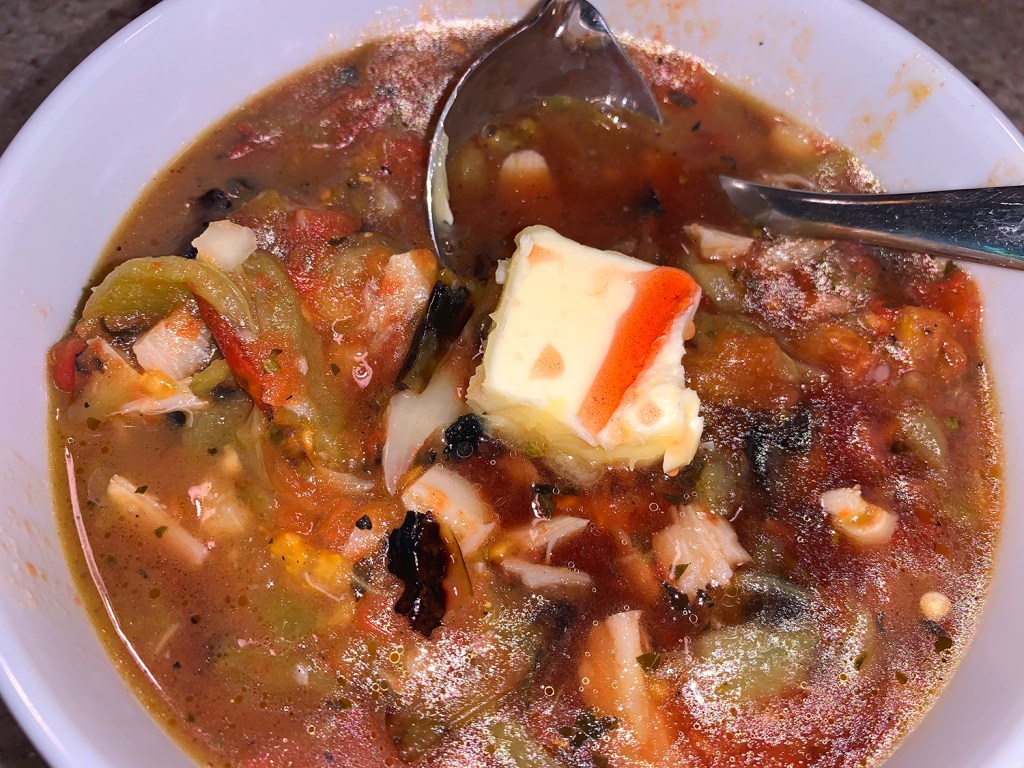
To prepare the sauce, while grill heats, in a large bowl, toss the tomatoes, peppers and oil. Place the vegetables on the hot side of the grill, then cover and cook, turning occasionally, until lightly charred all over, 5 to 10 minutes. Transfer to an 8-inch square disposable foil pan and add the garlic, 2 tablespoons of butter and the oregano. Cover with foil and poke a few holes in the foil, then place the pan on the cool side of the grill. Scrape any excess marinade off the pork chops and place the chops on the cool side of the grill alongside the foil pan. Cover the grill, positioning the lid vents over the pork chops if using a charcoal grill. Cook without lifting the lid for 10 minutes.
Move the chops to the hot side of the grill and cook, uncovered and turning occasionally, until well-browned on both sides and the centers near the bone are just barely pink when cut into or reach 135°F, 5 to 8 minutes. Transfer to a platter, place 1 piece of the butter on each chop and tent with foil. Let rest for 15 minutes.
Meanwhile, uncover the pan; the vegetables and garlic cloves should be completely softened. Using a fork, mash the vegetables until broken down but a bit chunky. Use tongs to remove and discard any large pieces of tomato or pepper skins that do not break down. Stir in the remaining 2 tablespoons butter until melted, followed by the vinegar. Season with salt and pepper to taste. Transfer to a serving bowl and serve with the pork.
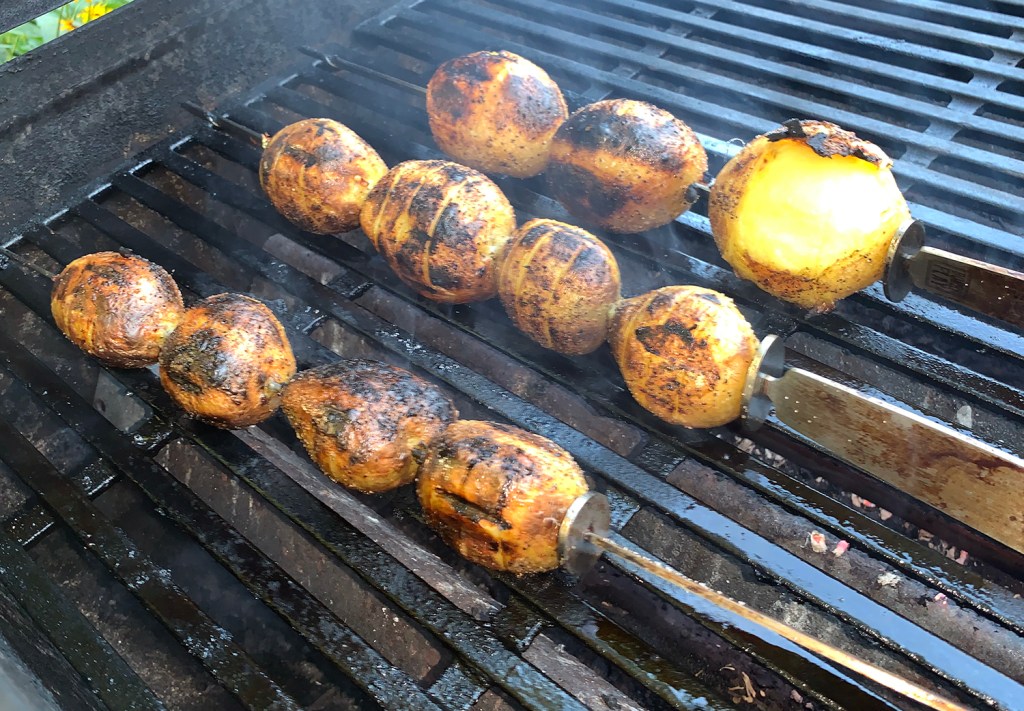
When purchasing potatoes for this recipe, look for ones about the size of an extra-large egg and that weigh about 2 ounces each and are of similar shape and size. The potatoes can be precooked and refrigerated up to a day in advance; just before grilling, skewer them, brush with melted butter and season with salt and pepper.
You’ll need three or four sturdy 12- to 14-inch metal skewers; skewers with pins that are flat rather than round or square help prevent the potatoes from spinning around, making them easier to manage on the grill. Place the skewered potatoes on the hot side of the grill after you’ve removed the pork chops and allow the potatoes to brown while the chops rest.
Keep in mind, you don’t want to precook the potatoes at a rolling boil which can cause the skins to split (which did happen to a few of ours). Aim to keep the water at a gentle but constant simmer. Don’t skewer the potatoes without first chilling them in an ice bath. Chilling firms the potatoes slightly so that they cut more cleanly when scored with a paring knife.
In a large pot over high, bring the potatoes and enough water to cover by about 1 inch to a boil. Reduce to medium-high, cover partially and cook until a paring knife inserted into the largest potato meets just a little resistance, adjusting the heat as needed to maintain a gentle but steady simmer, 8 to 12 minutes. Meanwhile, fill a large bowl with ice water. Drain the potatoes in a colander, then transfer to the ice water. Let stand for 10 minutes. Drain again and pat dry with paper towels.
Thread the potatoes lengthwise onto each of three 12- to 14-inch flat metal skewers, dividing them evenly. Using a paring knife, make 4 or 5 parallel crosswise cuts into each potato, stopping when knife blade reaches the skewer; leave the second sides of the potatoes uncut. Brush the potatoes on all sides with about ½ of the melted butter and season with salt and pepper.
Prepare a grill for high-heat cooking. For a charcoal grill, pour a large chimney of hot coals evenly over one side of the grill bed and open the bottom grill vents and lid vents; for a gas grill, heat all burners to high. Heat the grill, covered, for 5 to 10 minutes, then clean and oil the cooking grate.
Place the skewered potatoes on the hot side of the grill and cook, turning occasionally, until browned all over, 7 to 10 minutes. Transfer to a platter, brush with the remaining melted butter. Sprinkle with additional salt and pepper and the oregano. Serve with lemon wedges.
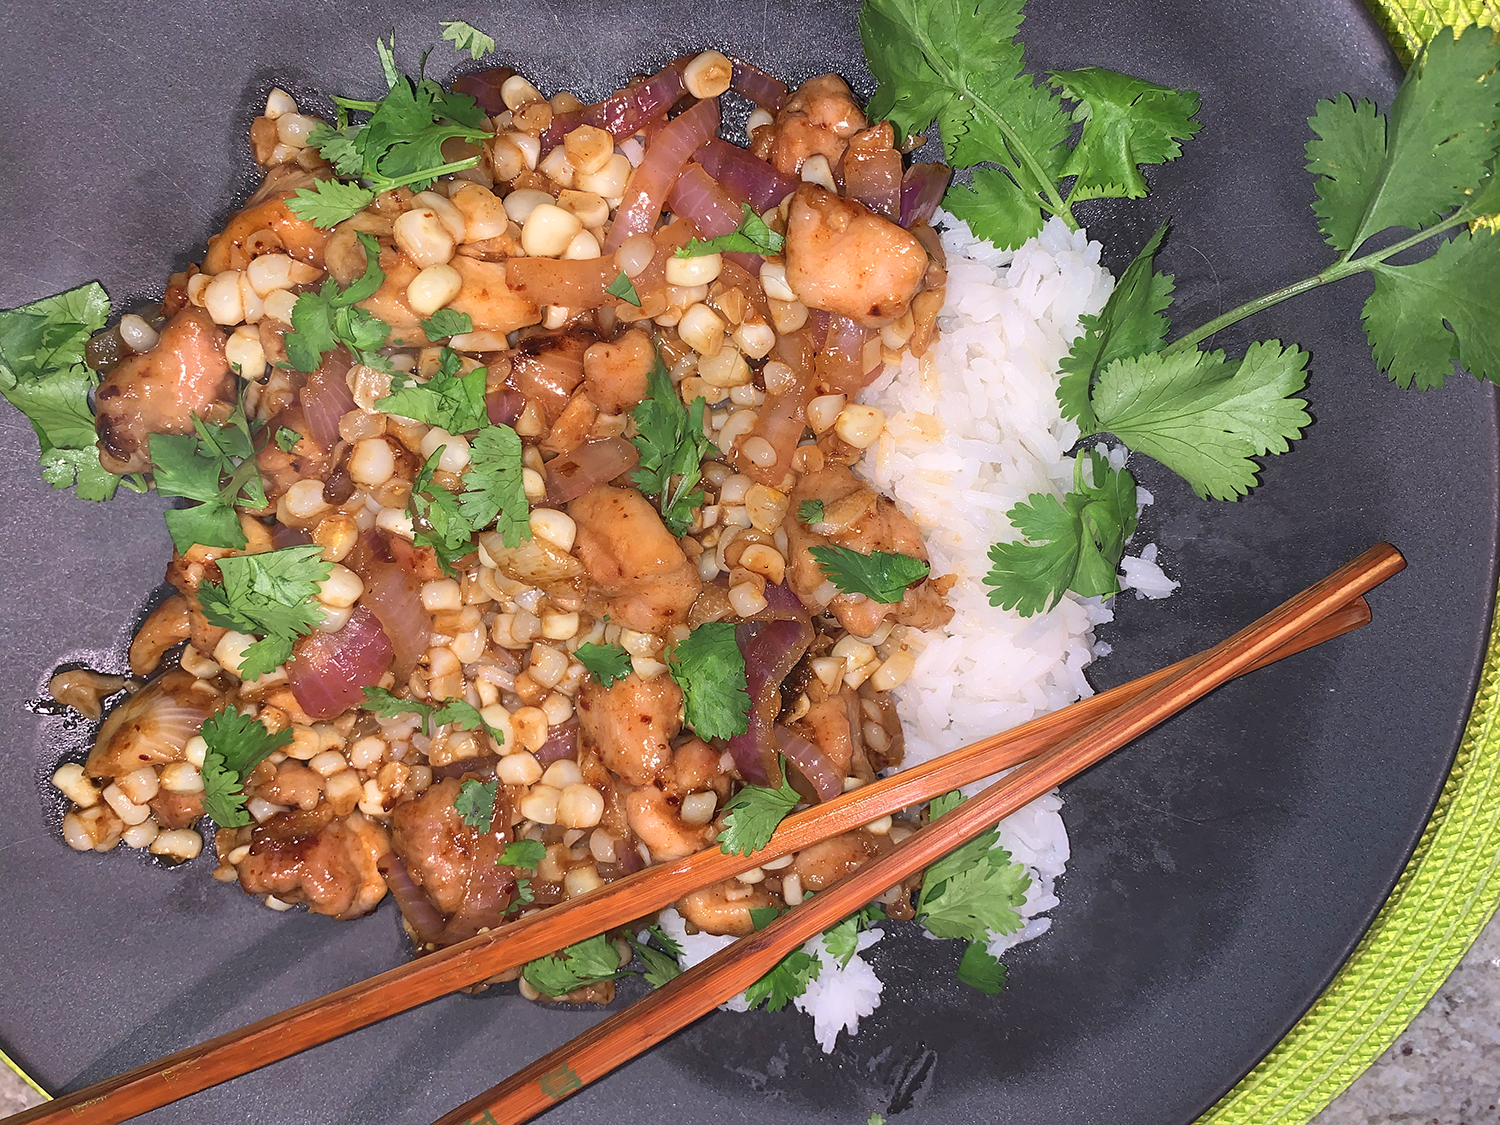
You’ll enjoy this unusual stir-fry combination utilizing fresh corn kernels cut from the cob. The corn, along with rice, does lean toward a carb-heavy meal, but it is so satisfying and full of flavor. Coating the chicken pieces in cornstarch thickens the sauce at the end so that it clings to the meat and veggies.
Rarely overpowering, oyster sauce is packed with umami and adds tons of depth to stir-fries like this one, boosting flavor in marinades, and just being all-around incredibly delicious. No ripe corn at the market? Bon Appétit suggests to swap in peppers, peas, mushrooms, or summer squash.
As with any stir-fry, make sure to chop and prep all of the ingredients ahead of time because once you start cooking, the process goes incredibly fast and you need to keep swinging that metal spatula around.
½ tsp. (or more) Aleppo-style pepper or other mild chile flakes
3 ears of corn, kernels cut from cobs
Steamed rice and cilantro leaves with tender stems (for serving)
Directions
Stir together oyster sauce, vinegar, sesame oil, and 2 Tbsp. water in a small bowl. Set aside.
Place chicken in a medium bowl. Season with salt and sprinkle with cornstarch; toss lightly to coat.
Heat 2 Tbsp. vegetable oil in a large well-seasoned wok or nonstick skillet over medium-high. Cook chicken, tossing occasionally, until golden brown and nearly cooked through, 6–8 minutes. Transfer to a large bowl.
To the wok, add red onion, garlic, ginger, Aleppo-style pepper, and remaining 2 Tbsp. oil. Cook, tossing, until vegetables are softened, about 2 minutes.
Add corn and cook, tossing often, until tender, about 3 minutes.
Return chicken to wok with vegetables.
Stir in reserved oyster sauce mixture and cook, tossing often, until reduced nearly to a glaze, about 2 minutes. Taste and season with salt if needed.
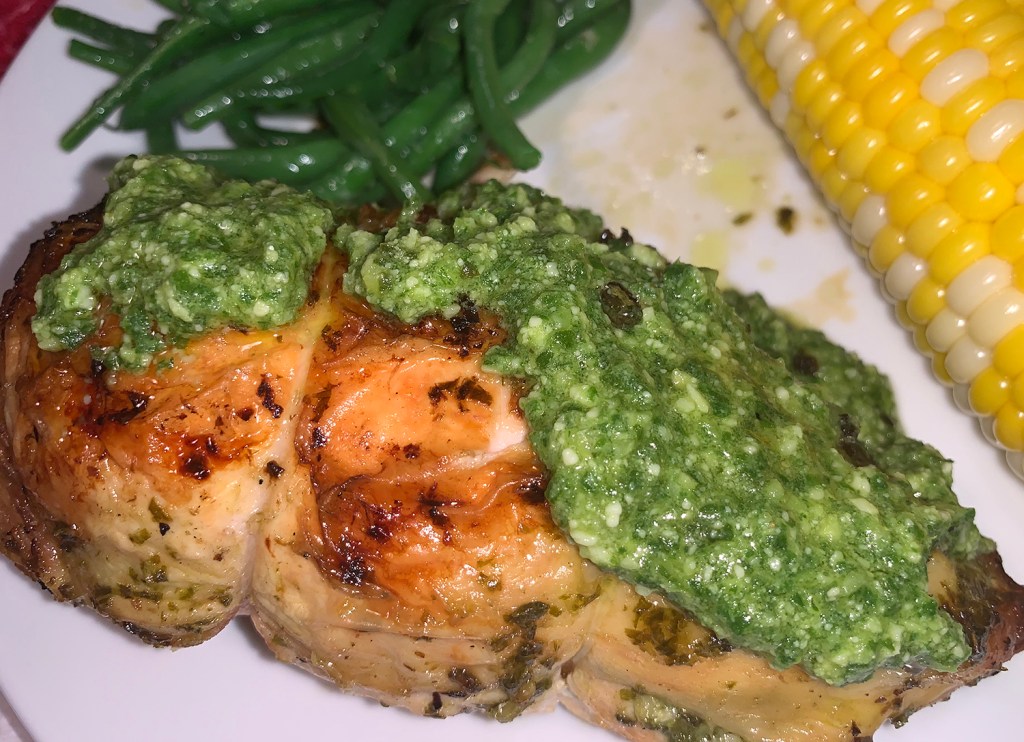
This pesto chicken recipe takes a three-pronged approach, compliments of Cook’s Country. Starting with a batch of homemade pesto, a portion is thickened with extra Parmesan cheese to make a stuffing for the bone-in, skin-on breasts. A cheese-less portion of the pesto functions as a marinade, flavoring the outside of the meat. Finally, cheesy pesto, thinned out to sauce consistency, is served with the chicken for one final hit of fresh basil flavor.
I am a white meat fan when it comes to chicken, while The Hubs prefers the dark meat which he believes to be juicier. While I can’t always argue with that logic, I do know that with the skin and bones of the breast pieces intact, the more succulent the meat will be.
Our poultry breasts weighed in at 15 ounces or so, a bit more than the 12-ounce pieces listed in the ingredients. In fact, one of them was larger than the other three and actually took an additional 7 minutes to come to temperature, so keep a close eyeball on the internal temps with an instant-read thermometer, especially if they are varying sizes.
Brimming with fresh basil, this recipe was a perfect opportunity to cut it back mid-season from our herb garden, encouraging robustness for the remainder of the season. And while the directions indicate to marinate the breasts in the pesto sauce in a bowl for one hour, I let them get happy in a large glass baking dish for three hours in the refrigerator wrapped tightly with saran wrap.
Results? The Hubs LOVED them! That’s big praise coming from a guy who steadfastly prefers the dark meat of the thighs and legs. He couldn’t believe how moist the white meat remained and how flavorful the overall pesto approach was. “Let’s make this for company” he sang, and I thought yes, let’s!
Note: that the pesto base is divided into three separate mixtures for marinating, stuffing, and saucing the grilled chicken.
Process basil, ½ cup oil, garlic, lemon juice, and ¾ teaspoon salt in food processor until smooth, about 1 minute, scraping down bowl as needed. Remove ¼ cup pesto from processor and reserve for marinating chicken.
Add Parmesan to pesto in processor and pulse until incorporated, about 3 pulses. Remove ¼ cup Parmesan pesto from processor and reserve for stuffing chicken.
Add remaining ¼ cup oil to Parmesan pesto in processor and pulse until combined, about 3 pulses; set aside for saucing cooked chicken.
Starting on thick side of breast, closest to breastbone, cut horizontal pocket in each breast, stopping ½ inch from edge so halves remain attached. Season chicken, inside and out, with salt and pepper.
Place 1 tablespoon of Parmesan pesto reserved for stuffing in pocket of each breast. Evenly space 2 pieces of kitchen twine (each 12 inches long) beneath each breast and tie to secure breast, trimming any excess twine.
Place stuffed breasts in bowl and add pesto reserved for marinating. Rub pesto all over chicken, cover, and refrigerate for 1 hour.
FOR A CHARCOAL GRILL: Open bottom vent completely. Light large chimney starter filled with charcoal briquettes (6 quarts). When top coals are partially covered with ash, pour evenly over half of grill. Set cooking grate in place, cover, and open lid vent completely. Heat grill until hot, about 5 minutes. FOR A GAS GRILL: Turn all burners to high, cover, and heat grill until hot, about 15 minutes. Turn all burners to medium-low. (Adjust burners as needed to maintain grill temperature of 350 degrees.)
Clean and oil cooking grate. Place chicken, skin side up, on grill (over cool side if using charcoal). Cover and cook until chicken registers 155 degrees, 25 to 35 minutes.
Flip chicken skin side down. If using charcoal, slide chicken to hot part of grill. If using gas, turn all burners to medium-high. (Our grill is very hot, so I only turned up the heat to medium.) Cover and cook until well browned and chicken registers 160 degrees, 5 to 10 minutes.
Transfer chicken to platter, tent loosely with foil, and let rest for 5 minutes. Remove twine from chicken and carve meat from bone. Serve, passing Parmesan pesto sauce separately.
BTW, if you are lucky enough to have some leftover breasts, make a chicken pesto salad. When cooled, remove the cooked meat from the skin and bones. Either shred it, or cut it up in small chunks (it will still contain the pesto stuffing).
In a mixing bowl, add the chunked chicken, small diced celery, thinly sliced scallions, mayonnaise and more of the pesto topping. Salt and pepper to taste. Refrigerate until ready to use. We served ours the next day for lunch over Bibb lettuce and topped with sliced yellow and red bell peppers and more sliced scallions.
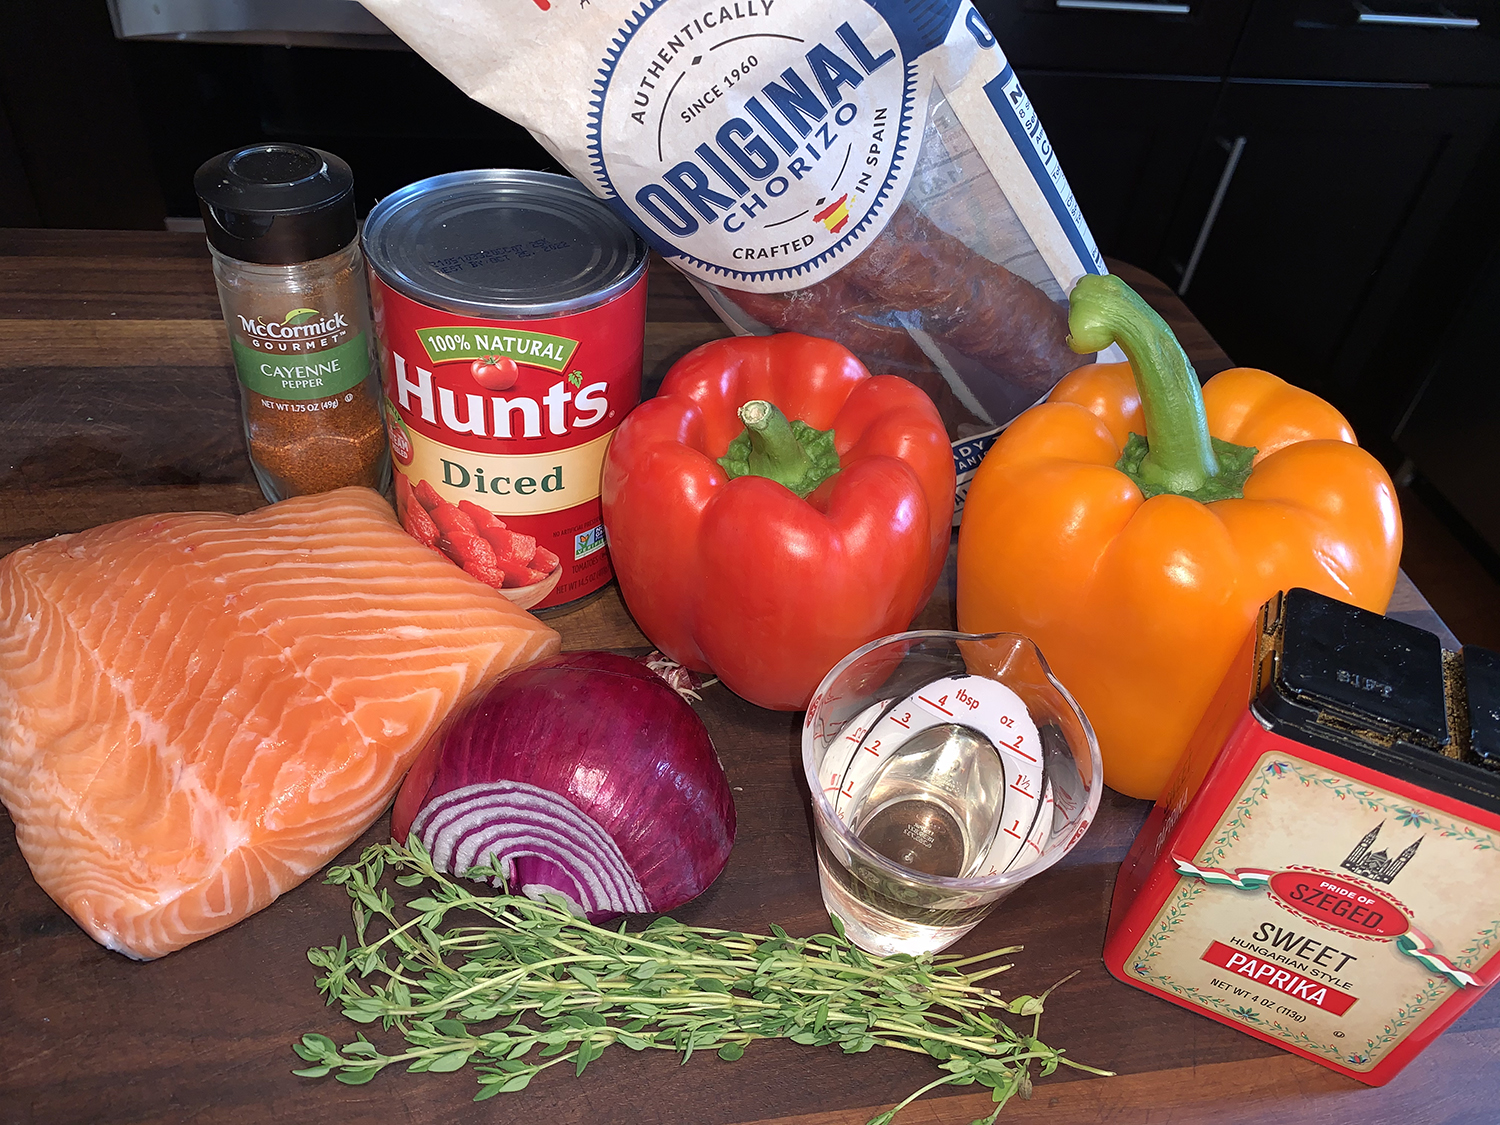
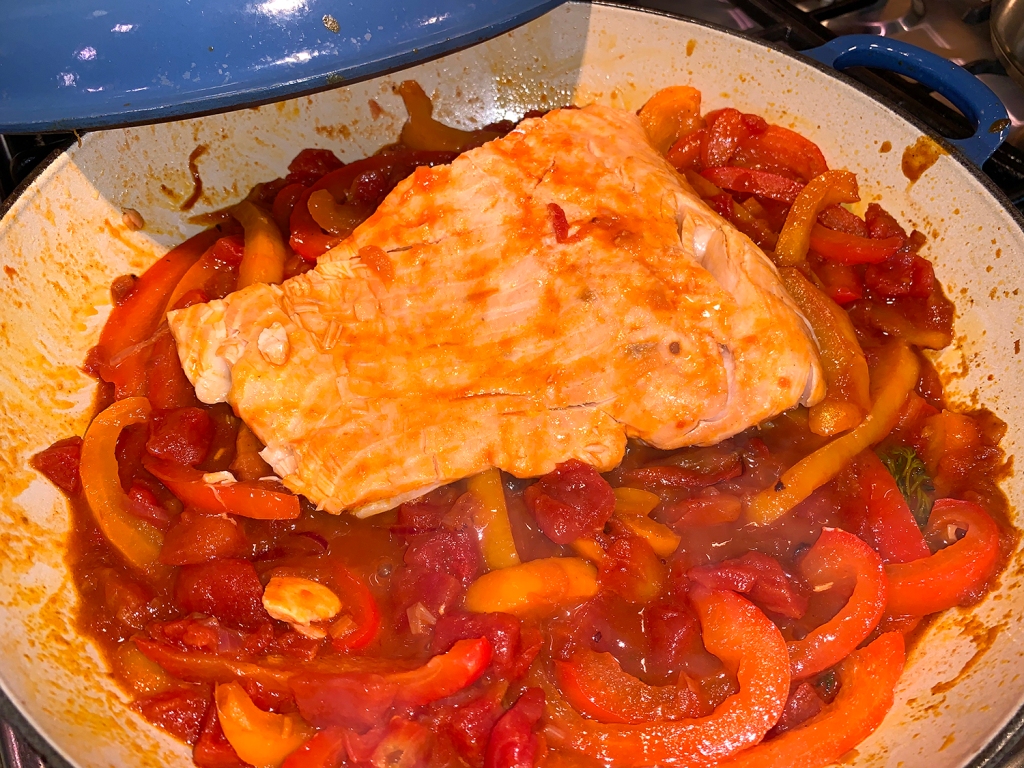
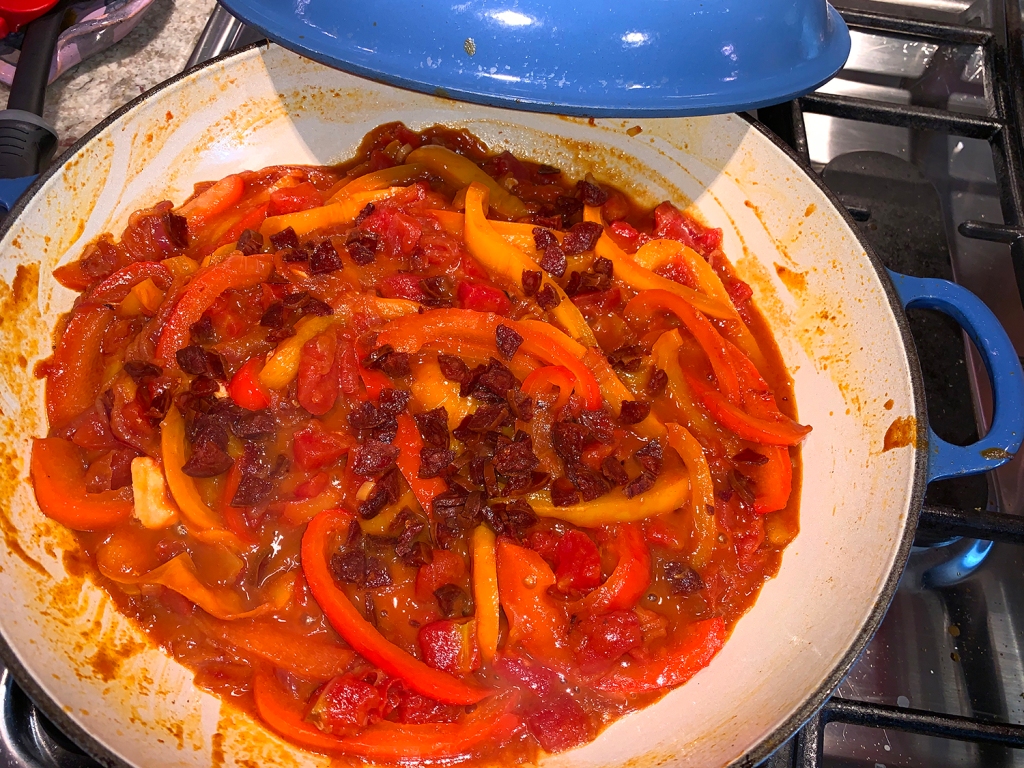
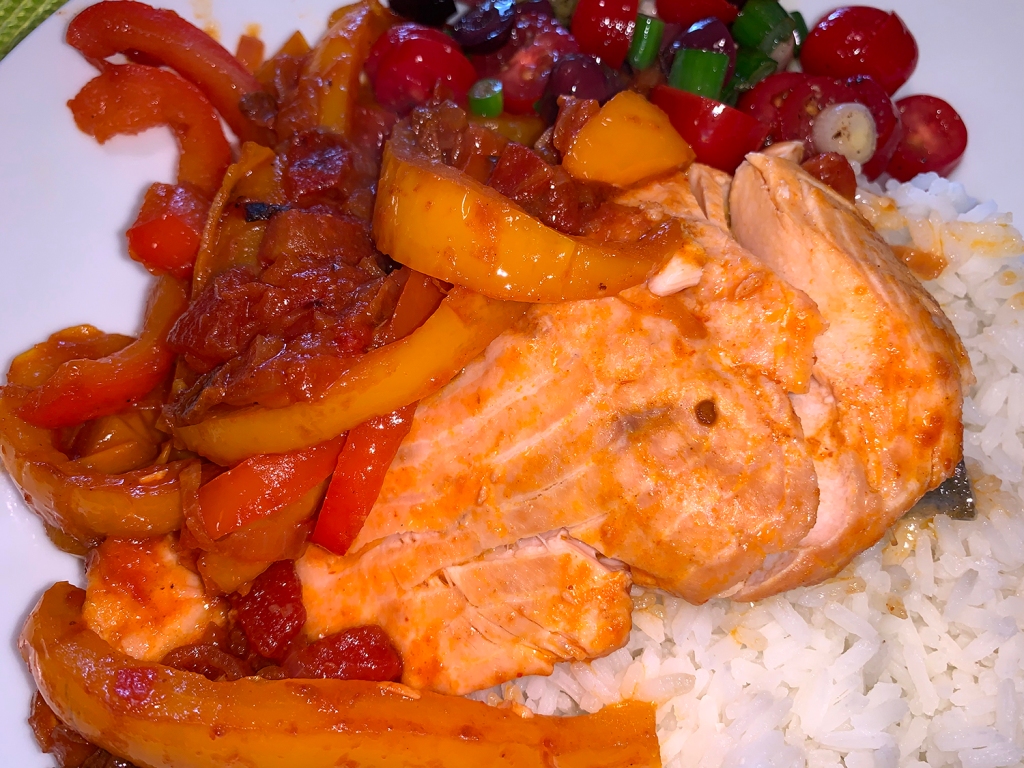
The rich flavor and firm texture of salmon, one of our favorite fish, pair perfectly with sweet peppers made into pipérade, a Basque relish-like stew of peppers, tomatoes, onion and garlic. Piment d’esplette is the authentic seasoning for pipérade, but instead a combination of sweet paprika and cayenne is used, both of which are probably already in your pantry.
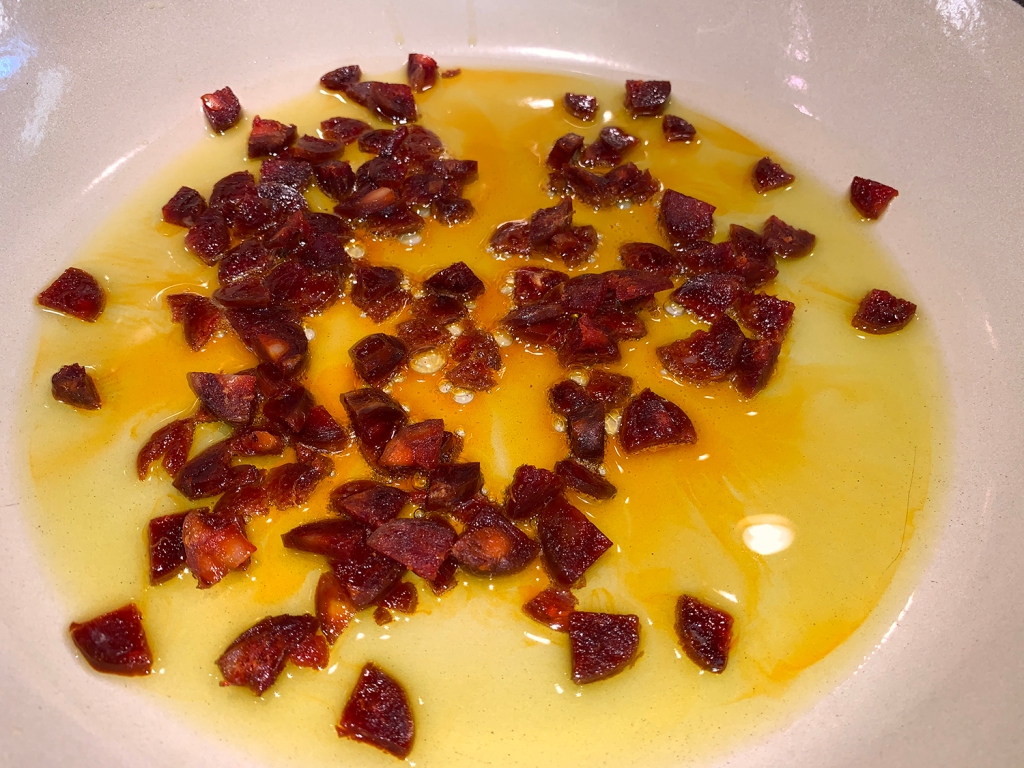
And for smoky, meaty flavor, sauté slices of Spanish chorizo; the rendered fat helps cook the vegetables and the browned chorizo simmers with peppers for a few minutes at the end. We prefer salmon at medium-well doneness—that is, cooked until the center is no longer translucent. To cook the fish until opaque throughout, simmer the fillets for a few minutes longer, or until the center reaches 130°F to 135°F. Serve with warm, crusty bread if desired.
Tip: Don’t forget to place the salmon skin side up in the pan. This way, while the fillets cook gently in the pepper mixture, the skin, which we remove before serving, protects the surface from drying out. Also, don’t allow the pepper mixture to simmer vigorously while the fish is in the skillet. Medium heat should ensure a gentle simmer, but adjust the burner as needed.
3 Tbsp. extra-virgin olive oil, plus more to serve
2 oz. Spanish chorizo, quartered lengthwise and thinly sliced
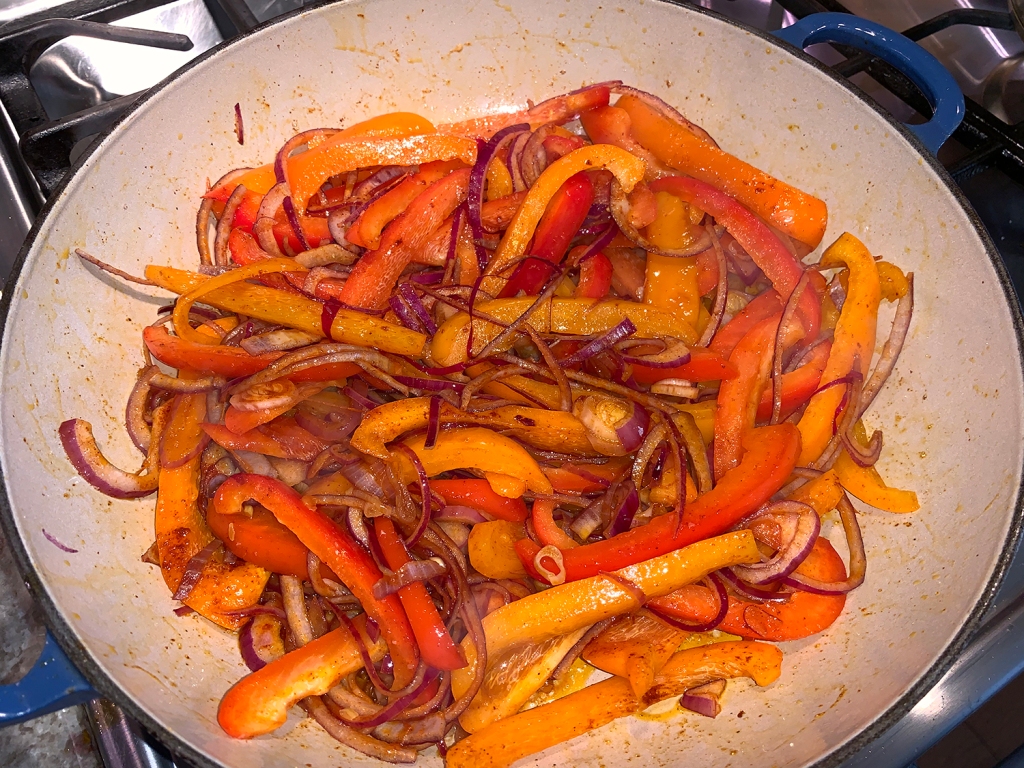
2 medium red or orange bell peppers (or 1 of each), stemmed, quartered lengthwise, seeded and thinly sliced crosswise
1 medium red onion, halved and thinly sliced
1 tsp. sweet paprika
¼ tsp. cayenne pepper
¼ cup dry vermouth or white wine
14½ oz. can diced tomatoes
3 large thyme sprigs
Directions
Season the salmon on both sides with salt. In a 12-inch skillet over medium, combine the oil and chorizo and cook, stirring occasionally, until the oil has taken on a reddish hue and the chorizo begins to brown, 3 to 4 minutes. Using a slotted spoon, transfer the chorizo to a small plate and set aside.
Set the skillet over medium-high and heat the fat until shimmering. Add the bell peppers, onion, paprika, cayenne and ½ teaspoon salt. Cook, stirring occasionally, until the vegetables are wilted and tender, 5 to 8 minutes.
Add the vermouth and cook, scraping up any browned bits, until the wine has evaporated, about 1 minute.
Add the tomatoes with juices along with the thyme, then bring to a simmer. Nestle the salmon fillets, skin-side up, in the mixture. Reduce to medium, cover and simmer, until the thickest parts of the fillets reach 115°F to 120°F, 6 to 8 minutes. If you want your salmon opaque throughout, cook a few minutes longer.
Remove the pan from the heat. Using tongs, carefully peel off and discard the skin from each fillet. Using a wide metal spatula, transfer the salmon to serving plates, flipping each piece so the skinned side faces down.
Bring the pepper mixture to a simmer over medium-high, add the chorizo and cook, stirring occasionally, until slightly thickened, 2 to 4 minutes. Taste and season with salt and pepper. Remove and discard the thyme, then spoon the mixture over and around the salmon and drizzle with additional oil.