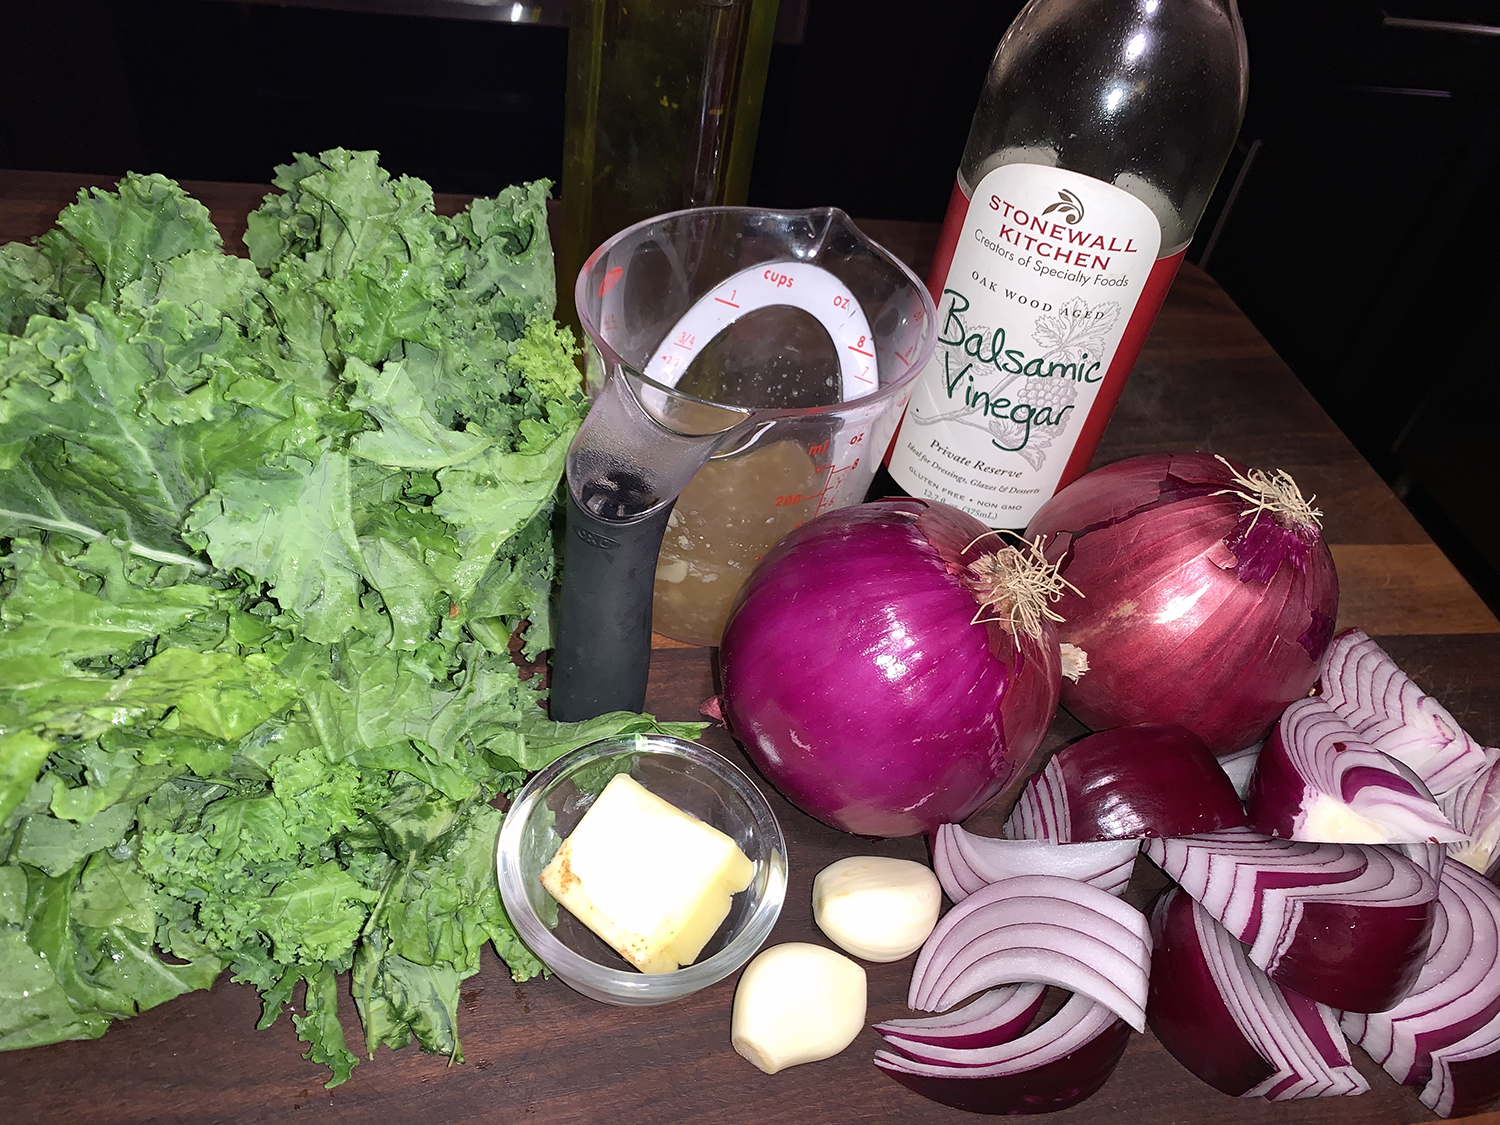
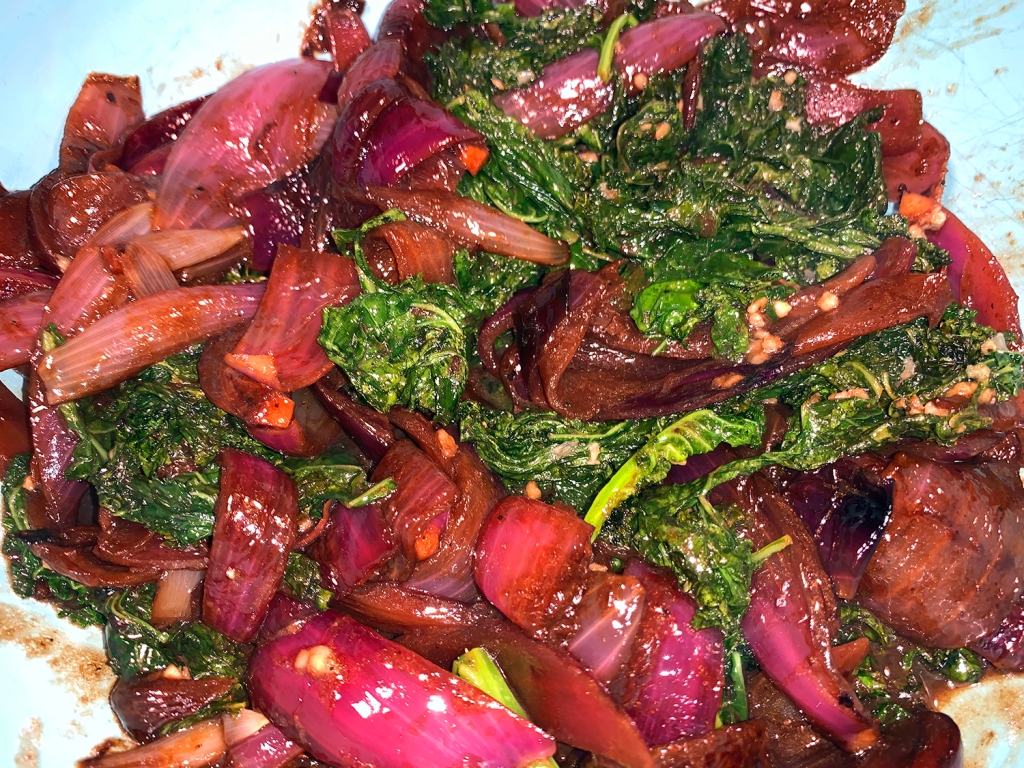
Found in a recent Fine Cooking Magazine, this tasty side dish recipe is a perfect combination of balsamic vinegar, kale, and red onion. The side made a wonderful partner to our Roasted Loin Chops with Charmoula.
With only the two of us, we cut the amount of onions and kale in half, the balsamic vinegar and chicken broth by a third, and the remaining ingredients were kept the same. The original recipe is intact below.
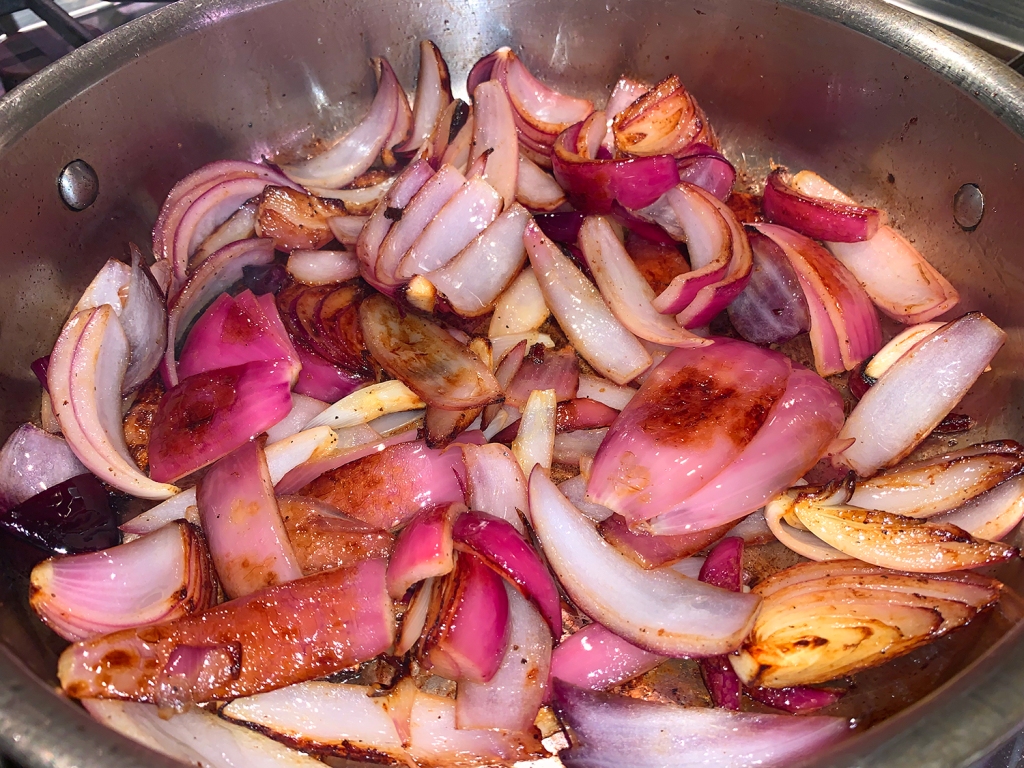
In bowl toss onion with 1 tablespoon of the oil, 1/4 teaspoon of the salt, and 1/4 teaspoon of the pepper; set aside.
Heat 1 tablespoon of the oil in large skillet; add onion mixture. Cook over medium-high heat 5 minutes, stirring occasionally, until onions begin to brown. Reduce heat to medium-low. Add broth and vinegar. Cover; cook 15 minutes or until onions are tender.
Add butter. Increase heat to high. Cook 2 to 3 minutes, shaking pan occasionally, until onions are glazed.
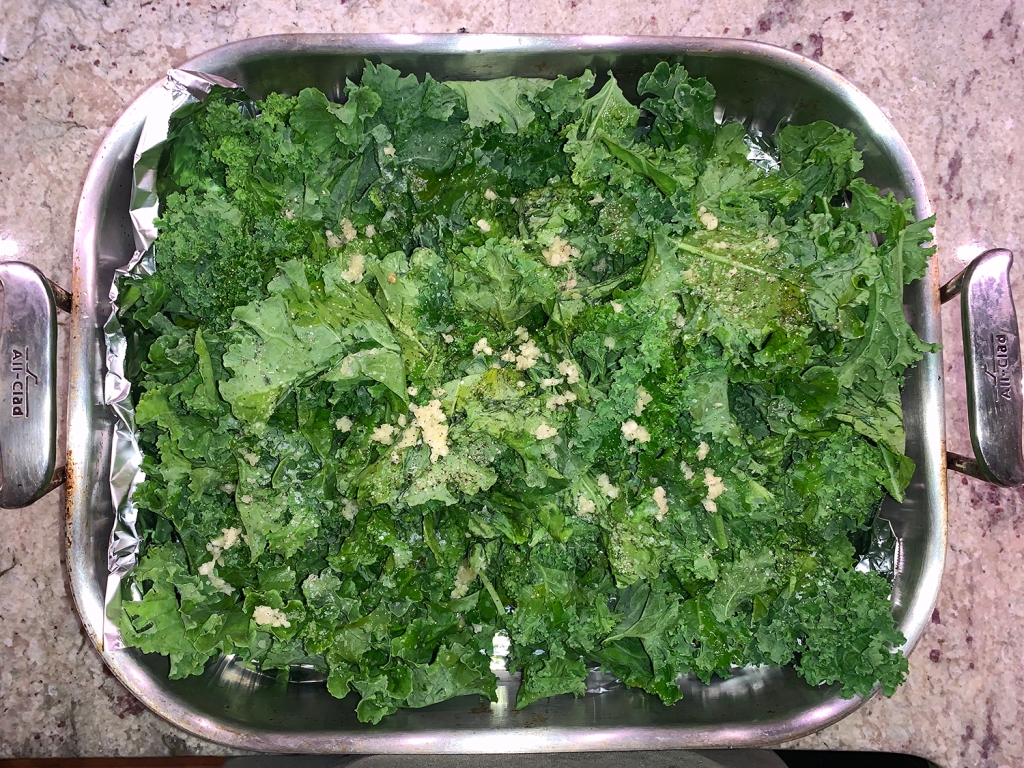
Meanwhile, add kale to roasting pan. Toss with remaining oil, garlic, salt, and pepper. Roast, uncovered, 15 minutes, tossing 3 times.
Shoulder chops aren’t the most tender, but they truly have great lamb flavor. Plus, they are far less expensive than other types of lamb chops. The steaks are usually rather thin, therefore make sure you have a hot fire ready so they get a good sear on the outside before they have a chance to overcook on the inside.
Lamb and grilling are a classic combination in Greek cookery. In just minutes over a hot fire, they are nearly ready to serve with that quintessential Greek flavoring combination of fresh oregano, fresh lemon juice, really good olive oil, and just a touch of garlic. Simple is, as simple gets.
To complete the meal we roasted some baby Yukon potatoes which benefited from some of that oregano-garlic sauce; and a side of Roasted Green Beans with Pecorino and Pine Nuts which are mixed with oil, salt, pepper, and a tad of sugar to enhance caramelization.
Four 10- to 12-ounce lamb shoulder blade chops, 1/2 inch to 1/4 inch thick
Kosher salt and freshly cracked black pepper to taste
1/4 cup extra-virgin olive oil
2 Tbsp. roughly chopped fresh oregano
1 tsp. minced garlic
1/2 lemon
Directions
Preheat grill to hot.
Dry the chops with paper towels and sprinkle them generously with salt and pepper. Place the chops on the grill and cook until well seared, 3 to 4 minutes per side. To check for doneness, use an instant-read thermometer. The chops are rare at 120°F, medium rare at 125°F, medium at 130°F, and well done at 145°F and higher. FYI, lamb can take on a gamey flavor when cooked past medium.
When the chops are done, remove them from the grill, cover them loosely with foil, and let them rest for 5 minutes.
Meanwhile, in a small bowl, combine the olive oil, oregano, and garlic and mix well.
Spoon the garlic mixture over the lamb chops, squeeze the lemon on top of them, and serve hot.
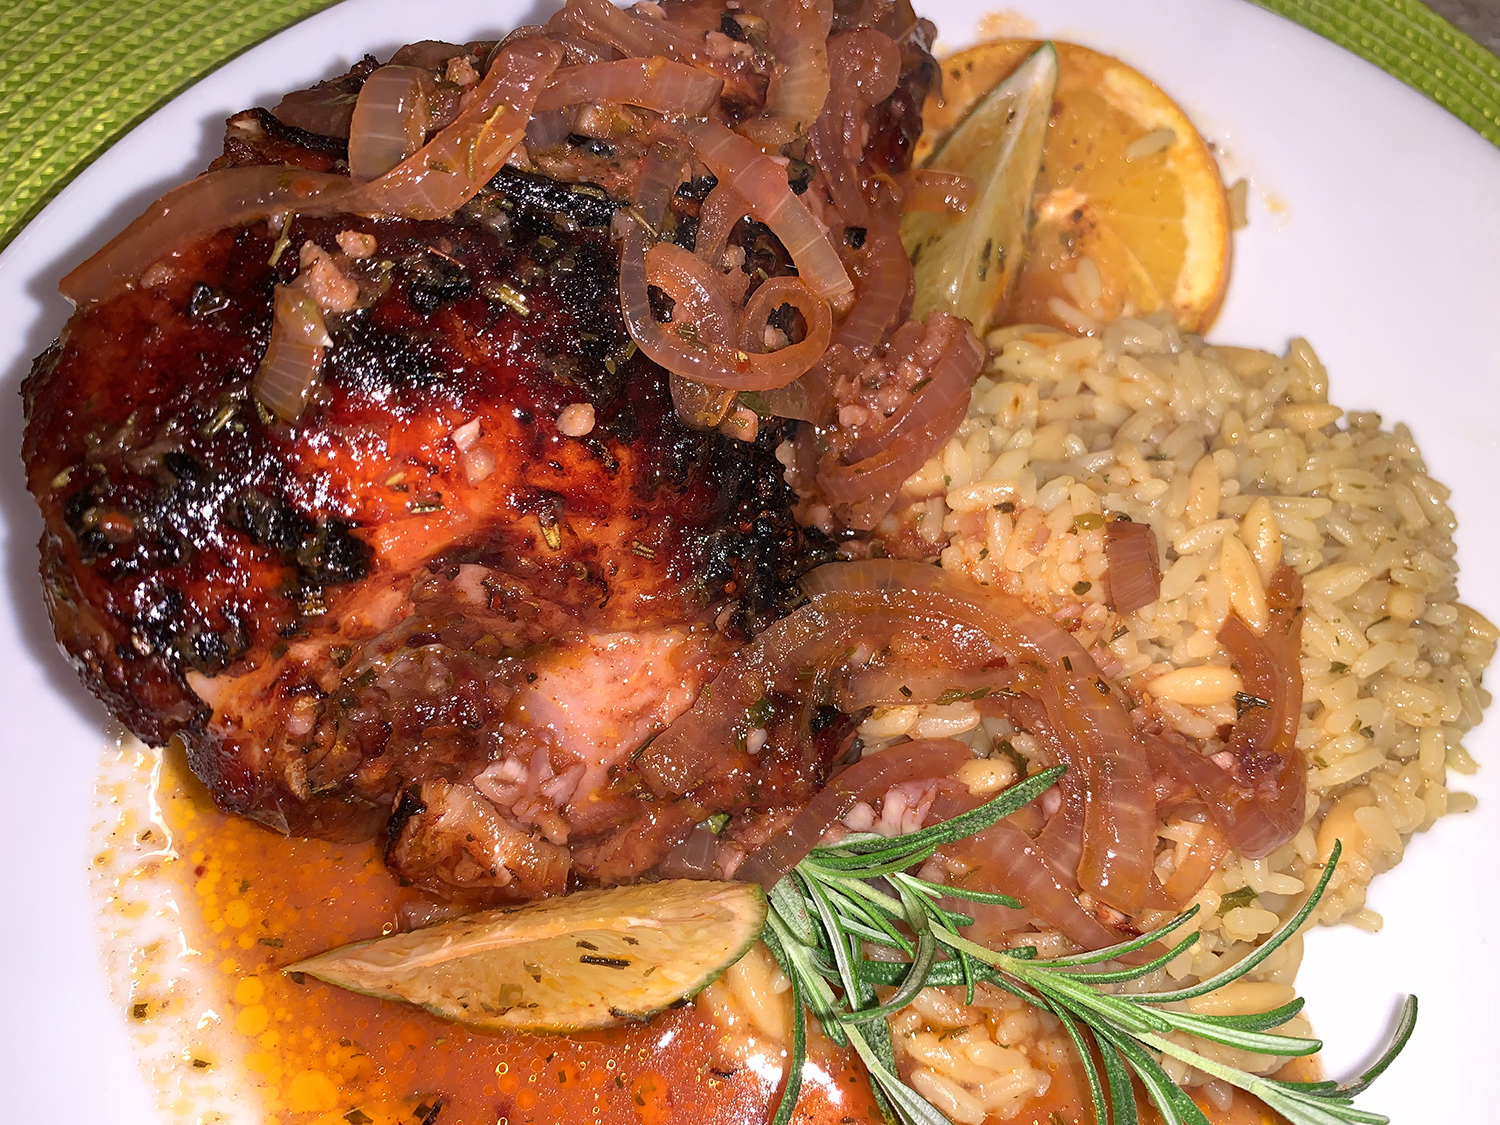
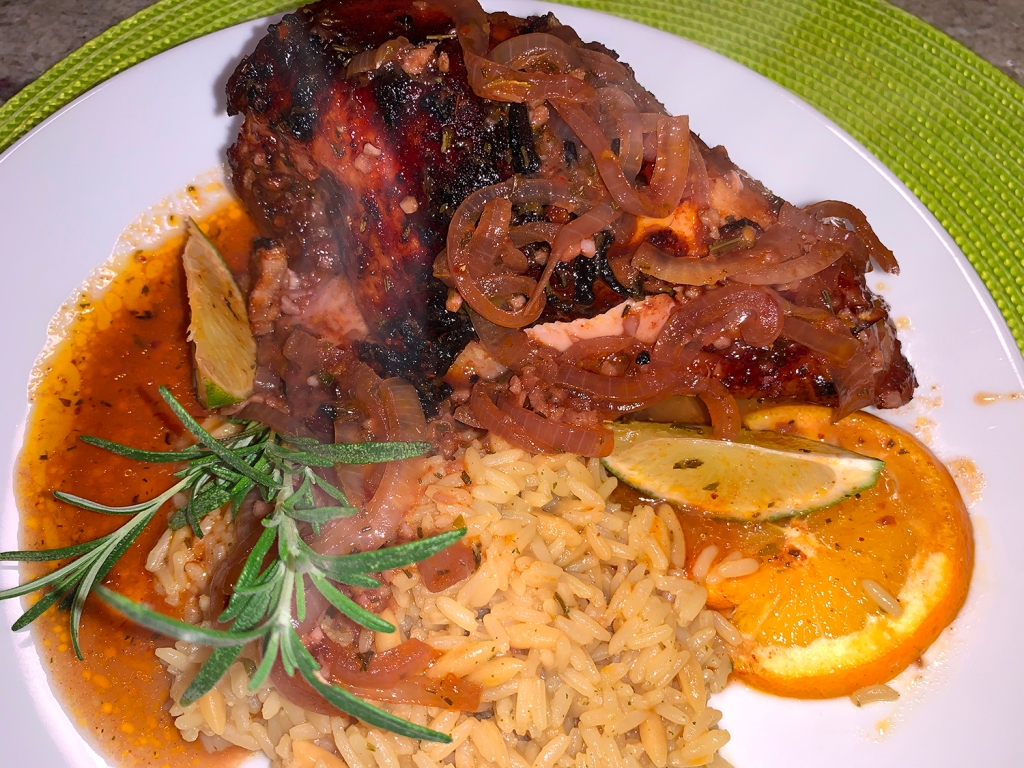
Roast chicken with citrus and herbs? It has my name written all over it! As far back as I can remember, Sunday supper with Mom’s Orange Juice Chicken was a meal I looked forward to all week—and I was one picky eater back then.
Crisp, tangy, and succulent citrus rosemary chicken, seasoned Mediterranean-style with garlic, rosemary, and oregano, and covered in a bold wine and orange marinade. I mean, what’s not to like? This simple twist on roast chicken makes a dish with the perfect balance of savory, tangy, and warm flavors! Delicious and impressive with little work involved. Who’s not with me now?
The citrus marinade in this recipe is made of a combination of wine, orange juice, lime juice, olive oil, tomato paste for color and umami, and fresh garlic, onions, rosemary, and other Mediterranean spices.
We served ours with a Near East rice pilaf dish and a side salad.
According to chef Suzy Karadsheh of The Mediterranean Dish food blog, “The key to great flavor here is to allow the chicken a good 1 to 2 hours in the marinade (refrigerated), and make sure to lift up the chicken skin to spoon some of the garlicky, citrus marinade underneath. If you only have a few minutes, leave the chicken to marinate at room temperature for 30 minutes or so.”
Now you can use a whole chicken and cut it up saving the neck, back and wingtips for homemade stock—which is our typical rodeo—however, this time we purchased precut bone-in, skin-on breasts and thighs. They were well-salted inside and outside the skin, left uncovered in the refrigerator overnight, and marinated for 2 hours prior to cooking.
Once the chicken is out of the oven, allow it 10 minutes to rest before slicing and serving. Then get ready to be amazed! This dish definitely evokes warm, childhood memories, but at a more advanced level, and with more depth of flavor.
1 whole chicken, split in half through the backbone; or pre-cut parts (about 3 ½ pounds)
Kosher salt
1 cup Pinot Noir
1 orange zested and juiced plus 1 sliced orange
1 lime juiced, plus 1 sliced lime
Extra virgin olive oil
3 Tbsp. tomato paste
1 ½ tsp. dried oregano
1 tsp. dried rosemary
1 tsp. sweet paprika
1 tsp. Aleppo pepper
7 to 8 garlic cloves minced
1 yellow onion halved and sliced
1 Tbsp. honey
Salt chicken inside skin and all around
Refrigerate uncovered overnight
Prepare citrus marinade
Add chicken to mix and marinate for 2 hours
Let chicken sit at room temp in braising pan for 30 min
Directions
Season the chicken with kosher salt on all sides, making sure to season underneath the skin as well. (You can do this one night ahead of time and keep the chicken in the fridge to air-chill uncovered.)
Prepare the citrus marinade. In a large bowl, add the wine, orange juice and zest, lime juice, 3 tablespoons extra virgin olive oil, tomato paste, spices, and a good dash of kosher salt. Add the garlic and onion. Whisk to combine.
Add the chicken and toss to coat, making sure to lift the skin up and spoon some of the marinade underneath (this will give you more flavor). Set aside at room temperature for 30 minutes. Alternatively, cover and refrigerate for an hour or two. (For best results, take it out of the fridge and leave the chicken at room temperature for 30 to 45 minutes before cooking.)
Preheat the oven to 425°F and adjust a rack in the middle.
Transfer the chicken and the marinade to a braising pan. Roast uncovered for 30 minutes, then carefully turn the pan 180 degrees and roast for another 15 minutes or until the chicken is fully cooked and tender (juices should run clear).
In a small bowl, mix together the honey with 1 tbsp of extra virgin olive oil. Carefully remove the chicken from the oven and brush the top with the honey and olive oil mixture.
Switch the oven to the broil function. Return the chicken back to the oven about 6 inches away from the broiler and cook briefly for 3 to 4 minutes, watching for the skin to turn a nice golden brown.
Remove from the heat and finish with lime juice. Add slices of fresh orange and wedges of lime.
We love all things mushrooms, but I know they are not everyone’s cup of tea. However you might be enticed to try this rich, woodsy side dish with combined straightforward creminis and meaty, smoky shiitakes.
To ensure that the mushrooms are evenly seasoned and stay moist during roasting, they are brined in a saltwater solution. This went against everything we’ve ever read about preparing mushrooms, but we gave it a whirl. A glass pie plate was put over the soaking mushrooms to keep them submerged in the brine.
The ‘shrooms are roasted in a hot oven for about an hour until they are deeply browned. Then they’re coated in extra-virgin olive oil and lemon juice before adding the flavorful mix-ins of grated Parmesan, parsley, and pine nuts.
Oh yeah Babe, this recipe from America’s Test Kitchen was divine. Served with grilled tomatoes and strip steaks, we felt like royalty on a weeknight!
Adjust oven rack to lowest position and heat oven to 450°F.
Dissolve 5 teaspoons salt in 2 quarts room-temperature water in large container. Add cremini mushrooms and shiitake mushrooms to brine, cover with plate or bowl to submerge, and let stand for 10 minutes
Drain mushrooms in colander and pat dry with paper towels. Spread mushrooms evenly on rimmed baking sheet, drizzle with oil, and toss to coat. Roast until liquid from mushrooms has completely evaporated, 35 to 45 minutes.
Remove sheet from oven (be careful of escaping steam when opening oven) and, using thin metal spatula, carefully stir mushrooms. Return to oven and continue to roast until mushrooms are deeply browned, 5 to 10 minutes longer.
Combine remaining olive oil and lemon juice in large bowl. Add mushrooms and toss to coat. Add Parmesan, pine nuts, and parsley and toss. Season with salt and pepper to taste; serve immediately.
Heart-healthy salmon is paired with jammy tomatoes which get an herby boost from pesto sauce. With very few ingredients and in less than a half hour, you have the makings of a company-worthy dinner.
Cutting the fish into the recommended 4 slices will end up with 6-ounce filets. We decided to divide the salmon into 3 filets weighing in at 8-ounces each. If they have thin “tails” at one end. flip them up and secure with a toothpick while you cook skin side down. Remove the toothpicks before flipping them over. This will help alleviate overdone ends.
Heat two tablespoons of the olive oil in a 12″ non-stick skillet over medium-high heat. Add grape tomatoes, season with 1/4 teaspoon Kosher salt and sauté until soft, about 4 minutes. Stir in pesto and sauté two minutes more. Transfer tomato mixture to a plate and keep warm in a 200°F oven.
Wipe out skillet (although I didn’t find this necessary). Season salmon pieces with 1/2 teaspoon each Kosher salt and pepper. Heat 1 tablespoon olive oil over medium-high heat. Place salmon pieces in skillet, skin side down. Sauté about 4-6 minutes. If you’re pieces are thick you may have to cook them a few minutes longer.
Turn salmon and sauté and additional 4 minutes until salmon is cooked but tender. Serve over tomatoes and with lemon wedges.
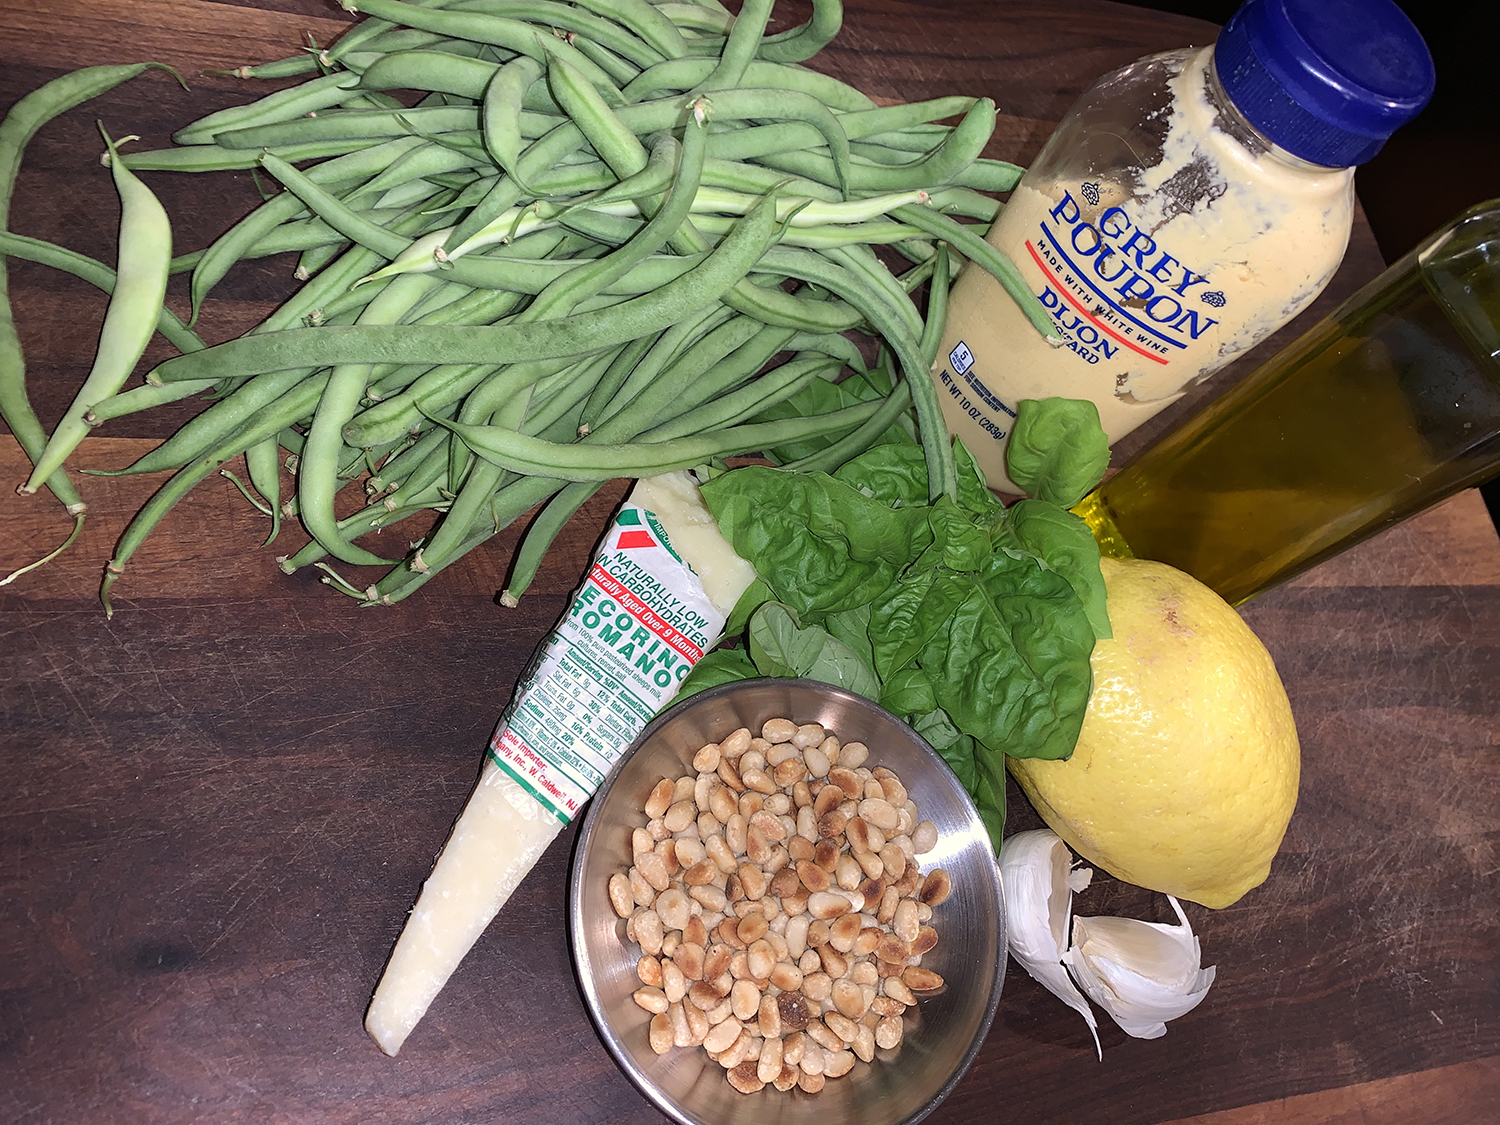
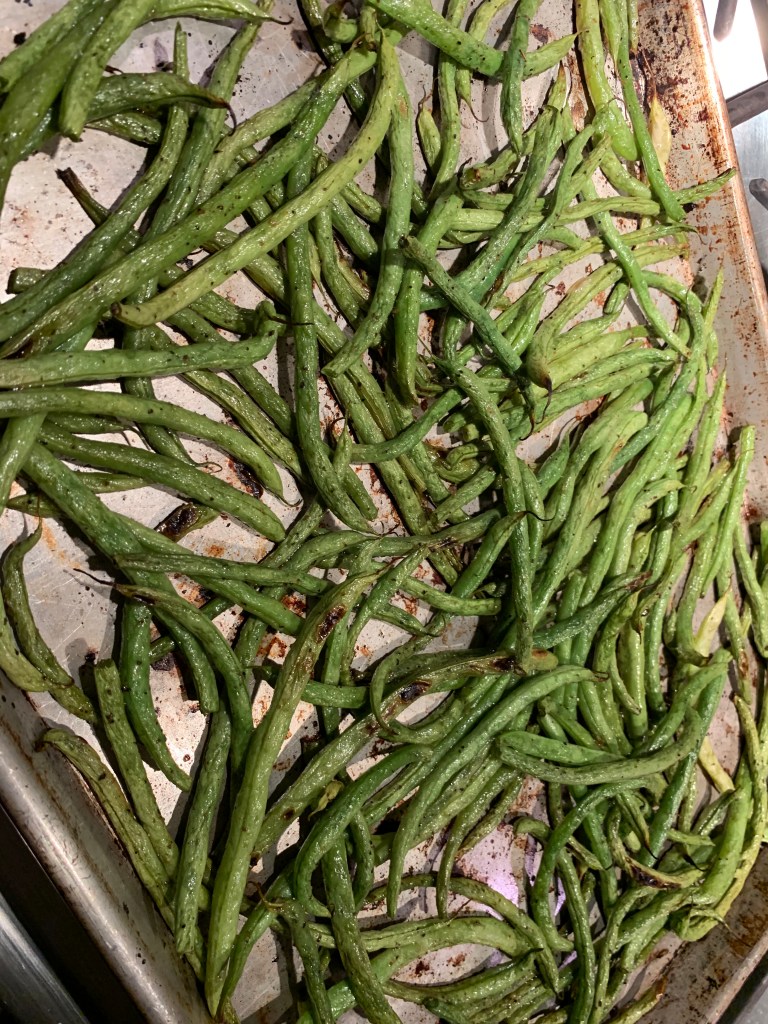
If you want earthy, sweet green beans with moist interiors and just the right amount of browning, this roasted bean recipe from Cook’s Country does the trick. Because they are often dry and leathery; start by covering the roasting beans which are mixed with oil, salt, pepper, and sugar and let them gently steam for 10 minutes.
The sugar promotes browning when the foil is removed to let the beans blister in the oven’s high heat. To add a lively bite to the flavorful beans, toss them with a lemon vinaigrette and top them with salty, sharp Pecorino and crunchy pine nuts.
1 ½ oz. Pecorino Romano cheese, shredded (1/2 cup)
¼ cup pine nuts, toasted
Directions
Adjust oven rack to lowest position and heat oven to 475 degrees.
Combine green beans, 1 1/2 tablespoons oil, sugar, 3/4 teaspoon salt, and 1/2 teaspoon pepper in bowl. Evenly distribute green beans on rimmed baking sheet.
Cover sheet tightly with aluminum foil and roast for 10 minutes. Remove foil and continue to roast until green beans are spotty brown, about 10 minutes longer, stirring halfway through roasting.
Meanwhile, combine garlic, lemon zest, and remaining 1/4 cup oil in medium bowl and microwave until bubbling, about 1 minute; let mixture steep for 1 minute. Whisk lemon juice, mustard, 1/4 teaspoon salt, and 1/4 teaspoon pepper into garlic mixture.
Transfer green beans to bowl with dressing, add basil, and toss to combine. Transfer to serving platter and sprinkle with Pecorino and pine nuts. Serve.
Another one-pan wonder, and who doesn’t like that for ease of clean-up and prep? It works as well for company as it does for a weeknight dinner. According to ATK’s “Complete Mediterranean Cookbook”, cooking the tenderloins until buttery-smooth is key, and roasting them atop a bed of vegetables buffers the heat to ensure juicy meat all the way through, which is rubbed with herbes de Provence, salt, and pepper.
The Mediterranean seasoning inspired the selection of vegetables: sweet, delicately flavored fennel, earthy artichoke hearts (frozen, to keep things easy), and briny olives (which I doubled the quantity). After softening the fennel in the microwave, it was tossed with the other vegetables and olive oil, and the mixture was spread into the roasting pan (or rimmed baking sheet), placing the tenderloins on top.
The vegetables are nearly cooked when the pork is done, so remove the meat to a moated cutting board and tent with foil. To the cooked veggies, add in juicy halved cherry tomatoes and lemon zest, and let them finish in the oven. After 10 minutes, the fennel should be tender, the tomatoes softened and releasing their juices.
NOTE: If using frozen artichoke hearts, be sure to thoroughly thaw and pat them dry; otherwise their moisture will inhibit the browning of the roasted vegetables.
Spice-Rubbed Pork Tenderloin with Fennel, Tomatoes, Artichokes, and Olives
2 large fennel bulbs, stalks discarded, bulbs halved, cored, and cut into ½-inch-thick strips
12 oz. frozen artichoke hearts, thawed and patted dry
½ cup pitted kalamata olives, halved
3 Tbsp. extra-virgin olive oil
18 oz. cherry tomatoes, halved
1 Tbsp. grated lemon zest
2 Tbsp. minced fresh parsley
Season with salt, pepper and herbs de Provence
After microwaving the fennel, drain well
Toss, fennel, artichoke hearts and olives with olive oil
Place seasoned pork on top and tuck under their thin tails
Halfway through, turn the meat over
Add tomatoes and lemon zest and cook another 10 minutes
Directions
Adjust oven rack to lower-middle position and heat oven to 450 degrees. Pat pork dry with paper towels and season with herbes de Provence, ½ teaspoon salt, and ¼ teaspoon pepper.
Combine fennel and 2 tablespoons water in bowl, cover, and microwave until softened, about 5 minutes; drain well. Toss drained fennel, artichokes, olives, and oil together in bowl and season with salt and pepper.
Spread vegetables into 16 by 12-inch roasting pan and lay pork on top, tucking under the thin part of the tail. Roast until pork registers 140 to 145 degrees, 25 to 30 minutes, turning tenderloins over halfway through roasting.
Remove pan from oven. Transfer pork to cutting board, tent loosely with aluminum foil, and let rest for 10 minutes. Meanwhile, stir cherry tomatoes and lemon zest into vegetables and continue to roast until fennel is tender and tomatoes have softened, about 10 minutes.
Remove pan from oven. Stir parsley into roasted vegetables. Slice pork into ½-inch-thick slices, and arrange vegetables and sliced pork on a platter, pouring any accumulated meat juices back over the plated pork and vegetables.
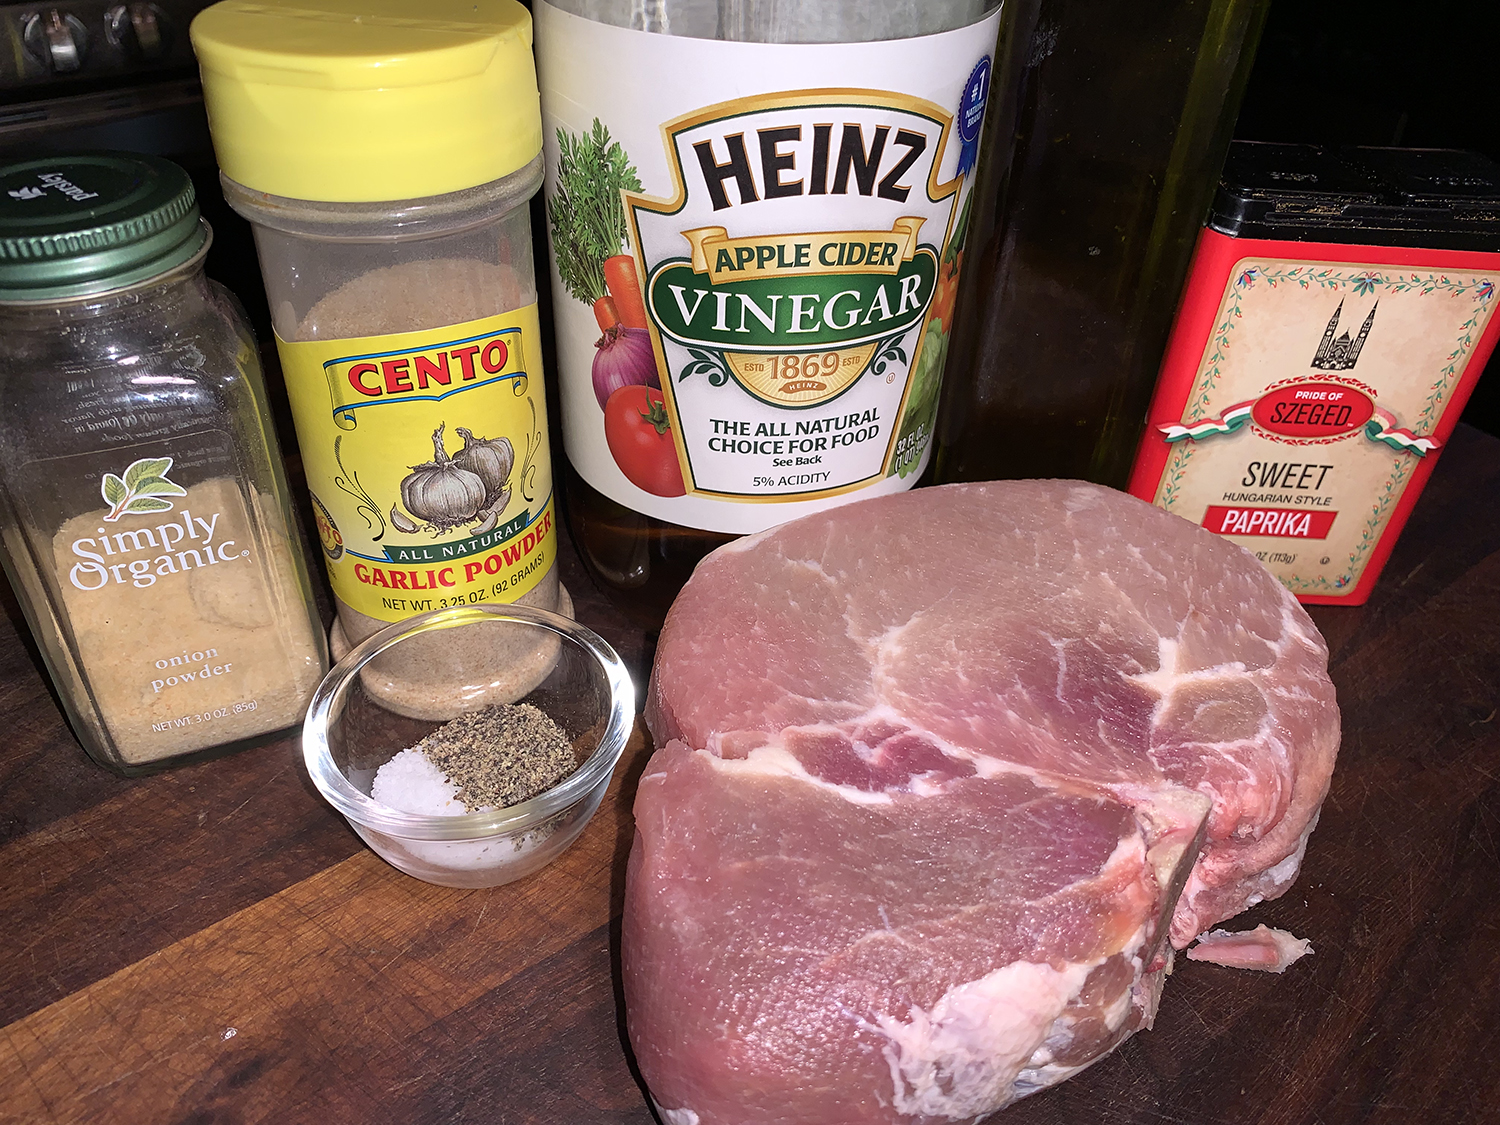
It’s likely you’ll have the ingredients for the wet spice rub already in your pantry. Among them would be paprika, which lends a fiery red-orange color, not to mention a sweet and slightly fruity taste with very mild heat.
While this approach uses one thick pork chop, you could use two thinner chops (I wouldn’t go less than one-inch thick); just be sure to keep a close eyeball on the temperature because they will get done much sooner.
Well, as luck would have it, tornadoes were in the area with two actually touching down only miles from our house. Just as The Hubs took the chop off the grill pan to let it rest, we were instructed to take cover immediately, so we spent about 15 minutes down the basement before getting the all clear—but at least the meat got to rest!
We served our pork with a side of Avocado Cucumber Salad and a few Truffled Pasta Purses.
As you can decipher from the stormy weather, we were not able to use our outside grill, so we took the next best option and that would be “Grilliam” our cast-iron grill pan. It works basically on the same principal as a gas grill, with grate marks and all!
1 1-3⁄4″ to 2″ (about 1.5 lbs.) boneless pork chops
Directions
In a small bowl, mix the olive oil, apple cider vinegar, paprika, onion powder, garlic powder, oregano, salt, and pepper until a thick paste forms.
Coat both sides of the pork chop in the paste and set it aside on a plate, or in a ziploc bag, to marinate while you warm up the grill—or for up to 8 hours in the refrigerator.
Preheat your grill to medium-high.
Grill your pork chop for 10-12 minutes per side with lid down, or until it reaches an internal temperature of 145 degrees (test with an instant-read thermometer). After removing from the grill, let rest on a moated cutting board for 5 minutes tented with foil.
Slice against the grain in 1⁄2-inch slices, arrange on a platter and pour over any accumulated juices.
A super-easy and healthy side dish to go with your grilled entrée. According to The Endless Meal where I found this recipe “Everything works about this salad: the crunchy but slightly softened cucumbers, the creamy avocados, the earthy cilantro, and the hint of spice that tingles your tongue.”
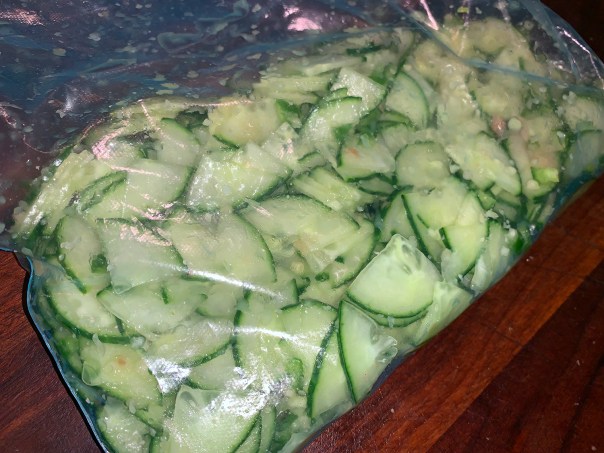
Making this cucumber and avocado salad requires maceration. The basis of which is tossing the cucumbers in a little salt and sugar then letting them sit at room temperature while some of the juice is drawn out. The process softens the cucumber just a little and makes a sort of dressing for the salad.
NOTE: You can prepare it ahead of time by combining the cucumbers and spices in the bag but NOT sprinkling the salt and sugar over. Place the bag in the fridge for up to 8 hours. When you are ready, take the bag out of the fridge, add the salt and sugar, let it sit for a half hour then continue with the rest of the preparation.
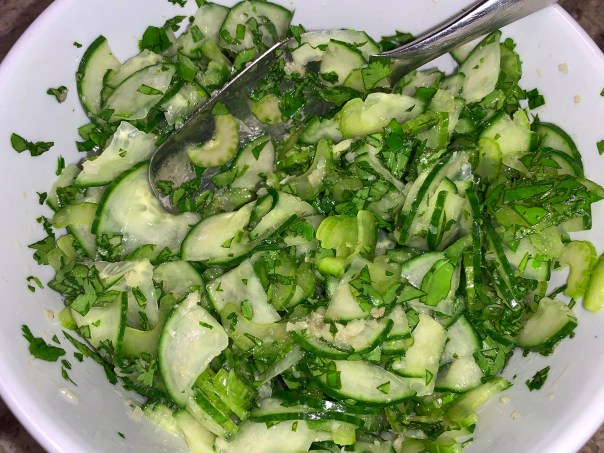
Yes, it is a “green salad” but quite different from what most of us picture because there is no lettuce at all! The recipe calls for a red Thai chili, but in lieu of that we used a green serrano making it even “greener”. The flavors and textures paired wonderfully with our grilled pork chop, but the salad does not store well after the initial meal, so eat it up! (That is why we cut the recipe in half for the two of us—with just a tad remaining.)
Place the ginger, cucumbers, sea salt, sugar, garlic, and red chili in a large, resealable plastic bag. Squish the bag around a little so that everything is mixed together. Set the bag aside on your counter for a half hour.
Pour everything from the bag into a salad bowl. Add the celery, oil, and lime juice and toss well. Season to taste with sea salt. Add the diced avocados, basil, and cilantro and gently toss once more.
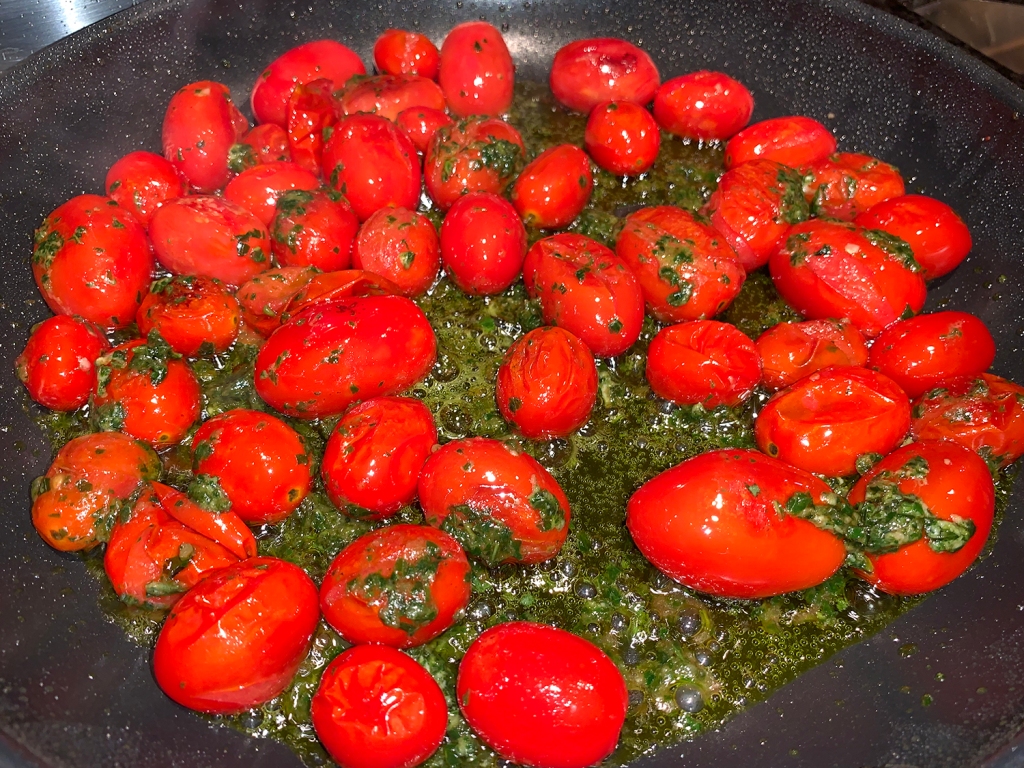
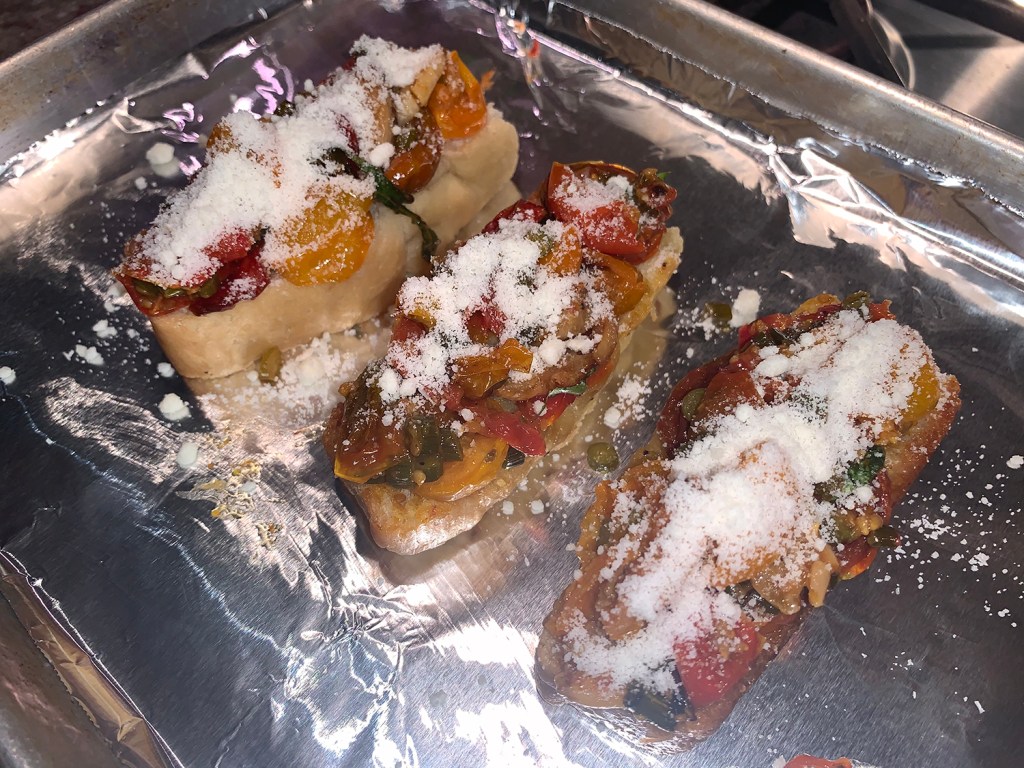
Lots of grape and/or cherry tomatoes? A great way to use them up before they go bad is to roast them with garlic and olive oil. All you need are tomatoes, olive oil and garlic cloves. However, we happen to have some organic garlic scapes on hand and decided to chop them up and add to the mix. Jammy describes the way these tomatoes collapse, thicken and sweeten when they’re roasted in the oven.
While exact measurements don’t make much of a difference, I sliced up just over a pound of multi-colored grape tomatoes, peeled and smashed about a head of garlic cloves, and chopped 6 garlic scapes. Then arranged in a single layer on a large rimmed baking sheet, tossed with about 1/4 cup of good olive oil and sprinkled with salt and pepper. The pan went into a preheated 325° oven for 30 minutes, then tossed everything with a spatula and spread back into an even layer. After another 30 minutes in the oven, the pan was removed.
Let cool completely. You can store in an airtight container for up to five days in the refrigerator, or use immediately as a spread on crusty bread, tossed with cooked pasta, or use as an accompaniment to fish, steak or chicken.
As a special treat, we spread some on thick focaccia slices, topped with shredded parm and put under the broiler for several minutes, then topped with a chiffonade of fresh basil from our garden. In a word, divine!
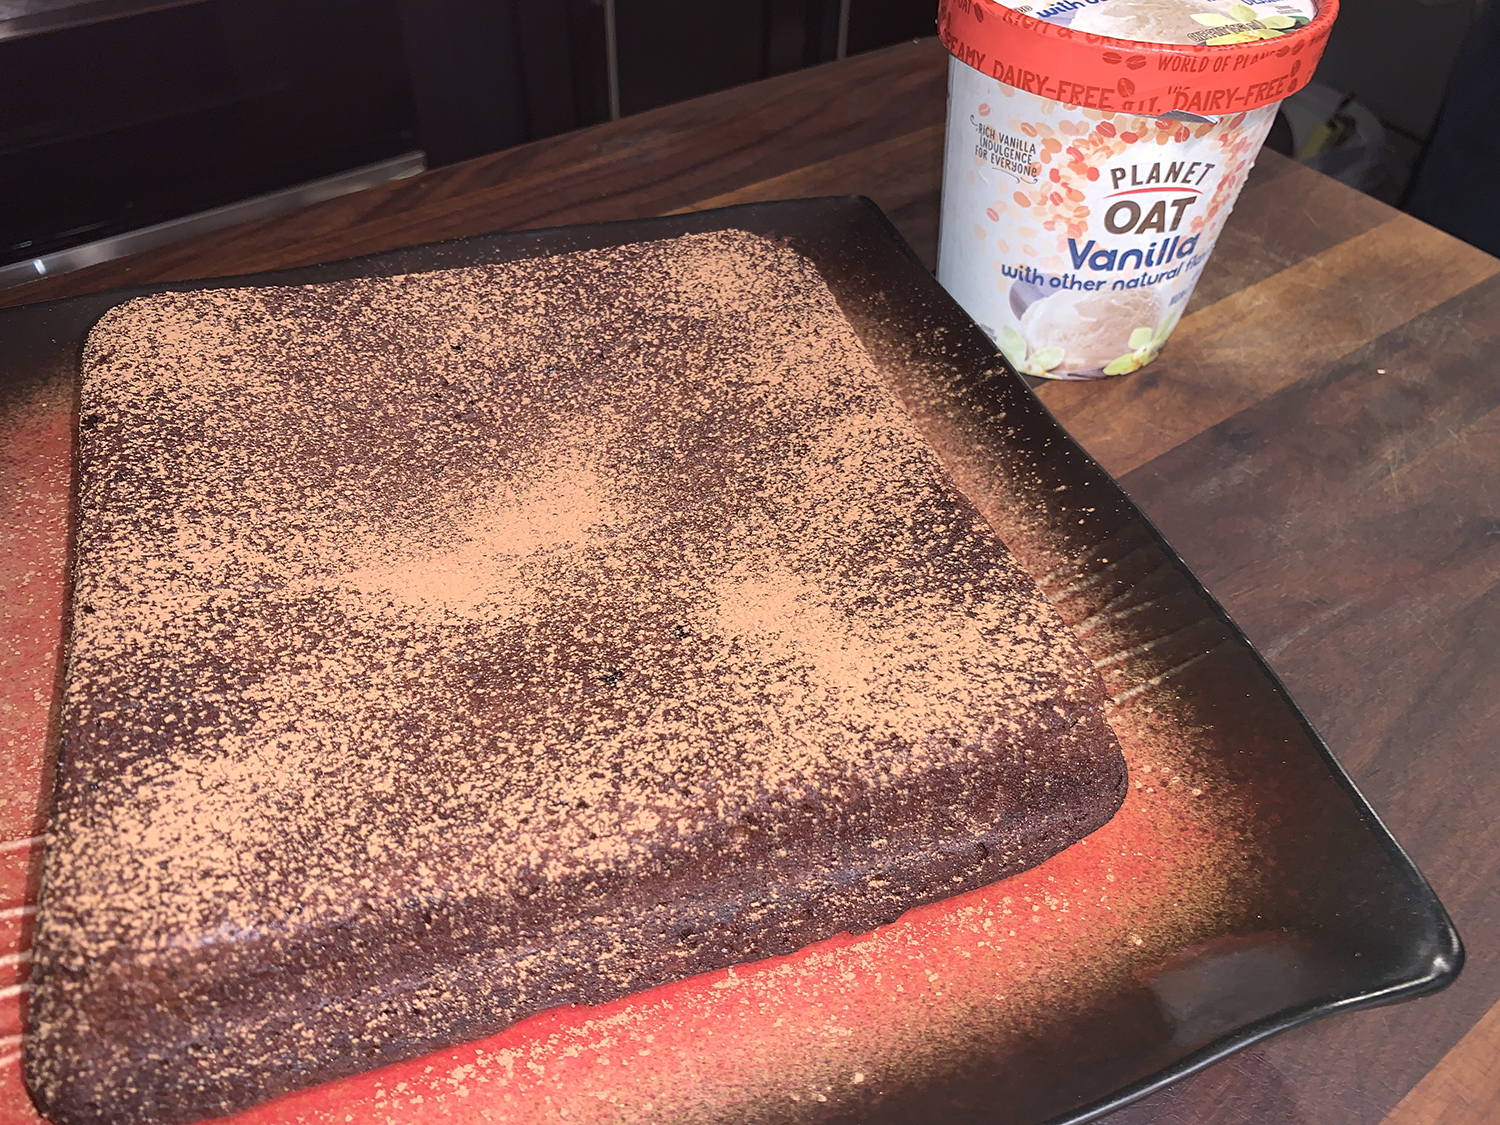
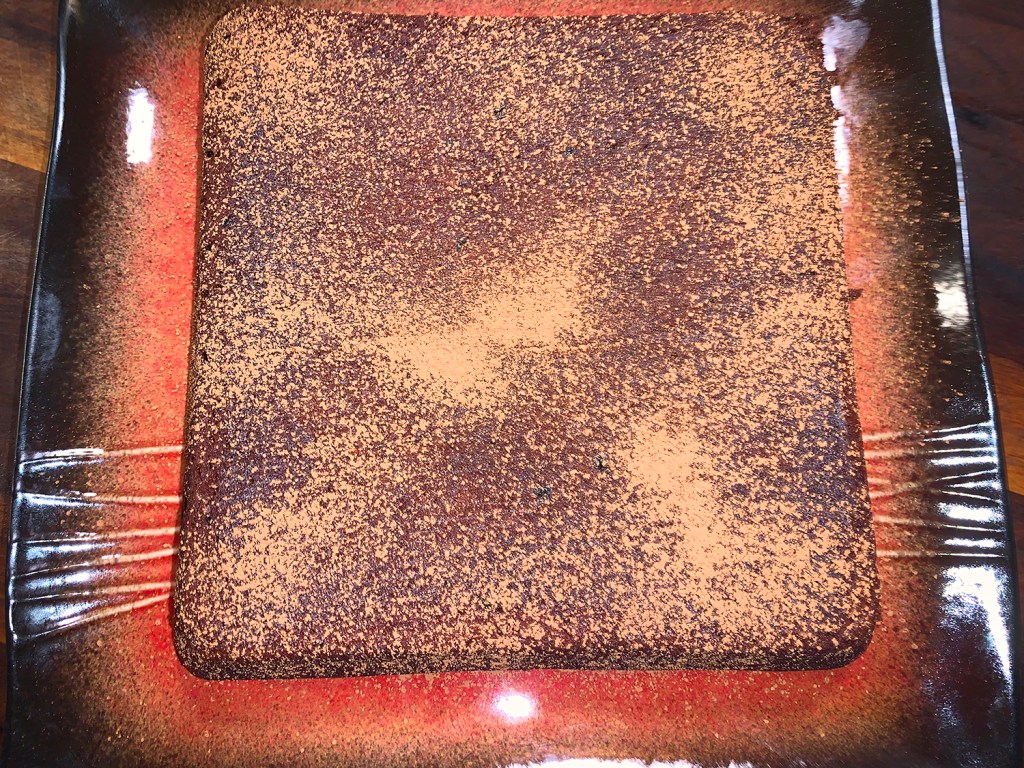
The Hubs decided to treat himself with dessert for Father’s Day and when he eyeballed this Flourless Chocolate Torta in the latest Milk Street magazine, he knew it was the ticket! Rich, light and flourless, this Italian cake is a fudgy, brownie-like dessert created by Eugenio Gollini of the medieval town of Vignola back in 1886.
In reinventing this cake, Milk Street found that peanut flour, one of the most distinctive ingredients of the original Gollini torta, could be omitted without sacrificing flavor or texture. Instead they use almond flour which provides an equally flavorful and moist cake—and is much easier to source.
Instant espresso powder accentuates the deep, roasty, bitter notes and a dose of dark rum lifts the flavors with its fieriness. Serve with lightly sweetened mascarpone, whipped cream, or with vanilla gelato or ice cream—in our case, it was with a non-dairy oat vanilla brand that our lactose intolerant guests loved.
Don’t use natural cocoa. The recipe will still work, but the cake will be lighter in color and not quite as deep in flavor as when made with Dutch-processed cocoa. Take care not to overbake thecake. Remove it from the oven when a toothpick inserted at the center comes out with a few sticky crumbs clinging to it. After 30 to 45 minutes of cooling, the cake is inverted out of the pan; don’t worry about re-inverting it. True torta Barozzi is left upside-down for cutting and serving.
Don’t forget that the eggs need to be room temperature.
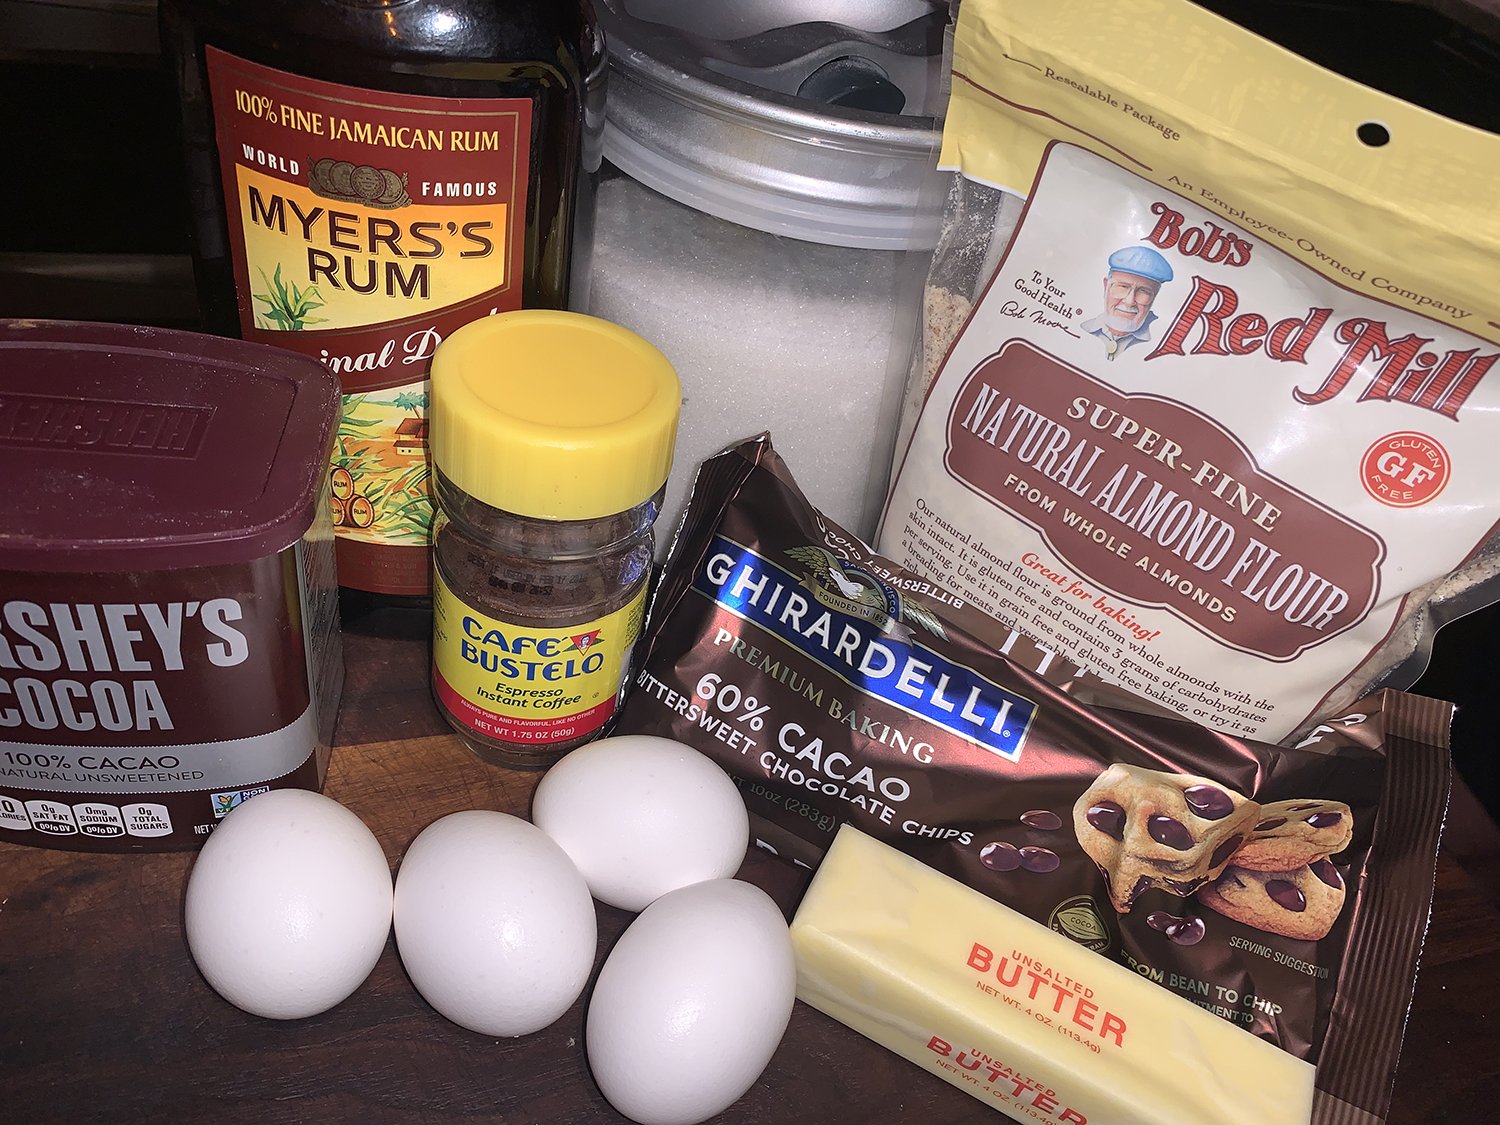
10 Tbsp. salted butter, cut into 10 pieces, plus more for the pan
6 oz. bittersweet chocolate, chopped
¼ cup Dutch-processed cocoa powder, plus more for dusting
1 Tbsp. instant espresso powder
4 large eggs, separated, room temperature
¾ cup white sugar, divided
1 cup almond flour
1/2 tsp. table salt
3 Tbsp. dark rum
Directions
Heat the oven to 350°F with a rack in the middle position. Butter an 8-inch square pan, line the bottom with a parchment square and butter the parchment.
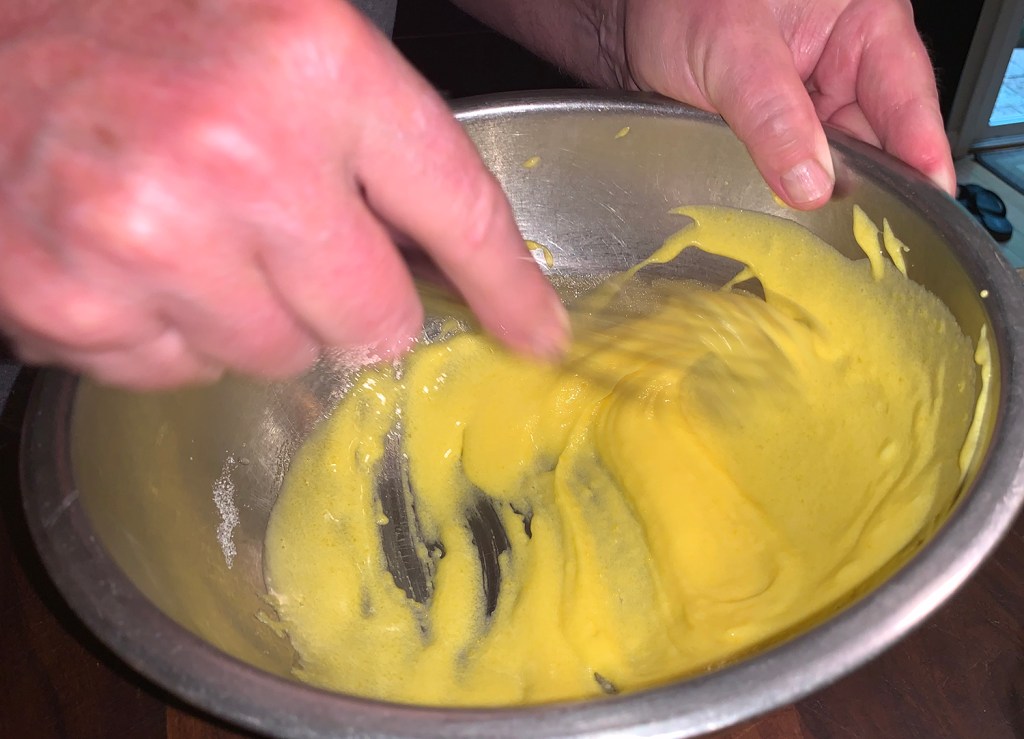
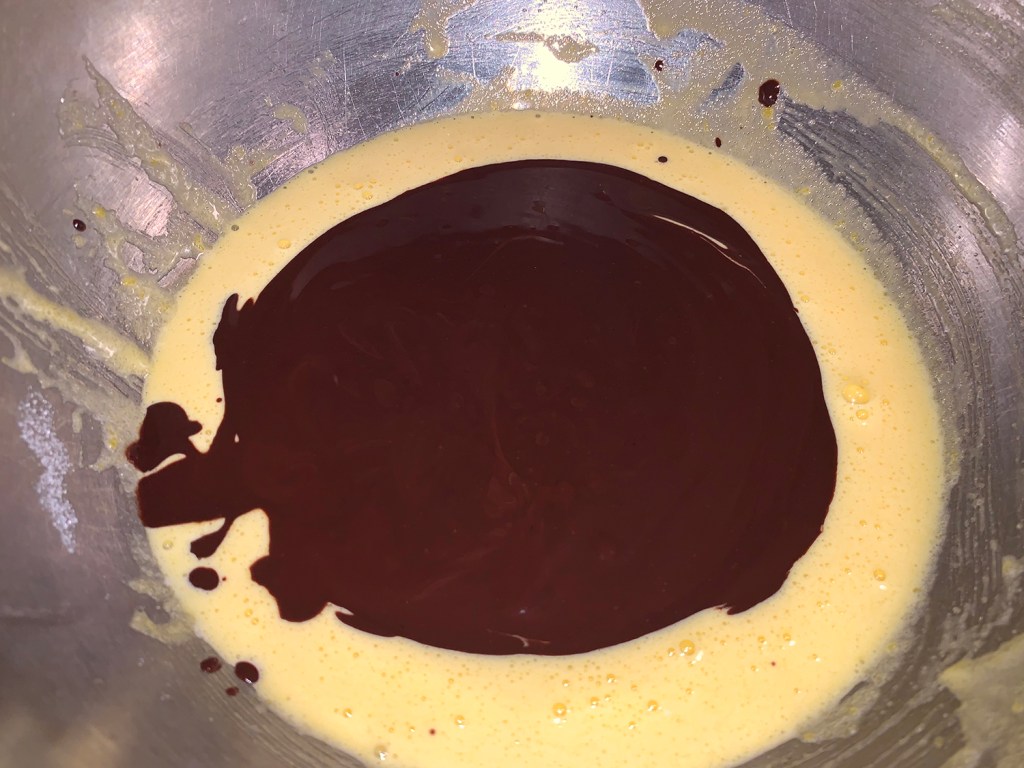
In a medium saucepan over medium, melt the butter. Remove from the heat and add the chocolate, cocoa and espresso powder. Let stand for a few minutes to allow the chocolate to soften, then whisk until the mixture is smooth; cool until barely warm to the touch.
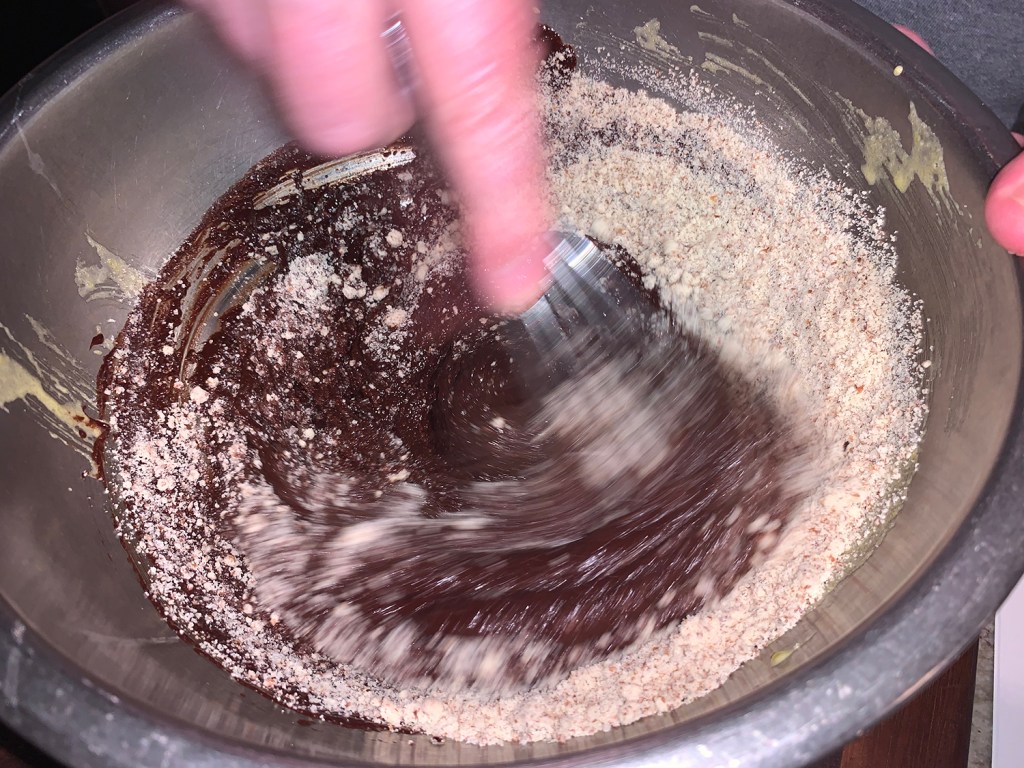
In a large bowl, vigorously whisk the egg yolks and ½ cup of the sugar until lightened and creamy, about 30 seconds. Add the chocolate mixture and whisk until homogeneous. Add the almond flour and salt, then whisk until fully incorporated. Whisk in the rum; set aside.
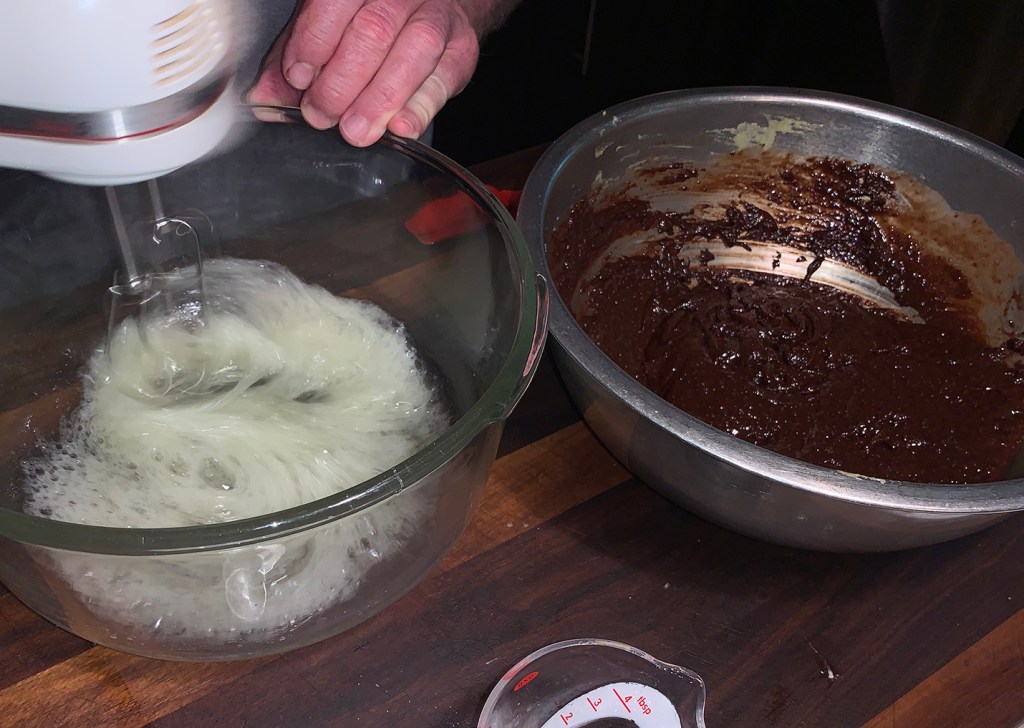
In a stand mixer with the whisk attachment or in a large bowl with a hand mixer, whip the egg whites on medium-high until frothy, 1 to 2 minutes. With the mixer running, gradually add the remaining ¼ cup sugar, then beat until the whites hold soft peaks, about 2 minutes.
Add about a third of the whipped whites to the yolk-chocolate mixture and fold with a silicone spatula to lighten and loosen the base. Scrape on the remaining whites and gently fold in until no streaks remain. Transfer to the prepared pan and gently shake or tilt the pan to level the batter.
Bake until the cake is slightly domed and a toothpick inserted at the center comes out with a few crumbs attached, 30 to 35 minutes. Cool in the pan on a wire rack for 30 to 45 minutes; the cake will deflate slightly as it cools.
Run a paring knife around the inside edge of the pan to loosen the cake, then invert onto a platter; if needed, peel off and discard the parchment. Cool completely. Dust with cocoa before serving.
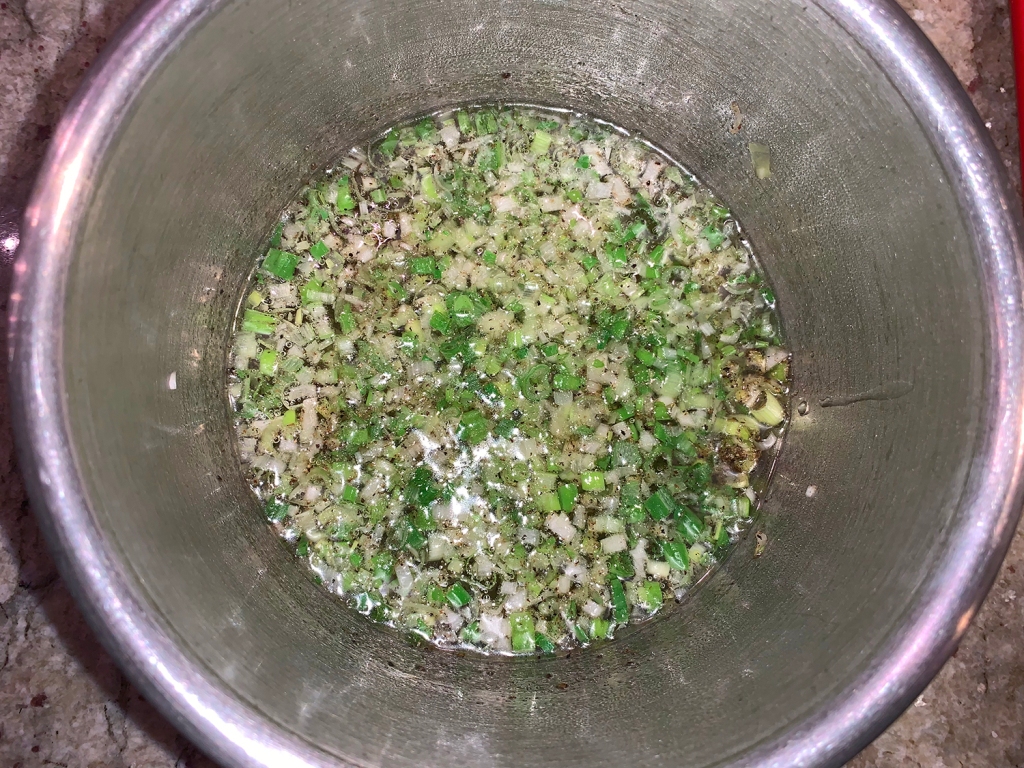
Adding fresh allium notes as well as bright green color to any dish, Vietnamese scallion oil, called mỡ hành, is used as a garnish or condiment on a number of different foods, here we are adding it to cooked asparagus.
This version from Milk Street includes savory fish sauce (or soy sauce), pungent ginger and a little sugar to build complexity. Try it on shrimp, steak, grilled pork chops, corn on the cob or steamed dumplings. Leftover scallion oil can be refrigerated in an airtight container for up to three days; return it to room temperature before serving.
For proper texture and flavor, the scallions should be chopped. Slice them first, then run the knife blade over them a few times to further break them down.
1 1⁄2 lbs. asparagus, trimmed and halved on the diagonal
3 Tbsp. water
Directions
In a medium heatproof bowl, combine the scallions, ¼ teaspoon salt and 1 teaspoon pepper. Using your fingers, gently rub the salt and pepper into the scallions until the scallions begin to wilt.
In a small saucepan over medium-high, heat the oil until shimmering, then pour the hot oil over the scallions; the scallions will sizzle. Stir, then stir in the fish sauce, ginger and sugar. Cool to room temperature.
In a 12-inch skillet over medium-high, heat 1 tablespoon neutral oil until barely smoking. Add asparagus and cook, stirring only a few times, until charred. Add 3 tablespoons water, then immediately cover. Reduce to low and cook, stirring just once or twice, until the asparagus is crisp-tender, 2 to 3 minutes. Serve with scallion oil spooned over.
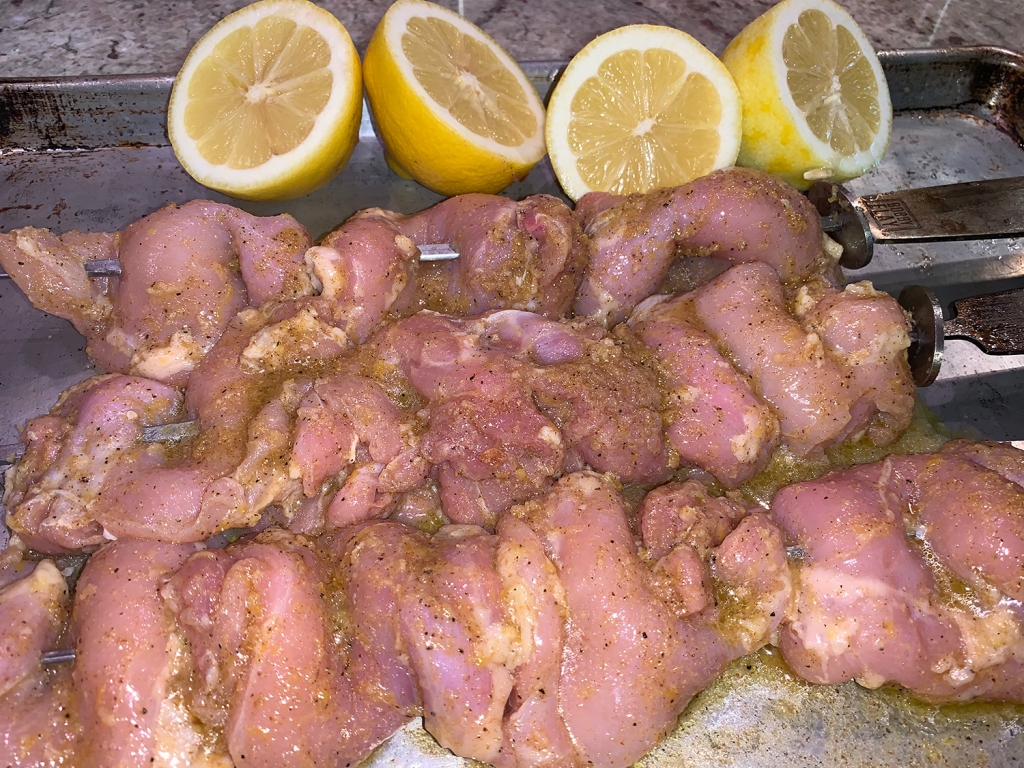
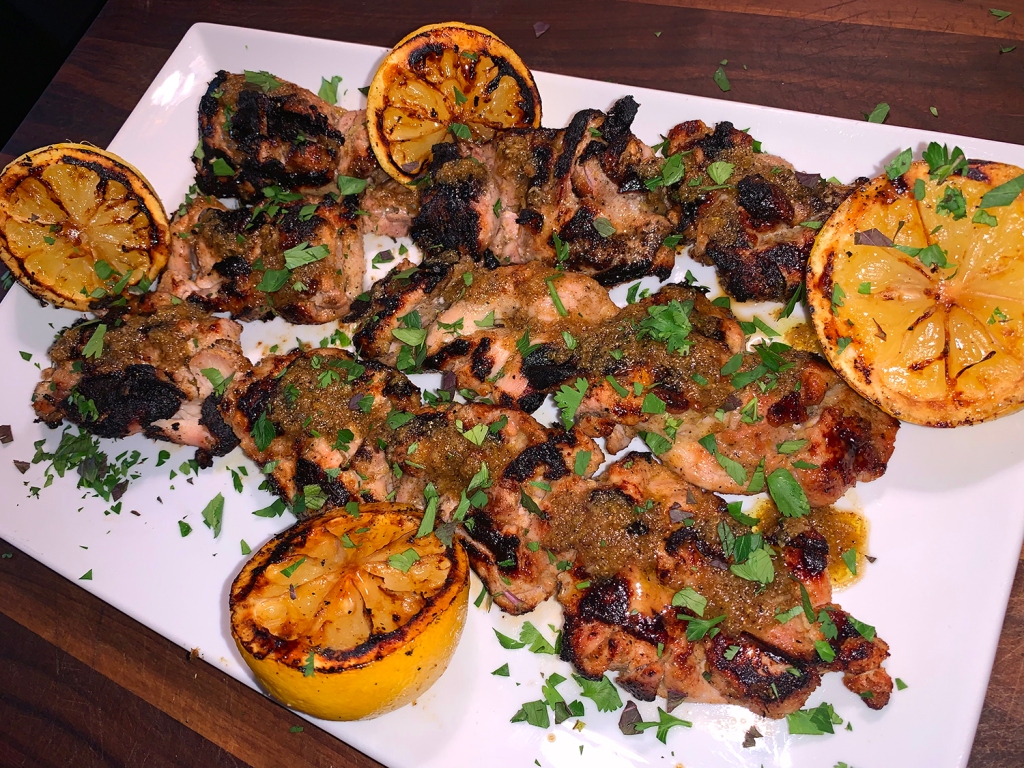
WOWSER, these were so friggin’ good! While the original Milk Street recipe broiled the skewers, we decided to grill them for a more enhanced char. The skewers are then finished with the juice of charred lemon halves that have been drizzled with honey, along with a sprinkle of fresh herbs. Cilantro, flat-leaf parsley or mint are good choices, alone or, as we did, in combination.
As a perfect accompaniment we also grilled vegetables tossed in EVOO, salt and pepper. Some skewers were laced with red and green bell pepper along with onion wedges; while others consisted of cherry tomatoes and mushroom caps. We purposely arranged them separately because the onion and pepper pieces took longer to cook. And if you’re not restricting carbs or gluten, tricolored couscous can round out the meal nicely.
Some reviewers commented that they used pomegranate molasses as a finishing drizzle with the herbs because it’s not as sweet as honey but still adds another interesting texture and taste. I think that’s worth a try!
Grated zest and juice of 1 lemon, plus 2 lemons, halved
¼ cup extra-virgin olive oil
2 Tbsp. honey, plus extra to drizzle
1 Tbsp. finely grated fresh ginger
1 Tbsp. ground cumin
1 Tbsp. ground coriander
Kosher salt and ground black pepper
1½ lbs. halved boneless, skinless chicken thighs
Chopped fresh herbs
Directions
Preheat the grill for direct high heat.
In a medium bowl, mix the lemon zest and juice, oil, honey, ginger, spices, 2 teaspoons salt and 1 teaspoon pepper; set aside 2 tablespoons.
Toss the chicken with the remaining mixture. Scrunch the chicken onto metal skewers, then place on a foil-lined rimmed baking sheet. Add the 4 lemon halves.
Oil the grates and grill chicken and lemon halves until charred, about 12 minutes, flipping the chicken skewers halfway through.
Spoon the reserved lemon-oil mixture over the chicken. Sprinkle with herbs.
Drizzle the lemon halves with honey and serve alongside for squeezing over the chicken.
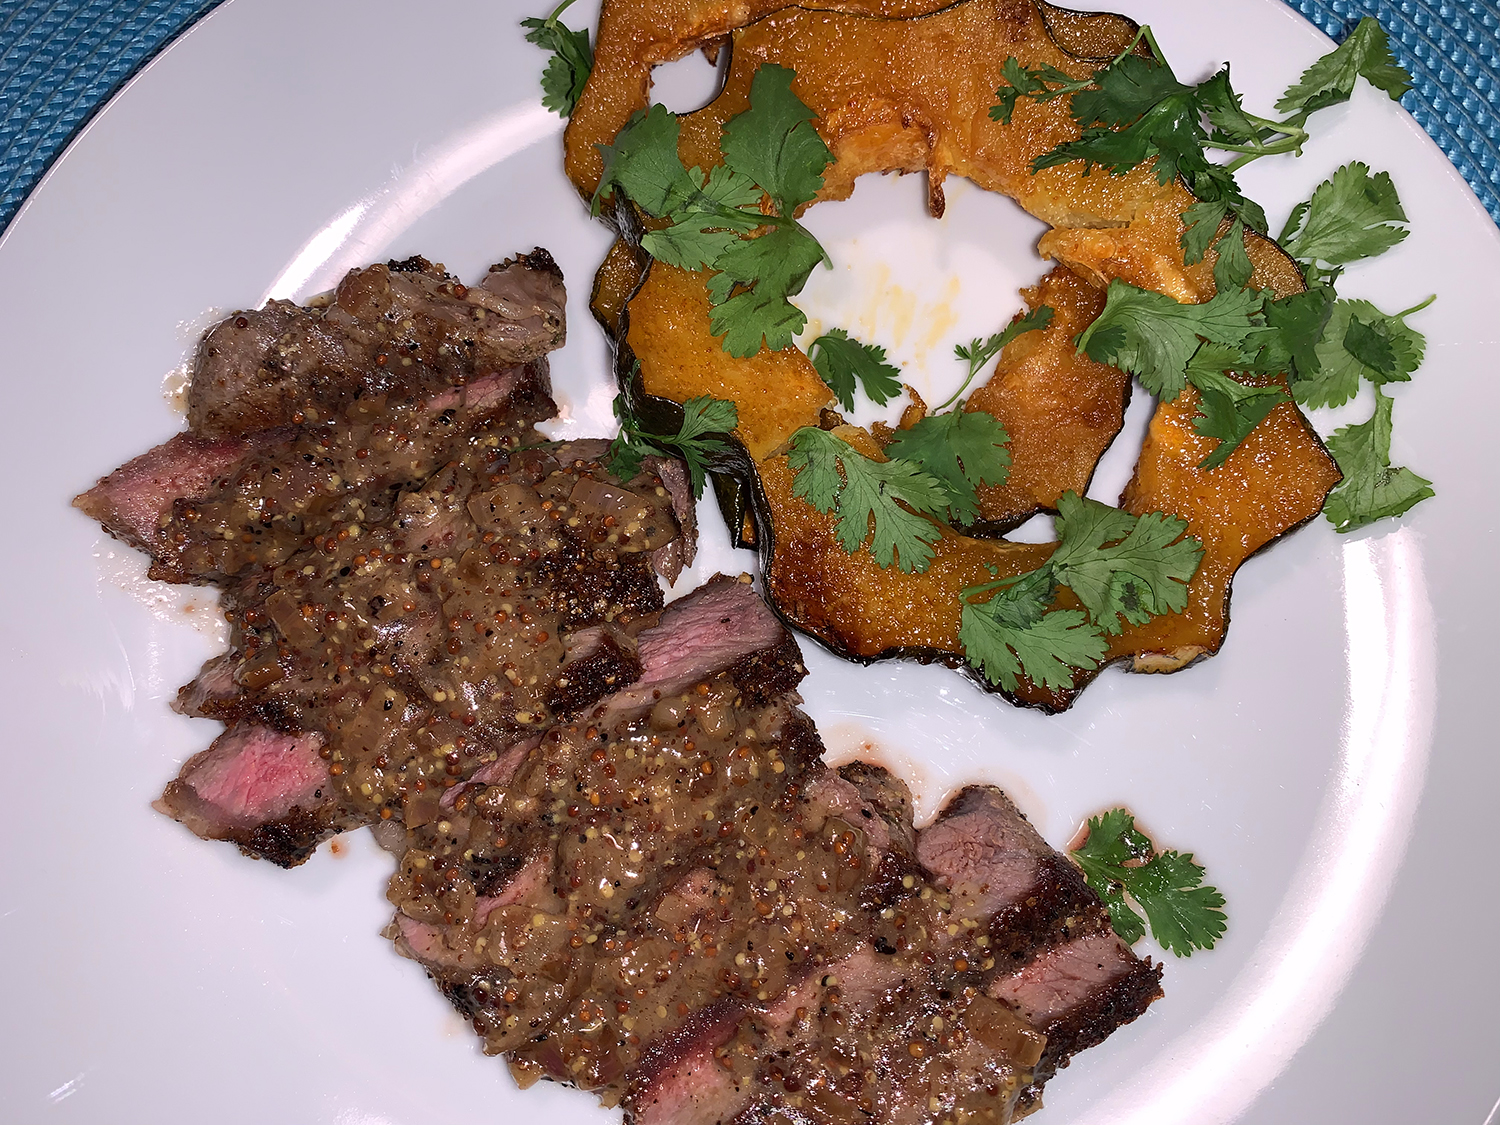
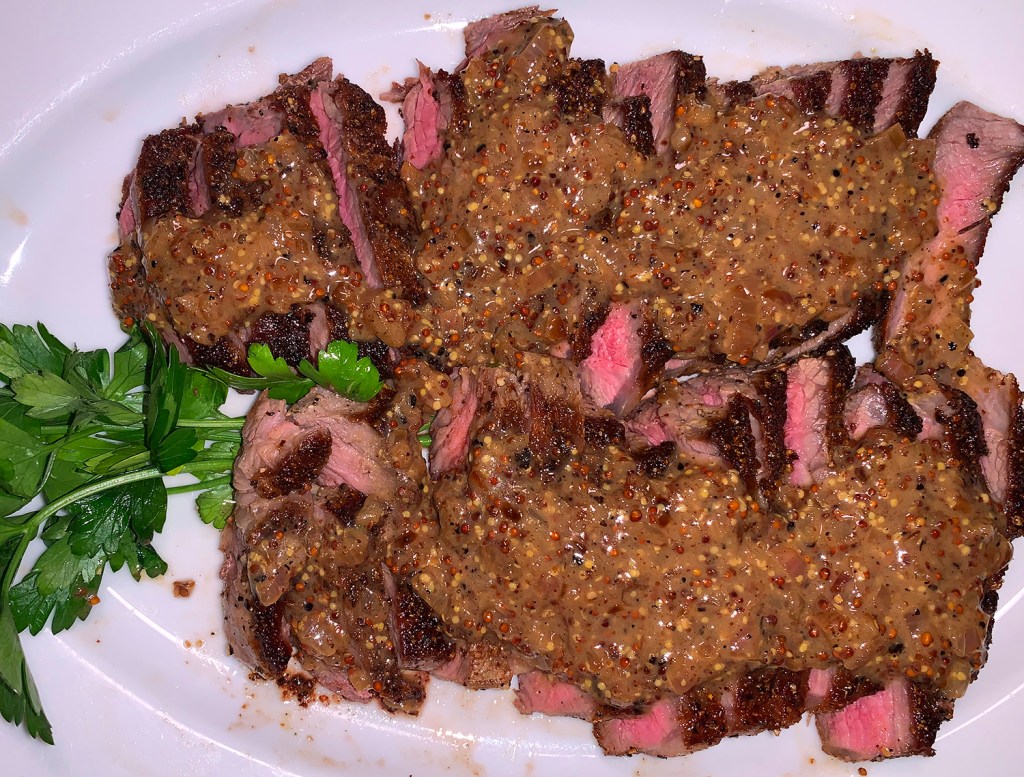
Super simple, and fabulously flavorful, this riff on pan-seared steak found in Milk Street magazine, is just the ticket to take a dinner from hum-drum to over-the-top! With Father’s Day coming up, it might be just the change your man is looking for. Of course, if he’s hell-bent on grilling, this recipe only works on the stove top because you need to make the fantastic sauce in a pan—which I guess you could improvise on an outdoor grill…
The secret is to build on the spicy mustard seed used as a steak seasoning by making that quick pan sauce with whole-grain mustard, plus a little shallot and butter. Cooking alert: Be sure the pan is off the burner when the butter is whisked into the sauce at the end so the butter doesn’t “break” and become watery. That would be a real bummer…
With our side of Roasted Sweet and Spicy Squash, another flavor-packed recipe, my man exclaimed this might be his new favorite steak meal!
Pan-Seared Steak with Mustard Seeds, Black Pepper, and Rosemary
3 Tbsp. salted butter, cut into 1-Tbsp. pieces, divided
1 medium shallot, finely chopped
2 Tbsp. whole-grain Dijon mustard
Directions
In a spice grinder, pulse the mustard seeds, peppercorns, rosemary and 1 tablespoon salt until coarsely ground. Season the steaks on all sides with the mixture.
In a 12-inch skillet, heat the oil over medium-high until barely smoking. Add the steaks and brown on both sides until the centers reach 120°F (for medium-rare). Transfer to a platter.
To the skillet, add 1 tablespoon of the butter and the shallot. Cook over medium, stirring, until the shallot is softened. Add ⅔ cup water and the Dijon mustard. Cook, stirring, until slightly thickened.
Off heat, whisk in the remaining 2 tablespoons butter and the accumulated steak juices. Taste and season with salt and pepper.
Slice the steaks, return to the platter and pour the sauce over them.
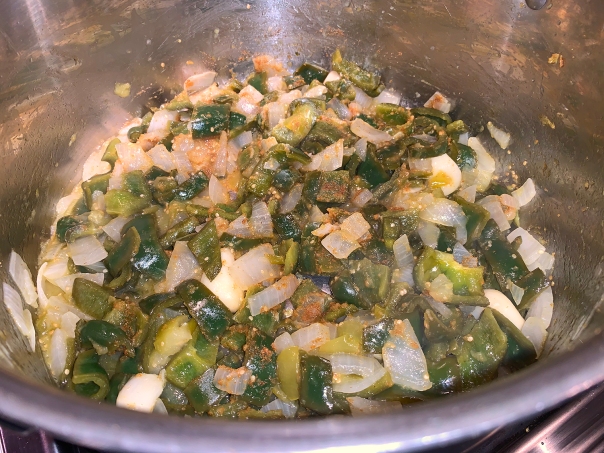
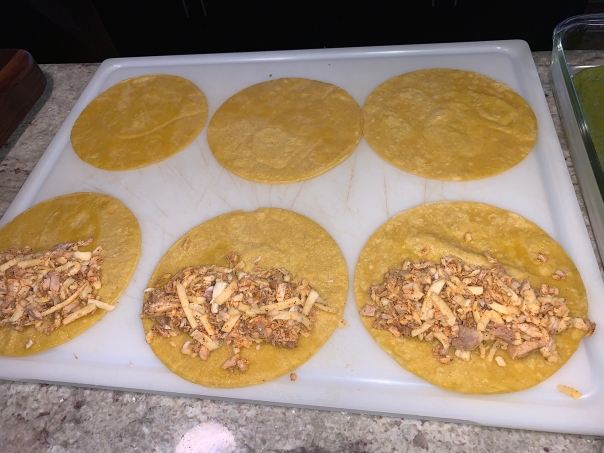
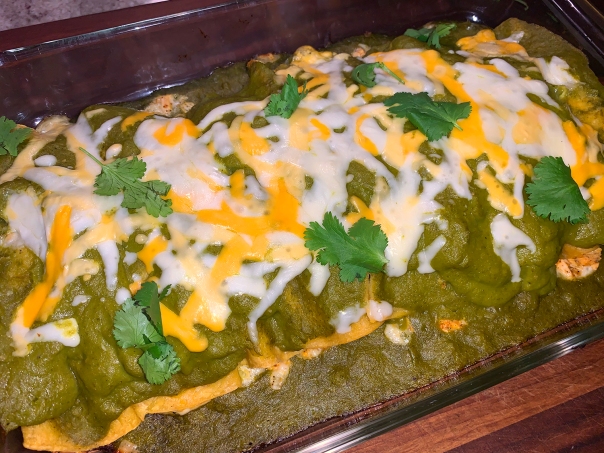
We were looking forward to making these enchiladas because Mexican cuisine is a fave, and a good green sauce can’t be beat. From Milk Street, we noticed right quick that we’d make some changes. Starting with a small rotisserie chicken, we picked off and chopped a little over two cups worth of meat, using the entire amount instead of just the 1 1/2 cups originally called for. In the same vein, we increased the whole-milk mozzarella cheese from 6 ounces to 8. Altogether it was the perfect amount of filling for eight tortillas.
In Step 2, the directions indicate to cook the veggies until well-browned and beginning to soften, 5 to 8 minutes. With all of that liquid in the pan, the veggies certainly softened, but did not brown, so we went ahead anyway. As an added pop of color, we topped the enchiladas with shredded Mexican cheese and placed the uncovered baking dish back into the hot oven for a final five minutes. All of our changes are included in the recipe below.
To make the filling for these enchiladas, use leftover roasted or grilled chicken or meat from a store-bought rotisserie bird (our choice this time around). You also can poach your own chicken. To do so, place 1 pound boneless, skinless chicken breasts in a medium saucepan, cover with water or chicken broth, bring to a simmer over medium-high, then reduce to low, cover and cook until the thickest part of the meat registers 160°F, about 20 minutes. Let the chicken cool in the liquid until just warm to the touch, then finely chop the meat.
Of course poaching your own chicken will add time to the process. Speaking of which, Milk Street noted the entire start to finish was supposed to be 45 minutes. No way, José. It took us at least twice that amount of time! There is a lot of prep work which took a good thirty minutes in itself. Oh, but they were so worth it!
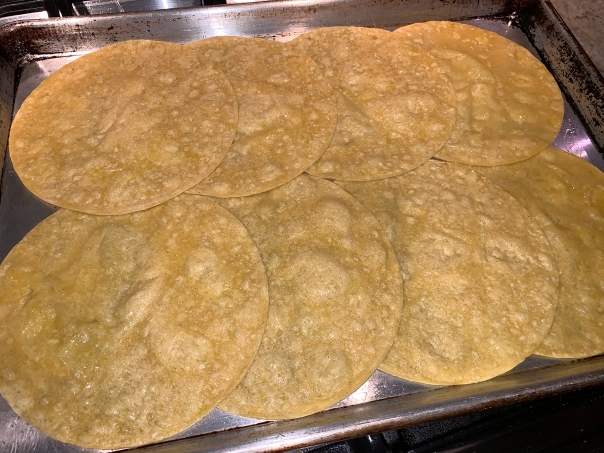
Tortilla Tip: Don’t skip the step of brushing the tortillas with oil and briefly warming them in the oven. If the tortillas are filled and rolled straight from the package, they will crack and tear. But take care not to overheat them, which will dry them out and make them too brittle to roll.
Green Enchiladas with Chicken and Cheese (Enchiladas Verdes)
3 medium poblano chilies (about 12 oz.), stemmed, seeded and chopped
1 lb. tomatillos, husked, cored and chopped
1 medium white onion, chopped
6 medium garlic cloves, peeled
1 Tbsp. ground cumin
½ cup low-sodium chicken broth or water
1 cup lightly packed cilantro leaves and stems
Kosher salt and ground black pepper
2 cups finely chopped cooked chicken
8 oz. whole-milk mozzarella cheese, shredded
2 Tbsp. hot sauce (cholula preferred)
8 6-in. corn tortillas
4 oz. shredded Mexican cheese fr topping (optional)
Lime wedges, to serve
Directions
Heat the oven to 475°F with a rack in the middle position.
In a large pot over medium-high, combine 1 tablespoon of the oil, the poblanos, tomatillos, onion and garlic. Cook, stirring occasionally, until the vegetables are well-browned and beginning to soften, 5 to 8 minutes.
Stir in the cumin and cook until fragrant, about 30 seconds. Add the broth and cook, stirring occasionally, until the vegetables have softened, about 5 minutes. Remove from the heat and let cool for 5 minutes.
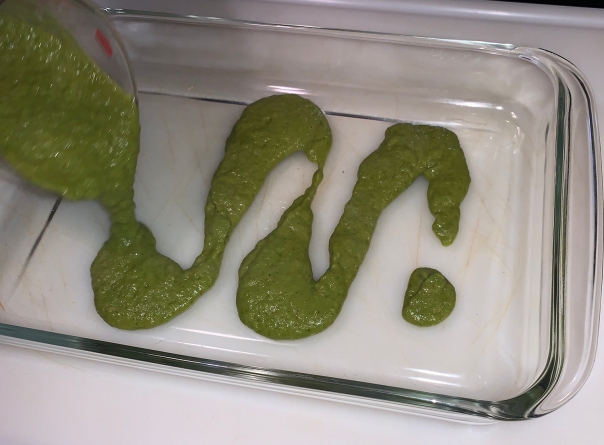
Transfer the mixture to a food processor and process until smooth, about 1 minute. Add the cilantro and continue to process until smooth, about 1 minute. Taste and season with salt and pepper. Spread 1 cup of the sauce in the bottom of a 13-by-9-inch baking dish; set aside.
In a medium bowl, toss together the chicken, cheese, hot sauce, 1½ teaspoons salt and 1 teaspoon pepper; set aside.
Brush both sides of the tortillas with the remaining 2 tablespoons oil, then arrange them on a rimmed baking sheet (its fine to overlap them slightly). Cover tightly with foil and warm in the oven just until soft and pliable, about 3 minutes.
Uncover the tortillas; reserve the foil. Lay the tortillas out on a large cutting board or clean counter. Divide the chicken mixture evenly among the tortillas (about 3 heaping tablespoons each), arranging and pressing the filling in a line along the bottom edge of each tortilla.
Working one at a time, roll up the tortillas to enclose the filling and place seam side down in a tight row down the center of the prepared baking dish. Spoon ½ cup of the sauce over the enchiladas. Cover tightly with the reserved foil and bake until the cheese begins to melt out of the ends, about 15 minutes.
Uncover and spread ½ cup of the remaining sauce over the enchiladas and top with the shredded Mexican cheese. Return to the oven for 5 minutes uncovered.