Tomato-Summer Squash Tart with Za’atar

For many of us, August is the time that a lot of our vegetable/herb gardens are abundant with their bounty. For instance, tomatoes, zucchini and basil are three popular homegrown favorites and this tart recipe takes full advantage of their product. No soggy summer tart here!

Frozen puff pastry makes this elegant and impressive savory tart easy to pull together. Za’atar, a Middle Eastern herb, seed and spice blend, is used to add a perfect flavor accent to the sweet, summery tomatoes and zucchini. To keep these high-moisture vegetables from releasing water during cooking—and leaving the pastry soggy—salt the slices for 20 minutes or so to draw out excess juices while the oven heats.

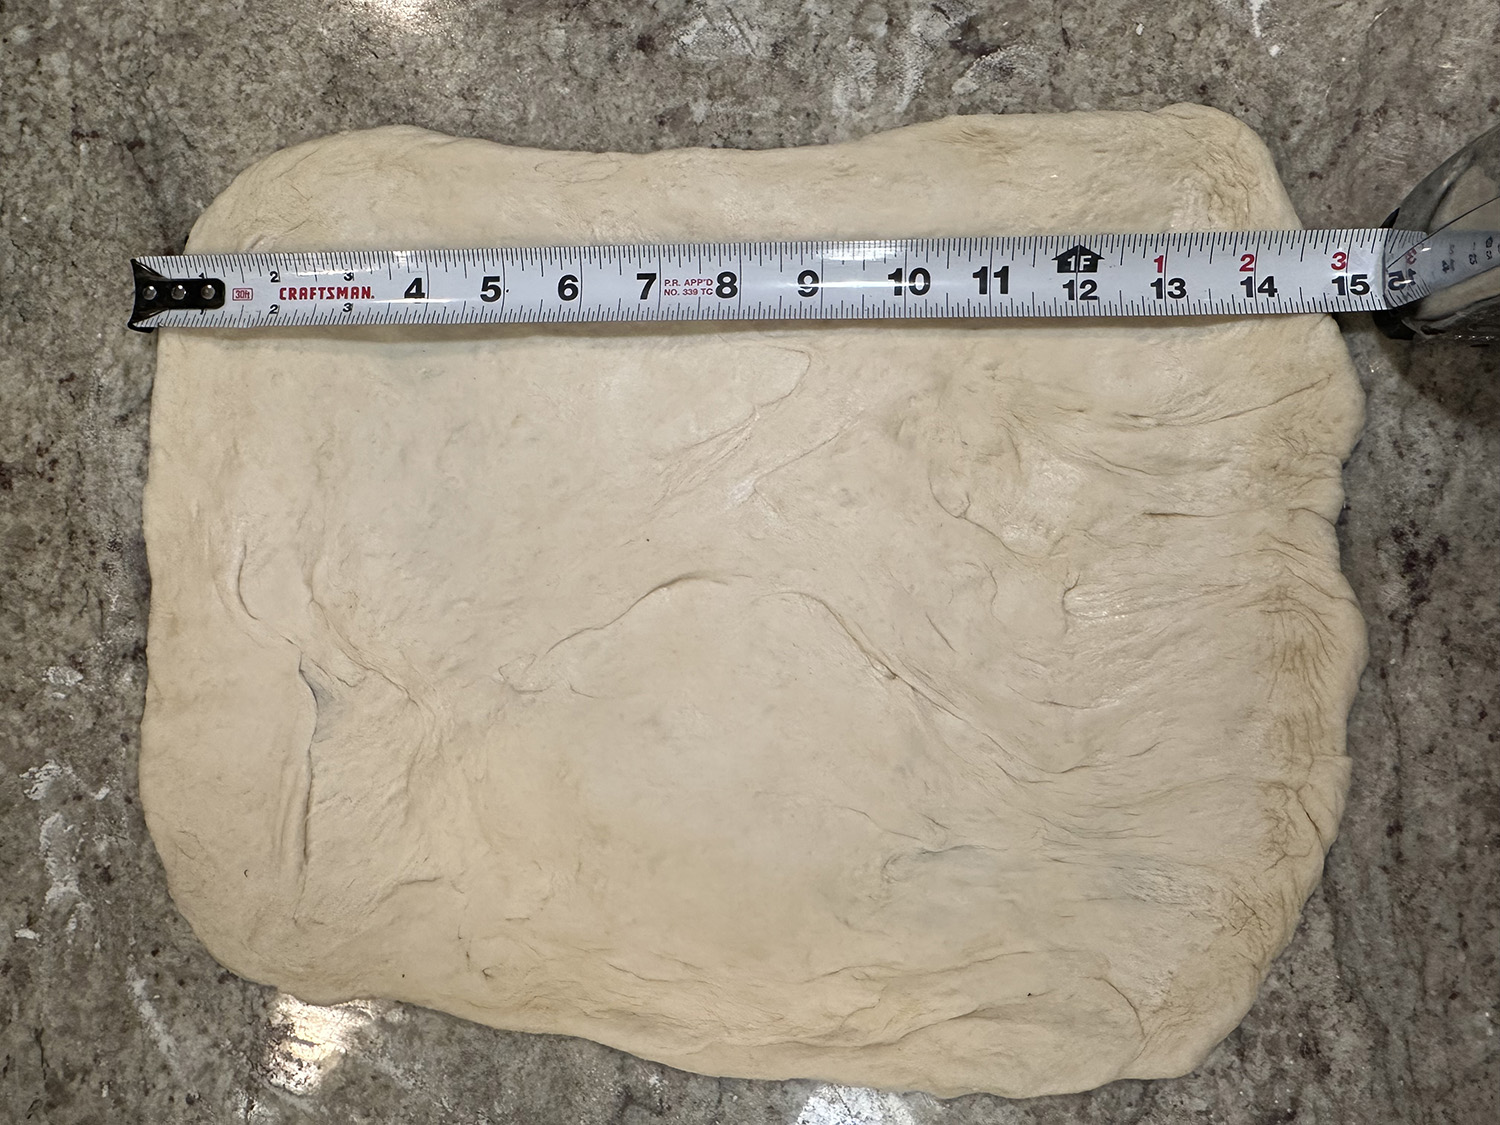
The bonus is vegetables with more concentrated flavor that are nicely seasoned. As for the puff pastry, Dufour is preferred because it is made with butter and is of a size that needs only minimal rolling after the sheet is unfolded. Pepperidge Farm puff pastry works, too, though it lacks buttery richness. You will need only one sheet from the 17.3-ounce box (which contains two sheets), and it will need to be rolled out into a rectangle roughly 10 by 14 inches. Serve the tart warm or at room temperature.

Now the original recipe from Milk Street indicates it feeds 6 to 8. No way José! At best you’ll get four 5″ x 7″ slices, and paired with a side salad, makes a complete meal. Yes, if you are serving it as an appetizer, you could cut the tart up into 16 pieces…

Don’t forget to leave a 1-inch border when poking holes in the rolled-out pastry. The holes help prevent too much lift in the area covered by the veggies while the border bakes up into a light, crisp crust around them.

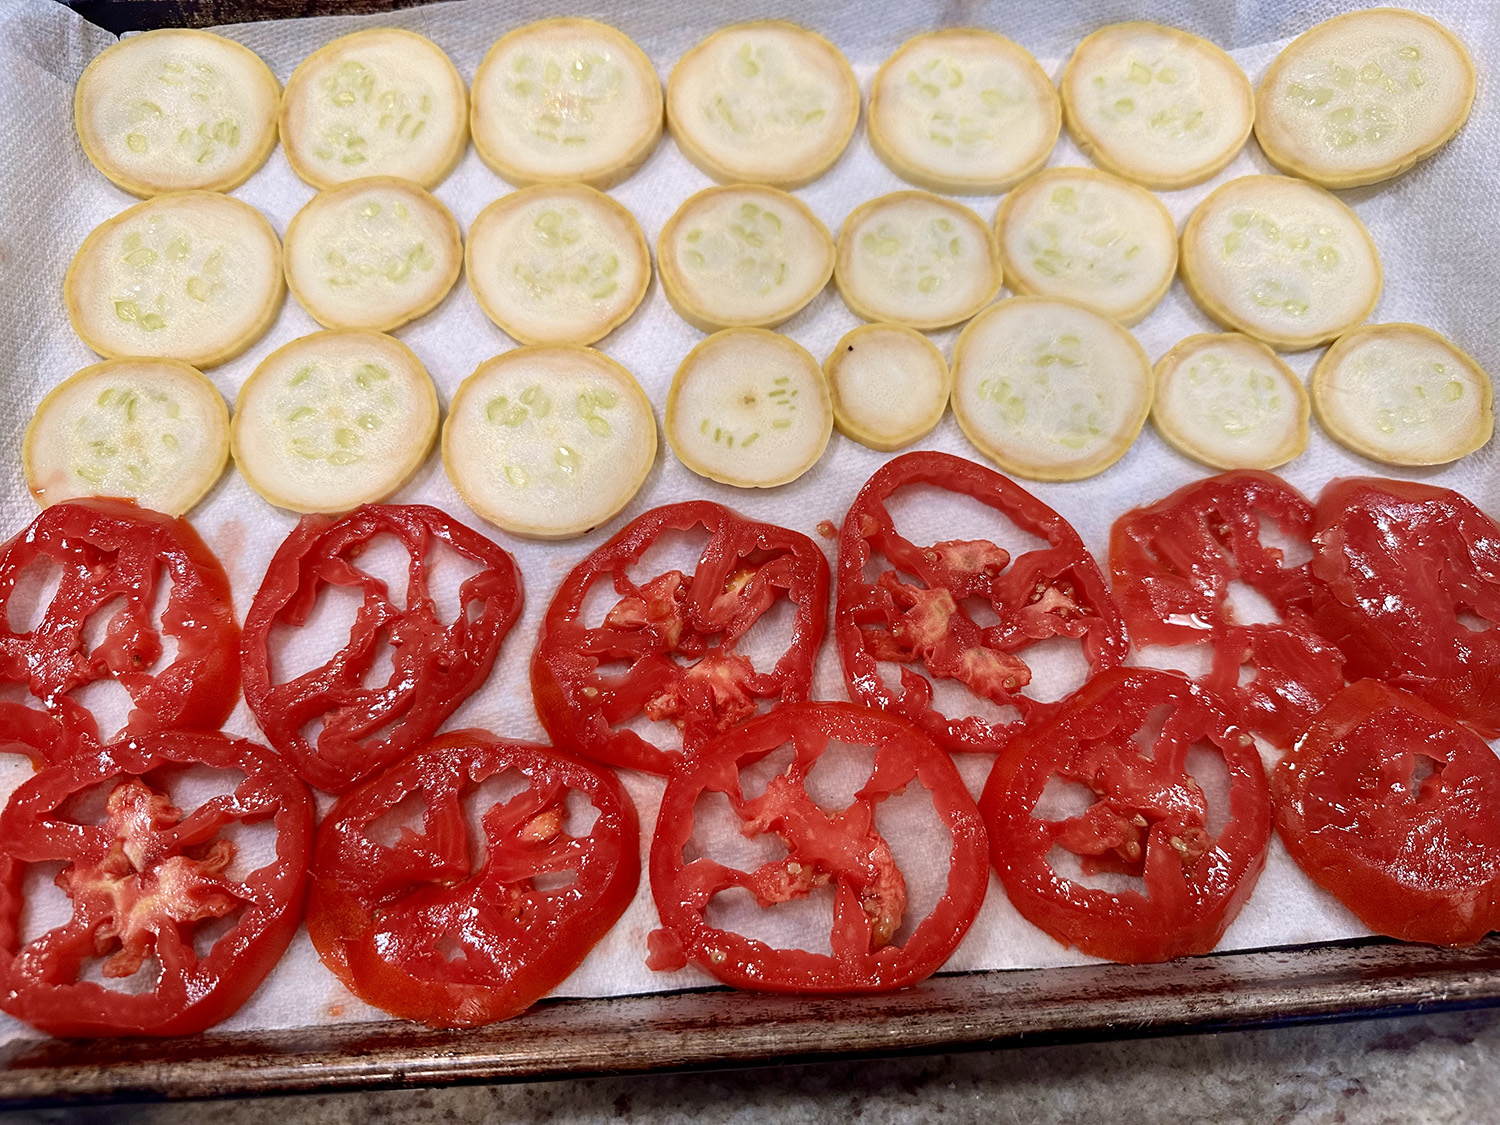
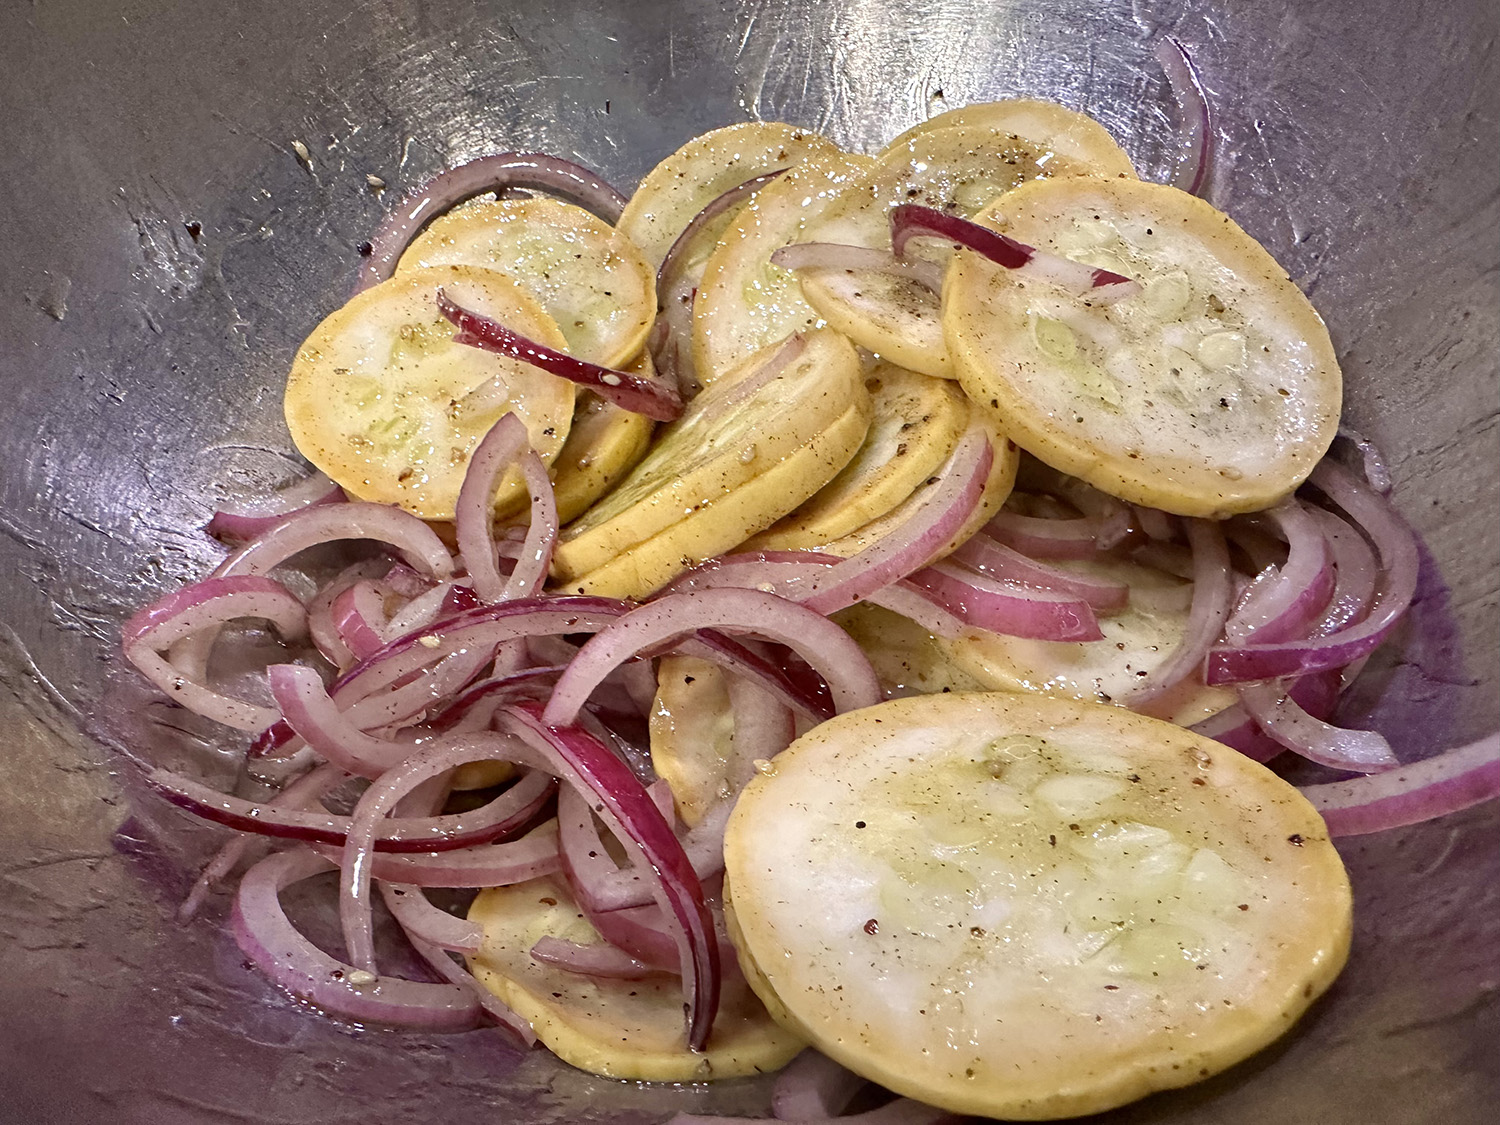
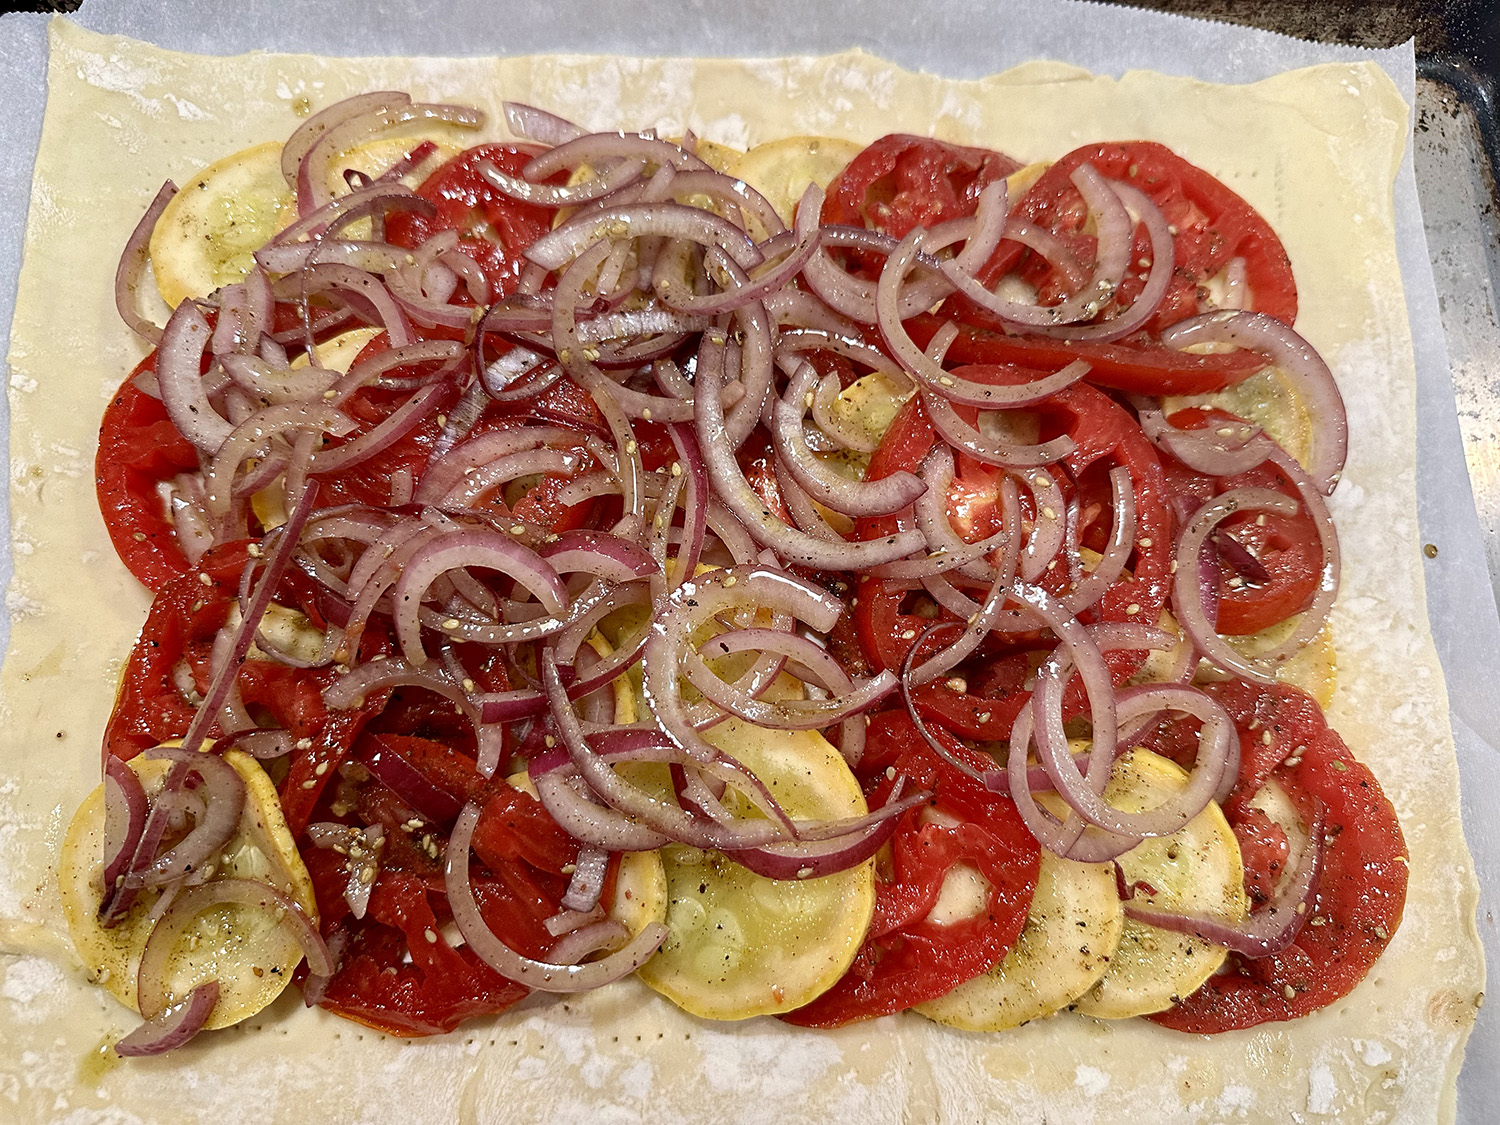
We made one noticeable change in the process. Since we were using large tomatoes, and not plum tomatoes, we seeded them first before salting. In a large bowl, we mixed the summer squash and onion with oil and za’atar before folding in the tomatoes. This helped to prevent the tomato slices from being torn apart.

Tomato-Summer Squash Tart with Za'atar

  • Servings: 4-8
  • Difficulty: easy
  • Print

Ingredients

  • 4 ripe medium plum tomatoes, cored and sliced into ¼-inch rounds
  • 1 medium (8 oz.) yellow summer squash OR zucchini, sliced into ¼-inch rounds
  • Kosher salt and ground black pepper
  • 1/4 cup extra-virgin olive oil, plus more to serve
  • 1 Tbsp. za’atar
  • 1/2 small red onion, thinly sliced
  • 14 oz. package Dufour frozen puff pastry, thawed but still cool, OR 1 sheet Pepperidge Farm puff pastry, thawed but still cool
  • All-purpose flour, for dusting
  • 2 oz. feta cheese, crumbled (½ cup)

Directions

  1. Line a rimmed baking sheet with paper towels. Lay the tomato and squash slices in a single layer on the paper towels and sprinkle with ¼ teaspoon salt. Flip the slices and sprinkle the second sides with another ¼ teaspoon salt. Let stand for 20 minutes. Meanwhile, heat the oven to 450°F with a rack in the lowest position.
  2. Pat the tomatoes and squash dry. In a medium bowl, toss the slices with the oil, za’atar, onion and ¼ teaspoon pepper. (You may want to fold in the tomato slices after mixing the other bowl ingredients.) Remove and discard the paper towels from the baking sheet.
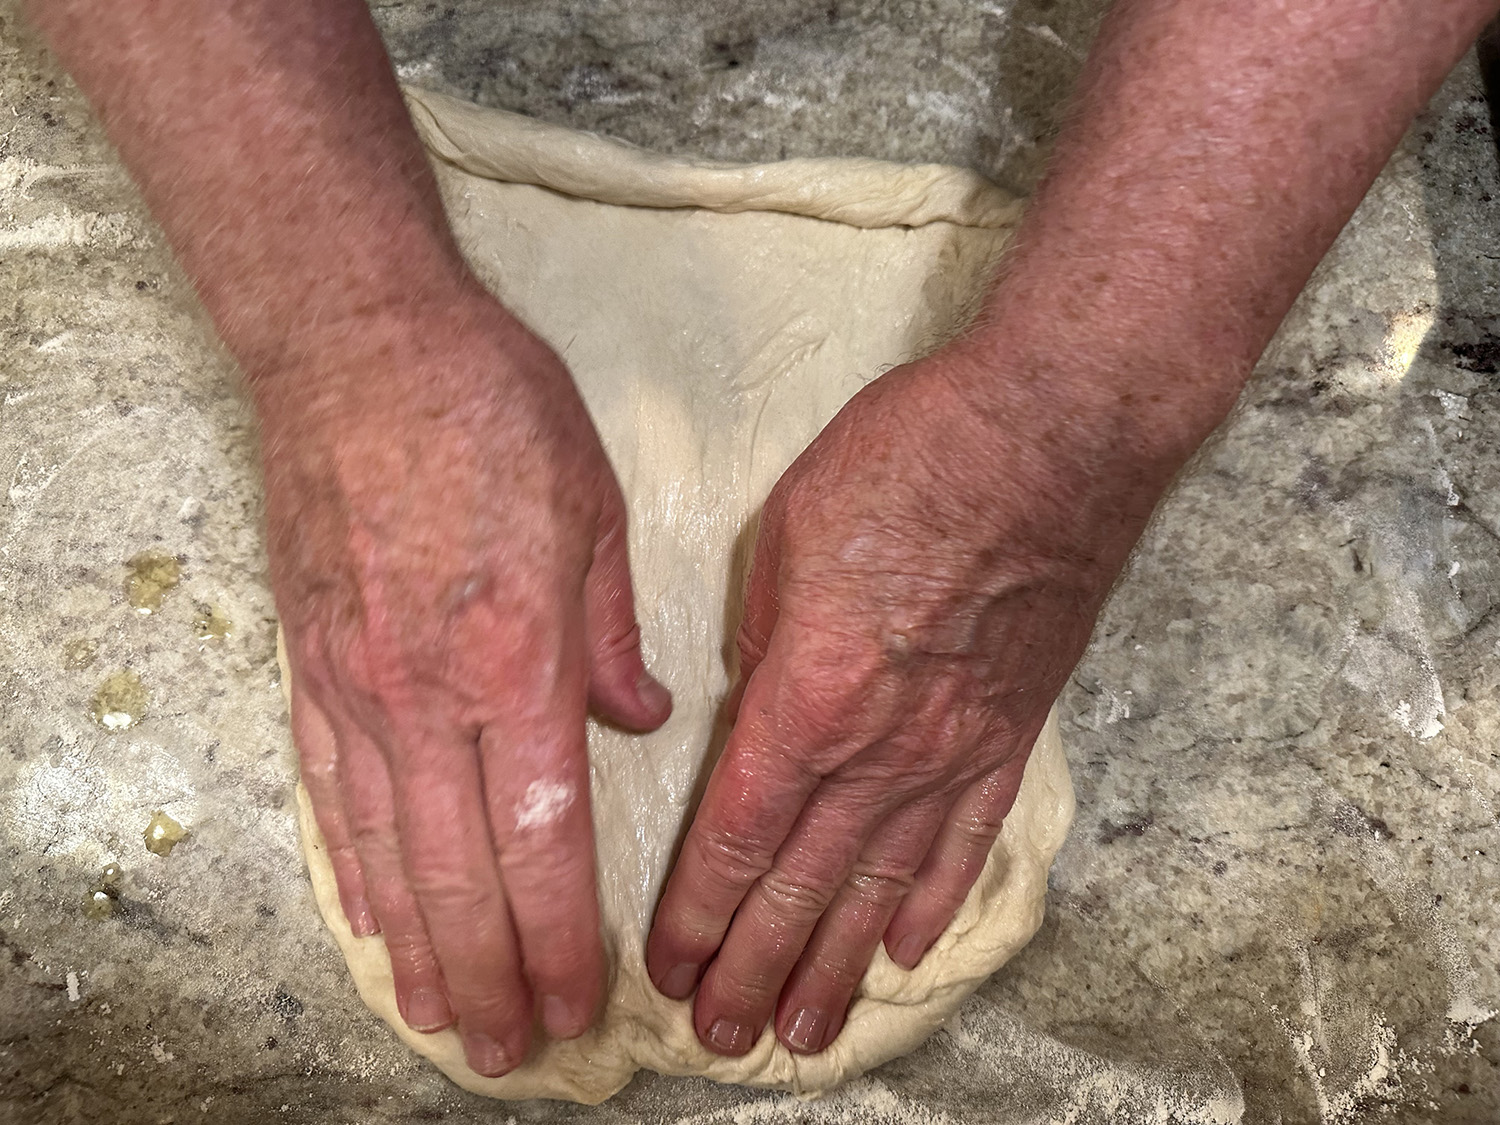
  3. Unfold the puff pastry onto a sheet of kitchen parchment that will fit in the baking sheet. Using a rolling pin, roll the pastry into a 10-by-14-inch rectangle, lightly dusting with flour if needed, then transfer the parchment with the pastry to the baking sheet.
  4. With a fork, poke holes all over the pastry, leaving a 1-inch border around the edges. Arrange the vegetables on the pastry, shingling the tomatoes and squash and avoiding the edges, then sprinkle with half of the feta. Bake until the pastry is golden brown, 15 to 20 minutes.
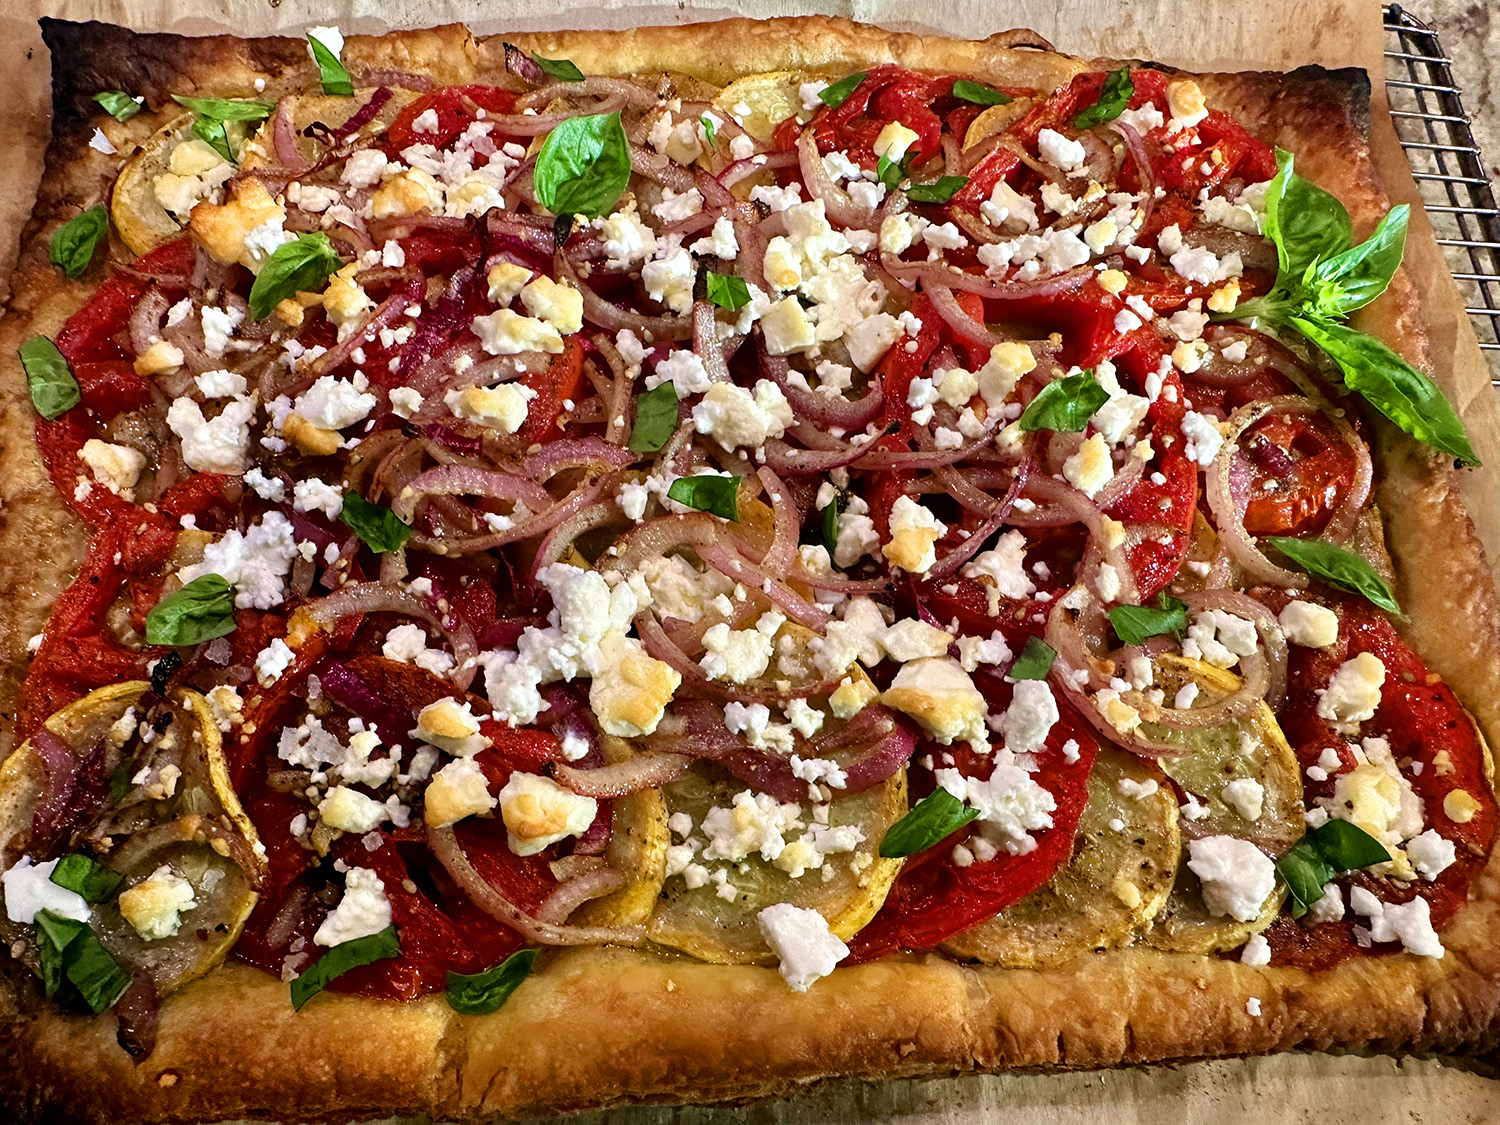
  5. Using the parchment, slide the tart onto a wire rack. Top with the remaining feta and a drizzle of oil. Cool for about 30 minutes, then cut into portions.
  6. Optional garnish: Chopped fresh mint or basil OR flaky sea salt OR both

http://www.lynnandruss.com

Original recipe by Rose Hattabaugh for Milk Street

Grilled Chicken Thighs and Corn with Lime-Basil Butter

Fresh corn is king this time of year in the Northeast, so it’s not unheard of for us to include it as an ingredient in up to 3 or 4 meals a week. Once the season has ended, fresh corn is rarely on the meal docket. This recipe is everything a dinner should be in summer: easy, cooked outside, minimal ingredients, and full of fresh flavors.

These summery grilled chicken thighs with sweet corn are scented with basil and lime. Warm your lime-basil butter on the side of the grill while you cook your corn and chicken, so it melts willingly on the charred thighs and corn kernels. Finishing with extra lime wedges and flaky salt isn’t a recommendation, but an essential final kick.

We thought the amount of corn was a bit shy, and suggest upping the amount by 50% to 6 ears. With a minimal amount of ingredients, the dish comes together rather quickly and bursts with flavor!

Grilled Chicken Thighs and Corn with Lime-Basil Butter

  • Servings: 4
  • Difficulty: easy
  • Print

Ingredients

  • 2 lbs. boneless, skinless chicken thighs
  • 3 garlic cloves, finely grated
  • 1 Tbsp. olive oil
  • Kosher salt and black pepper
  • Juice and zest of 2 limes
  • 4 Tbsp. unsalted butter, at room temperature
  • 1 cup basil leaves
  • 4-6 ears of corn, shucked
  • Flaky sea salt, to finish

Directions

  1. Place the chicken thighs in a large bowl and season with the garlic, olive oil, 1¾ teaspoons salt and juice of 1 lime. Toss to coat. Let marinate at room temperature while the grills heats up or, ideally, refrigerate, covered, overnight. (We marinated ours for 3 hours.)
  2. To make the lime-basil butter, place the butter, lime zest, ¾ cup basil leaves, ¼ teaspoon salt and 1 teaspoon freshly ground black pepper in a food processor and whizz until basil is chopped and incorporated. Refrigerate overnight or leave out of the fridge if you’re ready to grill.
  3. When ready to cook, light the grill to medium-high. If needed, remove the chicken and lime-basil butter from the fridge and place the butter near the grill so it softens. Place the ears of corn on one side of the grill, turning every 3 minutes or so, until cooked through and lightly charred, 10 to 20 minutes total. Pull the corn off the grill and slice off the charred kernels. Place them on a serving platter and top with some of the basil butter.
  4. While the corn is cooking and being sliced, place the chicken on the grill flat sides down. Char until it releases from the grates easily, 5 to 7 minutes. Rotate the chicken slightly, without flipping, to get more color on the first side. Pay attention to how the color develops and when areas of the first side become chestnut in color and look delicious, flip the chicken and grill for another 3 to 5 minutes. Continue rotating and flipping every few minutes until the chicken is cooked through. To check if the chicken is cooked, poke a knife into the thickest part of the meat. The juices should run clear and the meat should no longer be translucent.
  5. Remove the chicken from the grill, slice each thigh in half across its widest part and place slices on top of the corn. Spoon the remaining basil butter on top of the hot chicken and sprinkle over remaining basil leaves, the remaining lime juice and flaky salt. Grind some extra black pepper over the top.

http://www.lynnandruss.com

Original recipe by Clare de Boer for NYTimes Cooking

Grilled Corn Ribs with Honey Butter

What a real cool idea! These corn ribs were a big hit at a recent patio party. The spice-rubbed and honey-drizzled corn “ribs” combined the best things about corn on the cob and barbecue ribs. And are a much more “civilized” approach when dining among friends.

The safest and easiest way to cut corn into “ribs” is to first trim the ends of husked corn on the cob so they’re flat. Cut the corn in the cob in half crosswise, and then stand the corn up on the widest cut side. Use a sharp knife to cut straight down lengthwise, then lay each half flat on your cutting board, and cut in half again lengthwise. 

Make Ahead: The corn ribs can be cut up to a day in advance and stored in a large ziplock plastic bag in the refrigerator.

Grilled Corn Ribs with Honey Butter

  • Servings: 4
  • Difficulty: easy
  • Print

Ingredients

  • 4 ears fresh yellow corn, husked
  • 6 Tbsp. extra-virgin olive oil, plus more for grill
  • 1 tsp. black pepper
  • 1 tsp. light brown sugar
  • 1 tsp. smoked paprika
  • 1/2 tsp. garlic powder
  • 1/8 tsp. cayenne pepper
  • 2 1/4 tsp. kosher salt, divided
  • 3 Tbsp. unsalted butter, melted
  • 2 Tbsp. honey
  • Thinly sliced scallions, for garnish
Photo by Christopher Testani

Directions

  1. Preheat grill to high (450°F to 500°F). Cut 1/2 inch off ends of each corn cob; discard trimmed ends. Cut each cob in half l
  2. crosswise. Working with 1 cob piece at a time, stand cob upright, and carefully cut in half lengthwise.
  3. Place cob halves, cut sides down, on cutting board; cut in half lengthwise again to create “ribs.” Repeat with remaining cob pieces. Place corn ribs in an even layer on a large rimmed baking sheet; set aside.
  4. Whisk together oil, black pepper, brown sugar, smoked paprika, garlic powder, cayenne pepper, and 2 teaspoons salt in a small bowl; brush evenly over corn ribs.
  5. Place corn ribs on oiled grates; grill, covered, turning often, until corn is charred and tender, 4 to 8 minutes. Arrange corn ribs on a serving platter.
  6. Whisk together melted butter, honey, and remaining 1/4 teaspoon salt in a small bowl. Drizzle butter mixture over corn ribs; garnish with scallions. Serve hot.

http://www.lynnandruss.com

Recipe by Anna Theoktisto originally appeared in Food & Wine magazine, June 2024

Dry-Rub Chicken Wings with Creamy Gorgonzola Dip

Pair these baked chicken wings coated in a mouth-watering dry rub with a creamy gorgonzola dipping sauce and they’ll be the hit of the party! And indeed they were. Luckily we doubled the recipe. We bought the fresh chicken wings, and The Hubs chopped off the tips (saved for a later batch of chicken stock), and separated the drumettes from the wingettes.

The dry rub is epic and can be used on chicken pork or even veggies to impart full flavor and a decidedly delicious taste. The chicken is crispy on the outside and not greasy like they tend to be when fried. Since there are quite a few ingredients, make a triple batch so that you have some already made for the next time.

I was so excited to serve them that I completely forgot to take a photo of the finished dish… oh well, there will certainly be a next time…

Dry-Rub Chicken Wings with Creamy Gorgonzola Dip

  • Servings: 6
  • Difficulty: easy
  • Print

Ingredients

  • 1/2 Tbsp. ancho chile pepper 
  • 1/2 Tbsp. smoked paprika 
  • 1/2 Tbsp. onion powder 
  • 1/2 Tbsp. kosher salt 
  • 3/4 Tbsp. light brown sugar, packed 
  • 3/4 tsp. chili powder 
  • 3/4 tsp. paprika 
  • 3/4 tsp. cumin 
  • 1/2 tsp. garlic powder 
  • 1/2 tsp. cayenne pepper (less if you’re worried about the heat level) 
  • 1/2 tsp. dried mustard powder 
  • 1/4 tsp. black pepper 
  • 1/4 tsp. dried oregano 
  • 1/4 tsp. dried ground thyme
  • 4 lbs. chicken wings, thawed completely if using a frozen bag 
  • 2 Tbsp. vegetable or canola oil

Directions

  1. Fire up your grill.   
  2. Combine all dry rub ingredients in a small mixing bowl, set aside. In a large mixing bowl, add chicken wings and vegetable oil.  Use a rubber spatula to toss gently to coat. 
  3. Sprinkle in about half to 2/3 of the dry rub mixture and use your hands to massage it into all of the chicken wings, coating evenly. Feel free to use all the dry rub, but for a coating like in the photos, 1/2-2/3 of the mixture does just fine. 
  4. Add chicken wings to the flat cooktop. Cook for ten to fifteen minutes on each side. Until juices are clear when poked with a fork.

MAKE GORGONZOLA SAUCE:

  •  To your food processor or blender, add mayo, buttermilk, sour cream, 1.5 oz of the gorgonzola cheese, garlic, lemon juice, pepper and salt.  Process until smooth.  
  •  Transfer to serving bowl and stir in remaining gorgonzola cheese.  Cover with plastic wrap and refrigerate until ready to use.

http://www.lynnandruss.com

Original recipe from The Chunky Chef

Carnitas with Pickled Onions

The Hubs exclaimed it was better than any carnitas he’s ordered at a Mexican restaurant! High praise indeed. While I don’t think I’ve ever had it while dining out, I certainly will be making it again in the near future. Scrumpdillyicious! And if even possible, better as leftovers!

For this Instant Pot version of Mexican carnitas, you can either pressure-cook or slow-cook chunks of pork shoulder with spices and aromatics. Add only a small amount of water to the pot so when the cooking is done, the liquid already is rich and meaty. Still, reduce it for a few minutes to further concentrate the flavors, then use it to moisten the fork-tender pork that has been broken into bite-size pieces.

You can stop there and serve the carnitas as is or make it even more delicious by crisping it in a hot skillet in its own rendered fat. (We opted not to do this step.) To do so, in a 12-inch nonstick skillet over medium-high, heat 1 teaspoon of the reserved pork fat until barely smoking. Add the pork in an even layer and cook without stirring, pressing the meat against the skillet with a spatula, until the bottom is browned and crisp, three to five minutes.

Serve carnitas with rice and beans, such as Goya Gallo Pinto, or make tacos with warmed tortillas. Either way, the pickled red onions are a must—their sharp acidity balances the richness of the pork. And for an added flavor boost, top the meat with Trader Joe’s Salsa Verde.

Don’t trim the fat from the pork. The fat rendered during cooking is essential for flavoring the carnitas. And if you plan to fry the pork after shredding, be sure to reserve the fat you skim off the cooking liquid—it’s ideal for crisping the meat.

In lieu of an Insta Pot, use a pressure cooker for the fast method (which we used), or a slow cooker for the slow method. Our piece of pork weighed in at almost 4 pounds. The recipe feeds 4 to 6 depending on your sides and if you serve with warmed tortillas.

Carnitas with Pickled Onions

  • Servings: 4-6
  • Difficulty: easy
  • Print

Ingredients

  • 1/2 cup white vinegar
  • 1 tsp. white sugar
  • Kosher salt and ground black pepper
  • 2 medium red onions, halved and thinly sliced, divided
  • 1 jalapeño chili, stemmed, seeded and thinly sliced lengthwise
  • 1 Tbsp. grapeseed or other neutral oil
  • 10 medium garlic cloves, smashed and peeled
  • 3 lbs. boneless pork shoulder, untrimmed, cut into 2-inch chunks
  • 1 Tbsp. ground cumin
  • 1 Tbsp. ground coriander
  • 1 tsp. dried oregano, preferably Mexican oregano

Directions

  1. In a medium bowl, stir together the vinegar, sugar and 1 teaspoon salt until dissolved. Stir in 1 red onion and the jalapeño; cover and refrigerate while you cook the pork. On a 6-quart Instant Pot, select More/High Sauté. Add the oil and heat until shimmering. Add the remaining onion and cook, stirring occasionally, until softened, about 3 minutes. Add the garlic and cook, stirring, until fragrant, about 30 seconds. Add the pork, cumin, coriander, oregano, ½ teaspoon salt, 1 teaspoon pepper and ½ cup water. Stir, then distribute in an even layer.
  2. FAST: Press Cancel, lock the lid in place and move the pressure valve to Sealing. Select Pressure Cook or Manual; make sure the pressure level is set to High. Set the cooking time for 30 minutes. When pressure cooking is complete, allow the pressure to reduce naturally for 15 minutes, then quick-release the remaining steam by moving the pressure valve to Venting. Press Cancel, then carefully open the pot.
    SLOW: With the pot still on More/High Sauté, bring the mixture to a boil, then stir and redistribute in an even layer. Press Cancel, lock the lid in place and move the pressure valve to Venting. Select Slow Cook and set the temperature to More/High. Set the cooking time for 5 to 6 hours; the meat is done when a skewer inserted into a chunk meets no resistance. Press Cancel, then carefully open the pot.
  3. Using a slotted spoon, transfer the meat-onion mixture to a large bowl. Cool for a few minutes, then break the meat into bite-size pieces. Skim off the fat from the surface of the cooking liquid; reserve the fat if you plan to fry the pork before serving (see headnote). Select More/High Sauté. Bring the liquid to a boil and cook, stirring occasionally, until reduced to about ½ cup (about ⅛ inch depth in the pot), about 15 minutes. Press Cancel to turn off the pot. Add the pork and stir until heated through and evenly moistened. Taste and season with salt and pepper. Serve with the pickled onions.

http://www.lynnandruss.com

Adapted from a recipe by Elizabeth Mindreau for Milk Street

Miso Shrimp and Corn Couscous Salad

‘Tis the season for fresh corn this time of year in the great state of Pennsylvania. And so many of our dishes will contain the ingredient in one form or another. Here’s a fantastic shrimp dish that takes only about 30 minutes!

A delightful blend of bright, sunny colors and flavors shine in this summery salad. A lemony dressing coats the tender, slightly chewy, pearled couscous, which helps to cut the richness of the miso-butter mixture that coats the shrimp and charred corn.

While this salad is best with fresh corn — at its sweetest scraped straight off the cob — frozen corn makes an excellent substitute any time of year, even though it won’t char quite as visibly. Serve at room temperature or warm for a picnic or outdoor dinner, pairing it with aside salad. 

What made our version really stand out with lots of taste was using homemade shellfish stock to cook the whole wheat couscous. It takes it to another level. Of course if you do not have any, water works fine.

In Step 5 we recommend melting the butter with the miso separately (quickly in a microwave works fine), then stir into the pan with the other ingredients. If you don’t, there is a good chance the miso won’t get well distributed and could result in mouthful of miso (take it from our experience).

Miso Shrimp and Corn Couscous Salad

  • Servings: 4
  • Difficulty: easy
  • Print

Ingredients

  • ¼ packed cup chopped cilantro leaves and tender stems
  • 1 large lemon, juiced (about 3 Tbsp.)
  • 5 Tbsp. olive oil
  • Salt and freshly cracked black pepper
  • 1½ cups pearl couscous
  • 2 cups corn kernels, removed from the cob (from 2 to 3 fresh ears of corn)
  • 1 lb. peeled and deveined shrimp, patted dry
  • 4 scallions, light green and white parts thinly sliced
  • 1 Tbsp. white miso paste
  • 1 Tbsp. unsalted butter

Directions

  1. In a large serving bowl, mix together half the cilantro with the lemon juice and 2 tablespoons olive oil until combined. Season with salt and a few grinds of pepper.
  2. In a saucepan over medium-high, toast the couscous, stirring occasionally, until lightly browned and fragrant, 3 or 4 minutes. Add 3 cups of water and 1 teaspoon salt, then bring to a boil. Adjust the heat to maintain an active simmer and cook until tender, 7 to 8 minutes. Drain and let cool slightly; then transfer to the bowl and toss with the dressing.
  3. Meanwhile, heat 2 tablespoons of oil in a heavy, 12-inch skillet over medium-high until shimmering. Add the corn kernels, season lightly with salt and let cook, mostly undisturbed, until charred in spots, 7 to 9 minutes. Stirring once or twice as the kernels brown, or as needed if they start to pop.
  4. Push the corn to the sides of the pan to create an open space in the middle. Add the remaining 1 tablespoon olive oil, then the shrimp and scallions; season lightly with salt and cook for 2 minutes. Stir everything together and cook until the shrimp are cooked through, 1 to 2 minutes more, depending on the size of the shrimp.
  5. Remove from the heat and stir in the miso and butter* until evenly dispersed, scraping up anything on the bottom of the pan, about 1 minute more.
  6. Transfer everything in the pan to the serving bowl and toss with the couscous. Garnish with the remaining cilantro and serve.

http://www.lynnandruss.com

Original recipe by Yasmin Fahr for NYTimes Cooking

Taverna Salad

This colorful, meal-of-a-salad is inspired by two dishes creating a mash-up of a classic Greek salad (also known as horiatiki) and fattoush, the Lebanese salad of vegetables and pieces of fried pita. The ingredient list may look long at first, but each ingredient contributes to the harmony of the salad: bell pepper and cucumbers for crunch; shallot, olives and capers for a bit of tang; chopped tomatoes for sweetness.

Pan-fried halloumi adds richness and heft, but you can skip the searing process and instead opt for a 6-ounce block of feta, if desired. (Although we recommend going with the seared halloumi.) To save even more time, you can add a large handful of crumbled pita chips instead of making your own.

It was unanimous, all three of us loved it! While the recipe indicates it serves up to six, four is a more realistic estimate unless you are serving with other courses. There is no ingredient that we would have left out. For those who insist on a bit of meat, you could always serve chunks of chicken, beef or pork on the side.

Taverna Salad

  • Servings: 4-6
  • Difficulty: easy
  • Print

Ingredients

  • ⅓ cup plus 2 Tbsp. extra-virgin olive oil
  • 2 Tbsp. red wine vinegar
  • 1 tsp. minced garlic (1 small clove)
  • ½ tsp. dried oregano
  • Salt and pepper
  • 3 medium tomatoes, cored, seeded and diced into ½-inch pieces (or 1 cup halved cherry tomatoes)
  • 1 15-oz. can chickpeas, rinsed
  • 1 orange or yellow bell pepper, halved, seeded and diced into ½-inch pieces
  • ½ large English cucumber, halved, seeded and diced into ½-inch pieces
  • ½ cup pitted Kalamata olives
  • ¼ cup chopped fresh parsley
  • ¼ cup minced red onion or shallot
  • 2 Tbsp. drained capers, coarsely chopped
  • 2 scallions, thinly sliced
  • 1 6-inch pita
  • 1 8-oz. block halloumi cheese, patted dry and cut into ¾-inch-thick slices

Directions

  1. In a small bowl, combine ⅓ cup olive oil with the vinegar, garlic and oregano. Whisk vigorously to combine then season to taste with salt and pepper.
  2. In a large bowl, combine the tomatoes, chickpeas, bell pepper, cucumber, olives, parsley, red onion, capers and scallions. Pour the dressing over the salad and toss well.
  3. Chop the pita into 1-inch pieces and place them in a small bowl. Drizzle with 1 tablespoon olive oil, sprinkle with salt and toss to coat. Heat an 8-inch skillet over medium. Add the pita pieces and cook, tossing often, until toasted and golden brown, about 5 minutes. Return to the small bowl to cool, reserving the skillet.
  4. Place the halloumi slices on a small plate and drizzle with 1 tablespoon olive oil. Heat the same skillet over medium-high heat, and cook the halloumi until golden brown, 2 to 3 minutes per side. Transfer to a cutting board and cut the slices into bite-size cubes.
  5. Add the pita and halloumi to the salad, toss well and serve.

http://www.lynnandruss.com

Recipe by Lidey Heuck for NYTimes Cooking

Pan-Seared Salmon with Citrus Pesto and Pasta

A lovely pescatarian meal utilizing a unique pesto which uses lot of fresh basil, and perhaps some fresh mint from your herb garden, or a local farmer’s market. And the citrus coming from a pink grapefruit is a novel approach, although we added the zest from one lemon also, to emphasize those welcome citrus notes.

Genovese pesto isn’t the only pesto around: There are many regional variations, including a vibrant and light Sicilian version that stars citrus. This naturally vegan version doesn’t need cheese: The citrus provides acidity, and the umami comes from the capers and toasted nuts.

Pistachios and almonds grow abundantly in Sicily, but walnuts or pine nuts also work. Feel free, generally, to adapt this base recipe, as you’ll find Italian citrus pestos made with anchovies, garlic, dried oregano, fennel fronds, dried chile and, yes, cheese, if desired. We did add a bit of grated parmesan on the pasta.

We altered the original recipe to better suit our needs and preferences. For starters, we used a single one-pound salmon filet. The pesto was increased by half to make sure we had enough for our choice of pasta, orecchiette—which the sauce nestles inside of. And while we used both basil and mint, it was about a 75-25% ratio with basil being the dominant herb.

Pan-Seared Salmon with Citrus Pesto and Pasta

  • Servings: 2-4
  • Difficulty: easy
  • Print

Ingredients

For the Pesto

  • ½ cup toasted pistachios
  • 12 oz. orecchiette pasta
  • 1 Tbsp. drained and rinsed capers
  • Kosher salt
  • 3 cups mint or basil leaves (or a combination)
  • 1 ½ Tbsp. grapefruit, and ½ Tbsp.lemon zest; plus 4 ½ Tbsp. grapefruit juice
  • ½ cup extra-virgin olive oil, plus more as needed

For the Fish

  • 1 lb. salmon fish fillet
  • Salt
  • Extra-virgin olive oil, for greasing

Directions

  1. To make the pesto, add the pistachios, capers and 1 teaspoon salt to a food processor and process until coarsely chopped. Add the herbs, citrus juice and a pinch of salt and pulse until the herbs are finely chopped and the nuts are about the size of sesame seeds.
  2. Cook the orecchiette as directed on the package. Reserve about 1 cup of the pasta water.
  3. Add the olive oil and pulse just until combined. Stir in 1 Tbsp. of citrus zest. Taste, then continue to add more zest and salt until the pesto is citrusy and punchy.
  4. Thin with 2 to 3 more tablespoons of olive oil until it’s the consistency of a loose paste. Taste, and adjust seasonings as needed.
  5. To make the fish, season it all over with salt and oil. Add the fish (skin-side down, if your fillets are skin-on) to a large nonstick skillet, then heat over medium. Cook until the flesh is opaque ¾ of the way up the sides, 6 to 12 minutes, depending on the thickness of the fish. If the fish is buckling, press it down with a spatula so it makes contact with the skillet. Flip and cook until cooked through, 1 to 2 minutes.
  6. Divide the pesto roughly in half, adding part of it to the pasta along with some reserved pasta water until a loose consistency.
  7. Divide desired amount of cooked and sauced orecchiette onto plates, lay the salmon fillets and top with a few spoonfuls of pesto.

http://www.lynnandruss.com

Loosely adapted from a recipe by Ali Slagle for NYTimes Cooking

Pasta with Seafood Galore!

For savory seafood flavor in every bite, make a sauce with clam juice and several minced anchovies, which fortify the juices shed by the shellfish. Cooking the shellfish in a careful sequence—adding hardier clams first and then adding the shrimp and remaining seafood during the final few minutes of cooking—ensures that every piece is plump and tender.

The pasta is then finished cooking directly in the sauce; the noodles soaked up flavor while shedding starches that thickened the sauce so that it clings well to the linguine. Fresh cherry tomatoes, lots of garlic, fresh herbs, and lemon make for a bright, clean, complex-tasting sauce.

Our guest diner was following a gluten-free diet so we used gluten-free fusilli which tends to fall apart when stirred with other ingredients. If gluten-free is not an issue for you, stick with a regular wheat pasta such as linguine.

The types of seafood and amounts were altered to fit our preferences. One diner did not like mussels or squid, so we substituted lump crab meat and chunks of lobster. To complete the meal, we served a side of grilled romaine and some crusty garlic bread.

Pasta with Seafood Galore!

  • Servings: 4-6
  • Difficulty: easy
  • Print

Ingredients

  • 6 Tbsp. extra-virgin olive oil
  • 12 garlic cloves, minced
  • ¼ tsp. red pepper flakes
  • 12 littleneck clams, scrubbed
  • 9 scallops
  • 1 ¼ lbs. cherry tomatoes, half of tomatoes halved, remaining tomatoes left whole
  • 1 (8-oz) bottle clam juice
  • 1 cup dry white wine
  • 1 cup minced fresh parsley
  • 1 Tbsp. tomato paste
  • 4 anchovy fillets, rinsed, patted dry, and minced
  • 1 tsp. minced fresh thyme
  • Salt and pepper
  • 12 oz. linguine (or any pasta you prefer)
  • 12 extra-large shrimp (21 to 25 per lb.), peeled and deveined
  • 8 oz. lump crab meat
  • 5 oz. chunked lobster meat
  • 2 tsp. grated lemon zest, plus lemon wedges for serving

Directions

  1. Heat 1/4 cup oil in large Dutch oven over medium-high heat until shimmering. Add garlic and pepper flakes and cook until fragrant, about 1 minute. Add clams, cover, and cook, shaking pan occasionally, for 8 minutes until clams. Transfer clams to bowl, discarding any that haven’t opened, and cover to keep warm; leave any broth in pot.
  2. Add whole tomatoes, clam juice, wine, 1/2 cup parsley, tomato paste, anchovies, thyme, and 1/2 teaspoon salt to pot and bring to simmer over medium-high heat. Reduce heat to medium and cook, stirring occasionally, until tomatoes have started to break down and sauce is reduced by one-third, about 10 minutes.
  3. Meanwhile, bring 4 quarts water to boil in large pot. Add pasta and 1 tablespoon salt and cook, stirring often, for 7 minutes. Reserve 1/2 cup cooking water, then drain pasta.
  4. Add pasta to sauce in Dutch oven and cook over medium heat, stirring gently, for 2 minutes. Reduce heat to medium-low, stir in shrimp, cover, and cook for 4 minutes. Stir in lemon zest, halved tomatoes, and remaining 1/2 cup parsley; cover and continue to cook until shrimp are just cooked through, about 2 minutes longer.
  5. Gently stir in clams, crab meat and lobster. Remove pot from heat, cover, and let stand until clams are warmed through, about 2 minutes. Season with salt and pepper to taste and adjust consistency with reserved cooking water as needed.
  6. Transfer to large serving dish, drizzle with remaining 2 tablespoons oil, and serve, passing lemon wedges separately.

http://www.lynnandruss.com

Adapted from a recipe by America’s Test Kitchen

Pan-Fried Breaded Pork Chops

Look for beautiful good-quality pork, such as Berkshire, and ask for center-cut loin chops with bone. That being said, we were recipients of some meat from a recently butchered pig. Our friends gifted us a few cuts that were already wrapped in freezer paper. When we thawed them, we realized there were two loin and two shoulder chops, as opposed to center-cut loin chops. In the end, it didn’t make any difference.

For the bread crumbs, use day-old firm white sandwich bread or French loaf, cubed and whirled in a food processor, for about three cups of soft, fluffy crumbs. Take note: dry, fine store-bought crumbs will not yield the same result.

Make sure to fry these chops very gently over medium-high heat, to allow the bread-crumb coating to brown slowly, creating a crisp, golden crust. We paired ours with some Spanish-Style Butter Beans and toasted garlic bread.

The most important thing is to bread the chops early and let sit uncovered in the fridge for a couple of hours. It really makes a difference. The crust sautés beautifully without being greasy or falling off.

Pan-Fried Breaded Pork Chops

  • Servings: 4
  • Difficulty: easy
  • Print

Ingredients

  • 4 (8-oz.) center-cut pork chops, about ½-inch thick
  • Kosher salt and black pepper
  • 2 eggs, beaten
  • ½ cup milk
  • Small pinch of cayenne powder
  • All-purpose flour, for sprinkling
  • 3 cups fresh bread crumbs (from 8 slices crustless day-old sandwich bread)
  • 1 cup clarified butter/ghee, extra-virgin olive oil or lard, plus more as needed
  • Lemon wedges, for garnish

Directions

  1. Lay pork chops on a baking sheet, and season well on both sides with salt and pepper.
  2. Combine eggs and milk in a low, flat bowl. Season with salt, pepper and the small pinch of cayenne.
  3. Sprinkle flour generously over the chops on both sides, then shake off excess.
  4. Submerge the floured chops in the egg mixture, and turn them over several times to coat well. Leave chops in egg mixture for 5 minutes.
  5. Use your left hand to remove a chop from the batter and drain off excess liquid. Place chop on a baking sheet and, with your right hand, heavily sprinkle with bread crumbs on both sides. Repeat with remaining chops.
  6. Sprinkle each chop again with crumbs, patting with your hand to make sure crumbs adhere and coat well. Refrigerate, uncovered, until ready to fry.
  7. Set a wide cast-iron or other heavy skillet over medium-high heat. Add clarified butter to a depth of ½ inch. When butter is hot, lay in the chops without crowding, and let them fry very gently, about 4 to 5 minutes per side, until beautifully golden brown. (Turn down heat if they seem to be browning too fast.) If your pan is small, cook in 2 batches and keep finished chops warm in a 250-degree oven.
  8. Blot cooked chops on paper towels. Transfer to a warm platter or individual plates. Serve with lemon wedges.

http://www.lynnandruss.com

Recipe by Davis Tanis for The NYTimes Cooking

Yaki Udon

According to “The Woks of Life” cookbook, this Yaki Udon with pork and vegetables is a tasty one-pan meal that’s also very open to adaptation and interpretation. You can replace the pork with chicken, beef, or tofu, and use whatever vegetables you have on hand. Just don’t skip the first step of the recipe, which you might not find in other versions! 

This dish is similar to yakisoba, differing only in terms of the type of noodle used. While udon noodles are often served in soup, their thickness makes them great for stir-fries as well. And there is no need to buy frozen udon noodles if you happen to have a dry-packaged variety on hand.

Before stir-frying anything, you’re going to melt together butter, garlic, and dashi powder. Then, you let the udon noodles fry in the garlic/dashi butter until they crisp up a bit on the outside. Then you proceed with the regular steps to put together the recipe. We garnished with diagonally sliced scallion.

Not familiar with dashi powder? Neither were we. But don’t omit the the Japanese soup stock because it makes the dish taste very authentic. We ordered it online and received within 2 days. The umami profile consists of shiitake mushrooms, kombu kelp, dried flying fish, dried sardine and dried bonito flakes.

*While the original instructions suggest you can use a large Dutch oven, non-stick pot, or large cast iron skillet, we highly recommend a non-stick vessel. We used our large Le Crueset braising pot and the ingredients crusted to the bottom of the pot which was difficult to remove.

Yaki Udon

  • Servings: 4
  • Difficulty: easy
  • Print

Ingredients

  • 1 lb. frozen or dry-packaged udon noodles
  • 2 Tbsp. butter
  • 1 clove garlic, minced
  • 2 tsp. dashi powder
  • 1 Tbsp. oil
  • 4 oz. pork shoulder, julienned; can substitute chicken, beef, seafood, pressed tofu, or more vegetables
  • 4 oz. oyster or shiitake mushrooms, thinly sliced
  • 2 Tbsp. mirin
  • 2 cups cabbage, shredded
  • 1 medium carrot, julienned
  • 1/8 teaspoon black pepper
  • 2 Tbsp. low sodium soy sauce
  • 1 Tbsp. water
  • 3 scallions, 2 julienned; 1 diagonally sliced for garnish

Directions

  1. Start by bringing a large pot of water to a boil. Add the udon noodles. Boil for 30 seconds – 1 minute to loosen them. If using dried noodles, cook according to package instructions. Drain, rinse in cold water to remove excess starch, and drain thoroughly again. Set aside.
  2. Place a large Dutch oven, non-stick pot, or large cast iron skillet* over medium heat. When the pan is heated, add the butter. Once partially melted, stir in the garlic and dashi granules. Cook for 30 seconds, until the dashi partially dissolves. At this point, the butter should be a light brown color.
  3. Add the drained noodles and toss to coat them in the butter. Cook for 5 minutes over medium heat, until the noodles have dried out and are slightly crisped. Remove and set aside.
  4. Add a tablespoon of oil to the pot, along with the pork shoulder. Brown the pork until crisp on the edges. Add the mushrooms and mirin, and cook until caramelized.
  5. Add the cabbage, carrot, pepper, soy sauce, and water. Stir-fry until the vegetables are wilted, and add the noodles back in, along with the scallions. Stir-fry for another minute. Serve!

http://www.lynnandruss.com

Adapted from a recipe in The Woks of Life cookbook

Grilled Homemade Pizza

Homemade pizzas can run the gamut as far as the whole flavor profile goes. Are you jonesing for a meat lovers pie? A vegetarian mix? A spicy concoction? Or just a free-for-all?

Even the crust has options, be it typical white flour, whole wheat, or gluten-free. Not to mention a lo-carb choice of a cauliflower crust. In this case, we just used a store-bought pizza dough for our maiden voyage of cooking it on the gas grill.

Of course you can expedite the process even more by using a jarred sauce. Instead we prepared a homemade tomato sauce from Milk Street. This can always be made ahead of time. In fact, the sauce makes enough for two pies, just freeze the leftovers for a future pizza.

The steps to a great grilled pizza were taken from an article by J. Kenji López-Alt for NYTimes Cooking. Neapolitan-style pizza is typically baked in ovens heated past 900 degrees to achieve its signature crackly, thin, charred crust with a moist, stretchy crumb. But you can easily yield similar textures and flavors at home by baking pizza dough directly on a pizza stone on a hot grill until it’s bubbly and crisp.

When rolled out, the dough measures approximately 12 inches x 15 inches, a bit smaller than an unrimmed baking sheet. Total time is about 45 minutes. When cut down to 6 or 8 pieces, it will serve 3 to 4 people with 2 slices each.

Grilled Pizza with Homemade Sauce

  • Servings: 2 cups
  • Difficulty: moderate
  • Print

Ingredients

The Best Pizza Sauce

  • 1 28-oz can whole peeled tomatoes, with juice
  • 2 Tbsp. extra-virgin olive oil
  • 2 garlic cloves, minced
  • 1 tsp. dried oregano
  • 1/2 tsp. red pepper flakes
  • Kosher salt and ground black pepper

Directions

  1. In a blender, process half of the tomatoes until smooth, about 20 seconds. Transfer to a large bowl. Process the remaining tomatoes until mostly smooth but with some chunks, 4 or 5 pulses. Add to the bowl.
  2. In a medium saucepan over medium, heat the oil, garlic, oregano and pepper flakes, stirring occasionally, until sizzling. Slowly pour in the tomatoes and stir. Bring to a simmer over medium-high, then reduce to low and cook, stirring occasionally and adjusting the heat as needed to maintain a simmer, until a wooden spoon leaves a trail when drawn through the sauce, 20 to 25 minutes. (Ours took twice as long to thicken properly.)
  3. Remove from the heat and let cool to room temperature. Taste and season with salt and pepper. Refrigerate in an airtight container for up to 3 days or freeze for up to 1 month (thaw and stir to recombine before using).

The steps to a great grilled pizza were taken from an article by J. Kenji López-Alt for NYTimes Cooking. Neapolitan-style pizza is typically baked in ovens heated past 900 degrees to achieve its signature crackly, thin, charred crust with a moist, stretchy crumb. But you can easily yield similar textures and flavors at home by baking pizza dough directly on the grates (or on the hot pizza stone) of a hot grill until it’s bubbly and crisp. Once the dough is baked, it can be topped and finished via indirect heat.

Heat pizza stone on grill, cover for 30 minutes.

Transfer the crust to a pizza peel. (A cutting board or the back of a baking sheet will also work.) Spread a thin layer of shredded cheese across the surface of the crust (about 1 cup should do it). Using a spoon, add tablespoon-size dollops of crushed tomatoes, spaced an inch or two apart, across the whole surface of the pizza.

Add toppings as desired (our list is below). Slide the pizza onto the pizza stone, and move to cooler side of the grill, cover, and cook until the cheese is melted and the crust is crisp, 5 to 7 minutes total. Transfer to a cutting board, drizzle with olive oil, sprinkle with basil chiffonade, cut into 6 or 8 squares, and serve immediately. Top with more grated parmesan if desired.

Our Toppings

  • Roasted red peppers, drained, patted dry and sliced into thin strips
  • 4 oz. Cremini mushrooms, sliced thin and sautéed until browned
  • 2 oz. Proscuitto, sliced into ribbons
  • 1/4 cup grated parmesan, more for topping
  • 8 oz. mozzarella, shredded on box grater; don’t use preshredded
  • Fresh basil leaves, chiffonade for topping

http://www.lynnandruss.com

Cold Noodle Salad with Spicy Peanut Sauce

Looking for a recipe that’s healthy, meatless, is ready in less than a half hour, and would transport well for a picnic or potluck? Look no further than this tasty concoction from Betty Lou McKinnon.

Soba, Japanese buckwheat noodles, are ideal for salads because they taste particularly great when served cold. Crunchy vegetables are highlighted here, adding lots of crisp, fresh texture. Substitute with any raw vegetables you have on hand, such as cabbage, carrot, fennel, asparagus, broccoli or cauliflower.

The spicy peanut sauce is very adaptable: If you don’t want to use peanut butter, you can use any nut or seed butter, like cashew, almond, sunflower or even tahini. Both the soba and the peanut sauce can be prepared ahead of time and stored in the fridge overnight, but wait to combine them until you are ready to eat for the best texture and consistency. The peanut sauce thickens as it sits, so add a tablespoon or two of water to loosen it up, if necessary.

Instead of drizzling the peanut sauce on top of the mixed vegetables, we incorporated about 75% of it into the mix, saving the remainder to drizzle on top with the other garnishes.

Cold Noodle Salad with Spicy Peanut Sauce

  • Servings: 4
  • Difficulty: easy
  • Print

Ingredients

For the Salad

  • Kosher salt
  • 10 oz. soba noodles
  • 1 medium zucchini or cucumber (about 6 oz.)
  • 5 radishes
  • 1 bell pepper (any color)
  • 1 Tbsp. sesame oil
  • ½ cup roasted salted peanuts (about 2 oz.), roughly chopped
  • 2 scallions, trimmed and finely chopped
  • Handful of cilantro leaves
  • 1 lime, cut into wedges for serving

For the Spicy Peanut Sauce

  • ½ cup smooth peanut butter (not natural)
  • ¼ cup soy sauce
  • 2 Tbsp. maple syrup
  • 2 Tbsp. lime juice (from 1 lime)
  • 1 Tbsp. sesame oil
  • 2 tsp. chile oil or hot sauce, plus more to taste
  • 1 garlic clove, grated

Directions

  1. Bring a pot of salted water to the boil. Add the soba, stir to prevent sticking, and cook according to package instructions until just tender. Rinse under cold water until the noodles are completely cold.
  2. Meanwhile, make the sauce: In a medium bowl, combine the peanut butter, soy sauce, maple syrup, lime juice, sesame oil, chile oil or hot sauce, and garlic. Add ¼ to ½ cup water, 1 tablespoon at a time, and whisk until the sauce is a pourable consistency. Taste and add more chile oil or hot sauce as desired; set aside.
  3. Cut the zucchini or cucumber and radishes into ⅛-inch thick slices, then cut into thin matchsticks. Slice the peppers into ⅛-inch pieces. Place them all in a large bowl.
  4. Loosen the soba noodles by running them under some water, then allow to drain again. Add them to the vegetables, add the remaining 1 tablespoon sesame oil and toss to combine.
  5. When you are ready to serve, drizzle with spicy peanut sauce and top with peanuts, scallions and cilantro. Serve immediately, with lime wedges alongside.

http://www.lynnandruss.com

Recipe by Betty Lou McKinnon for NYTimes Cooking

Sheet-Pan Chicken Tikka Thighs

Commonly cooked in restaurants and street stalls across India and Pakistan, chicken tikka is typically prepared with marinated bone-in pieces and cooked on coals or in a tandoor. This preparation of chicken tikka uses boneless, skinless chicken thighs and a broiler for the same effect — layered, slightly smoky flavor from charred edges of otherwise juicy, tender chicken thighs. With minimal cleanup, this dish is delicately sweet, deeply spiced and has a confetti of textures.

The chicken is marinated in ginger, garlic and a mix of heady South Asian spices — red chile powder, cumin, garam masala — and yogurt is used as a tenderizer. Thirty minutes of marination does the trick but overnight is better. Bell pepper and onions sweeten during broiling and their edges char and crisp up too. Plus, juices from the spiced chicken further flavor the vegetables. Eat any leftovers in a salad or sandwich. 

Some of our changes include using a white onion instead of a red one (because that’s what we had on hand). The chicken thighs weighed in at about one-third more than the 1 pound suggested in the recipe. We also increased the Greek yogurt to 1/2 cup instead of 2 tablespoons. And even with the extras, and served with rice, the dish realistically fed 3 people, not 4.

Sheet-Pan Chicken Tikka Thighs

  • Servings: 3-4
  • Difficulty: easy
  • Print

Ingredients

  • 1/2 cup full-fat Greek or Indian yogurt
  • 1 tsp. ginger paste or freshly grated ginger
  • 1 tsp. garlic paste or freshly grated garlic
  • 1½ tsp. Kashmiri red chile powder
  • 1½ tsp. garam masala
  • 1½ tsp. ground cumin
  • ½ tsp. ground turmeric
  • Salt
  • 2 Tbsp. vegetable oil
  • 1 lb. boneless, skinless chicken thighs
  • 2 large bell peppers, chopped into 1-inch pieces
  • 1 red onion, chopped into 1-inch pieces
  • 1 tsp. cumin seeds
  • Cooked rice, for serving

Directions

  1. In a large bowl, stir together the yogurt, ginger, garlic, chile powder, garam masala, ground cumin, turmeric, 1 teaspoon salt and 1 tablespoon oil. Add the chicken and stir until the thighs are completely coated. Using a fork, thoroughly stab the chicken thighs so the marinade may penetrate the meat. Set aside for 30 minutes or cover and refrigerate overnight to marinate.
  2. On a medium sheet pan, about 13- by 9-inches, toss the bell peppers and onion with the cumin seeds and the remaining 1 tablespoon oil and ½ teaspoon salt. Lay the ingredients out in a single layer. Using tongs, hold up a chicken thigh over the bowl and scrape the excess marinade off with a spatula, and lay it on the vegetables. Repeat the process for the remaining thighs.
  3. Turn the broiler on high. Place the sheet pan on a rack about 3 inches below the broiler. Broil for 7 to 10 minutes. Flip the thighs and broil for another 7 to 10 minutes, until parts of the chicken and vegetables are charred and crisp on the outside and chicken is cooked through (when a thermometer inserted into thickest part of a thigh reads 165 degrees). Serve with rice or as is, spooning the juices from the sheet pan over the chicken as sauce.

http://www.lynnandruss.com

Adapted from a recipe by Zainab Shah for NYTimes Cooking

Grilled Swordfish Salmoriglio

Lemony, garlicky, oregano-infused salmoriglio is a workaday Sicilian staple, stirred together from basic ingredients and always on hand to season grilled foods, particularly swordfish and other proteins. A nearly 1:1 ratio of lemon juice to olive oil made for a bracing sauce, and adding lemon zest boosted its aroma.

Yes, swordfish is just as pricey in our area as is halibut, but we decided we were worth a splurge. And with just the two of us for dinner, we got by with only two steaks weighing in at just a bit over a pound. With a minimum of easy-to-source ingredients, and with only 40 minutes from start to finish, you can easily squeeze this fish meal into a weekday.

As the cooked fish rests in the salmoriglio, it sheds juices that slightly dilute the sauce’s acidity and balances its flavor. Plenty of dried oregano, garlic, salt, and pepper adds savory, herbaceous character to the bright sauce. Applying it to the swordfish three times—before and after cooking, as well as alongside the fish for serving—means every bite is full of flavor.

Flipping the fish every 2 minutes during cooking ensured that heat continuously hit both sides of the flesh, promoting uniform doneness. Pulling the swordfish off the grill when it reached 130 degrees and letting carryover cooking bring it up to its serving temperature (140 degrees) prevented overcooking.

While the swordfish rested for 10 minutes, it allowed us time to prepare our side of baby spinach and garlic sauté, and a side salad.

Purchase swordfish steaks that are 1 to 1½ inches thick, either four steaks that weigh 7 to 9 ounces each or two steaks that weigh about 1 pound each. Cut the larger steaks in half to create four steaks. Ask your fishmonger to remove the skin or trim it yourself with a thin, sharp knife.

Grilled Swordfish Salmoriglio

  • Servings: 4
  • Difficulty: easy
  • Print

Ingredients

  • 1 Tbsp. dried oregano
  • 2 tsp. grated lemon zest plus ¼ cup juice (2 lemons)
  • 2 garlic cloves, minced
  • 2 tsp. kosher salt, divided
  • 1 tsp. pepper, divided
  •  cup extra-virgin olive oil
  • 2 lbs. skinless swordfish steaks, 1 to 1½ inches thick
  • 2 Tbsp. chopped fresh parsley, divided

Directions

  1. Whisk oregano, lemon zest and juice, garlic, 1¼ teaspoons salt, and ½ teaspoon pepper in bowl until salt is dissolved. Whisk in oil.
  2. Arrange swordfish in single layer in shallow pan or dish. Pour half of marinade over fish, flipping steaks to ensure both sides are evenly covered. Refrigerate for at least 20 minutes or up to 45 minutes. Whisk 1½ tablespoons parsley into remaining marinade and set aside.
  3. FOR A CHARCOAL GRILL: Open bottom vent completely. Light large chimney starter filled with charcoal briquettes (6 quarts). When top coals are partially covered with ash, pour evenly over half of grill. Set cooking grate in place, cover, and open lid vent completely. Heat grill until hot, about 5 minutes.
    FOR A GAS GRILL: Turn all burners to high; cover; and heat grill until hot, about 15 minutes. Leave primary burner on high and turn other burner(s) to medium-high.
  4. Clean and oil cooking grate. Remove fish from marinade, letting excess drip off (do not pat dry). Sprinkle both sides with remaining ¾ teaspoon salt and ½ teaspoon pepper. Place fish on hotter side of grill and cook (covered if using gas), flipping every 2 minutes, until steaks develop dark grill marks and register 130 to 135 degrees, 7 to 11 minutes.
  5. Transfer fish to clean shallow pan or dish and pour reserved marinade over top. Tent with aluminum foil and let rest until centers register 140 degrees, 5 to 10 minutes. Transfer fish to serving platter or individual plates and sprinkle with remaining 1½ teaspoons parsley. Transfer sauce in pan to small bowl. Serve, passing sauce separately.

http://www.lynnandruss.com

Recipe from Cook’s Illustrated