Category Archives: Uncategorized

Braised Leeks; Two Options

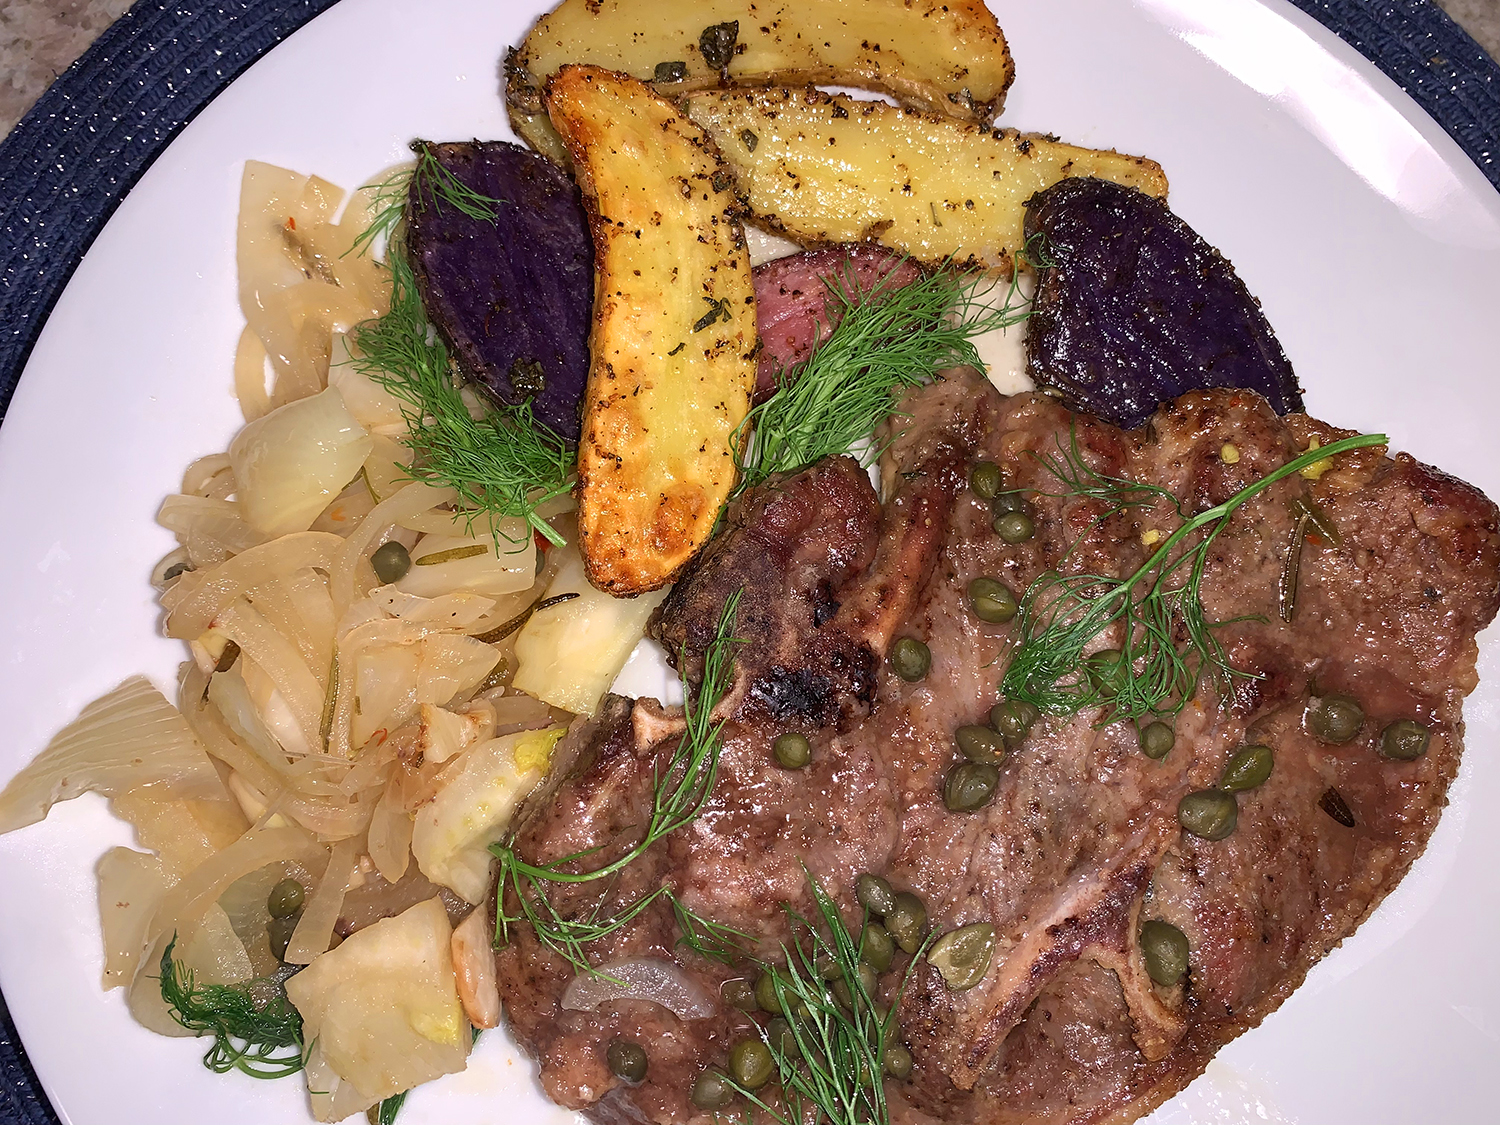
In the allium family, leeks are the tallest and offer the sweet taste of onion but with an earthier, grassy herbal character, and we love them! This first Braised Leeks with Bacon and Thyme recipe hailing from Molly Stevens “All About Braising” cookbook braises the leeks slowly in chicken broth until they collapse into blessed tenderness.

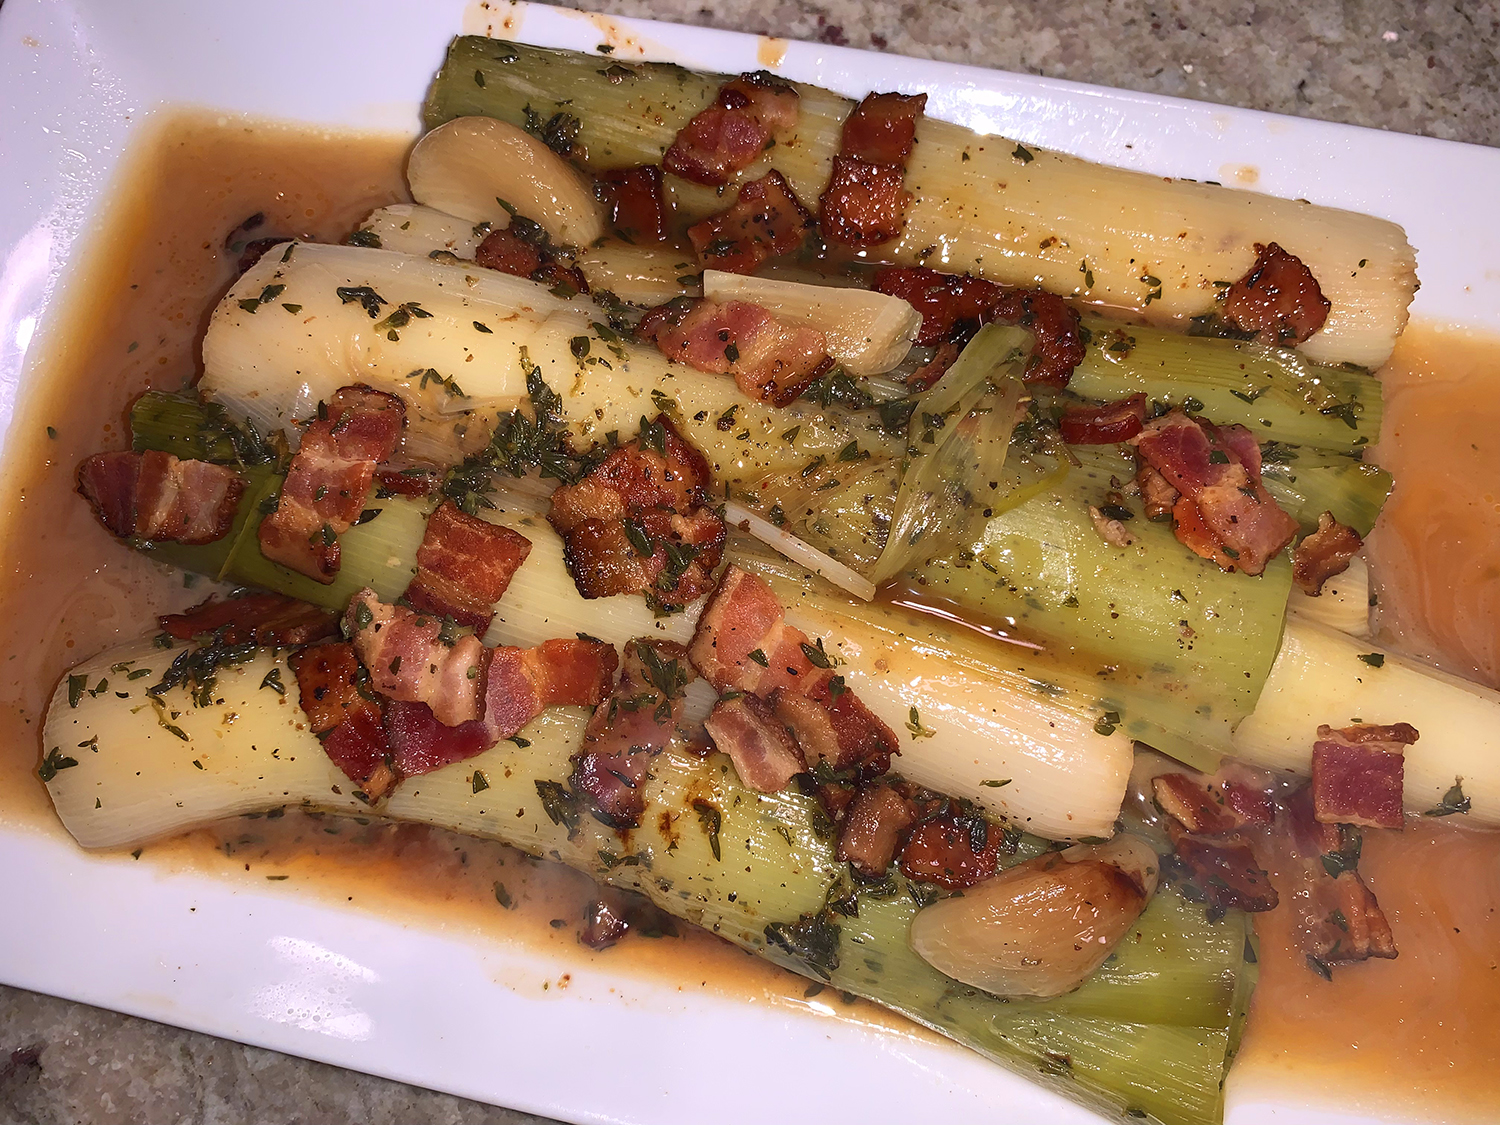
As Molly describes, braising reveals all of their goodness and brings out a complexity of flavor that would be lost by boiling or steaming. They are infinitely versatile and made a perfect accompaniment to our roasted chicken dinner. Serve them hot, warm, at room temperature or even a little chilled. They’ll keep for several days in the refrigerator.

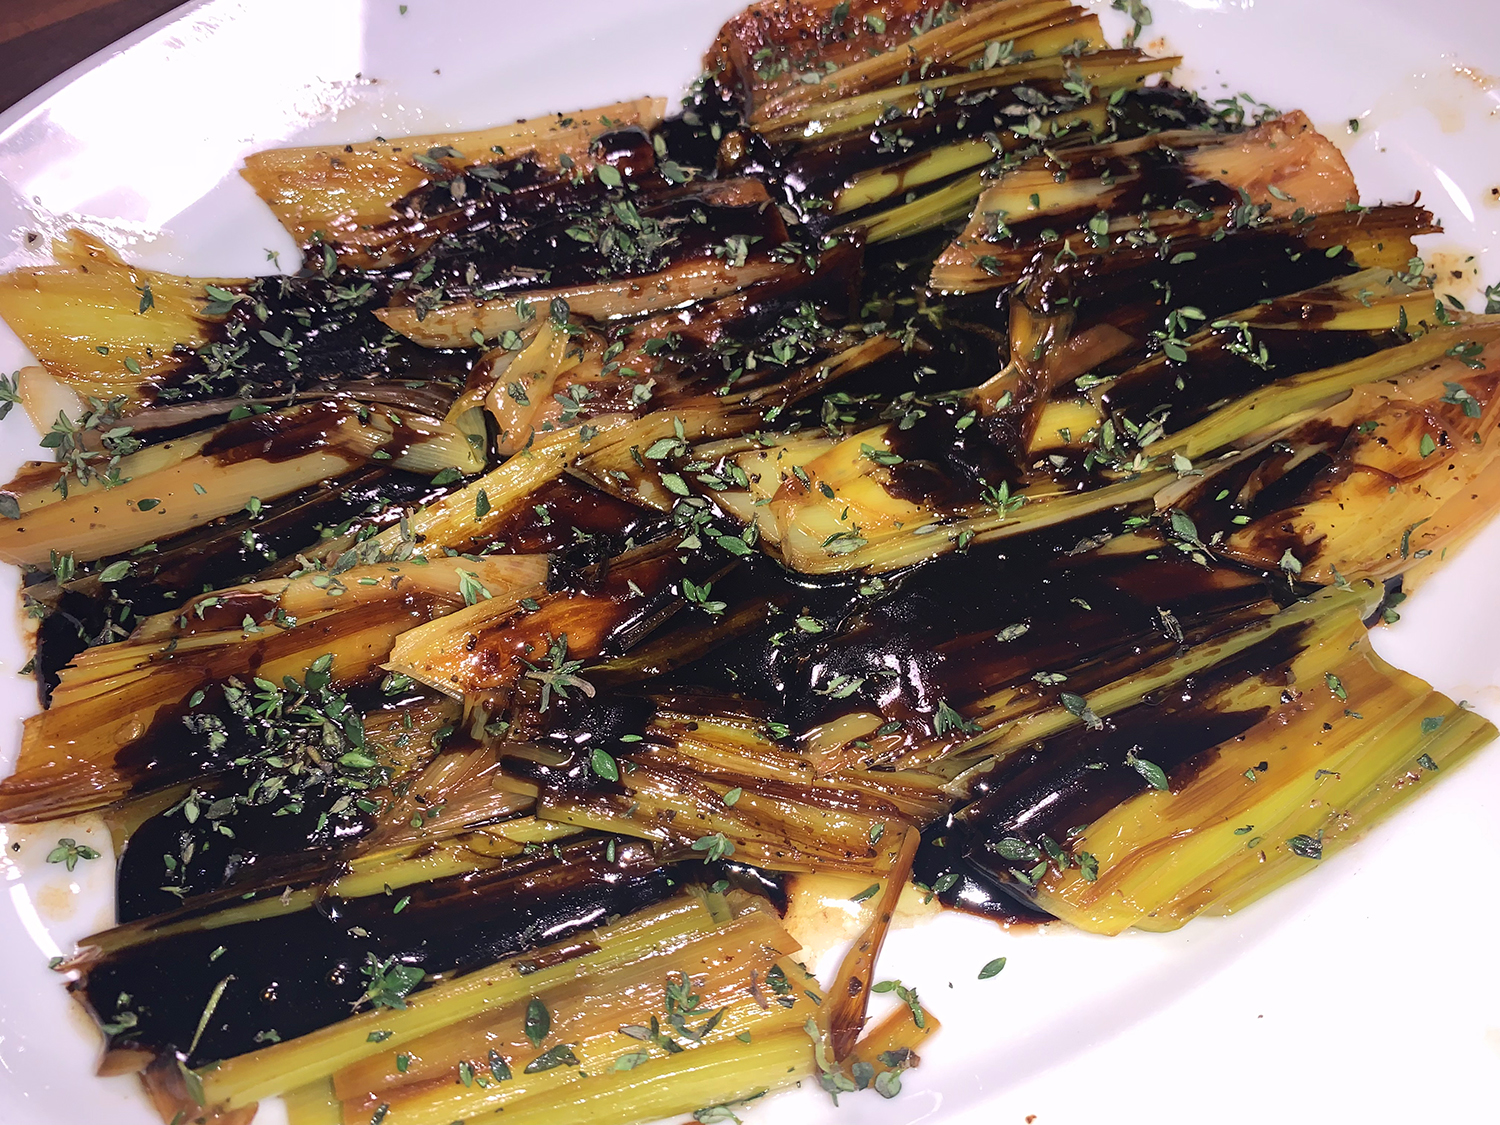
Option number two is a vegetarian dish from Milk Street. Braised Leeks with Balsamic Glaze are meltingly tender. They are poached in olive oil and water then drizzled with a tangy-sweet balsamic glaze. The vegetable retains its mild spring onion flavor with none of the raw allium pungency—a wonderful example of letting the natural flavor of an ingredient shine through!

Leeks are at their best in the fall and winter. Shop for leeks that feel solid at the base, not at all squishy. The green top portion should be dark, not dried out. Inspect the white portion to see that it’s smooth and bright, not split or slimy. Late-season leeks may have developed solid woody cores, an indication it is way past their prime, and shouldn’t be purchased.

Braised Leeks with Bacon and Thyme

  • Servings: 6
  • Difficulty: easy
  • Print

Ingredients

  • 4 slices thick-cut bacon, cut into 1/2-inch-wide strips
  • 1 tsp. butter
  • 4 to 5 lbs. medium to large leeks
  • 2 garlic cloves, peeled and cut lengthwise in half
  • Coarse salt and freshly ground pepper
  • Freshly grated nutmeg
  • 1 1/2 Tbsp. chopped fresh thyme (do not substitute dried)
  • 1 cup chicken stock, preferably homemade
  • 1/2 lemon

Directions

  1. Place the bacon in a medium skillet, set over medium heat, and fry, stirring often with a slotted spoon, until mostly crisp but with some softness remaining, 8-10 minutes. Transfer the bacon to a plate lined with paper towels to drain, and set the skillet aside.
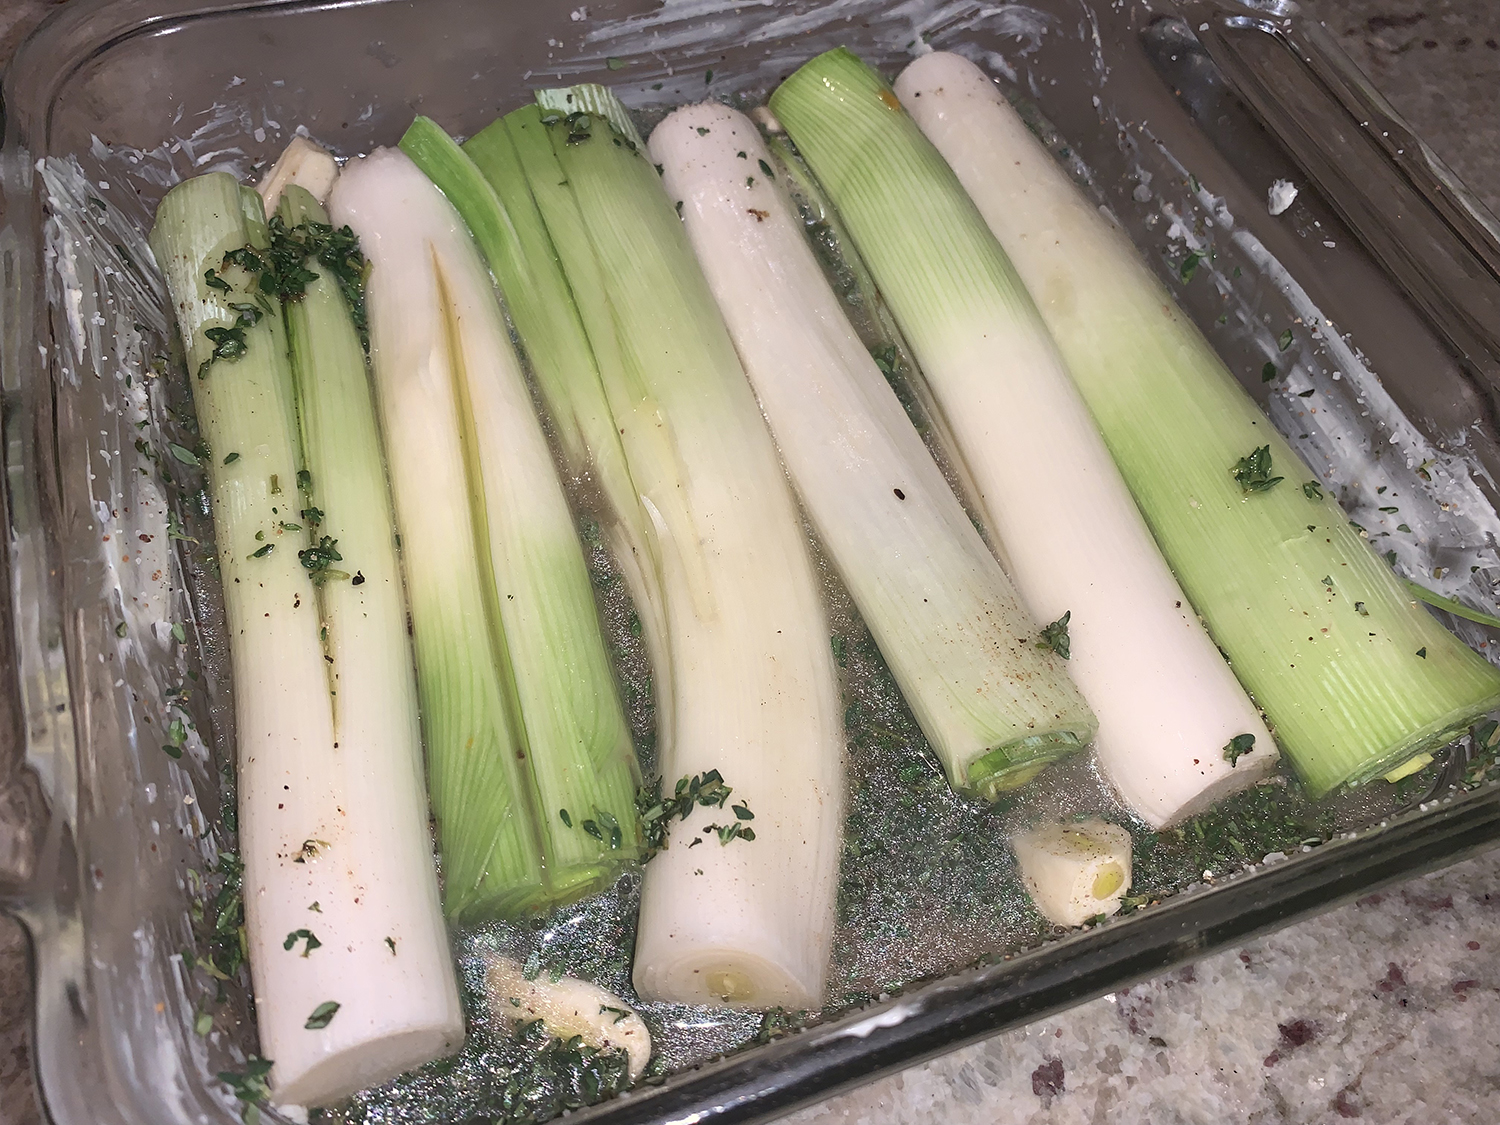
  2. Preheat the over to 325°F. Butter a 13-by-9-inch baking dish. (We didn’t have as many leeks so we used a 9×9 square dish.)
  3. With a large knife trim off the root end of each leek, but leave the base intact. Get rid of the heaviest green part and any tough white parts. Cut off the tops at the point where the green turns from pale and smooth to dark and leathery.
  4. Cut the leeks lengthwise in half, without cutting completely through the root end, Wash the leeks thoroughly, holding them upside down under cold running water and flaring the layers to let the water run through to remove all the sand.
  5. Shake off the excess water and place them in one layer in the prepared baking dish. Tuck the garlic halves in the dish and season with salt, pepper and nutmeg. Sprinkle on the thyme.
  6. Pour off as much fat from the reserved bacon skillet, without discarding the bacon drippings. Place over high heat, add the stock, and bring to a boil to deglaze the pan, scraping with a wooden spoon. Pour the hot stock over the leeks.
  7. Cover the dish tightly with foil and place on a rack in the lower third of the oven. Braise for 30 minutes.
  8. Turn the leeks over with tongs, and continue braising uncovered until the leeks are fork tender, another 15-25 minutes. Scatter the reserved bacon over the leeks and continue braising for an additional 15 minutes, or until the leeks are soft enough to be easily pierced with the tip of a knife.
  9. With tongs and a slotted spoon, transfer the leeks and bacon to a platter, and cover with foil to keep warm. Pour any remaining juices, along with those from the platter, into a skillet and reduce down to 1/4 cup. Add a generous squeeze of lemon, taste for salt and pepper, and simply pour over the leeks. Serve warm or room temperature.

http://www.lynnandruss.com

Braised Leeks with Balsamic Glaze

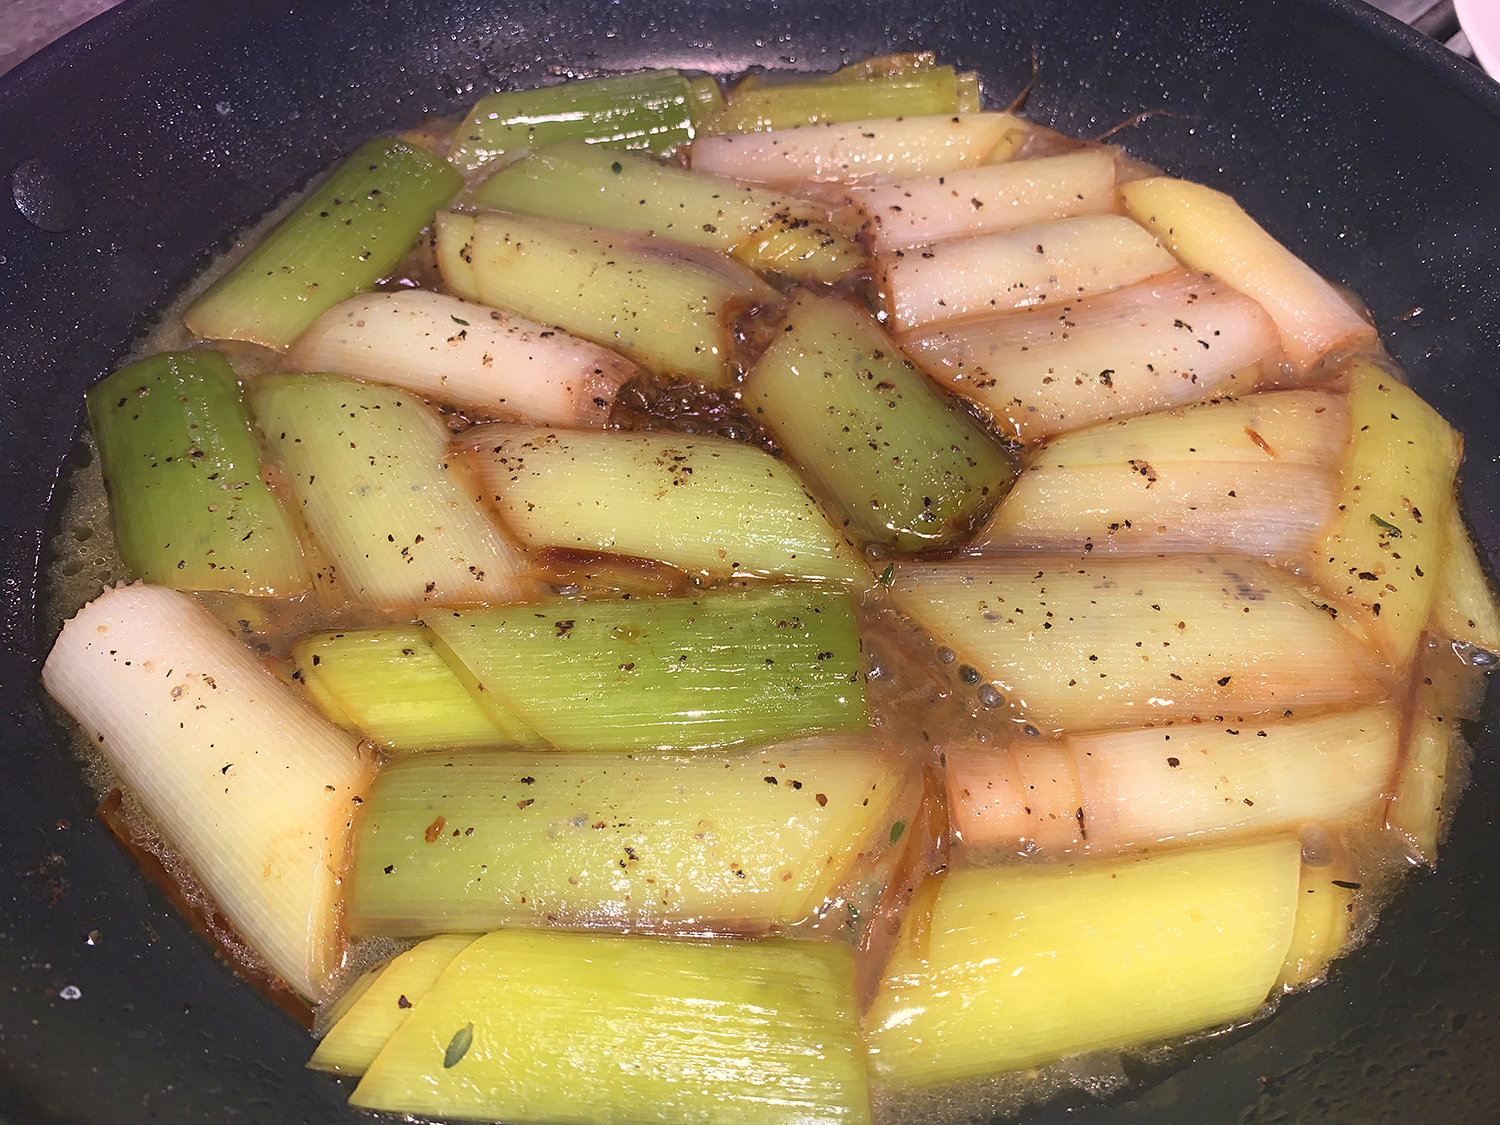
You want to make sure not to stir the leeks too vigorously or too often when browning them. Stir gently just once or twice, without flipping them, so they color evenly. And once the water goes into the pan and the cover goes on, it’s best to simply shake the skillet, not stir its contents, so the leeks hold together.

These leeks just melted in the mouth! We omitted the sliced almonds for this meal; and next time we would cut the glaze in half. Although it was very good, we didn’t even use all of it and it was still a lot.

Braised Leeks with Basamic Glaze

  • Servings: 4
  • Difficulty: easy
  • Print

Ingredients

  • 1 lb. leeks, white and light green parts only, outer layers removed
  • 2 cup extra-virgin olive oil
  • 2 Tbsp. salted butter, cut into 2 pieces
  • Kosher salt and ground black pepper
  • 6 thyme sprigs, plus 1 teaspoon chopped fresh thyme
  • 1/4 cup balsamic vinegar
  • 1 tsp. honey
  • 3 Tbsp. sliced almonds, toasted (optional)

Directions

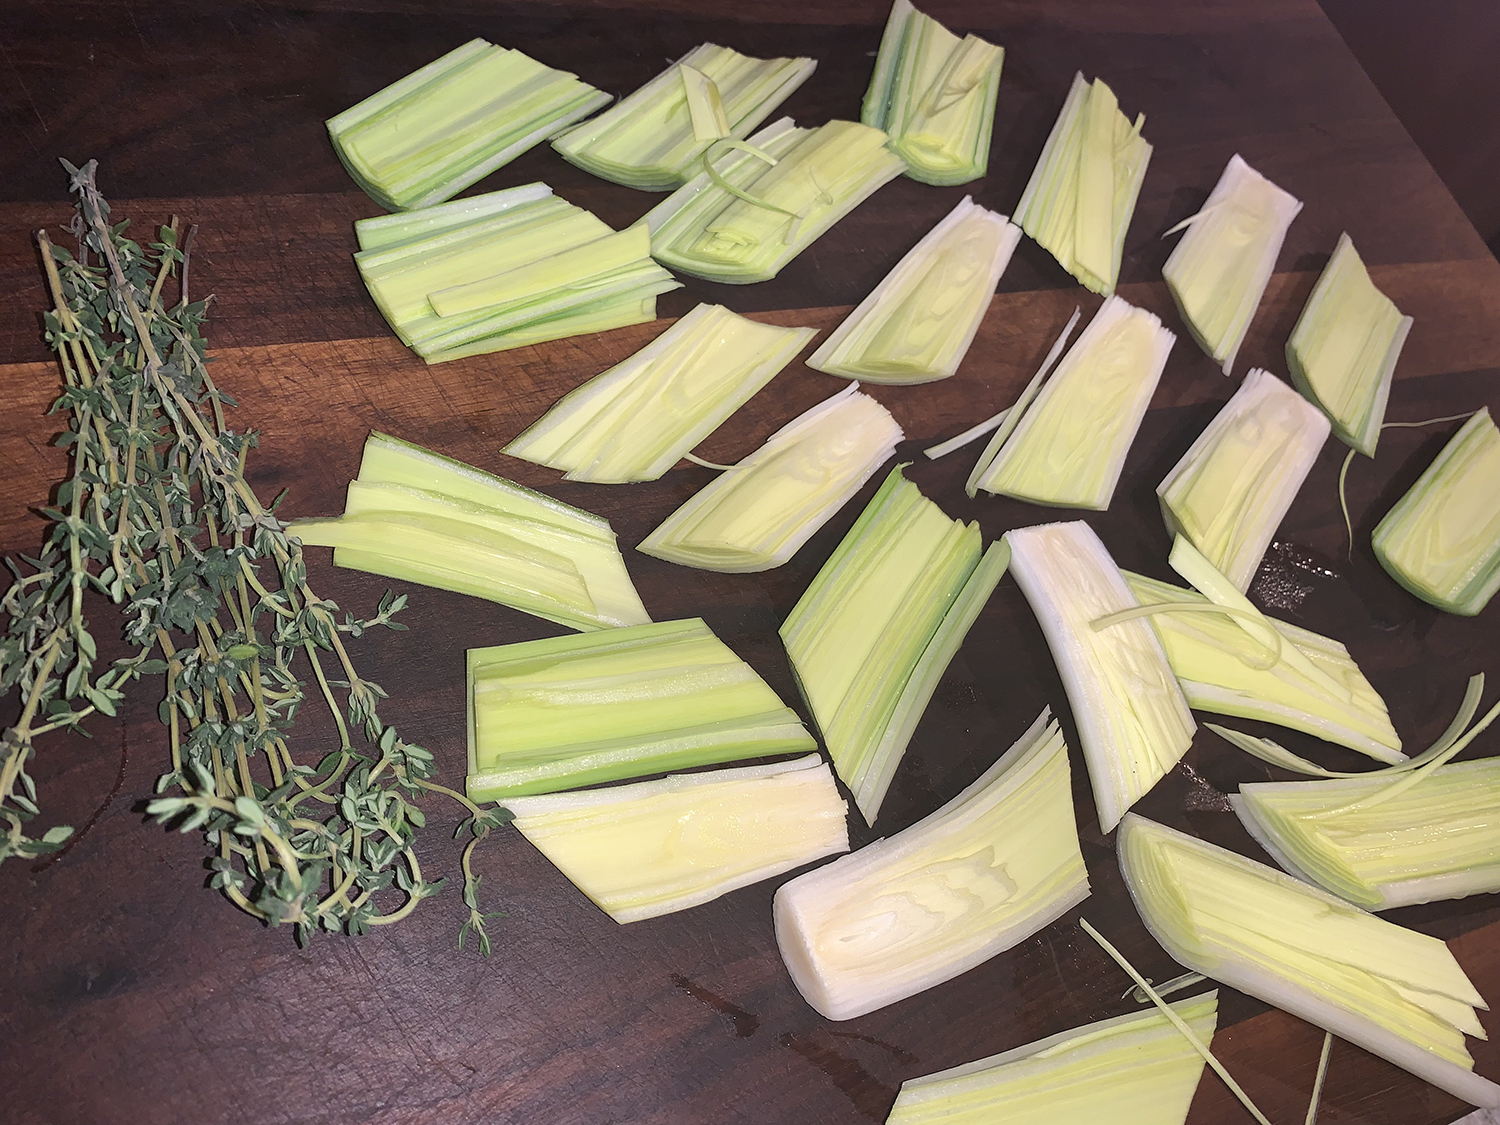
  1. Cut the leeks in half lengthwise. Fill a large bowl with water, submerge the leek halves and swish them around to remove the grit between the layers. Pour off the water and repeat until the leeks are clean, then pat dry. Cut the leeks on the diagonal into 2-inch sections, keeping the layers intact as much as possible.
  2. In a 12-inch skillet, combine the oil, butter and leeks, adding them to the pan cut side down. Set the pan over medium-high and cook, gently stirring only once or twice so the layers do not separate, until the leeks are lightly browned, 4 to 6 minutes.
  3. Add ¼ teaspoon salt and ½ teaspoon pepper, then slowly add ⅔ cup water. Add the thyme sprigs, cover and reduce to medium-low. Cook, occasionally shaking the skillet, until a knife inserted into the leeks meets no resistance and most of the water has evaporated, about 20 minutes.
  4. Using a slotted spoon, transfer the leeks to a platter, leaving the oil in the skillet. Remove and discard the thyme sprigs. Add the vinegar and honey to the pan, then cook over medium, stirring often, until the mixture is syrupy, 2 to 4 minutes.
  5. Taste and season with salt and pepper, then pour over the leeks. Sprinkle with the chopped thyme and the almonds, if using.

http://www.lynnandruss.com

Hoisin Broccoli and Tofu Traybake

Traybake, a savory, one-pan meal cooked on a baking sheet in the oven is a home chef’s friend. This simple vegetarian traybake combines several pantry staples—hoisin, soy sauce and garlic—with broccoli and tofu and yields a hearty, satisfying main.

A 475°F oven develops the right amount of flavorful char on the broccoli and cooks the florets to a pleasing tender-crisp texture. While steamed rice is the usual accompaniment, we went a step further and made Vegetable Fried Rice.

A bit short on the hoisin sauce, we decided to make up the 1/4 cup deficit by including oyster sauce. The end result was less sweet and more to our liking.

Don’t skip the baking-sheet prep. Be sure to line it with foil and mist it with cooking spray. The sugar in the hoisin makes things a little sticky in the oven. The foil and cooking spray help ensure the broccoli and especially the more fragile tofu release from the baking sheet.

Hoisin Broccoli and Tofu Traybake

  • Servings: 4
  • Difficulty: easy
  • Print

Ingredients

  • 3/4 cup hoisin sauce
  • 3 Tbsp. soy sauce
  • 3 medium garlic cloves, finely chopped
  • 1 Tbsp. toasted sesame oil
  • 1 lb. broccoli crowns, cut into 1½-inch florets
  • 14 oz. container firm OR extra-firm tofu, drained, halved lengthwise, cut crosswise into ½-inch-thick slices and pressed dry
  • Toasted sesame seeds, to serve

Directions

  1. Heat the oven to 475°F with a rack in the middle position. Line a rimmed baking sheet with foil and mist with cooking spray.
  2. In a small bowl, stir together the hoisin, soy sauce, garlic and sesame oil. In a medium bowl, toss the broccoli with half of the hoisin mixture until evenly coated. Distribute in an even layer on the prepared baking sheet.
  3. Transfer the remaining hoisin mixture to the now-empty bowl, add the tofu and gently toss to coat. Place the tofu on the baking sheet, arranging it in a single layer, being sure that all the slices lay flat against the baking sheet.
  4. Roast the broccoli and tofu without stirring until the broccoli is charred and tender-crisp, about 25 minutes. Using a wide metal spatula, transfer to a platter. Sprinkle with sesame seeds.
  5. Optional garnish: Chopped fresh cilantro

http://www.lynnandruss.com

By Calvin Cox for Milk Street

Beer-Braised Cabbage

To pump up the flavors of the braising liquid in this Beer-Braised Cabbage, Cook’s Country chose a light-bodied lager. They also used beer-complementing ingredients like sautéed onion, mustard, vinegar, and thyme. To ensure the cabbage doesn’t overcook from extended simmering, the braising liquid is simmered until slightly thickened before adding the cabbage.

We paired the cabbage with a pan-seared pork chop and braised red potatoes with miso and scallions.

A great side dish that’s quick enough for a weeknight. You can substitute ¼ teaspoon of dried thyme for the fresh. This hearty side dish was a nice complement to the pork, although you can serve it as a vegetarian side.

Beer-Braised Cabbage

  • Servings: 4
  • Difficulty: easy
  • Print

Ingredients

  • 2 Tbsp. unsalted butter
  • 1 onion, chopped fine
  • ½ cup beer, preferably light-bodied lager
  • 1 Tbsp. whole grain mustard
  • ½ tsp. minced fresh thyme
  • 1 small head green cabbage (about 1 lb.), halved, cored, and sliced thin
  • 2 tsp. cider vinegar
  • Salt and pepper

Directions

  1. Melt butter in large skillet over medium-high heat. Cook onion until softened, about 5 minutes.
  2. Stir in beer, mustard, and thyme and simmer until slightly thickened, about 2 minutes.
  3. Add cabbage and vinegar and cook covered, stirring occasionally, until wilted and tender, about 8 minutes.
  4. Season with salt and pepper. Serve.

http://www.lynnandruss.com

Recipe from Cook’s Country

Pescatarian Pantry Pasta

For this Spaghetti al Tonno pasta dish, it uses two jars of olive oil–packed tuna and a small amount of canned whole tomatoes, crushed by hand to produce small, supple pieces. Lots of garlic, some cooked in olive oil and the rest simply warmed through, contribute potent flavor to the tomato sauce, along with red pepper flakes for heat and anchovies for a briny backbone.

To ensure that the tuna stays moist and silky, stir it into slightly underdone spaghetti along with the tomato mixture off the heat and simply let it warm through. This not only gently warms the fish through so that it holds its moisture, but also hedges against mushy spaghetti.

Spaghetti or linguine are preferred for this dish (we used whole wheat pasta), but short or tubular shapes such as penne, fusilli, farfalle, ziti, or rigatoni also work. Likewise, oil-packed tuna is recommended, but if you happen to have water-packed tuna instead, don’t let that stop you. For a spicier dish, use the full ½ teaspoon of red pepper flakes.

The tuna brand we buy is Tonnino. With rich flavor and silky, thick‑cut yellowfin fillets, it is a step above most brands. Yes, it costs a few extra dollars, but it yields pasta al tonno that’s posh enough for company, and can bring a luxurious touch to any weeknight meal. And aren’t you worth at least a few extra bucks?

*Now here’s the thing. If you are using the more expensive jarred tuna, why would you discard the oil it is packed in? Use that oil and add some EVOO if needed to make the 1/2 cup called for in the recipe.

Spaghetti al Tonno

  • Servings: 4
  • Difficulty: easy
  • Print

Ingredients

  • 2 5- to 7-oz. jars/cans olive oil-packed tuna, drained* (see head note)
  • 1 Tbsp. lemon juice
  • 1 tsp. table salt, divided, plus salt for cooking pasta
  • ½ tsp. pepper, divided
  • ½ cup extra-virgin olive oil*, divided, plus extra for drizzling
  • 1½ Tbsp. minced garlic, divided
  • 3 anchovy fillets, rinsed, patted dry, and minced
  • ¼–½ tsp. red pepper flakes
  • 1 14.5-oz. can whole peeled tomatoes, drained with juice reserved, crushed by hand to small pieces
  • 12 oz. spaghetti
  • 6 Tbsp. chopped fresh parsley, divided

Directions

  1. Bring 4 quarts water to boil in large pot. While water comes to boil, gently stir tuna, lemon juice, ¼ teaspoon salt, and ¼ teaspoon pepper together in small bowl.
  2. Heat 2 tablespoons oil, 1 tablespoon garlic, anchovies, and pepper flakes in saucepan over medium heat, stirring occasionally, until oil sizzles gently and anchovies break down, 1½ to 2 minutes.
  3. Stir in tomatoes and their juice and ½ teaspoon salt. Increase heat to high and bring to strong simmer. Adjust heat to maintain gentle simmer and cook, stirring occasionally, until slightly thickened, 6 to 7 minutes. Cover and keep warm over low heat.
  4. Add spaghetti and 1 tablespoon salt to boiling water. Cook, stirring often, until barely al dente. Reserve ½ cup cooking water. Drain pasta and return it to pot.
  5. Off heat, add tomato mixture, remaining ¼ teaspoon salt, remaining ¼ teaspoon pepper, and remaining 1½ teaspoons garlic and toss until pasta is well coated. Add tuna mixture and toss gently. Cover and set aside for 3 minutes so flavors can meld and pasta can finish cooking.
  6. Adjust consistency of sauce with reserved cooking water as needed.
  7. Add ¼ cup parsley and remaining 2 tablespoons oil and toss to combine. Season with salt and pepper to taste.
  8. Distribute among pasta bowls. Drizzle each portion with extra oil, if using. Sprinkle with remaining 2 tablespoons parsley and serve.

http://www.lynnandruss.com

Recipe from Cook’s Illustrated

Shoulder Lamb Chops with Fennel and Capers

The flavors were amazing in this dish from Mastering the Art of Italian Cooking by Lidia Bastianich, one of our favorite Italian chef/authors. With rosemary, fennel, capers, onion and homemade stock, you can’t help but start salivating from the heady aromas while you’re cooking.

Shoulder lamb chops are usually not as costly as other cuts, but you do have to deal with a little more fat and bone. With only three chops, we still needed to brown them in two batches, which the original instructions didn’t indicate. Too closely together in the skillet, and the meat will steam instead of brown.

One major difference we will do next time is reduce the amount of stock from 2 cups down to 1 cup (this is noted in the list of ingredients below). After the chops were removed from the skillet, we tented them with foil, and reduced down the liquid in the pan (which still included the other ingredients).

And what is with throwing out the garlic?? That’s like tossing the baby out with the bath water, a sacrilege in our opinion! Otherwise, it was a fabulous recipe.

Shoulder Lamb Chops with Fennel and Capers

  • Servings: 4
  • Difficulty: easy
  • Print

Ingredient

  • 4 1⁄2-inch thick bone-in shoulder lamb chops
  • 2 tsp. kosher salt
  • All-purpose flour, dredging
  • Vegetable Oil for frying
  • 3 Tbsp. extra-virgin olive oil
  • 6 garlic cloves, crushed and peeled
  • 4 sprigs fresh rosemary
  • 2 large fennel bulbs, trimmed, cored, and cut into 1-inch chunks
  • 2 medium onions, sliced
  • 1⁄4 tsp. crushed red pepper flakes
  • 1⁄4 cup red wine vinegar
  • 1 cup chicken stock, preferably homemade
  • 1⁄4 cup drained tiny capers in brine

Directions

  1. Season lamb chops with 1 teaspoon of the salt. Spread some flour on a plate and dredge the chops in the flour, tapping off the excess.
  2. Heat a large skillet over medium-high heat, and add 1⁄4 inch of vegetable oil. Cook the chops until they are crisp and browned on both sides, about 3 minutes per side. Remove them to a plate. (It’s likely you will need to do this in 2 batches.)
  3. Pour out the oil and wipe the skillet clean. Set skillet over medium heat, and add olive oil. When the oil is hot, add the garlic and rosemary. Once the garlic and rosemary are sizzling, add the fennel and onions, and season with the remaining salt and the red pepper flakes. Cook, stirring to make sure the vegetables don’t burn, until they are wilted and golden, about 10 minutes.
  4. Add the vinegar and bring it to a boil. Add the stock. Reduce the heat so the sauce is simmering, and add the chops and capers.
  5. Simmer, covered, until the chops are tender, about 35 to 40 minutes. Remove the rosemary stems and garlic (no way!), and serve.

http://www.lynnandruss.com

Original recipe from Lidia Bastianich

Spatchcock Chicken with Potatoes and Lemon

A FOODGASM. That’s what The Hubs dubbed this dinner as we sucked the bones clean. “And in the blog, you can say that I said so.” So I took him up on his offer.

If roast chicken and potatoes are in your wheel house, then you must put this on your short list. The succulent poultry, mouth-watering potatoes, and variety of alliums, paired with herbs and seasonings all melded together into one harmonious orgy on the palette.

According to Spanish chef/author Mikel López Iturriaga, getting all the parts of a roasted chicken done just right is one of the greatest challenges of roasting poultry: when the thigh is cooked to temperature the breast is usually already dry, and if you remove the chicken from the oven earlier in order to keep the breast juicy, the thigh is still raw.

As Mikel claims, there are many tricks to overcome this dilemma, but the most effective has the name of a Lepidoptera, it’s called “butterflied chicken,” also known as spatchcock chicken. It’s about cutting the bird in such a way to leave it flattened. Not only does it have the advantage of bringing together cooking times for all of the parts, but it makes the cooking process much faster. In a half-hour, you can have it ready.

Now, as is our MO, we made a few changes. We added shallots in addition to the onions, increased the potato quotient, and didn’t remove garlic or potato skins. Count yourself lucky if you have leftovers. The most difficult part was waiting the extra 10 minutes for the bird to rest before carving and serving…

Spatchcock Chicken with Potatoes and Lemon

  • Servings: 4
  • Difficulty: easy
  • Print

Ingredients

  • 1 whole chicken, (3 1/2 to 4 lbs.), spatchcocked
  • 7 oz. dry white wine, or dry vermouth
  • 2 medium onions, or combination of onions and shallots
  • 4 medium Yukon Gold potatoes
  • 2 lemons, one cut in half horizontally and the other juiced
  • 1 head garlic, outer skin removed to reveal the cloves and cut in half horizontally
  • 3 sprigs fresh rosemary, each broken into 2 pieces
  • 3 sprigs fresh thyme, each broken into 2 pieces
  • 2 bay leaves, broken into halves
  • 1 Tbsp. pimentón dulce, (sweet smoked paprika)
  • 1 Tbsp. dried oregano
  • 1 tsp. freshly ground black pepper
  • Salt, to taste
  • Extra virgin olive oil

Directions

  1. Heat the oven to 475 degrees.
  2. Cut the potatoes in half, and then cut each half into three wedges. Do the same with the onions. If using shallots, cut them in half from top to bottom. Place the vegetables in a baking or roasting pan with sides high enough to allow the chicken to be placed on a rack over top of the vegetables. Add the lemon and garlic halves, drizzle everything with olive oil, mix well, and place in the preheated oven for 15 minutes.
  3. In a bowl, mix together 6 tablespoons of olive oil, the rosemary, thyme, bay leaves, pimentón, oregano, pepper, and a generous amount of salt. Cover the chicken well with a portion of this mixture reserving the remainder to pour over the vegetables.
  4. After the vegetables have been roasted for 15 minutes, remove them from the oven and pour the remaining marinade, lemon juice, and wine or vermouth over them. Place a rack over the top of the roasting pan and place the chicken on it, skin side up. Return the roasting pan to the oven.
  5. After 15 minutes, lower the oven temperature to 400 degrees and continue roasting for an additional 15 to 20 minutes, or until the chicken skin is golden and juices run clear. After removing the roasting pan from the oven, allow everything to rest for 10 minutes before serving.

http://www.lynnandruss.com

Recipe from Mikel López Iturriaga for El Pais

Cheesy Italian Baked Beans

Flexible in that this Cheesy Italian Baked Beans recipe could be your main dish, or part of a meal as a side. Here, traditional Italian ingredients like onion, garlic, tomatoes, cheese, and rosemary put a spin on classic baked beans.

The prep is minimal and afterward it only cooks in the oven for about 20 minutes. When it came to topping the casserole with the shredded fontina cheese, I may have put a bit more than the 1/2 cup that was called for… like 50% more 🙂

I added a final step of letting the casserole sit for 5-10 minutes after removing from the oven. We paired the entrée with a side of steamed broccolini and a toasted whole grain baguette with garlic and parmesan.

Cheesy Italian Baked Beans

  • Servings: 6
  • Difficulty: easy
  • Print

Ingredients

  • 2 Tbsp. extra-virgin olive oil
  • ½ cup coarsely chopped yellow onion 
  • 3 cloves garlic, sliced
  • 1 28-oz. can fire-roasted crushed tomatoes, undrained
  • ¼ cup fresh rosemary leaves, coarsely chopped, plus additional for garnish
  • 3 15-oz. cans cannellini beans, rinsed and drained
  • ¾ cup shredded Parmesan cheese 
  • Crushed red pepper
  • Coarse salt and freshly ground black pepper
  • ½ cup cup shredded Fontina cheese

Directions

  1. Preheat oven to 400°F. In a large skillet heat olive oil over medium-high heat. Add onion, garlic, and 1/8 tsp. salt. Cook and stir for 5 minutes or until tender.
  2. Stir in tomatoes and rosemary. Bring to boiling; boil gently, uncovered, 5 minutes or until slightly thickened.
  3. Stir in beans and half the Parmesan. Season to taste with crushed red pepper, salt, and black pepper. Transfer to a 2-qt. rectangular baking dish. Top with remaining Parmesan and the Fontina. Bake 15 to 20 minutes or until beginning to lightly brown around the edges.
  4. Remove from the oven and let sit for 5-10 minutes to thicken.
  5. Sprinkle with additional rosemary before serving.

http://www.lynnandruss.com

Adapted from a recipe in Fine Cooking Magazine

Spanish Beef Stew with Mushrooms and Sherry

The city of Jerez de la Frontera—commonly shortened to Jerez— is in a corner of the Andalusia region in southern Spain. It is home to sherry, the unique fortified wine that is produced in an area known as the Sherry Triangle. We were lucky enough to visit there a few years ago and experience a sherry tasting.

This beef stew got its origins in the “triangle.” It features tender, succulent pieces of beef, silky, supple mushrooms and a braising liquid rich with both sherry wine and sherry vinegar. The stew is familiar and comforting, yet deliciously different thanks to the wine’s tangy, nutty notes and the aged woodsiness and mellow acidity of the vinegar.

Milk Street adapted the recipe, adding a turnip along with the carrots and cinnamon to complement the wine. They say for this recipe simply seek a fino or manzanilla sherry—both are dry, bright and light, and therefore excellent counterpoints for the richness of the beef and mushrooms.

The sherry vinegar? If you can spare the expense, opt for gran reserva which is aged for at least 10 years and has a smooth, complex flavor, balanced acidity and mahogany hue. But, if that’s not an option, reserva (which we used) or any aged sherry vinegar, though less nuanced than gran reserva, will work perfectly well.

After one hour with the pot covered, there seemed to be too much liquid, so we left it uncovered to help some of that evaporate. After the hour and a half elapsed, we still weren’t happy with how watery it seemed so we removed the contents with a slotted spoon to a covered bowl, and reduced the liquid another 10 minutes. The beef, veggies and mushroom slices were added to the pot for the final 10 minutes.

The perfect meal on a lazy Sunday afternoon after a massive snowstorm… in fact, we both agreed, the BEST stew we’ve ever had! Confession, we were wiping our bowls clean of any residual sauce…

The original recipe claimed it would feed 4 to 6. If you served it over polenta or mashed potatoes, maybe 4 to 5? We got three portions. Next time we’ll add in another carrot and an extra turnip to make it more veggie-forward.

*NOTE: Don’t use sherry cooking wine or domestically produced “dry sherry.” To get the right complexity and balance of richness and acidity, look for fino or manzanilla sherry produced in Spain. Also, avoid sweet sherry for the obvious reasons.

Spanish Beef Stew with Mushrooms and Sherry

  • Servings: 4
  • Difficulty: easy
  • Print

Ingredients

  • 2 Tbsp. extra-virgin olive oil
  • 2 lbs. boneless beef chuck roast, trimmed of excess fat and cut into 1- to 1½-inch pieces
  • 4 medium garlic cloves, peeled
  • 1 medium yellow onion, halved and thinly sliced
  • Kosher salt and ground black pepper
  • 2 medium carrots, peeled and sliced ½ inch thick
  • 1 small white turnip, peeled and cut into ½-inch cubes
  • 2 bay leaves
  • 1 cinnamon stick
  • 4 tsp. sweet paprika
  • 1/2 tsp. grated nutmeg
  • 1 cup fino or manzanilla sherry*
  • 1 qt. low-sodium beef broth
  • 2 Tbsp. good-quality aged sherry vinegar, plus more to taste
  • 4 z. oyster or cremini mushrooms, trimmed and thinly sliced

Directions

  1. In a large Dutch oven over medium-high, heat the oil until shimmering. Add the beef and garlic, then cook, stirring occasionally, until lightly browned, about 5 minutes. Using a slotted spoon, transfer to a medium bowl and set aside; reserve the fat in the pot.
  2. To the same pot, add the onion and 1 teaspoon salt; cook over medium, stirring often, until golden brown, 8 to 10 minutes.
  3. Add the carrots, turnip, bay, cinnamon, paprika and nutmeg; cook, stirring, until fragrant, about 30 seconds.
  4. Add the sherry and bring to a simmer over medium-high, scraping up any browned bits; cook, stirring occasionally, until reduced by about half, 3 to 5 minutes.
  5. Stir in the broth, vinegar and ¼ teaspoon pepper. Return the beef and garlic, along with the accumulated juices, to the pot. Bring to a simmer, then cover partially. Reduce to medium-low and cook, stirring occasionally, until a skewer inserted into the beef meets just a little resistance, about 1½ hours.
  6. Stir in the mushrooms and cover completely. Reduce to low and cook, stirring once or twice, until the mushrooms are tender, 10 to 15 minutes.
  7. Off heat, remove and discard the cinnamon and bay. Taste and season with salt, pepper and additional vinegar, if needed.

http://www.lynnandruss.com

Adapted by Courtney Hill for Milk Street

Linguine with Artichokes, Lemon and Pancetta

Milk Street got the idea for this pasta dish from “Pasta Grannies” by Vicky Bennison. The unusual sauce is made by blitzing artichokes in a blender. Canned artichokes are used instead of fresh for ease, but first they are browned in a mixture of olive oil and rendered in pancetta fat to build flavor in the sauce. The crisp bits of pancetta lend texture and saltiness, lemon adds brightness and balance, and a generous amount of Parmesan ties all the elements together. Voila!

With a minimum of ingredients, this lovely pasta dish can be served as a first course or as the main entrée. Instead of canned, we used frozen artichokes—just make sure to really dry those chokes, otherwise they won’t brown. Using a wider pan would accelerate the browning process. In fact, you may want more of them for the topping!

Don’t use marinated artichokes for this recipe, as their flavor is too sharp and tangy. After draining the artichokes, make sure to pat them dry so they caramelize when added to the pot. Don’t forget to reserve about 2 cups of the pasta water before draining the noodles. You will need it for pureeing the artichokes and building the sauce. And we used every drop of those 2 cups, so perhaps save a bit more…

One other note. Instead of letting the cooked pasta sit in a colander while you make the rest of the dish, use two pots. As the linguine boils, cook the pancetta and then the artichokes in another. This way, everything comes together at one time and is guaranteed to be piping hot.

Linguine with Artichokes, Lemon and Pancetta

  • Servings: 4
  • Difficulty: easy
  • Print

Ingredients

  • 1 lb. linguine OR fettuccine
  • Kosher salt and ground black pepper
  • 1 Tbsp. extra-virgin olive oil, plus more to serve
  • 4 oz. pancetta, chopped
  • 14 oz. can artichoke hearts, drained, patted dry and quartered if whole
  • 1 Tbsp. grated lemon zest, plus 3 tablespoons lemon juice
  • 2 oz. Parmesan cheese, finely grated (1 cup), plus more to serve
  • ½ cup finely chopped fresh flat-leaf parsley OR chives OR basil

Directions

  1. In a large pot, bring 4 quarts water to a boil. Stir in the pasta and 1 tablespoon salt, then cook, stirring occasionally, until al dente. Reserve about 2 cups of the cooking water, then drain.
  2. In the same pot over medium, heat the oil until shimmering. Add the pancetta and cook, stirring, until crisp, 3 to 4 minutes. Using a slotted spoon, transfer to a small plate; set aside.
  3. Add the artichokes to the pot and cook, stirring, until beginning to brown at the edges, 3 to 4 minutes. Remove the pot from the heat. Transfer half the artichokes to a small bowl; add the remainder to a blender. Reserve the pot.
  4. To the artichokes in the blender, add ½ cup cooking water, the lemon juice and ¼ teaspoon each salt and pepper; puree until smooth. In the same pot over medium, bring 1 cup of the remaining cooking water to a simmer, scraping up any browned bits.
  5. Add the artichoke puree, the pasta, lemon zest, pancetta, Parmesan and parsley. Cook, tossing to combine, just until the noodles are heated through, 1 to 2 minutes; add more reserved water as needed to make a silky sauce. Taste and season with salt and pepper.
  6. Transfer to a serving bowl and top with the reserved artichokes, along with additional oil and Parmesan.

http://www.lynnandruss.com

Recipe by Rose Hattabaugh for Milk Street

Tomato and Feta Stuffed Chicken Breasts

This recipe is a lighter spin on the typical cheese-stuffed chicken breast, featuring feta, tomato and Greek-inspired flavors.

Purchase similarly sized chicken breasts so they’ll cook at the same rate. Because our 3 breasts were quite large, the stuffing mixture was doubled, although that is NOT noted in the list of ingredients below. And, they had to be cooked an additional 10 minutes to come to the proper temperature. As a side dish, we roasted some asparagus spears drizzled with olive oil and seasoned with salt, pepper and Za’atar.

Preserved lemons are a common ingredient in Moroccan recipes. You can find the salty pickled citrus in well-stocked grocery stores (near the pickles and olives) or Middle Eastern markets. We usually make and keep a jar of them in our auxiliary refrigerator. (Forgot to include them in the set-up photo below.)

Tomato and Feta Stuffed Chicken Breasts

  • Servings: 4
  • Difficulty: easy
  • Print

Ingredients

  • ¼ cup crumbled feta cheese
  • 1 Tbsp. whole-milk plain Greek yogurt
  • ¼ cup finely chopped grape tomatoes
  • 2 Tbsp. finely chopped pitted Kalamata olives
  • 2 tsp. finely chopped preserved lemon
  • 2 tsp. finely chopped fresh oregano
  • 1 clove garlic, grated
  • 4 same-sized boneless, skinless chicken breasts, trimmed 
  • ⅛ tsp. salt
  • ⅛ tsp. ground pepper
  • 1 Tbsp. extra-virgin olive oil

Directions

  1. Preheat oven to 400 degrees F.
  2. Mash feta and yogurt together in a small bowl. Stir in tomatoes, olives, lemon, oregano and garlic.
  3. Using a sharp knife, cut chicken breasts in half horizontally without cutting all the way through, to create a pocket. Stuff each pocket with equal amounts of the feta mixture; fold the chicken back over and secure with toothpicks. Sprinkle with salt and pepper.
  4. Heat oil in a large ovenproof skillet over medium-high heat. Add the chicken and cook until golden brown, about 4 minutes. Carefully flip the chicken and transfer the pan to the oven.
  5. Bake until an instant-read thermometer inserted in the thickest part of the chicken registers 165 degrees F, 20 to 25 minutes. Transfer to a clean cutting board. Let rest for 5 minutes, then slice.

http://www.lynnandruss.com

Original recipe from EatingWell Magazine.

Eggplant, Tomato and Chickpea Tagine

We found this lovely and full-flavored vegetarian dish in Milk Street’s Fast and Slow Cookbook for Instant Pot Cooking. A tagine is a North African stew cooked in a shallow, conical clay pot that goes by the same name. This chunky vegetable dish is warmly spiced like a tagine and features the common North African pairing of sweet and tart flavors.

For extra depth and a touch of spiciness, swirl in a spoonful of harissa into the tagine just before serving or offer some at the table for spooning on to taste. You will probably want to soak up the delicious sauce with crusty bread, warmed flatbread or couscous (or choice).

Be aware, you don’t want to shortcut the prep by leaving the tomatoes whole. Slicing 2 pints of grape tomatoes may sound like a bummer, but this step helps the tomatoes break down and cook at the same rate as the eggplant.

Eggplant, Tomato and Chickpea Tagine

  • Servings: 4
  • Difficulty: easy
  • Print

Ingredients

  • ¼ cup extra-virgin olive oil, plus more to serve
  • 4 medium garlic cloves, roughly chopped
  • 1 medium yellow onion, roughly chopped
  • 2 pints grape or cherry tomatoes, halved
  • 4 tsp. finely grated fresh ginger
  • 1½ tsp. ground cumin
  • 1 tsp. sweet paprika
  • ¼ tsp. ground cinnamon
  • Kosher salt and ground black pepper
  • 2 lbs. eggplant, trimmed and cut into 1-inch chunks
  • 15½ oz. can chickpeas, rinsed and drained
  • 1 Tbsp. lemon juice, plus lemon wedges to serve
  • 1 cup lightly packed fresh cilantro, finely chopped

Directions

  1. On a 6-quart Instant Pot, select Normal/Medium Sauté.
  2. Add the oil and garlic, then cook, stirring often, until golden brown, about 4 minutes.
  3. Add the onion, tomatoes, ginger, cumin, paprika, cinnamon, 2½ teaspoons salt and 1 teaspoon pepper. Cook, stirring occasionally, until the tomatoes begin to release some of their juices, 2 to 4 minutes.
  4. Press Cancel, then stir in ¼ cup water, scraping up any browned bits. Gently stir in the eggplant, then distribute in an even layer.
  5. Lock the lid in place and move the pressure valve to Sealing. Select Pressure Cook or Manual; set the pressure level to Low. Set the cooking time for 3 minutes. When pressure cooking is complete, quick-release the steam by moving the pressure valve to Venting. Press Cancel, then carefully open the pot.
  6. Gently stir in the chickpeas and lemon juice, then taste and season with salt and pepper. Stir in the cilantro.
  7. Serve drizzled with additional oil and with lemon wedges on the side.

http://www.lynnandruss.com

Recipe by Julia Rackow for Milk Street

Barley Soup with Mushrooms and Kale

What a powerhouse of healthy ingredients! First, there’s the barley. This versatile grain has a somewhat chewy consistency and a slightly nutty flavor that can complement many dishes. It’s also rich in many nutrients and packs some impressive health benefits, ranging from improved digestion and weight loss to lower cholesterol levels and a healthier heart.

And mushrooms are a low-calorie food that packs a nutritional punch. Loaded with many health-boosting vitamins, minerals, and antioxidants, they’ve long been recognized as an important part of any diet. Plus, the anti-inflammatory effect of mushrooms has been shown to greatly improve the efficiency of the immune system.

Kale, one of the so-called “superfoods” is also packed with nutrition that puts it high on the list of world’s healthiest food, not to mention it is low in calories and has zero grams of fat.

All health info aside, the soup is just darn tasty too! Because our onion wasn’t very large, we also included a shallot. Instead of lining a strainer with cheesecloth, The Hubs drained the hydrating porcinis through a coffee filter, which prevents any grit seeping into the broth.

It will keep for about three days in the refrigerator, but the barley will swell and absorb liquid, so you will have to add more to the pot when you reheat. We added one cup of mushroom broth when we reheated a few days later.

Barley Soup with Mushrooms and Kale

  • Servings: 8
  • Difficulty: easy
  • Print

Ingredients

  • 1/2 oz. dried porcini mushrooms
  • 2 cups boiling water
  • 1 Tbsp. extra virgin olive oil, as needed
  • 1 large onion, chopped
  • 1/2 lb. cremini mushrooms, cleaned, trimmed and sliced thick
  • 2 large garlic cloves, minced
  • Salt, preferably kosher salt, to taste
  • 3/4 cup whole or pearl barley
  • 1 1/2 qts. chicken stock, or beef stock
  • A bouquet garni made with a few sprigs each thyme, parsley and a bay leaf
  • 8 oz. kale, stemmed and washed
  • Freshly ground pepper to taste

Directions

  1. Place the dried porcini mushrooms in a bowl or a Pyrex measuring cup, and pour on two cups boiling water. Let sit for 30 minutes.
  2. Set a strainer over a bowl, and line it with cheesecloth, or better yet, a coffee filter. Lift the mushrooms from the water and squeeze over the strainer, then rinse in several changes of water. Squeeze out the water and set aside. Strain the soaking water through the cheesecloth/coffee filter-lined strainer. Add water as necessary to make two cups. Set aside.
  3. Heat the oil in a large, heavy soup pot or Dutch oven over medium heat, and add the onion. Cook, stirring often, until just about tender, about five minutes.
  4. Add the sliced fresh mushrooms. Cook, stirring, until the mushrooms are beginning to soften, about three minutes, and add the garlic and 1/2 teaspoon of salt. Continue to cook for about five minutes, until the mixture is juicy and fragrant.
  5. Add the reconstituted dried mushrooms, the barley, the mushroom soaking liquid, and the stock or water. Salt to taste. Bring to a boil, reduce the heat, cover and simmer 45 minutes.
  6. Meanwhile, stack the kale leaves in bunches and cut crosswise into slivers. Add the kale to the simmering soup, and continue to simmer for another 15 to 20 minutes.
  7. The barley should be tender and the broth aromatic. The kale should be very tender. Remove the bouquet garni, taste and adjust salt, add a generous amount of freshly ground pepper and serve.

http://www.lynnandruss.com

Recipe from The NY Times

Red Cabbage Glazed with Maple Syrup

This recipe, published in The Times in 1991, was adapted from Yves Labbé, the chef at Le Cheval d’Or, a restaurant in Jeffersonville, Vt., that showcased French country cooking. Mr. Labbé was known to serve this side dish alongside quail in a red-wine sauce, and its simple instructions belie depths of flavor. The cabbage cooks down, braising in its own juices, while the sweetness of the apples and maple syrup, a Vermont staple, tones down the bitterness of the cabbage. The result has broad appeal. —Marialisa Calta

We decided to pair it with a tasty and moist Sous Vide Pork Loin which came out of it’s immersion bath at just the right temperature, then was seared on all sides to achieve a golden crust…. but I’m getting ahead of myself… now about this cabbage dish.

It’s quite easy actually. Spend a bit of prep time chopping or mincing the first four ingredients. Next several minutes are spent sautéing the bacon and onion. Everything else now goes in the Dutch oven, the pot is covered and put in the preheated oven for 30 minutes.

The dish was incredibly good. We did notice however quite a bit of liquid in the bottom of the pot and thought perhaps next time we’d reduce the amount of maple syrup by half, using only a 1/4 cup instead of a 1/2 cup. Which would appeal to our preference for more savory than sweet.

Red Cabbage Glazed with Maple Syrup

  • Servings: 4
  • Difficulty: easy
  • Print

Ingredients

  • 5 slices bacon, minced
  • 1 onion, minced
  • 1 medium firm, tart apple, peeled, quartered, cored and sliced
  • 1 lb. red cabbage (about 1/2 head), cored, outer leaves removed and shredded
  • 1 bay leaf
  • 1/4 cup maple syrup
  • Salt and black pepper

Directions

  1. Heat oven to 350 degrees. In an ovenproof saucepan or Dutch oven large enough to hold all of the ingredients, sauté the bacon over medium until crisp, about 5 minutes. Add the onion and sauté until translucent, about 5 more minutes.
  2. Add the apple, cabbage, bay leaf, maple syrup, and season with salt and pepper, cover, and transfer to the oven. Bake for 30 minutes.
  3. Serve hot.

http://www.lynnandruss.com

Recipe by Yves Labbé for NY Times Cooking

Kung Pao Cauliflower

Even though Kung Pao Chicken originated in China’s Sichuan Province, it has become an iconic Chinese-American dish. The popular stir-fry typically includes chicken, vegetables and peanuts tossed in a dark, salty, sweet and spicy sauce, but in this vegan take, cauliflower steps in for the chicken.

Dark soy sauce is more caramel-flavored and less salty than regular soy sauce, and it adds color and richness to the dish. If you don’t have dark soy, substitute with regular soy sauce or hoisin sauce.

Make sure you have a lid for your skillet or wok on hand before you start cooking, as covering the cauliflower allows it to cook quicker and more evenly. And as with any stir-fry, always prep each ingredient ahead of cooking because you won’t have time in between.

Now, The Hubs inadvertently made more sauce than called for. He was using the “ounce” side of the small measuring cup instead of the “tablespoon” side. So he ended up doubling the soy sauces, vinegar, sugar and cornstarch. The vegetable stock remained at 1/4 cup. It ended up being a good mistake, as we tend to prefer our stir-fries on the saucier side anyway.

Kung Pao Cauliflower

  • Servings: 4
  • Difficulty: easy
  • Print

Ingredients

  • 1 Tbsp. dark soy sauce
  • 1 Tbsp. soy sauce
  • 1 Tbsp. black vinegar
  • 1 Tbsp. granulated sugar
  • 1/4 cup vegetable stock or water
  • 1 tsp. cornstarch
  • 3 Tbsp. neutral oil, such as grapeseed or canola
  • 1 head cauliflower (about 2 lbs.), cut into small 2-inch-long florets
  • Kosher salt
  • 1 green or red bell pepper, core, seeds and membrane removed, and cut into 1-inch pieces
  • 1 tsp. Sichuan peppercorns, lightly ground in a mortar and pestle, spice grinder or crushed with a rolling pin
  • 8 whole dried chiles, such as er jing tiao or chiles de árbol
  • 2 cloves garlic, finely chopped
  • 1 piece ginger, (1-inch) peeled and finely sliced
  • 1/3 cup roasted peanuts
  • 2 scallions, white and green parts, finely sliced
  • Steamed rice, to serve

Directions

  1. In a small bowl, whisk together the dark soy sauce, soy sauce, black vinegar, sugar, vegetable stock or water, and cornstarch. Set aside.
  2. Heat wok or large (12-inch) skillet on medium-high until very hot. Add 2 tablespoons of oil, the cauliflower florets and 1/2 teaspoon salt, and toss for 1 minute. Cover and cook for 5 to 6 minutes, tossing the cauliflower every 1 1/2 minutes or so, until the cauliflower is crisp-tender and charred in some parts. Remove from the pan and set aside.
  3. In the same wok or skillet, add the remaining 1 tablespoon of neutral oil, along with the bell pepper. Toss for 1 minute, then add the Sichuan peppercorns and whole dried chiles, and stir for 1 minute until fragrant.
  4. Add the garlic and ginger, and stir for 30 seconds, then add the cauliflower back to the pan. Stir the sauce in the bowl to make sure the cornstarch is well incorporated, then pour it over the cauliflower and toss until the cauliflower is well coated.
  5. Toss in the peanuts and scallions, stir to combine, then turn off heat. Serve with rice.

http://www.lynnandruss.com

Recipe from Hetty McKinnon for The NY Times Cooking

Bacon-Wrapped Roast Lamb with Anchovy and Garlic

So elegant, yet so simple, this roasted leg of lamb is truly company-worthy. It originally calls for a 4-pound roast, but we had a 2 1⁄2 pounder on hand, so we used that—though we did not cut back on the anchovy-garlic-herbs mixture which lends it so much umami goodness. Even if you are not an anchovy fan, you’d never know they were in the dish because their flavor just melds so perfectly with the other ingredients. DON’T leave them out.

And the icing on the cake so to speak? The bacon slices overlap each other across the top of the roast which create a beautiful crusty and golden exterior. And because our lamb was smaller in size, it took less strips of bacon to cover it.

Paired with baked sweet potatoes and roasted Brussels sprouts, all of which cook at the same 425°F temperature as the lamb—just different lengths of time—everything can be done in just one oven at the same time. Dinner done!

Bacon-Wrapped Roast Lamb with Anchovy and Garlic

  • Servings: 8-10
  • Difficulty: easy
  • Print

Ingredients

  • 4 anchovy fillets
  • 2 large cloves garlic, coarsely chopped
  • 2 Tbsp. herbes de Provence
  • 4 Tbsp. olive oil
  • 4 lbs. leg of lamb, rolled and boneless
  • 12 slices bacon
  • Salt and freshly ground pepper

Directions

  1. Heat oven to 425 degrees. Place anchovy fillets, garlic and herbs in food processor, and process until finely chopped. With machine running, add olive oil in a thin stream, and process until mixture forms an oily paste. Transfer paste to a small bowl and set aside.
  2. Dry the lamb well with paper towels and open flat on work surface. Sprinkle inside of lamb with salt and pepper and spread paste evenly over it. Roll lamb up tightly. Arrange bacon in overlapping slices on top of lamb, and tie roast as snugly as possible with butcher’s twine.
  3. Heat an oven-proof, 10-12 inch wide skillet over high heat 5 minutes. Sear lamb, bacon side down, until brown, about 4 minutes. Turn lamb with tongs and continue searing until all sides are browned, about 12 minutes total.
  4. Transfer skillet to oven and roast until lamb registers 130 degrees on instant-read meat thermometer, about 40 to 45 minutes. Remove lamb from oven and let rest, covered loosely with foil, at least 10 minutes before slicing.
  5. Make a pan sauce if desired.

http://www.lynnandruss.com

Recipe from NY Times Cooking