I have been an artist and designer all my life incorporating graphic design for websites, gardens, publications, fabrics, interior design and cooking. I am now retired from my professional job, but still create artistic visions in all forms on a daily basis.
View all posts by LynnHoll →
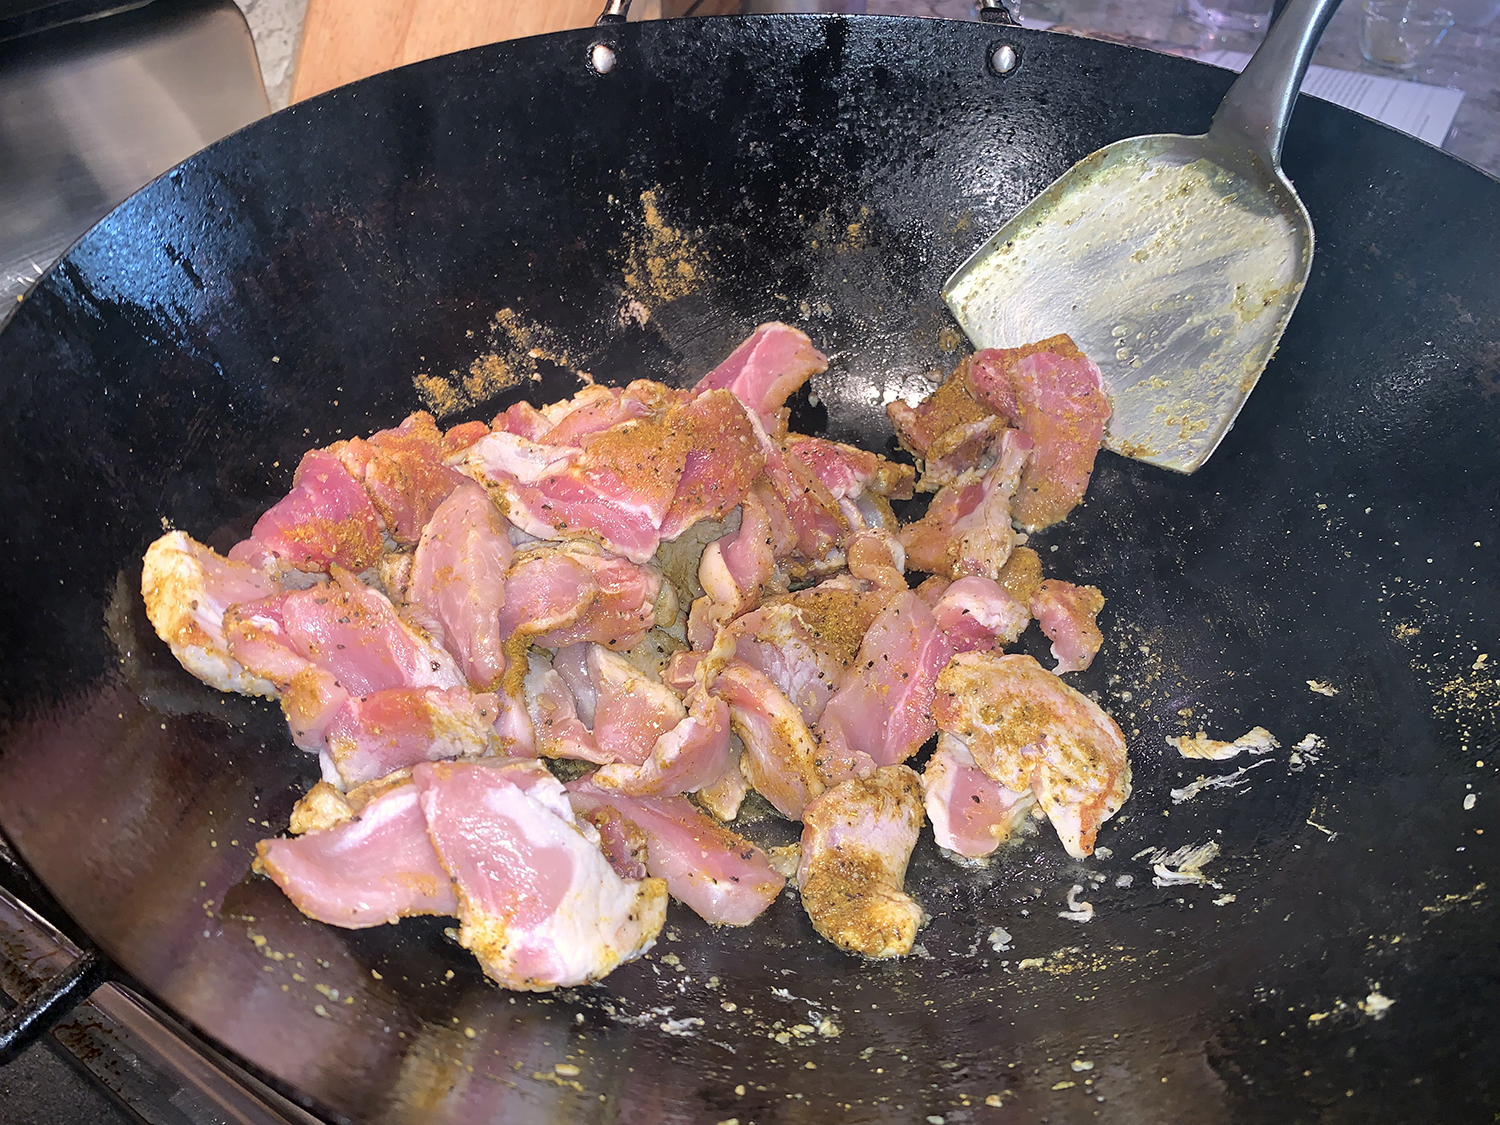
Identity crisis? This quick meat and vegetable curry starts as a stir-fry then finishes as a braise—but a quick braise. Usually pork shoulder takes hours to braise in the oven, but since the meat is cut into thin strips, the time dwindles considerably. Boneless pork shoulder has a rich, full flavor; plus slicing it thin before cooking counters its chewiness.
Green beans cook alongside, absorbing the spiced broth and providing a fresh, vegetal contrast. Curry powder is used as a flavor base, and whole spices amp up the intensity. Just remember to remove the cardamom pods before serving (if you can see them). The Hubs got quite a jolt when he accidentally bit into one!
In some cases you have choices on which spice to use. We incorporated as much of them as possible, i.e. both onion and garlic. And in the case of the noodles, you can always substitute steamed rice instead.
1 lb. boneless pork shoulder, trimmed, cut into 2-inch strips and sliced ¼ to ⅛ inch thick
2 tsp. curry powder
Kosher salt and ground black pepper
1 medium yellow onion, finely chopped OR 8 medium garlic cloves, chopped OR both
1 Tbsp. minced fresh ginger
3 cardamom pods, crushed OR 1 cinnamon stick OR 8 curry leaves OR a combination
8 oz. green beans, trimmed and halved on the diagonal
1 1⁄2 cups water
Rice OR cellophane noodles, cooked according to package directions
Directions
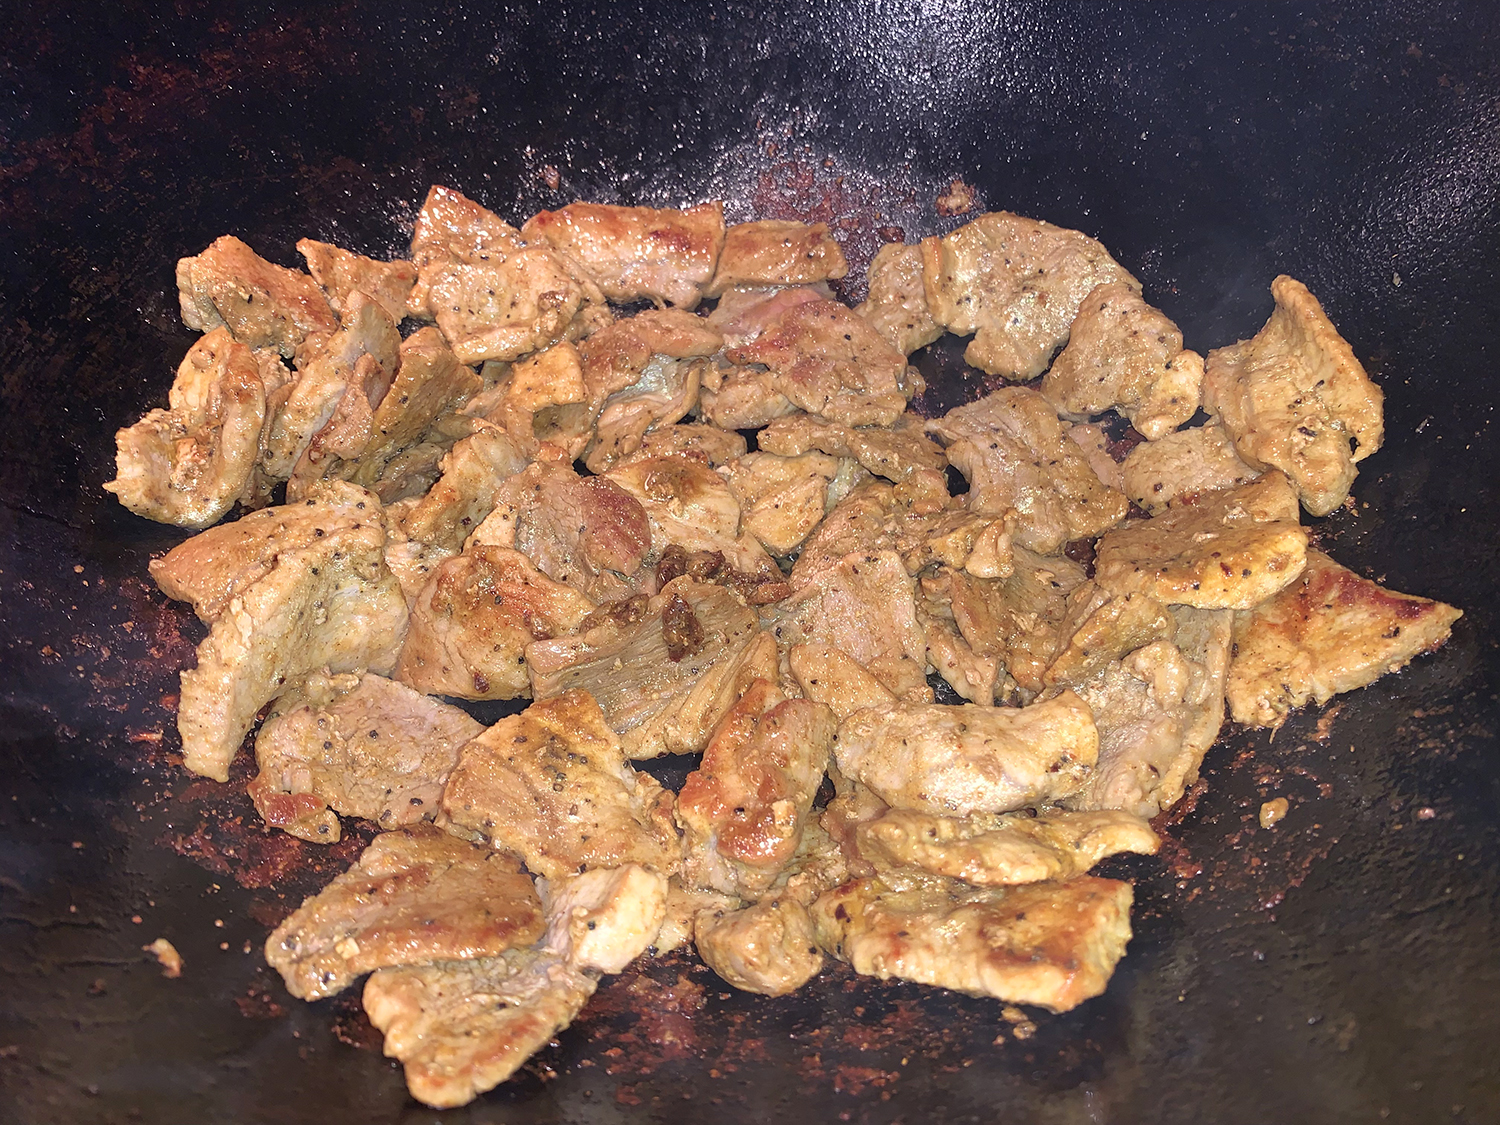
In a 12-inch skillet over medium-high, heat the oil until barely smoking. Add the pork, curry powder, 1½ teaspoons salt and ½ teaspoon pepper. Cook, stirring once or twice, until the pork is well browned, about 4 minutes.
Add the onion, ginger and cardamom; cook, stirring, until the onion is browned, about 2 minutes.
Add the beans and 1½ cups water; bring to a simmer, scraping up any browned bits. Cover partially and cook, stirring occasionally, until the beans are tender and the sauce clings to the meat, about 15 minutes.
Meanwhile, prepare your rice or cellophane noodles according to package directions.
Remove and discard the cardamom from the sir-fry, then taste and season with salt and pepper.
Optional garnish: Chopped fresh cilantro OR toasted sesame seeds OR chopped chilies OR a combination
Mushrooms are widely known for their great taste and amazing health benefits. Packed with a ton of essential vitamins and minerals, they make for an excellent addition to your diet, adding flavor to many different recipes. Thank goodness we love them!
This hearty plant-based mushroom ragù consists of readily available fresh mushrooms and is ready in about an hour. Three types of the funghi are incorporated in this recipe, but feel free to use just one or two types to make the sauce even easier. Serve vegan ragù over polenta, pasta, couscous, or even as a topping for steak or chicken.
Classic or vegan mushroom ragù will keep in the refrigerator for up to 5 days in an airtight container; in the freezer for up to 6 months. To reheat, spoon the ragù sauce into a pot over medium heat until warmed through. If it has become too thick, add a little more liquid (water or vegetable broth) to loosen it a little.
Make it even a bit healthier by using a whole wheat pasta. Of course if you add grated cheese like we did, it is no longer vegan, but we were OK with that.
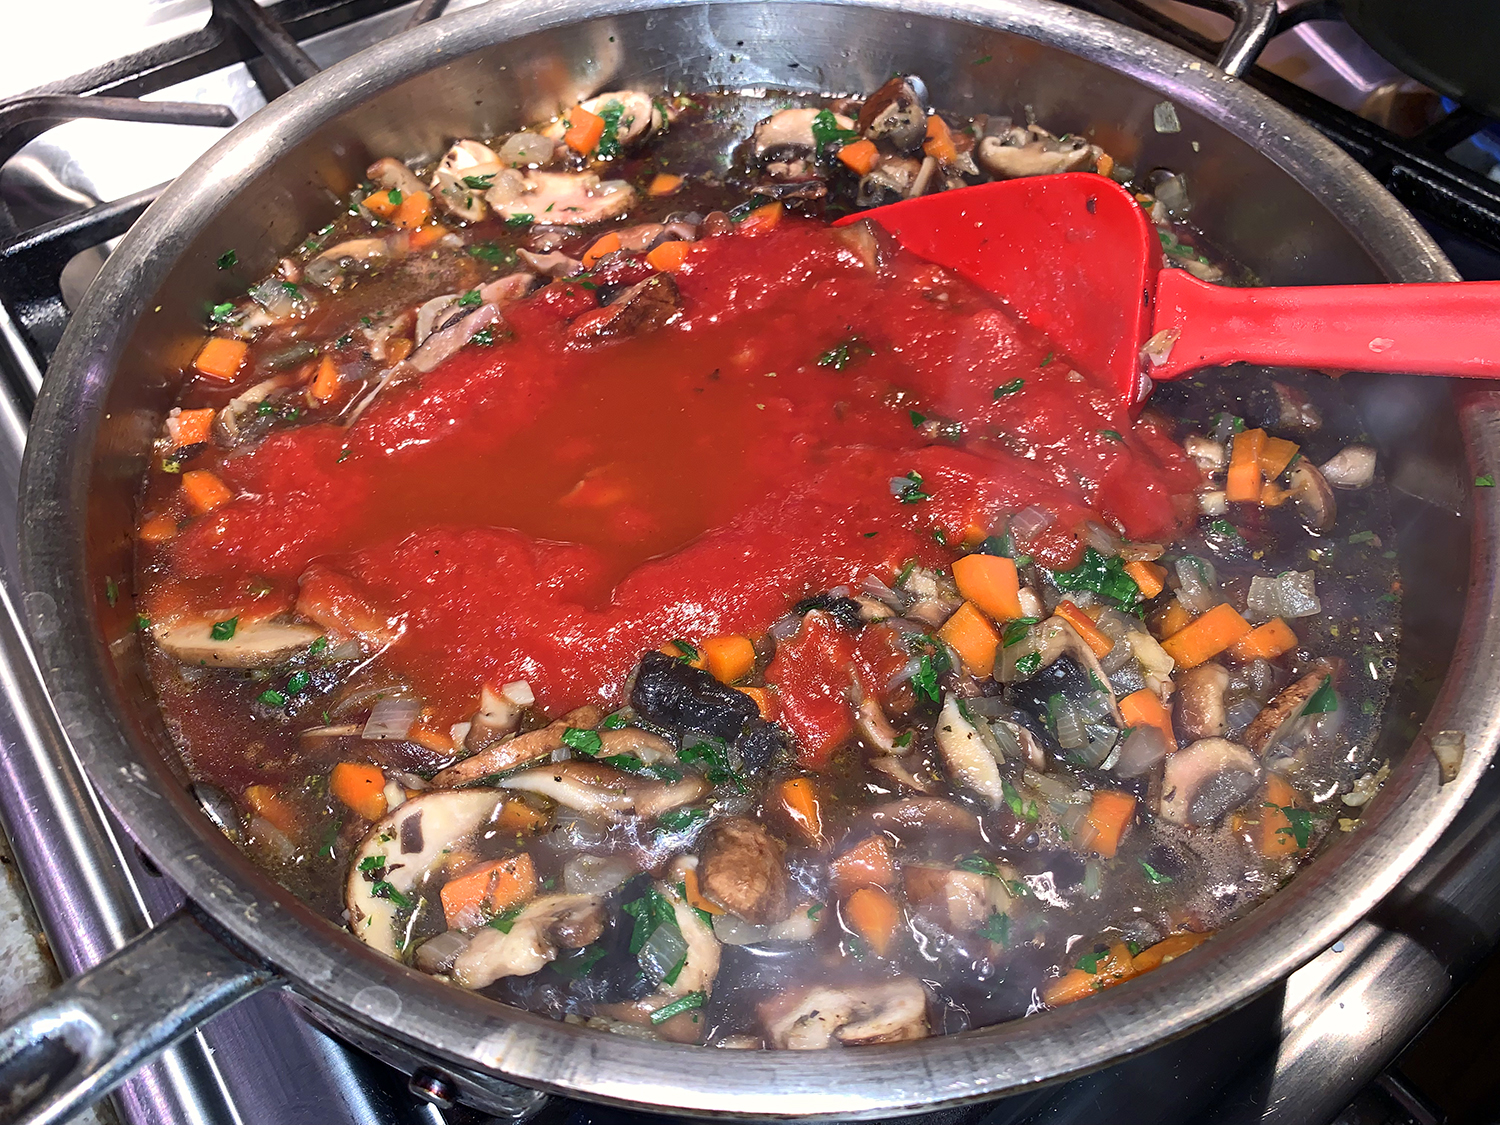
In a large pot, heat 3 tablespoons extra virgin olive oil over medium-high heat until shimmering but not smoking. Add the onions, carrots, and garlic. Season with a big pinch of kosher salt. Cook, stirring occasionally, until the vegetables have softened, about 5 minutes.
Add the mushrooms and season with another dash of salt. Add a drizzle more of olive oil and a little bit of the broth. Cook the mushrooms for about 5 minutes until they begin to soften and cook down a little bit.
Add the thyme, oregano, parsley, and a good dash of black pepper. Stir.
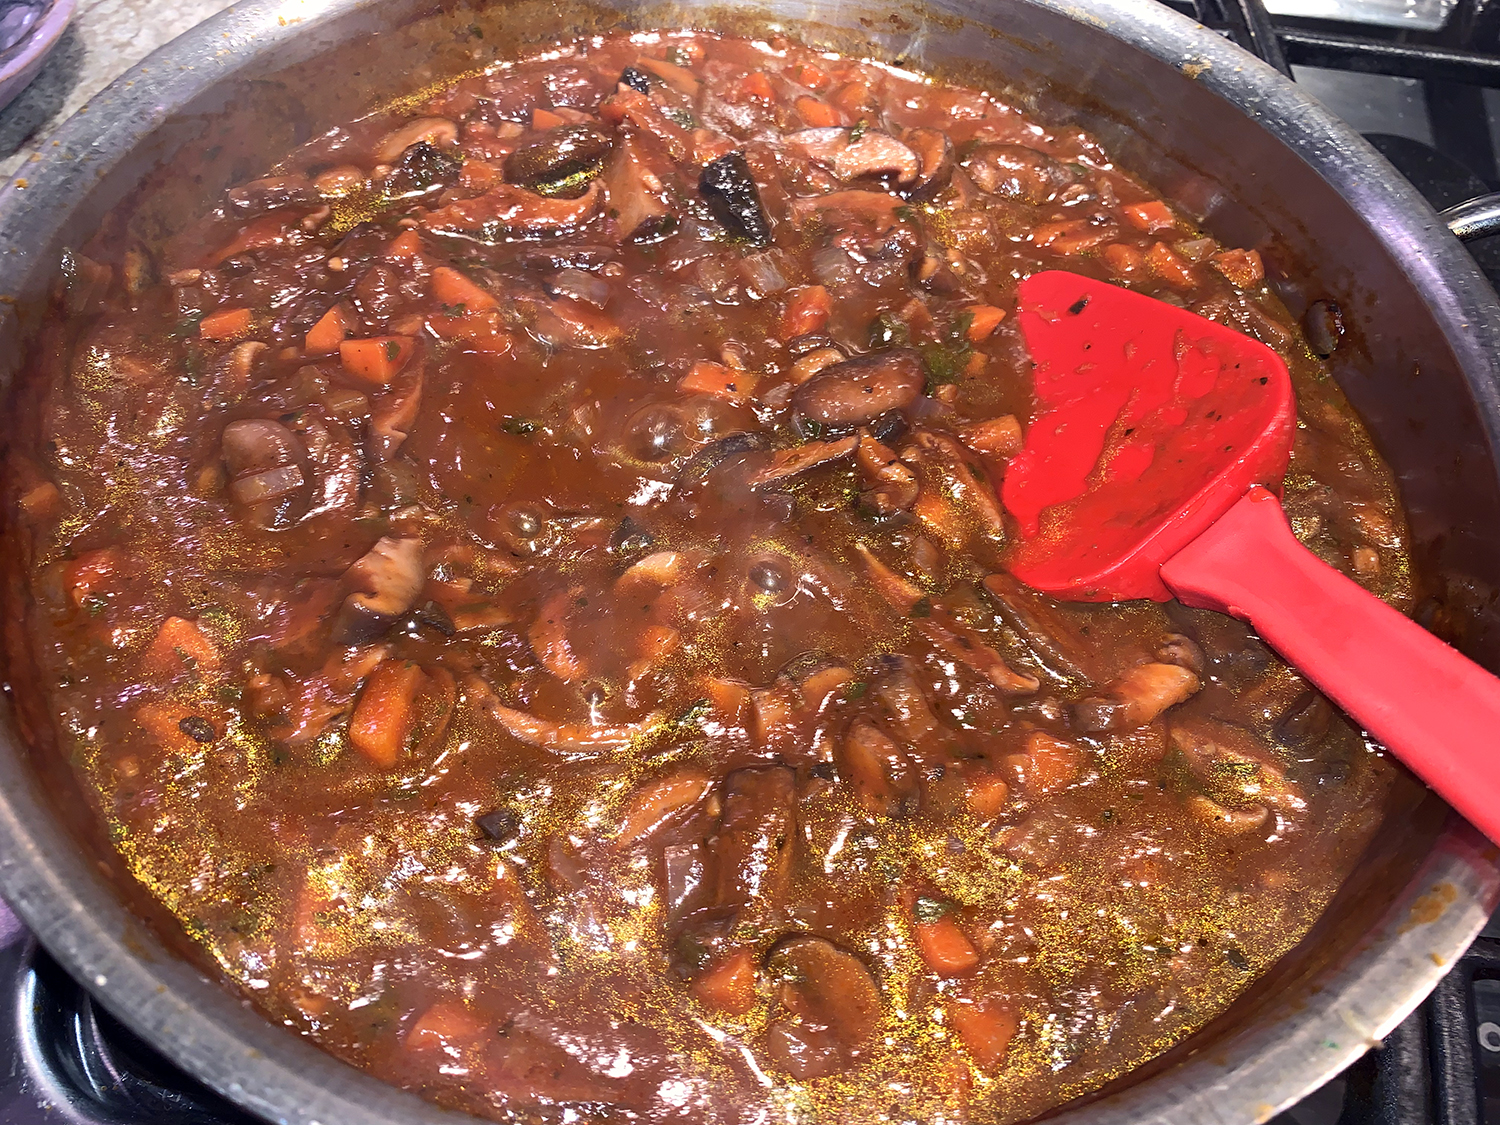
Finally, add the red wine, tomato sauce, and the remainder of the broth. Bring to a boil for 5 minutes, then reduce the heat to low and cover. Cook for 20 minutes or so covered, then uncover and allow the mushrooms to cook some more (about 15 to 20 minutes) until the mixture thickens to a ragù.
To finish, taste and adjust salt to your liking. Stir in a bit more fresh parsley. If you like, add in the chopped hazelnuts (optional).
Serve with your favorite pasta, polenta, or even pearl couscous
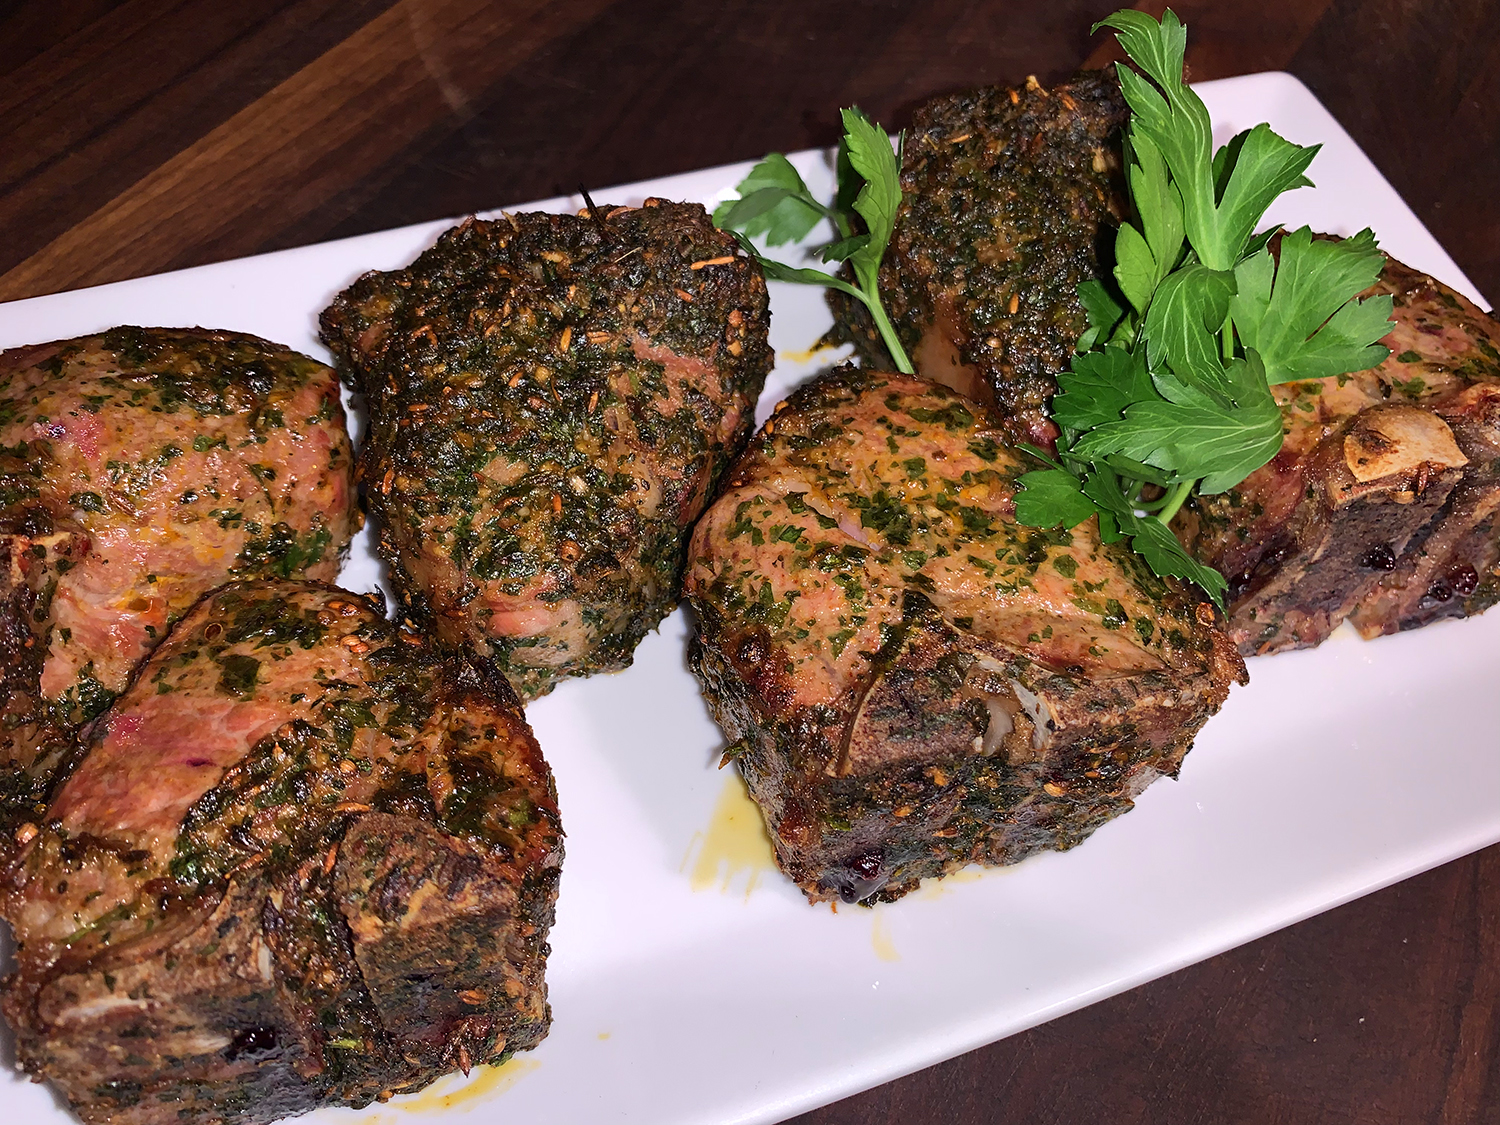
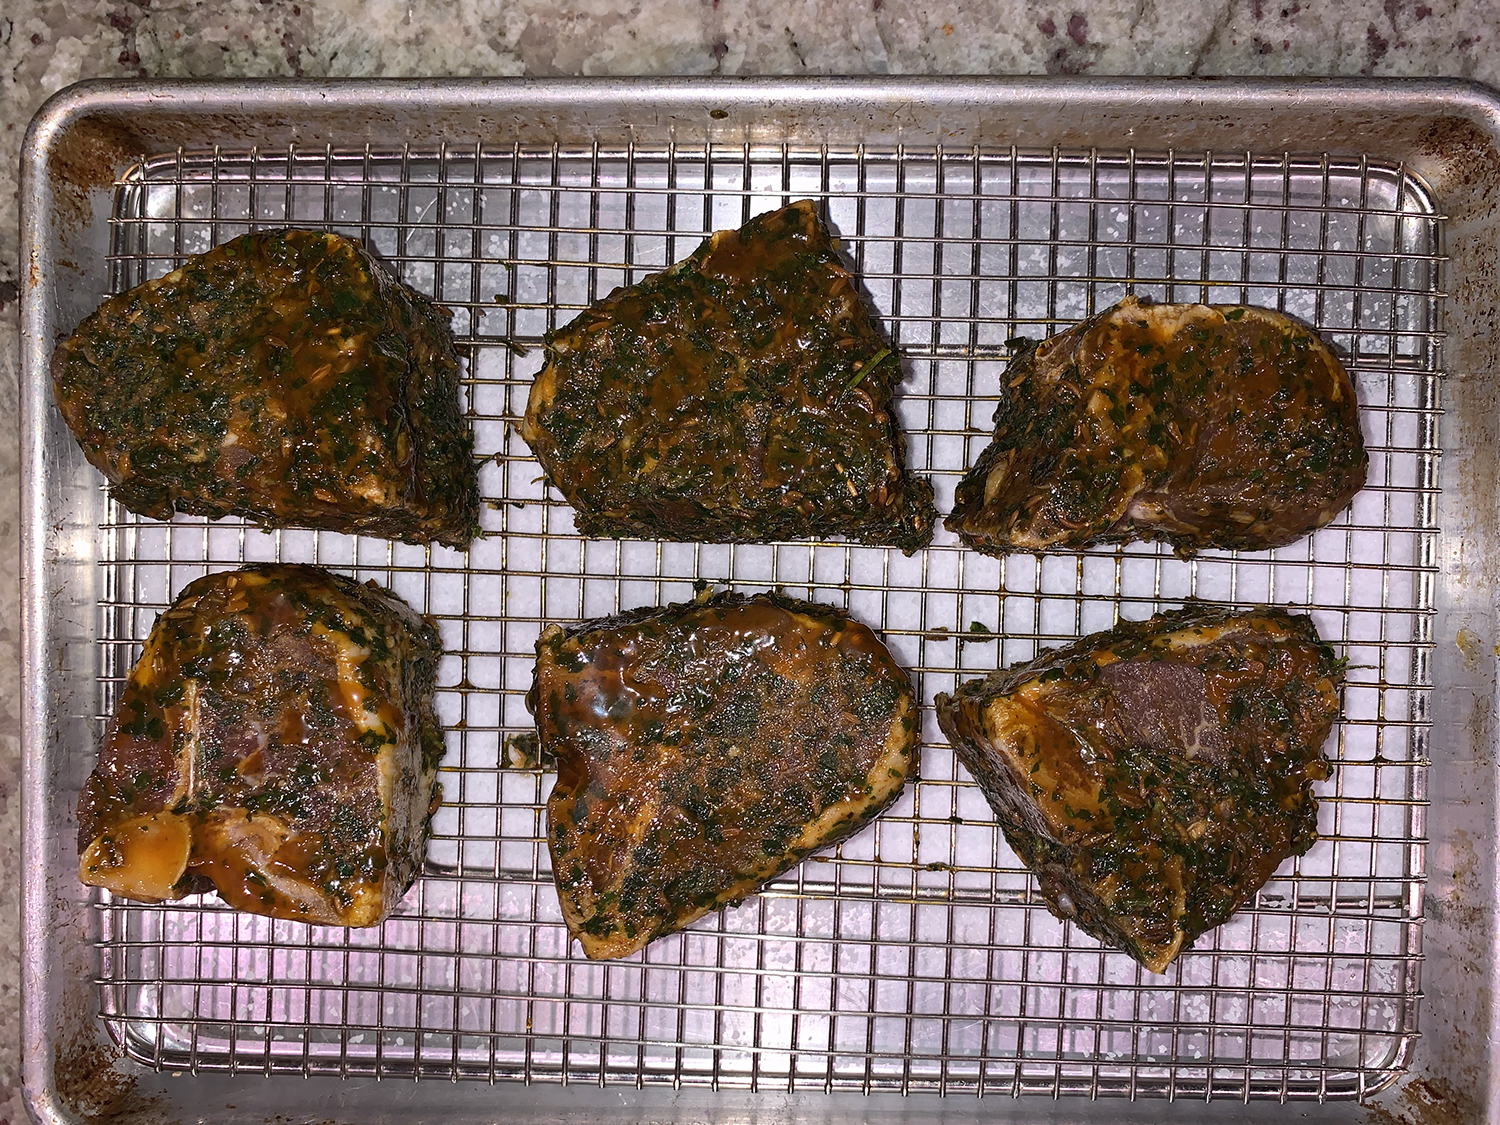
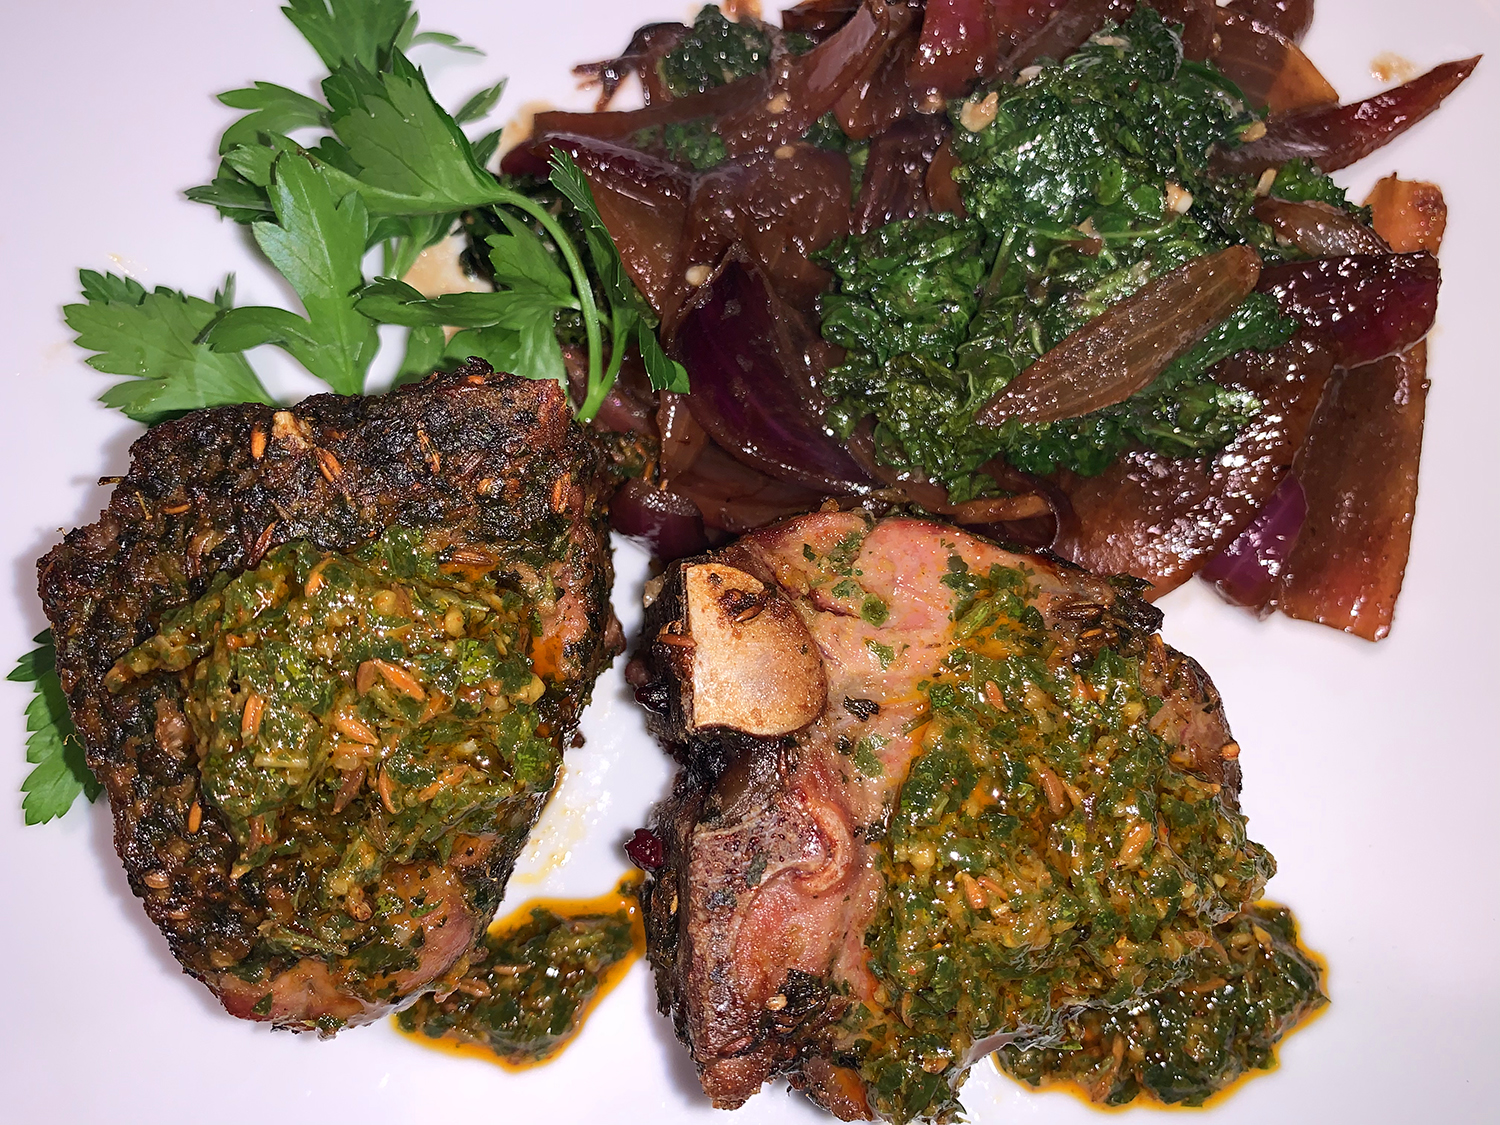
Charmoula may be best described as Middle Eastern pesto. Chef-author Molly Stevens version is packed with fresh herbs like parsley, mint and cilantro and enhanced with smoky paprika, toasted cumin, and plenty of garlic. Some of it is used to marinate the lamb, and the remainder is served at the table as a finishing sauce.
While the lamb chops cook in a high heated oven for only 11 minutes, they need to marinate in the charmoula for at least 4 hours (up to 24 hours) and sit at room temperature for an hour before roasting.
This recipe paired the lamb with asparagus and shallot, however we had kale and red onions on hand and therefore opted to make a roasted side dish out of them instead.
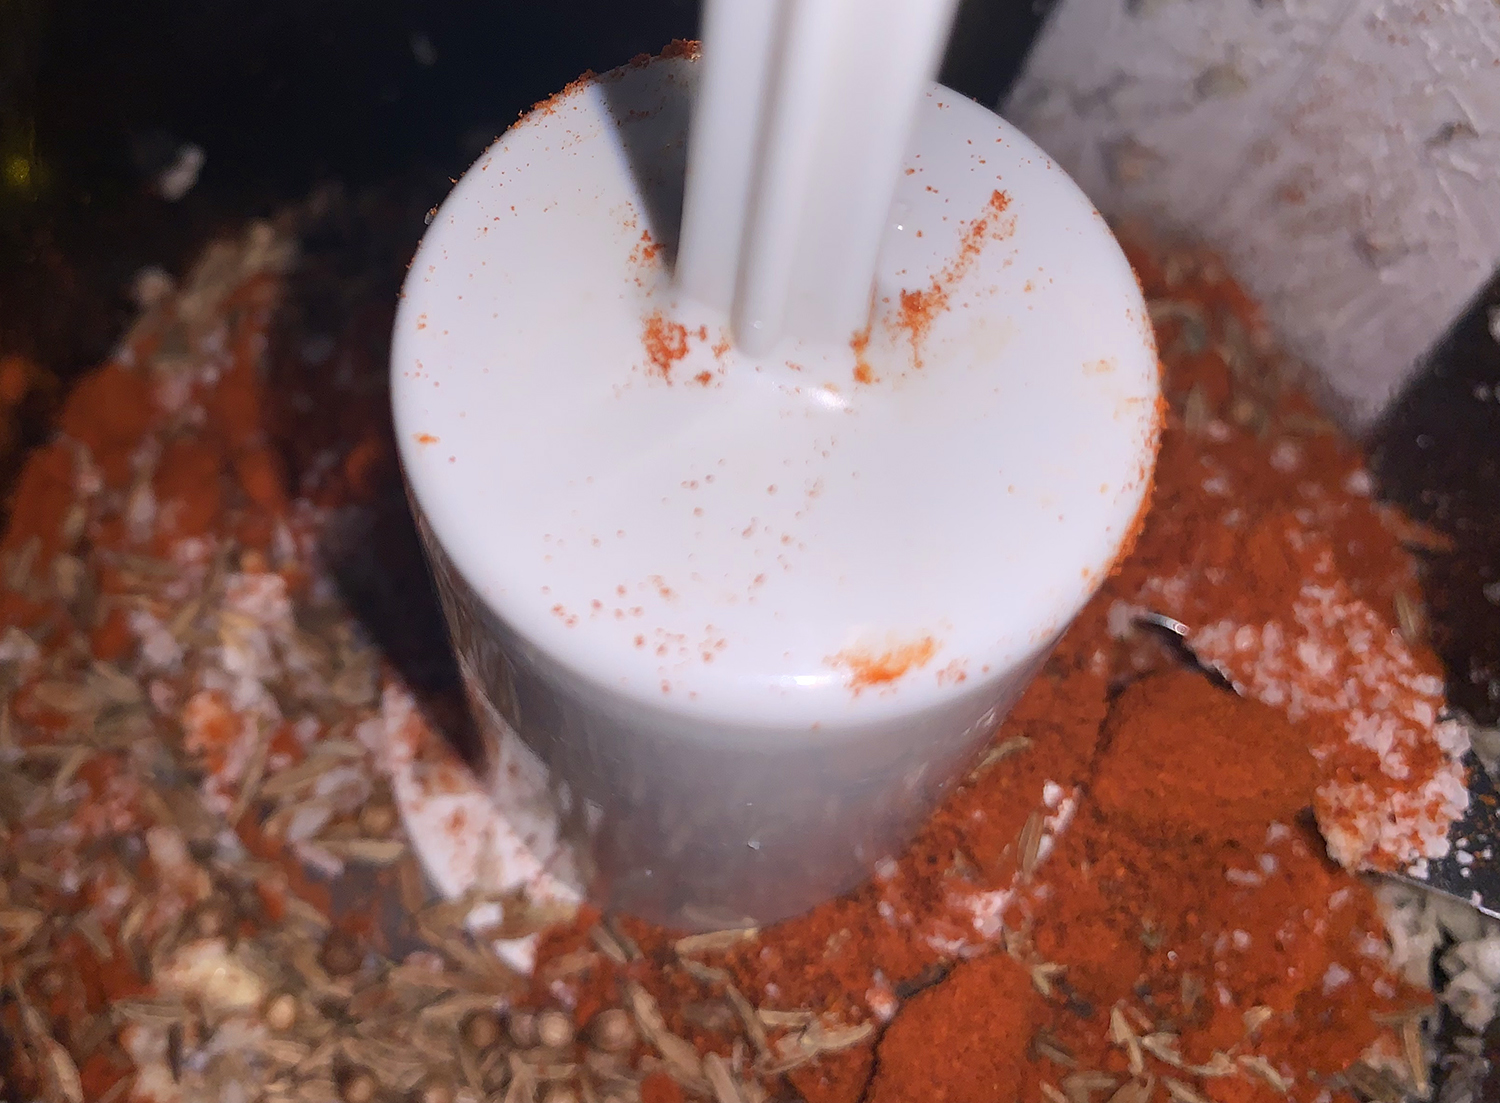
Heat small skillet over medium heat. Add cumin seeds and toast until aromatic and slightly darker, stirring occasionally, about 2 minutes. Transfer to processor.
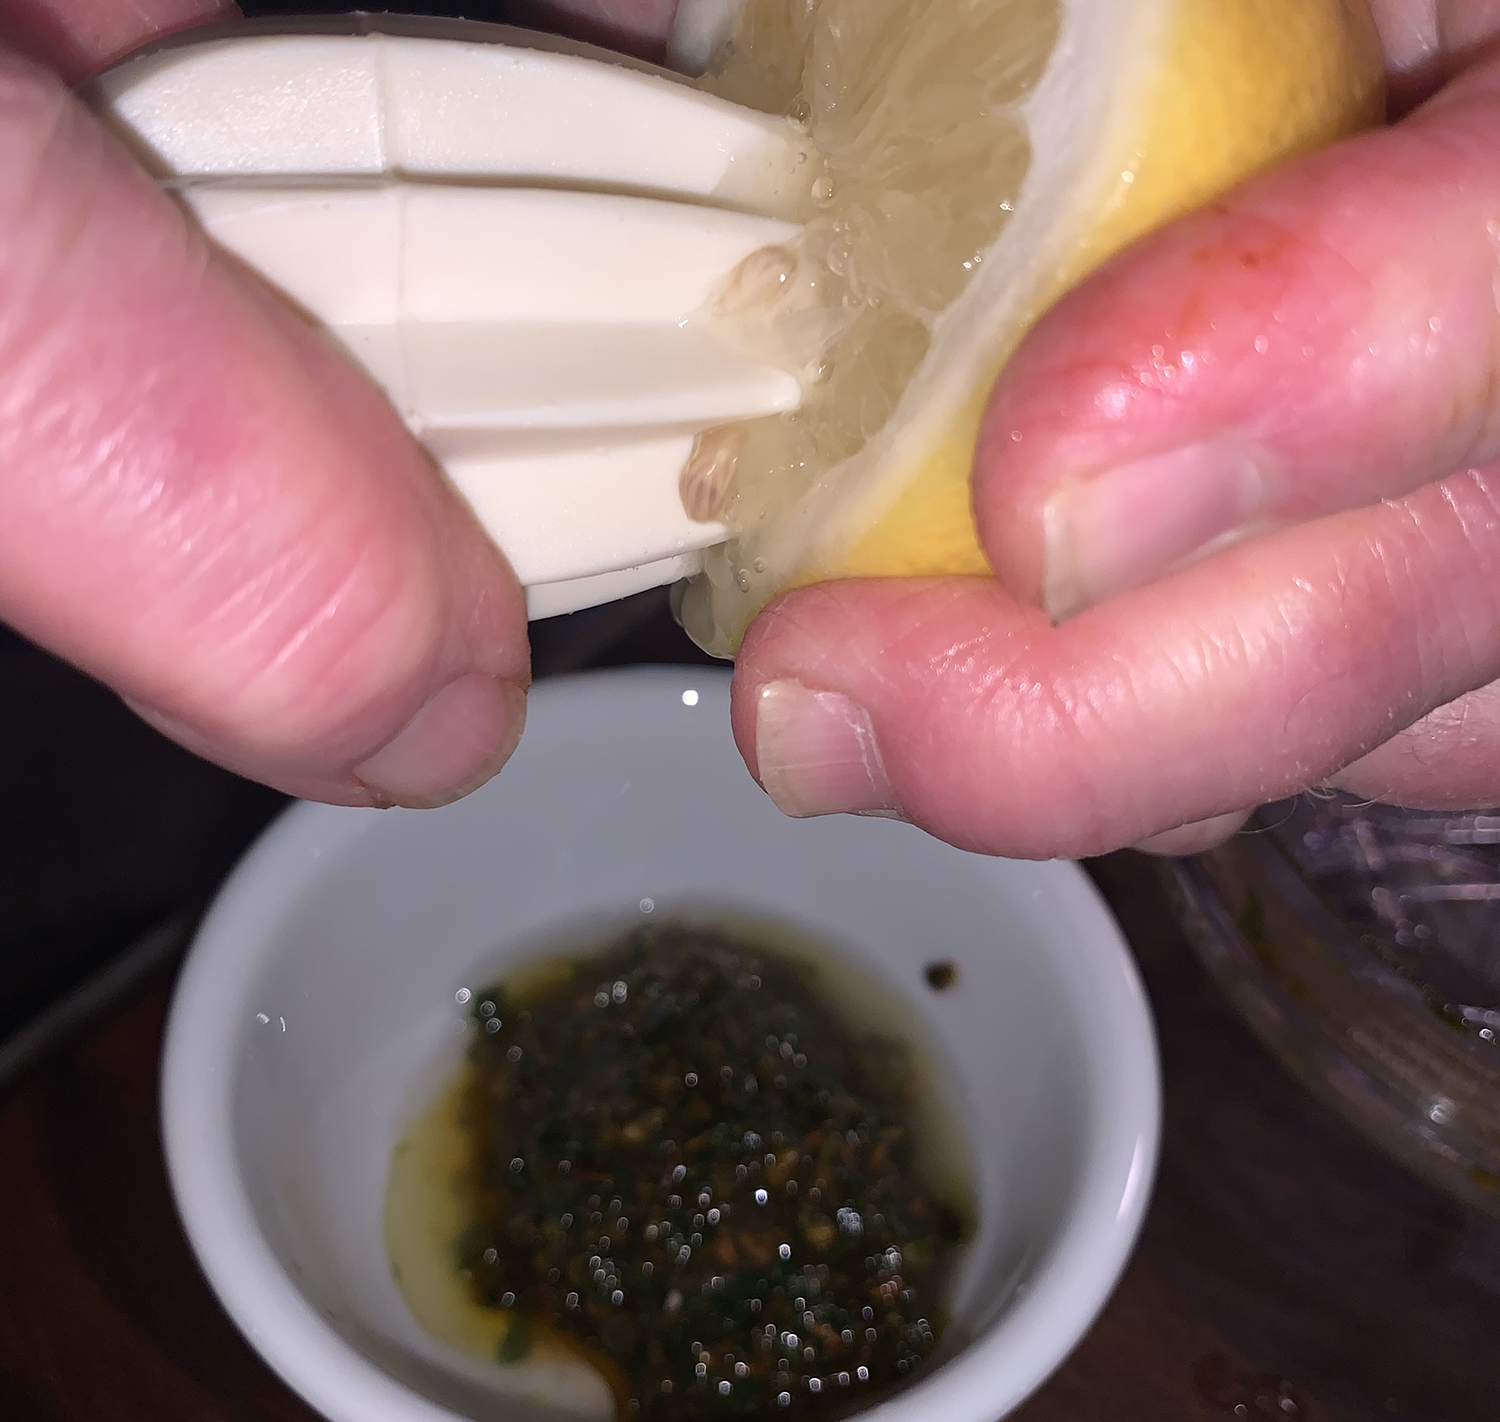
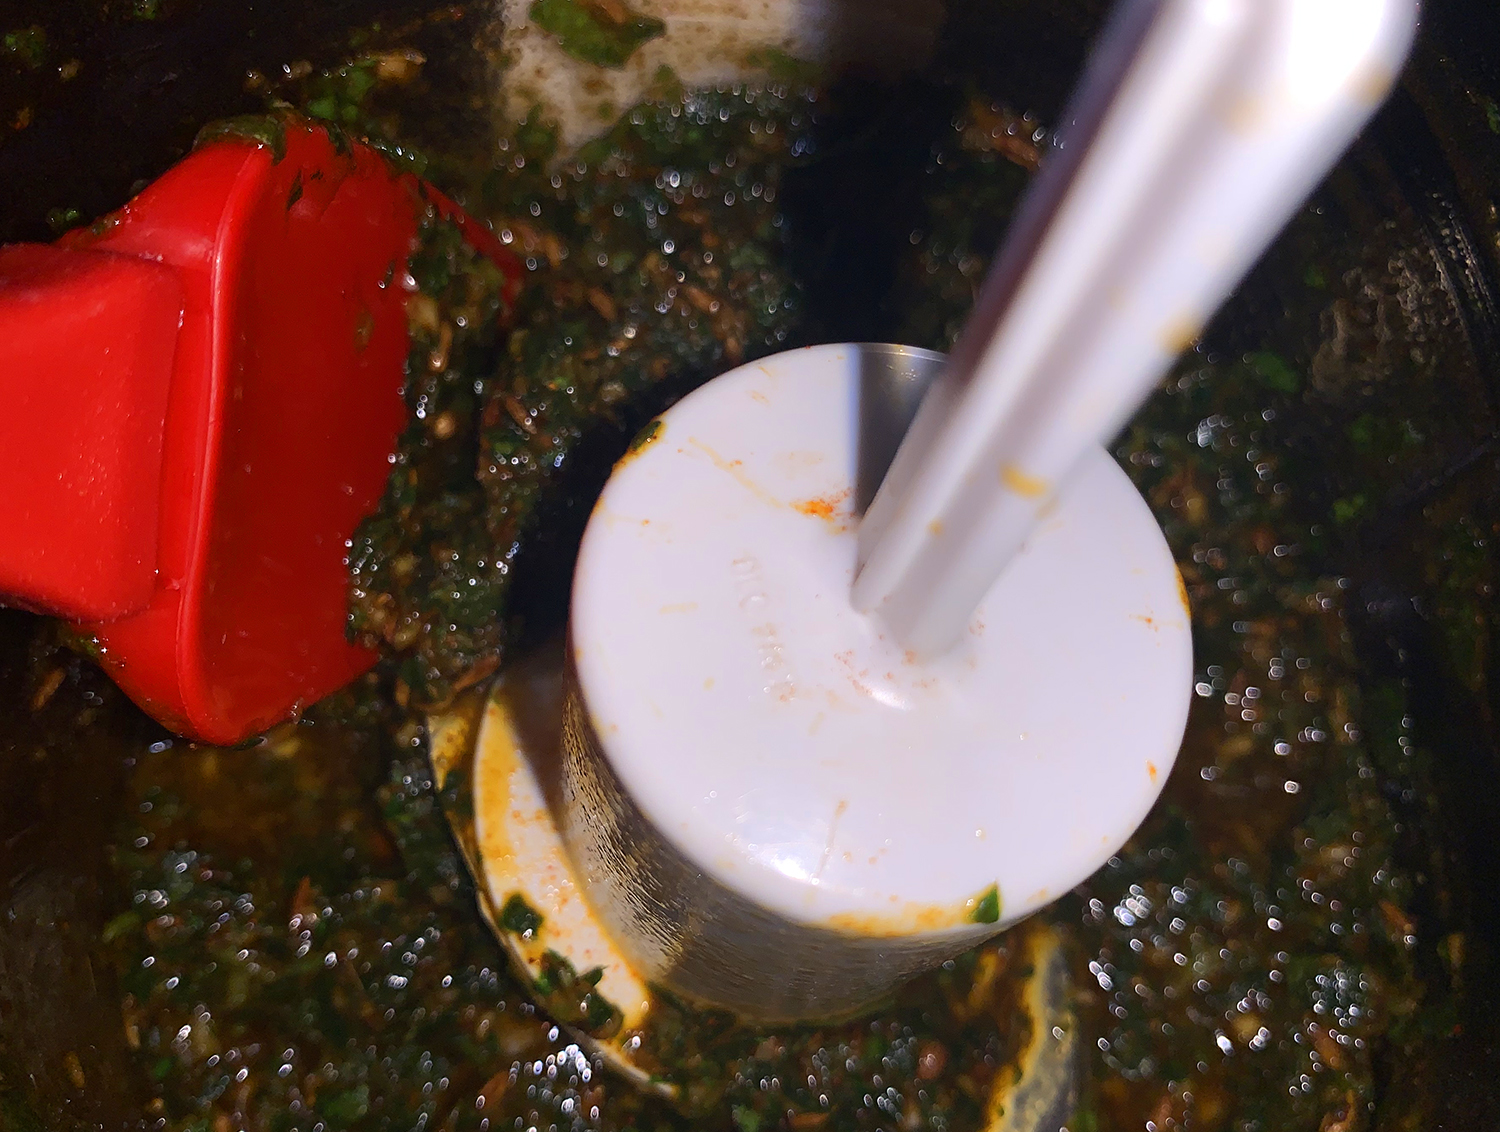
Add parsley leaves and next 6 ingredients to processor. Using on/off turns, process until coarse paste forms. With machine running, gradually add 4 tablespoons oil.
Transfer 2 tablespoons charmoula to small bowl; whisk in lemon juice and remaining 2 tablespoons oil.
Cover and chill to serve with lamb.
FOR LAMB
Transfer remaining charmoula to large resealable plastic bag. Add lamb chops; seal bag and turn to coat well. Chill at least 4 hours and up to 24 hours.
Let lamb and charmoula sauce in bowl stand at room temperature 1 hour.
Preheat oven to 500°F. Line rimmed baking sheet with foil. Place rack on prepared baking sheet. Place lamb on rack and sprinkle with salt and pepper. Roast until thermometer inserted into center registers 130°F for medium-rare, about 13 minutes. Transfer lamb to platter. Tent with foil and let rest 5 minutes.
Place 2 lamb chops on each of 4 plates. Drizzle lamb with charmoula sauce, passing remaining sauce alongside.
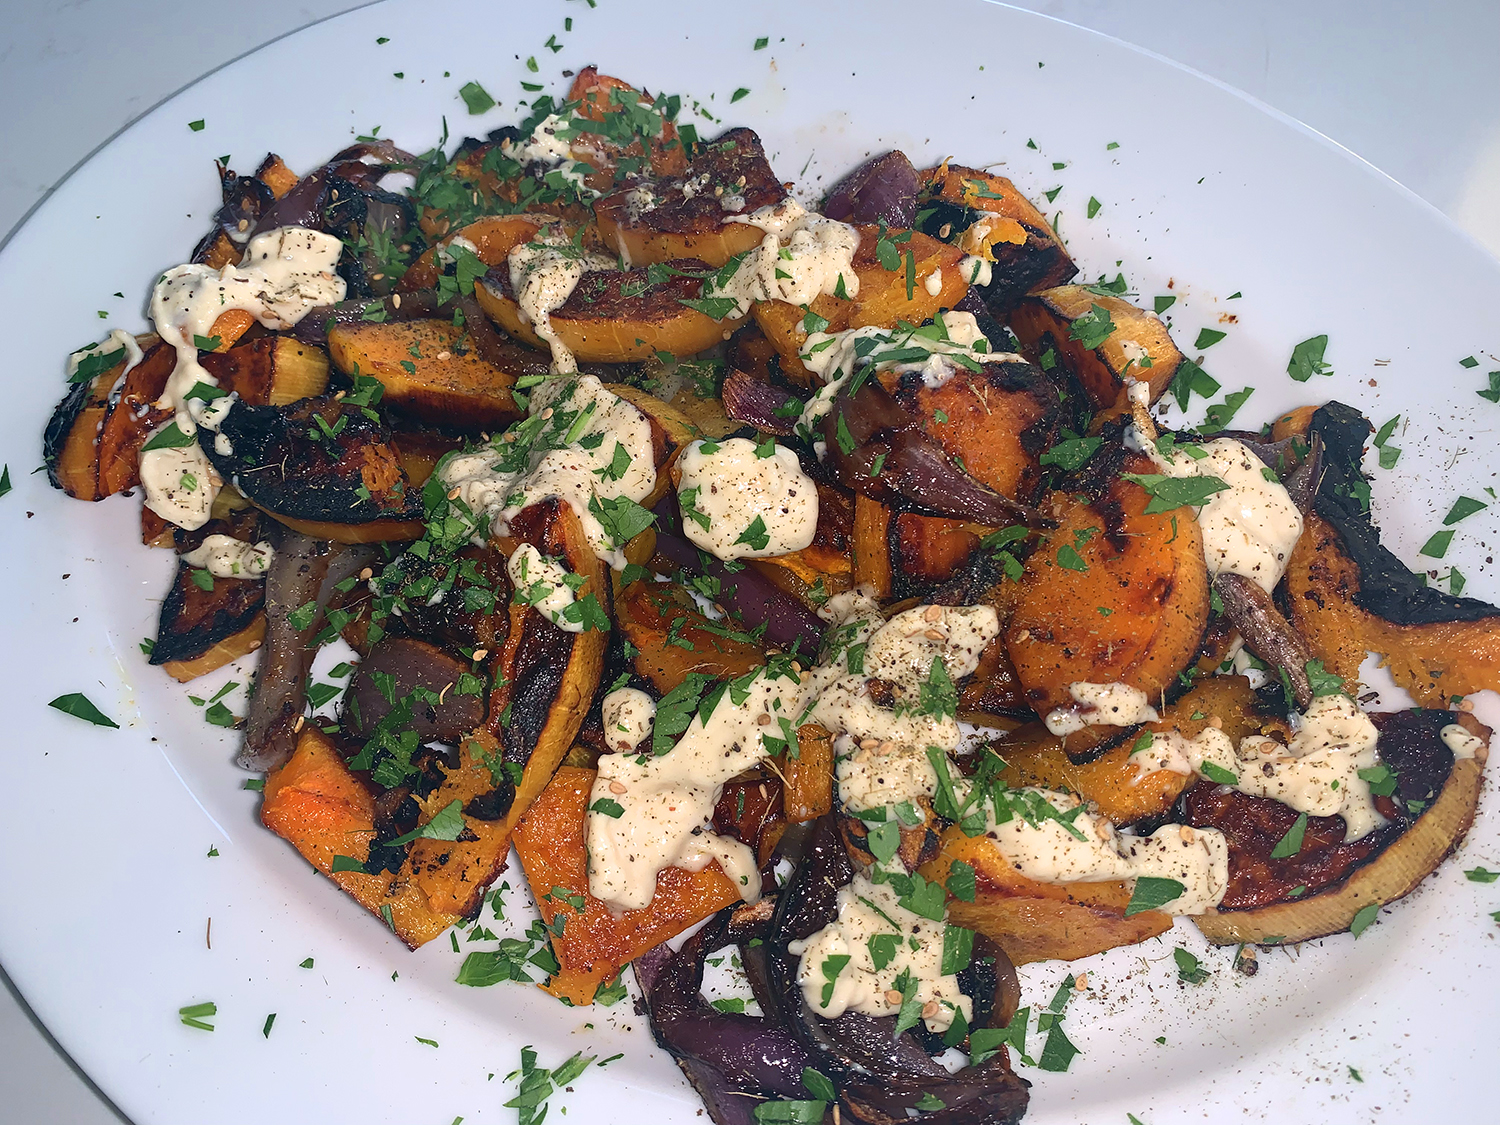
This may be a new cool weather side dish favorite. A recipe from Milk Street, it combines roasted butternut squash and red onion, then finishes them with a tahini-lemon-garlic sauce and a dusting of za’atar—a Middle Eastern herb, spice and seed blend.
Before roasting, the squash and onion are tossed with olive oil and honey to encourage browning. After sprinkling on the za’atar, you scatter on chopped parsley or basil chiffonade for color and fresh, herbal notes.
Don’t worry if the pieces of squash are in different shapes; this is unavoidable. But when cutting the squash quarters crosswise, be sure they’re no thicker than ¾ inch and that the chunks don’t measure larger than 1½ inches in any dimension or they’ll take too long to roast.
We had less than half a red onion on hand, so we threw in a small shallot to help compensate. But the onion was so good roasted, that I want to make sure to have a large whole one when we make it again.
1 medium red onion, root end intact, cut into 1-inch wedges
2 Tbsp. tahini
4 tsp. lemon juice
1 medium garlic clove, finely grated
1 tsp. za’atar
¼ cup lightly packed fresh flat-leaf parsley, roughly chopped, or lightly packed fresh basil, cut into thin ribbons
Directions
Heat the oven to 475°F with a rack in the lower-middle position. In a large bowl, whisk together 2 tablespoons oil, the honey and ½ teaspoon salt. Add the squash and onion, then use your hands to rub the mixture over the vegetables until well coated.
Distribute in an even layer on a rimmed baking sheet and roast for 15 minutes. Using a wide metal spatula, flip the vegetables, then roast until nicely browned and a skewer inserted into the squash meets no resistance, 12 to 15 minutes.
Meanwhile, in a small bowl, whisk together the remaining 1 teaspoon oil, the tahini, lemon juice, garlic, ¼ teaspoon salt and 1 teaspoon water; the mixture should have the consistency of thin yogurt (if too thick, whisk in additional water 1 teaspoon at a time to thin). Set aside.
When the vegetables are done, transfer them to a serving platter. Drizzle with the tahini-lemon mixture, then sprinkle with the za’atar and parsley.
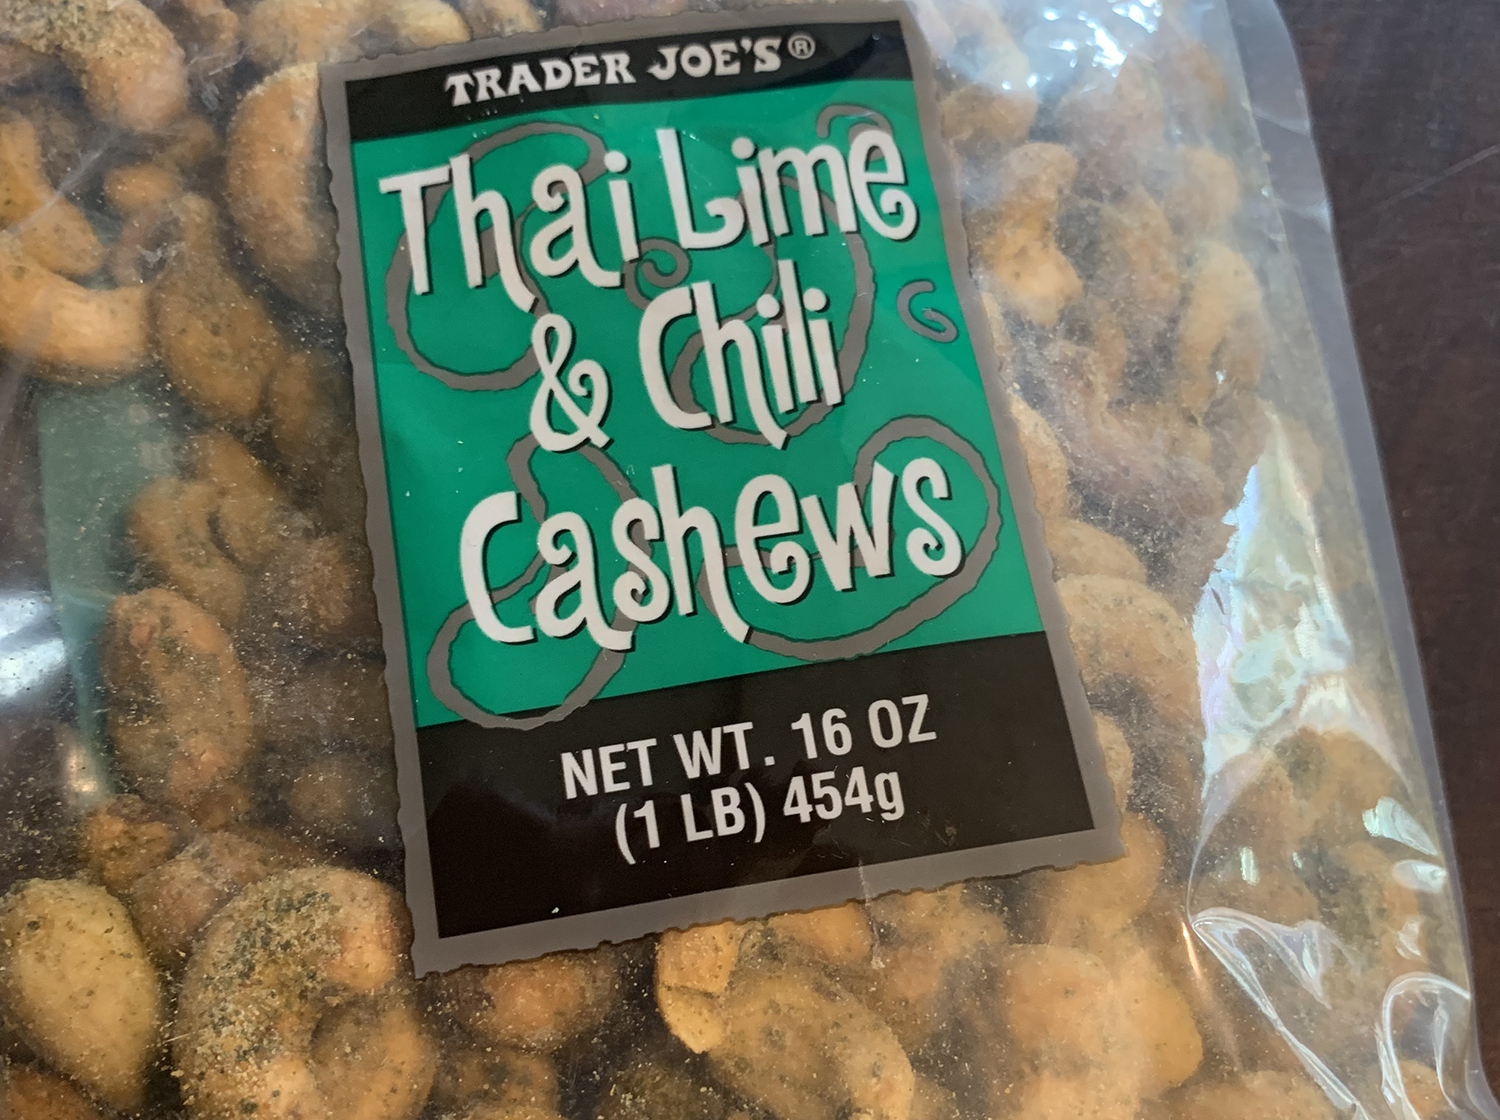
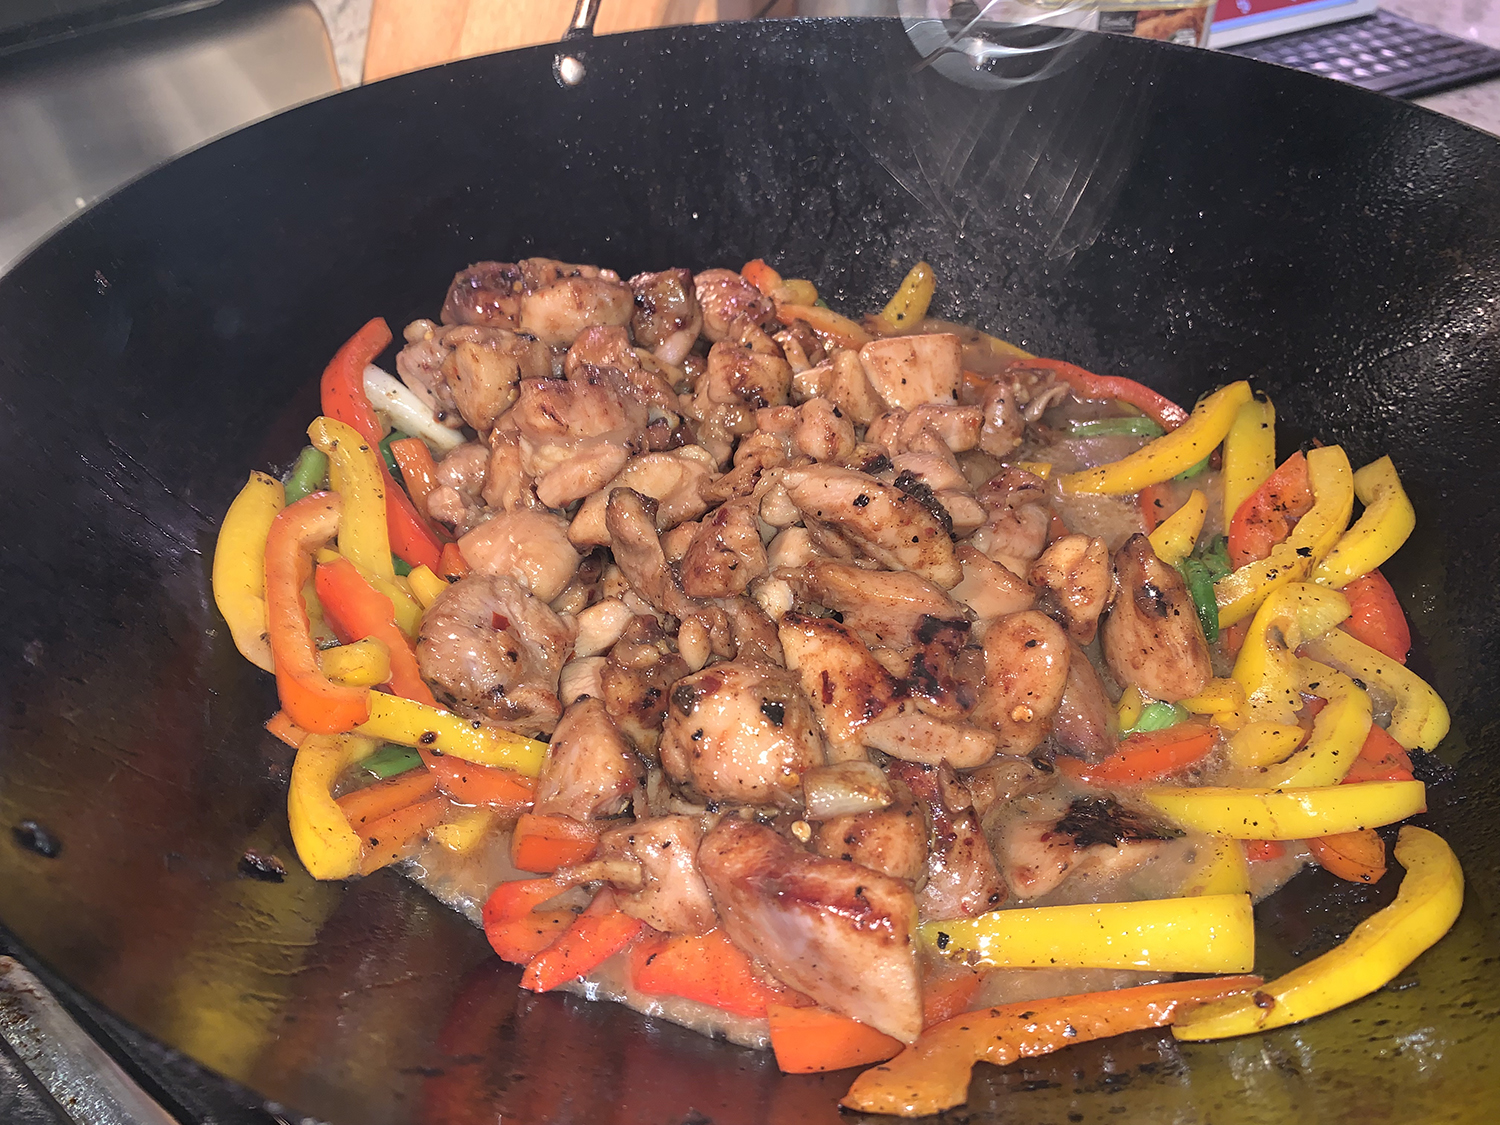
Thai stir-fries are one of our favorite go-to’s; and this recipe rachetes it up a notch with the addition of Thai cashews (find them at Trader Joe’s). And if you like bold flavors, then this will end up on your short list.
Originally from Milk Street, we scaled back on the chicken by 25%, but increased the bell pepper quotient by 100%, adding a yellow one along with the red pepper, making it more veggie-forward. Another change was doubling the sauce (except for the garlic). These alterations are noted in the recipe below.
And while you could pair it simply with steamed jasmine rice, you might want to try the Coconut Rice recipe below for even more depth of flavor.
I have to give a shout-out to these fabulous Trader Joe’s Thai cashews. Not only are they a fabulous snack right out of the bag, but they’re perfect for this dish. If you can get your hands on them, by all means do so.
NOTE: Don’t discard the marinade after draining the chicken. It’s mixed with ¼ cup water and becomes a sauce that lightly coats the chicken and vegetables.
1 1⁄2 lbs. boneless, skinless chicken thighs, trimmed and cut into 1-inch pieces
2 Tbsp. peanut oil
1 red bell pepper, stemmed, seeded and sliced into thin strips
1 yellow bell pepper, stemmed, seeded and sliced into thin strips
1 bunch scallions, cut into 1-inch lengths; save some of the dark green cut into smaller pieces for garnish
1/2 cup roasted Thai cashews, roughly chopped
Directions
Start coconut rice, directions below.
For the Stir-fry: In a medium bowl, whisk together the garlic, fish sauce, soy sauce, sugar, cornstarch, pepper flakes and 3/4 teaspoon white pepper. Stir in the chicken, then marinate at room temperature for 15 minutes.
Drain the chicken in a fine mesh strainer set over a medium bowl, pressing the chicken to remove excess marinade. Stir 1/2 cup water into the marinade and set aside.
In a 12-inch skillet or wok over medium-high, heat the oil until barely smoking. Add the chicken in an even layer, then cook, stirring occasionally, until golden brown, 8 to 10 minutes. Remove chicken to a plate.
Heat a bit more oil in the wok, stir in the bell peppers and scallions. Stir-fry for several minutes until just starting to brown. Add chicken back to the veggies.
Stir the marinade mixture to recombine, add to the pan and bring to a simmer, scraping up any browned bits. Toss in the cashew pieces, cook, stirring often, until the liquid thickens and clings to the chicken, about 2 minutes.
Taste and season with white pepper. Spoon over cooked coconut rice and garnish with scallion greens.
Place jasmine rice in a fine mesh sieve and rinse under cold water until water runs clean. Drain well, it works best to tap base of sieve with your hand or against the sink.
Heat coconut milk and coconut water in a medium non-stick saucepan set over medium-high heat. Bring to a boil, season with salt, sugar, lime zest strips add rice and bring to a simmer.
Reduce heat to low, cover and simmer until liquid has been absorbed (you may find there’s a few small pools of liquid at the top and that’s fine), about 20 minutes.
Uncover over low heat for 5 minutes. Fluff with a fork and serve warm.
This version of bolognese is half lamb and half ground beef, a mixture you’ll see a lot in northern Italy, and because the lamb is lean, this is a somewhat lighter sauce than all-beef or pork-based ragu.
The sauce needs a good long simmer, but it makes enough that you’ll likely get two meals. Giada claims the pasta shouldn’t be swimming in sauce; you only want it to stain the pasta, but we are “saucy” people and like to pile on a fair amount.
One of the ingredients is Calabrian chili paste, but a good substitute is Sriracha, and that’s what we used.
1 can whole San Marzano tomatoes, (28 ounce) crushed by hand
1 bay leaf
1 piece parmesan rind, (3 inch)
1 cup freshly grated parmesan cheese
1 lb. fusilli, cooked to package instructions; or polenta
Directions
Heat a medium dutch oven over medium heat. Add the butter and 2 tablespoons olive oil and warm until the butter is melted.
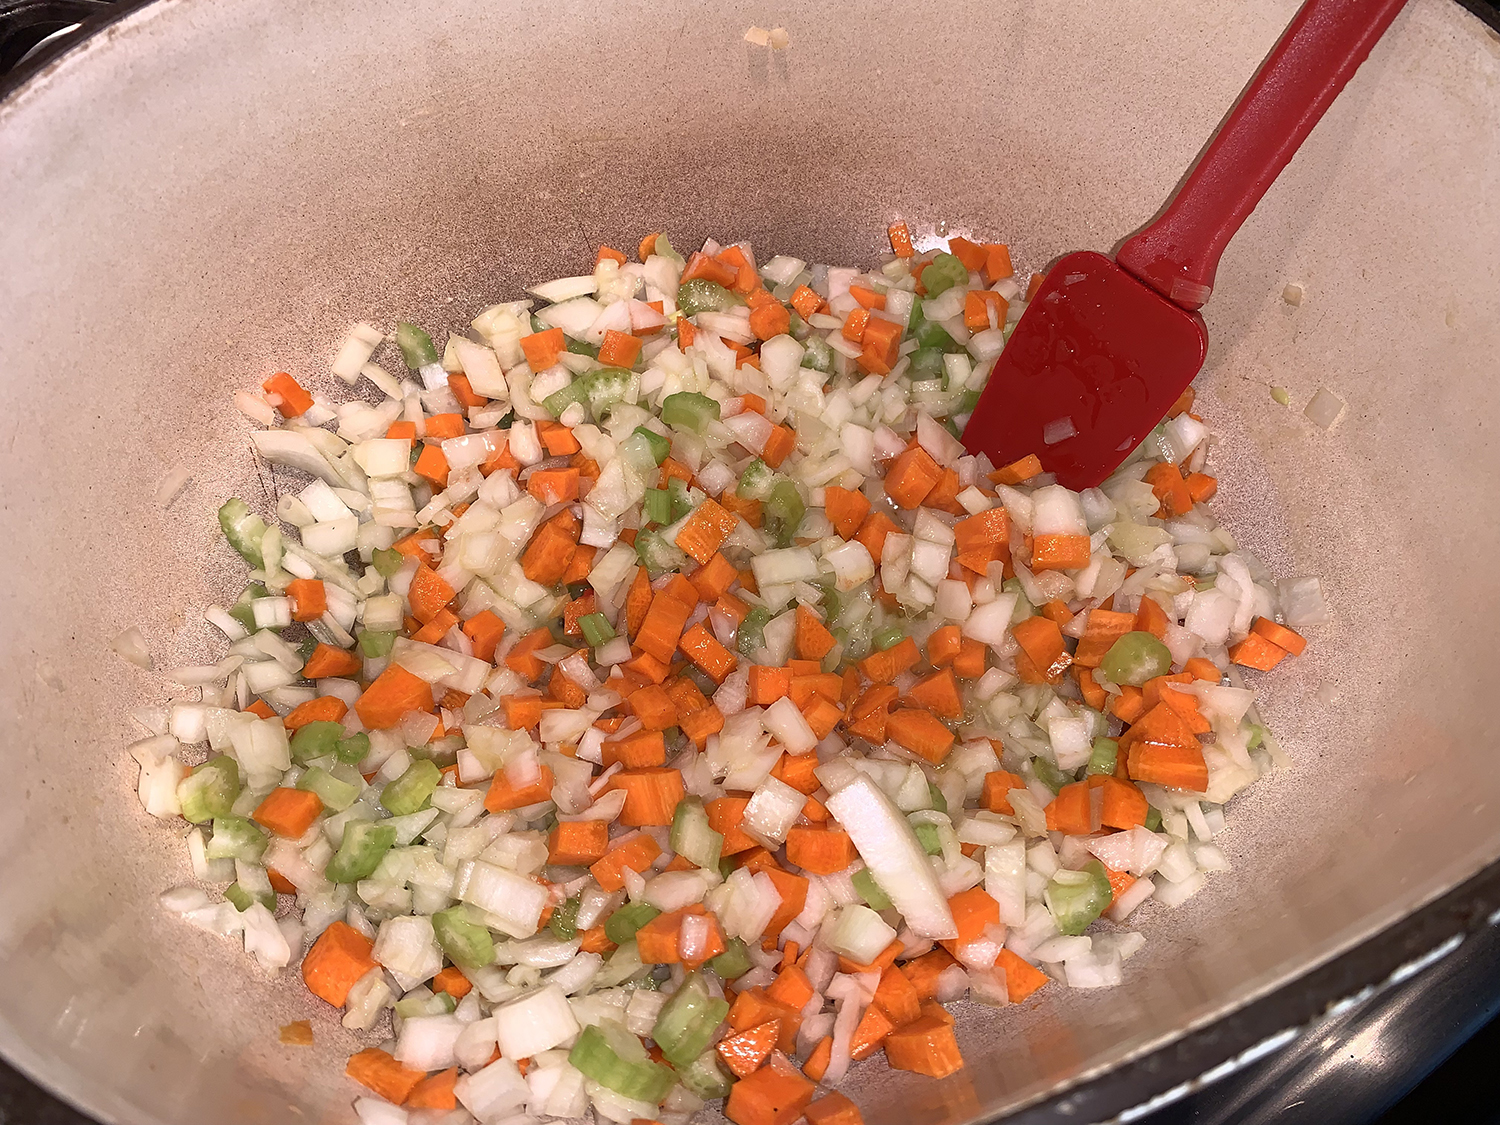
Add the onions, carrots, celery and a 1/2 teaspoon salt. Cook stirring often for 6 minutes or until the vegetable are soft but have no color.
Add the lamb and beef and cook breaking apart the meat with a wooden spoon for 5 minutes or until the meat is cooked through and no longer pink.
Stir the garlic, chili paste, red pepper flakes, and tomato paste into the meat mixture. Cook the tomato paste stirring often for 2 minutes.
Add the milk. Bring to a simmer and cook for 20 minutes, stirring occasionally until the milk is almost entirely evaporated.
Add the wine, tomatoes, bay leaf, parmesan rind and remaining salt. Bring to a simmer and reduce the heat to low to just maintain a gentle simmer. Simmer the sauce for 1 ½ to 2 hours, stirring occasionally to prevent sticking. Use several folded paper towels to skim some of the oil from the surface.
Discard the bay leaf and parm rind.
Spoon the bolognese over fusilli or creamy polenta reserving any extra to serve on the side. Serve with additional parmesan and a drizzle of olive oil, if desired.
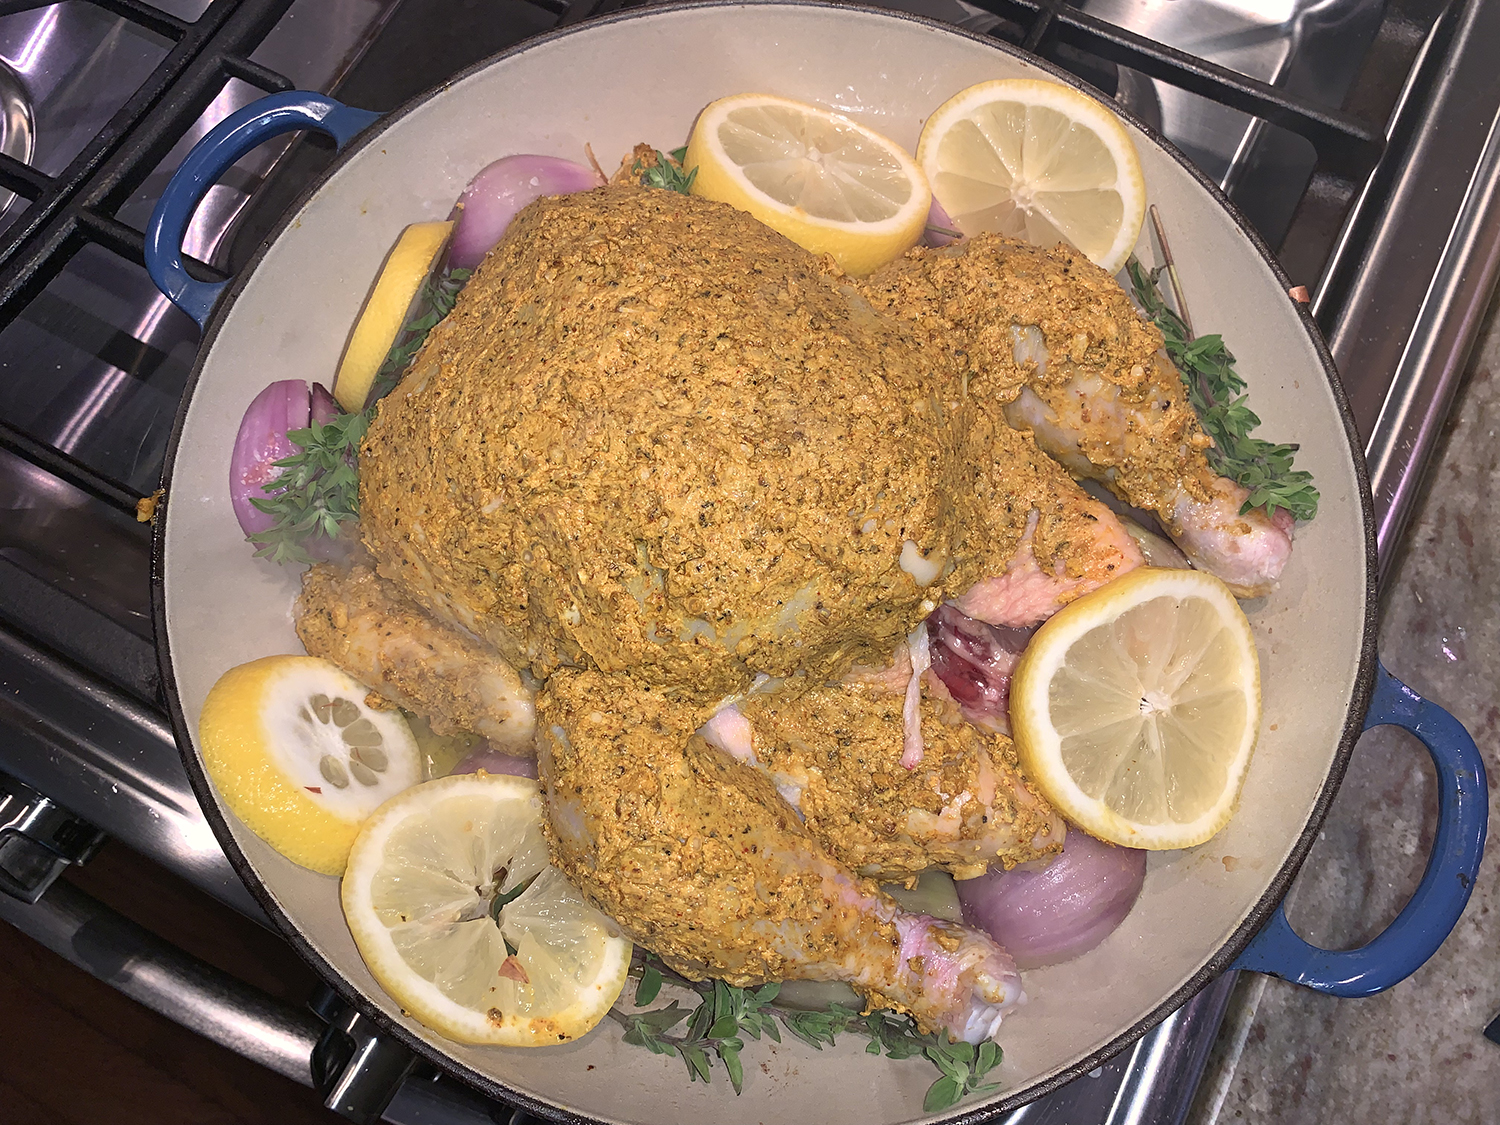
Yogurt is a common marinade throughout the Levant region, a large area in the Eastern Mediterranean region of Western Asia. Not only does it act as a tenderizer, but it also creates a crust on the meat and carries the flavor of the spices (here those are the shawarma heavy-hitters like cumin, coriander, and turmeric).
The chicken can marinate for as little as 30 minutes, or up to 12 hours in the fridge if you’re not in a rush, making it quite doable without tons of planning. Roasting the bird alongside halved shallots and sliced lemons means you get jammy and crispy accompanying bites built right in, cooked in the rich chicken juices.
The original recipe called for 3 shallots, but we more than doubled them to 7 (noted below), all their jammy goodness paired wonderfully with the seasoned chicken, as did the lemon. As sides, we prepared a Warm Farro with Lemon and Herbs dish, and some charred broccoli.
1 lemon, sliced into ¼”-thick rounds, seeds removed
1⁄2 cup water
4 oregano or thyme sprigs, plus leaves for serving
Flaky sea salt (for serving)
Directions
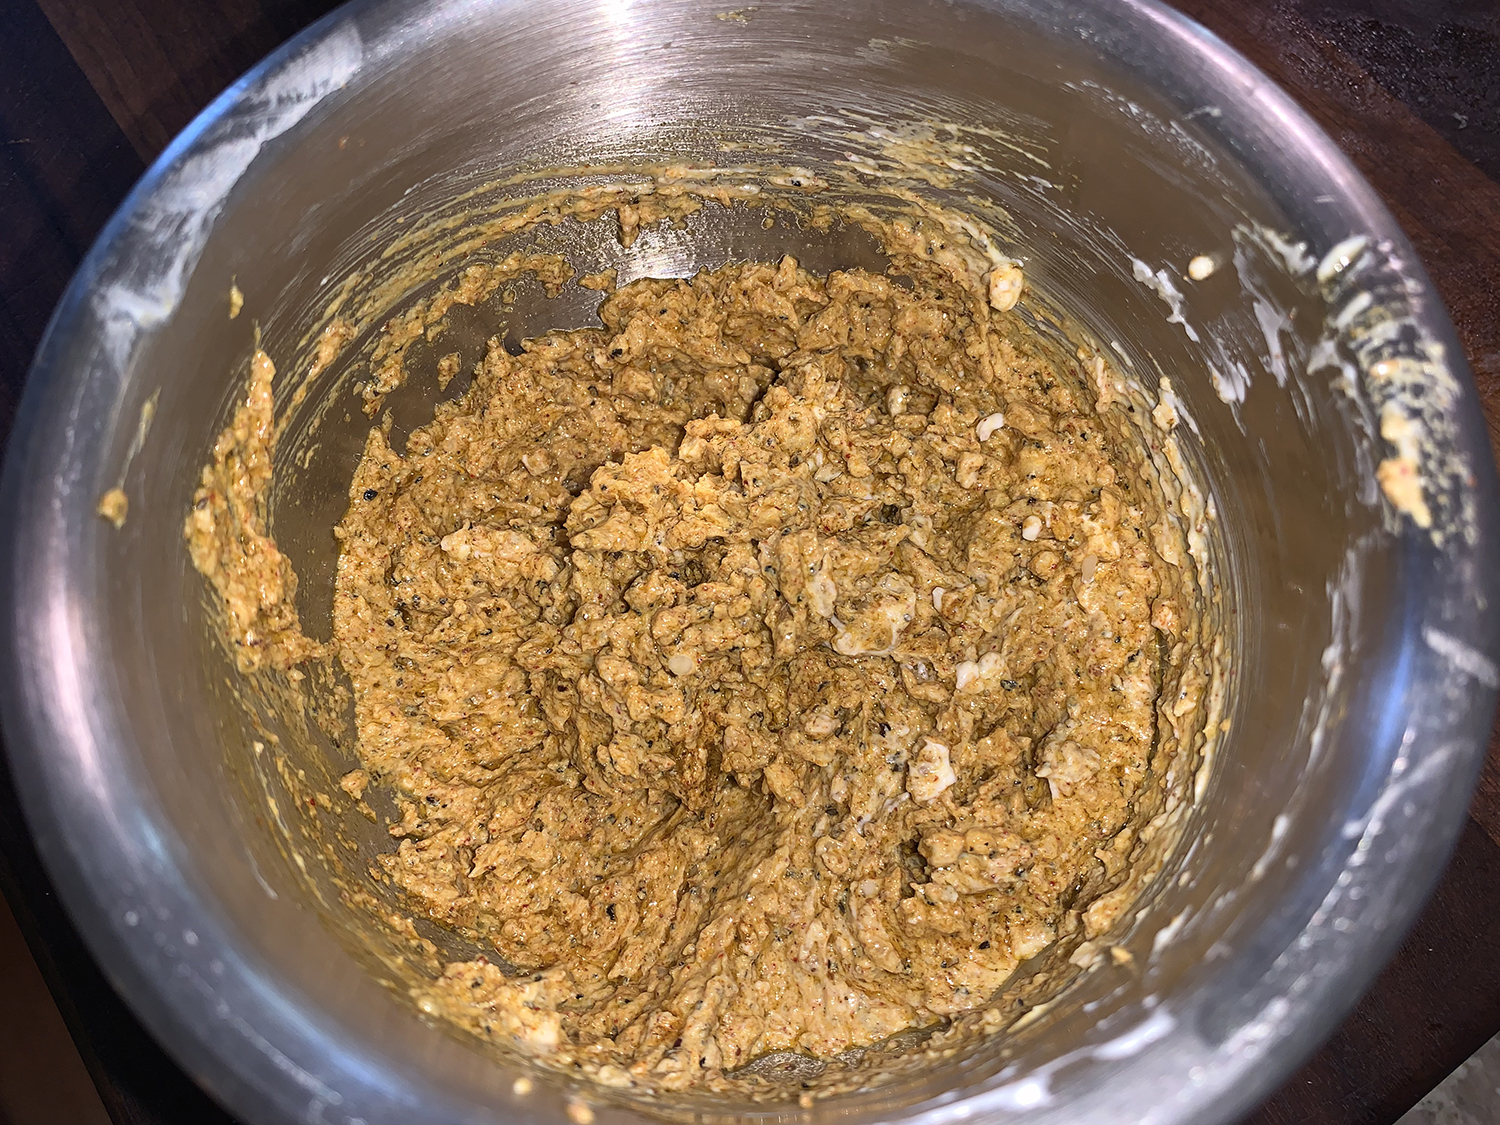
Finely grind coriander seeds, cumin seeds, peppercorns, paprika, and turmeric in a spice mill. Transfer spice mixture to a small bowl; whisk in garlic, yogurt, and 2 Tbsp. oil.
Generously season chicken with salt, then smear yogurt mixture all over. Let sit on a rimmed baking sheet at room temperature at least 30 minutes, or chill, uncovered, up to 12 hours. If chilling, let chicken sit at room temperature 30 minutes before roasting.
Preheat oven to 425°. Heat remaining 2 Tbsp. oil in a large skillet over medium-high. Place chicken, breast side up, in pan, then nestle shallots, cut side down, and lemon slices around. Season shallots and lemon with salt. Tuck in oregano sprigs and cook, undisturbed, until shallots are starting to brown, about 3 minutes.
Pour ½ cup water into pan; transfer skillet to oven, arranging so legs are pointing toward back of oven. Roast until skin has taken on some color, 10–15 minutes. Reduce heat to 325°; continue to roast until chicken is cooked through and tender (an instant-read thermometer inserted into thickest part of breast should register 155°; it will climb to 165° as the chicken rests) and shallots are jammy, 60–70 minutes. Let rest 15 minutes.
Transfer chicken to a cutting board and carve as desired. Arrange on a platter; tuck shallots and lemon slices around. Spoon juices in pan over, top with oregano leaves, and sprinkle with sea salt.
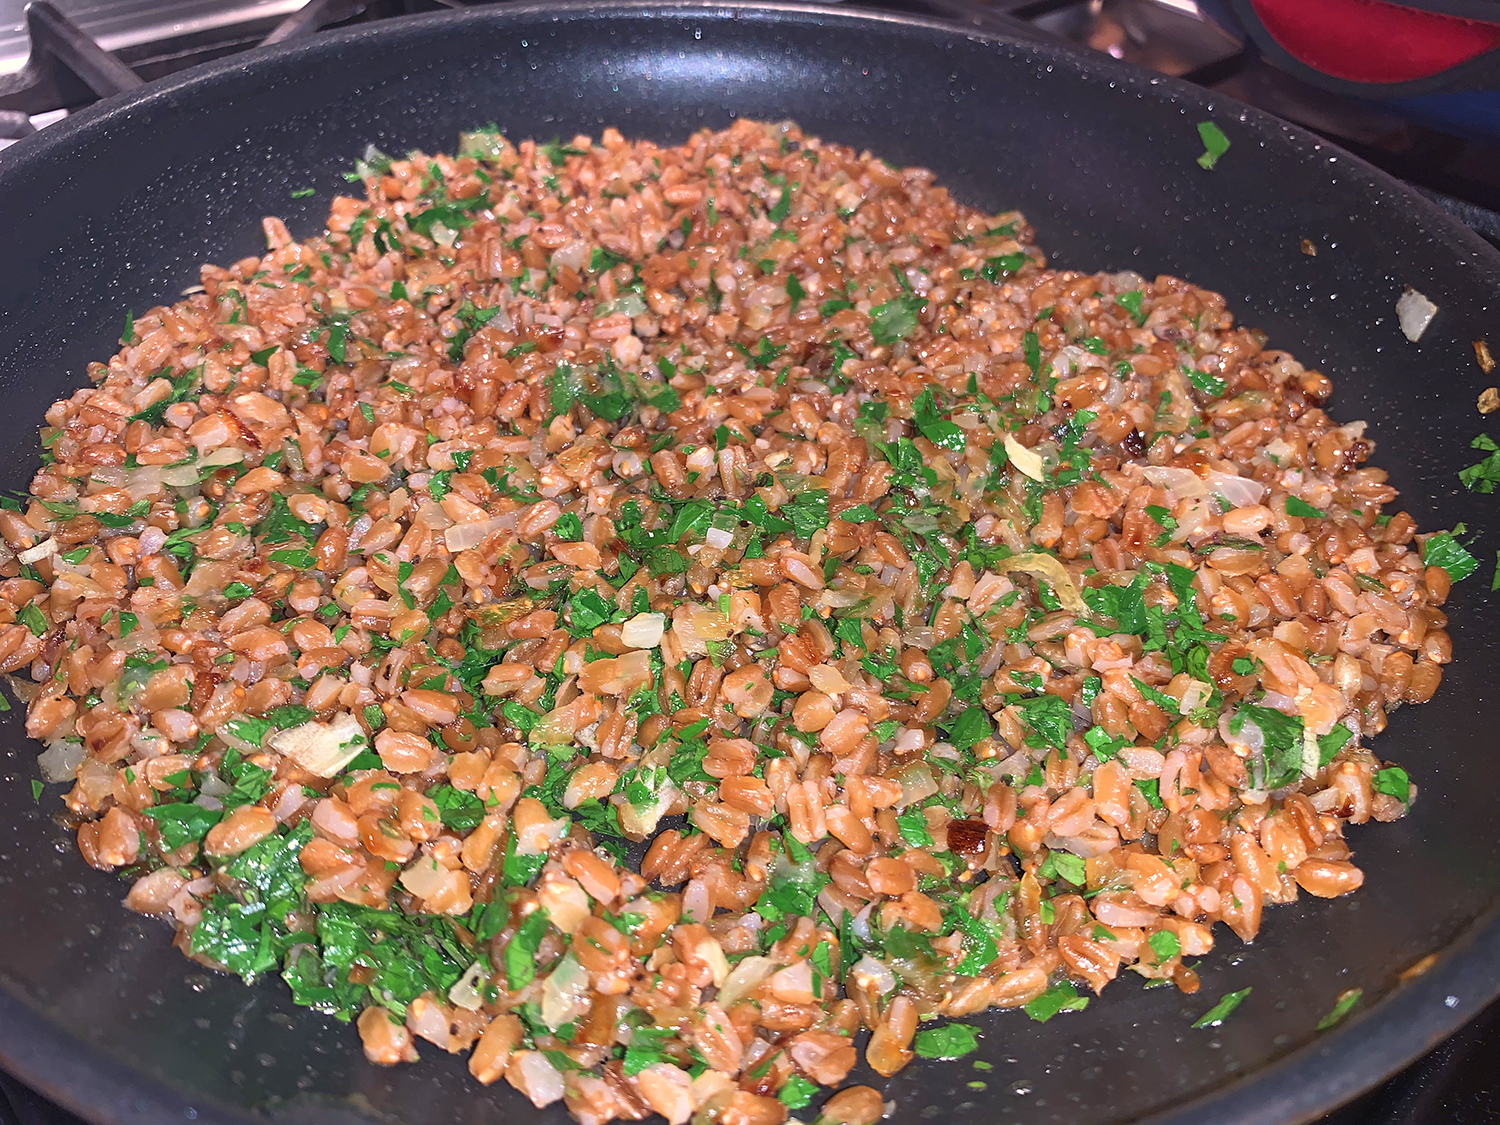
For this dish, use whole farro, in which the grain’s germ and bran have been retained. It has a nutty flavor and delicately chewy texture, and some brands cook in as little as 20 minutes, making it one of the fastest-cooking whole grains. (Ours took 30 minutes.)
The simplest cooking method is best: Just boil in salted water for about 20-30 minutes until tender and drain well. Warm farro can be tossed with sautéed aromatics, olive oil and herbs for a simple but satisfying side dish such as this one. It went wonderfully with our Shawarma Chicken.
We were fresh out of mint, so in lieu of making an extra trip to the grocery store, we just substituted two tablespoons of fresh oregano, which was one of the herbs in our main chicken entrée.
Bring 4 quarts water to a boil in a Dutch oven. Add farro and 1 tablespoon salt, return to boil, and cook until grains are tender with a slight chew, 20-30 minutes. Drain farro, return to now empty pot, and cover to keep warm.
Heat 2 tablespoons olive oil in 12-inch skillet over medium heat, until shimmering. Add onion and 1/4 teaspoon salt and cook, stirring frequently, until onion is softened and slightly golden, 6 to 8 minutes.
Add garlic and cook until fragrant, about 1 minute.
Add remaining 1 tablespoon oil and cooked farro, stirring frequently until heated through, 3 to 5 minutes.
Remove from heat and stir in parsley, mint, and lemon juice. Season with salt and pepper to taste, and serve.
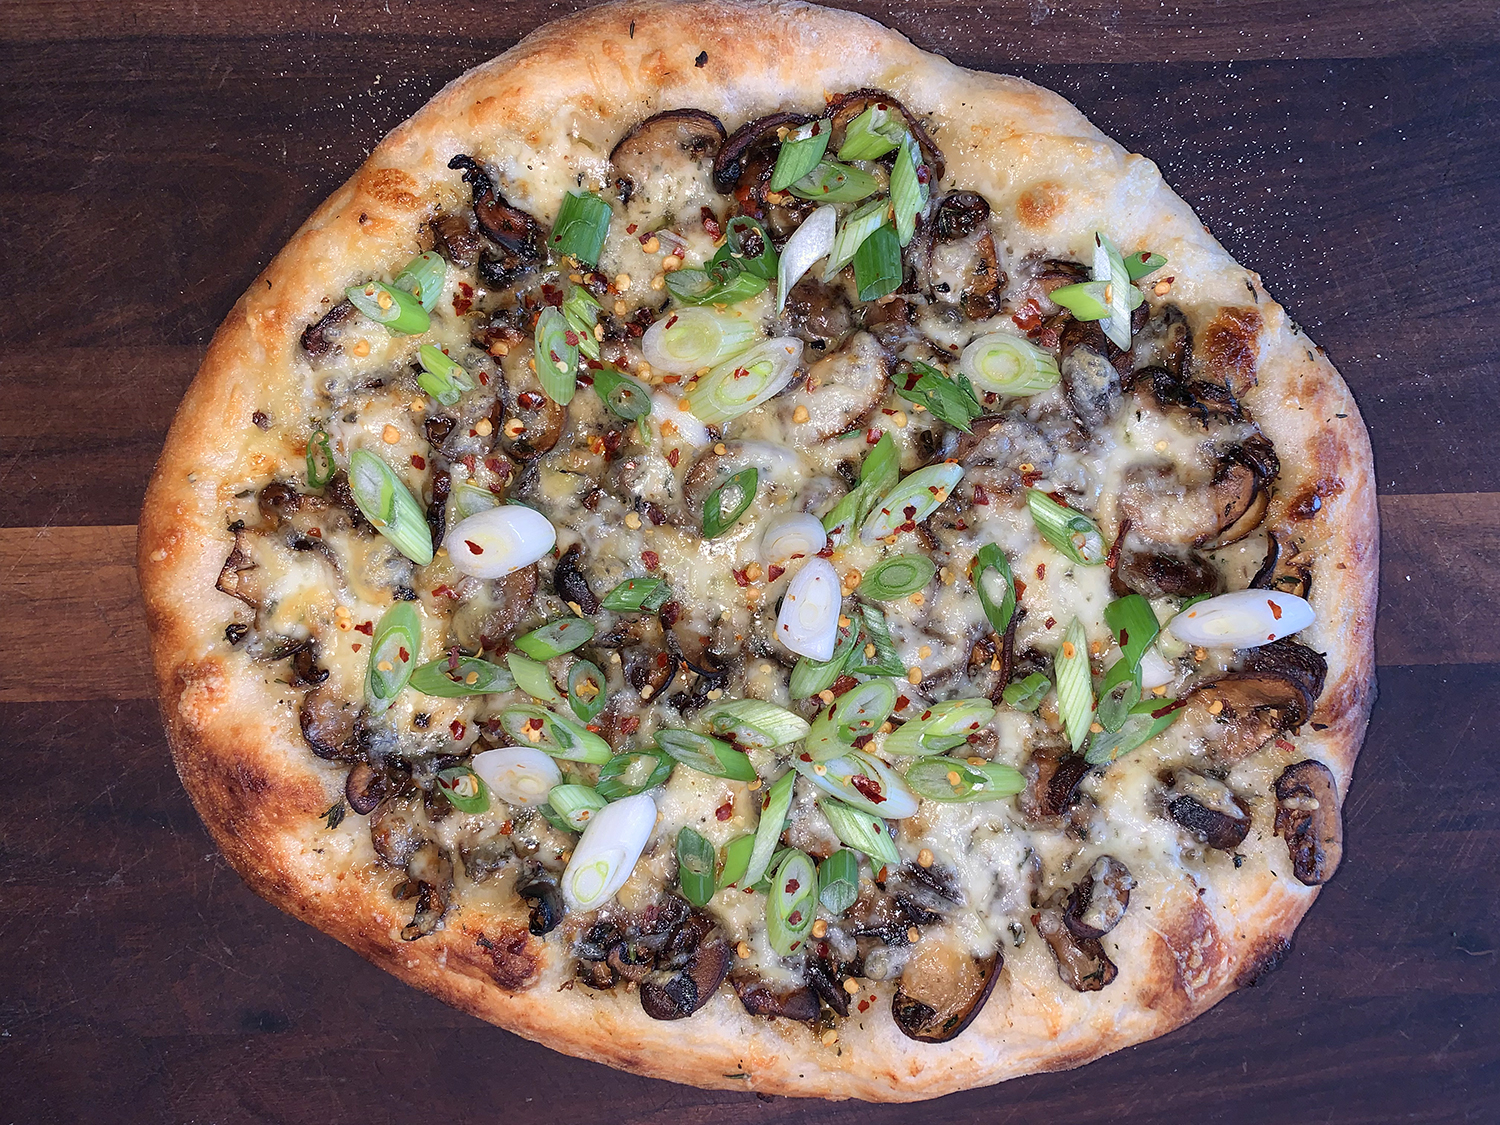
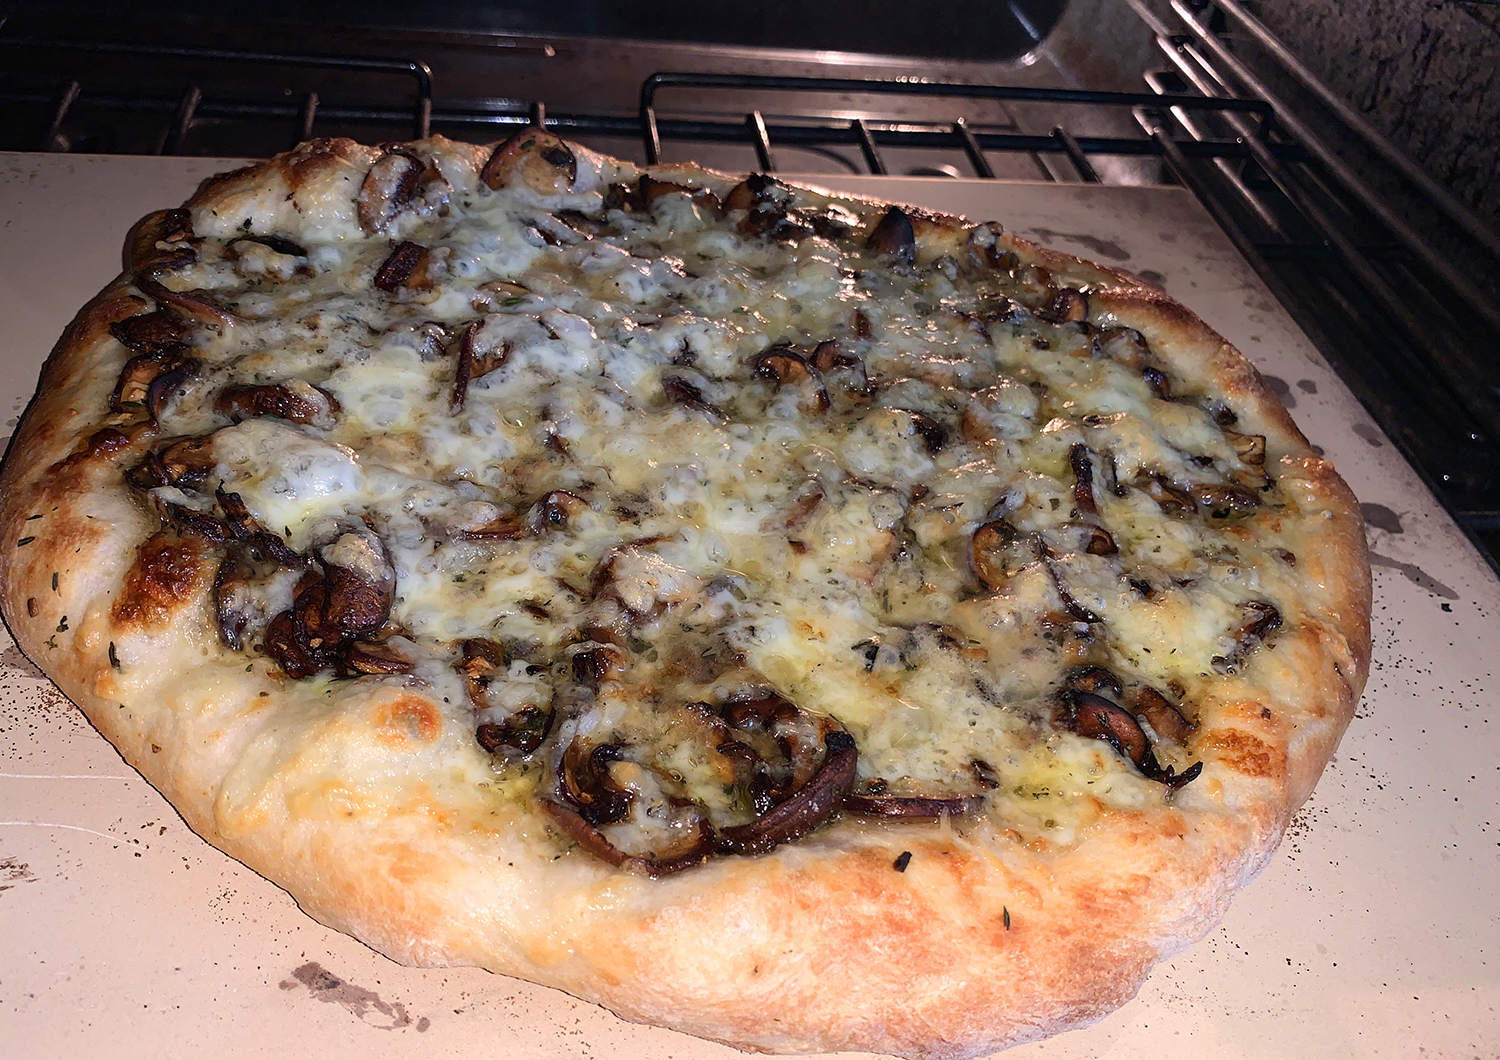
Having a ready-made pizza delivered to your doorstep is certainly the easy route. But often times we love a culinary challenge, and this pizza recipe from Milk Street proved to be just that. We made our dough from scratch, even warmed it up to a perfect 75° in a sous vide bath, but it still was tricky to stretch out. You can always purchase a pre-made dough and save yourself some aggravation, just sayin’…
Be aware, heating the oven and pizza steel or stone to 550°F takes about an hour. Use this time to roast portobello mushrooms, and to combine the fontina-Parmesan cream white sauce. Don’t undercook the mushrooms. Roasting them until well browned removes moisture that would otherwise make the pizza crust soggy. Another suggestion would be to use cremini mushrooms instead of portobello caps, then you wouldn’t have to remove any gills.
The second pie was more successful!
For a time-saver on dinner day, the mushrooms also can be prepped up to 24 hours ahead and refrigerated. When shaping the pizza dough, make sure that the edges are thicker than the center so they contain the cream sauce, which becomes runny during baking. For a crisp, well-browned bottom crust, if your oven only goes to 500°F, the pizza will need to bake for an extra two minutes.
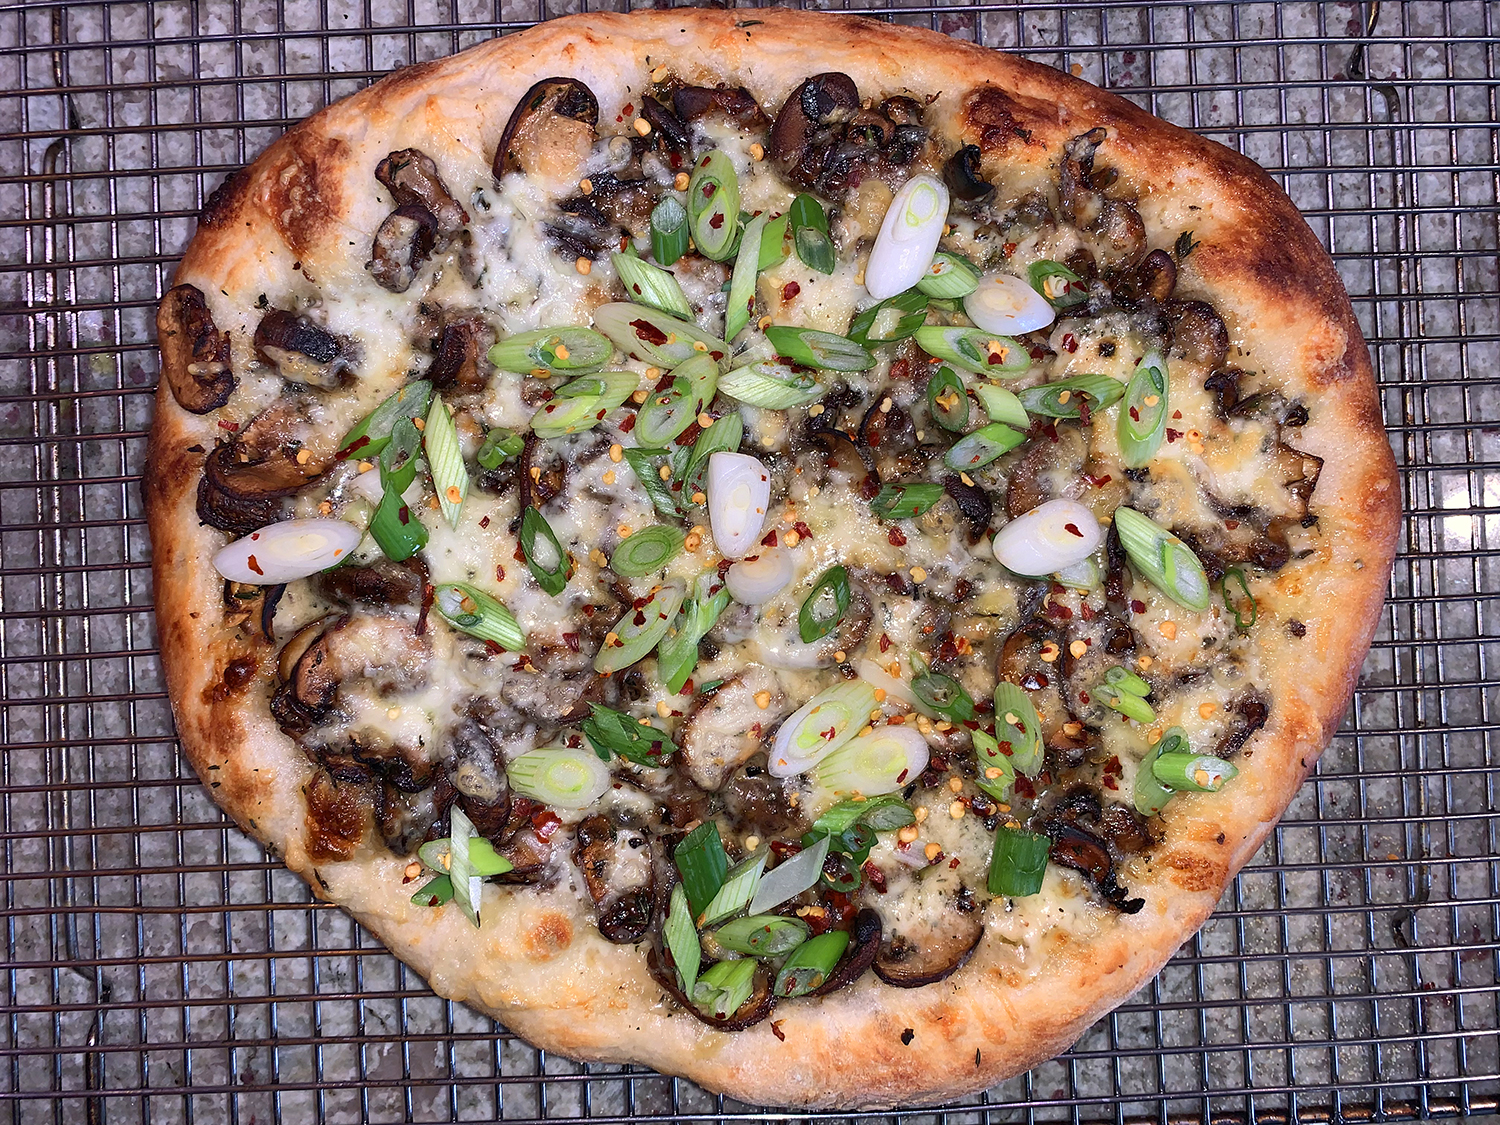
The first attempt was unremarkable. The crust shape was more rectangular and we over-charred the mushrooms. Since the Fontina-Parmesan Cream makes enough for two pizzas, we made another several days later, which was more of a success story. This time we browned cremini mushrooms in a nonstick skillet on the stovetop. Plus we added about another cup of shredded fontina on top of the mushrooms. And that my friends, was a perfect pie!
1 cup fontina-Parmesan cream (recipe below); more on top of the mushrooms if desired.
2 scallions, thinly sliced on bias
1/4 tsp. red pepper flakes
Directions
At least 1 hour before baking, heat the oven to 550°F with a baking steel or stone on the upper-middle rack and a second rack in the lower-middle.
Cut the mushroom caps into ¼-inch slices. In a large bowl, toss the mushrooms, olive oil and ¼ teaspoon salt.
Spread the mushrooms in an even layer on a rimmed baking sheet. Roast on the lower oven rack, stirring once, until they have released their moisture, the moisture evaporates and the mushrooms begin to brown, about 15 minutes. OR, brown them in a nonstick skillet on the stovetop.
Stir in the thyme and garlic, then roast/cook in skillet until the mushrooms have browned and the garlic is no longer raw, another 3 to 4 minutes. Let cool completely on a wire rack.
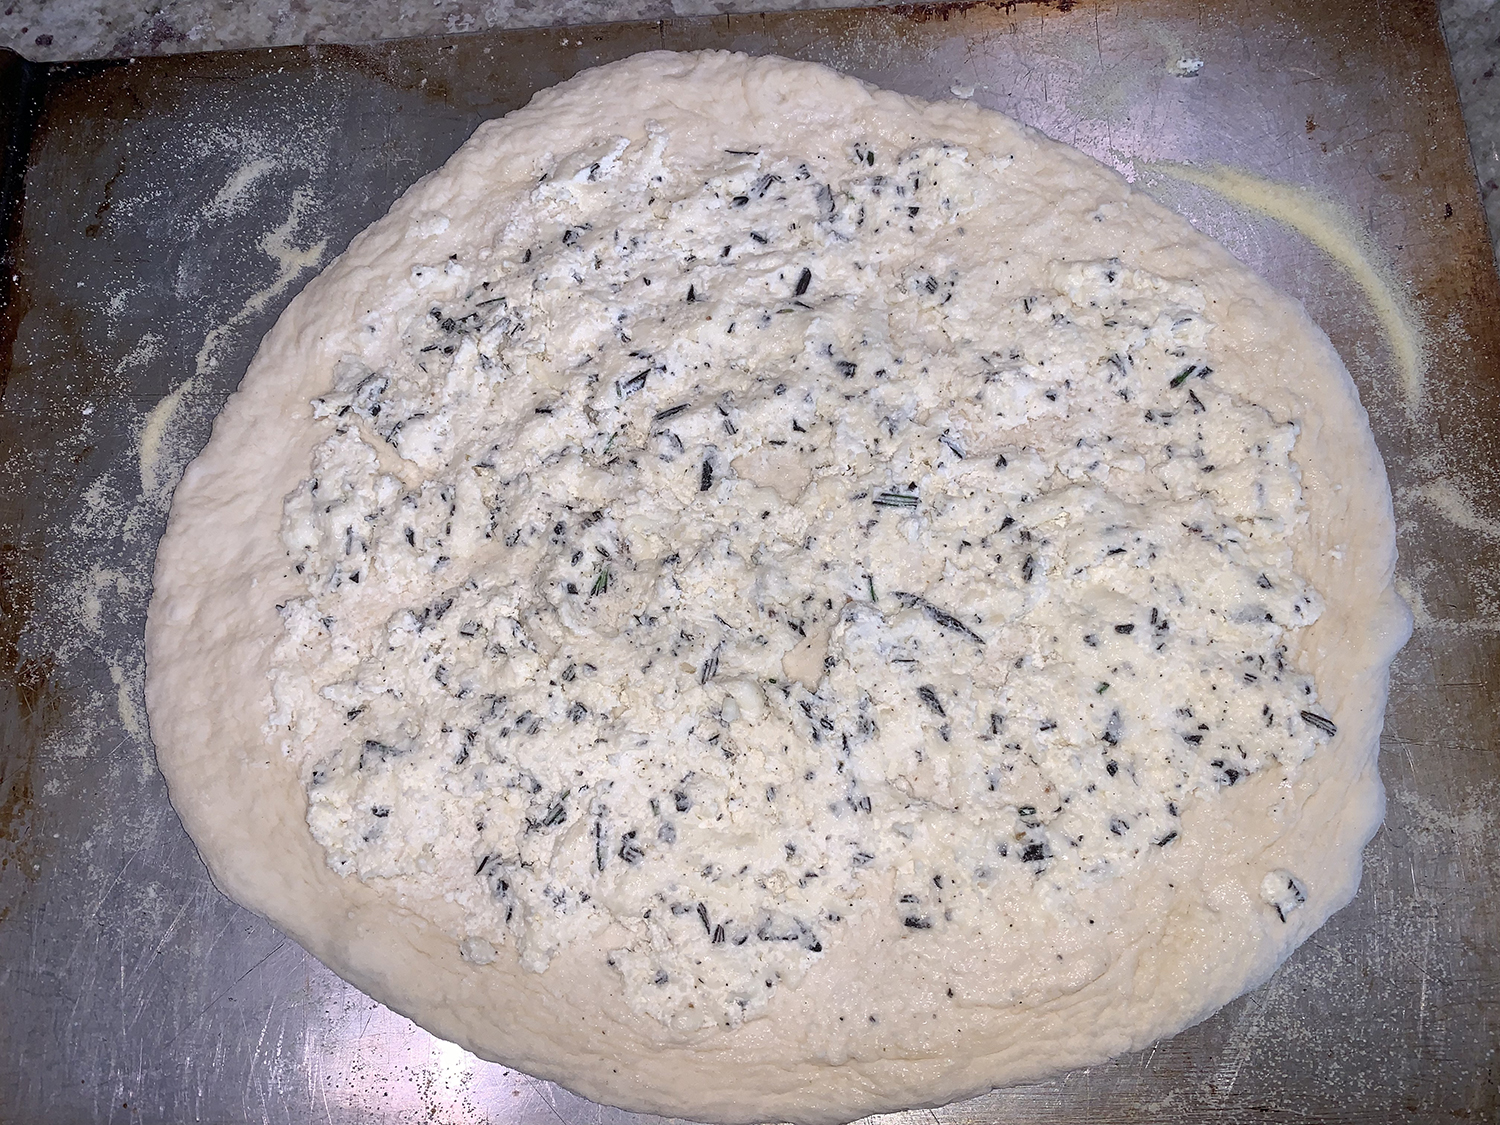
Turn the dough out onto a counter dusted generously with bread flour. Flour your hands and, using your fingers, press the dough, starting at the center and working out to the edges, into a 12-inch round, turning the dough over once. The round should be thin in the center, with slightly thicker edges. Lightly dust a baking peel, inverted baking sheet or rimless cookie sheet with the semolina. Transfer the dough to the peel and, if needed, reshape into a 12-inch round.
Using the back of a spoon, spread the fontina-Parmesan cream evenly on the dough, leaving ½-inch border at the edge. Scatter the mushrooms over it and season with pepper. If desired, add more shredded fontina on top of the mushrooms.
Slide the pizza onto the baking steel or stone and bake until the crust is well browned, 7 to 9 minutes.
Using the peel, transfer the pizza to a wire rack. Let cool for a couple of minutes, then sprinkle with scallions and red pepper flakes.
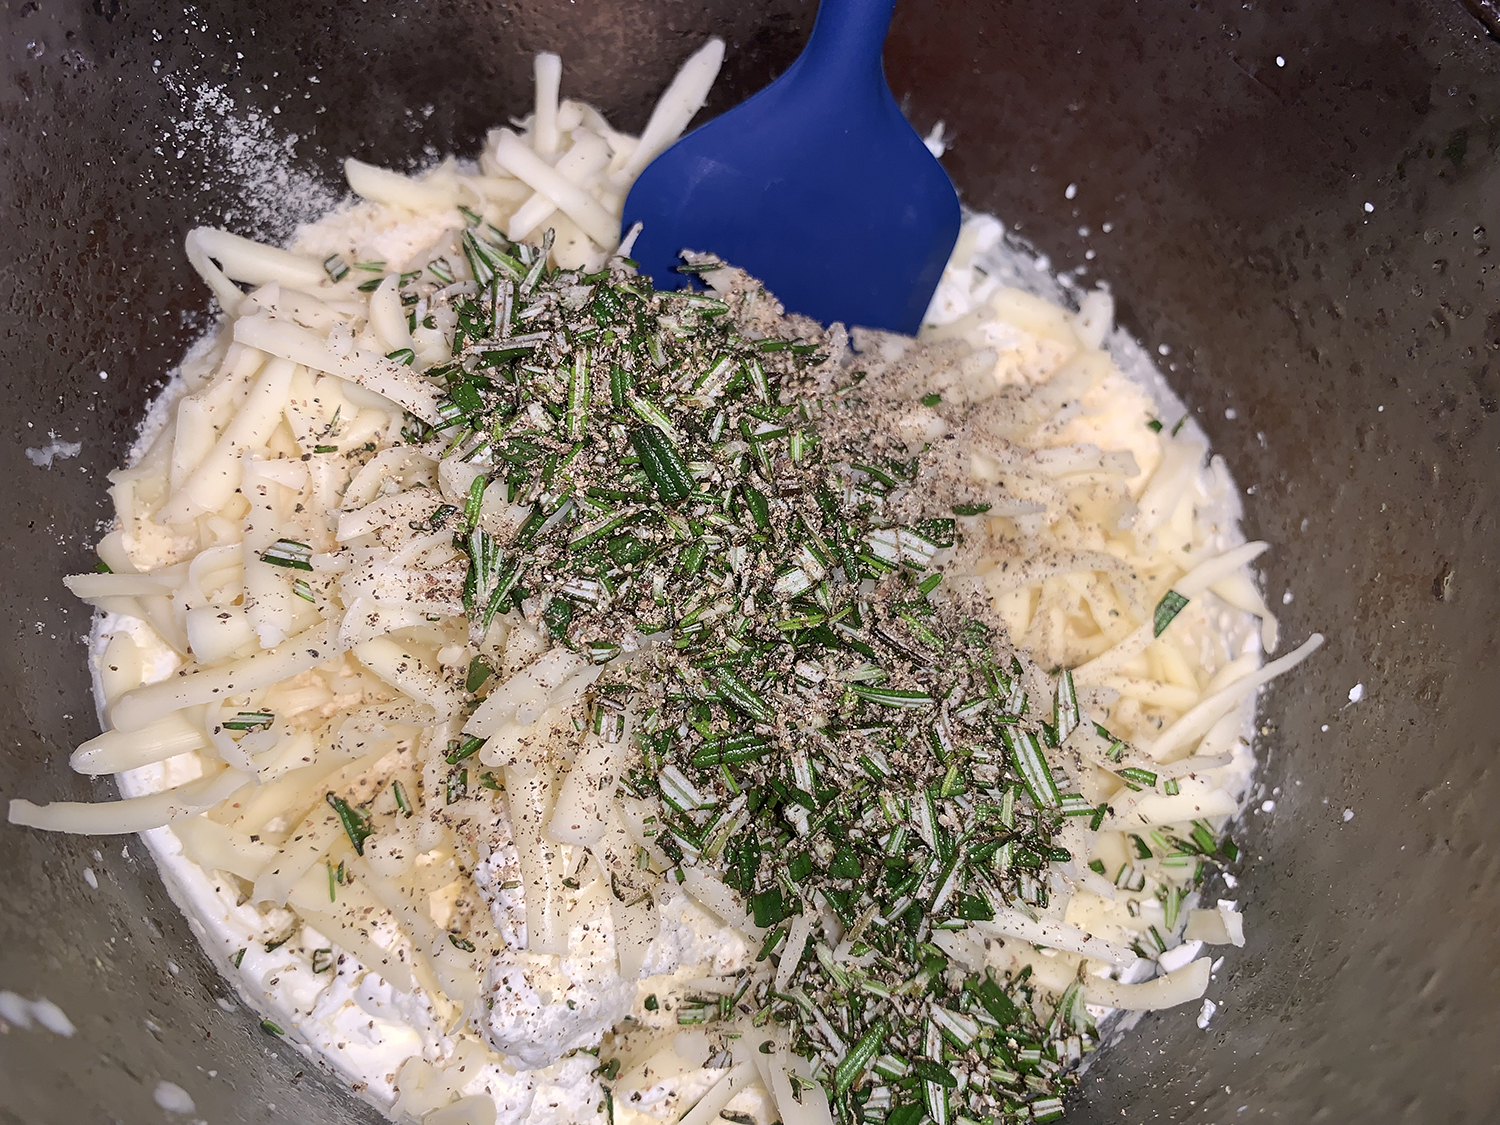
Fontina-Parmesan Cream
Ingredients
3/4 cup heavy cream, cold
1 cup shredded fontina cheese
1/4 cup grated Parmesan cheese
1 Tbsp. minced fresh rosemary
1/2 tsp. ground black pepper
Directions
In a stand mixer fitted with the whisk attachment, whip the cream on medium until stiff peaks form, about 2 1⁄2 minutes.
Using a rubber spatula, fold in the fontina, Parmesan, rosemary and pepper.
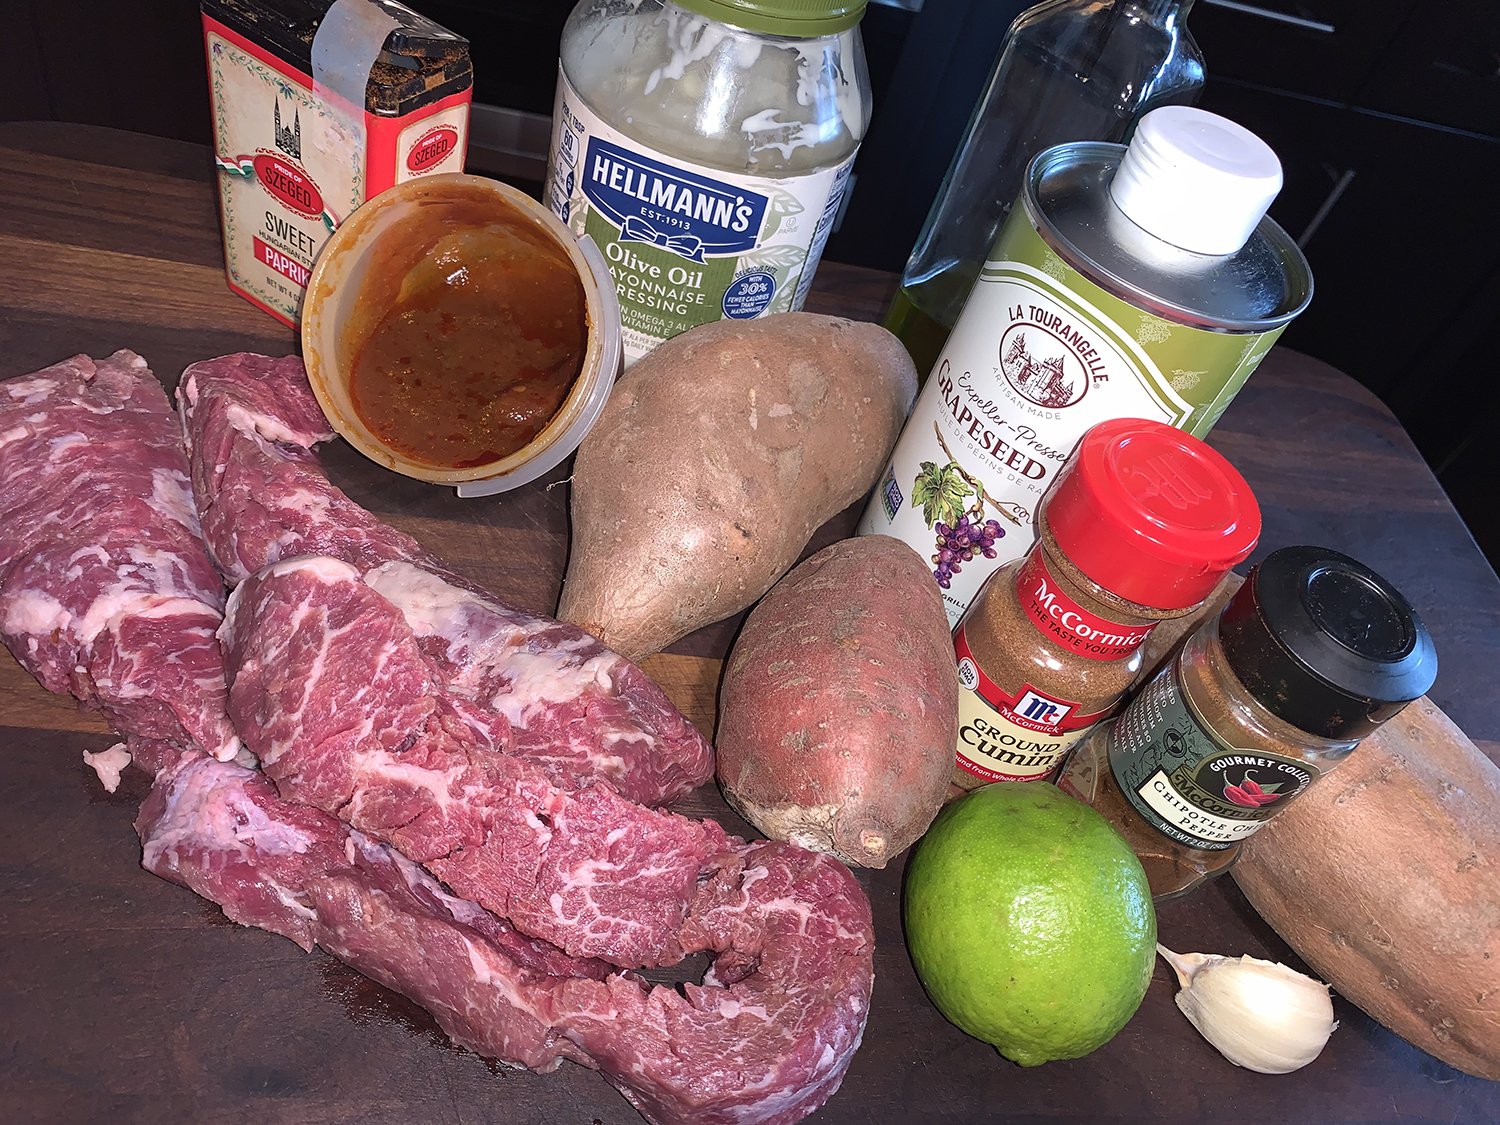
Occasionally, when grocery shopping, we come across great meat prices, so we buy what strikes our fancy with the intention of vacuum-sealing and storing in one of our freezers until a future date. It dawned on us we could never remember exactly what we bought and where it was stored, so we started writing a list. Well, that hand-written list became messy and hard to decipher so then we had the brilliant idea to keep an Excel spreadsheet and share it on One Drive so that it can be accessed from any of our devices.
For the most part, it’s been a tremendous aid, until we neglect to delete items that we’ve already used. I’m telling you this because that’s exactly what happened for this meal. The day before we planned on cooking it, I went to retrieve the flank steak from the downstairs freezer, which is where the Excel file said it was, and couldn’t find it, nor could The Hubs.
But Excel also indicated we had two packages of flap meat, which actually happens to be more to our liking than flank steak. So yes, you guessed it, we did use the flap meat for this recipe—and removed it from the Freezer Inventory database.
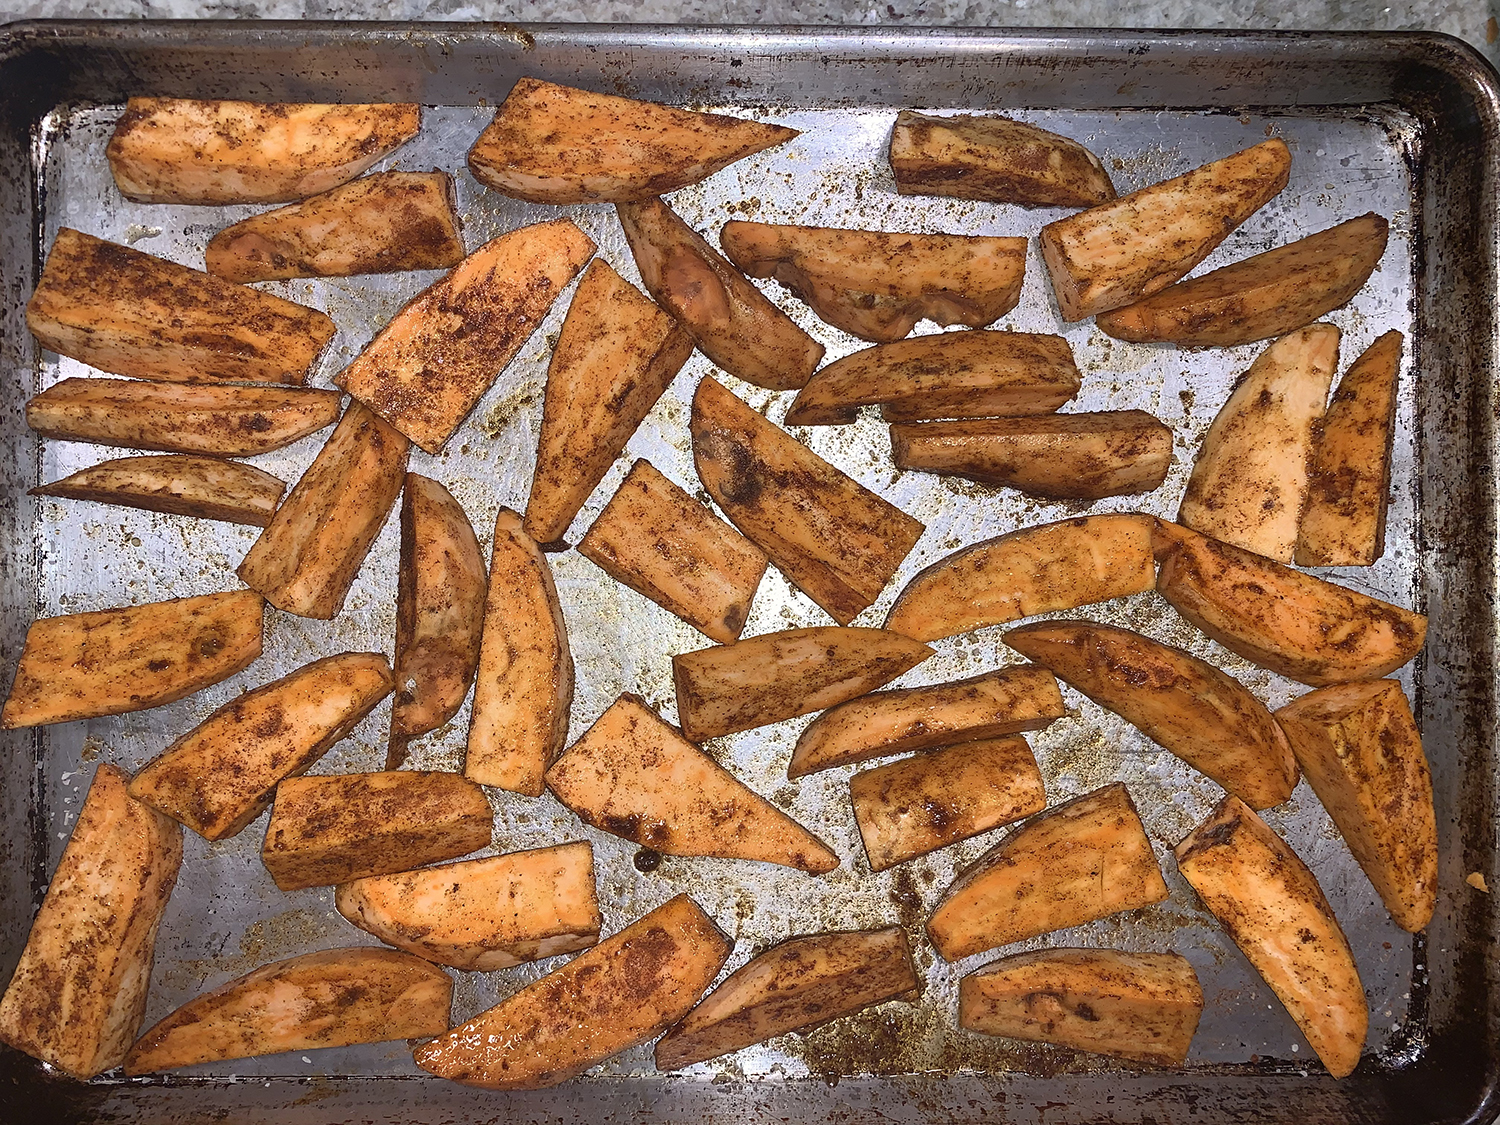
Here, the steak and sweet potatoes share a spice rub, but they are cooked separately. The steak is sear-roasted in a screaming-hot skillet, then finished in a moderate oven. Molly Stevens author of the original recipe, suggests leaving the skin on the sweet potatoes to obtain a textural contrast with the smooth insides and rugged skin. We chose otherwise.
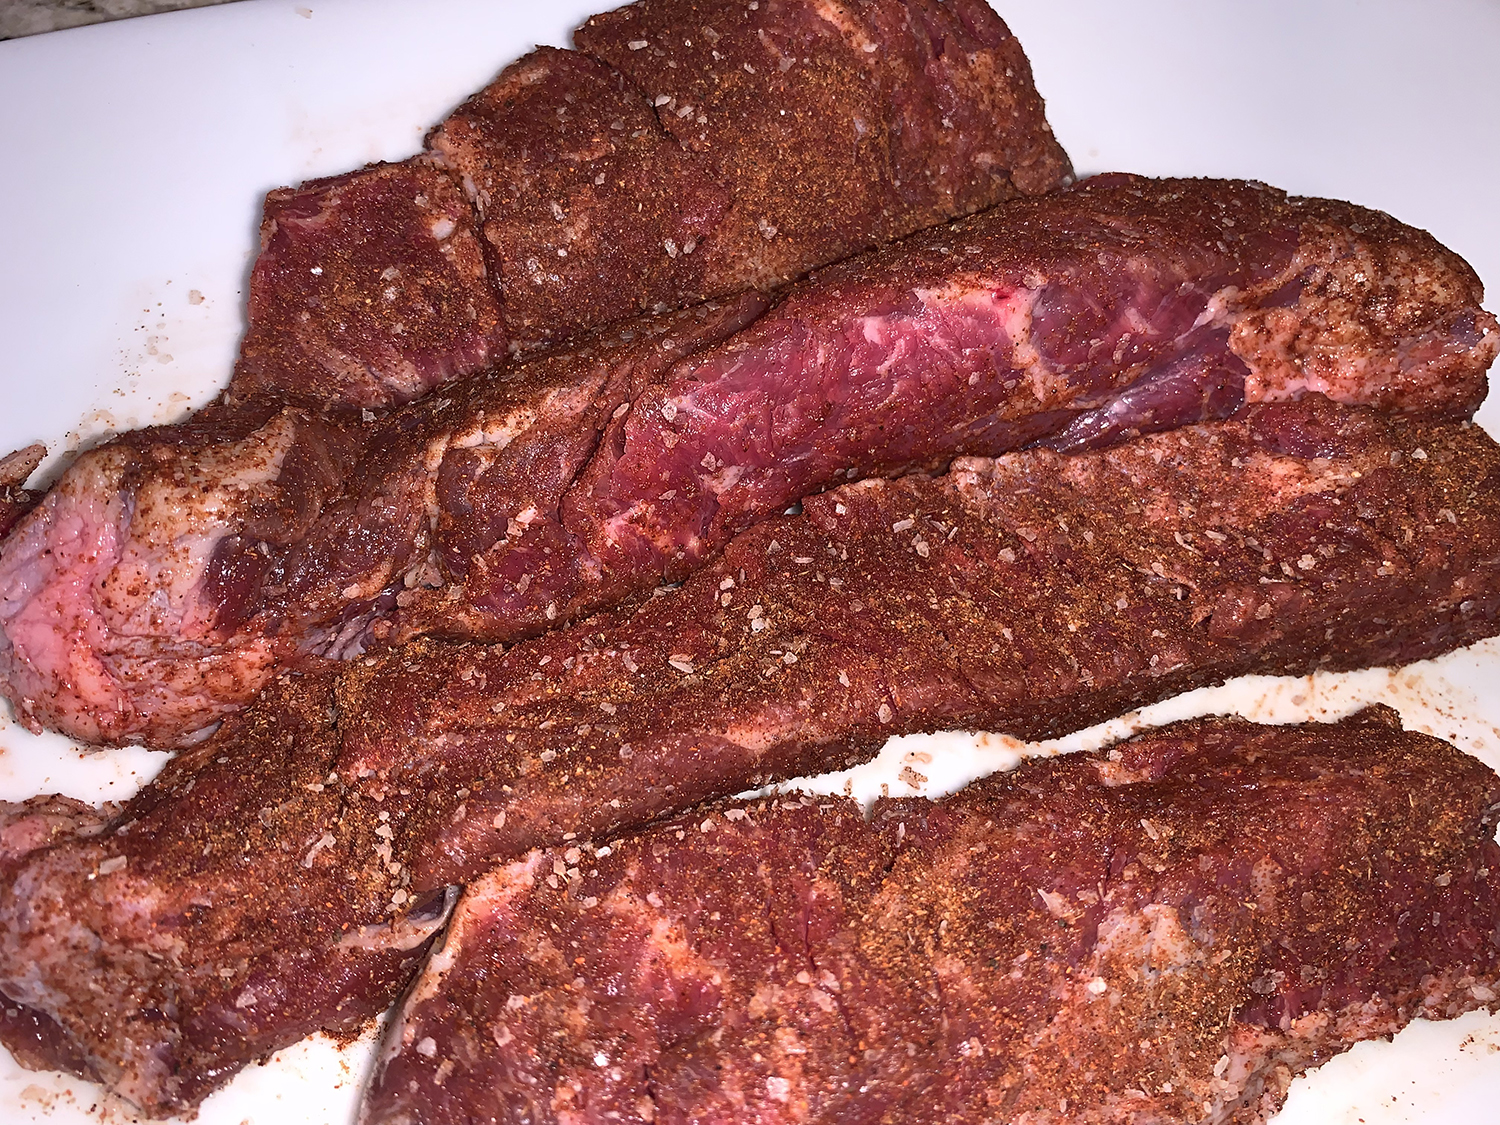
Rubbing the steak ahead of time and leaving uncovered in the fridge for 2-12 hours, allows the the spice rub to works its magic in keeping the meat juicy, and it also gives the flavors time to penetrate and enhance the taste of the steak.
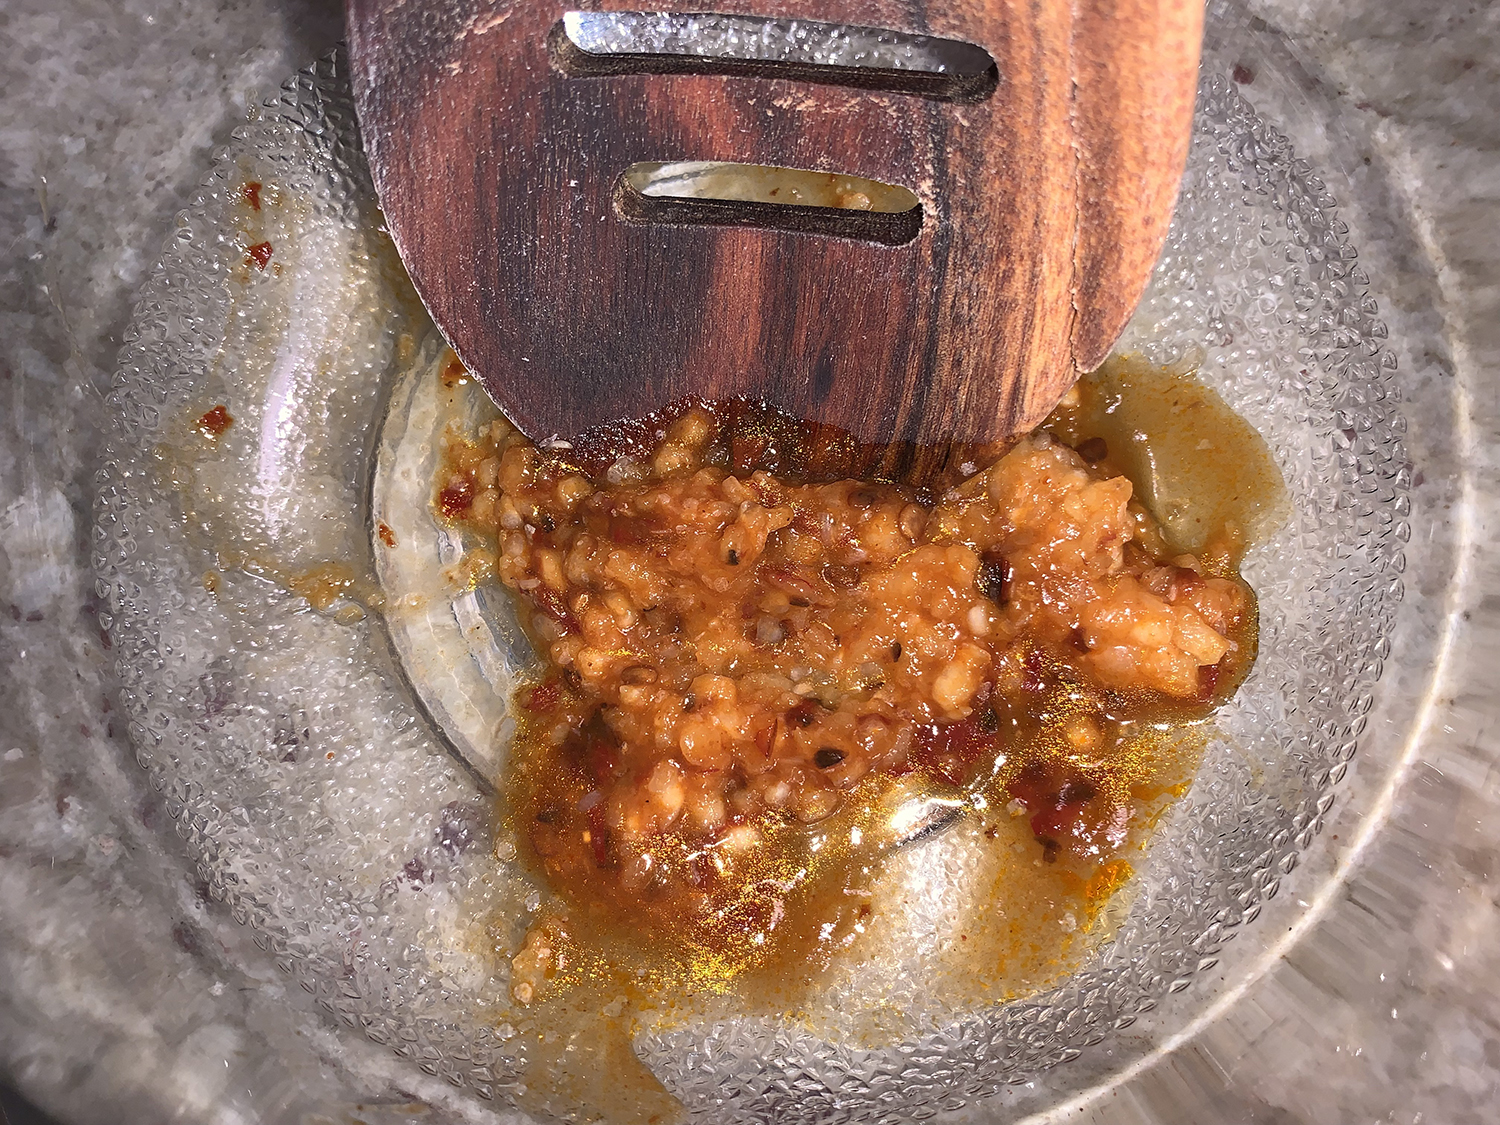
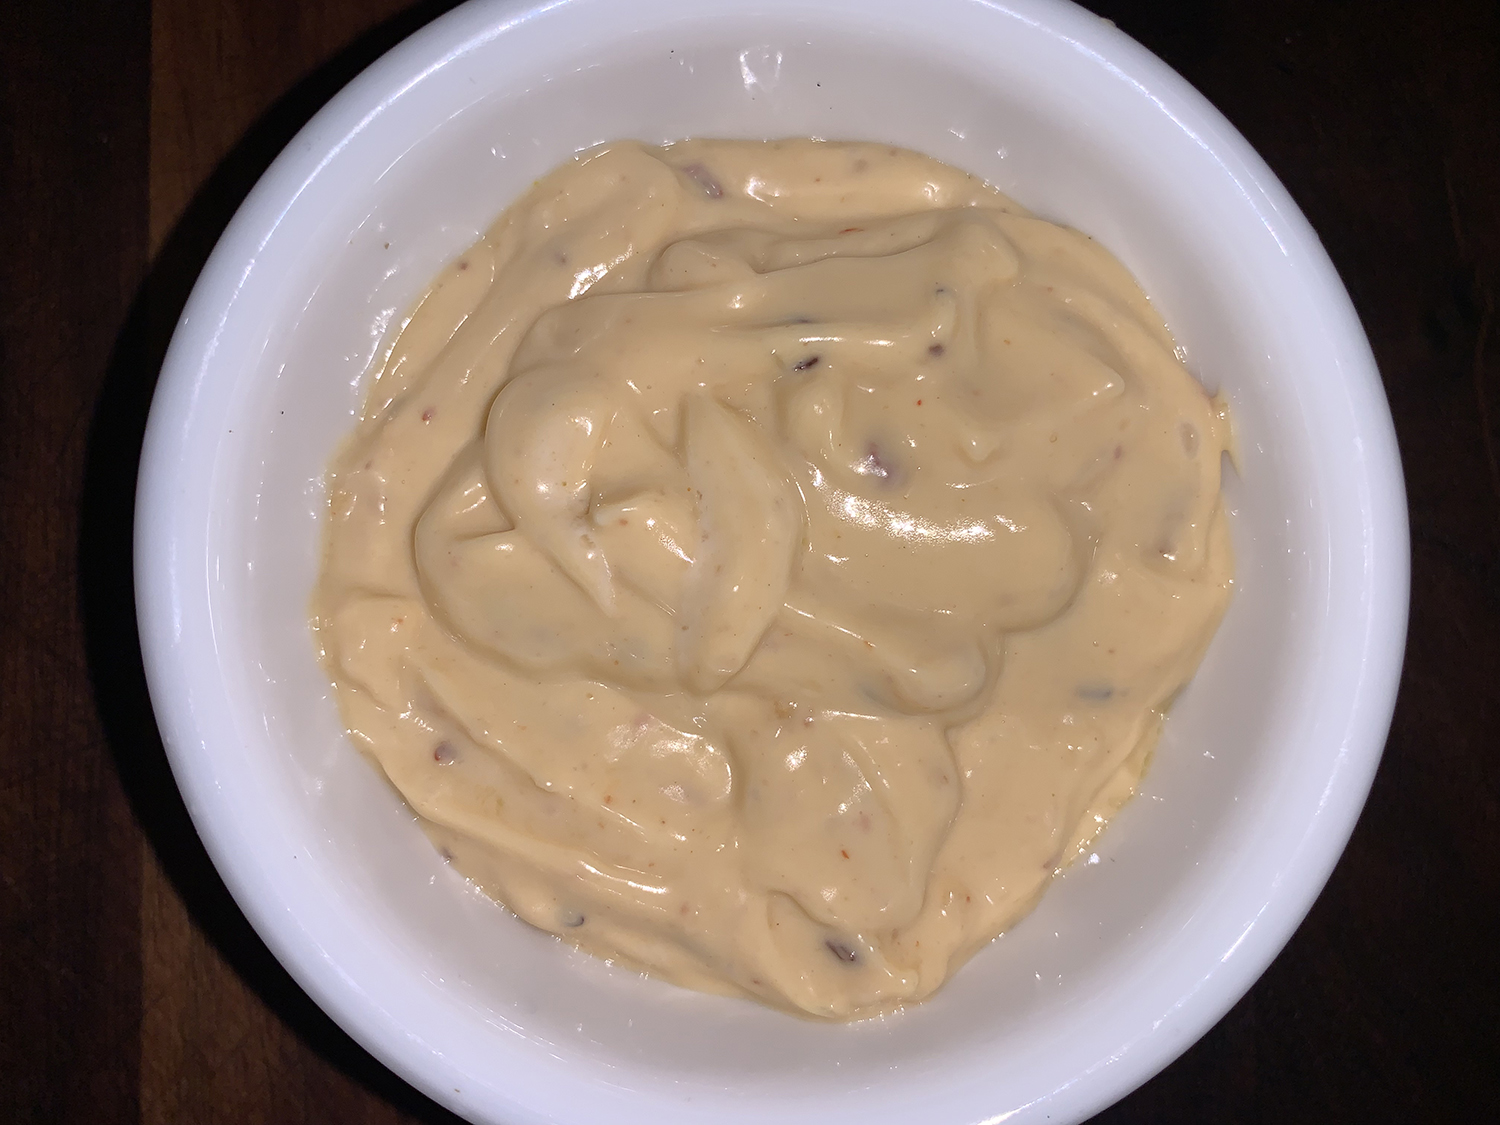
The smoky-spicy aioli is fabulous when drizzled over both the potatoes and steak bringing it all together. We made a note in the cookbook to double the aioli next time—it’s that good! A simple side salad completed the meal and added that fresh component.
Spice-Rubbed Flank Steak and Sweet Potatoes with Chipotle Aioli
1⁄2 tsp. canned chipotle in adobo, minced; plus 1⁄2 tsp. adobo sauce from can
1 garlic clove, finely minced
Salt
1⁄3 cup mayonnaise
1 Tbsp. extra-virgin olive oil
1 Tbsp. fresh lime juice
Directions
Combine paprika, cumin, chili powder, 2 teaspoons kosher salt, and several grinds of black pepper in a small bowl. Divide the mixture in half.
With the steak on a platter, sprinkle half of the spice mixture all over the steak, rubbing it into the meat. Refrigerate uncovered for at least 2 hours, and up to 12 hours.
Combine the chipotle, adobo sauce, garlic and 1⁄4 teaspoon salt in a small bowl and mash to a paste with a wooden spoon. Whisk in the mayonnaise and olive oil. Add the lime juice, stir and season with salt and pepper to taste.
Heat the oven to 400°.
Cut the sweet potatoes lengthwise in half and then into wedges that are about 1-inch across at their widest part. If any of them are 6 inches or more, cut them in half. Put them on a rimed baking sheet, drizzle with 2 tablespoons of oil, and toss to coat. Season with the remaining spice rub and toss again. Spread out in a single layer.
Roast in preheated oven until tender, about 30 minutes, turning once halfway through.
After the sweet potatoes have roasted for about 20 minutes, heat a large ovenproof skillet, such as cast iron, until very hot. Coat with the remaining tablespoon of oil and sear the steak until well-browned on the first side, about 1 1⁄2 minutes. Flip and brown the second side for another 2 minutes.
Transfer the pan to the oven and roast for 5 to 7 minutes for medium-rare (120° to 125°); 7 to 9 minutes for medium (125° to 130°).
If the potatoes are done before the steak, let them sit at room temperature, or leave them in the oven with the temperature turned off. Do not cover with foil or they will steam and turn soggy.
Transfer the steak to a cutting board, tent with foil, and let rest for 10 minutes.
Thinly slice the steak against the grain (if using flap meat, serves in large chunks). Serve the sweet potatoes along side, spooning a little aioli over everything. Pass any extra aioli around the table.
Necessity is the Mother of Invention, right? Well, when we had a hankering for Loaded Nachos and realized we didn’t have a packet of taco seasoning for the ground meat, we just made our own. The Hubs did a quick Google scan and found this recipe from Sommer Collier.
Simple homemade taco seasoning is a great way to save money, use up spices, and make the best-tasting taco seasoning you’ve ever tried. It’s really simple. Just mix chili powder, ground cumin, paprika, crushed red pepper, onion powder, garlic powder, oregano, salt and black pepper. Then taste and add more crushed red pepper and salt as desired.
The recipe provided makes roughly the equivalent of a single store-bought packet of taco seasoning. If you want to make a larger batch to scoop and use at will, just multiply the recipe as needed. Which is exactly what we did back when football season was just beginning and nachos would be a recurring theme for months to come! The seasoning works equally well on ground or shredded chicken, turkey, pork and lamb.
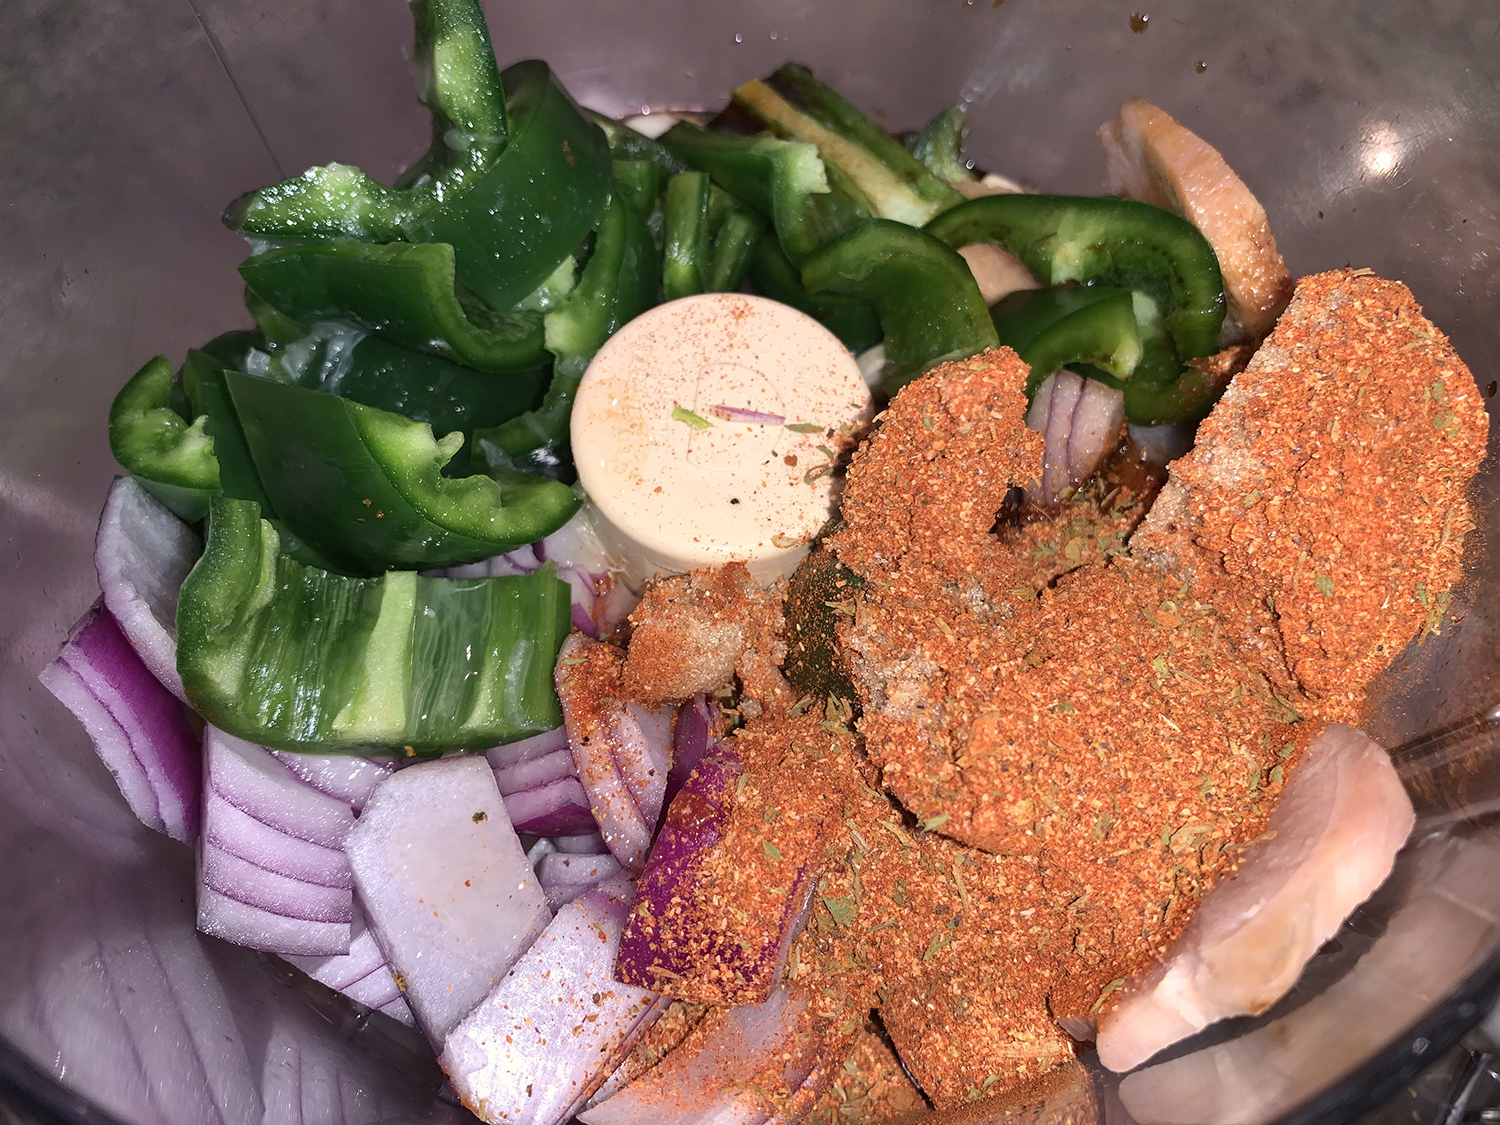
One of our “pool friends” gifted us a container of Wah Gwan over the holidays. We had never heard of the spice blend, so I did a little online research to find out what it’s about.
Growing up in Long Island New York while maintaining deep roots in Jamaica, chef and nutrition coach Marc Anthony has made a career out of his passion for good food. “For years I have been testing and trying blends of spices thinking there must be an all purpose seasoning that bridges cultural and situational cooking. I want a blend I could season my tacos and pasta with and sprinkle over eggs in the morning.”
“My Wah Gwan™ seasoning to this day only sources the most quality imported ingredients. The Paprika in fact still comes from Spain and the Scotch Bonnet is grown by hand by the only person I found who can grow and dry the pepper to be just right. This is what set’s us apart and I stand by this product tearing through tins of it in our own home. Enjoy!” –Marc Anthony
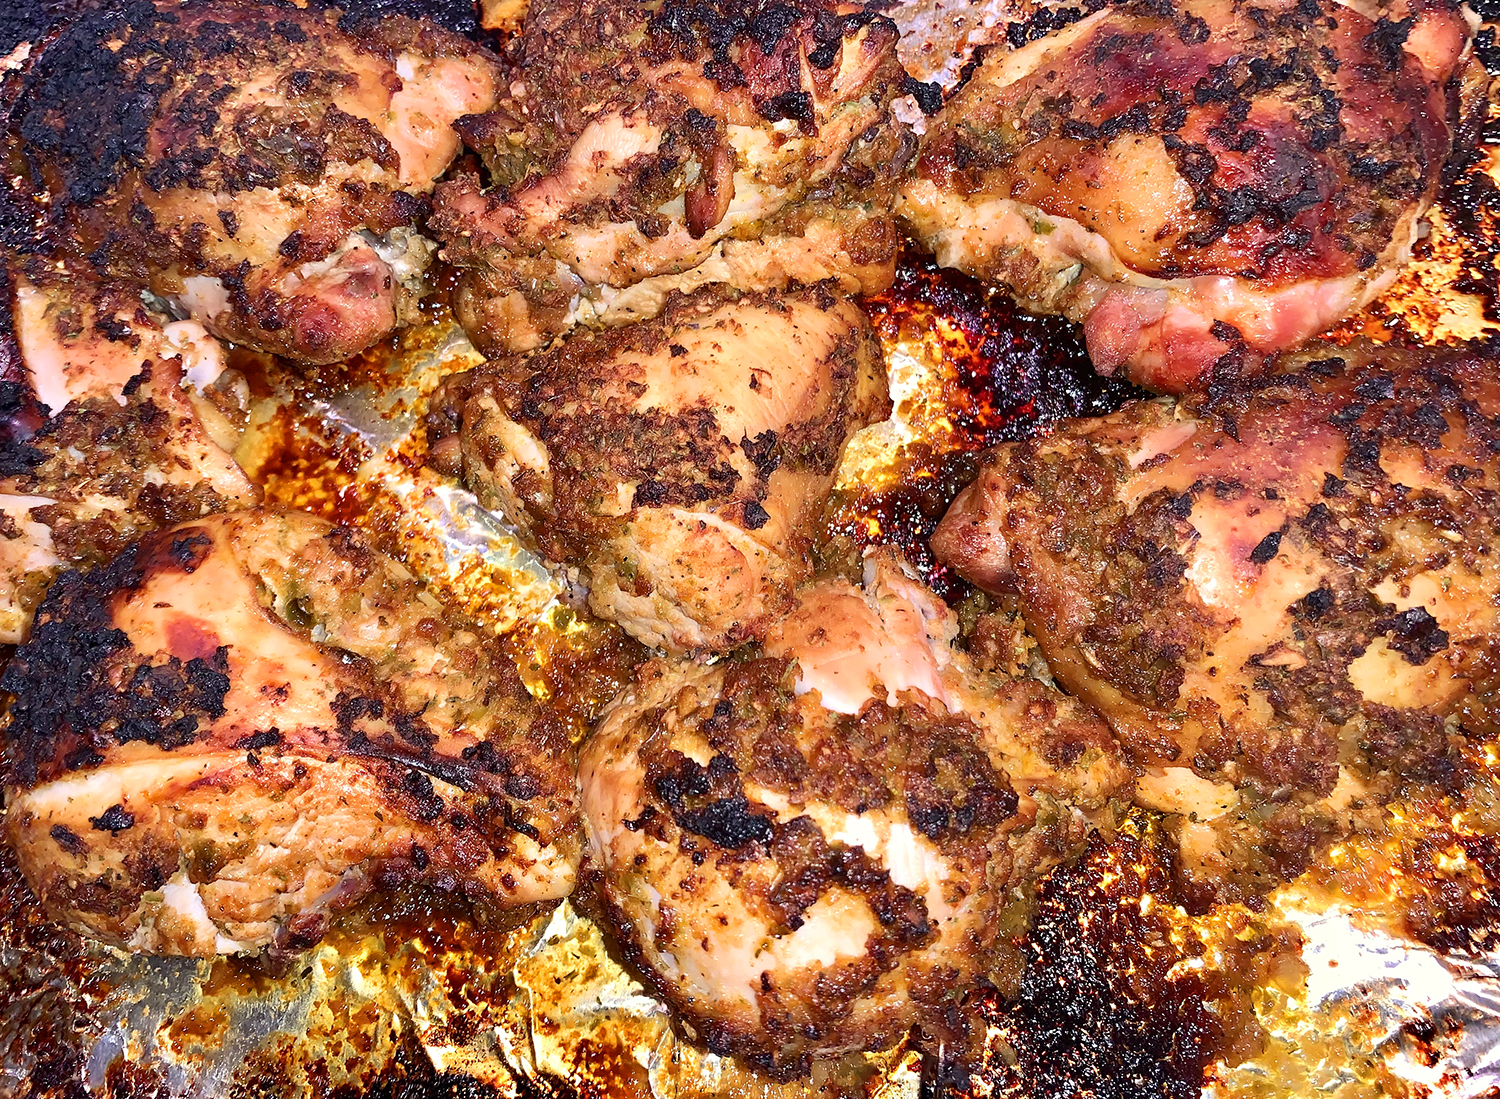
He makes a mean Jerk Chicken, a dish that is adopted by cultures worldwide mostly in African and Caribbean communities. Jerk is native to Jamaica as its signature flavors come from plants only found on that island. Pimento wood, scotch bonnet pepper and allspice berries complete the flavor profile of traditional Jamaican Jerk.
Unfortunately his recipe takes 8 hours to cook over a wood fire and uses many, many ingredients. I found another recipe from cooking classy.com, that although still needs a long marinating session, gets dinner on the table much quicker. But instead of using five different spices and dried herbs, I substituted 2 tablespoons of the Wah Gwan mix. (There is also a “hot” version if you are so inclined.)
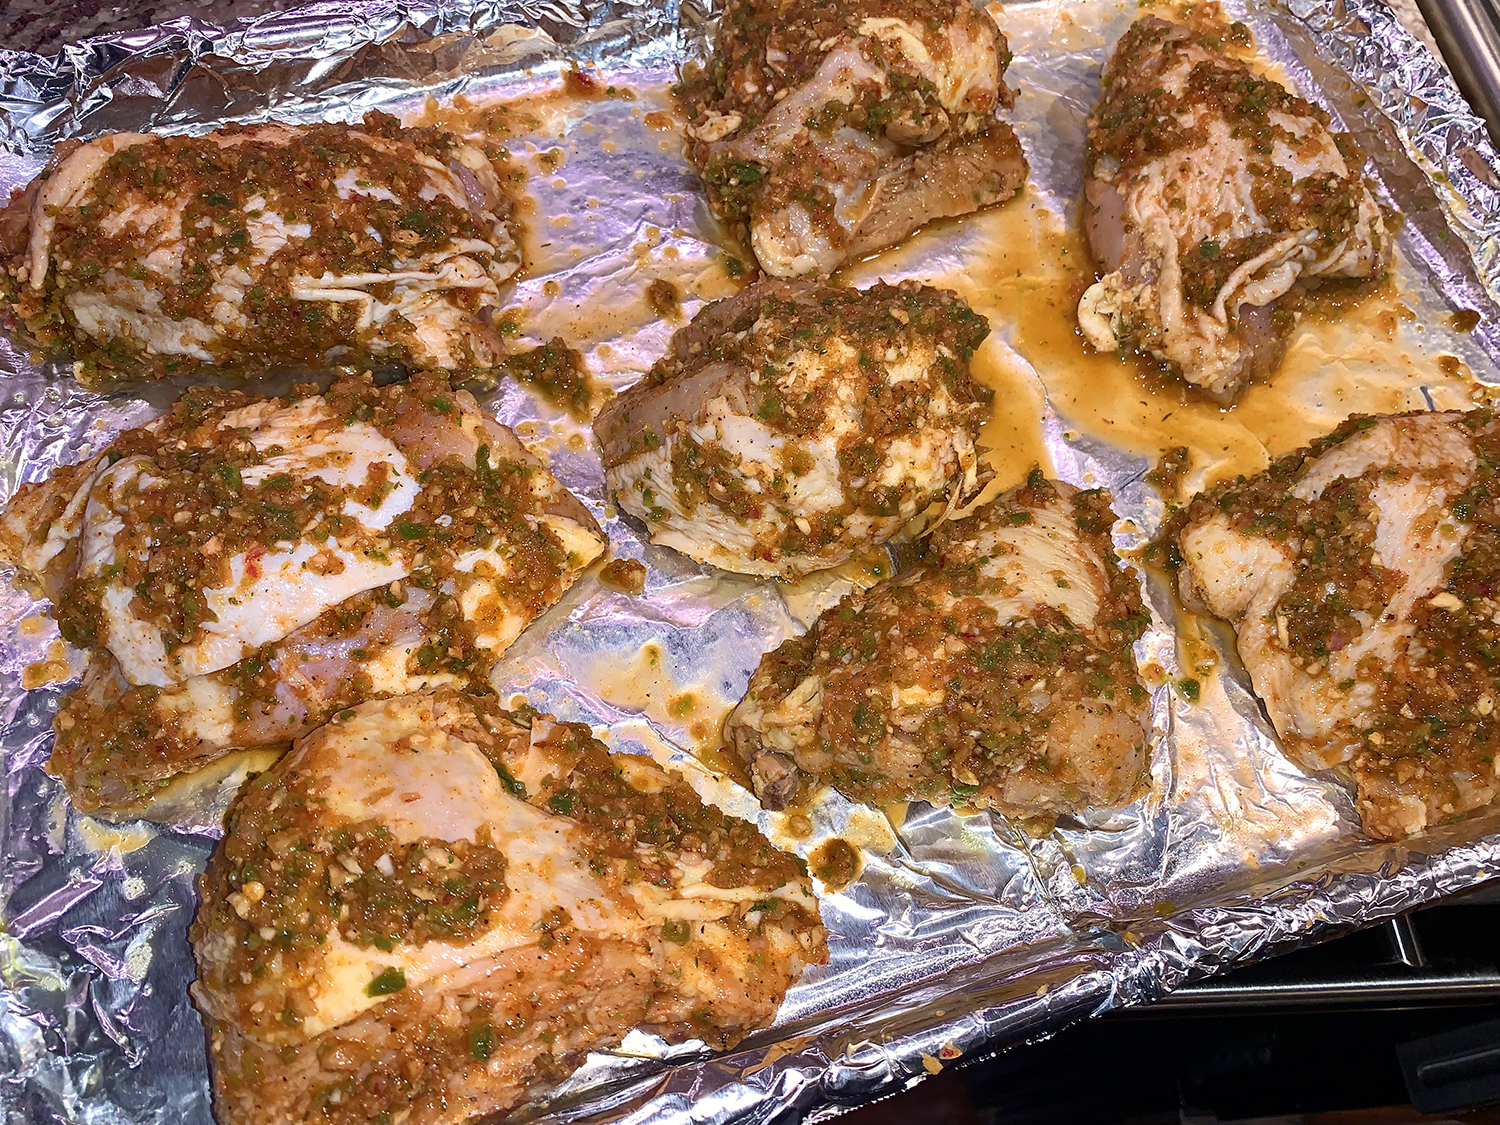
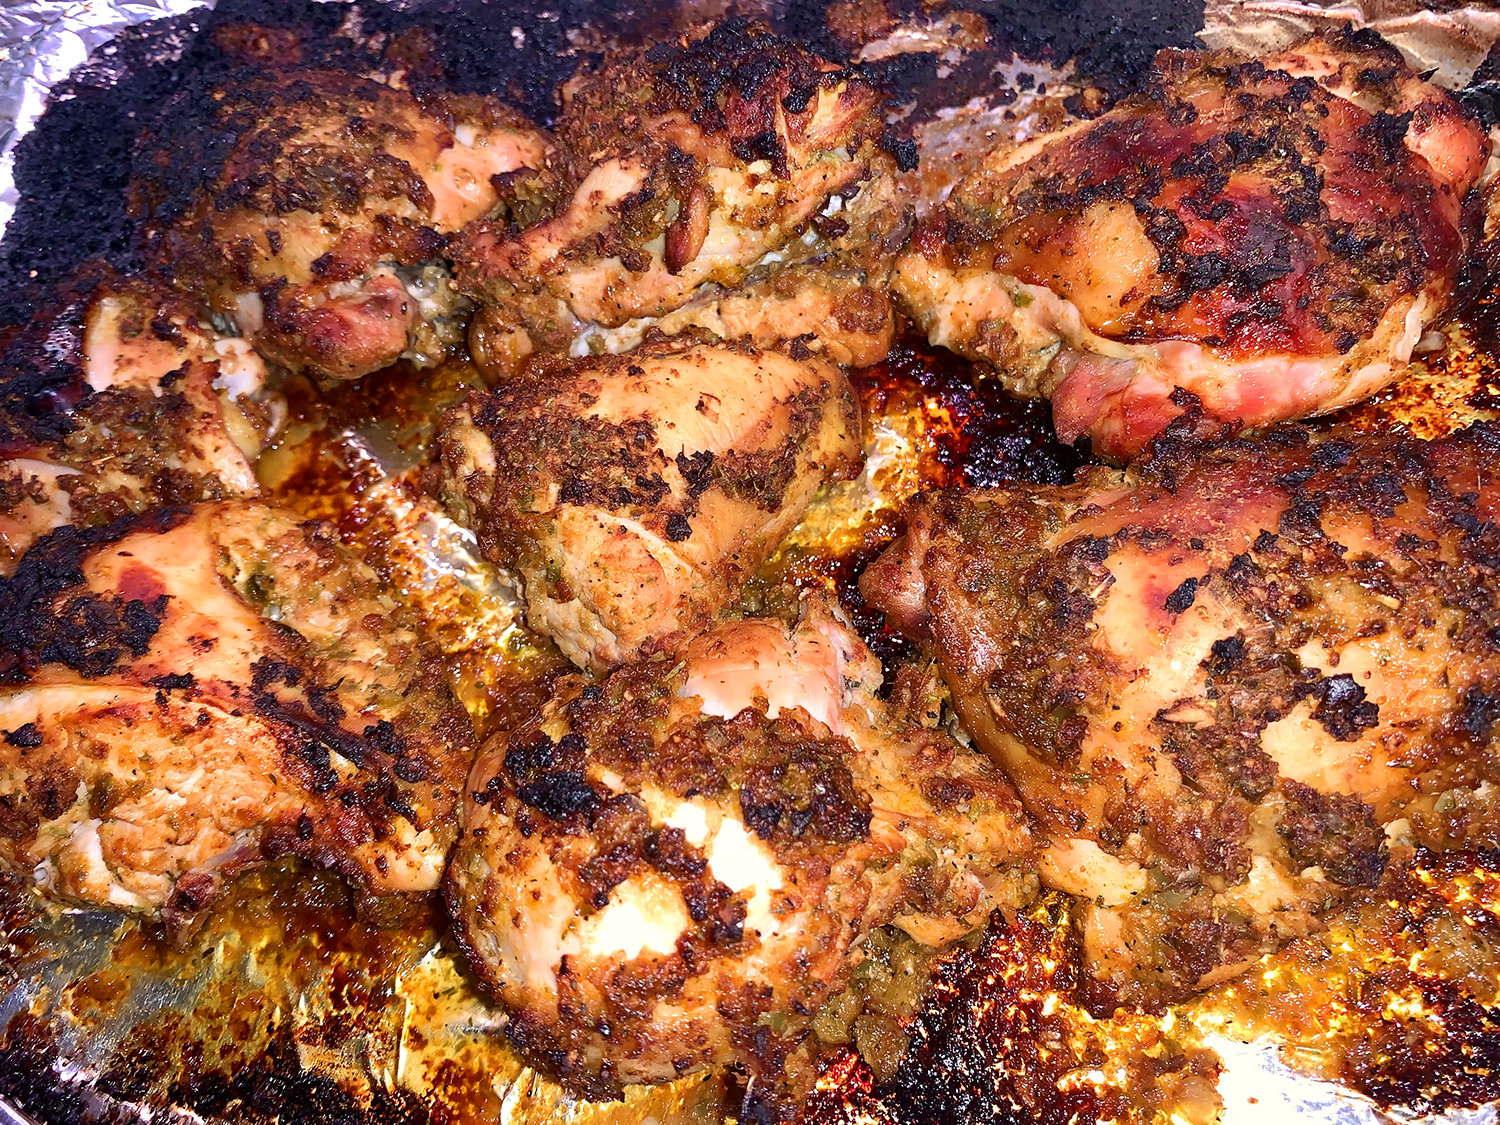
Below is the much less-involved recipe, but still incredibly flavorful thanks to hours of marinating in a vibrant and deliciously seasoned marinade. And who can resist that light char and crave-able spicy kick? Our dish included some quartered breast pieces along with the thighs to please those that prefer white meat over dark. We paired it with coconut rice and Swiss chard.
The end result is spicy, but not overly-so, at least to us. If you want to kick it up a notch, use habanero or scotch bonnet peppers in place of the jalapeños.
Grilling is also an option (see instructions below). The problem with that is, as you keep turning the chicken pieces, the jerk marinade chunks will fall off into the flames below, and those charred bits are part-and-parcel of what constitutes the appeal of this recipe.
8-10 bone-in skin on chicken pieces, thighs and legs (about 3 1⁄2 lbs.), trim excess fat and skin
6 green onions, cut into 2-inch pieces; or a small red onion
4 garlic cloves, peeled and smashed
2 jalapeño peppers, stemmed and seeded
1 1/2 -inch piece ginger, peeled and sliced
1/3 cup fresh lime juice
1/4 cup soy sauce
1 1/2 Tbsp. brown sugar
2 Tbsp. Wah Gwan spice, OR the 5 ingredients listed below
1 Tbsp fresh thyme leaves
1 tsp. freshly ground black pepper
1 tsp. ground allspice
1/2 tsp. ground cinnamon
1/2 tsp. ground nutmeg
Directions
Place chicken pieces in a gallon size resealable bag.
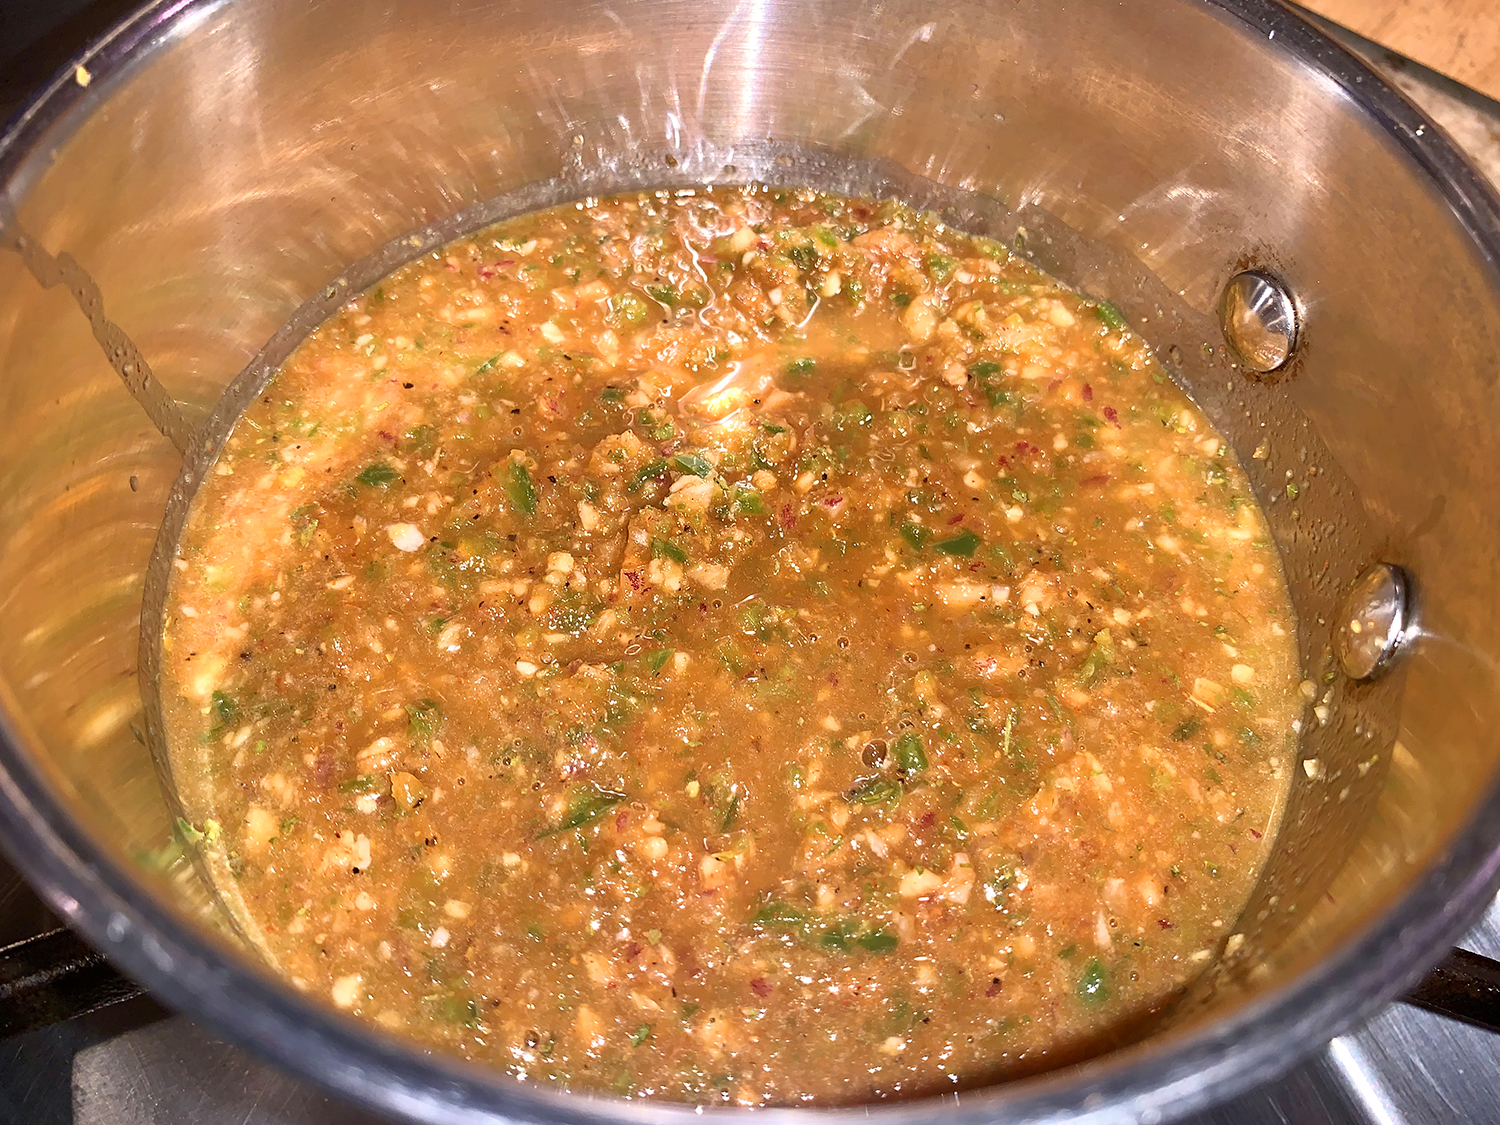
Add remaining ingredients to a food processor and plus several times to chop (it should be somewhat coarse). Pour mixture over chicken in bag, seal bag while pressing out excess air then rub marinade over chicken. Let rest in refrigerator 3 – 24 hours.
Oven instructions: Preheat oven to 375 degrees. Line a 18 by 13-inch baking sheet with aluminum foil and spray with non-stick cooking spray.
Remove chicken from marinade, leaving some chunks on the meat. Place the remaining marinade in a small sauce pan, heating on low while the chicken bakes. Serve alongside the cooked chicken for garnish.
Arrange pieces on baking sheet leaving space between them. Bake in preheated oven until cooked through, about 45 – 50 minutes, while broiling during the last few minutes for better browning.
Or grill instructions: preheat a gas grill to medium-high heat (about 400 degrees). Clean grill grates and rub lightly with oil using tongs and an oiled paper towel.
Grill until chicken is cooked through, turning occasionally (and reducing burning temperature slightly if it’s browning too quickly) about 30 minutes.
Now, if you feel like going the extra mile, you can go online to Marc Anthony’s website and get the directions to make this jerk glaze which includes all of the ingredients below.
¼ cup olive oil
¼ cup jerk marinade
2 Tbsp. Wah Gwan®
½ bulb of garlic
½ cup Jamaican dark rum
½ cup beer
½ cup espresso
½ cup honey
½ cup maple syrup
1 peel from a lime
½ cup citrus juice tangerine orange
¼ cup cubed mango
In a pot on medium heat, add olive oil. Bring to temp and add marinade. Cook for 2 minutes two cook the rawness out of the marinade. Add Wah Gwan® and stir to combine. Cook for 2 minutes, then add garlic clove cut side down. Cook for another minute or so then add all of the next ingredients and bring to a boil. Turn heat to medium high and let the glaze thicken. Remove from heat and set aside.
Odd name for a refreshing unique drink with bright, citrusy, herbal and anise flavors. But if you need to purchase all of the liquor that comprises this cocktail, it may put you in a tail spin and a need to be revived!
Luckily, we had all of it except the absinthe, and that alone is quite pricey. Since the libation uses a minuscule amount, you may want to consider using Herbsaint (prices vary), or dry anisette (much more reasonable), in place of the absinthe.
We both gave it two thumbs up. A refreshing tipple that would revive any corpse!
Add gin, Lillet Blanc, liqueur, lemon juice, simple syrup, and absinthe to cocktail shaker, then fill with ice. Shake mixture until fully combined and well chilled, about 15 seconds.
Double-strain cocktail into two chilled cocktail glasses. Garnish with orange twist and serve.
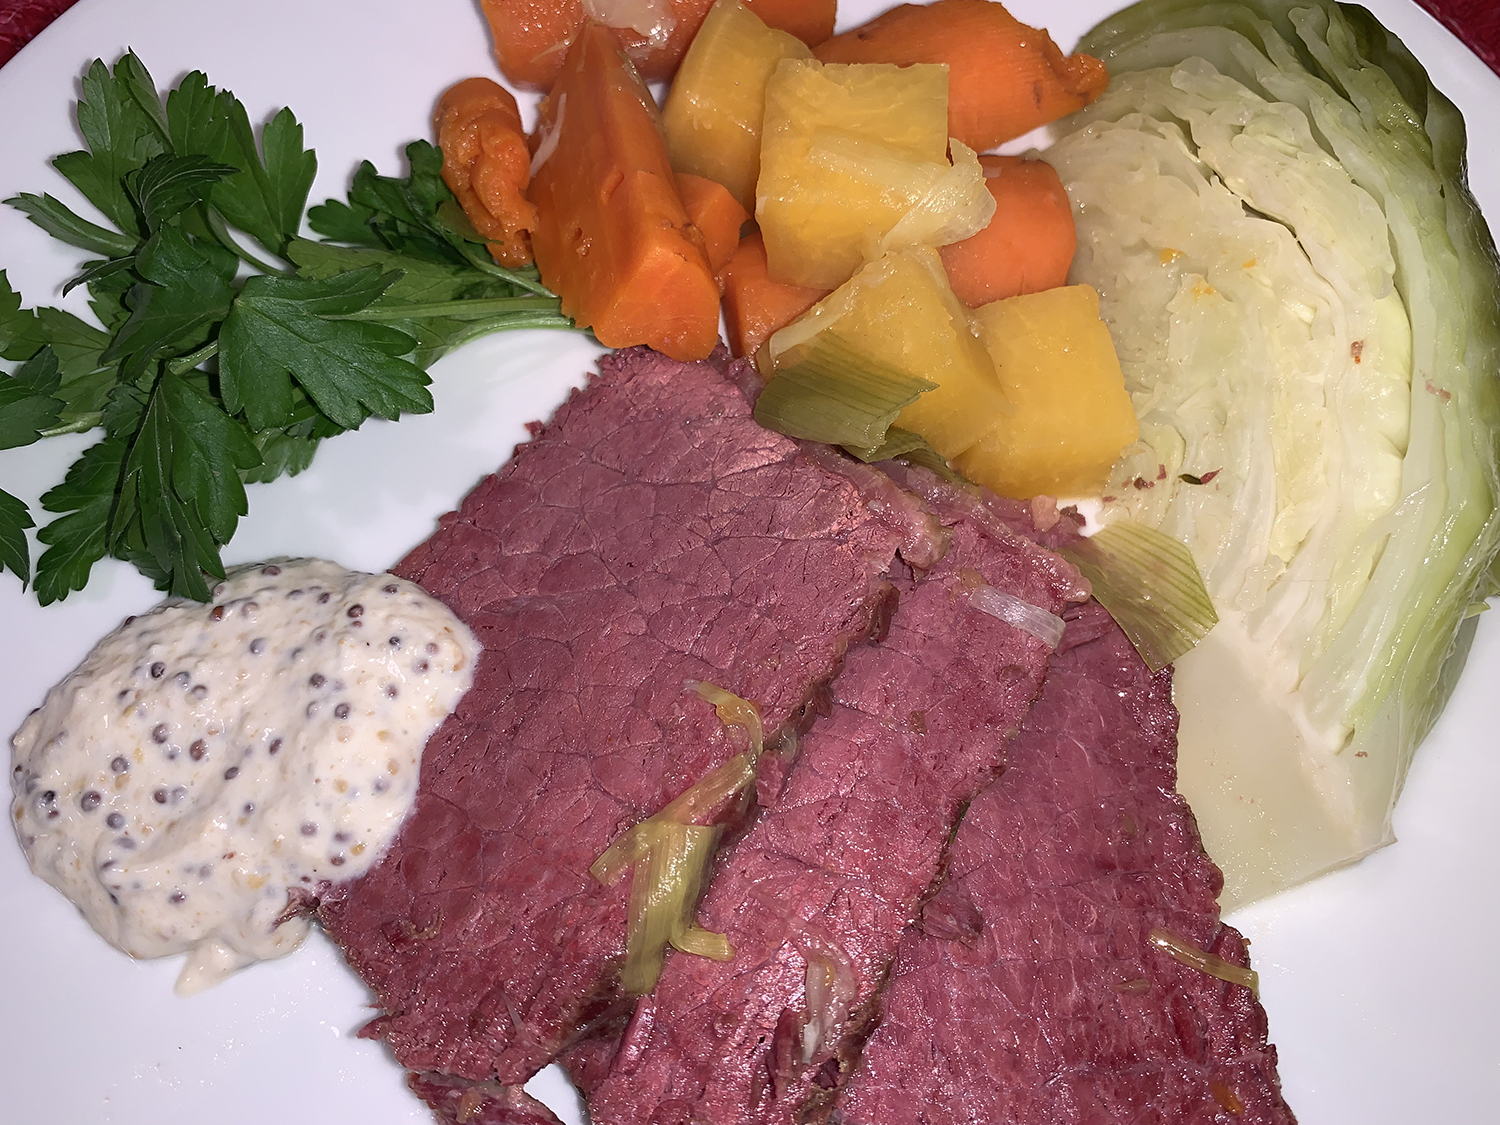
Here’s a perfect solution to celebrating a traditional St. Patrick’s day dinner without the usual long process. It’s an easy express route that uses your pressure cooker/Instant Pot. Even this method takes over two hours, so plan ahead.
When it comes to the meat itself, we prefer a thicker brisket as opposed to the flatter ones. Mix up the sour cream, whole-grain mustard and horseradish into one condiment adjusting the taste to suit your personal preferences. In our case, that means a lot of horseradish!
2 leeks, white and light green parts only, split lengthwise, cleaned and cut into 1-inch lengths
4 carrots, cut into 2-inch pieces
1 small head green cabbage, core intact, cut into thick wedges
1/4 cup loosely packed fresh parsley leaves, chopped
Sour cream, prepared horseradish and whole-grain mustard, for serving
Directions
Put the onion, thyme, garlic, pickling spice, brisket and 6 cups water into an Instant Pot®. Follow the manufacturer’s guide for locking the lid and preparing to cook.
Seal and cook on high pressure for 85 minutes. Follow the manufacturer’s guide for quick release, then remove the meat and set aside.
Strain the liquid through a fine mesh strainer into a bowl and return 2 cups back to the Instant Pot® along with the butter.
Add the rutabaga, leeks, carrots and cabbage to the Instant Pot®. Seal and cook on high pressure for 7 minutes. Quick release the steam.
Thinly slice the brisket across the grain and transfer to a serving platter. Arrange the vegetables around the meat, sprinkle with the parsley and serve with the sour cream, horseradish and mustard on the side.
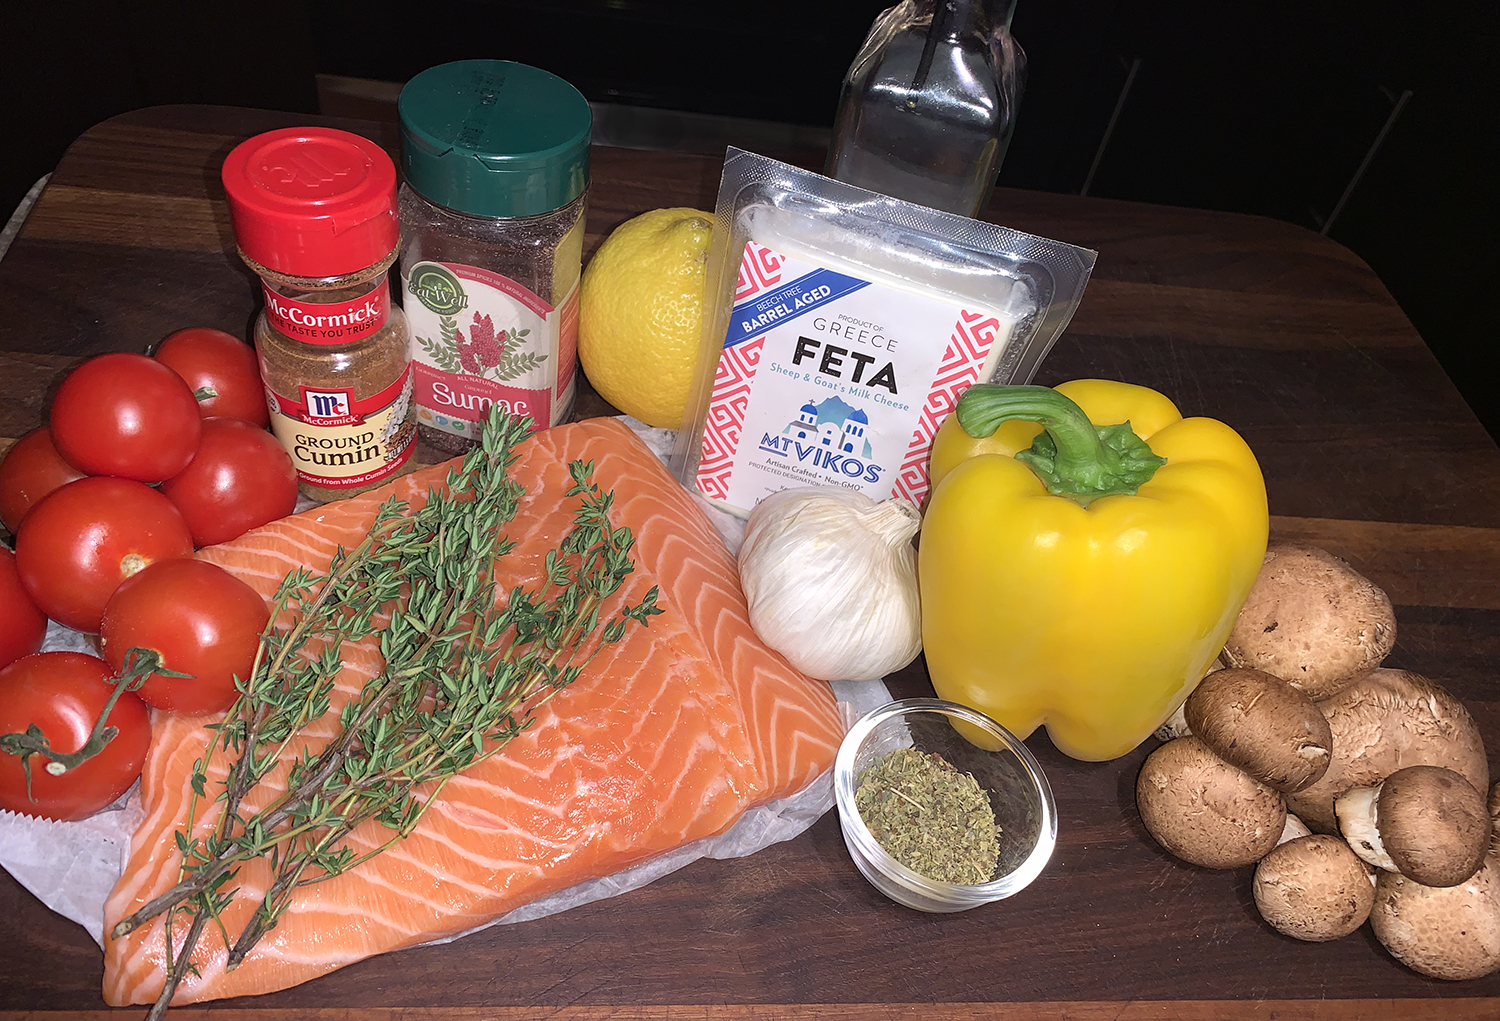
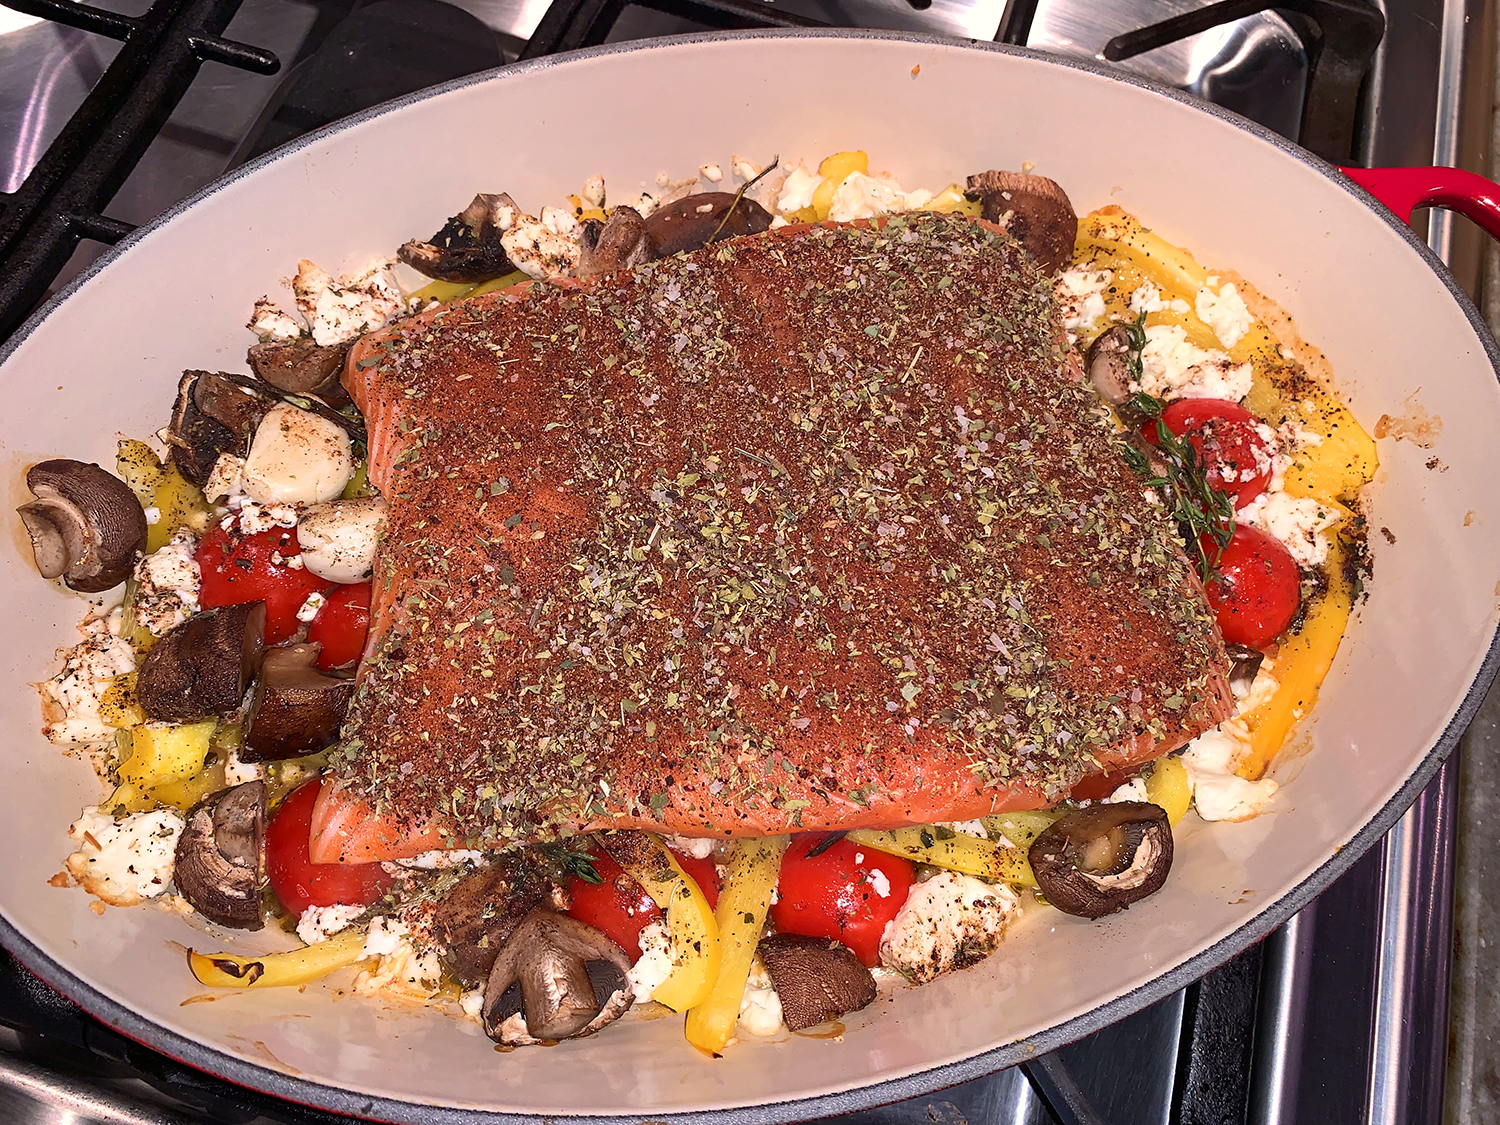
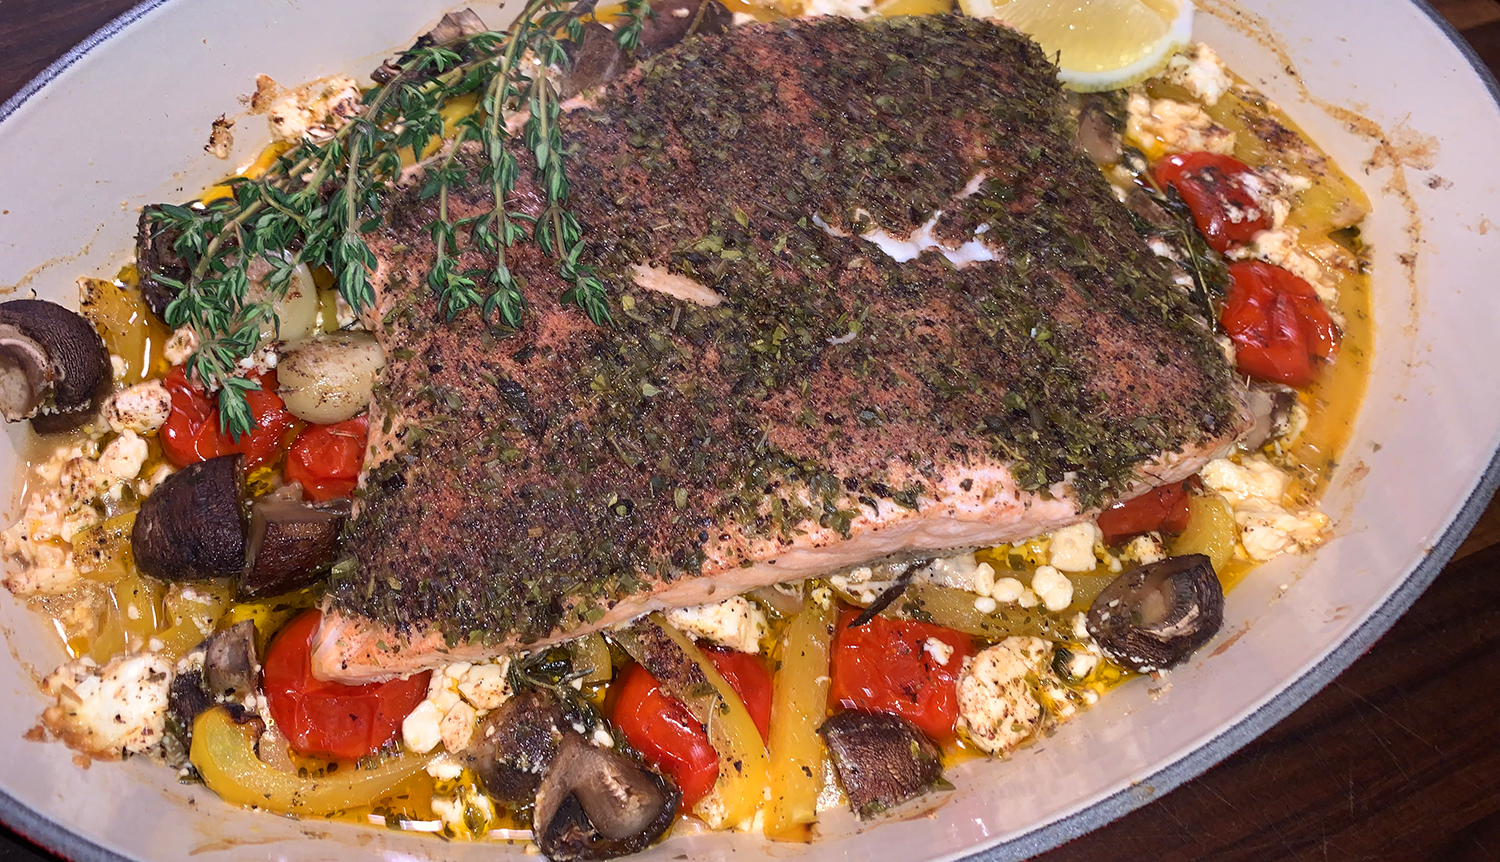
This one-pan dinner is ready in no time, and you’ll love the bold Greek vibes in this dish. A perfect weeknight meal, this easy, “fancy” salmon recipe with vegetables and feta is brimming with healthy ingredients and enlivened Mediterranean flavors.
A couple of suggestions so that your salmon won’t dry out. Bring the fish closer to room temperature before baking. About 15 minutes before you start cooking, set the salmon on the counter to get it as close to room temperature as possible. Allowing the salmon fillets to return to room temperature helps them cook more evenly.
And, cover with foil to bake. Covering the pan with foil will trap the moisture and help cook the fish so that it is perfectly tender, moist, and flaky. Here, you’ll also par-cook the vegetables briefly before adding the salmon in.
The original recipe indicated to first cook the vegetables for 5-10 minutes before adding the salmon. We did not feel they were ready at that point and cooked them an additional 5 minutes, totaling 15 altogether. Since our fish was one slab, we let it sit out for 30 minutes to come to room temperature. Plus, due to the size and thickness, it took double the time at 20 minutes to cook to medium, 130°F after adding it atop the vegetables, covered with foil.
So we had to bide our time a little longer, but it was sooo worth the wait!
1 bell pepper, any color, cored and sliced into thin sticks
5 oz. cremini mushrooms, trimmed and halved
4 to 5 large garlic cloves, peeled
5 to 6 oz. feta cheese block, cut into large chunks
6 to 7 sprigs of fresh thyme
Kosher salt and black pepper
Extra virgin olive oil
4 6-oz. portions salmon fillet
1 to 2 large lemons, halved, for serving
Directions
Heat the oven to 425°F and arrange a rack in the middle.
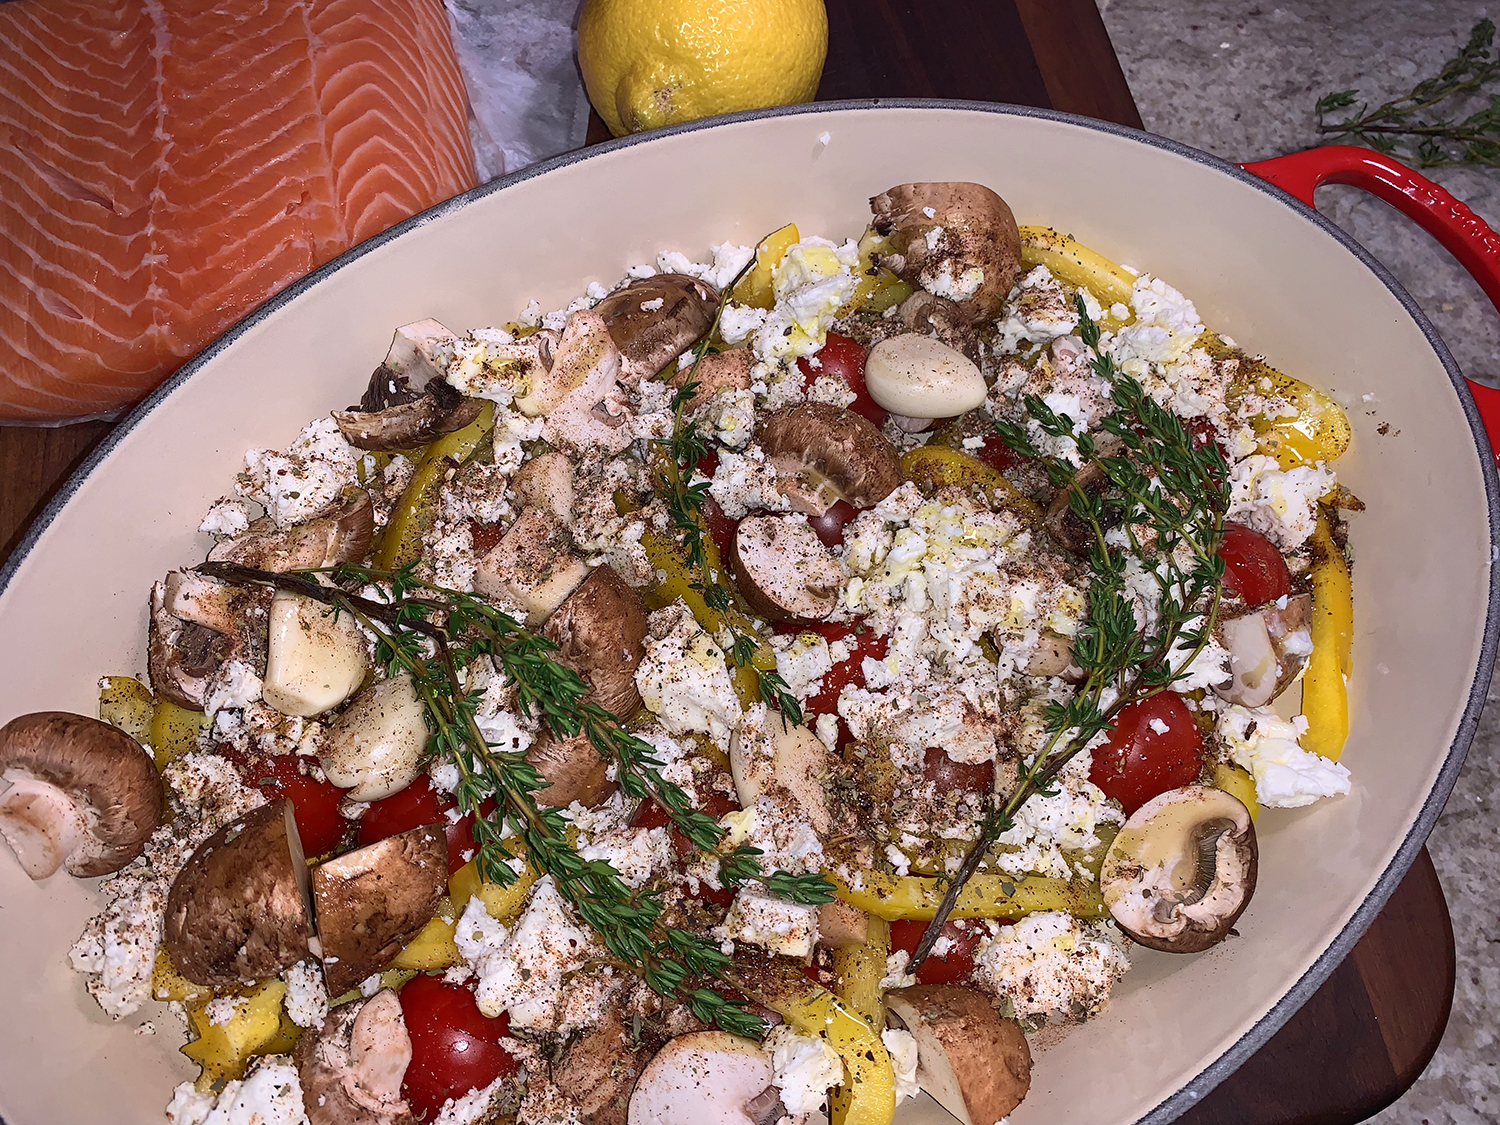
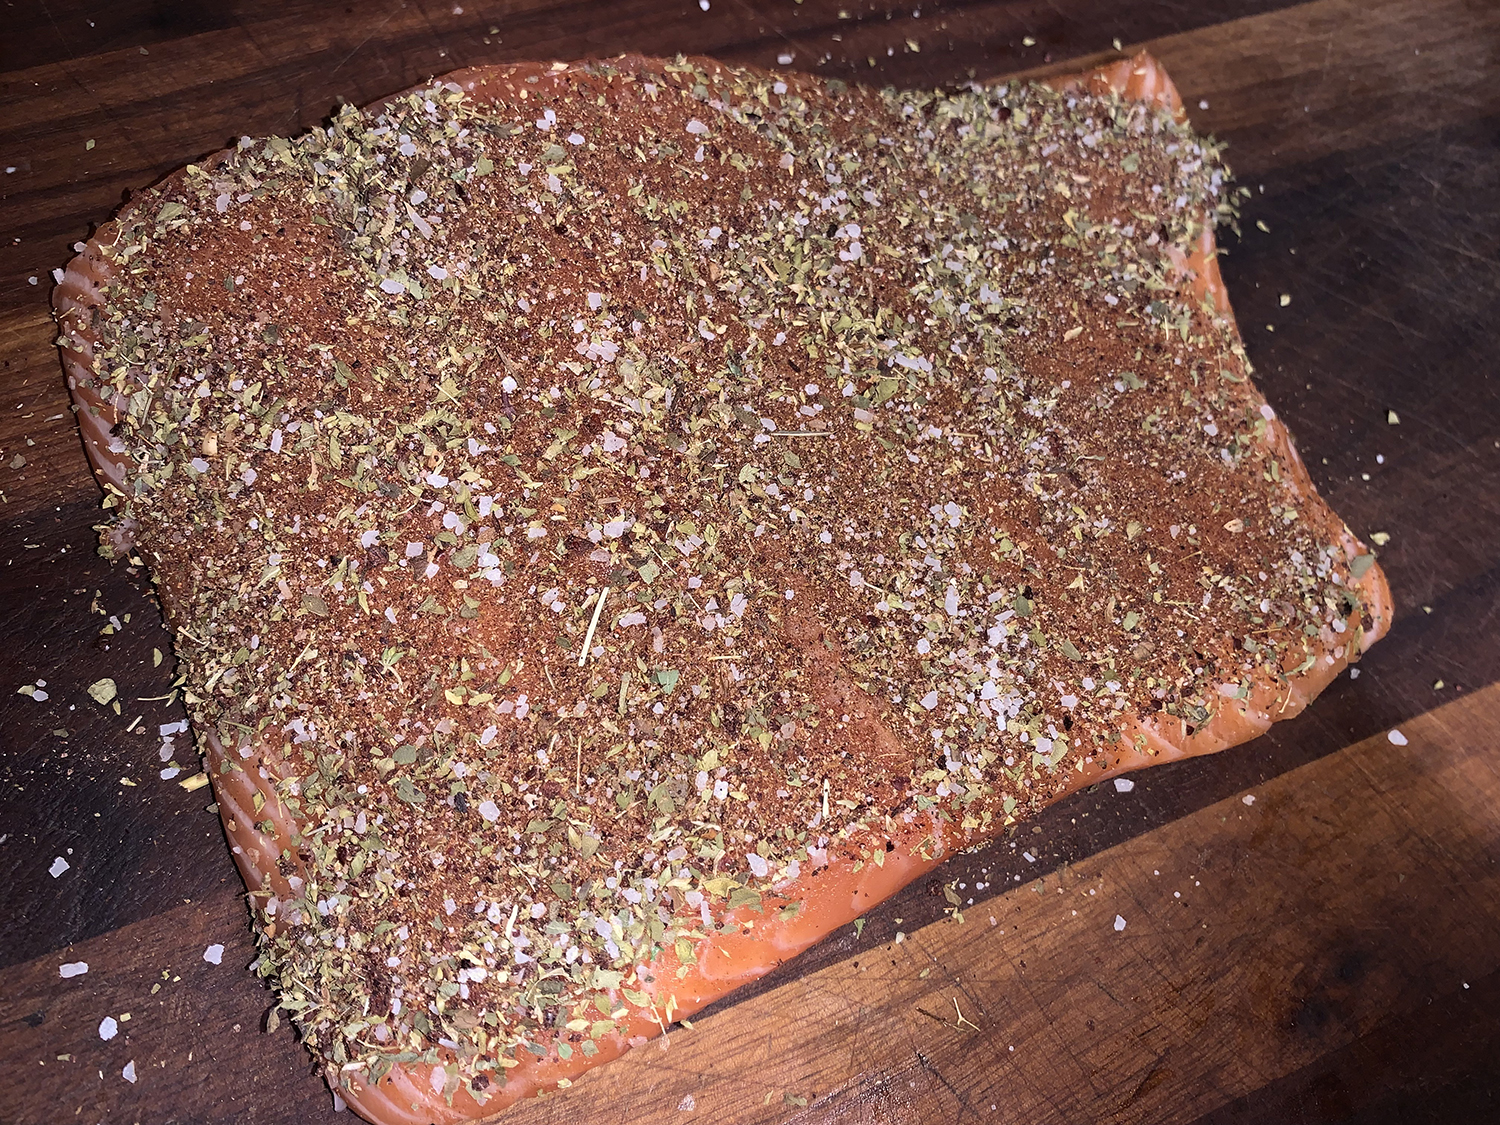
In a small bowl, combine the oregano, sumac, and cumin.
In a baking dish or sheet-pan, arrange the tomatoes, mushrooms, bell peppers, and 4 to 5 whole garlic cloves. Nestle the chunks of feta in between. Sprinkle with 1 ½ teaspoons of the spice mixture and a good pinch of kosher salt and black pepper. Add a few sprigs of fresh thyme. Drizzle with 1 to 2 tablespoon olive oil.
Place the sheet pan in the heated oven on the center rack. Bake for 15 minutes until the veggies start to soften.
Meanwhile, pat the fish dry and season on both sides with kosher salt and black pepper and the remainder of the spice mixture.
Carefully remove the sheet pan/baking dish from the oven and add the fish in with the veggies and feta.
Cover the sheet pan/baking dish with foil and return to the center rack of the heated oven. Cook for about 10 minutes or until the fish is cooked through and flakes easily. (As one thick slab, ours took 20 minutes to reach the preferred 130°F.)
Remove from the oven and immediately squeeze lemon juice onto the fish.