Mushrooms are widely known for their great taste and amazing health benefits. Packed with a ton of essential vitamins and minerals, they make for an excellent addition to your diet, adding flavor to many different recipes. Thank goodness we love them!
This hearty plant-based mushroom ragù consists of readily available fresh mushrooms and is ready in about an hour. Three types of the funghi are incorporated in this recipe, but feel free to use just one or two types to make the sauce even easier. Serve vegan ragù over polenta, pasta, couscous, or even as a topping for steak or chicken.
Classic or vegan mushroom ragù will keep in the refrigerator for up to 5 days in an airtight container; in the freezer for up to 6 months. To reheat, spoon the ragù sauce into a pot over medium heat until warmed through. If it has become too thick, add a little more liquid (water or vegetable broth) to loosen it a little.
Make it even a bit healthier by using a whole wheat pasta. Of course if you add grated cheese like we did, it is no longer vegan, but we were OK with that.
In a large pot, heat 3 tablespoons extra virgin olive oil over medium-high heat until shimmering but not smoking. Add the onions, carrots, and garlic. Season with a big pinch of kosher salt. Cook, stirring occasionally, until the vegetables have softened, about 5 minutes.
Add the mushrooms and season with another dash of salt. Add a drizzle more of olive oil and a little bit of the broth. Cook the mushrooms for about 5 minutes until they begin to soften and cook down a little bit.
Add the thyme, oregano, parsley, and a good dash of black pepper. Stir.
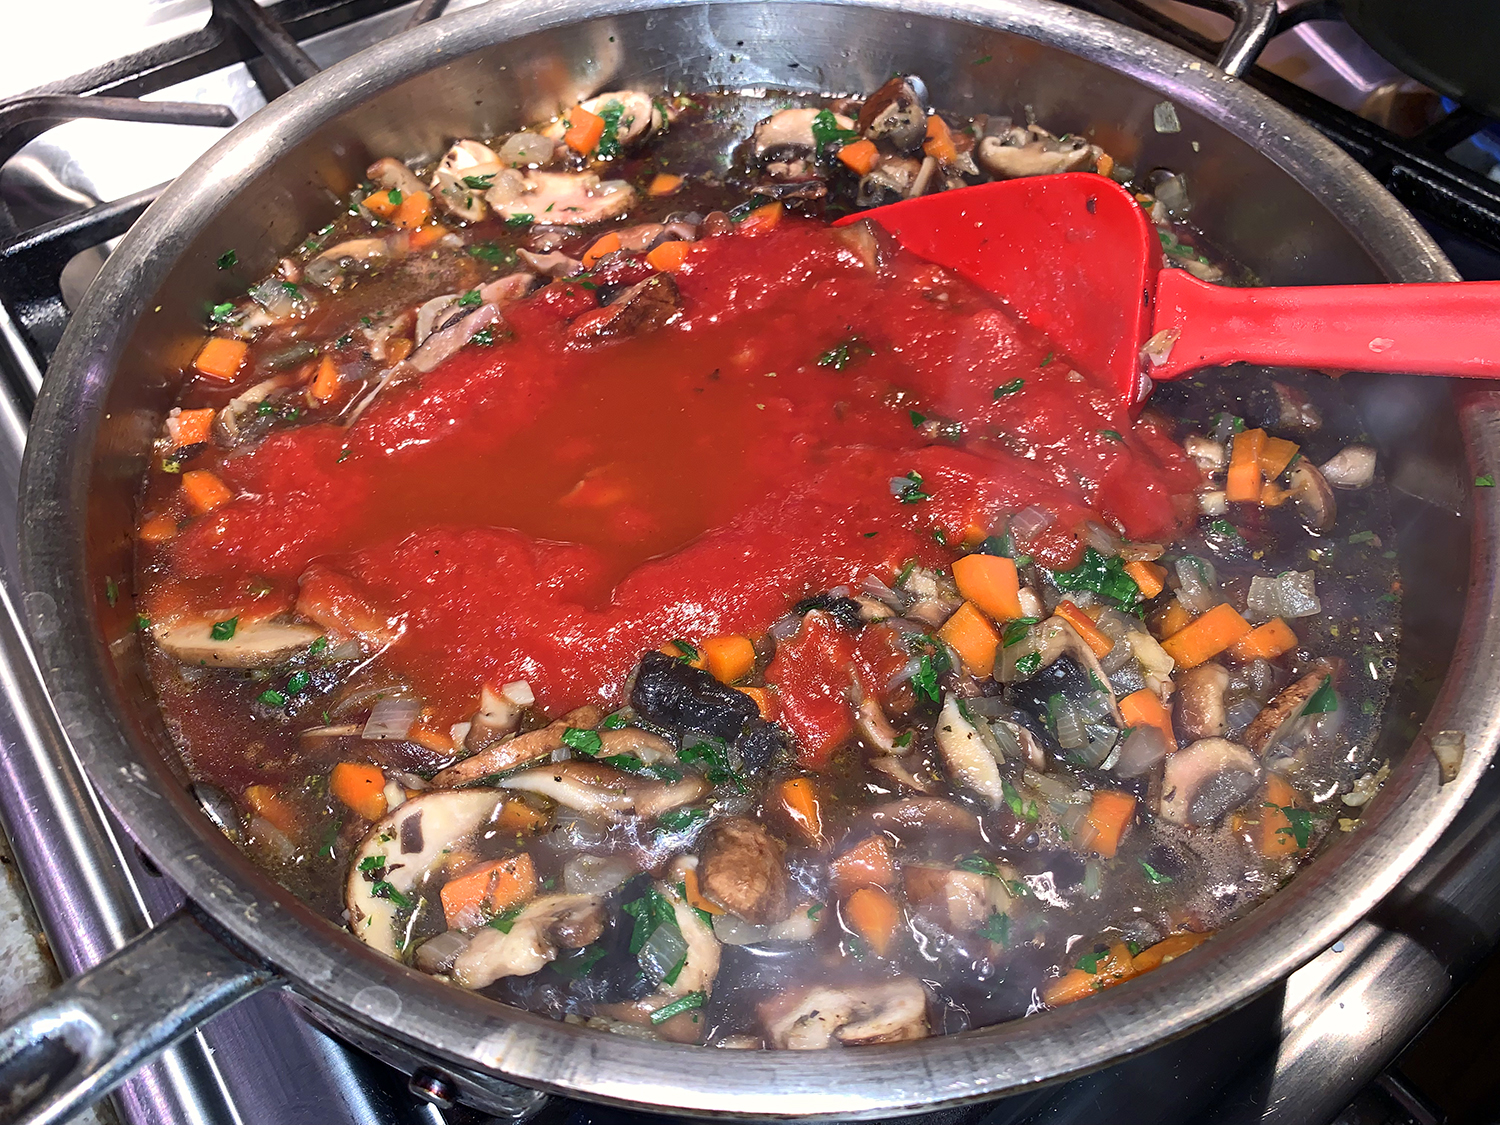
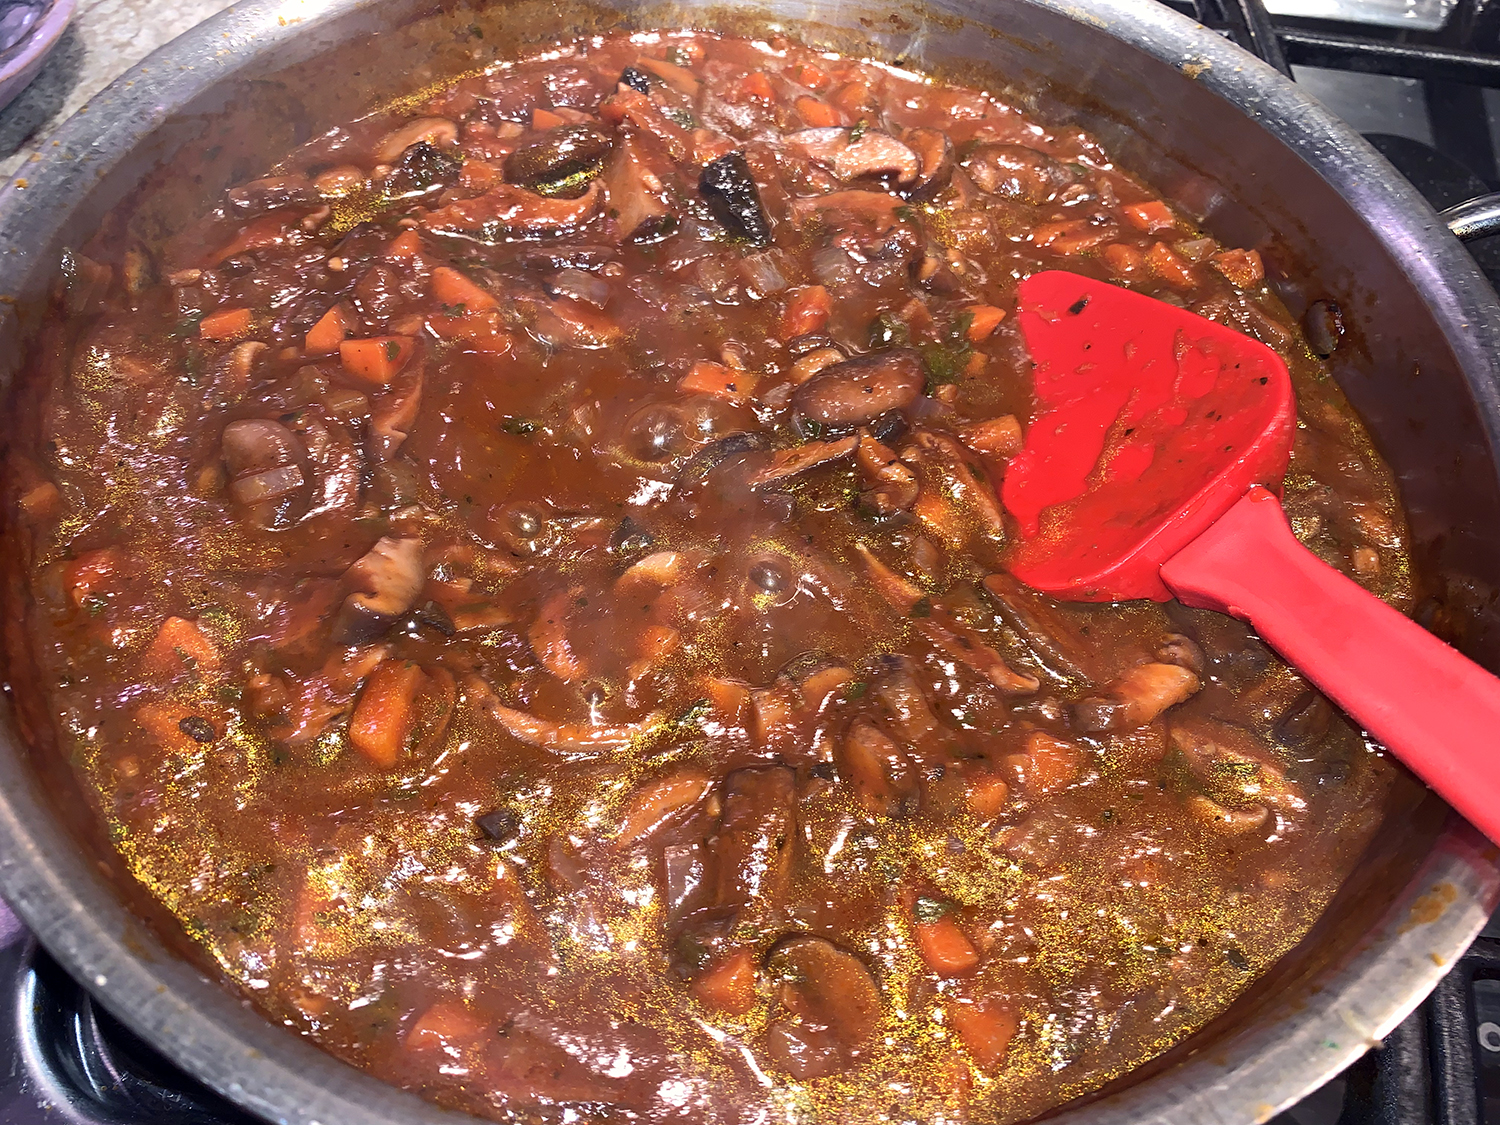
Finally, add the red wine, tomato sauce, and the remainder of the broth. Bring to a boil for 5 minutes, then reduce the heat to low and cover. Cook for 20 minutes or so covered, then uncover and allow the mushrooms to cook some more (about 15 to 20 minutes) until the mixture thickens to a ragù.
To finish, taste and adjust salt to your liking. Stir in a bit more fresh parsley. If you like, add in the chopped hazelnuts (optional).
Serve with your favorite pasta, polenta, or even pearl couscous
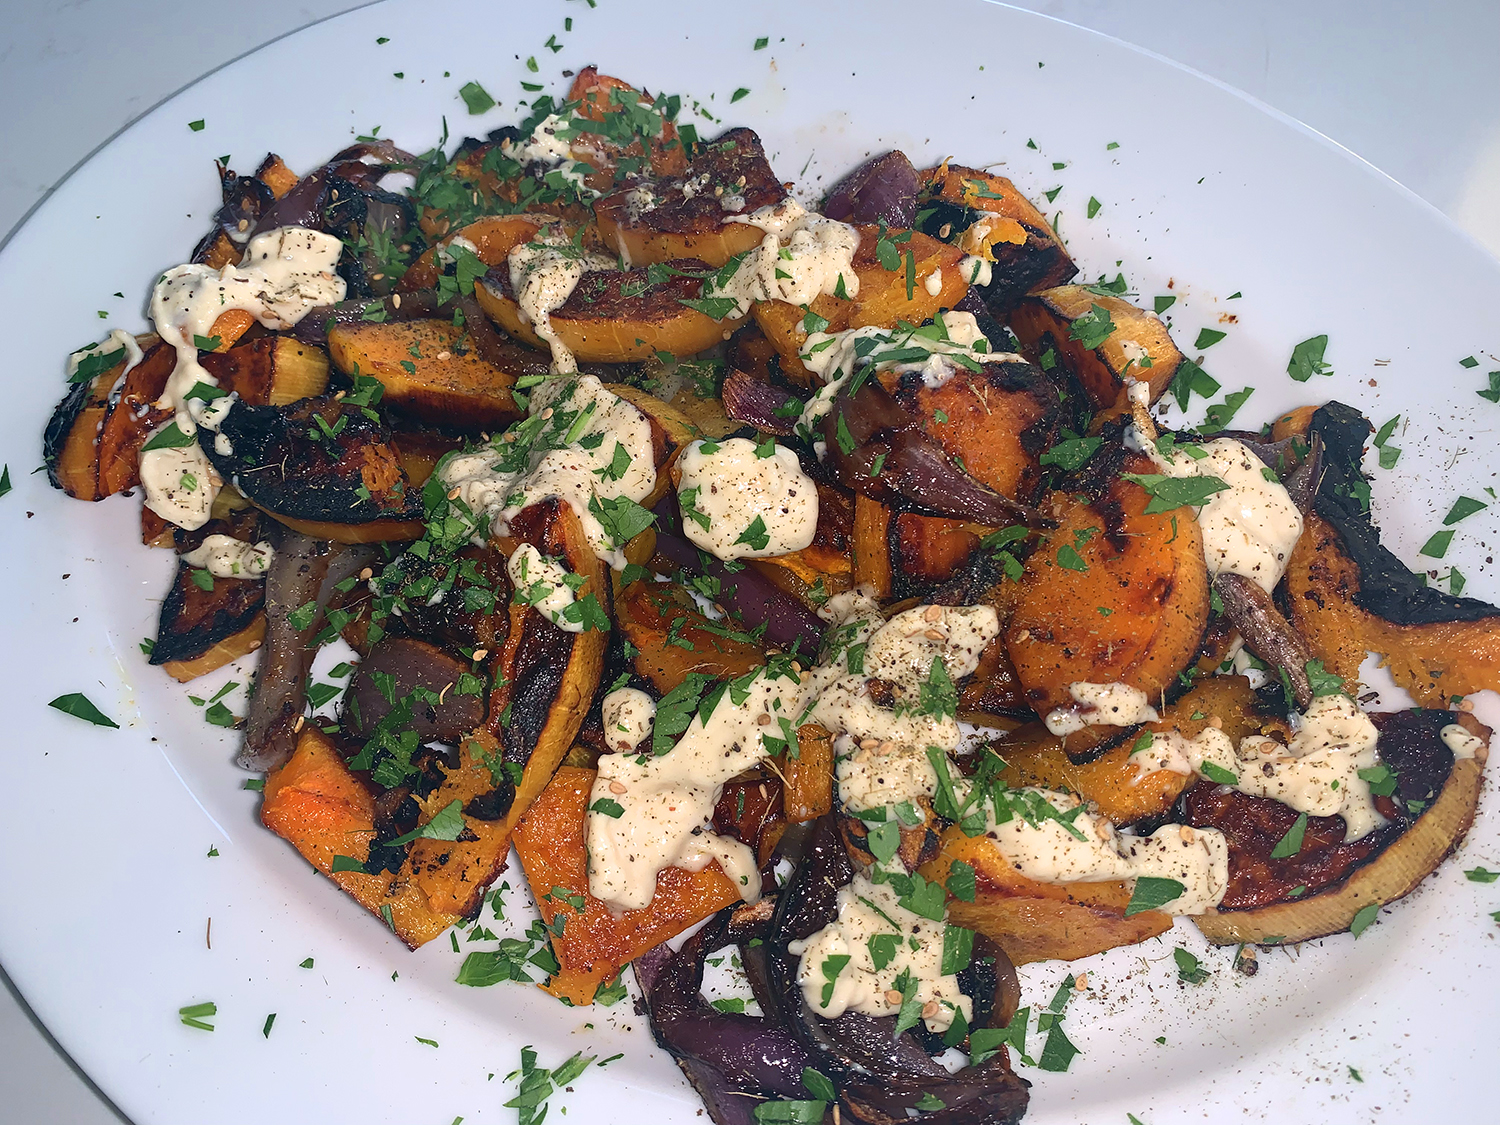
This may be a new cool weather side dish favorite. A recipe from Milk Street, it combines roasted butternut squash and red onion, then finishes them with a tahini-lemon-garlic sauce and a dusting of za’atar—a Middle Eastern herb, spice and seed blend.
Before roasting, the squash and onion are tossed with olive oil and honey to encourage browning. After sprinkling on the za’atar, you scatter on chopped parsley or basil chiffonade for color and fresh, herbal notes.
Don’t worry if the pieces of squash are in different shapes; this is unavoidable. But when cutting the squash quarters crosswise, be sure they’re no thicker than ¾ inch and that the chunks don’t measure larger than 1½ inches in any dimension or they’ll take too long to roast.
We had less than half a red onion on hand, so we threw in a small shallot to help compensate. But the onion was so good roasted, that I want to make sure to have a large whole one when we make it again.
1 medium red onion, root end intact, cut into 1-inch wedges
2 Tbsp. tahini
4 tsp. lemon juice
1 medium garlic clove, finely grated
1 tsp. za’atar
¼ cup lightly packed fresh flat-leaf parsley, roughly chopped, or lightly packed fresh basil, cut into thin ribbons
Directions
Heat the oven to 475°F with a rack in the lower-middle position. In a large bowl, whisk together 2 tablespoons oil, the honey and ½ teaspoon salt. Add the squash and onion, then use your hands to rub the mixture over the vegetables until well coated.
Distribute in an even layer on a rimmed baking sheet and roast for 15 minutes. Using a wide metal spatula, flip the vegetables, then roast until nicely browned and a skewer inserted into the squash meets no resistance, 12 to 15 minutes.
Meanwhile, in a small bowl, whisk together the remaining 1 teaspoon oil, the tahini, lemon juice, garlic, ¼ teaspoon salt and 1 teaspoon water; the mixture should have the consistency of thin yogurt (if too thick, whisk in additional water 1 teaspoon at a time to thin). Set aside.
When the vegetables are done, transfer them to a serving platter. Drizzle with the tahini-lemon mixture, then sprinkle with the za’atar and parsley.
Having a ready-made pizza delivered to your doorstep is certainly the easy route. But often times we love a culinary challenge, and this pizza recipe from Milk Street proved to be just that. We made our dough from scratch, even warmed it up to a perfect 75° in a sous vide bath, but it still was tricky to stretch out. You can always purchase a pre-made dough and save yourself some aggravation, just sayin’…
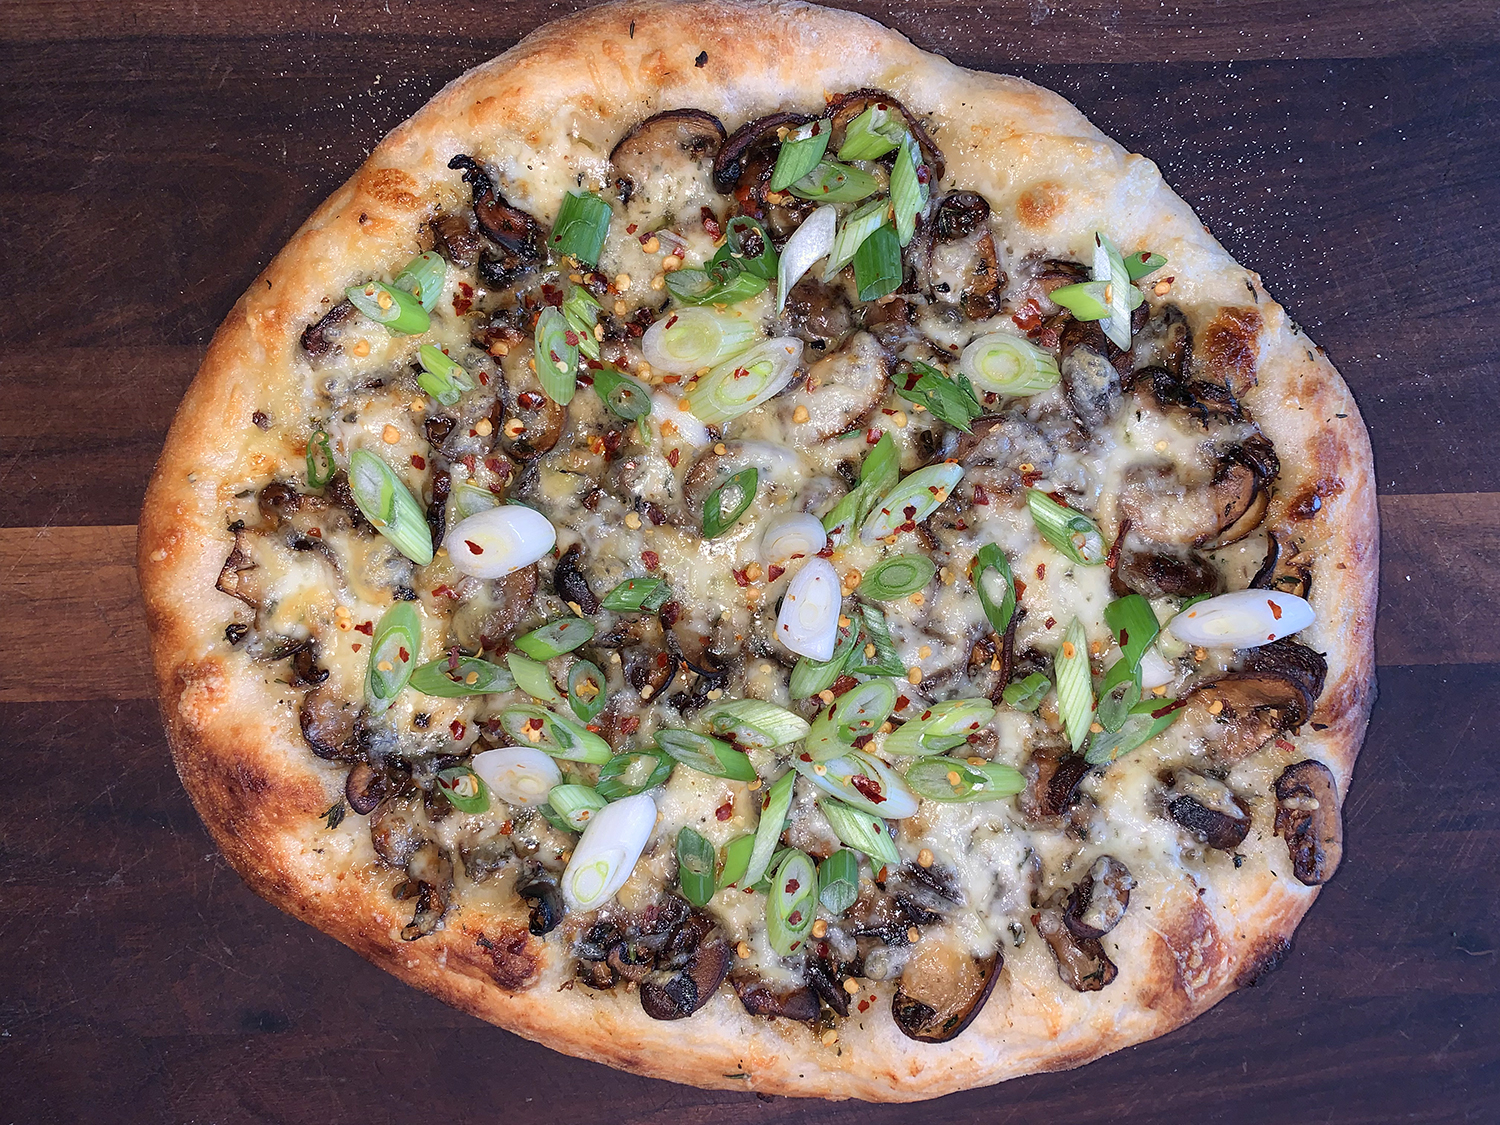
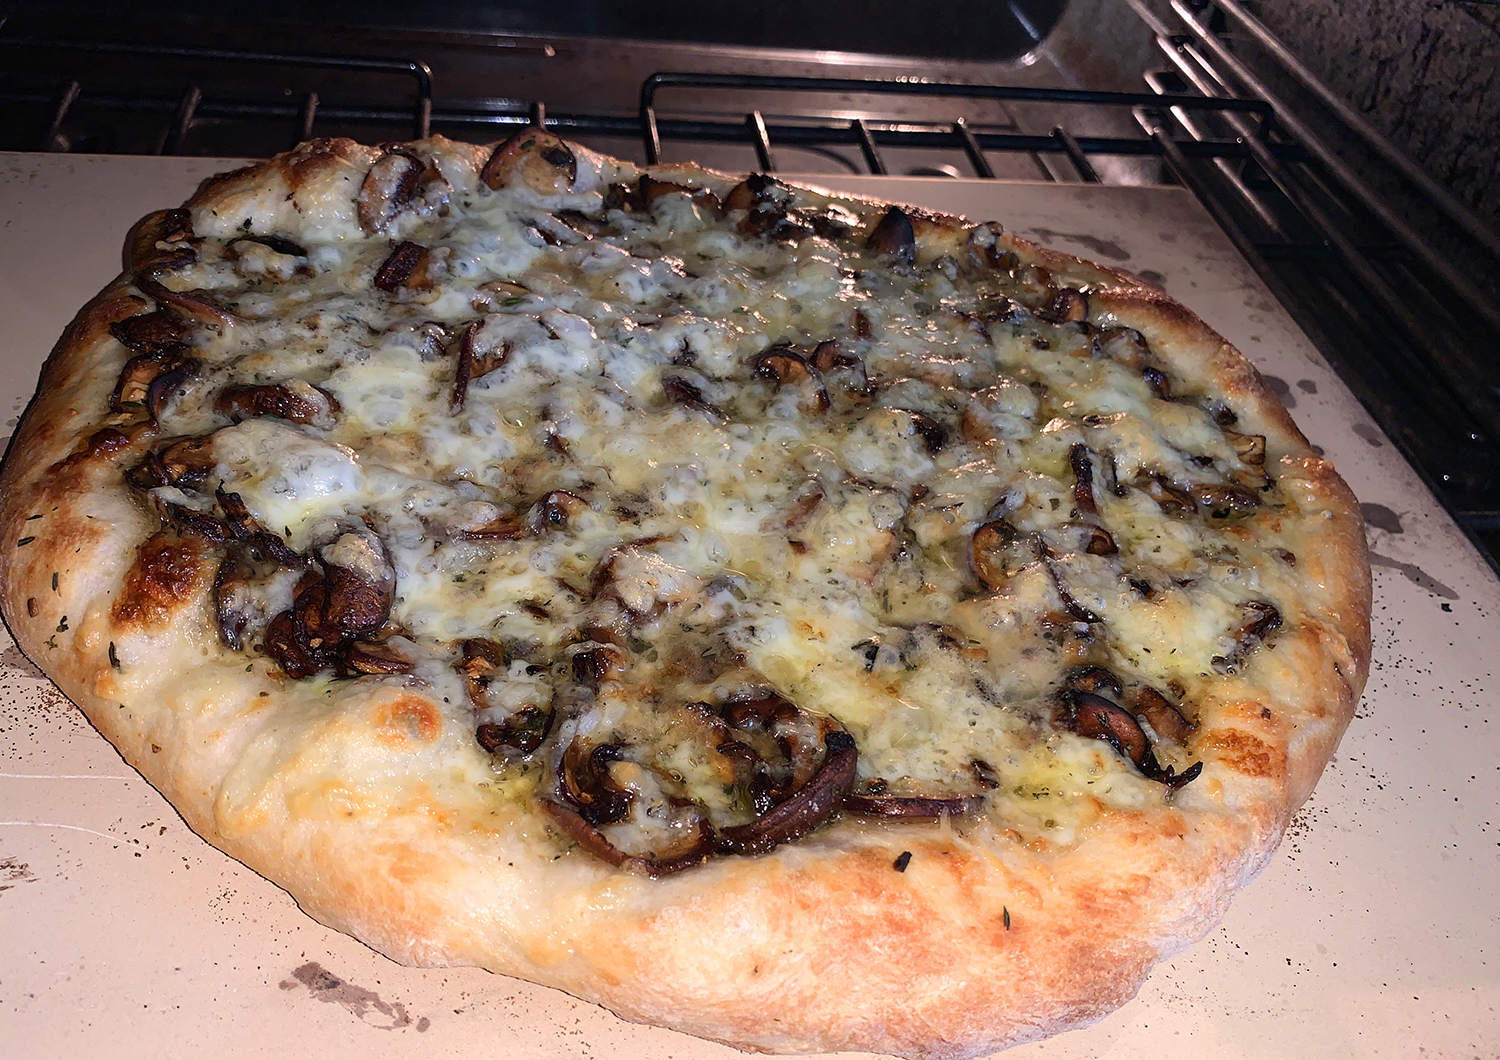
Be aware, heating the oven and pizza steel or stone to 550°F takes about an hour. Use this time to roast portobello mushrooms, and to combine the fontina-Parmesan cream white sauce. Don’t undercook the mushrooms. Roasting them until well browned removes moisture that would otherwise make the pizza crust soggy. Another suggestion would be to use cremini mushrooms instead of portobello caps, then you wouldn’t have to remove any gills.
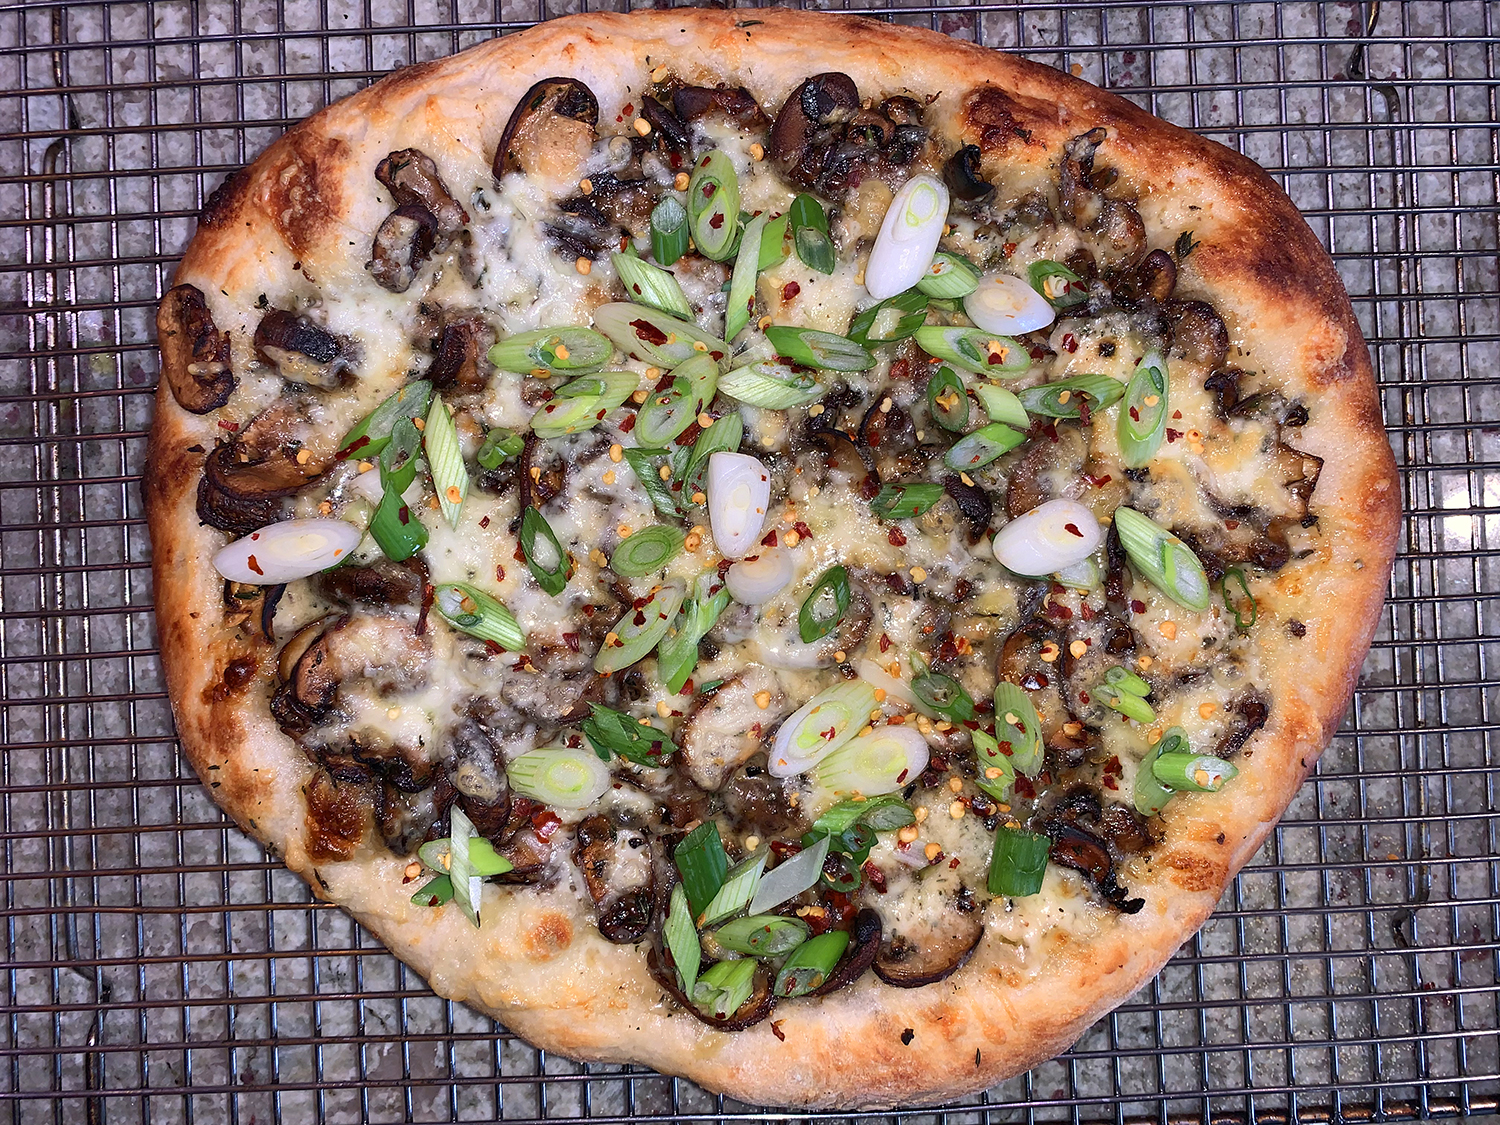
The second pie was more successful!
For a time-saver on dinner day, the mushrooms also can be prepped up to 24 hours ahead and refrigerated. When shaping the pizza dough, make sure that the edges are thicker than the center so they contain the cream sauce, which becomes runny during baking. For a crisp, well-browned bottom crust, if your oven only goes to 500°F, the pizza will need to bake for an extra two minutes.
The first attempt was unremarkable. The crust shape was more rectangular and we over-charred the mushrooms. Since the Fontina-Parmesan Cream makes enough for two pizzas, we made another several days later, which was more of a success story. This time we browned cremini mushrooms in a nonstick skillet on the stovetop. Plus we added about another cup of shredded fontina on top of the mushrooms. And that my friends, was a perfect pie!
1 cup fontina-Parmesan cream (recipe below); more on top of the mushrooms if desired.
2 scallions, thinly sliced on bias
1/4 tsp. red pepper flakes
Directions
At least 1 hour before baking, heat the oven to 550°F with a baking steel or stone on the upper-middle rack and a second rack in the lower-middle.
Cut the mushroom caps into ¼-inch slices. In a large bowl, toss the mushrooms, olive oil and ¼ teaspoon salt.
Spread the mushrooms in an even layer on a rimmed baking sheet. Roast on the lower oven rack, stirring once, until they have released their moisture, the moisture evaporates and the mushrooms begin to brown, about 15 minutes. OR, brown them in a nonstick skillet on the stovetop.
Stir in the thyme and garlic, then roast/cook in skillet until the mushrooms have browned and the garlic is no longer raw, another 3 to 4 minutes. Let cool completely on a wire rack.
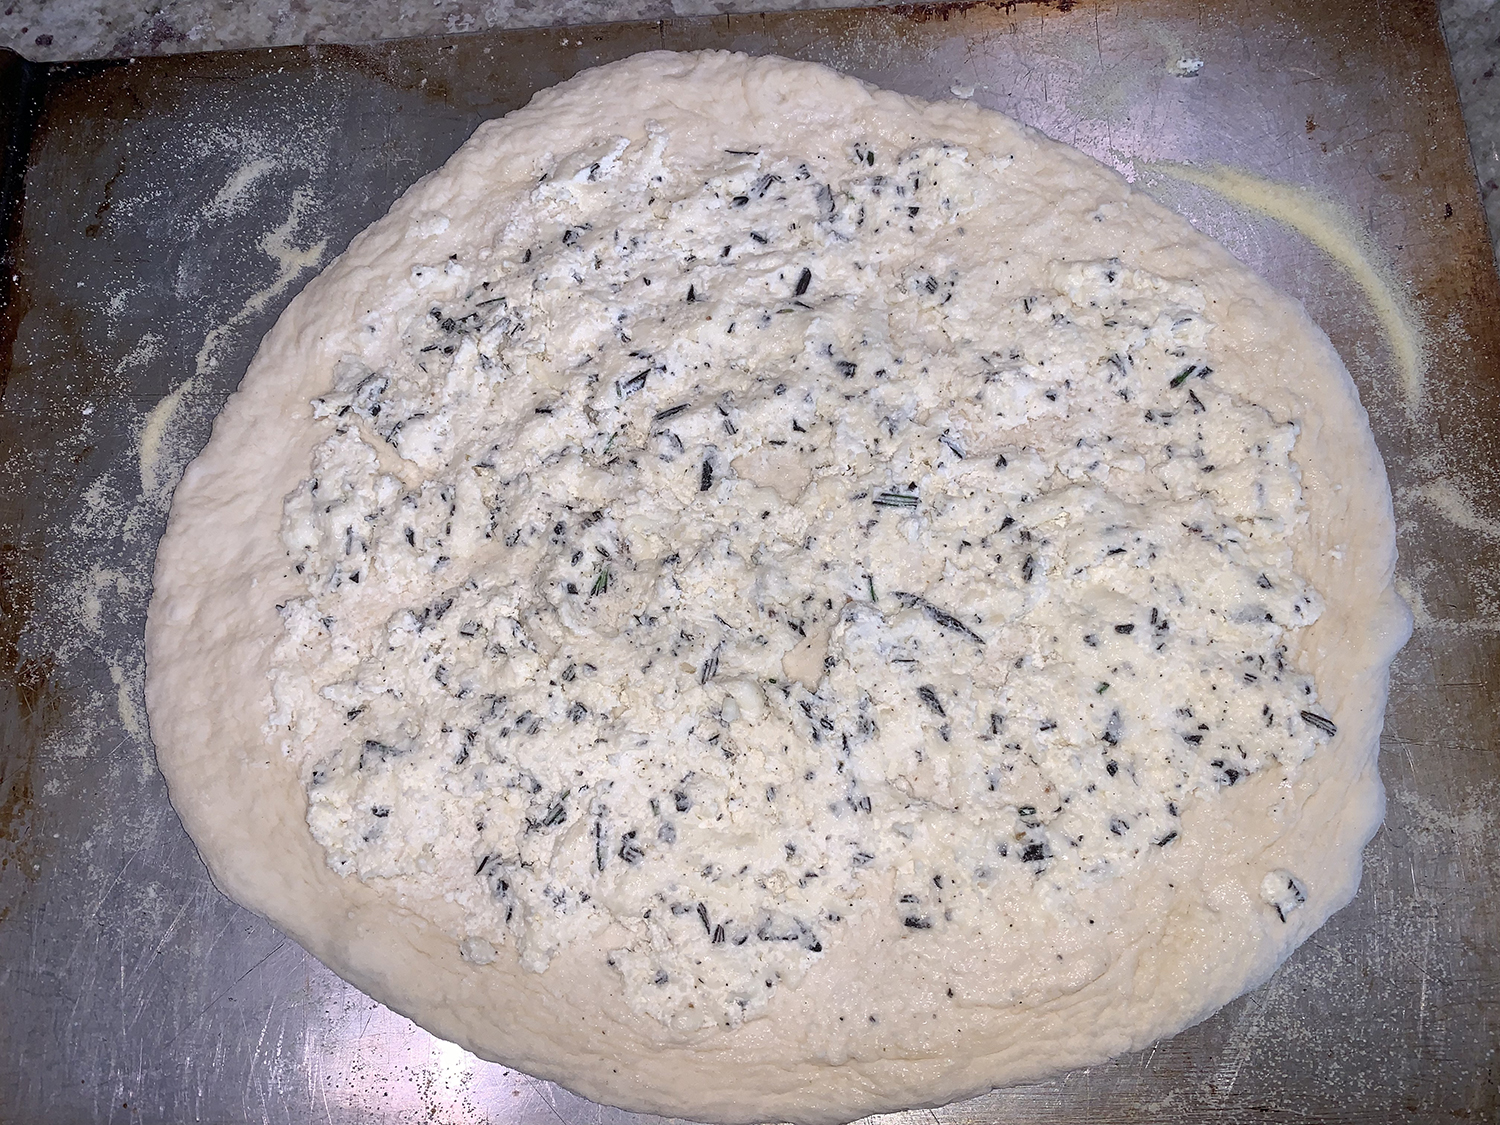
Turn the dough out onto a counter dusted generously with bread flour. Flour your hands and, using your fingers, press the dough, starting at the center and working out to the edges, into a 12-inch round, turning the dough over once. The round should be thin in the center, with slightly thicker edges. Lightly dust a baking peel, inverted baking sheet or rimless cookie sheet with the semolina. Transfer the dough to the peel and, if needed, reshape into a 12-inch round.
Using the back of a spoon, spread the fontina-Parmesan cream evenly on the dough, leaving ½-inch border at the edge. Scatter the mushrooms over it and season with pepper. If desired, add more shredded fontina on top of the mushrooms.
Slide the pizza onto the baking steel or stone and bake until the crust is well browned, 7 to 9 minutes.
Using the peel, transfer the pizza to a wire rack. Let cool for a couple of minutes, then sprinkle with scallions and red pepper flakes.
Fontina-Parmesan Cream
Ingredients
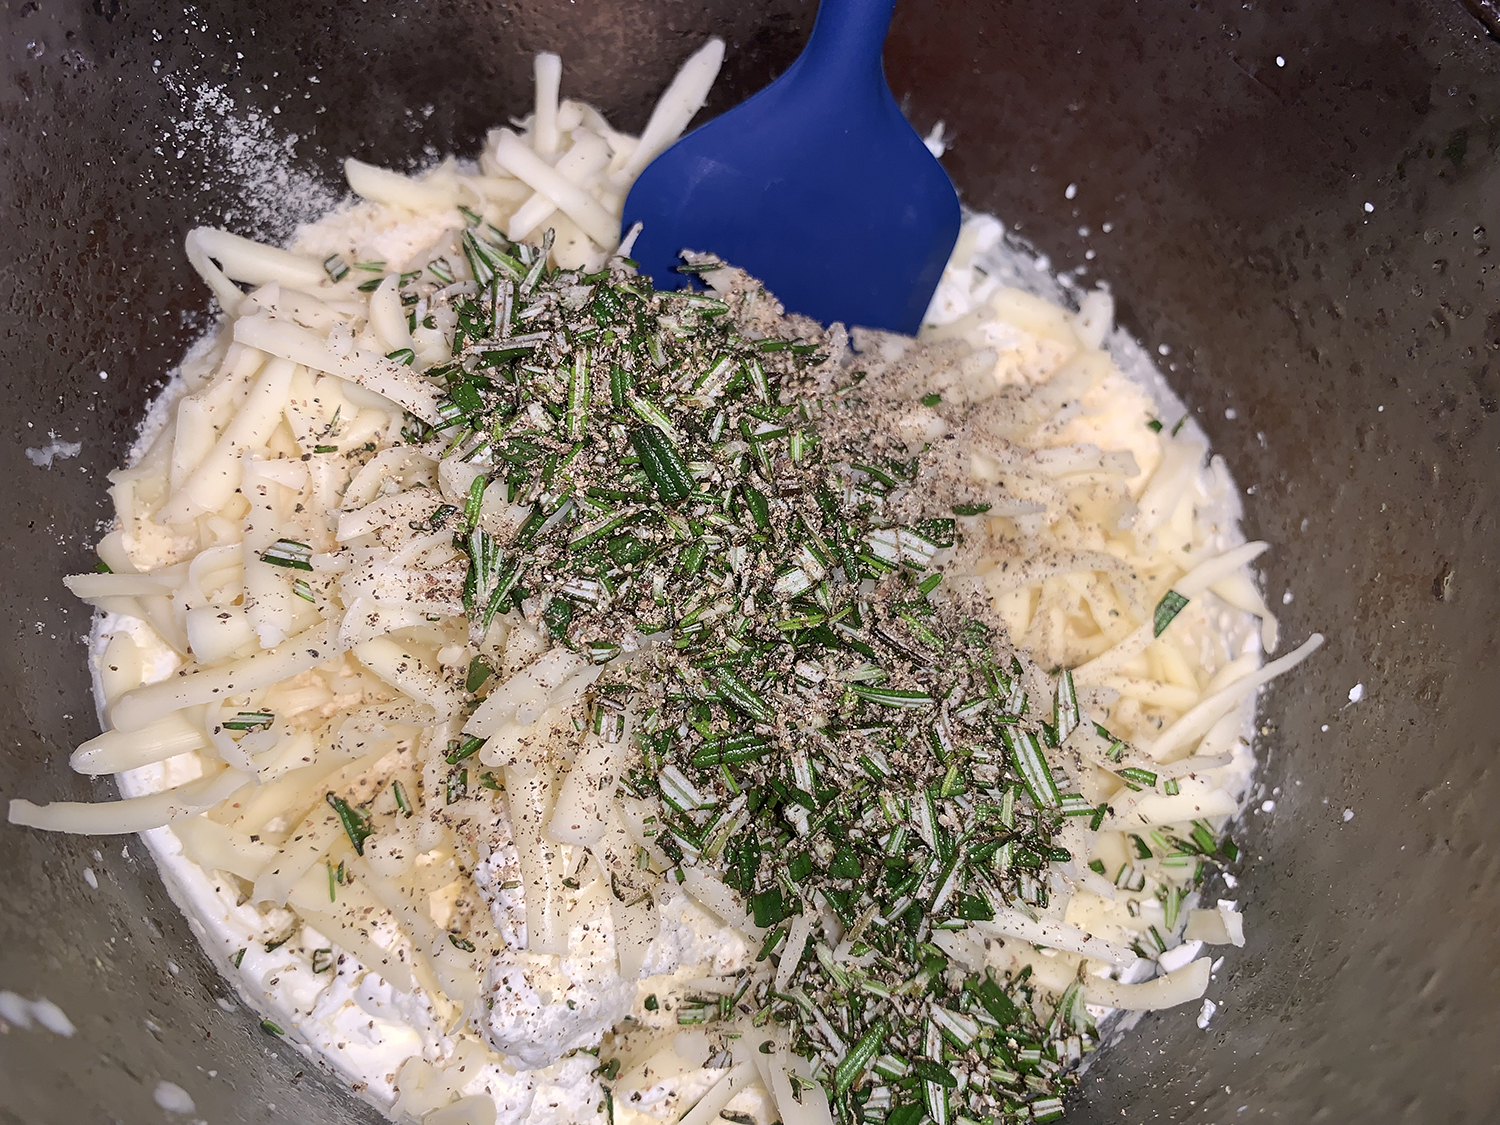
3/4 cup heavy cream, cold
1 cup shredded fontina cheese
1/4 cup grated Parmesan cheese
1 Tbsp. minced fresh rosemary
1/2 tsp. ground black pepper
Directions
In a stand mixer fitted with the whisk attachment, whip the cream on medium until stiff peaks form, about 2 1⁄2 minutes.
Using a rubber spatula, fold in the fontina, Parmesan, rosemary and pepper.
Similar to it’s meat cousin, Pork-Fried Rice, this vegetable version with simple seasonings and a balance of mix-ins makes for a frugal and incredibly satisfying meal—or side dish. Typically you use day old rice, but if you cook rice like pasta, in other words in a lot of water with salt for 10 minutes then drain and cool it, you don’t have to make it ahead of time. Plus cooking it like pasta rids the raw grains of any surface starch so that it readily breaks apart into individual grains.
But, if you have leftover rice here’s the deal. Day-old jasmine rice works best; the varietal is loaded with a popcorn-y aromatic compound that perfumes the fried rice with gorgeous fragrance, and when stir-fried, the hard, dry clumps relax into tender-firm, distinct grains. All rice should be roughly room temperature when you stir-fry.
To make fluffy, tender pockets of scrambled eggs, pour the raw beaten eggs into oil that is just smoking (not merely shimmering); the eggs will puff as their water rapidly turns to steam and their proteins set.
There’s no garlic or ginger to mince, no spices or curry paste to bloom, and no sauce to mix up, which keeps the prep work minimal and the backdrop neutral, not plain, simply highlighting the namesake ingredient: rice. However, you may want to serve with soy sauce on the side for those who wish a bit more flavor.
In case you are curious why this is labeled vegetarian, since they are not technically animal flesh, eggs are usually thought of as vegetarian. Eggs that have been fertilized and therefore have the potential to become an animal may not be considered vegetarian.
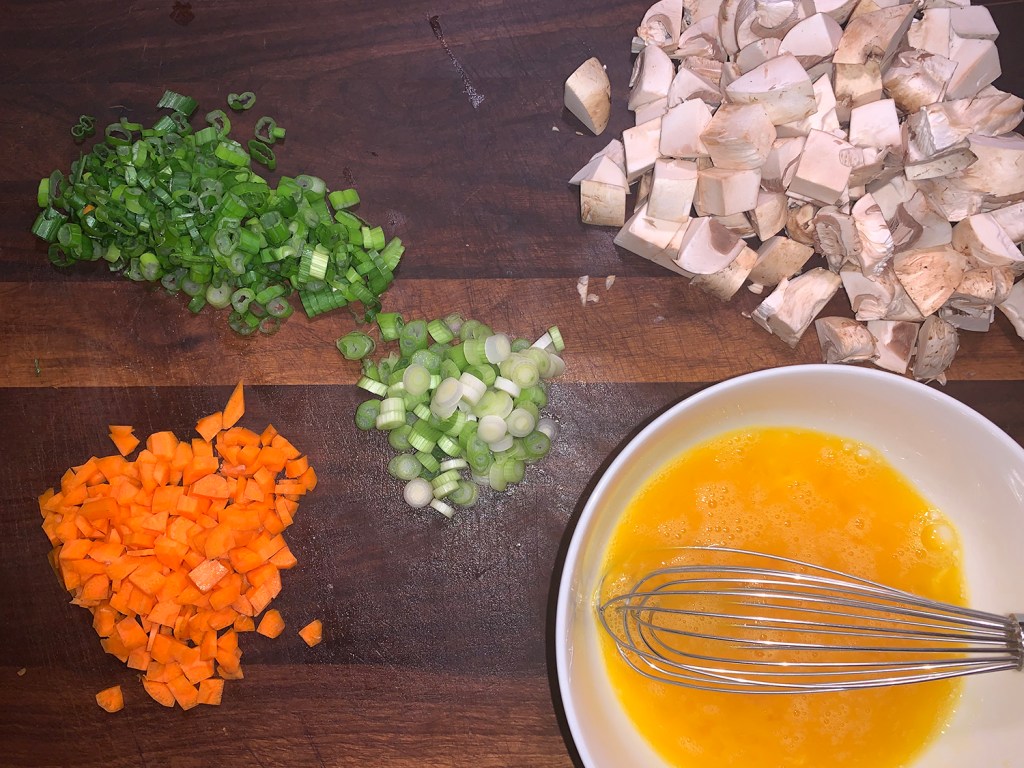
4 scallions, white and green parts separated and sliced
4 cups cooked jasmine rice, room temperature
¼ tsp. pepper
½ cup frozen peas
Directions
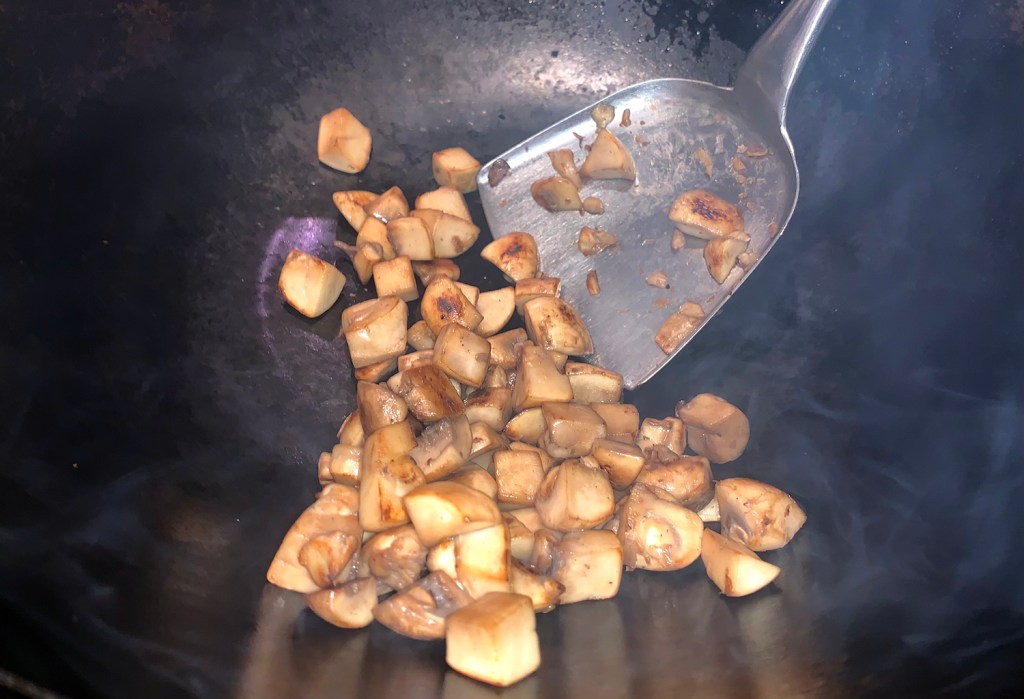
Beat eggs and ¼ teaspoon salt in bowl until well combined. Heat 2 teaspoons oil in 14-inch flat-bottomed wok or 12-inch carbon-steel or cast-iron skillet over medium-high heat until oil is just smoking. Add the mushrooms and cook, stirring frequently, until just beginning to brown, about 4 minutes. Transfer to a large plate.
Add eggs and cook, stirring frequently, until very little liquid egg remains, 30 to 60 seconds. Transfer to the large plate.
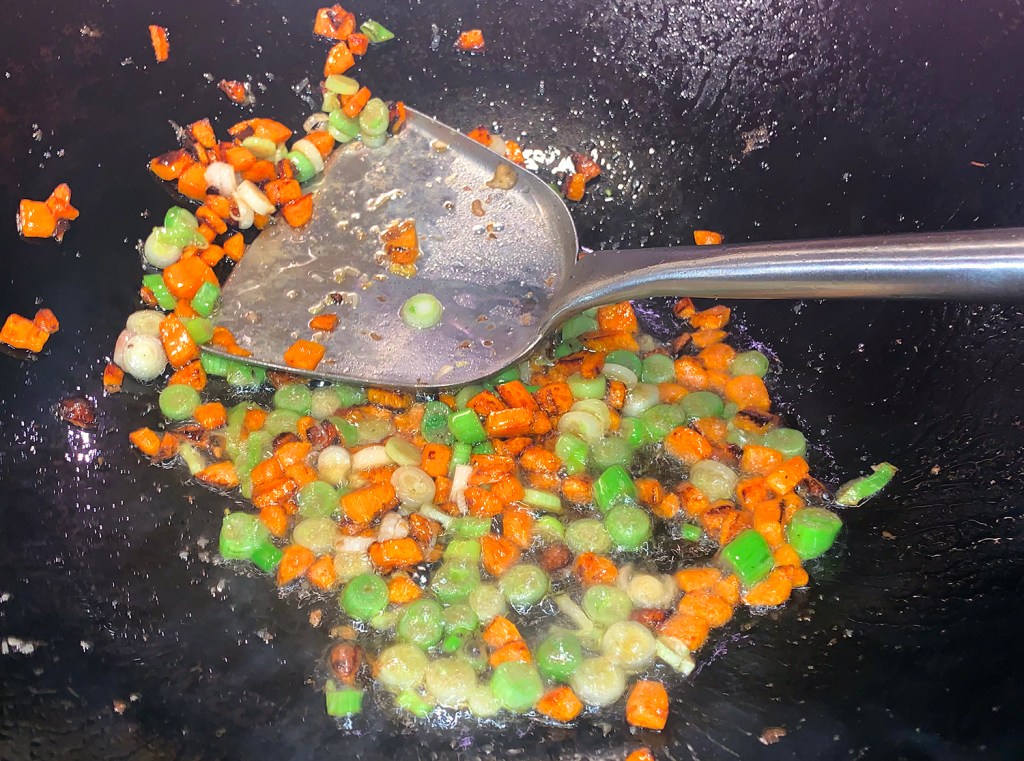
Add 1 teaspoon oil to now-empty wok and reduce heat to medium. Add carrot and ¼ teaspoon salt and cook, stirring frequently, until just beginning to brown, 2 to 4 minutes. Transfer to plate with eggs.
Add scallion whites and remaining 1 tablespoon oil to now-empty wok. Cook, stirring constantly, until fragrant, about 1 minute. Add rice and stir until combined. (It’s OK if some clumps of rice remain.) Spread into even layer. Sprinkle pepper and remaining 1 teaspoon salt evenly over rice. Continue to cook, stirring frequently and pressing on rice with spatula to break up clumps, until grains are separate and heated through, 2 to 5 minutes longer.
Add peas, egg and mushroom mixture, and scallion greens and cook, stirring frequently and using edge of spatula to break eggs into small pieces, until peas are warmed through, about 2 minutes. Serve with soy sauce.
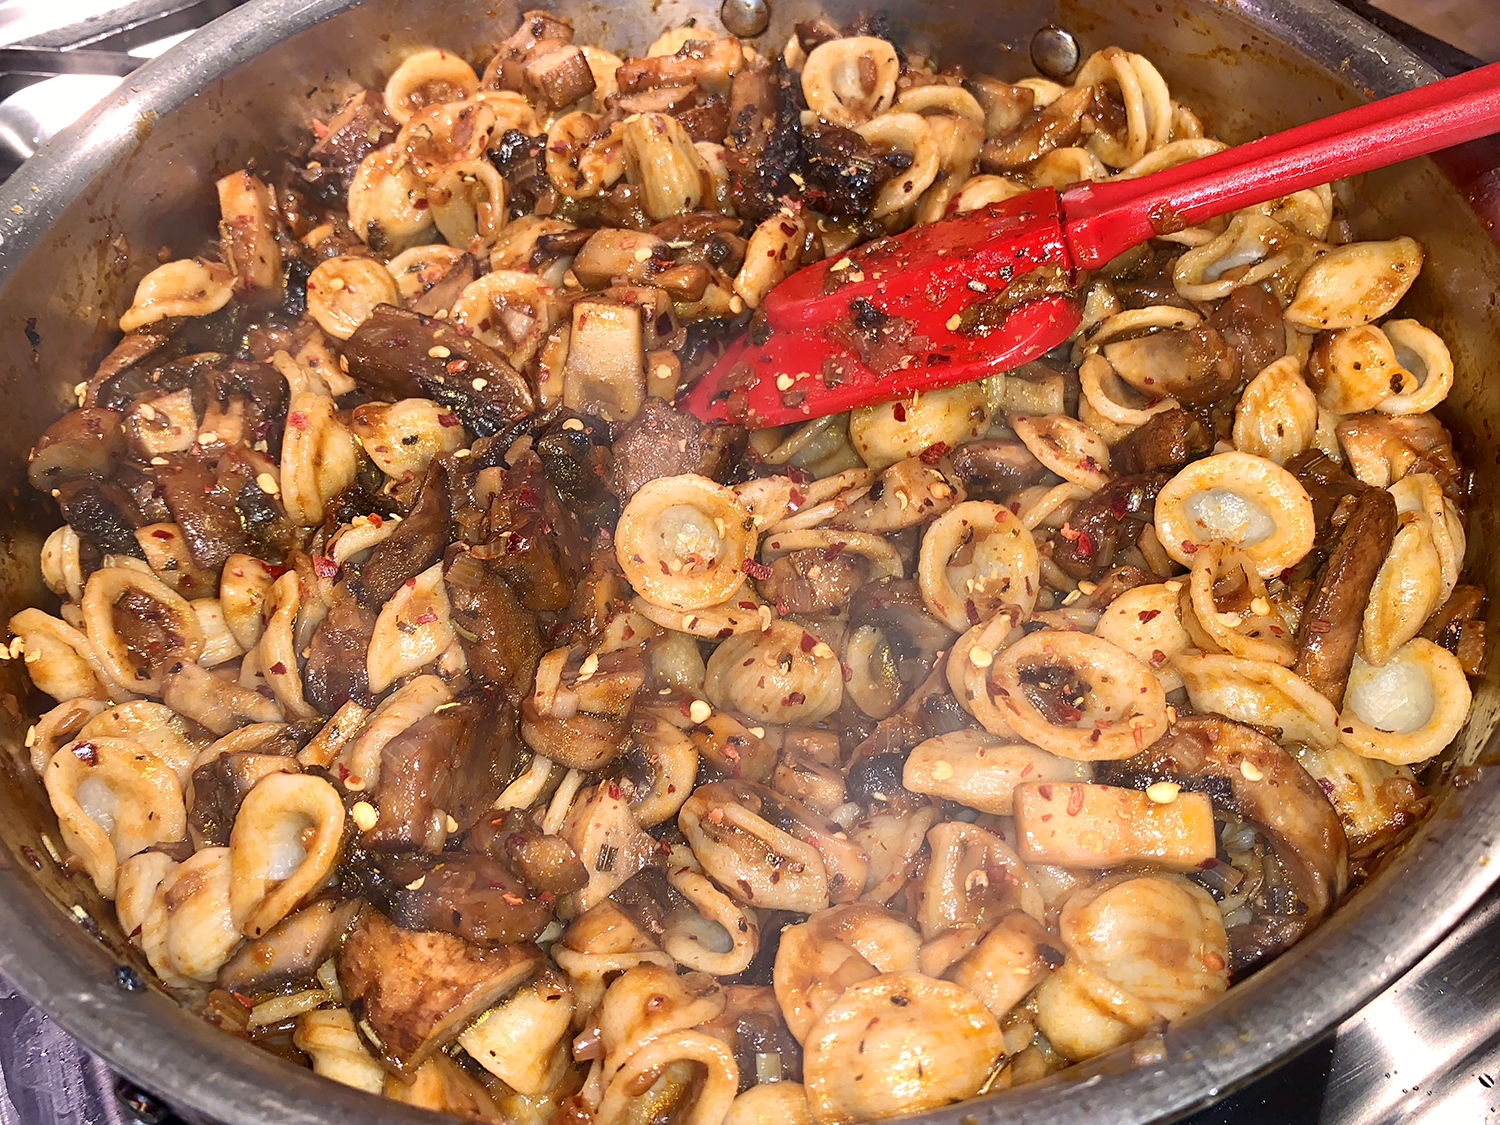
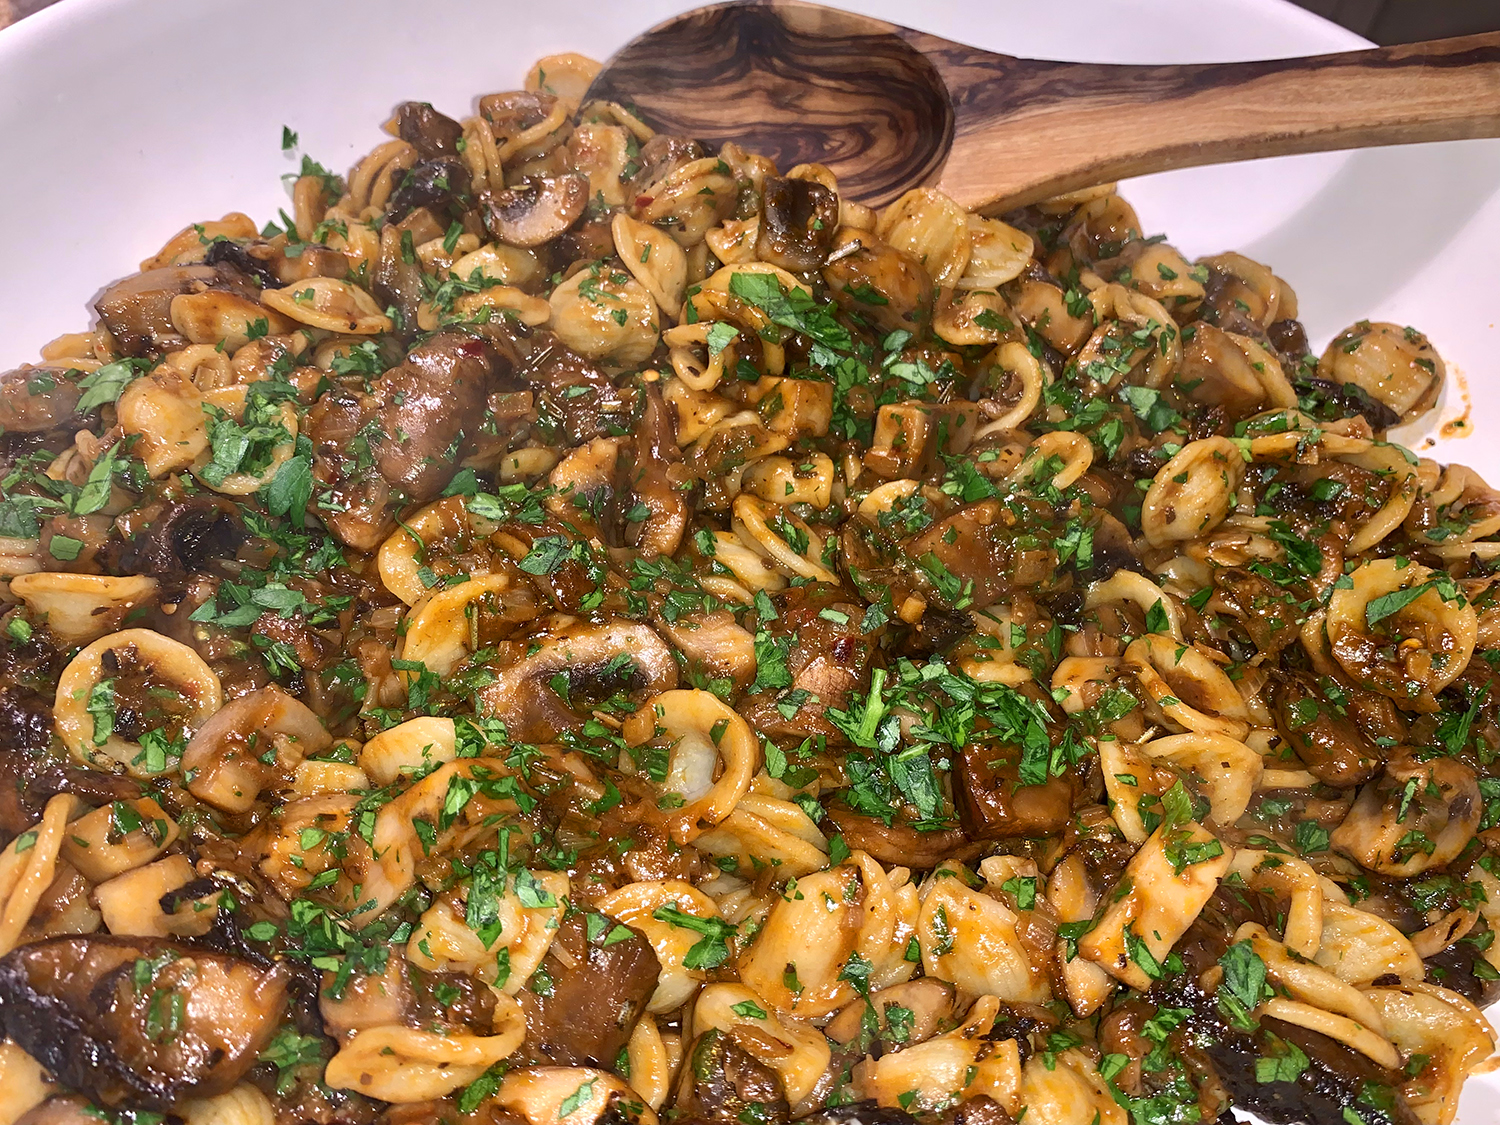
According to chef/author Suzy Karadheh, this is hands-down the BEST mushroom pasta recipe without cream. Rich and velvety with loads of mushrooms, garlic, shallots, a little parmesan, and a lighter silky-smooth sauce.
An easy recipe, it has two main components: the pasta and the mushroom sauce. Once you cook the pasta and sauté the mushrooms, everything will come together with a light sauce in one pan.
A typical pasta with mushrooms usually involves a heavy cream-based sauce that you would likely cook separately and then spoon over the pasta. Making a hearty garlic mushroom pasta without cream or too much butter is fairly simple. The science behind this is using a little of the starchy pasta water.
Walnuts were in the original list of ingredients, but you know how The Hubs detests those little nuggets, claiming they taste like soap. I personally love them, but to keep the peace they went by the wayside. And the dish didn’t seem to suffer without them!
8 oz. dry pasta, such as orecchiette, campanelle or farfalle
Kosher salt
⅓ cup extra virgin olive
1 Tbsp. butter
2 shallots, minced
5 garlic cloves, minced
8 oz. cremini mushrooms, sliced
8 oz. white mushrooms, sliced
8 oz. portabella mushrooms, roughly chopped
Black pepper
1 tsp. rosemary
3 Tbsp. of tomato paste
¼ cup dry red wine
½ cup of grated Parmigiano-Reggiano
½ cup packed parsley, chopped
Red pepper flakes to taste, optional
Directions
Cook the pasta to al dente in boiling salted water according to box instructions. Keep 1 cup of the pasta cooking water then drain the pasta.
In a large skillet, heat the olive and butter over medium-high heat, add the shallots and garlic and cook, tossing regularly for 2 to 3 minutes (manage the heat so that the garlic does not burn).
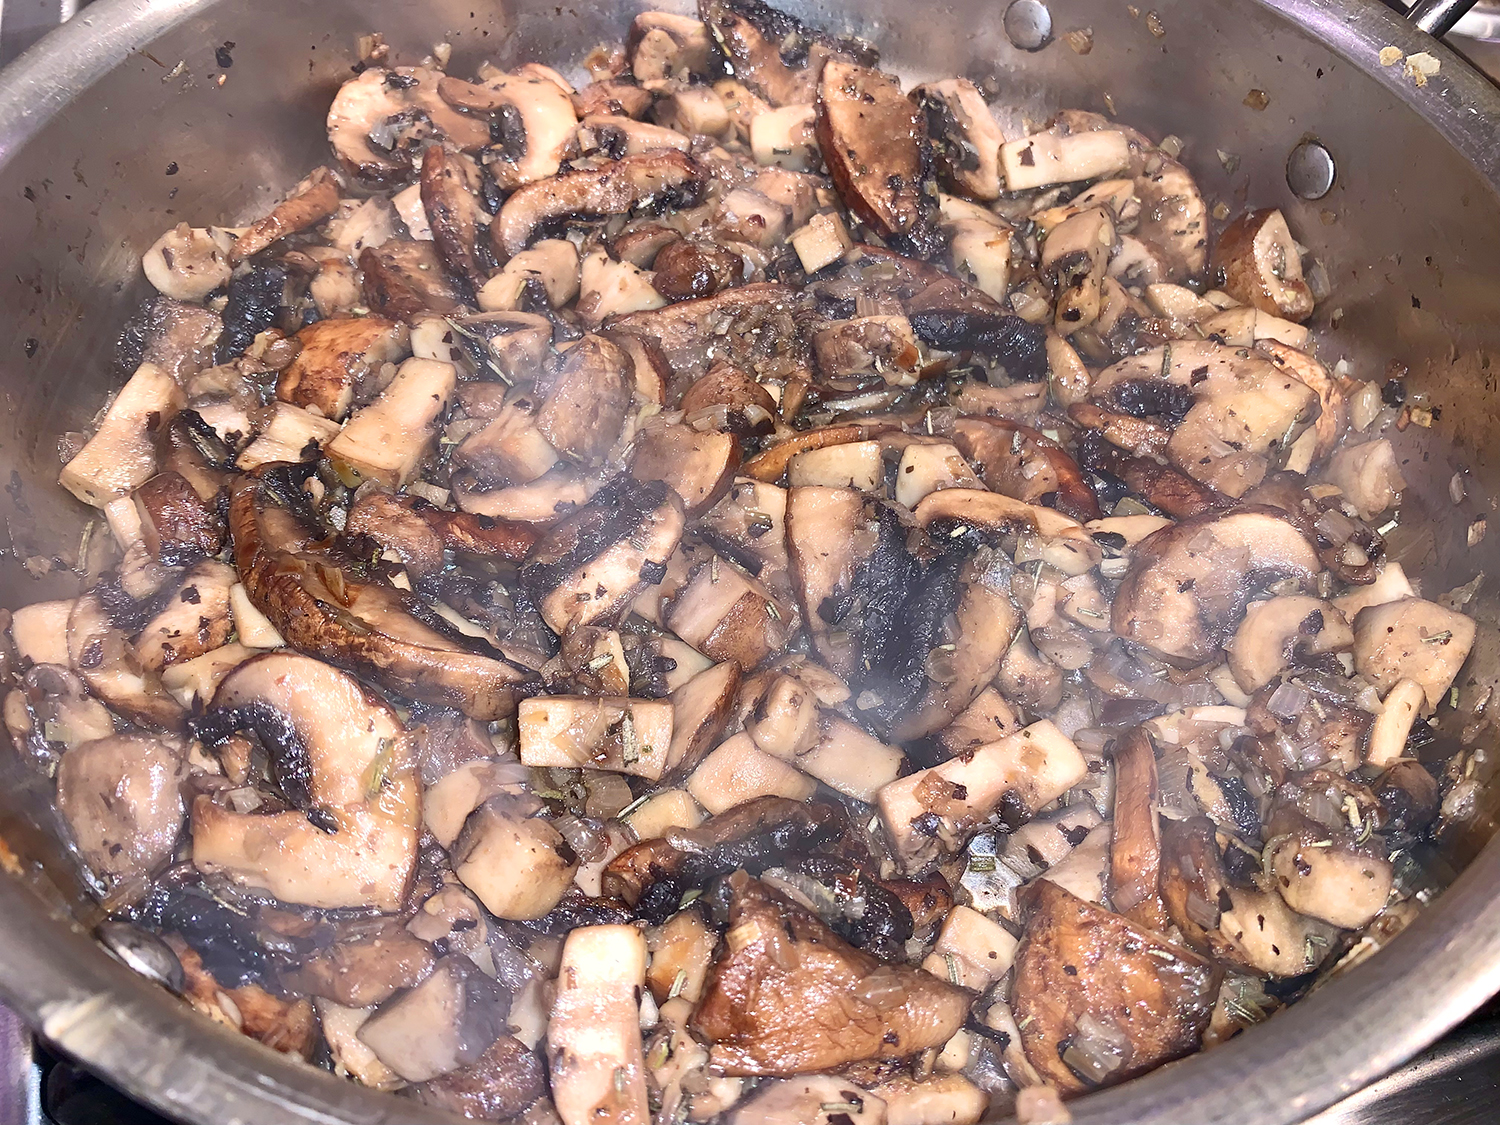
Add all the mushrooms and toss them around in the pan for a couple of minutes, adding another drizzle of extra virgin olive oil. Season with a good pinch of kosher salt, black pepper and the rosemary. Cook the mushrooms for about 7 to 10 minutes, tossing occasionally, until they turn color and release their juices.
Add the tomato paste, wine and about ½ to ¾ cup of the pasta cooking water. Cook over medium heat for about 4 to 5 minutes (this becomes your mushroom pasta sauce).
Add the cooked pasta to the mushroom sauce. Toss to combine. If needed add a little bit more of the pasta cooking water.
Stir in Parmesan cheese and finish with a sprinkle of parsley and red pepper flakes. Serve immediately.
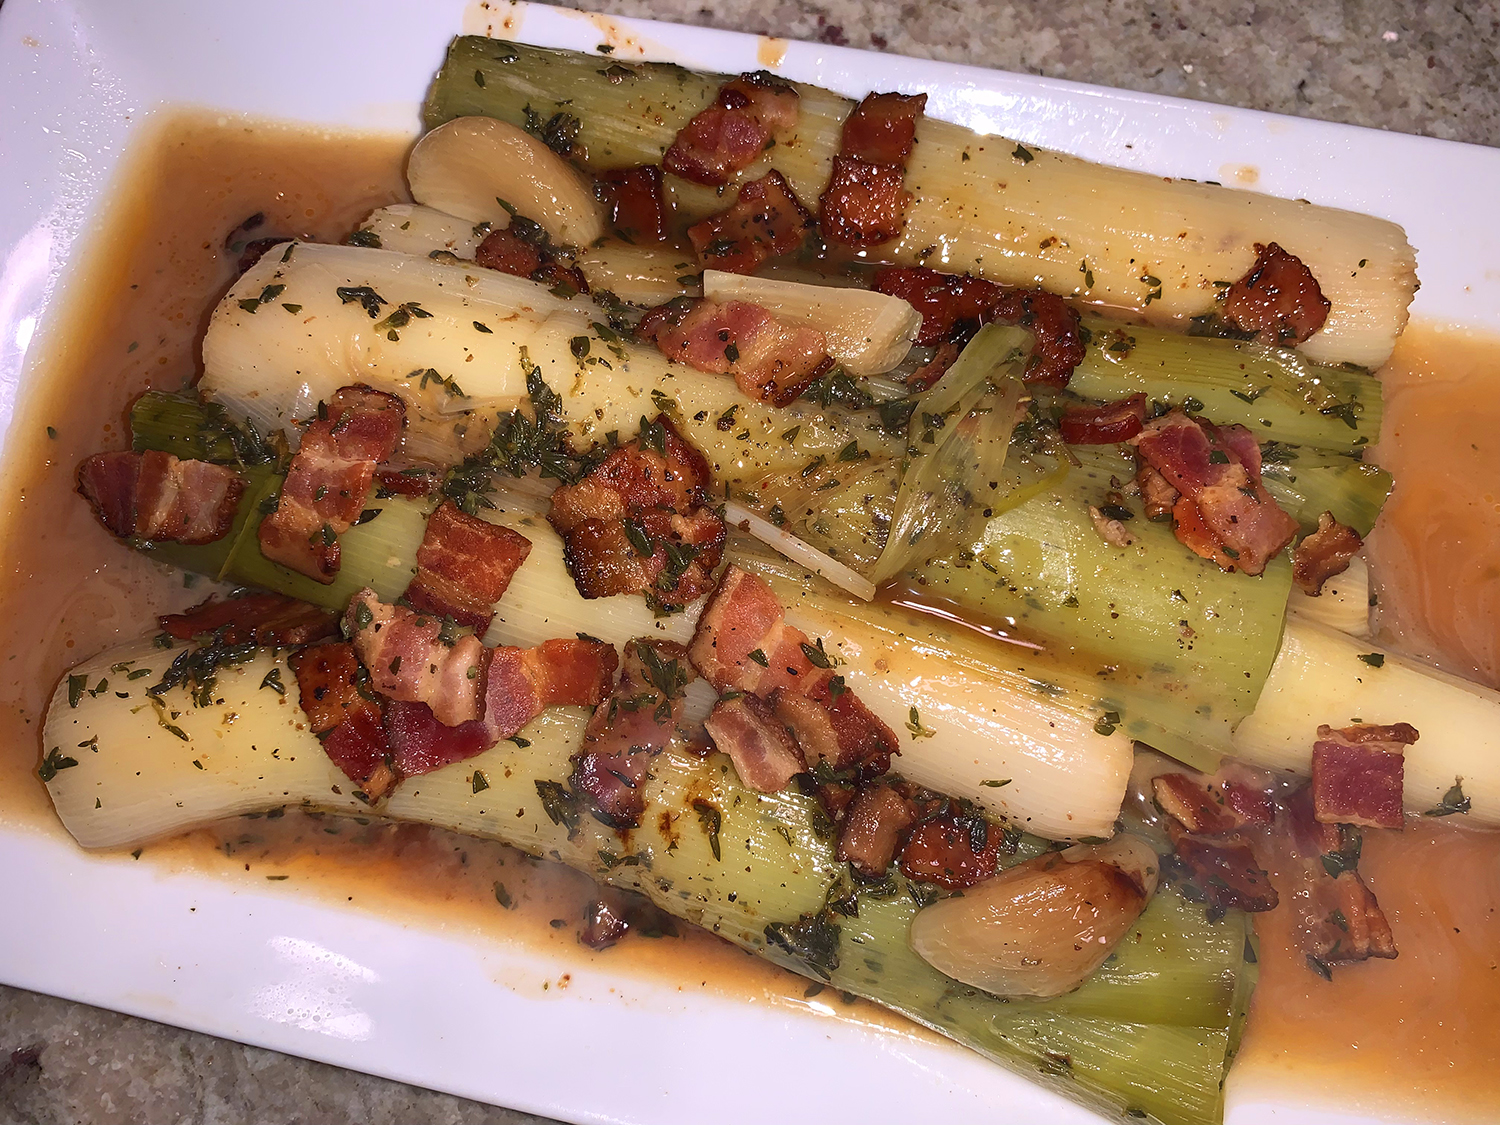
In the allium family, leeks are the tallest and offer the sweet taste of onion but with an earthier, grassy herbal character, and we love them! This first Braised Leeks with Bacon and Thyme recipe hailing from Molly Stevens “All About Braising” cookbook braises the leeks slowly in chicken broth until they collapse into blessed tenderness.
As Molly describes, braising reveals all of their goodness and brings out a complexity of flavor that would be lost by boiling or steaming. They are infinitely versatile and made a perfect accompaniment to our roasted chicken dinner. Serve them hot, warm, at room temperature or even a little chilled. They’ll keep for several days in the refrigerator.
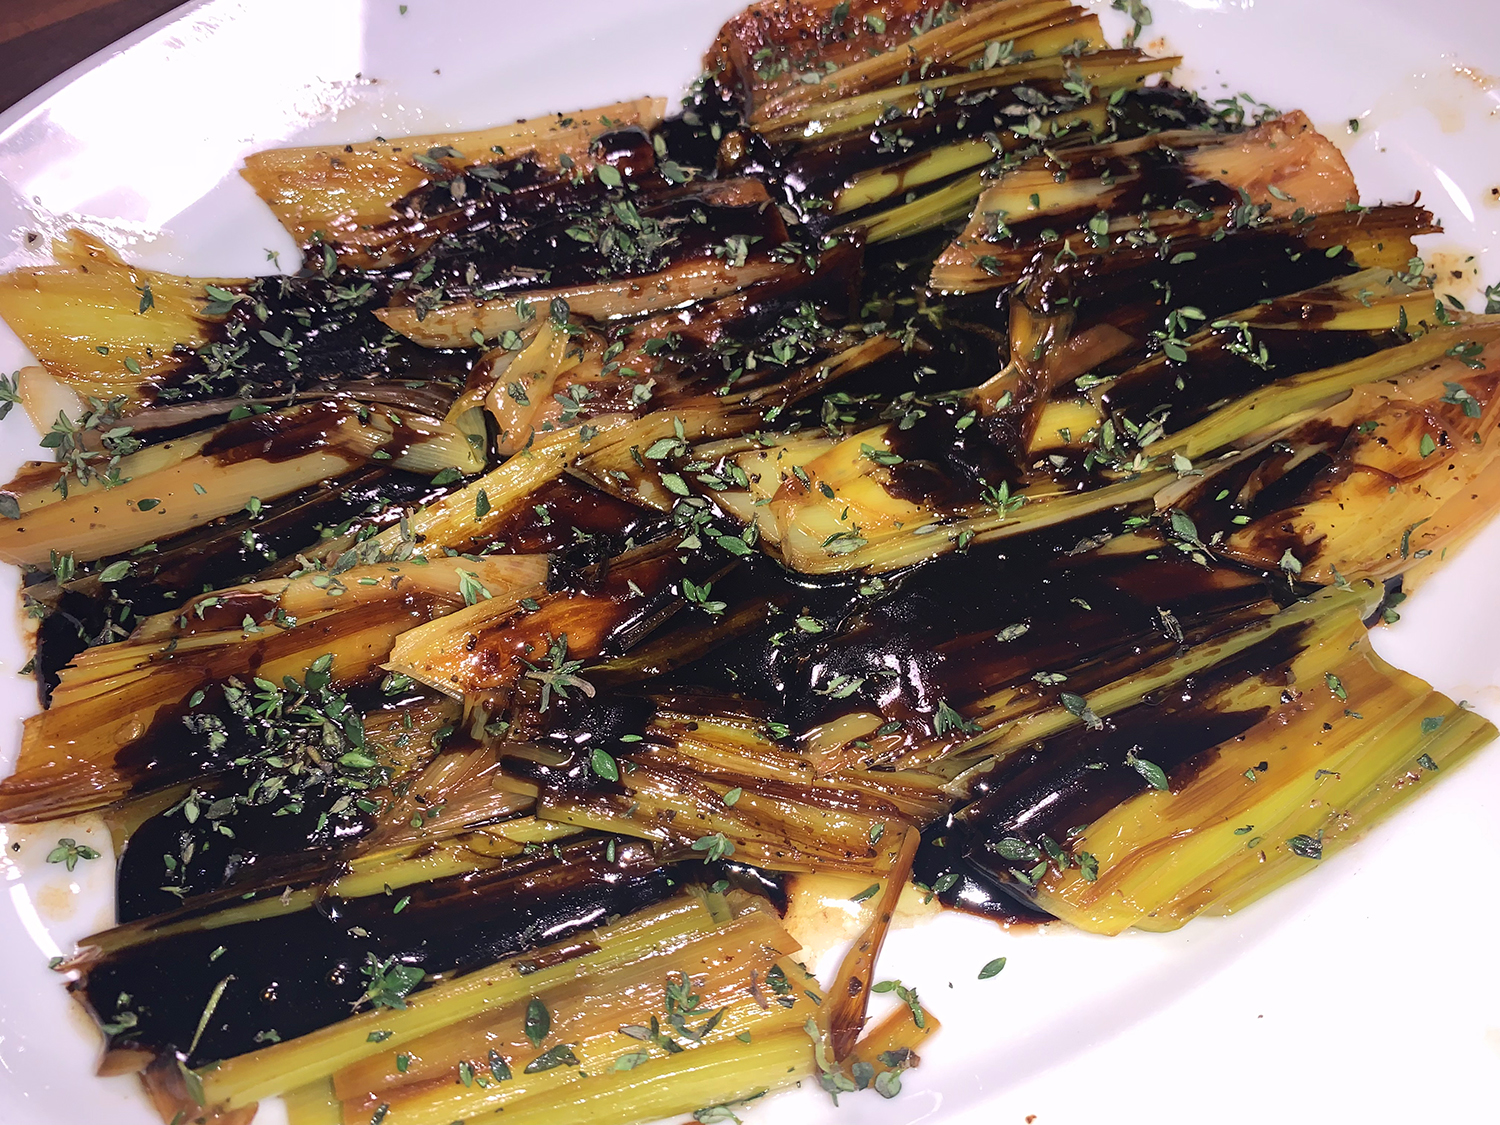
Option number two is a vegetarian dish from Milk Street. Braised Leeks with Balsamic Glaze are meltingly tender. They are poached in olive oil and water then drizzled with a tangy-sweet balsamic glaze. The vegetable retains its mild spring onion flavor with none of the raw allium pungency—a wonderful example of letting the natural flavor of an ingredient shine through!
Leeks are at their best in the fall and winter. Shop for leeks that feel solid at the base, not at all squishy. The green top portion should be dark, not dried out. Inspect the white portion to see that it’s smooth and bright, not split or slimy. Late-season leeks may have developed solid woody cores, an indication it is way past their prime, and shouldn’t be purchased.
4 slices thick-cut bacon, cut into 1/2-inch-wide strips
1 tsp. butter
4 to 5 lbs. medium to large leeks
2 garlic cloves, peeled and cut lengthwise in half
Coarse salt and freshly ground pepper
Freshly grated nutmeg
1 1/2 Tbsp. chopped fresh thyme (do not substitute dried)
1 cup chicken stock, preferably homemade
1/2 lemon
Directions
Place the bacon in a medium skillet, set over medium heat, and fry, stirring often with a slotted spoon, until mostly crisp but with some softness remaining, 8-10 minutes. Transfer the bacon to a plate lined with paper towels to drain, and set the skillet aside.
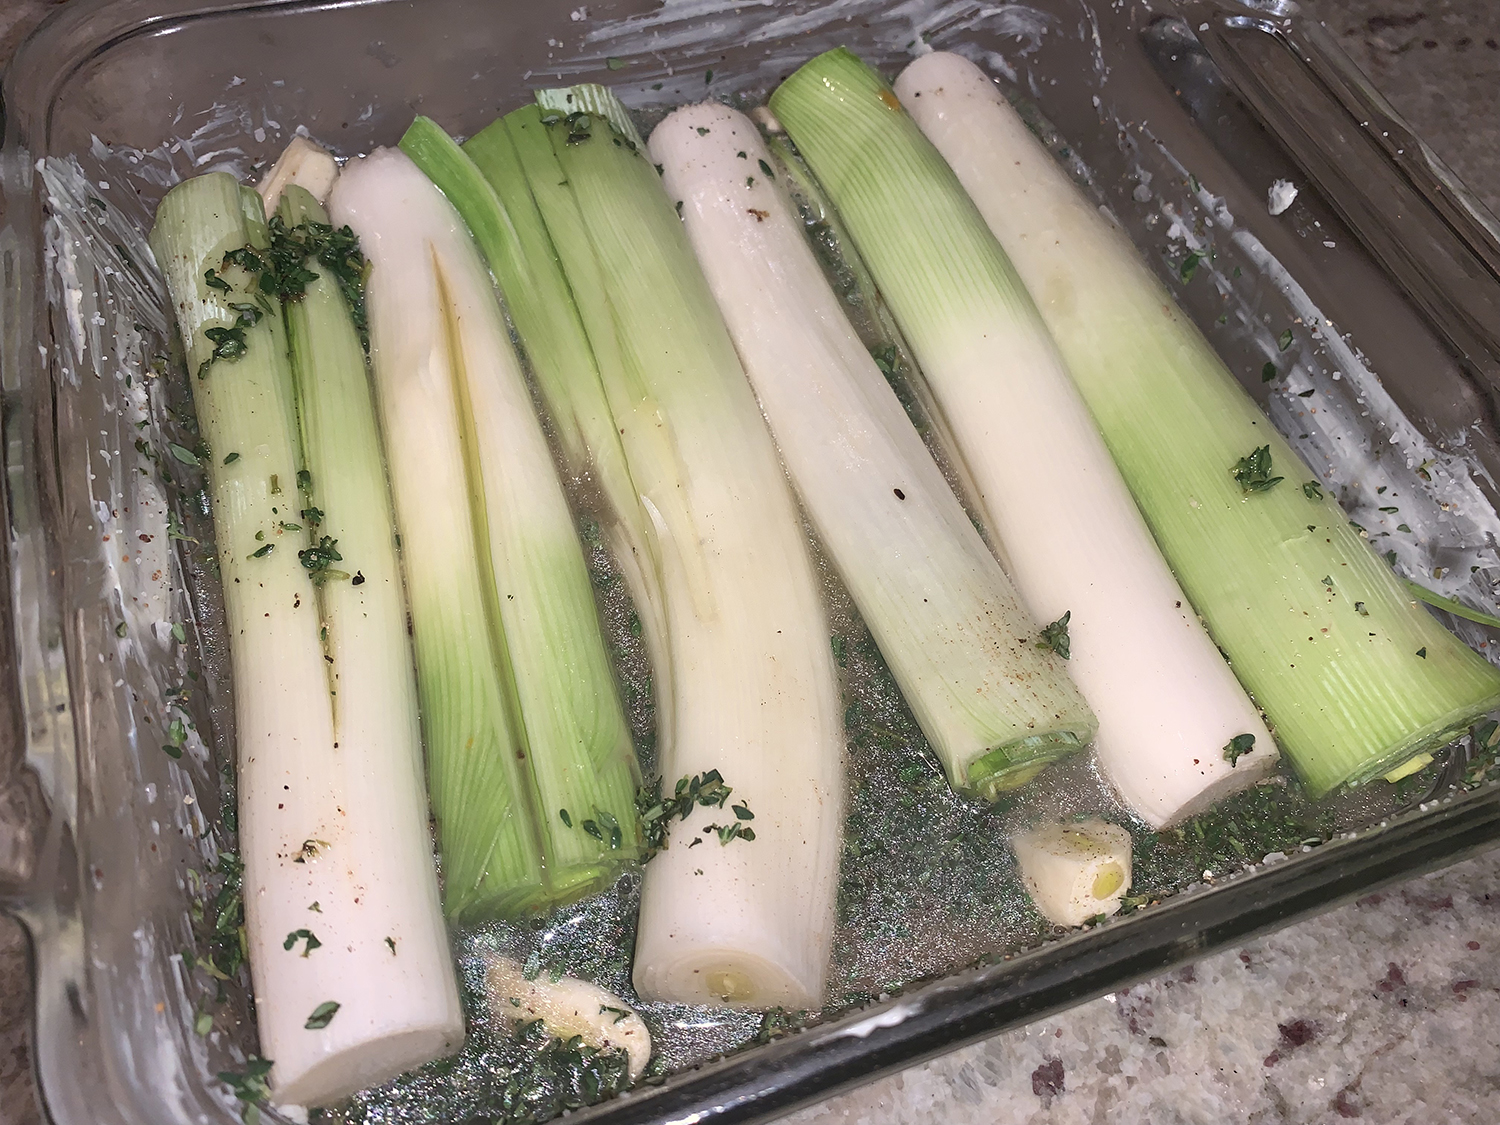
Preheat the over to 325°F. Butter a 13-by-9-inch baking dish. (We didn’t have as many leeks so we used a 9×9 square dish.)
With a large knife trim off the root end of each leek, but leave the base intact. Get rid of the heaviest green part and any tough white parts. Cut off the tops at the point where the green turns from pale and smooth to dark and leathery.
Cut the leeks lengthwise in half, without cutting completely through the root end, Wash the leeks thoroughly, holding them upside down under cold running water and flaring the layers to let the water run through to remove all the sand.
Shake off the excess water and place them in one layer in the prepared baking dish. Tuck the garlic halves in the dish and season with salt, pepper and nutmeg. Sprinkle on the thyme.
Pour off as much fat from the reserved bacon skillet, without discarding the bacon drippings. Place over high heat, add the stock, and bring to a boil to deglaze the pan, scraping with a wooden spoon. Pour the hot stock over the leeks.
Cover the dish tightly with foil and place on a rack in the lower third of the oven. Braise for 30 minutes.
Turn the leeks over with tongs, and continue braising uncovered until the leeks are fork tender, another 15-25 minutes. Scatter the reserved bacon over the leeks and continue braising for an additional 15 minutes, or until the leeks are soft enough to be easily pierced with the tip of a knife.
With tongs and a slotted spoon, transfer the leeks and bacon to a platter, and cover with foil to keep warm. Pour any remaining juices, along with those from the platter, into a skillet and reduce down to 1/4 cup. Add a generous squeeze of lemon, taste for salt and pepper, and simply pour over the leeks. Serve warm or room temperature.
You want to make sure not to stir the leeks too vigorously or too often when browning them. Stir gently just once or twice, without flipping them, so they color evenly. And once the water goes into the pan and the cover goes on, it’s best to simply shake the skillet, not stir its contents, so the leeks hold together.
These leeks just melted in the mouth! We omitted the sliced almonds for this meal; and next time we would cut the glaze in half. Although it was very good, we didn’t even use all of it and it was still a lot.
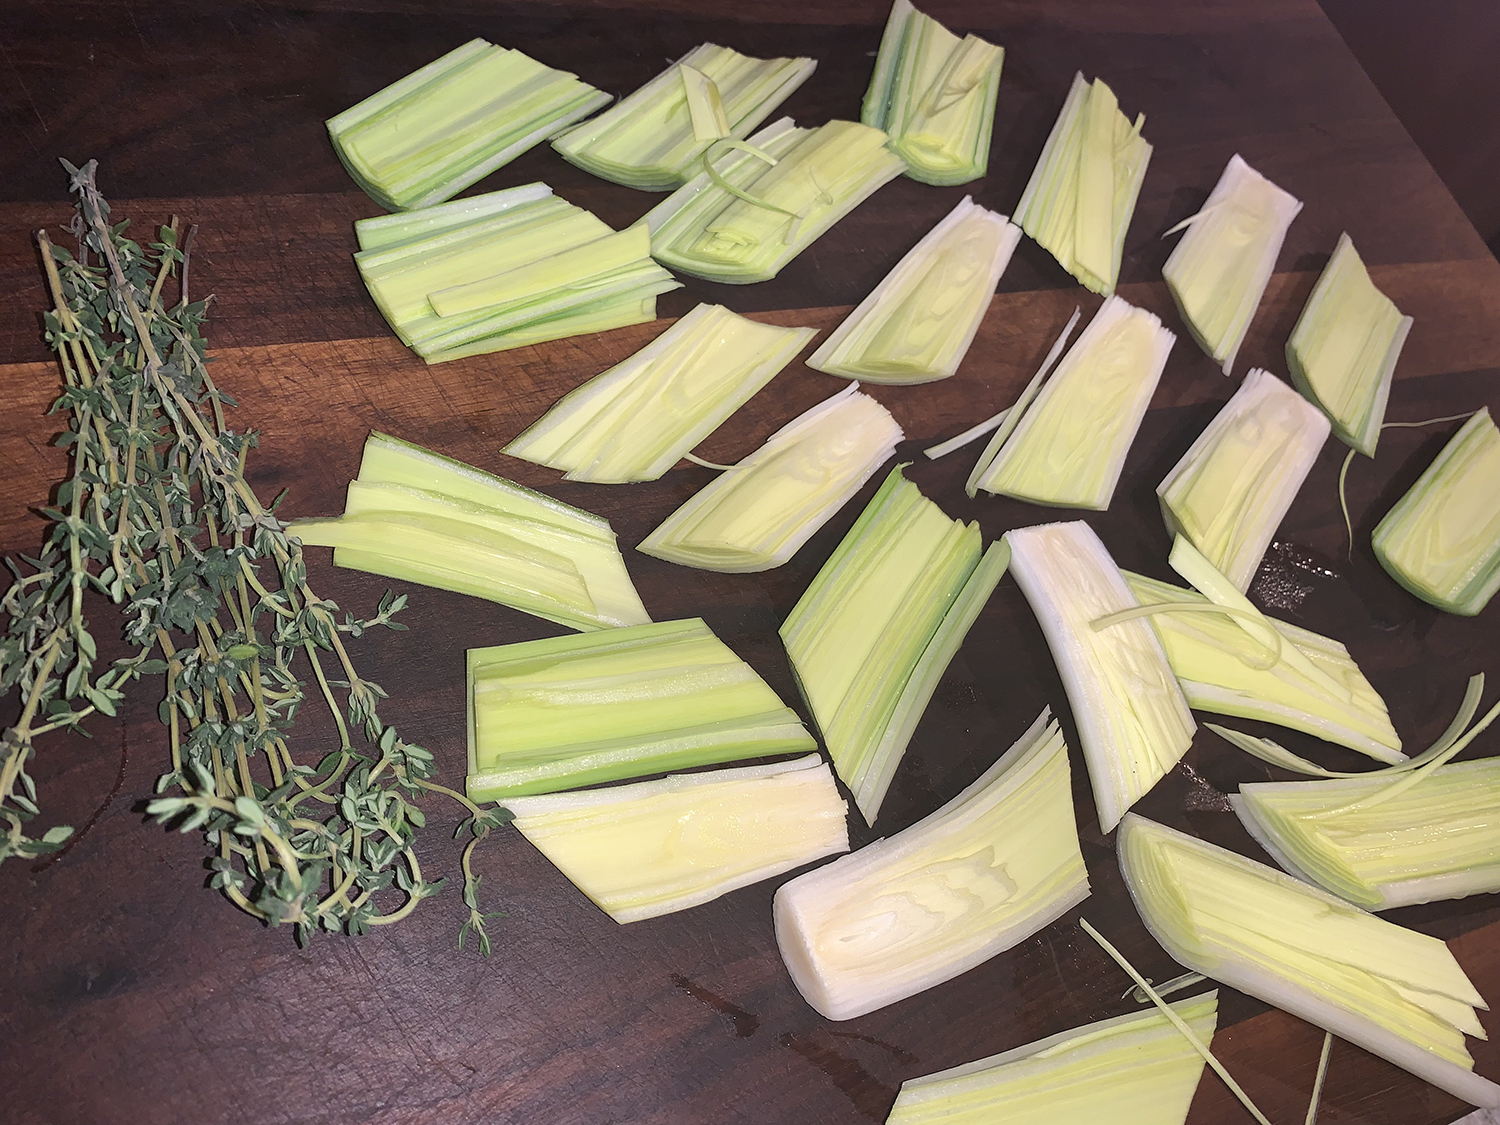
1 lb. leeks, white and light green parts only, outer layers removed
2 cup extra-virgin olive oil
2 Tbsp. salted butter, cut into 2 pieces
Kosher salt and ground black pepper
6 thyme sprigs, plus 1 teaspoon chopped fresh thyme
1/4 cup balsamic vinegar
1 tsp. honey
3 Tbsp. sliced almonds, toasted (optional)
Directions
Cut the leeks in half lengthwise. Fill a large bowl with water, submerge the leek halves and swish them around to remove the grit between the layers. Pour off the water and repeat until the leeks are clean, then pat dry. Cut the leeks on the diagonal into 2-inch sections, keeping the layers intact as much as possible.
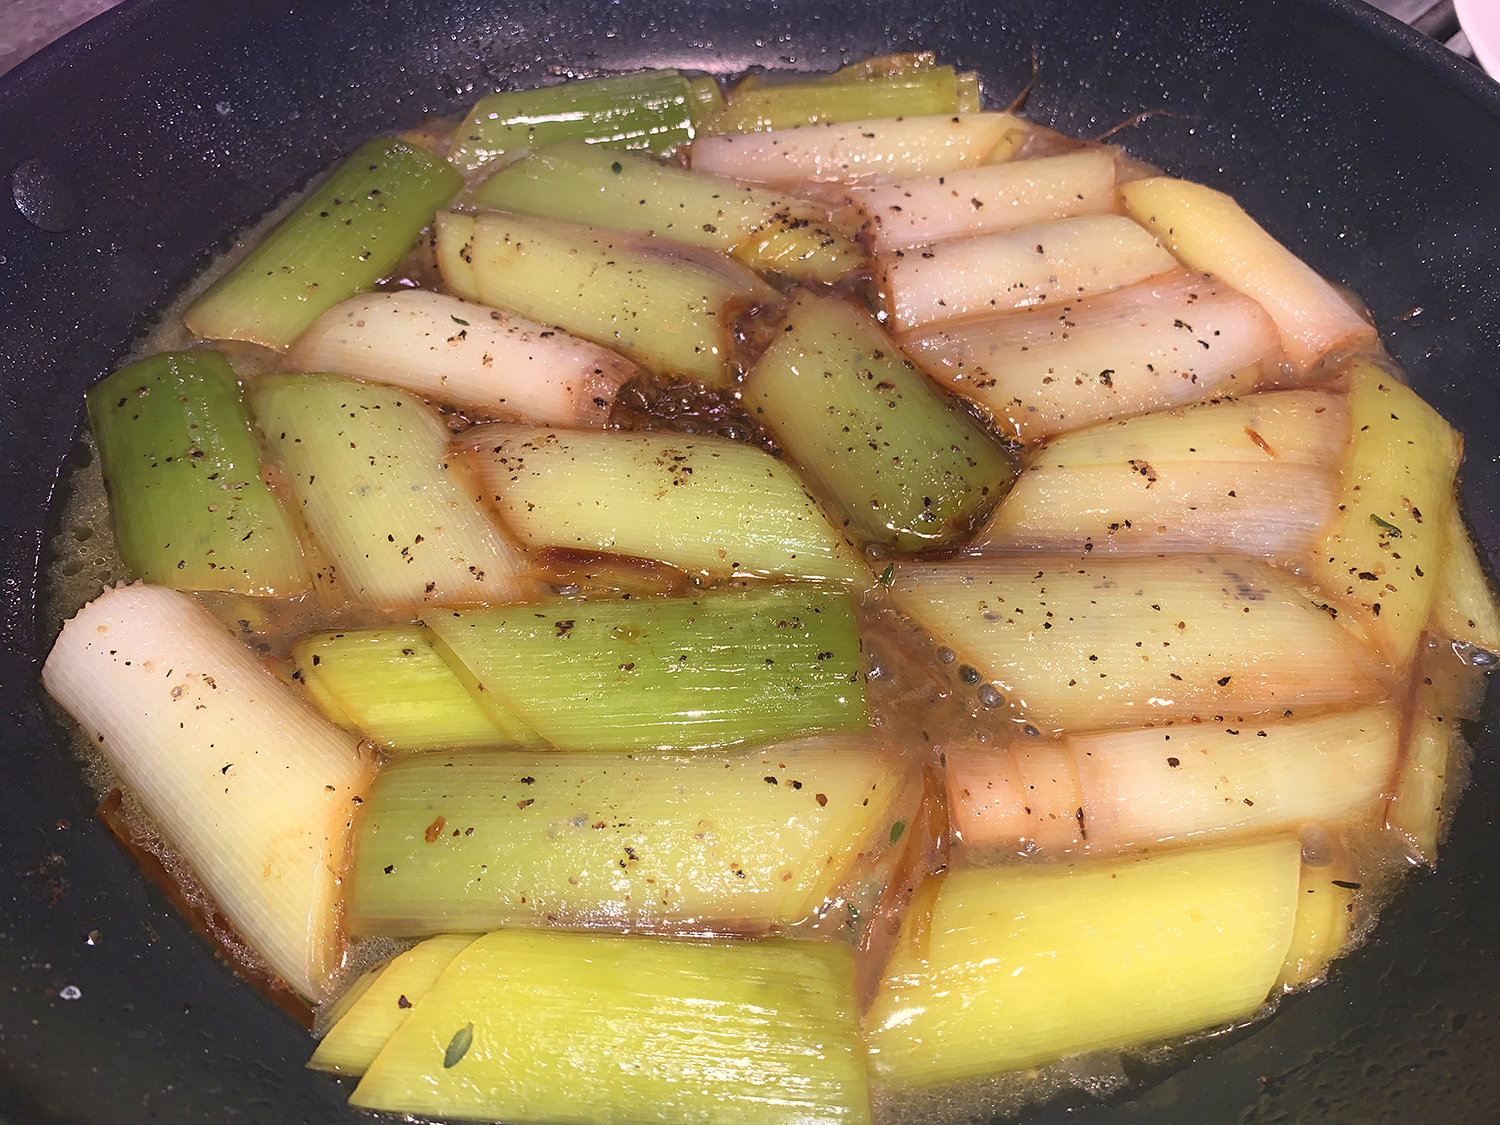
In a 12-inch skillet, combine the oil, butter and leeks, adding them to the pan cut side down. Set the pan over medium-high and cook, gently stirring only once or twice so the layers do not separate, until the leeks are lightly browned, 4 to 6 minutes.
Add ¼ teaspoon salt and ½ teaspoon pepper, then slowly add ⅔ cup water. Add the thyme sprigs, cover and reduce to medium-low. Cook, occasionally shaking the skillet, until a knife inserted into the leeks meets no resistance and most of the water has evaporated, about 20 minutes.
Using a slotted spoon, transfer the leeks to a platter, leaving the oil in the skillet. Remove and discard the thyme sprigs. Add the vinegar and honey to the pan, then cook over medium, stirring often, until the mixture is syrupy, 2 to 4 minutes.
Taste and season with salt and pepper, then pour over the leeks. Sprinkle with the chopped thyme and the almonds, if using.
Traybake, a savory, one-pan meal cooked on a baking sheet in the oven is a home chef’s friend. This simple vegetarian traybake combines several pantry staples—hoisin, soy sauce and garlic—with broccoli and tofu and yields a hearty, satisfying main.
A 475°F oven develops the right amount of flavorful char on the broccoli and cooks the florets to a pleasing tender-crisp texture. While steamed rice is the usual accompaniment, we went a step further and made Vegetable Fried Rice.
A bit short on the hoisin sauce, we decided to make up the 1/4 cup deficit by including oyster sauce. The end result was less sweet and more to our liking.
Don’t skip the baking-sheet prep. Be sure to line it with foil and mist it with cooking spray. The sugar in the hoisin makes things a little sticky in the oven. The foil and cooking spray help ensure the broccoli and especially the more fragile tofu release from the baking sheet.
14 oz. container firm OR extra-firm tofu, drained, halved lengthwise, cut crosswise into ½-inch-thick slices and pressed dry
Toasted sesame seeds, to serve
Directions
Heat the oven to 475°F with a rack in the middle position. Line a rimmed baking sheet with foil and mist with cooking spray.
In a small bowl, stir together the hoisin, soy sauce, garlic and sesame oil. In a medium bowl, toss the broccoli with half of the hoisin mixture until evenly coated. Distribute in an even layer on the prepared baking sheet.
Transfer the remaining hoisin mixture to the now-empty bowl, add the tofu and gently toss to coat. Place the tofu on the baking sheet, arranging it in a single layer, being sure that all the slices lay flat against the baking sheet.
Roast the broccoli and tofu without stirring until the broccoli is charred and tender-crisp, about 25 minutes. Using a wide metal spatula, transfer to a platter. Sprinkle with sesame seeds.
To pump up the flavors of the braising liquid in this Beer-Braised Cabbage, Cook’s Country chose a light-bodied lager. They also used beer-complementing ingredients like sautéed onion, mustard, vinegar, and thyme. To ensure the cabbage doesn’t overcook from extended simmering, the braising liquid is simmered until slightly thickened before adding the cabbage.
We paired the cabbage with a pan-seared pork chop and braised red potatoes with miso and scallions.
A great side dish that’s quick enough for a weeknight. You can substitute ¼ teaspoon of dried thyme for the fresh. This hearty side dish was a nice complement to the pork, although you can serve it as a vegetarian side.
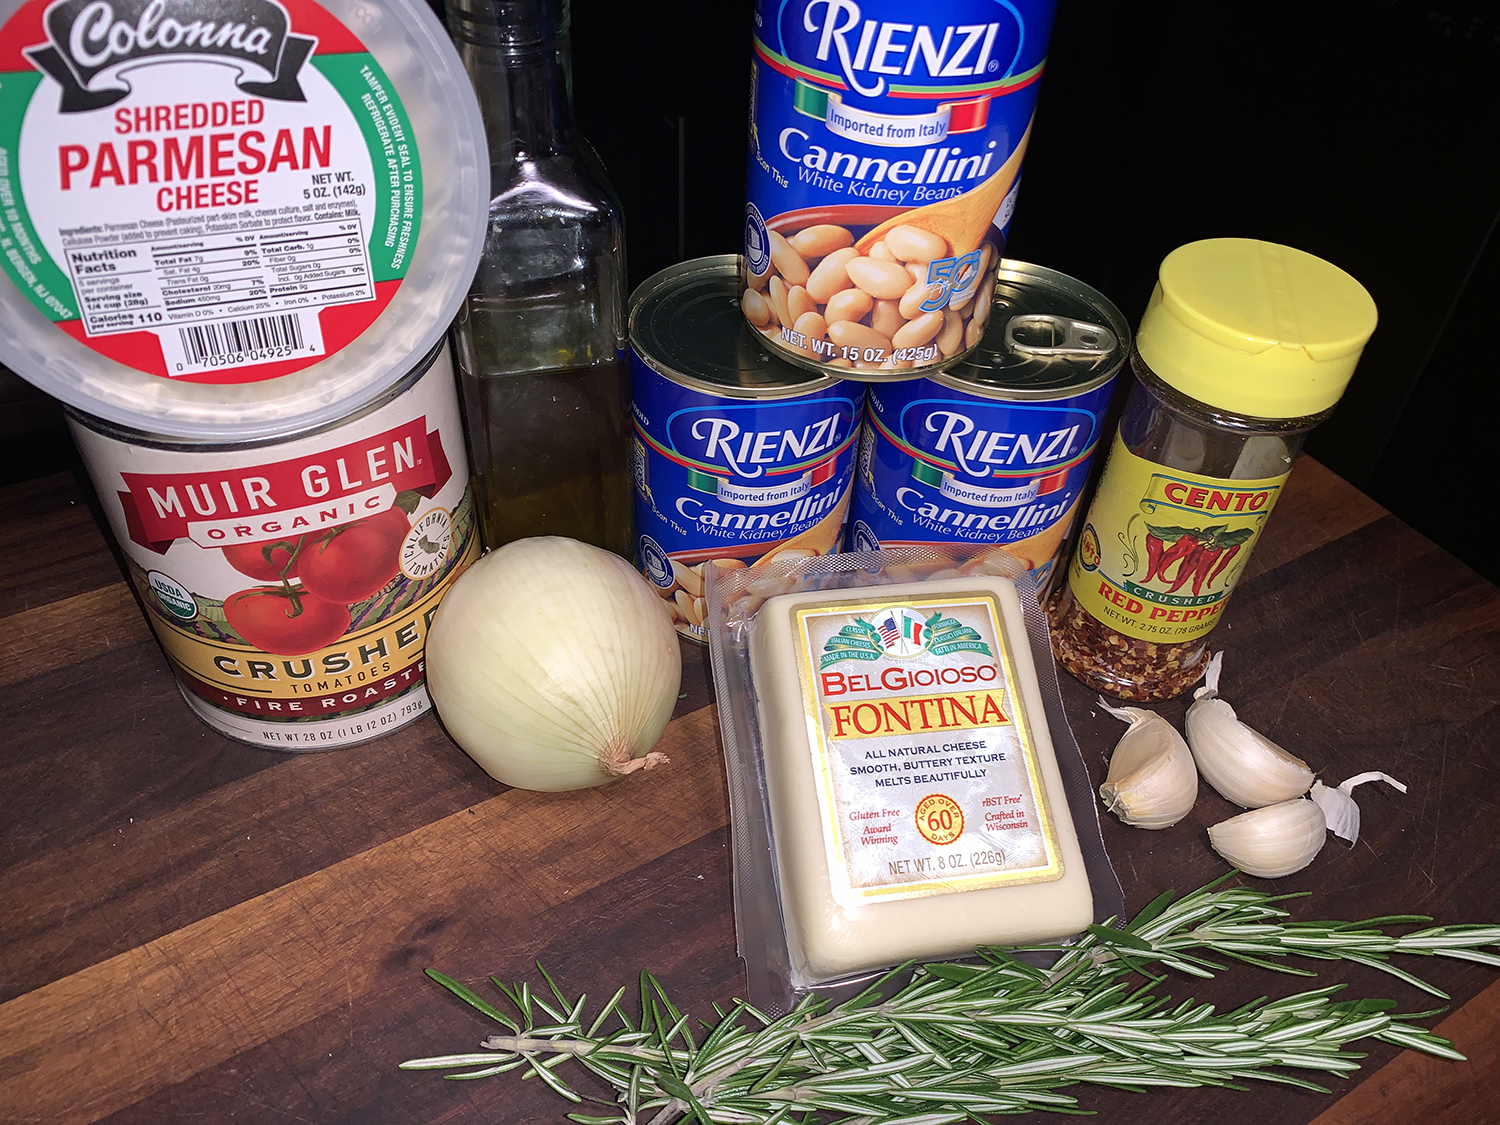
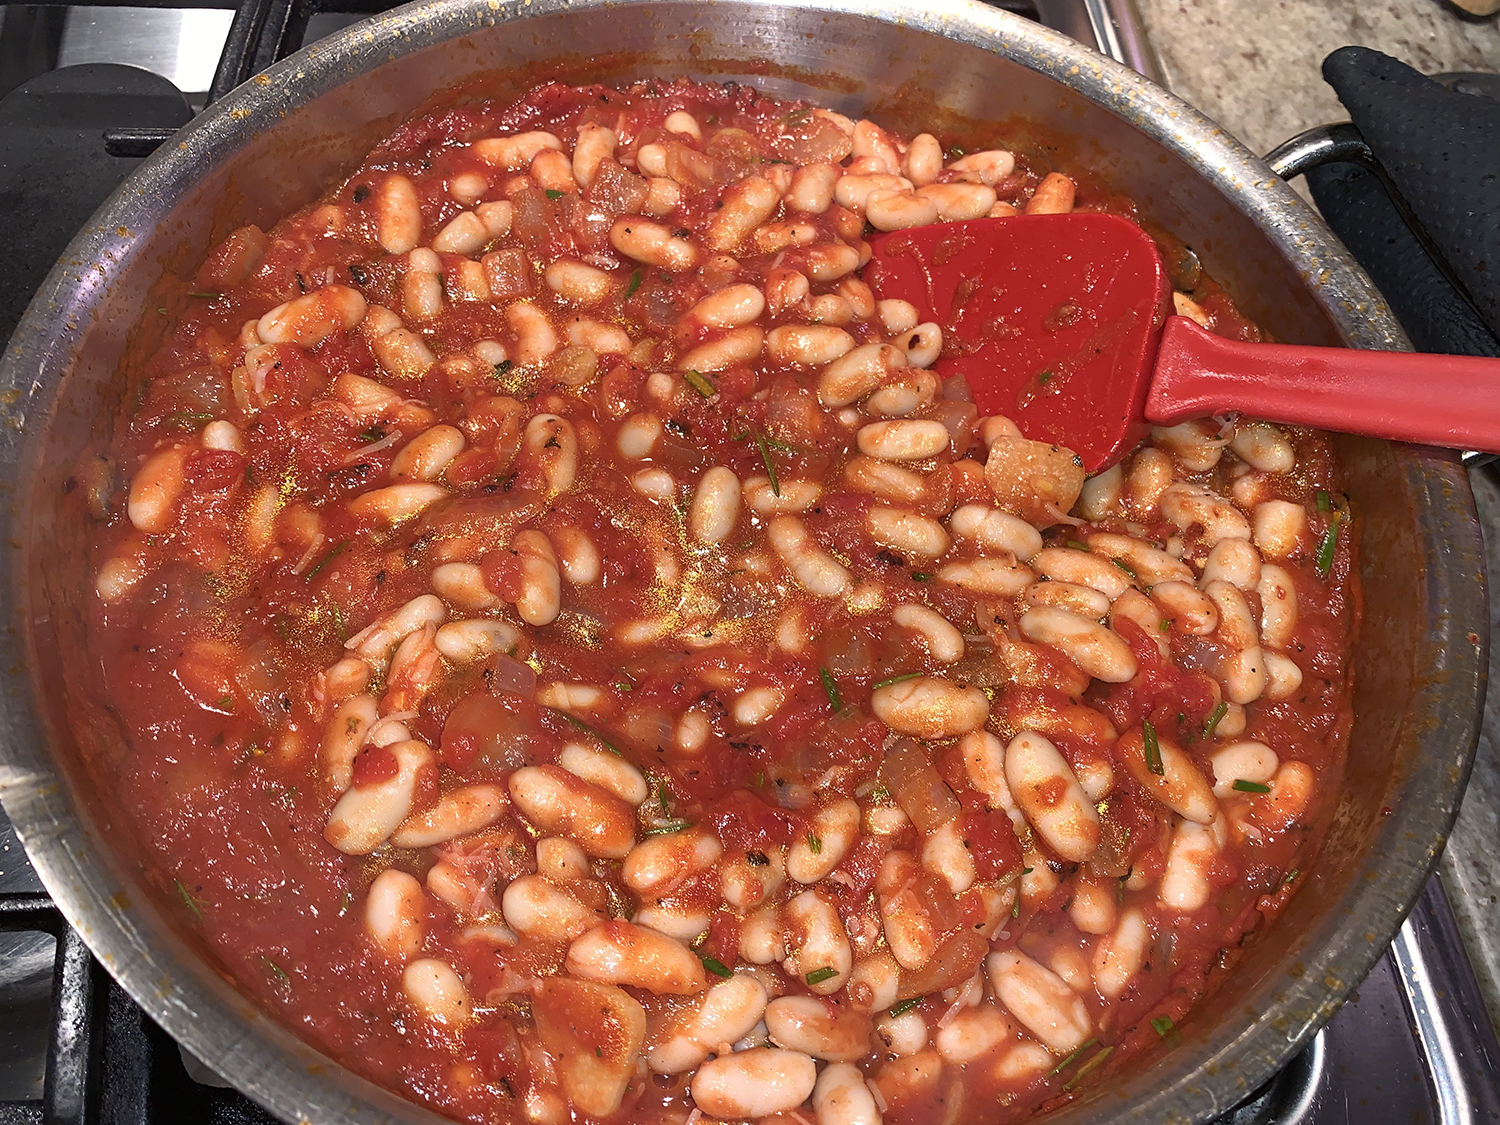
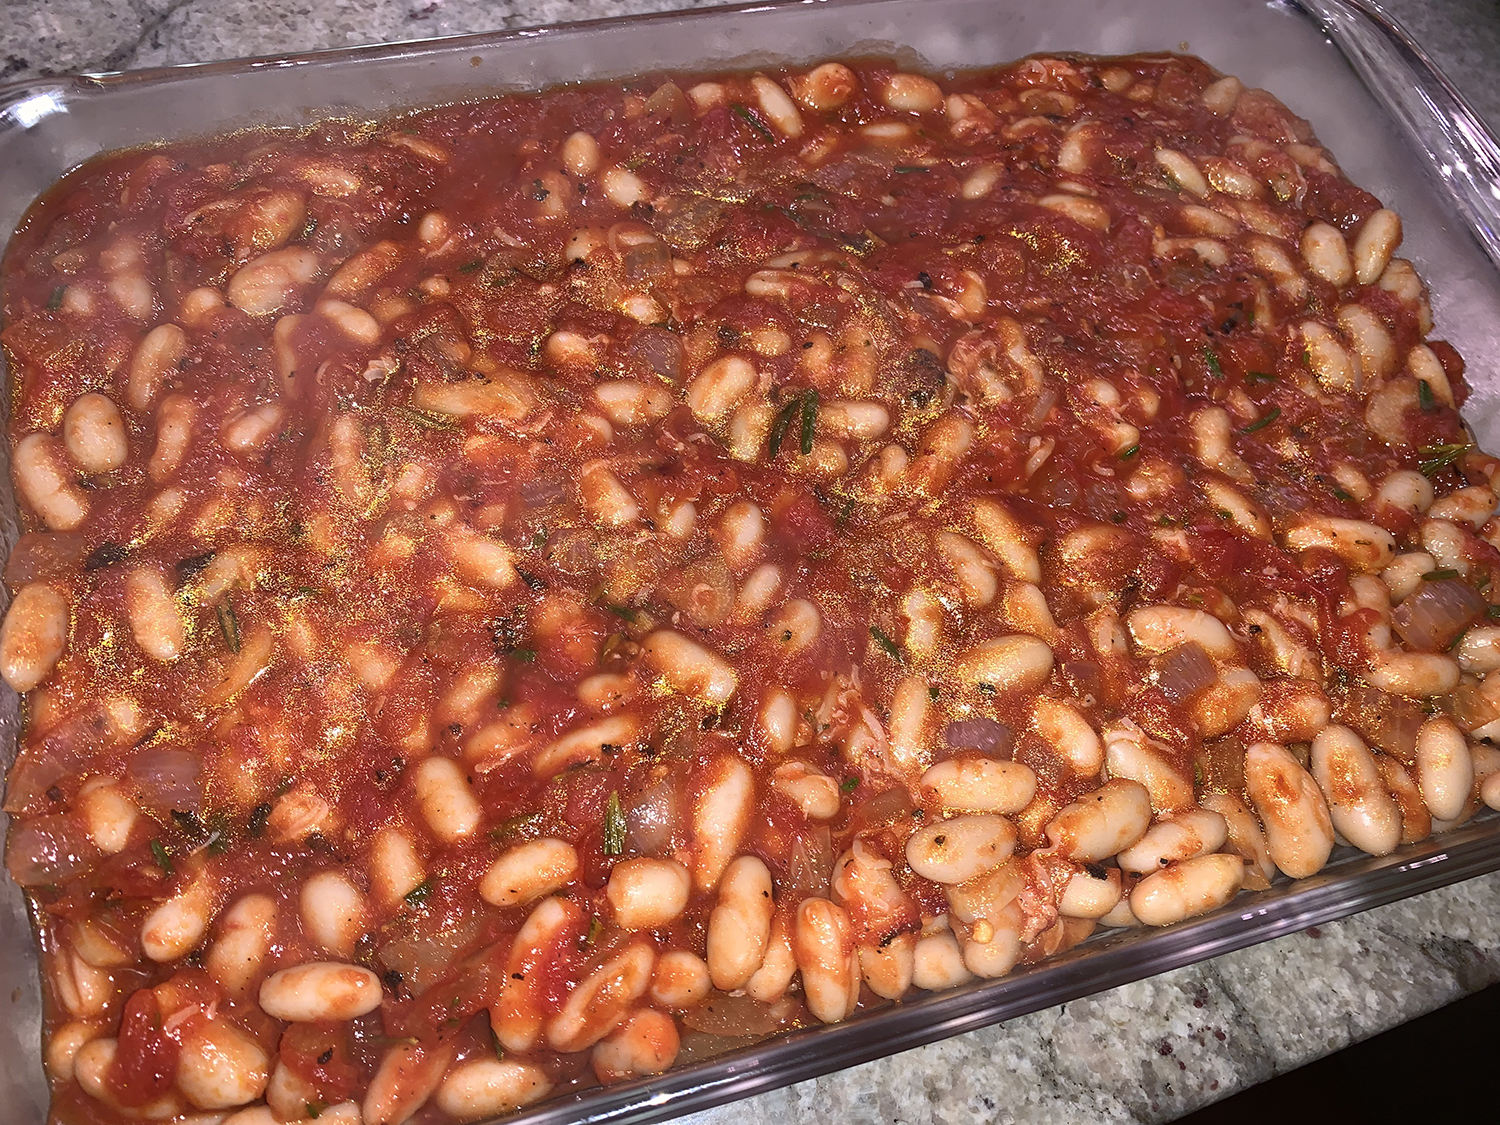
Flexible in that this Cheesy Italian Baked Beans recipe could be your main dish, or part of a meal as a side. Here, traditional Italian ingredients like onion, garlic, tomatoes, cheese, and rosemary put a spin on classic baked beans.
The prep is minimal and afterward it only cooks in the oven for about 20 minutes. When it came to topping the casserole with the shredded fontina cheese, I may have put a bit more than the 1/2 cup that was called for… like 50% more 🙂
I added a final step of letting the casserole sit for 5-10 minutes after removing from the oven. We paired the entrée with a side of steamed broccolini and a toasted whole grain baguette with garlic and parmesan.
1 28-oz. can fire-roasted crushed tomatoes, undrained
¼ cup fresh rosemary leaves, coarsely chopped, plus additional for garnish
3 15-oz. cans cannellini beans, rinsed and drained
¾ cup shredded Parmesan cheese
Crushed red pepper
Coarse salt and freshly ground black pepper
½ cup cup shredded Fontina cheese
Directions
Preheat oven to 400°F. In a large skillet heat olive oil over medium-high heat. Add onion, garlic, and 1/8 tsp. salt. Cook and stir for 5 minutes or until tender.
Stir in tomatoes and rosemary. Bring to boiling; boil gently, uncovered, 5 minutes or until slightly thickened.
Stir in beans and half the Parmesan. Season to taste with crushed red pepper, salt, and black pepper. Transfer to a 2-qt. rectangular baking dish. Top with remaining Parmesan and the Fontina. Bake 15 to 20 minutes or until beginning to lightly brown around the edges.
Remove from the oven and let sit for 5-10 minutes to thicken.
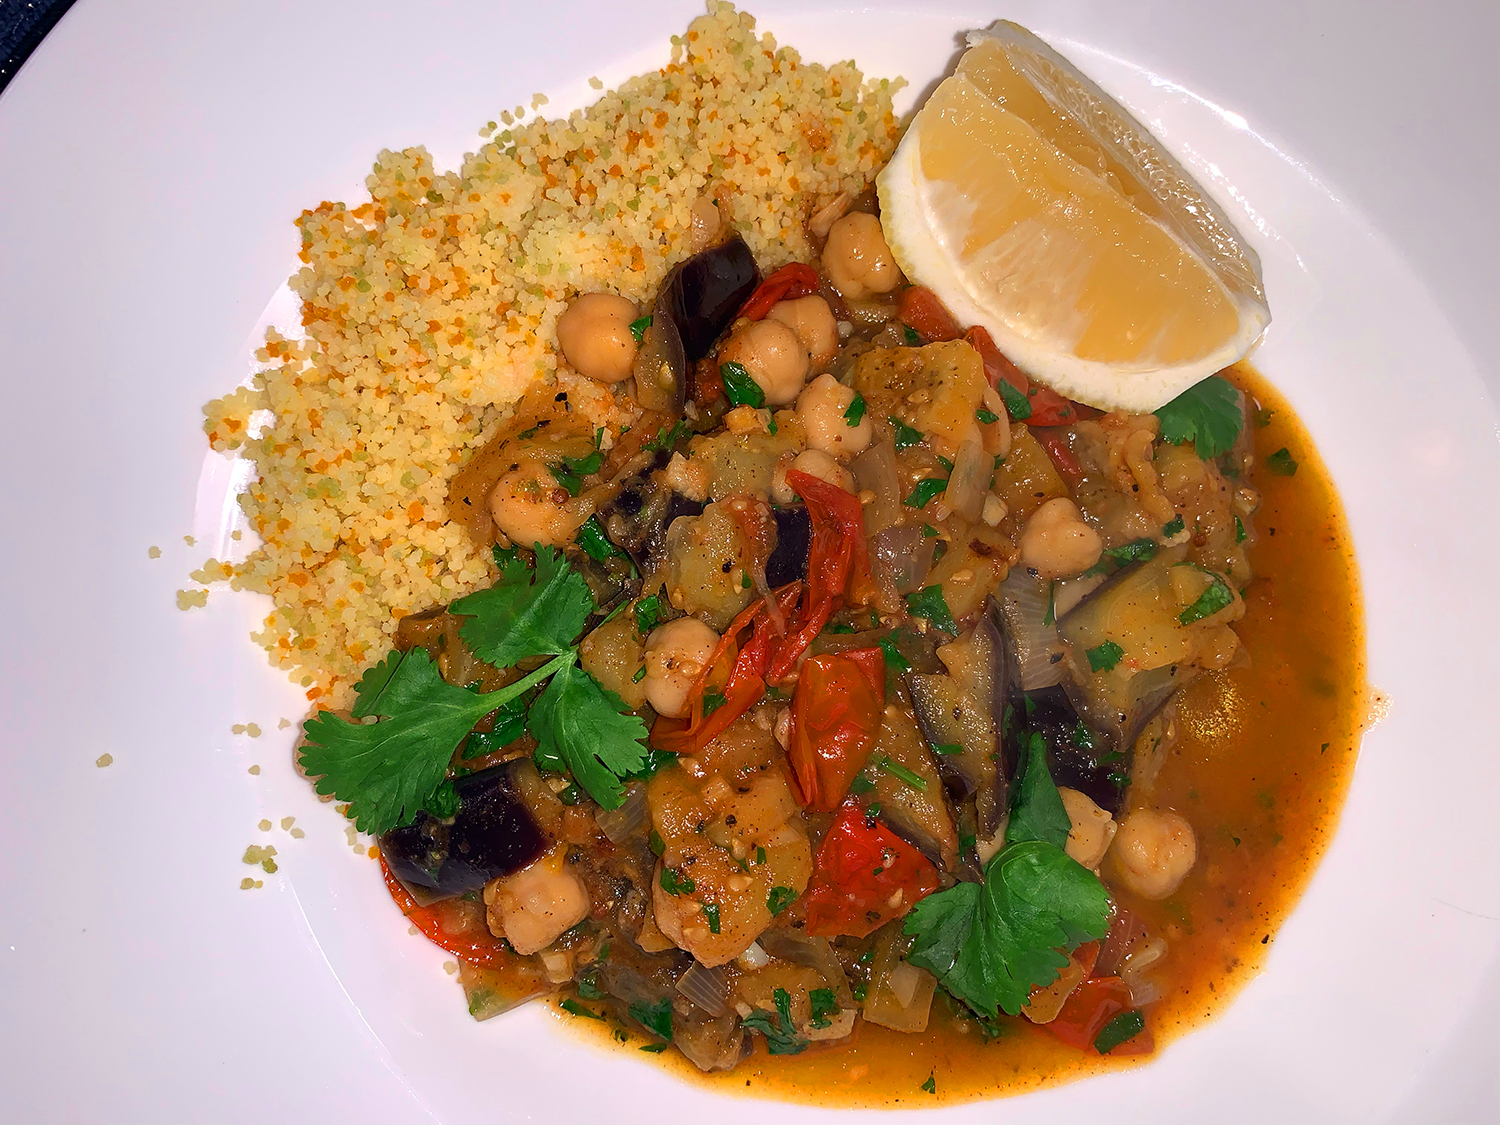
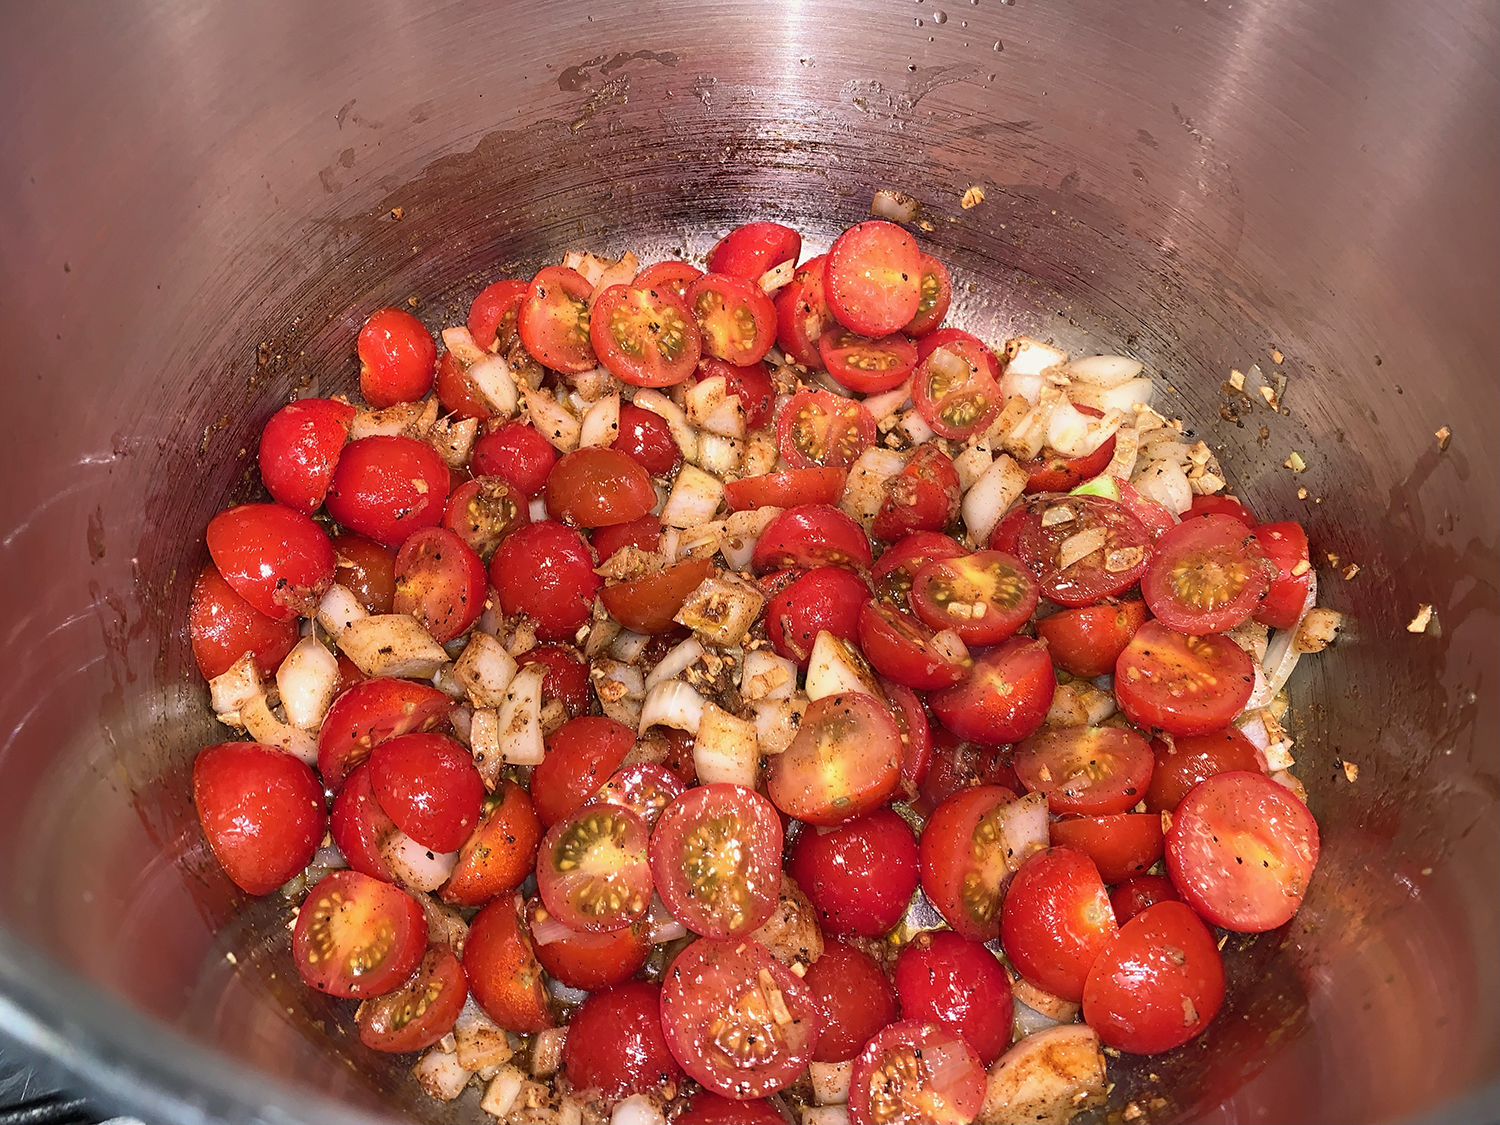
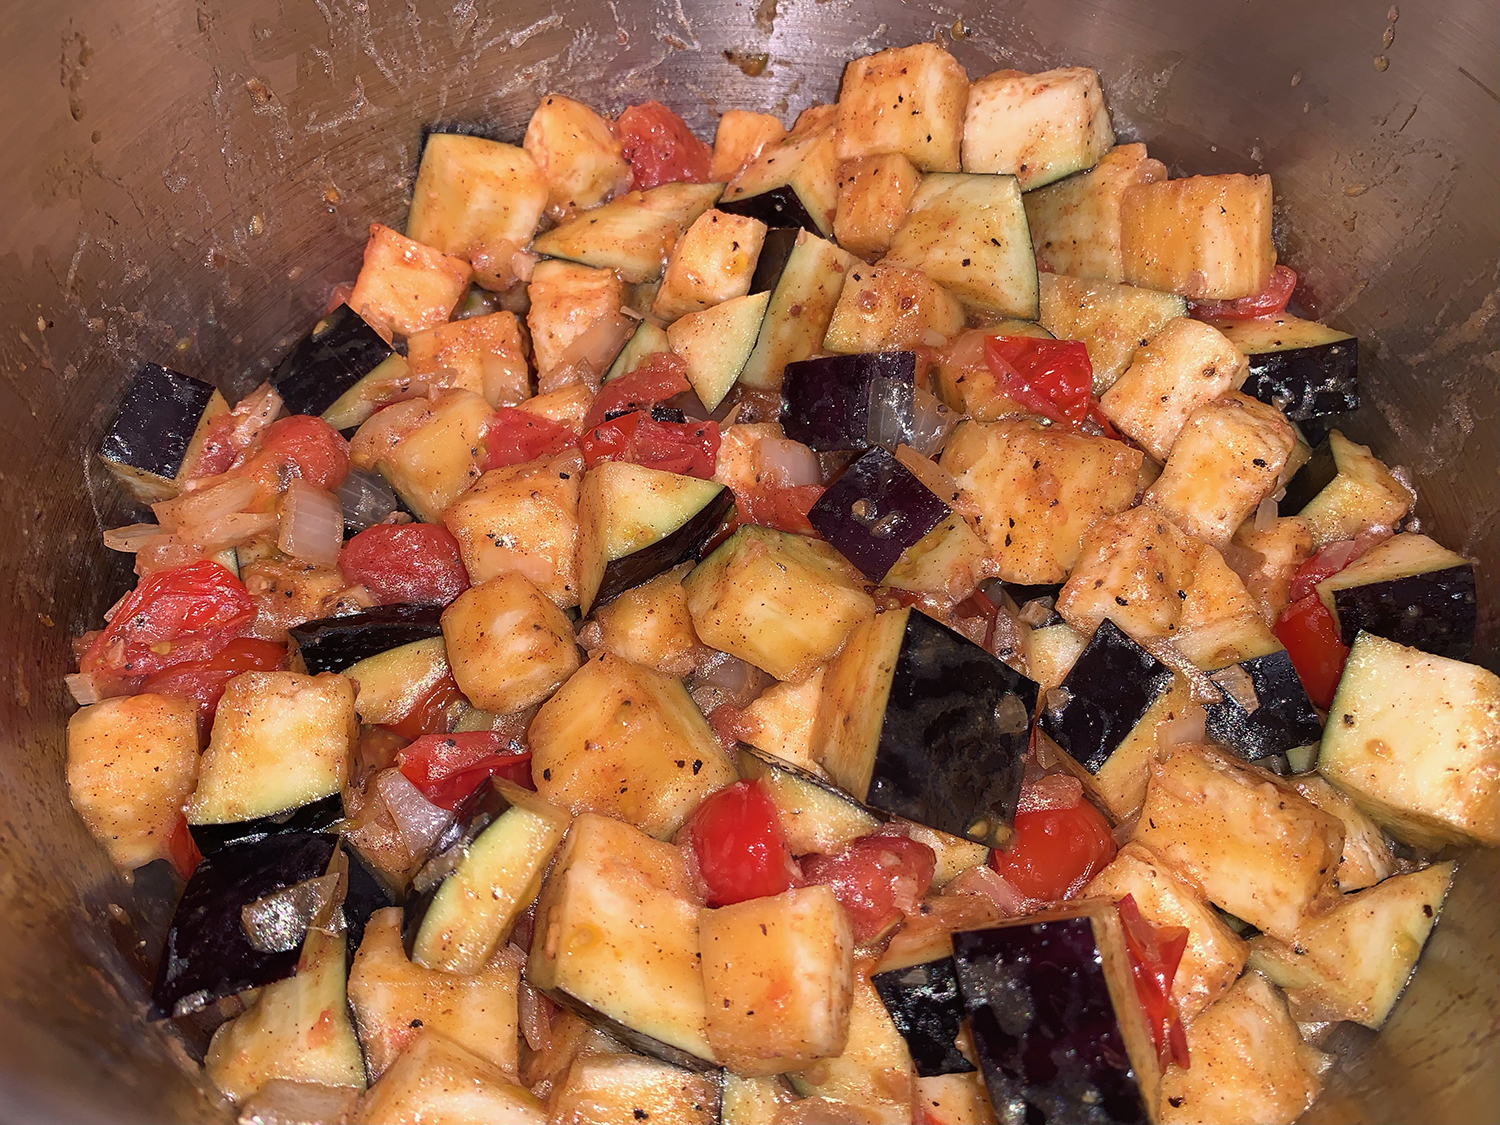
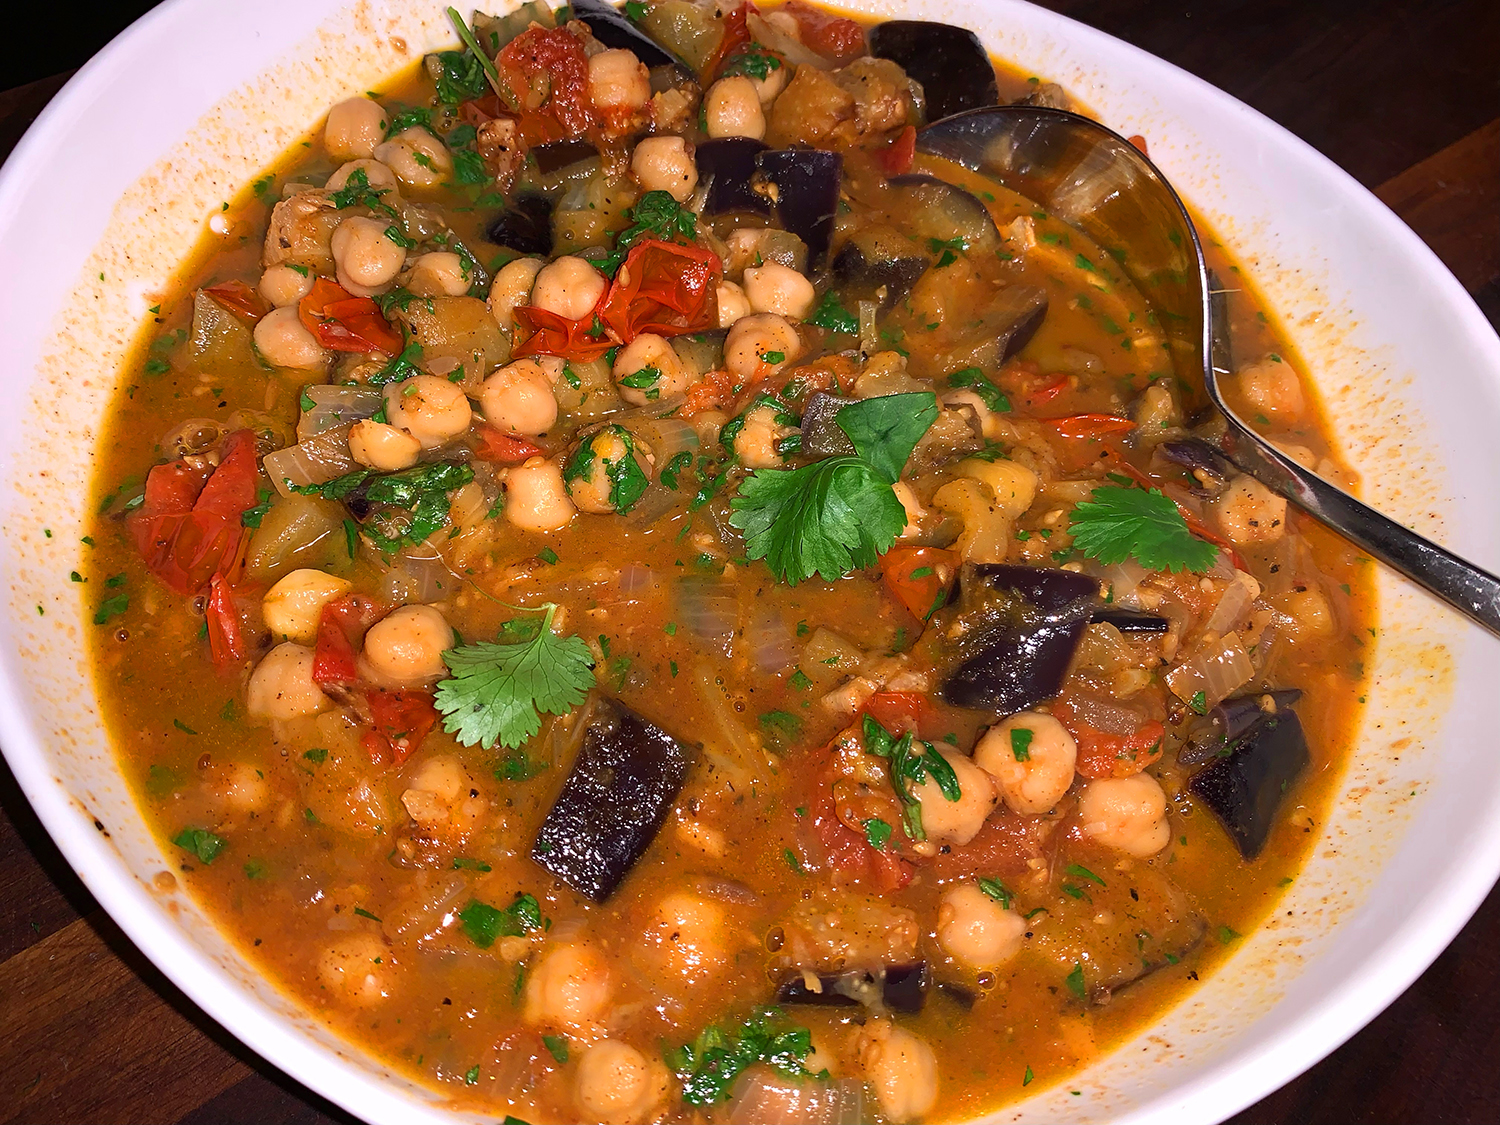
We found this lovely and full-flavored vegetarian dish in Milk Street’s Fast and Slow Cookbook for Instant Pot Cooking. A tagine is a North African stew cooked in a shallow, conical clay pot that goes by the same name. This chunky vegetable dish is warmly spiced like a tagine and features the common North African pairing of sweet and tart flavors.
For extra depth and a touch of spiciness, swirl in a spoonful of harissa into the tagine just before serving or offer some at the table for spooning on to taste. You will probably want to soak up the delicious sauce with crusty bread, warmed flatbread or couscous (or choice).
Be aware, you don’t want to shortcut the prep by leaving the tomatoes whole. Slicing 2 pints of grape tomatoes may sound like a bummer, but this step helps the tomatoes break down and cook at the same rate as the eggplant.
2 lbs. eggplant, trimmed and cut into 1-inch chunks
15½ oz. can chickpeas, rinsed and drained
1 Tbsp. lemon juice, plus lemon wedges to serve
1 cup lightly packed fresh cilantro, finely chopped
Directions
On a 6-quart Instant Pot, select Normal/Medium Sauté.
Add the oil and garlic, then cook, stirring often, until golden brown, about 4 minutes.
Add the onion, tomatoes, ginger, cumin, paprika, cinnamon, 2½ teaspoons salt and 1 teaspoon pepper. Cook, stirring occasionally, until the tomatoes begin to release some of their juices, 2 to 4 minutes.
Press Cancel, then stir in ¼ cup water, scraping up any browned bits. Gently stir in the eggplant, then distribute in an even layer.
Lock the lid in place and move the pressure valve to Sealing. Select Pressure Cook or Manual; set the pressure level to Low. Set the cooking time for 3 minutes. When pressure cooking is complete, quick-release the steam by moving the pressure valve to Venting. Press Cancel, then carefully open the pot.
Gently stir in the chickpeas and lemon juice, then taste and season with salt and pepper. Stir in the cilantro.
Serve drizzled with additional oil and with lemon wedges on the side.
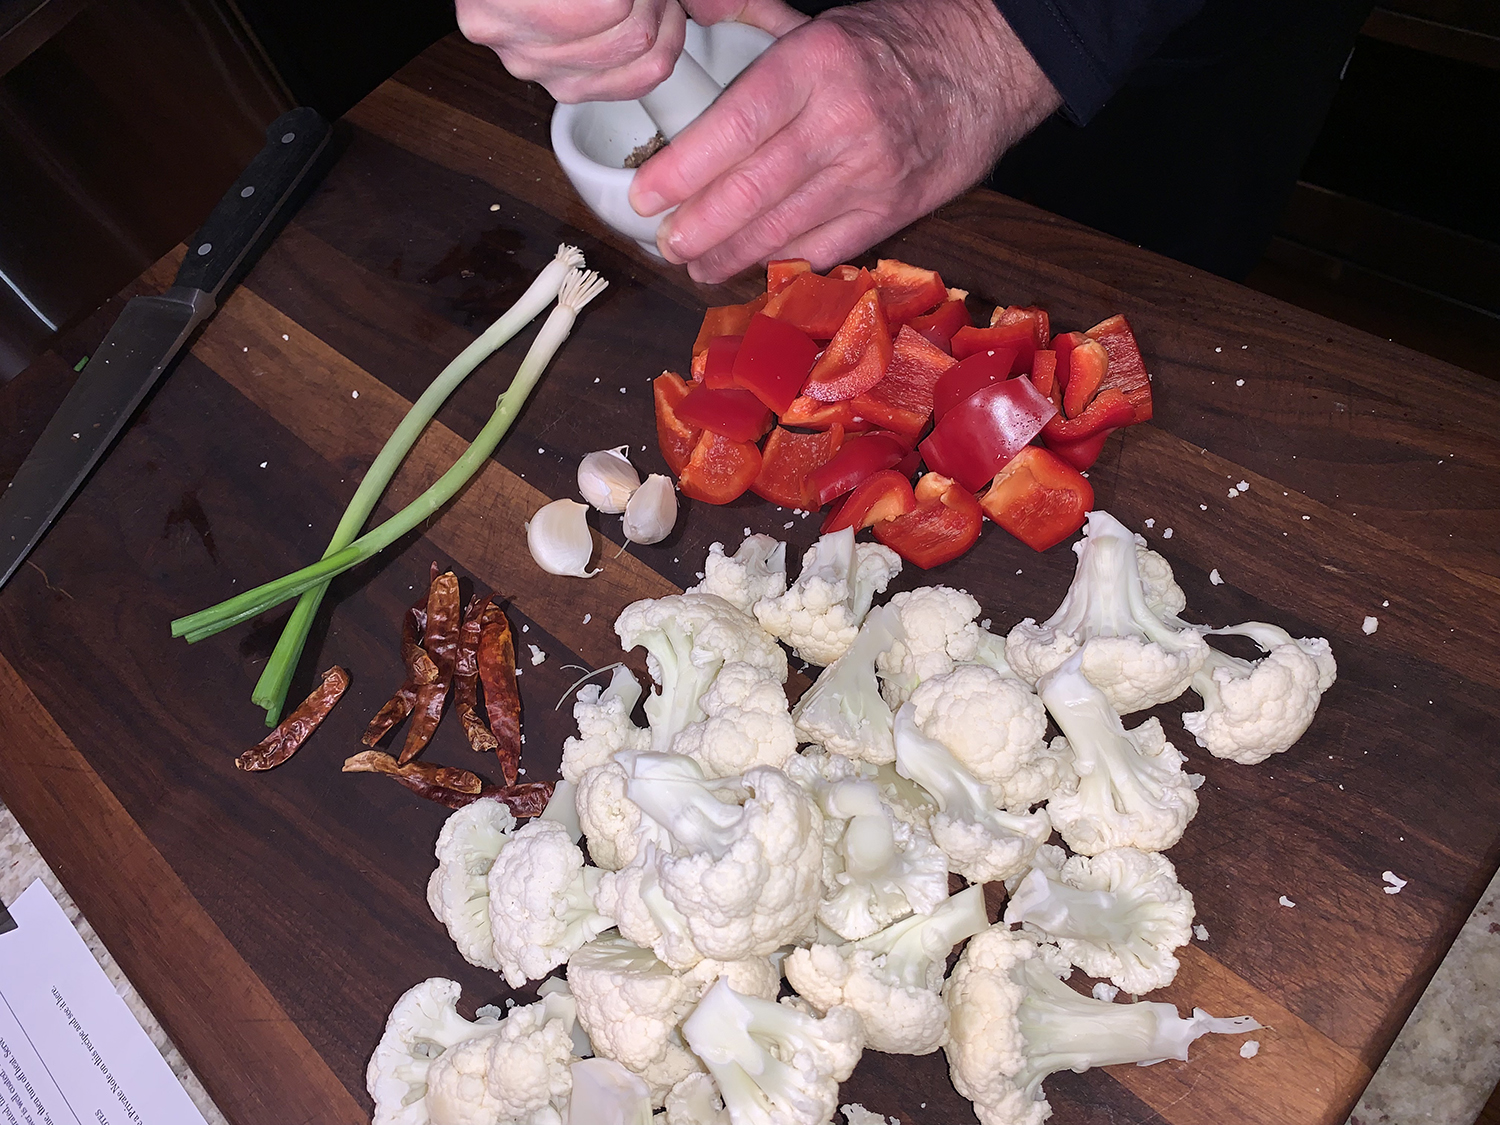
Even though Kung Pao Chicken originated in China’s Sichuan Province, it has become an iconic Chinese-American dish. The popular stir-fry typically includes chicken, vegetables and peanuts tossed in a dark, salty, sweet and spicy sauce, but in this vegan take, cauliflower steps in for the chicken.
Dark soy sauce is more caramel-flavored and less salty than regular soy sauce, and it adds color and richness to the dish. If you don’t have dark soy, substitute with regular soy sauce or hoisin sauce.
Make sure you have a lid for your skillet or wok on hand before you start cooking, as covering the cauliflower allows it to cook quicker and more evenly. And as with any stir-fry, always prep each ingredient ahead of cooking because you won’t have time in between.
Now, The Hubs inadvertently made more sauce than called for. He was using the “ounce” side of the small measuring cup instead of the “tablespoon” side. So he ended up doubling the soy sauces, vinegar, sugar and cornstarch. The vegetable stock remained at 1/4 cup. It ended up being a good mistake, as we tend to prefer our stir-fries on the saucier side anyway.
1 head cauliflower (about 2 lbs.), cut into small 2-inch-long florets
Kosher salt
1 green or red bell pepper, core, seeds and membrane removed, and cut into 1-inch pieces
1 tsp. Sichuan peppercorns, lightly ground in a mortar and pestle, spice grinder or crushed with a rolling pin
8 whole dried chiles, such as er jing tiao or chiles de árbol
2 cloves garlic, finely chopped
1 piece ginger, (1-inch) peeled and finely sliced
1/3 cup roasted peanuts
2 scallions, white and green parts, finely sliced
Steamed rice, to serve
Directions
In a small bowl, whisk together the dark soy sauce, soy sauce, black vinegar, sugar, vegetable stock or water, and cornstarch. Set aside.
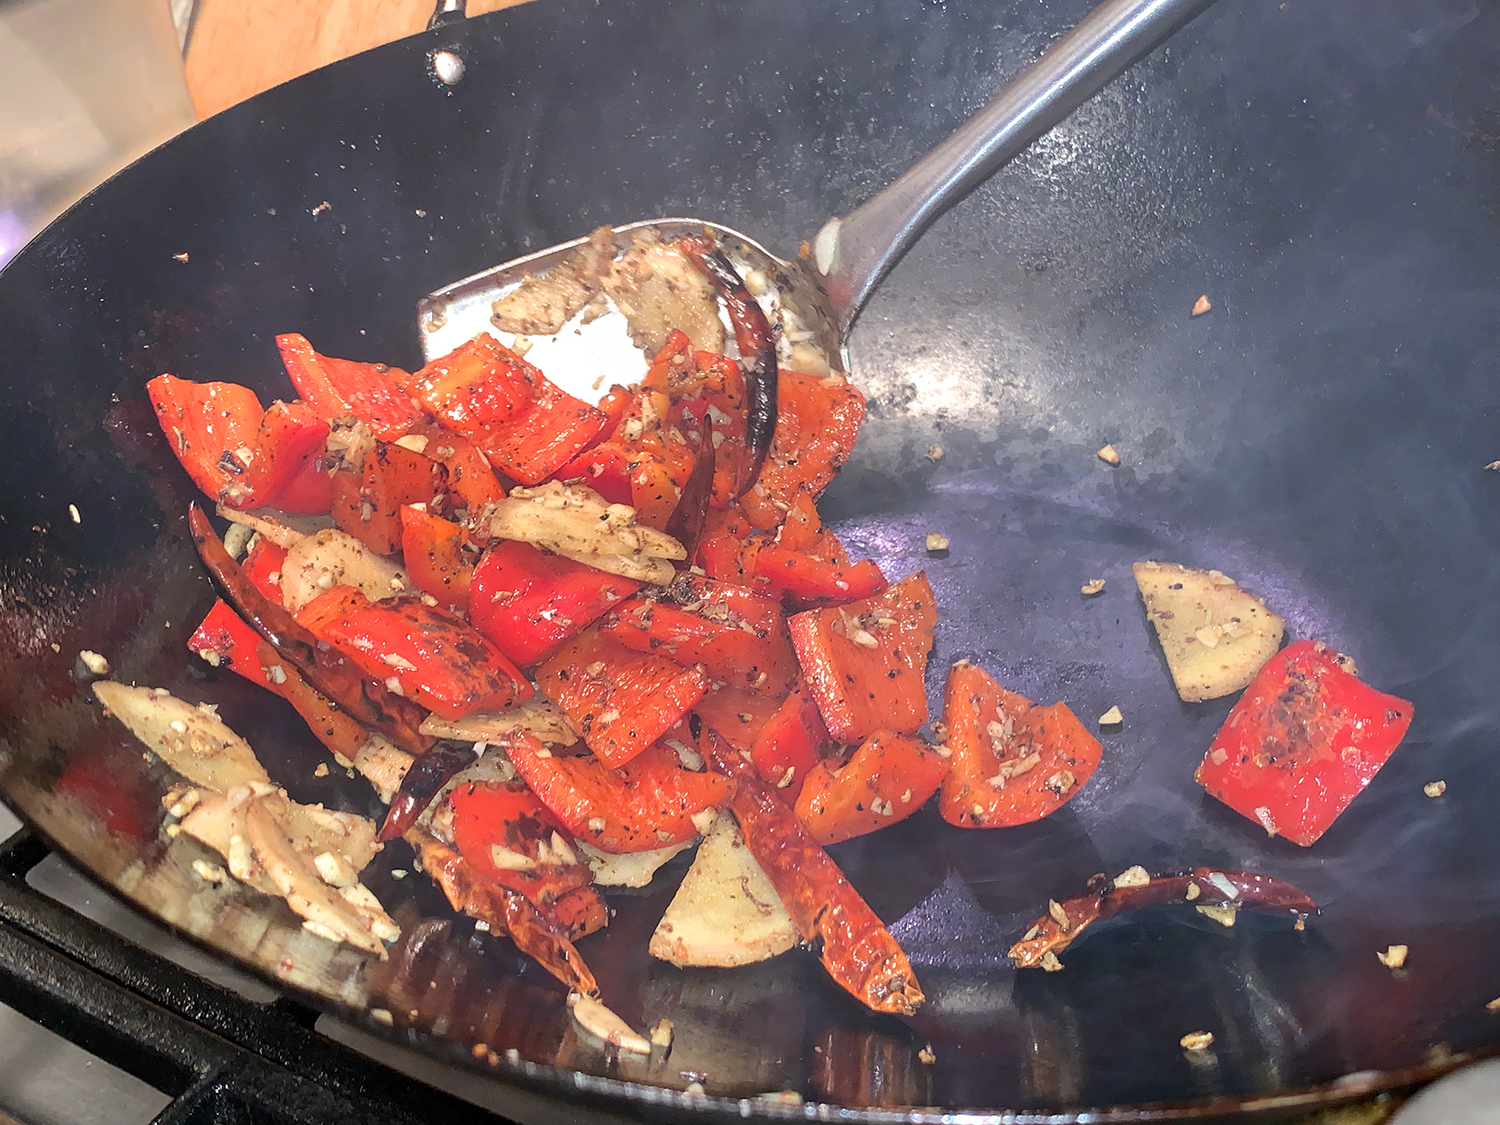
Heat wok or large (12-inch) skillet on medium-high until very hot. Add 2 tablespoons of oil, the cauliflower florets and 1/2 teaspoon salt, and toss for 1 minute. Cover and cook for 5 to 6 minutes, tossing the cauliflower every 1 1/2 minutes or so, until the cauliflower is crisp-tender and charred in some parts. Remove from the pan and set aside.
In the same wok or skillet, add the remaining 1 tablespoon of neutral oil, along with the bell pepper. Toss for 1 minute, then add the Sichuan peppercorns and whole dried chiles, and stir for 1 minute until fragrant.
Add the garlic and ginger, and stir for 30 seconds, then add the cauliflower back to the pan. Stir the sauce in the bowl to make sure the cornstarch is well incorporated, then pour it over the cauliflower and toss until the cauliflower is well coated.
Toss in the peanuts and scallions, stir to combine, then turn off heat. Serve with rice.
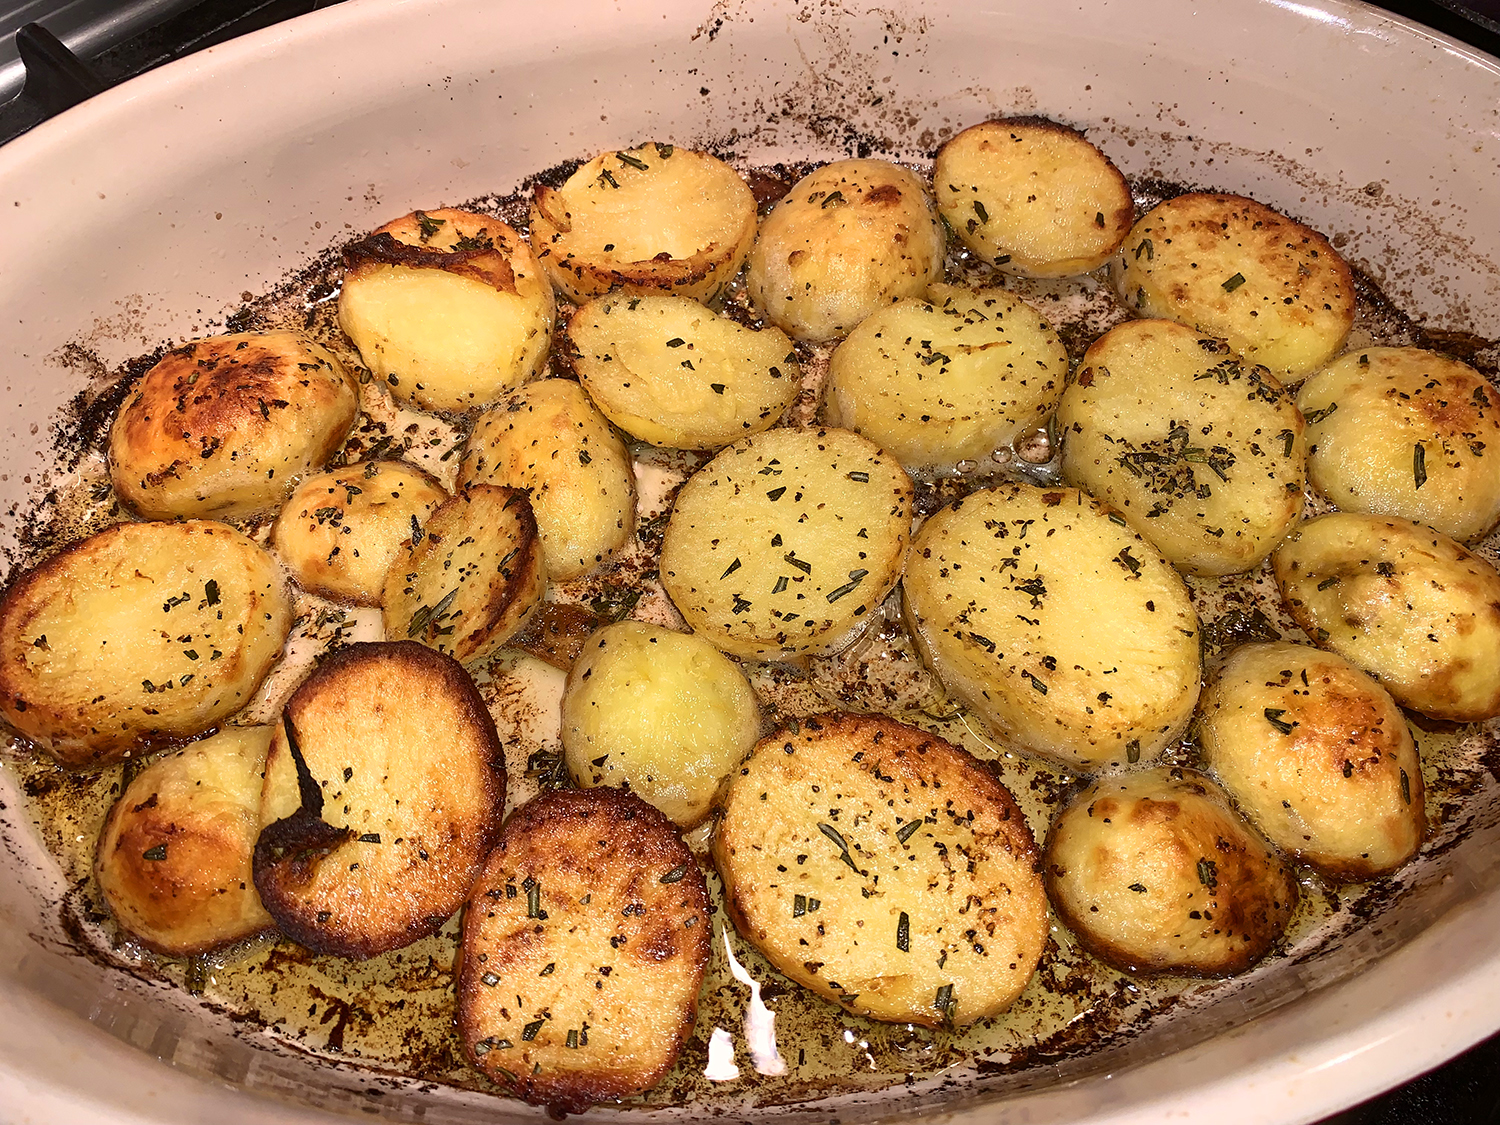
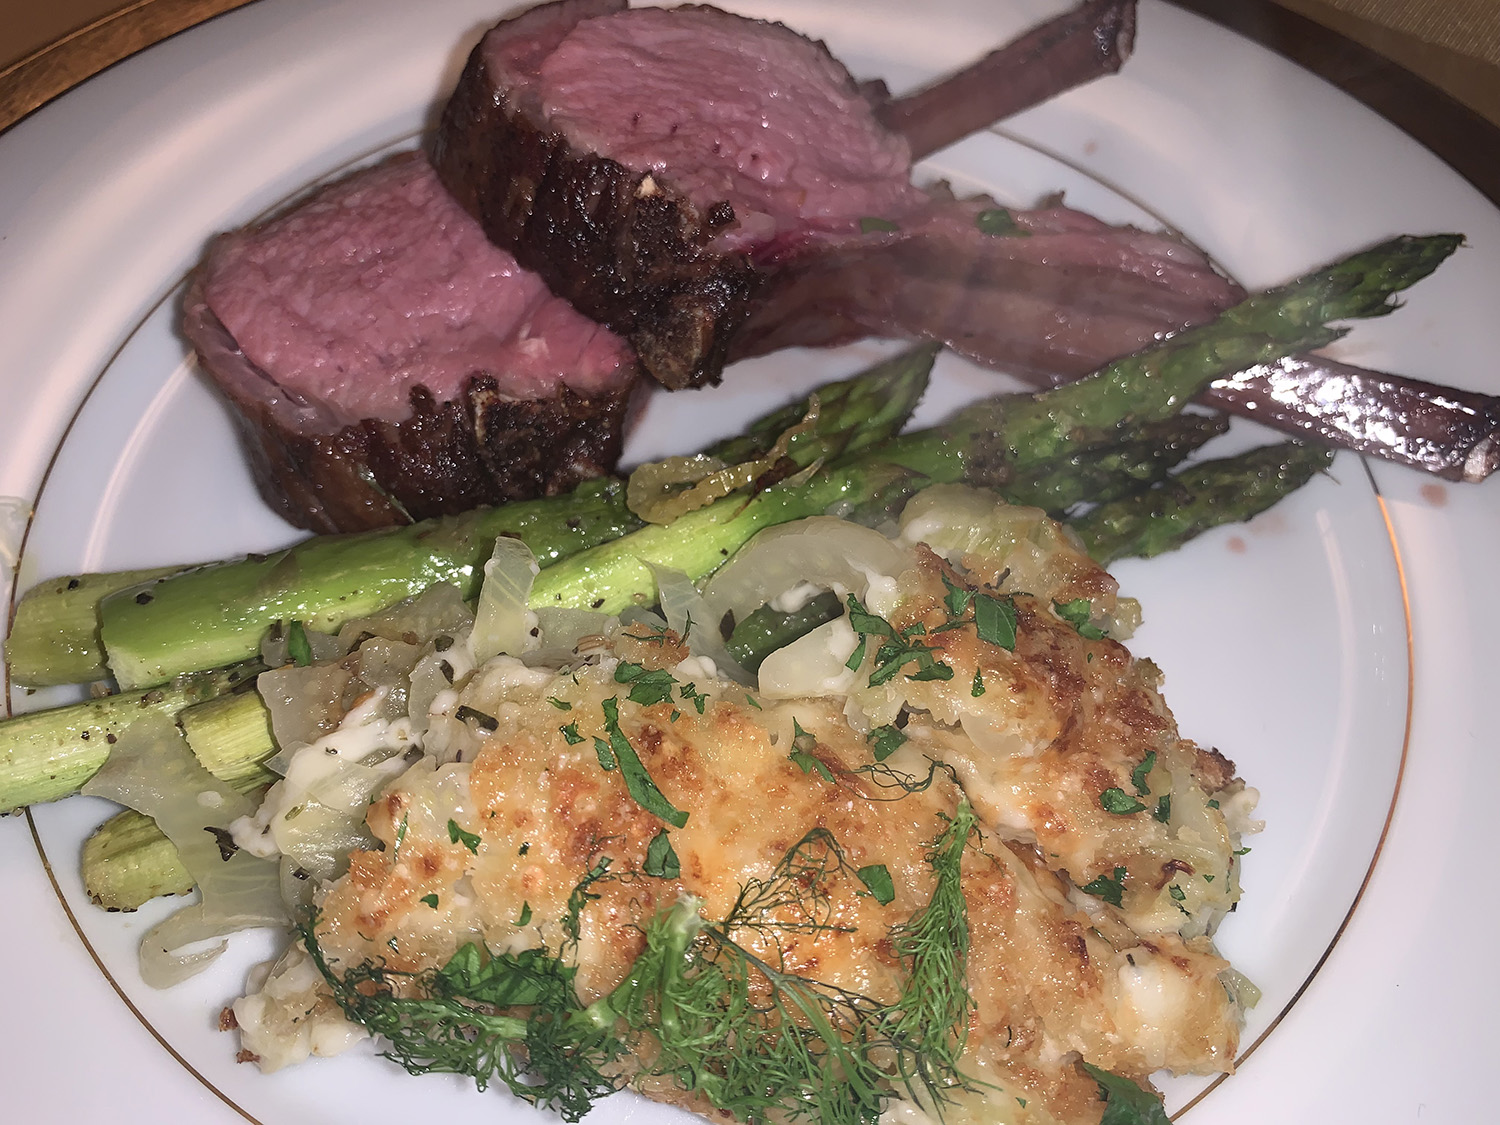
“These full-flavored potatoes are a great new approach to your typical potato side dish. The potatoes roast, then “melt” with the flavors of lemon, rosemary and garlic. They’re good enough for a special occasion, but easy enough for a weeknight.” —EatingWell
We paired our potatoes with a sous vide, pan-seared steak and spinach sautéed with garlic and olive oil.
The original recipe indicates the potatoes will serve six. They were so good, we barely got three portions from them, so I would plan on a maximum of four servings.
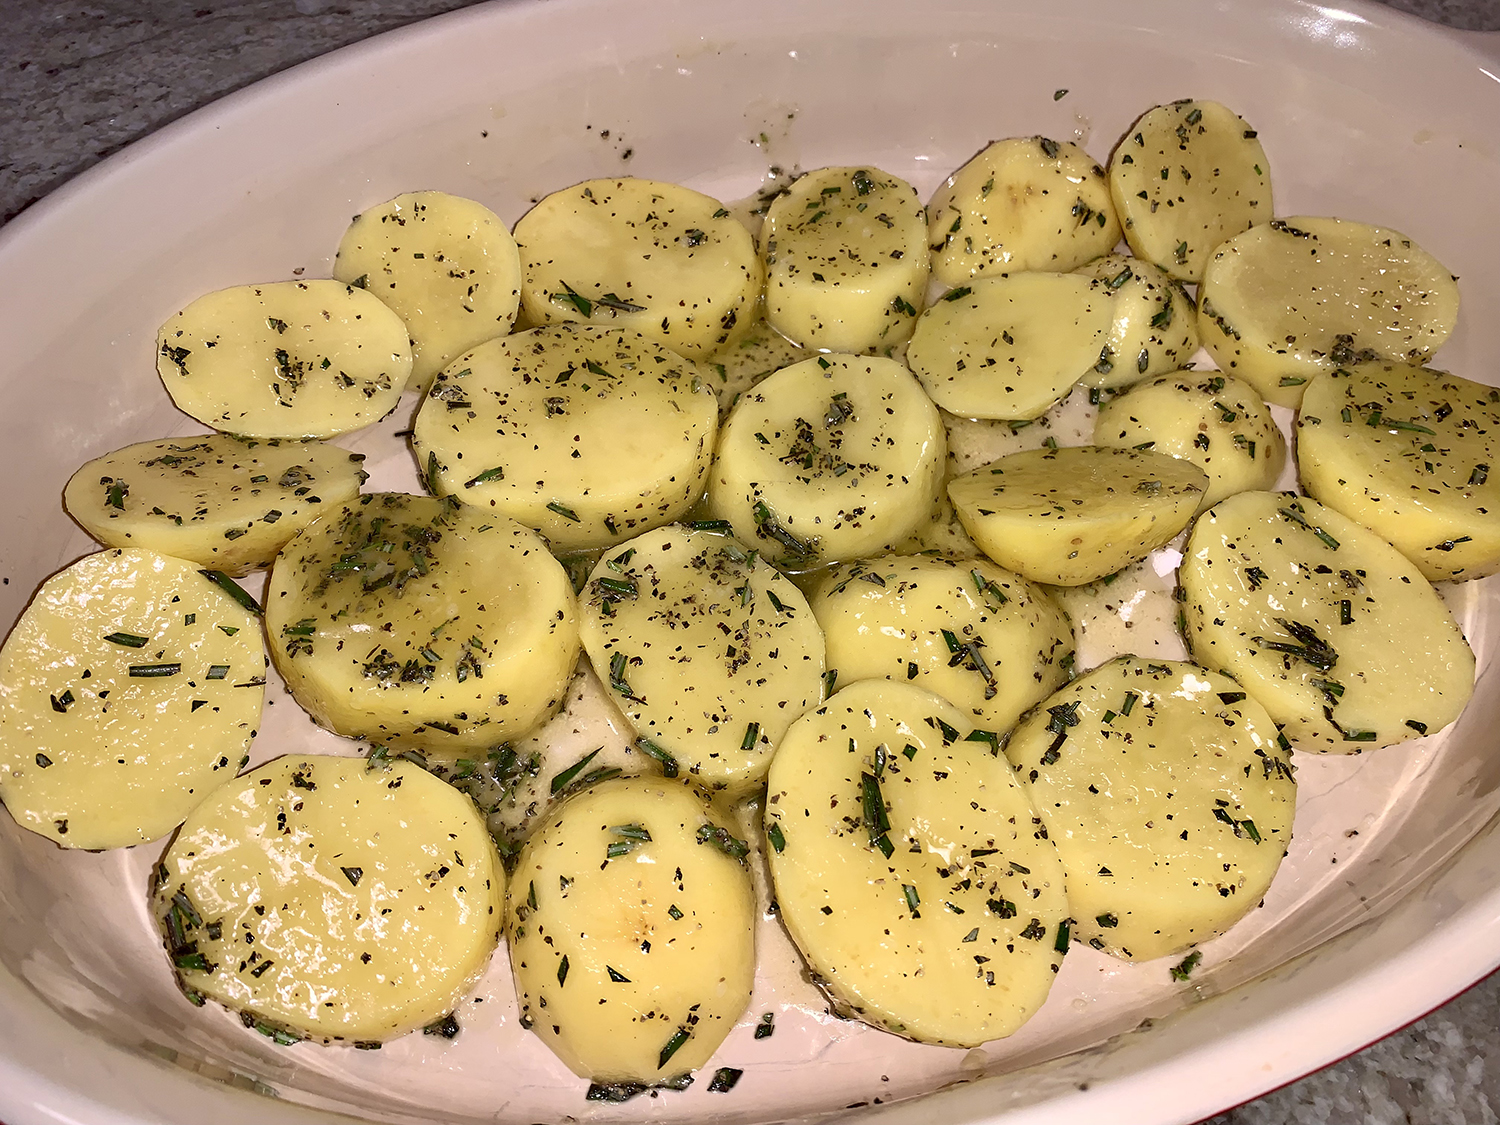
A word to the wise, DO NOT use glass or stone bakeware. When it’s time to add the broth and lemon, even though the liquids are room temperature, there’s a high likelihood the very hot dish will crack, trust us on this one. Either a metal pan or enameled cast-iron one are good choices. Ideally, the pan should have a wide enough bottom to accommodate the potato slices arranged in a single layer.
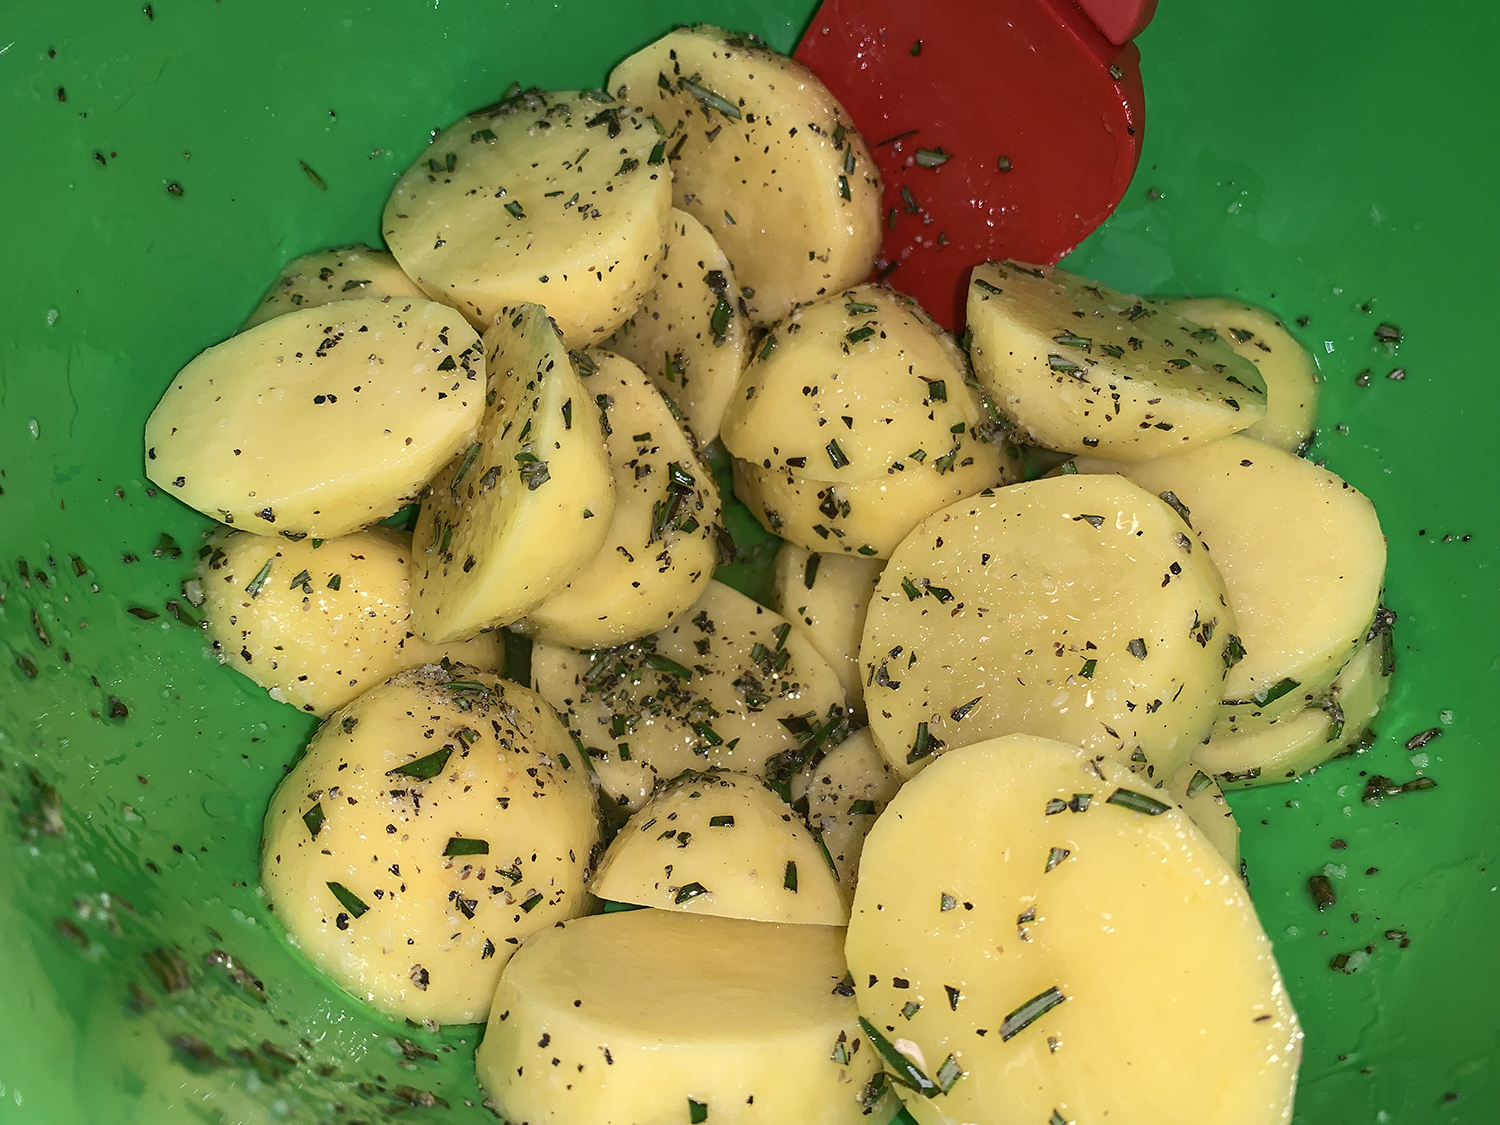
2 lbs. Yukon Gold potatoes, peeled and sliced 1 inch thick
2 Tbsp. butter, melted
2 Tbsp. extra-virgin olive oil
1 Tbsp. chopped fresh rosemary, plus more for garnish
¾ tsp. salt
½ tsp. ground pepper
¾ cup vegetable or chicken broth
¼ cup lemon juice
2 Tbsp. sliced garlic
Directions
Position rack in upper third of the oven; preheat to 500 degrees F.
Toss potatoes, butter, oil, rosemary, salt and pepper in a large bowl. Arrange the potatoes in a single layer in a 9-by-13-inch metal baking pan. (Don’t use a glass dish, which could shatter.) Roast, turning once, until browned, about 30 minutes.
Carefully add broth, lemon juice and garlic to the pan. Continue roasting until most of the liquid is absorbed and the potatoes are very tender, 10 to 12 minutes more.
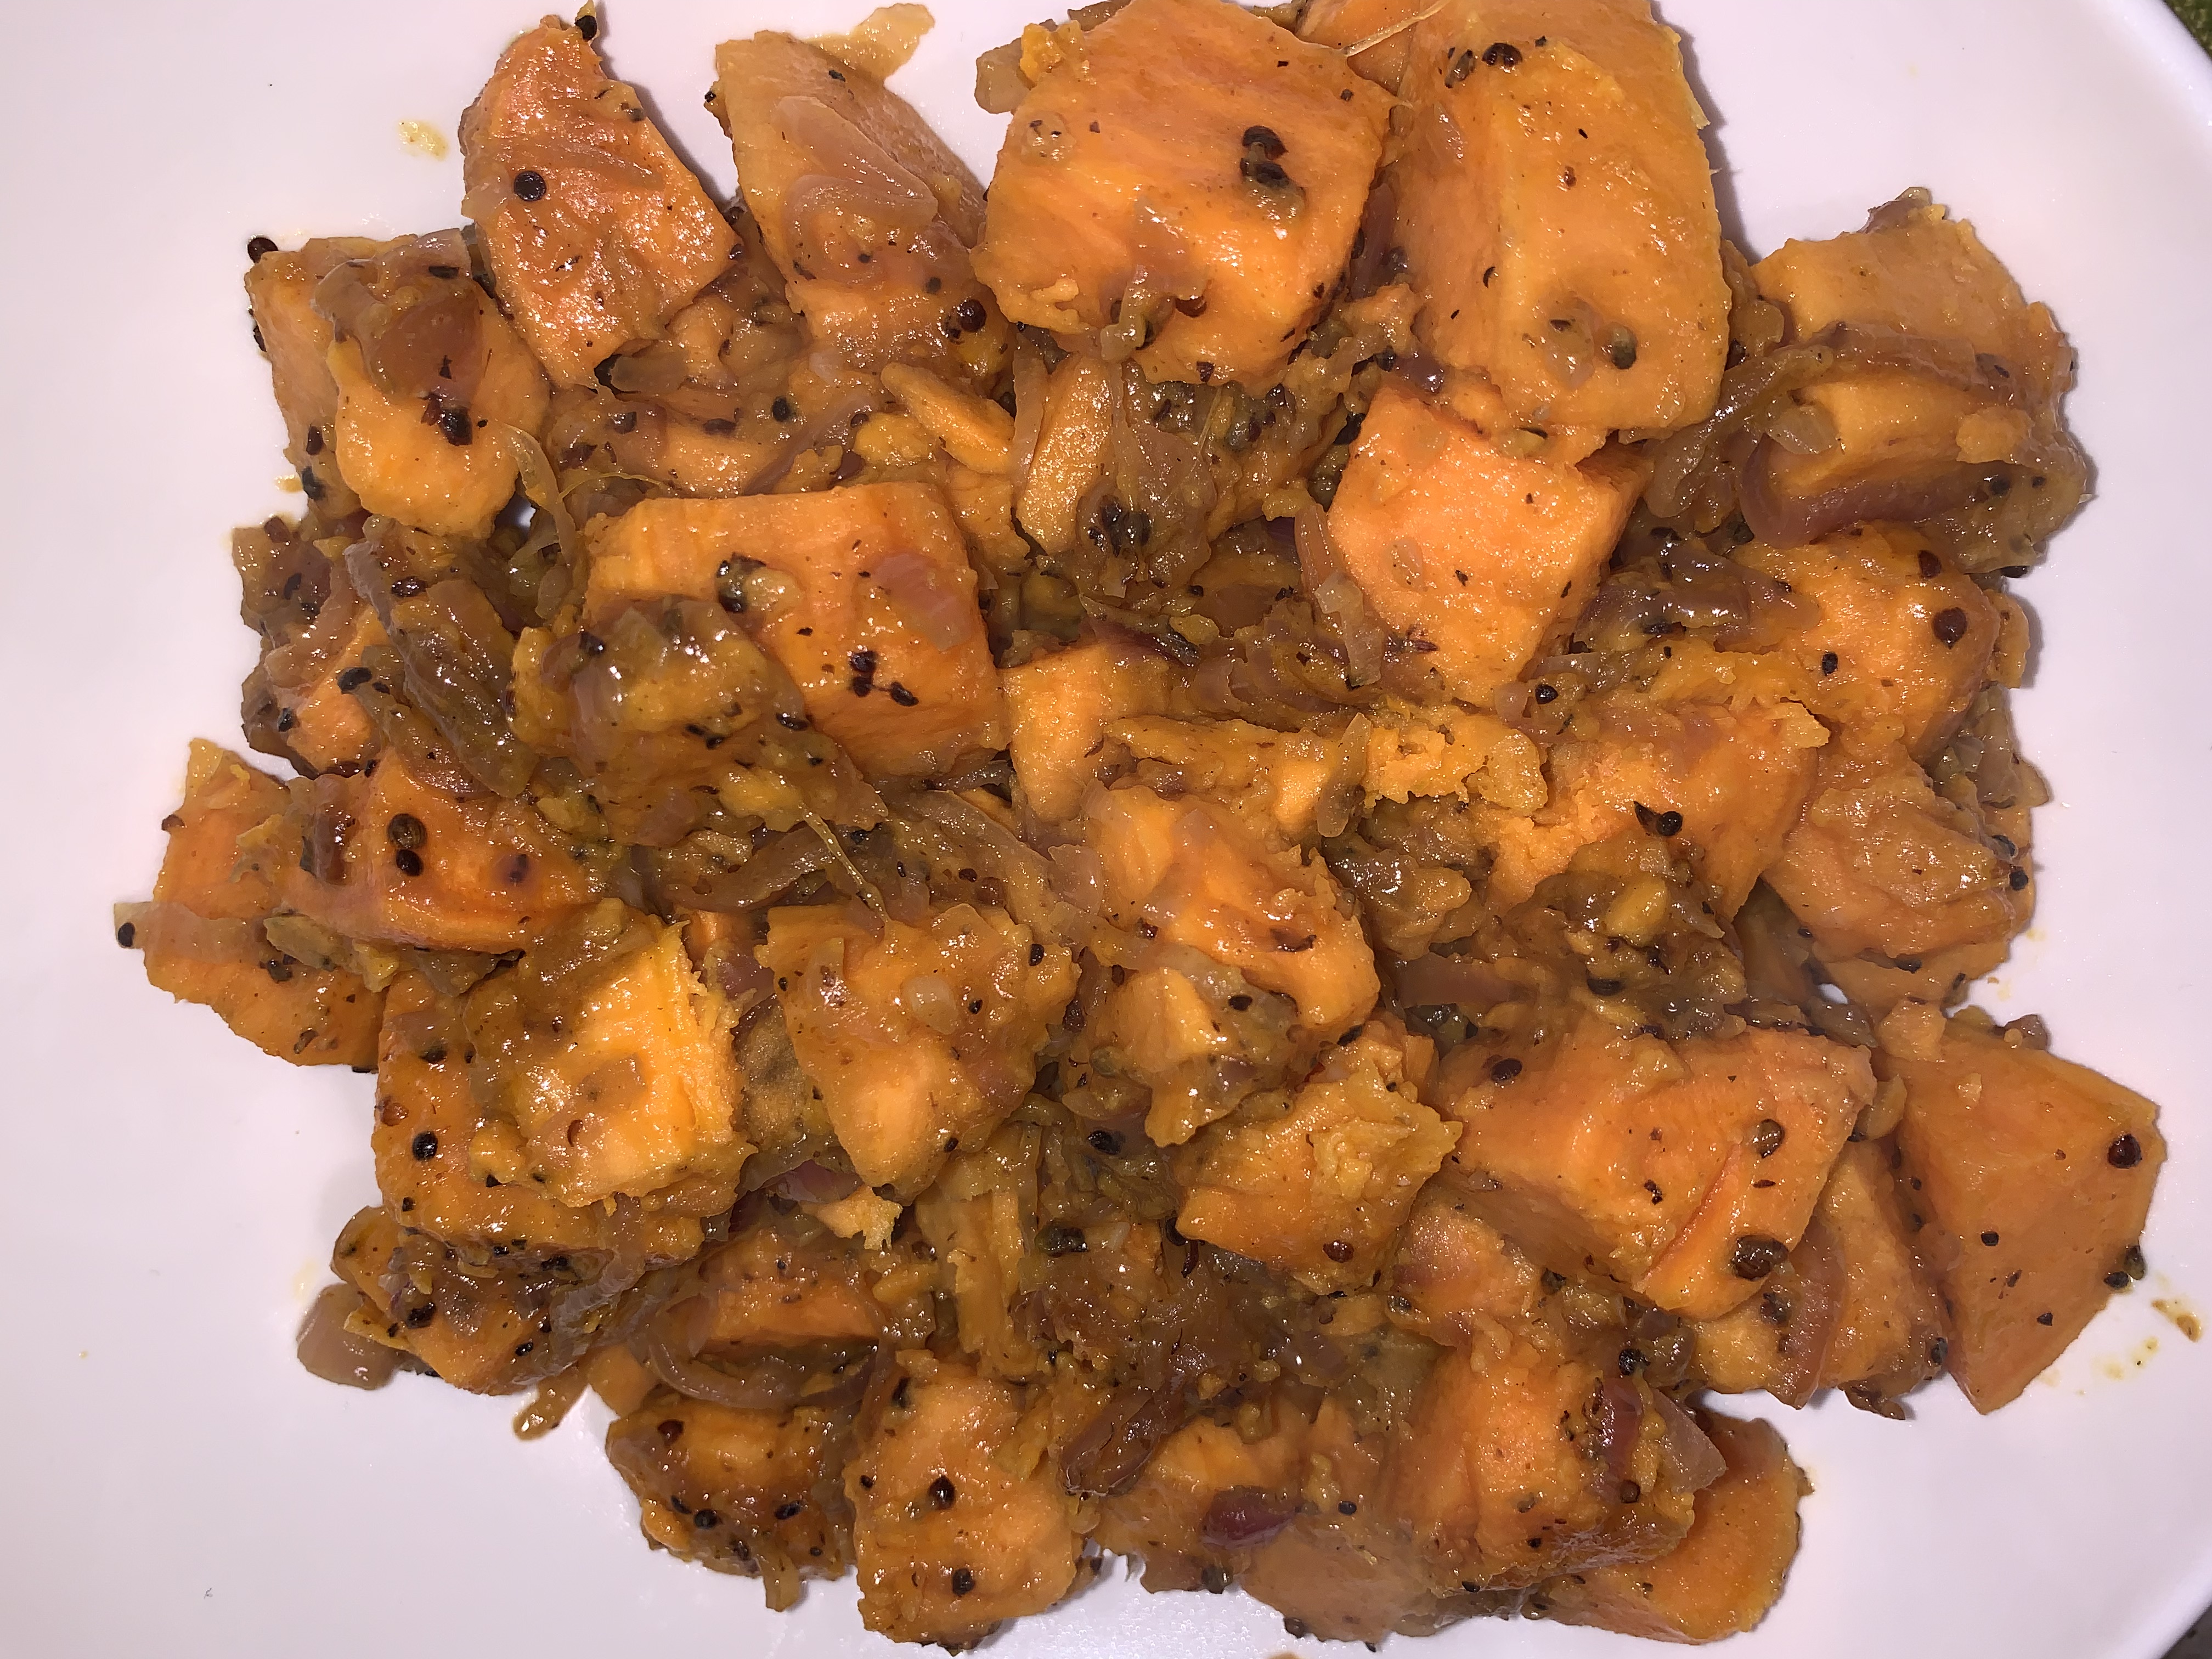
This colorful side dish features an unusual combination of flavors; the inspiration comes from a recipe in “365,” a cookbook by German food blogger Meike Peters. Earthy sweet potatoes pair well with the subtle citrusy notes of coriander and the fruitiness of orange juice, while savory onion, spicy cayenne and salty olives balance the natural sugars. Although we skipped the olives altogether this time in reference to the rest of the meal.
We love the texture and flavor pop of lightly crushed coriander seeds; a mortar and pestle are the best tools for the task but the bottom of a heavy skillet works, too; OR put them in a small ziploc and mash with a heavy meat club. If you prefer, you can use 1 tablespoon ground coriander in place of the seeds, but it will require less than a minute to bloom in the oil.
Don’t use a narrow saucepan or pot for this recipe. The wider diameter of a Dutch oven allows the potatoes to be distributed in a thinner layer, which results in more even cooking. If you like sweet potatoes, you’ll LOVE this amped-up version of the colorful spuds.
1 medium red onion, peeled, halved and thinly sliced
Kosher salt and ground black pepper
2 lbs. orange-flesh sweet potatoes, peeled and cut into 1-inch chunks
2/3 cup orange juice
1/4 tsp. cayenne pepper
1/2 cup black or green pitted olives, or a mixture, chopped (optional)
Directions
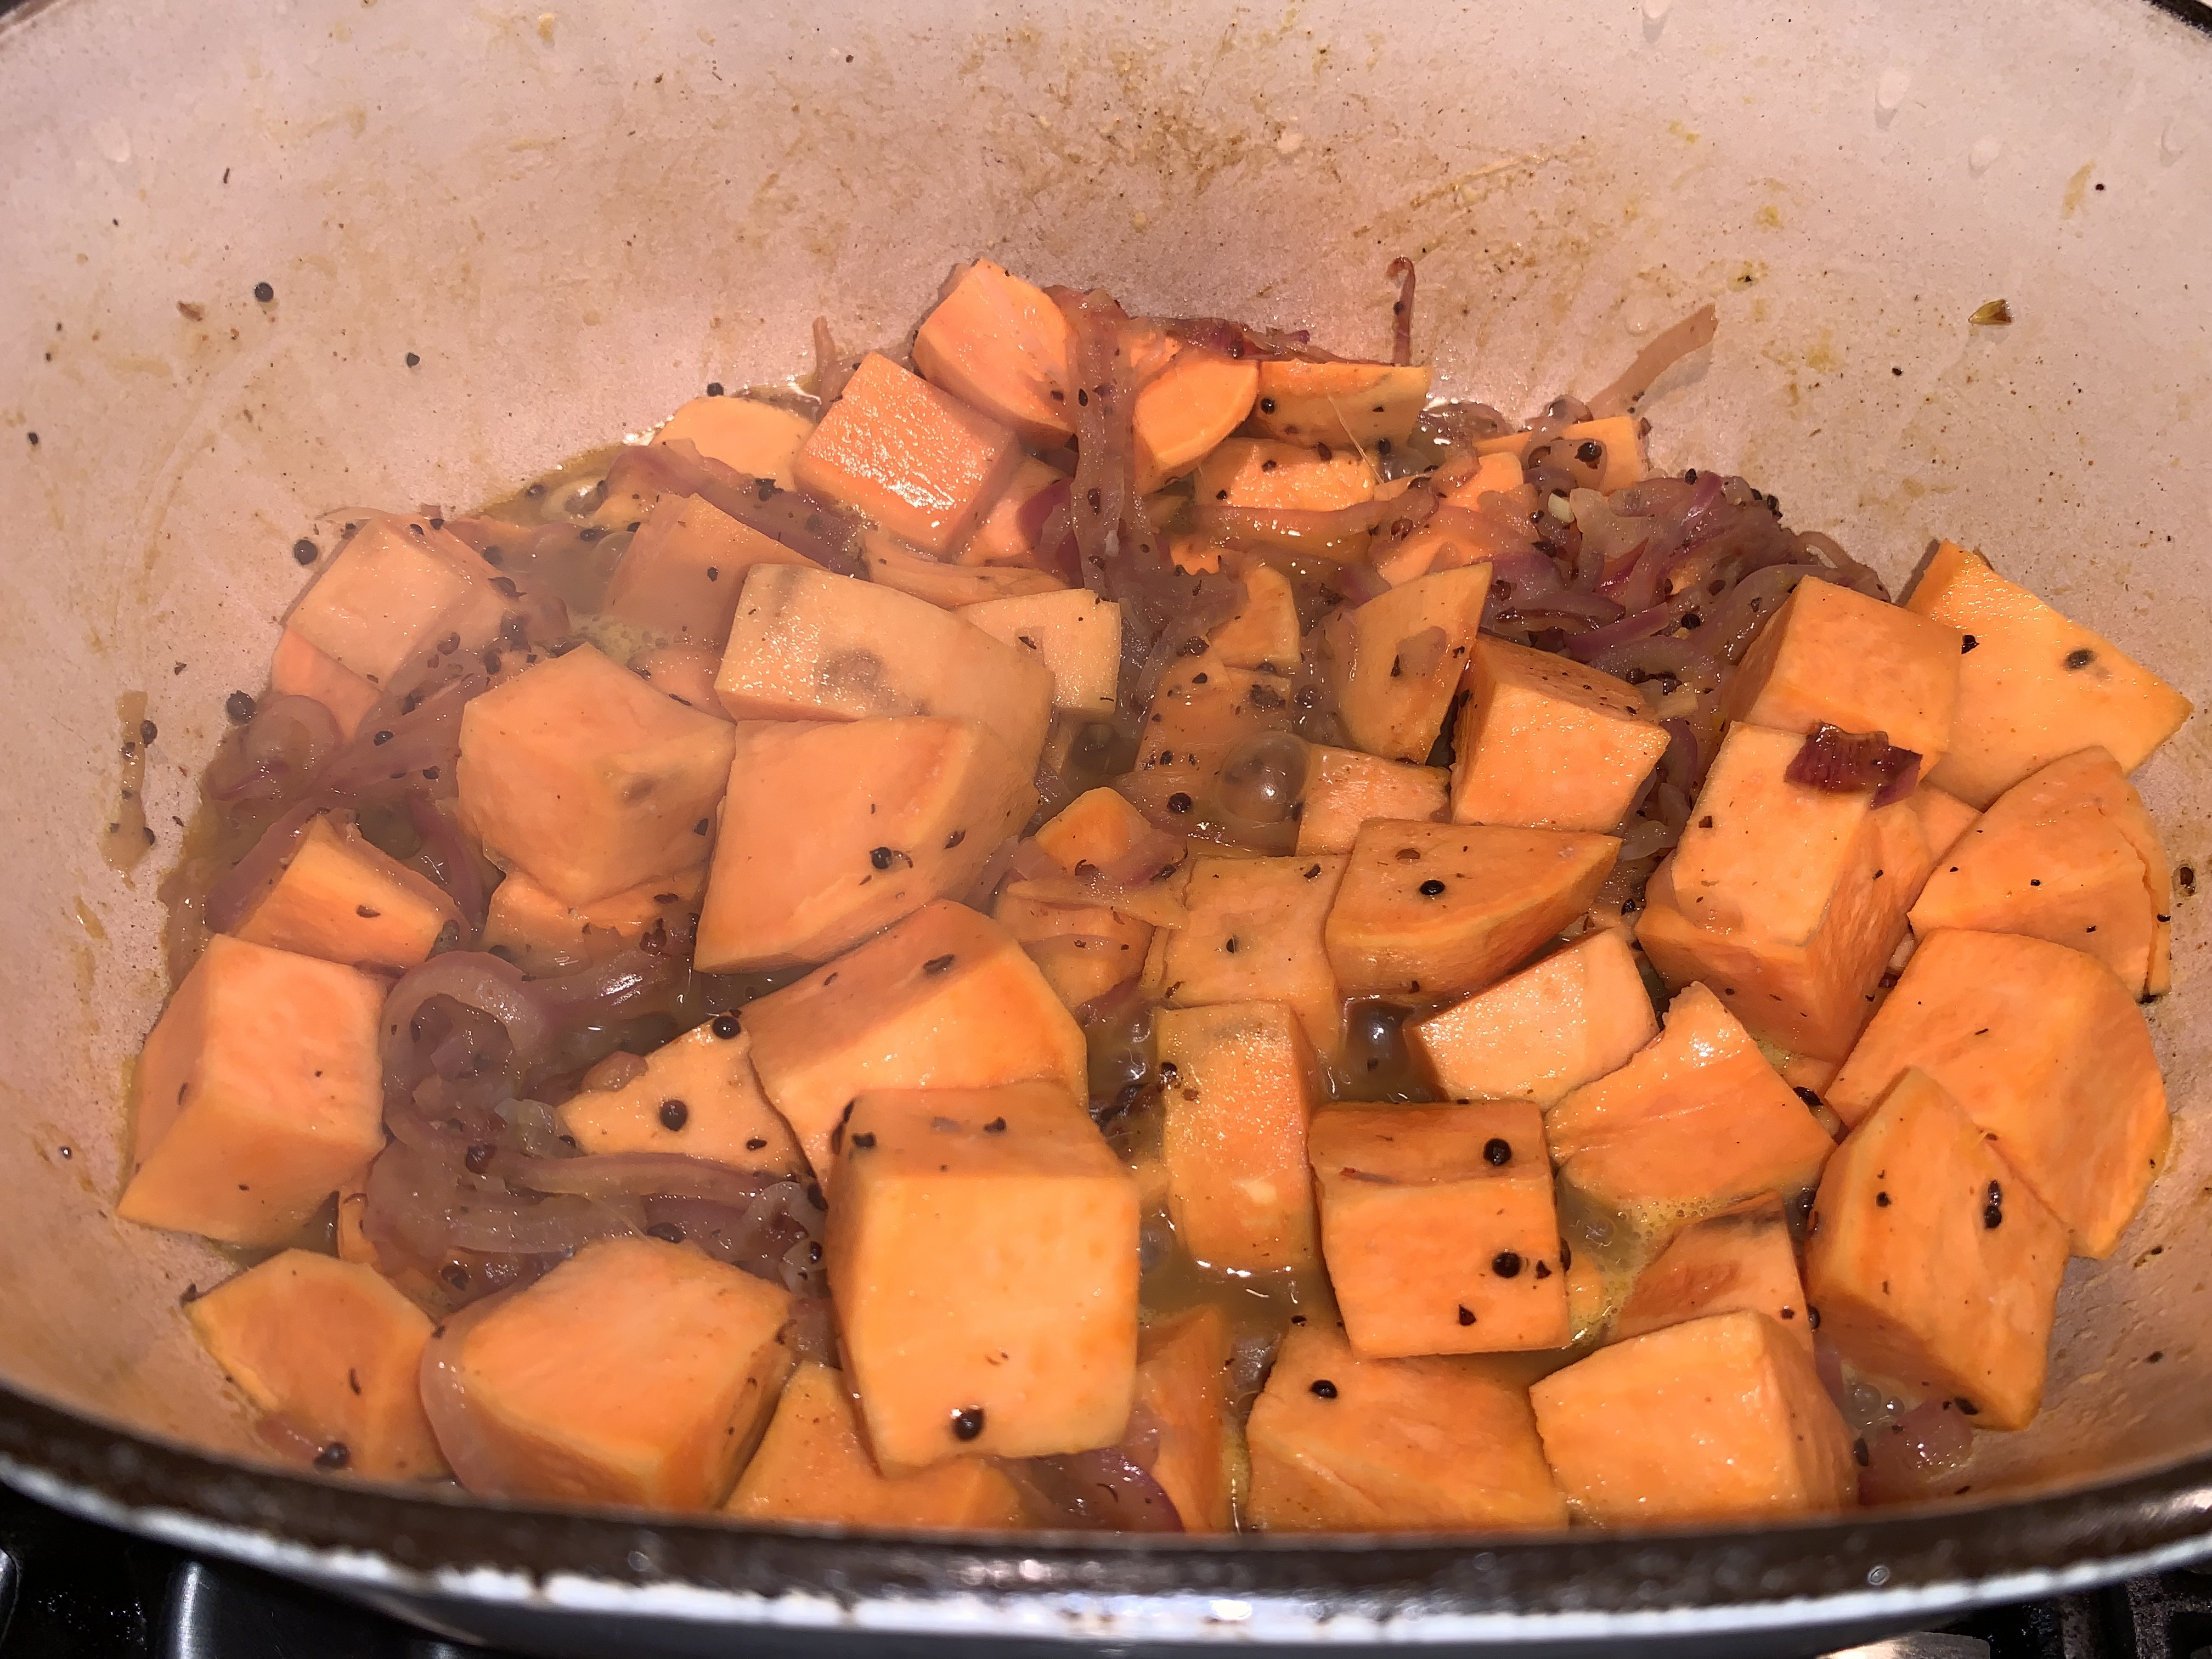
In a Dutch oven over medium-high, cook the oil and coriander seeds, stirring, until fragrant and sizzling, 2 to 4 minutes. Add the onion and ¼ teaspoon salt, then cook, stirring occasionally, until the onion is softened and lightly browned, 3 to 5 minutes.
Add the sweet potatoes, orange juice, cayenne, ½ teaspoon salt, ¼ teaspoon pepper and ½ cup water. Bring to a simmer, cover and reduce to medium. Cook, stirring occasionally, until a skewer inserted into the potatoes meets no resistance, 8 to 11 minutes.
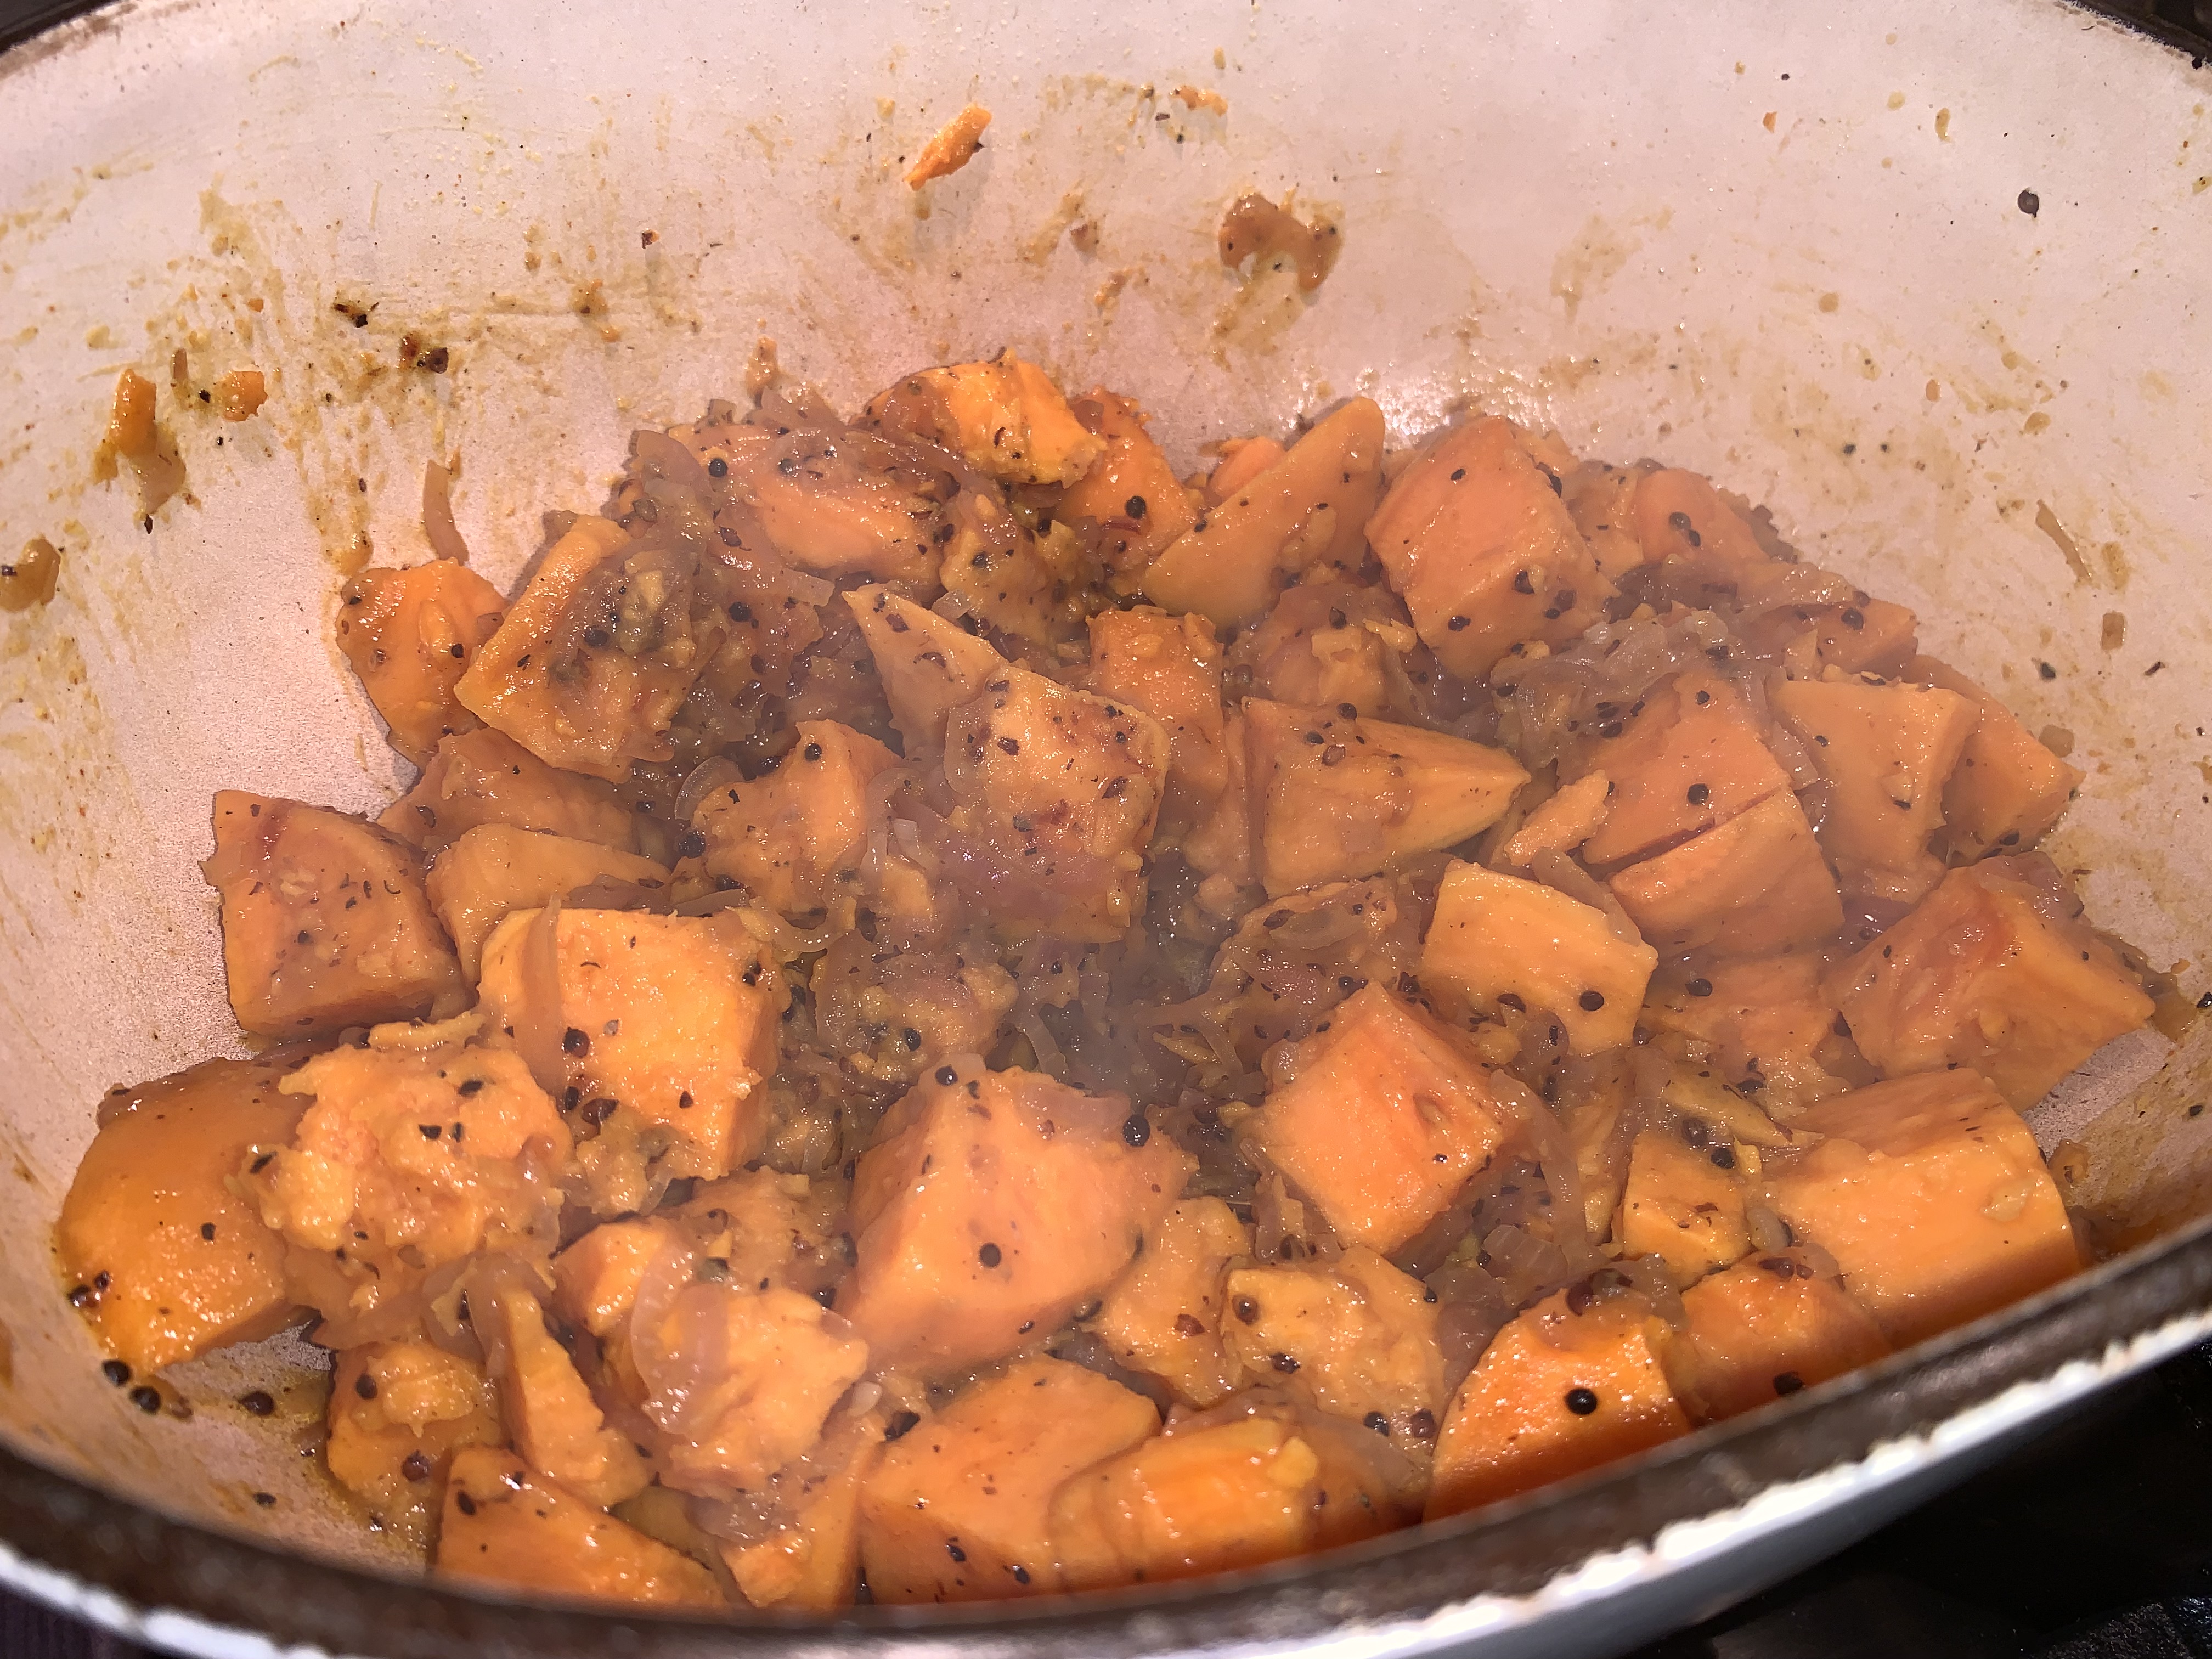
Uncover and cook, stirring constantly, until the liquid has almost fully reduced and the potatoes are glazed, about 2 minutes. Off heat, stir in the olives, if using. Taste and season with salt and pepper.
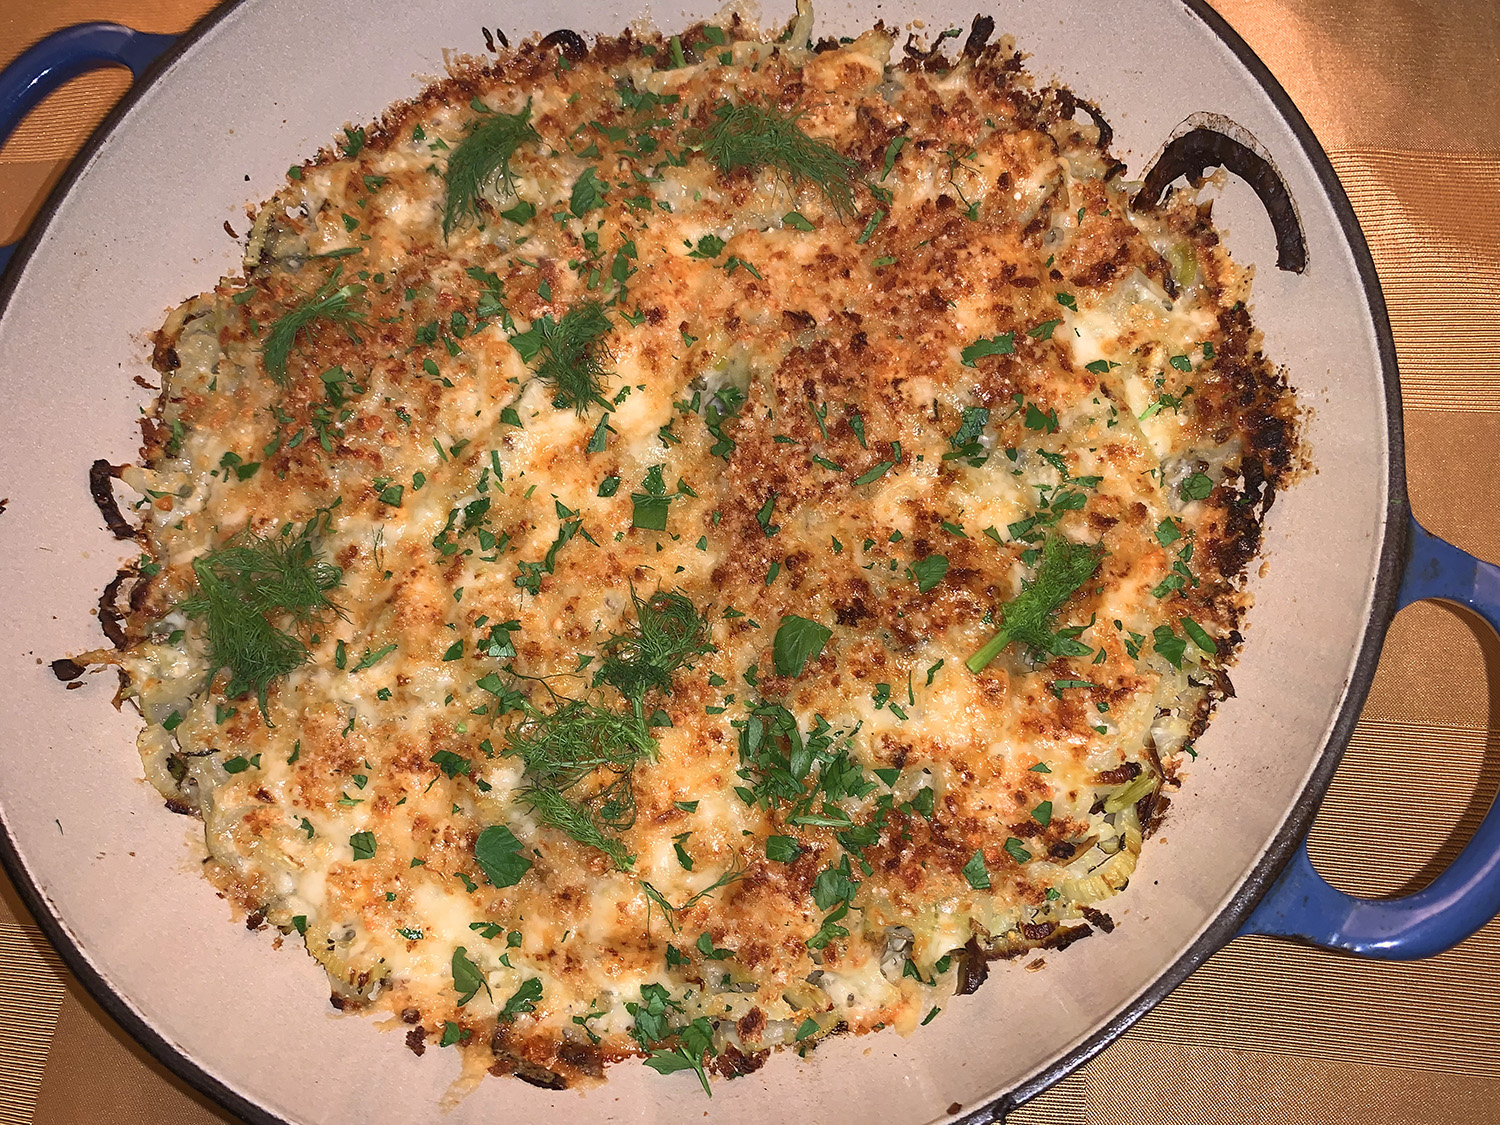
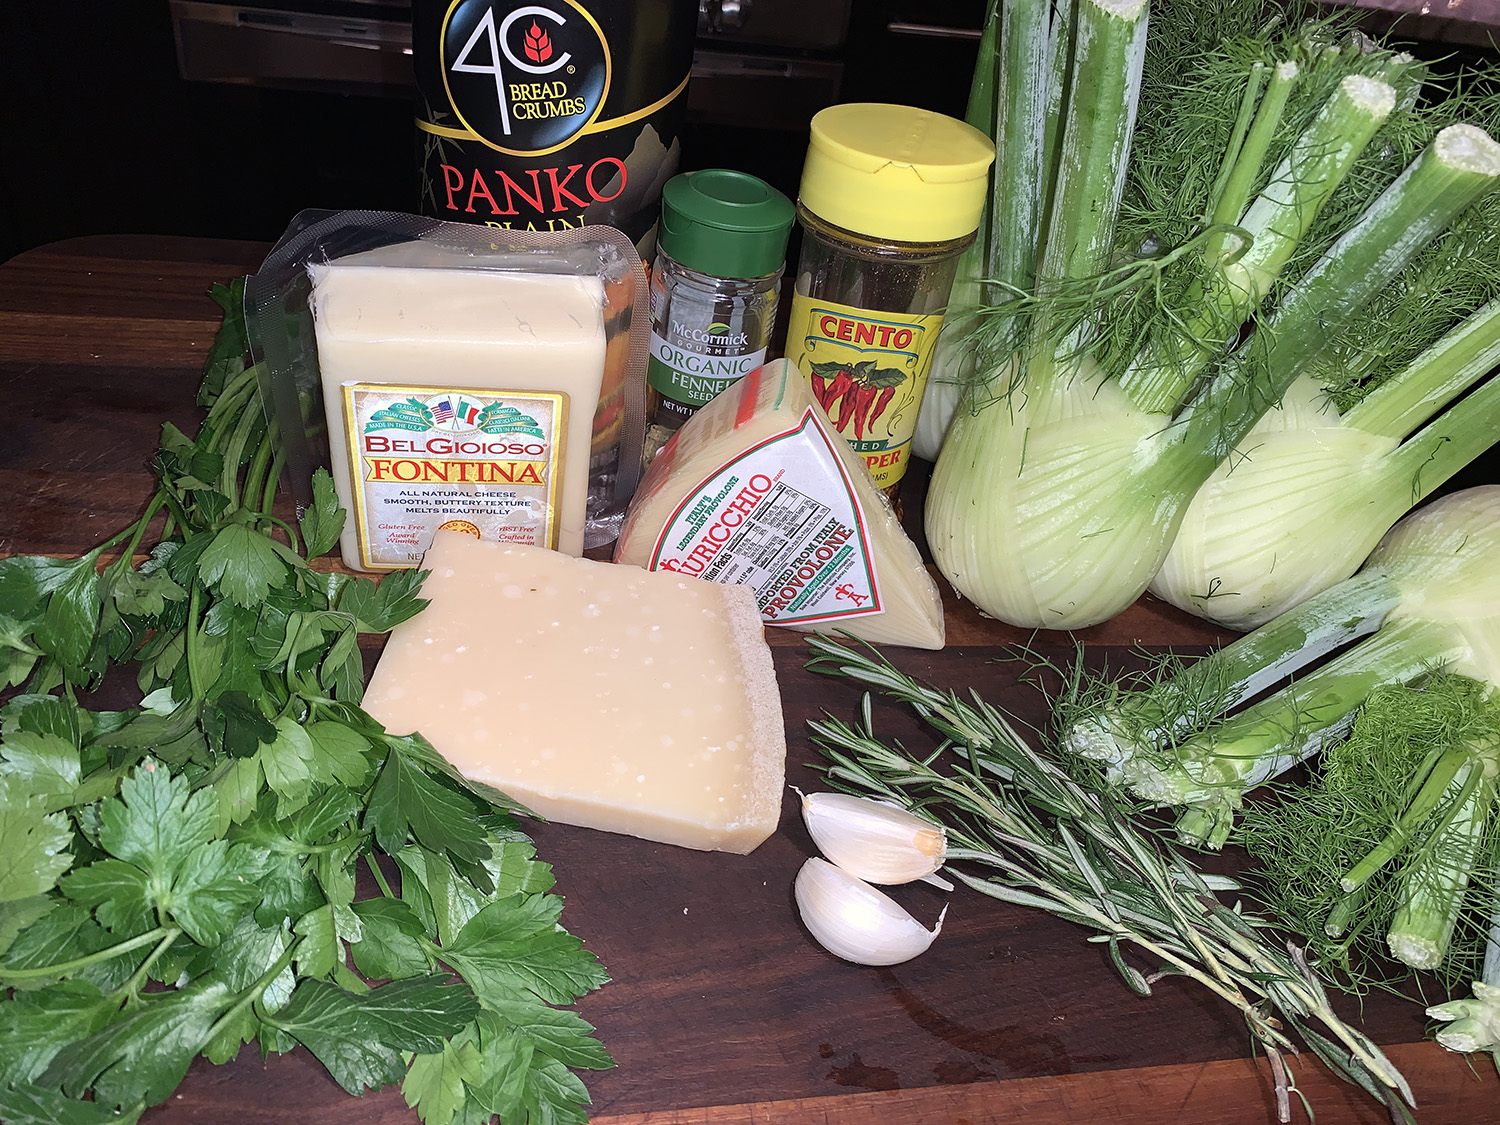
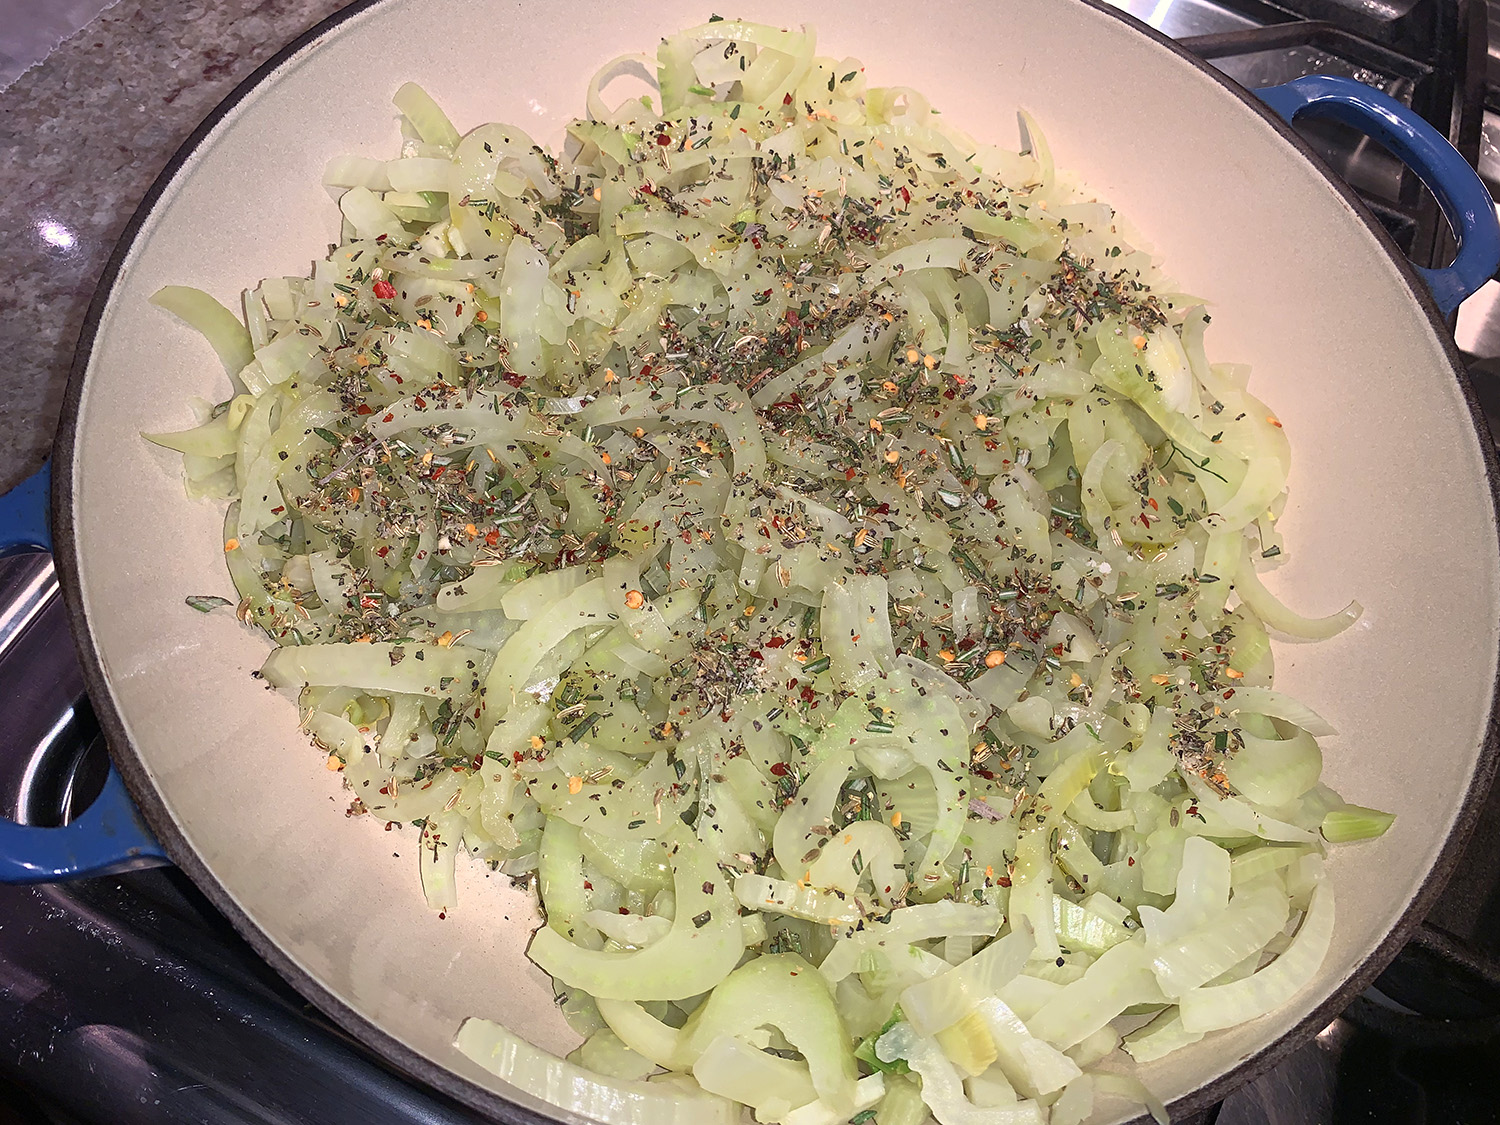
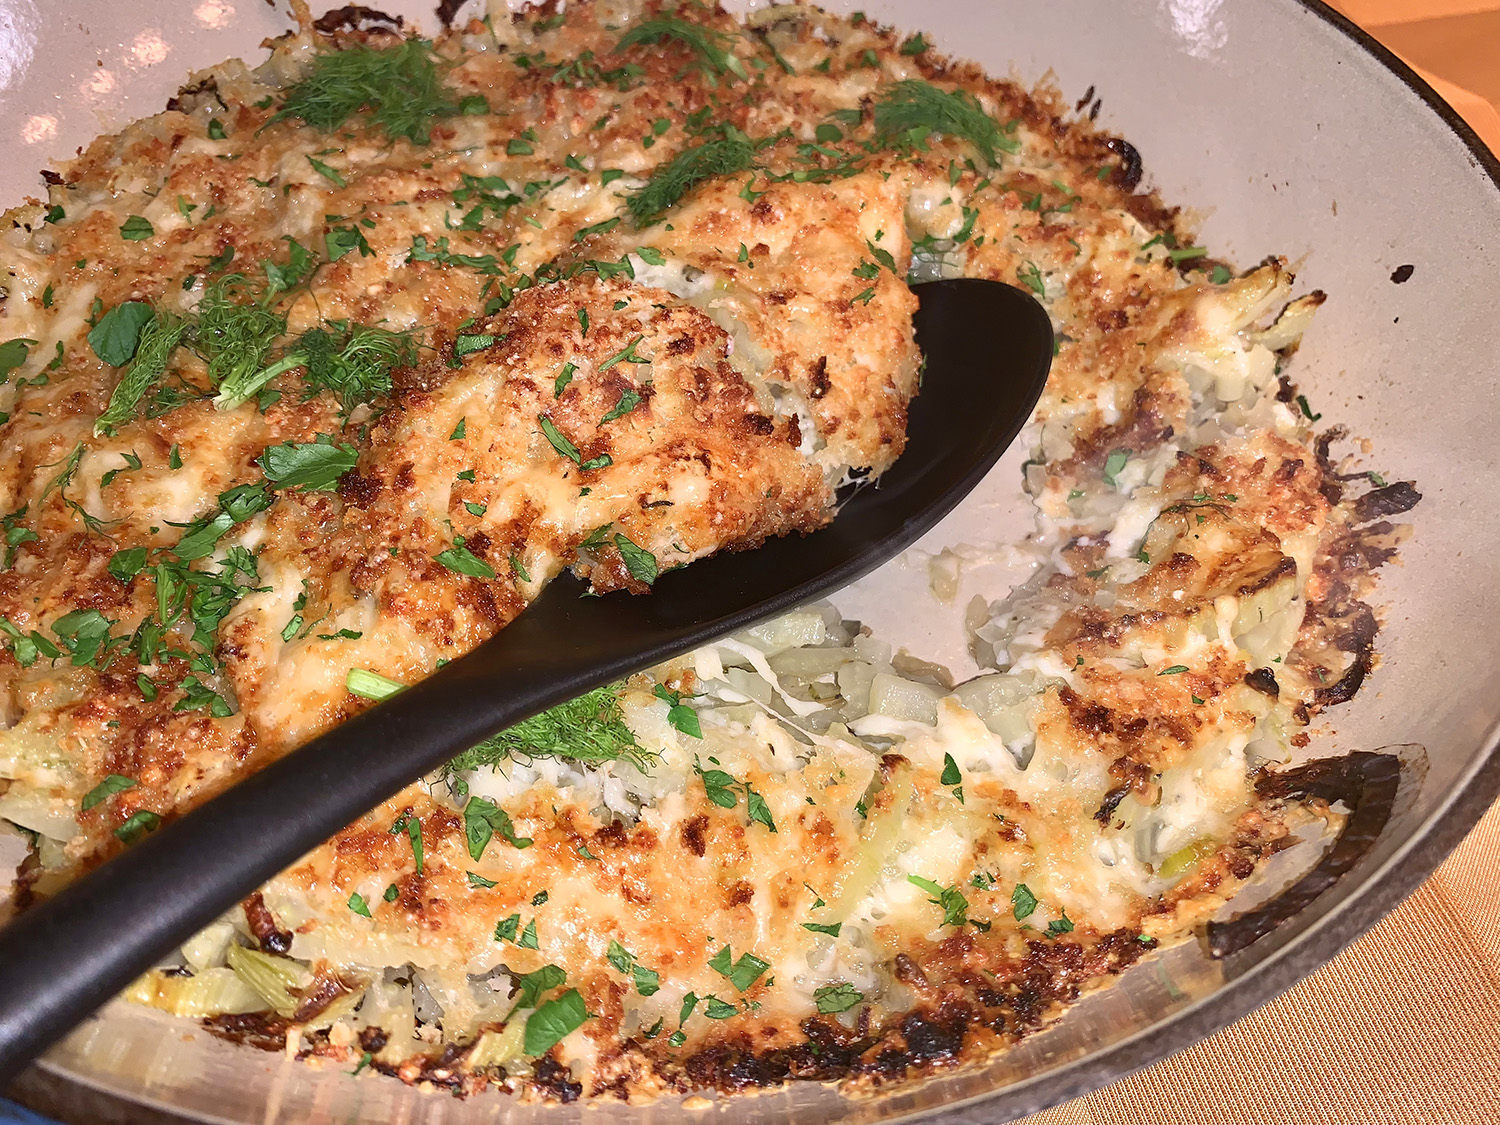
Hands down, one of our most favorite side dishes ever! American chef and cookbook author David Tanis‘ homey but sophisticated Cheesy and Creamy Fennel Gratin casserole, incorporates fresh mozzarella, fennel seed, garlic, crushed red pepper and rosemary, plus a hearty glug of olive oil to help the flavors meld in the oven.
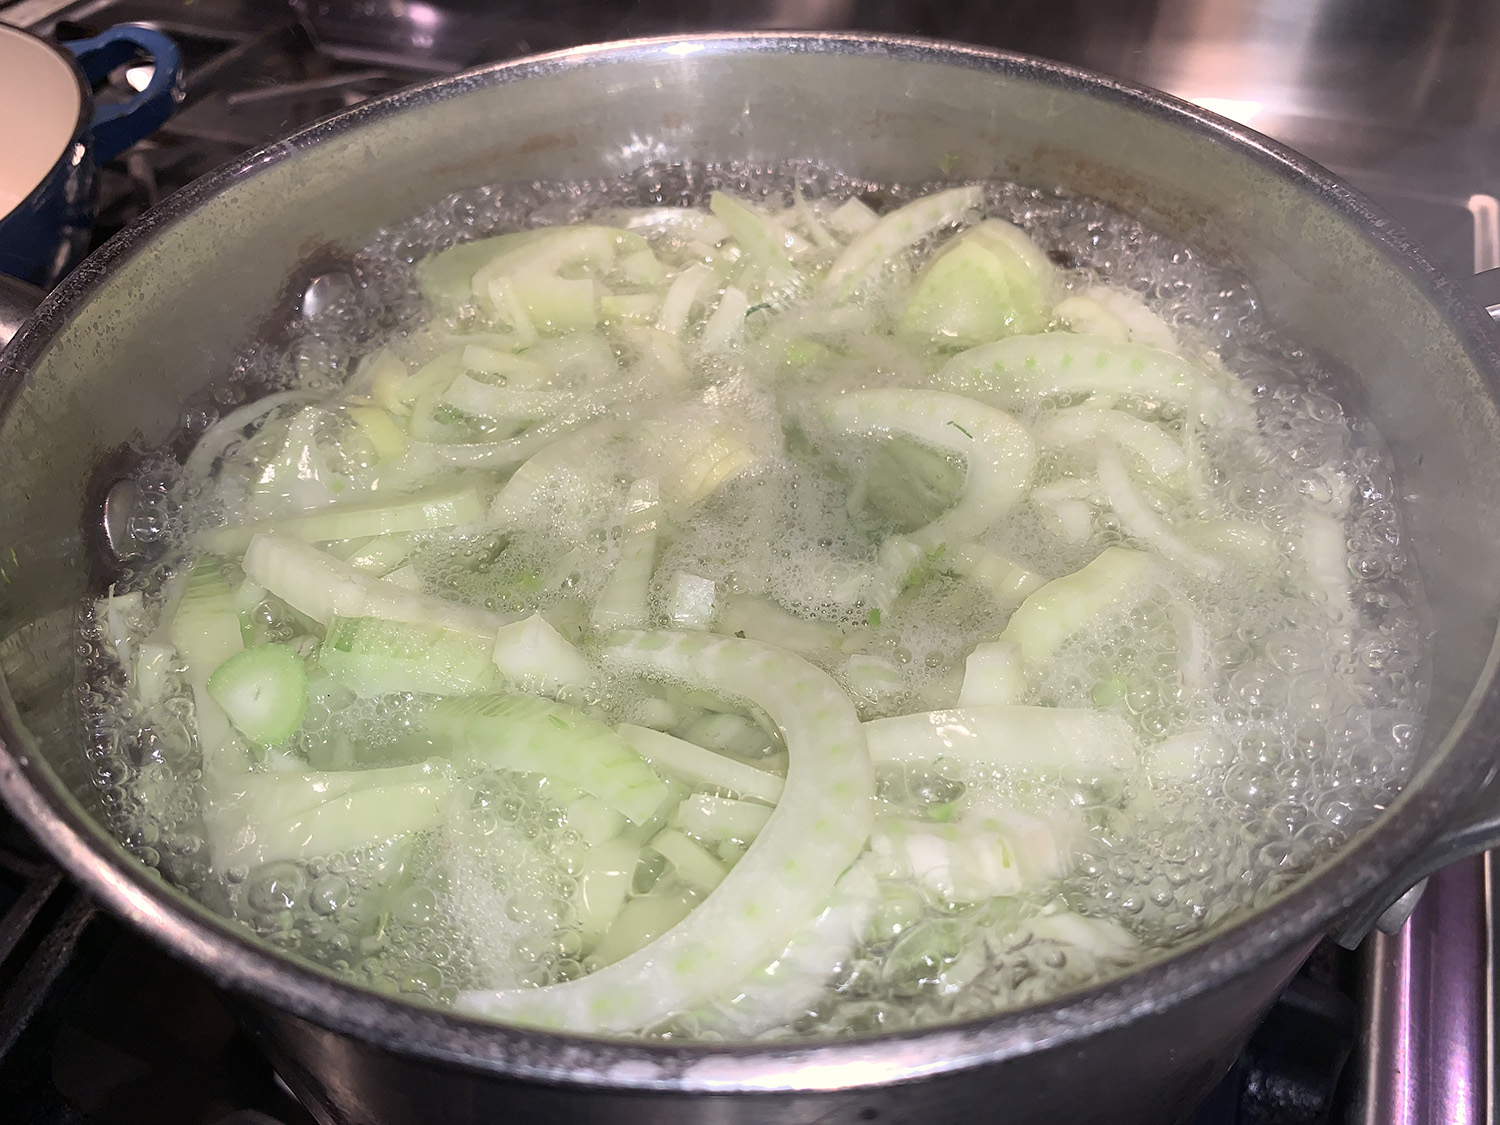
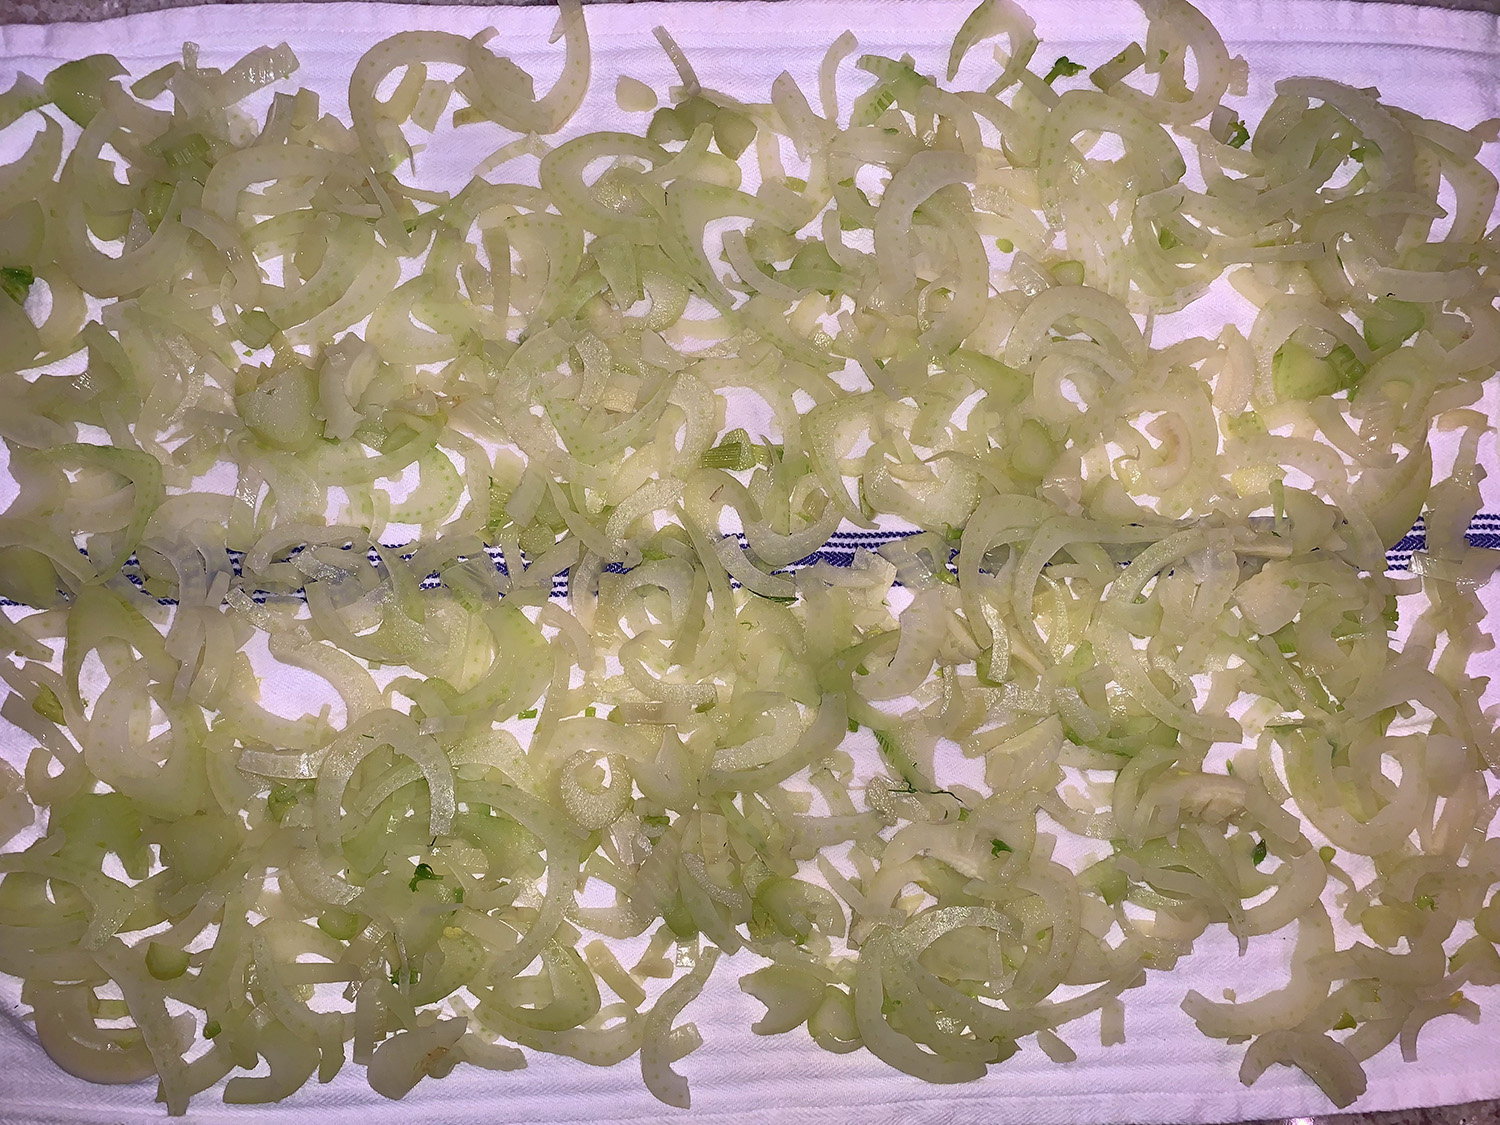
To avoid stringy and tough cooked fennel, David explains in his latest book, “David Tanis Market Cooking,” to blanch the fennel for a few minutes, drain, then run under cold water, a process that just barely tenderizes the fennel slices. The result, after baking, strikes the ideal balance between toothsome bite and jammy caramelized onion.
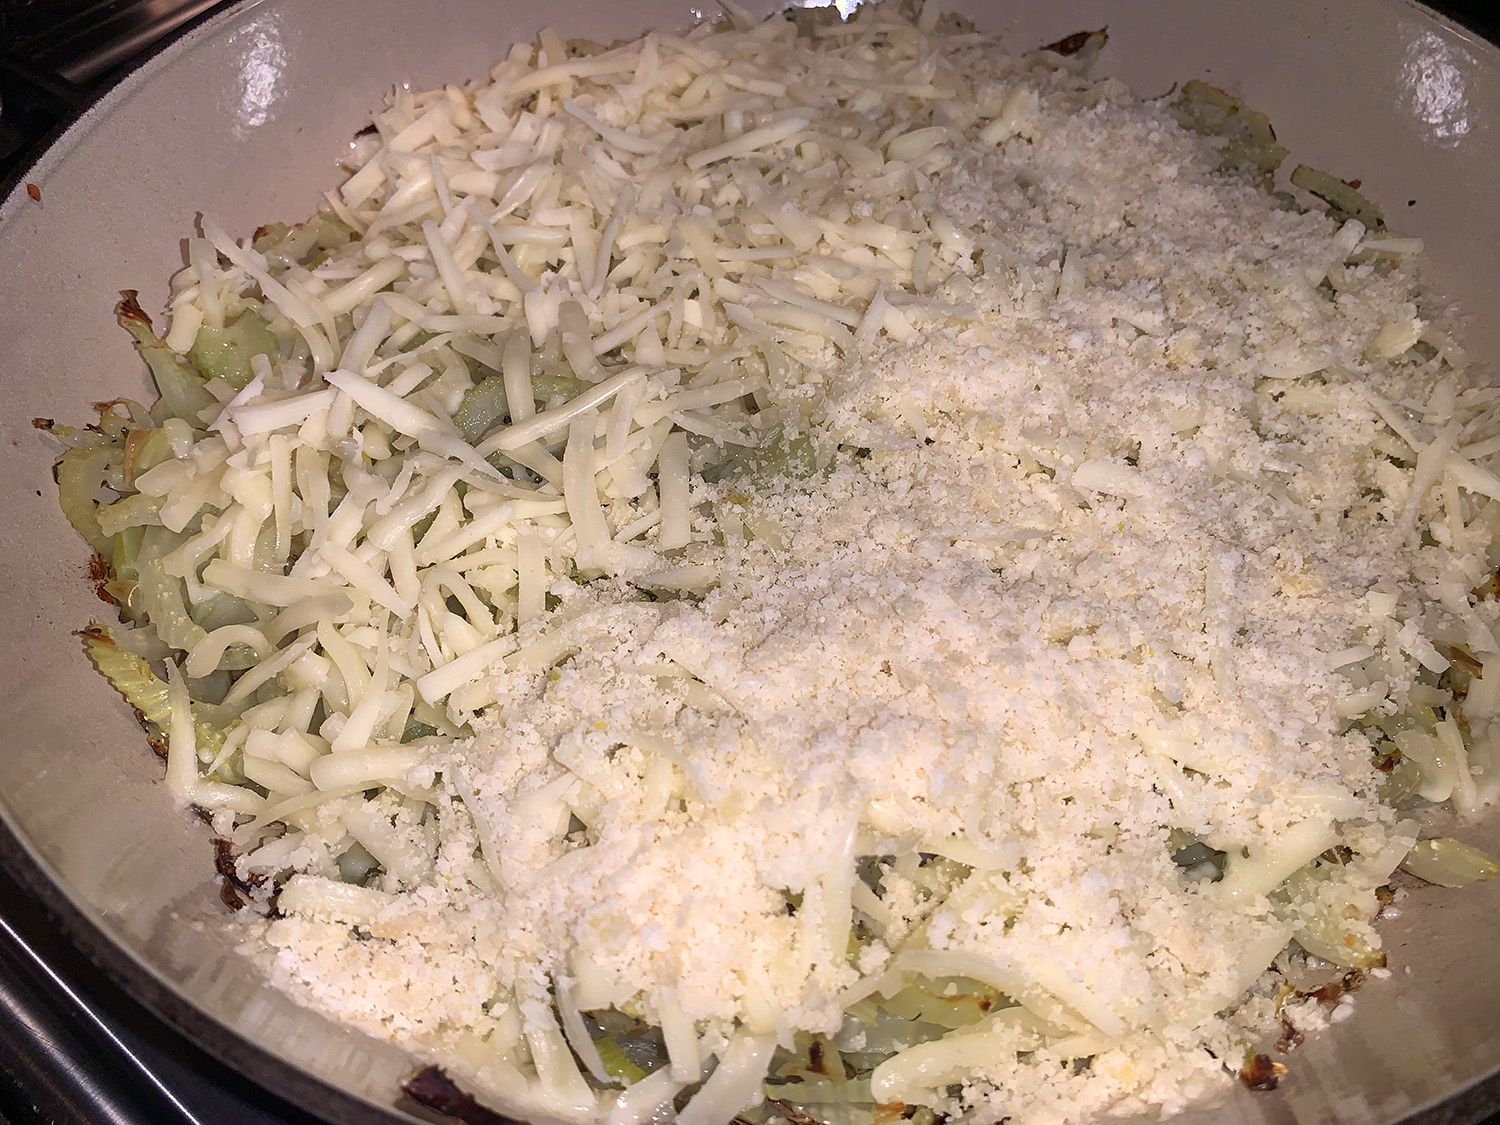
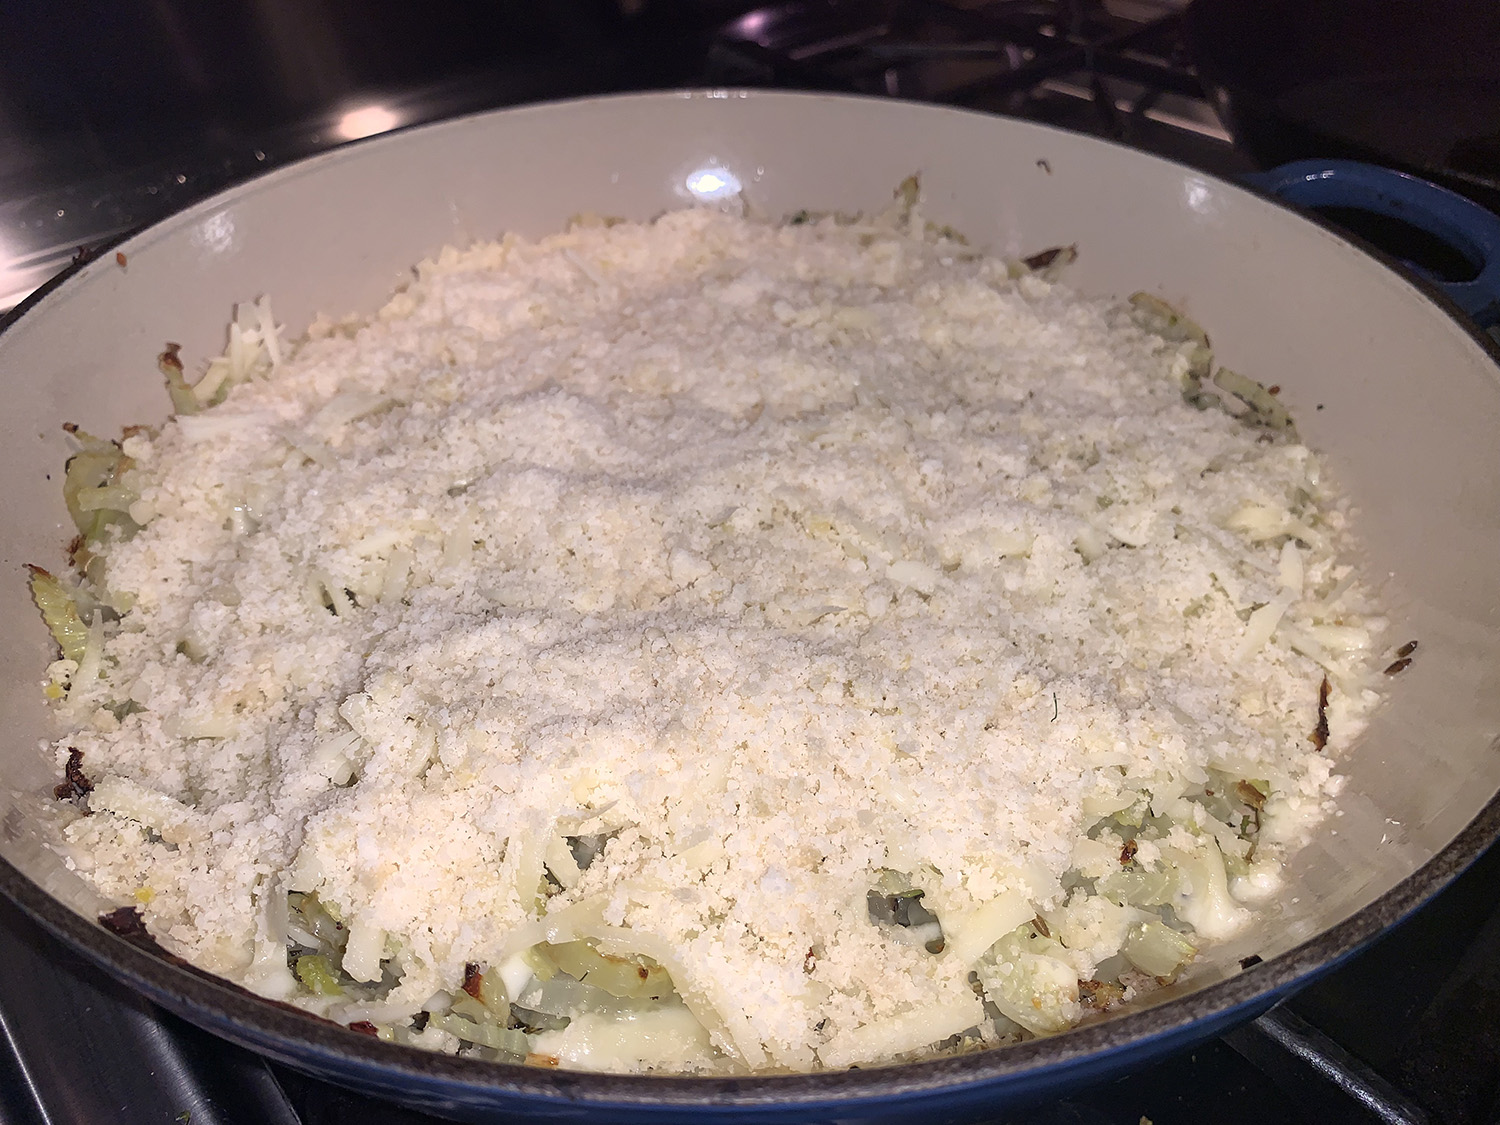
Since many supermarket mozzarellas lack the creaminess of harder-to-find fresh, Milk Street (where we found this recipe) opts for a blend of shredded fontina and provolone. And mixing Parmesan into panko breadcrumbs creates a solid crust that contrasts with the tender fennel beneath. Finally, a sprinkle of fresh parsley adds a pop of color and grassy notes to balance the cheese. This simple combination elevates the dish into something much more than the sum of its parts, and was a perfect compliment to our rack of lamb entrée.
Important: Don’t use a baking dish or pan that is not broiler safe. After baking, the gratin spends a couple minutes under the broiler to brown the topping, so be sure the vessel can withstand the intense heat.
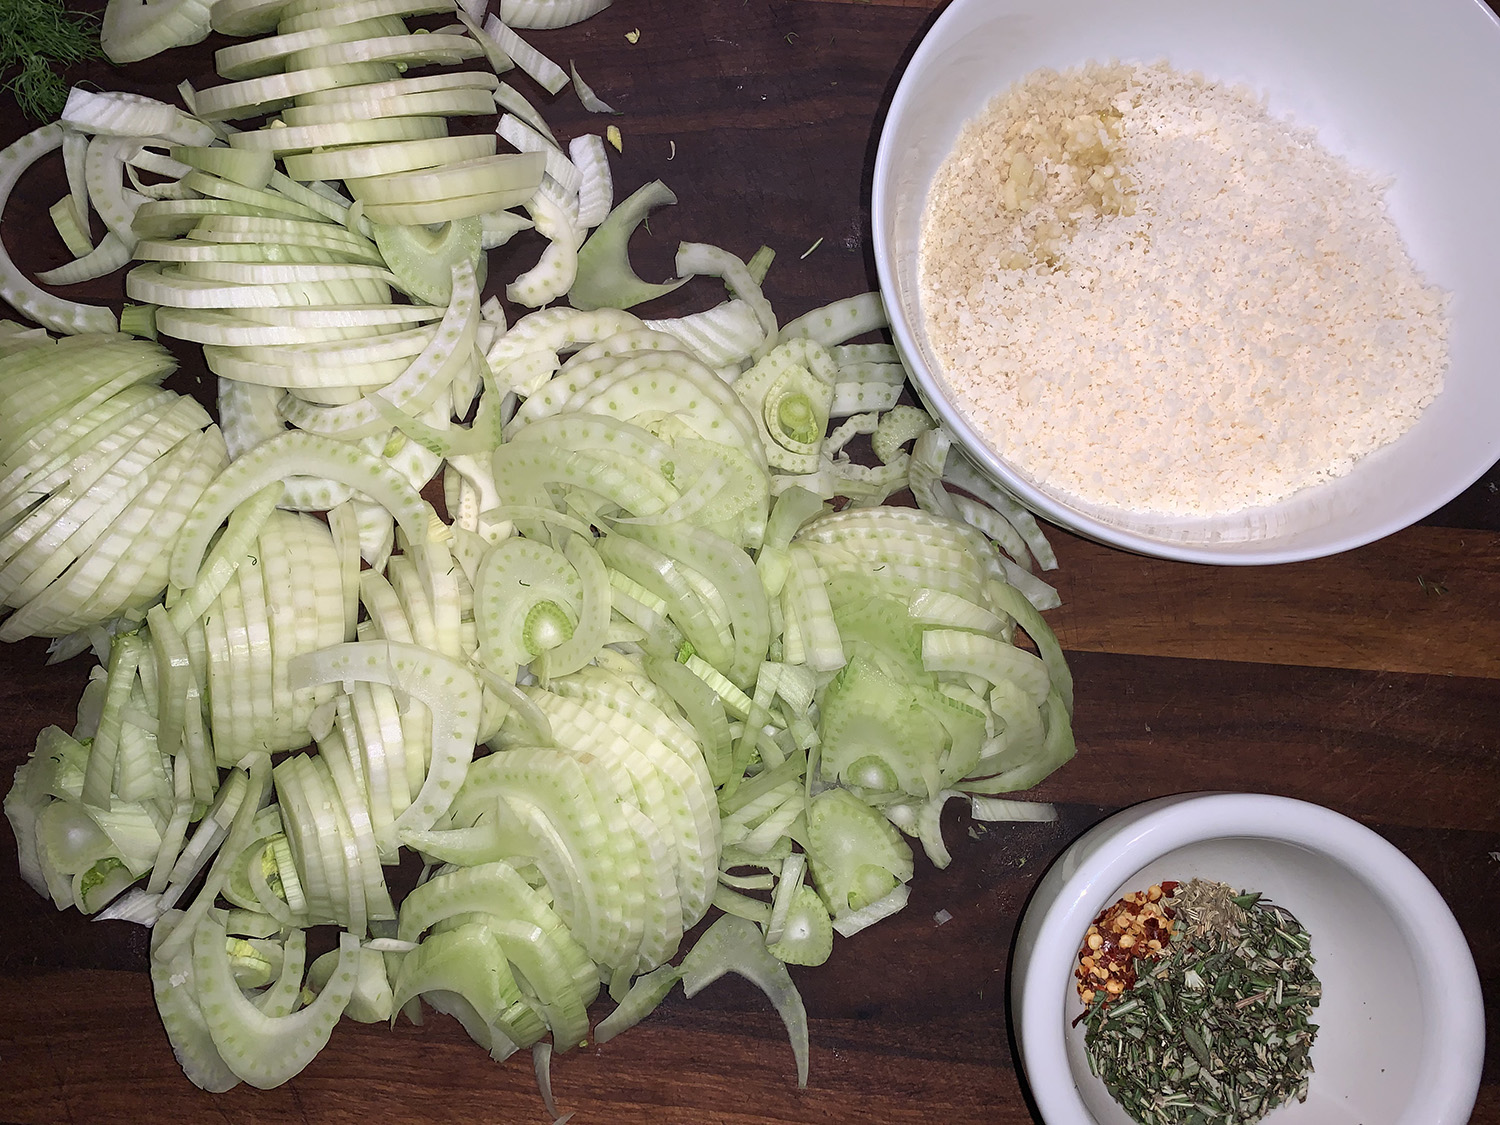
4 medium fennel bulbs (about 2½ lbs. total), halved lengthwise, cored and sliced about ¼ inch thick
Kosher salt and ground black pepper
2 Tbsp. extra-virgin olive oil
2 tsp. finely chopped fresh rosemary
1 tsp. fennel seeds, lightly crushed
1/4 tsp. red pepper flakes
1 1/2 oz. Parmesan cheese, finely grated (¾ cup)
1/4 cup panko breadcrumbs
2 medium garlic cloves, minced
4 oz. fontina cheese, shredded (1 cup)
4 oz. provolone cheese, shredded (1 cup)
1/3 cup lightly packed fresh flat-leaf parsley, chopped
Directions
Heat the oven to 450°F with a rack in the upper-middle position.
In a large pot, bring 2 quarts water to a boil. Add the fennel and 1 tablespoon salt, then cook for 3 minutes. Drain in a colander and rinse under running cold water until cool to the touch. Shake the colander to remove as much water as possible, then lay the slices out on a kitchen towel and thoroughly pat them dry.
In a 9-by-13-inch broiler-safe baking dish, toss together the fennel, oil, rosemary, fennel seeds, pepper flakes and ¼ teaspoon each salt and black pepper; distribute in an even layer.
Roast until beginning to brown and a skewer inserted into the fennel meets no resistance, 25 to 30 minutes.
Meanwhile, in a small bowl, stir together the Parmesan, panko and garlic.
Remove the baking dish from the oven and turn on the broiler. Evenly distribute the fontina and provolone over the top of the fennel, then sprinkle on the Parmesan-panko mixture.
Broil until the top is nicely browned, 2 to 3 minutes. Remove from the oven and cool for 5 minutes. Sprinkle with the parsley and serve.
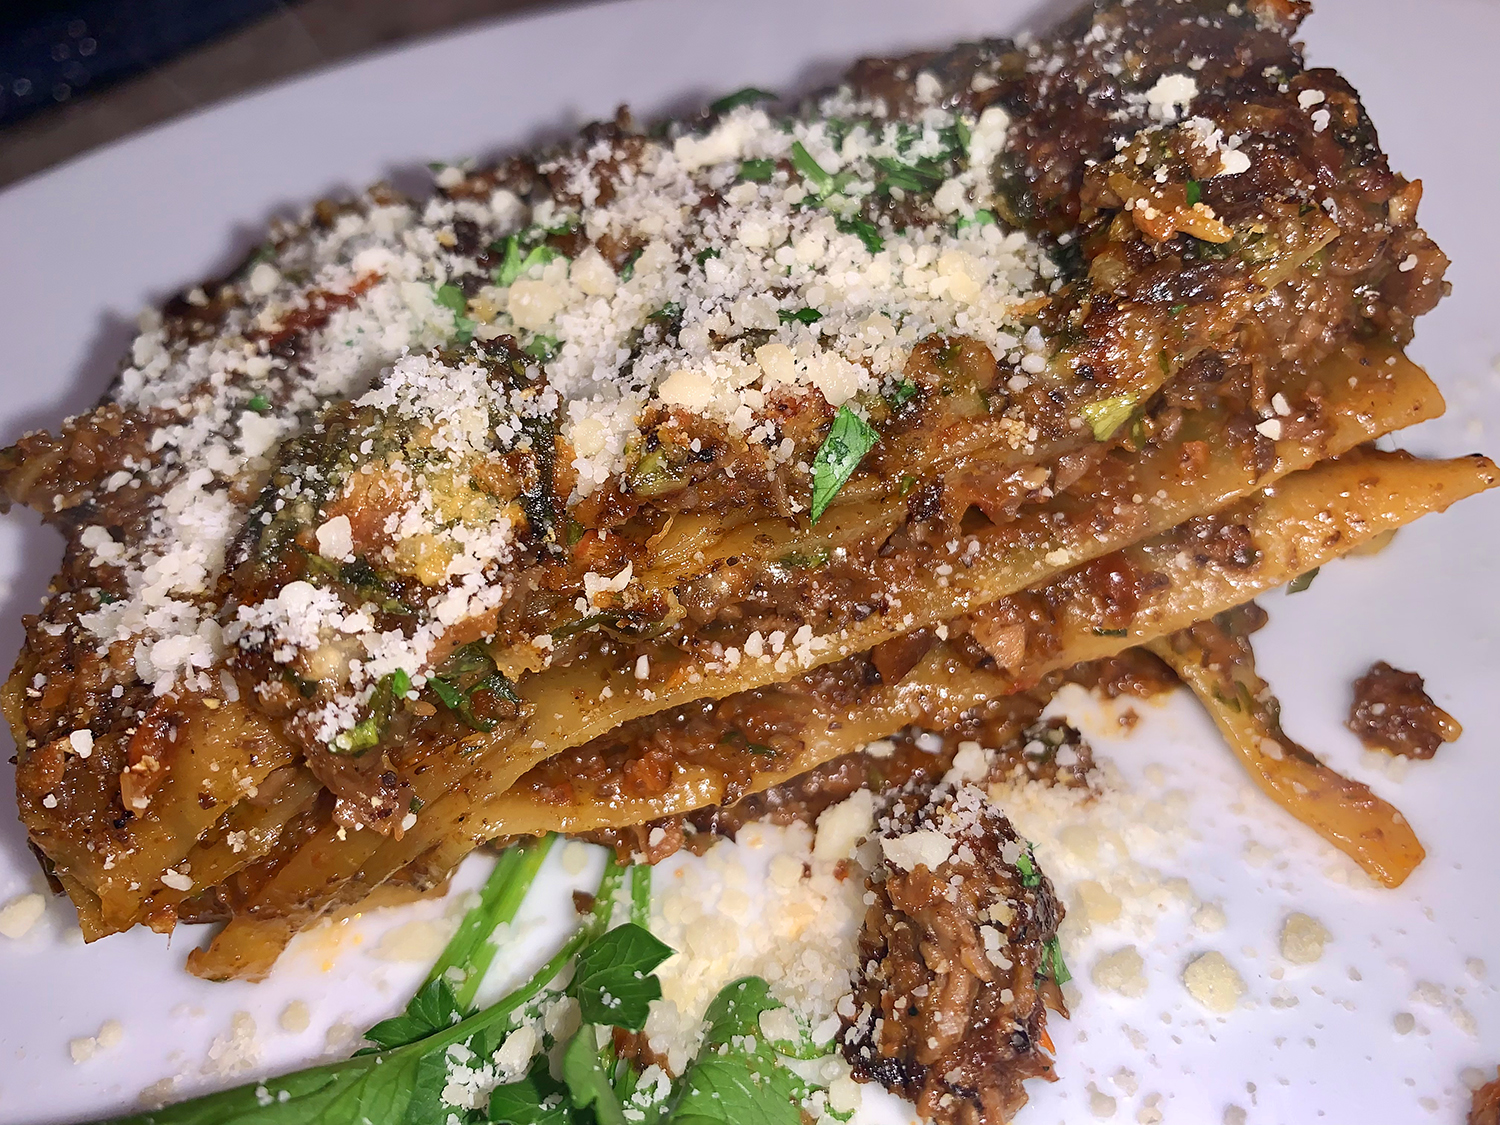
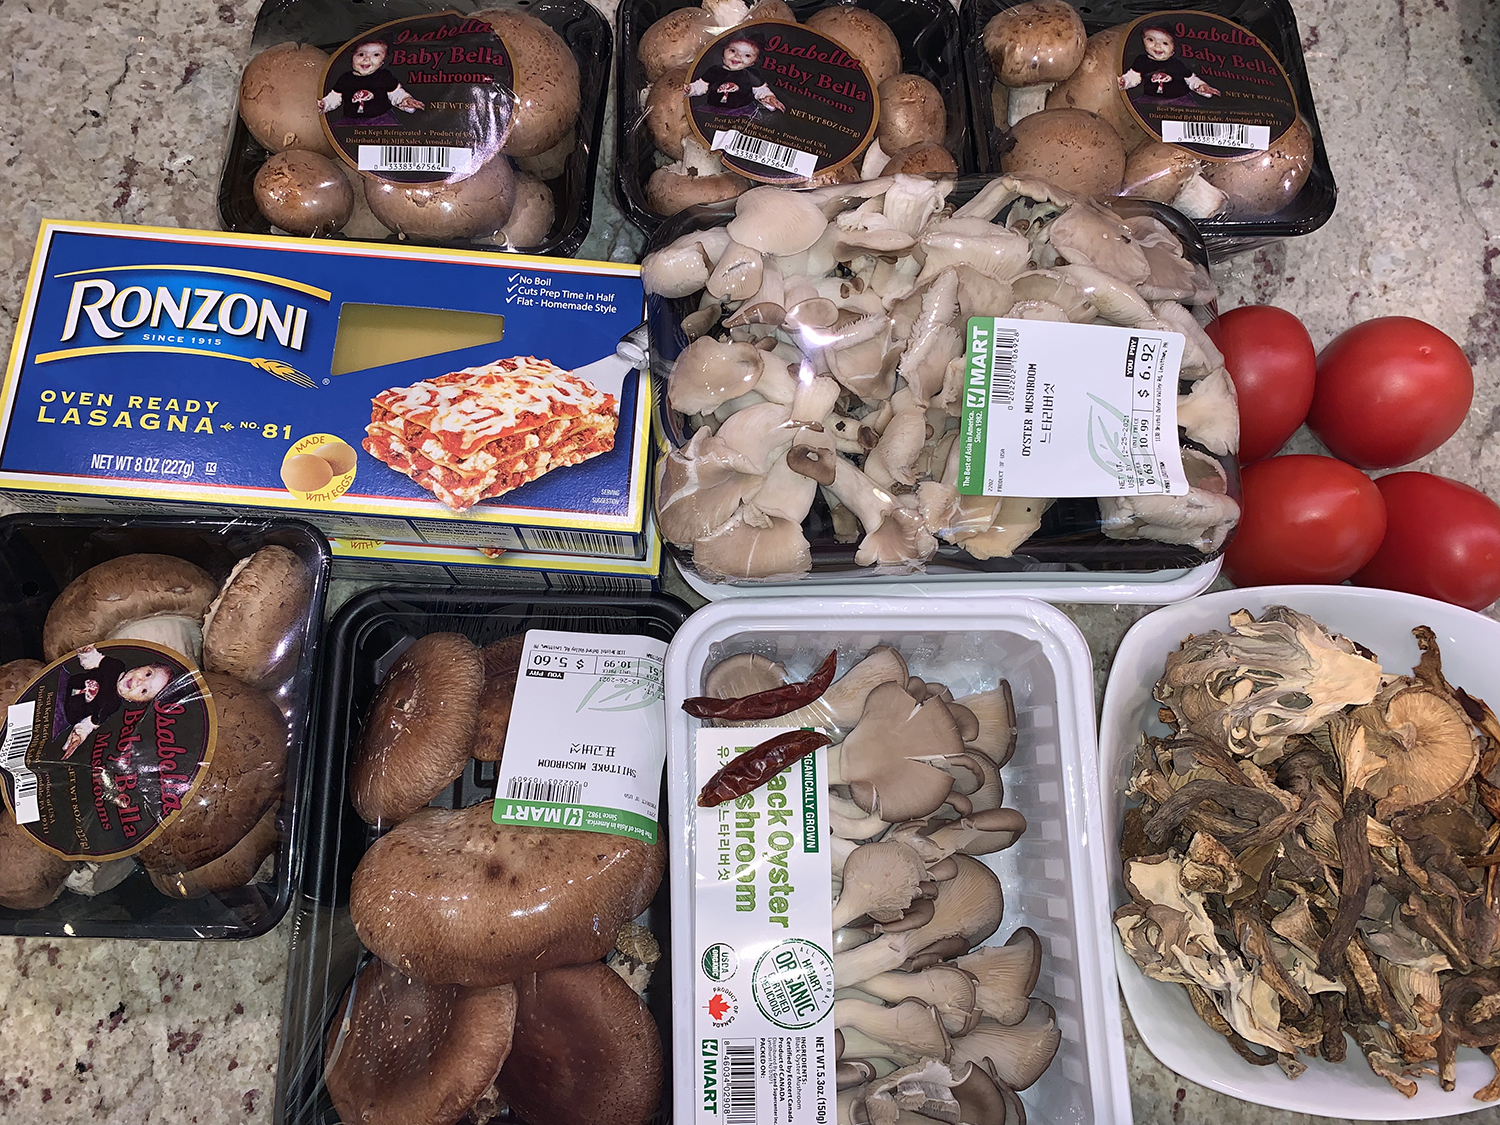
A glorious meat-free dish that contains four types of mushroom and two types of cheese which lend it the most satisfying, and savory intensity. They claim there’s a fair amount of heat in this Spicy Mushroom Lasagna, but we beg to differ, we could barely detect any heat. However, if you feel the need to tone it down a bit, reduce the amount of pepper and omit the chili altogether.
The mushrooms are the star here and their flavor truly shines. Those layers of flavor and umami build on each other with each delicious bite. Yes, quite a LOT of time and effort is necessary, as it is prep- and ingredient-intense, yet the result is well worth your effort. To get ahead, build the lasagna one day, chill, then bake the next.
One reviewer wrote “The umami factor here was really off the charts. To me it was one of those rare recipes in which all the ingredients sound good by themselves and smell wonderful when cooking, but when brought together, the finished product is head and shoulders above the individual parts.” We have to agree…
You will be dehydrating the fresh mushrooms and rehydrating the dried mushrooms, then mixing them altogether to obtain a very tasty, meaty consistency. While the original recipe called for only two plum tomatoes, we decided to double that and added in 4 large. Paired with a side salad and a glass of wine, it was the perfect Sunday evening meal.
1 oz. dried wild mushrooms or dried porcini mushrooms
2 dried red chili peppers roughly chopped (seeded if desired)
2 cups plus 2 Tbsp. hot vegetable stock
For the filling
1 onion, peeled and quartered
5 garlic cloves, peeled and roughly chopped
1 carrot, peeled and quartered
6 Tbsp. olive oil
4 medium plum tomatoes, quartered
1/3 cup tomato paste
1 1/2 tsp. table salt
1 3/4 tsp. freshly ground black pepper plus more as desired
3 1/3 cups water
9 Tbsp. heavy cream (just a touch more than 1/2 cup)
2/3 cup pecorino, finely grated
2/3 cup Parmesan, finely grated
1/4 cup fresh basil leaves, finely chopped
1/2 cup parsley leaves, finely chopped, plus 1 tsp.
12 oz. oven-ready dried lasagna sheets (about 14 sheets)
Directions
Roast the fresh mushrooms
Preheat the oven to 450°F. Line a large rimmed baking sheet with parchment paper.
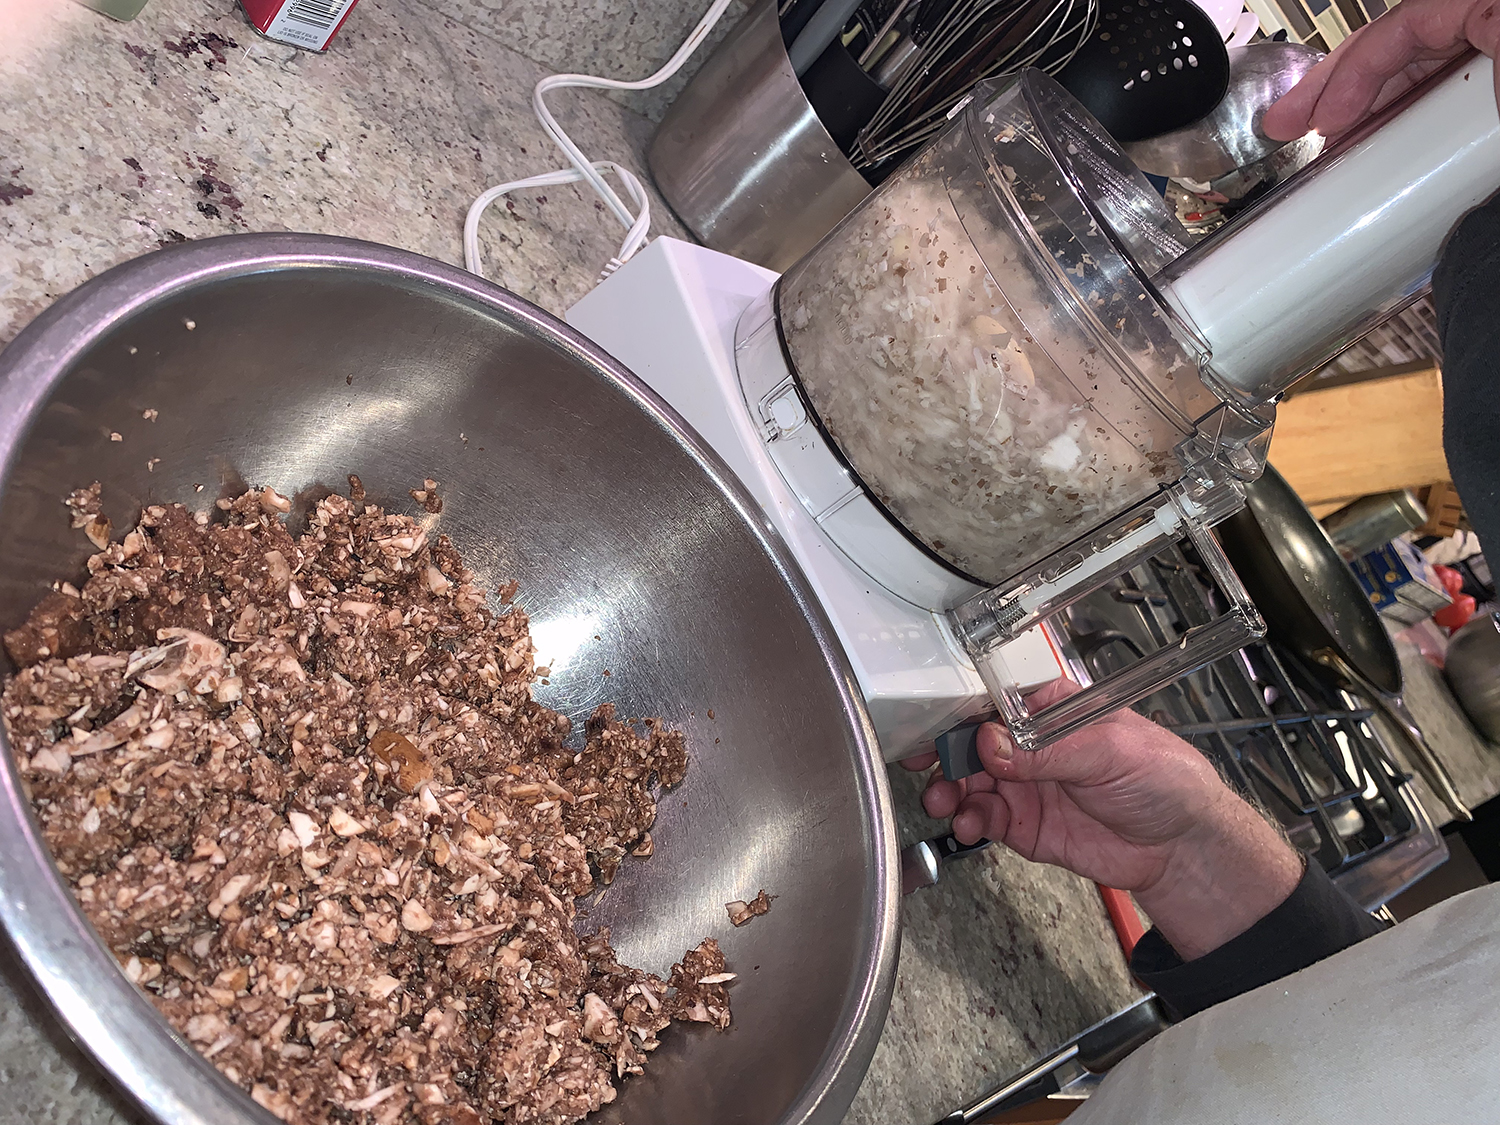
In a food processor, working in 3 or 4 batches, add the button mushrooms and oyster mushrooms and pulse each batch until finely chopped (or finely chop everything by hand). Avoid filling the processor bowl more than halfway so that the mushrooms are finely chopped and not over processed.
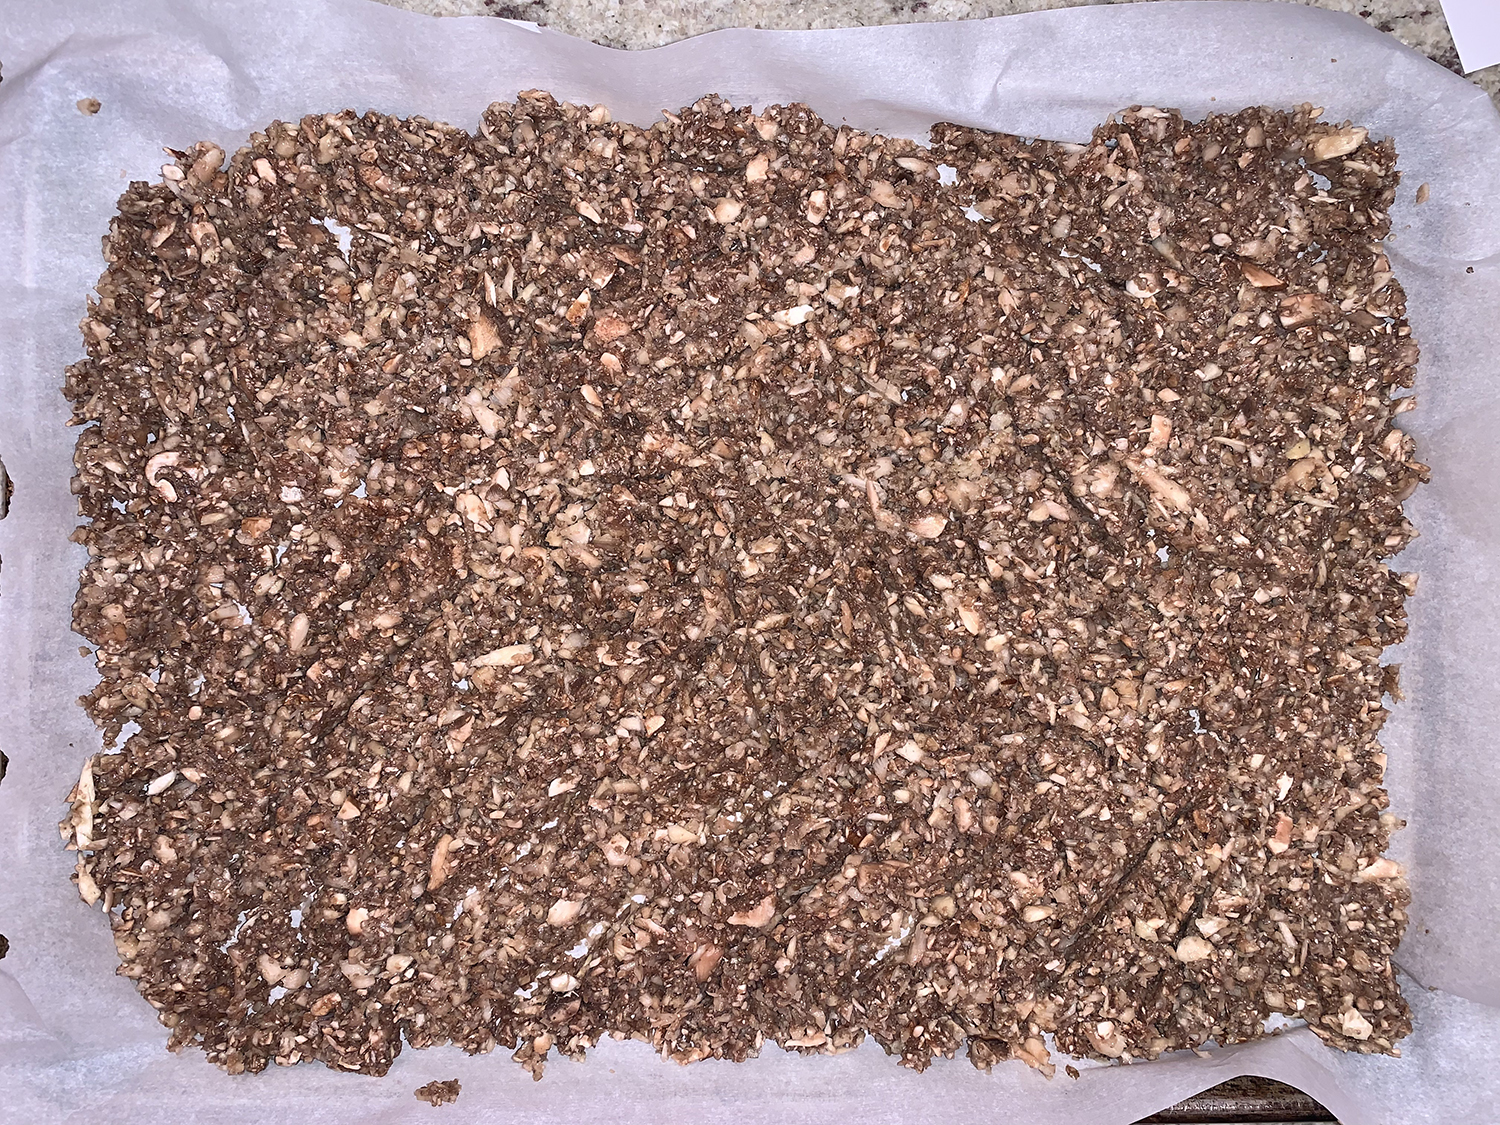
In a large bowl, toss the chopped mushrooms with the oil and salt. Spread out on the prepared baking sheet.
Roast near the top of the oven, stirring 3 or so times throughout, until the mushrooms are golden brown and have reduced in volume significantly, 30 to 45 minutes. Let cool.
Decrease the oven temperature to 425°F.
Rehydrate the dried mushrooms
Meanwhile, in a large bowl, combine all the dried mushrooms, the chiles, and hot stock, and let soak for 30 minutes. Strain the liquid into another bowl, squeezing as much liquid from the mushrooms as possible to get just under 1 1/2 cups—if you have any less, top up with water.
Very roughly chop the rehydrated mushrooms (you want some chunks) and finely chop the chili peppers. Set the stock and mushrooms aside separately.
Make the filling
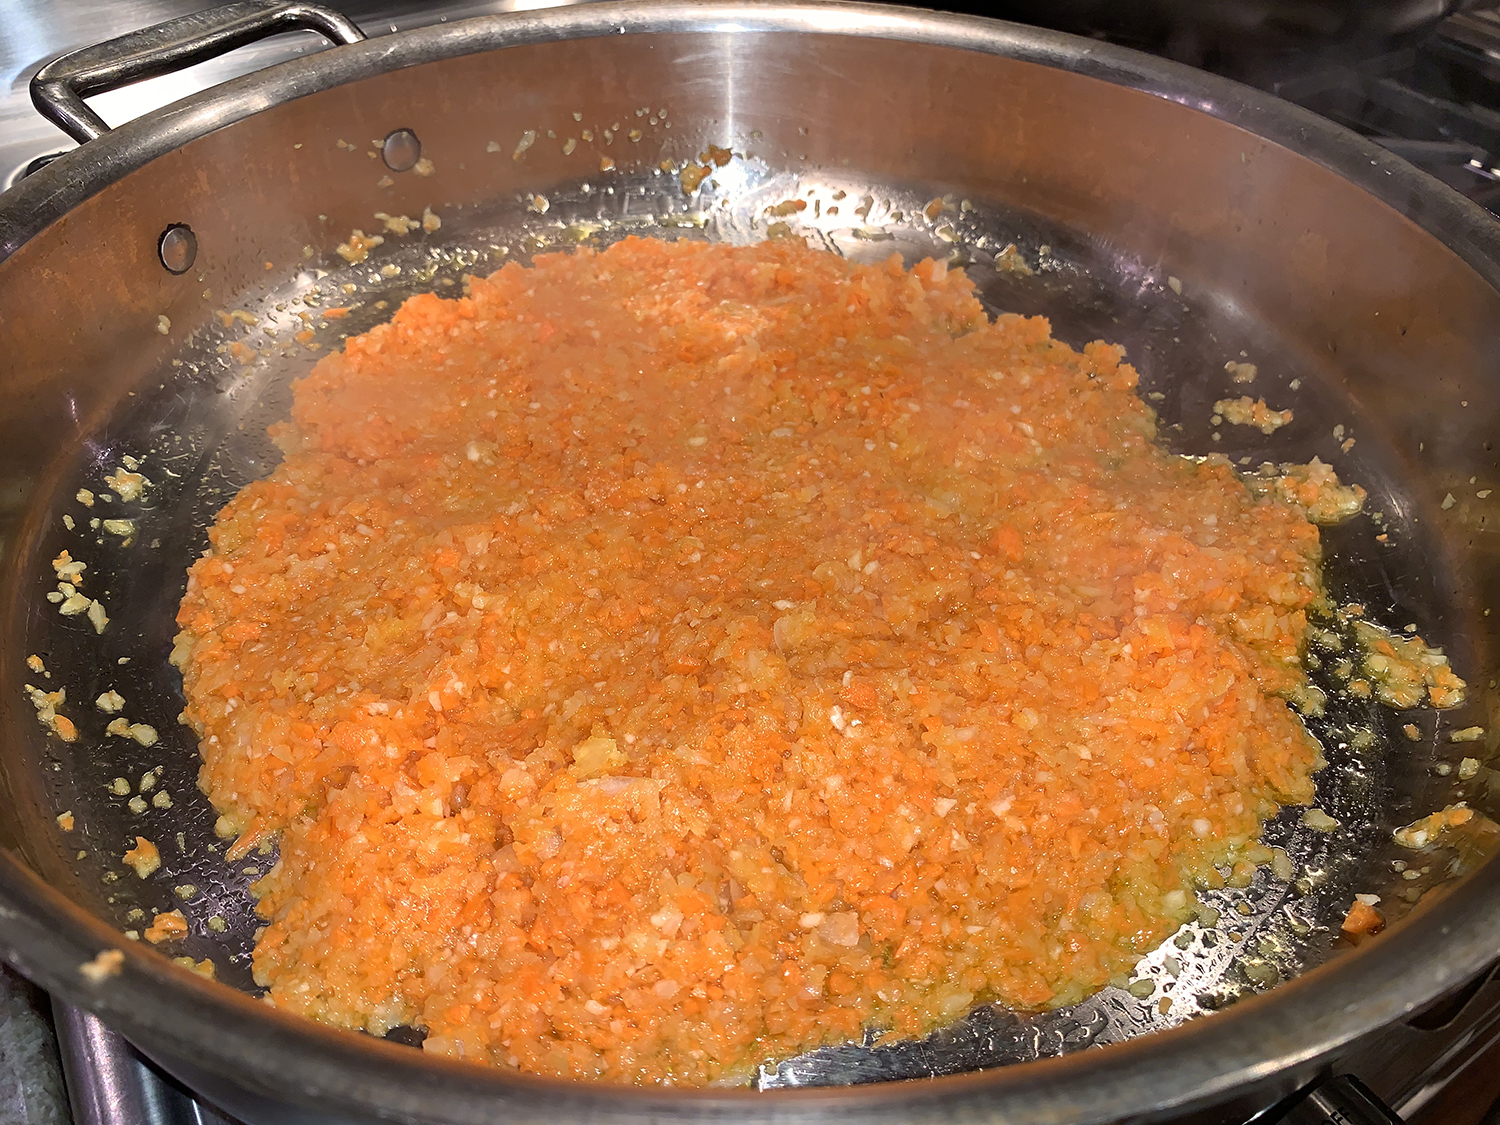
In the food processor, combine the onion, garlic, and carrot, and pulse until finely chopped or finely chop everything by hand.
In a large sauté pan or pot over medium-high heat, warm 4 tablespoons oil. Once hot, add the onion mixture and cook, stirring occasionally, until softened and golden, about 8 minutes.
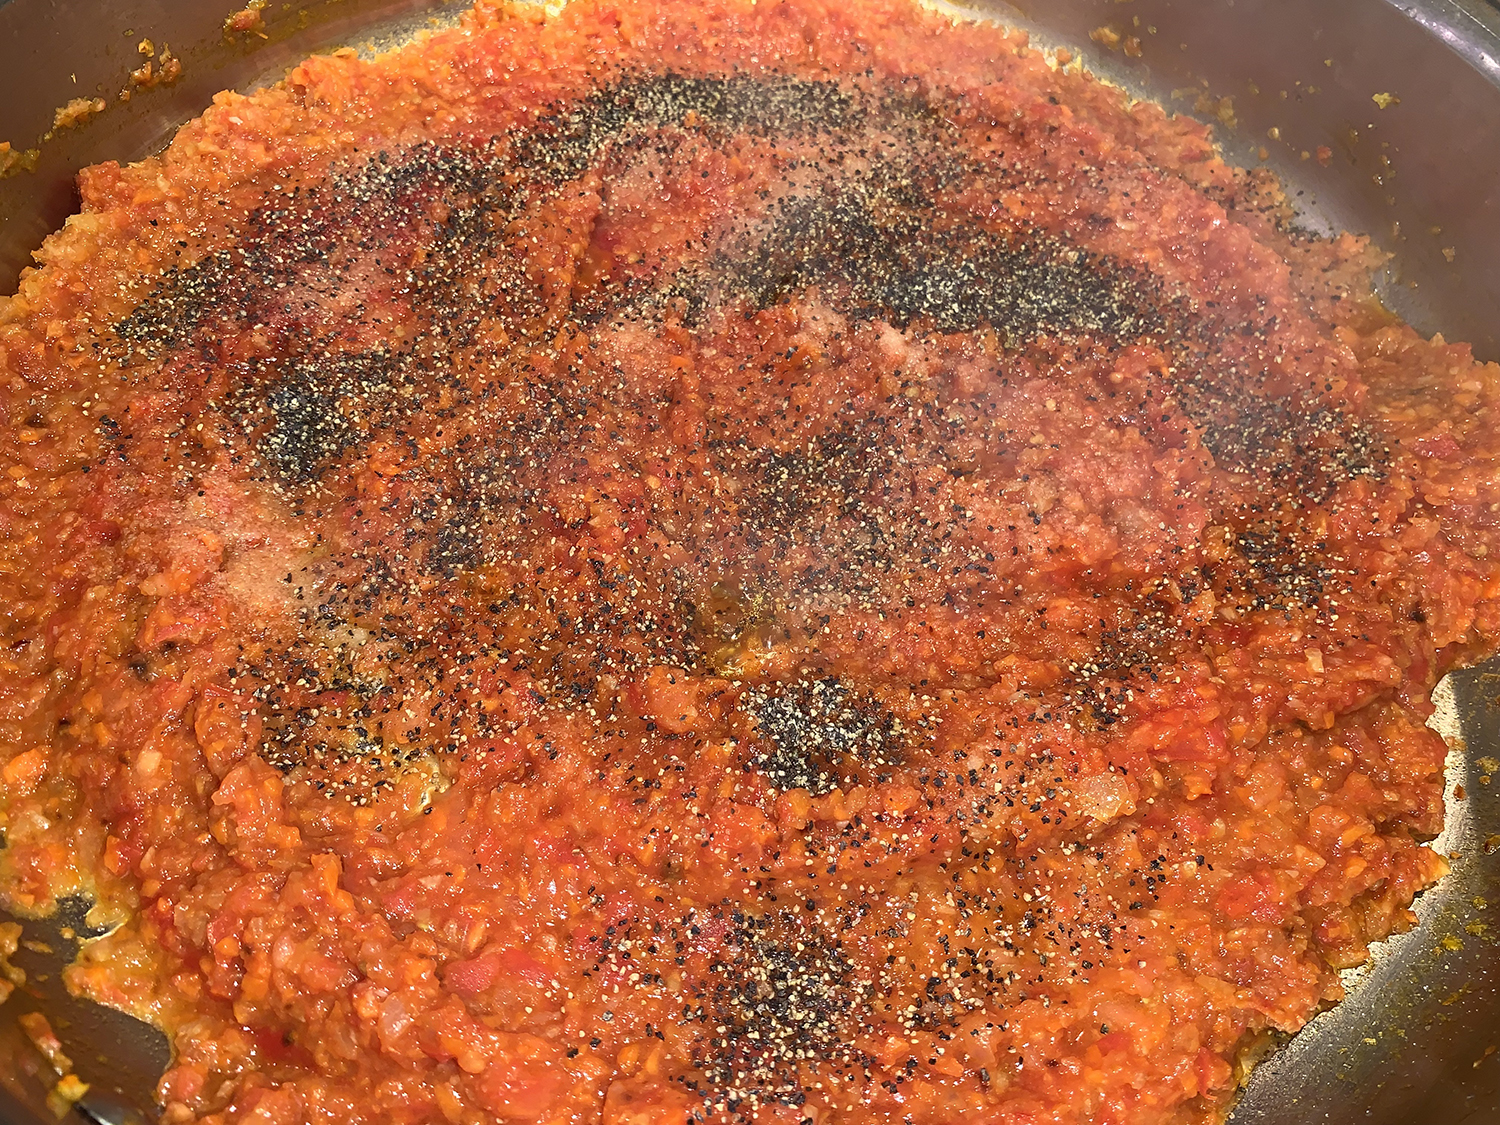
In the food processor, pulse the tomatoes until finely chopped or finely chop by hand and then add them to the pan along with the tomato paste, salt, and pepper. Cook, stirring occasionally, for 7 minutes.
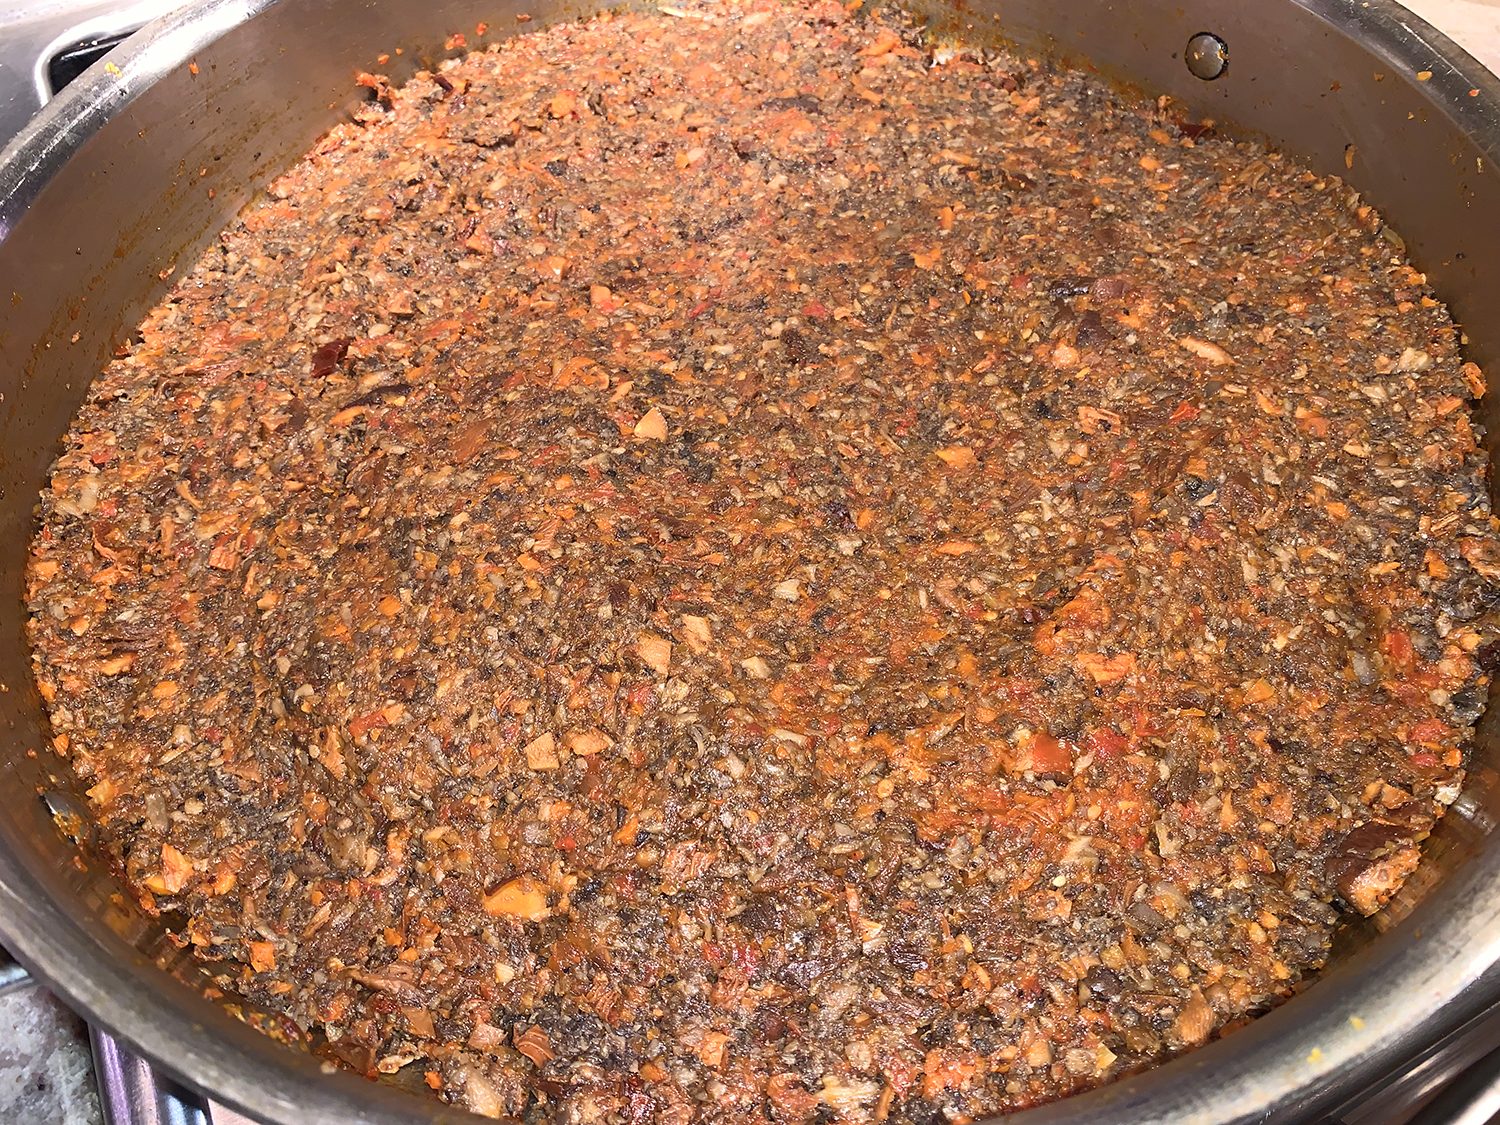
Add the rehydrated mushrooms and chiles and the roasted mushrooms and cook for 9 minutes, stirring only once during the cooking. Resist the urge to stir more frequently; you want the mushrooms to be slightly crisp and browned on the bottom.
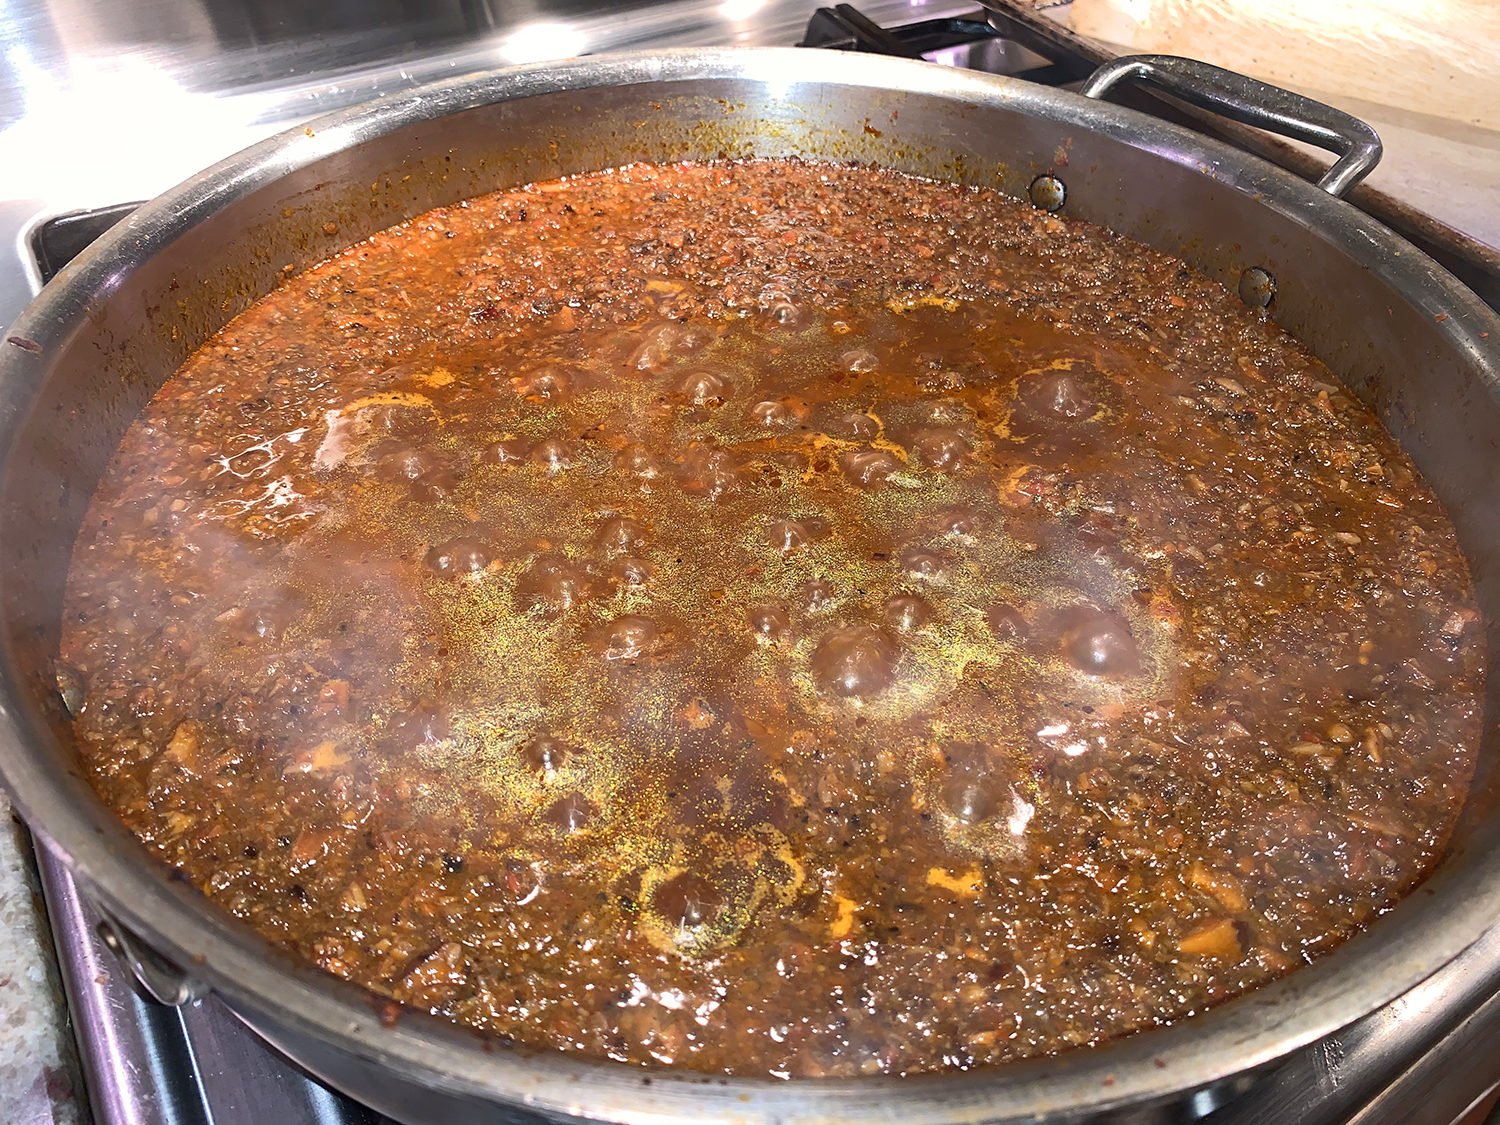
Stir in the water and reserved stock and bring to a simmer. Reduce the heat to medium and cook, stirring occasionally, until you get the consistency of a ragù, about 25 minutes.
Stir in 7 tablespoons of the cream and simmer for 2 minutes more, then remove from the heat.
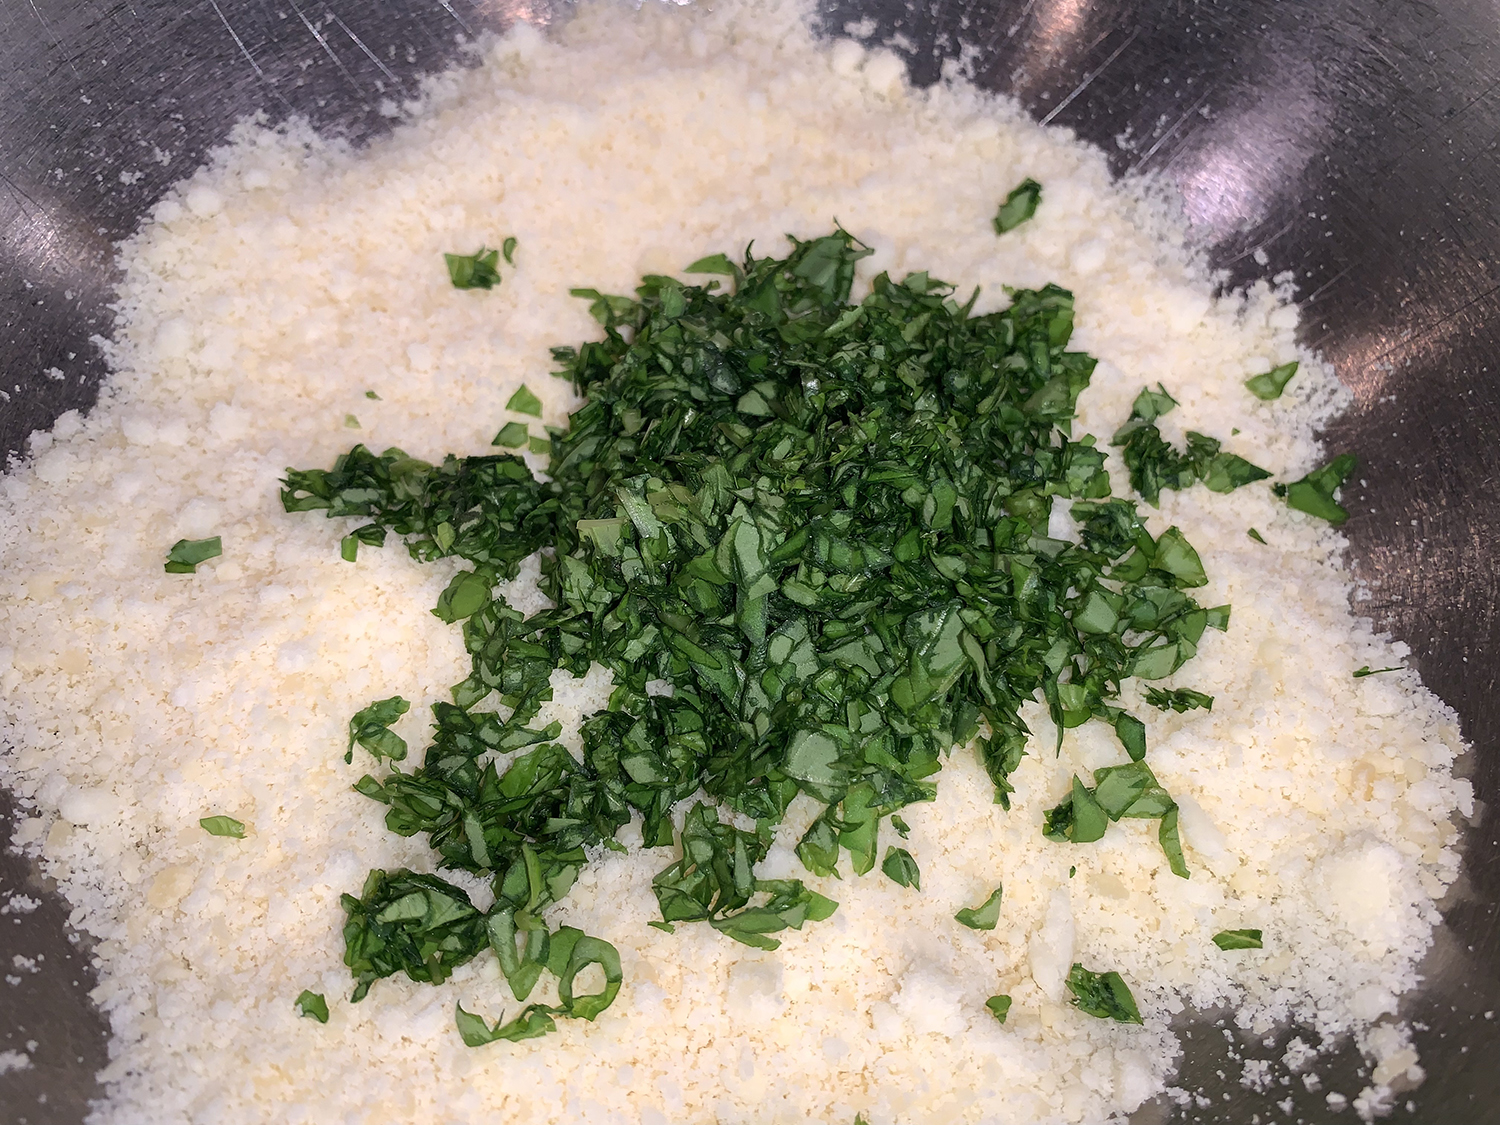
In a small bowl, combine both cheeses, the basil, and 1/2 cup parsley.
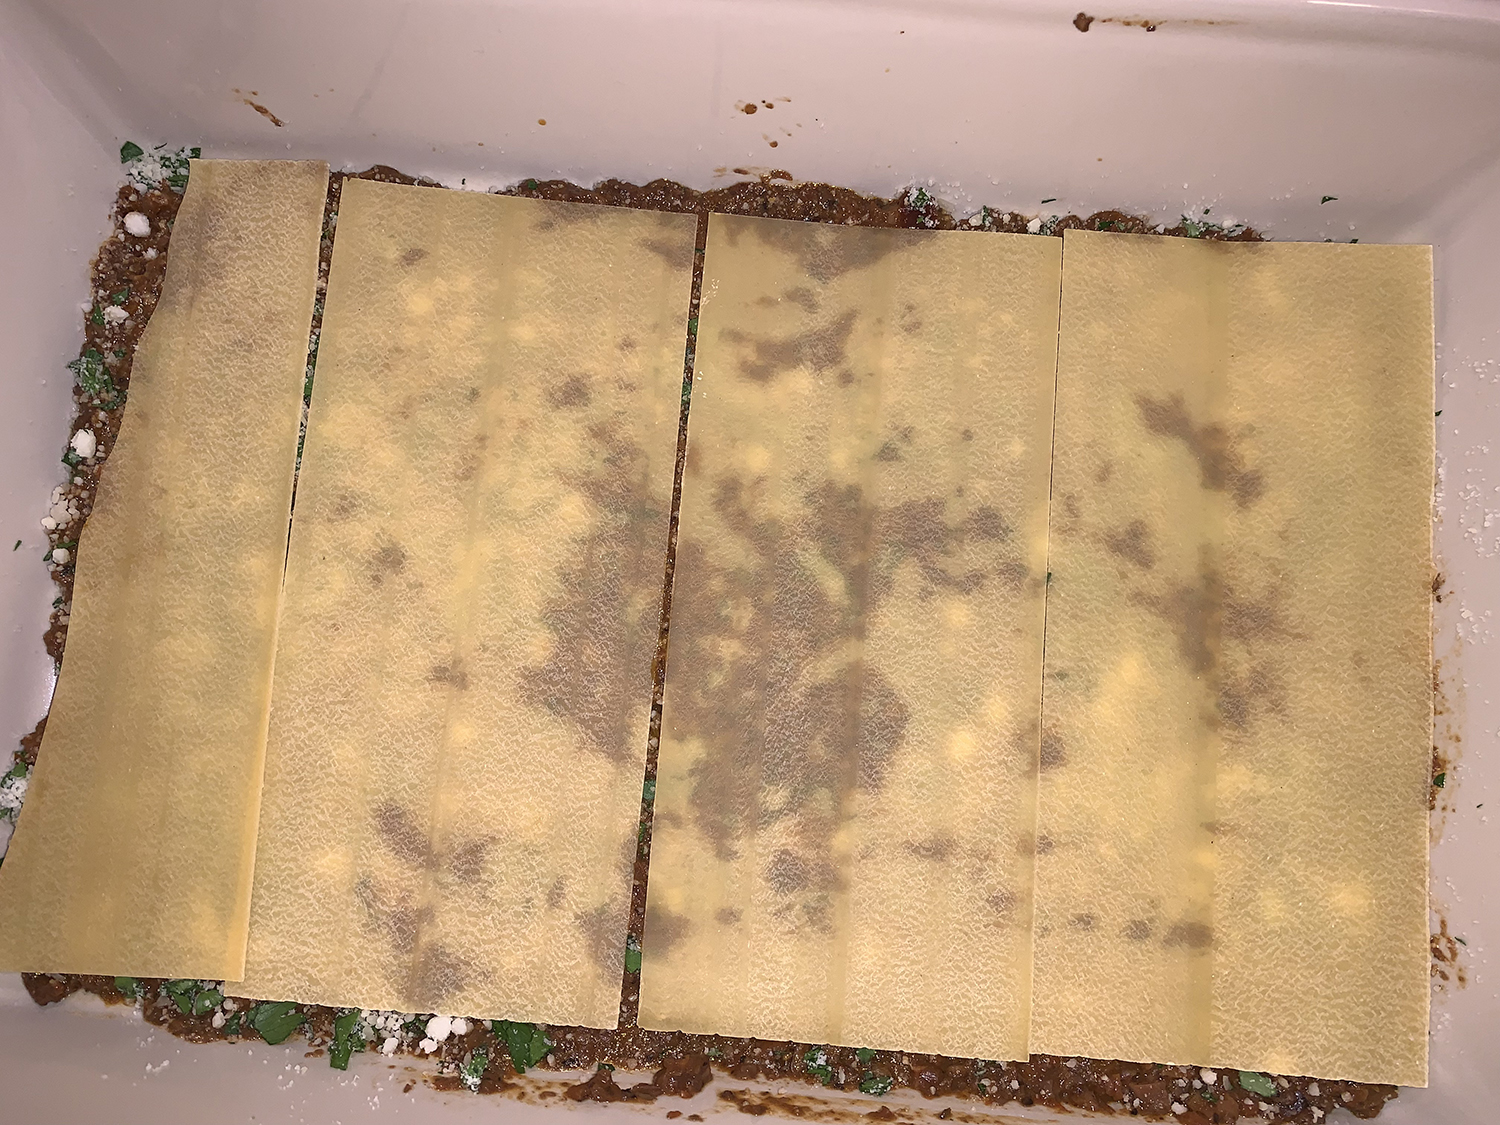
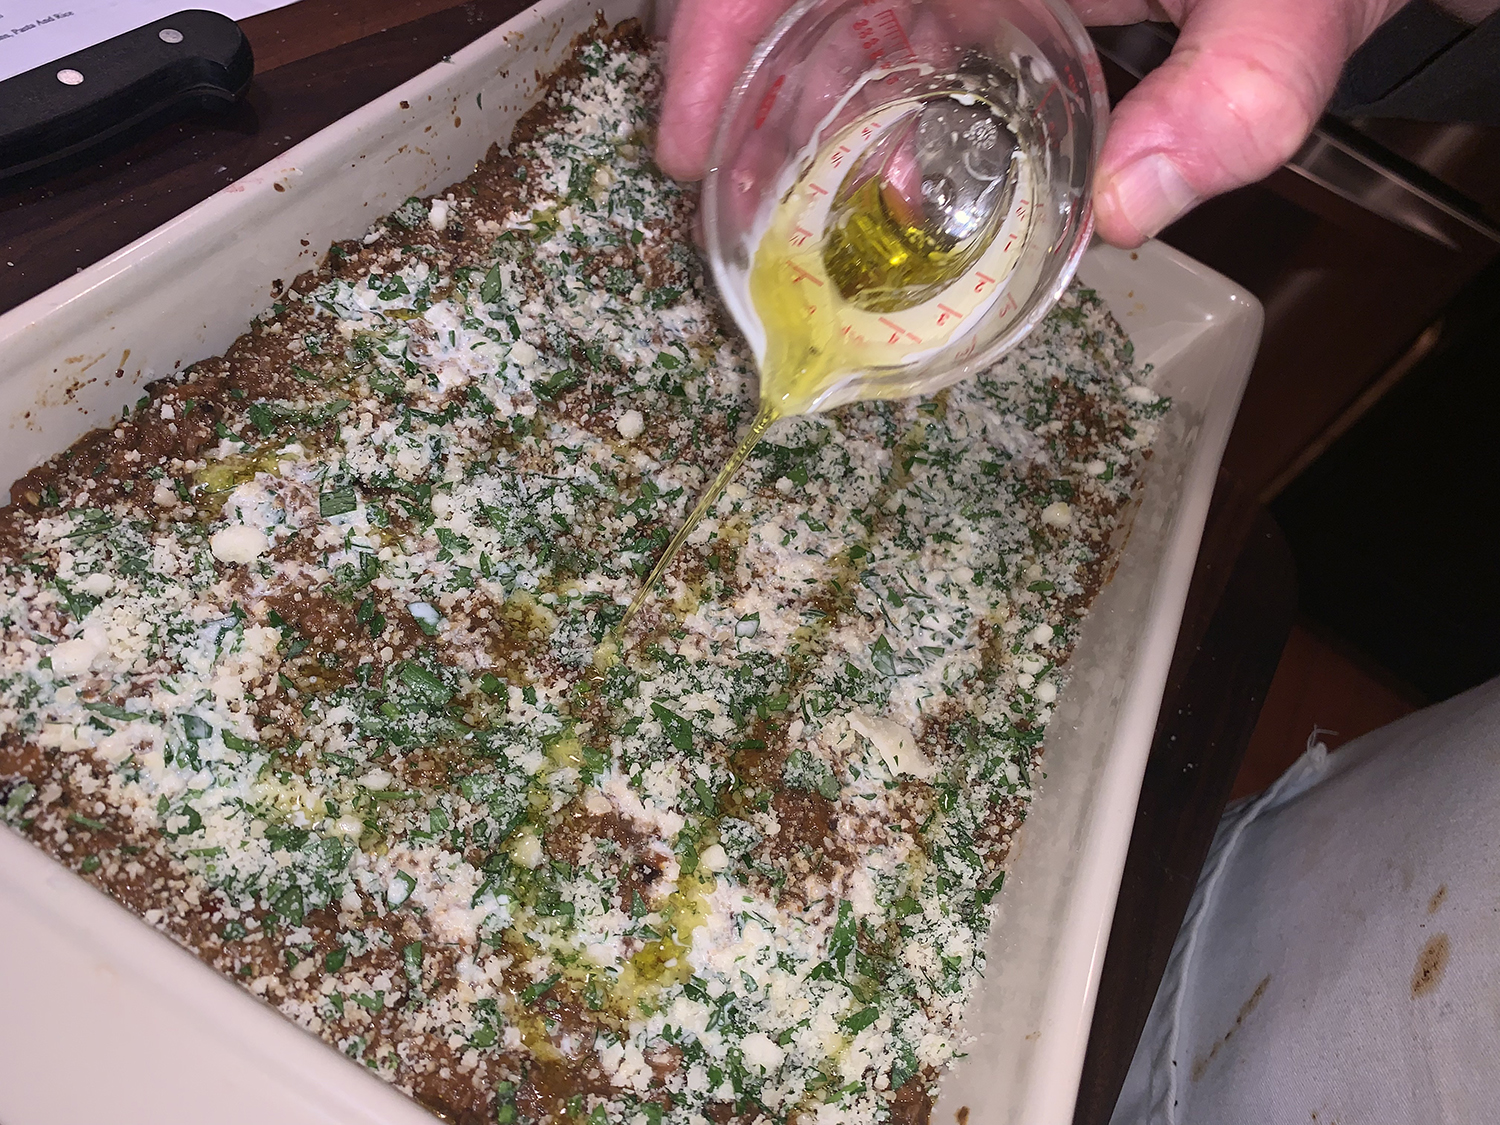
Spread 1/5 of the sauce in the bottom of a round 12-inch baking dish or a 9-by-13-inch rectangular dish, then top with 1/5 of the cheese mixture, followed by a layer of lasagna sheets, broken to fit where necessary. Repeat these layers 3 more times in that order. Finish with a final layer of sauce and cheese; that’s 5 layers of sauce, 5 layers of cheese, and 4 layers of pasta.
Drizzle with 1 tablespoon cream and 1 tablespoon olive oil, then cover with aluminum foil and bake for 15 minutes. Remove the foil, increase the temperature to 450°F, and bake for 12 minutes more, rotating the dish halfway through.
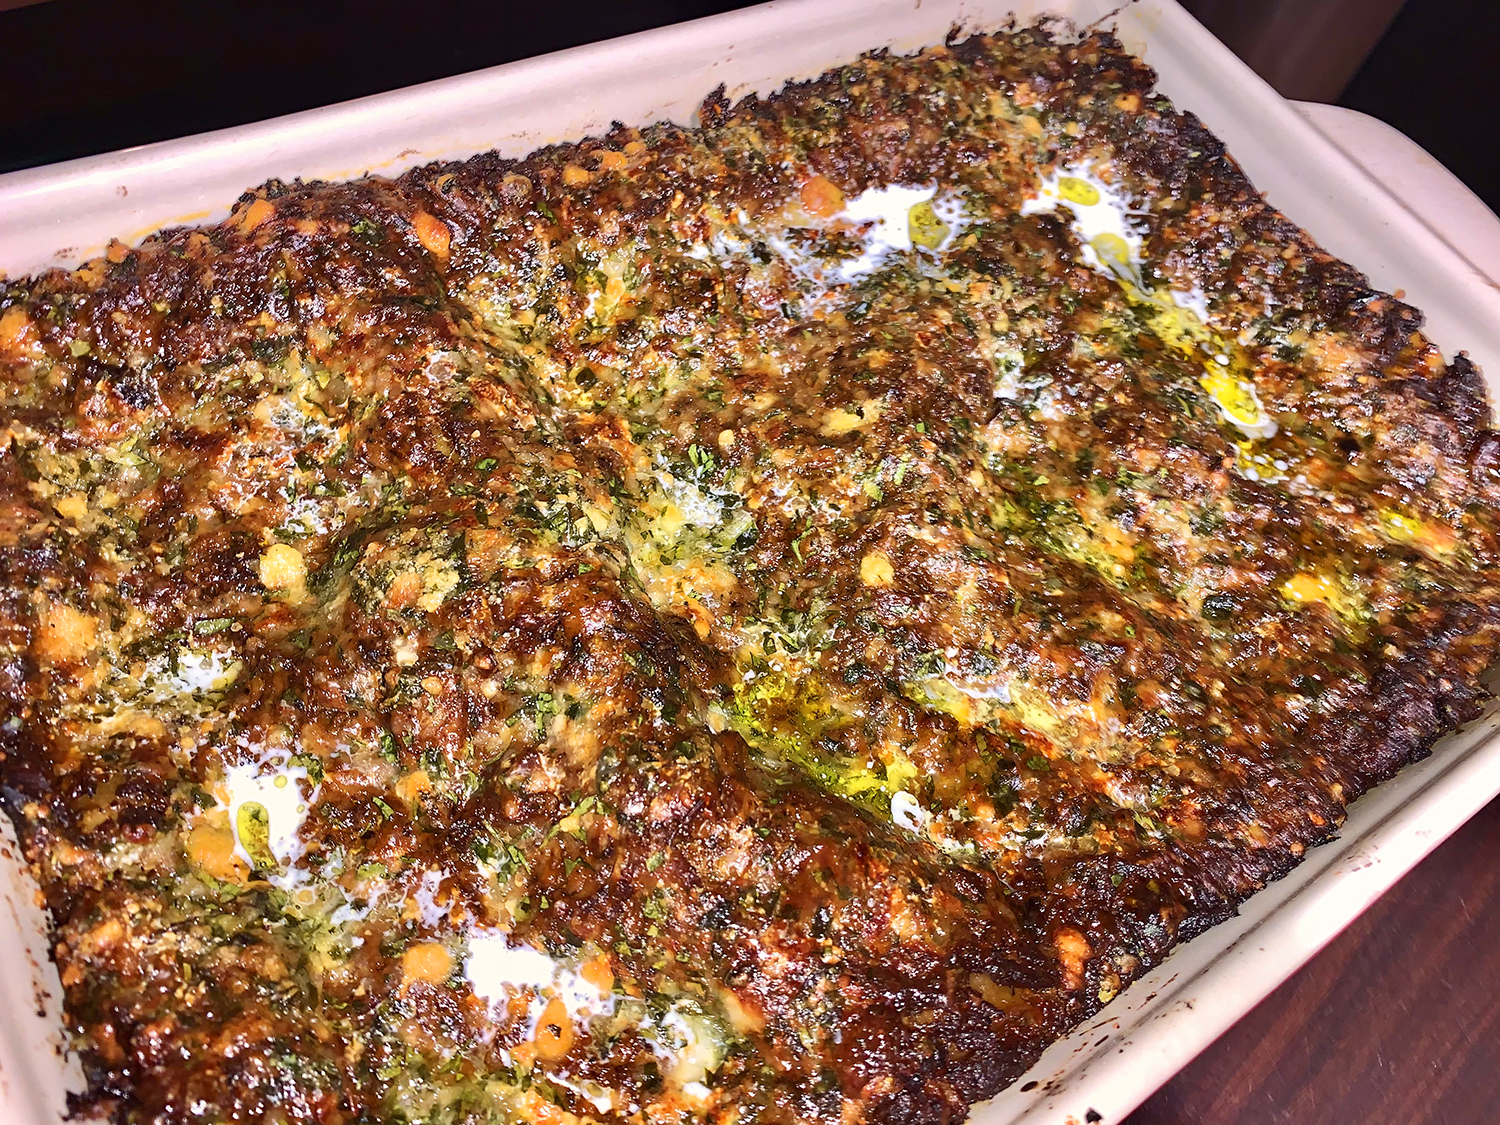
Turn the oven to the broil setting and broil until the edges are brown and crisp, about 2 minutes.
Set aside to cool for 5 minutes or so, then drizzle with the remaining 1 tablespoon cream and 1 tablespoon oil. Sprinkle with the 1 teaspoon parsley and finish with a good grind of pepper. Serve immediately.