I have been an artist and designer all my life incorporating graphic design for websites, gardens, publications, fabrics, interior design and cooking. I am now retired from my professional job, but still create artistic visions in all forms on a daily basis.
View all posts by LynnHoll →
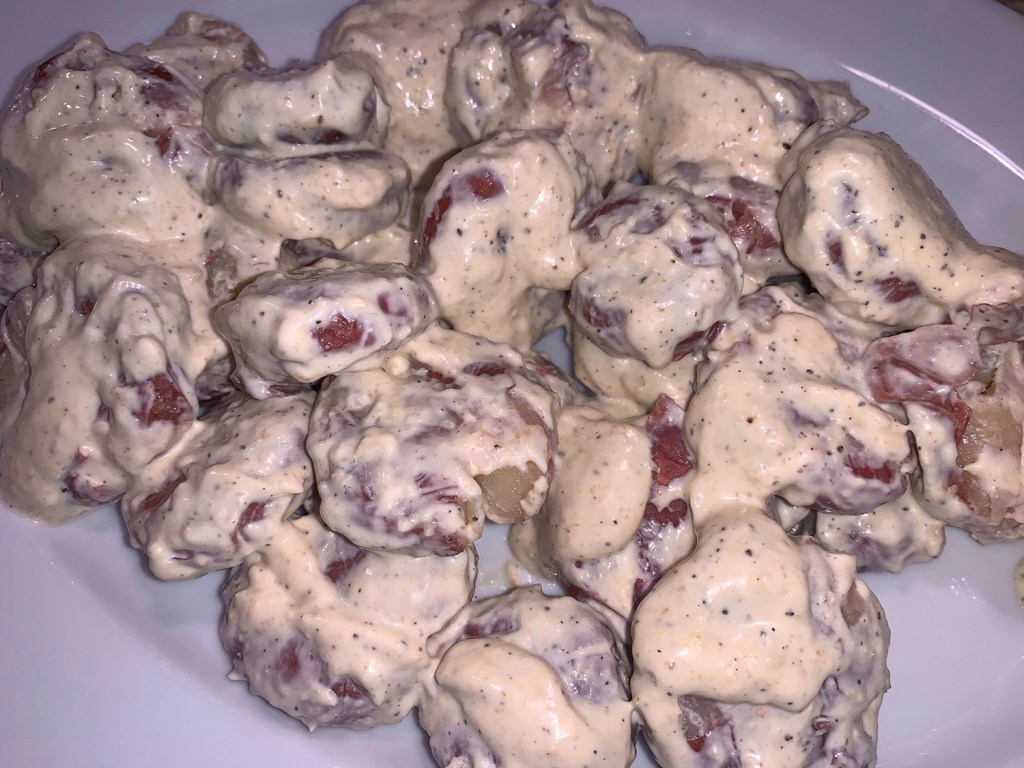
A bit of a twist, this classic potato salad adaptation from Good Housekeeping utilizes lots of fresh, tender herbs, and is a little more sophisticated looking than the typical bowl of potato salad.
The spuds are kept whole, but smashed with the bottom of a cup after cooking them in water. Then they get mixed with the mayonnaise mixture, spread onto a platter and capped with scallions, parsley and dill. While it may look like an overload of toppings, remember there aren’t any actually mixed into the potatoes (although I did reduce the amount of parsley down to about 2/3 cup).
Served at room temperature, it made a wonderful side to grilled bratwurst sausages and caramelized onions. Go ahead and cook the baby reds in the morning or the day before, and save yourself some time at dinner.
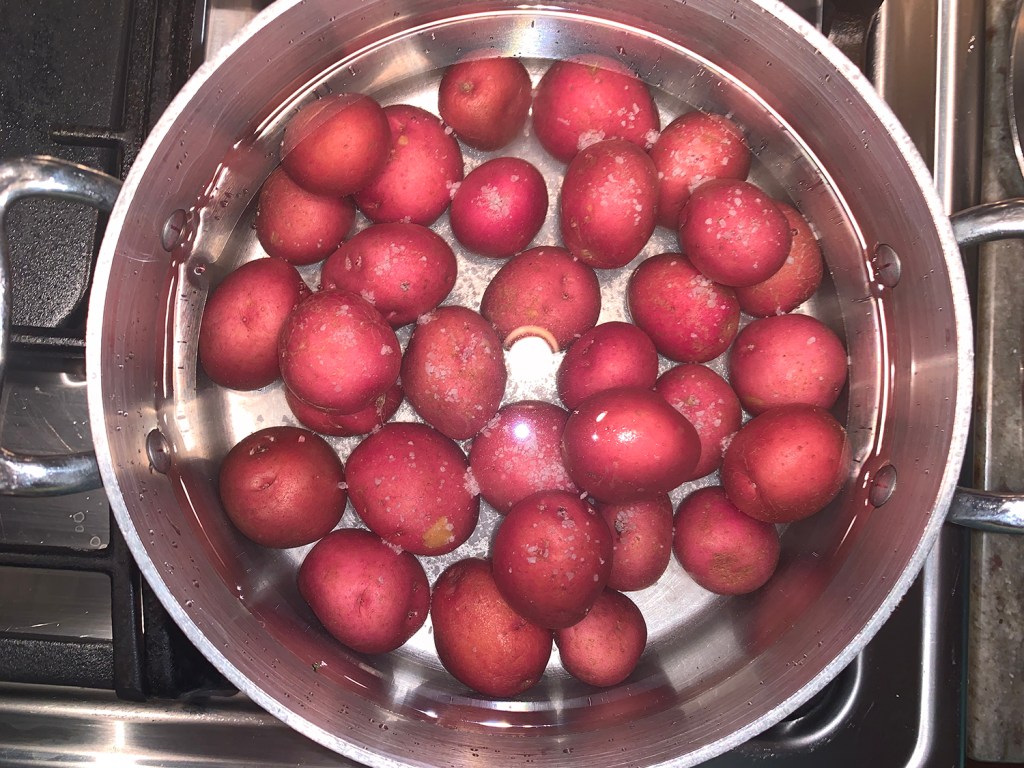
Place potatoes in a medium pot and cover with cold water. Bring to a boil, add 1/2 tablespoon salt, reduce heat and simmer until just tender, 12 to 15 minutes.
Drain and run under cold water for 30 seconds. Drain well and pat dry.
On cutting board, gently flatten each potato with bottom of cup.
While potatoes cook, in a small bowl whisk together mayonnaise, sour cream, horseradish, mustard, lemon juice and 1⁄2 teaspoon each salt and pepper until smooth.
In a large bowl, gently toss potatoes with the dressing. On serving platter, arrange potatoes in single layer, drizzle with any remaining dressing and sprinkle with herbs and scallions. Add more salt and pepper, if desired.
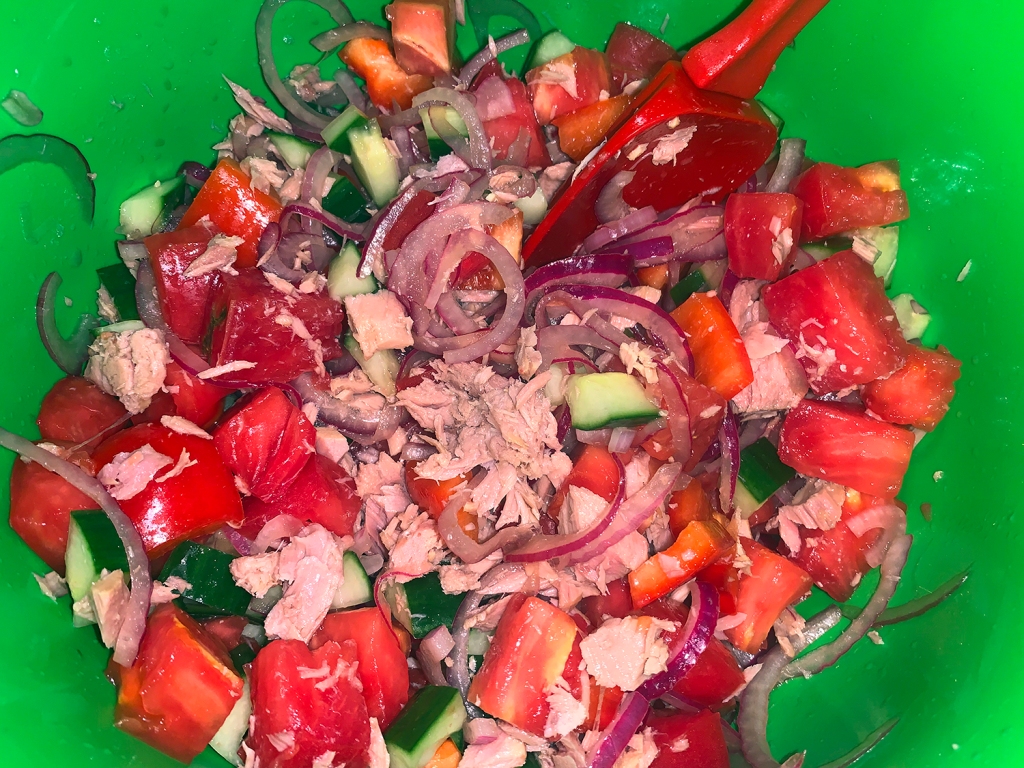
With tomatoes at the height of their season, this fabulous salad hits all the right notes. No cooking, easy to prep, and tasty as all get out—providing you use great tomatoes. All we needed was one because the heirloom that we picked up at the local farmer’s market weighed in at a whopping 1 1⁄2 pounds and was bright red all the way through!
According to the Milk Street article where this recipe came from, pipirrana is a summery, tomato-centric salad from Andalusia in southern Spain. Consider it gazpacho in chopped-salad form. Their version of pipirran con atún, includes tuna, and hard-cooked eggs, making the dish hearty enough to be a satisfying main course. The vegetables are left in largish chunks instead of a fine dice, as is common. The onion is thinly sliced and steeped in sherry vinegar for a few minutes to tame its bite.
One thing you want to stay away from here is canned tuna packed in water. The flavor of tuna in olive oil is richer and its texture more velvety. And by all means, when you drain the tuna, do it over a bowl and use it when making the vinaigrette, adding olive oil as needed to make up the difference. Don’t know why most recipes fail to mention this step.
We drained the pickled onions directly over the bowl holding the tuna olive oil. This is used to make the vinaigrette that dresses the salad. We were blown over by how good this simple salad was—made even better with a chilled glass of crisp Spanish white wine.
1½ lbs. ripe tomatoes, cored and cut into 1-inch chunks
1 English cucumber, halved lengthwise, seeded and cut into ½-inch chunks
Kosher salt and ground black pepper
1 small red onion, halved and thinly sliced
3 Tbsp. sherry vinegar
1 medium green or red bell pepper, stemmed, seeded and cut into 1-inch pieces
¼ cup drained capers
2 5-oz. cans olive oil–packed tuna, drained and flaked into small pieces (don’t discard the olive oil from the tuna can, save it to make the vinaigrette)
½ cup extra-virgin olive oil
4 hard-cooked eggs, peeled and quartered
2 Tbsp. finely chopped fresh flat-leaf parsley
Directions
In a large bowl, toss together the tomatoes, cucumber and ½ teaspoon salt. In a medium bowl, stir together the onion, vinegar and ¼ teaspoon salt. Let both stand for about 10 minutes.
Place a large strainer over the bowl containing the oil from the canned tuna. Pour the onion slices and their juices into the strainer, pressing down to remove most of the vinegar. Add the drained onions to the tomato-cucumber mixture.
Add the bell pepper, capers and tuna to the vegetables, lightly stir.
To the vinegar oil mixture, and ¼ teaspoon each salt and pepper. Stir in the parsley. Pour the dressing over the salad and gently toss. Transfer to a serving dish and top with the egg wedges.
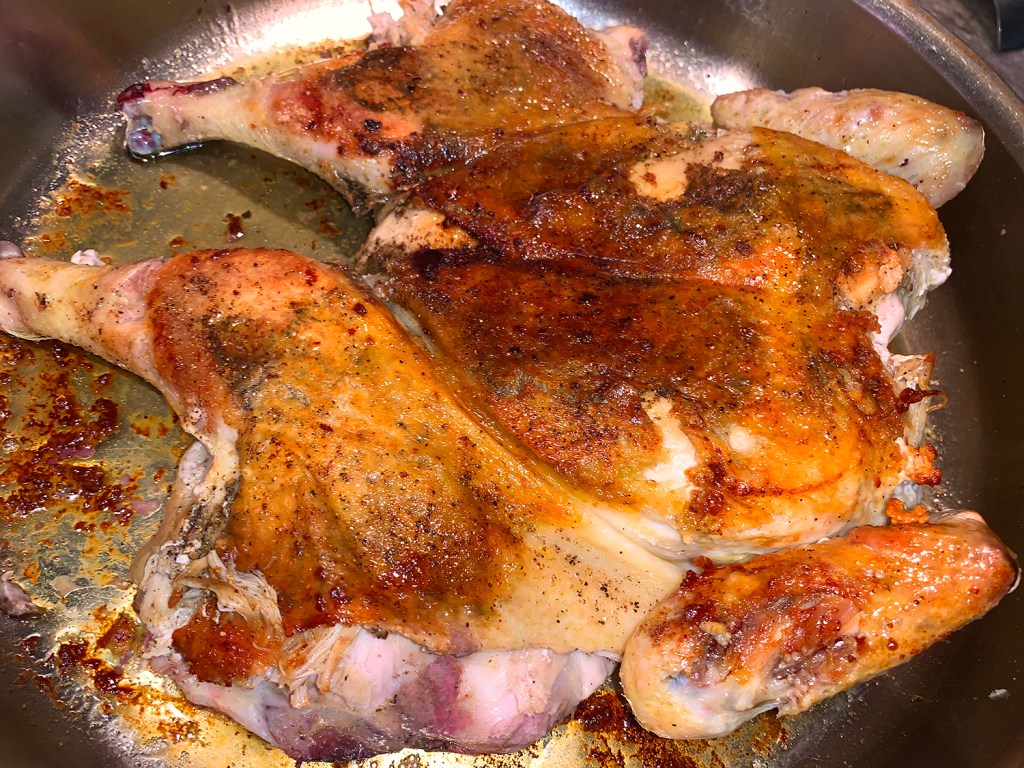
For an easy, but impressive weeknight dinner, turn a simple roast chicken into a fabulous poultry dinner by rubbing it with za’atar. Using olive oil to form a paste, spread za’atar and salt underneath the chicken skin and let it rest in the refrigerator for 6 to 8 hours, which has the same effect as brining a chicken.
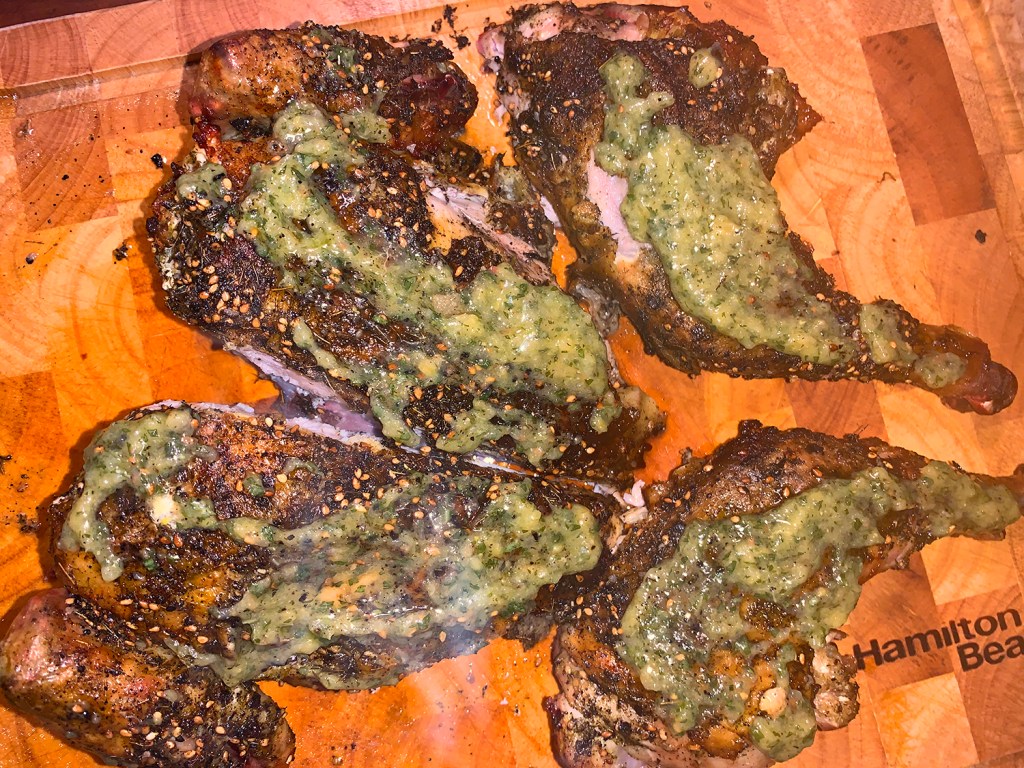
To cook it, use the Italian technique of cooking under a brick (or a pot in this case). Once the skin is crisp, brush on additional za’atar and olive oil paste. Then finishing the chicken breast side up in a hot oven turns the paste into a crisp crust. While the chicken cooks, create a zesty vinaigrette that brightens up the finished dish.
But exactly what is za’atar? It is so multifaceted and dynamic due to a blend of many different flavors, textures, and fragrances. Even though it varies greatly (specific recipes can be closely-guarded secrets), za’atar is generally a combination of dried oregano, thyme, and/or marjoram (woodsy and floral), with sumac (tangy and acidic) and toasted sesame seeds (nutty and rich).
If za’atar is not available at the grocery/specialty store, make it at home, like us (see below). Play around with different quantities of crushed dried oregano, dried thyme, and dried marjoram, and add sumac, toasted sesame seeds, and, if you want, salt.
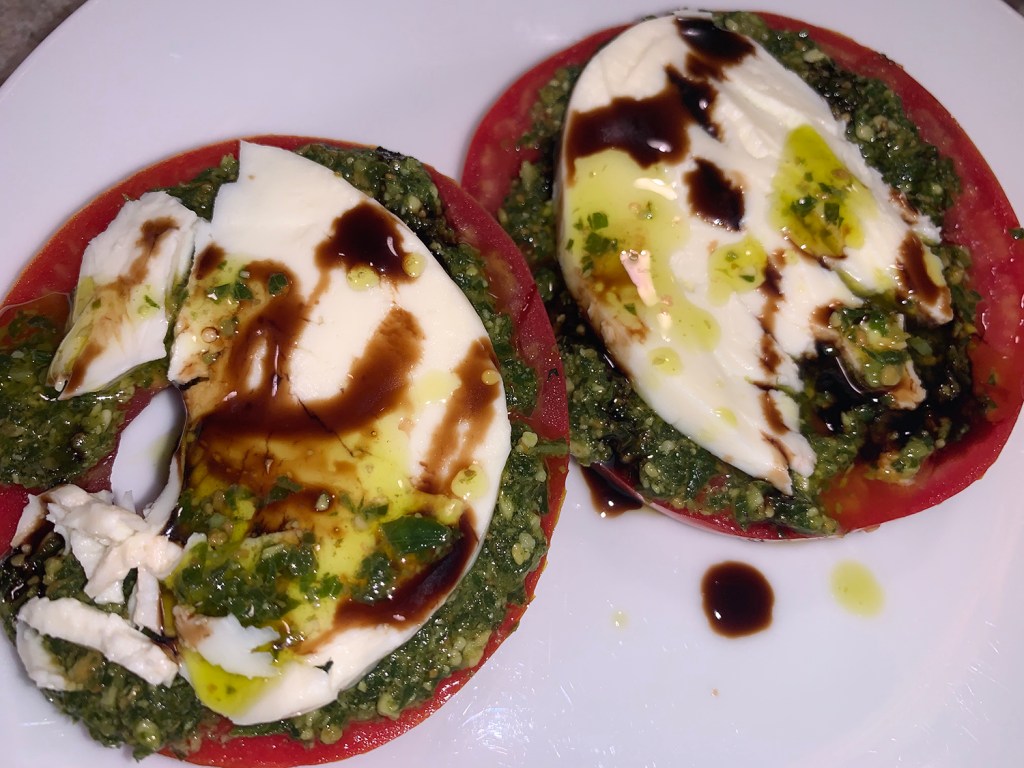
One of our paired side dishes was locally grown organic tomatoes, spread with fresh pesto, topped with slices of mozzarella, and drizzled with balsamic vinaigrette.
TIP: We keep a jar of preserved lemons in our auxiliary refrigerator at most times. If you don’t have or can’t find preserved lemons, you can microwave four 2-inch strips lemon zest, minced, 1 teaspoon lemon juice, ½ teaspoon water, ¼ teaspoon sugar, and ¼ teaspoon salt at 50 percent power until the liquid evaporates, about 1½ minutes, stirring and mashing the lemon with the back of a spoon every 30 seconds.
Because our chicken weighed over 5 pounds—25% bigger than called for—I used more za’atar mix and doubled the preserved lemon vinaigrette. It also took a bit longer to come to temp, but not much because we used a convection roast setting. If at any time while in the oven the skin seems to be getting too dark, rest foil over it while the meat continues to reach temperature. Test both breast and thighs with an instant-read thermometer.
Za’atar-Rubbed Butterflied Chicken with Preserved Lemon Vinaigrette
¼ preserved lemon, pulp and white pith removed, rind rinsed and minced (1 Tbsp.)
2 tsp. white wine vinegar
½ tsp. Dijon mustard
Skin side down in hot pan.
Place heavy pot on chicken to press flat.
Flip browned chicken over.
Spread za’atar mixture all over skin areas, place in hot oven.
After 20 minutes in the oven, and 10 minutes resting, it’s ready to carve.
Make the preserved lemon vinaigrette.
Spread vinaigrette over all pieces of chicken, serving any remainder.
Directions
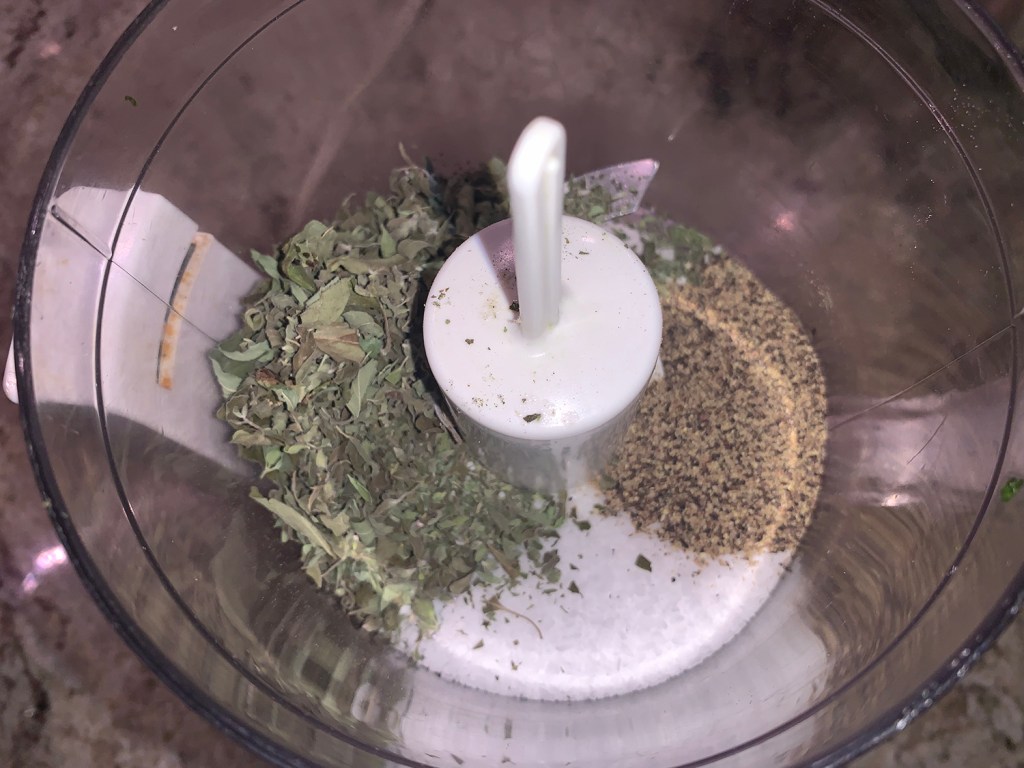
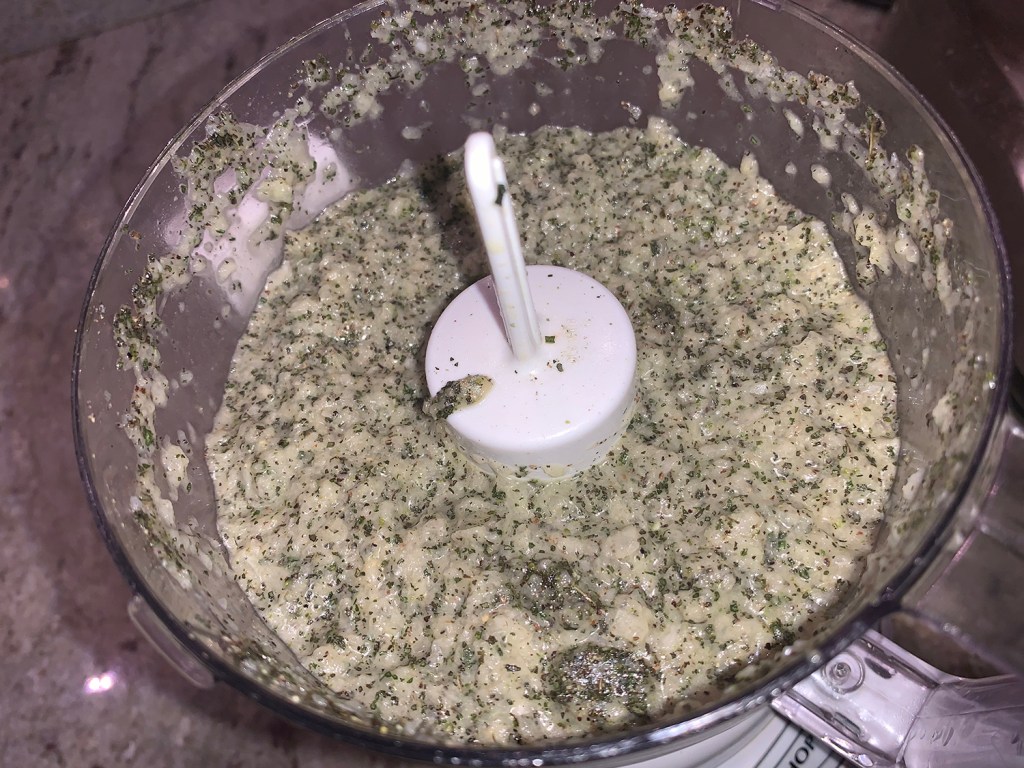
Combine 1 tablespoon oil, 1 tablespoon za’atar, and 1 teaspoon salt in small bowl.
With chicken breast side down, use kitchen shears to cut through bones on either side of backbone. Discard backbone and trim any excess fat or skin at neck. Flip chicken and tuck wingtips behind back. Press firmly on breastbone to flatten, then pound breast to be same thickness as leg and thigh. Pat chicken dry with paper towels and, using your fingers, gently loosen skin covering breast and thighs.
Rub za’atar-oil paste evenly under skin. Transfer chicken to large plate and refrigerate uncovered for 6 to 8 hours.
Adjust oven rack to lowest position and heat oven to 450 degrees.
Pat chicken dry with paper towels and season with salt and pepper. Combine 1 tablespoon oil and remaining 1 tablespoon za’atar in small bowl. Heat 1 teaspoon oil in 12-inch skillet over medium-high heat until just smoking. Place chicken skin side down in skillet, reduce heat to medium, and place heavy pot on chicken to press flat.
Cook chicken until skin is crisp and browned, 20 to 25 minutes. (If chicken is not crisp after 20 minutes, increase heat to medium high).
Off heat, remove pot and carefully flip chicken. Brush skin with za’atar mixture, transfer skillet to oven, and roast until breast registers 160 degrees and thighs register 175 degrees, 10 to 20 minutes.
Transfer chicken to carving board and let rest for 10 minutes. Meanwhile, whisk mint, lemon, vinegar, mustard, ⅛ teaspoon salt, and ⅛ teaspoon pepper together in bowl until combined. Whisking constantly, slowly drizzle in remaining 3 tablespoons oil until emulsified. Carve chicken and serve with dressing.
Za’atar
Ingredients
2 Tbsp. dried thyme
1 Tbsp. dried oregano
1 ½ Tbsp. sumac
1 Tbsp. sesame seeds, toasted
¼ tsp. salt
Directions
Process thyme and oregano in spice grinder or mortar and pestle until finely ground and powdery.
Transfer to bowl and stir in sumac, sesame seeds, and salt. (Za’atar can be stored at room temperature in airtight container for up to 1 year.)
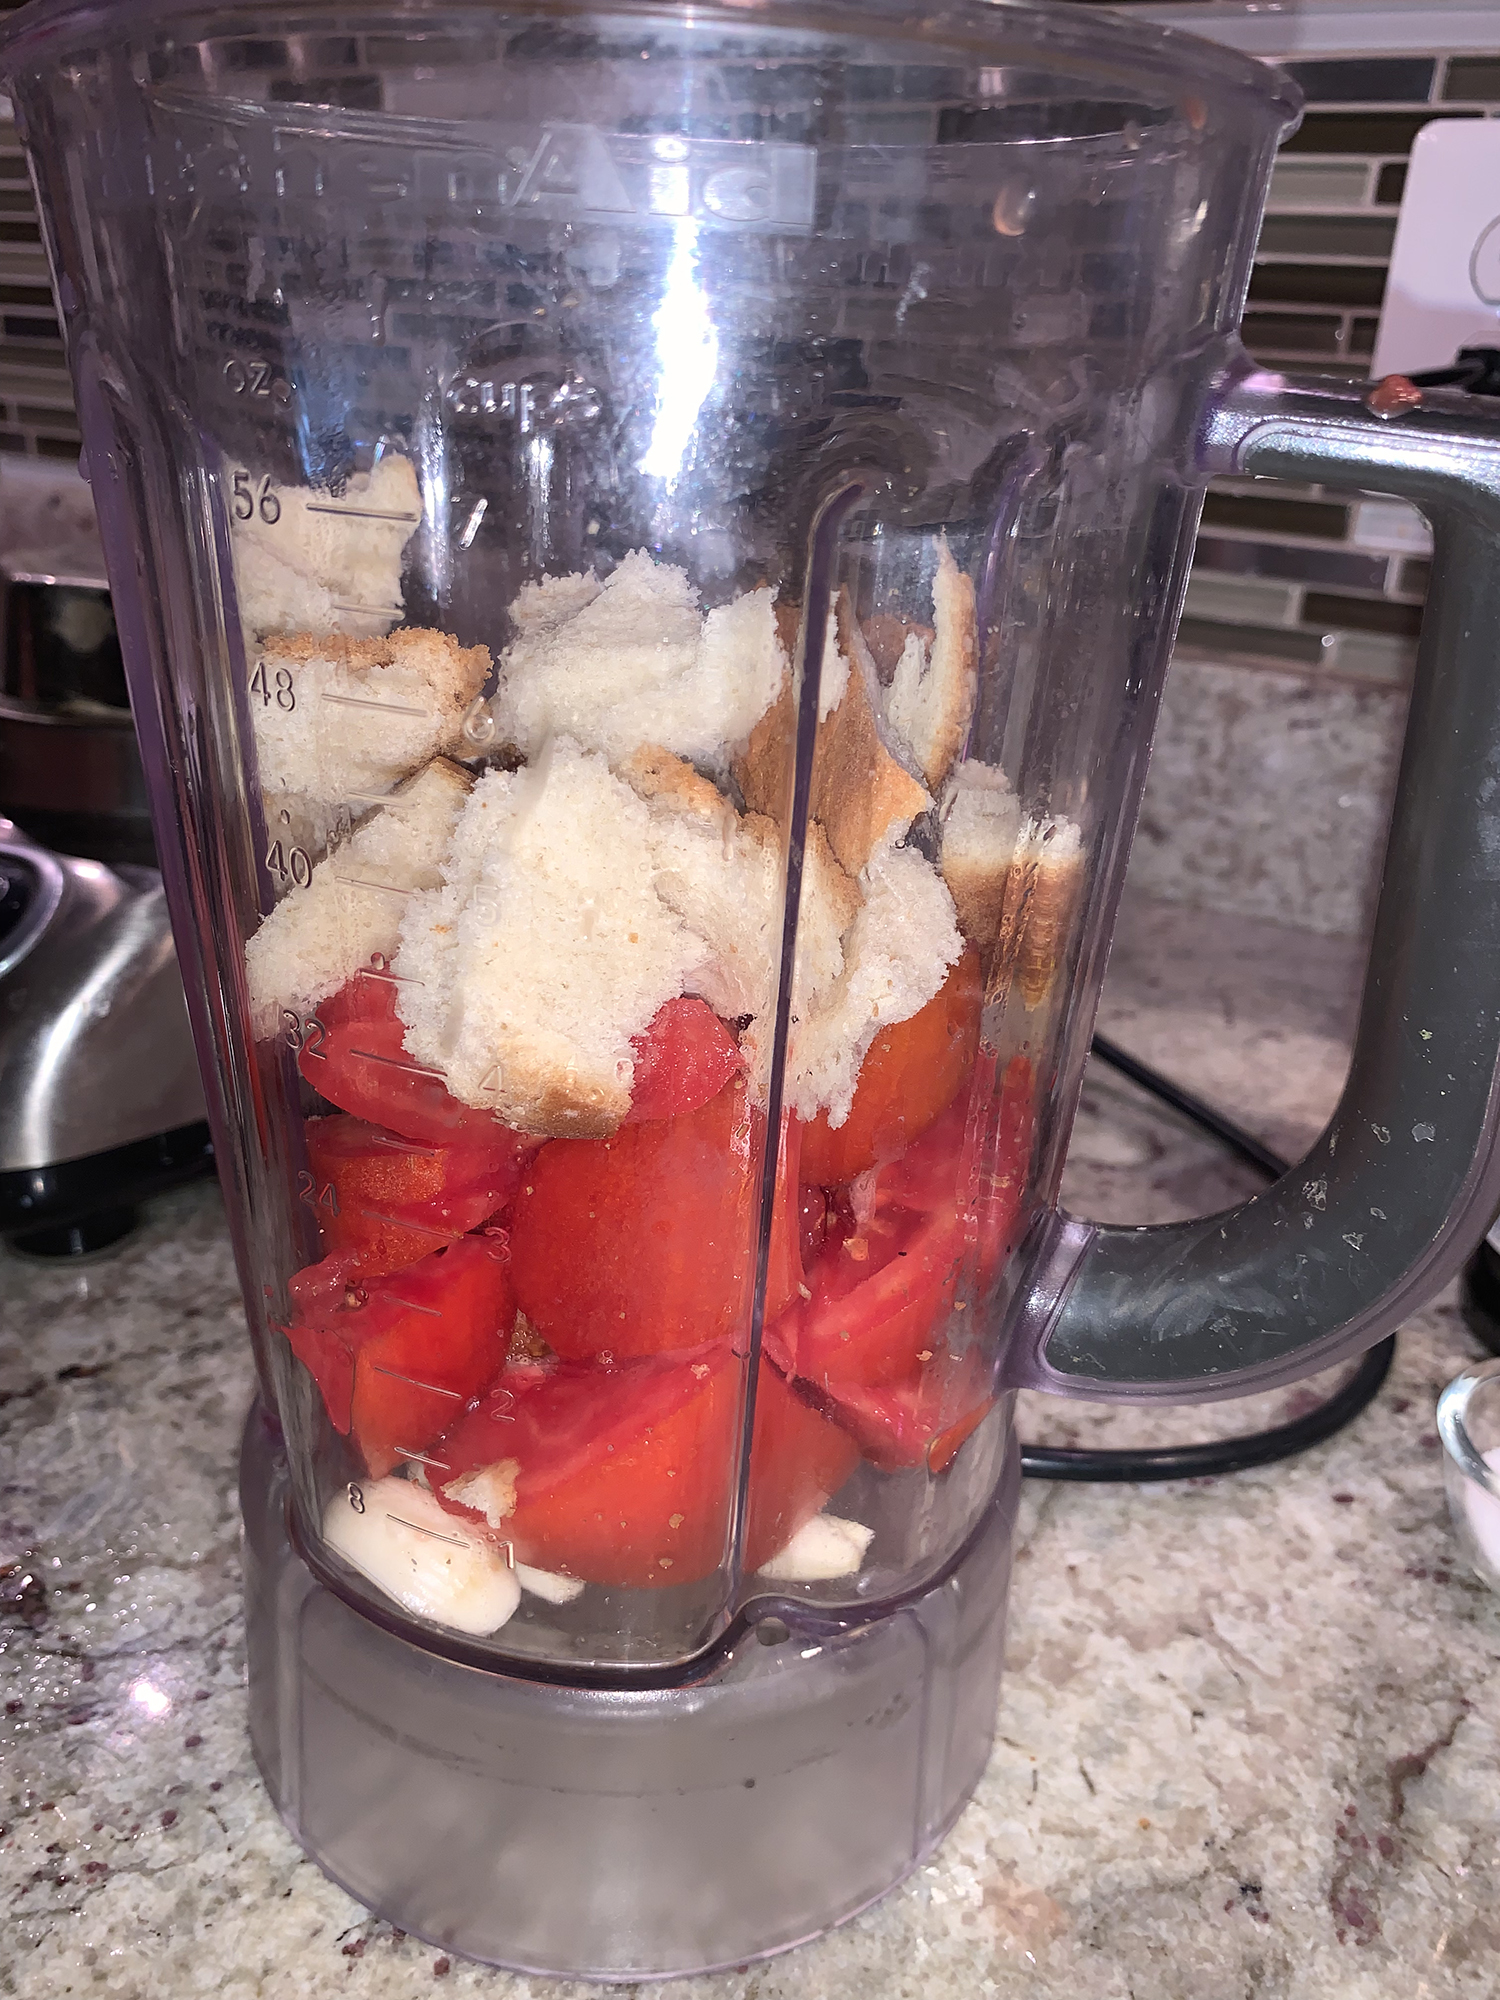
On one of our numerous trips to Spain, we took a cooking class in Seville at Taller Andaluz de Cocina. One of the recipes was making a Salmorejo—sometimes known as ardoria or ardorío—a traditional soup originating from the Andalusia region in southern Spain. It is composed simply of tomato, bread, extra-virgin olive oil and garlic.
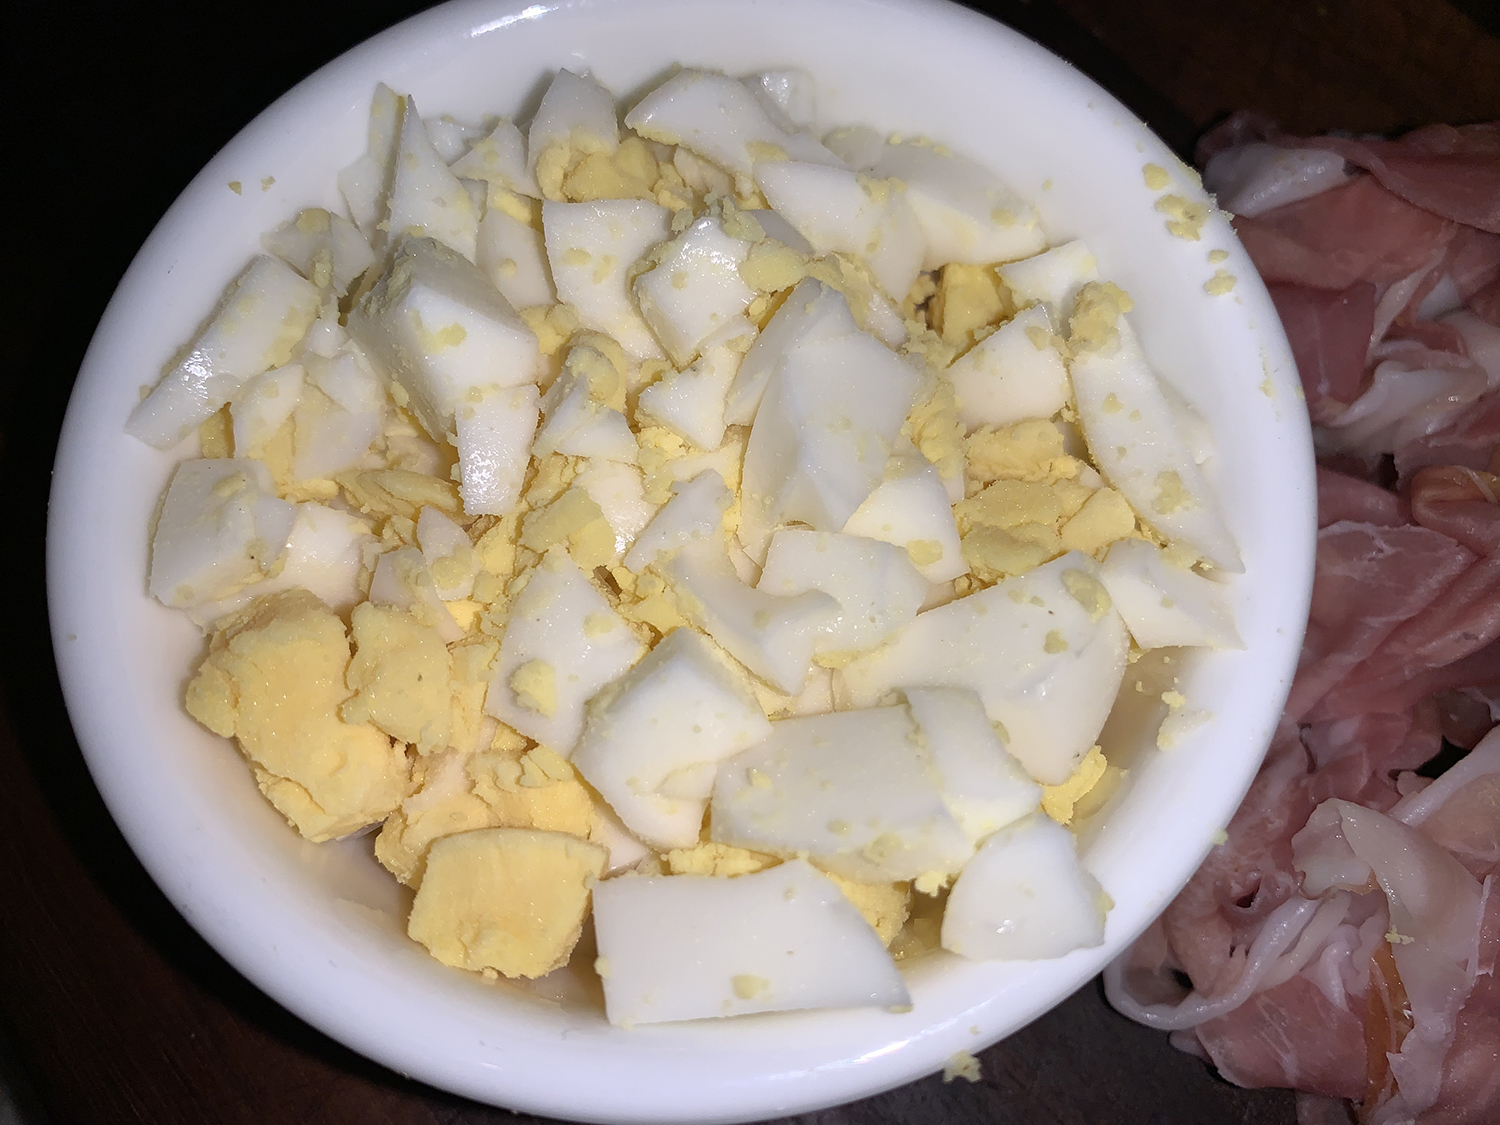
The soup is served cold and is garnished with chopped Spanish serrano ham and diced hard-boiled eggs. Unfortunately, the grocery store was not carrying either jamón serrano or Ibérico, but push-come-to-shove, prosciutto is an acceptable substitute. Although reminiscent of gazpacho, Salmorejo is more pink-orange, and is also much thicker and creamier in texture, because it includes more olive oil and bread.
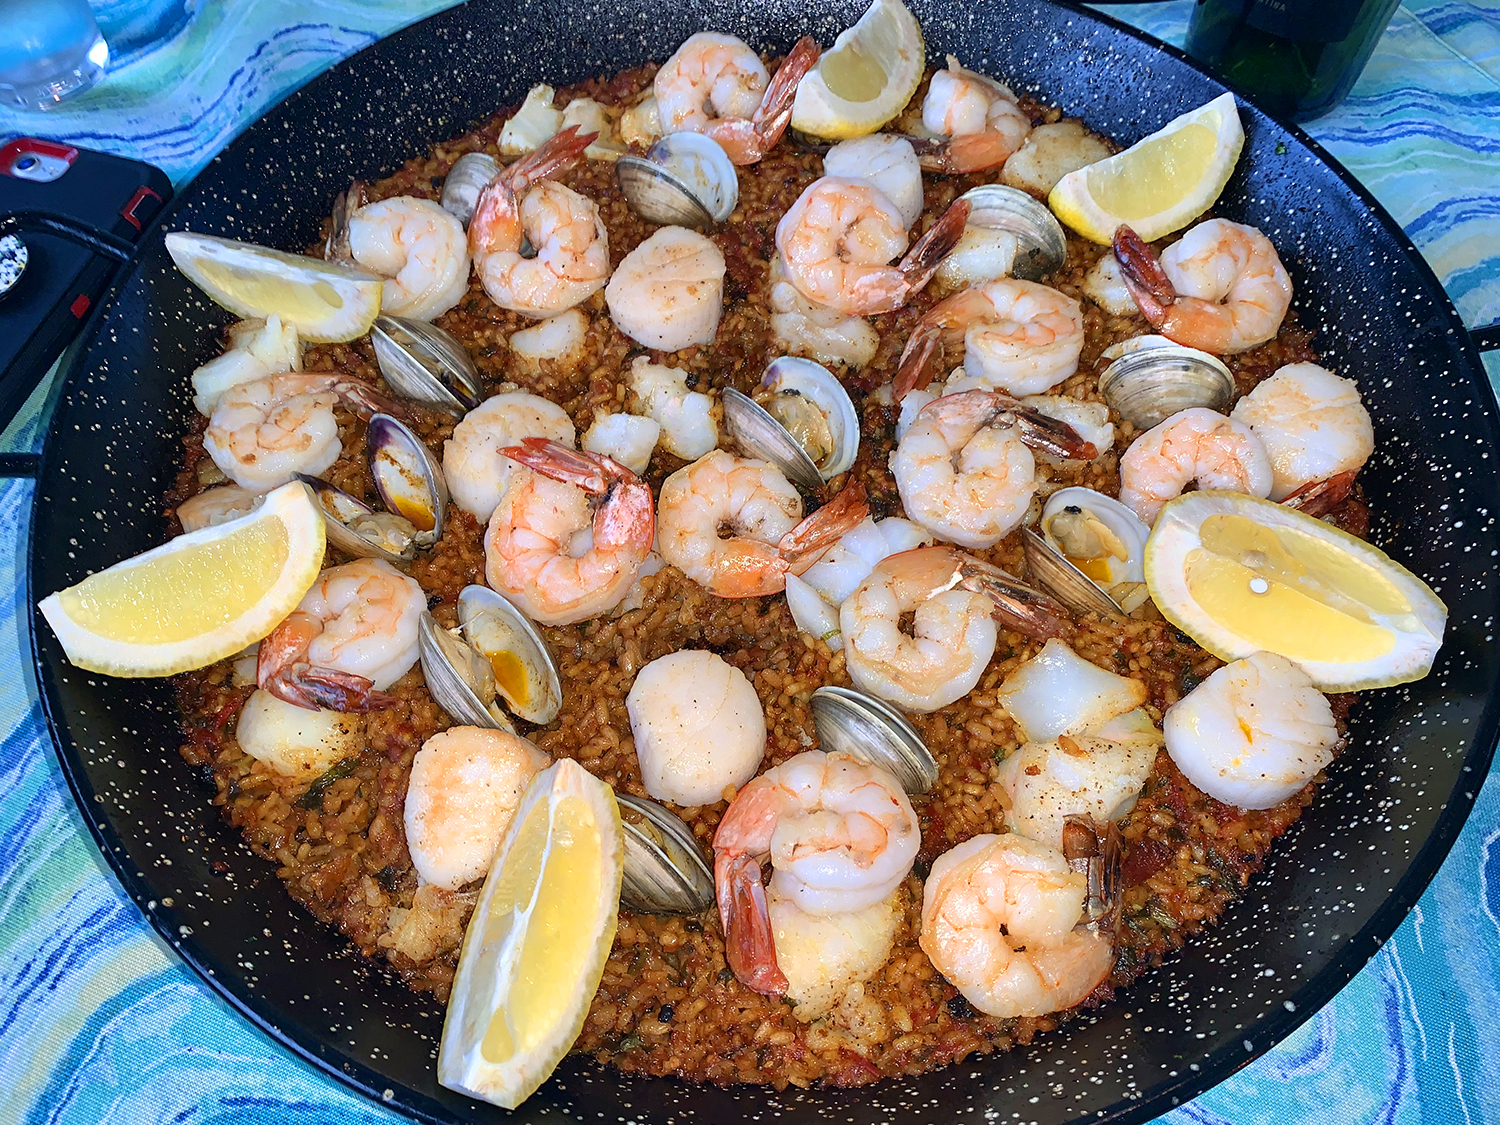
A Spanish-themed dinner was planned for a belated birthday of some good friends. For starters, our drinks, tinto de verano, were paired with a tomato-pesto Manchego cheese appetizer. While The Hubs made a seafood paella on his grill, and Spanish music played softly in the background, our guests, Maria Odili and Steve, took the opportunity to do a bit of dancing.
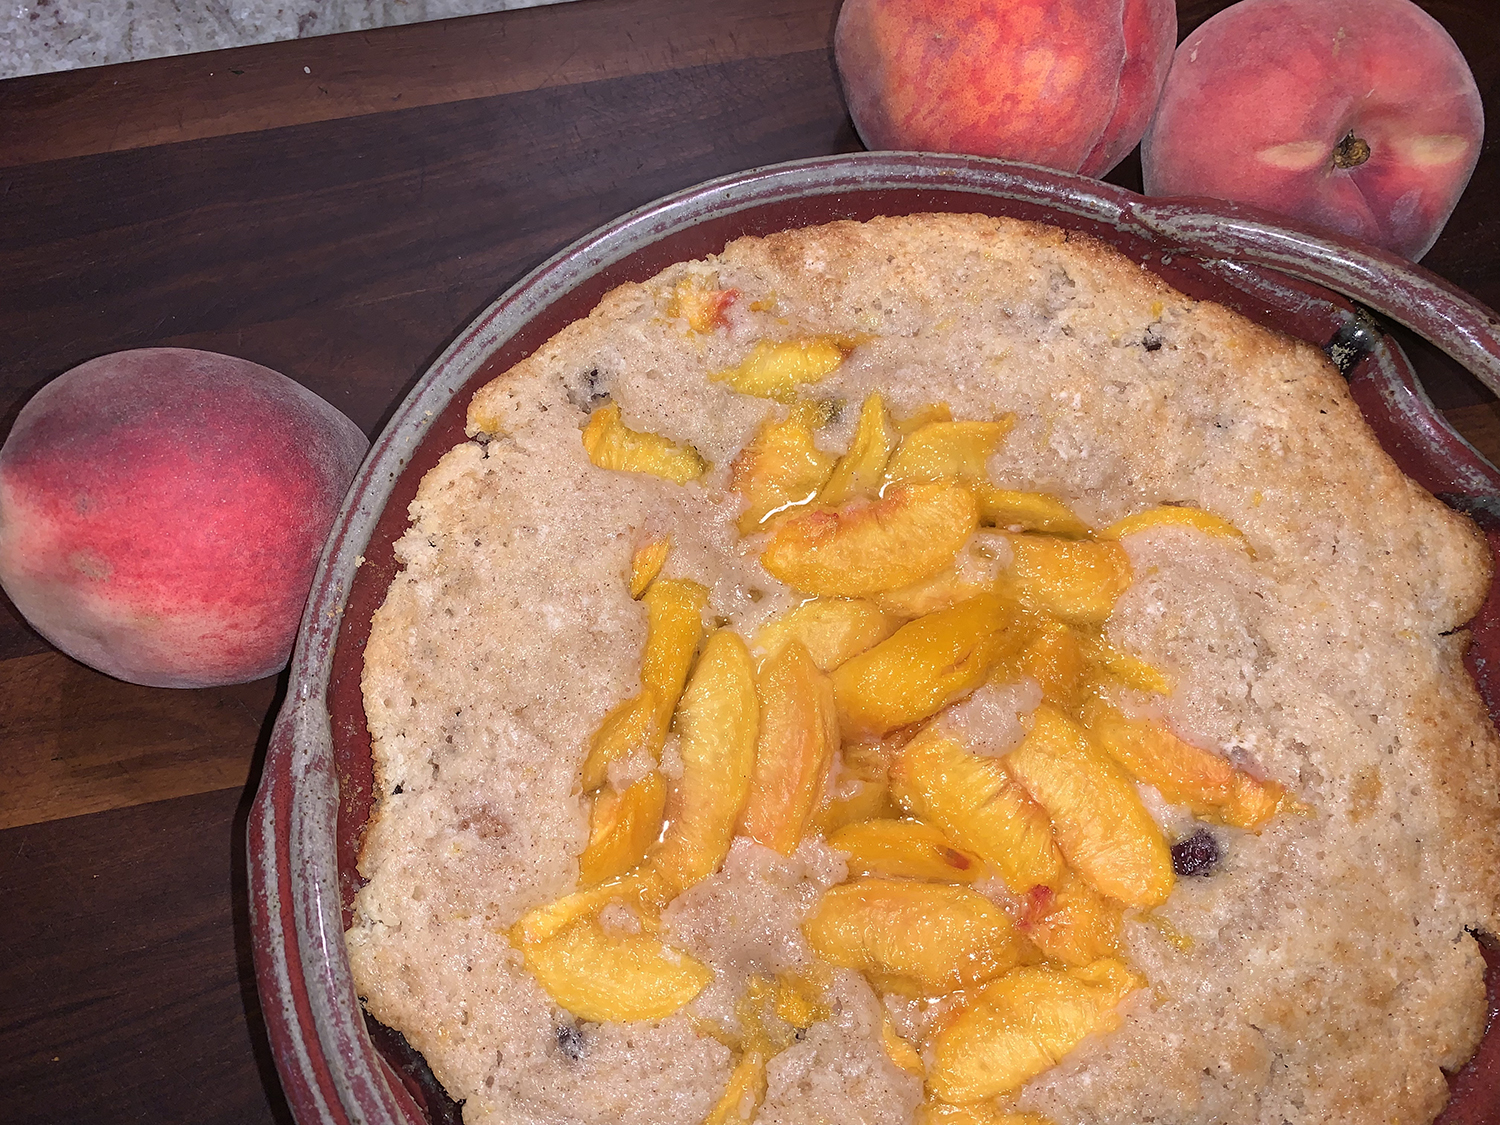
The Salmorejo was our initial course, and boy was it a hit, we think even better than the version we made in Seville, with everyone enjoying seconds! After the paella, lots of laughter and more wine, those that still had room feasted on Maria’s homemade peach cobbler. Not a shabby way to spend a midweek evening at all…
4 oz. stale bread, torn in pieces and moistened with water if too dry
4 oz. extra virgin olive oil, plus more for garnish
1 clove garlic, peeled and green shoot removed
1 tsp. table salt, or more to taste
2 tsp. sherry vinegar
2 hard boiled eggs, peeled and chopped, for garnish
2 oz. jamón serrano or Ibérico, diced, for garnish
Directions
Core the tomatoes and cut into quarters while holding them over blender jar. Add the bread, garlic, salt and vinegar. Blend all ingredients until smooth, scraping sides of blender jar as needed.
With the blender on, add the olive oil in a slow, steady stream to create a creamy, salmon-orange emulsion. Taste and even out the flavor by adding more salt and vinegar if needed. Remember that the garlic and vinegar flavors will taste stronger after resting in the refrigerator.
Before serving, garnish the soup with chopped boiled egg, diced ham, and a drizzle of extra-virgin olive oil.
Here’s an elegant low-carb salad that’s bulky enough to feed four as a main entrée. It was the perfect antidote for lunch on a recent Sunday afternoon when a couple of friends dropped by and our original plans for outside dining fell through due to inclement weather.
Much of the prep can be prepared ahead of time, such as the hard boiled eggs, bacon, and shredded chicken. A rotisserie chicken is so easy, and generally cheaper than buying a whole uncooked chicken—basically a no-brainer. But if you happen to have some breast meat already cooked, go ahead and shred that.
We always keep a homemade sherry-based mustard vinaigrette on hand, thus we used it with the added touch of flavor provided by the bacon fat. Sherry vinegar is now appearing not just in specialty stores but also in many ordinary supermarkets. With its nutty, oaky, savory flavors it is good in applications across the board. While we always buy “Columela” sourced from Spain, Napa Valley Naturals costs just $0.43 per ounce and is sold widely in supermarkets, so it’s a good one to try.
1 rotisserie chicken, breast meat removed and shredded (save the remaining chicken for another use)
2 ripe avocados, halved and cut into 1⁄4″ slices
8 oz. grape or cherry tomatoes, halved
4 hard boiled eggs, cut into 8 wedges each
1 cup blue cheese crumbles
8 strips of bacon, crisped and cut into 1⁄2″ pieces (2 Tbsp. fat reserved for dressing)
1⁄2 cup vinaigrette with 2 Tbsp. bacon fat
Directions
Prepare hard boiled eggs ahead of time. When ready to assemble salad, cut them into wedges.
Make/buy a sherry vinaigrette (don’t use a balsamic version), and measure 1/2 cup; add 2 tablespoons bacon fat to vinaigrette a whisk together.
Line the bottom of a large serving (or pasta) bowl with the torn Bibb lettuce. Toss the lettuce with half of the vinaigrette.
Arrange each of the other items, except bacon, in rows across the Bibb with the chicken in the middle. Sprinkle the bacon across the center on top of the chicken.
Serve salad family-style and pass around the remaining vinaigrette.
Recently a foodie friend posted pictures of this recipe on her FB feed, and I knew I had to try it—thanks Deb! She informed me it’s from “Mostly Plants” by Tracy Pollan, an Emmy award-nominated actress who has enjoyed a successful career in television, film, and on the Broadway stage—and is the wife of Michael J. Fox.
In October 2014, Pollan, along with her two sisters and mother, co-authored the multiple award winning The Pollan Family Table, a cookbook of family recipes, kitchen tips and cooking techniques. Based on the outcome of this dish, I’m curious to try some more from the Pollan family…
If you’ve ever had chicken or veal piccata, you are familiar with the flavor components of tangy lemon, briny capers and aromatic garlic all combined together in a silken butter sauce. Paired with spinach with its range of valuable vitamins and minerals, and navy beans with their high nutritive value and protein content, you got one healthy meal here!
Our changes: Instead of four skinless fillets, we cooked the skin-on salmon whole which required a few minutes longer on each side. In lieu of canned navy beans, which the grocery store didn’t have, we used Great Northern. And there was a lot of liquid in the sauce so the cooking time was nearly doubled to reduce it enough before adding the butter.
In a large non-stick skillet over medium heat, heat the olive oil. Add the garlic and cook, stirring until fragrant, about 1 minute.
Slowly add the spinach and cook, stirring until wilted, 2 to 3 minutes.
Add the beans and season with salt and pepper, mix until combined. Cook until the beans are warm, about 2 minutes; remove from heat.
In a separate large nonstick skillet over medium-high heat, heat the grapeseed oil until shimmering. Gently add the fillets and cook for 3 to 4 minutes on each side, until light golden brown. Transfer fillets to a platter and tent with foil to keep warm.
Add the shallots to the hot skillet and cook, stirring until translucent, about 1 minute.
Add the broth, wine, lemon juice and capers. Cook, stirring occasionally, until the liquid has reduced slightly, about 4 to 5 minutes. Add the butter, and when melted, add 2 tablespoons of parsley and stir.
Distribute the sautéed spinach and beans on a serving platter (or divided amongst 4 individual plates). Top with the salmon fillets and spoon the sauce over the fish.
Sprinkle with the remaining parsley, and top with lemon slices. Serve hot.
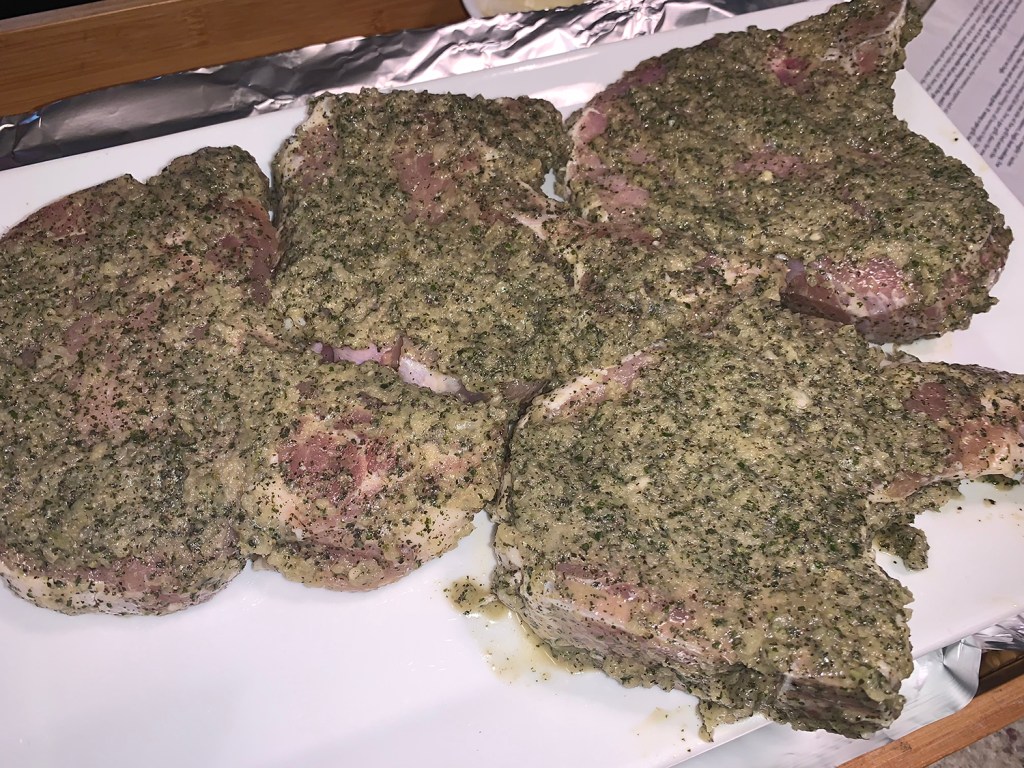
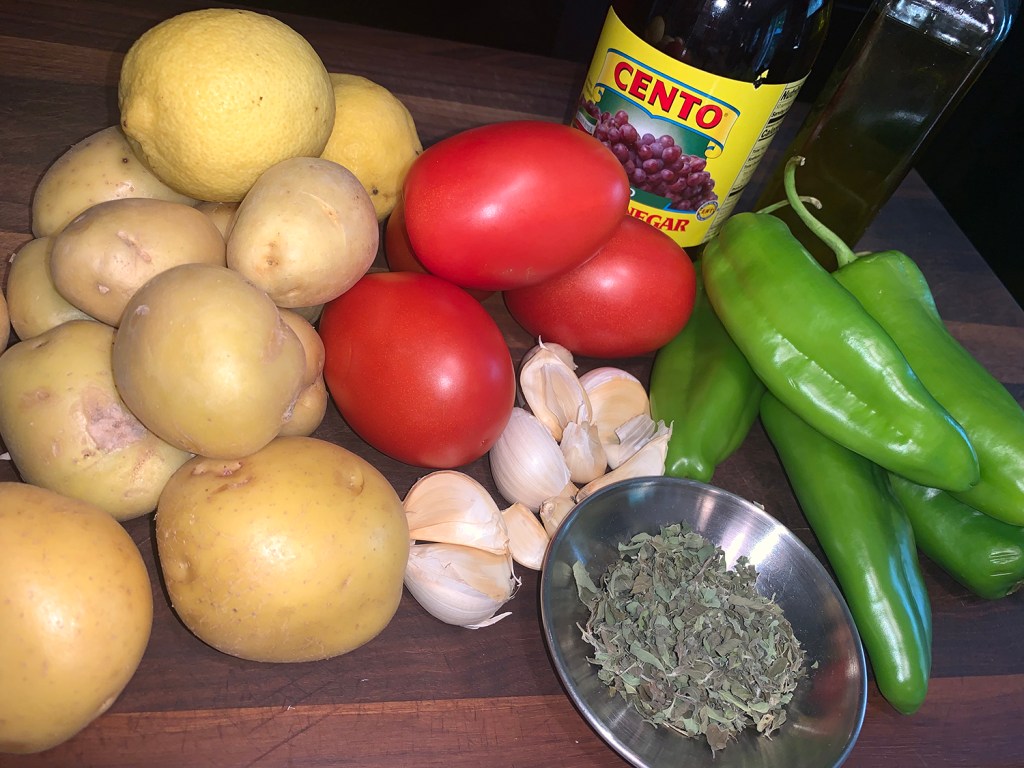
Khorovats is Armenian barbecue. Here, thick-cut, bone-in pork chops, are marinated in a mix of onion and oregano, then grilled with wood chips to infuse the pork with smokiness. According to Milk Street where we found this recipe, bone-in, blade-end pork loin chops are the best cut because they contain a good amount of fat, which keeps the meat moist and flavorful; but rib chops will work, too (because they are leaner, it’s important not to overcook them).
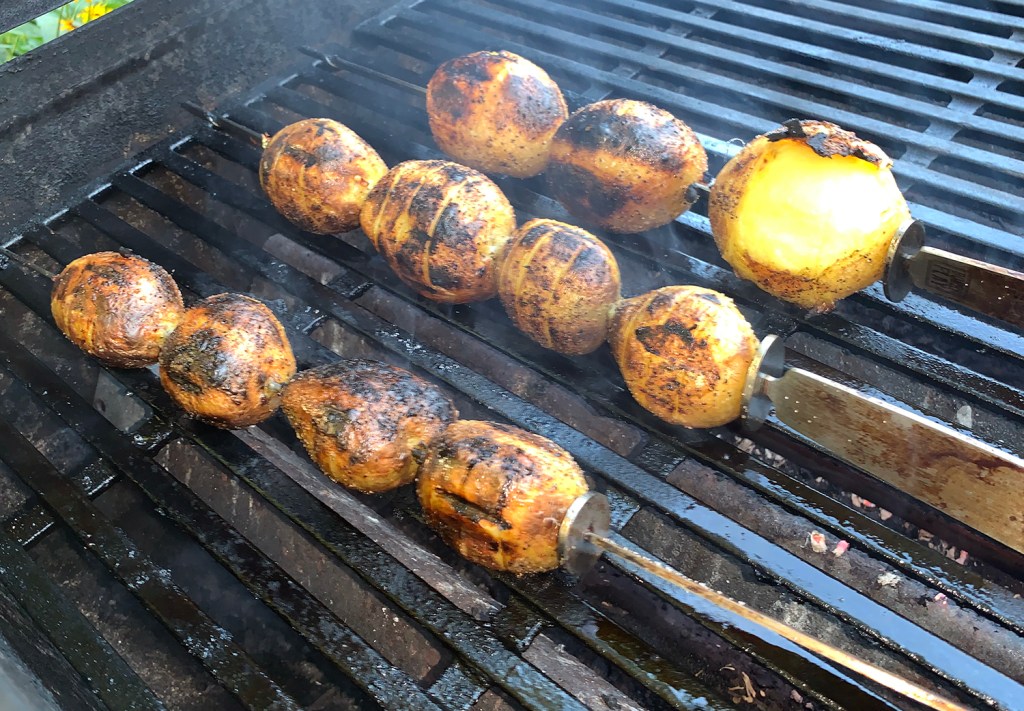
In a nod to son David’s fiancée Vikki, who has Armenian heritage, we decided to make this meal paired with another dish from the same country, Armenian Grilled Potato Skewers(recipe below). It’s pretty important to get spuds that are the same size, but was an impossible task at the time we were grocery shopping. So we had several that were larger and had to preboil them a bit longer as well as grill them several more minutes.
Left, Vikki and David hold dog Olive while they patiently wait for dinner to be served.
The sauce that accompanies these chops is also excellent with any grilled pork or chicken. All-in-all we agreed it was fabulous, our only complaint was that the garlic cloves could have been softer. I admit, I did choose large cloves, so cutting them in half or going smaller would most likely have remedied that issue.
The consensus was unanimous, we all LOVED the dinner!!
Tip: Don’t soak the wood chips before wrapping them in foil. Dry chips smoke more readily, which is desirable for quick-cooking foods such as pork chops. After placing the pork on the grill, don’t open the lid for 10 minutes. This allows the smoke to collect and create a more intense smokiness in the chops.
To prepare the chops, in a food processor, combine the oil, onion, oregano, 2 tablespoons salt and 1 tablespoon pepper. Process to form a coarse paste, about 1 minute, scraping the bowl as needed. Transfer the mixture to a large bowl. Using a paring knife, make verticals cuts spaced about ½ inch apart into the fat on each chop. Add the chops to the onion paste and turn to coat, rubbing the mixture into the meat. Cover and refrigerate for at least 2 hours or up to 24 hours. Remove from the refrigerator 30 minutes before heating the grill.
Loosely wrap the wood chips in a 12-by-18-inch sheet of foil, forming a flat packet roughly 7 inches square. Poke several holes in each side of the packet. Prepare a grill for indirect, high-heat cooking. For a charcoal grill, pour a heaping chimney of hot coals evenly over one side of the grill bed and set the wood chip packet on the coals; open the bottom grill vents and lid vents. For a gas grill, place the wood chip packet directly on one burner that will remain on during cooking; turn all burners to high. Heat the grill, covered, for 5 to 10 minutes, then clean and oil the cooking grate. If using a gas grill, turn off one burner, leaving the remaining burner(s) on high.
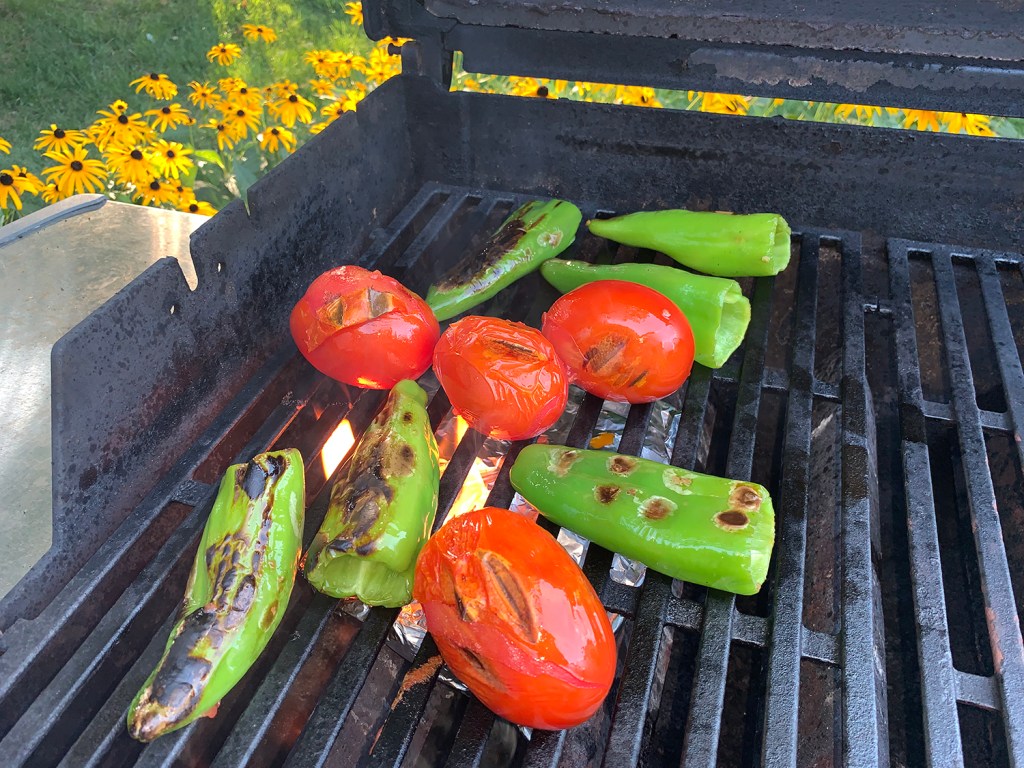
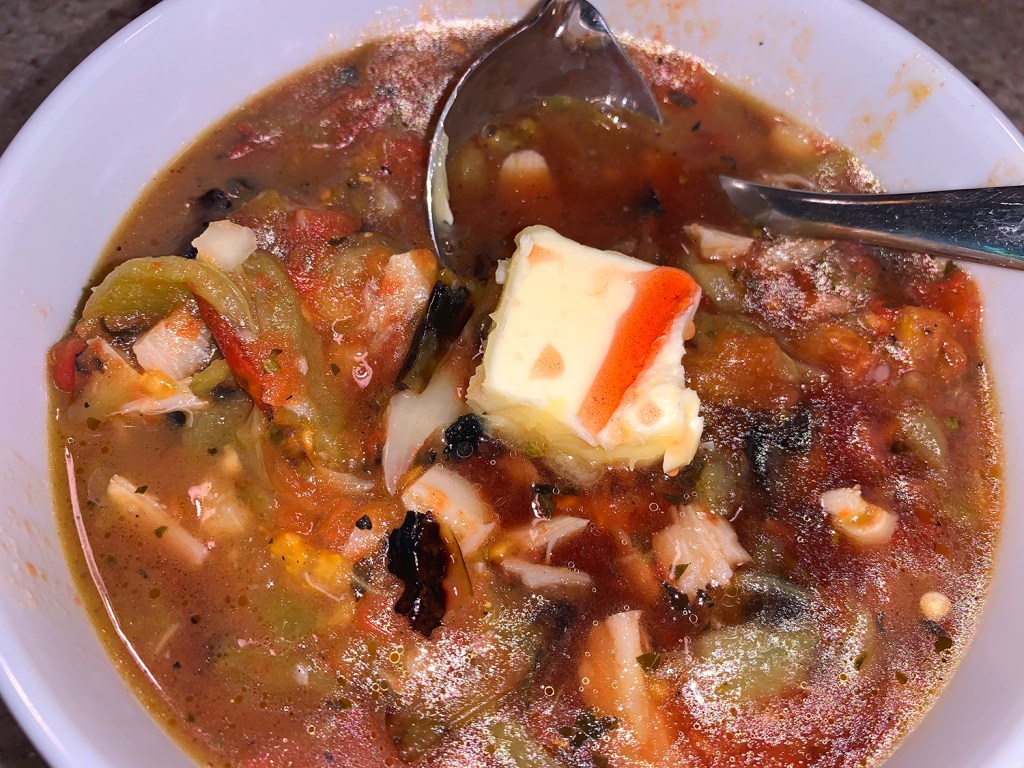
To prepare the sauce, while grill heats, in a large bowl, toss the tomatoes, peppers and oil. Place the vegetables on the hot side of the grill, then cover and cook, turning occasionally, until lightly charred all over, 5 to 10 minutes. Transfer to an 8-inch square disposable foil pan and add the garlic, 2 tablespoons of butter and the oregano. Cover with foil and poke a few holes in the foil, then place the pan on the cool side of the grill. Scrape any excess marinade off the pork chops and place the chops on the cool side of the grill alongside the foil pan. Cover the grill, positioning the lid vents over the pork chops if using a charcoal grill. Cook without lifting the lid for 10 minutes.
Move the chops to the hot side of the grill and cook, uncovered and turning occasionally, until well-browned on both sides and the centers near the bone are just barely pink when cut into or reach 135°F, 5 to 8 minutes. Transfer to a platter, place 1 piece of the butter on each chop and tent with foil. Let rest for 15 minutes.
Meanwhile, uncover the pan; the vegetables and garlic cloves should be completely softened. Using a fork, mash the vegetables until broken down but a bit chunky. Use tongs to remove and discard any large pieces of tomato or pepper skins that do not break down. Stir in the remaining 2 tablespoons butter until melted, followed by the vinegar. Season with salt and pepper to taste. Transfer to a serving bowl and serve with the pork.
When purchasing potatoes for this recipe, look for ones about the size of an extra-large egg and that weigh about 2 ounces each and are of similar shape and size. The potatoes can be precooked and refrigerated up to a day in advance; just before grilling, skewer them, brush with melted butter and season with salt and pepper.
You’ll need three or four sturdy 12- to 14-inch metal skewers; skewers with pins that are flat rather than round or square help prevent the potatoes from spinning around, making them easier to manage on the grill. Place the skewered potatoes on the hot side of the grill after you’ve removed the pork chops and allow the potatoes to brown while the chops rest.
Keep in mind, you don’t want to precook the potatoes at a rolling boil which can cause the skins to split (which did happen to a few of ours). Aim to keep the water at a gentle but constant simmer. Don’t skewer the potatoes without first chilling them in an ice bath. Chilling firms the potatoes slightly so that they cut more cleanly when scored with a paring knife.
In a large pot over high, bring the potatoes and enough water to cover by about 1 inch to a boil. Reduce to medium-high, cover partially and cook until a paring knife inserted into the largest potato meets just a little resistance, adjusting the heat as needed to maintain a gentle but steady simmer, 8 to 12 minutes. Meanwhile, fill a large bowl with ice water. Drain the potatoes in a colander, then transfer to the ice water. Let stand for 10 minutes. Drain again and pat dry with paper towels.
Thread the potatoes lengthwise onto each of three 12- to 14-inch flat metal skewers, dividing them evenly. Using a paring knife, make 4 or 5 parallel crosswise cuts into each potato, stopping when knife blade reaches the skewer; leave the second sides of the potatoes uncut. Brush the potatoes on all sides with about ½ of the melted butter and season with salt and pepper.
Prepare a grill for high-heat cooking. For a charcoal grill, pour a large chimney of hot coals evenly over one side of the grill bed and open the bottom grill vents and lid vents; for a gas grill, heat all burners to high. Heat the grill, covered, for 5 to 10 minutes, then clean and oil the cooking grate.
Place the skewered potatoes on the hot side of the grill and cook, turning occasionally, until browned all over, 7 to 10 minutes. Transfer to a platter, brush with the remaining melted butter. Sprinkle with additional salt and pepper and the oregano. Serve with lemon wedges.
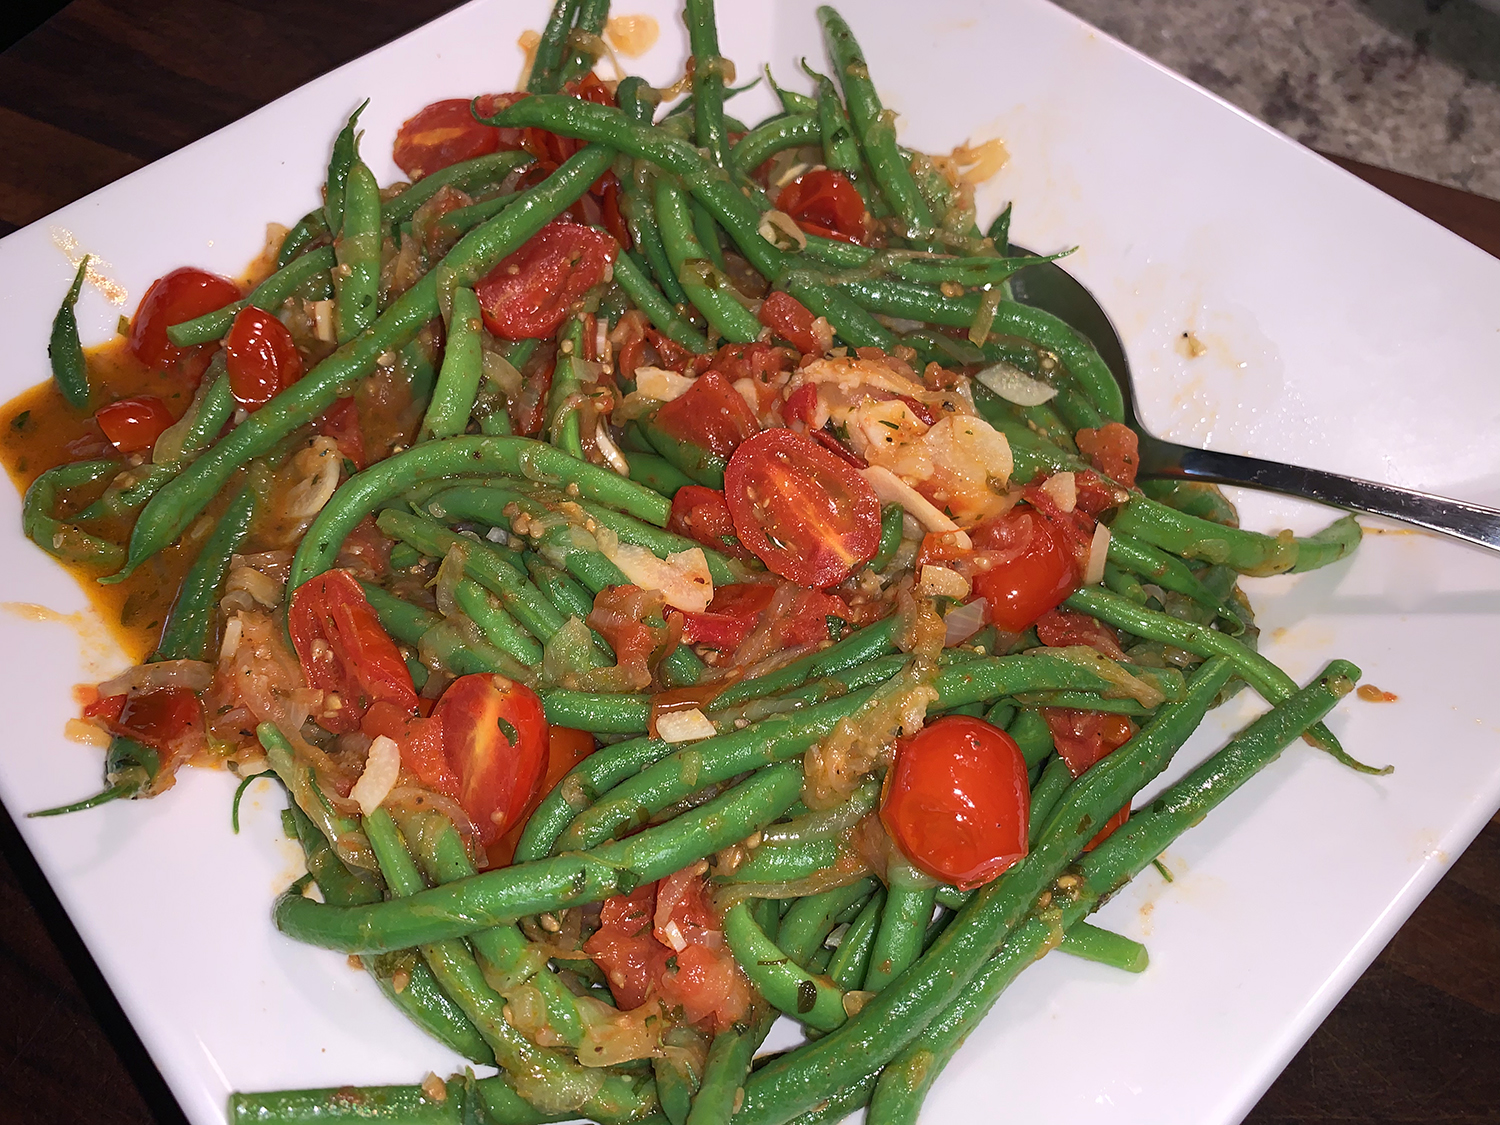
By mid-August we harvest green beans on a daily basis. Even with gifting friends our excess supply, the beans will be a staple for dinner many nights a week. We’ve roasted, grilled, steamed and boiled them either alone or in combination with other veggies.
I asked The Hubs to whip something together that would use both an abundance of the beans and our plum and grape tomatoes, and that would compliment our dry rubbed loin lamb chops and Herby Potato Salad. Greek-style instantly came to his mind, which typically uses flat Romano beans. However using our freshly picked pole beans, the dish was still hearty, healthy and bursting with fresh and vibrant colors and flavors.
In lieu of blanching the beans first, you could add them raw at the halfway point of cooking the tomatoes. Just keep a sharp eyeball on the beans so that they are crisp-tender and not overcooked, limp and no longer bright green.
Blanche* the green beans in salted boiling water for 2 to 3 minuted depending on how thick they are. Drain and immediately drop in an ice bath until cool. Drain in a colander.
In a large sauté pan, heat oil until shimmering over medium heat. Add garlic slices and cook until lightly golden, about 2 minutes.
Add the onion to the garlic with a pinch of salt. Turn the heat down to medium-low and continue to cook until the onions are softened, about 2 to 3 minutes more.
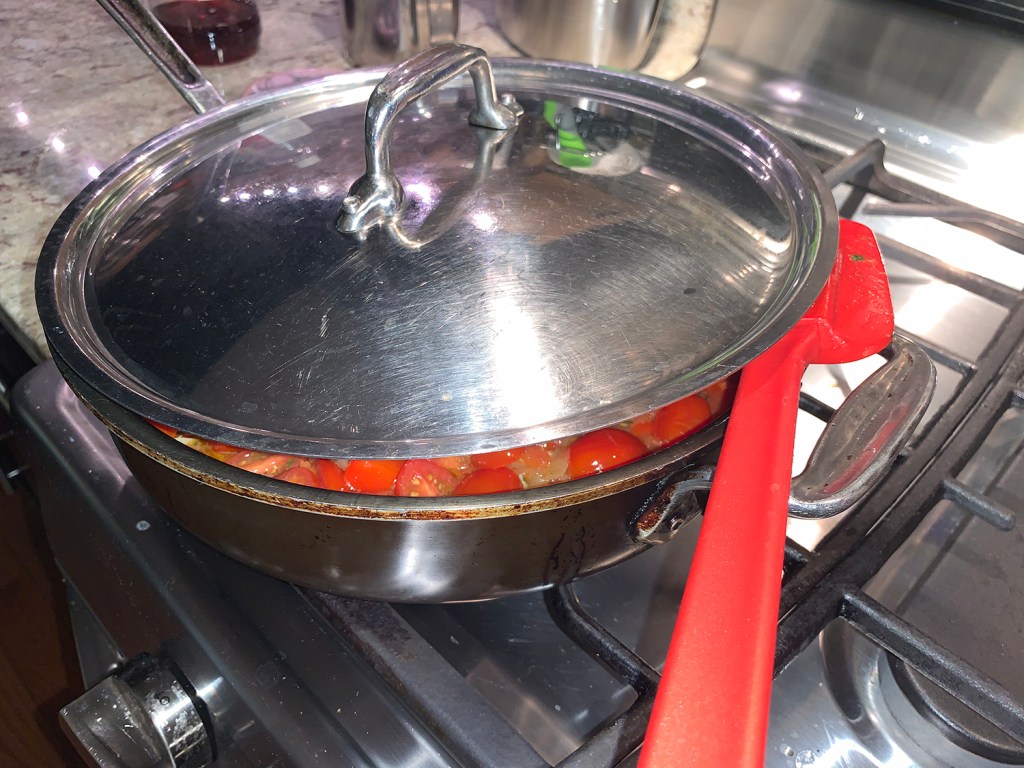
Add the chopped tomatoes, turn the heat back up to medium, stir in a 1⁄2 teaspoon each of salt and pepper, a pinch of red pepper flakes, and 1 tablespoon of the oregano. Stir well, partially cover, and cook for 10 to 12 minutes, stirring occasionally until tomatoes break down and release their juices. *If you choose not to blanche the beans, you can add raw beans 5 minutes into cooking the tomatoes, and cook just until beans are crisp-tender, about 5-6 minutes more.
Stir in the blanched beans and remaining oregano and cook for 1-2 minutes more while beans heat through. Remove from heat and stir in 1 teaspoon of red wine vinegar. Serve immediately.
Take a walk on the wild side and rev up your standard grilled cheeseburger with this riff on toppings. Instead of the same-old lettuce and tomato on a ground beef patty, start with sweet Italian sausage, then top with melted provolone, tomato pesto and garlicky spinach all nestled in a toasted ciabatta roll.
The grocery store was only offering rectangular ciabatta rolls, so after toasting them, they were cut in half which became the perfect size vehicles with enough heft to support the rest of the ingredients. Yes, anchovy paste is optional and it’s not for everyone, but believe me, the small amount of salty funkiness adds a welcome layer of umami complexity when dissolved into the garlicky spinach.
The Mr. just couldn’t help himself and had to have a second one! See below for a bonus Sun-Dried Tomato Pesto recipe. You only need 1/4 cup of the tomato pesto for the burgers, so you have plenty leftover for another use such as in a pasta dish or an appetizer.
2 Tbsp. extra-virgin olive oil, plus more for brushing
2 garlic cloves, minced
1 tsp. anchovy paste (optional)
Salt
1 lb. sweet or hot Italian sausages (or a combination of both), casings removed
4 slices of provolone cheese
1/4 cup sun-dried-tomato pesto, store bought or homemade (see recipe below)
4 round ciabatta rolls, split and toasted
Directions
In a large skillet, bring 1/4 inch of water to a boil. Add the spinach and cook, stirring, until just wilted, about 1 minute; drain and press out as much water as possible. Wipe out the skillet.
In the same skillet, heat the 2 tablespoons of olive oil until shimmering. Add the garlic and anchovy paste and cook over high heat, stirring, until fragrant, 1 minute. Add the spinach, season with salt and stir just until coated, about 10 seconds.
Light a grill or preheat a grill pan. Using slightly moistened hands, form the sausage meat into four 4-inch patties, about 3/4 inch thick. Brush the burgers with oil and grill over moderate heat until browned and crusty on the bottom, about 5 minutes.
Carefully flip the burgers and grill until the burgers are cooked through about 5 minutes longer, adding the cheese one minute before taking off the grill. Spread the pesto on the rolls. Top with the burgers and spinach and serve.
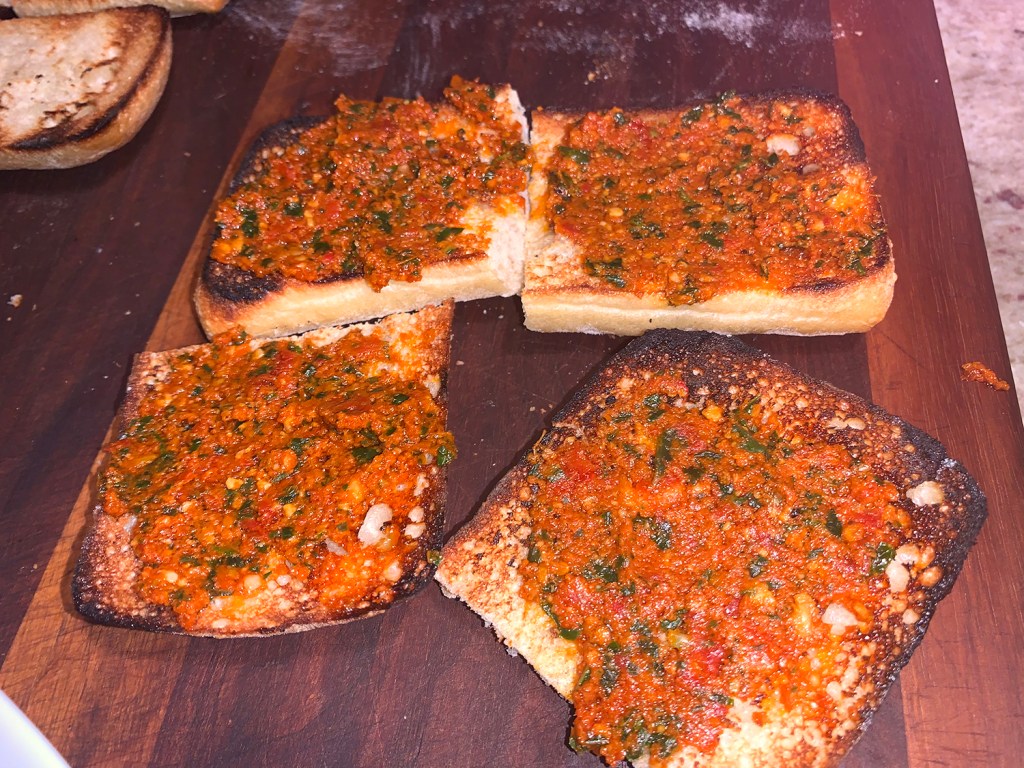
This herby Italian sauce is not only great on the sausage burgers, but works with shellfish and pasta too. Make a day or two ahead to save time and effort on dinner night. Leftovers make a great condiment on baguette toasts topped with shredded mozzarella and a chiffonade of fresh basil… YUM!
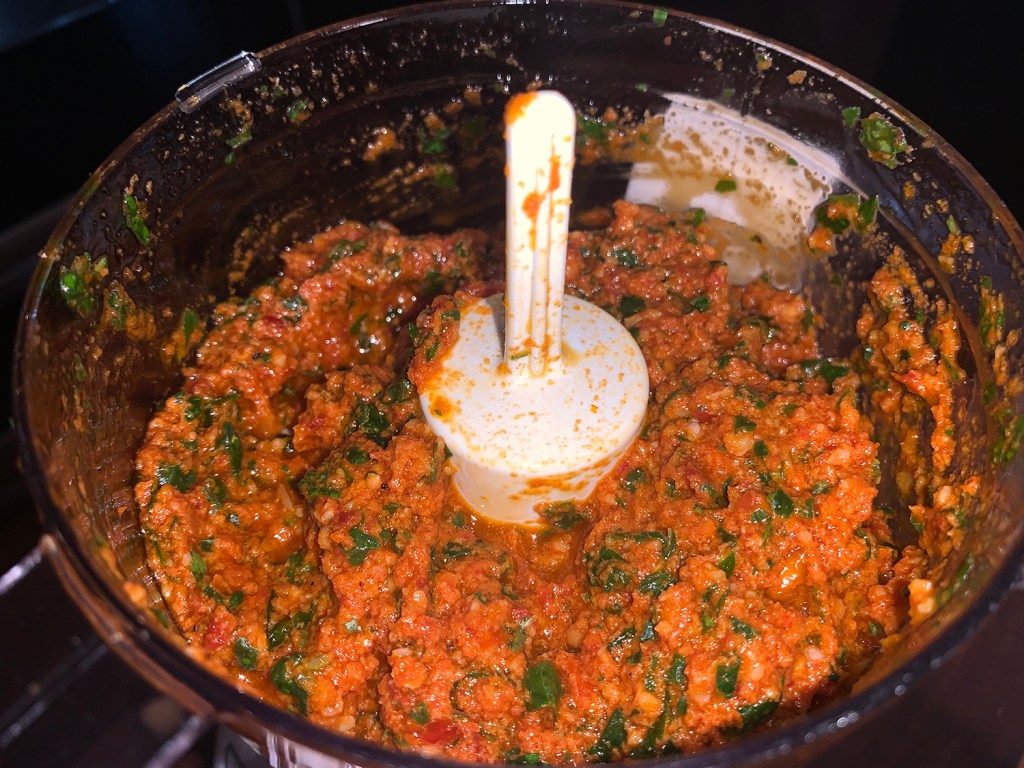
Blend the sun-dried tomatoes, along with their oil, roasted red pepper, garlic, basil, parsley, and Parmesan cheese in a food processor until it forms a thick paste, adding extra oil until smooth.
Taste for seasoning and add salt and pepper as needed.
When the first farm-fresh cobs of corn are ready in early summer, we all can’t wait to start chomping down on those flavorful kernels. By August, we’re ready for a fresh approach to corn on the cob. Over the years, we’ve made many a sautéed corn recipe, noting this Creole version from Cook’s Country would be a great side dish for an upcoming BBQ for eight. Since the original is intended for four guests, we doubled the amounts.
For deep, porky flavor in every bite, it starts with bacon. Aromatics are added, then sprinkled with the reserved bacon over the final dish for texture and additional smoky flavor. Instead of sautéing the bell peppers (I used a red and a green since the recipe was doubled) and garlic with onions, scallions are used for their lightness and are better suited to summer.
Lightly browning the corn kernels lends a pleasant, nutty quality to the Creole Corn Sauté. To meld the dish, extract pulp and milk from corn cobs with the back of a chef’s knife down the stripped cobs and collect the juices, then added the corn pulp to the skillet with the kernels. This way the sautéed corn gets creamy, and the individual ingredients come together as a unified dish.
5 scallions, white parts chopped fine, green parts sliced thin
1 green bell pepper, seeded and chopped fine
1 garlic clove, minced
1 Tbsp. chopped fresh parsley
2 tsp. minced fresh thyme
1 tsp. hot sauce, Tabasco brand preferred
Salt and pepper
Directions
Cut kernels from cobs over large bowl and scrape remaining pulp into bowl with kernels. Set aside.
Cook bacon in large skillet over medium-high heat until crisp, about 5 minutes. Using slotted spoon, transfer bacon to paper towel-lined plate. Pour off all but 1 tablespoon fat from skillet.
Cook scallion whites and bell pepper in bacon fat until just softened, about 2 minutes. Add garlic and cook until fragrant, about 30 seconds.
Add corn and corn pulp to skillet and cook until lightly browned, at least 3 minutes, probably longer. Off heat, stir in scallion greens, parsley, thyme, hot sauce, and bacon. Season with salt and pepper. Serve.
Kick your weeknight dinner up a notch with this simple version of coca, a type of Spanish flatbread. Coca is open-faced like pizza (without cheese) and can be savory, sweet or plain. In Catalan, its place of origin, a coca is a gathering of leftovers or whatever vegetables might be in season (coca derives from the Dutch word kok, for cake). For that reason, this dish isn’t so much a recipe as it is a broad template.
For ease, use store-bought refrigerated pizza dough, put it into a rimmed baking sheet and top it with roasted peppers, marinated artichokes and capers before sliding it into the oven. As the crowning touch, slices of prosciutto are draped on after the flatbread comes out of the oven. If you’re able to find Spanish dry-cured ham, such as serrano or Ibérico, feel free to use it instead. Voila, a fun dinner in no time!
A pizza wheel cutter makes it a cinch to slice up!
A few notes about the ingredients. Our crust was a European-style pizza dough that was already rectangular in shape making it a cinch to spread onto the rimmed baking sheet. Each package was 14.1 ounces, so I used two, one on top of the other, which ended up being over 4 ounces more than called for.
FYI—Don’t use cold dough, as it will be more resistant to stretching and shaping than room-temperature dough; it also bakes up denser. Remove it from the refrigerator 30 to 60 minutes in advance, depending on the ambient temperature of your kitchen. Also, to prevent sticking, make sure to coat the baking sheet with cooking spray before placing the dough on top.
If you have the chance, get the Trader Joe’s brand of marinated artichoke hearts, they’re the best! For the roasted red peppers, we used a jar of Spanish-style grilled Piquillo peppers. And the amount of prosciutto was increased to four ounces. (I would have chosen Serrano ham if the store had been carrying it at the time.) The sweetness of roasted peppers is balanced by the brininess of jarred artichokes and capers. A sprinkling of fresh thyme offers herbal notes, while sliced prosciutto adds depth and savoriness.
Spanish-Style Flatbread with Roasted Peppers, Artichokes and Prosciutto
1 12-oz. jar roasted red peppers, drained, patted dry and roughly chopped (about 1 cup)
1 cup drained marinated artichoke hearts, roughly chopped
2 medium garlic cloves, finely grated
1/4 cup drained capers, roughly chopped
1 Tbsp. fresh thyme, chopped
2 Tbsp. extra-virgin olive oil, divided, plus more to serve
Kosher salt and ground black pepper
1 1/2 lbs. store-bought refrigerated pizza dough, room temperature
5 thin slices prosciutto (about 2½ oz.)
1/3 cup lightly packed fresh flat-leaf parsley, roughly chopped
Directions
Heat the oven to 500°F with a rack in the lower-middle position. Mist a rimmed baking sheet with cooking spray.
In a medium bowl, toss together the red peppers, artichokes, garlic, capers, thyme, 1 tablespoon of oil, ½ teaspoon each salt and pepper; set aside.
Set the dough in the center of the prepared baking sheet, then press and stretch it until it covers the pan and is of an even thickness. Press from the center outward and lift and stretch the edges as needed; it’s fine if the dough doesn’t completely fill the corners. If the dough is resistant or shrinks after stretching, wait 5 to 10 minutes before trying again; if it is very elastic, you may need to give it 2 or 3 rests.
When the dough fills the baking sheet, brush it with the remaining 1 tablespoon oil. Evenly distribute the red pepper mixture over the top, leaving a narrow border around the edge, then gently press the toppings into the dough. Bake until the edges of the dough are well-browned, 12 to 15 minutes.
Remove from the oven and slide the flatbread out of the baking sheet and onto a wire rack. Tear the prosciutto into narrow ribbons and drape over the top. Cool for 5 minutes.
Transfer to a cutting board. Sprinkle with the parsley, then cut into pieces. Serve drizzled with additional oil.
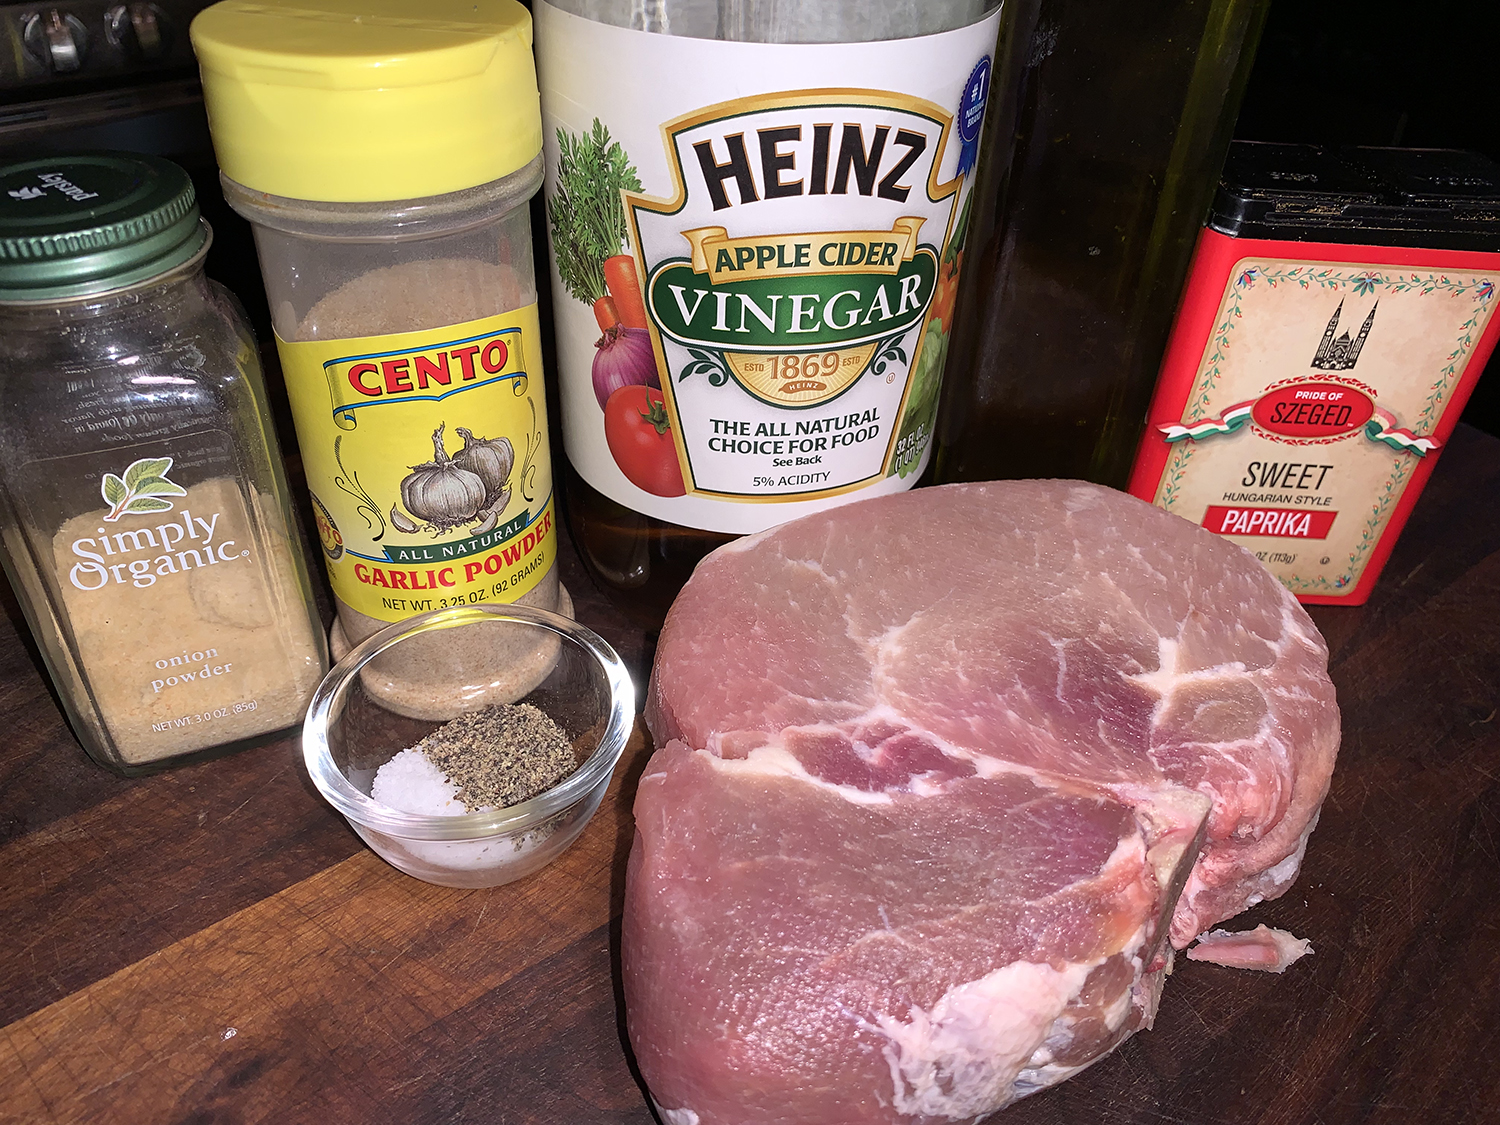
It’s likely you’ll have the ingredients for the wet spice rub already in your pantry. Among them would be paprika, which lends a fiery red-orange color, not to mention a sweet and slightly fruity taste with very mild heat.
While this approach uses one thick pork chop, you could use two thinner chops (I wouldn’t go less than one-inch thick); just be sure to keep a close eyeball on the temperature because they will get done much sooner.
Well, as luck would have it, tornadoes were in the area with two actually touching down only miles from our house. Just as The Hubs took the chop off the grill pan to let it rest, we were instructed to take cover immediately, so we spent about 15 minutes down the basement before getting the all clear—but at least the meat got to rest!
We served our pork with a side of Avocado Cucumber Salad and a few Truffled Pasta Purses.
As you can decipher from the stormy weather, we were not able to use our outside grill, so we took the next best option and that would be “Grilliam” our cast-iron grill pan. It works basically on the same principal as a gas grill, with grate marks and all!
1 1-3⁄4″ to 2″ (about 1.5 lbs.) boneless pork chops
Directions
In a small bowl, mix the olive oil, apple cider vinegar, paprika, onion powder, garlic powder, oregano, salt, and pepper until a thick paste forms.
Coat both sides of the pork chop in the paste and set it aside on a plate, or in a ziploc bag, to marinate while you warm up the grill—or for up to 8 hours in the refrigerator.
Preheat your grill to medium-high.
Grill your pork chop for 10-12 minutes per side with lid down, or until it reaches an internal temperature of 145 degrees (test with an instant-read thermometer). After removing from the grill, let rest on a moated cutting board for 5 minutes tented with foil.
Slice against the grain in 1⁄2-inch slices, arrange on a platter and pour over any accumulated juices.
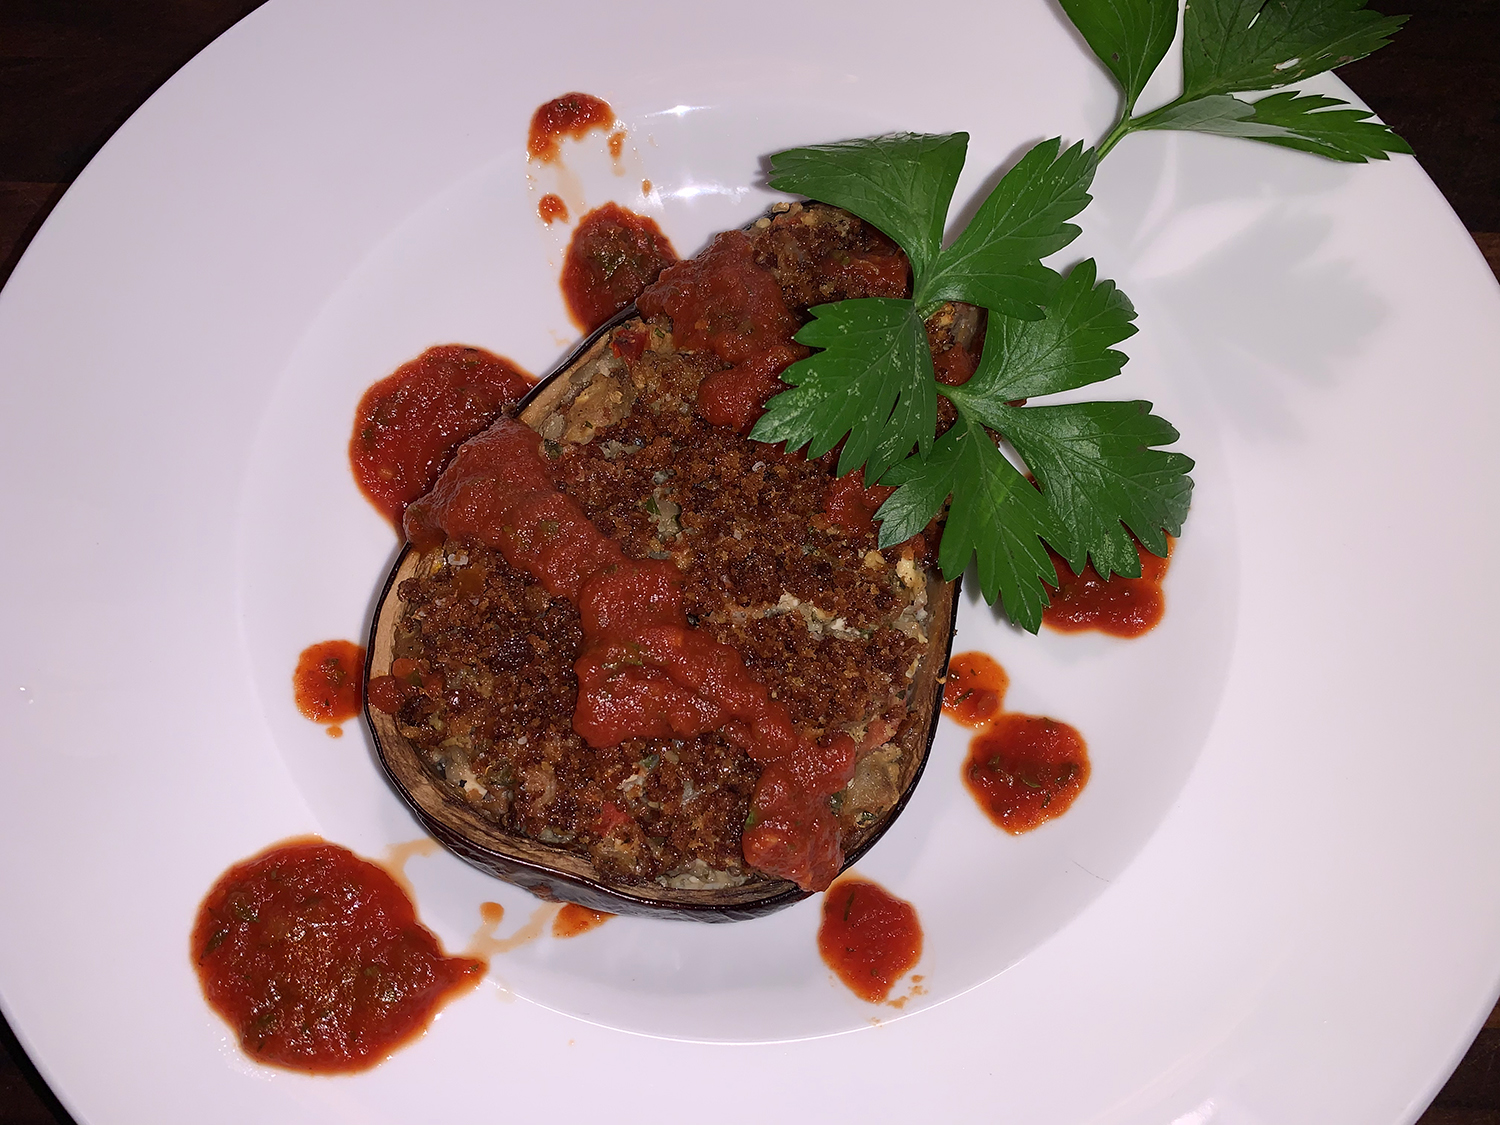
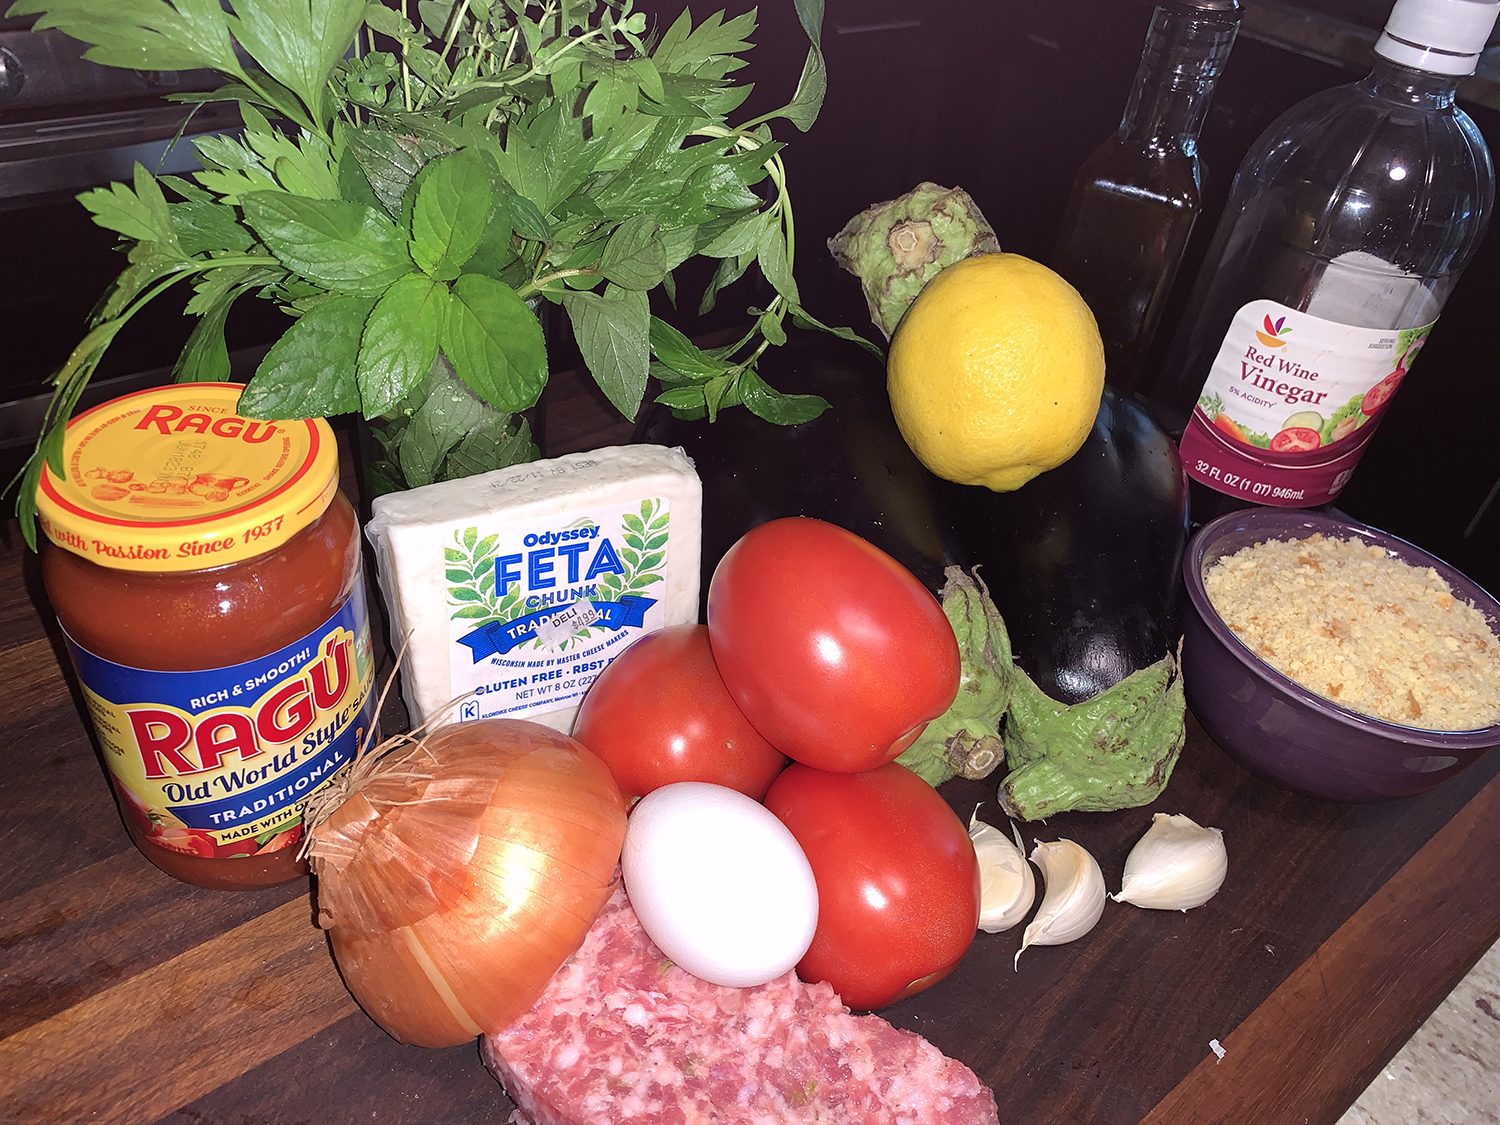
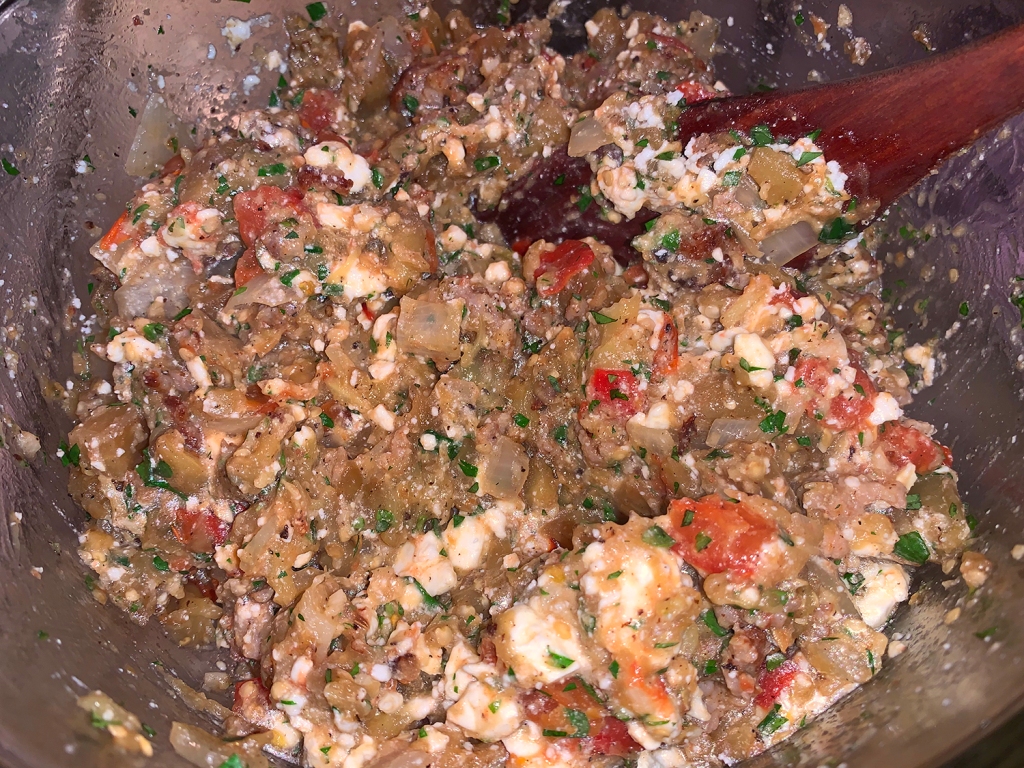
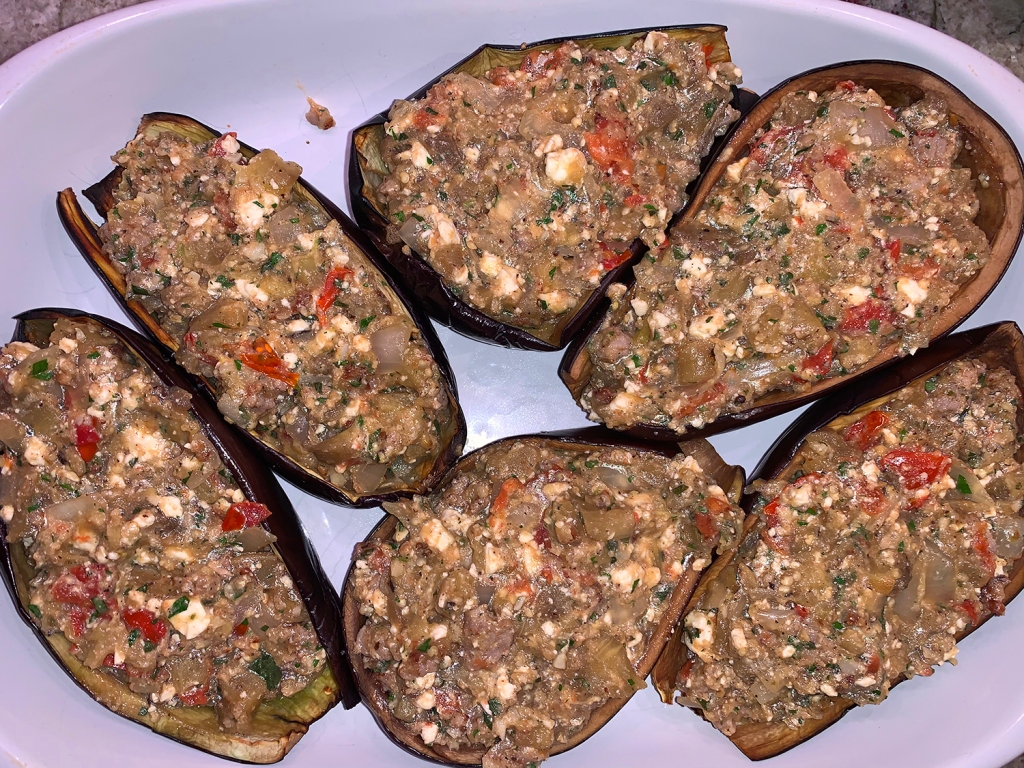
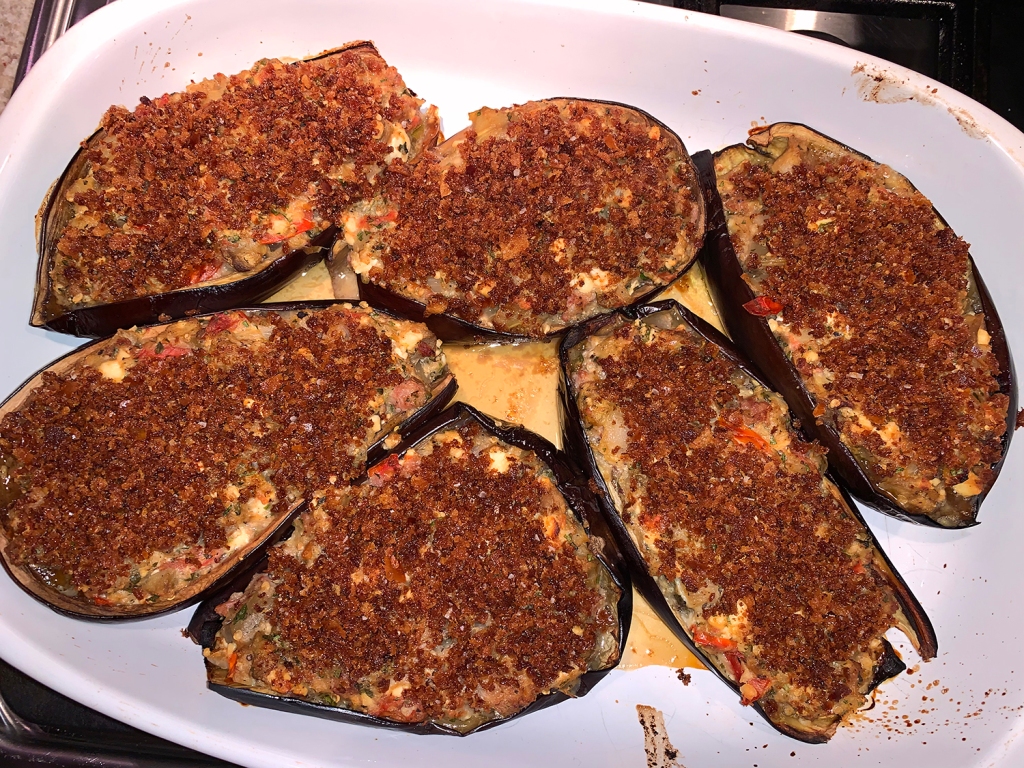
Baked Stuffed Eggplant with Italian Sausage is described by Food & Wine as over-the-top stuffed dreamboats. Well “dreamboats” may be a stretch, but they were very good indeed! Ripe tomatoes and roasted eggplant come together to yield a hearty filling, made even better with the addition of Italian sausage (sweet or hot, your choice). Combined with a bright and lemony breadcrumb topping and a quick-fix tomato sauce jazzed up with fresh herbs, this makes a stunning summer main dish.
OK, first glance at the list of ingredients and I hear a few of you sigh an audible groan. But please don’t despair, yes the process is a bit time-consuming, but so worth it! Just be sure you have enough time on hand. It’s rare that we ever follow a recipe exactly due to inability obtain the needed ingredients, or because the amounts of some of those ingredients just don’t seem adequate.
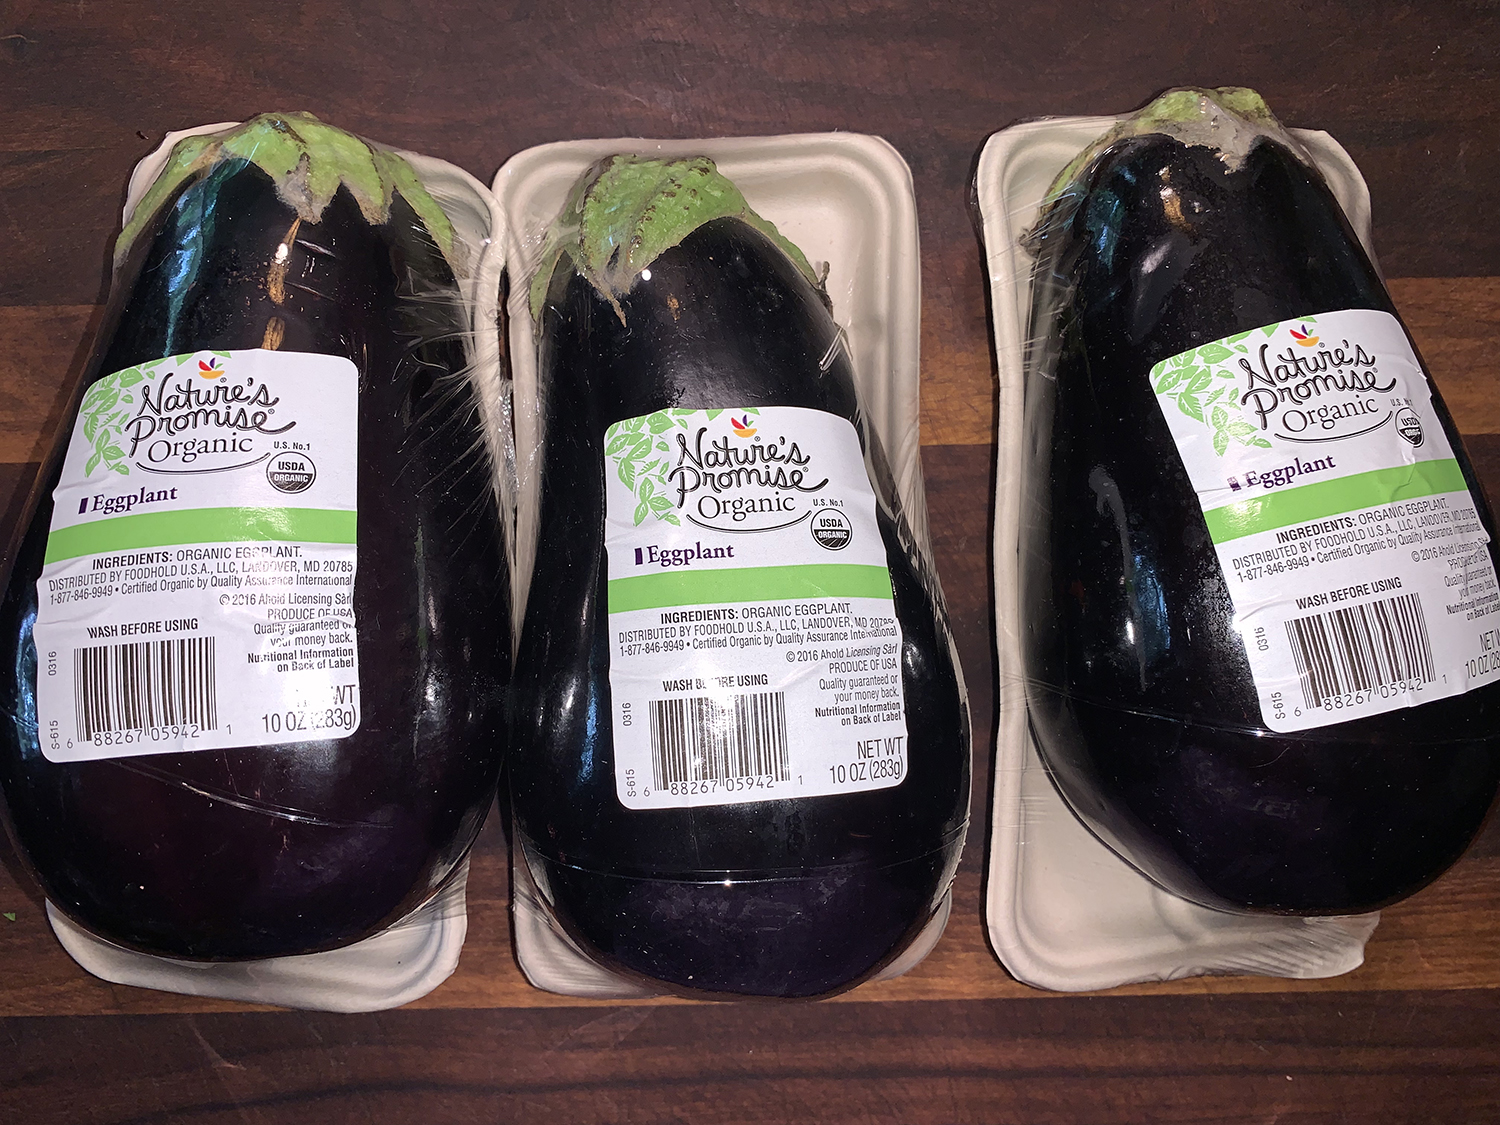
For example, the smallest eggplants I could get were 10 ounces each, while the recipe called for smaller ones. Then, the original amount of sausage was only a 1/4 pound—barely a tablespoon per serving, so we doubled the amount to a 1/2 pound. Finally, the marinara sauce at only 8 ounces again seemed inadequate, so a 14-ounce jar was our choice; in which case the fresh herbs were increased to counterbalance the adjustments.
When it came time to cooking the eggplant and onion, I increased those cooking times because as noted at only 2 or 3 minutes, the veggies weren’t as far along as they should have been. All of our changes are noted below.
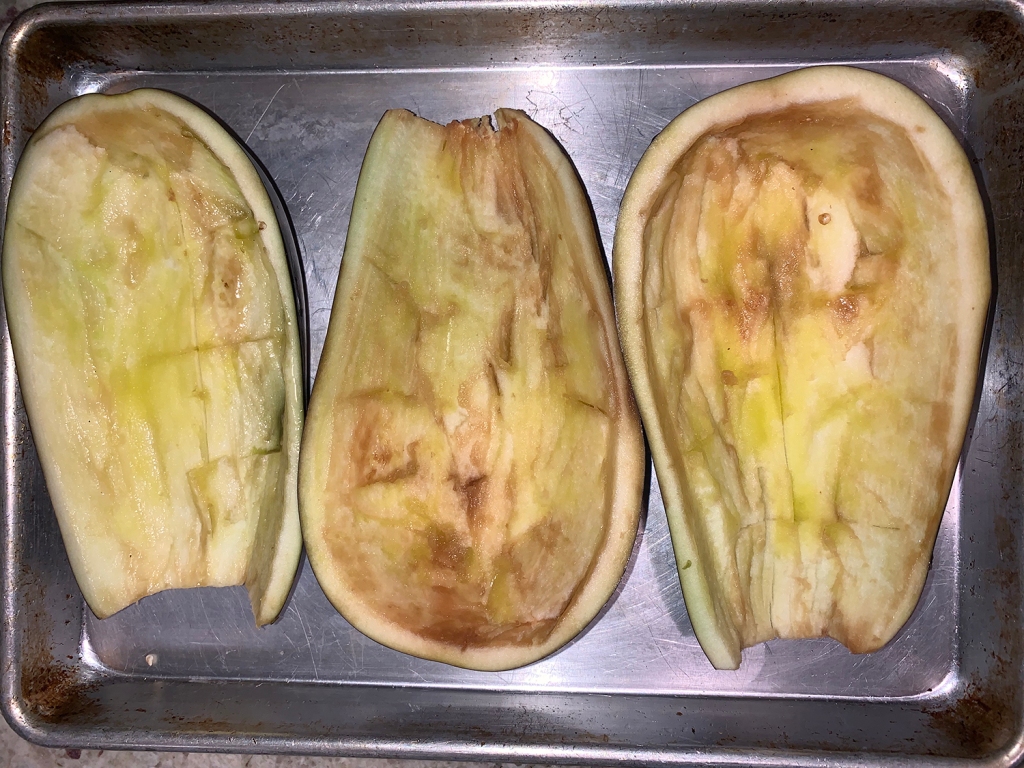
It’s important to get eggplants that are all the same size. Here, at 10 ounces each, they were bigger than the recipe called for so we made some adjustments.
8 oz. feta cheese, crumbled (about 2 cups), plus more for garnish
1 large egg, lightly beaten
3 Tbsp. chopped fresh oregano, divided
3 Tbsp. chopped fresh mint, divided
3 Tbsp. chopped fresh flat-leaf parsley, divided
1 Tbsp. red wine vinegar
14 oz. jarred marinara sauce
Directions
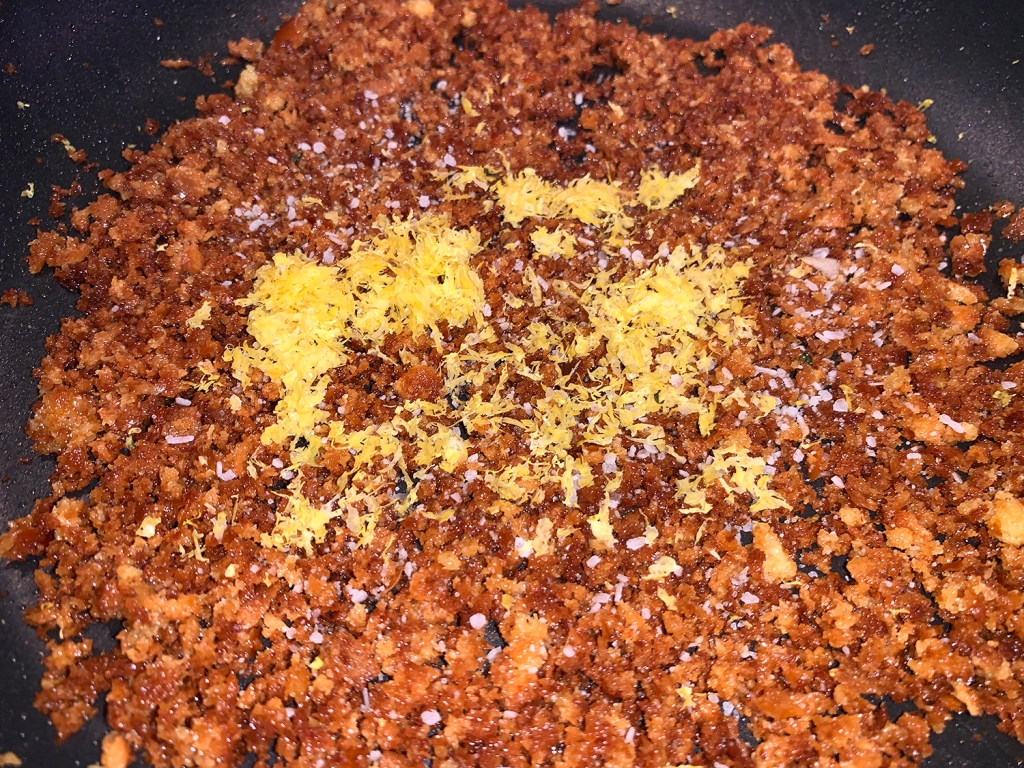
Heat 3 tablespoons olive oil in a large skillet over medium. Add breadcrumbs, and cook, stirring occasionally, until golden brown, 5 to 6 minutes. Remove from heat. Stir in lemon zest and 1/4 teaspoon salt; set aside.
Cut eggplants in half lengthwise. Scoop out pulp, leaving a 1/4-inch shell. Chop pulp into 1/2-inch thick cubes. Sprinkle eggplant shells with 1 teaspoon salt, and invert onto a clean, dry towel. Let stand 30 minutes to drain.
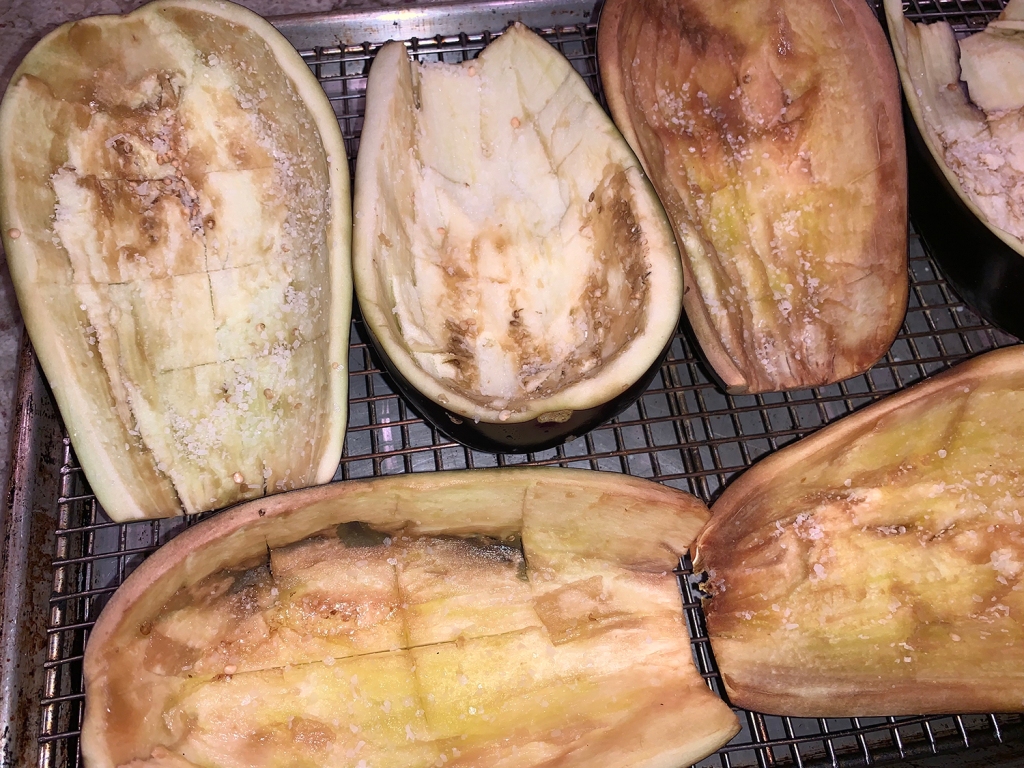
Preheat broiler to high with oven rack 5 to 6 inches from heat. Pat eggplant shells dry, and brush with 1 tablespoon oil. Place eggplant shells, cut side up, on a baking sheet, and broil just until tender, about 5 minutes. (I did this in two lots, 3 at a time.)
Remove from oven, and reduce oven temperature to 375°F. Place in a single layer in a 10- x 14-inch baking dish.
Heat 1 tablespoon oil in a large skillet over medium-high. Add sausage, and cook, stirring often with a wooden spoon to break up large pieces, until sausage is browned, 7 to 8 minutes. Using a slotted spoon, transfer sausage to a large bowl. Reserve drippings in skillet.
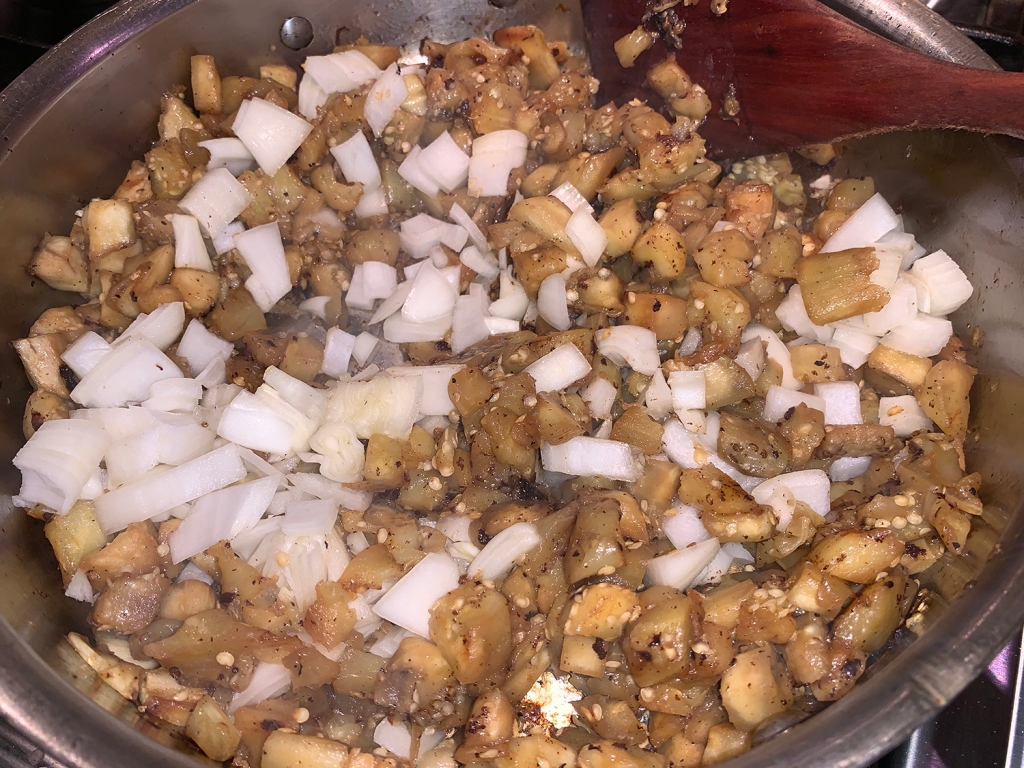
Heat remaining 2 tablespoons oil in skillet over medium-high. Cook reserved eggplant cubes in hot oil, stirring occasionally, until lightly browned, 5 to 6 minutes.
Add onion, and cook, stirring occasionally, until just tender, 3 to 4 minutes. Add tomatoes, garlic, pepper, and remaining 1/2 teaspoon salt, and cook, stirring occasionally, until tender, 2 to 3 minutes.
Transfer tomato mixture to the large bowl with sausage. Add feta, 1/2 cup breadcrumb mixture, egg, 2 tablespoons oregano, 2 tablespoons mint, 2 tablespoons parsley, and vinegar; toss until combined. Divide mixture evenly among eggplant shells. Top evenly with remaining breadcrumb mixture, and place stuffed eggplants in oven. Bake at 375°F until filling is golden and bubbly, 25 to 30 minutes. (Because our eggplant were larger, I cooked them for 40 minutes.)
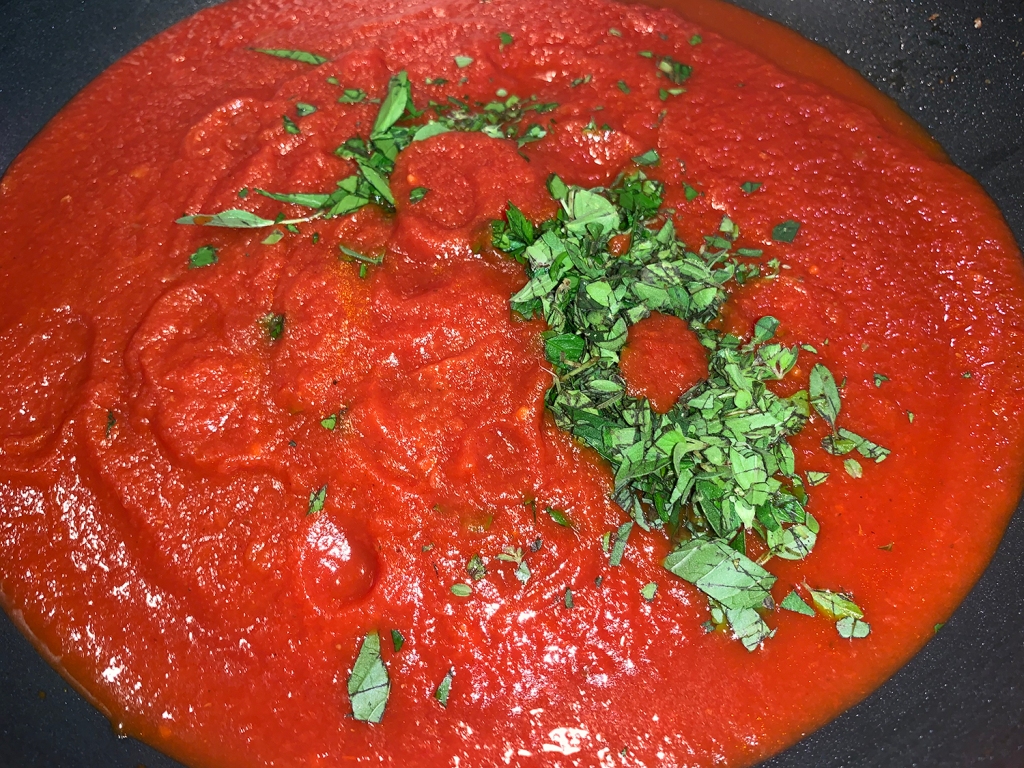
Meanwhile, stir together marinara sauce, remaining 1 tablespoon of the oregano, mint, and parsley in a small saucepan. Heat over low just until warmed through, about 5 minutes. Drizzle over baked stuffed eggplant just before serving. Sprinkle with remaining sauce and additional feta, if desired.
These babies are lickety-split fast, extremely simple, and so freakin’ yummy! In fact, keep this marinade in mind for poultry as well. You may decide to try other herbs in place of the basil, like oregano, tarragon or chives; or also give them a sprinkle of fresh herbs at the end.
It was the perfect appetizer to bring for a small dinner party at our friends, Mr. and Mrs, Z. The evening could not have been lovelier as we were sitting outside sipping some wine and marveling at the well-manicured gardens. We transported the soaked wooden skewers, marinating shrimp and a sprig of basil leaves along with the perfect sized platter. All that needed to be done when the four of us were ready for a nosh, was to preheat the grill and thread the 20 shrimp onto the skewers—evenly distributed at 5 apiece.
Within minutes on the grill, the shrimp were done and the feast could begin… Speaking of feast, I have to give a shout out to our hosts for the fantastic meal! Mrs. Z. made a leg of lamb that was to die for, accompanied by a tasty potato salad, an incredible watermelon and arugula salad, asparagus, green bean and tomato salad, and a wonderful summery dessert of nectarines over blueberry compote topped with vanilla ice cream all artfully presented in parfait glasses. A dinner to remember for sure…
But I digress, back to the original post which is the featured shrimp kebabs…
1 lb. peeled and deveined jumbo shrimp, tails left on
Directions
Gather the ingredients.
Soak four 12-inch wooden skewers in water to cover for at least 30 minutes.
In a small bowl, mix together the orange juice, lemon or lime juice, orange zest, garlic, olive oil, basil, and salt and pepper until well blended.
Add the shrimp and mixture to a large ziploc bag, seal and mush around to coat. Let sit at room temperature for 15 minutes, or refrigerate for 1 to 2 hours.
Preheat the broiler or grill. Skewer the shrimp, dividing them evenly between the skewers. Discard any remaining marinade. Broil or grill for about 4-6 minutes total, turning once as they brown, until they are just cooked throughout.
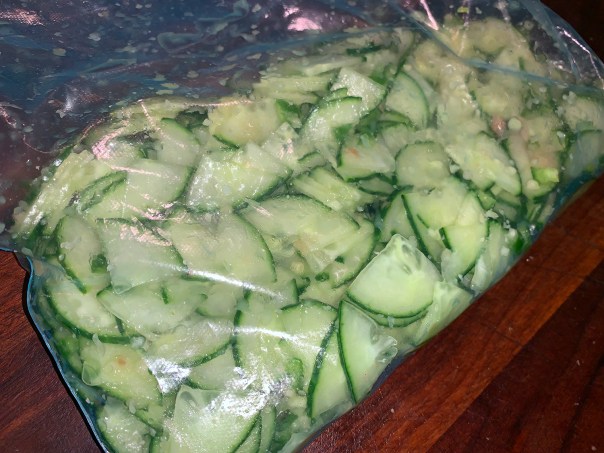
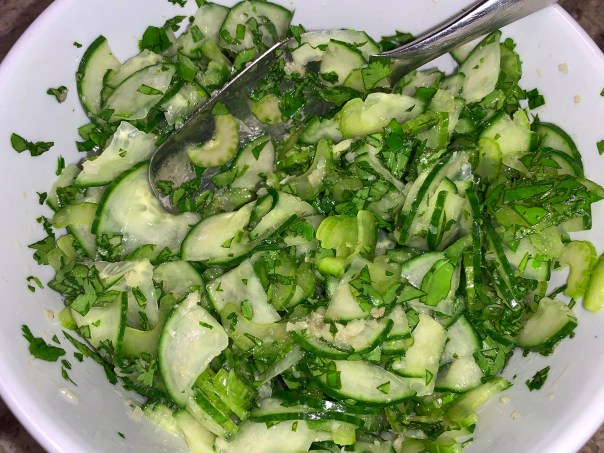
A super-easy and healthy side dish to go with your grilled entrée. According to The Endless Meal where I found this recipe “Everything works about this salad: the crunchy but slightly softened cucumbers, the creamy avocados, the earthy cilantro, and the hint of spice that tingles your tongue.”
Making this cucumber and avocado salad requires maceration. The basis of which is tossing the cucumbers in a little salt and sugar then letting them sit at room temperature while some of the juice is drawn out. The process softens the cucumber just a little and makes a sort of dressing for the salad.
NOTE: You can prepare it ahead of time by combining the cucumbers and spices in the bag but NOT sprinkling the salt and sugar over. Place the bag in the fridge for up to 8 hours. When you are ready, take the bag out of the fridge, add the salt and sugar, let it sit for a half hour then continue with the rest of the preparation.
Yes, it is a “green salad” but quite different from what most of us picture because there is no lettuce at all! The recipe calls for a red Thai chili, but in lieu of that we used a green serrano making it even “greener”. The flavors and textures paired wonderfully with our grilled pork chop, but the salad does not store well after the initial meal, so eat it up! (That is why we cut the recipe in half for the two of us—with just a tad remaining.)
Place the ginger, cucumbers, sea salt, sugar, garlic, and red chili in a large, resealable plastic bag. Squish the bag around a little so that everything is mixed together. Set the bag aside on your counter for a half hour.
Pour everything from the bag into a salad bowl. Add the celery, oil, and lime juice and toss well. Season to taste with sea salt. Add the diced avocados, basil, and cilantro and gently toss once more.