Monthly Archives: April 2025

Asparagus Involtini

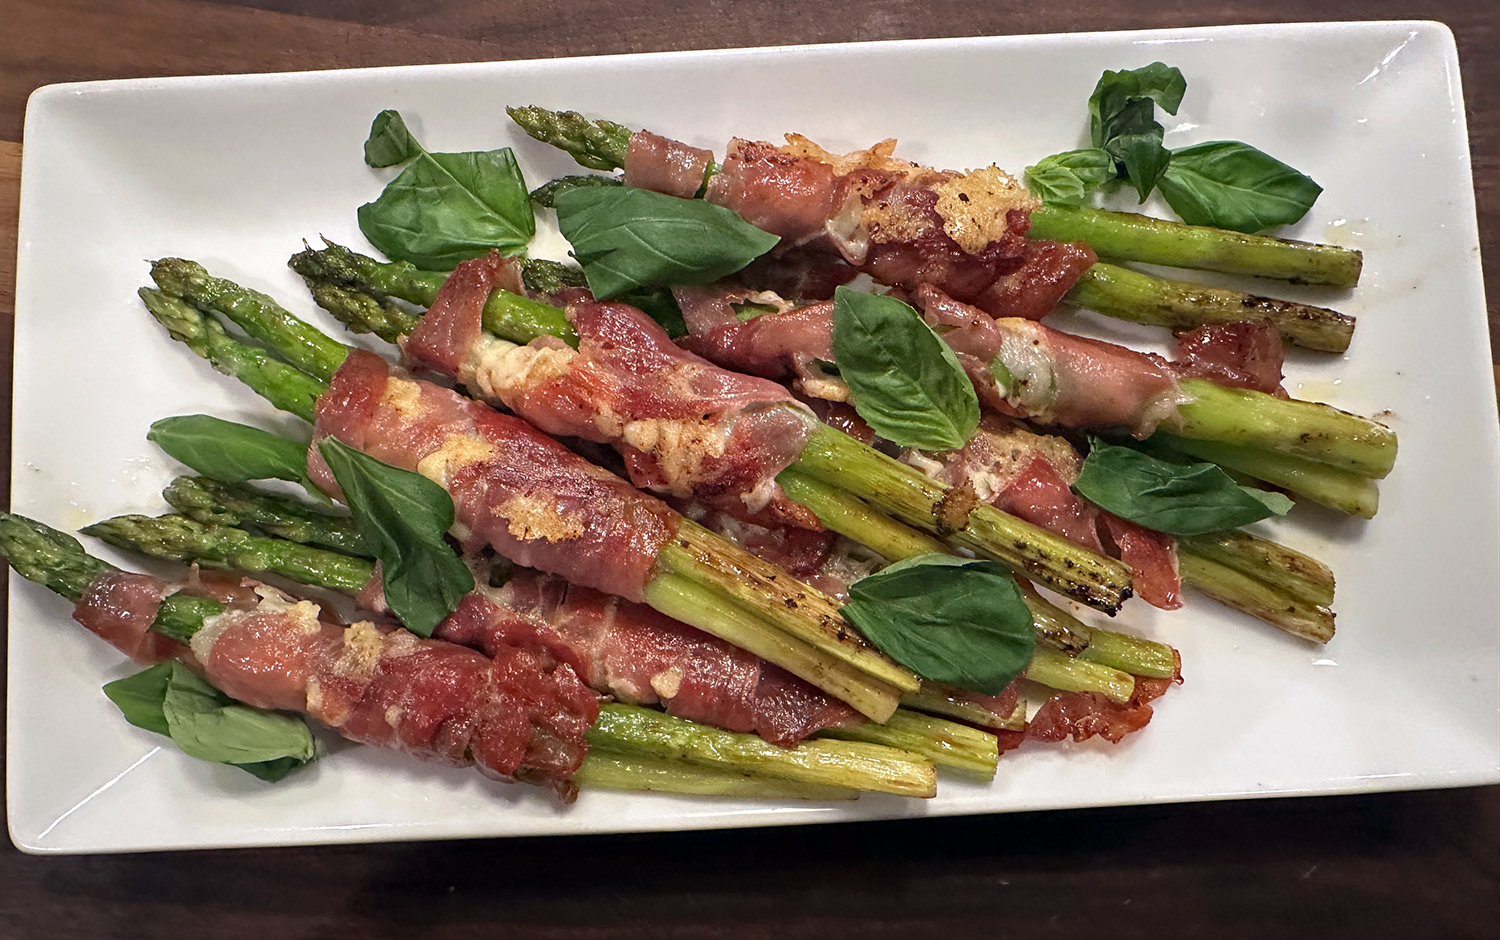
When we spied this asparagus recipe in our latest issue of Food & Wine, we knew we had to get it on our short list. An elegant alternative to bacon-wrapped asparagus, these prosciutto-wrapped spears are a delightful combination and perfect for springtime.

Asparagus is quickly blanched and shocked to preserve its bright green color and crisp-tender texture. When paired with nutty Montasio cheese (named after the Montasio plateau in Italy, this rich, semi-hard cheese is made from cow’s milk and has a nutty, slightly fruity flavor). Montasio cheese is difficult to source in our area, so Asiago makes a good substitute.

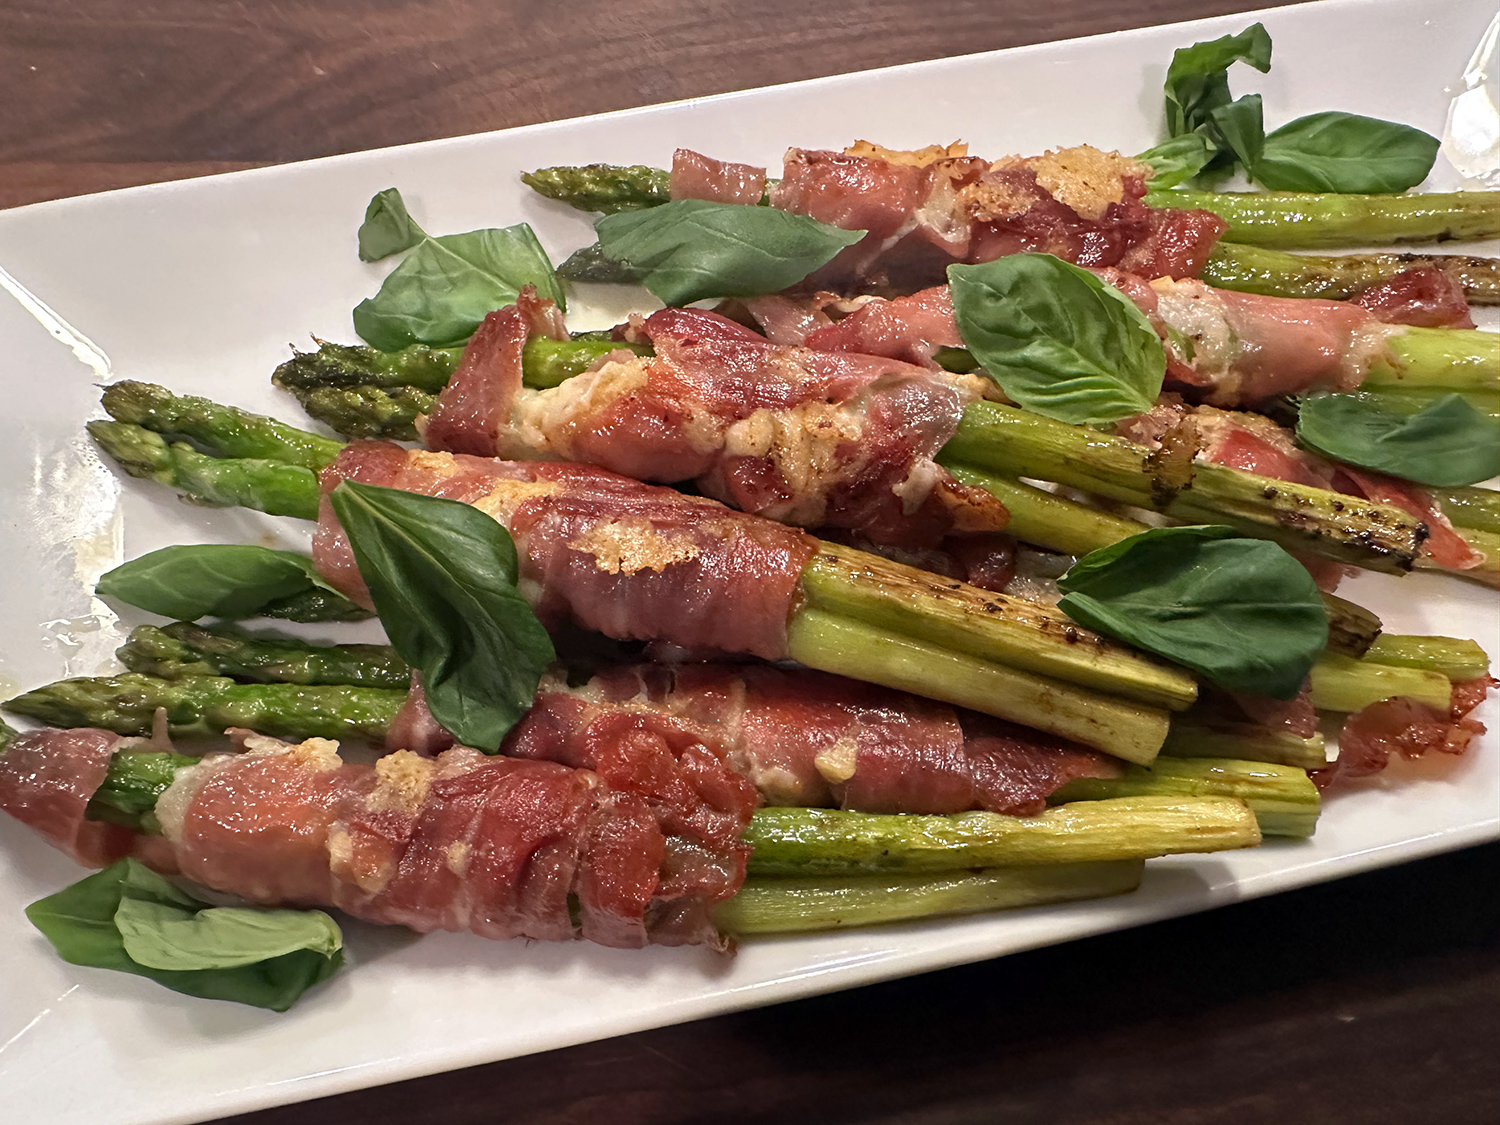
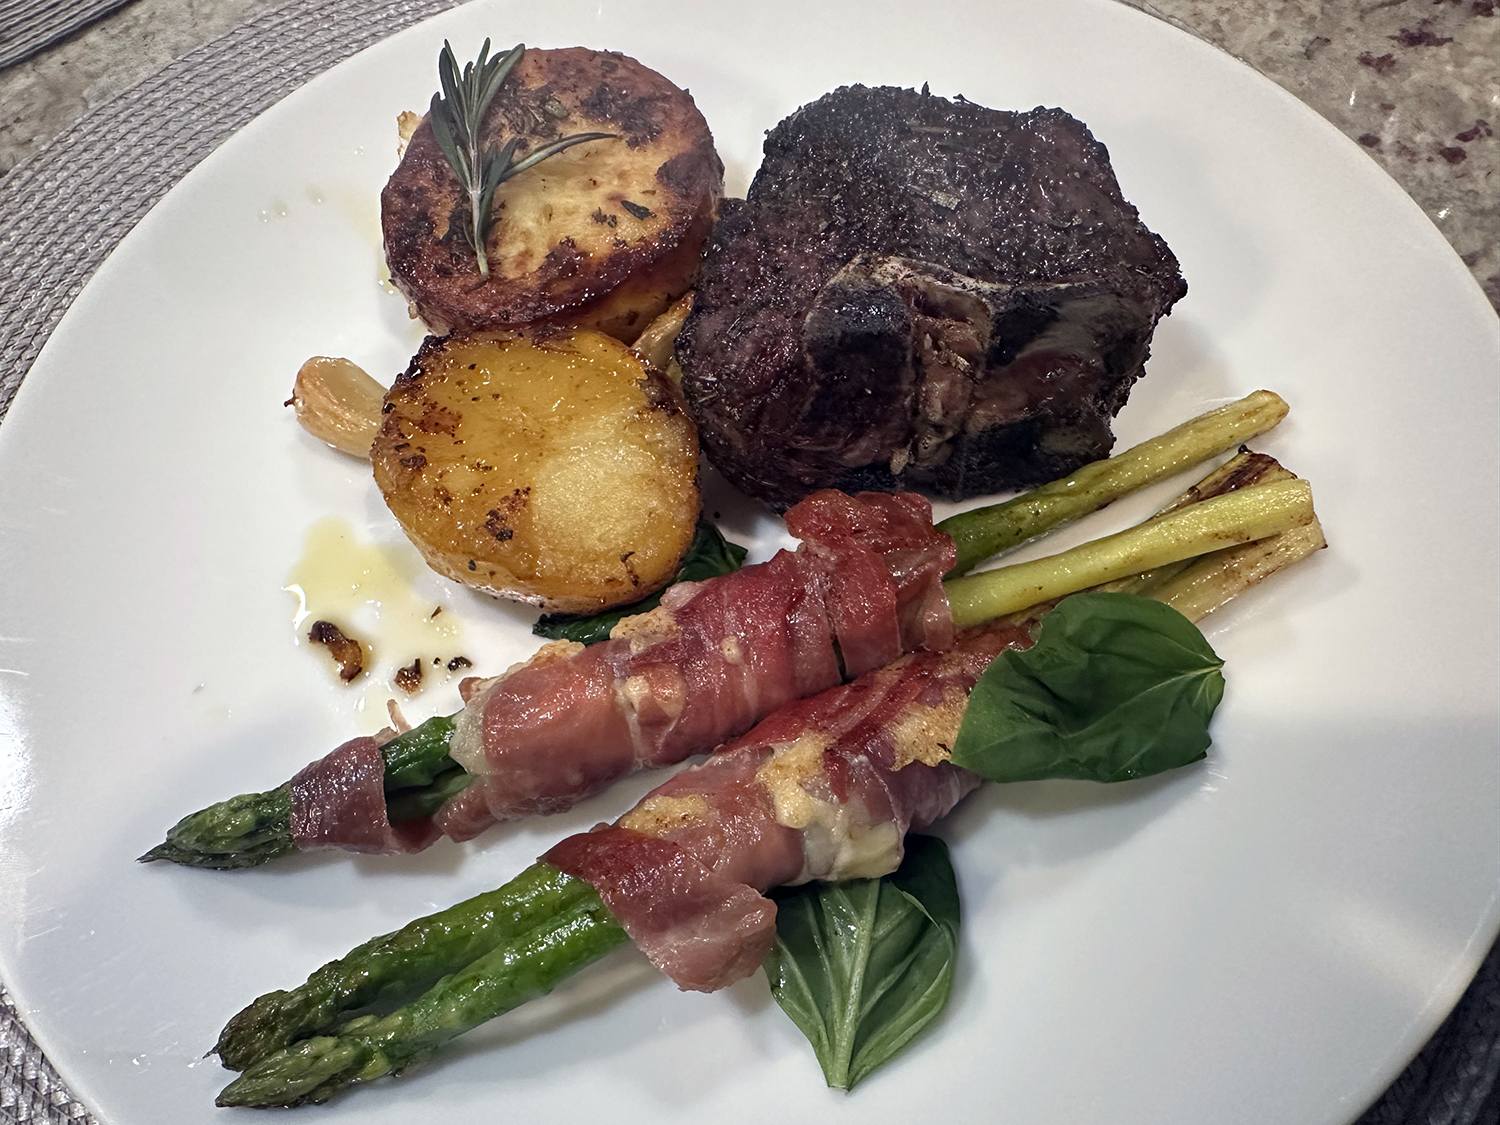
Wrapped in salty prosciutto, these asparagus involtini—the Italian word for “rolls”—make for a great party appetizer or vegetable side dish. Serve these prosciutto-wrapped asparagus warm, accompanied by a fresh salad, or as part of an antipasto platter.

Asparagus typically takes about three to four minutes to blanch in boiling salted water. To keep the asparagus extra green and crisp before it finishes cooking in the pan, blanch it for just two to three minutes.

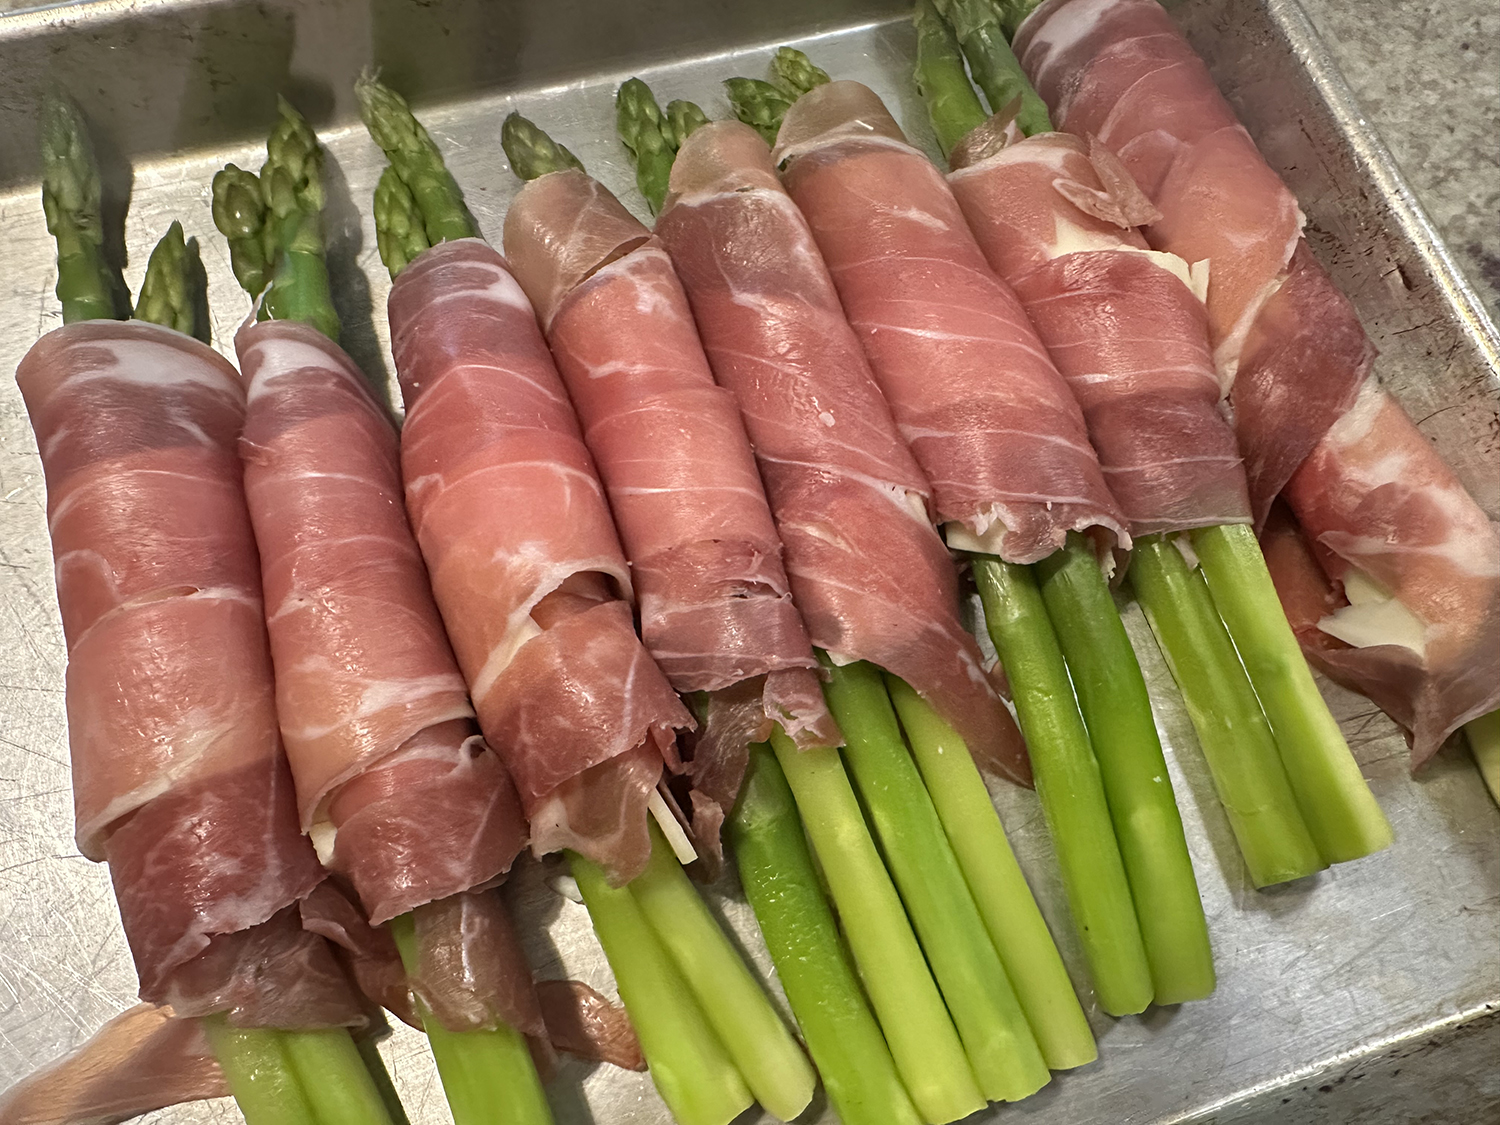
The wrapping process is a bit tricky, so keep your patience and perhaps buy a few extra slices of prosciutto. If you don’t need to use the extras, they make a mighty fine nibble. Since there was just two of us for dinner, we halved the recipe and still had leftovers.

TIP: Chilling the prosciutto in the refrigerator for a few minutes before rolling will help keep it together as you work it around the asparagus; when the prosciutto is too warm it can tear while rolling. 

Have a party coming up? Rolled and uncooked prosciutto and asparagus wraps can be made ahead and stored in an airtight container in the refrigerator for up to four days.

Asparagus Involtini

  • Servings: 4-8
  • Difficulty: moderately easy
  • Print

Ingredients

  • 1 lb. asparagus, trimmed
  • 8 oz. Montasio or Asiago cheese, chilled (about 4 cups)
  • 16 thin slices of prosciutto (preferably prosciutto di Parma)
  • 1 Tbsp. unsalted butter 
  • 1 Tbsp. extra-virgin olive oil
  • Black pepper and torn basil leaves, for garnish

Directions

  1. Bring a large pot of salted water to a boil over high. Fill a large bowl with ice water. Add asparagus to boiling water; cook, stirring occasionally, until bright green and crisp-tender, 2 to 3 minutes. Drain asparagus and immediately place in ice bath; let stand until thoroughly chilled, about 2 minutes. Drain and pat dry.
  2. Shave long strips of cheese using a vegetable peeler. Place 1 slice of prosciutto on a clean work surface. Place a small cheese slice (about 1/2 ounce) over prosciutto. Place 2 asparagus spears over cheese at the short end of the prosciutto slice. Tightly roll prosciutto around asparagus spears, spiraling upward. Repeat process with remaining prosciutto, cheese, and asparagus.
  3. Heat butter and oil in a large nonstick skillet over medium until butter melts and begins to foam. Add 4 or 5 asparagus rolls to skillet, seam side down, and cook until prosciutto is crisp and cheese is melted, 2 to 3 minutes per side. Repeat with remaining asparagus rolls. Transfer to a platter; sprinkle with black pepper and basil. Serve warm.

http://www.lynnandruss.com

Recipe by Lachlan Mackinnon-Patterson for Food & Wine

Hot Honey-Glazed Pork Chops

OMG, these skillet-cooked pork chops have it all going on, and then some. Here, Calabrian chiles combine with bright orange juice, honey, and salt for a sweet and zippy marinade that infuses the meat with smoky, fruity flavor while simultaneously tenderizing the chops. And sucking the meat off the bones is a must!

Calabrian chiles have a moderate heat level, comparable to cayenne peppers. There are three major types of Calabrian chiles, and their heat ranges from warming and tangy to mildly fruity. Whole jarred Calabrian chiles, such as the ones called for in this recipe, tend to be more warming and tangy than fruity.

Can’t quickly source Calabrian chiles? Do what we did and use Fresno chiles as a substitution. Chop a couple of them up, sauté in about 1 tablespoon olive oil for several minutes, then strain the oil from the chiles. Separate and use both for the recipe.

Aside from adding flavor to a dish, raw honey is mildly acidic and contains trace amounts of a key enzyme called protease, which both help break down connective muscle tissue, gradually tenderizing tougher meat cuts. For more tender cuts like these chops, honey caramelizes the surface for a cracking crust suffused with toasty notes and a lustrous glaze that doesn’t require much work on your behalf.

Remember you’ll be marinating the pork chops for at least 1 hour. Ours marinated for 2 1/2 hours. And by all means, get the rib chops. We kept oohing and aahing through out the dinner, and again with the leftovers. It is on the short list to make again.

Hot Honey-Glazed Pork Chops

  • Servings: 4
  • Difficulty: easy
  • Print

Ingredients

  • 3/4 cup plus 1 Tbsp. orange juice, divided
  • 2 Tbsp. plus 1/4 cup honey, divided
  • 2 Jarred whole Calabrian chiles, chopped, plus 2 tsp. chile oil, divided
  • 1 Tbsp. kosher salt, divided, plus more to taste
  • 4 Bone-in rib-cut pork chops (about 1 inch thick) (about 2 lbs.)
  • 1 tsp. black pepper
  • 2 Tbsp. canola oil, divided
  • 2 Shallots, sliced
  • 4 Garlic cloves, thinly sliced 
  • 1 1/4 cups chicken broth
  • 1 Tbsp. Dijon mustard
  • 1 Whole small navel orange, sliced into half-moons
  • 2 Tbsp. cold unsalted butter, cut into 2 pieces 
  • 2 tsp. fresh thyme leaves

Directions

  1. Whisk together 3/4 cup orange juice, 2 tablespoons honey, Calabrian chile oil, and 1 teaspoon salt in a small bowl. Transfer mixture to a large ziplock plastic bag; add pork chops. Seal bag, and turn to coat pork. Refrigerate for at least 1 hour and up to 8 hours.
  2. Preheat oven to 425°F. Place marinated pork chops on a large plate; reserve marinade. Pat pork chops dry using paper towels. Sprinkle both sides evenly with black pepper and remaining 2 teaspoons salt.
  3. Heat a 12-inch cast-iron skillet over high until starting to smoke. Reduce heat to medium. Add 1 tablespoon canola oil to skillet, swirling to coat. Add 2 pork chops; cook, undisturbed, until browned on 1 side, 3 to 4 minutes. Transfer to a plate, browned side up; repeat cooking process with remaining 2 pork chops. Set aside.
  4. Wipe skillet clean. Return skillet to medium heat and add remaining 1 tablespoon canola oil, shallots and garlic. Cook over medium, stirring often, until starting to soften, 2 to 3 minutes. Add chicken broth, and bring to a boil over high. Boil, stirring often, until slightly reduced, about 1 minute. Add reserved marinade, and continue to boil for 1 minute. Reduce heat to medium; add chopped Calabrian chiles. Place pork chops in skillet, browned side up, and bake until a meat thermometer inserted into thickest portion of pork chops registers 140°F, about 12 minutes.
  5. Transfer pork chops to a plate. Bring marinade mixture in skillet to a boil over medium-high. Whisk in mustard, remaining 1/4 cup honey, and remaining 1 tablespoon orange juice until combined. Add orange slices, and cook, stirring occasionally, until mixture is thickened and begins to resemble a sauce, about 4 minutes. Remove from heat; add butter, 1 tablespoon at a time, whisking until emulsified, about 1 minute. Season to taste.
  6. Nestle pork chops in skillet, spooning orange slices and sauce over pork chops. Sprinkle with thyme; serve.

http://www.lynnandruss.com

Recipe by Andee Gosnell for Food & Wine

Sausage and Barley Soup with Greens

This simple, satisfying soup relies on sausage as its flavorful base, therefore we doubled the amount. Start by cooking raw sausage, rather than precooked links, since it generally has better texture and flavor for soup.

Pearled barley adds heartiness and a wonderful chewy texture, another item we increased. We also doubled the greens which are stirred in at the end. A little vinegar is added for brightness, and voila!, you have a cozy meal in less than an hour of mostly hands-off time.

To make this soup gluten-free, you can substitute French green lentils for the barley. If you are making it ahead of time, wait to add the greens until you’re ready to serve to preserve their bright, fresh flavor.

As mentioned above, we altered certain ingredients, in some cases because that is how the items were packaged. Instead of 8 ounces of sausage, our coil was 1 pound and felt that amount was perfect. The baby kale came in 5-ounce clam shells so we used two for a total of 10 ounces instead of the 8 listed. The barley was increased to 3/4 cup and we added 4 cloves of garlic, chopped. Our changes are noted in the recipe below.

Tip: If using regular (hulled) barley, add about 15 minutes to the simmer time for the barley to become tender.

Sausage and Barley Soup with Greens

  • Servings: 6-8
  • Difficulty: easy
  • Print

Ingredients

  • 2 Tbsp. olive oil 
  • 1 lb. raw Italian pork or chicken sausage (casings removed if necessary)
  • 1 medium onion, chopped (about 2 cups)
  • 3 large carrots, peeled and chopped (about 2 cups)
  • 4 cloves garlic, peeled and chopped
  • Salt and black pepper
  • 6 cups chicken stock or water
  • 1 14-oz. can diced tomatoes
  • 3/4 cup pearled barley (see Tip)
  • 10 oz. tender greens, like spinach or baby kale
  • 2 Tbsp. red wine vinegar or apple cider vinegar
  • Grated Parmesan and fresh herbs (optional), for garnishing

Sausage and Barley Soup with Greens

  • Servings: 6
  • Difficulty: easy
  • Print

Directions

  1. Heat a medium Dutch oven or other heavy-bottomed pot over medium. Add the olive oil and swirl to coat the bottom of the pot. Add the sausage, pressing it into a thin layer that covers the bottom of the pot. Cook, undisturbed, until golden brown on the bottom, about 5 minutes. Flip the sausage and break it up into bite-size pieces, then cook until golden brown all over, stirring occasionally, about 5 minutes more. If there is a large amount of fat left in the pot after browning the sausage, remove all but about 2 tablespoons.
  2. Add the onion and carrots, season with salt and pepper, and cook, stirring occasionally, until the onion is translucent, about 5 minutes.
  3. Stir in the stock, tomatoes and their juices and the barley, scraping the browned bits from the bottom of the pot. Bring to a simmer, then turn the heat down to low and cook, stirring occasionally, until the barley is tender, about 30 minutes.
  4. When ready to serve, stir in the greens and cook until bright green and slightly wilted, about 2 minutes.
  5. Add the vinegar, taste and season with salt and pepper as needed.
  6. Divide among bowls and garnish with Parmesan and fresh herbs, if using. (The soup will keep, refrigerated, for up to 3 days. The barley will absorb some liquid as the soup sits, so loosen any leftover soup with a bit of water or stock.)

http://www.lynnandruss.com

Adapted from a recipe by Linda Xiao for NYTimes Cooking

Porcini-Seasoned Steak au Poivre

For a decadent but easy “date-night” dinner, splurge a little on some decent steaks, then make this au poivre sauce to take it to the next level. Another hack to ensure great steak is to dry-age it. The dry-aging process allows the meat’s natural enzymes to break down the connective tissue, resulting in a more tender steak. The process also causes the meat’s moisture to evaporate, intensifying the beefy flavor and creating a unique taste and texture.

About the sauce. “Mushroom powder sounds illicit, but it’s actually a secret-weapon umami bomb.” Here, dried porcini mushrooms are pulverized, mixed with salt and pepper, then rubbed all over steaks for intense seasoning. Additionally, some water is stirred in for an instant broth, making a full-flavored pan sauce. Crème fraîche, instead of heavy cream, gives the sauce body and richness. And what a treat they are!

Avoid moving the steaks until halfway through cooking. They will release easily when properly seared. *We thought the amount of black pepper was pretty intense and would cut it back to 1 tablespoon, but that’s a choice we’ll leave up to you…

The extra sauced can be spooned over your sides such as pasta, mashed potatoes or vegetables. Our sides were porcini tagliatelle and sautéed spinach and garlic.

Porcini-Seasoned Steak au Poivre

  • Servings: 4
  • Difficulty: easy
  • Print

Ingredients

  • 1/4 oz. dried porcini mushrooms, broken into pieces
  • 1½ Tbsp.* whole black peppercorns
  • 1 ½ tsp. Kosher salt
  • 1 Tbsp. neutral oil
  • 2 1-lb. beef strip steaks or ribeye steaks, trimmed
  • 2 Tbsp. salted butter
  • 1 medium shallot, minced
  • 4 Tbsp. brandy, divided
  • 1/4 cup crème fraîche
  • Finely chopped fresh chives, to serve

Directions

  1. In a spice grinder, pulverize the porcini to a fine powder; transfer to a small bowl. Add 1 tablespoon of the porcini powder to 1½ cups water; set aside. In the spice grinder, pulse the peppercorns until coarsely ground. Stir the pepper and 1½ teaspoons salt into the remaining porcini powder; sprinkle and rub over the steaks. (Dry-age the steaks for 24 to 48 hours prior, if desired.) Add any seasoning that falls off to the porcini water.
  2. In a 12-inch skillet over medium-high, heat the oil until barely smoking. Add the steaks, reduce to medium and cook until the centers reach 120°F for medium-rare, 10 to 12 minutes; flip halfway through. Transfer to a platter, and tent with foil while you make the sauce. Discard any fat in the pan.
  3. In the same pan over medium, melt the butter. Add the shallot and cook, stirring, until softened, about 2 minutes. Off heat, add 3 tablespoons of the brandy. Return to medium and cook, scraping up the browned bits, until slightly reduced. Add the porcini water; cook over medium-high, stirring, until a spatula drawn through leaves a trail, 8 to 10 minutes.
  4. Whisk in the crème fraîche, remaining 1 tablespoon brandy and any steak juices; cook, whisking, until slightly thickened, 2 to 3 minutes. Off heat, taste and season with salt and pepper. Slice the steaks, return to the platter and pour the sauce over them. Sprinkle with chives.

http://www.lynnandruss.com

Recipe by Hisham Hassan for Milk Street

Yogurt-Marinated Chicken Thighs with Potatoes and Broccolini

This sheet pan dinner features yogurt-marinated chicken thighs with charred broccolini and potatoes. Juicy chicken thighs and roasted vegetables come together in this effortless sheet pan dinner. The lactic acid in yogurt, responsible for the dairy’s characteristic tang, gently tenderizes the chicken thighs as they marinate.

To ensure crispy potatoes and charred broccolini, prevent overcrowding by roasting the vegetables and chicken on separate sheet pans. The flavorful chicken drippings are liquid gold — drizzle them over the chicken and vegetables just before serving.

Yogurt is ideal to use in a marinade for both its flavor and ability to tenderize meat. It contains lactic acid, which tenderizes more slowly and gently than a citrus juice – or vinegar-based marinade. However, in this recipe, we also add a bit of lemon juice to bump up the marinade’s acidity and reap some of its benefits in a shorter time frame.

OK, yeah so it is two sheet pans instead of one. But, roasting the vegetables and chicken on two separate pans means you get the best of both worlds: crispy and tender vegetables and juicy chicken thighs with crispy skin and lots of schmaltzy pan drippings. Can’t argue with that.

Yogurt-Marinated Chicken Thighs with Potatoes and Broccolini

  • Servings: 4
  • Difficulty: easy
  • Print

Ingredients

  • 3/4 cup plain whole-milk strained (Greek-style) yogurt
  • 2 Tbsp. fresh lemon juice
  • 2 garlic cloves, grated
  • 1 tsp. coarse-ground Dijon mustard
  • 1 tsp. paprika
  • 3/4 tsp. ground coriander
  • 5 Tbsp. extra-virgin olive oil, divided
  • 3 1/2 tsp. kosher salt, divided
  • 1 1/2 tsp. black pepper, divided
  • 3 lbs. bone-in, skin-on chicken thighs (about 8 small thighs)
  • 1 lb. baby gold potatoes, halved
  • 1 8-oz. bunch broccolini, trimmed
  • 2 lemons, halved crosswise

Directions

  1. Whisk together yogurt, lemon juice, garlic, mustard, paprika, coriander, 2 tablespoons oil, 2 teaspoons salt, and 1 teaspoon pepper in a large bowl until smooth. Add chicken thighs; toss to coat, rubbing yogurt mixture evenly over chicken. Cover and refrigerate for at least 30 minutes or up to 4 hours.
  2. Preheat oven to 425°F with racks in the upper and lower third positions. Toss potatoes and broccolini with remaining 3 tablespoons olive oil, remaining 1 1/2 teaspoons salt, and remaining 1/2 teaspoon pepper in a large bowl until evenly coated. Arrange potatoes, cut sides down, in a single layer on a large rimmed baking sheet; set broccolini in bowl aside. Remove chicken thighs from marinade; place chicken, skin side up, on a second large rimmed baking sheet; discard marinade. Arrange lemon halves, cut sides down, around chicken.
  3. Place baking sheet with chicken on upper rack and baking sheet with potatoes on lower rack of oven; roast for 25 minutes. Remove potatoes from oven, and flip using a thin metal spatula; arrange broccolini on baking sheet with potatoes, making sure to drape some stalks over the potatoes so as not to completely char. Return to oven; continue roasting until potatoes and broccolini are tender and a thermometer inserted into thickest portion of chicken registers 165°F, 12 to 15 minutes. (Ours only took another 11 minutes.)
  4. Skim off fat from chicken pan juices and discard. Drizzle pan juices over chicken and vegetables. Serve hot.

http://www.lynnandruss.com

Recipe by Nicole Hopper for Food & Wine

One-Skillet Crispy Salmon with Mustardy Lentils

Salmon and lentils is an absolutely classic French pairing. In this simple, satisfying one-pot dinner for two that plays off the famous coupling, crispy salmon is served in a broth of lentils flavored with caramelized shallots and mustard.

Using one skillet for the entire recipe allows the caramelized shallots to play double duty, imparting their sweet flavor to both the salmon and the lentils. The salmon rests while the canned lentils are quickly cooked with vegetable broth, herbs, and mustard, so that the whole dish is ready without wasting a minute.

Mistakingly, we bought salmon filets without the skin, but it ended up being a positive error. I personally do not like to eat salmon skin and the fish got just as crispy without it. When making this dish again in the future, we will again purchase salmon filets without the skin. That choice is up yo you…

In the end, the meal was super simple and super-tasty!

One-Skillet Crispy Salmon with Mustardy Lentils

  • Servings: 2
  • Difficulty: easy
  • Print

Ingredients

  • 2 Tbsp. extra-virgin olive oil, divided, plus more for serving
  • 4 medium shallots, thinly sliced (about 1/2 cup)
  • Kosher salt and freshly ground black pepper
  • 2 6-oz. salmon filets, skin on (or not, depending on your preference)
  • 1 14.5-oz. can Puy lentils, drained and rinsed
  • 3 sprigs thyme or 1 sprig rosemary
  • 1 cup vegetable or chicken stock, preferably homemade
  • 1 Tbsp. whole-grain mustard
  • 1 Tbsp. chopped flat-leaf parsley
  • 1 tsp. fresh lemon juice

Directions

  1. In a medium nonstick skillet, heat 1 tablespoon of olive oil over medium heat until shimmering. Add shallots and cook, stirring frequently, until very soft and browned, about 15 minutes; lower the heat if necessary to prevent burning. Season to taste with salt and pepper and set caramelized shallots aside. Wipe out skillet.
  2. Press salmon filets between paper towels to dry surfaces thoroughly. Season on all sides with salt and pepper. Heat remaining 1 tablespoon in the skillet over medium-high heat until shimmering. Add salmon filets skin side-down. Immediately reduce heat to medium-low. Cook, pressing gently on back of filets to ensure good contact with skin, until skin is rendered and crisp, about 6 minutes. If skin shows resistance when attempting to lift with a spatula, allow it to continue to cook until it lifts easily. Flip salmon and cook on second side until a thermometer inserted into the thickest part registers 120°F for medium rare or 130°F for medium, about 1 minute longer. Transfer salmon to a paper towel-lined plate and allow to rest.
  3. Add lentils, thyme or rosemary, broth, whole grain mustard, and caramelized shallots to the skillet and bring to a boil. Reduce heat to medium and simmer until the broth has reduced by about half, about 5 minutes. Remove from the heat and stir in parsley and lemon juice. Season to taste with salt and pepper. Spoon the lentils onto plates, set the salmon on top, drizzle with more olive oil, and serve immediately.

http://www.lynnandruss.com

Adapted from a recipe from Serious Eats

Confetti Stuffed Peppers Redux

Over eight years ago I posted a very similar stuffed pepper recipe but haven’t made them since, so I thought it was time for a redo. While much of the veggie-forward ingredients and directions remain the same, there are a few differences here. For one, I switched out the zucchini and instead used cremini mushrooms. Another is when I added the tomato sauce…

Since peppers vary in size, you will get anywhere from four to six servings. Using four large (not necessarily tall), I still had enough meat mixture leftover to fill a fifth pepper (which I packaged for another day).

As I noted eight years ago, there’s the debate about which rice to use, white or brown? There are pluses and minuses to each. The upside is, brown rice, unlike white rice, still has the side hull and bran. Other facts:

The Good—

  • Brown rice has more micronutrients: magnesium, phosphorus, and potassium. It also has a lot of manganese, selenium, and copper.
  • Brown rice has a lower glycemic index than white rice.
  • The fiber content of brown rice keeps bowel function at it’s peak since it makes digestion that much easier.

The Bad—

  • Brown rice has 43 more calories per cup than white rice.
  • Brown rice has 7g more carbohydrates per cup than white rice.

The Ugly—

  • That would only pertain to those who have a rice allergy…

Alright, the rice choice is totally up to you and those who will be eating the stuffed peppers. We opted for brown rice. But no matter which choice you make, you have to cook the rice before it is used in the stuffing.

To make the meal more weeknight-friendly, make the recipe on a Sunday afternoon up to the first line of Step 7, and then refrigerate them over night. It sure makes for an easy dinner prep the next day.

Veggie-Forward Stuffed Peppers

  • Servings: 4-6
  • Difficulty: easy
  • Print

Ingredients

  • 1 1/2 lbs. lean ground meatloaf mixture (beef, veal, pork)
  • 4 large bell peppers, a mix of colors
  • 5 Tbsp. olive oil
  • Kosher salt and freshly ground black pepper
  • 4 cloves garlic, finely minced
  • 1 onion, finely diced
  • 1 medium zucchini or summer squash, finely diced
  • 4 plum tomatoes, seeded and finely diced
  • 1/2 tsp. red pepper flakes, more to taste
  • 1 1/2 cups cooked brown or white long grain rice
  • 2 cups tomato sauce, more for topping
  • 1 1/2 cups grated pepper Jack cheese

Directions

  1. Preheat the oven to 350 degrees F.
  2. Cut the tops off the peppers. Remove and discard the stems, then finely chop the tops; set aside. Scoop out the seeds and as much of the membrane as you can. In a baking dish large enough to hold them upright, place the peppers in cut-side up.
  3. Heat 2 tablespoons of the olive oil in a large skillet over medium-high heat. Add the meat, season with salt and pepper and cook, breaking up the lumps, until it is cooked through and just beginning to brown, 8 to 10 minutes. Remove as much fat from the pan, then transfer the meat to a paper towel-lined plate to get rid of the remaining fat.
  4. Wipe out the skillet and add one more tablespoon olive oil. When hot, add the chopped mushroom pieces and stir occasionally for about 4 minutes until lightly browned and most of the moisture is evaporated. Transfer to the plate with the ground meat.
  5. Add the remaining 2 tablespoon oil to the skillet and when hot, add the onions and chopped peppers and cook until beginning to soften, 3 to 4 minutes. Add the garlic and cook for another minute.
  6. Add the diced tomatoes and season with salt and red pepper flakes. Cook until everything is heated through.
  7. In a large mixing bowl, add the cooked veggies, then stir in the meat and rice. Taste and adjust the seasoning. Stir in 1 cup of the cheese.
  8. Fill the peppers with the rice mixture. Pour two cups of tomato sauce over the potted peppers. Cover and bake for 30 minutes. (If you refrigerated overnight, cook for 45-50 minutes.)
  9. Uncover and cook for another 15 minutes, then top each with a sprinkle of the remaining 1/2 cup cheese. Bake until the peppers are soft and the cheese is melted and lightly browned, another 10 minutes or so. Alternatively, plate each pepper, slice in half, then top with more sauce and some cheese. Microwave for 30 seconds to melt cheese.
  10. Serve with mashed potatoes and top with more tomato sauce from the bottom of the pot, if desired.

http://www.lynnandruss.com

Catalan Braised Pork Shoulder with Dried Fruit

A long braise on a cool Sunday afternoon is not uncommon in our household. And we just happened to have a 4-pound pork shoulder in the freezer waiting for a chance to show off. It was over nine years ago since we made this luscious Catalan pork dish, so I located the post in our blog and resurrected the recipe, with several changes this time.

For a little background, I am repeating “Spain is a nation of pork eaters. Their penchant for pork has economic underpinnings because the matanza—the fall slaughter of the family hog—was central to rural life. A country within a country, with its own language, complex history, and a wealth of artistic traditions, Catalunya (to natives) has more in common with neighboring France, than macho Castile—but all share a love of pork. Catalan food blends Roman, Arabic and even Italian influences into one of Europe’s most distinct and emphatic cuisines.”

About those changes. One major alteration involves the cooking time. The original recipe said to cook the roast for 1 1/2 hours until it reaches an internal temperature of 165°. According to all of our other sources, a 4-pound pork shoulder roast needs to be cooked at least 2 hours with an internal temp of 180-185°F. This ensures tender slices.

After searing the roast on all sides, including the end caps, The Hubs removed the meat to a platter and poured the contents of the pot through a strainer into a cup. This way it is easy to eliminate the burnt garlic, return the oil to the Dutch oven and continue the cooking process. And though we didn’t cut down the apricots this time or last, we suggest you give them a rough chop so that the pieces are easier to consume.

BTW, kirsch can be substituted for the brandy. We had never cooked with it before and thought you might be interested in the flavor profile, which sounds like a great match for this dish:

kirsch, dry, colourless brandy distilled from the fermented juice of the black morello cherry. Kirsch is made in the Black Forest of Germany, across the Rhine River in Alsace (France), and in the German-speaking cantons of Switzerland. Its production methods remain traditional. The fully ripened cherries are mashed in a large wooden tub or vat and allowed to ferment freely. Upon completion of this process, the entire mass—liquid, pulp, and cherry stones—is distilled in a pot still. During the mashing some of the cherry stones, or pits, are crushed, releasing some of their oils and acids. These include small amounts of hydrocyanic acid, which impart a distinctive bitter almond undertone to the beverage. Kirsch is not aged. It is marketed at 90 to 100 proof, in the clear white (colorless) state it comes off the still. It is a fruit brandy with a clean cherry fragrance and bitter almond taste. Kirsch is consumed neat, as brandy, and in cocktails and is also used in cooking as a flavoring.

So if pork is in your wheelhouse, you may want to get this on your shortlist.

Catalan Braised Pork Shoulder with Dried Fruit

  • Servings: 6-8
  • Difficulty: easy
  • Print

Ingredients

  • 1 boneless pork shoulder, such as Boston Butt (about 4 lbs., trimmed of excess fat)
  • Salt and freshly ground black pepper (kosher or sea)
  • 2 medium garlic cloves, crushed
  • 3 Tbsp. light olive oil
  • 1 medium onion, chopped
  • 1 carrot, diced
  • 8 oz. frozen white pearl onions
  • 1⁄4 cup brandy
  • 2 cups full-bodied dry red wine
  • 1 cup stock (beef or chicken)
  • 3⁄4 cup pitted dried sour cherries
  • 1⁄2 cup dried apricots (or dried figs), roughly chopped
  • 1 large bay leaf
  • 1 small piece cinnamon stick
  • 2 fresh rosemary sprigs

Directions

  1. Preheat oven to 325º.
  2. Using kitchen string, tie the pork shoulder crosswise, spacing the ties 1 inch apart. Rub the pork generously with salt and pepper and the garlic.
  3. Heat 2 tablespoons of the olive oil in a 5 to 6 quart flameproof casserole or Dutch oven over high heat until almost smoking. Add the pork and cook until richly browned on all sides, about 8 minutes total. Add the remaining oil while the pork browns, if the casserole looks too dry. Transfer the pork to a platter. Drain oil and drippings over a strainer on a cup to remove burnt garlic, and return strained oil to the Dutch oven.
  4. Add the chopped onion, carrot, and pearl onions to the casserole and brown well, 6 to 7 minutes. Add the brandy and cook over high heat until it is reduced to about 1 tablespoon, about 1 minute.
  5. Add the wine, beef stock, cherries, apricots, bay leaf, cinnamon stick, and rosemary sprigs and bring to a boil, scraping the bottom of the casserole to dislodge the brown bits. Season the sauce with salt to taste.
  6. Return the pork to the casserole. Place a large piece of parchment that over hangs the pot, then cover tightly and transfer it to the oven. Bake the pork, turning it once or twice, until it is very tender and an instant-read thermometer registers 180-185°, about 2 hours and 15 minutes. Start checking at 2 hours.
  7. Transfer the pork to a plate and cover it tightly with foil to keep warm. Remove and discard the bay leaf, cinnamon stick, and rosemary sprigs.
  8. Transfer the casserole to the stove top and cook the sauce over high heat until it is slightly syrupy, about 5 minutes.
  9. Remove the string from the pork and discard it. Cut the pork into slices and arrange on a serving platter. Pour the sauce over the pork and serve.

http://www.lynnandruss.com

Adapted from a recipe in Anya Von Bremzen’s cookbook “The New Spanish Table”

Orecchiette Puttanesca with Tuna and White Beans

In a word, delicious! A great choice for those nights where you prefer a meatless or pescatarian meal.

A one-pot wonder, this recipe is bold, with a briny puttanesca sauce that finds delicious partners in creamy white beans and flaked tuna (just needed more of it). First the pasta is boiled and drained, then the same pot is used to make the sauce.

Orecchiette pasta is preferred because the small saucer shapes catch bits of the olives, capers and tuna. The consistency is on the “soupy” side; stir in additional pasta water at the end to adjust the consistency to suit your taste.

Two major changes we made included doubling the canned tuna to two 5-ounce cans, and decreasing the pasta by 25%, down to 12 ounces. These differences still provided 4 large portions. Also, don’t discard the olive oil when draining the tuna. Use it as part of, or in place of, the necessary olive oil for the recipe.

NOTES: Don’t forget to rinse and drain the beans. If their starchy liquid makes it into the pot, it will turn the sauce thick and heavy. Don’t worry about removing the garlic cloves after they’re lightly browned. They’ll soften and break apart slightly as the sauce cooks.

Orecchiette Puttanesca with Tuna and White Beans

  • Servings: 4-6
  • Difficulty: easy
  • Print

Ingredients

  • 12 oz. orecchiette pasta
  • Kosher salt and ground black pepper
  • 1 Tbsp. extra-virgin olive oil, plus more to serve
  • 2 medium garlic cloves, smashed and peeled
  • 1 tsp. red pepper flakes
  • 1 cup pitted green or black olives (or a combination), roughly chopped
  • ¼ cup drained capers, rinsed and patted dry
  • 28 oz. can whole peeled tomatoes, crushed by hand
  • 15½ oz. can cannellini beans, rinsed and drained
  • 2 5 oz. cans olive oil-packed tuna, drained and flaked
  • ⅓ cup lightly packed fresh flat-leaf parsley, roughly chopped

Directions

  1. In a large pot, bring 4 quarts of water to a boil. Stir in the pasta and 1 tablespoon salt, then cook, stirring occasionally, until just shy of al dente. Reserve 2½ cups of the cooking water, then drain.
  2. In the same pot over medium, combine the oil and garlic. Cook, stirring occasionally, until the garlic is light golden brown, 2 to 4 minutes. Add the pepper flakes, olives, and capers. Increase to medium-high and cook, stirring, until the capers begin to brown, about 1 minute. Add the tomatoes with juices along with the beans, then cook, stirring occasionally, until the mixture is slightly thickened, 3 to 4 minutes.
  3. Stir in 1½ cups of the reserved water and bring to a simmer over medium-high. Add the orecchiette and cook, stirring occasionally, until the pasta is al dente, 2 to 4 minutes; add more reserved water if needed to thin. Taste and season with salt and black pepper. Off heat, stir in the tuna and parsley. Serve drizzled with additional oil.

http://www.lynnandruss.com

Adapted from a recipe from Karen Waldman for Milk Street

Coq Au Vin Meatballs

From Food & Wine, this riff on Coq au Vin, a classic French dish of chicken braised in a red wine stew, swaps out the chicken for ground turkey, leans on white wine, and transforms the dish into a semi-quick weeknight dinner. Tender turkey meatballs are browned and then finished in a simple and lightly acidic pan sauce speckled with earthy mushrooms and smoky bacon.

When making these meatballs, you can substitute ground chicken for ground turkey. Be sure to source ground chicken that is a mix of white and dark meat, not just ground chicken breast, which is very lean and will result in dry meatballs. Keep the meatballs chilled until you are ready to cook to help them hold their shape.

*Our meatballs ended up being quite dense, probably because they were too lean at 99%. So, just as you should not purchase all white chicken meat, buy ground turkey that’s no more than 93% lean, and try not to overwork them when creating the balls. We also suggest that after you place the meatballs back into the skillet with the sauce that you partially cover the pan. This should ensure the sauce won’t reduce too much and the meatballs will get to temperature quicker and stay more moist.

The original recipe indicates it feeds four, three 1 1/2-inch meatballs per guest. We had our doubts, thinking so few meatballs per person would be a bit on the shy side. However, served over noodles or pasta, it was quite filling (we also paired with a side salad). Meatballs can be prepared through Step 1 up to one day in advance. Proceed with the recipe as directed when ready to cook.

Coq Au Vin Meatballs

  • Servings: 4
  • Difficulty: easy
  • Print

Ingredients

  • 1 lb. lean ground turkey (see above*)
  • 1 large egg, beaten
  • 1/3 cup panko
  • 1 tsp. kosher salt, plus more to taste
  • 1 Tbsp. minced garlic, divided
  • 1/2 tsp. black pepper, divided
  • 4 thick-cut bacon slices, chopped
  • 8 oz. cremini mushrooms, sliced
  • 1 small yellow onion, finely chopped
  • 1/2 cup plus 2 Tbsp.  chicken broth, divided
  • 1 Tbsp.  all-purpose flour
  • 1 cup (8 oz.) dry white wine
  • 2 Tbsp.  Dijon mustard
  • 1 Tbsp.  fresh thyme leaves, plus more for garnish
  • 1/2 cup heavy cream

Directions

  1. Stir together ground turkey, egg, panko, salt, 1 teaspoon garlic, and 1/4 teaspoon pepper in a medium bowl until evenly combined. Shape mixture into 12 (about 1 1/2-inch) meatballs; transfer to a parchment paper–lined baking sheet. Cover and refrigerate until ready to cook.
  2. Cook bacon in a large skillet over medium-high, stirring often, until crisp and rendered, about 8 minutes. Transfer bacon to a paper towel–lined plate using a slotted spoon. Reserve 1/4 cup drippings in skillet; discard remaining drippings, or reserve for another use.
  3. Return skillet with drippings to medium-high. Cook meatballs, turning occasionally, until browned on all sides, about 6 minutes. Transfer meatballs to a plate, and set aside.
  4. Add mushrooms to skillet with drippings, and cook over medium-high, undisturbed, until browned on 1 side, about 3 minutes; stir and cook 2 more minutes. Add onion, 2 tablespoons broth, and remaining 2 teaspoons garlic. Cook, scraping up browned bits from the bottom of the skillet, until onion is just tender, about 3 minutes. Add flour; cook, stirring constantly, for 1 minute. Add wine, mustard, thyme, and remaining 1/2 cup broth; bring to a boil over medium-high.
  5. Add meatballs and half of reserved bacon to skillet; simmer over medium-low, partially cover and turn meatballs occasionally, until a thermometer inserted into meatballs registers 165°F and sauce is thickened, 8 to 10 minutes. Stir in cream and remaining 1/4 teaspoon pepper. Season to taste with salt. Sprinkle with remaining bacon, and garnish with additional thyme leaves.

http://www.lynnandruss.com

Original recipe from Anna Theoktisto for Food & Wine

Cod with Chorizo, Greens and Chickpeas

In this one-pan dinner from Bon Appétit, cod and Spanish chorizo—the dry, cured kind, often sold in a link like salami—showcase why the ingredients make such a great pair.

Chorizo is a highly seasoned chopped or ground pork sausage used in Spanish and Mexican cuisine. Mexican chorizo is made with fresh (raw, uncooked) pork; while the Spanish version, which is used here, is made with garlic and pimentón (Spanish smoked paprika, either sweet or hot), which gives it its deep brick-red color and smoky flavor.

Using rendered chorizo to cook down garlic, tomato paste, and sherry vinegar creates a red-tinged mixture at the bottom of the pan; with water, it becomes a flavorful braising liquid for sturdy greens, then warming canned chickpeas, and finishing your previously seared fish.

Finishing the lean, flaky fish in liquid ensures gentle cooking so you don’t end up with rubbery overdone fish. Crispy chickpeas, made first, in the same pan, add a textural garnish. Add a piece of crusty bread for sopping up all the extra sauce and you have a dish that’s fast enough for a weeknight but elevated enough for company.

For an extra fiery version of this dish, swap in a tablespoon of Calabrian chile paste for one of the two tablespoons of tomato paste (you’ll want to still use a bit of tomato paste to ensure the sauce gets some color).

We made numerous changes including increasing the olive oil, using a larger can of chickpeas, decreasing the amount of flour, and starting with a larger skillet. All of our changes are noted in the recipe below.

Cod with Chorizo, Greens and Chickpeas

  • Servings: 4-6
  • Difficulty: easy
  • Print

Ingredients

  • 2 Tbsp. all-purpose flour, for dusting one side of the fish
  • 1–1½ lb. skinless cod fillet, cut into 2–4 pieces, patted dry
  • Kosher salt, freshly ground pepper
  • 4 Tbsp. extra-virgin olive oil
  • 1 19 oz. can chickpeas, rinsed, divided
  • 4 oz. smoked Spanish chorizo, casing removed if needed, cut into very small pieces
  • 5 garlic cloves, thinly sliced
  • 2 Tbsp. sherry vinegar or red wine vinegar
  • 2 Tbsp. tomato paste
  • ¼ tsp. crushed red pepper flakes
  • 1 bunch kale, ribs and stems removed, leaves torn into large pieces (about 6 cups)
  • 2 Tbsp. unsalted butter

Directions

  1. Place ⅓ cup all-purpose flour in a shallow bowl. Season 1–1½ pounds skinless cod fillet, cut into 2–4 pieces, patted dry, on both sides with kosher salt and freshly ground black pepper, then press one side into flour to coat and tap off excess.
  2. Heat 2 tablespoons extra-virgin olive oil in a large high-sided skillet over medium-high. Cook ½ cup chickpeas, rinsed, tossing often, until crisp, about 3 minutes. Using a slotted spoon, transfer to a small bowl; season with salt.
  3. Reduce heat to medium. Cook cod, flour side down, in oil left in pan until light golden underneath, about 3 minutes. Transfer to a plate and arrange browned side up.
  4. Cook 4 ounces smoked Spanish chorizo, casing removed if needed, cut into very small pieces, in same pan, stirring often, until oil is red and chorizo is starting to crisp, about 1 minute. Add 5 garlic cloves, thinly sliced, and cook, stirring often, until fragrant, about 1 minute. Add 2 tablespoons sherry vinegar, 2 tablespoons tomato paste, and ¼ teaspoon crushed red pepper flakes and cook, stirring often, until combined about 1 minute. Add 1 medium bunch kale, ribs and stems removed, leaves torn into large pieces (about 4 cups), and stir to coat, then add 2 tablespoons unsalted butter, remaining chickpeas, a pinch of salt, and 1 cup water. Cook, tossing often, until kale is wilted, about 3 minutes.
  5. Arrange cod, browned side up, in pan; simmer, spooning sauce over, until cooked through, about 3 minutes. Top with crisped chickpeas and season with black pepper.

http://www.lynnandruss.com

Adapted from a recipe by Kendra Vaculin for Bon Appétit