A favorite combination for many with a sweet tooth: chocolate and peanut butter. Here, the famous duo meld together seamlessly with a chocolate cookie base that replaces one quarter of the butter with a 1/2 cup of smooth-style peanut butter mixed into the dough.
Another twist in the recipe, was the inclusion of some semi-sweet chocolate chips in addition to the peanut butter chips. Then, as if that isn’t enough, even more peanut butter chips were added atop the dropped raw cookie dough before going into the oven.
The double batch recipe shown below yielded 4 dozen cookies.
Preheat the oven to 350° F. Grease 2 cookie sheets.
Beat sugar and butter with an electric mixer in a large bowl until smooth and fluffy. Beat first egg into butter mixture. Beat in second egg along with vanilla extract.
Combine flour, cocoa, baking soda, and salt in a separate bowl; stir into creamed mixture until just combined. Fold in peanut butter and semisweet chips. Drop cookies by heaping teaspoonfuls onto the prepared cookie sheets. Add 2 or 3 chips to the tops of each cookie mound.
Bake in the preheated oven until edges are set, 8 to 10 minutes. Cool on the baking sheets briefly before removing to a wire rack to cool completely.
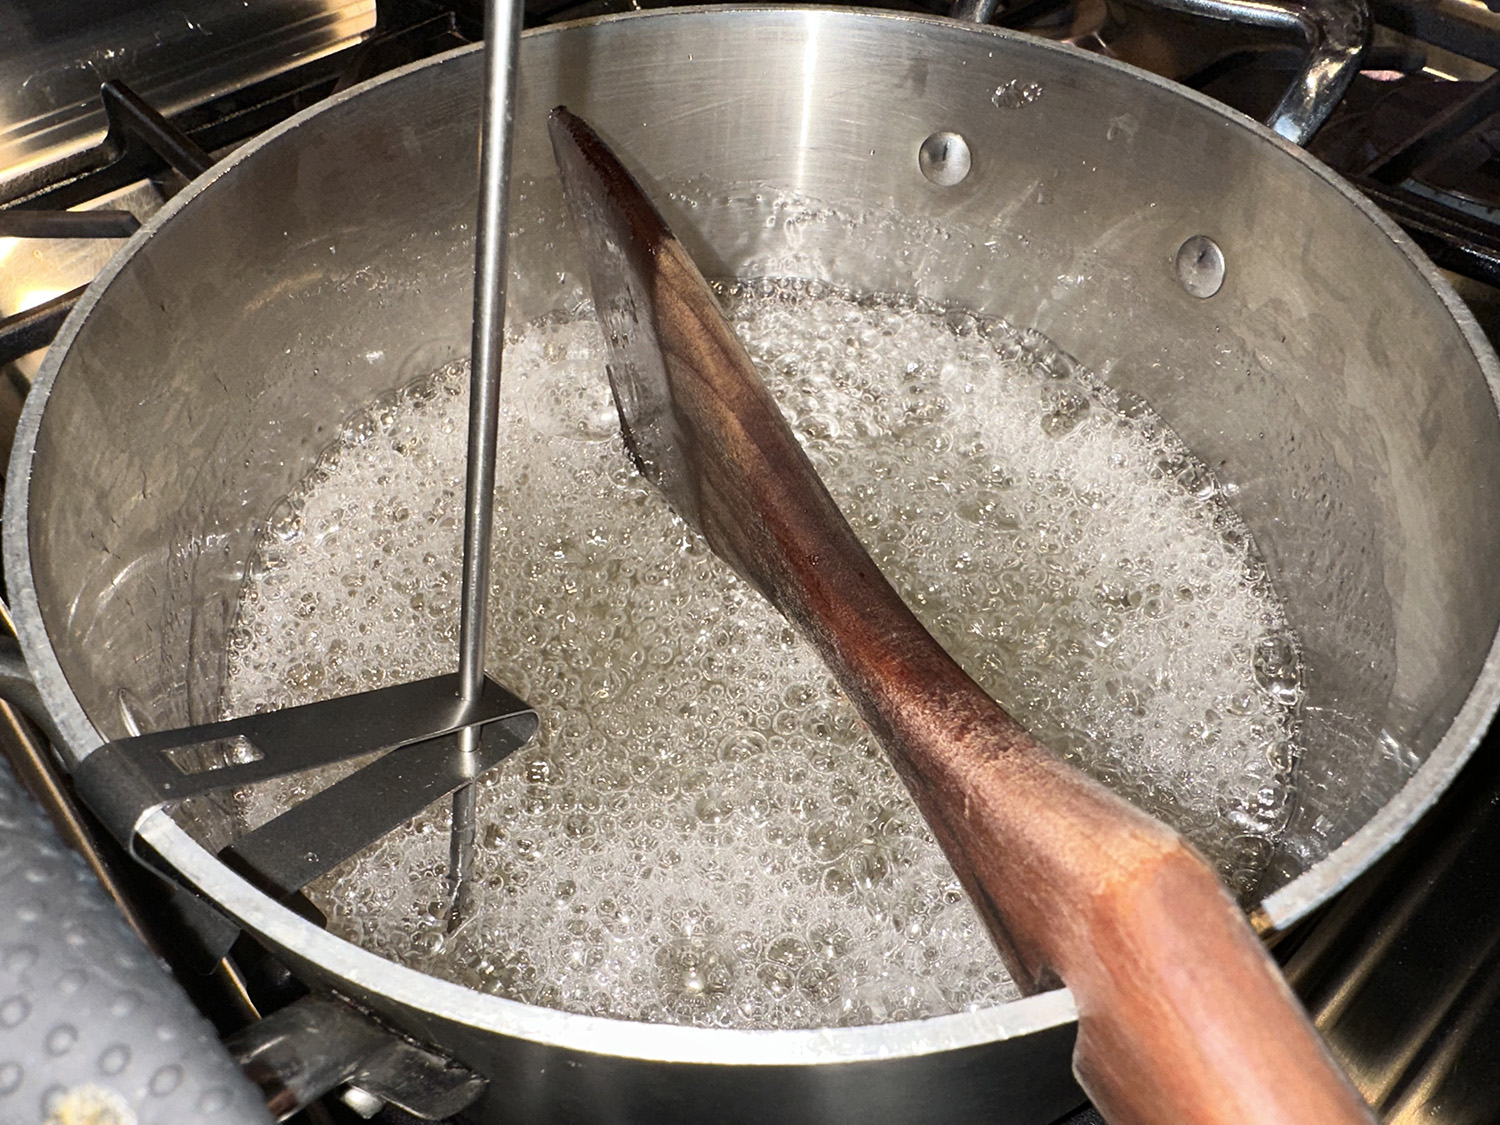
After spending a full afternoon making double batches of dough for 4 different holiday cookie recipes, I still had a little starch left in me and decided to try this intriguing peanut brittle recipe found in Food & Wine Magazine. This giftable brittle from chef LaMara Davidson is loaded with toasty peanuts, pepitas, and smoky, sweet ancho chile powder.
Baking soda reacts with the acidic caramelized sugar to create the tiny air pockets that give the candy a porous and snappy texture. FYI, the molten sugar will bubble up vigorously when adding the baking soda, so be sure to use a long-handled wooden spoon for safe stirring. In place of a candy thermometer, which we didn’t have, use a probe meat thermometer.
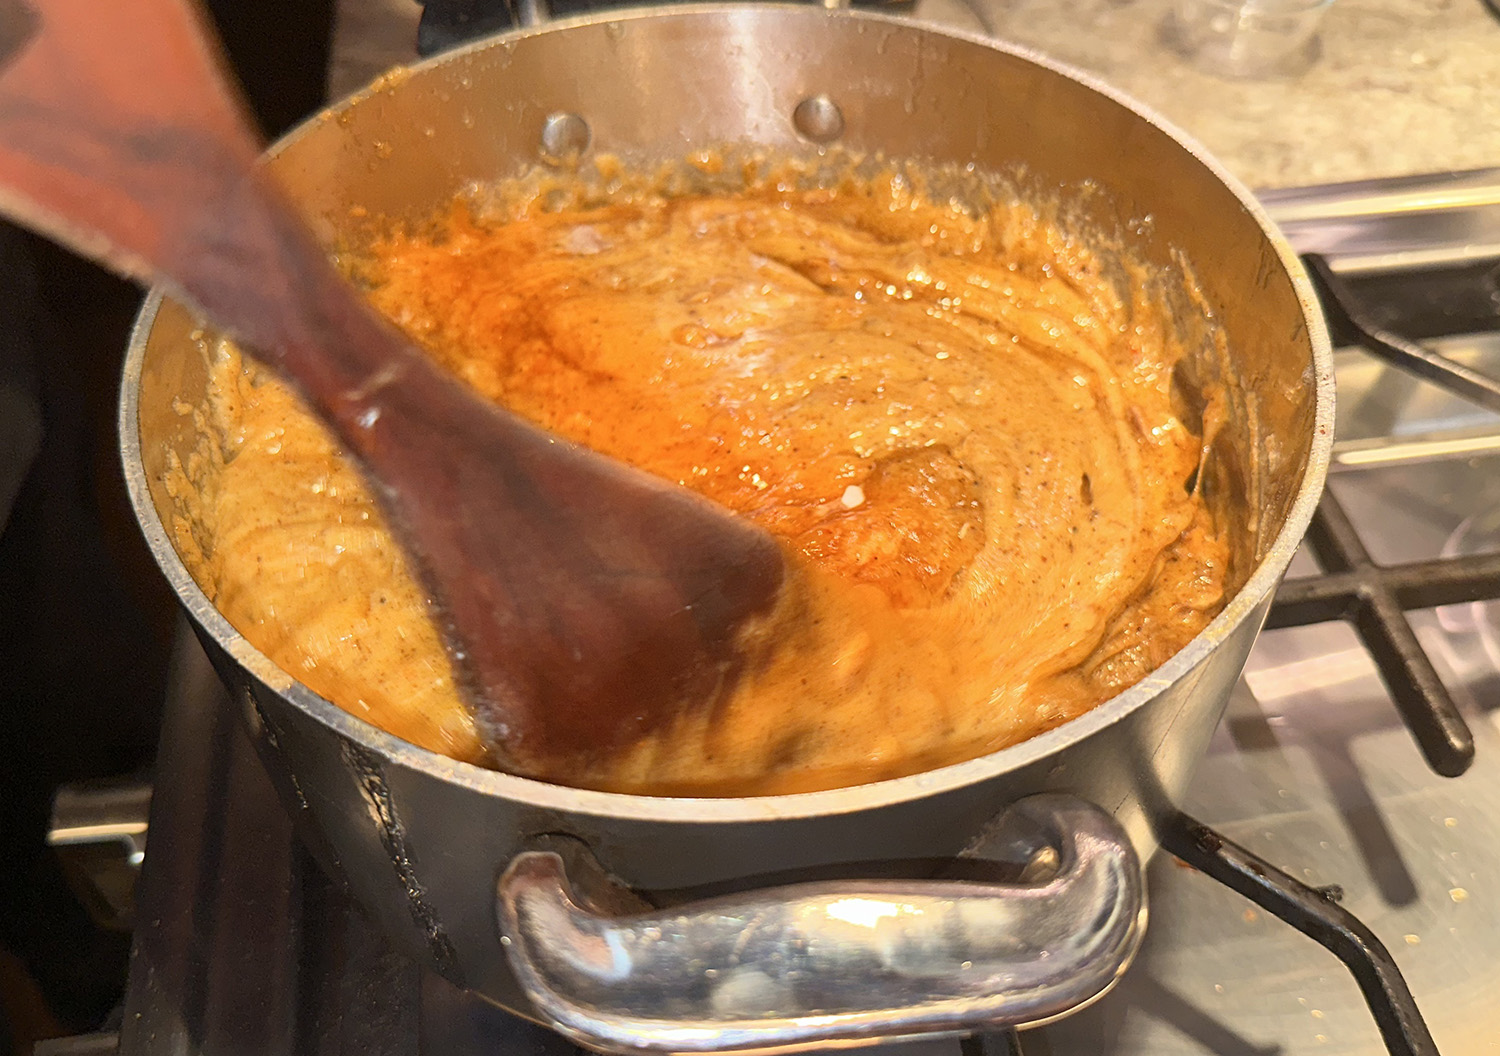
Work quickly when spreading the brittle on the buttered baking sheet as the caramelized syrup will begin to thicken as soon as it hits the cold pan. Once completely cooled, the candy can be broken into a mosaic of shards. Speckled with rusty-red chile powder, loaded with nuts and sprinkled with flaky sea salt, this delectable brittle was packaged in small festive bags along with the homemade cookies as a flavorful holiday gift.
Ancho powder is ground ancho (pablano) chile peppers, and is a dark smokey chili with a deep rich flavor and mild to medium heat, with a somewhat sweet flavor. If you like more of a spicy note, add a small amount of either cayenne pepper or pimentón picante. Spanish pimentón can be spicy, sweet, or smoky, but it’s almost always better than the regular grocery store paprika.
1/2 cup unsalted butter (4 oz.), cut into 1/2-inch cubes, plus softened unsalted butter, for greasing
2 cups granulated sugar
1 cup light corn syrup
1/2 cup water
1 tsp. kosher salt
1 1/4 cups dry roasted peanuts
1 1/4 cups roasted salted pepitas
1 1/2 Tbsp. ancho chile powder, plus more for garnish
1 tsp. vanilla extract
1/2 tsp. ground cinnamon
1 tsp. baking soda
1 tsp. sea salt
Directions
Generously grease a 13- x 18-inch rimmed baking sheet with butter; set aside.
Stir together sugar, corn syrup, 1/2 cup water, and kosher salt in a medium saucepan; attach a candy thermometer to side of pan. Cook over medium, stirring occasionally with a wooden spoon, until mixture reaches 280°F, 18 to 20 minutes.
Stir in cubed butter, peanuts, pepitas, ancho chile powder, vanilla, and cinnamon until mixture is well combined and butter is melted, 1 to 2 minutes. Continue cooking, stirring often, until mixture is golden brown and reaches 300°F, 4 to 5 minutes.
Add baking soda, stirring until well combined. (Mixture will bubble up vigorously.) Working quickly, immediately pour brittle mixture onto prepared baking sheet. Gently shake baking sheet to smooth brittle into a thin, even layer, or use the back of a spoon to spread brittle into a thin, even layer. (Lightly grease spoon with butter if brittle sticks.)
Sprinkle hot brittle evenly with flaky sea salt; garnish with additional ancho chile powder.
Let brittle cool completely at room temperature, about 30 minutes. Break into pieces.
A new one on us, this aromatic Moroccan dish—called harira—traditionally is served during Ramadan to break the daily fast. As Milk Street explains, it’s sometimes vegetarian, other times meaty, and depending on the the cook, its consistency may be thick and hearty, or light and brothy. I personally thought it was too brothy and prefer a thicker base. This could be accomplished be cutting back on the amount of water and/or adding more lentils which absorb liquid.
While the original recipe calls for lamb, you could substitute an equal amount of boneless beef chuck. For convenience and a time-saver, we omitted the step of soaking dried chickpeas and simply stirred in one can of drained chickpeas into the soup at the end. This is noted in the recipe below.
Serve with lemon wedges and a drizzle of grassy extra-virgin olive oil, and offer crusty bread for soaking up the broth. A nice toasted slab of crusty bread with a schmear of garlic butter was the perfect antidote.
2 Tbsp. extra-virgin olive oil, plus more to serve
6 medium celery stalks, sliced ½ to ¾ inch thick
1 medium yellow onion, roughly chopped
6 medium garlic cloves, smashed and peeled
3 Tbsp. finely chopped fresh ginger
¾ tsp. ground cinnamon
½ tsp. sweet paprika
14½ oz. can whole peeled tomatoes, crushed by hand
2 lbs. boneless lamb shoulder or beef chuck, trimmed and cut into ¾- to 1-inch chunks
⅓ cup lentils du Puy (French Lentils)
1 19 oz. can chickpeas, drained and rinsed
1 cup lightly packed fresh cilantro, flat-leaf parsley or a mixture, chopped, plus more to serve
Directions
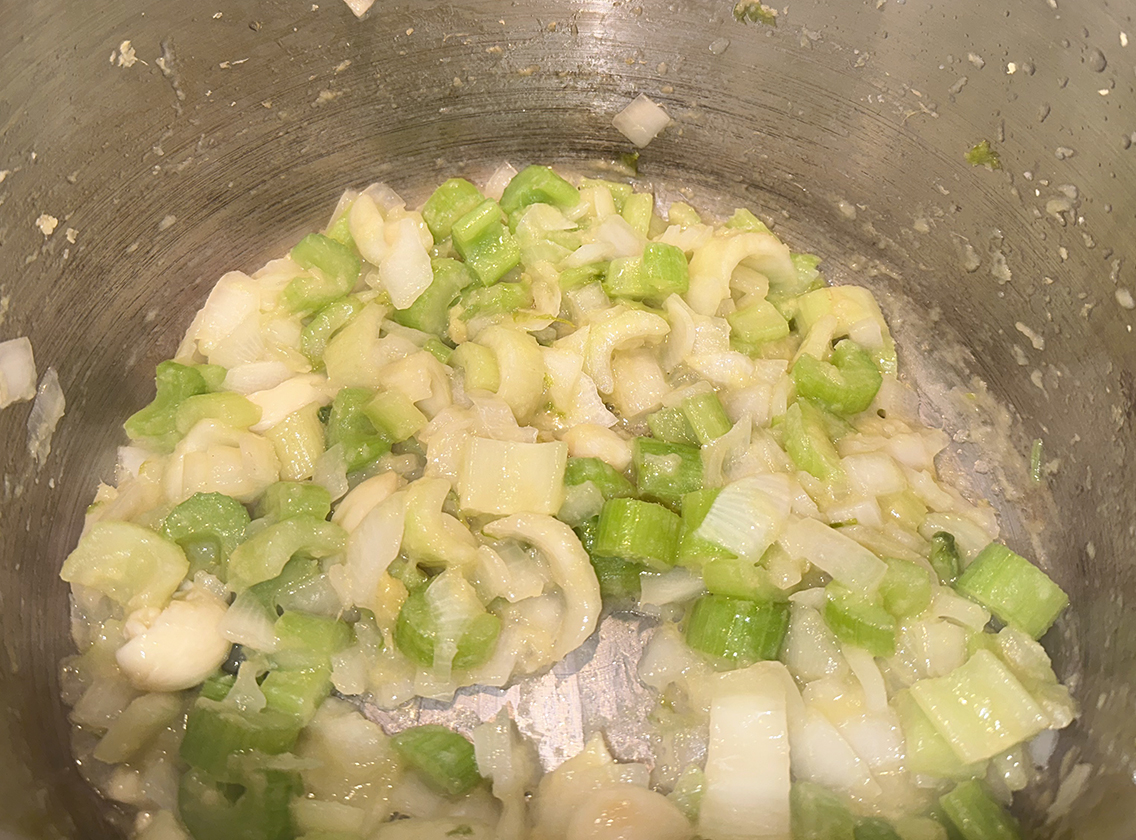
On a 6-quart Instant Pot, select Normal/Medium Sauté. Add the oil and heat until shimmering. Add the celery, onion, garlic, ginger and 2½ teaspoons salt. Cook, stirring occasionally, until the vegetables are softened, about 5 minutes.
Add the cinnamon, paprika and 1½ teaspoons pepper, then cook, stirring, until fragrant, about 10 seconds. Stir in the tomatoes and 4 cups water, scraping up browned bits. Add the lamb, lentils and chickpeas; stir to combine, then distribute in an even layer.
Press Cancel, lock the lid in place and move the pressure valve to Sealing. Select Pressure Cook or Manual; make sure the pressure level is set to High. Set the cooking time for 15 minutes.
When pressure-cooking is complete, let the pressure reduce naturally for 15 minutes, then release the remaining steam by moving the pressure valve to Venting. Press Cancel, then carefully open the pot.
Taste and season with salt and pepper, then stir in the drained chickpeas, parsley and/or cilantro. Serve sprinkled with additional herbs and drizzled with oil.
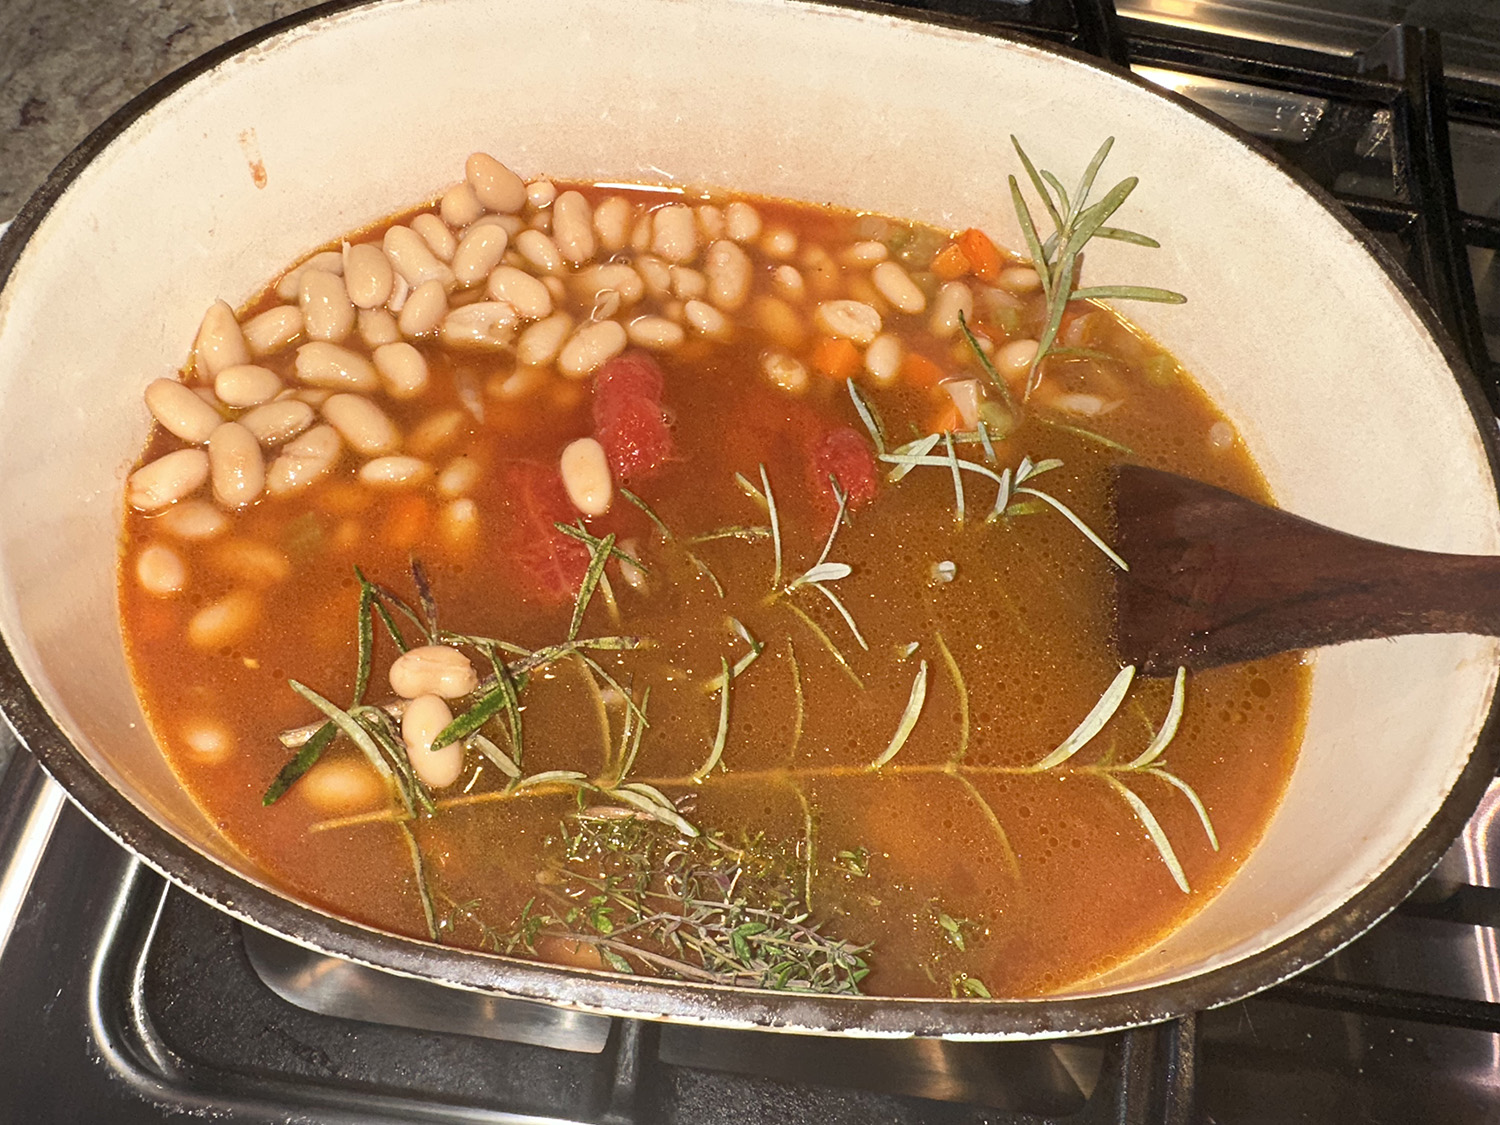
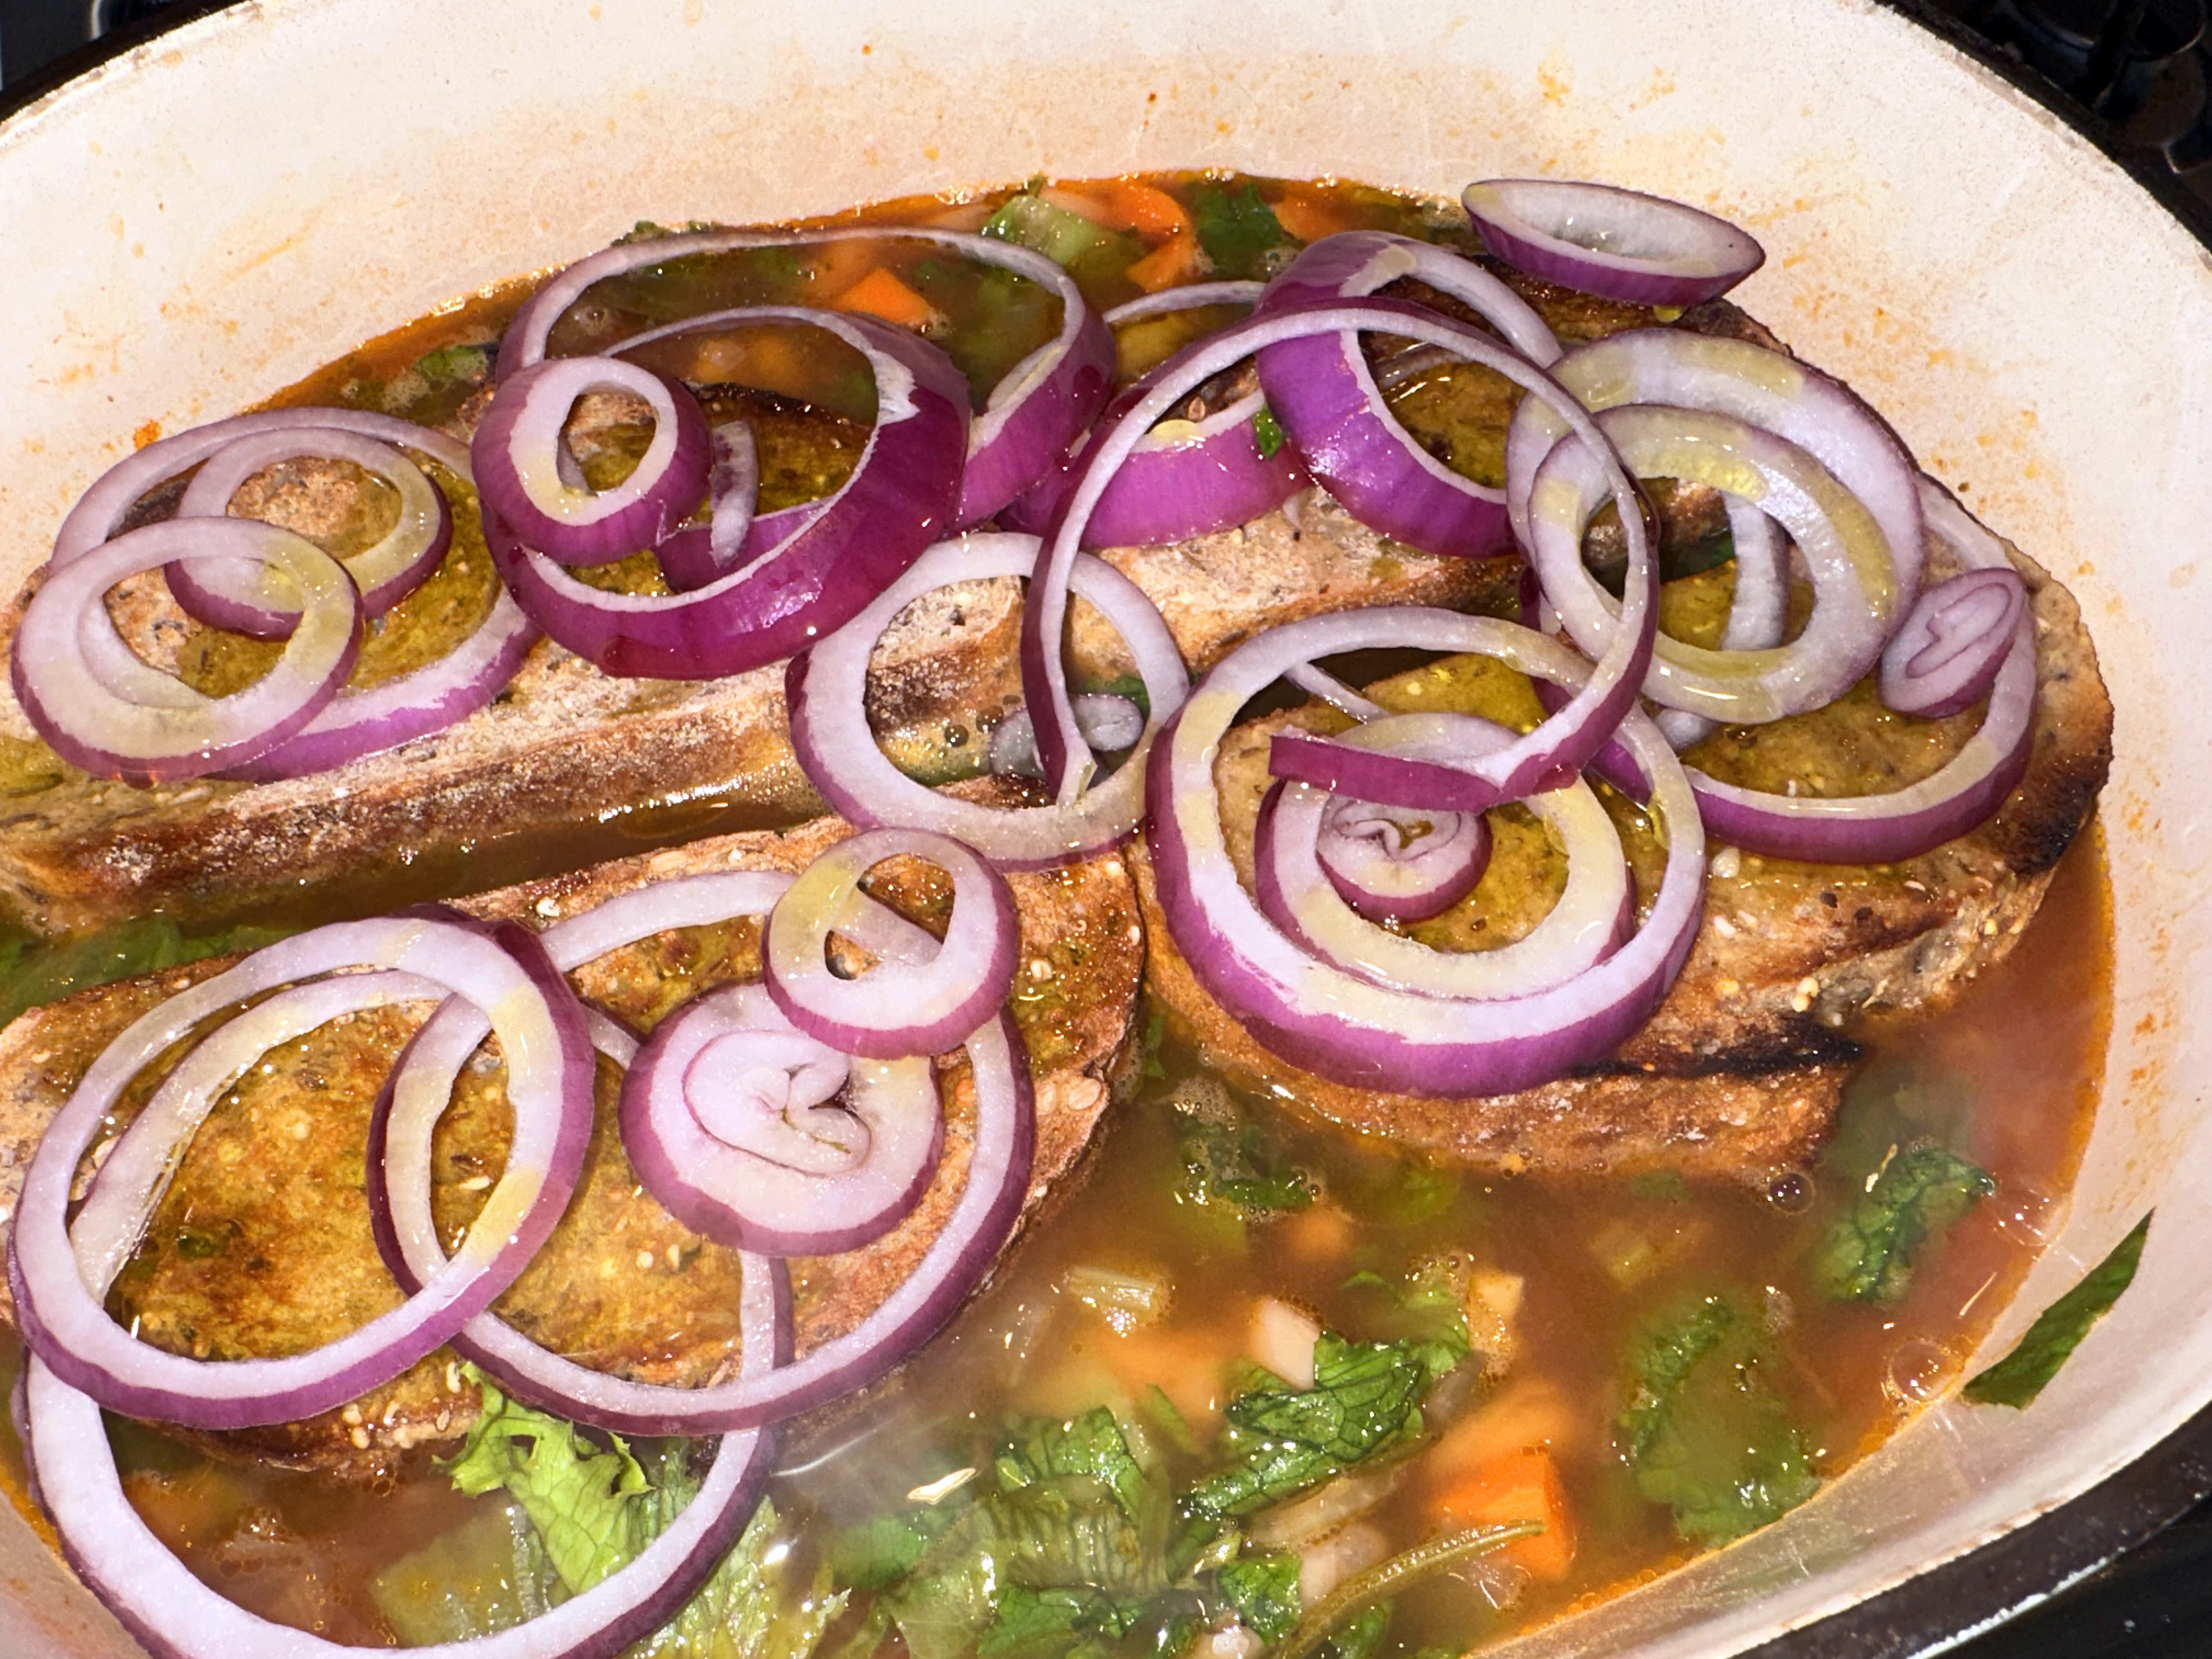
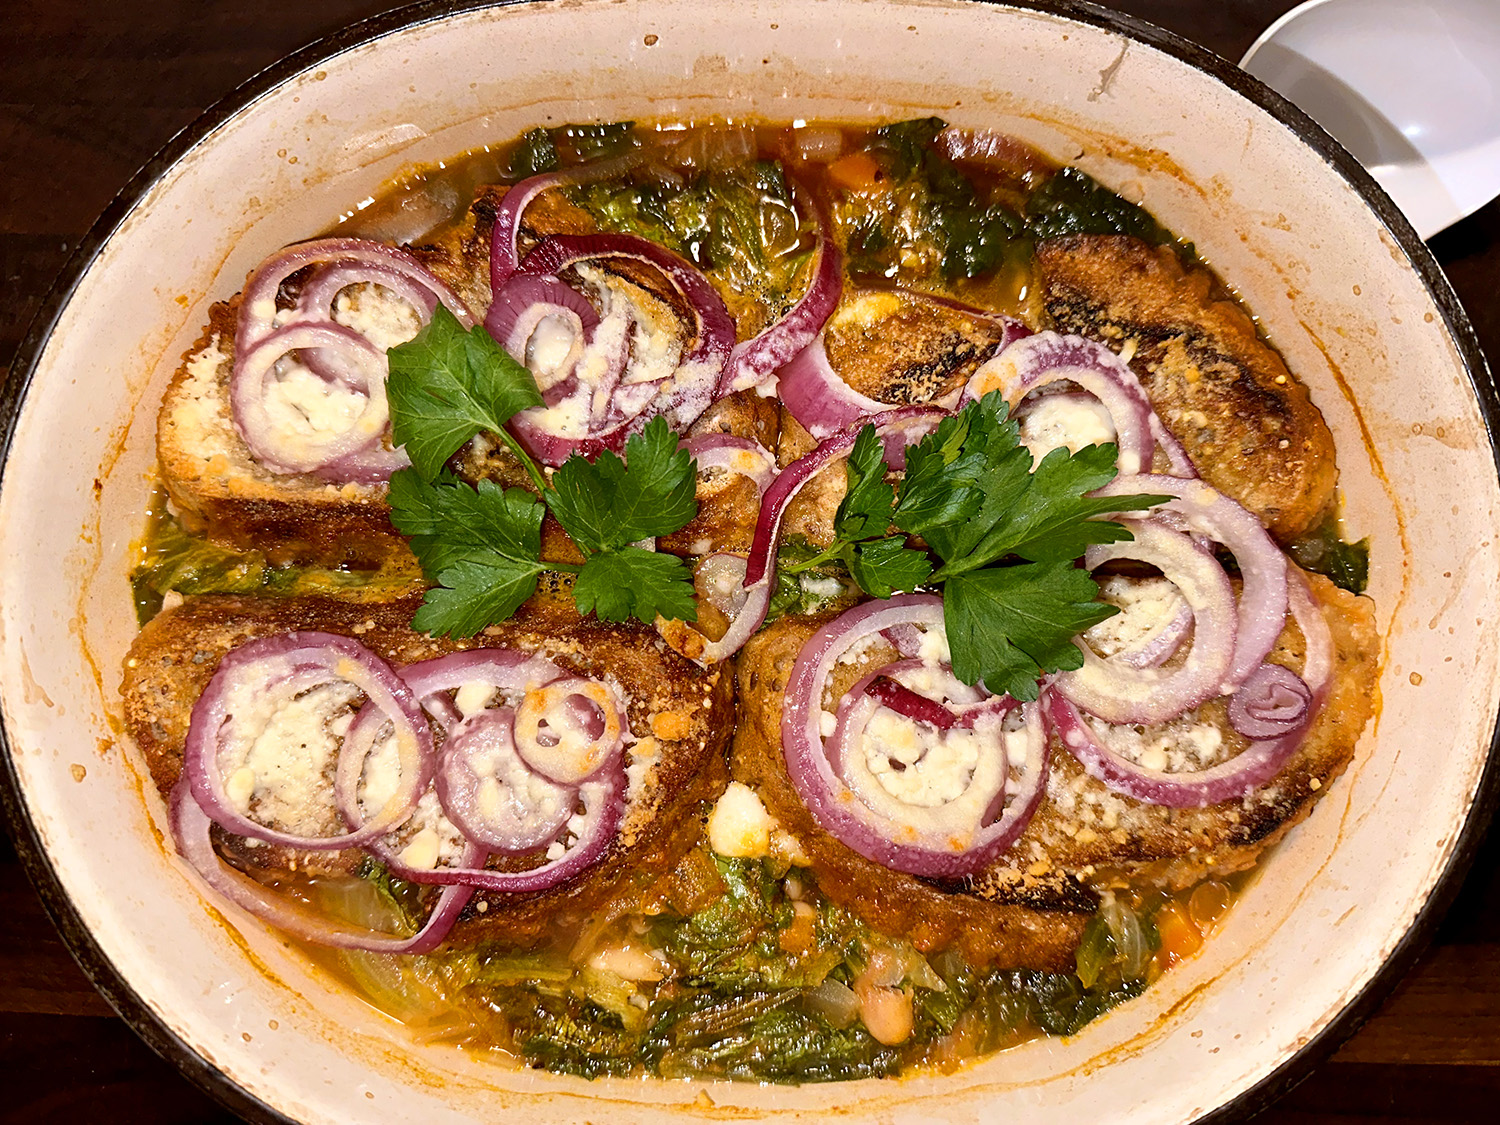
Such a thing as too many veggies? This recipe adds a pound of kale—that’s right, a full pound—to softened onions, carrots and celery, combined with beans and tomatoes. It’s simply a matter of bringing the other vegetables to the party in a simmer, then adding the kale and topping with the thick, toasted, crusty slabs of multi-grain bread. The whole dish bakes in the oven for a few minutes to crisp the toast and the Parmesan.
Confession, the supermarket carried kale, but it was lousy looking at best, so we opted for the substitute of escarole. And for a time-saver we used canned cannellinis, in fact we used two cans, about double the original amount!
This might be just the ticket to feast on after indulging in all that rich food during the holidays. Make sure to get a thick crusty multi-grain loaf of bread that is cut into 1-inch thick slices and toasted. Add extra parmesan when serving, if desired.
Put 2 tablespoons of the oil in a large pot over medium heat. When it’s hot, add onion, carrot, celery and garlic; sprinkle with salt and pepper and cook, stirring occasionally, until vegetables are soft, 5 to 10 minutes.
Heat the oven to 500 degrees. Drain the beans; if they’re canned, rinse them as well. Add them to the pot along with tomatoes and their juices and stock, rosemary and thyme. Bring to a boil, then reduce heat so the soup bubbles steadily; cover and cook, stirring once or twice to break up the tomatoes, until the flavors meld, 15 to 20 minutes.
Fish out and discard rosemary and thyme stems, if you like, and stir in kale. Taste and adjust seasoning. Lay bread slices on top of the stew so they cover the top and overlap as little as possible. Scatter red onion slices over the top, drizzle with the remaining 3 tablespoons oil and sprinkle with Parmesan.
Put the pot in the oven and bake until the bread, onions and cheese are browned and crisp, 10 to 15 minutes. (If your pot fits under the broiler, you can also brown the top there.) Divide the soup and bread among 4 bowls and serve.
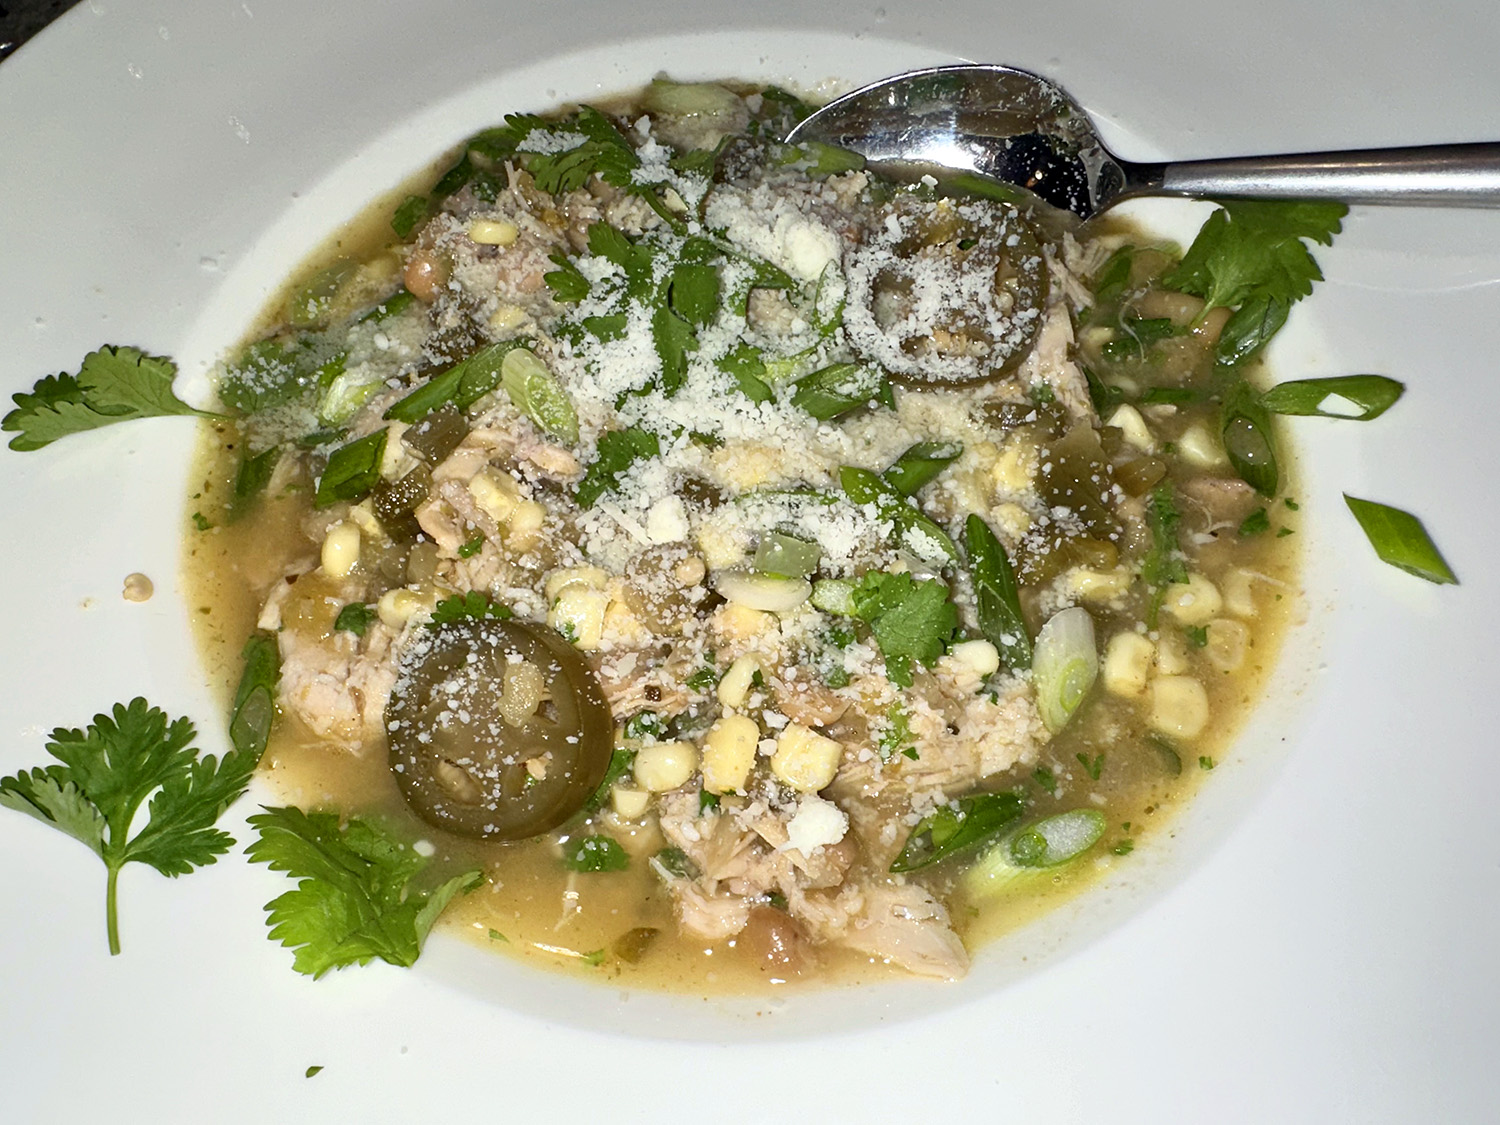
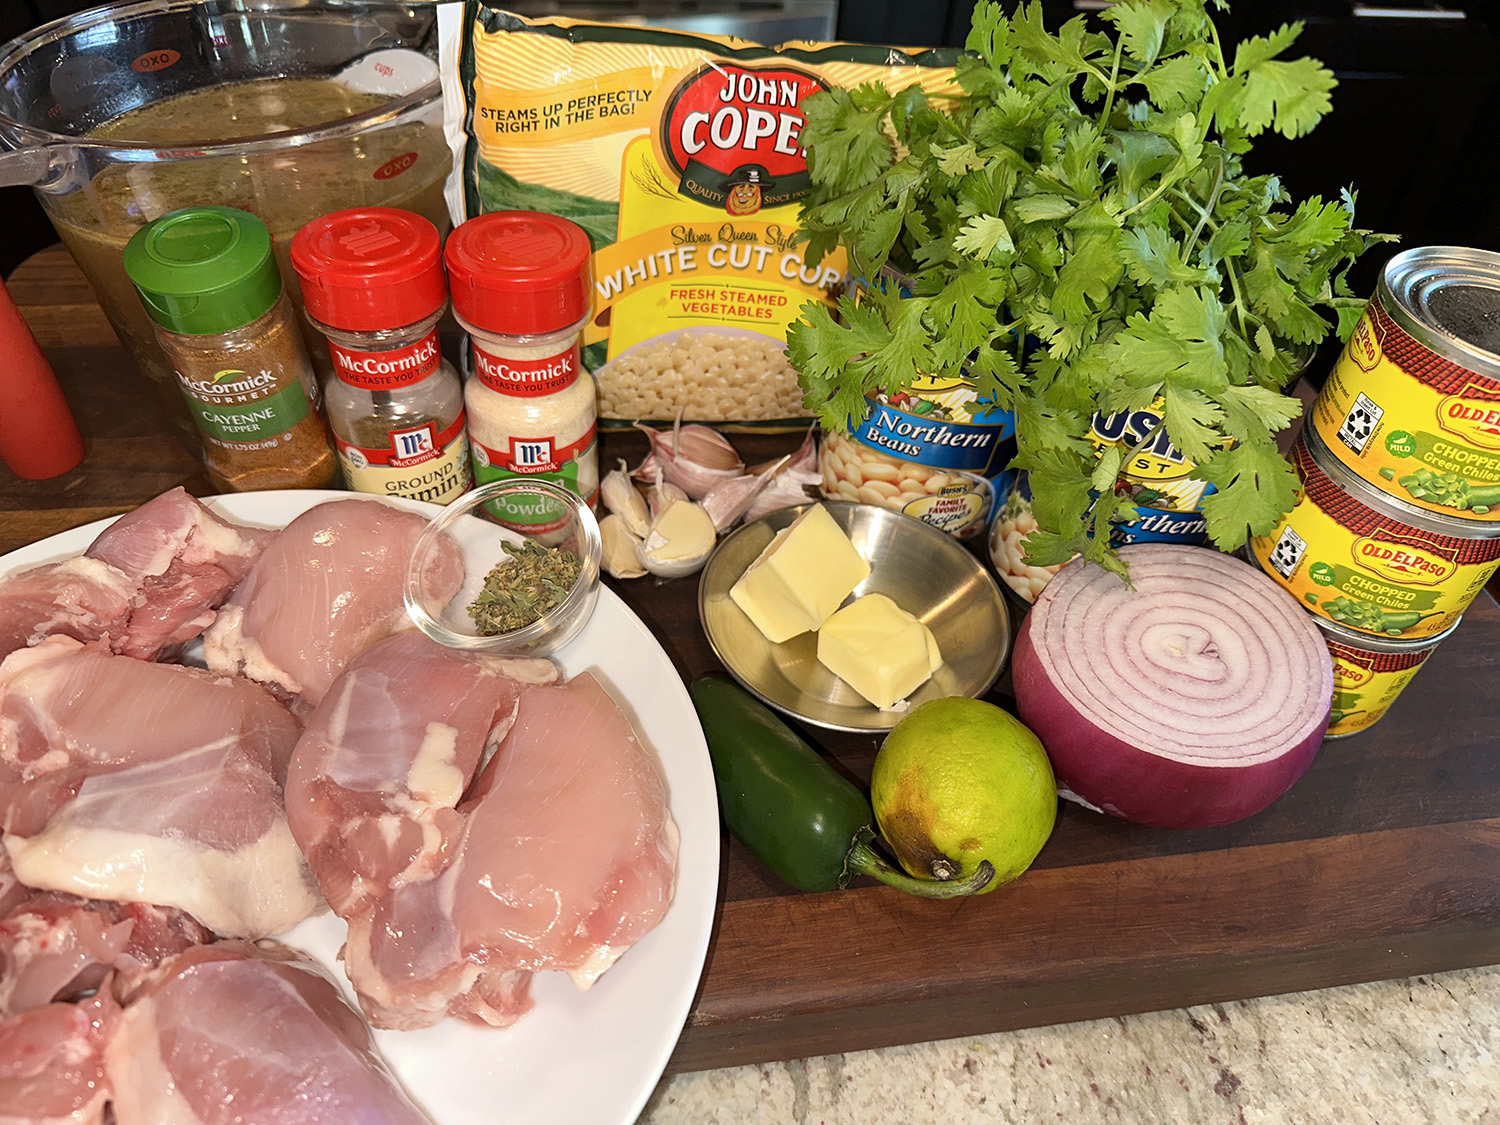
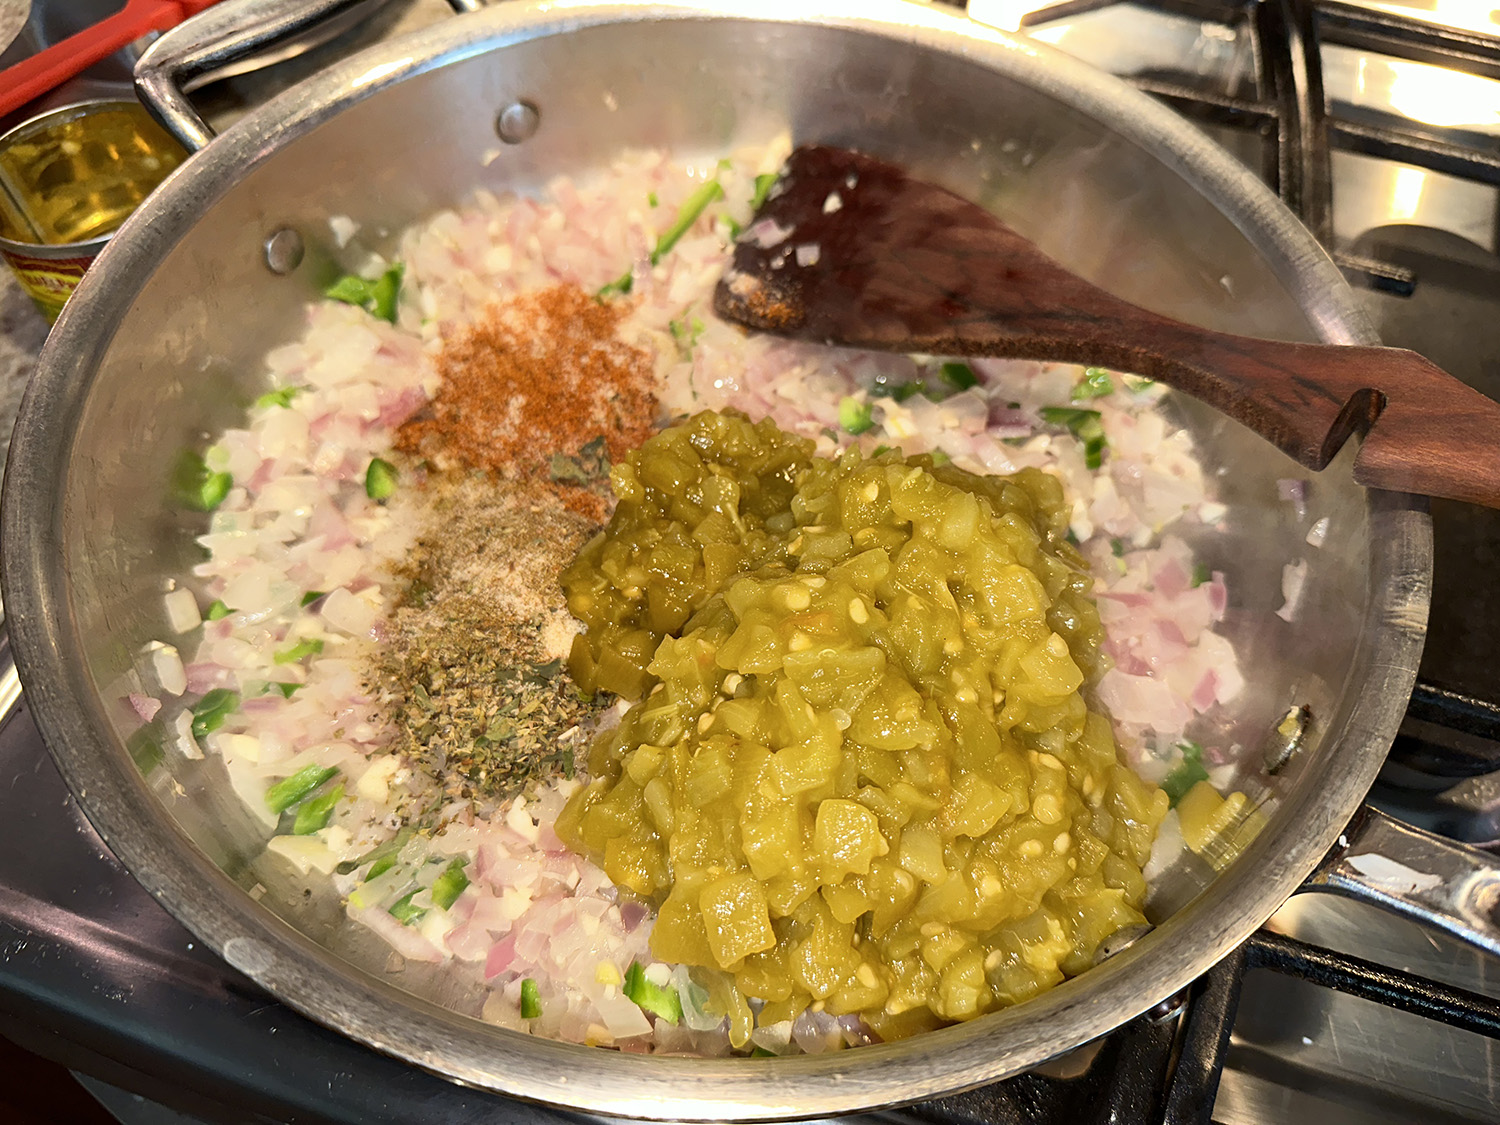
A perfect time of year for chili, and this tangy, mildly spicy white-bean chili is as warming and comforting as a traditional one, but in a lighter, brighter form. Plenty of green chiles — fresh and canned — provide kick while creamy white beans mellow it all out. To decrease the heat level, remove and discard the seeds from the jalapeño before you mince it.
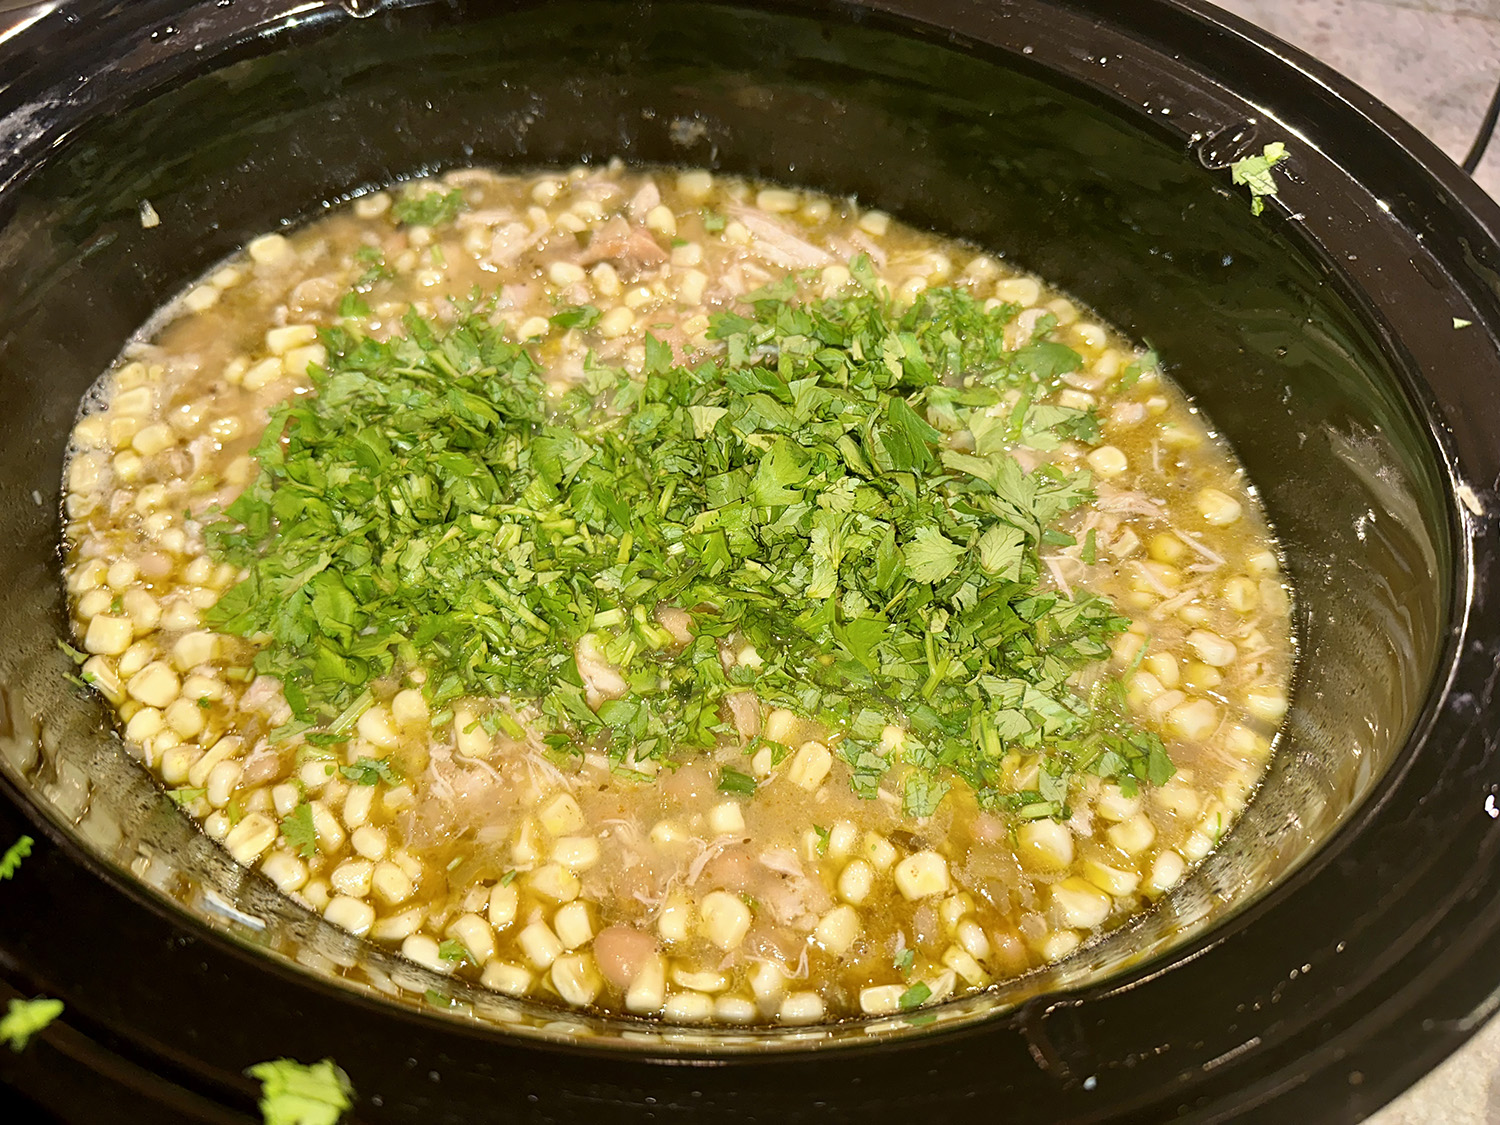
A large handful of chopped cilantro added at the end brings freshness, but if you don’t care for cilantro, pass it at the table along with the other toppings or omit it entirely. In the spirit of customizing your chili, you can make this in the slow cooker or on the stovetop*. Use 3 cups chicken stock in the slow cooker and 4 cups on the stovetop, where liquid is more likely to evaporate.
On addition to sliced scallions and chopped cilantro, we topped the chili with grated Cotija cheese. It is a Mexican, dry grated cheese, made from cow’s milk and can be compared to the taste of feta and parmesan. BTW, queso fresco means “fresh cheese” in Spanish, the best substitute for cotija if you can find it in stores or happen to have some on hand. It is very close in flavor to cotija but is a little bit milder.
*You can also cook the chili in a Dutch oven on your stovetop. In step 2, add 4 cups stock instead of 3 cups and let the mixture come to a simmer over medium-high. Reduce the heat to low, cover, and cook until the chicken is tender, stirring occasionally, about 35 minutes.
In a large Dutch oven, melt the butter over medium heat. Add the onion, season with salt and cook, stirring occasionally, until the onion is softened and translucent, about 8 minutes. Add the garlic and jalapeño and cook until fragrant, about 1 minute. Add the chopped green chiles, cumin, onion powder, oregano and cayenne and stir until fragrant, 1 to 2 minutes.
*Transfer the mixture into a 5- to 8-quart slow cooker. Generously season the chicken thighs with salt and add them to the pot. Stir in 3 cups chicken stock and the beans. Cover and cook on low until the chicken is tender, 4 to 6 hours.
Shred the chicken using two forks. (You can do this directly in the pot, or remove the chicken to a bowl, shred it, then return it to the pot.) Stir in the frozen corn, cover and cook until warmed through, about 10 minutes. Stir in the cilantro, if using, and lime juice. Season to taste with salt. Serve in bowls and pass the toppings at the table.
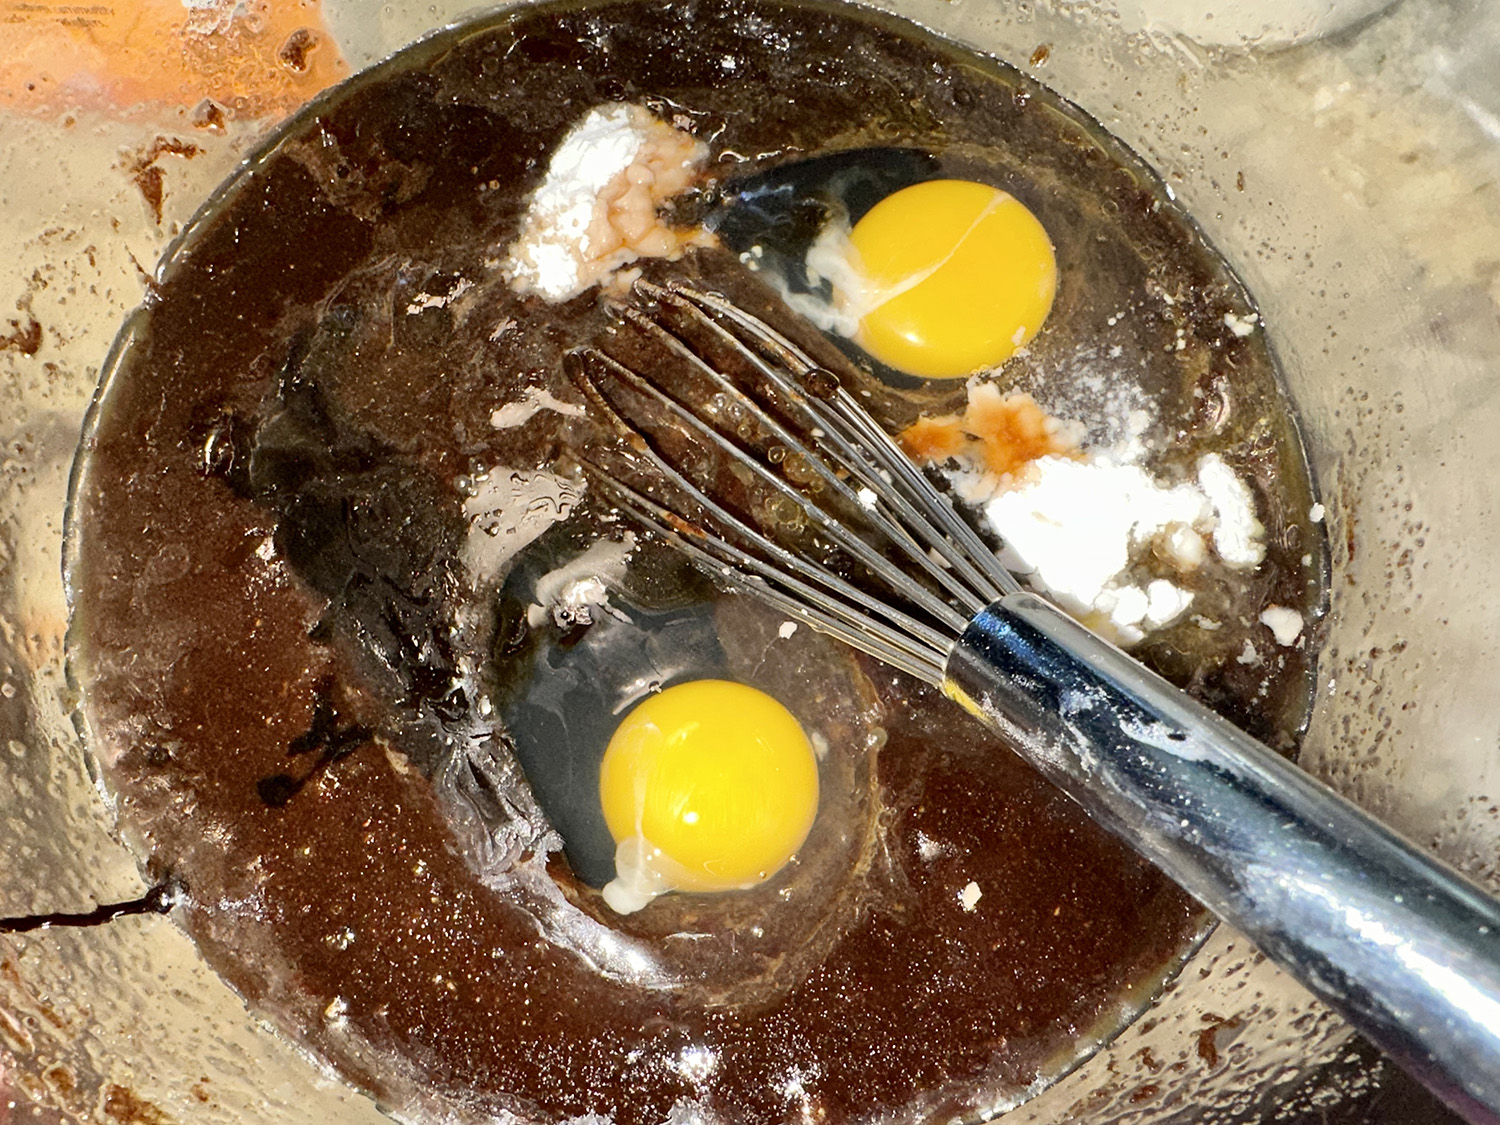
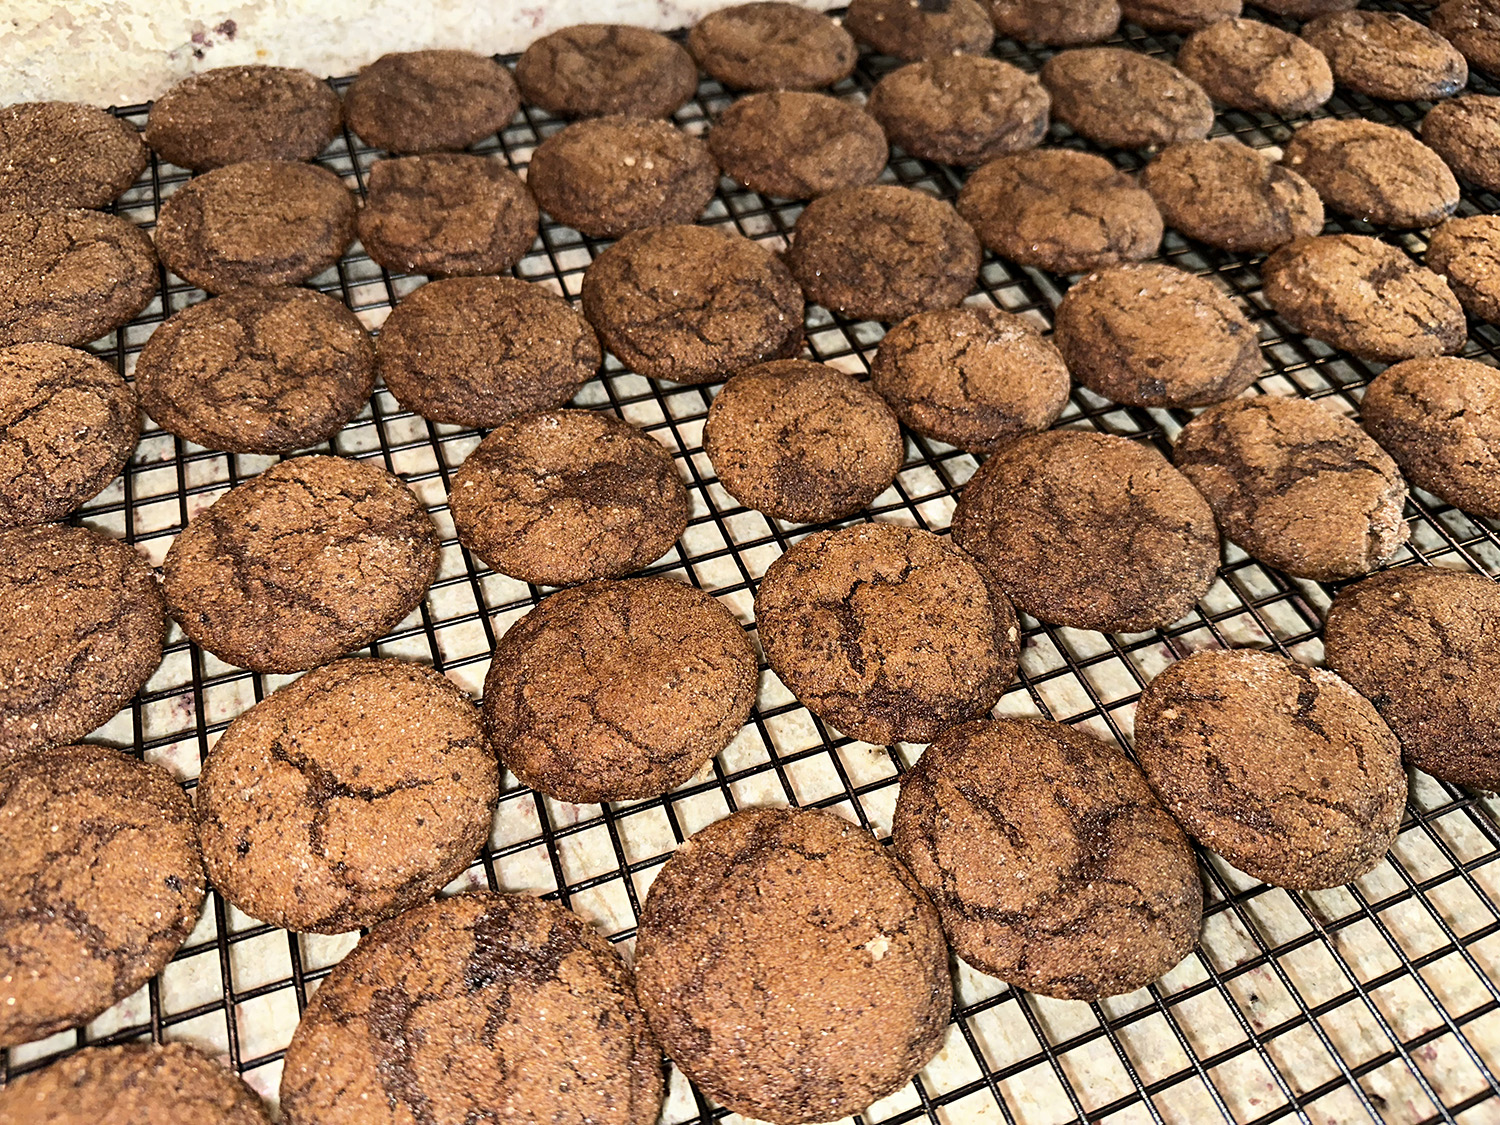
Spiced cookies are a favorite of The Hubs. So when he spotted this recipe on The NYTimes Cooking site, he immediately sent me a link… of course we had to try them. In fact, I made a double batch, one for an Art Opening we were attending, and one for the house.
“Biting into one of these cookies is like taking the first sip of a festive beverage, and their spiced coffee fragrance gives your kitchen cozy holiday vibes. A combination of fresh and ground ginger adds an extra note of warmth that accentuates the coffee flavor and other spices, while the espresso-sugar coating creates crisp edges that yield to pillowy-soft interiors. Pair it with your milk of choice and you have a gingerbread latte in a single bite.”
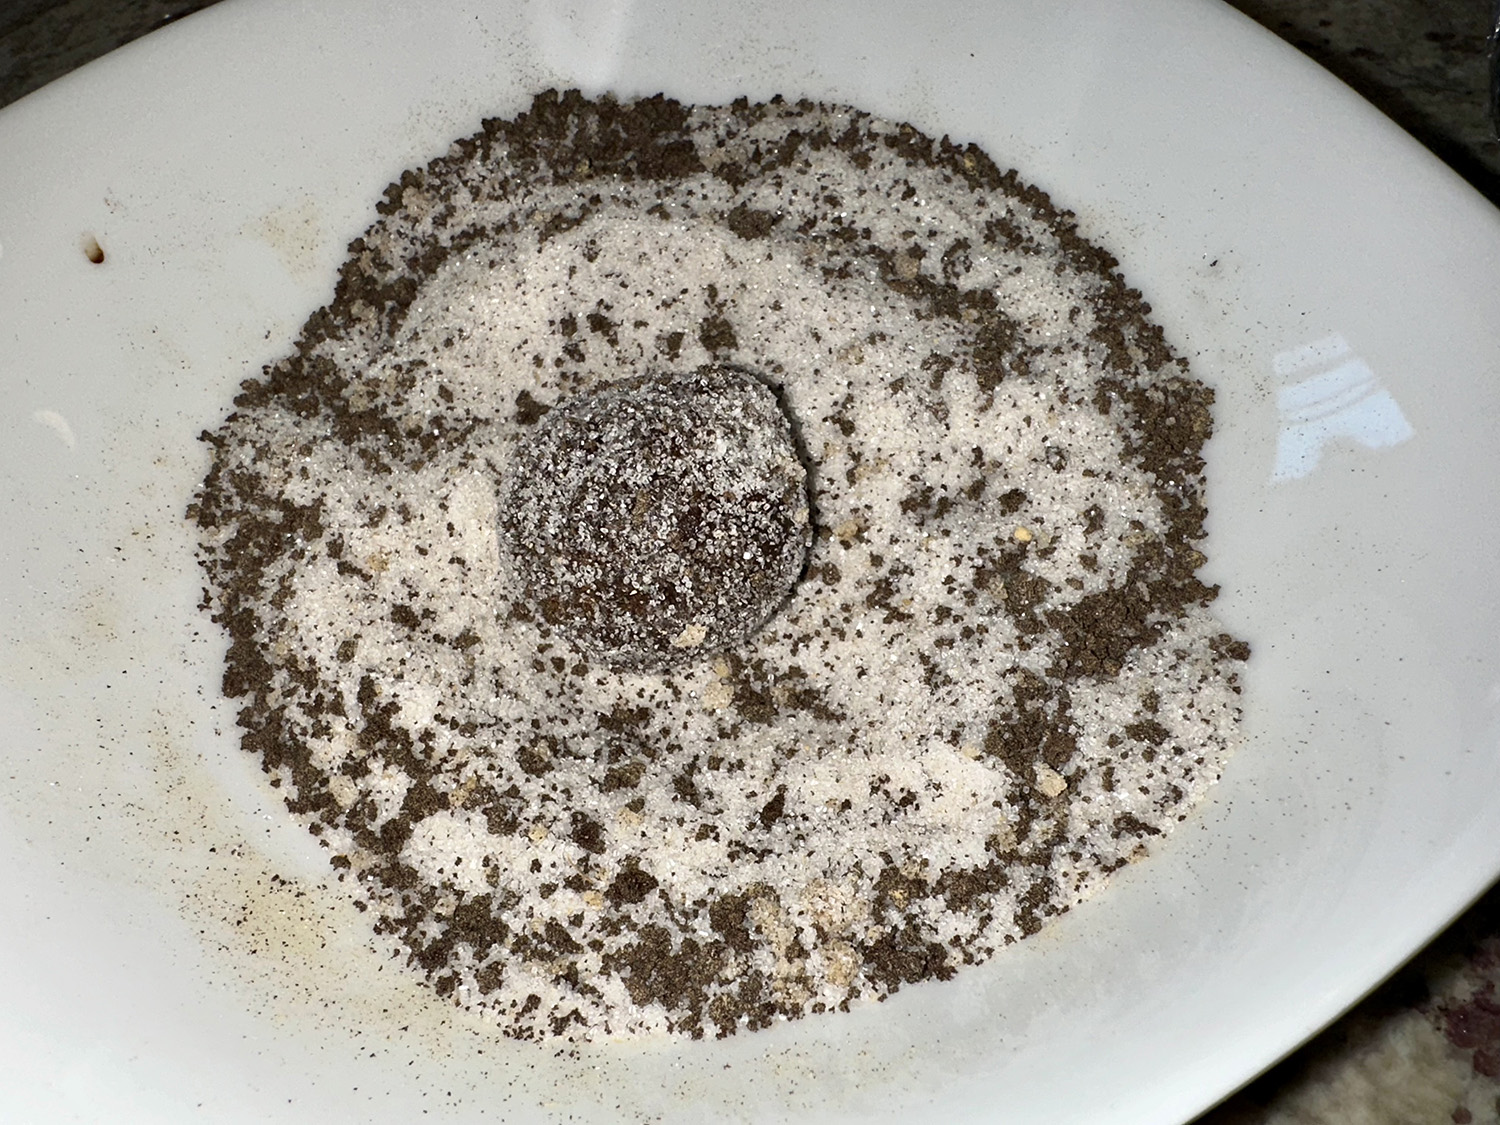
My double batch, rolled into 1 1⁄2 inch balls (smaller than the 2″ suggested size) yielded 58 cookies, nearly 5 dozen. After 2 hours refrigeration time, the dough was easily workable. Even though my finished cookies were smaller—2 1⁄2 to 3 inches in diameter—they still took the full 10 minutes to bake, turning the baking sheet halfway through.
NOTE: If you are using a scale to measure amounts, the original recipe called for ¼ cup/158 grams unsulphured molasses. The quarter cup measurement is correct, but the 158 grams is too much and should be 85 grams.
Tip: Portioned dough can be frozen in balls, then coated and baked for about 13 minutes.
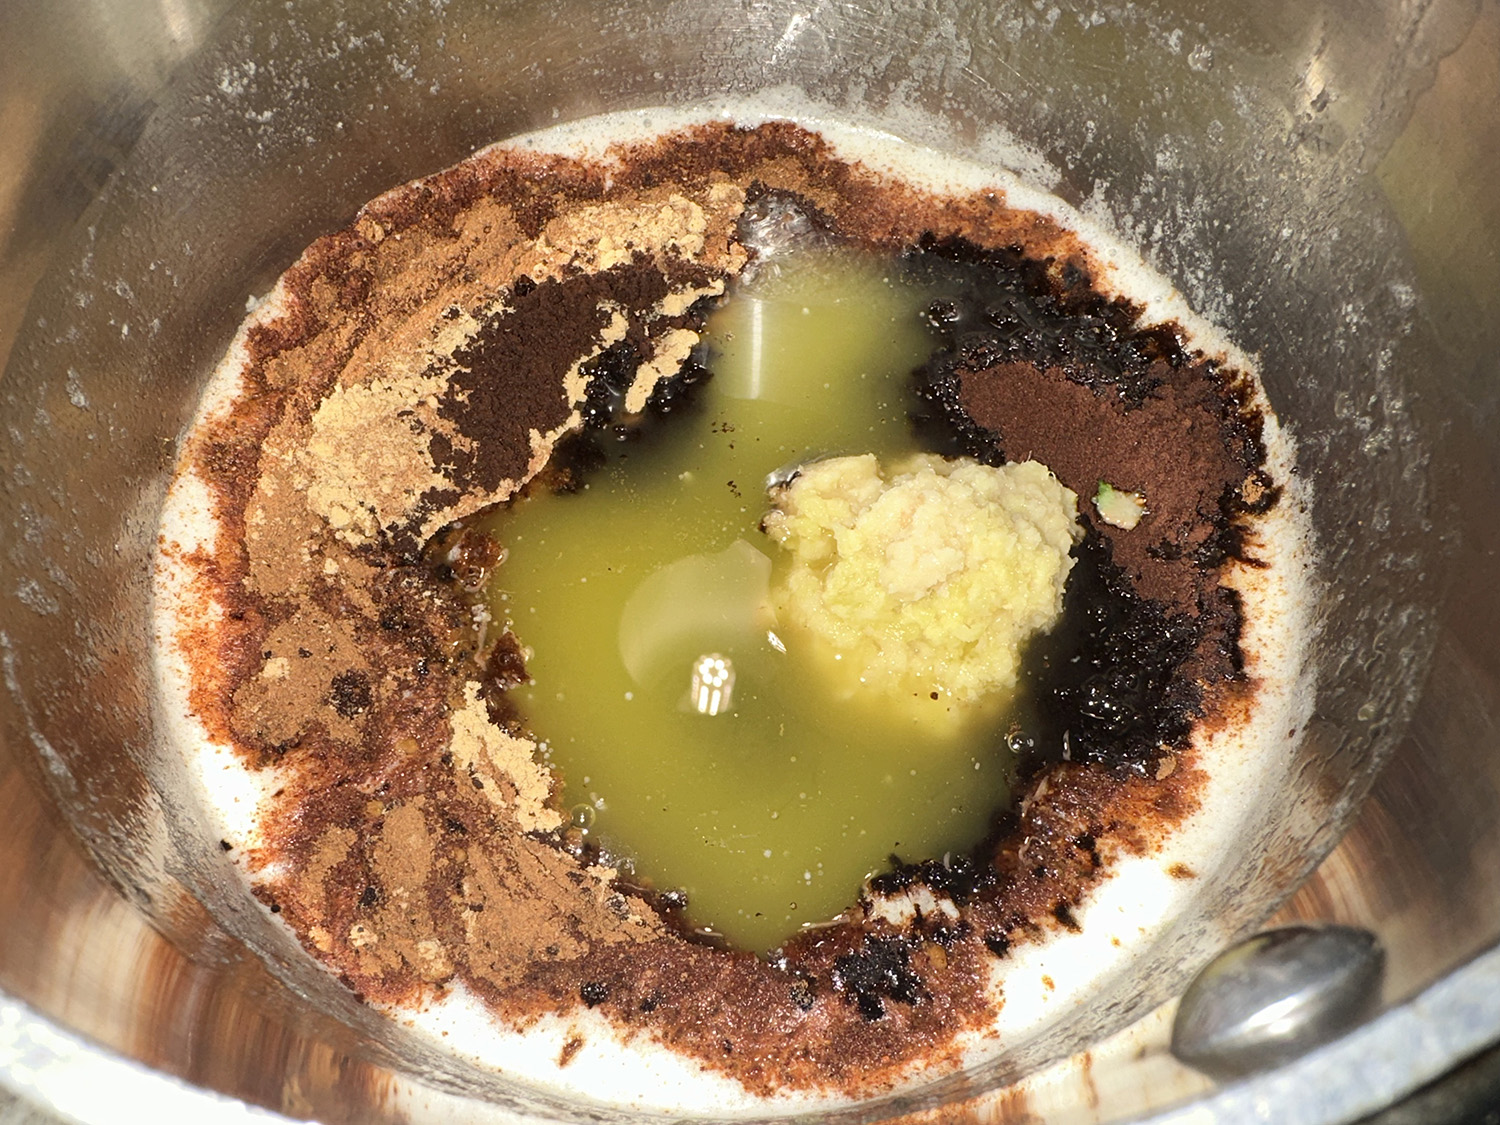
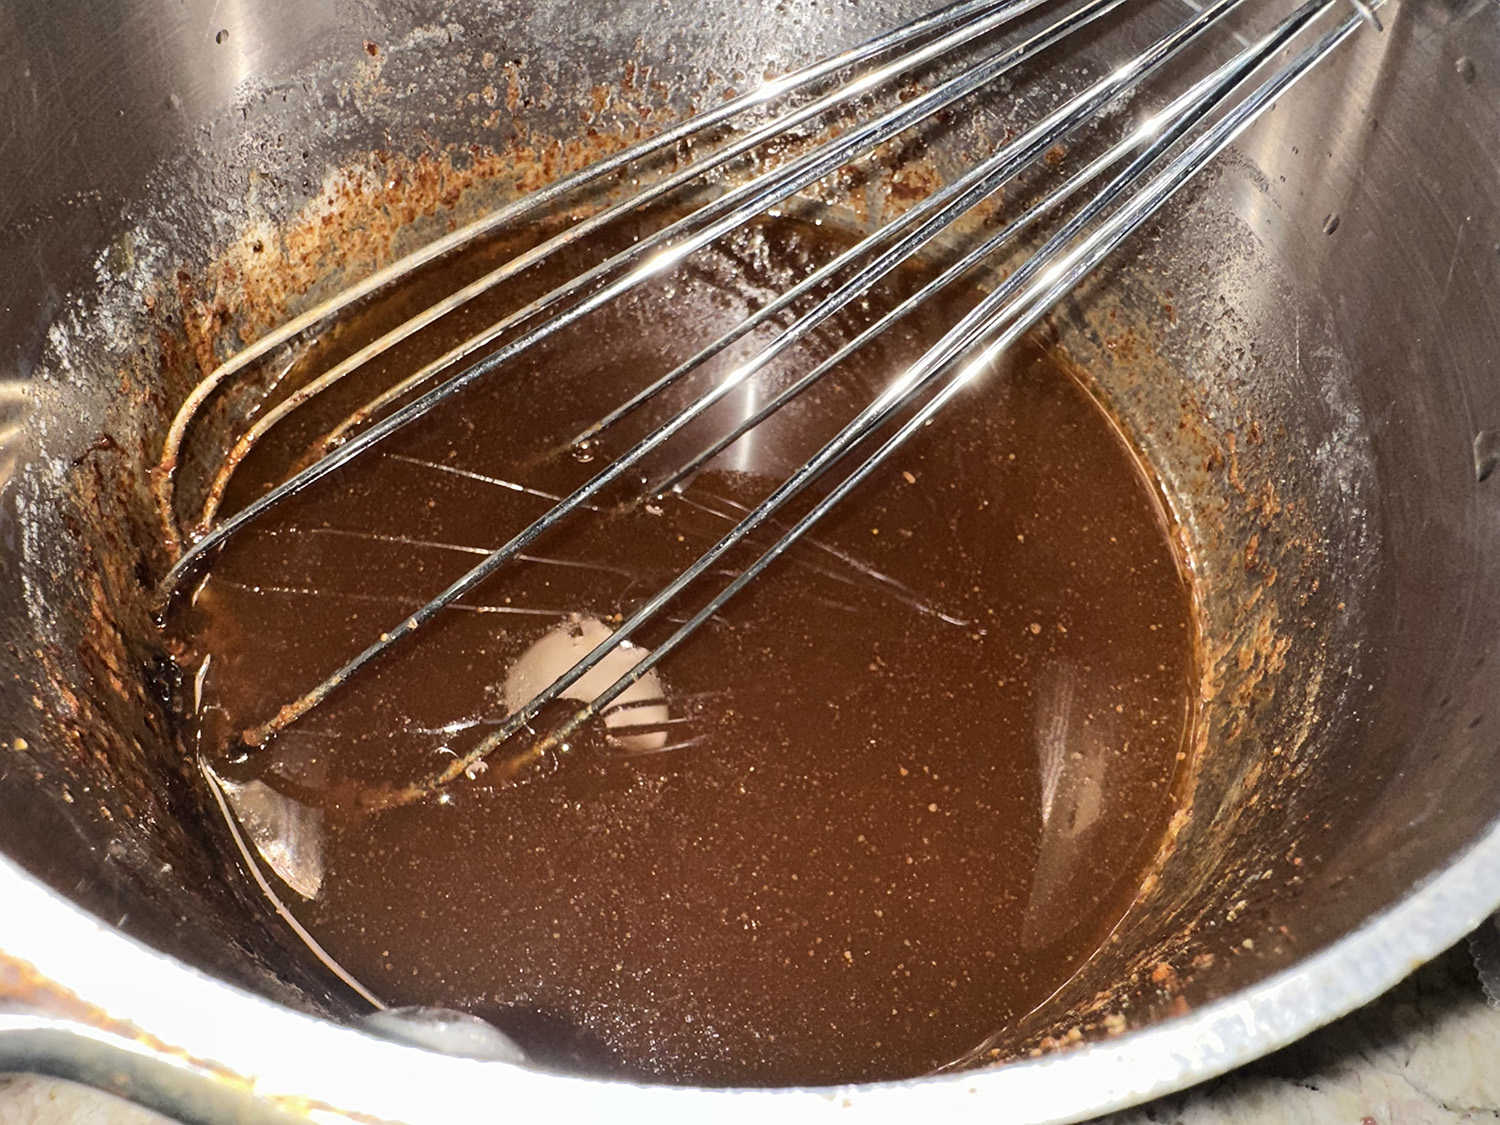
Melt the butter in a medium saucepan over medium. When it begins to bubble and get foamy, remove from the heat and whisk in the espresso powder, fresh ginger, ground ginger, cinnamon, nutmeg and clove. Scrape the butter mixture into a medium mixing bowl and set aside to cool for about 5 minutes.
Add the sugars, molasses and salt to the bowl and whisk vigorously to combine. Add the egg, vanilla and baking soda and continue whisking until the mixture appears smooth and it’s the consistency of thin pancake batter, about 2 minutes. Add the flour and mix until evenly incorporated. Cover and chill the dough for at least 2 hours and up to 2 days before baking.
Heat oven to 375 degrees, with racks on the lower and upper thirds. Line 2 baking sheets with parchment paper. Prepare the coating by combining the granulated sugar, espresso powder and ground ginger in a small bowl.
Using a 2-tablespoon (1 ounce) scoop, scoop the dough and, using your hands, roll into walnut-size balls. (Alternatively, for each cookie, use a tablespoon measure to scoop 2 tablespoons dough and roll them into a ball.) Toss in the sugar mixture to coat.
Place the portioned dough 2 inches apart on the prepared baking sheets and bake, rotating the sheets on the racks halfway through, until the cookies have spread slightly and appear craggy on the surface, about 10 minutes. Allow to cool on the baking sheets for 3 minutes, then transfer to a wire rack to cool completely. (The cookies will flatten once cooled.) These cookies keep in an airtight container at room temperature for 4 to 5 days.
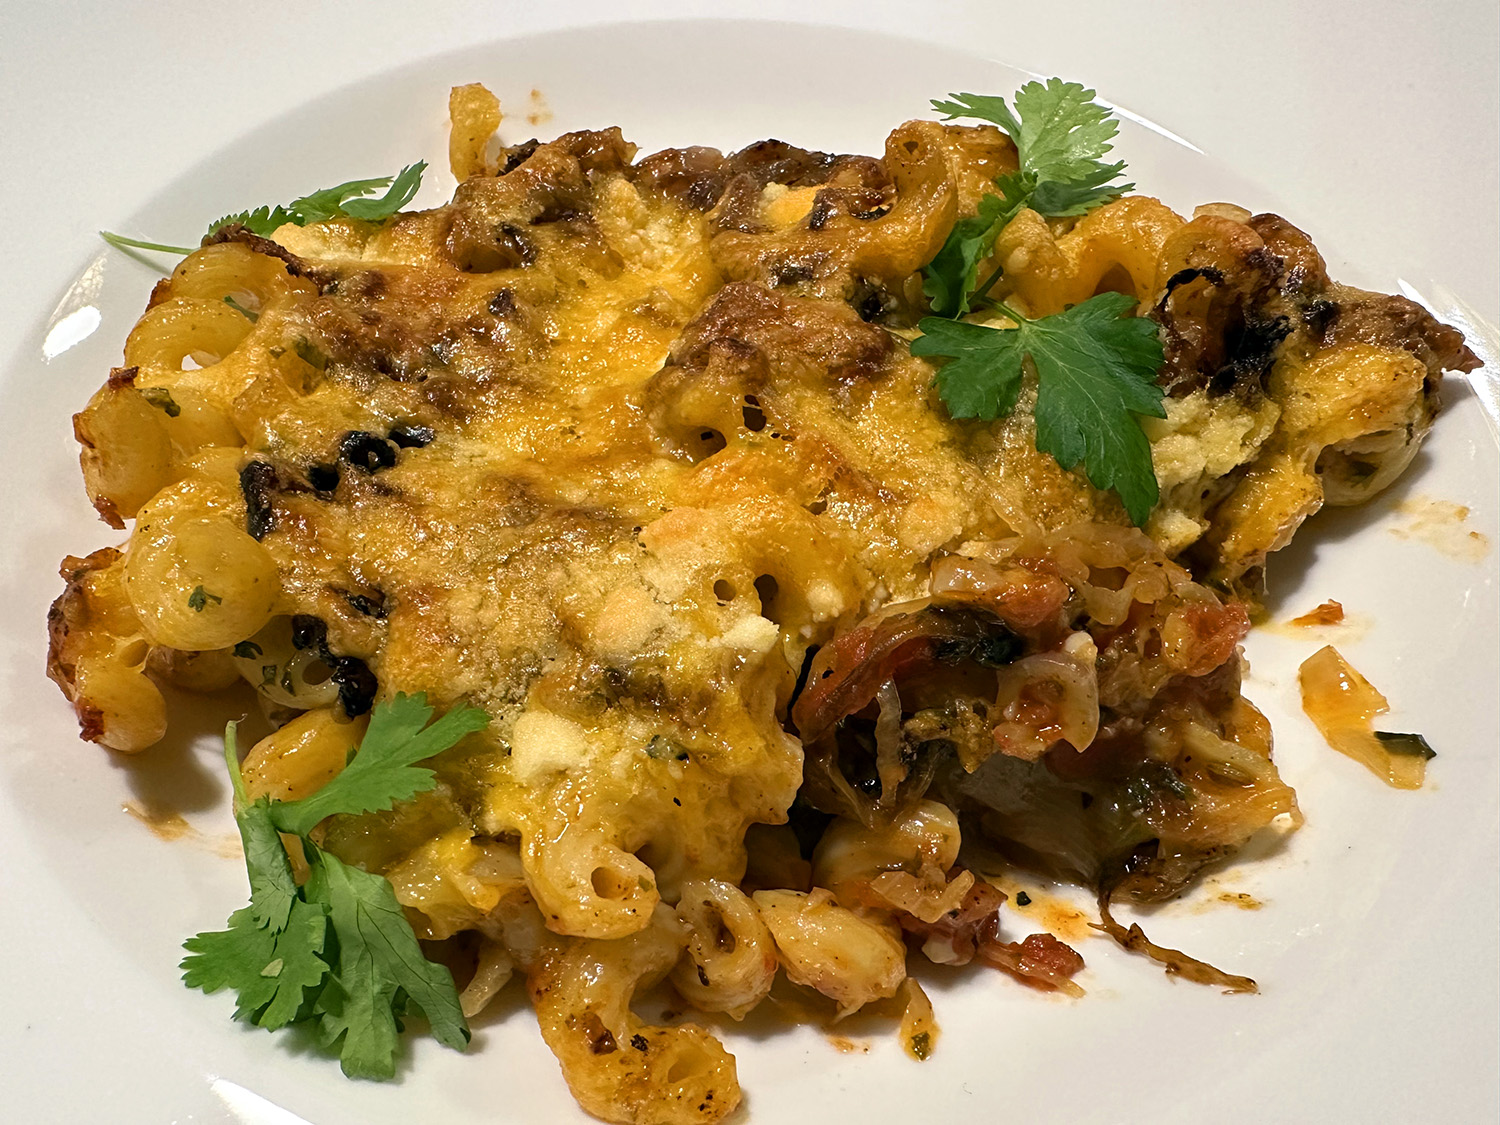
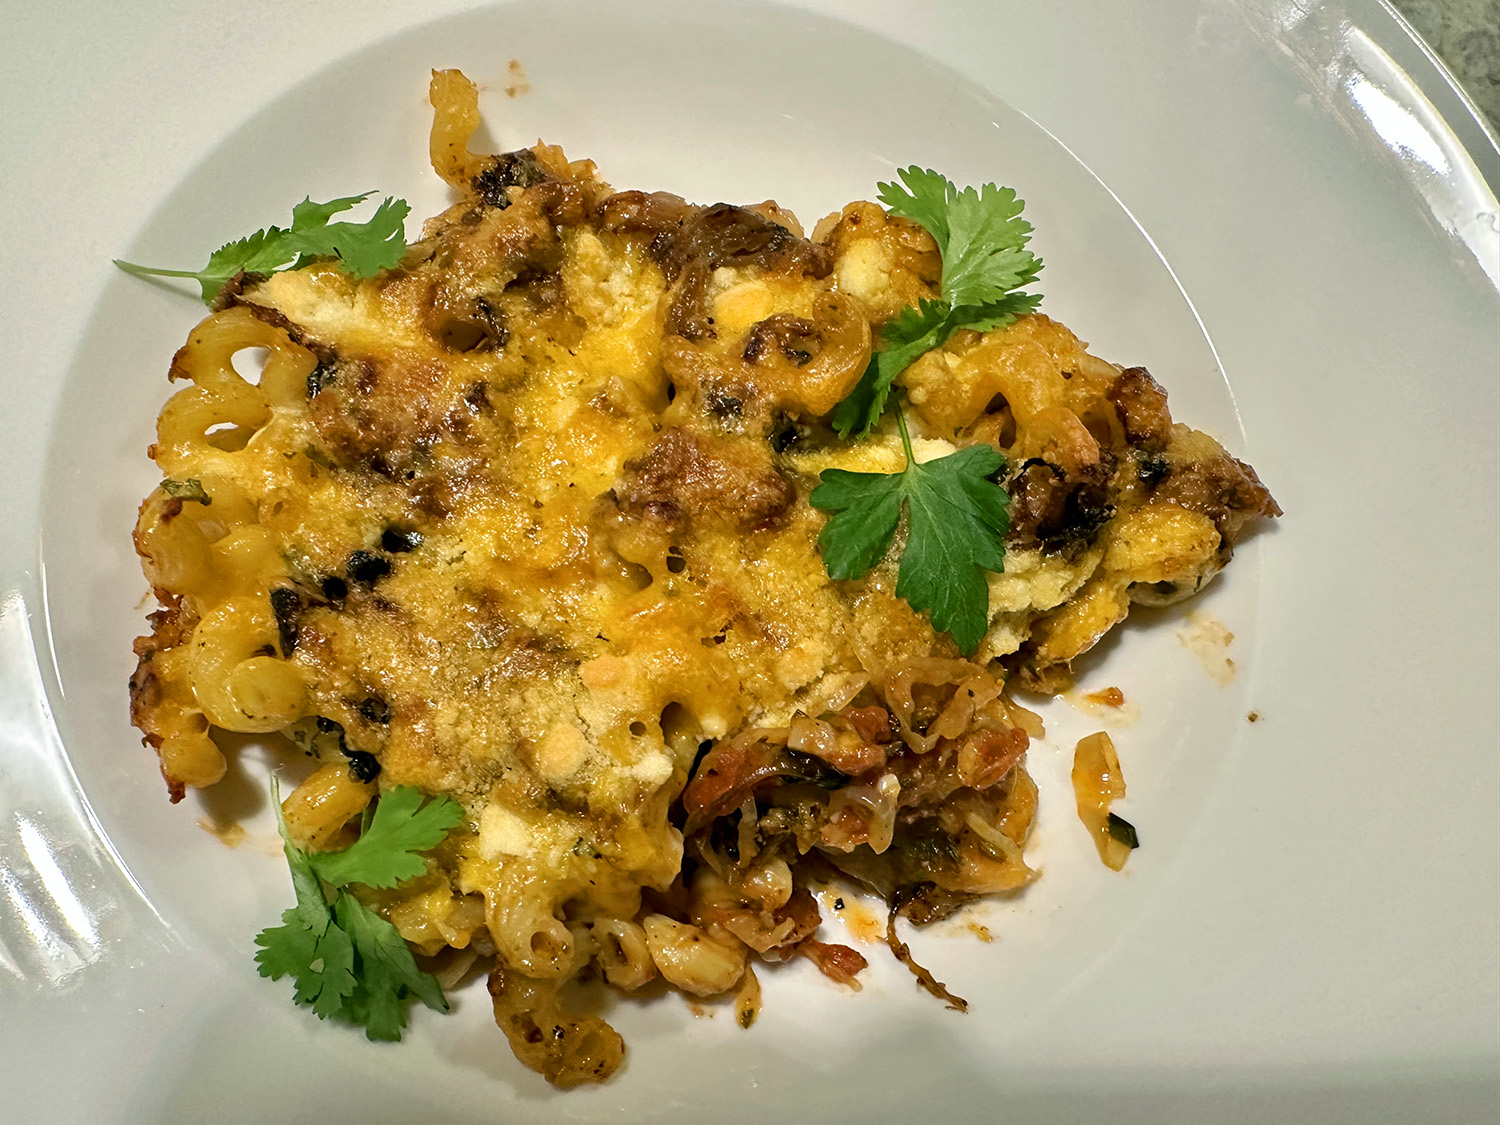
A pizza/pasta mash-up with a slight Mexican undertone served in pie-shaped wedges. Is it a dish with an identity crisis? Maybe, but it was still interesting, fun and tasty! And if you are looking for a new meatless recipe, then this puppy is worth a try.
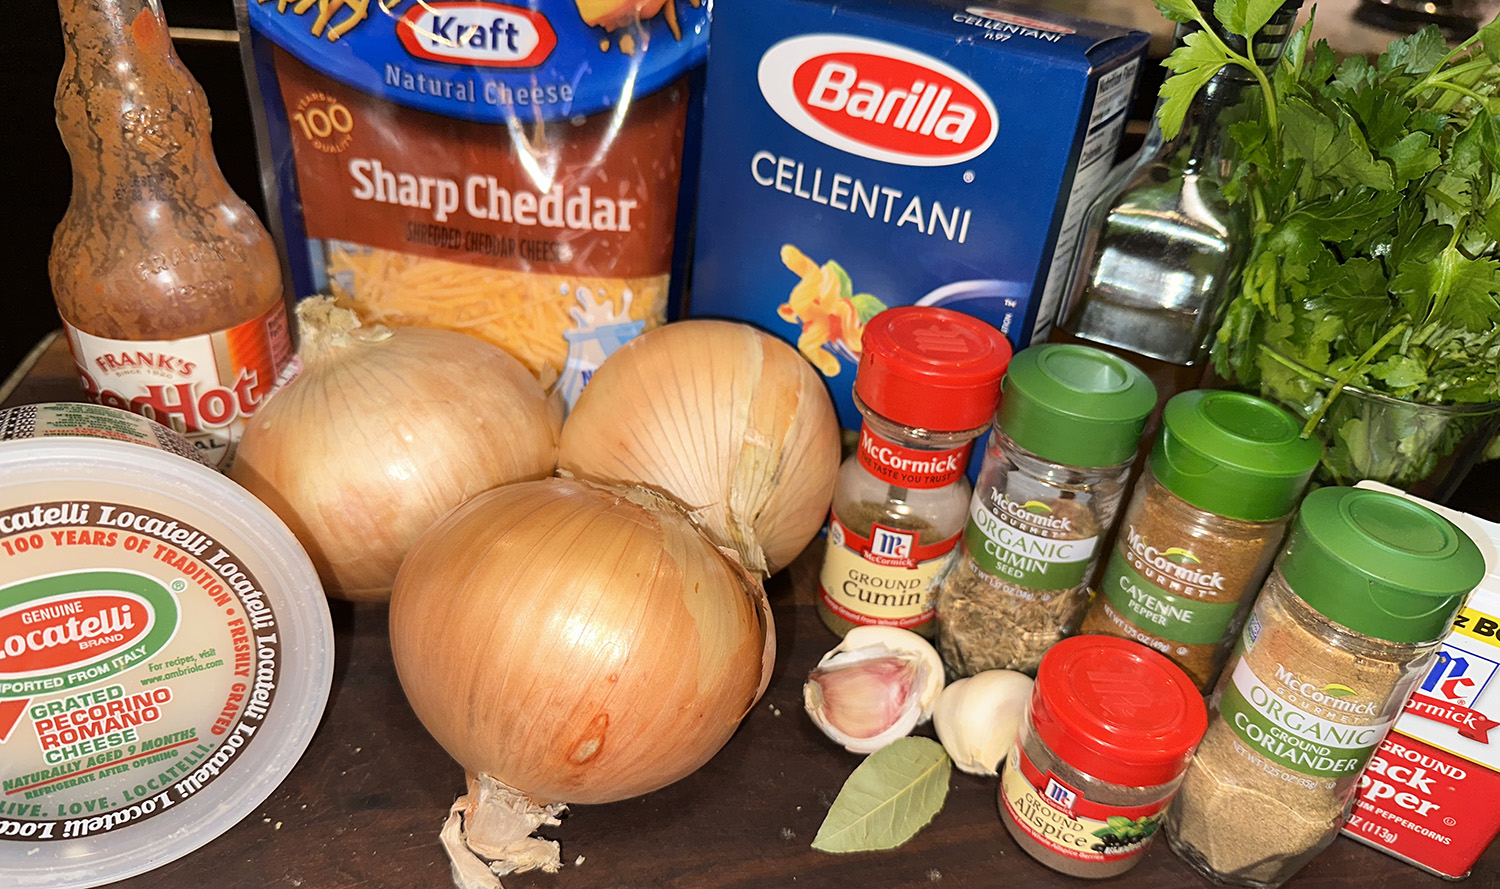
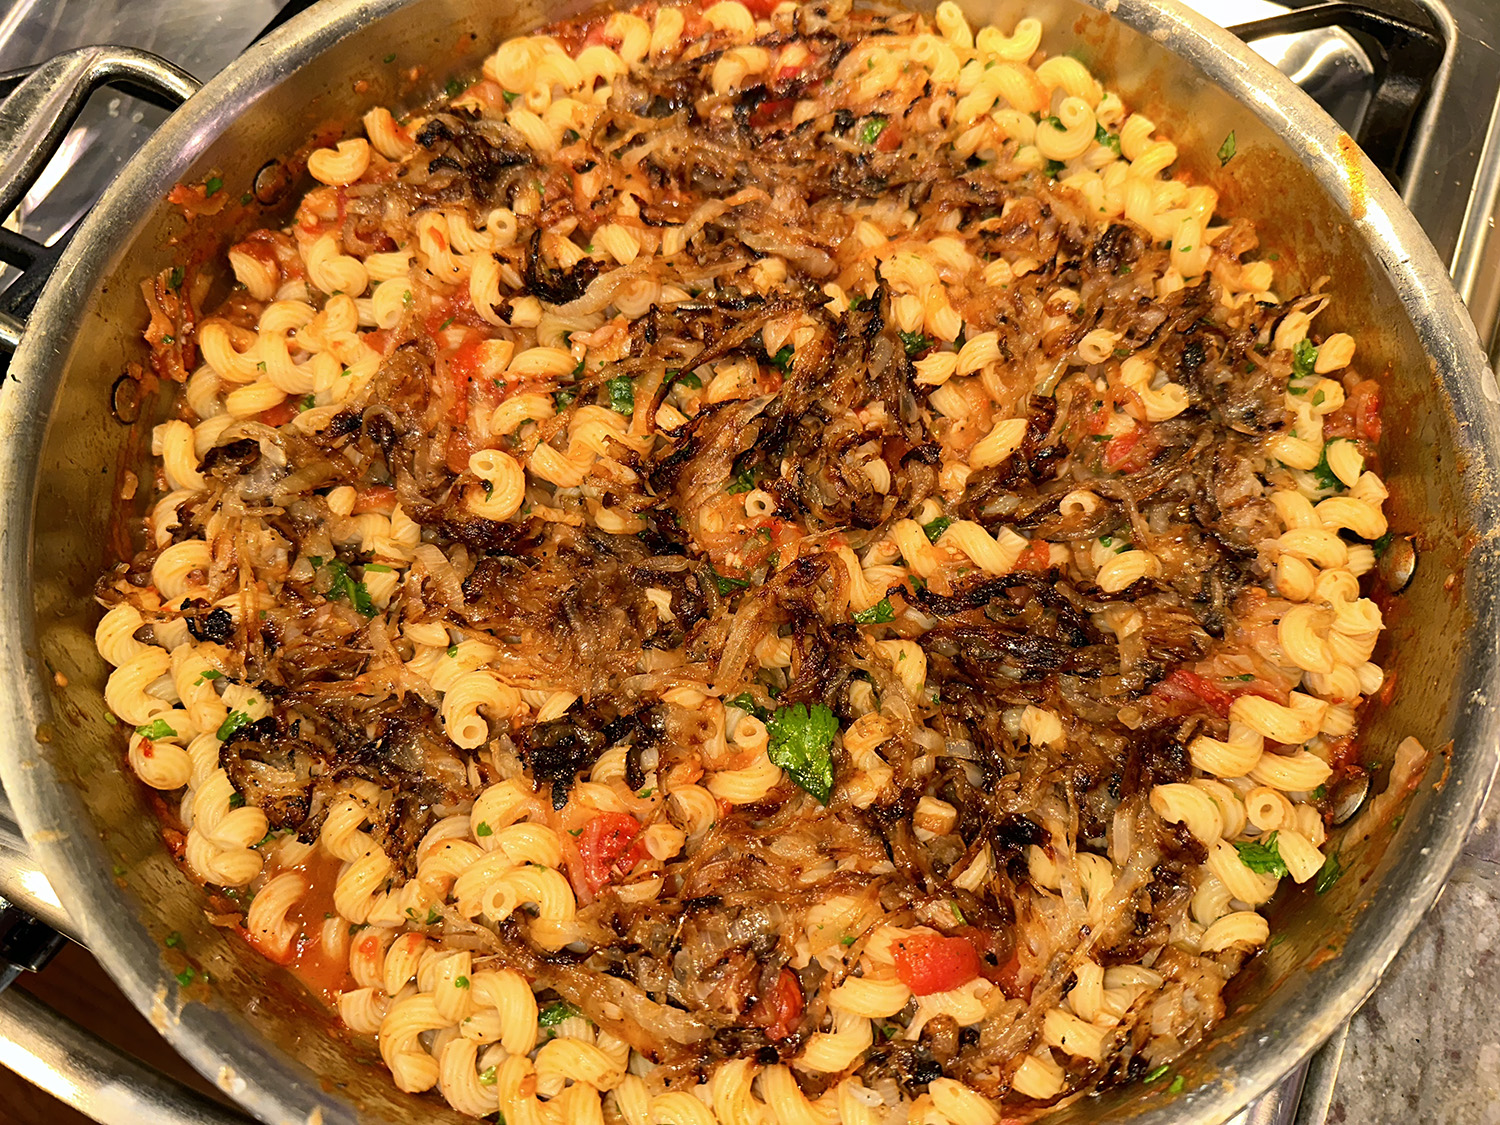
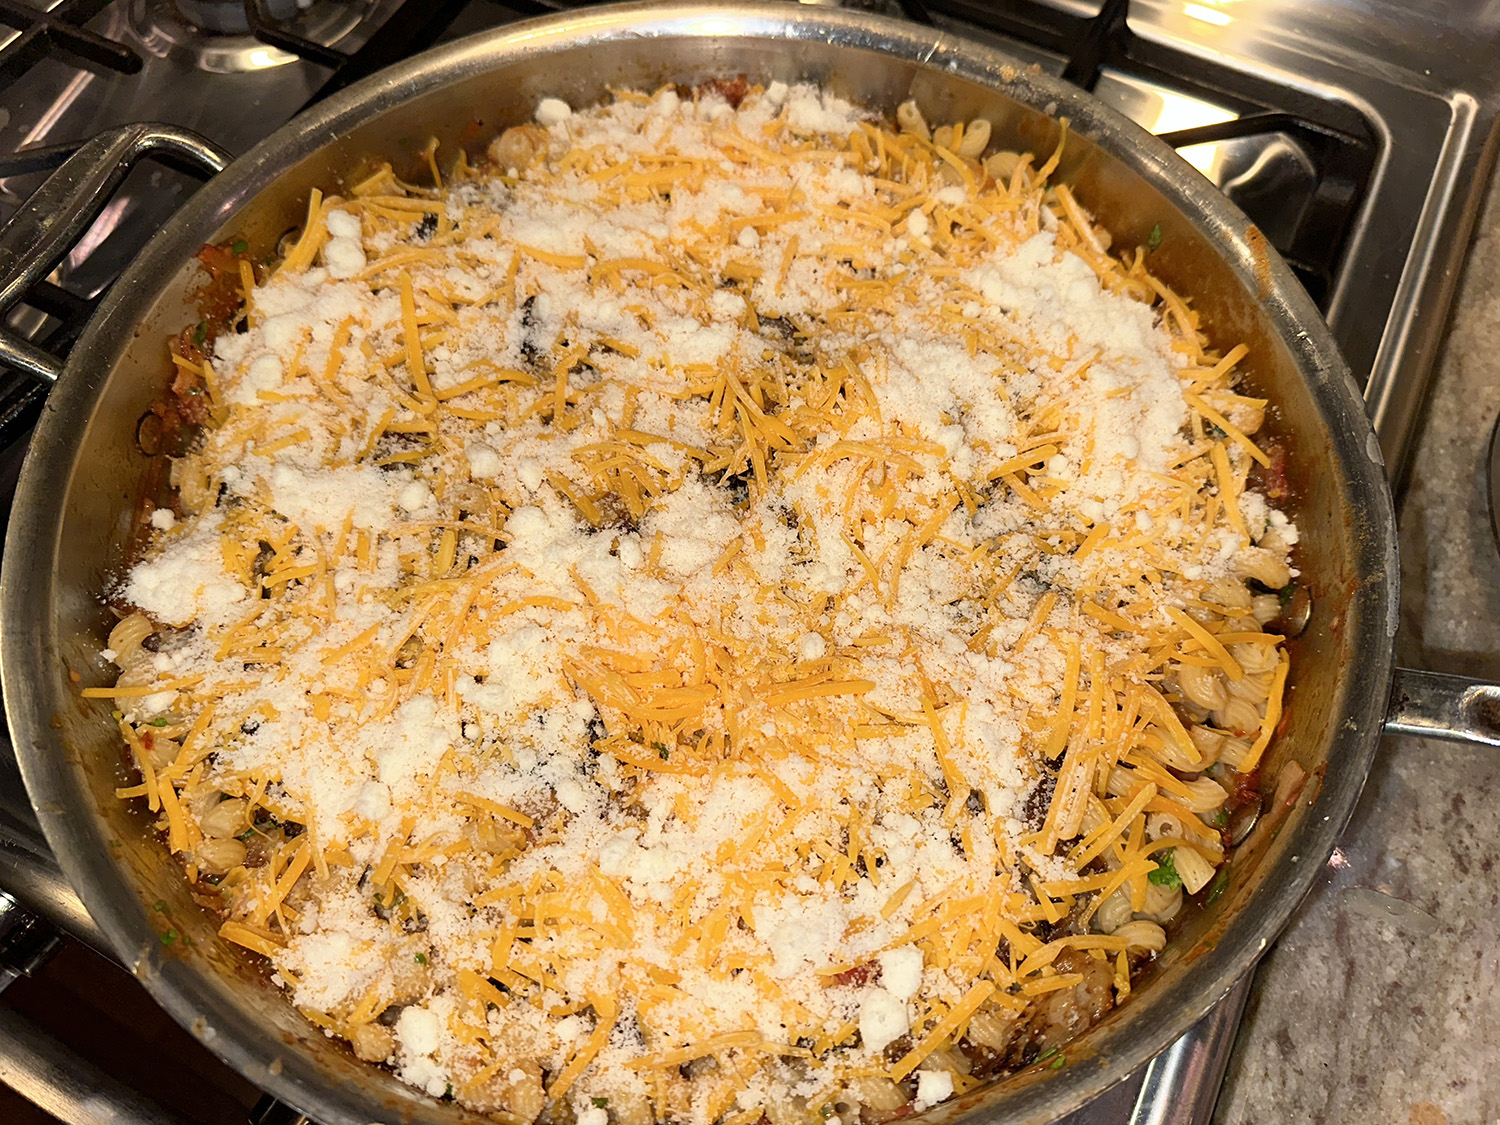
In this warming skillet pasta bake, onions — sautéed with cumin, coriander and allspice until golden and aromatic — do double duty. They form the base of the tomato sauce that’s used to coat the pasta, and are mixed with grated Cheddar for the topping, where strands of browned onions mingle with the melted, gooey cheese. It’s satisfying and easy, with the pasta baked in the same skillet as the sauce.
We used a 13″ sauté pan (which is a little larger than instructed); upped the portion of tomatoes from a 15-ounce to a 28-ounce can; and eliminated adding a cup of water to the tomato mix; although we did reserve, and use, 1 cup of the pasta water at the end.
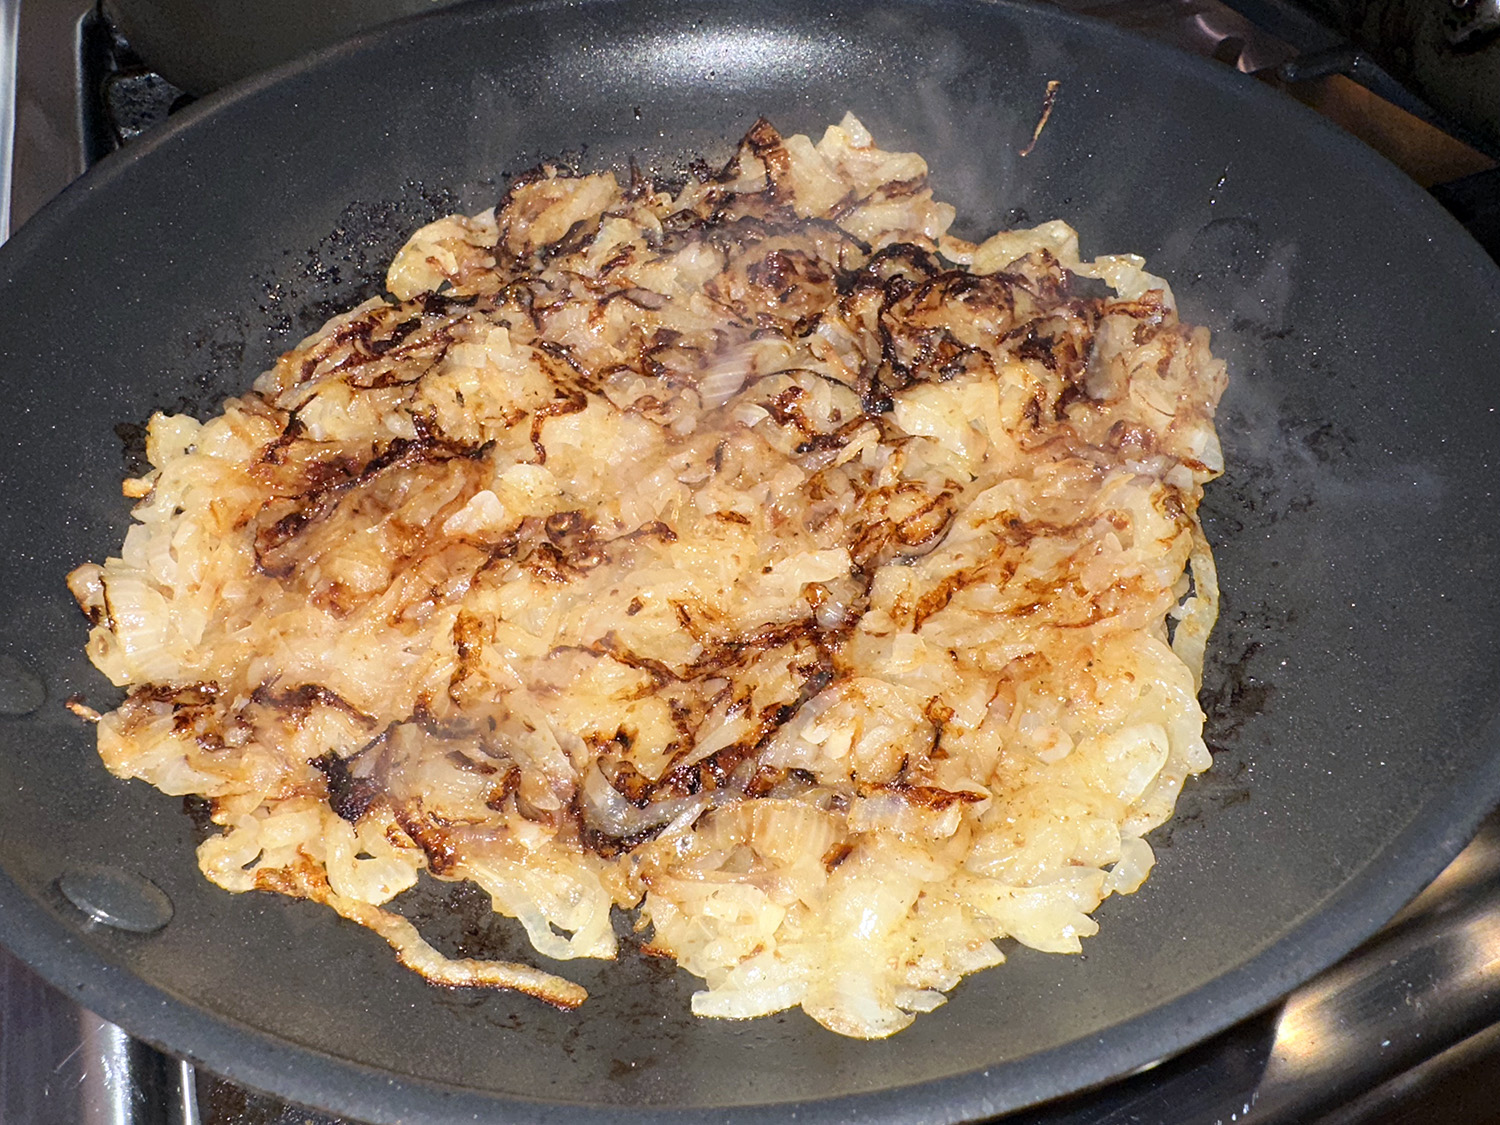
Since we already had a box of pasta on hand, we opted to use our cellentani, a corkscrew-shaped pasta which captured the onions and tomato bits very nicely. Word to the wise, it’s tough getting that many onions to brown in the skillet, so when it was time to remove half of them, I put one half of the onions in another pan for browning further. I had intended to try adding a pinch of baking soda as suggested by one reviewer, but totally forgot.
Serve it as a meatless main course with a crisp salad alongside, or as a rich side to a lighter chicken or fish dish.
TIP: A pinch of baking soda will speed up the browning process (the Maillard reaction.) Just a pinch, too much will be noticeable in the finished dish.
Baked Skillet Pasta with Cheddar and Spiced Onions
¾ cup chopped parsley or cilantro (or use a combination of cilantro and parsley), plus more for serving
8 oz. shredded Cheddar
½ cup grated Parmesan
Hot sauce, for serving (optional)
Directions
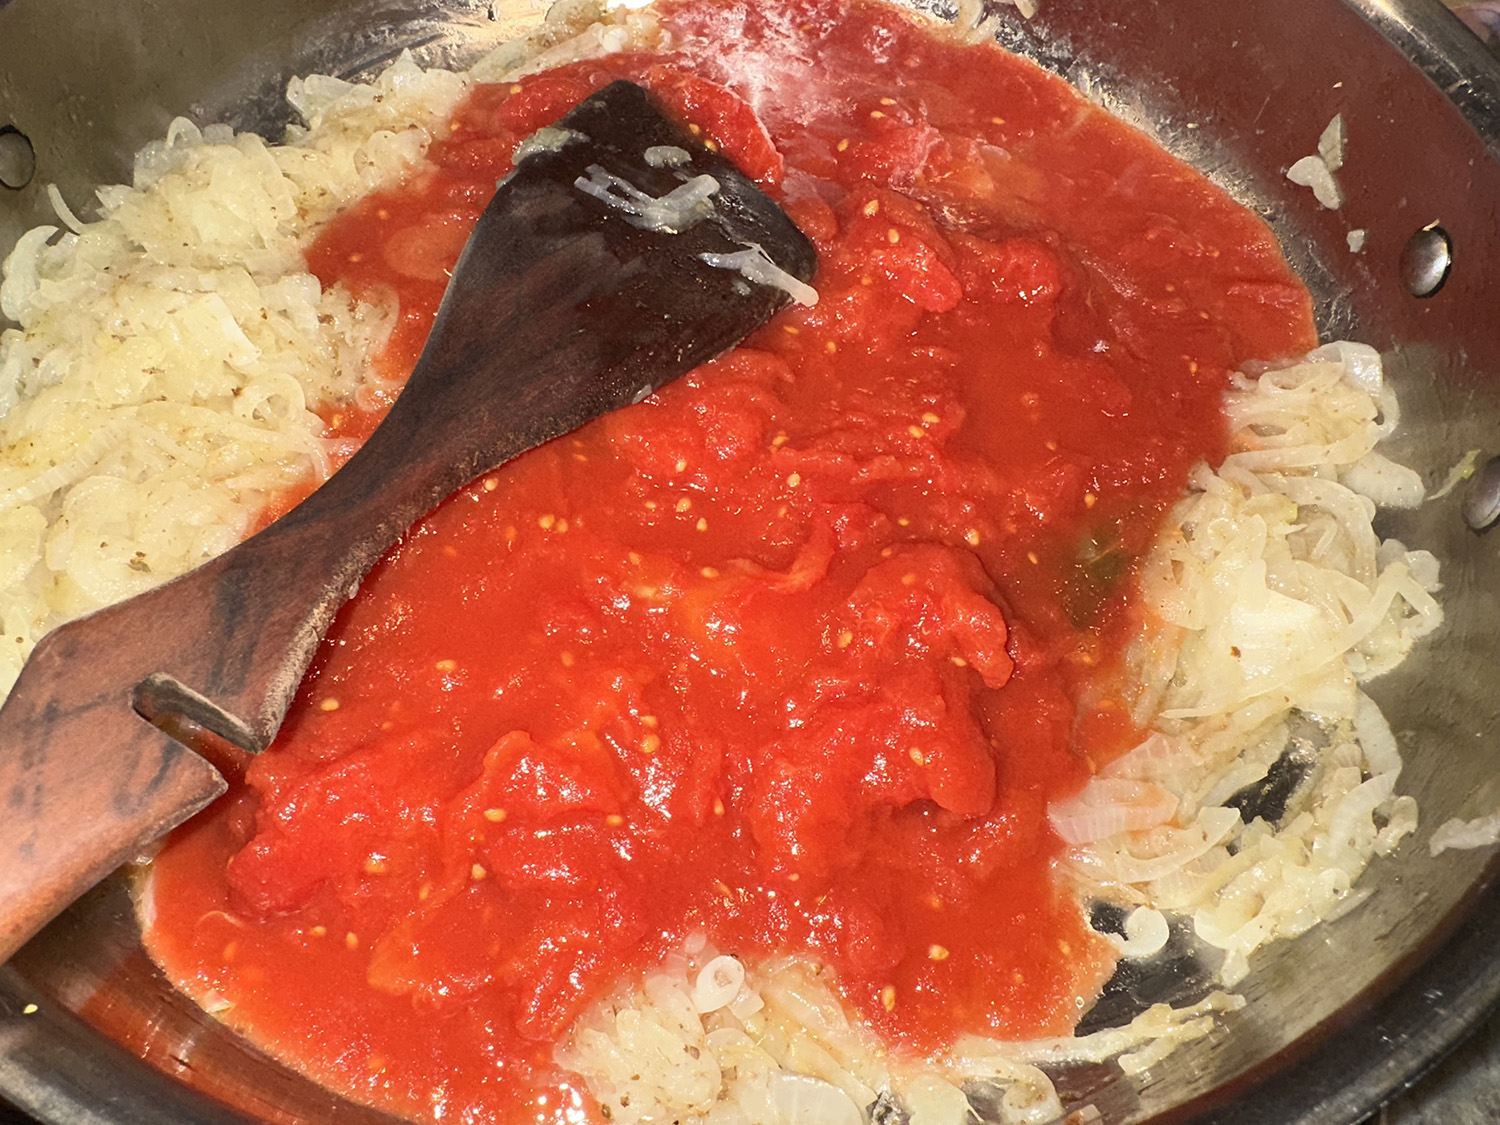
Heat ¼ cup oil in a 12-inch skillet over high heat. Add onions and bay leaf, and cook, stirring frequently, until softened and browned in spots, 12 to 20 minutes. (Reduce heat if the pan starts to scorch.) Lower heat to medium, and stir in coriander, ground cumin, cayenne and ¼ teaspoon salt; cook 1 more minute. Transfer half the onions to a bowl and reserve (leave the bay leaf in the skillet).
Add garlic, cumin seeds, pepper and allspice to the skillet, and stir. Cook until fragrant, about 1 minute. Pour in the juice from the canned tomatoes. Use your hands or kitchen scissors to squish or cut the tomatoes into pieces and add to pan. Add remaining 2 tablespoons oil and remaining 1 teaspoon salt, and bring mixture to a simmer. Simmer until thickened, about 20 minutes. Taste, and add more salt and cayenne if you like. Remove bay leaf.
As mixture cooks, heat oven to 400° and bring a large pot of salted water to a boil. Cook pasta until just about 2 minutes shy of al dente. Reserve 1 cup pasta water, and drain pasta.
Stir pasta, reserved pasta water, and parsley into skillet with tomato sauce. Top with reserved browned onions, Cheddar and Parmesan. Transfer to oven and bake until golden and bubbly, 20 to 25 minutes. If you like, you can run the pan under the broil to brown the top, or leave it as is. Let cool slightly, top with more parsley, if desired, and serve with hot sauce, if you like.
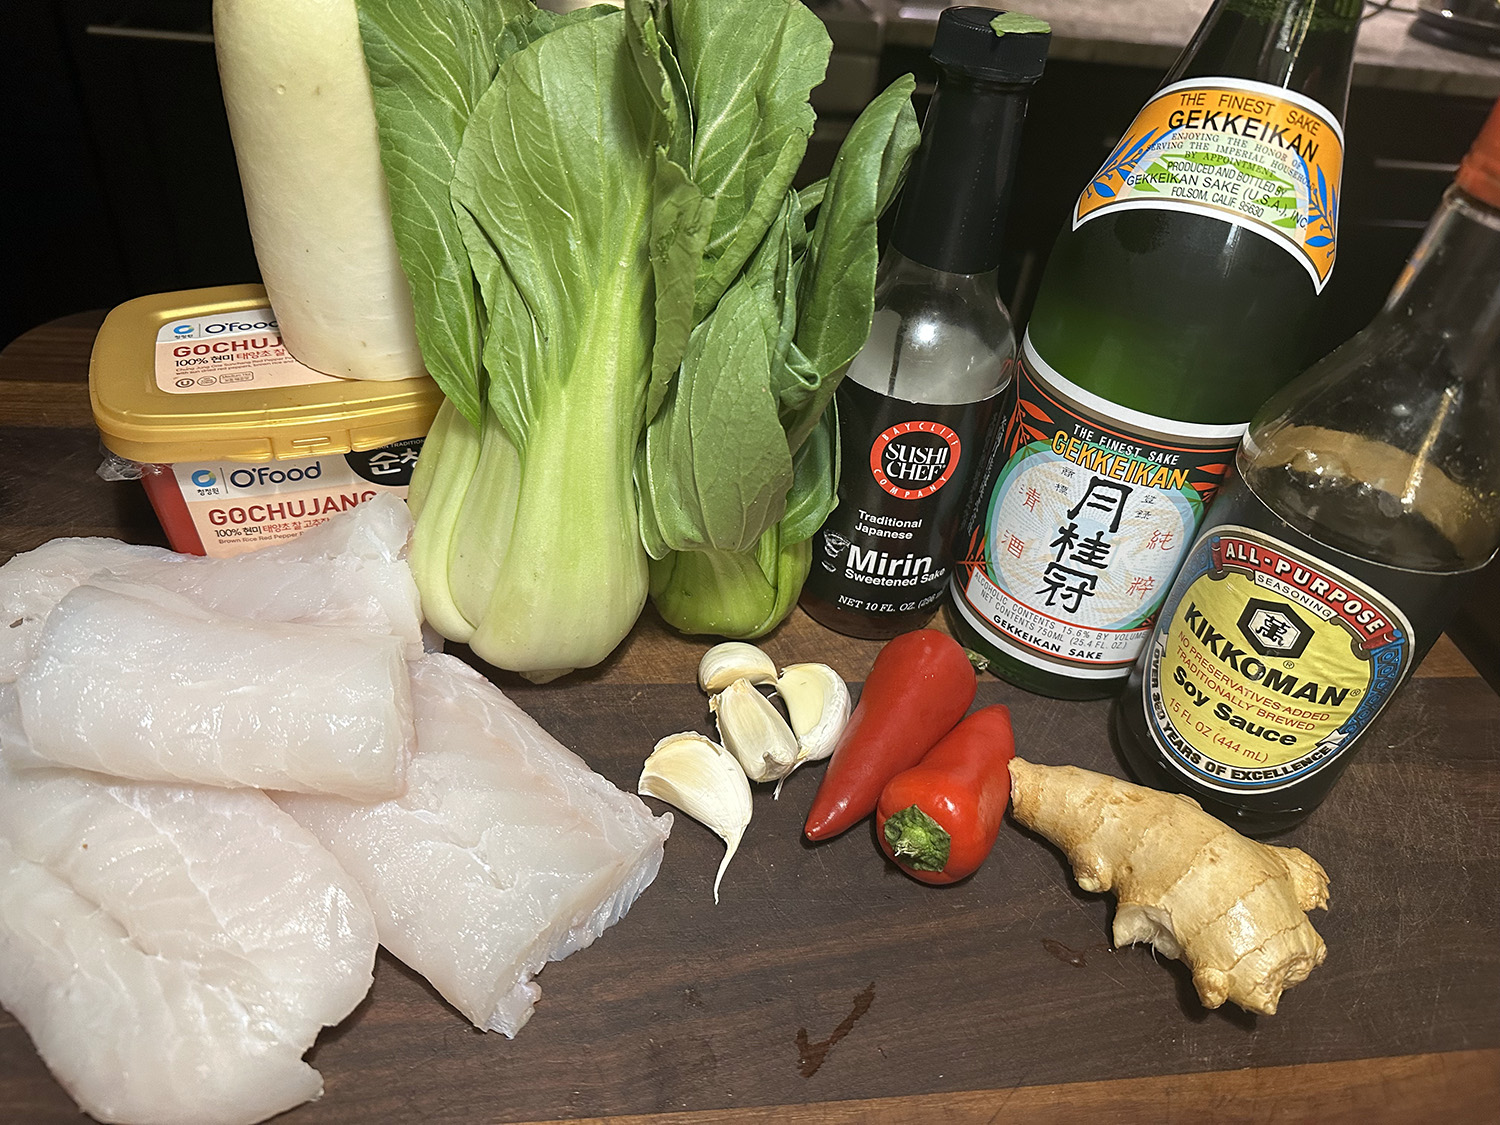
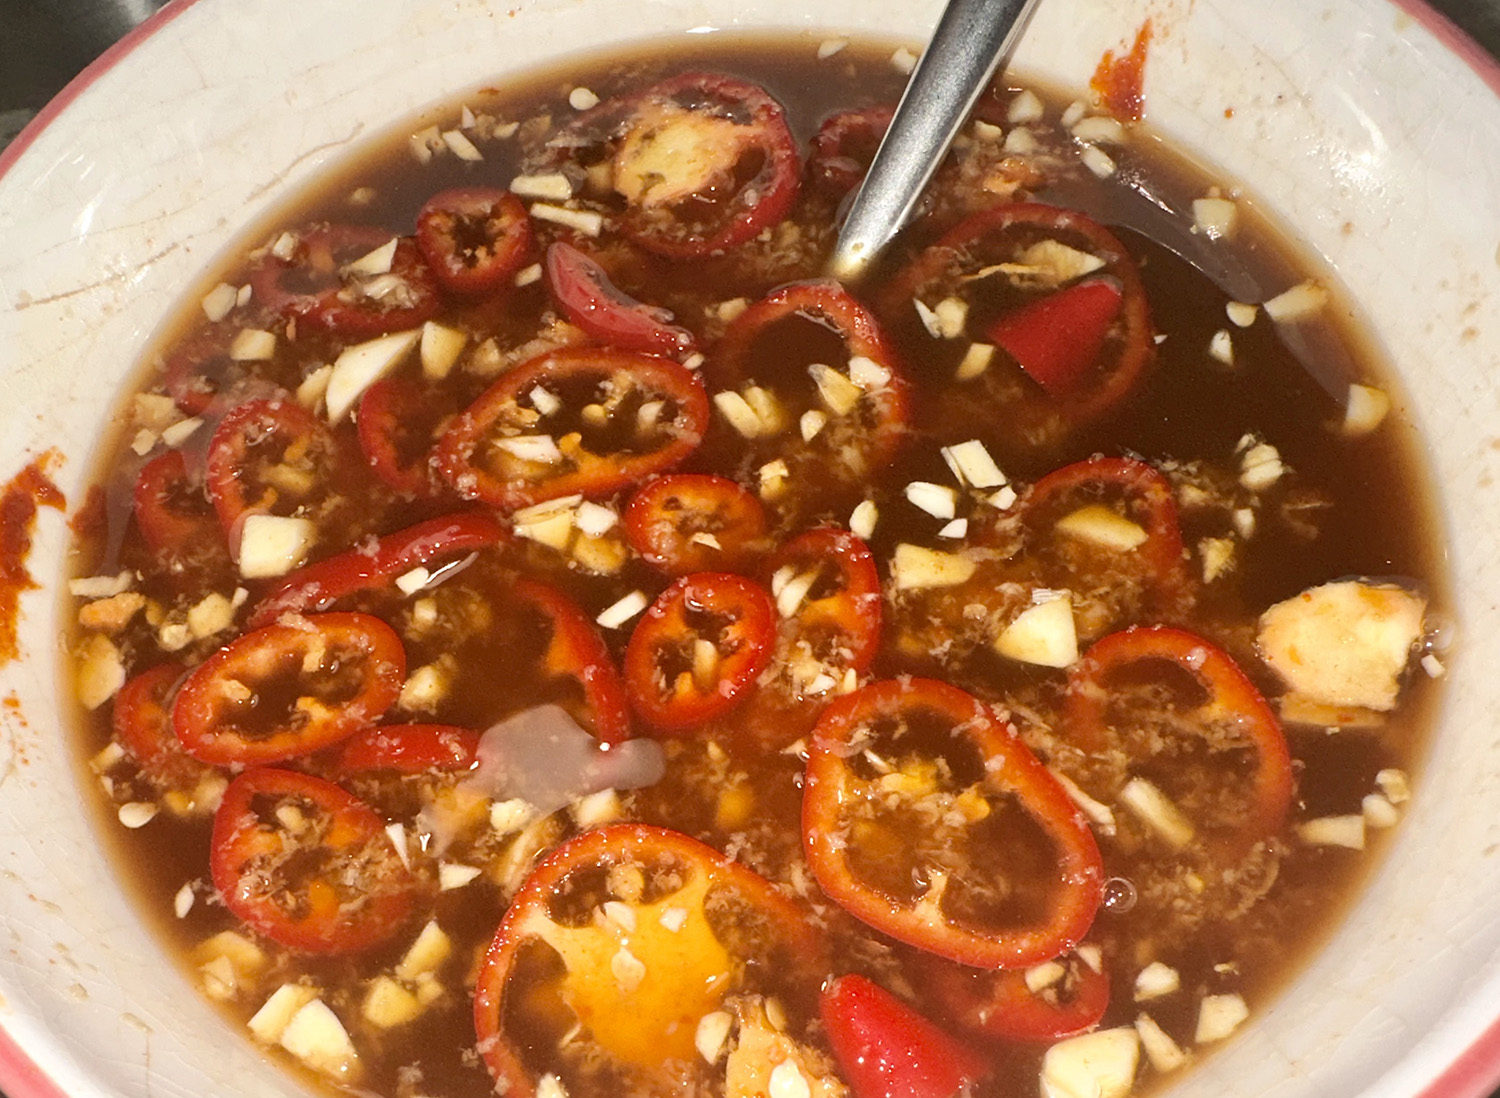
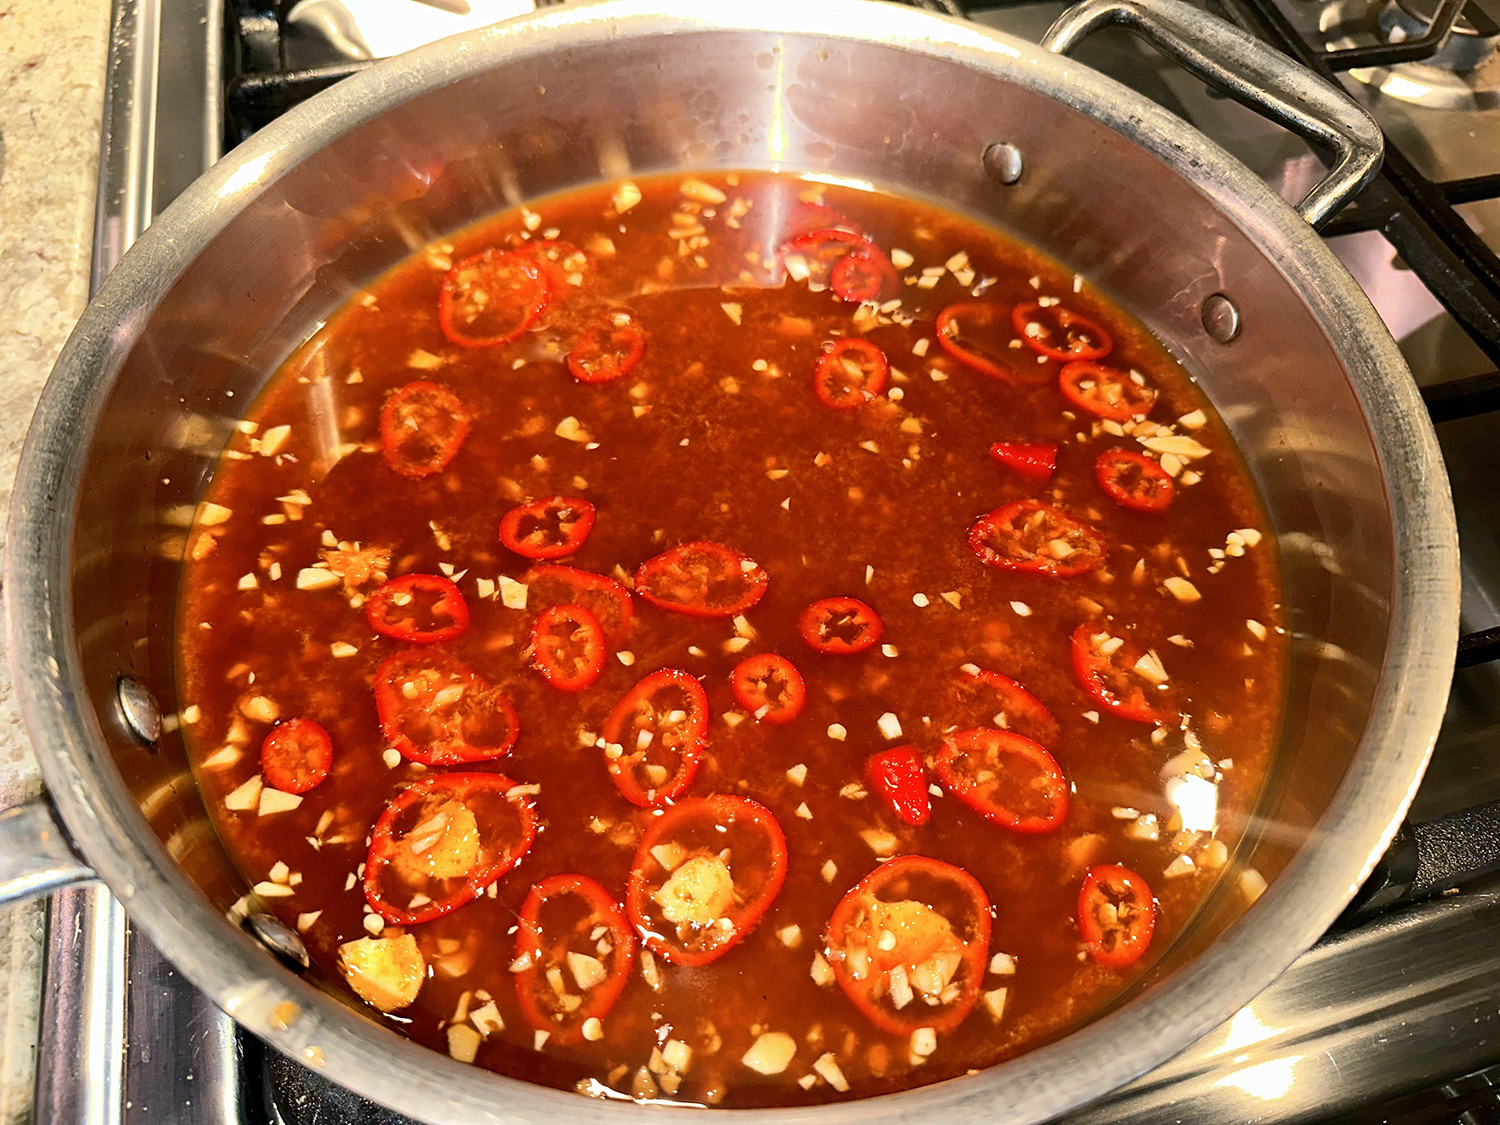
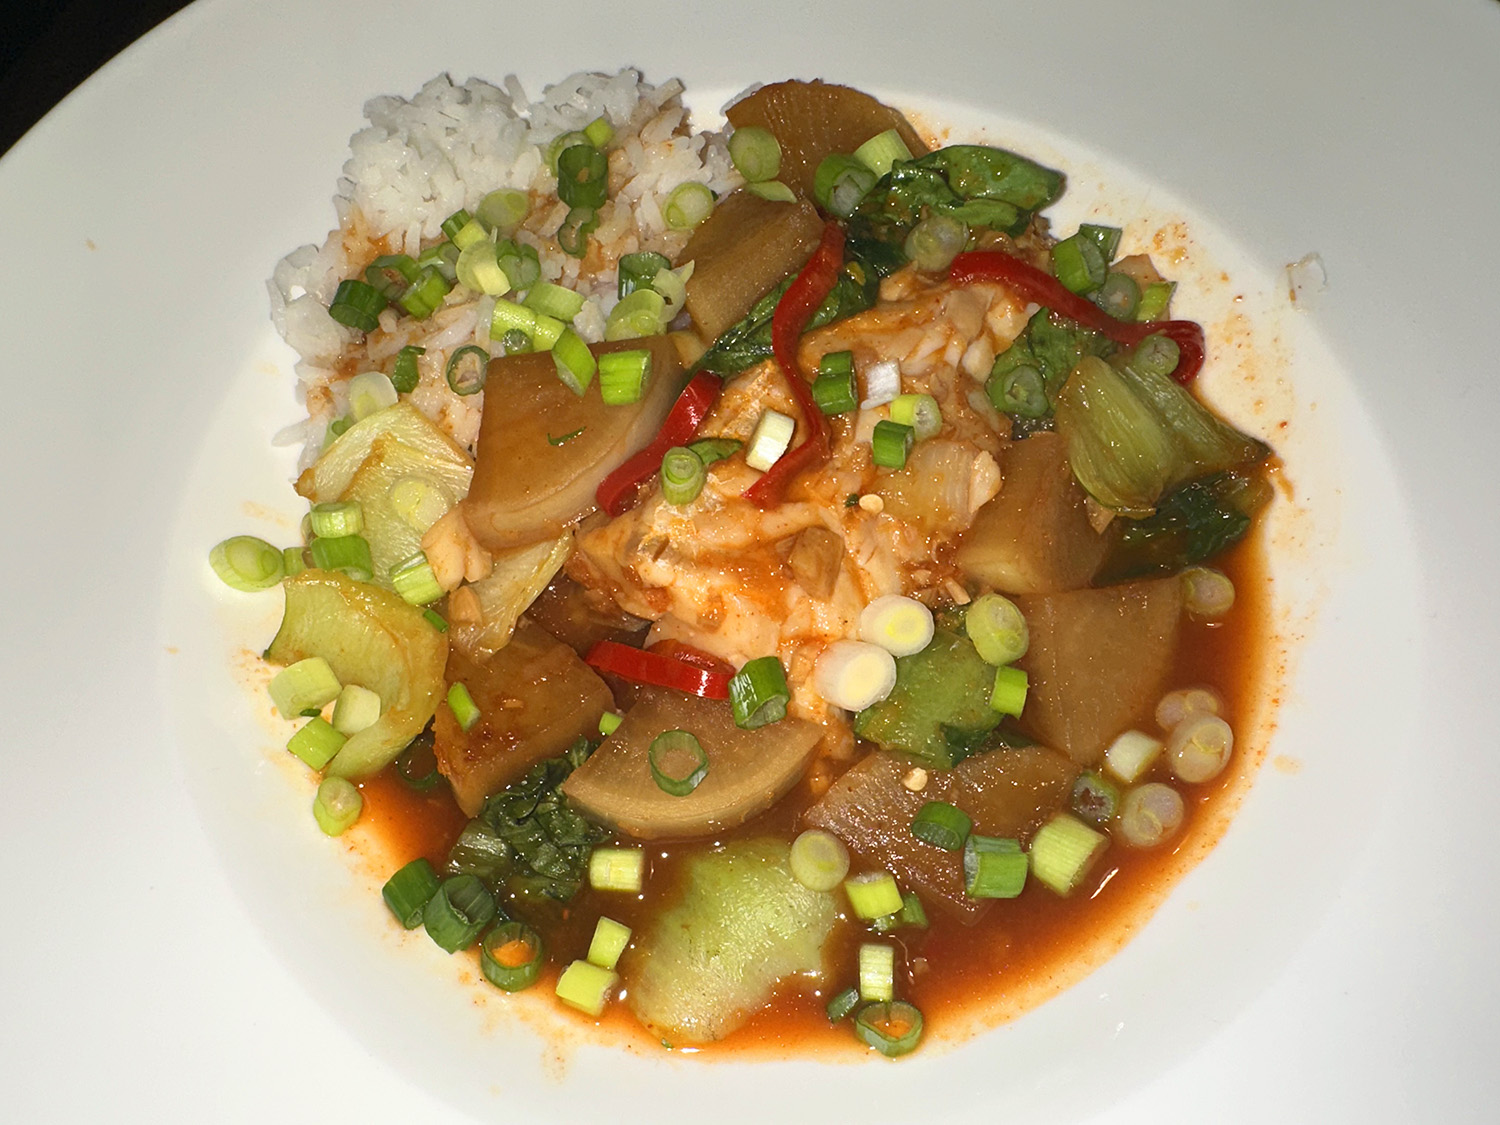
OK, I’ll go out on a limb here and claim this cod recipe is probably one of the best fish dishes I’ve ever eaten! The skillet braise is a simplified version of daegu jorim, or Korean braised cod. Here, Milk Street builds an umami-rich braising liquid by combining sake, mirin, soy sauce and gochujang (Korean fermented chili paste), plus garlic, ginger and chilies.
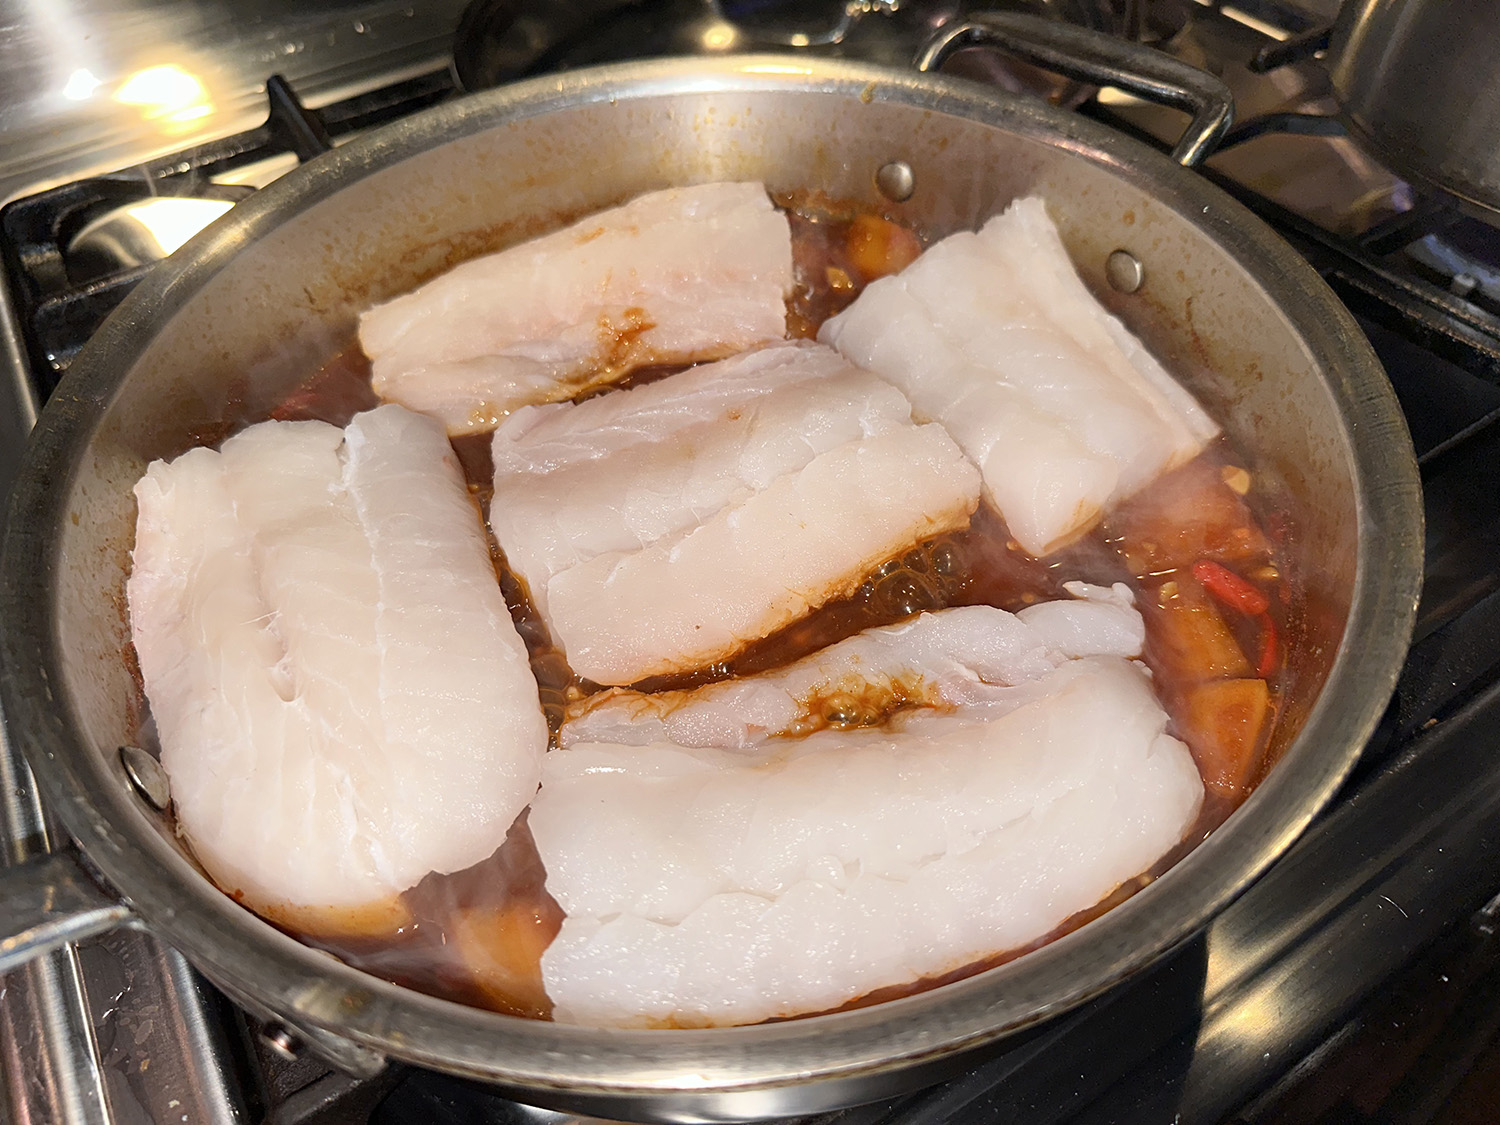
In the Korean kitchen, steaks of fatty fish, such as black cod or mackerel, are commonly used in daegu jorim, but this recipe opts for easy to source Atlantic cod fillets. Instead of buying individual fillets, we bought a 1 1⁄2-pound piece and cut it down to our preferences.
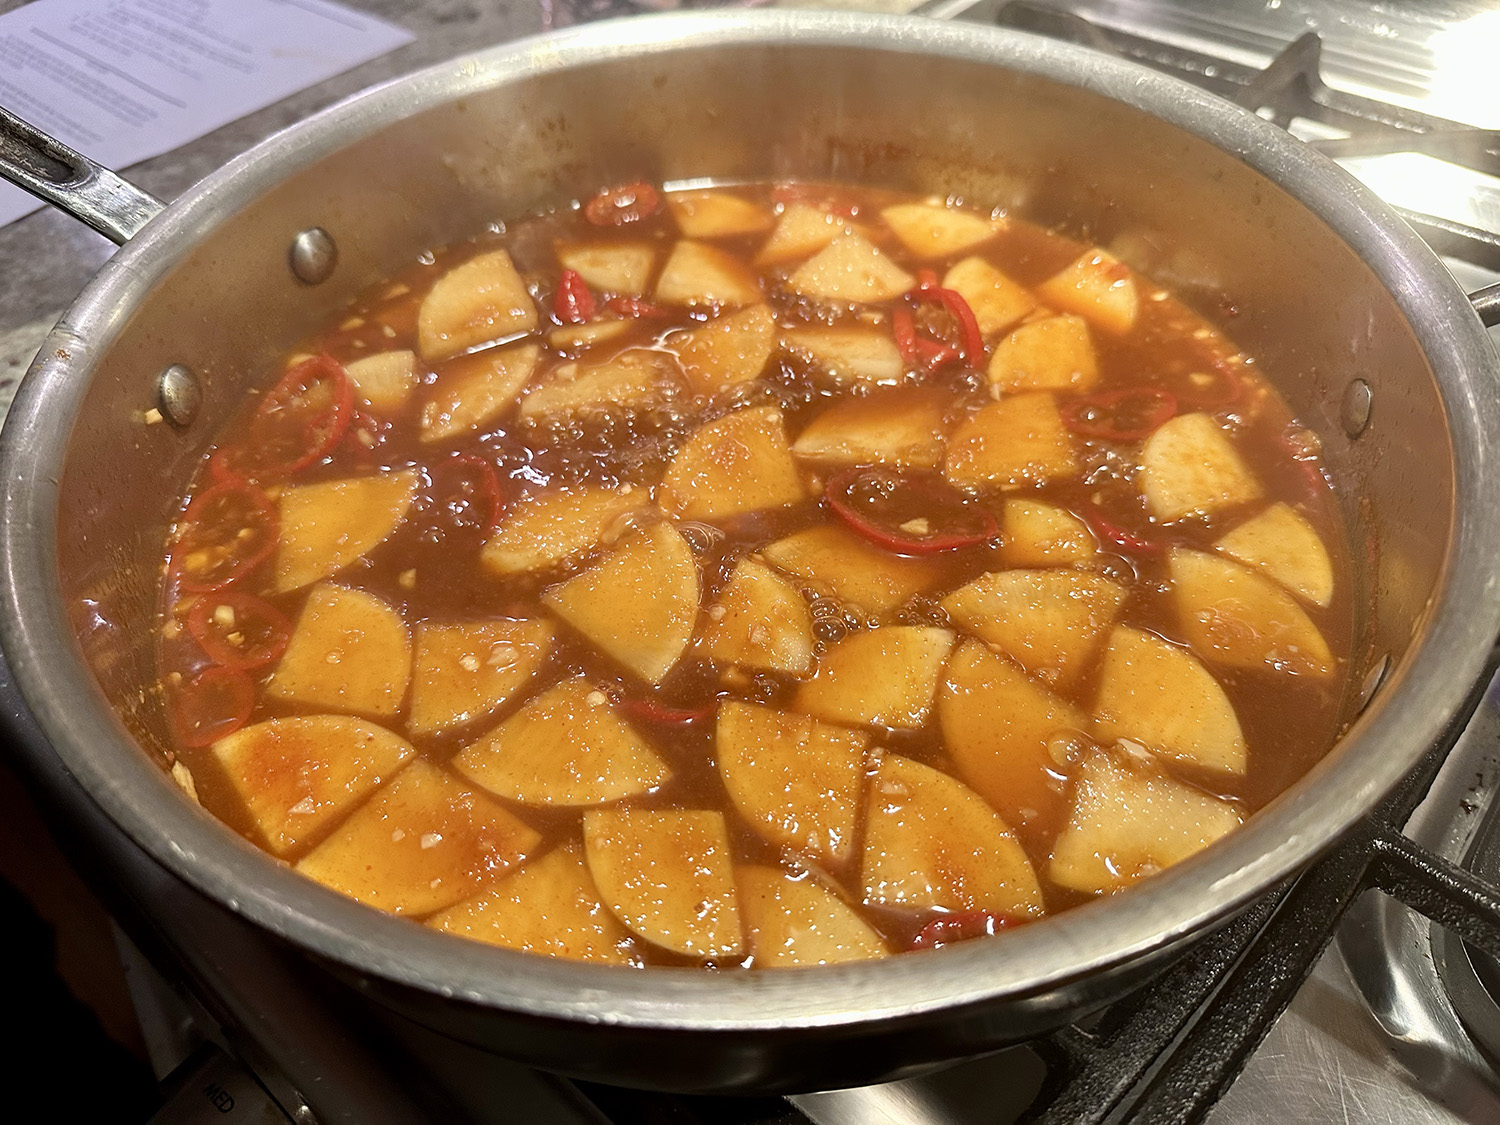
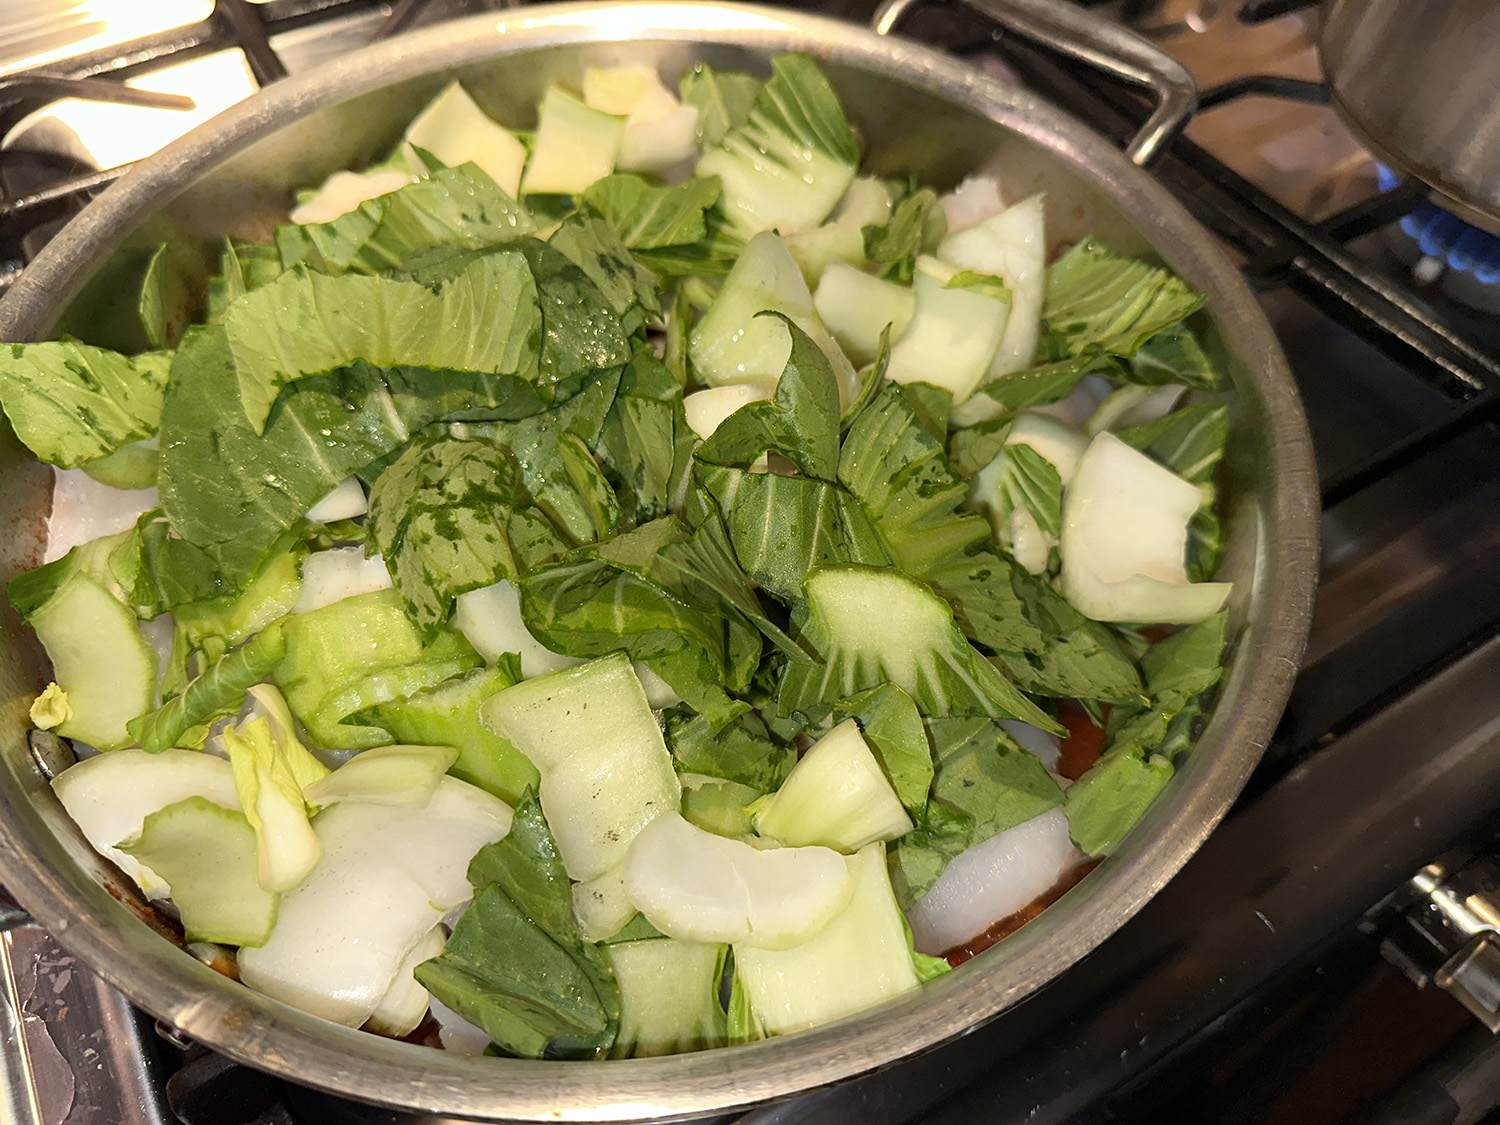
Earthy, subtly sweet daikon radish is a standard ingredient in the braise but Yukon Gold potatoes are said to be a good alternative. Baby bok choy is also added for color and to round out the braise. Let ‘s just say, this packs quite a punch—which we loved—but to tone it down a notch or three, use only one Fresno chili and discard the seeds and veins.
If you like, sprinkle on sliced scallions or toasted sesame seeds as a garnish, and/or drizzle on some sesame oil. Be sure to serve steamed short-grain rice alongside. Kimchi would be a great accompaniment, too. It was even very good as leftovers. — Just YUM!
Don’t cover the skillet tightly after adding the cod and bok choy. Leaving the lid ajar allows some steam to escape, so the broth reduces slightly, for more concentrated flavor and consistency.
1 – 2 Fresno or jalapeño chilies, stemmed and sliced into thin rounds
12 oz. daikon radish, peeled, quartered lengthwise and cut crosswise into ½-inch pieces or 12 oz. medium Yukon Gold potatoes, peeled and sliced into ½-inch rounds
4 6-oz. skinless cod fillets, each about 1 inch thick
8 oz. baby bok choy, trimmed and cut crosswise into 1-inch pieces
Kosher salt and ground black pepper
Steamed rice
Directions
In a 12-inch skillet, stir together the sake, mirin, soy sauce, gochujang, garlic, ginger and chilies; bring to a boil over medium-high, stirring occasionally. Add the daikon (or potato), then cover, reduce to medium, and cook, flipping and stirring the radish every 5 minutes or so, until a skewer inserted into the pieces meets no resistance, 10 to 15 minutes.
Slide the cod fillets into the skillet and scatter the bok choy over the top. Cover partially and cook over medium, turning the fish and stirring the vegetables just once or twice, until the cod flakes easily and the sauce is slightly thickened, 5 to 8 minutes. Taste and season with salt and pepper.
Ladle into shallow bowls and garnish with sliced scallions and sesame seeds.
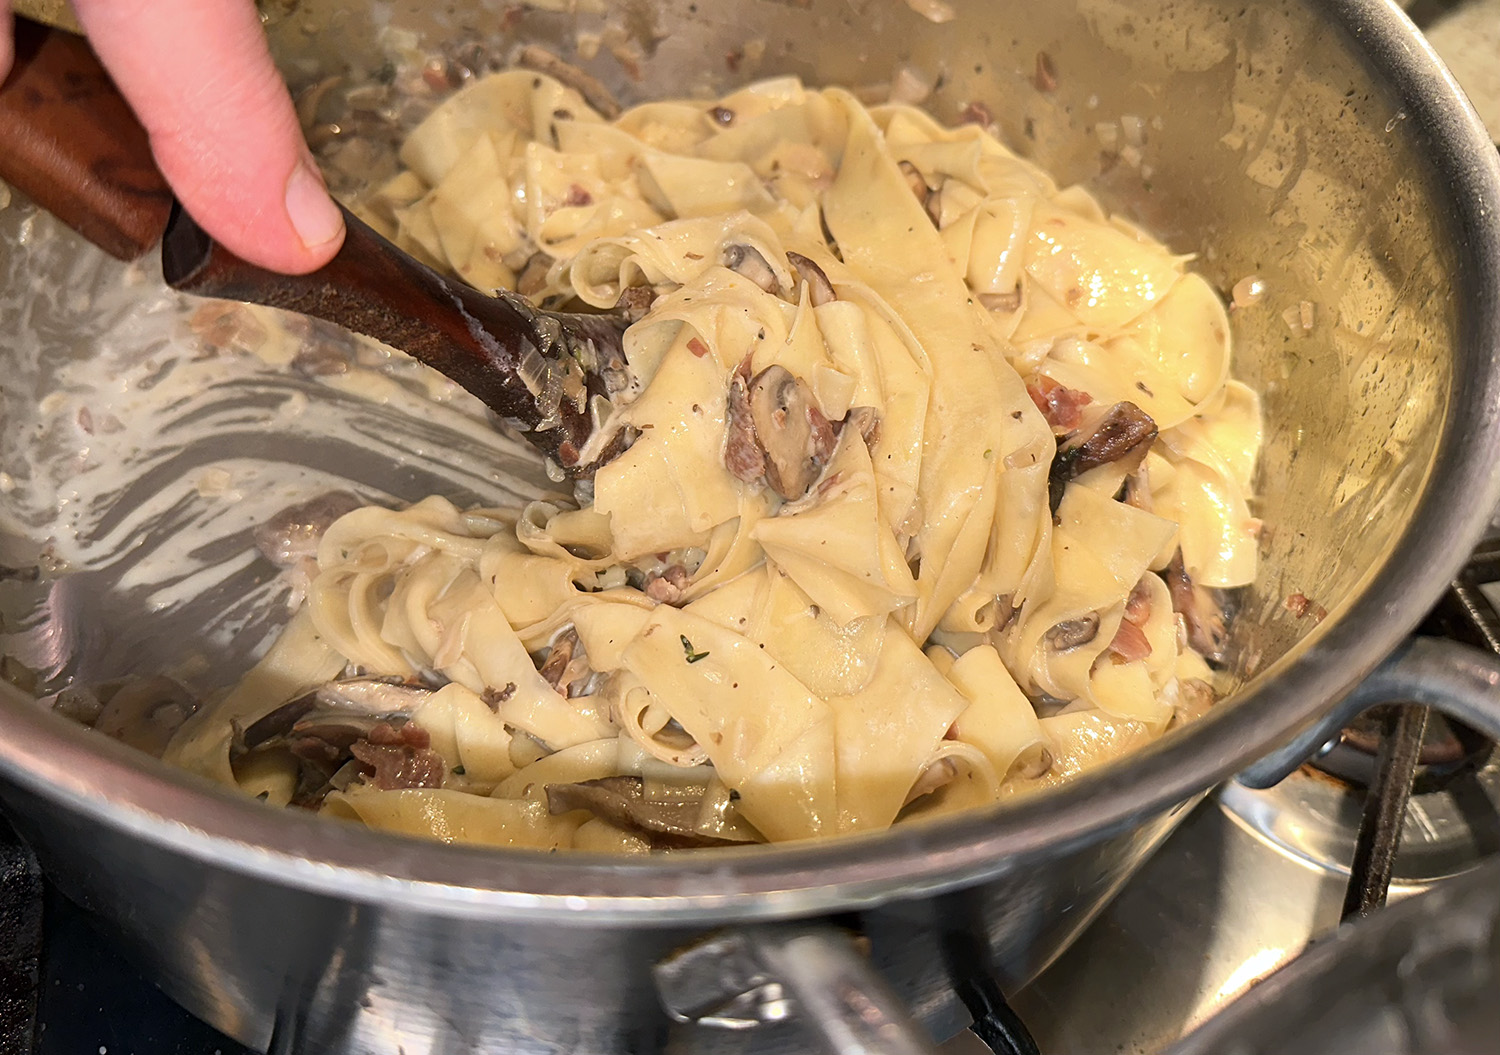
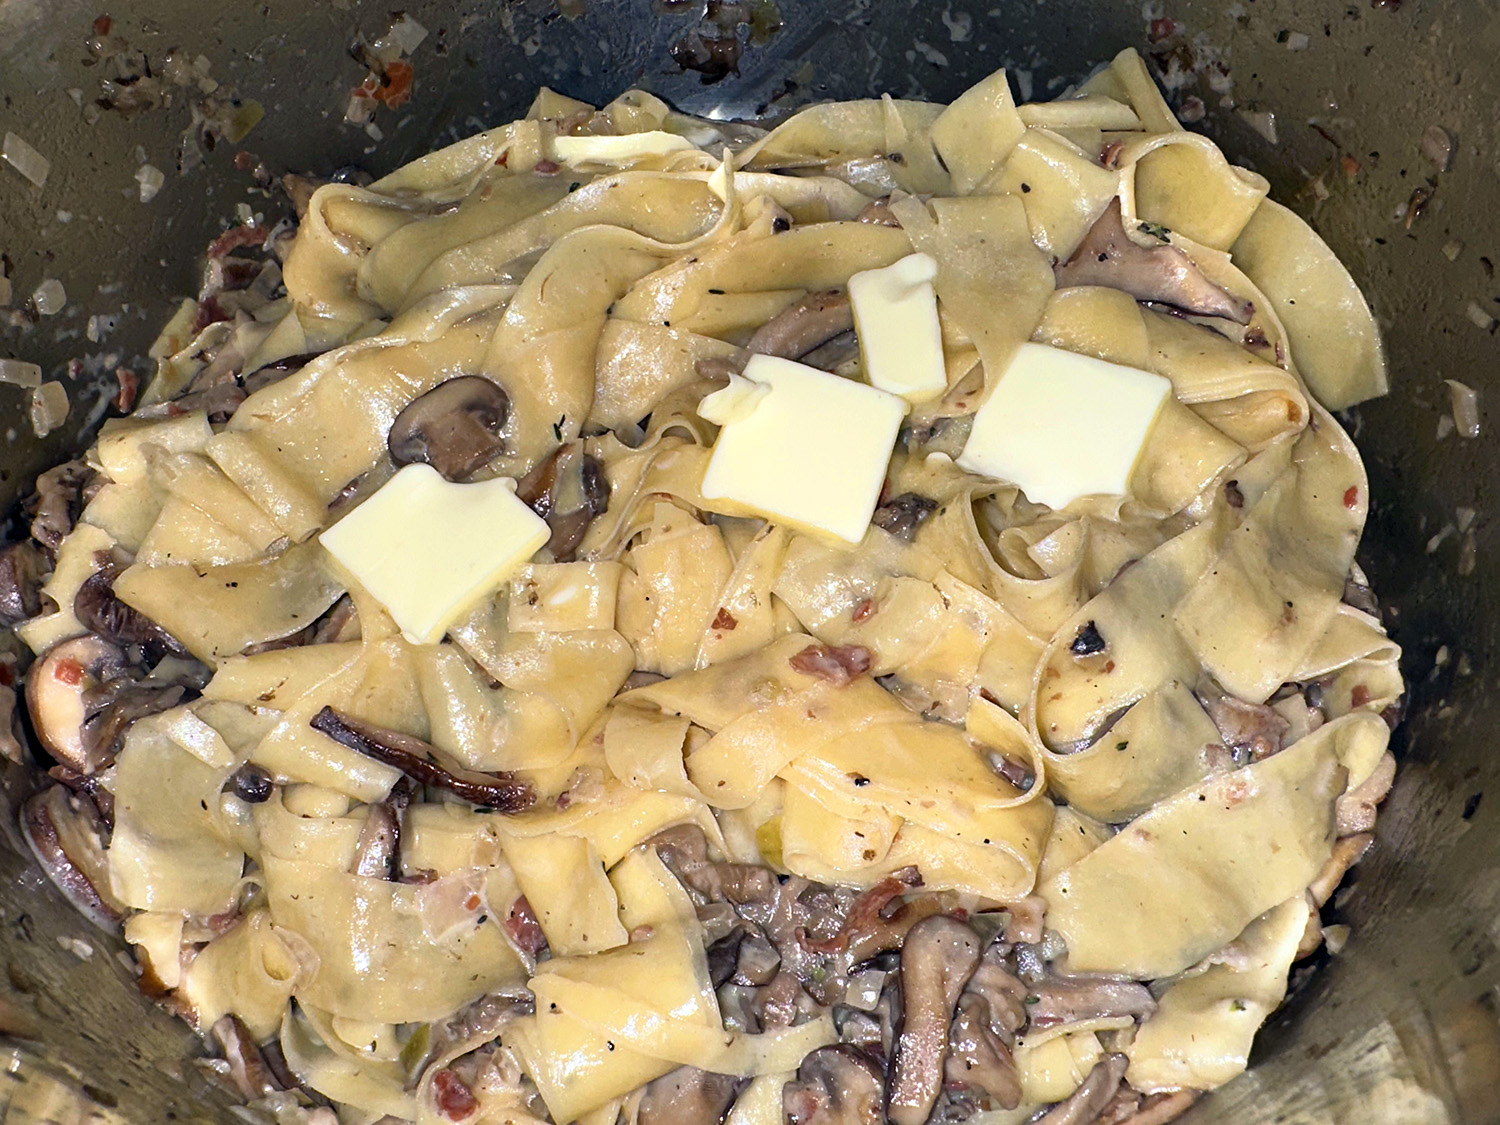
Getting the consistency of the creamy mushroom sauce right is key for this pasta recipe. You want to reduce it just until it clings to the pappardelle to create a light coating; but be careful not to reduce it too much. To that end, don’t discard the pasta water after removing the pappardelle, you may need it to thin the dish when combining everything at the end (we did).
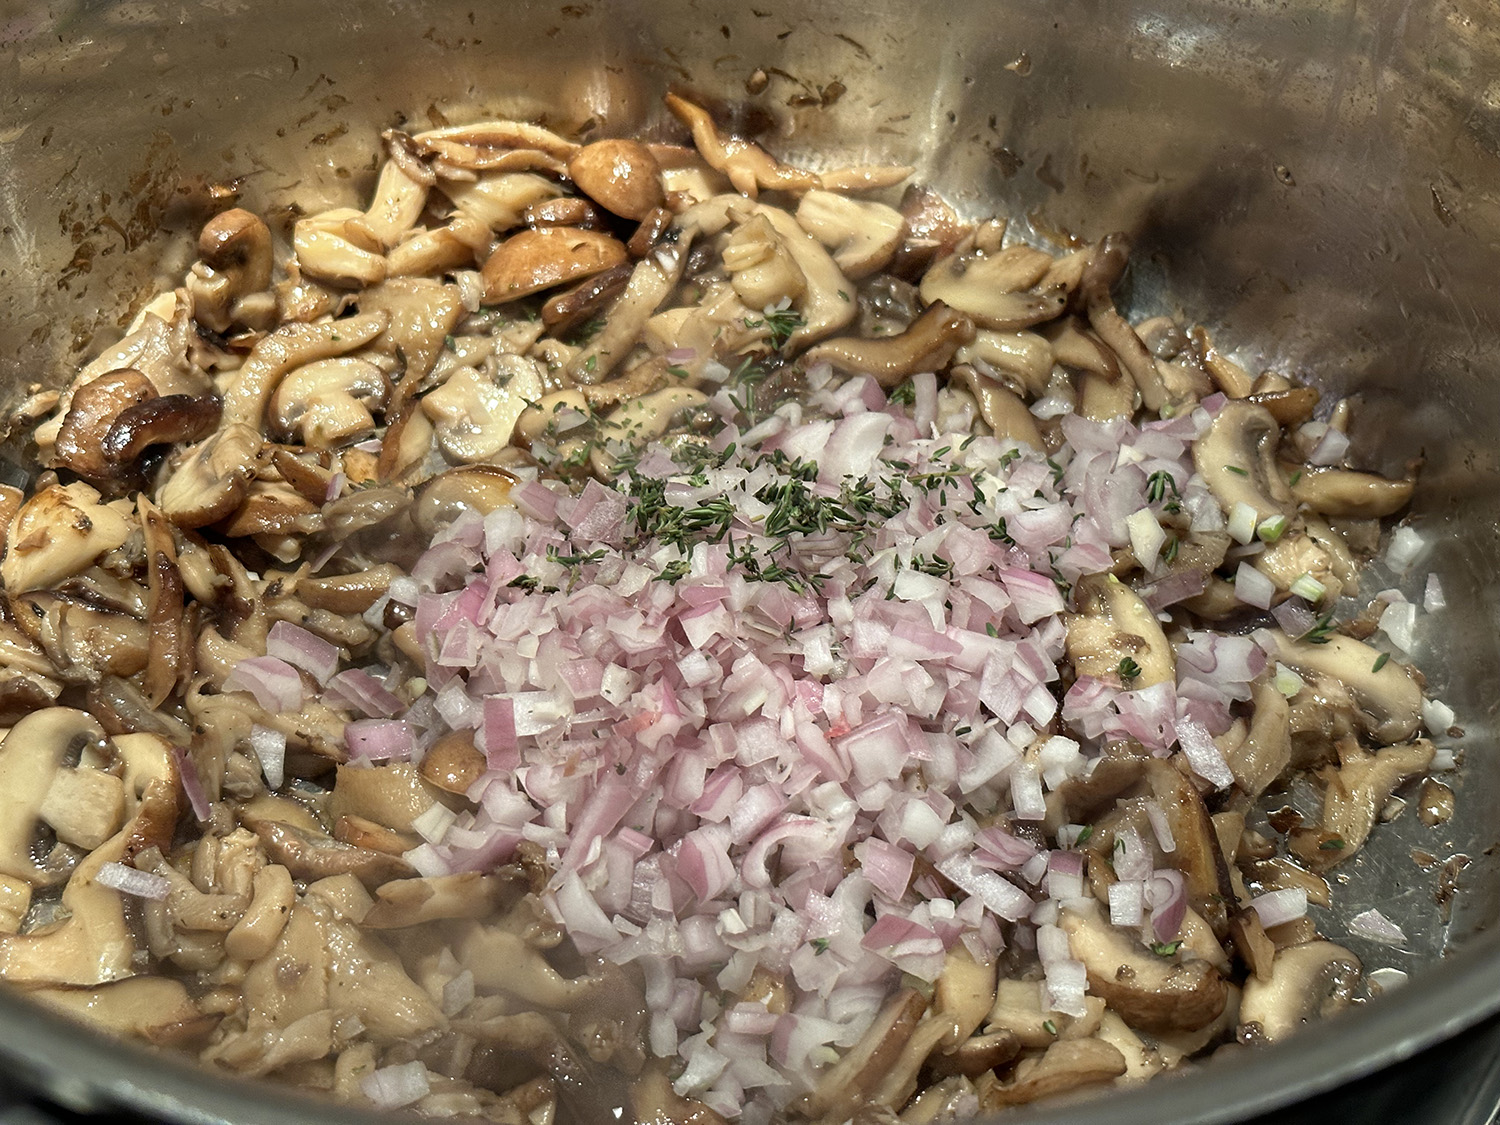
If you buy the prepackaged prosciutto, it is very thin and almost impossible to keep in one piece as you place in into the hot oil. It doesn’t really matter because in the end it gets crunched up anyway. Our mushroom mix consisted of oyster, cremini, and shiitakes. If unable to source pappardelle, fettuccine would be a comparable substitute.
We altered the amounts of a few ingredients. Instead of 12 ounces of pasta we decreased it to 8 ounces; and increased the prosciutto from 2 ounces to 4. These changes are noted in the list of ingredients below, however, you can decide what amounts work best for you.
1 lb. mixed mushrooms (such as chanterelles, maitake, oyster, cremini, and/or shiitake), torn into bite-size pieces
2 medium shallots, finely chopped
1 tsp. thyme leaves, plus more for serving
Kosher salt, freshly ground pepper
1 cup chicken stock, preferably homemade
8 oz. pappardelle or fettuccine
⅓ cup heavy cream
2 Tbsp. unsalted butter
Directions
Heat ¼ cup oil in a large Dutch oven or other heavy pot over medium. Arrange prosciutto in a single layer in pot and cook, turning once or twice, until crisp, about 5 minutes. Transfer to paper towels to drain.
Heat remaining 2 Tbsp. oil in same pot over high. Cook mushrooms, tossing occasionally, until browned and tender, 5–8 minutes. Reduce heat to medium-low.
Add shallots and 1 tsp. thyme, season with salt and pepper, and cook, stirring often, until shallots are translucent and softened, about 2 minutes. Add stock and reduce heat to low. Bring to a simmer and cook until only a thin layer of stock coats bottom of pot, 5−7 minutes.
Meanwhile, cook pasta in a large pot of boiling salted water, stirring occasionally, until very al dente, about 3 minutes less than package directions.
Using tongs, transfer pasta to pot with mushrooms and add 1 cup pasta cooking liquid. Crumble half of prosciutto into pot. Increase heat to medium, bring to a simmer, and cook, tossing constantly, until pasta is al dente and liquid is slightly thickened, about 2 minutes. Add cream, return to a simmer, and cook, tossing, until pasta is coated, about 1 minute.
If pasta sauce is thicker than prefered, add additional pasta water a 1/4 cup at a time, stirring well after each addition until desired consistency is achieved. Remove from heat, add butter, and toss to combine. Taste and season with salt if needed.
Divide pasta among bowls. Top with more thyme and crumble remaining prosciutto over; season with pepper.
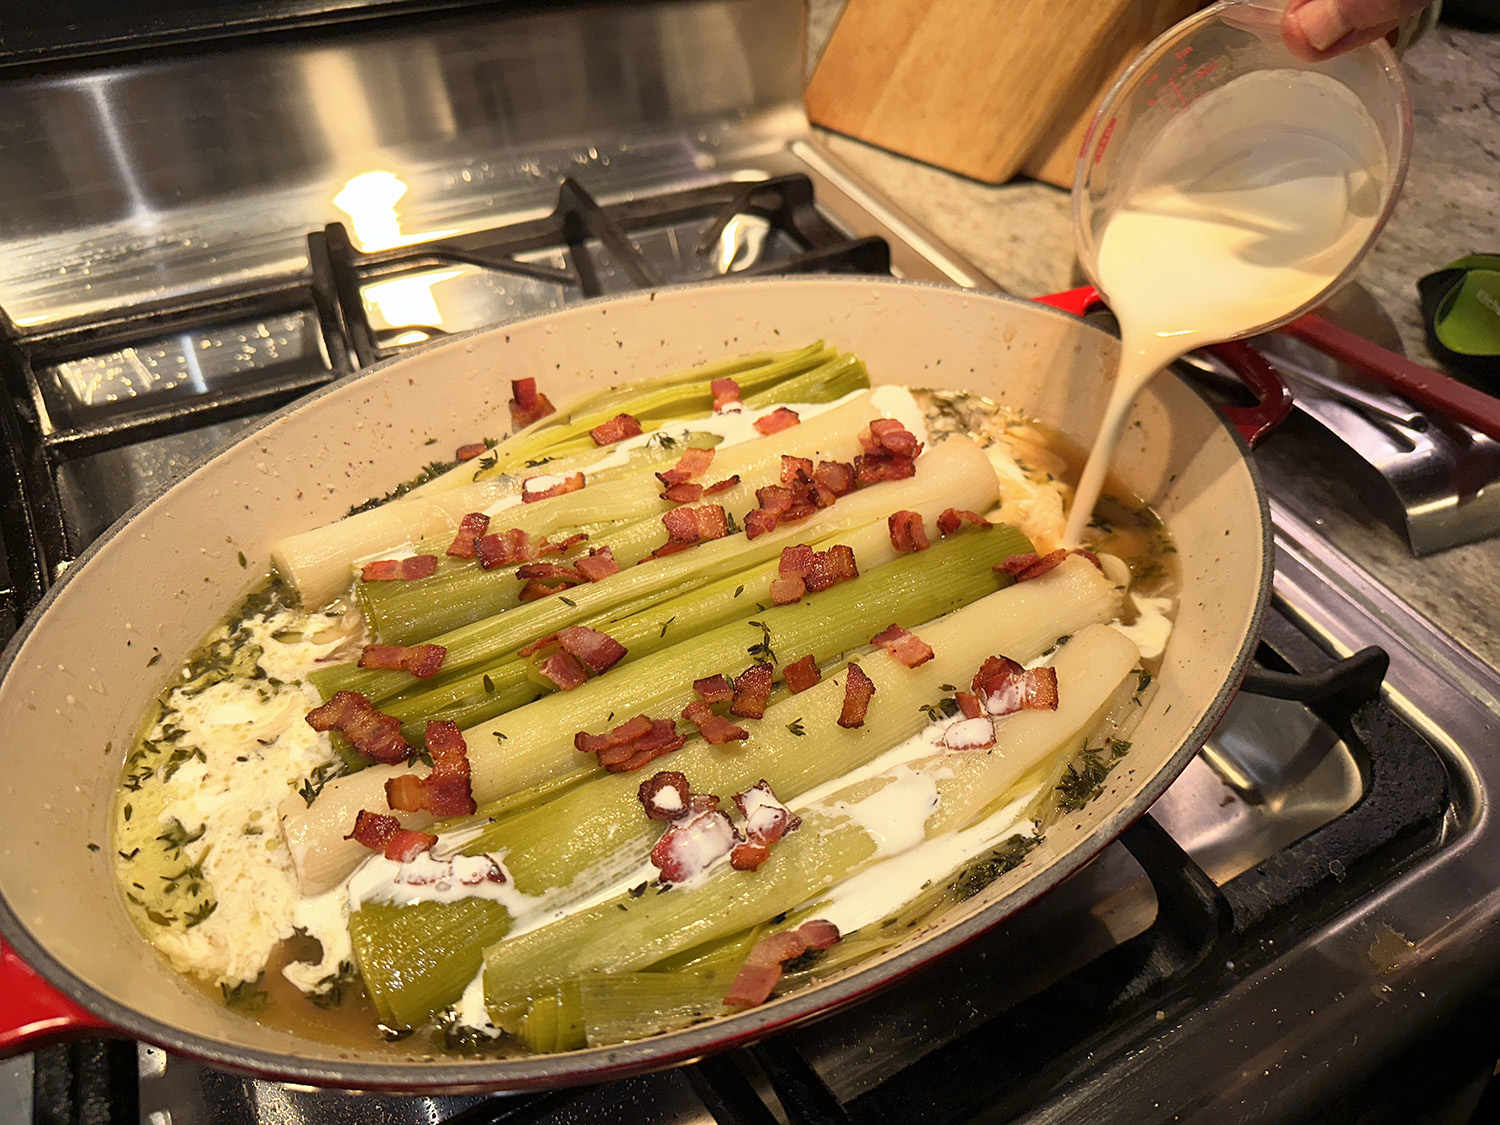
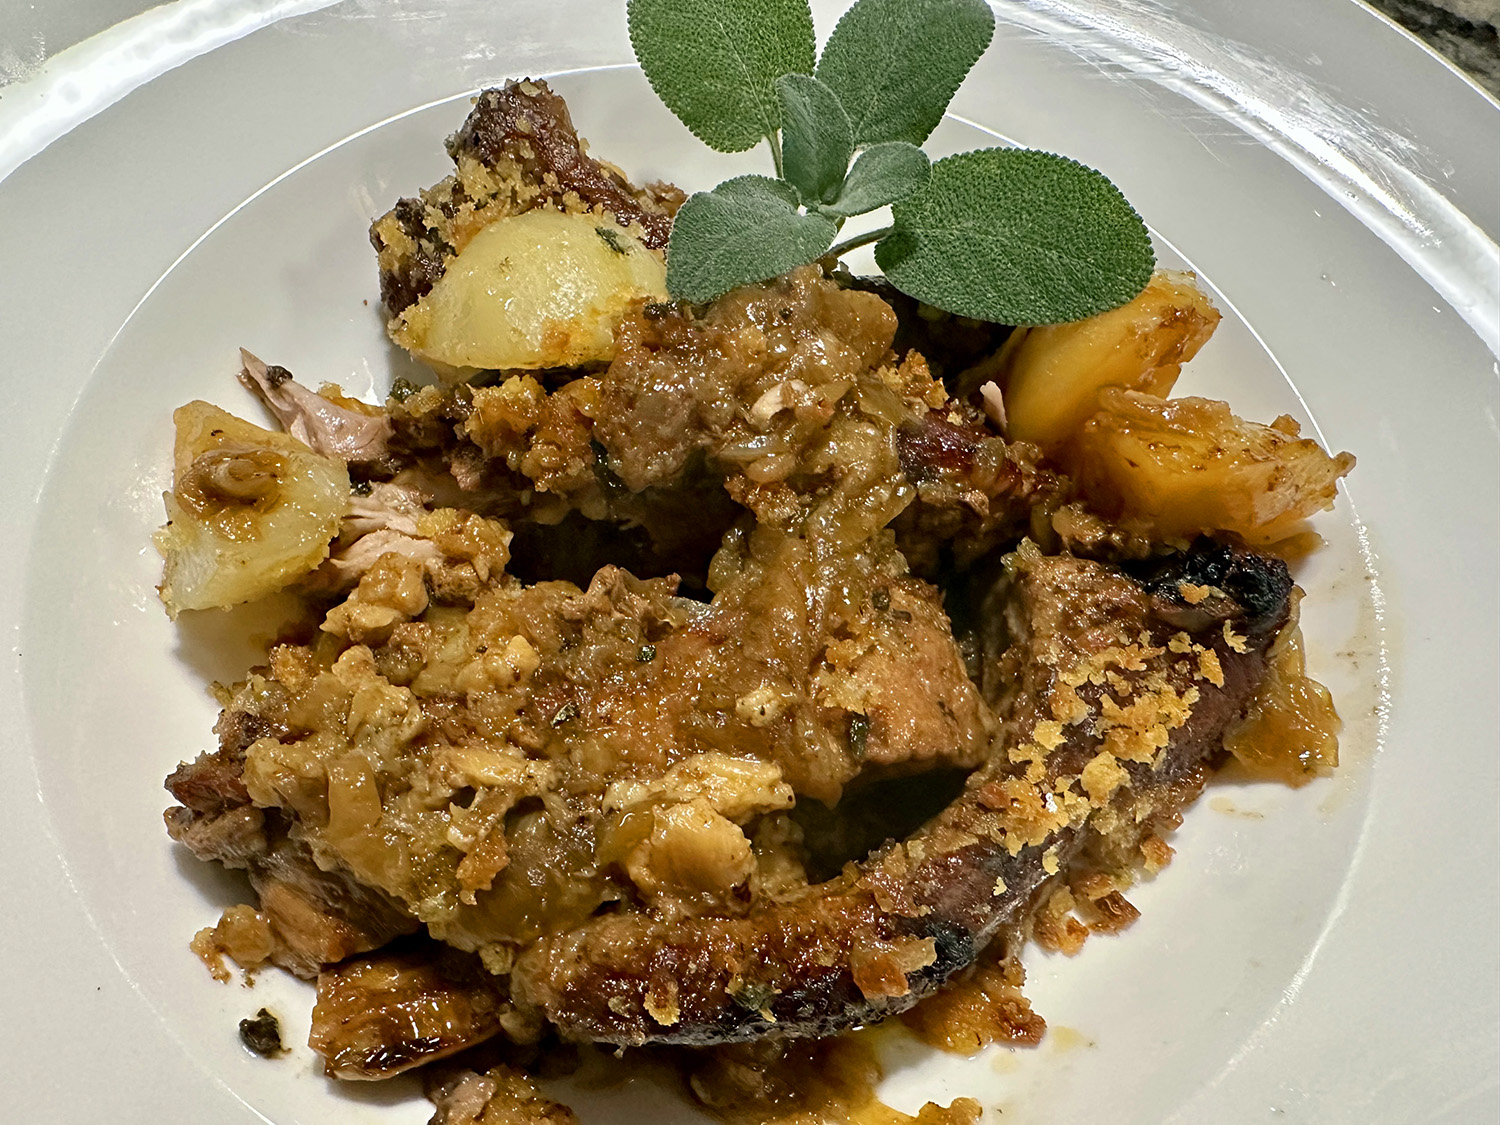
Here’s a lovely long braised dish perfect for a cool weather weekend afternoon into evening. Baby back ribs are braised till they fall off the bone, then garnished with an herby crumb topping. Plus a bonus recipe for Braised Leeks with Bacon and Cream.
Admittedly, we always think of baby back ribs as an outdoor barbecue kind of dinner. It has never dawned on us to showcase the ribs as a cool weather meal. Now that we have enjoyed the fruits of our labor, these ribs are sure to make a showing again in the near future.
The bread crumb topping is optional, but adds a tremendous depth of flavor and a nice crunch factor. Cracking the new potatoes in half with the tip of a knife helps them to release their starch and therefore thicken the sauce a bit.
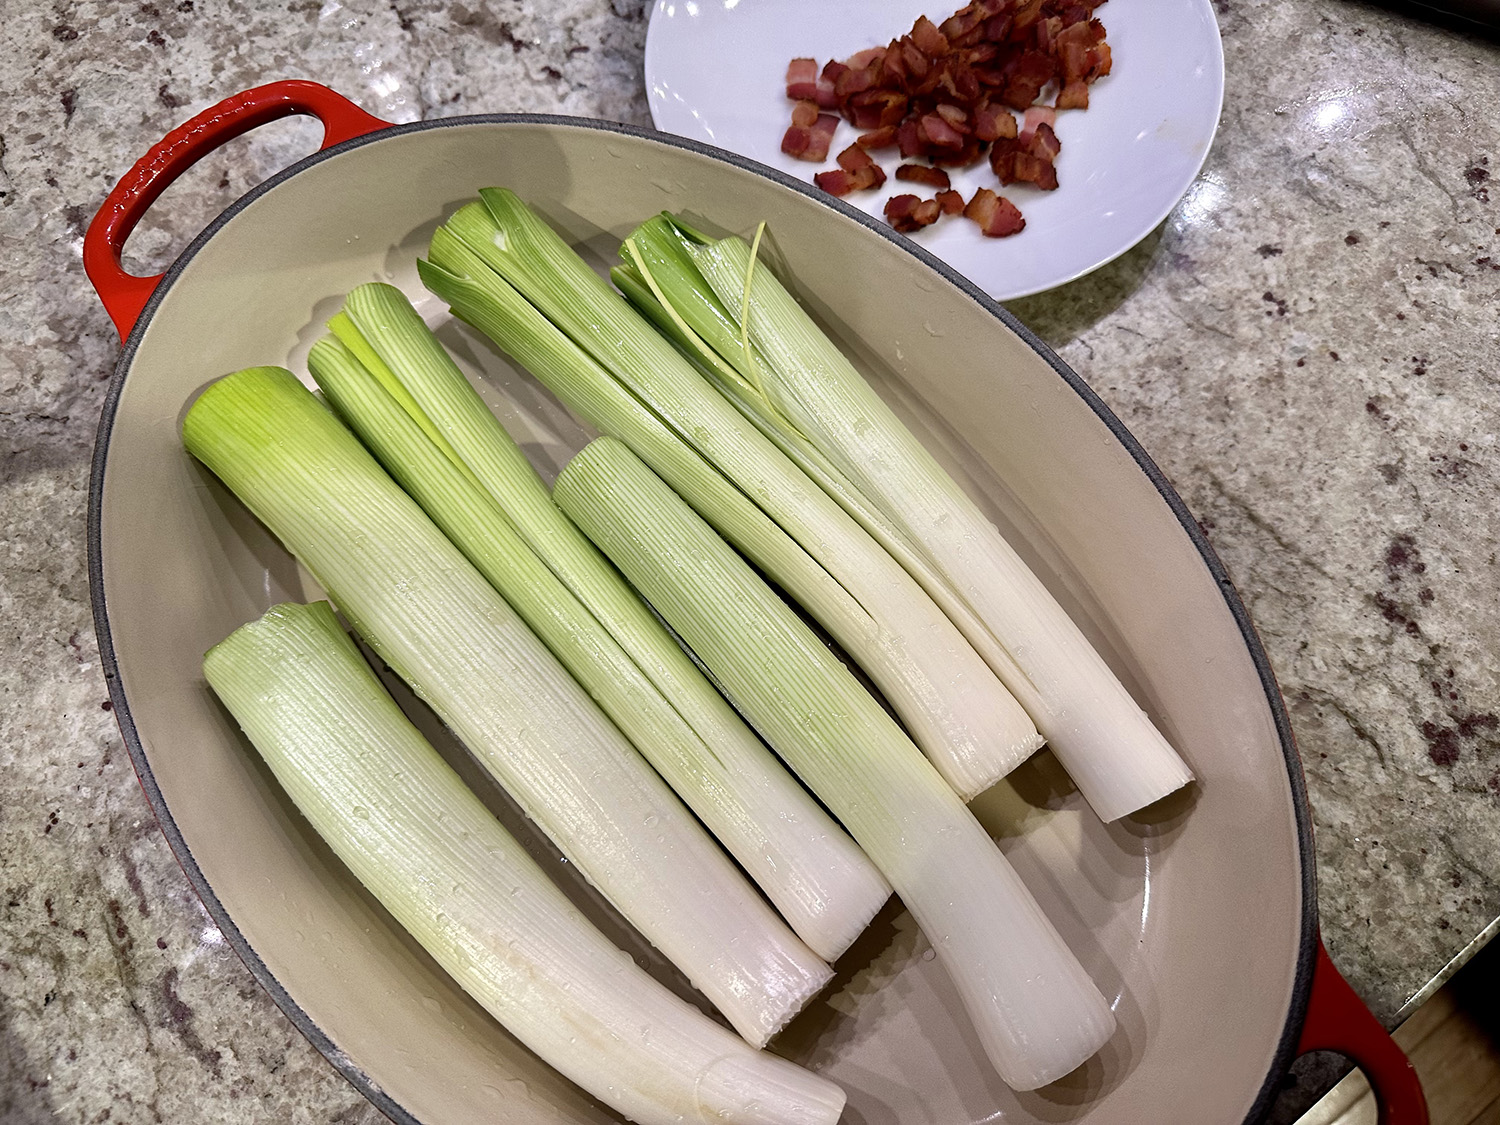
As an accompaniment, we prepared a side of Braised Leeks with Bacon and Cream (shown below), originally from Molly Stevens “All About Braising” cookbook. A while back, we enjoyed the same recipe using thyme, but minus the cream. Either option braises the leeks slowly in chicken broth until they collapse into blessed tenderness.
On our initial trip to the grocery store, there were only a few lousy looking leeks with hardly any white parts, so we rethought our scouting expedition and went to a local Asian Mart known to carry great produce. Their leeks were phenomenal, the best we’ve ever seen.
Try to coordinate the cooking times of both the ribs and the leeks so that they are done braising at about the same time.
Braised Pork Ribs and Potatoes with Fried Herb Crumbs
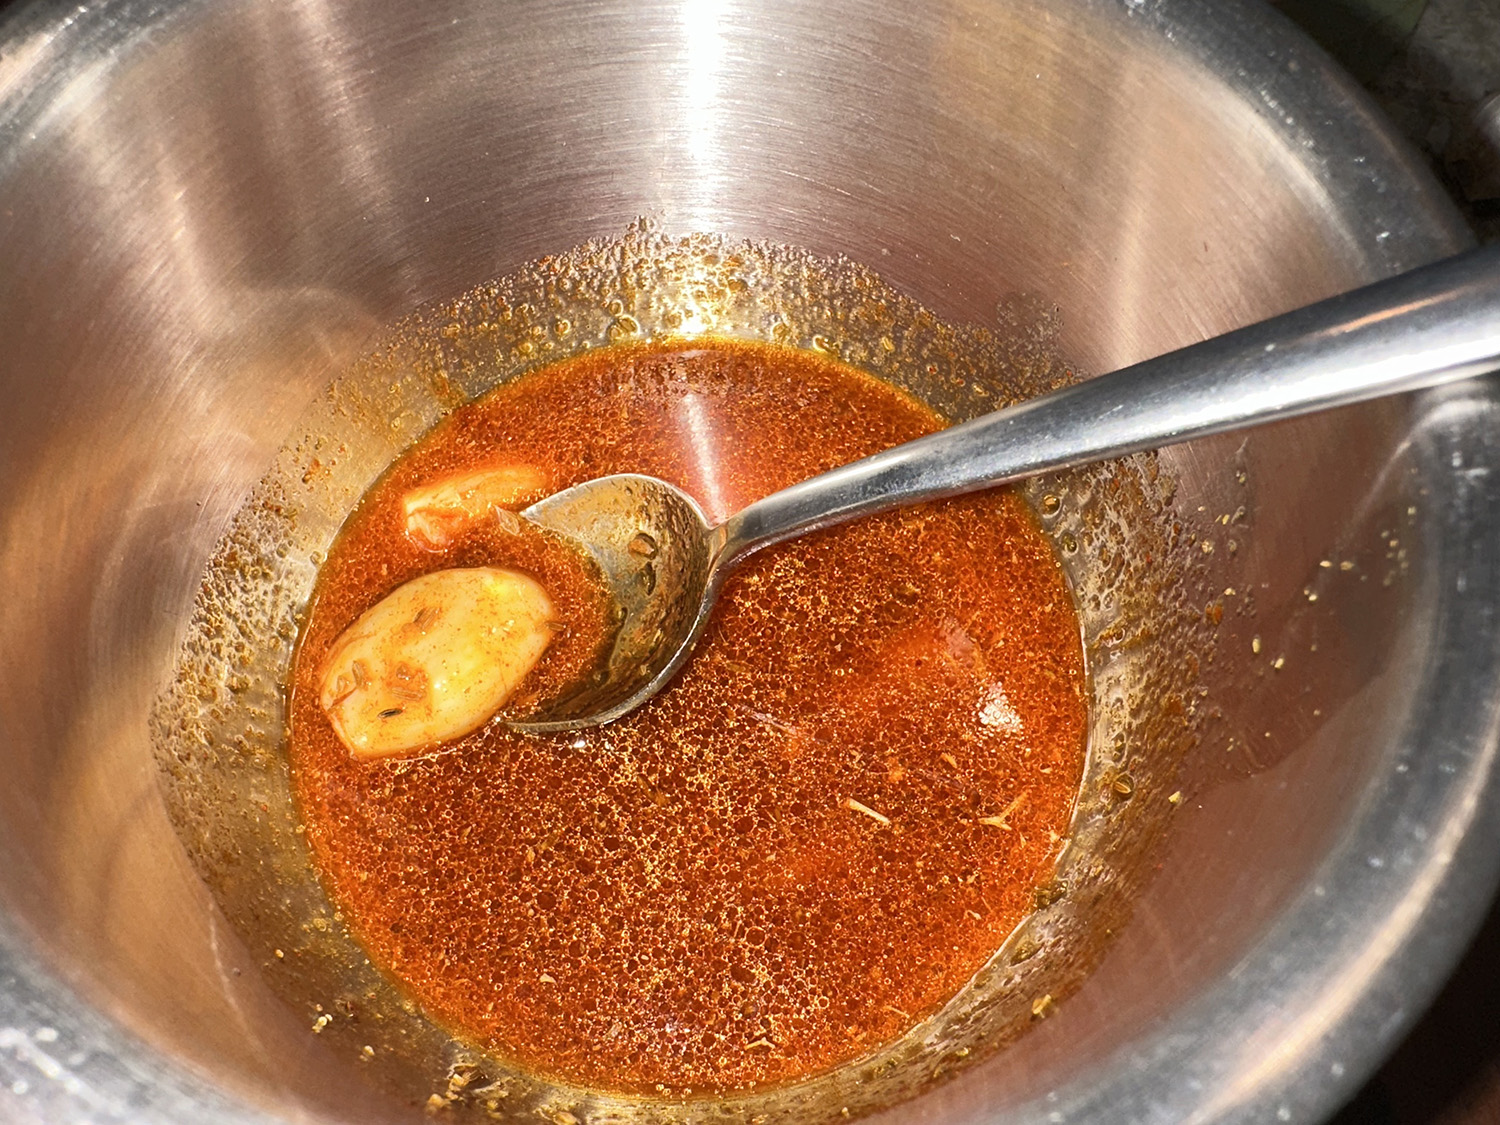
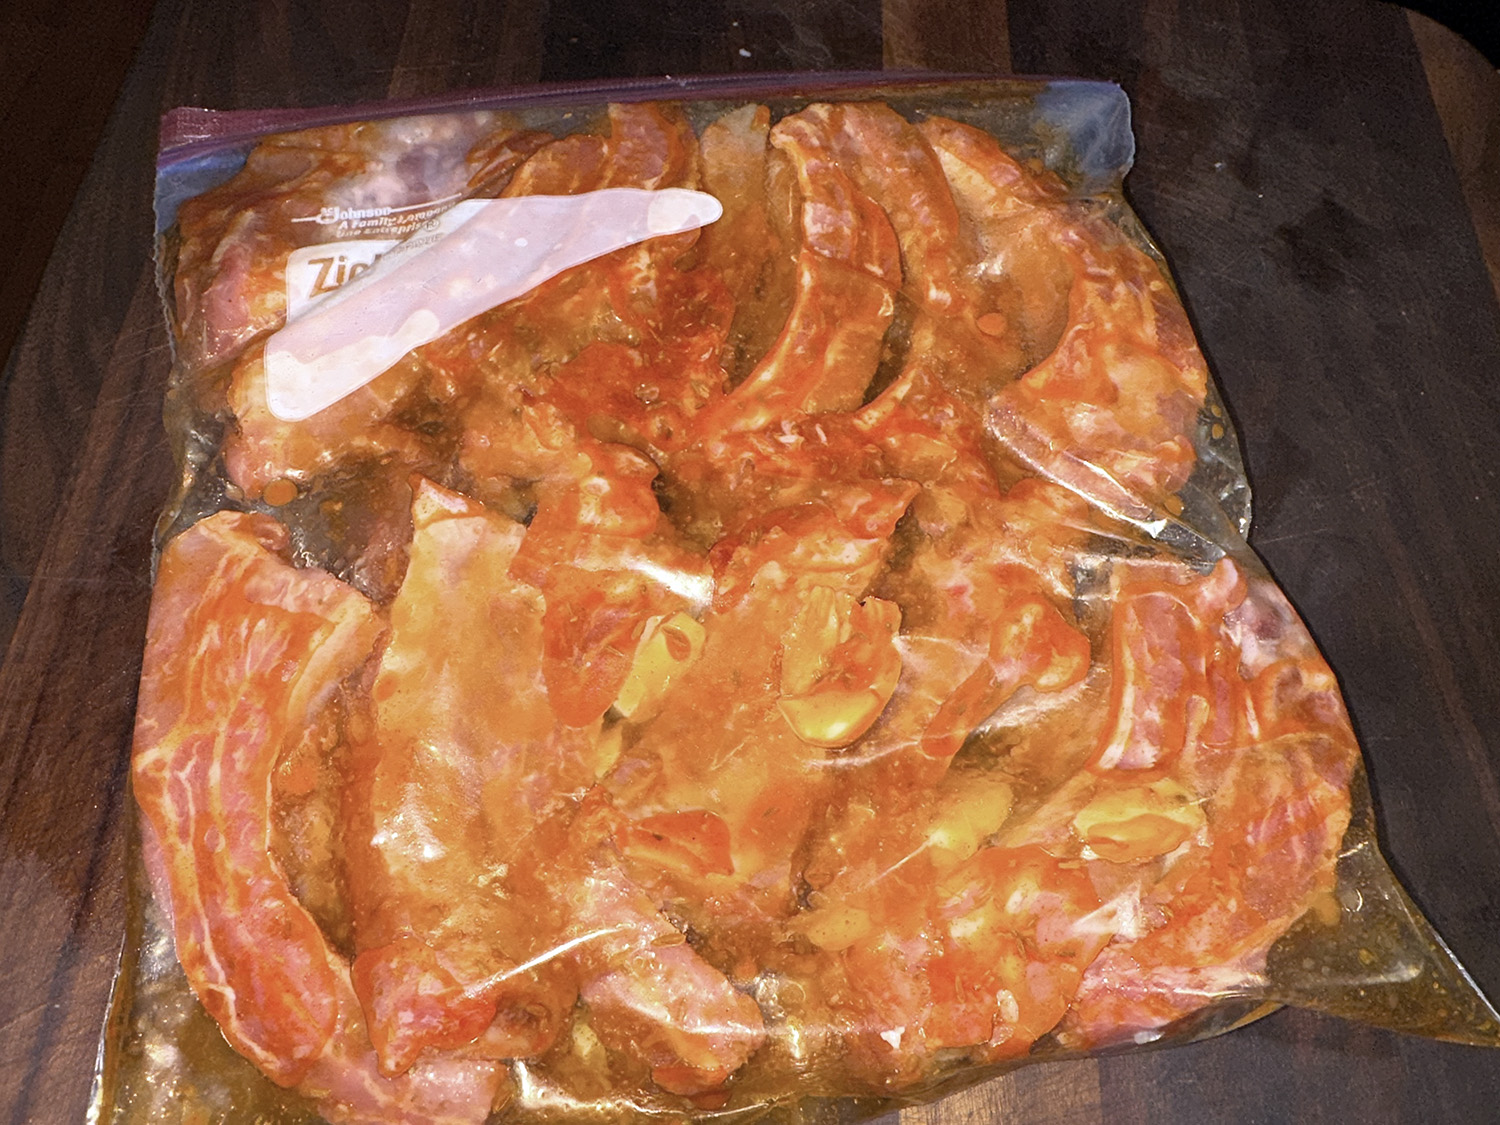
Arrange the ribs in a large dish, add the pimentón, two of the bashed garlic cloves, two tablespoons of the olive oil, a teaspoon of the crushed cumin seeds and 2 ounces of the white wine. Toss to coat the ribs, then cover and leave to marinate for at least three hours (or put in the fridge overnight).
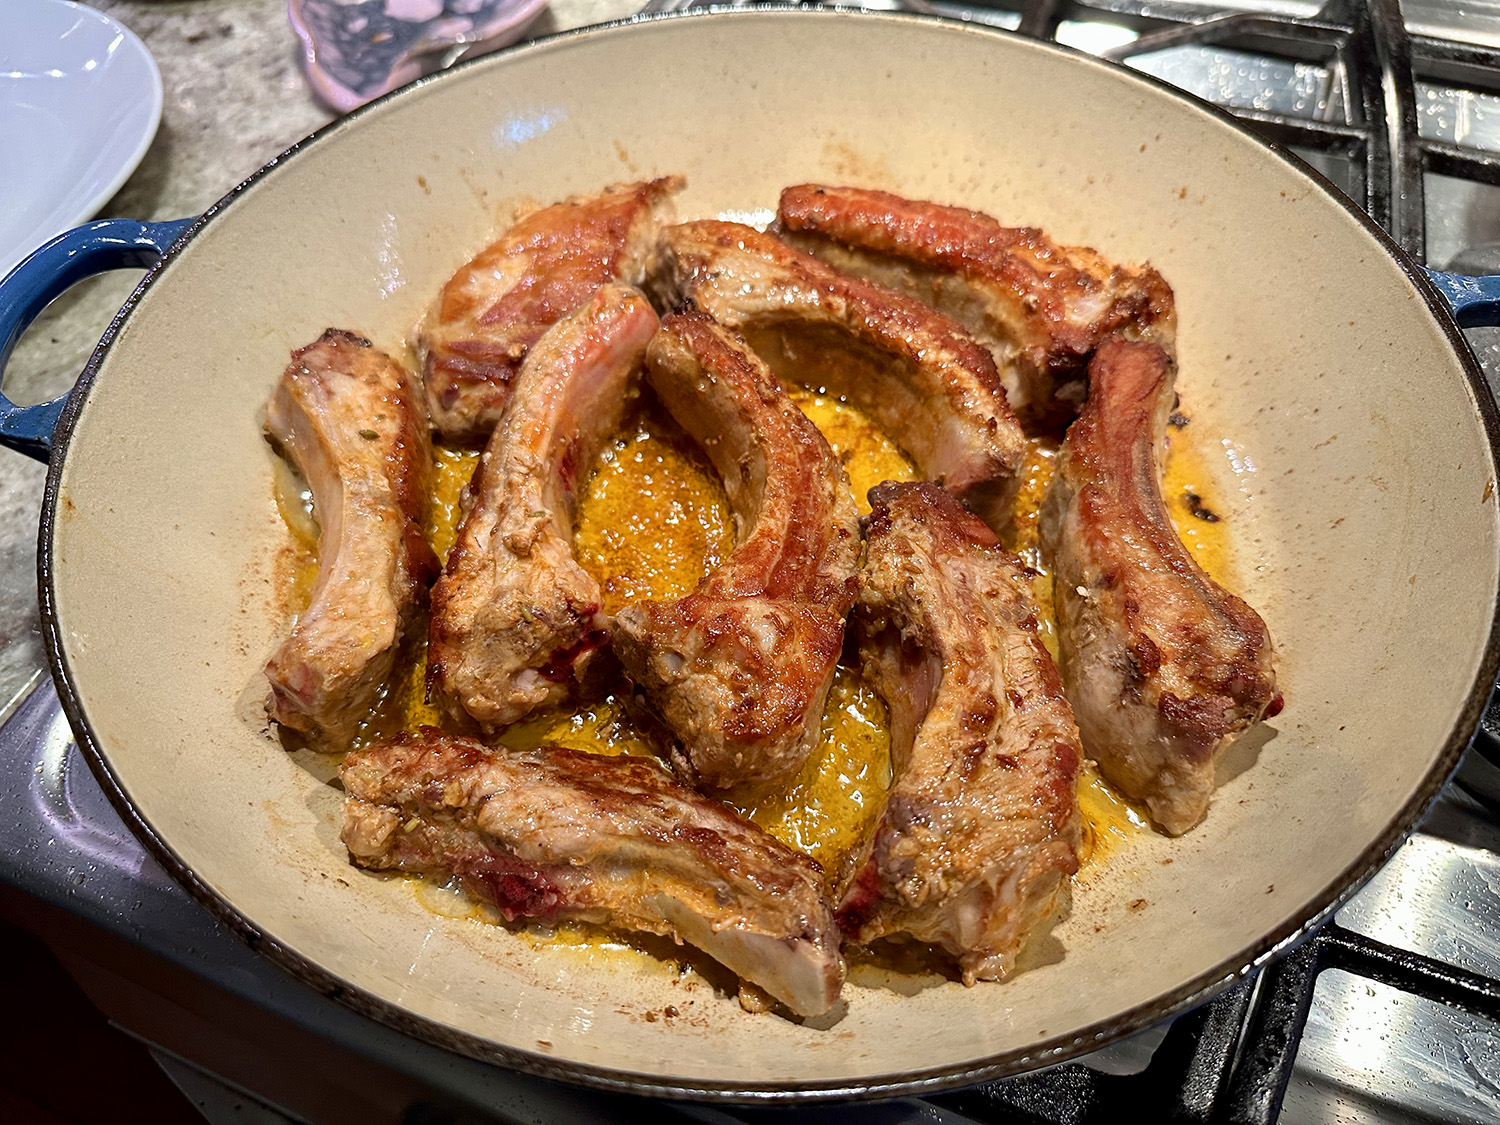
Heat the oven to 340F. Heat the remaining two tablespoons of olive oil in a deep casserole dish on a medium-high heat. Take the ribs out of their marinade (keep the marinade for later), and sear for four to five minutes on each side, until browned all over.
Transfer the ribs to a plate, add the onion to the pan and sauté, stirring, for 10 minutes, until brown. Add the remaining garlic and cumin seeds, stir to combine, then return the ribs to the pan.
Pour in the remaining 3 ounces of white wine, leave to bubble for a minute, then add the bay leaves, stock and reserved marinade. Season well and bring to a boil, then cover and transfer to the oven to cook for an hour to an hour and a half, until the meat is tender and beginning to pull away from the bones.
Crack the new potatoes in half with the tip of a knife (this helps them to release their starch), then add to the casserole dish and cook for 30-40 minutes, until the potatoes are cooked through and starting to break apart a bit and thicken the sauce.
Meanwhile, make the herby crumbs. Put the oil in a frying pan on a medium-high heat, fry the garlic for 10 seconds, then add the breadcrumbs, lemon zest and sage.
Remove the lid from the casserole, sprinkle the crumb mix all over the top, then bake uncovered for a further 20 minutes.
Then put under a broiler for a couple of minutes to crisp the top. Serve in shallow bowls with lots of the lovely sauce.
This mellow, velvety soup filled with barley and vegetables is a perfect place for your leftover Thanksgiving turkey. It’s savory, herby and very warming on a cold winter evening, makes you want to cozy up to the fireplace.
If you want to make your own stock from the turkey bones, please do, the soup will be even richer. But store-bought stock works, just not as flavorful, but it makes this straightforward recipe quicker to put together. Brown rice makes an excellent barley substitute, though you may have to add a few minutes to the cooking time.
In Step 3, The Hubs was afraid that the barley would suck up too much liquid, so he cooked them separately in water and then added to the soup pot with the turkey. I left the original directions as written, so it’s up to you what you want to do with the barley.
2 medium carrots, peeled and sliced into ½-inch coins
2 celery stalks, thinly sliced
1 medium yellow onion, finely diced
3 garlic cloves, minced or finely grated
2 tsp. finely chopped fresh sage leaves
2 tsp. fine salt, plus more as needed
½ tsp. freshly ground black pepper, plus more as needed
¼ tsp. freshly grated nutmeg
Pinch of cayenne
4 thyme sprigs
4 parsley sprigs, plus 1 cup coarsely chopped parsley leaves and tender stems, plus more for garnish
1 bay leaf
2 qts. turkey or chicken stock, preferably homemade
¾ cup pearled barley
2 to 3 cups shredded or chopped leftover turkey
1 lemon, halved
Directions
In a large soup pot over medium-high, melt butter, or heat the oil until shimmering. Add carrot, celery and onion, and cook, stirring occasionally, until lightly browned at the edges, 7 to 10 minutes. Stir in garlic and sage, and sauté for a minute, until fragrant. Stir in salt, pepper, nutmeg and cayenne.
Tie the thyme and parsley sprigs and the bay leaf together with a piece of kitchen twine to make a bouquet garni and add to the pot (or just throw the herbs directly into the pot; you’ll just have to fish them out later).
Add stock and barley* (see above note) and bring to a boil. Reduce to a simmer and cook until barley is almost done, about 30 minutes. Add turkey and cook until barley is tender, about 10 to 15 minutes longer.
Remove from heat and remove the bouquet garni or herbs. Squeeze the juice from half a lemon into the soup, and stir in chopped parsley. Taste and add more salt, pepper and lemon juice, if you like. Cut the remaining lemon half into wedges. Garnish soup with more parsley, and serve with lemon wedges.
Besides soup and sandwiches, here’s another option for leftover turkey: Creamy Pasta with Turkey and Crispy Crumbs. This pasta recipe features an Alfredo-like sauce dressed up with leftover shredded (or cubed) turkey, crispy bread crumbs, and salty capers and is ready to eat in just over a half hour.
The original recipe, found in a past issue of Fine Cooking Magazine, used linguine as the pasta. We substituted whole wheat spaghetti since we already had it in our pantry. Any long pasta such as fettuccine, bucatini or linguine will work, just cook according to package directions for al dente.
8 oz. whole wheat spaghetti (or other long stranded pasta)
½ cup grated Parmesan cheese
2 – 3 Tbsp. capers, drained
Directions
In a large skillet heat 1 tablespoon butter over medium. Add half the garlic; cook 30 seconds. Add bread crumbs and a pinch of salt. Cook and stir 2 minutes or until bread crumbs are golden brown and aromatic. Transfer to a small bowl. Wipe out pan. Stir parsley into bread crumbs.
Bring a large pot of salted water to boiling.
Meanwhile, melt 1 tablespoon butter in the skillet. Add celery and remaining garlic; cook and stir over medium 5 minutes.
Stir in cream; simmer, uncovered, 3 minutes. Add turkey and thyme; cook and stir until heated through.
Cook spaghetti according to package directions. Drain, reserving 1/4 cup cooking liquid. Stir cooking liquid into turkey mixture then toss with pasta.
Stir in cheese, capers, 1/2 teaspoon salt, and 1/4 teaspoon black pepper. Divide among 4 plates; top each with bread crumbs.
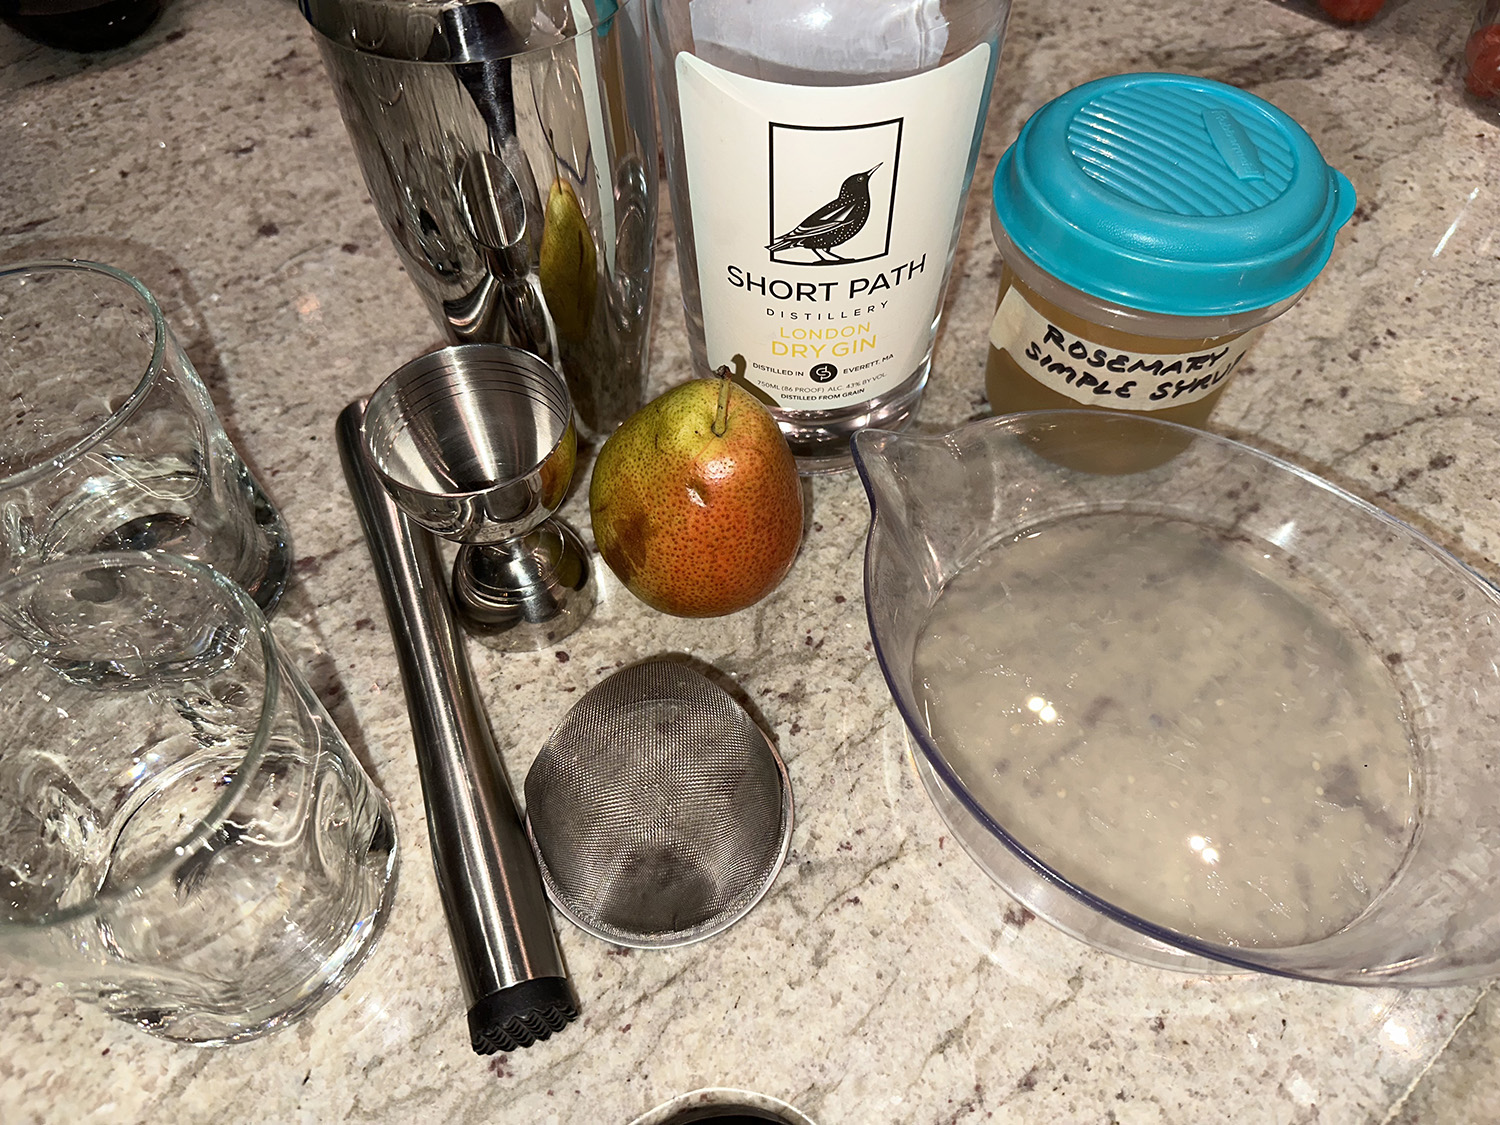
The holiday season is upon us which means enjoying a festive cocktail, or three. On an occasional Autumn/Winter Sunday evening it has been our custom the past few years to experiment making new libations. This Pear Gin Cocktail with Rosemary caught our attention recently, and so we had to give it a trial run to see if it was company-worthy.
The answer is a resounding yes! The combination of fresh fruit, infused simple syrup, and a touch of ginger liqueur creates an easy, elevated cocktail to sip as you enjoy some party-time hors d’oeuvres.
Just remember to make the rosemary simple syrup a day or so ahead of time. All you need to do is combine equal parts sugar, water and add fresh rosemary sprigs in a medium saucepan. You’ll also need a wooden spoon, a wire-mesh strainer or slotted spoon, and a jar or bottle to store it in.
Combine 1 cup each of water, sugar, and several sprigs of rosemary in a small saucepan. Bring to a boil, stirring until sugar dissolves. Simmer for 1 minute. Remove from heat and let syrup steep for 30 minutes. Pour syrup into a sterilized glass jar through a mesh strainer to remove rosemary leaves; let cool.
This Peruvian chicken escabeche is seasoned with aji amarillo, an orange-yellow chili ubiquitous to that country’s cuisine. In the U.S., the chilies are difficult to find fresh, but aji amarillo paste, sold in jars, is available in some well-stocked markets, specialty stores, or easily online. We purchased it online as a 3-pack with two other Peruvian pastes.
Escabeche is made by soaking meat or seafood in an acidic marinade after cooking, allowing the addition of bright flavors without altering the texture of the meat. The fruity, yet earthy flavor of aji amarillo is an important part of this dish, but if you cannot find the paste, use 1 or 2 seeded and finely minced jalapeños.
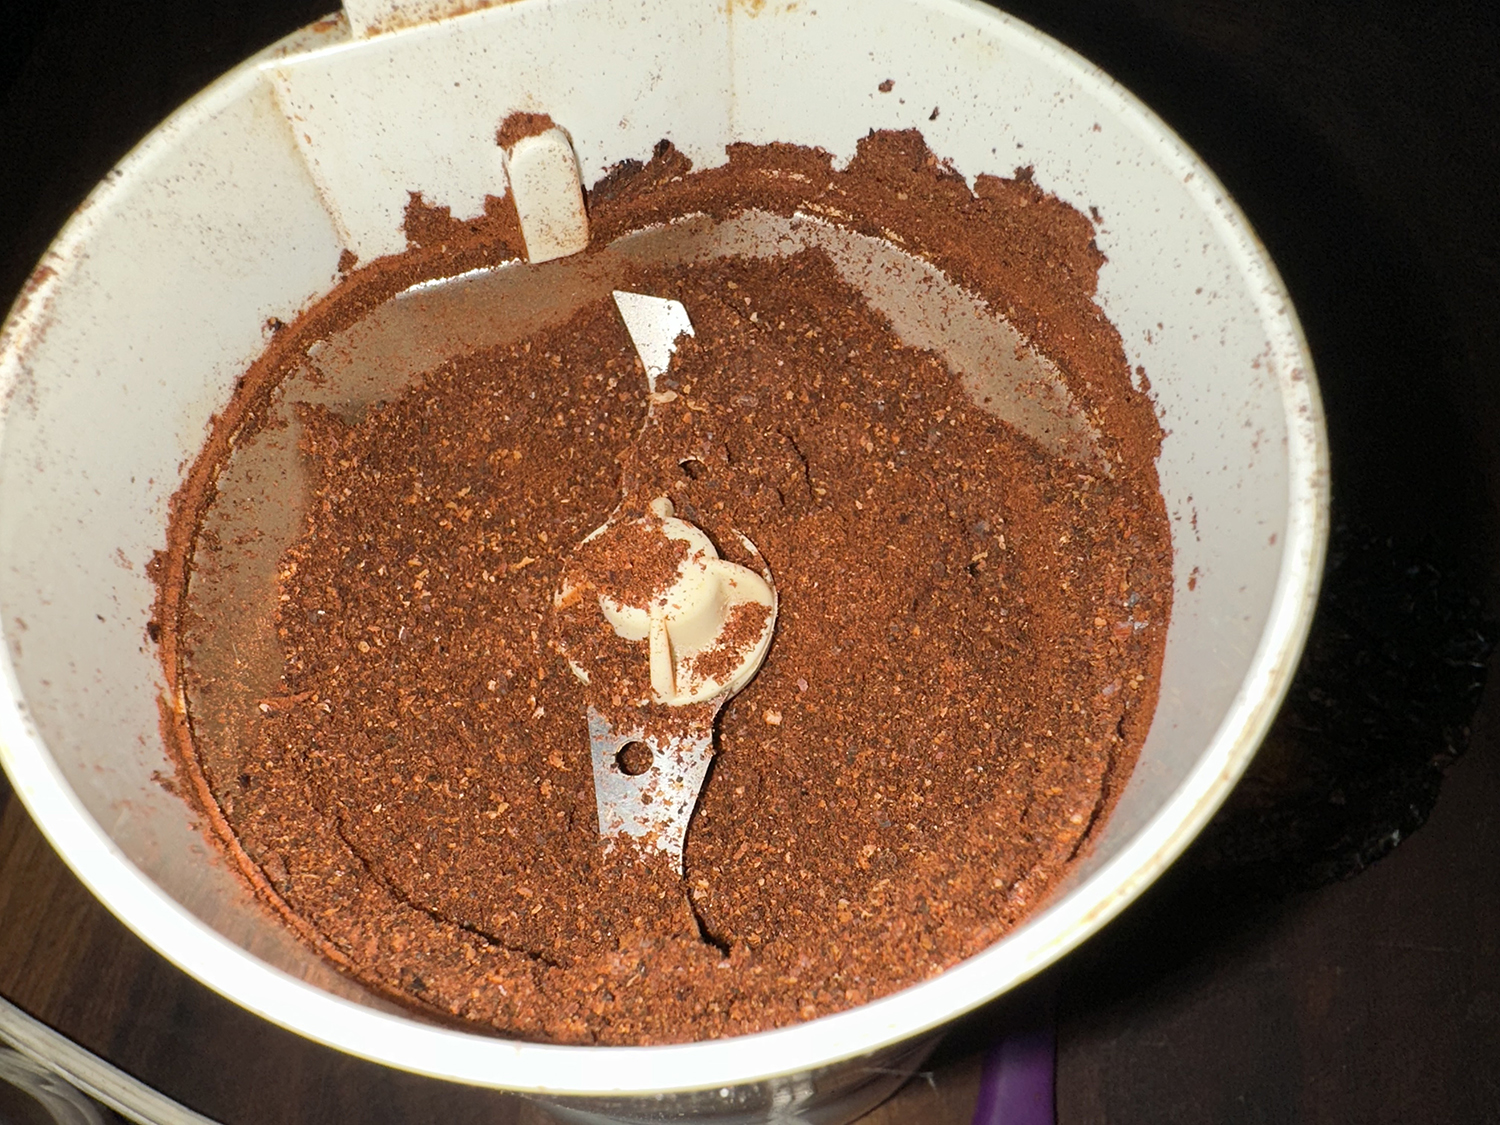
FYI–Don’t use regular chili powder instead of pure ancho chili powder. Regular chili powder is a spice blend, whereas ancho chili powder contains only ancho chilies. If you can’t find the powdered, grind some dried ancho chilies in a spice grinder, as shown above.
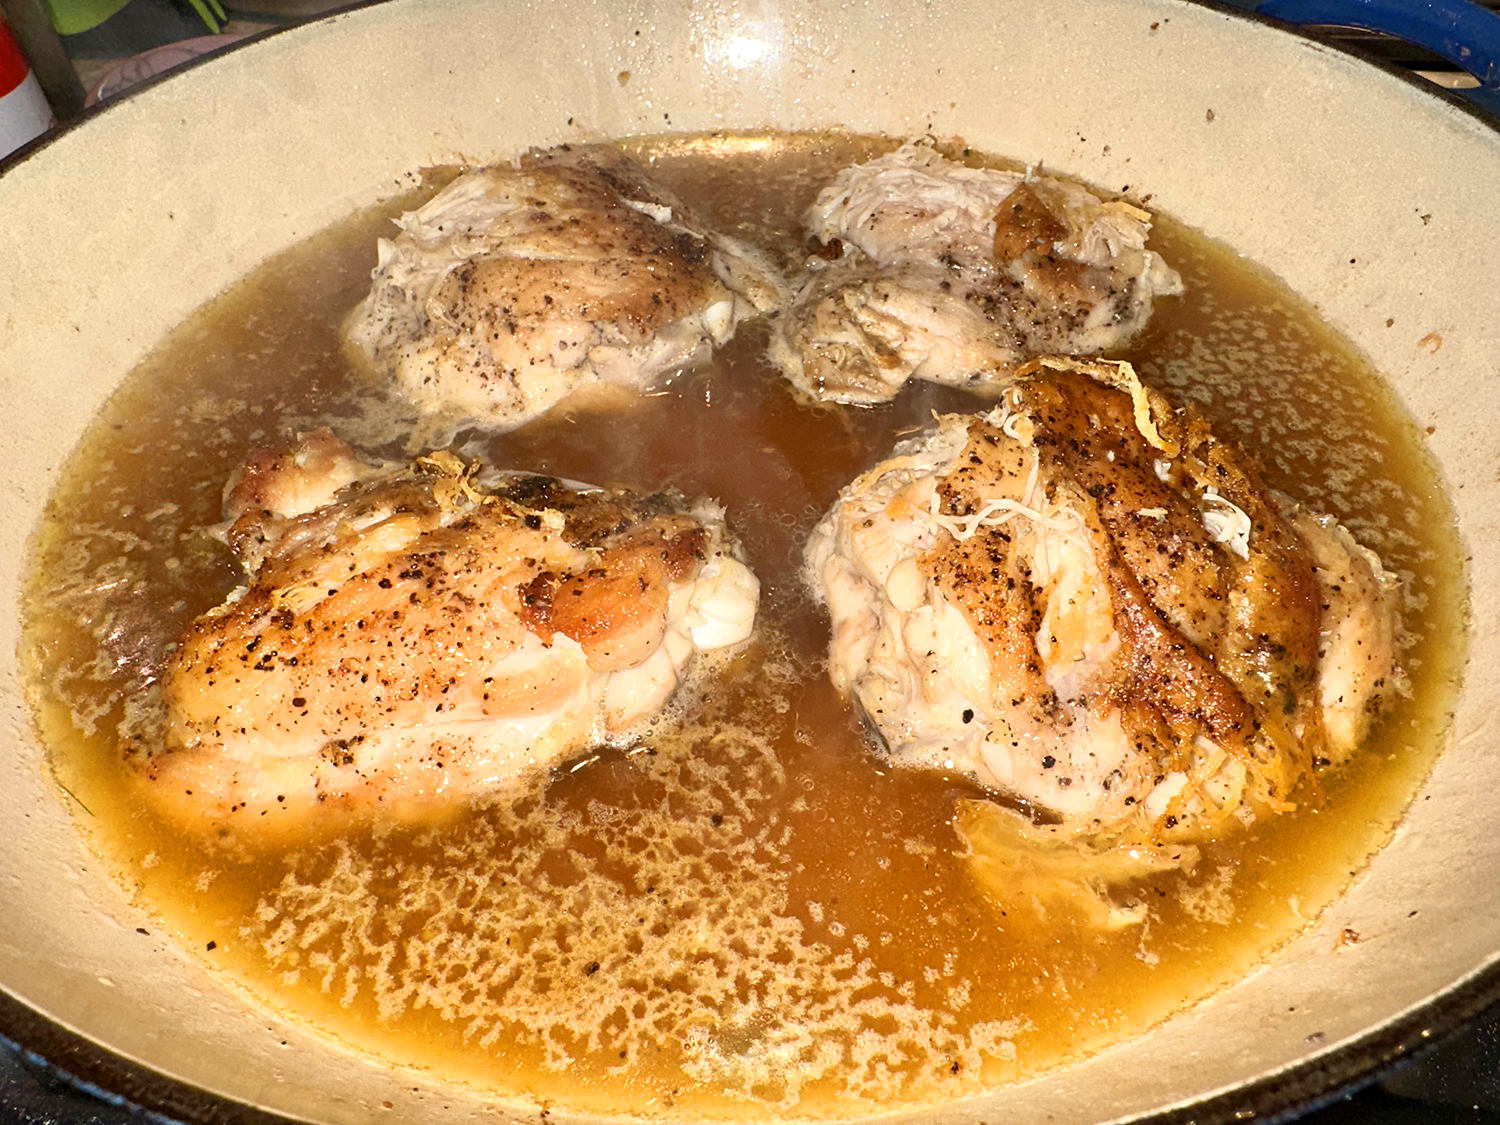
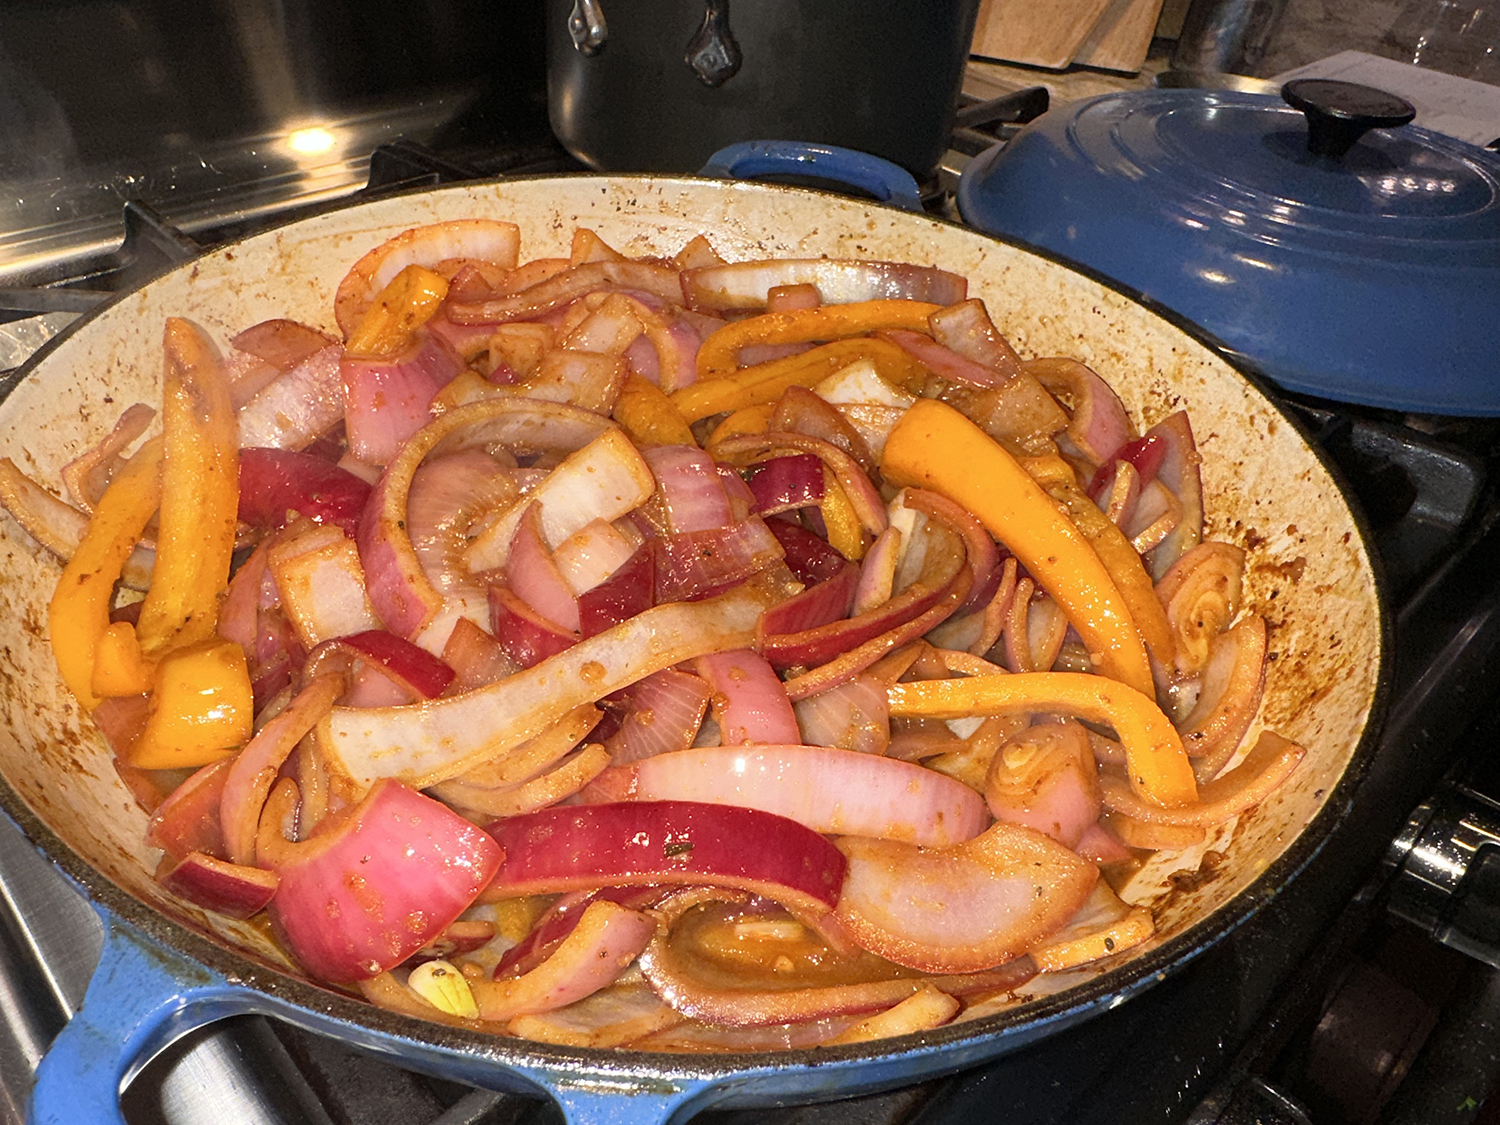
Because the skin was removed, you might encounter the chicken meat sticking to the pan. Try to pry most of it off the pan, but it is OK to leave some of the meat because it will make a nice fond and release itself once the liquids are added in. It was delicious served with the onion mixture on top of the thighs over a bed of garlic rice.
3 medium red onions, halved and sliced ¾-inch thick
1 large orange bell pepper, stemmed, seeded and sliced into ¼-inch strips
1/3 cup white wine vinegar
Directions
Season the chicken all over with salt and pepper. In a large Dutch oven over medium-high, heat 1 tablespoon of oil until barely smoking. Add the chicken in a single layer and cook on each side, without disturbing, until deep golden brown, 3 to 5 minutes per side. Add the broth and bring to a boil. Cover, reduce to low and simmer until a skewer inserted into the largest thigh meets no resistance, 10 to 15 minutes.
Transfer the chicken to a serving dish and cover with foil. Bring the cooking liquid to a boil over high and cook until reduced to 1 cup, about 5 minutes. Transfer to a small bowl or measuring cup and set aside.
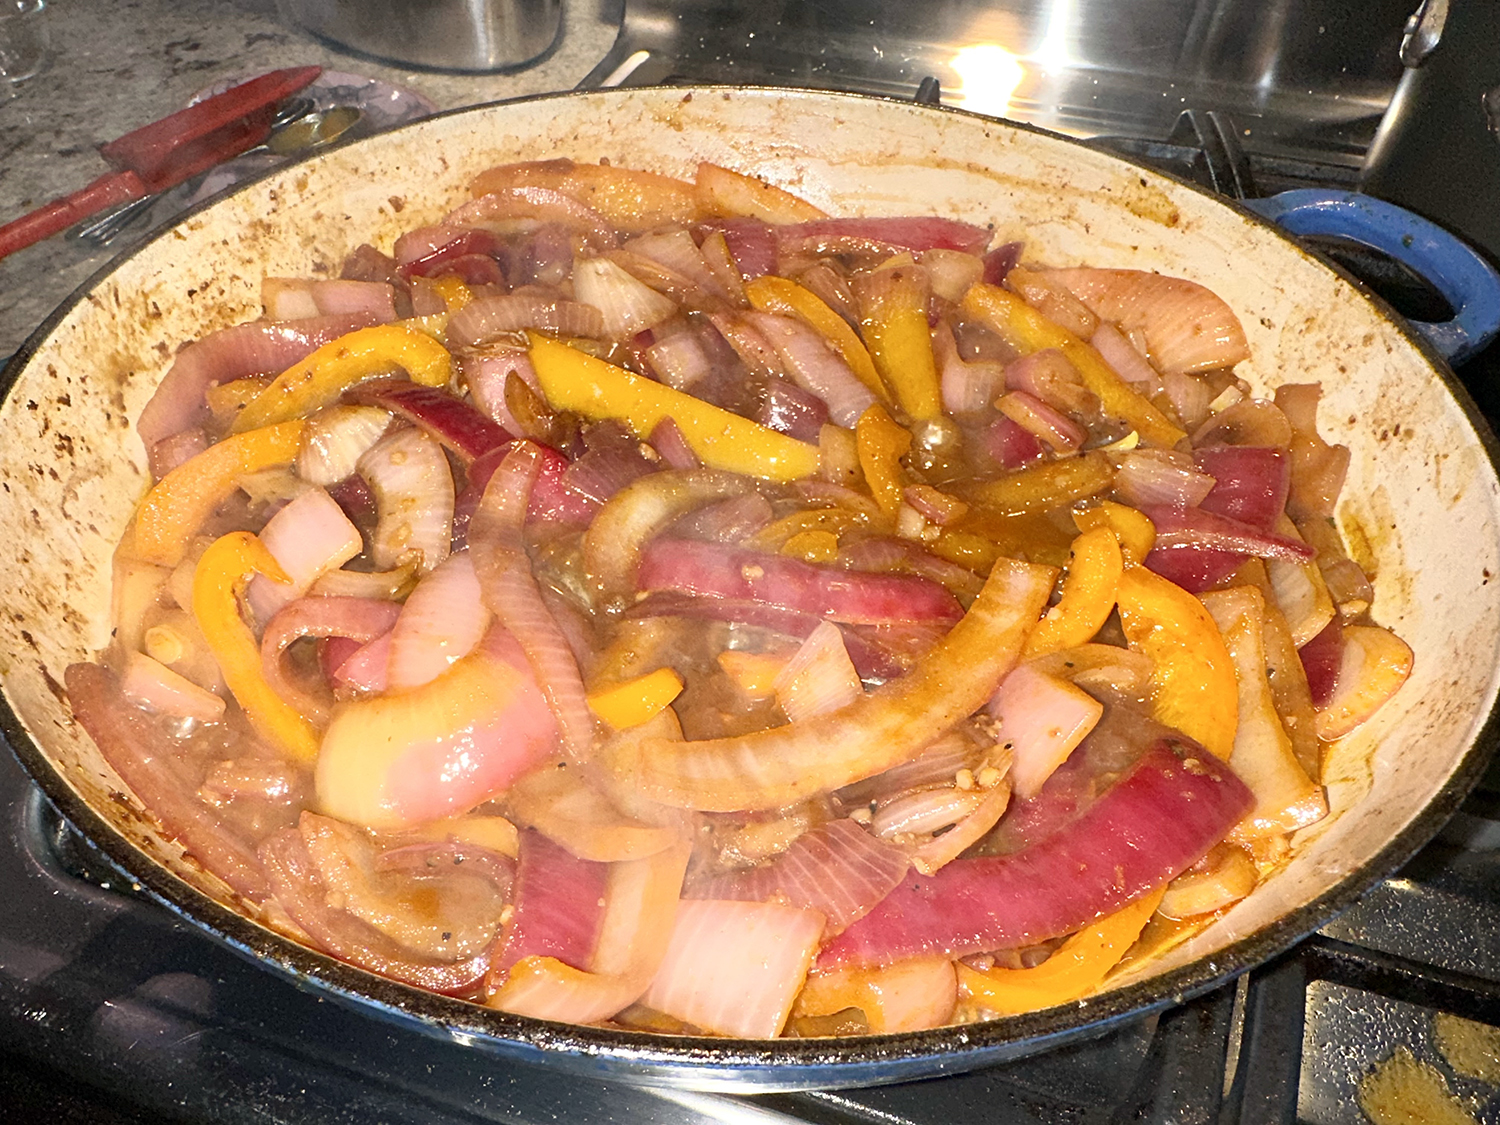
In the same pot, heat the remaining 1 tablespoon oil over medium until shimmering. Add the garlic, aji amarillo paste, ancho chili and cumin, then cook, scraping the bottom, until browned and fragrant, about 1 minute. Stir in the onions, bell pepper, 2 teaspoons salt and ¼ teaspoon pepper, then add the vinegar. Cook, stirring, until the onions have begun to soften and the sauce is just thick enough to coat the vegetables, 2 to 3 minutes. Add the reduced broth, bring to a simmer over medium-high and cook, stirring, until thickened to a glaze, about 10 minutes.
Pour the sauce and vegetables over the reserved chicken. Cover and let rest for 10 minutes, then serve.
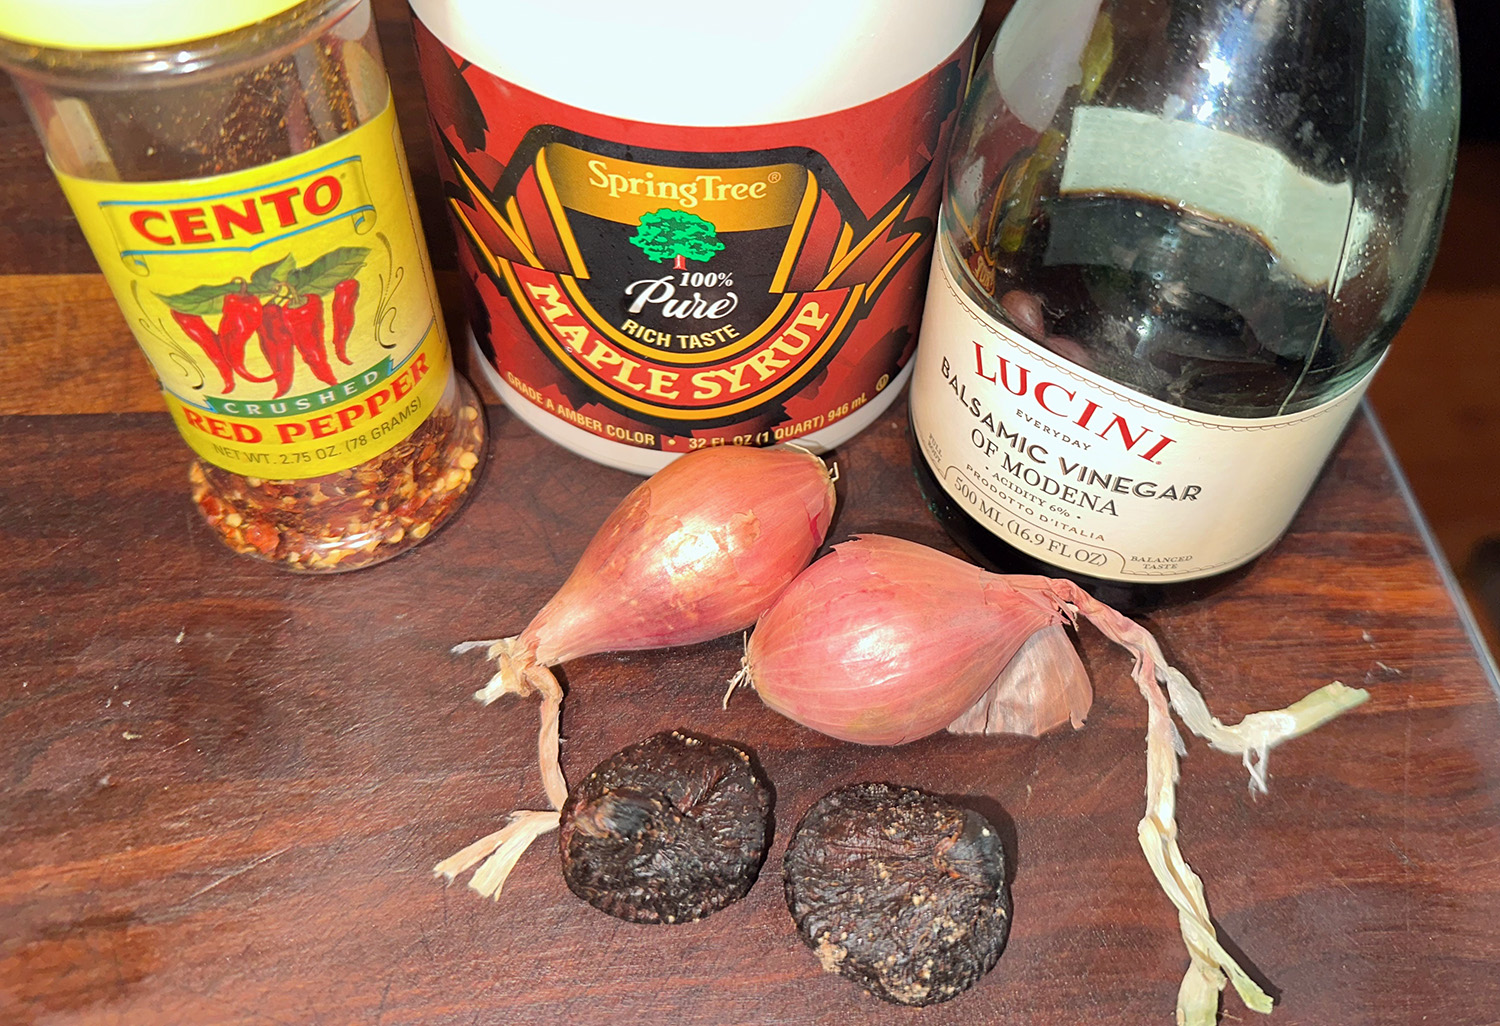
To explain, agrodolce is an Italian sauce with a sticky consistency. Its name is Italian for “sour” (agro) and “sweet” (dolce). A classic agrodolce recipe contains reduced honey or sugar, vinegar, pine nuts, and a mixture of dried fruits and veggies, such as golden raisins, red onion, dried figs, or currants. The vinegar you use to make agrodolce impacts the flavor of the sauce. Here we used balsamic.
This simple sauce with limited ingredients is a quick agrodolce. Meats such as pork chops, chicken breasts, and steak benefit from a sauce with sweet-tart flavors post-grilling or pan-searing. And we paired our chops with a wonderful side of Roasted Winter Squash with Lime, Chili and Cilantro.
*If desired and you have the time, season the pork chops with salt and pepper, place them on a rack in a rimmed baking sheet and refrigerate, uncovered, for 8 to 24 hours.
Pan-Seared Bone-In Pork Chops with Maple Agrodolce
*Season the pork chops with salt and pepper, place them on a rack in a rimmed baking sheet and refrigerate, uncovered, for 8 to 24 hours.
Pat chops dry with paper towels and sprinkle both sides with pepper. Place chops 1 inch apart in cold 12-inch nonstick or carbon-steel skillet, arranging so narrow part of 1 chop is opposite wider part of second. Place skillet over high heat and cook chops for 2 minutes. Flip chops and cook on second side for 2 minutes. (Neither side of chops will be browned at this point.)
Flip chops; reduce heat to medium; and continue to cook, flipping chops every 2 minutes, until exterior is well browned and meat registers 140 degrees, 10 to 15 minutes longer. (Chops should be sizzling; if not, increase heat slightly. Reduce heat if skillet starts to smoke.)
Transfer chops to carving board and let rest for 5 minutes. If serving more than 2 people, carve the meat from the bone and make slices about 1⁄2″ thick. Season meat with coarse or flake sea salt to taste. Serve with bones, if desired.
Maple Agrodolce
This easy, elegant sauce from Cook’s Illustrated is the perfect accompaniment to cuts of pork, such as the above Pan-Seared Thick-Cut, Bone-In Pork Chops. Using maple syrup as a sweetener in place of sugar contributed viscosity, enhancing cling, and an attractive glossiness. Plump raisins, or dried figs add pleasing texture, and minced shallot and red pepper flakes amp up the savoriness, keeping the sauce from becoming cloying.
Ingredients
¼ cup balsamic vinegar
2 Tbsp. maple syrup
2 Tbsp. minced shallot
2 Tbsp. chopped golden raisins OR dried figs, chopped
Pinch red pepper flakes
Pinch table salt
Directions
Bring all ingredients to boil in small saucepan over medium heat. Reduce heat to low and simmer until reduced and slightly thickened, 8 to 10 minutes (sauce will continue to thicken as it cools).
Serve. (If not using right away, cover to keep warm.)