I have been an artist and designer all my life incorporating graphic design for websites, gardens, publications, fabrics, interior design and cooking. I am now retired from my professional job, but still create artistic visions in all forms on a daily basis.
View all posts by LynnHoll →
During mid- and late-summer months, many fruits are at their peak. While we certainly aren’t encouraged to attend large gatherings during this pandemic, you still may be having some smaller family parties warranting a food contribution. Making this Skewered Fruit Tray will be a showstopper on the table.
Of course, you can use any fruit you want, but I’ll give you the run down on what was chosen for this particular pyramid. Start with a whole ripe pineapple, chop off the pointy top (don’t toss) and carve away the thick outer skin. Quarter the remaining flesh and remove the tough inner core. Slice each quarter lengthwise into two more strips each, and then cut those strips down into chunks.
The other fruits included fresh strawberries, with their green tops left intact; plus cantaloupe chunks, blueberries and blackberries. I alternated each wooden skewer (short ones) with either a pineapple or cantaloupe chunk to start with, then tapered the remaining fruits as shown ending with a large blueberry.
To assemble, place the pineapple crown in the center of a disposable platter and start placing the skewers, alternating between the cantaloupe and pineapple ends to create the first tier. Repeat with several more tiers until your cone shape is complete. If not using immediately, cover with plastic wrap and refrigerate until the party starts!
You’ll need about a pint of fresh blueberries, one quart of blackberries, two quarts of strawberries, one large ripe cantaloupe and a pineapple. (You may not necessarily end up using all of the fruit.) Other than a large platter, short wooden skewers, and a sharp knife, nothing else is needed other than your time.
The skewers were a huge hit at the (pre-pandemic) party I brought them to. Most people love fresh fruit and/or are looking to nibble on something healthy amid a selection of more caloric options. Other fruits that come to mind and would make a festive presentation are kiwi slices, green melon chunks, raspberries, peach chunks, and red, green or purple seedless grapes to name a few.
Now you could get even fancier and use a star or heart shaped cookie cutter on planks of melon or watermelon as accent pieces. Just think how much money you’ll save by making your own instead of paying for those Edible Arrangements!
It was a very trying Spring with cool, rainy weather amplified by the restraints from the pandemic, followed by racial tensions and curfews. But the weather in the Mid-Atlantic/Northeast finally turned a corner with longer stretches of warmer days when I penned this blog. Ideal for this classic Italian salad which marries cooked white beans and oil-packed tuna for a protein-packed, pantry-friendly, light meal.
With summer now hitting the high notes—and by that I mean real muggy with soaring temps—it’s time to move away from heartier stews, and dive into bean dishes like this one, which require little to no additional cooking, and can be served at room temperature.
Because this dish is comprised of just a few ingredients, it’s at its best when made with top quality products. Cooked dried beans (and their cooking liquid) have much better flavor and texture than canned beans, so it’s highly recommended to use them in this recipe, if possible. BUT, we didn’t want to “cook” so we used Great Northern canned.
Protein-Packed
According to SeriousEats.com where we got this recipe, if using canned beans, substitute bean cooking liquid with 2 teaspoons water and 1 teaspoon Dijon mustard. The flavor of the dish obviously won’t be exactly the same, but mustard provides similar emulsifying properties as the bean cooking liquid for the dressing. I just learned something new with that!
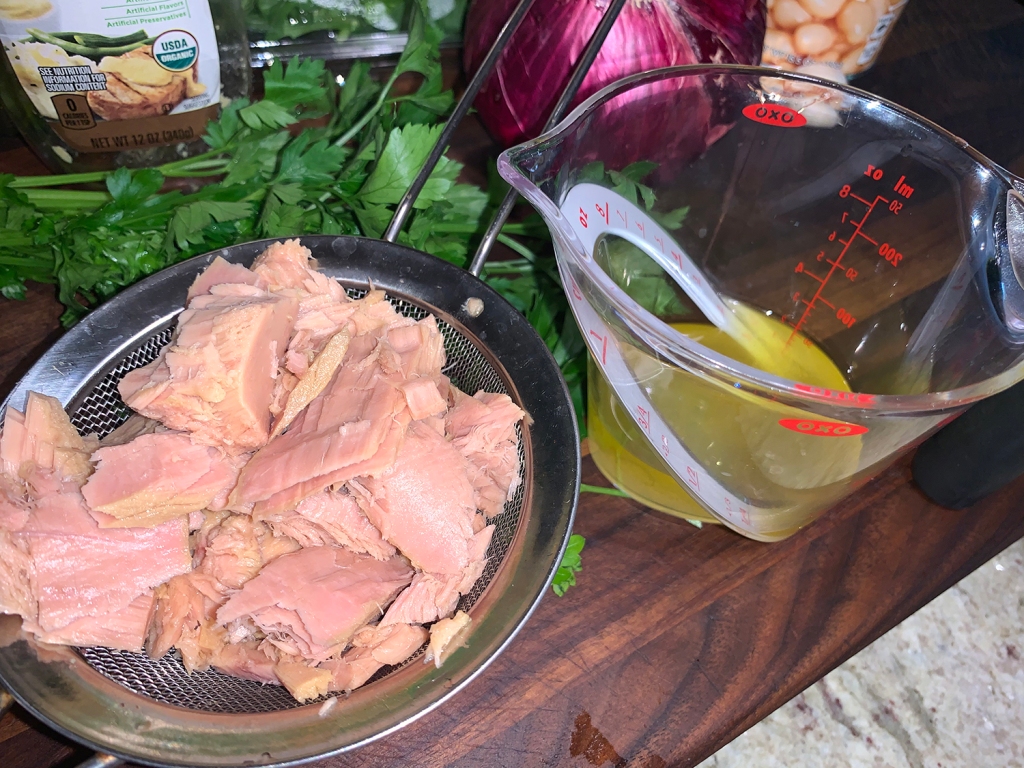
Beans are one thing, but do not skimp on the tuna. The quality of the tuna you use will make a difference here. Oil-packed ventresca tuna is recommended, which comes from the richer, fatty belly; it’s moister and more flavorful than other canned or jarred tuna. Two great options of ventresca are both Ortiz and Tonnino—we used the latter.
About that tuna, 5.6 ounces for 4 people? Seemed a bit scant to me. Our jar was slightly larger at 6.7 ounces. (I noted the larger amount in the list below.) Plus, I don’t know why they didn’t save the oil after draining the tuna. We did, and it was exactly a 1/4-cup, the amount of EVOO needed for the dressing. The jarred oil is already brimming with flavor from the tuna, so why not use it?
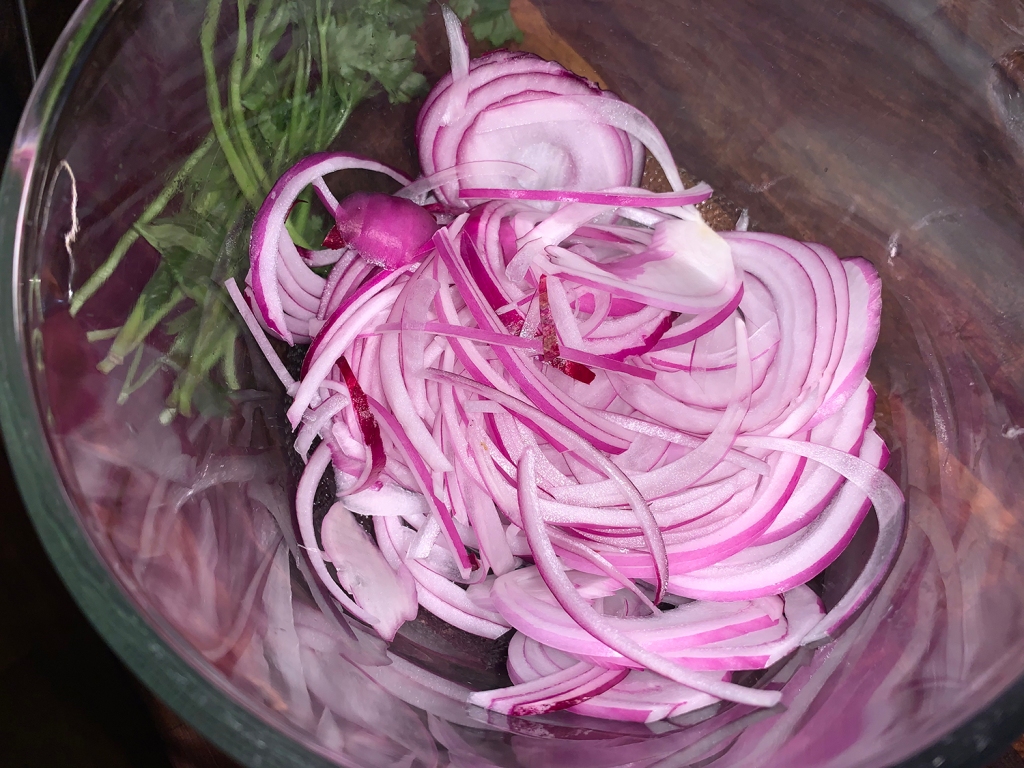
Using a small mandoline to slice the red onion very thin makes quick work of the task. The original recipe doesn’t even list greens in the ingredients (although it is fleetingly mentioned in their narrative), but to me, a dinner salad needs a bed of them, otherwise it’s a “side dish” in my opinion. We chose a mix of baby spinach and arugula.
Hearty, but light, this salad requires less than 10 minutes of hands-on work, making it the perfect no-cook, quarantine pantry, warm-weather meal. And because it can be served at room temperature, it would make a fine contribution to a potluck or picnic affair. Enjoy!
1 Tbsp. Champagne, white wine, or red wine vinegar plus extra for drizzling
Kosher salt and freshly ground black pepper
3 cups (1 pound 6 ounces) cooked dry white beans, drained; or two (15-ounce) cans low-sodium white beans, drained and rinsed
6.7 ounces olive oil-packed tuna, preferably ventresca tuna belly, drained into a measuring cup, and gently flaked into bite-size pieces (save the oil for the dressing)
1 med. garlic clove, minced or finely grated
1 Tbsp. bean cooking liquid, from a pot of beans cooked from dry (see note if using canned beans)
Extra-virgin olive oil, enough needed, if any, to add to the tuna oil to make 1/4 cup
1/4 cup finely chopped fresh parsley leaves and tender stems
5 oz. baby salad greens
Drain the tuna, save the liquid
Slice 1/2 red onion very thin
Onion sits in ice water for 15 min
Combine drained beans and tuna in large bowl.
Directions
In a small bowl, combine red onion and enough ice water to cover. Using clean hands, gently scrunch and squeeze the onion slices, taking care not to crush or break them. Let onion slices sit in ice water for 15 minutes, then drain and discard ice water, and return red onion to now-empty bowl.
Add vinegar and 1/4 teaspoon salt and toss and gently massage onions to evenly coat with vinegar and salt. Set aside for 5 minutes to allow onion slices to marinate.
Meanwhile, combine beans and tuna in a large bowl. Once onions have marinated for 5 minutes, squeeze onion slices to release moisture into the bowl that they marinated in, then transfer onion slices to large bowl with beans and tuna; set large bowl aside.
There should be at least 1 tablespoon of vinegar-onion juice liquid left in the small bowl. Add garlic, bean cooking liquid (or, if using canned beans, 2 teaspoons water plus 1 teaspoon Dijon mustard), and 1/4 teaspoon ground black pepper, and whisk to combine. Whisking constantly, slowly drizzle in the tuna olive oil. Stir in parsley and season to taste with salt.
Transfer dressing to large bowl with bean-tuna mixture, using a rubber spatula to scrape all of the dressing into the large bowl. Using a large spoon, gently toss salad to evenly coat with dressing, taking care not to crush tuna or beans in the process.
Season to taste with salt and pepper. Divide salad between individual serving plates or one large serving platter.
If desired, drizzle lightly with olive oil and a splash of vinegar, and serve.
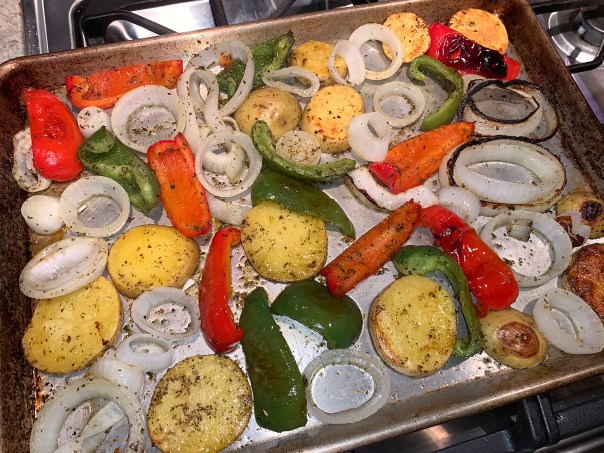
Simple, easy, delicious, there is no more reliable guest at a cookout than sausage, roasted over the open fire. But before you grill the meat, get some peppers, onions and potato slices soft and dark and fragrant in the heat, and use these as a bed on which to serve the links.
Well, the best laid plans… right? Our grilling hopes were dashed by a torrential day-long tropical storm soaking. I can’t really complain because we were in dire need of some precip for the gardens and lawn. That’s why it’s important to formulate a Plan B, in this case, “grilling” indoors.
To bulk up the meal, we included sliced Yukon gold potatoes. They were a perfect compliment to the roasted onions and peppers, and were crispy on the outside while remaining creamy on the inside.
Grilled Italian Sausages, Onion, Peppers and Potatoes
2 sweet peppers (green, red or yellow) seeded and cut into eighths
1 large yellow onion, peeled and cut into large coins
4 medium Yukon gold potatoes, sliced about 3/8″ thick (we only used 2 potatoes)
2 Tbsp. extra-virgin olive oil, more to taste
1/2 teaspoon salt
2 tsp. dried oregano
4 links (about 1 lb.) sweet/mild Italian sausages
Directions
For a gas grill, turn all burners to high, lower cover and heat for 15 minutes, then turn burners to medium.
Meanwhile, toss peppers, onions and potatoes with oil and dried oregano, and sprinkle with salt. Lightly prick sausages all over so that they do not burst.
Put peppers, onions and potato wedges in a grill basket on the grill, turning occasionally until they are softened and dark at the edges, 10 to 12 minutes. Move them to the cooler side of the grill.
Place the sausages on the hot side of the grill, cover and cook, turning occasionally until they are cooked through, 8 to 10 minutes.
Transfer the vegetables to a platter and top with the sausages. Drizzle with olive oil and serve.
Oil and season the sliced veggies
Roast one side for 15 minutes
Flip and roast the other side
Sear the sausage links in a hot cast-iron skillet
Portion out each serving
ORPLAN B: if you have to cook indoors, rub a rimmed baking sheet lightly with oil, put the pan in the oven and preheat to 450°.
Once the oven comes to temperature, spread the oiled veggies in a single layer on the hot baking sheet and return to the oven. Cook for 15 minutes.
Remove pan from oven, flip each morsel over, rotate the pan 180° and continue cooking another 15 minutes.
Meanwhile, heat a large cast-iron skillet over medium-high heat until very hot. Add a teaspoon or two of olive oil and place the links in the hot skillet. Cook for 10-12 minutes total, turning a few times to brown all over. You may have to put a lid on the pan for a few minutes to make sure the links reach 155°.
Place roasted veggies on a platter and top with sausage links.
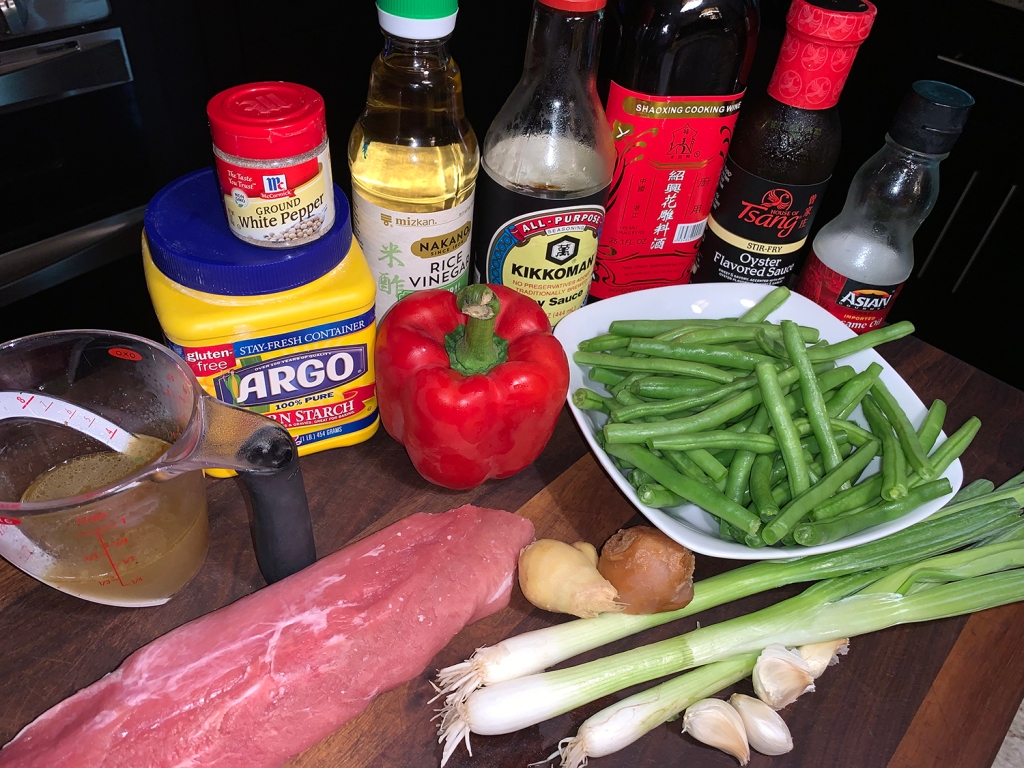
Stir-frying is the name of the game when you want something quick and healthy. And making it yourself ensures you know exactly what’s in it, as compared to many Asian take-out places loaded with unwanted fat and calories. Cook’s Illustrated found that marinating pork tenderloin in a simple soy-sherry mixture and cooking it quickly (about two minutes) in batches over high heat kept the meat tender and beautifully seasoned. In place of the sherry, we substituted Shaoxing wine which is fermented from rice.
Because different vegetables cook at different rates, batch-cook the vegetables and add aromatics (like ginger and garlic) at the end so they are cooked long enough to develop their flavors but not long enough to burn. Chicken broth gives the sauce some backbone, and cornstarch slightly thickens it so that it lightly cloaks the meat and veggies.
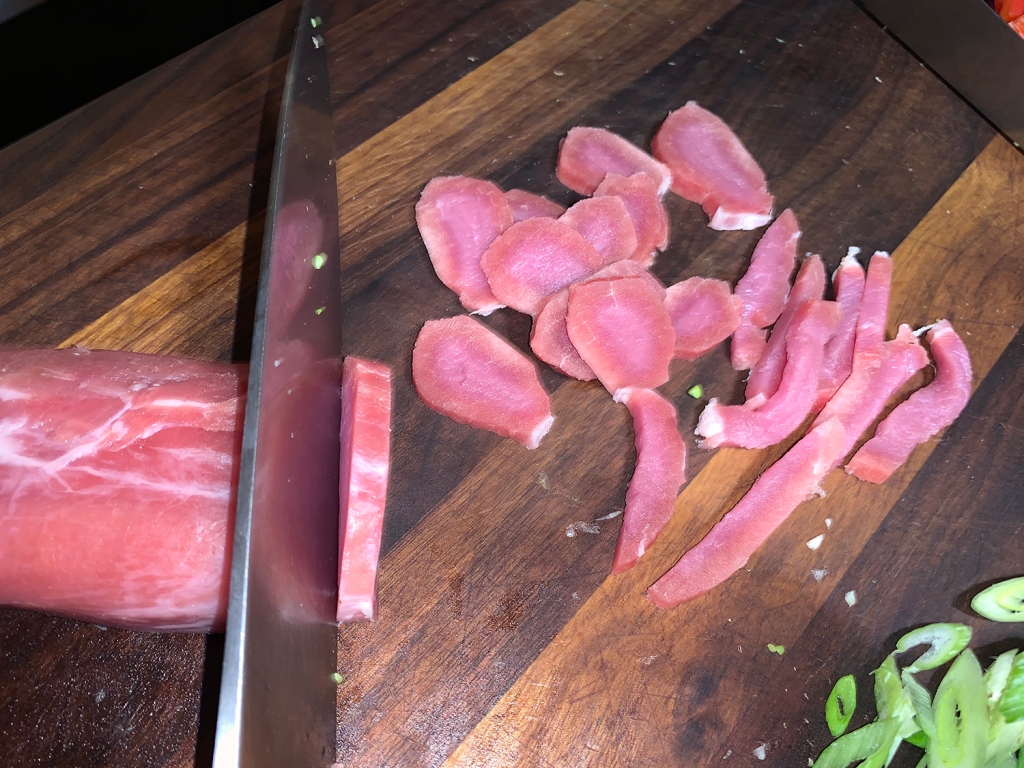
We increased the amount of pork tenderloin from the original 12 ounces to one pound. And because of that, we doubled the soy sauce and sherry that gets mixed with the pork strips (which is all noted below). Keep in mind that pork tenderloin is easier to slice if it is partially frozen. *Freeze the tenderloin until firm but not frozen solid, 45 minutes to 1 hour. Then cut the tenderloin crosswise into 1/4-inch slices. Cut the slices into 1/4-inch strips.
Stir-frying isn’t rocket science, and that’s what’s so great about it. It doesn’t require lots of fancy equipment. Instructions indicate to cook in a skillet, however we feel most stir-fries benefit from being cooked in a flat-bottomed wok. It helps to have a stir-fry spatula which fits the contour of the wok and has a long handle (to keep distance from the intense heat).
Stir frying is advantageous over other methods of cooking as it requires very little oil, which is healthier than deep frying or pan frying, and it also retains the nutrients present in the food being stir fried. As the name indicates, the food is constantly stirred while you cook it. Make sure to use an oil with a high smoke point such as peanut, canola, safflower, soybean, etc.
Stir-Fried Pork, Green Beans and Red Bell Pepper with Gingery Oyster Sauce
2 inch piece fresh ginger, grated (about 2 tablespoons)
3 Tbsp. peanut oil or vegetable oil
12 oz. green beans, cut on bias into 2-inch lengths
1 large red bell pepper (about 8 ounces), cut into 3/4-inch squares
3 medium scallions, sliced thin on bias
Jasmine rice, cooked according to package directions (or brown rice if you prefer)
Make sure to cook the pork strips in at least two batches. You don’t want to steam the meat.
Directions
Combine pork, soy sauce, and 1 Tbsp. + 1 teaspoon sherry in small bowl. Whisk remaining 1 tablespoon sherry, chicken broth, oyster sauce, sesame oil, rice vinegar, white pepper, and cornstarch in measuring cup.
Combine garlic, ginger and 1 1/2 teaspoons peanut oil in small bowl.
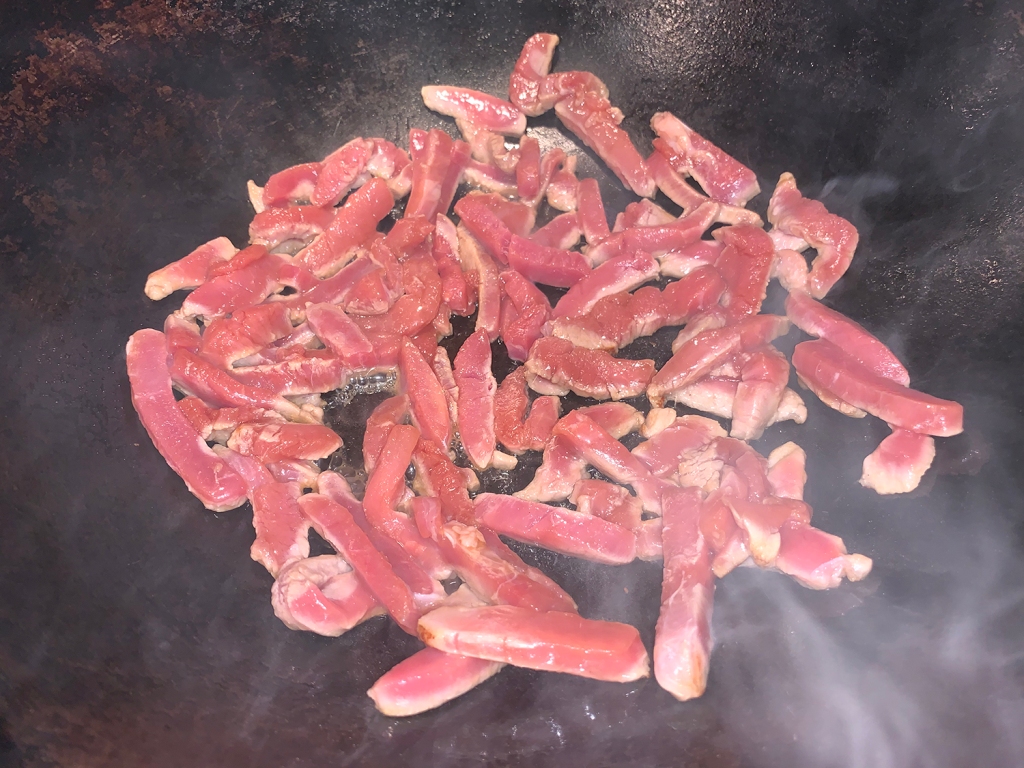
Heat 1 1/2 teaspoons peanut oil in 12-inch nonstick skillet over high heat until smoking; add half of pork to skillet and cook, stirring occasionally and breaking up clumps, until well-browned, about 2 minutes.
Transfer pork to medium bowl. Repeat with additional 1 1/2 teaspoons peanut oil and remaining pork.
Add 1 tablespoon peanut oil to now-empty skillet; add green beans and cook, stirring occasionally, until spotty brown and tender-crisp, about 5 minutes; transfer to bowl with pork.
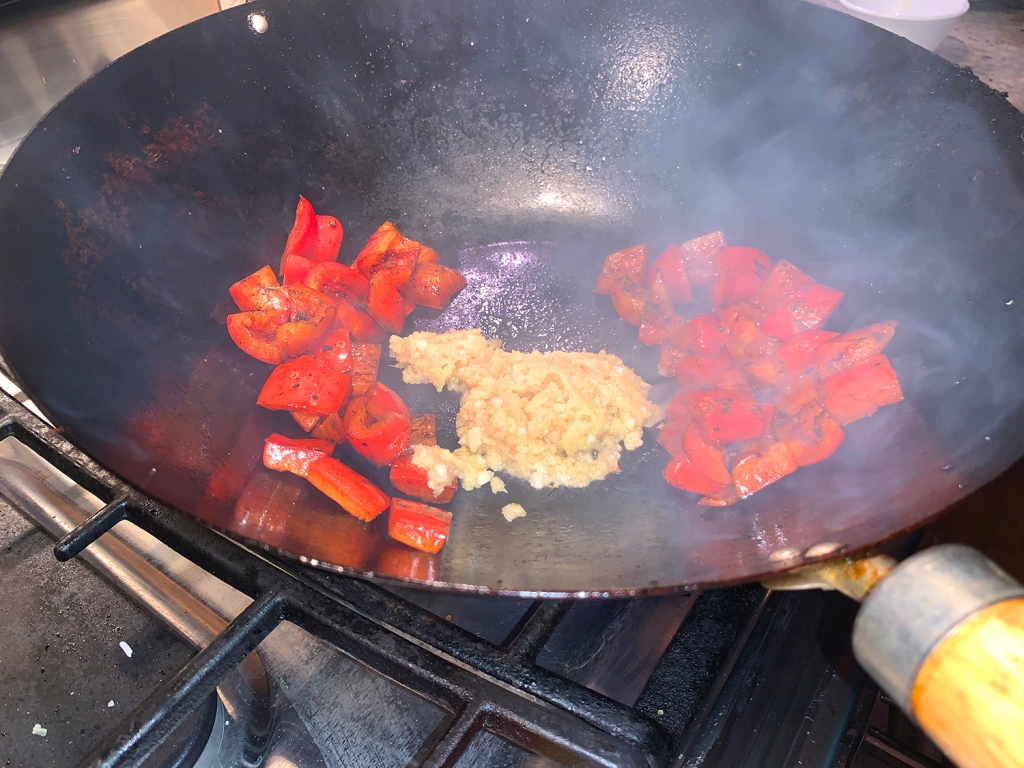
Add remaining 1 1/2 teaspoons oil to skillet; add bell pepper and cook, stirring frequently, until spotty brown, about 2 minutes.
Clear center of skillet, then add garlic/ginger mixture to clearing; cook, mashing mixture with spoon, until fragrant, about 45 seconds, then stir mixture into peppers.
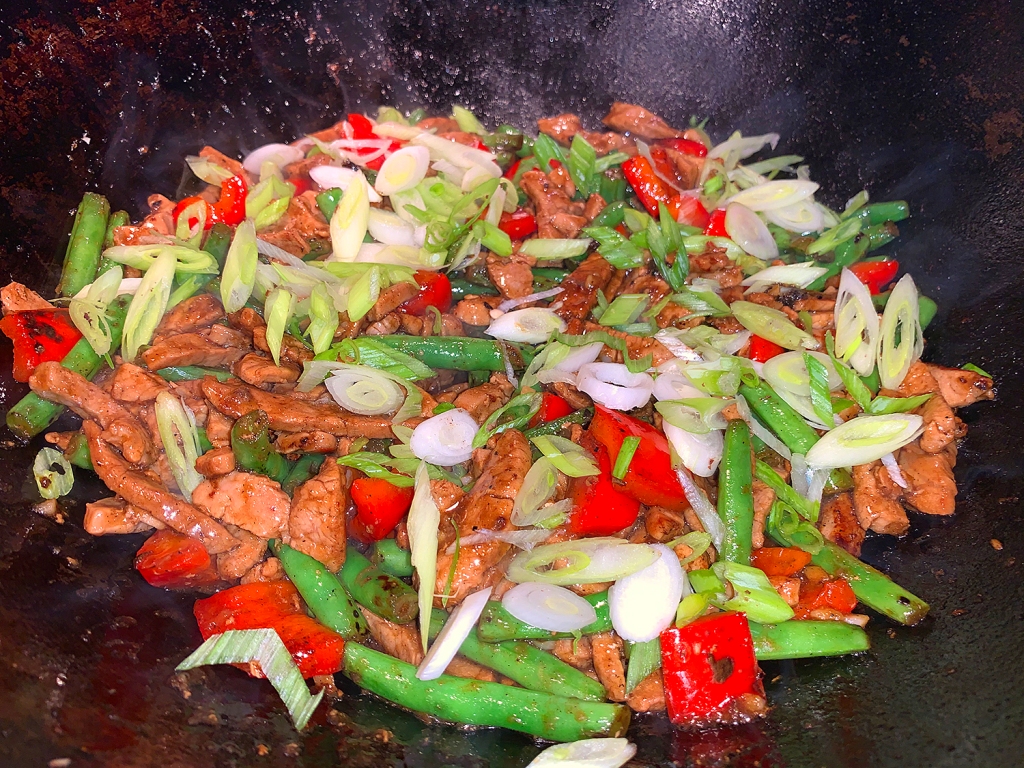
Add pork and green beans; toss to combine. Whisk sauce to recombine, then add to skillet; cook, stirring constantly, until sauce is thickened and evenly distributed, about 30 seconds.
Transfer to serving platter; sprinkle with scallions and serve over hot jasmine rice.
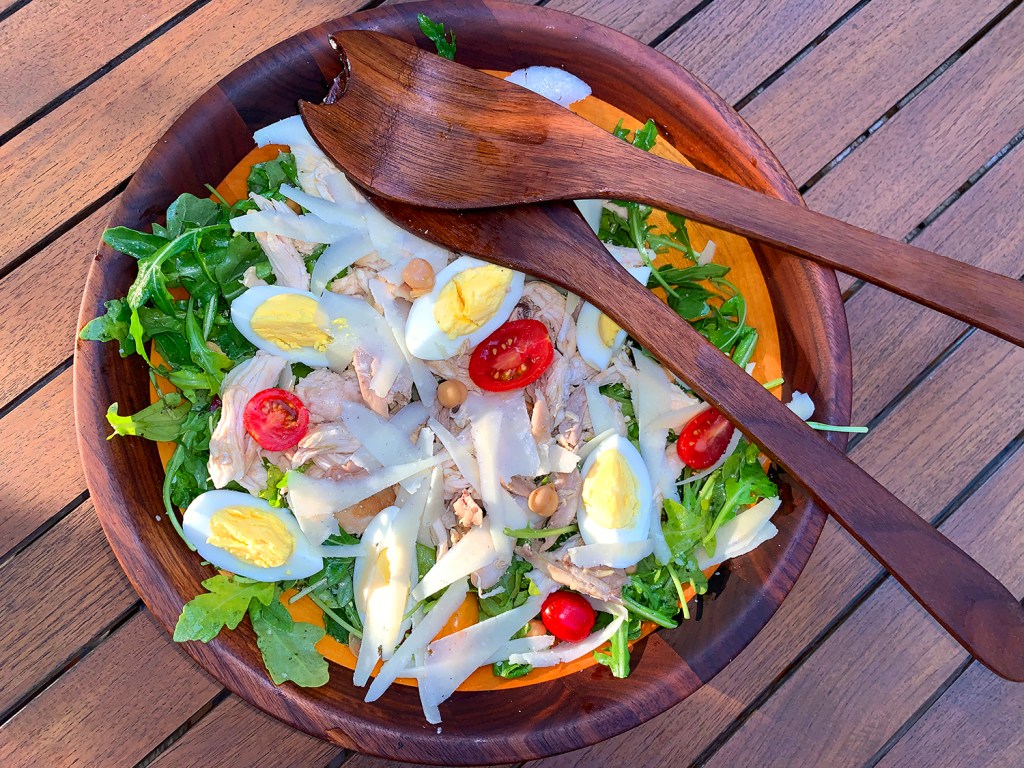
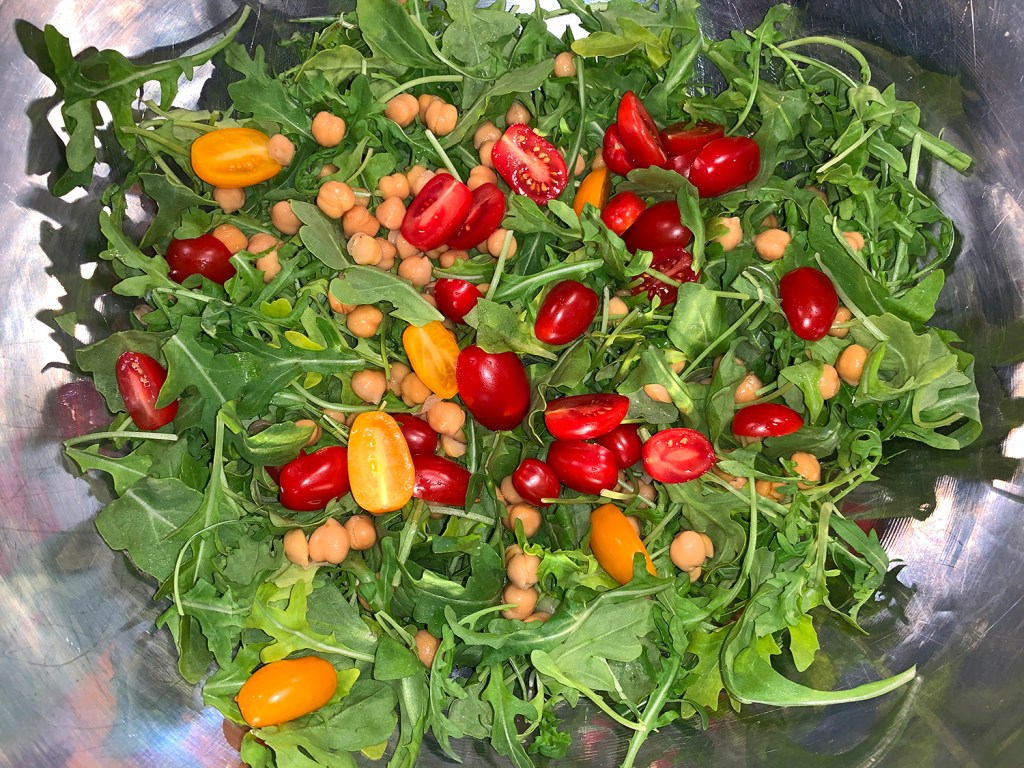
Arugula Salad with Cherry Tomatoes, Chickpeas, Hard-Cooked Eggs, and Pecorino is a simple, almost no-cook dinner salad, perfect for the dog days of summer. Buy a rotisserie chicken along with some hard-boiled eggs at the supermarket and now you definitely have a “no-cook” meal.
In addition to oil and vinegar for the vinaigrette, Cook’s Illustrated made it with a combination of emulsifiers (mustard and mayonnaise) and a stabilizer (molasses), which help the emulsion form and hold for several days. We had some concerns with adding molasses, but it worked perfectly without any overpowering emphasis.
The dressing template is adaptable to a variety of oils and acids, as well as aromatics and fresh herbs, so feel free to experiment. For instance, switch out lemon juice in place of wine vinegar; or replace the baby arugula with watercress and baby spinach. You could also substitute toasted hazelnut or walnut oil for the extra-virgin olive oil.
Simply simple.
Arugula Salad with Cherry Tomatoes, Chickpeas, Hard-Cooked Eggs and Pecorino
Toss arugula, tomatoes, and chickpeas with 3 tablespoons vinaigrette in large bowl. Season with salt and pepper to taste and transfer to serving platter.
Add chicken to now-empty bowl along with remaining 1 tablespoon vinaigrette and toss to combine.
Arrange chicken over arugula, followed by eggs.
Sprinkle with shaved Pecorino and serve.
Make Ahead Vinaigrette
1 tablespoon mayonnaise
1 tablespoon molasses
1 tablespoon Dijon mustard
½ teaspoon Salt
¼ cup wine vinegar
½ cup extra-virgin olive oil
¼ cup vegetable oil
Regular or light mayonnaise can be used in this recipe; but DO NOT use blackstrap molasses.
Directions
Combine mayonnaise, molasses, mustard, and salt in 2-cup jar with tight-fitting lid. Stir with fork until mixture is milky in appearance and no lumps of mayonnaise or molasses remain.
Add vinegar, seal jar, and shake until smooth, about 10 seconds.
Add ¼ cup olive oil, seal jar, and shake vigorously until thoroughly combined, about 10 seconds.
Repeat, adding remaining ¼ cup olive oil and vegetable oil in 2 additions, shaking vigorously until thoroughly combined after each addition. (After third addition, vinaigrette should be glossy and lightly thickened, with no pools of oil on its surface.)
Refrigerate for up to 1 week. Shake briefly before using.
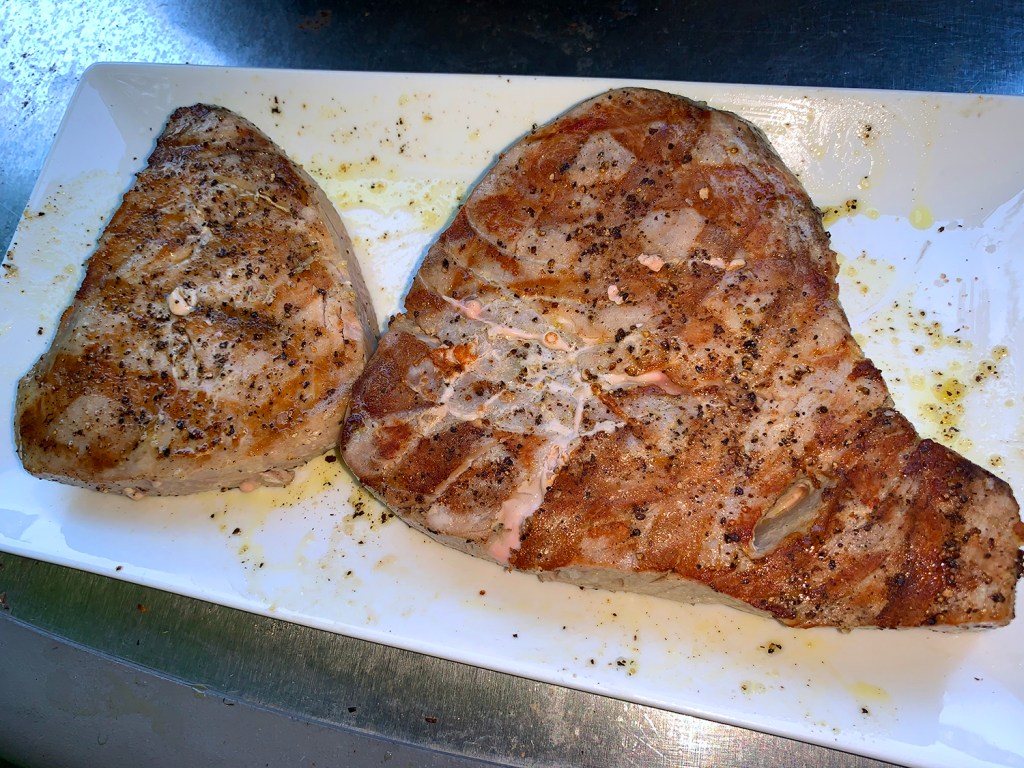
The secret for the best grilled tuna steaks? Extra-virgin olive oil my friend. To produce tuna steaks beautifully seared on the outside and moist and tender on the inside, Cook’s Illustrated discovered that marinating the fish in extra-virgin olive for at least an hour produced remarkably moist grilled fish. We took it a step further—in fact, 10 hours further—by marinating the fish for 11 hours.
Reminiscent of Mediterranean cuisine, it inspired me to include some salt-dried black olives which gave the dish an extra depth of flavor and a little salt bomb pop. Be aware, that once you place the tuna on the grill, it’s only a matter of minutes before the fish comes to temp at 120°, which is medium-rare, so make sure everything else is prepared in advance.
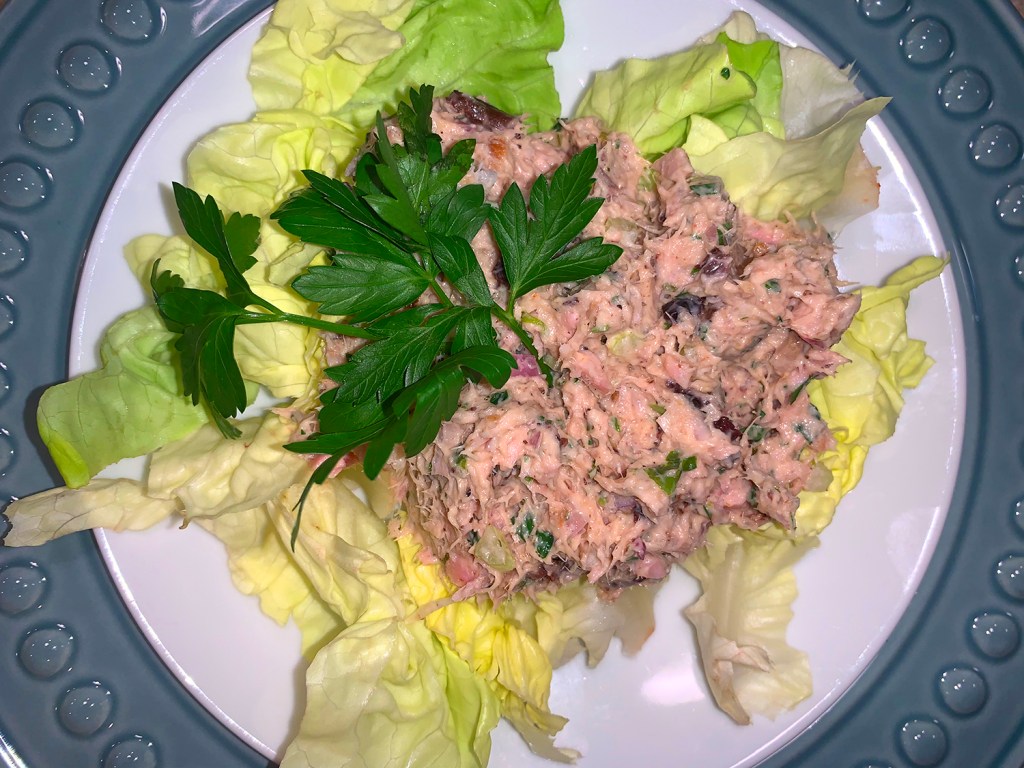
With just the two of us, we had ample tuna leftover, so the following day The Hubs made a fabulous tuna salad which included mayo, anchovy, roasted garlic paste, minced celery and shallot, dijon mustard, sherry vinegar, cured olives, fresh parsley, and salt and pepper. He just eyeballed the proportions and taste-tested until he was satisfied. If you’re lucky enough to have leftovers, adjust the ingredients to suit your own preferences.
We made tuna salad from the leftover tuna steak meat and served it on a bed of bibb lettuce.
Two meals from one—always a win-win in my book!
Grilled Tuna with Watercress-Parsley Salad and Charmoula Vinaigrette
4 tuna steaks (about 3/4-inch thick and 8 ounces each)
3 tablespoons extra-virgin olive oil
For Vinaigrette
2 ½ tablespoons lemon juice from 1 lemon
2 small cloves garlic, minced
½ teaspoon table salt
½ teaspoon ground cumin
¼ teaspoon paprika
⅛ teaspoon cayenne pepper
2 tablespoons chopped fresh cilantro leaves
½ cup extra-virgin olive oil
ground black pepper
1 bunch watercress, washed, dried well, and trimmed
1 cup fresh parsley leaves, washed and dried well
1/2 cup salt brined black olives, pitted and roughly chopped
Directions
For Tuna: Place tuna and oil in gallon-sized zipper-lock plastic bag; seal bag and refrigerate until fish has marinated fully, at least 1 and up to 24 hours.
Meanwhile, preheat your grill until very hot.
Remove tuna from bag; season both sides of each steak with salt and pepper.
Grill over direct heat until well seared and grill marks appear, about 1 1/2 minutes.
Flip steaks over and grill on second side until fish is cooked to medium (opaque throughout, yet translucent at very center when checked with point of paring knife), 1 to 1 1/2 minutes longer.
For Vinaigrette: Whisk lemon juice, garlic, salt, cumin, paprika, cayenne, and cilantro in small bowl. Add oil in slow, steady stream, whisking constantly until smooth; season with pepper to taste.
Place watercress, parsley and olives in medium bowl; drizzle with half the vinaigrette and toss to coat.
Divide dressed greens among four serving plates; place a grilled tuna steak next to or on each bed of greens, drizzle with a portion of remaining vinaigrette, and serve immediately.
Spicy Grilled Pork with Fennel, Cumin and Red Onion, just the name gets my juices flowing. Imbued with spices that char at high heat, this aromatic pork recipe is a snap to throw together — exactly what you want for a night of summer grilling.
If using wooden skewers, don’t forget to soak them in water for an hour before grilling, so they don’t flare up. And, NYTimes where we got the recipe, suggested if you’re broiling and you don’t want to bother with skewers at all, just spread the pork cubes out on a rimmed sheet pan, turning them halfway through cooking with tongs or a spatula. Always good to have a Plan B for inclement weather.
With just the two of us, we halved the recipe so there wouldn’t be much leftover—and there wasn’t because it was sooo good!
Our side dish of Smashed Cucumber Salad with Peanuts, Scallions and Cilantro was just the ticket to compliment the pork and make for a low-carb dinner. The lime and heat in both recipes ensured a unity of tastes. I see making this by itself as a lunch, and would be great to bring to a picnic, potluck or dinner invitation.
While I basically stuck to the pork kebab recipe, I made a few changes in how I handled the cuke salad from Milk Street. Besides cutting the recipe in half, I left the salted cucumber slices in the colander for an hour as opposed to 15 minutes to make sure most of the moisture would be removed. And instead of several cans on the inside plate while draining the slices, I added weight by filling a smaller heavy bowl with water.
A meat mallet came in handy for both smashing the cucumbers and the roasted peanuts, but you may have another preference.
Spicy Grilled Pork with Fennel, Cumin and Red Onion
¼ cup cilantro or basil, leaves and tender stems, plus more for serving
2 Tbsp. fish sauce
2 garlic cloves, smashed and peeled
1 jalapeño or other green chile, seeded if desired
1 tsp. honey
1 ½ tablespoons fennel seeds
1 Tbsp cumin seeds
1 Tbsp coriander seeds
1 small red onion, sliced, for serving
Directions
Season pork lightly with kosher salt and put it in a bowl or resealable bag.
Juice the lime into a blender or food processor and add cilantro, fish sauce, garlic, jalapeño and honey. Blend until the jalapeño and garlic are puréed, then add fennel, cumin, coriander seeds and pulse four or five times to bruise the spices and mix them in.
Pour mixture over the pork, tossing to coat the pieces. Refrigerate for at least 30 minutes while you heat the grill, or up to 24 hours. (We marinated for 24 hours to make sure all of that great flavor permeated the pork.)
When ready to cook, heat the grill or broiler with a rack positioned 4 inches from the heat source.
Thread the pork onto skewers, leaving a little space between cubes. Grill over the highest heat possible, or broil on high, for 2 to 5 minutes, then flip the skewers and continue cooking until the meat is browned all over and charred in spots. It should be just cooked through: A little pink is OK, but there shouldn’t be any red spots.
Serve the pork with cilantro sprigs and onion slices on top, and lime wedges on the side for squeezing.
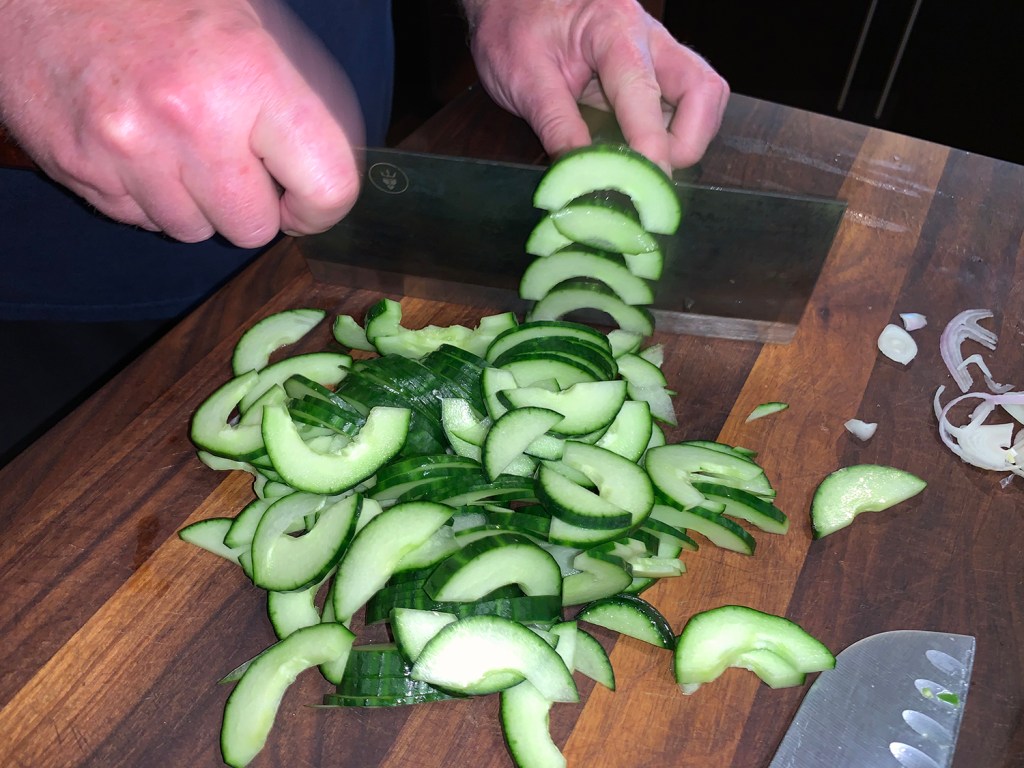
Don’t use regular cucumbers; they contain a large amount of seeds that will quickly water down the salad, even if first salted to remove excess moisture. And don’t forget to peel the cucumbers. The skins will block the salt from drawing out the maximum amount liquid of from the watery flesh.
Ingredients
2 Medium garlic cloves, finely grated
2 tsp. finely grated fresh ginger
4 Tbsp. lime juice
1½ tsp. sriracha
½ tsp. white sugar
Kosher salt and ground black pepper
3 English cucumbers, trimmed and peeled
½ Cup roasted unsalted peanuts, finely chopped
4 Scallions, thinly sliced
1 Serrano chili, stemmed, halved, seeded and thinly sliced
½ Cup lightly packed fresh cilantro, finely chopped
Instead of cans to add weight, I filled a small heavy bowl with water.
Directions
In a small bowl, stir together the garlic, ginger, lime juice, Sriracha, sugar and ½ teaspoon salt. Set aside. Place the cucumbers on a cutting board. With the flat side of a chef’s knife or a rolling pin, hit the cucumbers until they split and crack. I used a meat mallet which worked great!
Slice the cucumbers ½-inch thick on the diagonal and transfer to a large colander set over a large bowl. Add 2 teaspoons salt and toss. Top with a plate smaller than the diameter of the colander; weigh down the plate with 2 or 3 cans. Let stand until liquid has pooled in the bowl, about 15 minutes. Discard the liquid, then rinse and dry the bowl.
In the same large bowl, combine the cucumbers, peanuts, scallions, chili and cilantro. Add the dressing and toss to coat. Taste and season with salt and pepper.
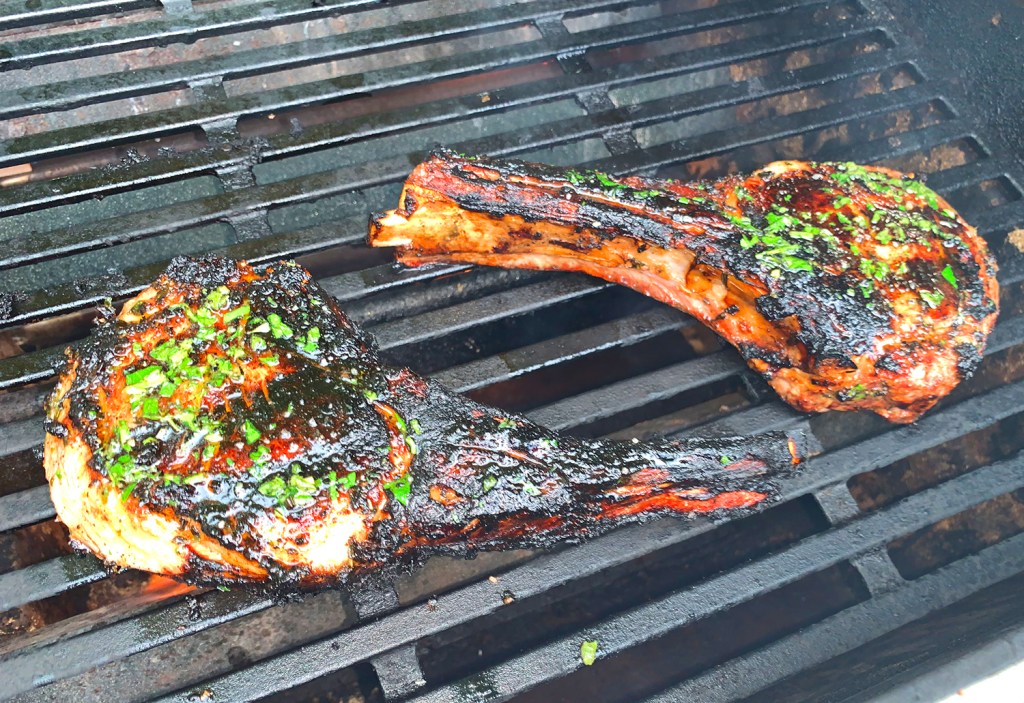
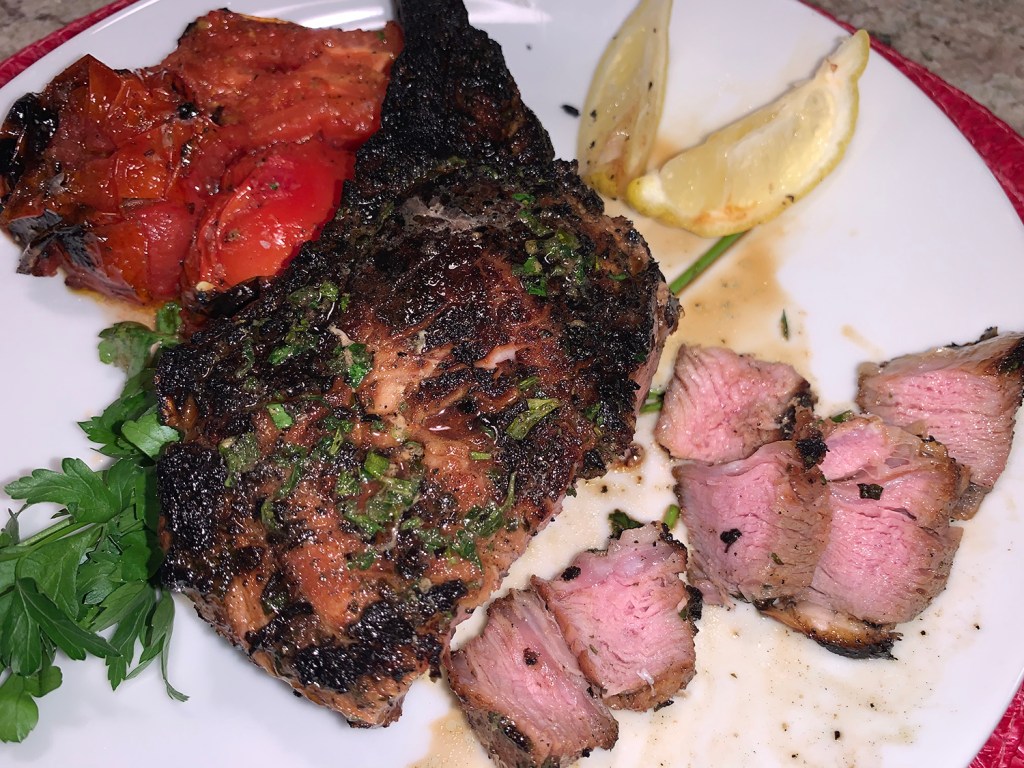
I first posted a blog on this Grilled Veal Rib Chops with Mediterranean Herb Paste recipe 5 years ago. Back then, we only had veal loin chops, but now we got to revisit with actual rib chops. We loved it the first time, and cemented the love affair with this reiteration.
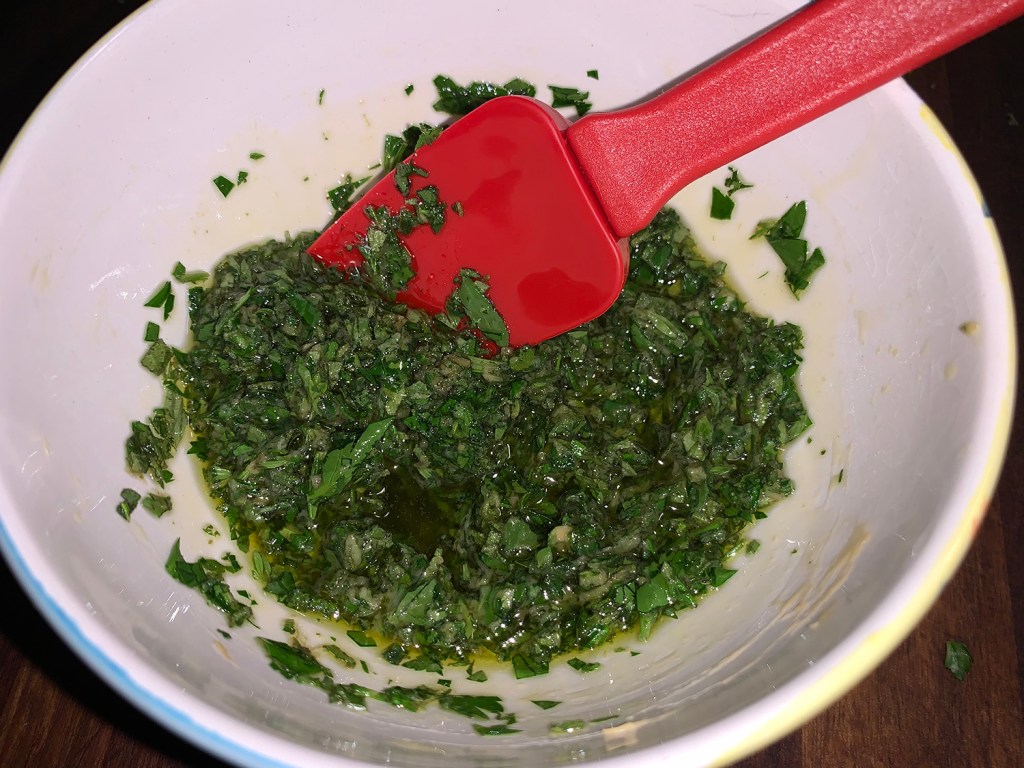
All of the herbs were just picked from our organic, raised-bed garden giving us the freshest taste possible. In fact, since the past winter was mild, most of our herbs returned, and with aplomb. Just look at those stunning sage leaves. Now that’s a WOW factor—we hated to chop them!
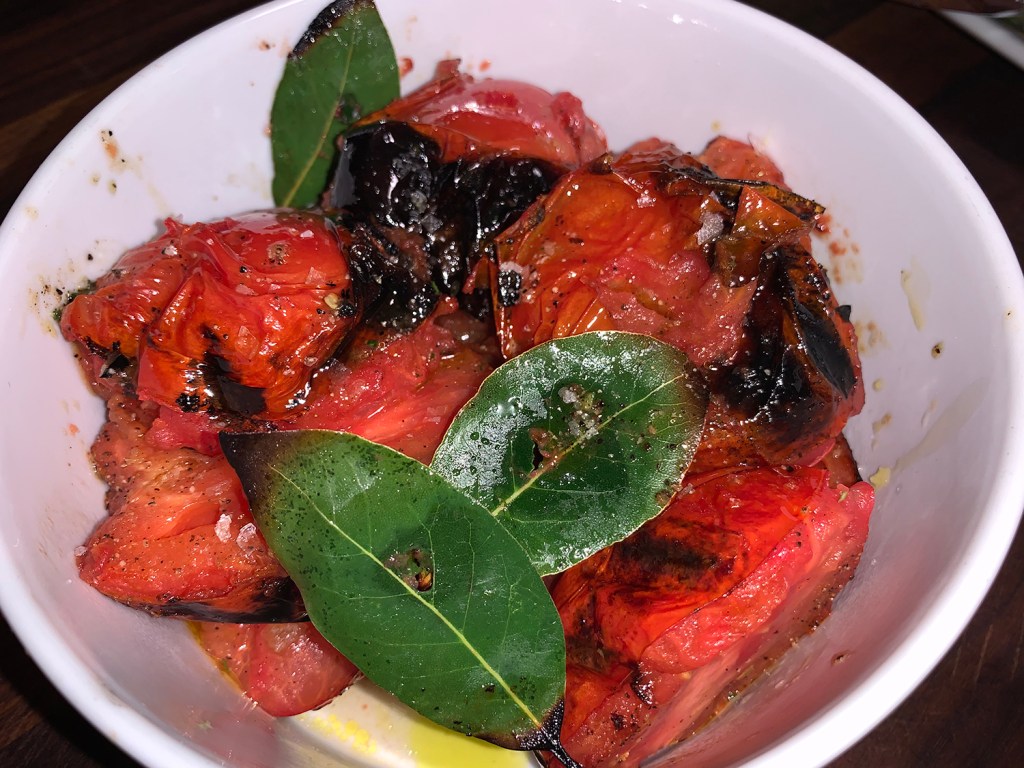
And how about a side of grilled tomato skewers? Pretty darn simple and a wonderful pairing with the chops. Remove the top core, slice them in half lengthwise, and thread them onto metal skewers alternating with a fresh bay leaf* on the cut side. Brush with EVOO and sprinkle with salt and pepper.
When you move the veal chops over to the cool side of the grill for 10 minutes, place the tomato skewers on the hot side, turning once half way through. They’ll take about 8-10 minutes total to get a nice char. Carefully remove them from the hot metal into a bowl and drizzle on a bit more EVOO. Six roma tomatoes (and 12 bay leaves) makes enough for 3-4 servings.
*Speaking of those bay leaves, it’s best to get fresh ones. If all you can get your hands on are dried, soak them in water for about 10-15 minutes so that they become pliable and won’t crack as you thread them on the skewers.
Grilled Tomato Skewers
As I mentioned, we were in Heaven over this meal! And the bonus was getting to gnaw the bone 😉
Grilled Veal Rib Chops with Mediterranean Herb Paste
3 medium garlic cloves, minced or pressed through garlic press (1 tablespoon)
1 Tbsp. minced fresh parsley leaves
2 tsp. minced fresh sage leaves
2 tsp. minced fresh thyme leaves
2 tsp. minced fresh rosemary
2 tsp. minced fresh oregano leaves
1 lemon, cut into wedges, for serving
If you don’t have all the herbs, feel free to add additional amounts of what you do have to compensate.
Directions
Preheat grill with all burners turned to high and lid down until very hot, about 15 minutes. Use grill brush to scrape cooking grate clean. Leave one burner on high and turn other burner(s) down to medium.
Sprinkle chops with salt and pepper to taste.
Mix oil, garlic, and herbs together in small bowl; rub herb paste over chops.
Grill chops, covered, over hotter part of grill until browned, about 2 minutes on each side. (If chops start to flame, slide them to cooler part of grill for moment and/or extinguish flames with squirt bottle.) Move chops to cooler part of grill. Continue grilling, turning once, until meat is still rosy pink at center and instant-read thermometer inserted through side of chop and away from bone registers 130 degrees, 10 to 11 minutes.
Remove chops from grill and let rest for 5 minutes before serving. Serve with lemon wedges.
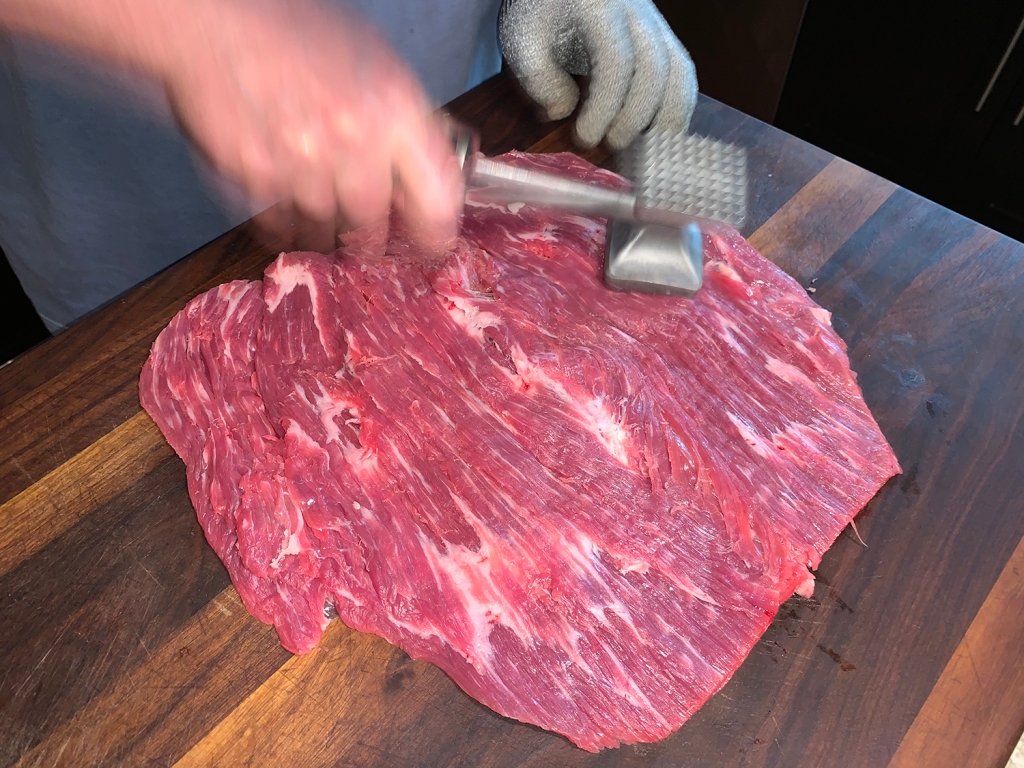
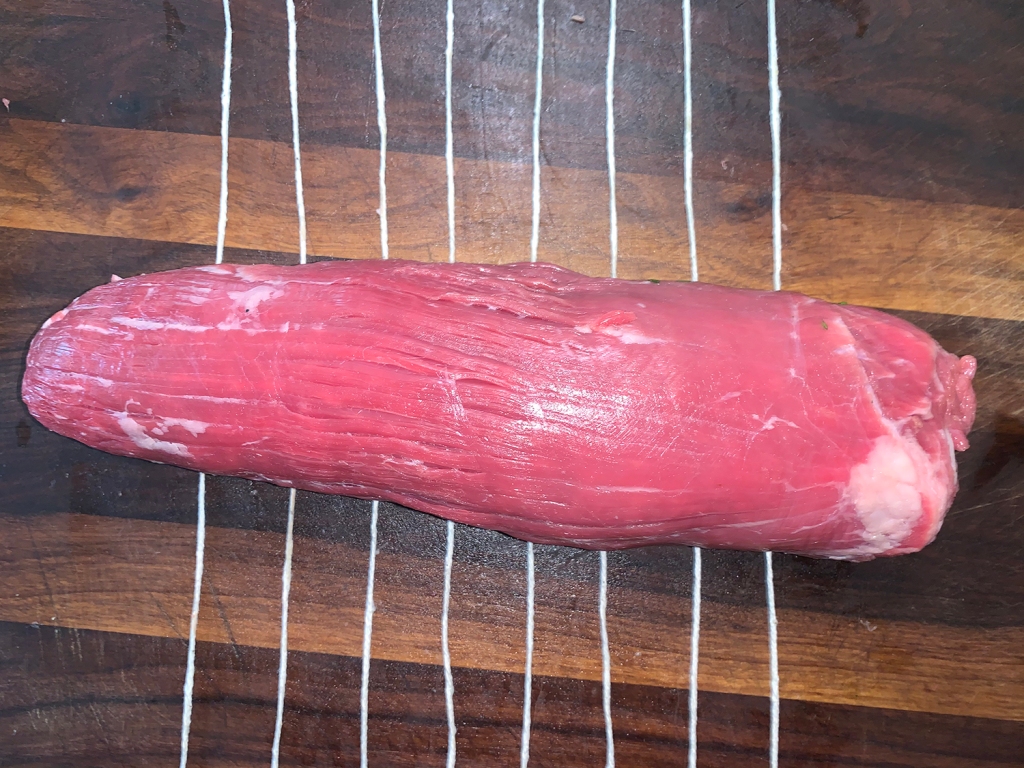
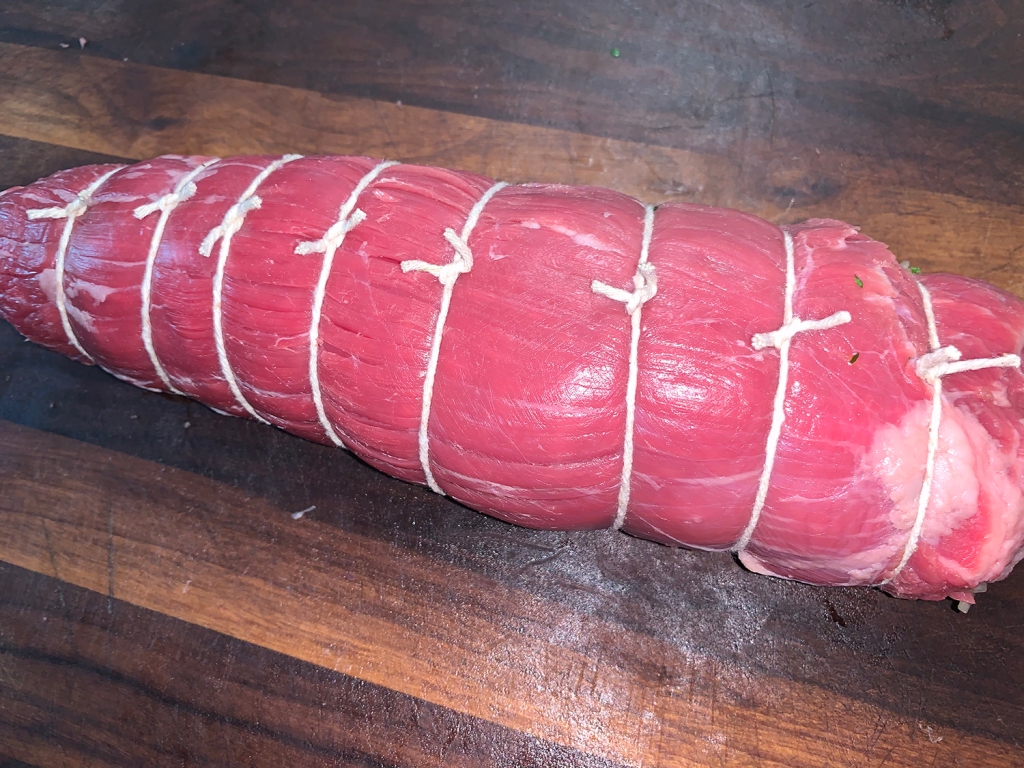
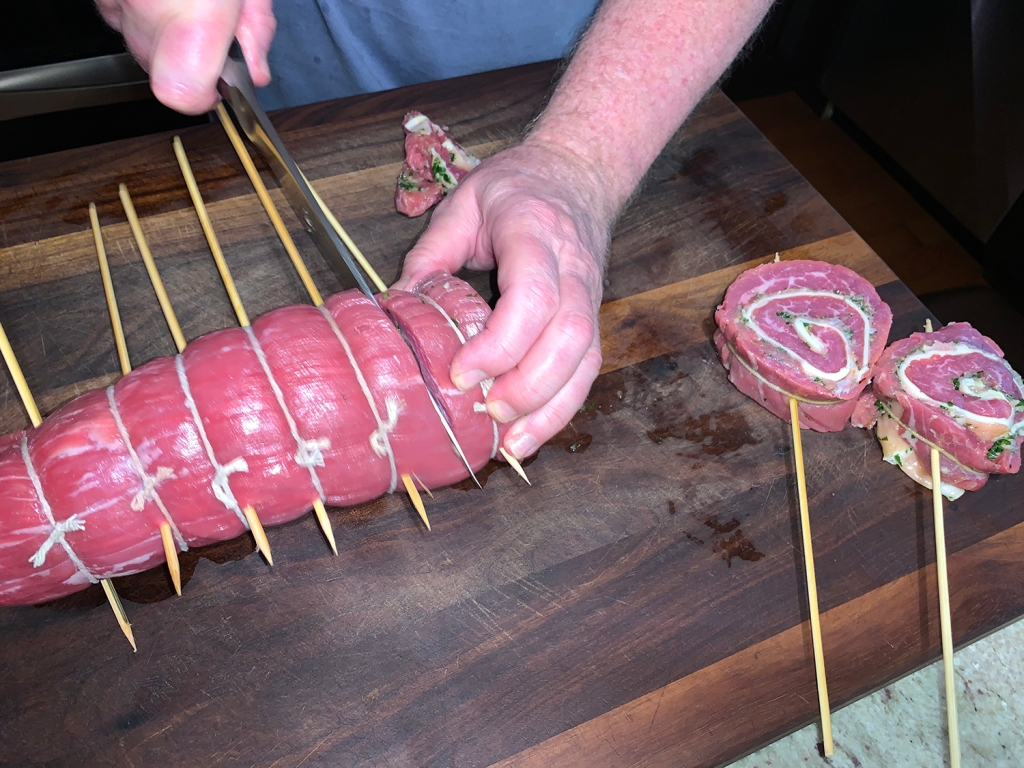
One of, if not THE, most popular posts on this blog over the course of its 6 1/2 year history is this Flank Steak Pinwheel Lollipops recipe. In the past month alone it garnered over 17,000 impressions on my Pinterest Board Casa “H” Culinary Creations! Even though they may look complicated in structure, they’re not, and folks love them, as did our recent dinner guests Pat and Charlie.
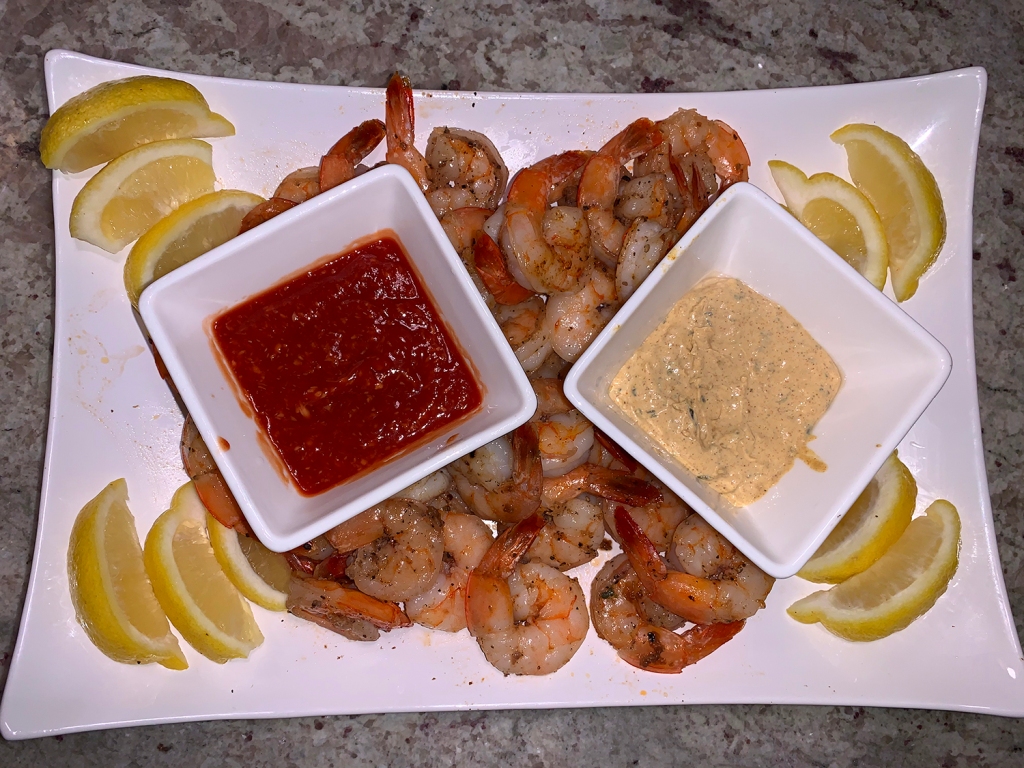
To start the evening, Pat and Charlie (shown below), brought a lovely shrimp appetizer with two dips. One was a spicy homemade cocktail sauce; and the other an unusual combination that Charlie said at first tasted like spackle. Not so in the end. Apparently they were trying to find an avocado dip but after visiting numerous stores, only found a quasi avocado/spinach combo. Thanks to some clever additions, their concoction ended up being quite tasty indeed.
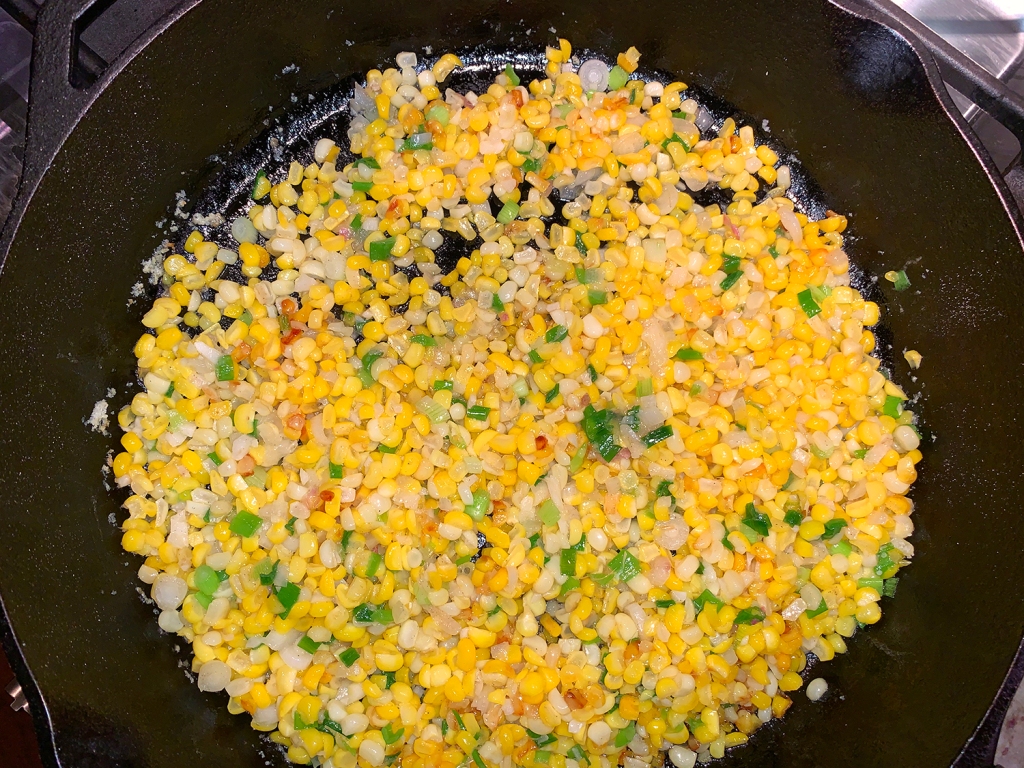
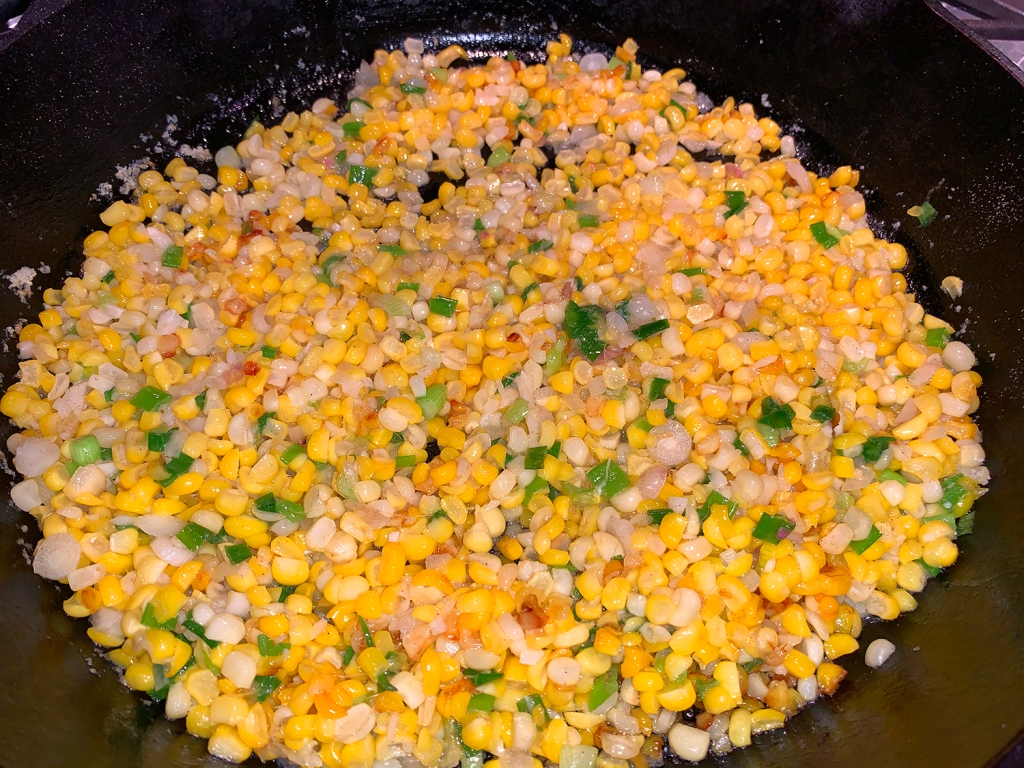
Can’t have a summer BBQ without a couple of good side dishes, and what screams summer more than fresh corn and tomatoes? I’ve included the Summer Sweet Corn Sauté recipe below. It couldn’t be more simple, is super quick, and oh so tasty. And if you’ve never had a Caprese Salad with heirloom tomatoes, I urge you to whip one together real soon.
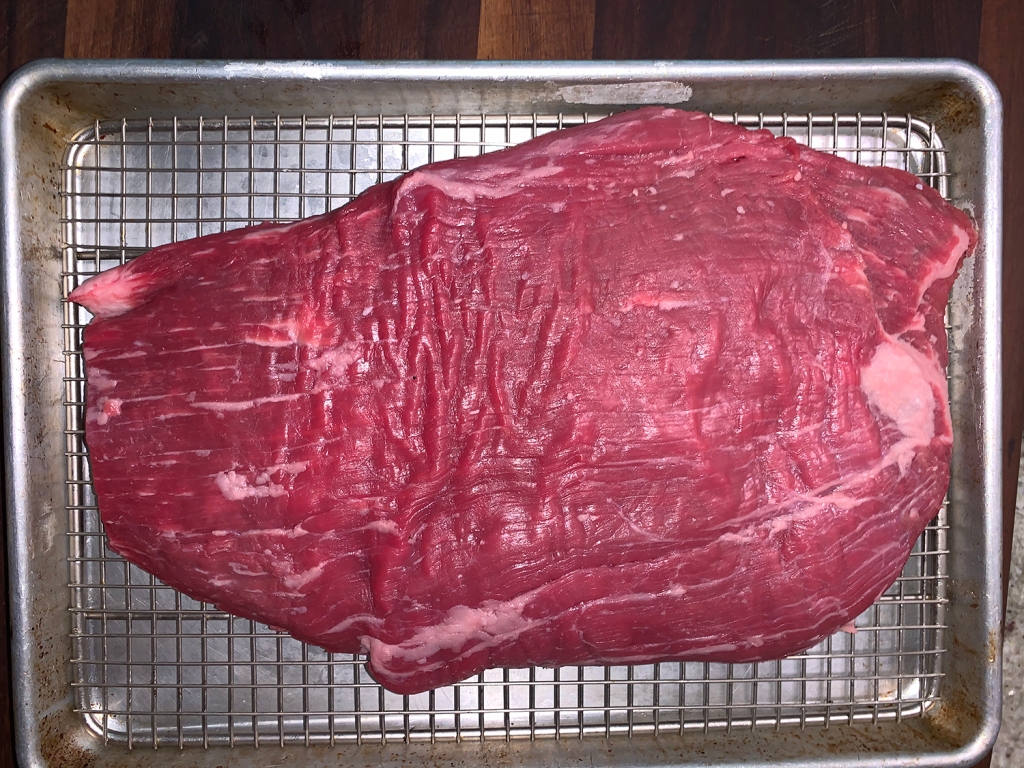
Back to that main entrée. It is difficult to find a large enough, 2 to 2 1/2 pound, flank steak. Do yourself a favor and call the butcher several days ahead of time and reserve one. Even doing so, the largest I could get was just over 2 pounds, but it sufficed to feed four people with one lollipop left over.
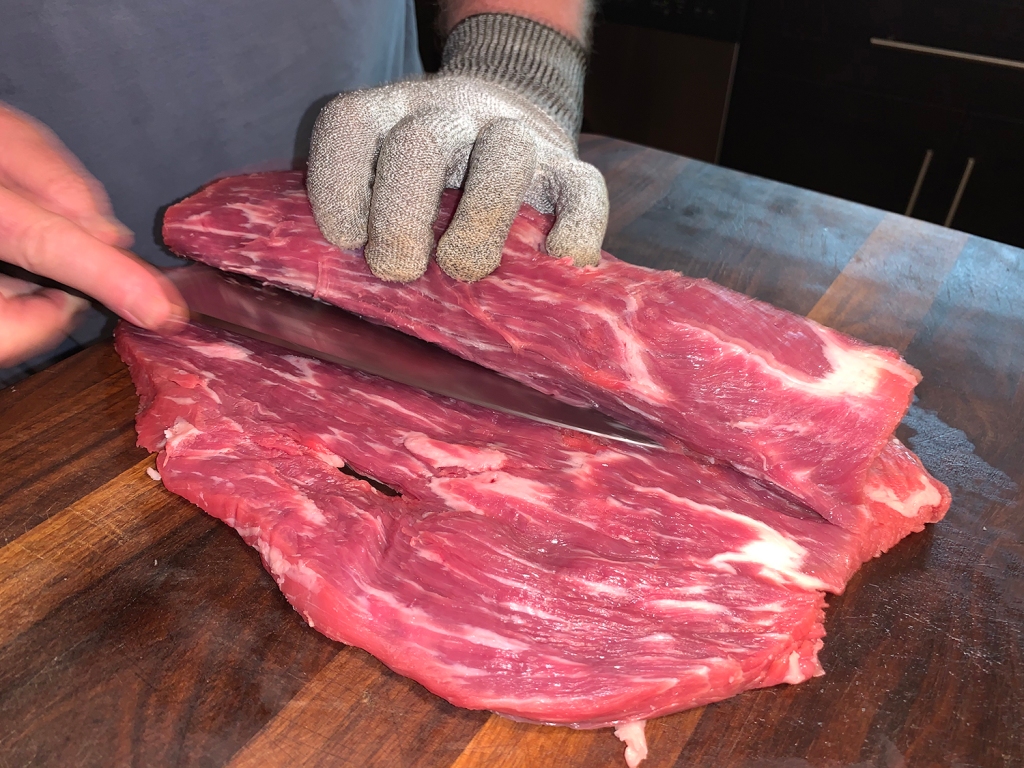
To get the filling to stay put in the stuffed flank steak, first freeze the meat for about 30-45 minutes, butterfly the steak, then split it horizontally and open it like a book. Use a food mallet to pound it down to an even thickness, being careful not to tear holes in it. Once stuffed and rolled, the meat holds up well on the grill when you use both skewers and twine to secure the layers.
Don’t break a sweat if some of the wooden skewers catch fire while grilling, ours did and we had soaked them all day! Just blow out the flames as needed. You’ll be removing them and the twine before you serve your guests anyway.
Grilled and Stuffed Flank Steak Pinwheel Lollipops
2 medium garlic cloves, minced or pressed through garlic press (about 2 teaspoons)
1 small shallot, minced (about 2 tablespoons)
2 Tbsp. fresh parsley leaves, finely minced
1 tsp. sage leaves, finely minced
2 Tbsp. olive oil, plus extra for oiling grate
1 flank steak (2- to 2 ½-pounds)
4 oz. thinly sliced prosciutto
4 oz. thinly sliced provolone
8 – 12 skewers soaked in water for at least 30 minutes
Kosher salt and ground black pepper
Directions
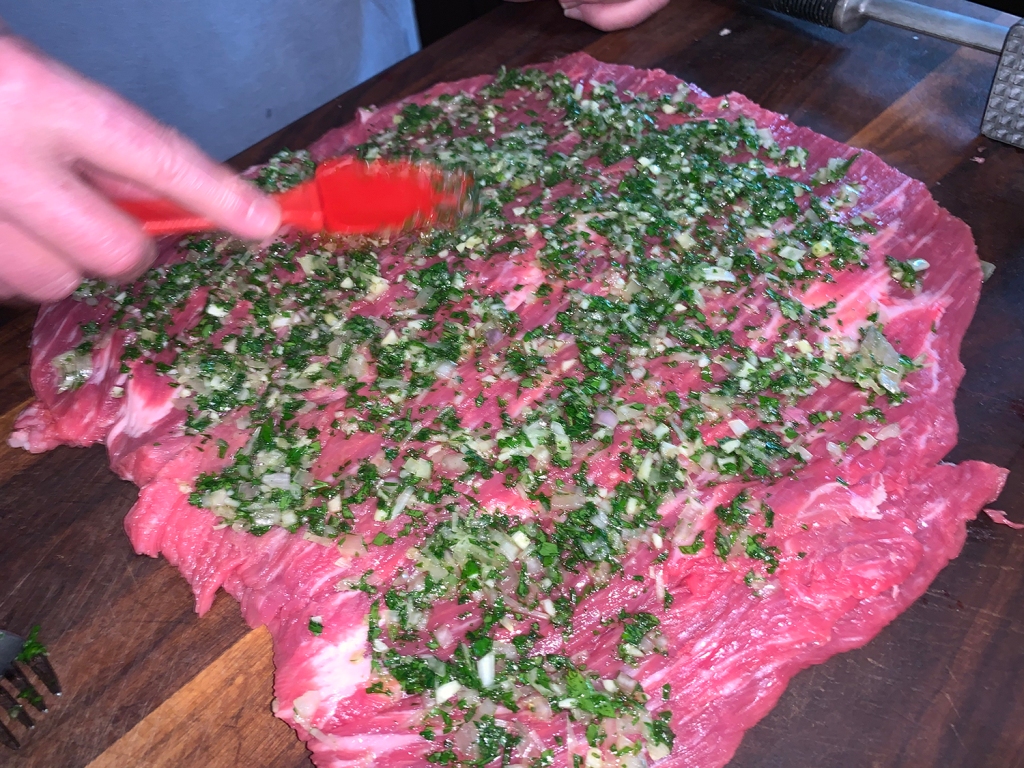
Combine garlic, shallot, parsley, sage, and olive oil in small bowl. Butterfly and pound flank steak into rough rectangle.
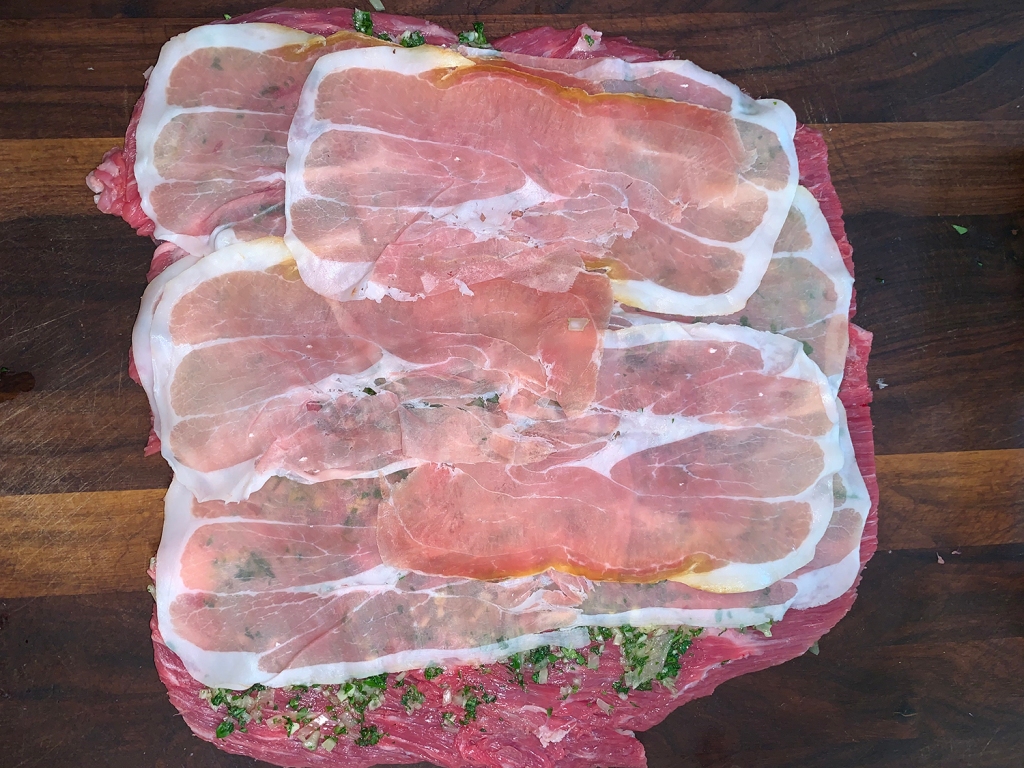
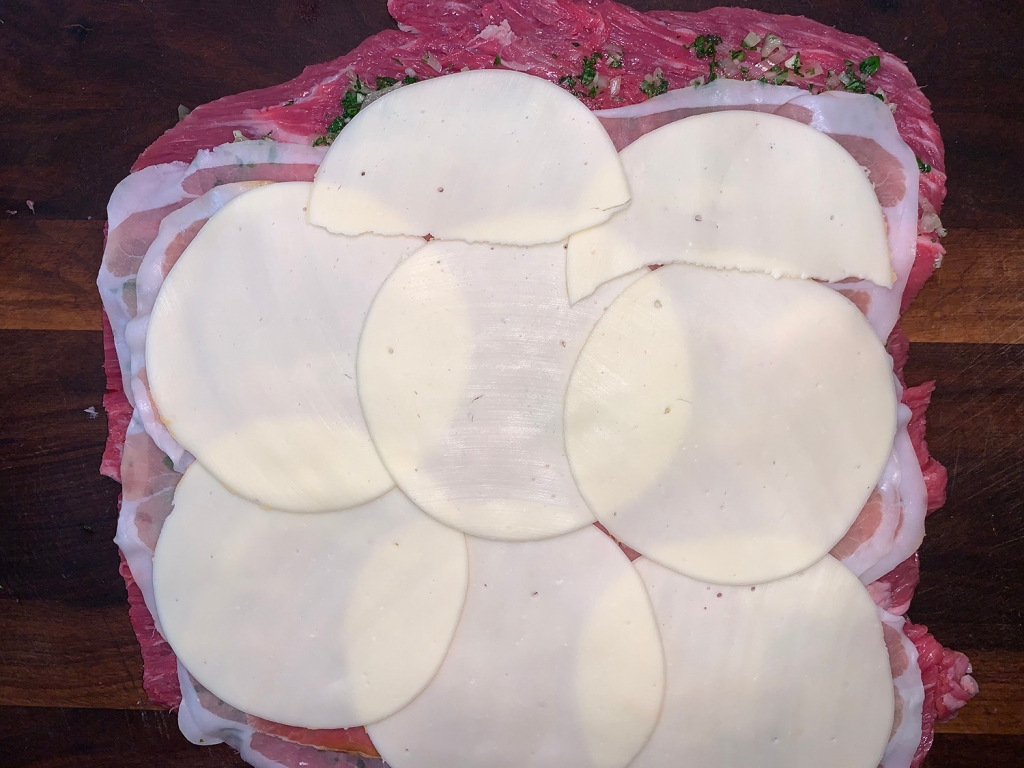
With steak positioned so that grain runs parallel to edge of counter and opened side faces up, spread herb mixture evenly over surface of steak. Lay prosciutto evenly over steak, leaving 2-inch border along top edge. Cover prosciutto with even layer of cheese, leaving 2-inch border along top edge.
Starting from bottom edge and rolling away from you, roll beef into tight log and place on cutting board seam-side down.
Starting ½ inch from end of rolled steak, evenly space 8 to twelve 14-inch pieces of butcher’s twine at 1-inch intervals underneath steak. Tie middle string first; then working from outermost strings toward center, tightly tie roll and turn tied steak 90 degrees so seam is facing you.
Skewer beef directly through outermost flap of steak near seam through each piece of string, allowing skewer to extend ½ inch on opposite side. Using chef’s knife, slice roll between pieces of twine into 1 1/4 inch thick pinwheels. Season pinwheels lightly with kosher salt and black pepper.
Turn all burners to high and heat with lid down until very hot, about 15 minutes. Scrape grate clean with grill brush. Dip wad of paper towels in oil; holding wad with tongs, wipe cooking grate. Leave primary burner on high and turn off other burner(s).
Grill pinwheels directly over hot side of grill until well browned, 3 to 6 minutes. Using tongs, flip pinwheels; grill until second side is well browned, 3 to 5 minutes longer.
Transfer pinwheels to cooler side of grill, cover, and continue to cook until center of pinwheels registers 125 degrees on instant-read thermometer, 1 to 4 minutes (slightly thinner pinwheels may not need time on cooler side of grill).
Transfer pinwheels to large plate, tent loosely with foil, and let rest 5 minutes. Remove and discard skewers and twine and serve immediately.
Melt the butter in a large cast iron skillet over medium heat.
Once melted, add the corn kernels and cook undisturbed for 8-10 minutes (or longer if needed). The corn should be lightly browned and caramelized on one side.
Add the scallions, shallot and garlic and continue cooking for another 4 minutes.
Turn off the heat. Stir in the basil chiffonade and transfer to a serving bowl and serve.
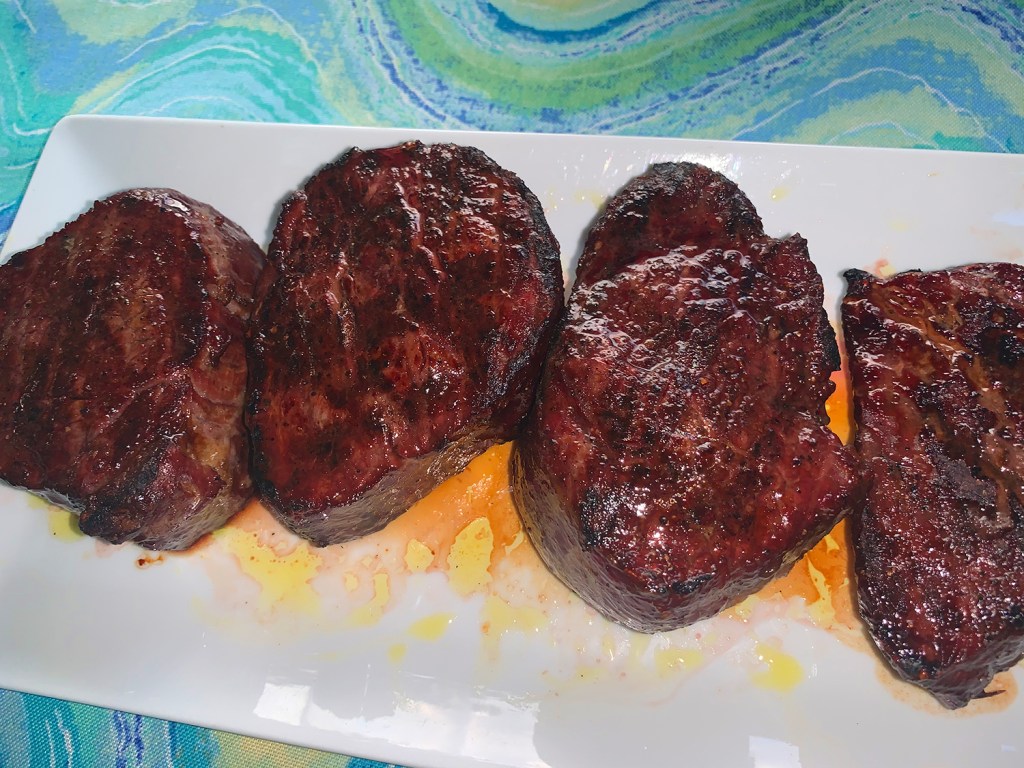
Father’s Day and grilled steak go together like peanut butter and jelly, ham and cheese, or any number of iconic pairings that you can think of. So when youngest son David and girlfriend Vikki said they’d be paying us a visit on Dad’s Day, we immediately thought of grilled steak to celebrate.
A win-win for the three of us, but the issue was Vikki who maintains a mostly plant-based diet. However, she did say she’ll eat an occasional filet mignon, and wouldn’t you know, I had just picked up a 7-pound tenderloin that we cut down into an array of filets. Perfect!
It is undeniable that the most tender, buttery, luscious steak on a cow is the filet. The perfect filet mignon will have a tender, juicy interior with a flavorful, crisp exterior, exactly what we were trying to achieve here.
The tenderloin was butchered the day before our gathering so that we could season and dry-brine the filets over night. Brining, once a means of food preservation, is now prized for the flavor and moisture it brings. And if you’ve been following my blog recently, you know I’ve been singing it’s praises as of late.
Of course, you don’t need to wait until next Father’s Day to make this special combo meal. To me, any occasion is a good enough reason to treat myself and my loved ones.
Dry-Brined Filet Mignon with Sautéed Garlic Mushrooms
Arrange the filets mignons on a rack in a rimmed baking sheet. Generously salt and pepper each on both sides.
Dry-brine the steaks in the refrigerator overnight, uncovered.
Heat your grill for the indirect method. Once at 250°, add the filets to the cool side and close the lid.
After 25 minutes, using an instant read thermometer, check to see if they are registering 125° for medium-rare.
Move them over to the direct heat side of the grill, turn up the burners to high, and sear each side for a couple of minutes. The final internal temperature of your steak should be 135°F for medium-rare and 145°F for medium. The sear will give your steaks the rich golden brown color and enhanced flavor that is typically associated with grilled steaks.
Sautéed Mushrooms with Garlic Butter
The important thing in making these gems really shine is sautéing the mushrooms in just the right way. You want to get them nice and golden brown because this is where the flavor comes from. Caramelization is key.
Do not be afraid of turning up the heat. In order to accomplish a nice sear on these mushrooms, start by sautéing them in olive oil, which has a higher smoke point. (If you use butter at a high heat like this, it could burn.) When they’re nice and golden brown, that’s when you’re going to add the butter to create a silky, shiny coating on the mushrooms.
Sautéed Mushrooms with Garlic Butter serves 4-6 and takes only 15 minutes.
Ingredients
1 Tbsp. olive oil
1 lb. cremini mushrooms, washed and cut in half
1/2 tsp. kosher salt
1/4 tsp. ground black pepper
3 Tbsp. unsalted butter
2-4 cloves garlic, minced; OR 1 Tbsp. roasted garlic paste
1 Tbsp. chopped fresh thyme
Directions
In a large sauté pan (you want the mushrooms to fit in a single layer), heat olive oil over medium-high heat. Add mushrooms and season with salt and pepper. Toss to coat all mushrooms with the oil and then spread them into a single layer.
Cook for four minutes on medium-high heat without stirring. Stir and cook for 2 more minutes without stirring.
Reduce heat to medium-low and add butter and garlic. Cook for 3-4 more minutes, stirring frequently, until mushrooms are fully cooked, butter is melted, and garlic is fragrant.
Remove from heat, stir in parsley and serve immediately.
This recipe borders on being a sort of Vietnamese taco or lettuce wrap, if you will. We found it on Milk Street whose staff, while in Vietnam, learned to make grilled lemon grass pork, or thịt nướng, as part of the dish called bún thịt nướng. It’s a salad that combines slender rice noodles with grilled pork, pickled and fresh vegetables, tons of herbs and a savory-sweet sauce (nước chấm).
To simplify, Milk Street focused on the pork along with the pickles and sauce, and accompaniments that are perfect complements to the rich, smoky pork. If you must choose between making either the sauce or pickles, opt for the former. The pork for thịt nướng is not always skewered, but doing so makes it easier to manage the thinly sliced meat on the grill. Lettuce leaves are ideal for wrapping the pork and pickles (dip into the nước chấm before taking a bite) or serve the skewers, sauce and pickles with steamed jasmine rice.
Don’t be afraid to pack the pork tightly onto the skewers. This helps prevent overcooking. If using a gas grill, make sure to allow it to heat covered for about 15 minutes before cleaning and placing the skewers on the grate. The sweet, sour and crunchy condiments balance the charred meat nicely.
2 Lbs. boneless pork shoulder, trimmed of surface fat
5 Medium garlic cloves, smashed and peeled
2 Medium shallots, quartered
2 Stalks lemon grass, trimmed to the lower 5 or 6 inches, dry outer layers discarded, thinly sliced
1 Serrano chili, stemmed and roughly chopped
1 tsp. chinese five-spice powder
Kosher salt and ground black pepper
2 Tbsp. grapeseed or other neutral oil
1 Tbsp. soy sauce
1 Tbsp. fish sauce
1 Tbsp. honey
Nước chấm (recipe follows)
Pickled carrots and daikon (recipe follows)
Lettuce leaves, to serve (optional)
Directions
Place the pork on a large plate and freeze until the meat is firm and partially frozen, about 1 hour.
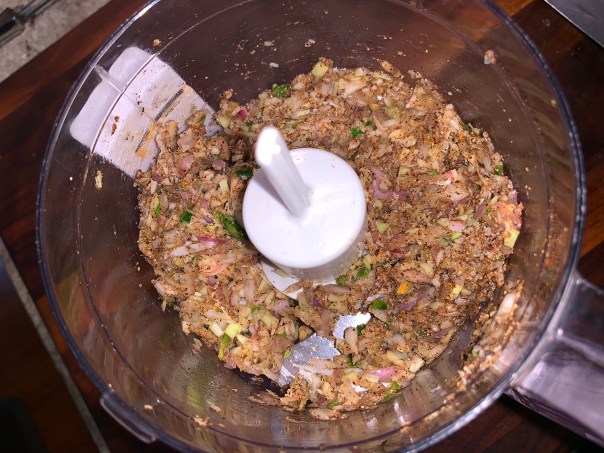
Meanwhile, in a food processor, combine the garlic, shallots, lemon grass, chili, five-spice and 1½ teaspoons each salt and pepper. Process until finely chopped, about 45 seconds, scraping the bowl as needed.
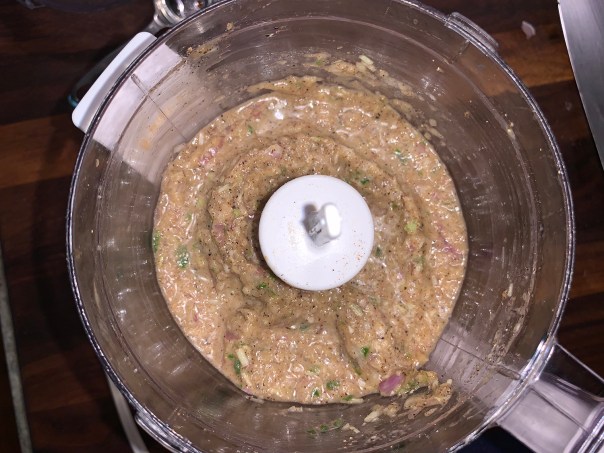
Add the oil, soy sauce, fish sauce and honey, then process until smooth, 1 to 2 minutes, scraping the bowl as needed. Transfer to a large bowl; set aside.
Using a chef’s knife, slice the partially frozen pork against the grain into pieces about ⅛ inch thick. The slices will be irregularly shaped; cut them into strips about 1-inch wide (it’s fine if the strips are not uniform). Add to the seasoning paste and toss, rubbing the paste into the meat.
Thread the pork onto as many 10- to 12-inch metal skewers as needed, evenly dividing the meat and scrunching it together, packing it quite tightly. If some pieces are too wide, too wispy or awkwardly shaped, fold the meat or tuck in the edges as you skewer.
Place on a rimmed baking sheet or in a large baking dish, cover and refrigerate while you prepare the grill.
Prepare a charcoal or gas grill. For a charcoal grill, ignite a large chimney of coals, let burn until lightly ashed over, then distribute evenly over one side of the grill bed; open the bottom grill vents. Heat the grill, covered, for 5 minutes, then clean and oil the grate. For a gas grill, turn all burners to high and heat, covered, for 15 minutes, then clean and oil the grate.
Place the skewers on the hot side of the grill (if using charcoal) and cook until lightly charred, about 3 minutes. Flip and continue to cook until the second sides are lightly charred, about another 3 minutes.
Flip the skewers again and continue to cook, turning every couple of minutes, until well charred on both sides, about another 3 to 5 minutes.
Transfer to a platter and drizzle with about ¼ cup of the nước chấm. Serve with the pickles and lettuce leaves for wrapping and with the remaining nước chấm for spooning on or dipping.
In the Vietnamese kitchen, nước chấm is a multipurpose sauce/dressing. If you wish to moderate the spiciness, seed the chilies before mincing them. The flavors are best the day the sauce is made, but it will keep in an airtight container in the refrigerator for up to three days.
Ingredients
⅓ cup fish sauce
3½ Tbsp. lime juice
¼ cup white sugar
3 med. garlic cloves, minced
1-2 serrano chiles, stemmed, seeded and minced
Directions
In a small bowl, combine the fish sauce, lime juice, sugar and 6 tablespoons water. Stir until the sugar dissolves, then stir in the garlic and chilies.
Cover and refrigerate up to 3 days; bring to room temperature before serving.
Grilling season is the best, on so many levels. In many cases it’s quick, it’s easy, few pots or pans are used, and your meal screams summer. And this simple Skirt Steak with BA.1 Sauce fits all of that criteria to a T.
Sweet, salty, tart, and goosed with secret sources of umami, steak sauce may be the ideal foil for a sizzling slab of red meat. We… whipped up a signature steak sauce of our own. It’s big on flavor, free of weird preservatives, and comes together in about a minute flat. Welcome to the world, BA.1.
Bon Appétit
In some ways, the taste of this sauce resembles A1 Sauce, but without the processed taste, and it’s a bit lighter in consistency. I loved it so much, I also added it to my side of grilled asparagus.
1 Tbsp. vinegar-based hot sauce (such as Frank’s or Crystal)
1 tsp. Dijon mustard
1 tsp. honey
Kosher salt
Steak and Assembly
Vegetable oil (for grill)
1½ lb. skirt steak, cut into thick slices
Kosher salt, freshly ground pepper
Flaky sea salt
Directions
Sauce
Whisk vinegar, Worcestershire sauce, ketchup, oil, hot sauce, mustard, honey, and 1 Tbsp. water in a medium bowl to combine; season with salt.
Do ahead: Sauce can be made 2 months ahead. Store airtight at room temperature.
Steak and Assembly
Prepare a grill for medium-high heat; oil grate.
Season steak generously with kosher salt and pepper.
Grill, turning every 1–2 minutes and moving closer to or farther away from heat as needed to build even color, until nicely charred and an instant-read thermometer inserted into the thickest part of steak registers 125°(juices pooling on top of meat is a fairly good indicator that meat has reached medium-rare), 7–9 minutes.
Transfer steaks to a cutting board and let rest 5–10 minutes before slicing against the grain.
Transfer steak to plates and top with sauce. Crack some pepper over and sprinkle with sea salt.
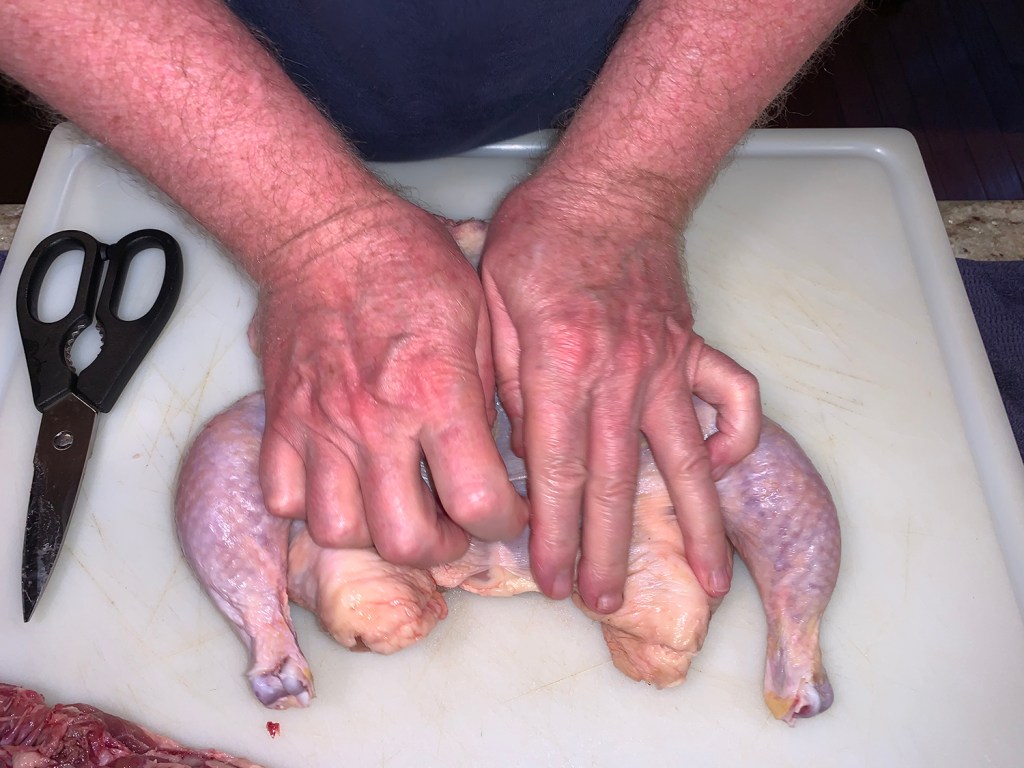
“A halved chicken is really easy to handle on the grill. Since it’s on the bone, it comes out super flavorful. There are nutrients and flavors in the bones.”
Brad Leone
Be aware, it’s crucial to dry-brine the chicken for at least eight hours, so plan ahead. This step seasons the meat and gives it time to absorb the floral kick of the mixed peppercorns. A fermented garlic-honey and vinegar glaze helps to mellow out the bite. You can make your own fermented garlic honey, but you will need to do this over a week ahead of time—time we didn’t have. You could also use regular honey or maple syrup instead.
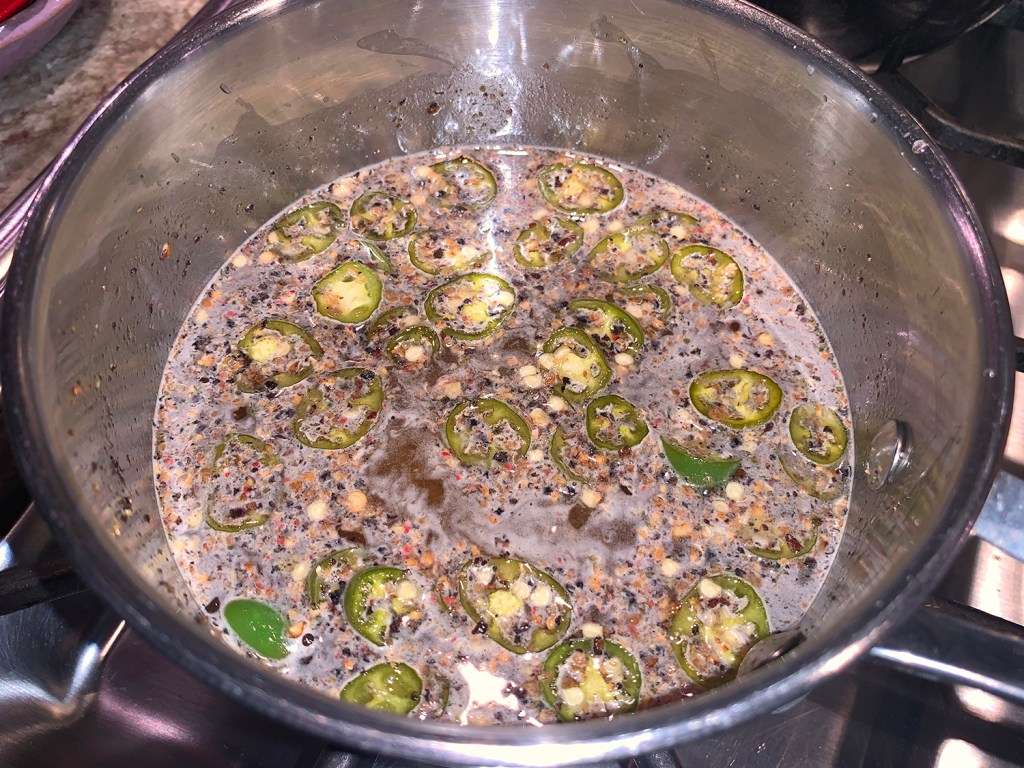
Fresno chiles are similar, although a bit more fruity than jalapeños, but we had neither so we substituted a serrano, which tends to have more kick. It was near impossible to find pink peppercorns (another fallout from COVID-19??) so we used a blend of colored peppercorns that included some pink, red, green and black. Do not substitute all black peppercorns!
What’s the difference between black and pink? The most common variety, black peppercorns are just cooked green peppercorns that have then been left out to dry. They have the strongest, most pungent flavor. But the pink—which aren’t actually peppercorns at all—are berries that come from a South American shrub. Though they still have a peppery bite, they also have fruity and floral notes.
To keep the meal lo-carb, colorful and healthy, we paired our chicken with a grilled vegetable medley of summer squash, cremini mushrooms, onion, bell peppers, garlic and rosemary. Cut everthing up into bite-sized pieces, marinate with some olive oil, herbs and spices in a ziploc bag for a couple of hours, then either thread onto metal skewers, or use a grill basket.
How the chicken looks after 24 hours uncovered in the fridge.
½ cup fermented garlic honey, honey, or pure maple syrup
3 Tbsp. Champagne vinegar or white wine vinegar
Directions
Finely grind black peppercorns and 2 Tbsp. pink peppercorns in a spice mill or mortar and pestle. Transfer to a small bowl and mix in 5 tsp. Diamond Crystal or 2¾ tsp. Morton kosher salt; set seasoning aside.
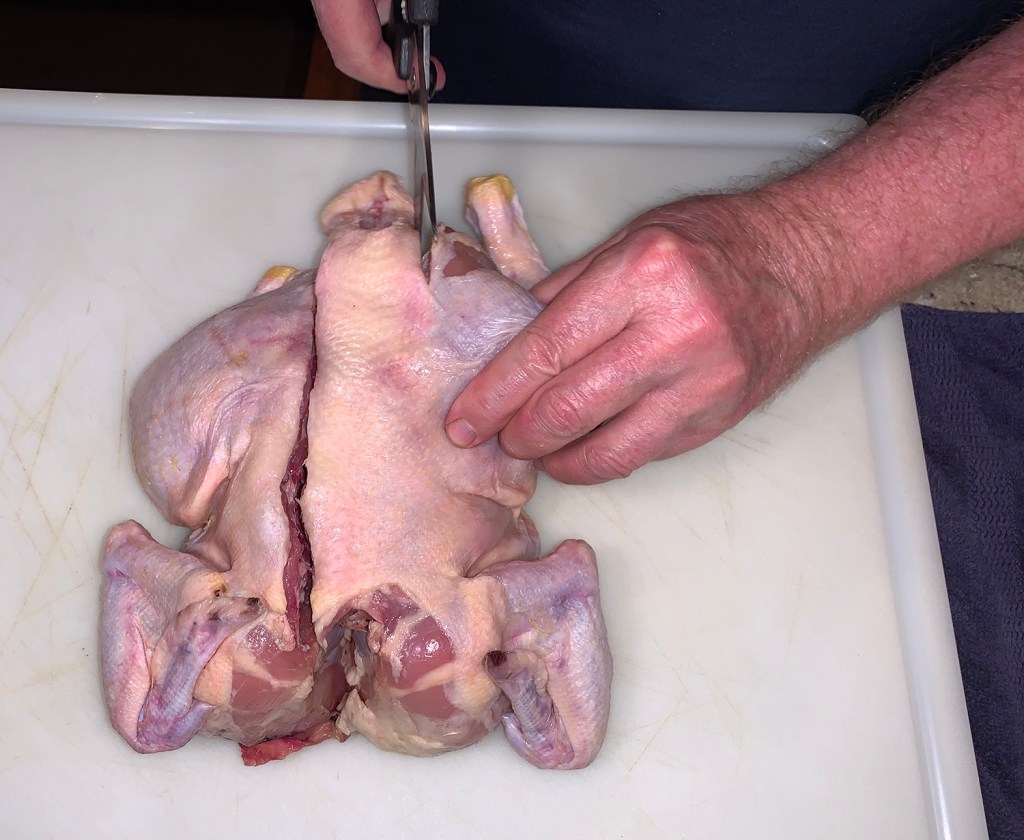
Place chicken, breast side down, on a cutting board and use kitchen shears to cut along both sides of the backbone to remove (freeze and save it for stock!). Open chicken and turn skin side up. Press down on center of breast to flatten chicken—you should hear the breastbone crack.
Using a chef’s knife or cleaver, split chicken in half through breastbone. Pat dry; rub all over with 1 Tbsp. oil. Sprinkle reserved seasoning all over, making sure to get into all the nooks and crannies.
Place on a wire rack set inside a rimmed baking sheet. Chill, uncovered, at least 8 hours and up to 2 days.
Coarsely grind remaining 2 Tbsp. pink peppercorns in spice mill or mortar and pestle.
Cook chiles, honey, vinegar, and remaining 1 tsp. Diamond Crystal or ½ tsp. Morton kosher salt over medium heat, stirring occasionally, until mixture just turns amber in color and is reduced by about half (it should coat a spoon), 10–12 minutes. Stir in pink pepper and set aside.
Prepare a grill for medium heat. Lightly oil grate.
Set chicken on grate, cover, positioning vent over chicken if your grill has one, and grill, turning every 5 minutes, until an instant-read thermometer inserted into the thickest part of thighs registers 120°–130°, 15–20 minutes.
Uncover and continue to grill, basting with honey mixture and turning chicken every 2–3 minutes, until an instant-read thermometer inserted into the thickest part of thighs registers 175° and 155° in the thickest part of breast, 10–15 minutes longer.
Transfer to a cutting board and place skin side up. Let rest 30 minutes before carving.
Cambodia is famous for its Kampot pepper—here a generous measure of ground black pepper plus a fresh chili are used to add multilayered spiciness to the savory-sweet dressing. The salad is best with a combination of cilantro, mint and basil—which we used—but it’s still delicious made with only one herb.
This noodle salad is a version of one that Milk Street staff tasted in Cambodia. Vegetables, herbs and chopped peanuts add tons of color and texture to tender rice vermicelli noodles. And if you like, omit the shrimp altogether or substitute 2 cups shredded cooked chicken.
Don’t bypass the step of rinsing the noodles. It prevents them from sticking together and overcooking. It also cools them down quickly for the salad. If your noodles are long, use scissors to cut them down to a manageable size.
The Hubs compared this salad to an inside-out Asian spring vegetable roll. It was absolutely delicious both as a dinner, and for lunches the next day. It would make a welcome option for a hot, humid summer’s eve when the last thing you want to do is cook.
Cambodian-Style Rice Noodle Salad with Shrimp, Cucumber and Herbs
1 English cucumber, halved lengthwise, seeded and thinly sliced into half moons
1 Medium shallot, halved and thinly sliced
Kosher salt and ground black pepper
1 Cup roasted peanuts, finely chopped
6 Tbsp. lime juice (about 3 limes)
1 Fresno or thai chili, stemmed, seeded and minced
3 Tbsp. fish sauce
2 Tbsp. packed brown sugar
1 Lb. cooked shrimp, roughly chopped
1½ Cups chopped fresh cilantro, mint and/or basil
Directions
Bring a large pot of water to a boil. Add the noodles and cook until tender, 2 to 3 minutes. Drain in a colander, then rinse under running cold water, tossing, until fully cooled. Drain again.
Use kitchen shears to snip the noodles in several places to cut them into shorter lengths. Transfer to a large bowl; set aside.
In the colander, toss the sliced cucumber and shallot with 1 teaspoon salt. Let drain in the sink for about 5 minutes.
In a small bowl, stir together the peanuts, lime juice, chili, fish sauce, sugar and 2 teaspoons pepper.
Add the cucumber-shallot mixture, shrimp and cilantro to the bowl with the noodles. Add the dressing and toss well.
Just let me put it out there. I am NOT a fast-food fan. In fact, it’s definitely been over four decades since I’ve had a fast-food burger. BUT, there’s been this resurgence of late among many of our revered culinary magazines (read Bon Apétit, Cook’s Illustrated, Fine Cooking) singing the praises of Smashed Burgers.
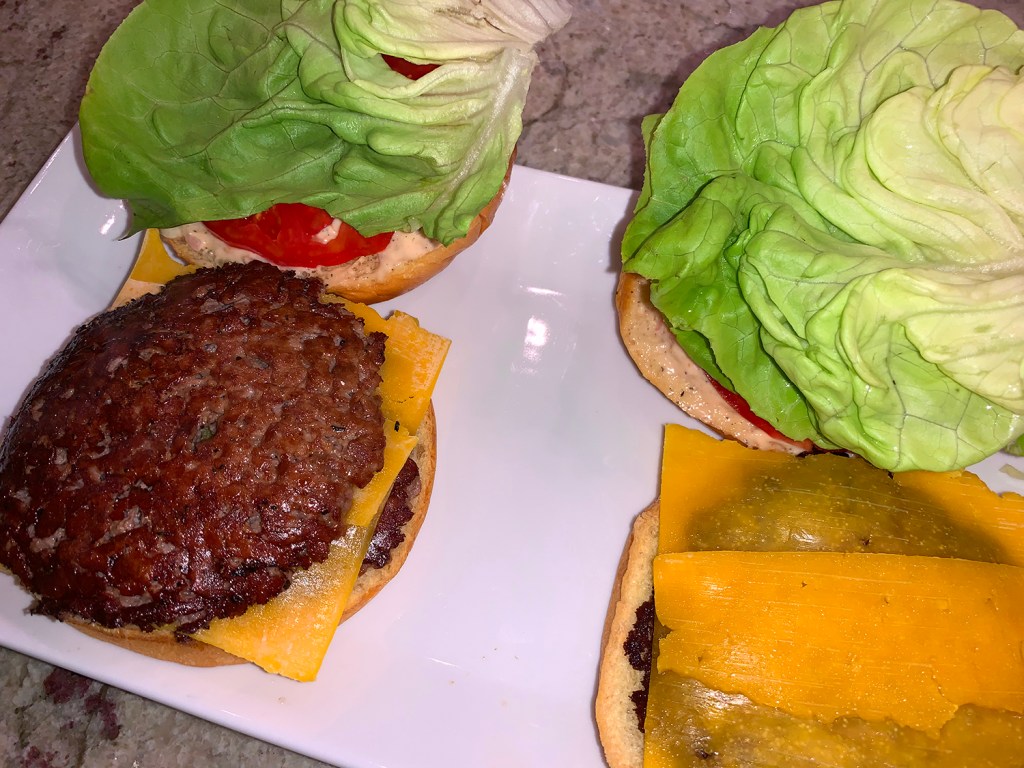
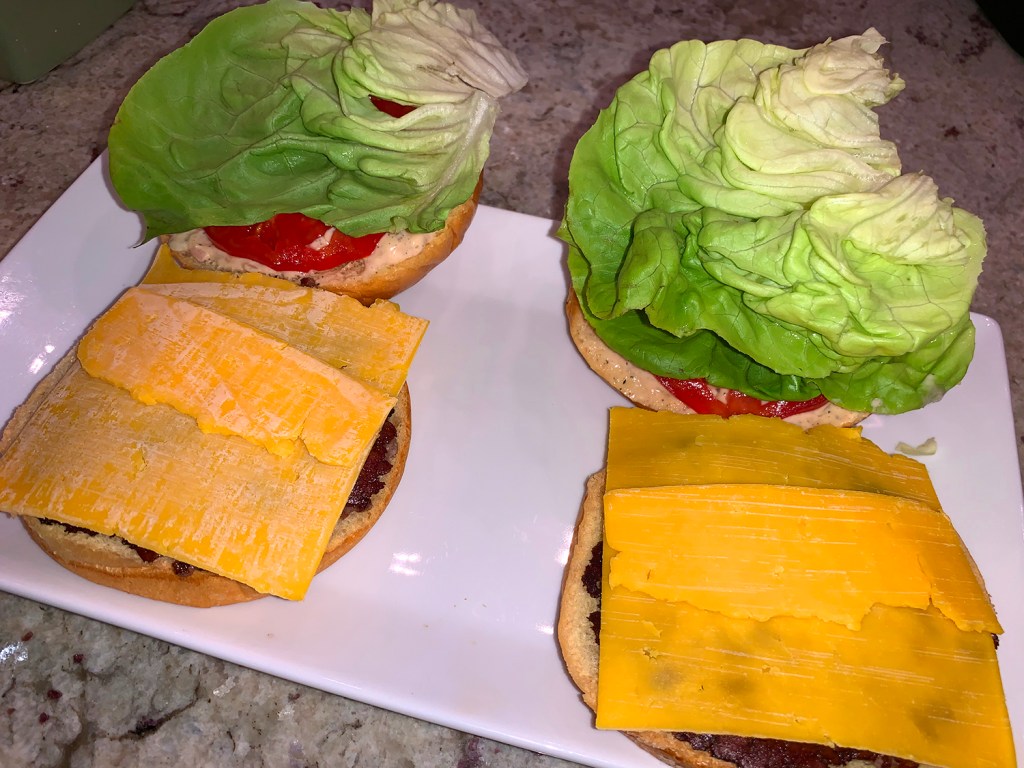
These diner icons share the same thin, verging-on-well-done profile as typical fast-food burgers, as well as their all‑American array of fixings: gooey American cheese; creamy, tangy burger sauce; crisp lettuce; thinly sliced tomato; and a soft bun. But with a smashed burger, extra-special attention is paid to making the brownest, crispiest, most savory crust.
Cook’s Illustrated
Now get this. Smashed burgers are fast and easy to make. Since the patty is thoroughly cooked and the crust delivers so much flavor, there’s no need to be choosy about the cut of beef or grind your own meat. In fact, commercial 80-percent lean ground beef makes better smashed burgers than home-ground chuck does because the former is more finely ground and thus stays more cohesive when it’s flattened. And to think I’m usually singing the praises of the latter.
You have to get the toppings just right, because smashed burgers—more than any other style of burger—rely on the condiments to deliver the moisture and tenderness that are sacrificed in pursuit of the ultimate crust. Along with that sauce, use a soft brioche bun to finalize the package.
The cheese resides between the 2 patties.
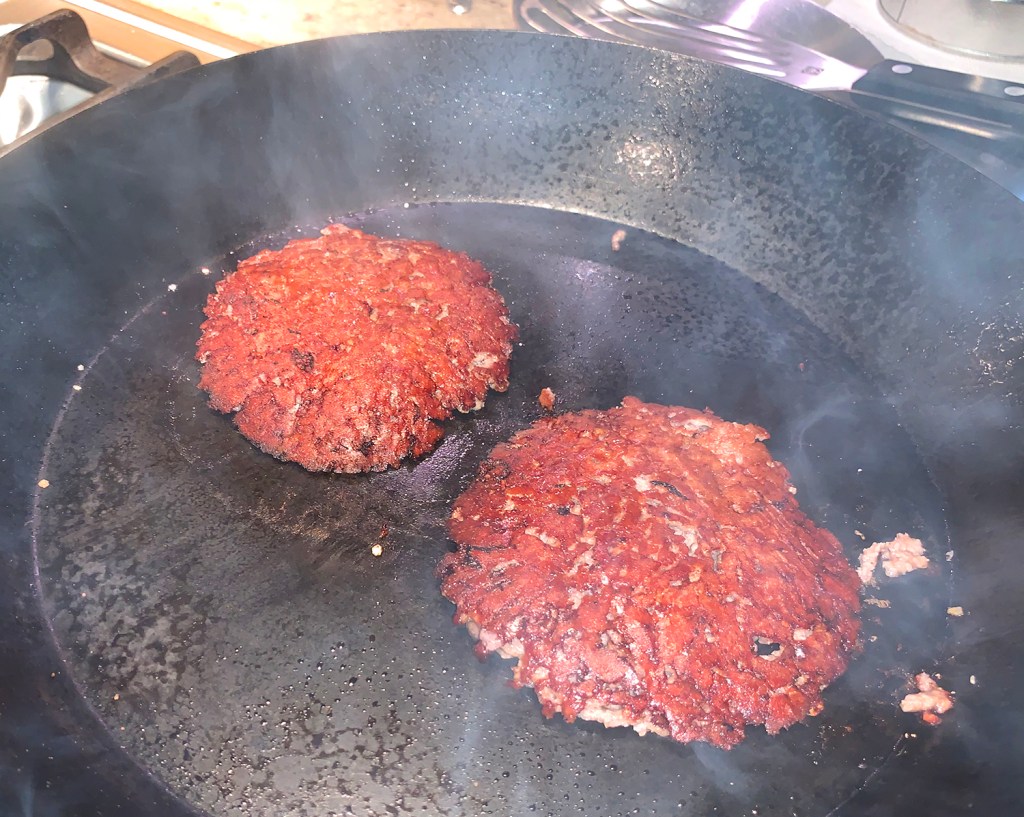
The sticking point? To flip the burgers, you’ll need to scrape them loose from the pan—and that’s a good thing. Sticking means that the meat has made full contact with the pan and browned deeply and uniformly. Burgers that don’t stick shrink and thicken, reducing the amount of brownable surface area and thus savory flavor. Make sure to use a thin metal spatula for best results.
Among family and friends, I am known for my homemade ultimate grilled burgers weighing in at nearly a half-pound each, with medium-pink juicy interiors that dribble down your chin. I knew not to expect that outcome with these smashed burgers, and was very pleasantly surprised with how good—and simple to make—they ended up.
Are smashed burgers our new replacement? No, but it’s always a good thing to have an arsenal of culinary varieties that you can fall back on depending on your circumstances. So the THIN versus FAT burger dilemma will have to go another round or two in our household. Might even venture to say there could be two winners…
1 ½ teaspoons finely chopped dill pickles plus ½ teaspoon brine
1 ½ teaspoons ketchup
⅛ teaspoon sugar
⅛ teaspoon pepper
Burgers
2 hamburger buns, toasted if desired
8 ounces (80 percent lean) ground beef
¼ teaspoon vegetable oil
¼ teaspoon kosher salt, divided
2 slices American cheese (2 ounces)
Bibb lettuce leaves
Thinly sliced tomato
Directions
FOR THE SAUCE: Stir all ingredients together in bowl.
FOR THE BURGERS: Spread 1 tablespoon sauce on cut side of each bun top. Divide beef into 4 equal pieces (2 ounces each); form into loose, rough balls (do not compress).
Place oil in 12-inch cast-iron or carbon-steel skillet. Use paper towel to rub oil into bottom of skillet (reserve paper towel). Heat over medium-low heat for 5 minutes.
While skillet heats, wrap bottom and sides of small saucepan with large sheet of aluminum foil, anchoring foil on rim, and place large plate next to cooktop. OR, use the bottom of a 28-ounce can oiled with cooking spray, which we did.
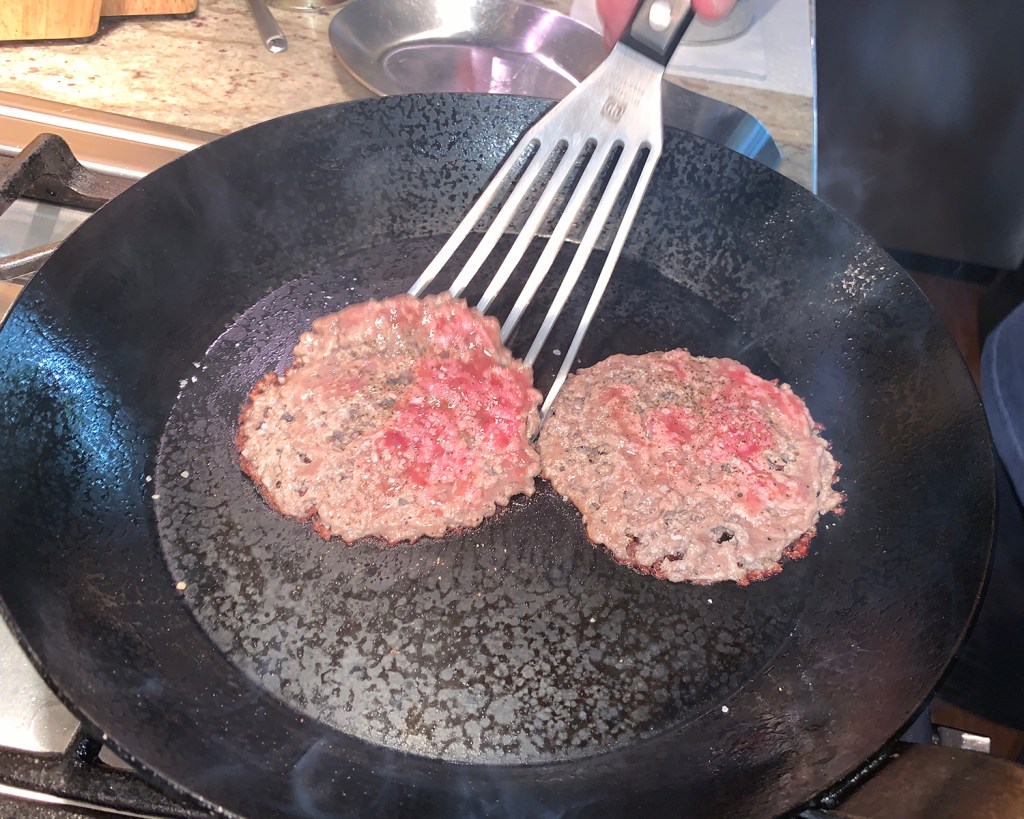
Increase heat to high. When skillet begins to smoke, place 2 balls about 3 inches apart in skillet. Use bottom of prepared saucepan (or 28-ounce can) to firmly smash each ball until 4 to 4½ inches in diameter. Place saucepan/can on plate next to cooktop.
Sprinkle patties with ⅛ teaspoon salt and season with pepper. Cook until at least three-quarters of each patty is no longer pink on top, about 2 minutes (patties will stick to skillet).
Use thin metal spatula to loosen patties from skillet. Flip patties and cook for 15 seconds. Slide skillet off heat. Transfer 1 burger to each bun bottom and top each with 1 slice American cheese.
Gently scrape any browned bits from skillet, use tongs to wipe with reserved paper towel, and return skillet to heat. Repeat with remaining 2 balls and place burgers on top of cheese.
Top with lettuce and tomato. Cap with prepared bun tops. Serve immediately.