I have been an artist and designer all my life incorporating graphic design for websites, gardens, publications, fabrics, interior design and cooking. I am now retired from my professional job, but still create artistic visions in all forms on a daily basis.
View all posts by LynnHoll →
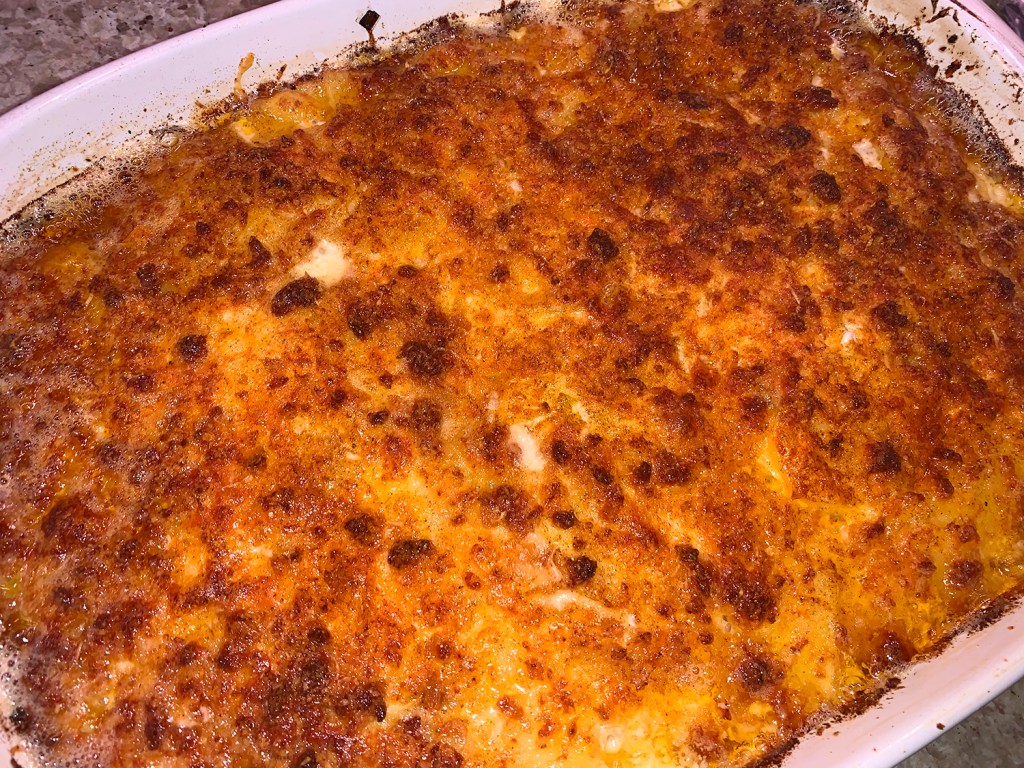
This rich, creamy gratin gets a note of smokiness from the bacon between the layers of tender potatoes. A hand mandoline positioned over a large bowl makes an excellent tool for which to create perfectly sized potato slices.
Definitely company-worthy and impressive, not to mention sinfully decadent and flavorful, these were a big hit for all of us.
3 medium leeks, white and light-green parts only, thinly sliced
6 oz. grated Gruyère
1 Tbsp. chopped fresh thyme
1/4 tsp. freshly grated nutmeg
1/2 cup fresh breadcrumbs
1/4 cup finely grated Parmigiano-Reggiano
2 Tbs. unsalted butter, melted
Sweet paprika, for topping (optional)
Directions
Position a rack in the center of the oven and heat the oven to 400°F. Butter or oil a 3-quart gratin dish; set aside.
Put the potatoes, cream , 1/2 tsp. salt, and a few grinds of pepper in a 12-inch skillet. Simmer, partially covered, over medium to medium-low heat, stirring often and gently with a rubber spatula until the potatoes are barely tender when pierced with a fork or skewer, 8 to 12 minutes.
In a medium skillet, cook the bacon until browned and fully cooked. Set aside to cool, reserving 2 Tbs. of the fat in the skillet. Heat the reserved fat over medium-high heat and sauté leeks until tender, fragrant, and lightly browned. Season to taste with salt and pepper. When the bacon is cool, crumble it into small pieces.
Using a slotted spoon, transfer half the potatoes to the prepared gratin dish, spreading them evenly. Layer on the leeks, bacon, Gruyère, thyme, and nutmeg. Top with the remaining potatoes spreading them evenly, and pour over any liquid remaining in the pan.
In a small bowl, combine the breadcrumbs, Parmigiano-Reggiano, and melted butter. Evenly scatter the topping mixture over the potatoes. If using, sprinkle a light layer of sweet paprika over the breadcrumb topping.
Bake the gratin until it’s bubbly, the top is brown, and the potatoes are completely tender when poked with a fork or a skewer, 25 to 30 minutes. Let the gratin sit for at least 10 and up to 30 minutes before serving so the liquid is fully absorbed and the layers are cohesive.
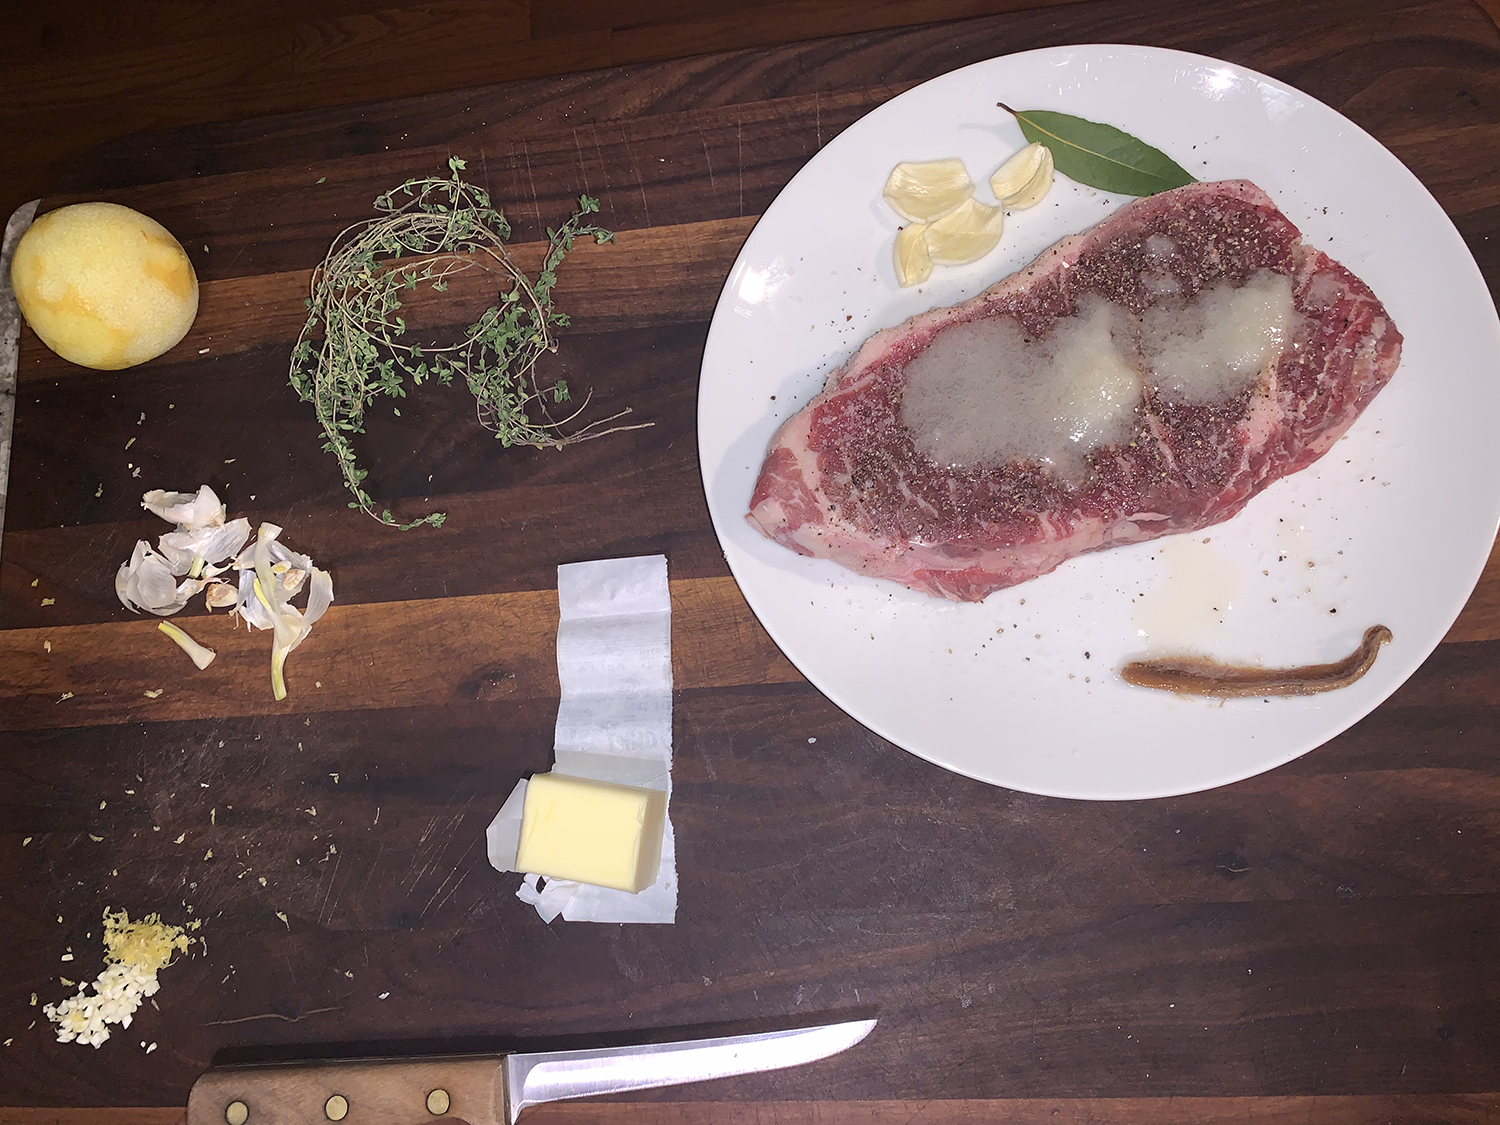
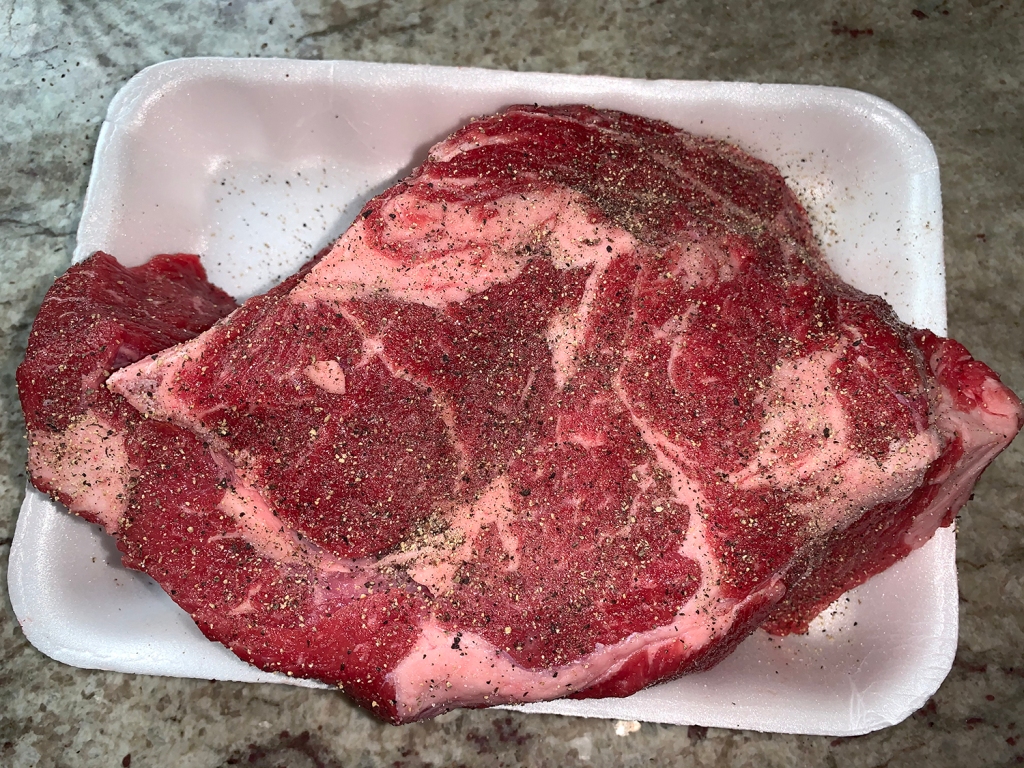
Thickness matters. It’s not just about portion control because without an adequately thick steak, it’s very difficult to get that perfect contrast between exterior and interior. Start with good quality rib-eye or strip steaks that are 1 1/2″ to 2″ thick (ours was 1 3/4″), and weigh in at around 1 1/2 pounds.
Very thin steaks will tend to overcook before they can finish developing a nice crust, even over the hottest fire you can build. With sous vide in particular, using a thicker steak will help you maintain more of that perfectly cooked interior during the searing process.
So the question begs, which cooking option will you use to make the steak for two: in a sous vide bath, cast iron skillet or grill? Cooking steak the traditional way, in a cast iron skillet or on the grill, leaves lots of room for error, and an over- or undercooked steak is a big mistake to make when there’s a prime-grade piece of beef on the line. Plus, the fact that it was Winter with snow on the ground sort of dissuaded us from grilling…
Sous vide cooking takes all of the guesswork out of the process, delivering steaks that are cooked to precisely the temperature you like each and every time. Not only that, because sous vide is such a gentle cooking process, you’ll be able to achieve steaks that are evenly cooked from edge to edge. As you might have guessed by now, we chose the sous vide method.
In a water bath, the doneness of a steak is by and large determined by the maximum internal temperature it reaches during cooking. For instance, so long as a strip steak does not rise above 130°F (54°C), it will never cook beyond medium-rare. With traditional cooking methods, there is a very short window of time during which your meat is perfectly cooked. A minute too long will mean overcooked meat. With sous vide cooking, on the other hand, that window of time is stretched into hours, which means your steak will be hot and ready to go whenever you’re ready to sear and serve it.
Remember this: It’s better to cook one large steak for every two people than to cook two smaller steaks.
1.5 lbs. rib-eye or NY strip steak, 1 1/2 to 2-inches thick
Kosher salt and freshly ground pepper
1 bay leaf
2 sprigs of fresh thyme
2 garlic cloves, split in half
2 tsp. extra virgin olive oil
Directions
Mash the anchovy fillet into a paste on a cutting board with the side of a chef’s knife. Sprinkle the garlic with a pinch of kosher salt and mash it into a paste.
Put the butter in a small microwave-safe bowl and microwave it on high in 10-second bursts until it just begins to melt. Mash the butter with a fork and stir in the anchovy, garlic, parsley, capers, lemon zest, and a few grinds of black pepper. Set aside.
Fill a large pot about 3 quarters of the way full with water. Attach a sous vide unit and set for 129°.
While the water is heating, salt and pepper the steak and allow to rest for at least 30 minutes. Put steak in a gallon ziploc bag, add garlic, thyme bay leaf and olive oil. Seal the bag, removing as much air as possible and massage contents to distribute evenly.
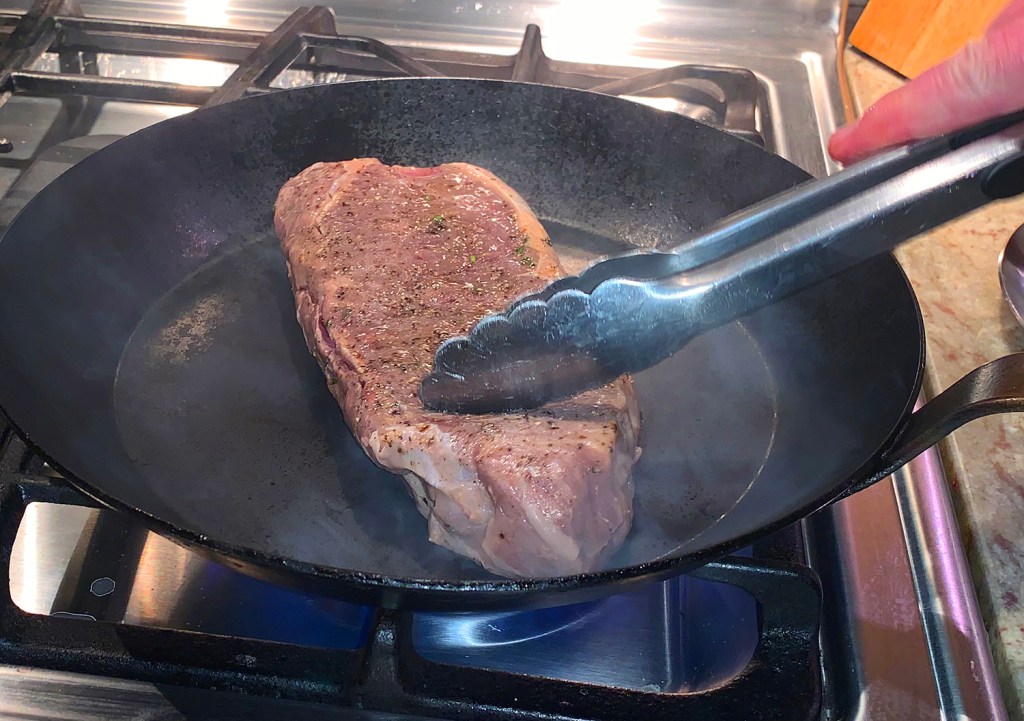
Place the bag in the heated water once it reaches temperature. Allow to cook for 1 1/2 hours. Remove steak from bag.
Heat a dry cast iron or carbon steel skillet over high heat. Sear the steak until you achieve a nice crust on all sides and edges; about two minutes per side.
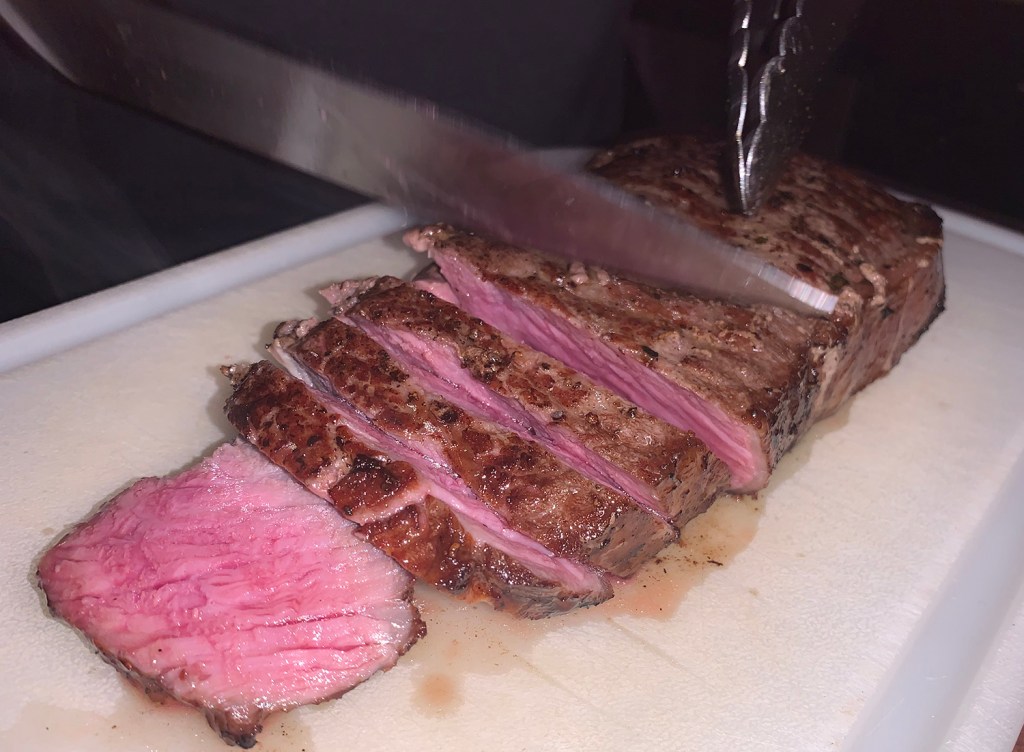
Cut the steak at a diagonal against the grain into 1/2-inch thick slices on a moated cutting board to catch the juices.
Move the sliced steak to a serving platter, drizzle with accumulated juices and serve the sliced steak topped with dollops of the butter, passing around any remaining butter.
This is a speedy version of slow-cooked Italian green beans, elegant in its simplicity. Sauté the haricots verts quickly to preserve their delicate texture, then toss them with a sauce of plum tomatoes and balsamic vinegar.
2 large plum tomatoes, roughly chopped and puréed in a food processor
1 Tbs. balsamic vinegar
Freshly ground black pepper
Shavings of Parmigiano-Reggiano,for garnish (optional)
Directions
Bring a pot of well-salted water to a boil. Add the beans and cook until bright green and just tender, 3 to 4 minutes. Drain and immediately plunge in a large bowl of ice water. Let cool for 3 to 4 minutes. Drain and set aside
Heat the oil in a large (12-inch) skillet over medium heat. Add the garlic and cook for about 1 minute.
Add the tomatoes and vinegar, sprinkle with 1/2 tsp. each salt and pepper, and cook, stirring until the mixture reduces by half, about 2 minutes.
Add the beans to the pan and cook until warmed through and coated with the tomato mixture, about 1 minute.
Taste the beans and season with salt and pepper if needed; garnish with shavings of Parmigiano-Reggiano if desired. Serve immediately.
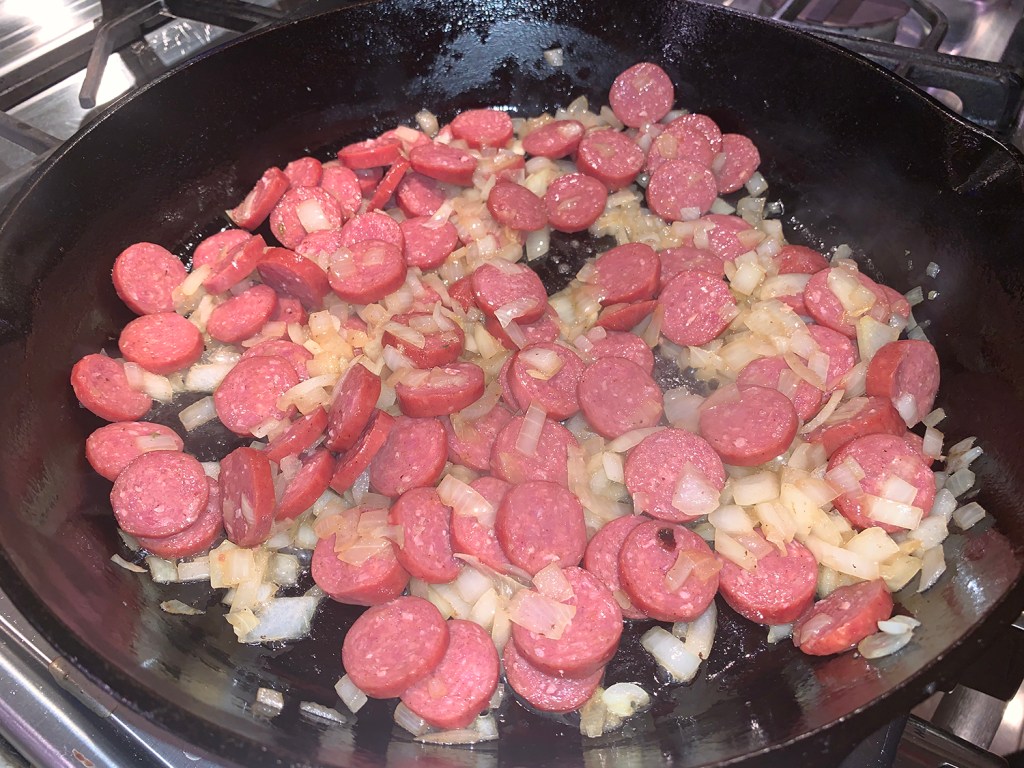
“Kielbasa,” the Polish word for “sausage” typically carries a more pronounced garlic flavor and is lightly smoked. When you purchase kielbasa in the grocery store, it has already been smoked and pre-cooked so you are automatically saving cooking time with this ingredient.
While microwaving the potato pieces also saves time, the results are uneven. In fact, they were nowhere near done after four minutes, so I zapped them for another four. If you can spare a bit of extra time, I suggest boiling the potatoes in water until soft for a more uniform tenderness.
After the fact, we thought the softened potatoes should have been browned with the onion to get a crisp on the outside. It’s nearly impossible to do so in the crowded pan with all of the sausage.
Our conclusion? The original recipe (as listed below) was too sweet with two tablespoons of brown sugar. If like us, you prefer a more savory flavor, cut back on the brown sugar to—at most—one tablespoon; and increase the amount of Dijon mustard. Finally, using only half an onion seemed a bit underwhelming so an entire onion was chopped.
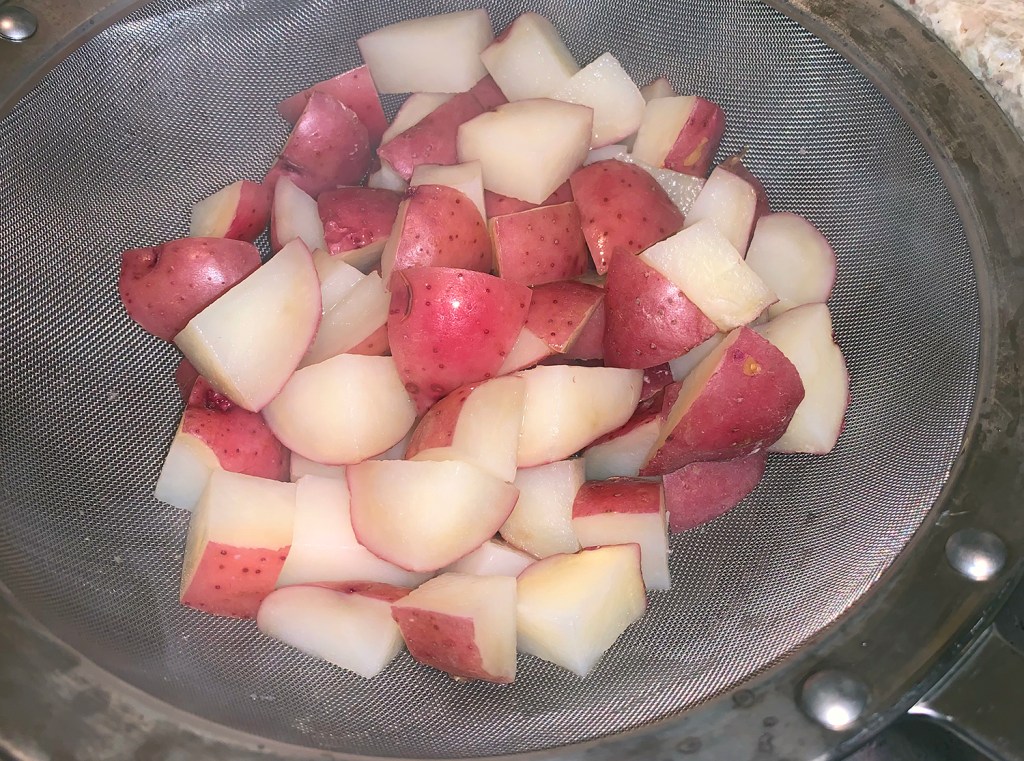
1 lb. red potatoes (3-4 medium), cut into 1-inch pieces
3 Tbsp. water
2 Tbsp. brown sugar
2 Tbsp. cider vinegar
1 Tbsp. Dijon mustard
1-1/2 tsp. minced fresh thyme or 1/2 tsp. dried thyme
1/4 tsp. pepper
1 Tbsp. olive oil
1/2 cup chopped onion
3/4 1b. smoked kielbasa or Polish sausage, cut into 1/4-inch slices
4 cups fresh baby spinach
5 bacon strips, cooked and crumbled
Directions
Place potatoes and water in a microwave-safe dish. Microwave, covered, on high until potatoes are tender, 3-4 minutes (ours took 8 minutes); drain.
Meanwhile, mix brown sugar, vinegar, mustard, thyme and pepper. In a large skillet, heat oil over medium-high heat; sauté onion and kielbasa until onion is tender.
Add potatoes; cook and stir until lightly browned, 3-5 minutes. Stir in brown sugar mixture; bring to a boil. Reduce heat; simmer, uncovered, 2 minutes, stirring occasionally.
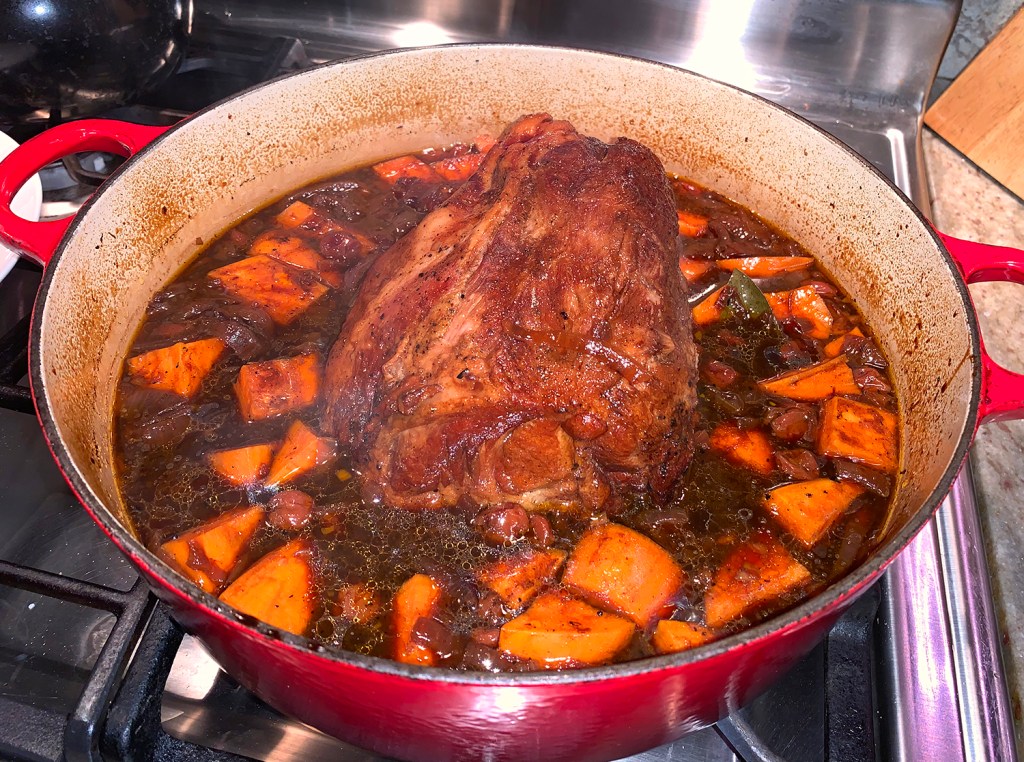
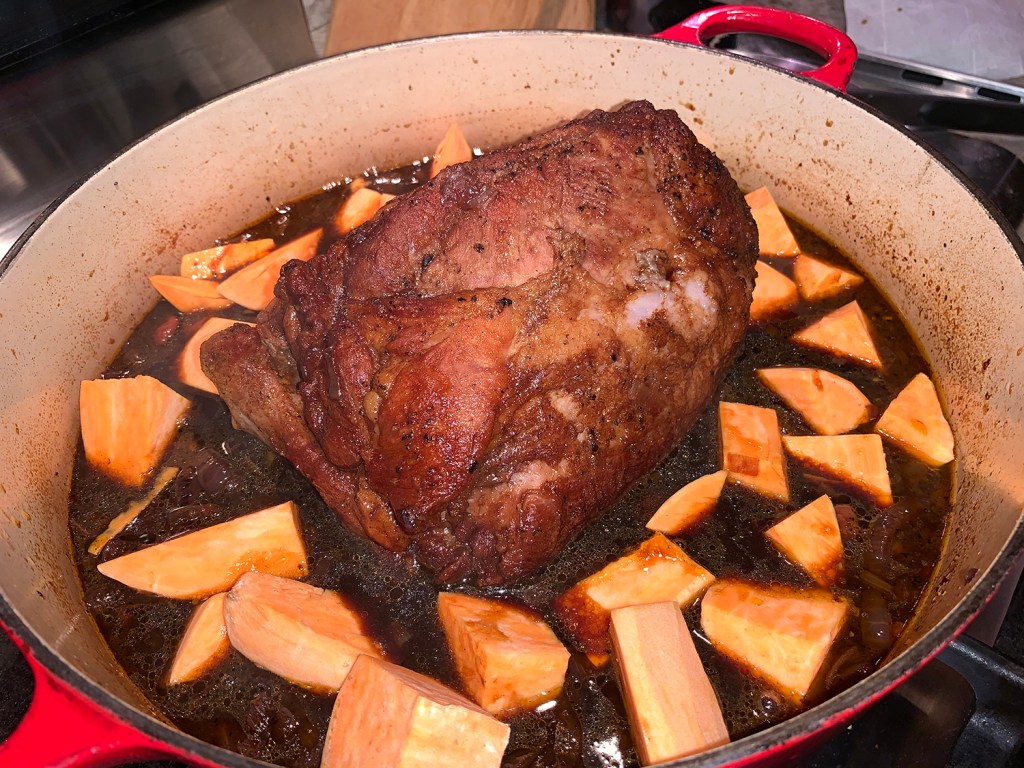
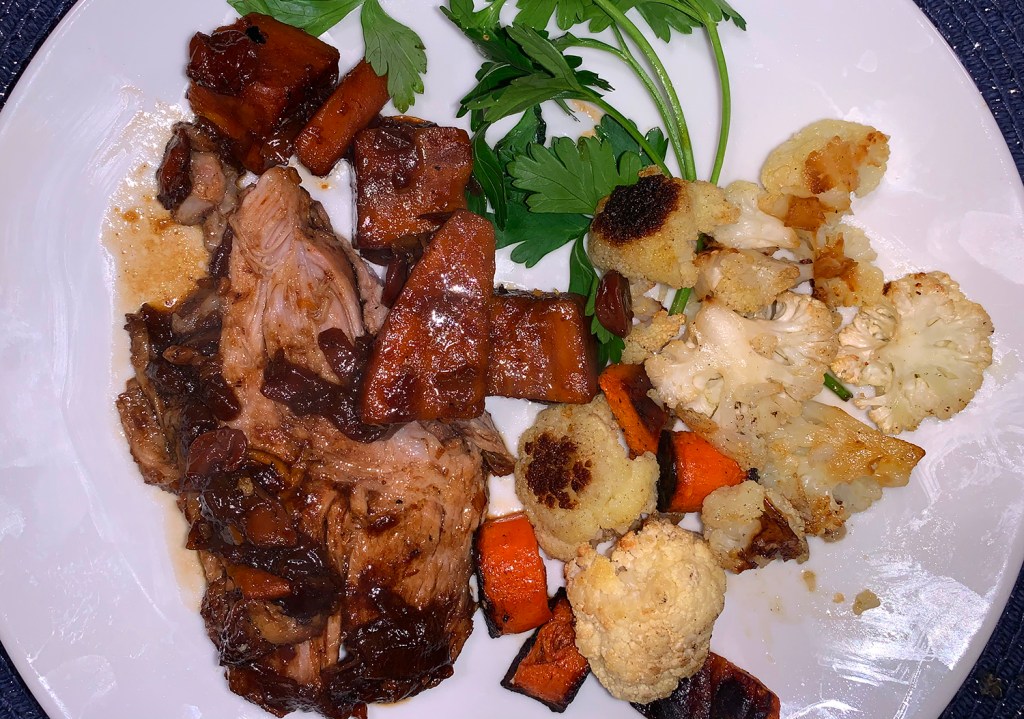
Pork shoulder is a classic for braising. The meat turns nearly spoonable but still slices nicely, and leftovers are great for sandwiches. In this recipe the pork is combined with dried cherries and sweet potatoes, balancing their sweetness with the slightly bitter taste of Guinness stout and molasses. Odd combination? I thought so too, but OMG, it was fantastic!
It hailed from renowned Chef Daniel Boulud’s cookbook “Braise, A Journey Through International Cuisine” where all of his recipes are influenced with a global perspective. We know that braising transforms inexpensive, tough cuts of meat into succulent soft morsels. And as Daniel writes “In fact, the cheaper, more sinewy, and more chewy the meat is to begin with, the more delectable it’s texture and the thicker the sauce after cooking.”
The original recipe, which is depicted below, calls for a 5-1/2 pound shoulder roast. We happened to have a 3-1/2 pound pork roast on hand, so that’s what we used and adjusted the other ingredients to follow suit. Then we completed the meal with roasted cauliflower and carrots.
Don’t forget to make the Guinness stout and cherry sauce ahead of time. It needs to sit for at least an hour or be refrigerated overnight for the flavors to meld.
Pork Shoulder with Guinness, Dried Cherries and Sweet Potato
Coarse sea salt or kosher salt and freshly ground black pepper
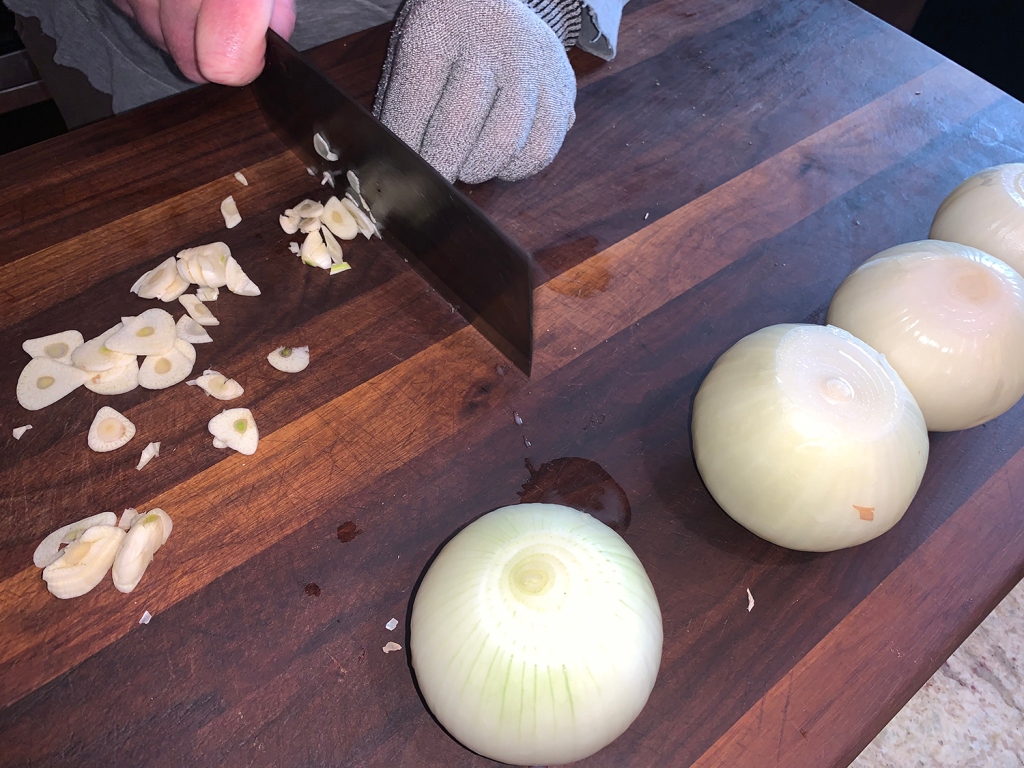
3 large red onions, peeled and sliced
1/2 tsp. crushed black pepper
4 garlic cloves, peeled and finely minced
1 Tbsp. tomato paste
5 whole allspice, crushed
2 bay leaves
1/4 cup molasses
3 Tbsp. packed dark brown sugar
2 lbs. sweet potatoes or yams, peeled and roughly chopped
Directions
Bring the stout, cherries, and vinegar to a simmer in a saucepan. Transfer to a bowl, cover tightly with plastic wrap, and let sit for at least 1 hour, or refrigerate overnight.
Center a rack in the oven and preheat the oven to 300°F.
Warm the oil in a large cast-iron pot or Dutch oven over high heat. Season the pork shoulder with salt and ground black pepper and sear on all sides until golden brown, 12 to 15 minutes. Transfer the pork shoulder to a platter. Remove all but 2 tablespoons of the fat in the pot.
Add the onion and the crushed black pepper to the pot and sauté for 7 minutes. Add the garlic and continue cooking until the onions are translucent, about 3 minutes. Stir in the tomato paste and cook for 2 to 3 minutes longer.
Add the pork shoulder, the marinated cherries and liquid, allspice, bay leaves, molasses, brown sugar, 1 teaspoon salt, and 2 cups water. Bring the mixture to a simmer.
Cover the pot, transfer it to the oven, and braise for 1 hour, turning the pork once during cooking. Add the sweet potatoes and continue to braise for 2 more hours, turning two more times. If the sauce is too thin or is not flavored intensely enough, ladle most of it off into another pot and simmer it until it thickens and intensifies. Then add it back to the first pot.
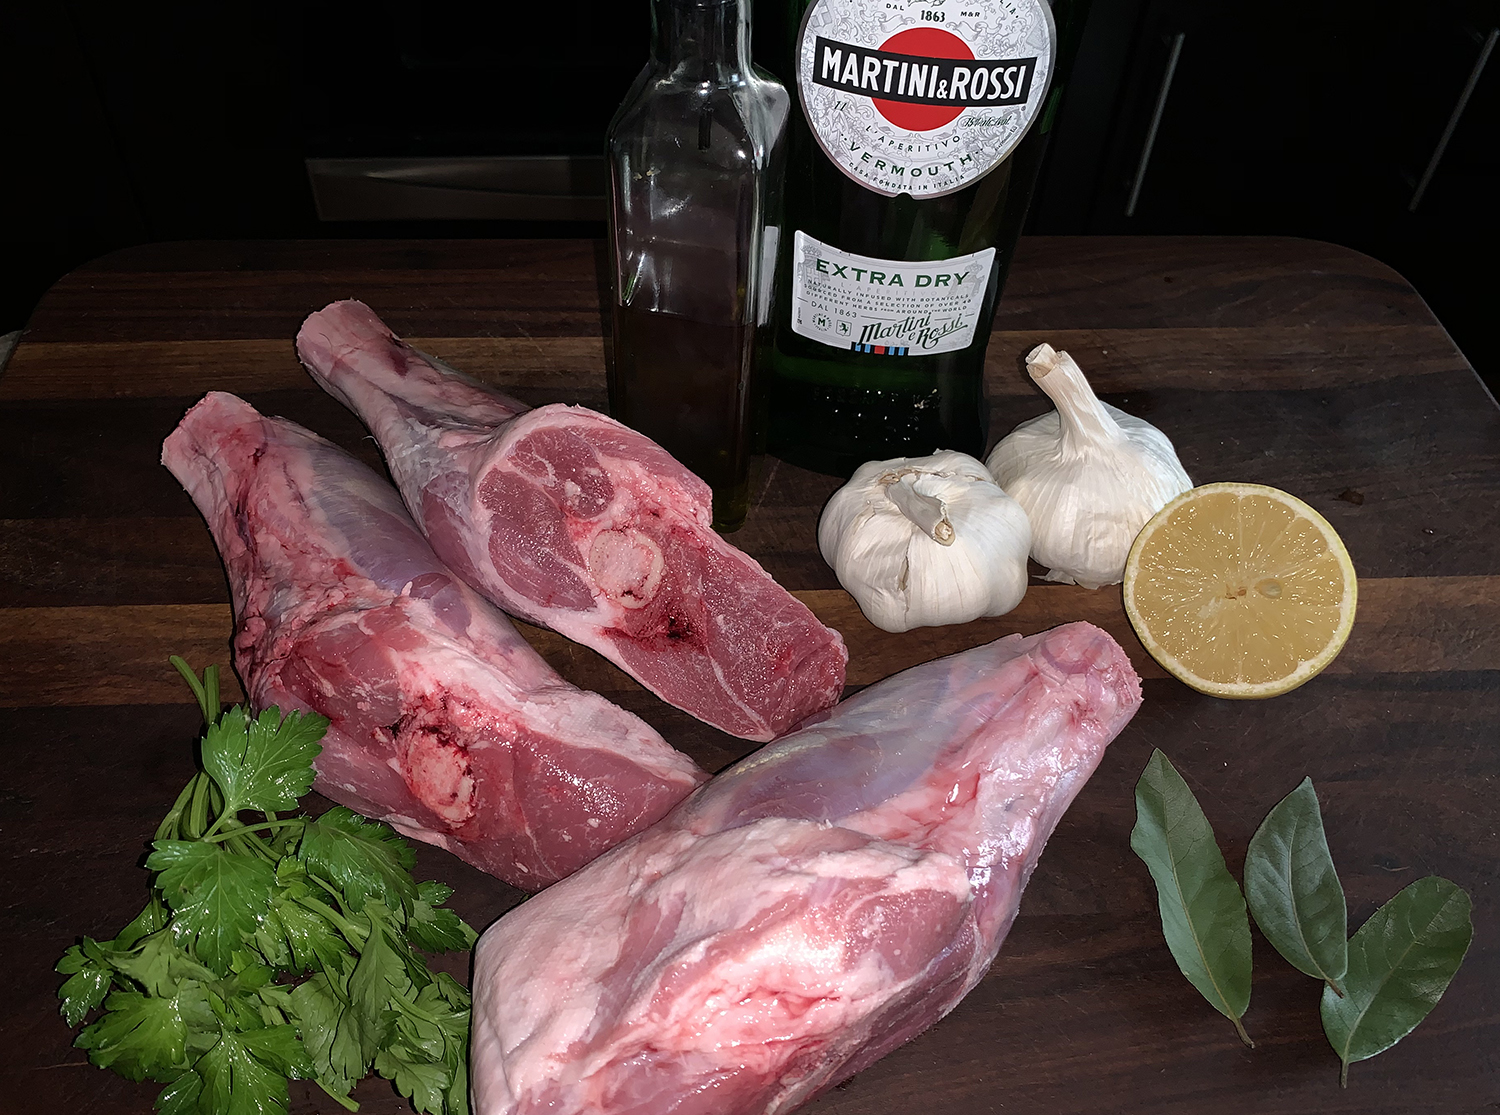
Our long-time friend Merry Sue was going to be staying overnight with us so we wanted to prepare an elegant, yet simple meal. After assuring that she did indeed like lamb, we went to one of our tried and true braising wizards, Molly Stevens, and found this Braised Lamb Shanks with Garlic & Vermouth (Souris aux Aulx) recipe.
Given that I was gallery-sitting all afternoon the day she arrived, and wouldn’t be home until the evening, The Hubs smartly braised the shanks the day before (see tip below). The entrée was paired with two other tried-and-true side dishes: Dorie Greenspan’s Celery Root Purée and a most recent Balsamic Roasted Brussels Sprouts and Shallots.
As there were only three of us and the recipe fed six, we halved only the number of shanks but kept all of the other ingredients at full throttle. In fact, if you are making six shanks, you may want to double everything else for the extra sauce. The recipe enhances the flavor of lamb. It is truly delicious and so simple to make; elegant enough for a dinner party or special occasion, yet it’s quick to prep, and is almost effortless as a casual supper.
TIP: The dish can be made up to three days ahead. After braising, transfer the shanks to a baking dish. Strain and season the sauce as directed in the recipe. Pour a little strained sauce over the shanks to moisten them. Refrigerate the shanks and the sauce separately, both tightly covered. Before serving, reheat the chilled sauce, pour it over the shanks in the baking dish, cover the dish with foil, and warm in a 325ºF oven for about 30 min. Finish with the herbs and black pepper, and serve.
1 cup dry white vermouth, preferably Vya or Noilly Pratt
2 bay leaves
2 heads garlic, separated into cloves (unpeeled)
2 tsp. fresh lemon juice; more as needed
1/4 cup chopped fresh herbs, preferably a mix of mint and parsley (chervil and chives are also good)
Directions
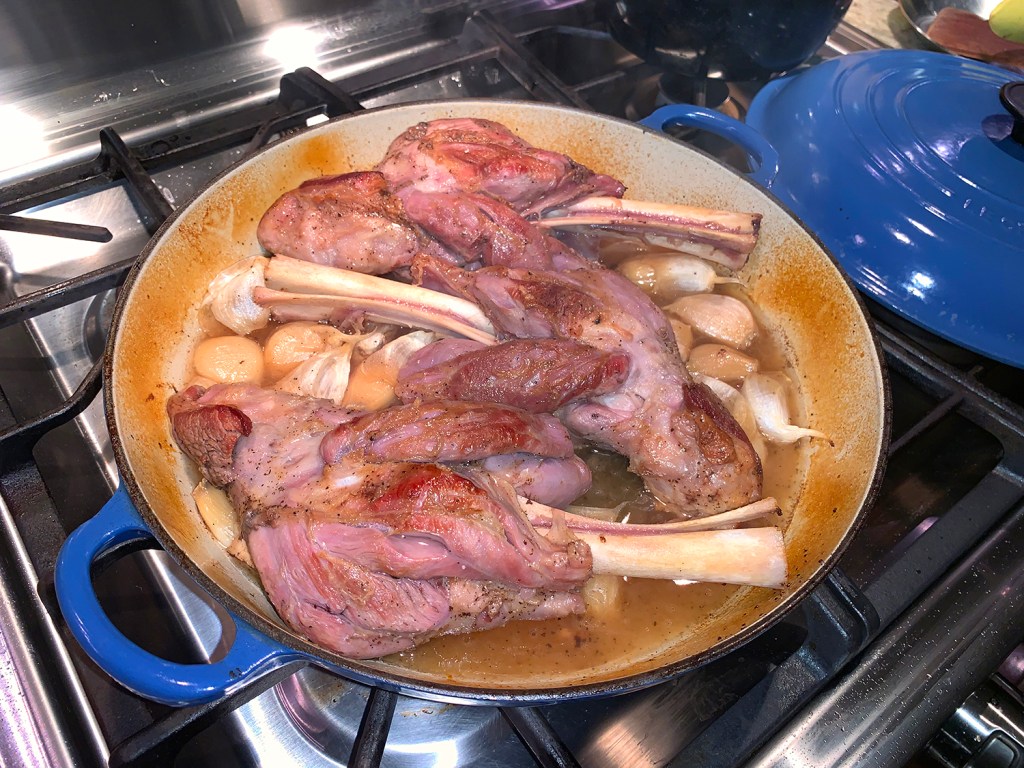
Position a rack in the lower third of the oven and heat the oven to 325°F. If necessary, trim any excess fat from the lamb shanks, but don’t trim away the thin membrane that holds the meat to the bone (we mistakenly did). Season the shanks all over with salt and pepper.
Heat the oil over medium heat in a large Dutch oven or other heavy braising pot large enough to accommodate the lamb shanks in a snug single layer. When the oil is shimmering, add half the shanks and brown them on all sides, 12 to 15 min. total. Set the browned shanks on a platter. Repeat with the remaining shanks. When all the shanks are browned, pour off and discard the fat from the pan.
Set the pan over medium-high heat and add the vermouth. As it boils, stir with a wooden spoon to dissolve any drippings. Return the shanks to the pan, arranging them as best you can so they fit snugly. Tuck the bay leaves in between the shanks and scatter the garlic over them. Cover and braise in the oven, turning the shanks every 45 min., until fork-tender, 1-1/2 to 2 hours.
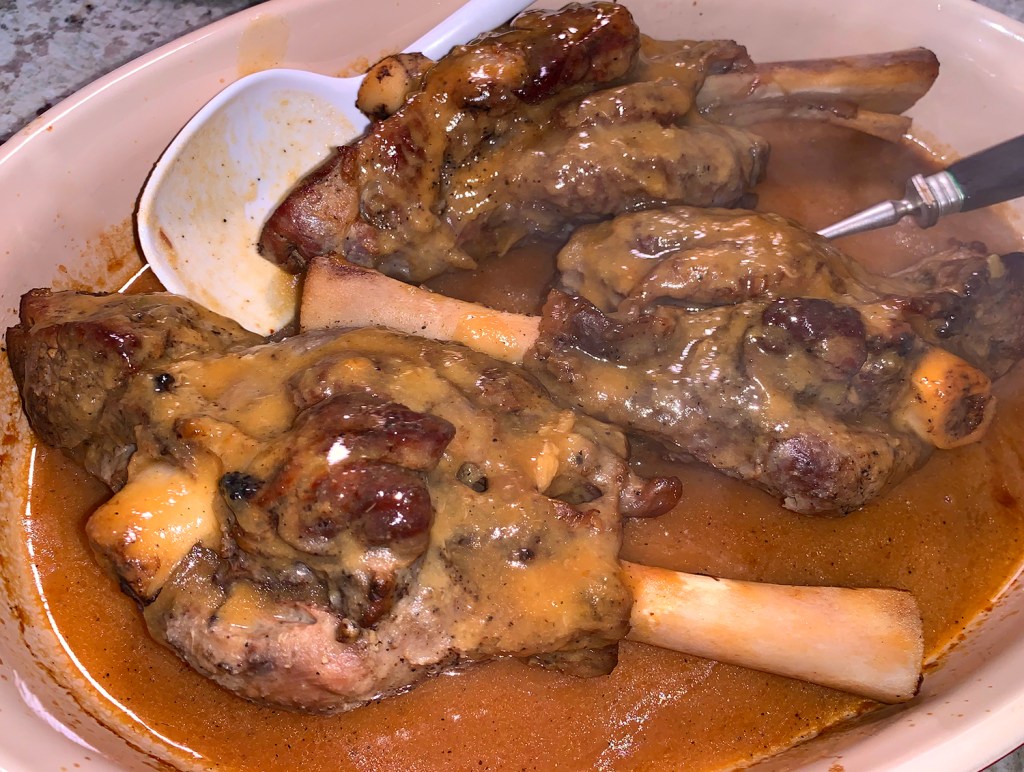
Transfer the shanks to a platter and cover with foil to keep warm. Tilt the braising pot to pool the juices at one end and skim off and discard any surface fat. Pour what remains in the pot into a medium-mesh sieve set over a bowl. Discard the bay leaves. With a rubber spatula, scrape over and press down on the garlic cloves so the pulp goes through but not the skins; be sure to scrape the pulp clinging to the bottom of the strainer into the sauce. Whisk in the lemon juice. Taste and add salt, pepper, and more lemon juice if needed. To serve, pour the sauce over the shanks and shower them with the chopped herbs and a little freshly ground pepper.
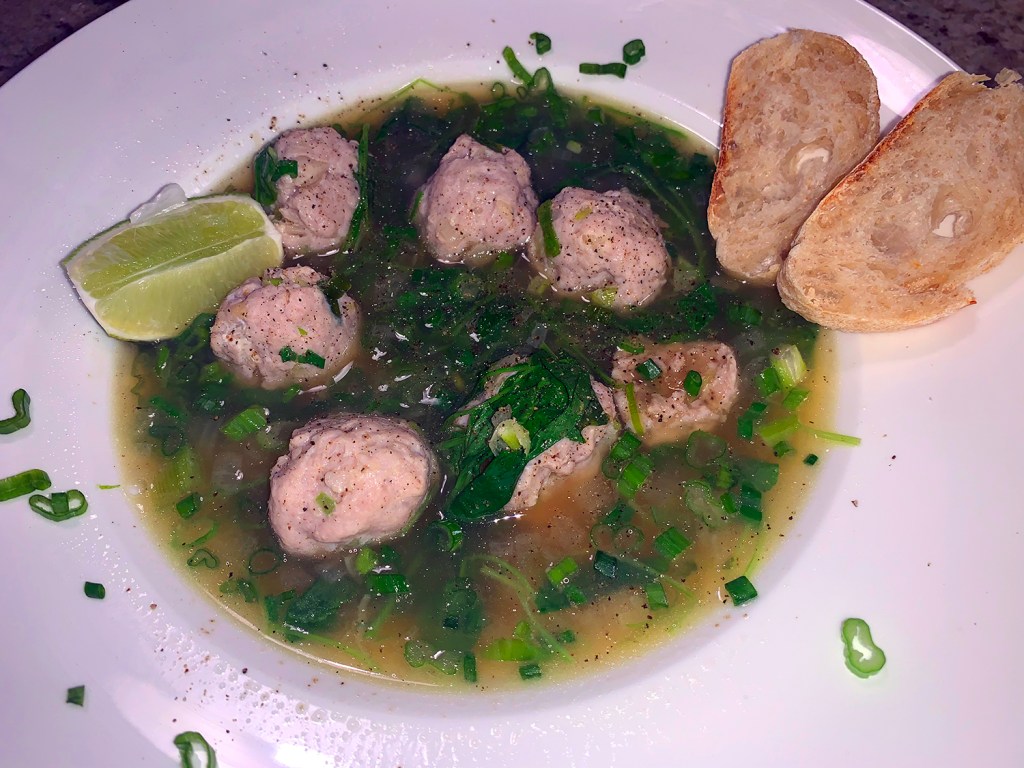
This light and soothing soup was just the ticket on a recent Winter night; and the following day was our first snowstorm of the season so the leftovers were perfect for lunch. Watercress adds a peppery note to the soup; while lime juice provides a bright note. Of course it’a always best to use homemade chicken broth if you have it on hand because of the depth it brings to the overall flavor.
Slices from a sour dough baguette were a perfect accompaniment.
Look for “live” watercress, which is packaged with its roots attached, it stays fresher longer and is easier to clean. To prep it, trim off and discard the roots, rinse and drain the greens, then cut them into 1½-inch lengths, discarding any stems that are thick or tough. If you prefer, substitute an equal amount of baby spinach for the watercress. We actually doubled the amount of watercress to two bunches.
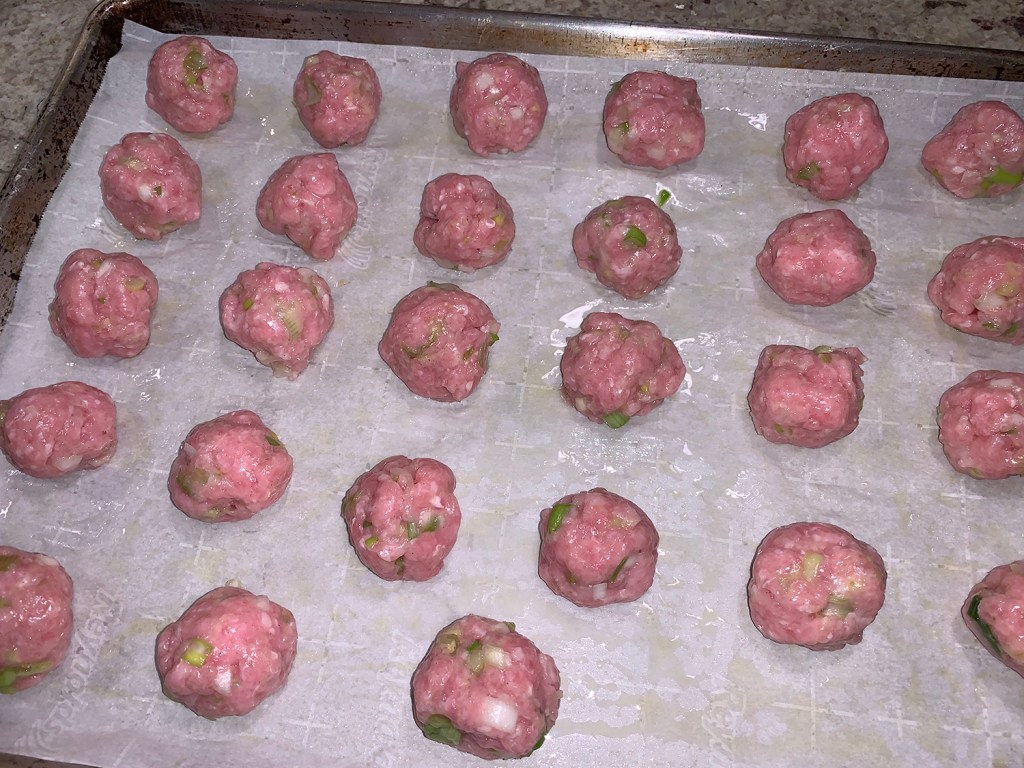
Tip: Don’t leave the meatballs at room temperature after shaping them. Chilling firms them so they hold together when added to the simmering broth.
Our package of ground pork was 1 1/4 pounds and therefore we ended up with 27 meatballs as opposed to 20. When you drop the refrigerated meatballs into the hot broth, they initially sink, but don’t worry, as they heat, they will rise to the top.
Line a rimmed baking sheet with kitchen parchment and mist with cooking spray.
In a medium bowl, combine the pork, scallion whites, egg white, 1 tablespoon of the fish sauce, 2 teaspoons of the ginger, 1¼ teaspoons kosher salt and 1 teaspoon white pepper. Mix with your hands. Lightly moisten your hands with water and form into 20 balls, each about a generous tablespoon, and set on the prepared baking sheet. Cover and refrigerate.
In a large Dutch oven over medium, heat the oil until shimmering. Add the onion and cook, stirring occasionally, until beginning to soften, about 5 minutes.
Add the remaining 2 teaspoons ginger and the garlic, then cook until fragrant, about 30 seconds.
Add the broth and bring to a boil over high. Reduce to medium-low and simmer, uncovered, until the onion is fully softened, about 10 minutes.
Add the meatballs, bring to a simmer over medium-high, then reduce heat to maintain a simmer. Cook undisturbed until the meatballs are cooked through, 160°F at the center, 8 to 10 minutes; cut through a meatball to check for doneness.
Off heat, stir in the watercress and remaining 2 tablespoons fish sauce. Let stand until the greens are wilted and tender, about 1 minute.
Stir in the lime juice. Taste and season with salt and pepper, then stir in the scallion greens.
Is it soup, or is it an entrée? Call it whatever you want, but this richly flavored main dish is sure to get your attention. And once you taste the end product, you won’t believe how GOOD it is with very little work and not a lot of ingredients. It is rich folks, so a simple side salad pairs well.
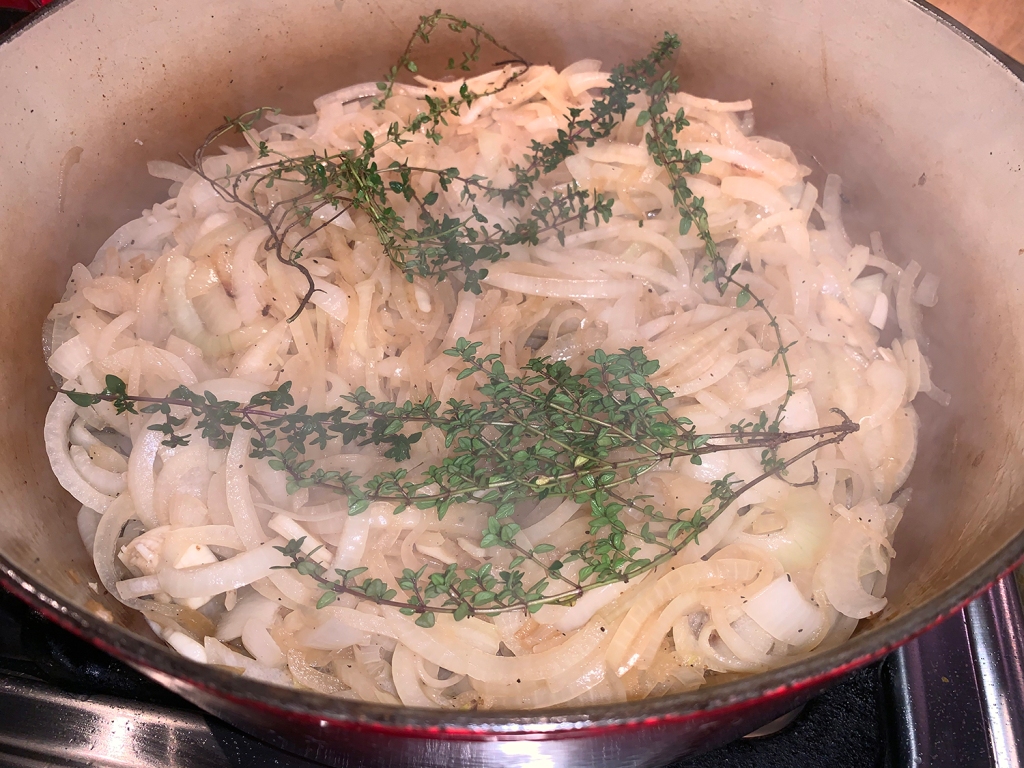
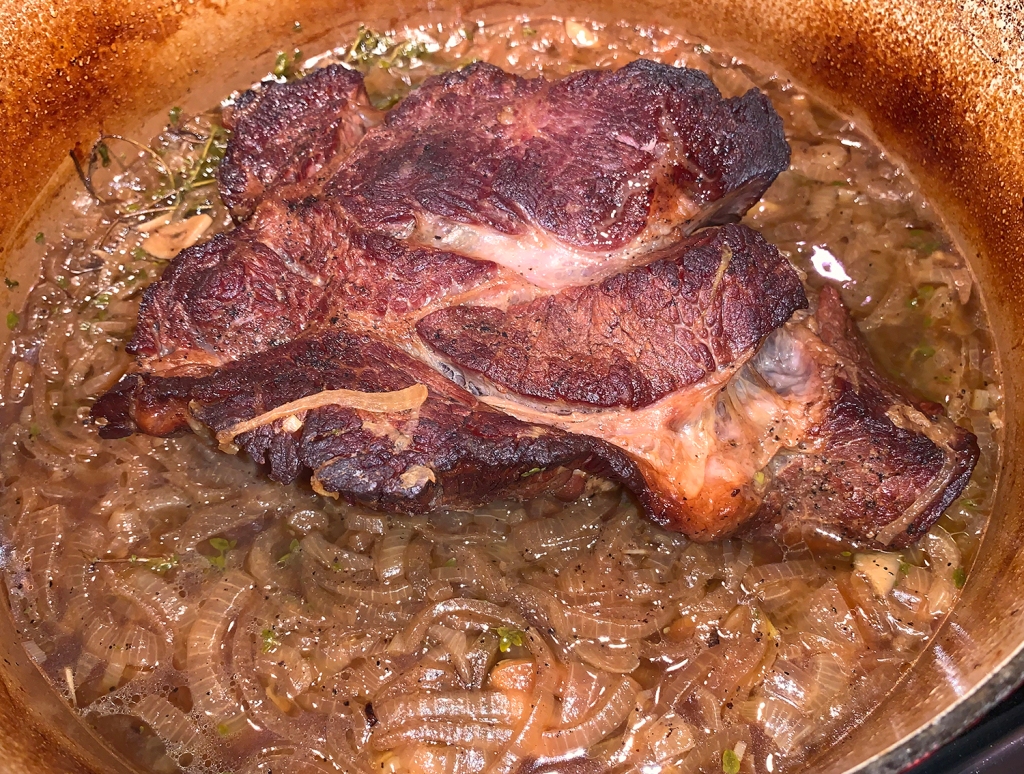
We already know that a large chunk of time is necessary to achieve a successful fork-tender, falling-apart pot roast. Like at least three hours in the oven, depending on the size of your roast. But the good news is the low and slow oven does most of that flavor-building for you.
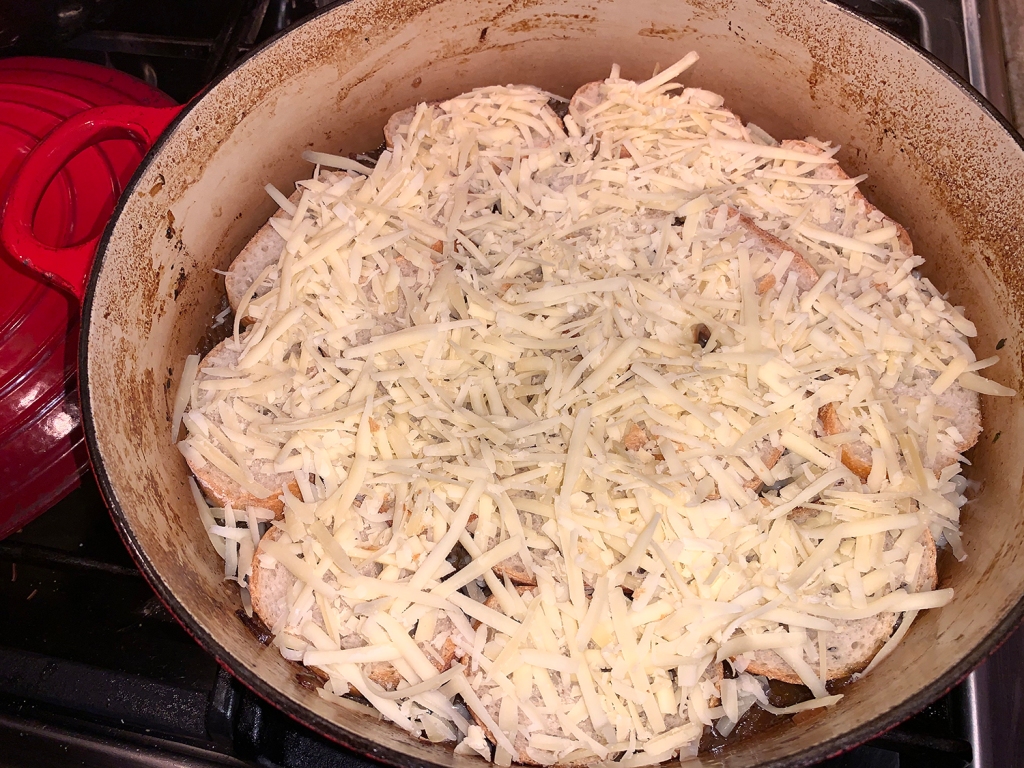
The credit for this recipe goes to 12tomatoes.com. Of course we usually have to make some changes to suit our preferences, one of which was the addition of four large garlic cloves. Plus we sautéed the onion and garlic in the braising pot after removing the seared roast. And next time (because that WILL be happening) we intend to increase the number of onions to 5 or 6. Then midway through the braising, about 90 minutes in, the roast was turned over so that both sides made contact with the bed of caramelizing onions.
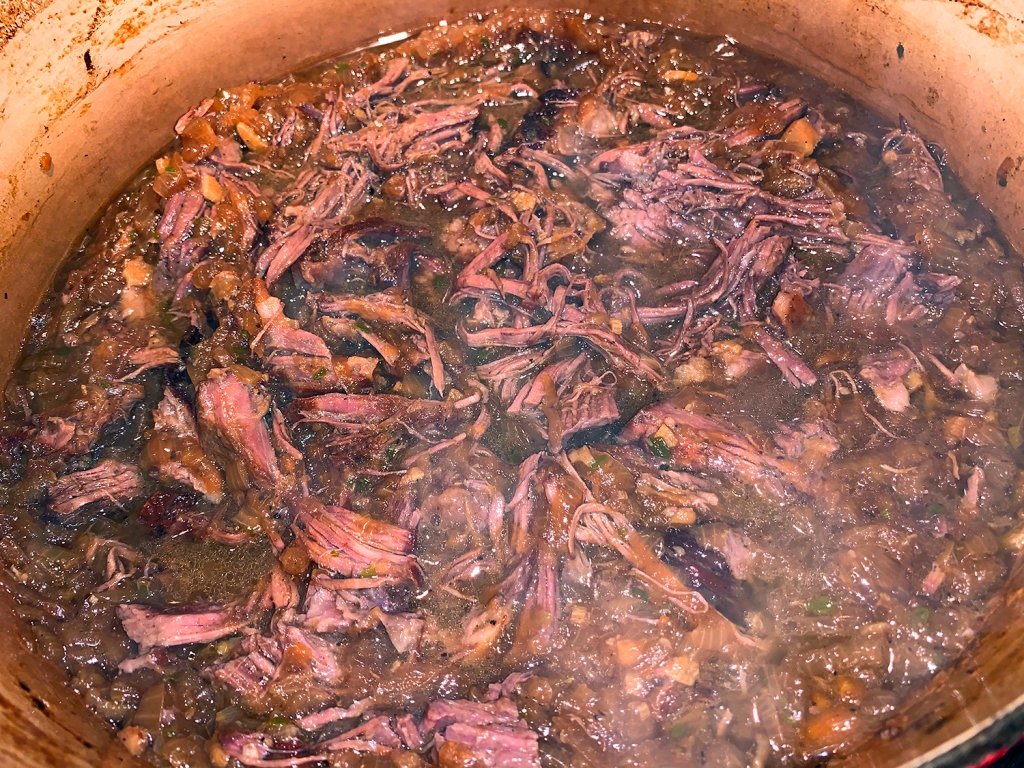
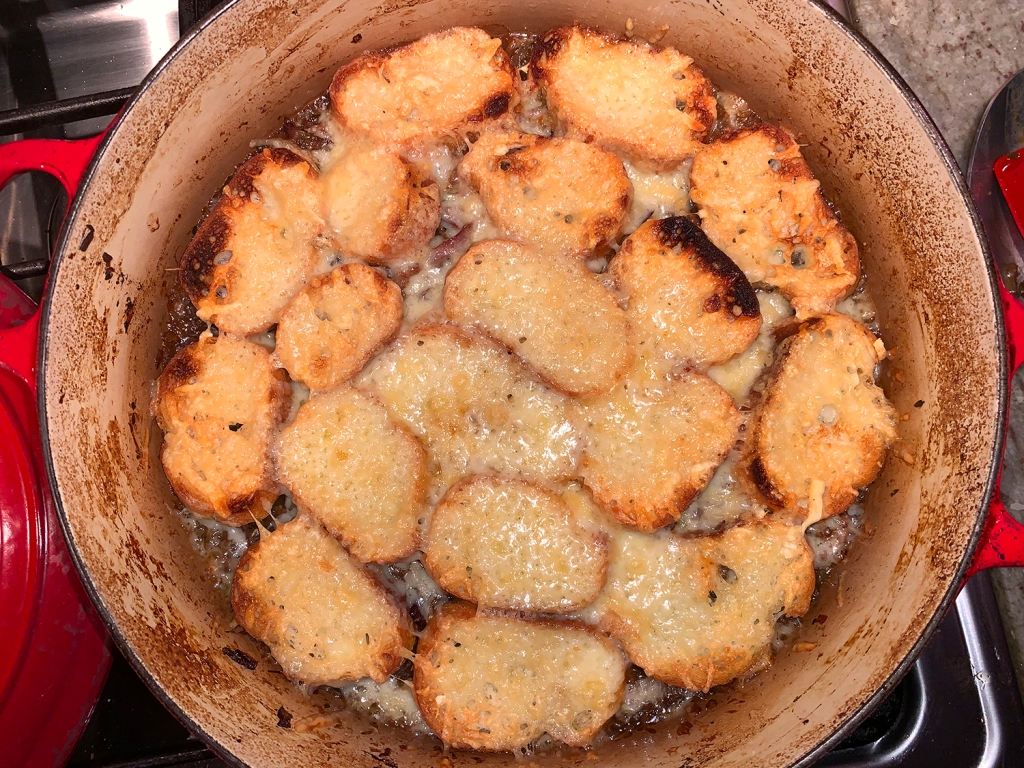
Three cups of broth results in a brothier outcome, so if loose and yummy is your desire, stick with that. If you want more of a slice-able pot roast with French onion flavor, scale the broth back to two cups—although we don’t advise it. Much the same way it does in the original French Onion Soup incarnation, the bread soaks up a good bit of that beefy, oniony, brothy deliciousness here.
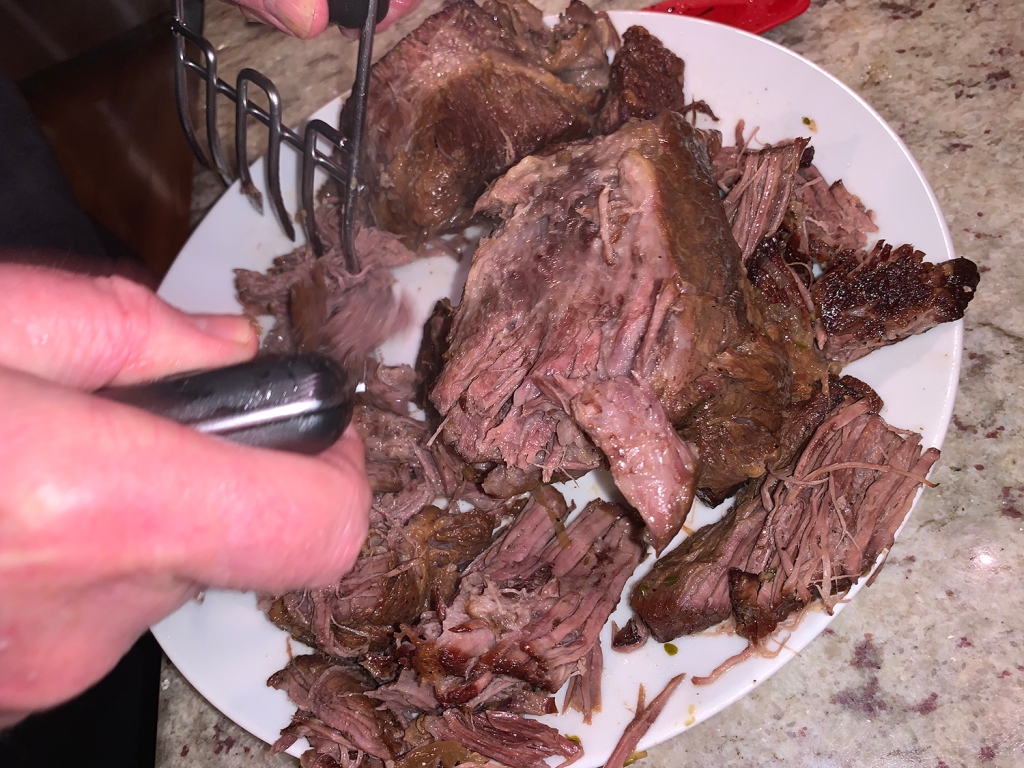
TIP: Culinary bear claws work best for shredding the roast after the braising step.
1 baguette, cut into 1/2-inch slices (you might not need the entire loaf)
1 1/2 cups Gruyere cheese, grated
Kosher salt and freshly ground black pepper, to taste
Directions
Preheat oven to 325°F.
Season roast liberally with salt and pepper, and some of the thyme.
Add olive oil to a Dutch oven or heavy-bottomed pot over medium-high heat.
Once oil is hot, add roast and sear until deep brown, 4-5 minutes per side. Remove roast and set aside.
Add onions and garlic to pot, sauté for 4-5 minutes. Nestle the remaining thyme into the onions, place the chuck roast on top, add beef broth and Worcestershire sauce. Lay a sheet of parchment over the top of the pot extending beyond the edges, cover, and transfer to oven.
After 90 minutes, turn the roast over, recover the pot with parchment and lid, then cook another 1 1/2 to 2 hours, for a total of 3 to 3 1/2 hours.
Remove from oven and remove thyme sprigs. Shred beef into chunks.
Turn oven to broil on high.
Top with baguette slices and Gruyere and return to oven, uncovered. Broil until cheese is bubbly and golden brown, about 2 minutes. (Under our gas broiler it took 5 minutes before the cheesy baguettes became golden brown.)
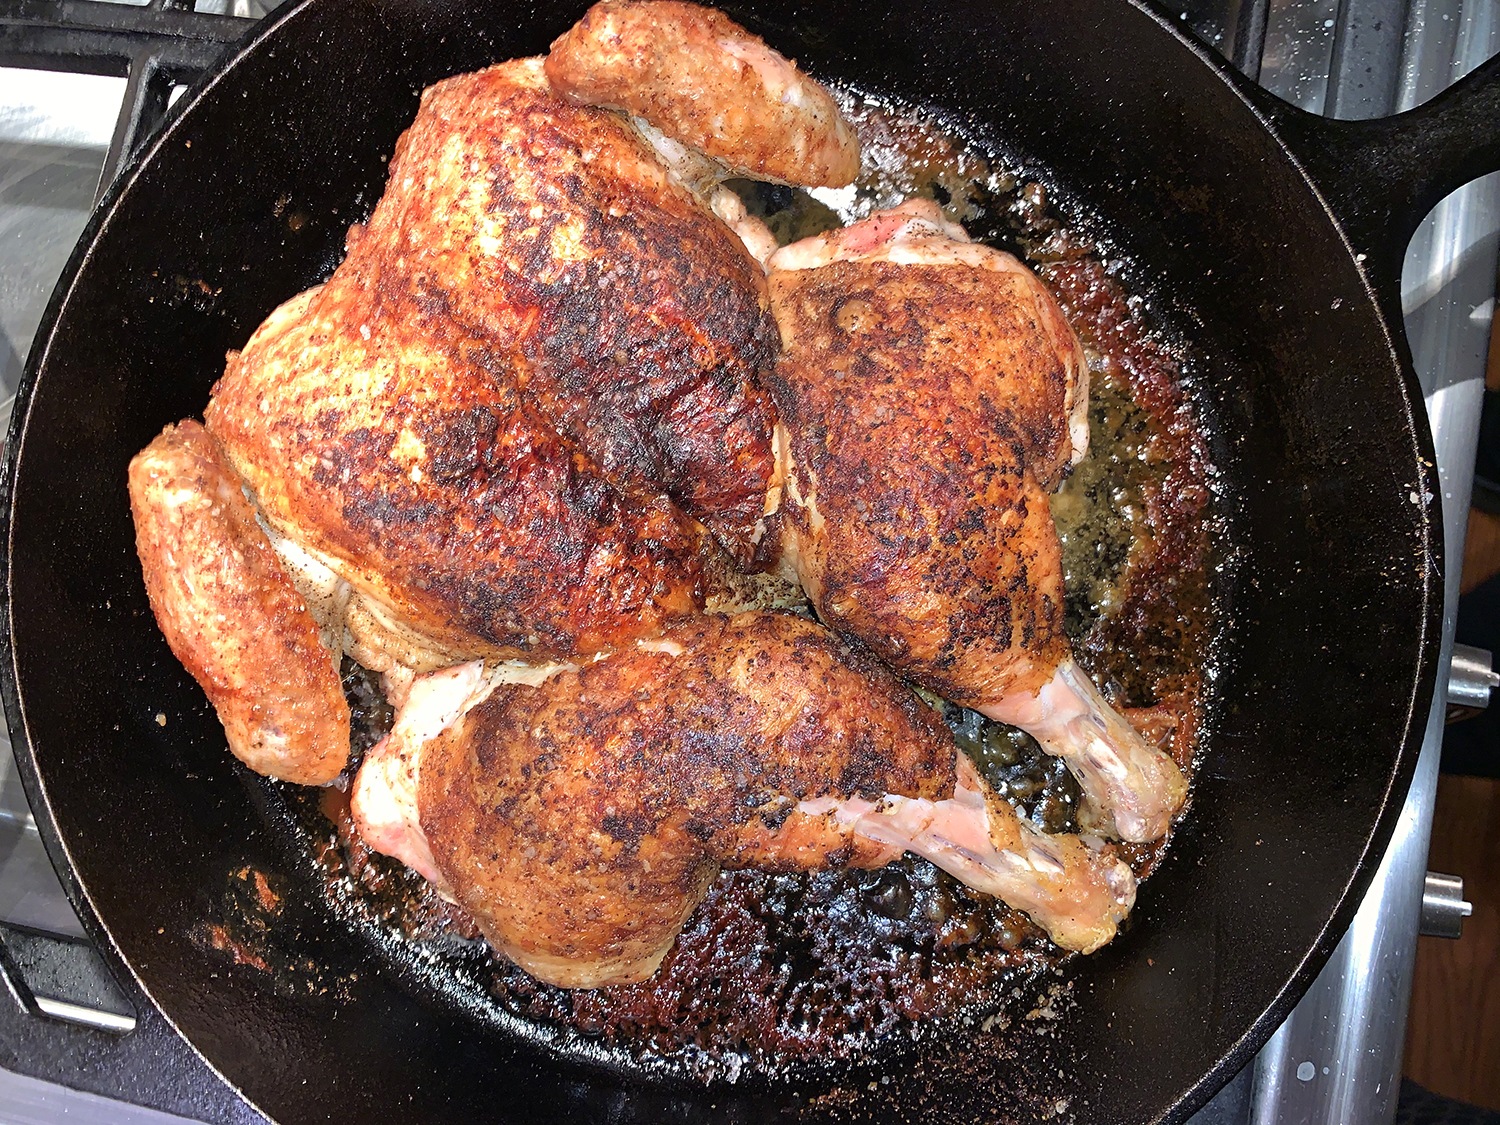
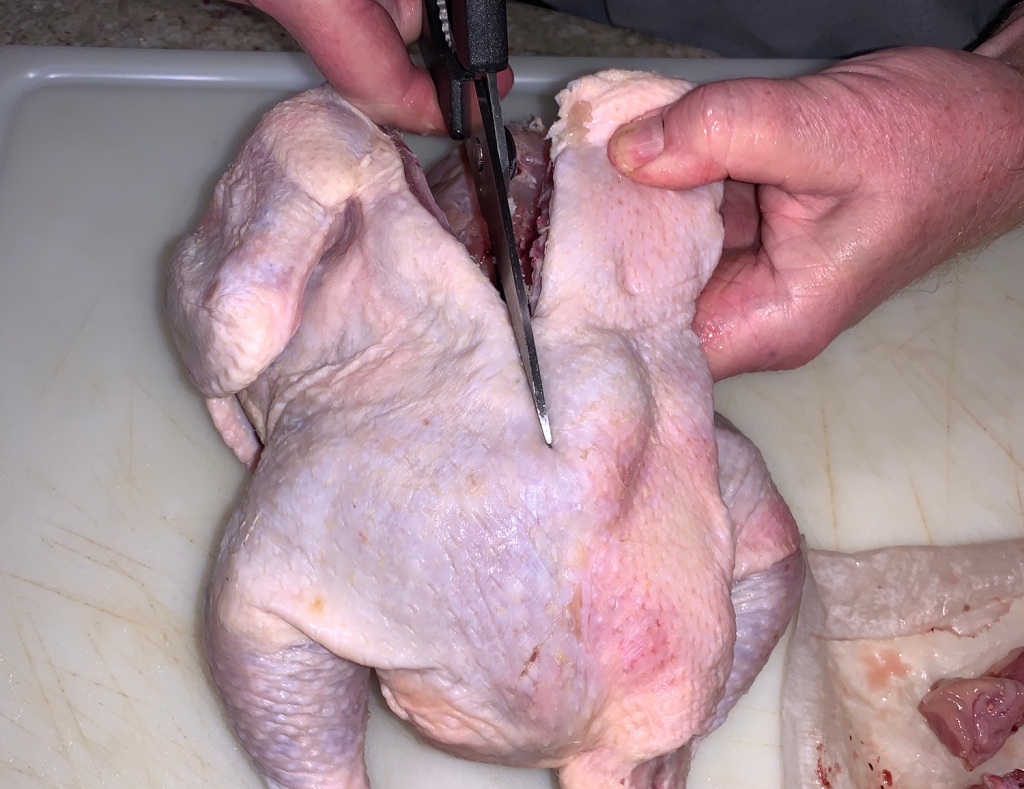
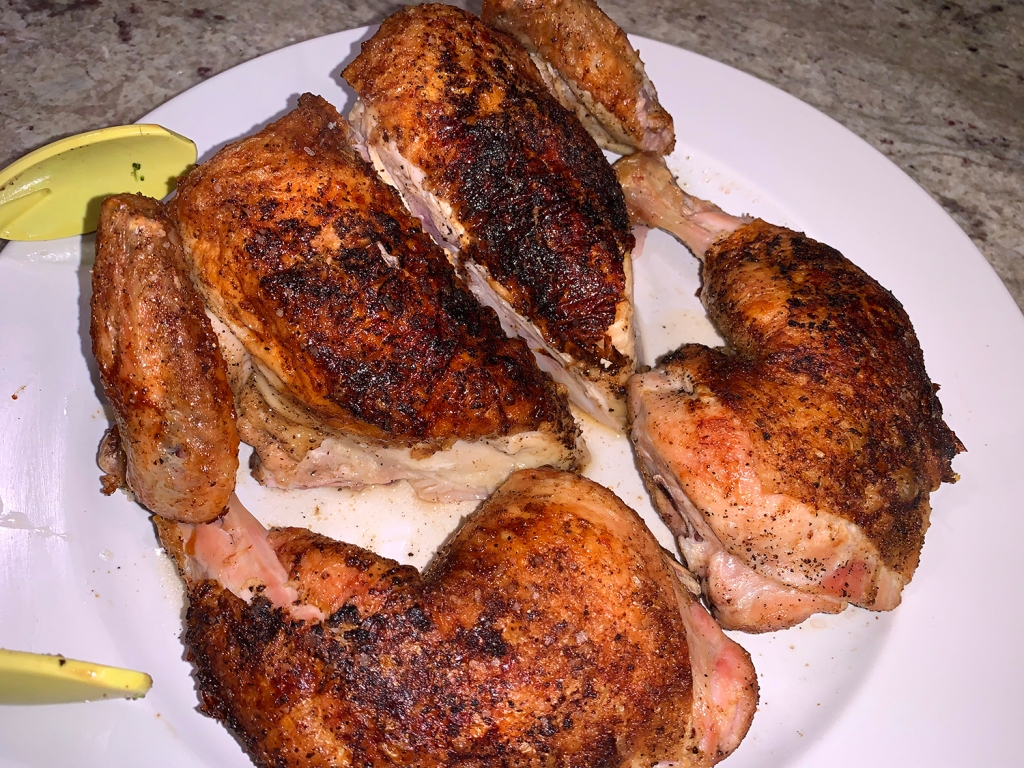
Chicken under a brick is an approach similar to Italy’s pollo alla mattone. In Italy, instead of simply seasoning the meat, cooks build flavor by marinating it in lemon juice, olive oil, garlic and herbs, such as rosemary, then searing the chicken, skin side down, with bricks on top. They then usually flip it and finish it in the oven. Here, we spatchcock the bird and add a dry rub.
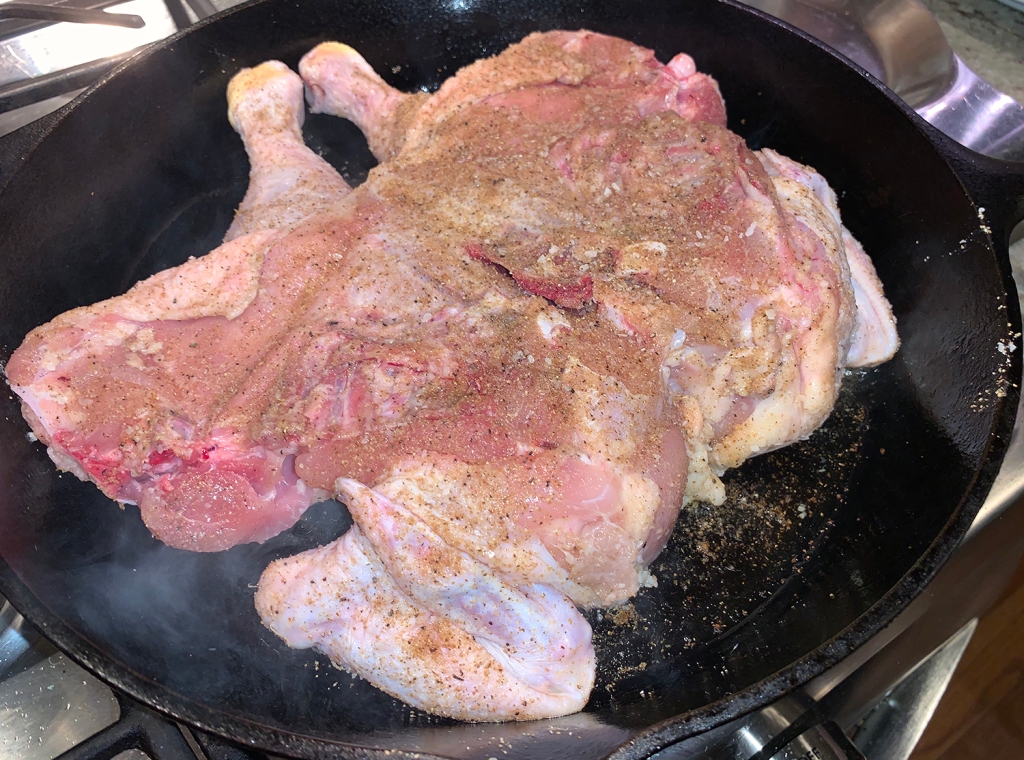
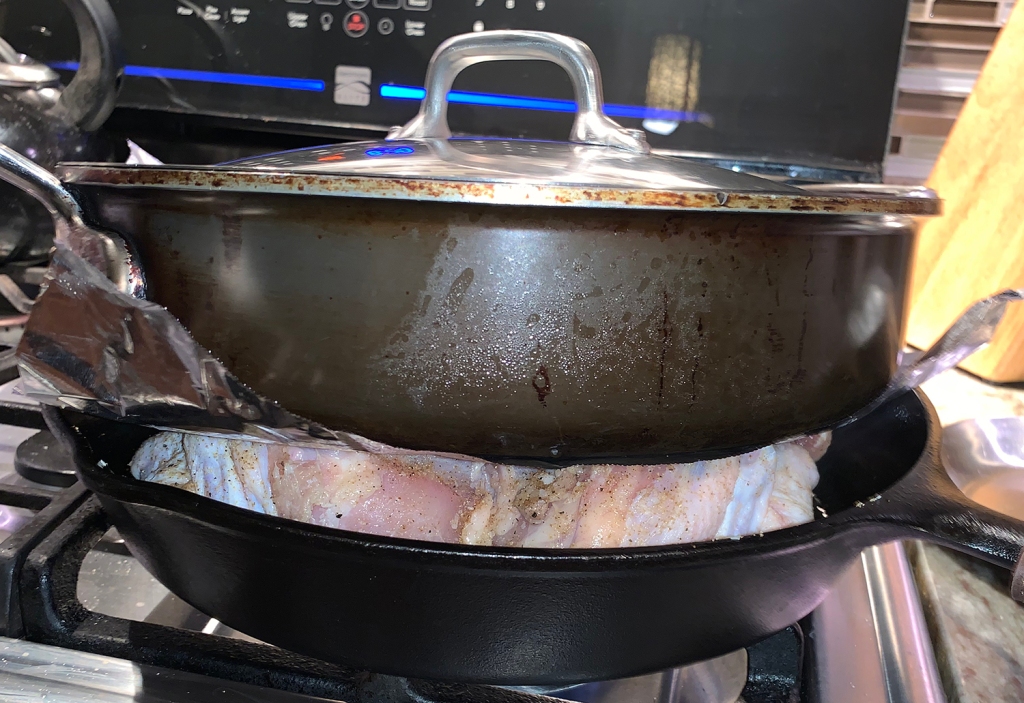
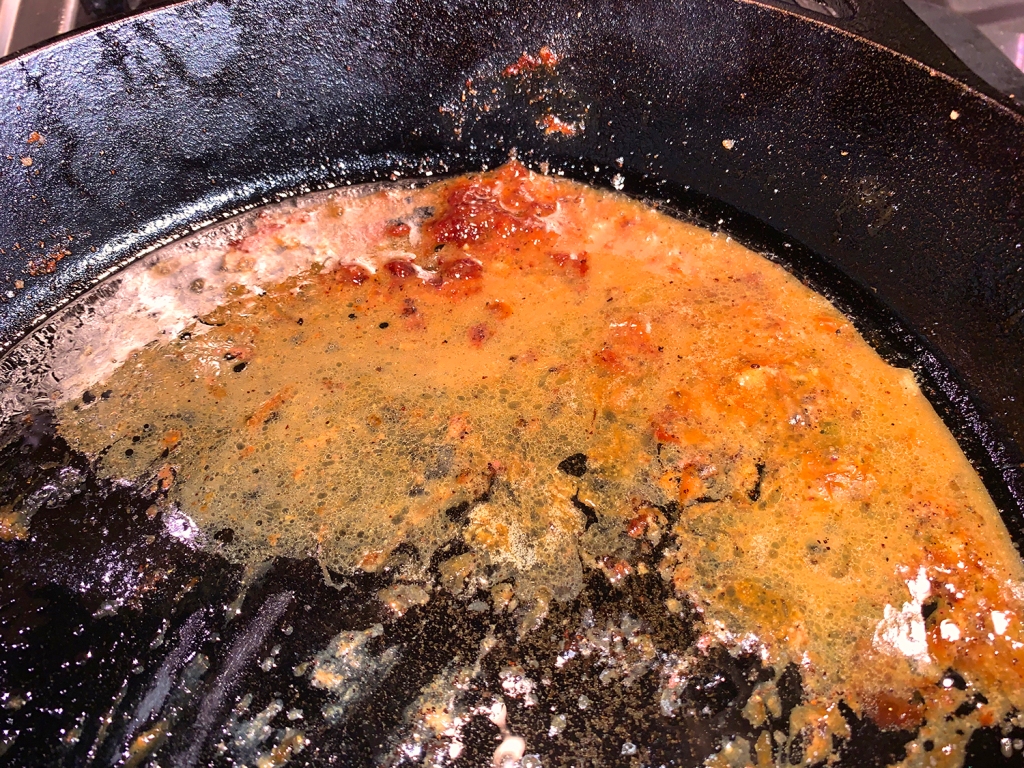
For this recipe from Milk Street, the skillet in which the chicken is cooked must be oven-safe, as the bird roasts in the oven after the initial stovetop sear. For the “brick,” you can used a second heavy skillet or a large, sturdy pot (such as a Dutch oven). My Mister cleverly used the already-filled skillet with Brussels sprouts intended for our side dish. The weight presses the chicken down, ensuring the bird makes good contact with the hot skillet, rendering the fat and crisping the skin.
Our chicken was larger than suggested at 4.4 pounds, but it did fit our large cast iron skillet (see tip below).
TIPS:Don’t use a chicken much larger than 4 pounds, as it may not fit comfortably in the skillet. Don’t forget to pat the chicken dry before searing. The drier the skin, the better it crisps. After searing, make sure to drain the fat in the pan before putting the bird in the oven; this reduces splatter. Finally, don’t forget that the skillet’s handle will be hot after being in the oven. — Milk Street
In a small bowl, stir together the coriander, granulated garlic, 1 tablespoon salt and ½ teaspoon black pepper. Place the chicken breast down on a cutting board. Using sturdy kitchen shears, cut along both sides of the backbone, end to end. Remove and discard the backbone (or save it to make broth).
Spread open the chicken, then turn it breast up. Use the heel of your hand to press down firmly on the thickest part of the breast, until the wishbone snaps. Season all over, front and back, with the spice mixture, rubbing it into the skin. Let stand, uncovered, at room temperature for 30 to 45 minutes.
Heat the oven to 450°F with a rack in the lowest position.
Thoroughly pat the chicken dry with paper towels. In a 12-inch oven-safe skillet over medium-high, heat the oil until just smoking. Place the chicken breast down in the pan. Lay a small sheet of foil over the chicken, then place a second heavy skillet or pot on top. Reduce to medium and cook until the skin is golden brown, 10 to 15 minutes, removing the weight and foil and checking every 4 to 5 minutes to ensure even browning.
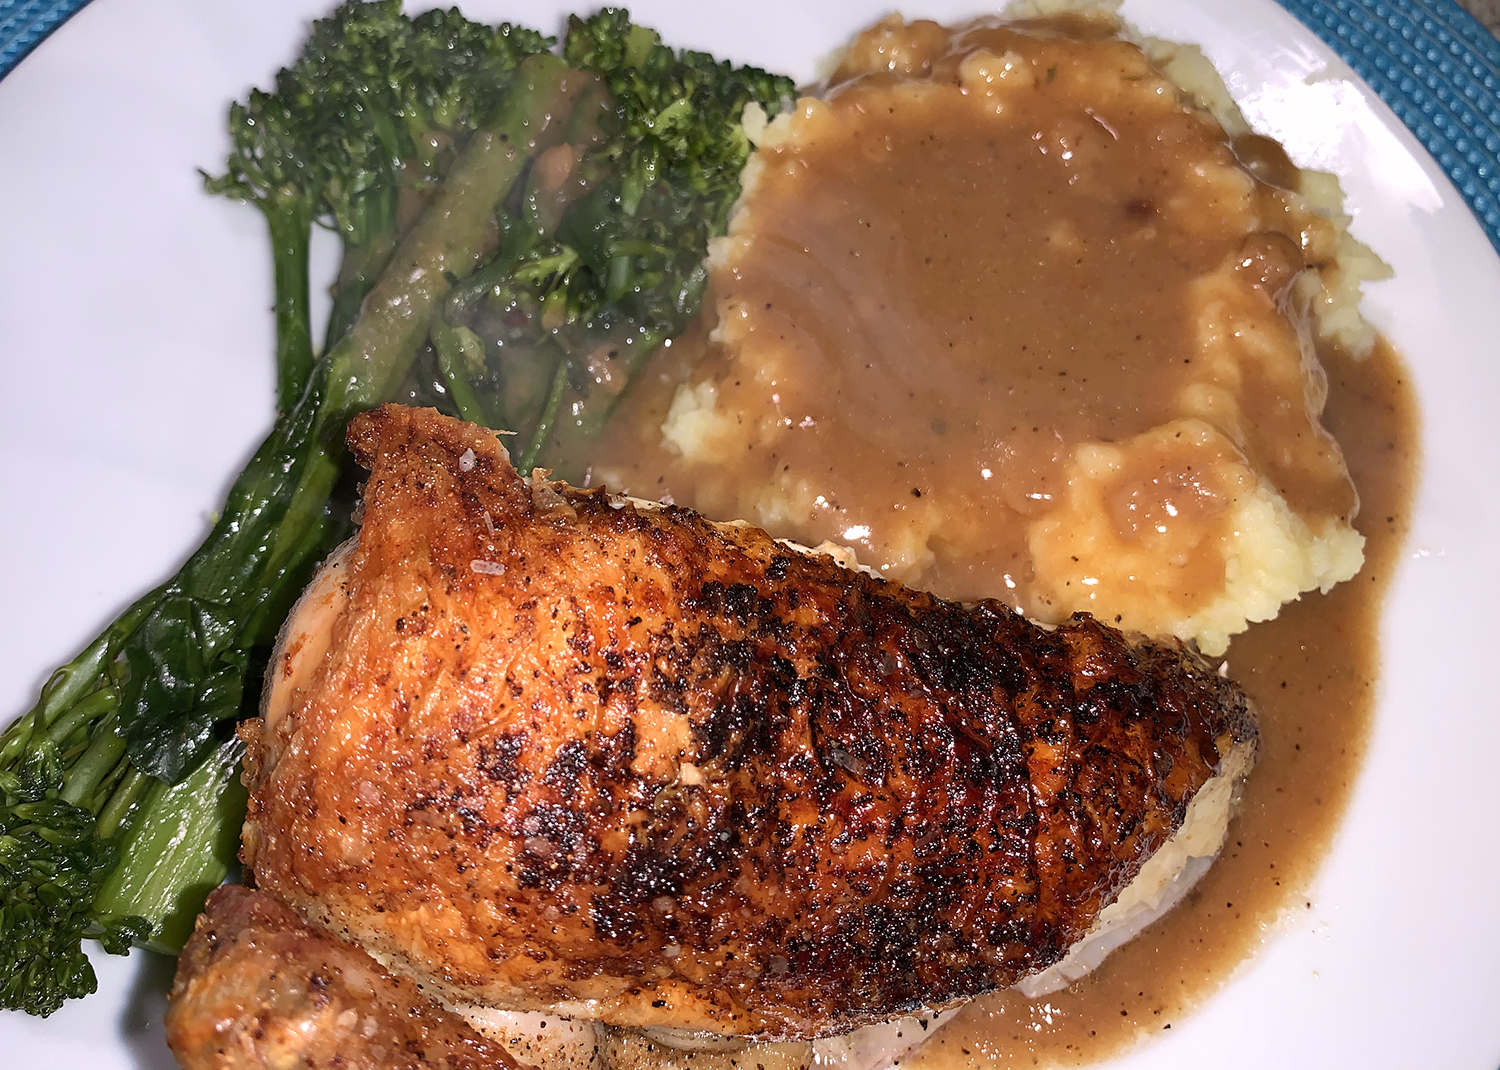
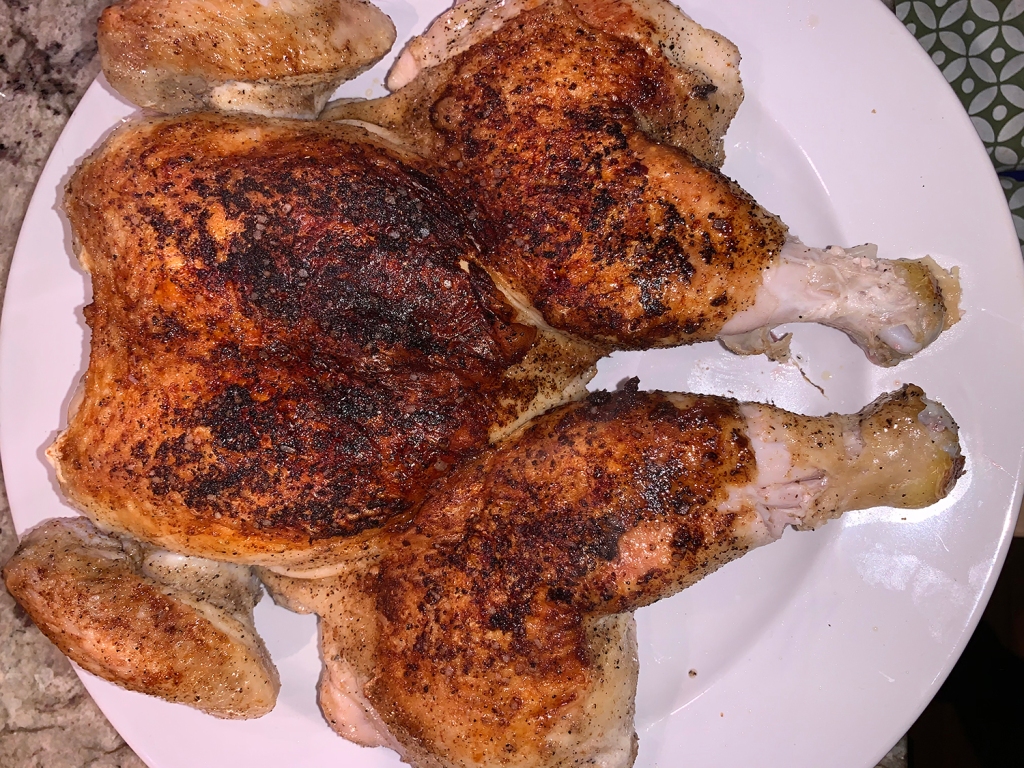
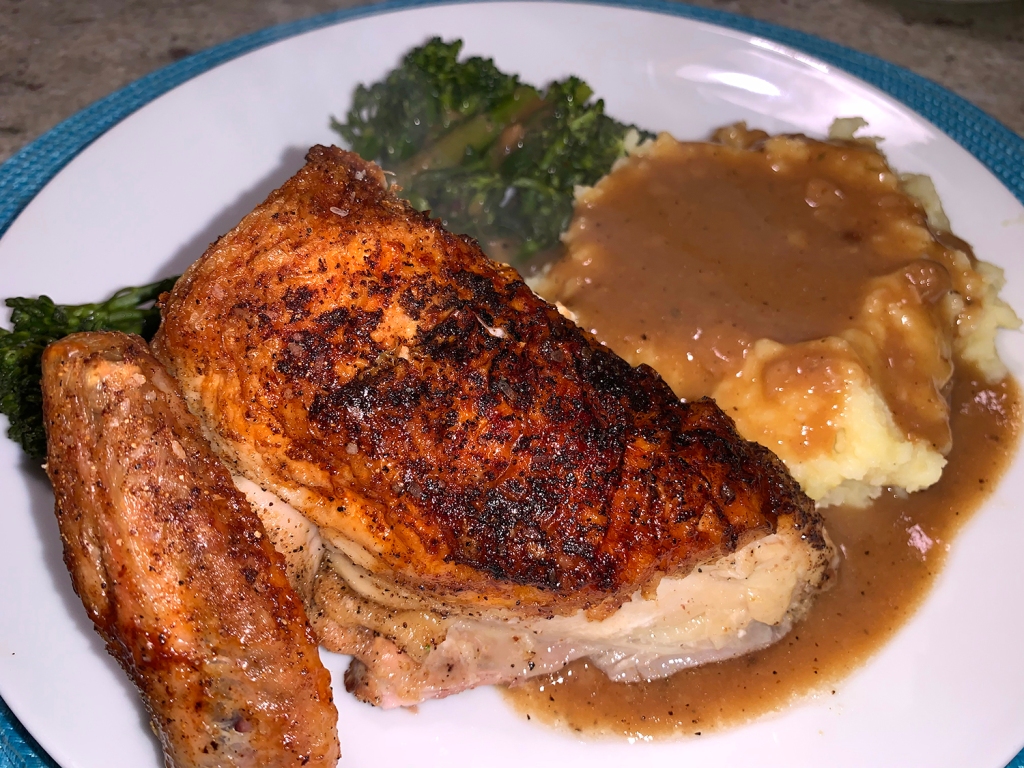
Using tongs, carefully transfer the chicken to a large plate, turning it breast up. Pour off and discard the fat in the skillet. Slide the chicken breast up back into the pan and place in the oven. Roast until the thickest part of the breast reaches 160°F, 25 to 35 minutes. Carefully transfer the chicken to a cutting board and let rest while you make the sauce.
Set the skillet (the handle will be hot) over medium-high and cook the butter and garlic, stirring occasionally, until the garlic is lightly browned, about 2 minutes.
Add the broth and bring to a simmer, scraping up any browned bits, then cook until the garlic is softened and the mixture is lightly thickened and reduced to about ¾ cup, 10 to 15 minutes.
Using a silicone spatula, mash the garlic until almost smooth and mix it into the sauce. Off heat, stir in the cayenne, lemon juice and cilantro, then transfer to a serving bowl. Carve, then serve with the sauce.
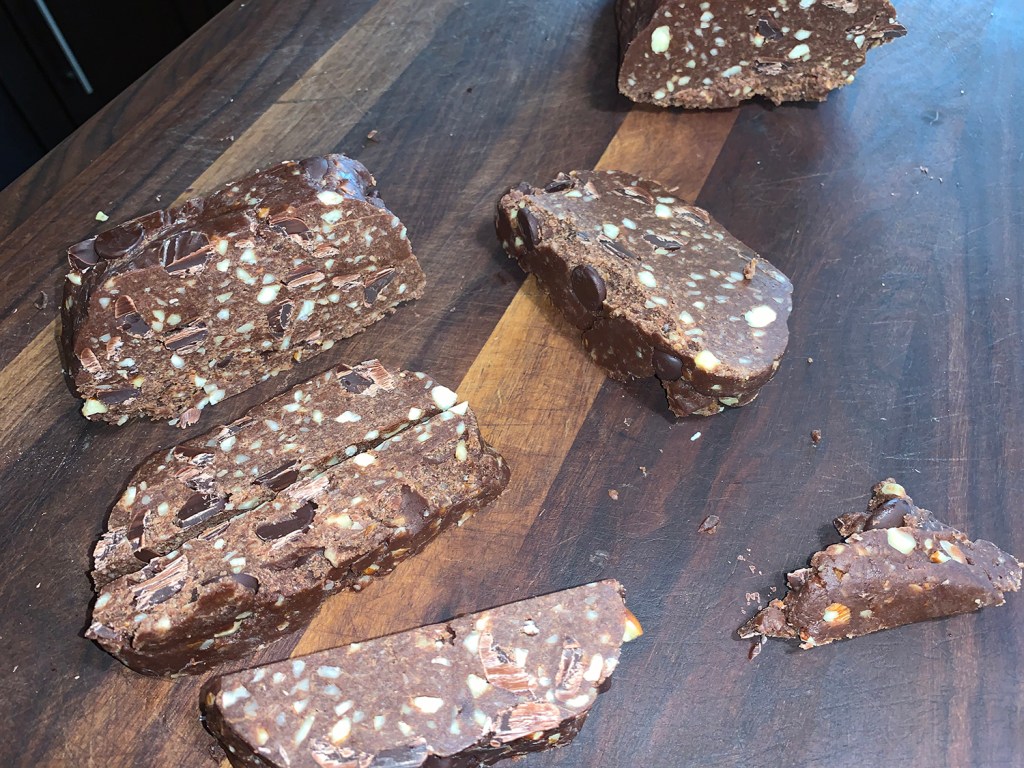
Each Winter holiday season, along with my tried-and-true decorated sugar cookies, I like to introduce at least one new recipe to the fold. This year we were struck by the chocolatey appearance of these Pizzettes in the latest Bon Appétit magazine, and knew they had to become part-and-parcel of our baking agenda.
They are an Italian classic with fudgy texture, piercing bittersweet chocolate, almonds, citrus zest, and a heady undertone of cinnamon and clove. They sounded so good, I decided to make a double batch in addition to double batches of three other cookie batters—all on the same morning!
Please note, that the almonds need to be blitzed in the food processor and the chocolate chips should be chopped before adding to the dough. I only ground the almonds and didn’t realize I should have chopped the chocolate chips until after I made the dough and read the reviewers comments. (Chopping them makes it easier to cut into bars.)
As far as cutting the dough into cookies, I did it a little differently than the instructions below. My log of dough was very firm after refrigerating it all night. So I made 1-inch thick slices vertically across the log. Then I cut each slice in half, then in half again at a diagonal.
I glazed most of the cookies while in a cupcake wrapper which makes them easier to package and serve.
With a good bit of chocolate glaze left over, I thickened it with more powdered sugar and then used a spoon to drizzle over each bar to give more visual interest and contrast.
½ tsp. Diamond Crystal or ¼ tsp. Morton kosher salt
½ cup (1 stick) unsalted butter
¾ tsp. ground cinnamon
½ tsp. ground nutmeg
½ cup granulated sugar
¼ cup Dutch-process cocoa powder
1 large egg
1 large egg yolk
4 oz. bittersweet chocolate chips, chopped
1 tsp. finely grated lemon zest
1 tsp. finely grated orange zest
Glaze and Assembly
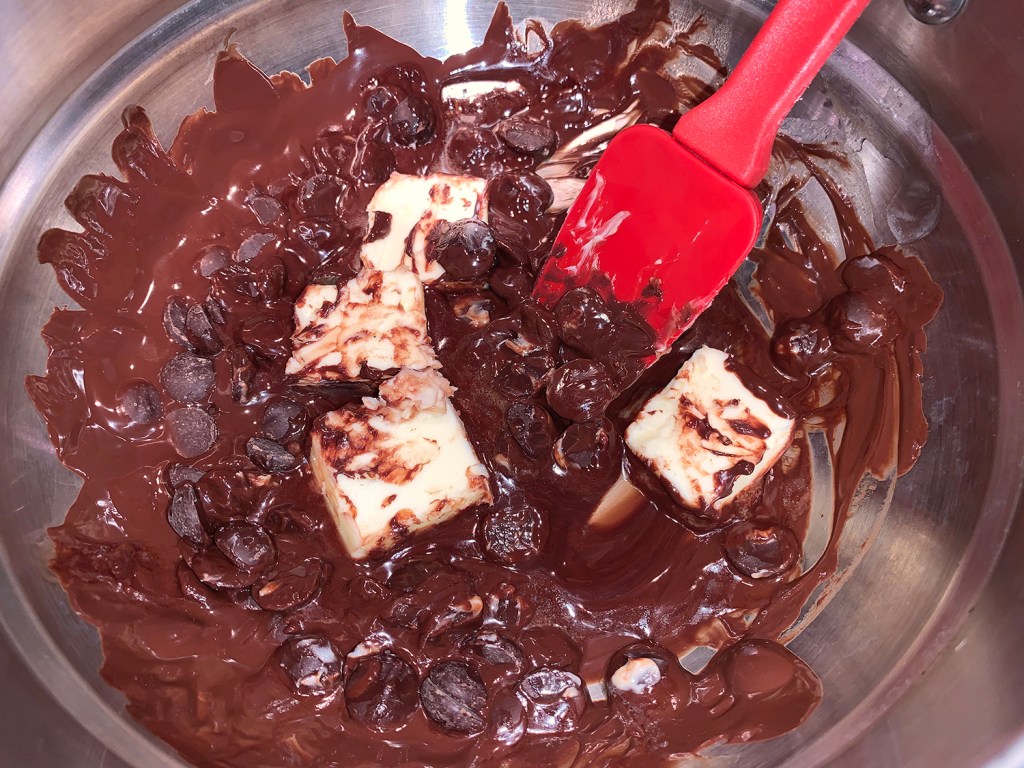
2 oz. bittersweet chocolate
2 tsp. unsalted butter
⅔ cup powdered sugar
Pinch of kosher salt
Directions
Cookies
Place racks in upper and lower thirds of oven; preheat to 350°. Toast almonds on a rimmed baking sheet, tossing once, until slightly darkened in color and fragrant, 7–10 minutes. Let cool, then blitz in a food processor. Set aside.
Increase oven temperature to 375°.
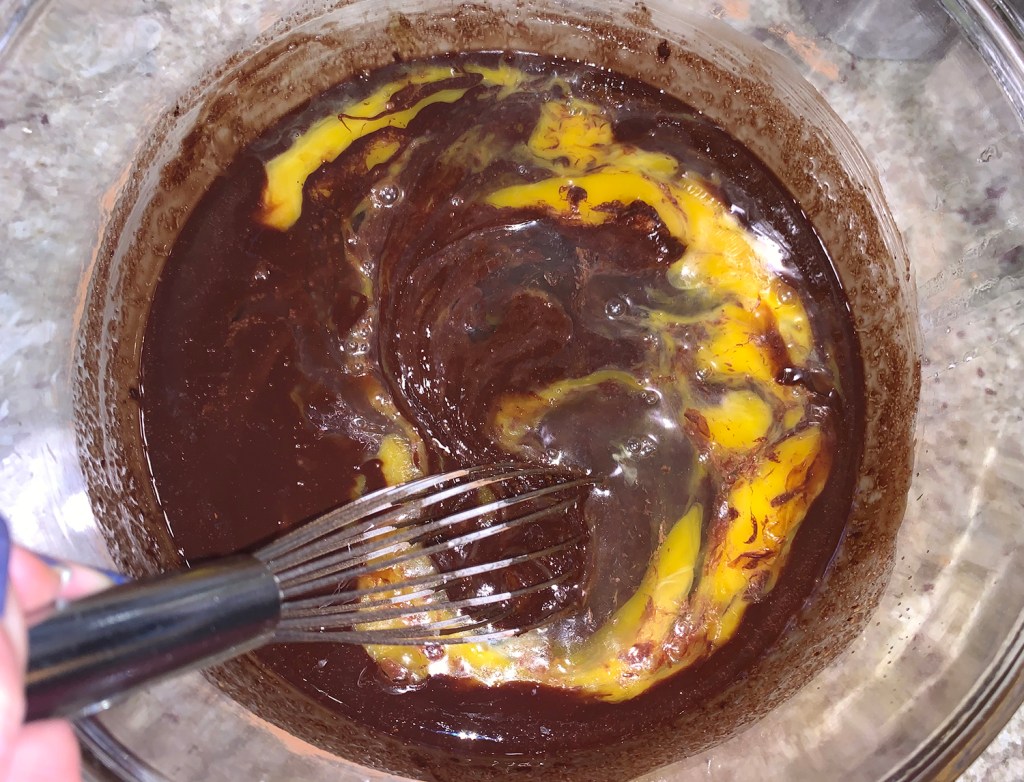
Meanwhile, whisk flour, baking powder, and salt in a medium bowl. Melt butter in a medium saucepan over medium heat. Stir in cinnamon, cloves, and nutmeg. Remove from heat and let sit 5 minutes to infuse.
Whisk granulated sugar and cocoa powder in a large bowl. Pour in spiced butter, scraping pan so you don’t leave any spices behind, and whisk vigorously to combine.
Add egg and egg yolk; whisk vigorously to combine. Mix in dry ingredients, then almonds, chocolate chips, lemon zest, and orange zest.
Turn out onto a clean surface. Divide in half, then roll each half into a log about 1½” wide. Flatten logs to 2″ wide and slice on a diagonal into 1″-wide cookies. Divide between 2 parchment-lined baking sheets, spacing at least 1″ apart.
Bake cookies, rotating baking sheets top to bottom and front to back halfway through, until firm around edges but still soft in the middle, 8–10 minutes. Let cool.
Glaze and Assembly
Melt chocolate and butter in a small heatproof bowl set over a small saucepan of barely simmering water (do not let bowl touch water), stirring occasionally, or melt in a small microwave-safe bowl in a microwave in 20-second bursts, stirring between bursts.
Add powdered sugar, salt, and 2 Tbsp. boiling water and whisk until glaze is smooth and glossy.
Dip tops of cookies into glaze and let sit, glaze side up, on a wire rack until glaze is set, about 2 hours.
Optional: If you have leftover glaze, thicken it with more powdered sugar and then drizzle with a spoon over each bar, zig zagging as you go.
Do ahead: Pizzettes can be made 5 days ahead. Store airtight at room temperature, or freeze up to 1 month.
The Mr. loves a good spice cookie so he wanted to make sure we got them in the holiday extravaganza rotation this season. Since it’s his passion, I let him pick out which recipe would make the cut. After a bit of research he found this Ginger Spiced Molasses Cookie on oliveandmango.com which apparently was adapted from a Martha Stewart recipe. These homemade soft molasses cookies with crackly tops are super chewy and so perfectly spiced.
Delightfully chewy with a crisp sugar coated exterior and plenty of spice and warmth, these ginger spiced molasses cookies are impossible to resist. They have the perfect balance of sweet molasses, spicy ginger, and warm cinnamon.
Chilling the cookie dough is always a good idea to allow the flavors and textures to develop. If you skip the chill time they will still be delicious but the dough will spread out more when baked and the cookies will be thinner.
Interestingly the original recipe indicated the yield to be 30 cookies, when in fact I ended up with 52! So it all depends on how large you roll them. I did as the directions instructed at about a 1 tablespoon ball… oh well, the more the merrier, especially during the holidays!
¾ cup (1½ sticks) unsalted butter, room temperature
½ cup packed light-brown sugar
½ cup granulated sugar, plus ⅓ cup for coating
6 Tbsp. molasses
2 Tbsp. dark rum
1 large egg
Directions
In a medium bowl, whisk together flour, baking soda, salt, ginger, cinnamon, clove, allspice, and pepper.
Cream the butter, brown sugar, and ½ cup granulated sugar until light and fluffy. Beat in molasses, egg and rum. With mixer on low, gradually beat in flour mixture until just combined. Wrap bowl in plastic, and freeze for 20 minutes or refrigerate 1 hour or up to 2-3 days. Meanwhile preheat oven to 350°F and line two baking sheets with parchment paper; set aside.
Remove cookie dough from the refrigerator. If the cookie dough chilled longer than 2 hours, let it sit at room temperature for at least 30 minutes.
Place remaining ⅓ cup granulated sugar in a bowl. Roll cookie dough, 1 tablespoon each, into balls. Roll each in granulated sugar and arrange 3 inches apart on the baking sheets. Bake for 11-12 minutes or until edges appear set. If the tops aren’t appearing cracked as pictured, remove the baking sheet from the oven and gently bang it on the counter 2-3x. This will help those warm cookies spread out and crack on top. Return to the oven for 1 additional minute.
Remove from the oven and allow cookies to cool on the baking sheet for 5 minutes before transferring to a wire rack to cool completely.
Cookies will stay fresh covered at room temperature for 1 week.
Lean white fish is mild in flavor, so before steaming the fillets we season it boldly with garlic, ginger, oyster sauce and fiery-sweet Sriracha. We often carve out the start of our weekday meals for a “Meatless Monday” and this combo from Milk Street (MS) fit the bill.
From their “New Rules Cookbook” it emphasizes a gentle heat as best for keeping the delicate flesh of fish tender. Steaming is ideal because the heat surrounds the fish, cooking it from all sides without movement. An aromatic sauce is added to complement the mild fish.
Because we are fungi fanatics, we increased the shiitake mushrooms by 50% for a total of 12 ounces. For a little spice, drizzle the plated fish fillets with a little chili oil before sprinkling with the scallions. Or sprinkle with toasted sesame seeds. Serve with steamed or stir-fried greens and jasmine rice.
Pairing the cod with stir-fried baby bok choy made with garlic, ginger soy and a few red pepper flakes, and a side of steamed jasmine rice brought the entire dinner together. And plating it all on a singular platter makes for an easy presentation and allows each diner to serve themselves as much as they want.
Simple. Healthy. Tasty. What more could you ask for?
4 6-oz. skinless cod, haddock or halibut fillets (each about 1 inch thick)
8 oz. shiitake mushrooms, stemmed and thinly sliced
2 Tbsp. unseasoned rice vinegar
1 Tbsp. packed light or dark brown sugar
2 scallions, thinly sliced
Directions
In a shallow bowl or pie plate, whisk together the oyster sauce, Sriracha sauce, oil, garlic, ginger, 2 tablespoons of soy sauce and ½ teaspoon each salt and pepper. Add the fillets and turn to coat, gently rubbing in the sauce.
Add the mushrooms and toss until evenly coated. Marinate at room temperature for about 10 minutes.
Place a steamer basket in a large Dutch oven. Add enough water to fill the bottom of pot without touching the basket. Remove the basket. Cover the pot and bring to a simmer over medium-high.
Meanwhile, mist the steamer basket with cooking spray. Arrange the fish in an even layer in the basket and top the fillets with the mushrooms, evenly arranging them. Return the basket to the pot, cover and steam over medium until the fish flakes easily, 8 to 12 minutes. (Ours took the entire 12 minutes.)
Meanwhile, in a small bowl, stir together the vinegar, sugar, the remaining 1 tablespoon soy sauce and ¼ cup water.
When the fish is done, use a thin metal spatula to transfer the fillets and mushrooms to a platter. Sprinkle with the scallions and serve with the sauce on the side.
On weekends, we usually work out dinner menus for Sunday through Wednesday for the following week. Then Thursday is leftover night, while Friday and Saturday we dine out. (Of course, COVID put a big dent in that typical scenario for much of 2020.)
Recently, one Saturday morning I was creating the menu while simultaneously preparing a shopping list of necessary ingredients. Part way into process, The Mr. joined me to work out the details. Shortly afterward we hit the road to make our purchases.
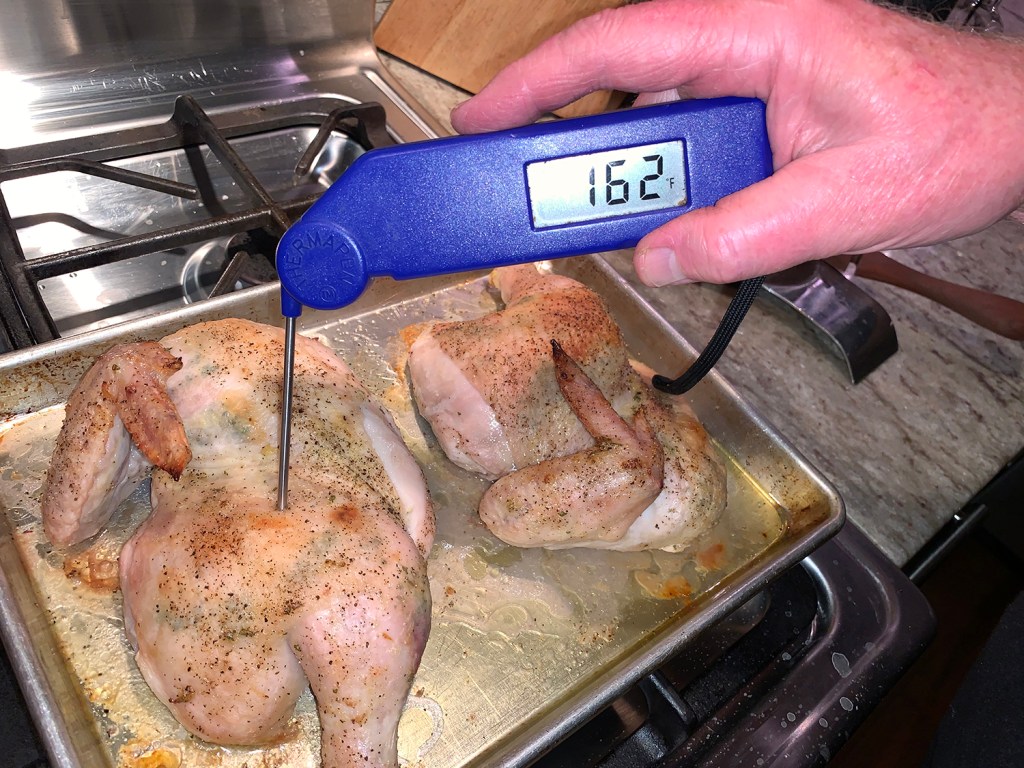
As I mentioned, Saturday night is a dine-out event. As we enjoyed our repast at a nearby restaurant, I wondered aloud what we had planned for dinner the next day on Sunday? We just stared at each other open-mouthed, and realized that somehow, we had entirely overlooked that meal altogether, duh! So we made a split decision and decided to retrieve two chicken halves from the freezer as soon as we got home.
That begged the question of exactly what to do with said chicken halves, not to mention what sides to serve with it? I decided to make a butter-garlic rub for the chicken and roast some Balsamic Roasted Brussels Sprouts with Shallots and garlic, all of which could go into a 425° oven. Hubby was going to throw together a baked rice dish which he could do entirely on the stovetop. Crisis averted.
I always keep a container of homemade roasted garlic paste in the fridge and decided to make a butter rub using the paste, rosemary and lemon zest. Our Lynn’s Split-Decision Roast Chicken not only spoke to our separate preferences of white versus dark meat, it resulted in a wonderful dinner full of flavor!
If you’re starting with a whole chicken, cut out the back and split the chicken into two equal halves. Preheat the oven to 425°F.
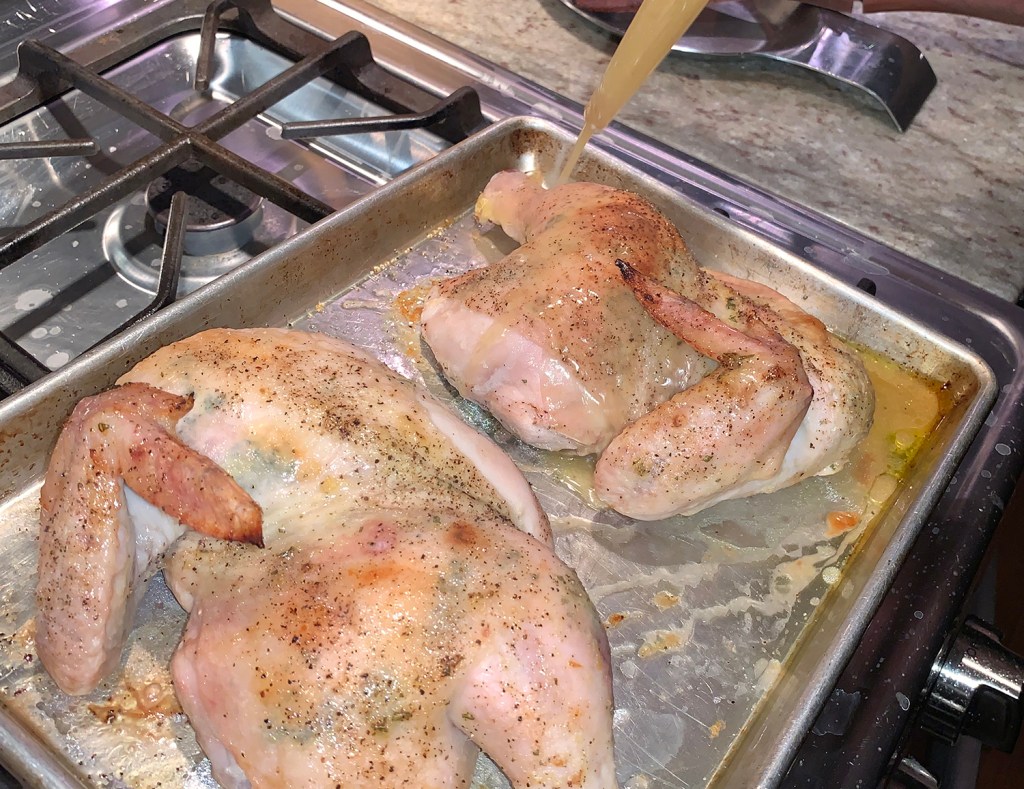
Combine the other ingredients with 1/2 teaspoon salt and 1/4 teaspoon pepper in a small bowl. Lifting the skin of the chicken rub the butter mixture all over the breast, thigh and legs without ripping the skin.
Oil a rimmed quarter baking sheet. Arrange the chicken halves, skin side up on the baking sheet, rub more oil over the skin and sprinkle on salt and pepper.
After 30 minutes, baste the chicken with the drippings to help the skin brown and crisp. Check the temperature and return to the oven for about another 10 minutes. The thickest part of the thigh, without touching the bone, should register 170° when done.
Remove the baking sheet from the oven, move chicken to a platter, and tent with foil for 5-10 minutes. If desired, cut the breasts away from the thighs to create 4 pieces total.
This one-pot meal from Milk Street with classic Italian flavors couldn’t be easier. The ingredients are combined in the pot, then pressure cooked (or slow cooked) until the chicken is fork-tender. To finish the dish and create a flavorful sauce, the cooking liquid is thickened with a couple tablespoons of flour—just enough for clingability but without any heaviness. A little lemon juice adds acidity and brightness. Super Good!
It is suggested to serve over polenta or with hunks of crusty bread. Since we were doing neither, we increased the amount of baby potatoes by about 50%, to 12 ounces instead of 8 (which would be pretty paltry for four people). And with only 1.6 pounds of thighs, we were able to use our smaller 4-liter pressure cooker. Somehow we forgot to halve the potatoes, but they still came out tender and creamy.
Don’t worry that ½ cup vermouth is too little liquid. The chicken and vegetables release flavorful juices as they cook that, combined with the vermouth, form the base for the sauce.
In a 6-quart Instant Pot, stir together the vermouth, garlic, fennel seeds, 1 teaspoon salt and ¼ teaspoon white pepper. Add the chicken, potatoes and fennel, distributing the ingredients in an even layer.
Lock the lid in place and move the pressure valve to Sealing. Select Pressure Cook or Manual; make sure the pressure level is set to High. Set the cooking time for 8 minutes. When pressure cooking is complete, let the pressure release naturally until the float valve drops. Press Cancel, then carefully open the pot.
Using a slotted spoon, transfer the chicken and potatoes to a serving bowl, then tent with foil. In a small bowl, whisk the flour with 2 tablespoons of the cooking liquid until smooth, then stir into the pot. Select Normal/Medium Sauté and bring the liquid to a simmer. Cook, stirring often, until lightly thickened, 2 to 5 minutes. Off heat, stir in the arugula and lemon juice, then taste and season with salt and white pepper. Pour the sauce over the chicken and potatoes.
When preparing our weekly menus, we try to be as diverse as possible concerning the main entrée. And we certainly are suckers for trying new dishes or twists to an old favorite. Variety is the spice of life, right? We need a little variation during the extended periods of lockdown when we are all so weary of the challenges 2020 has thrown our way.
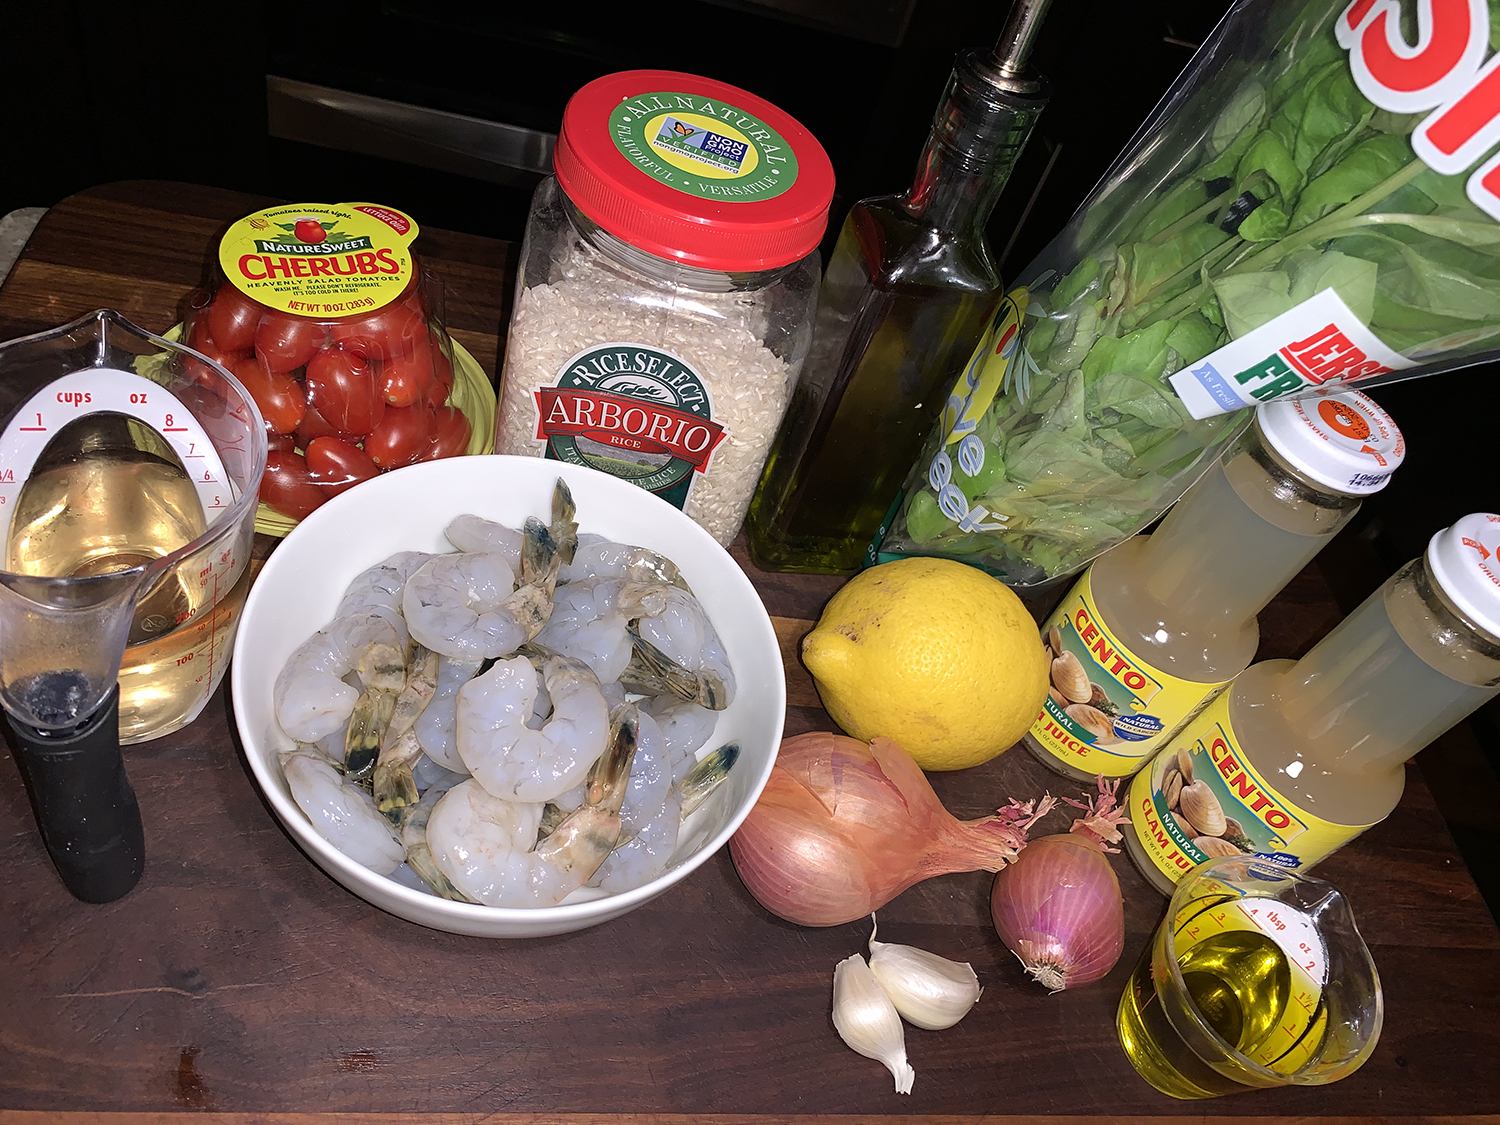
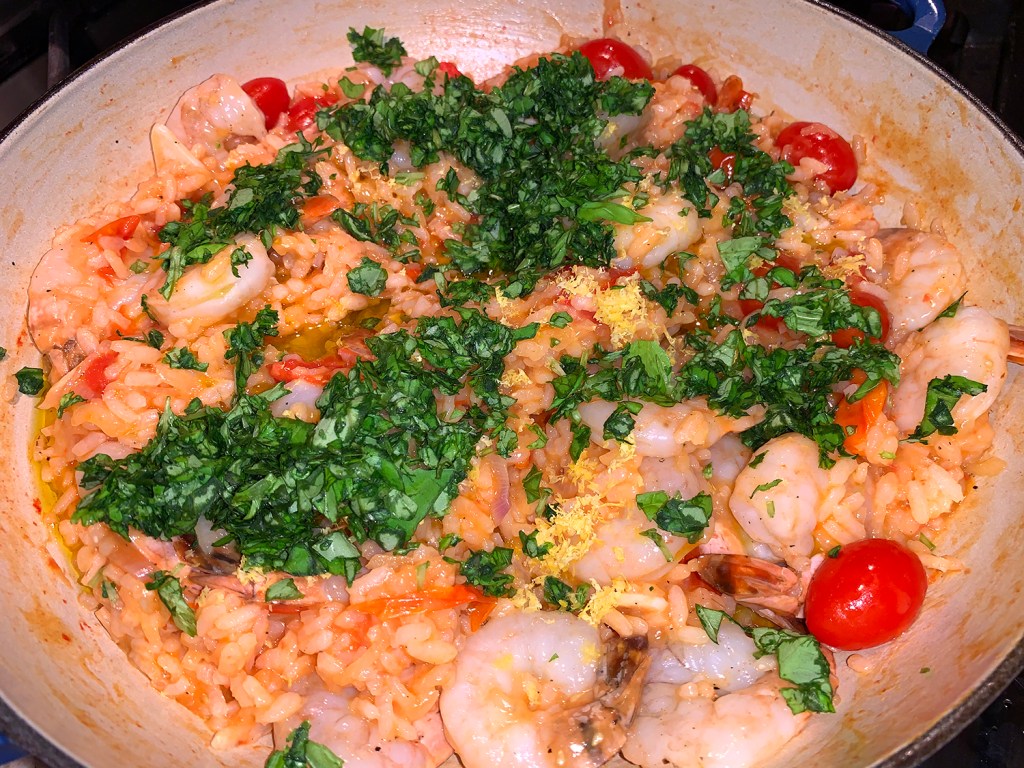
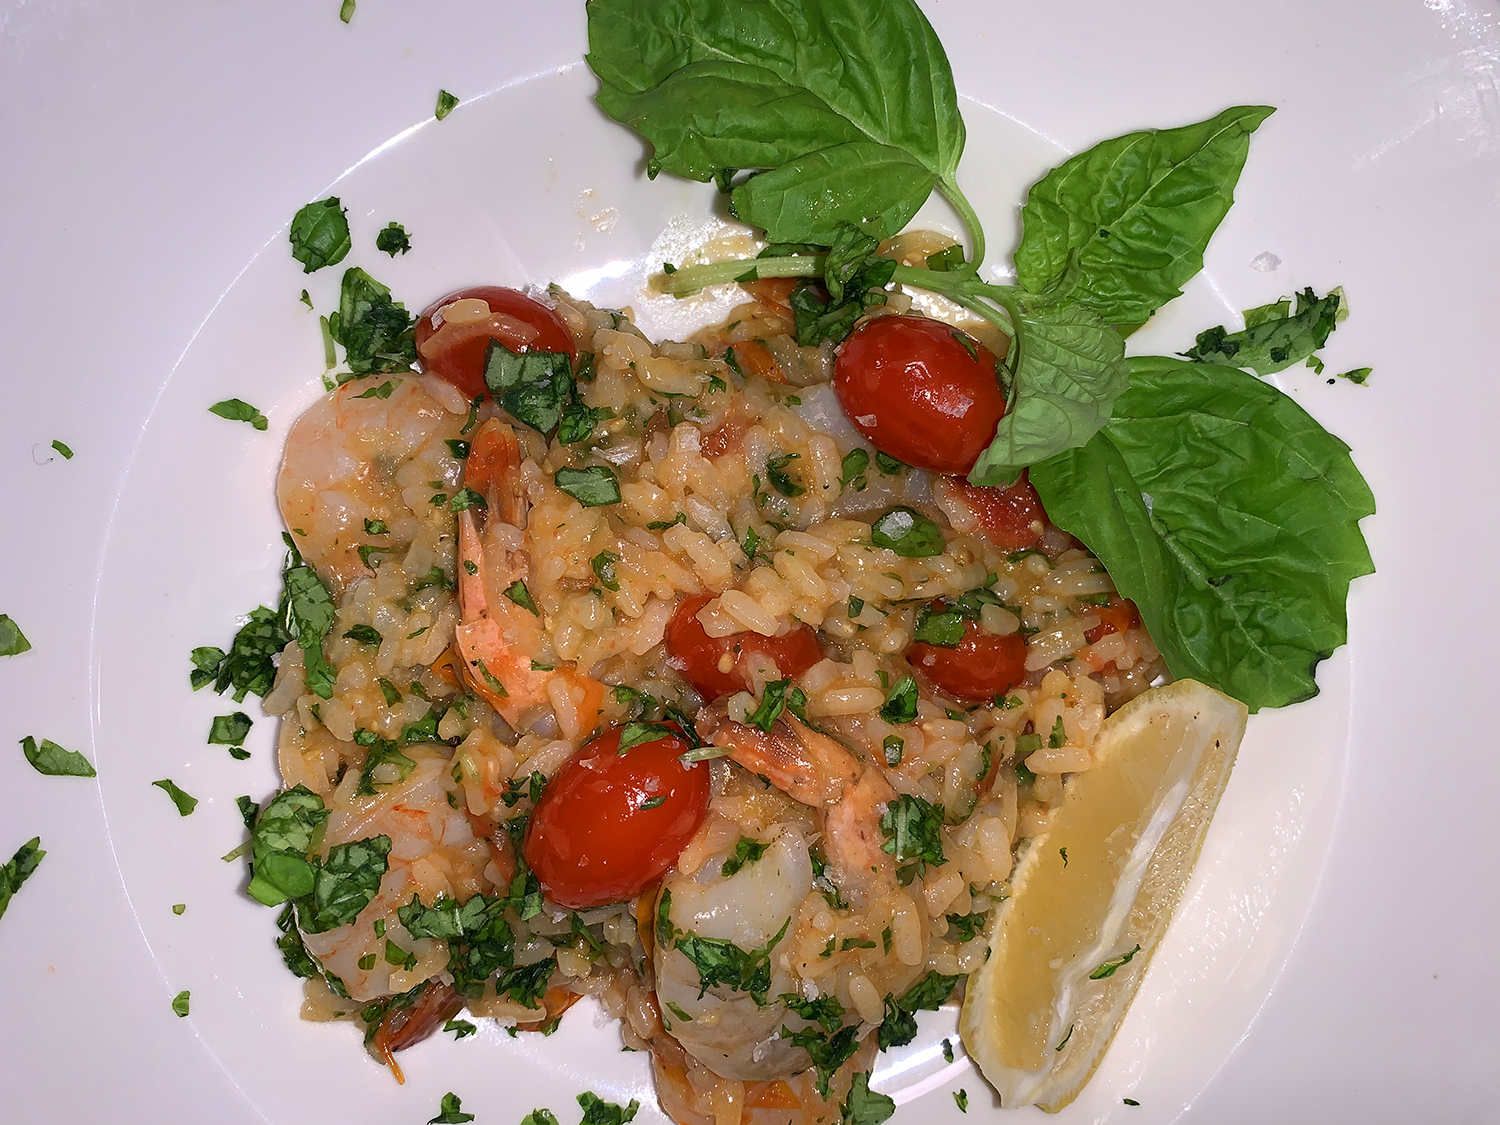
After seeing this Shrimp Risotto with Tomatoes and Basil recipe in our latest Milk Street magazine, it quickly prompted us to add shrimp to the grocery list. Classic risotto-cooking technique calls for adding hot broth in several additions to the rice as it cooks, as well as for constant stirring. This simplified method from Milk Street adds the liquid in just two batches with frequent but vigorous stirring which coaxes the starch from the grains, yielding a rich, velvety risotto with minimal effort.
The starchy, creamy consistency of carnaroli (or Arborio) rice is a perfect backdrop for the briny-sweet flavor of plump, perfectly cooked shrimp; juicy tomatoes; and fresh, fragrant basil.
Milk Street
Don’t forget to cover the pot after adding the shrimp; this traps heat in the pot so that the shrimp gently cook through. Ours took 8 minutes to become fully opaque. And just to note, we increased the quantity from 12 ounces to a full pound. That seemed more reasonable for 4 servings as a main course.
If you happen to have homemade shellfish stock on hand, use that in place of, or in addition to, the clam juice.
1 tsp. grated lemon zest, plus 1 Tbsp. lemon juice
Directions
In a 1-quart liquid measuring cup or medium microwave-safe bowl, combine the clam juice and 2 cups water. Cover and microwave on high until hot, about 4 minutes; set aside, covered. Season the shrimp with salt and pepper; set aside.
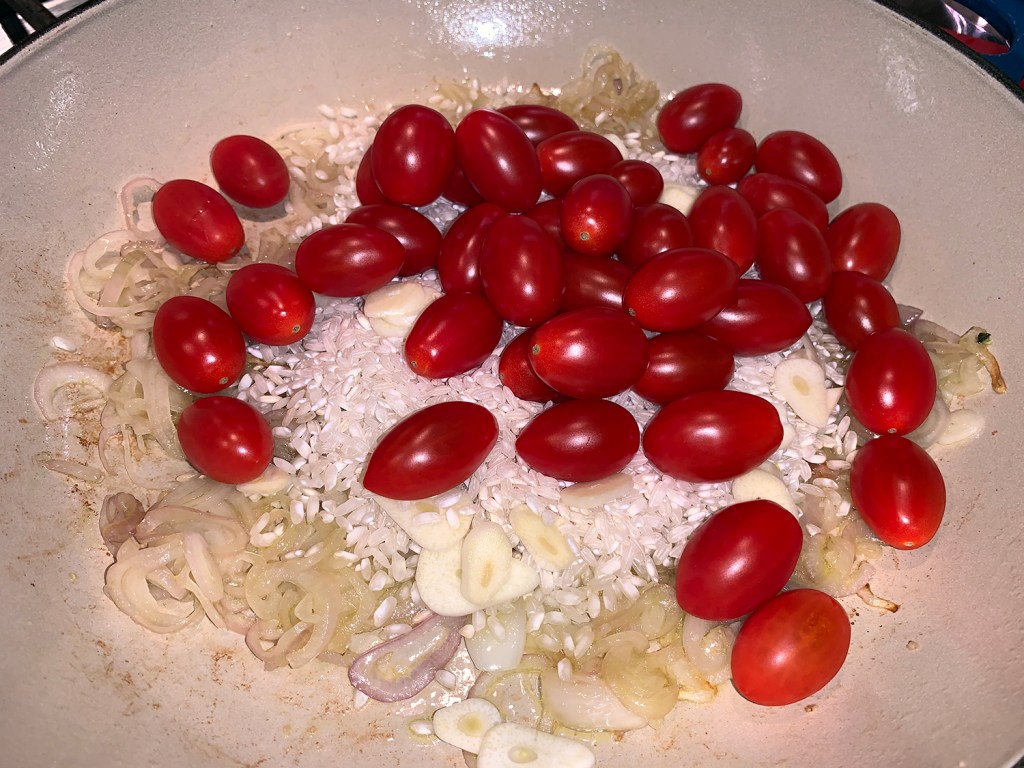
In a large Dutch oven over medium-high, heat 2 tablespoons oil until shimmering. Add the shallots and ½ teaspoon salt. Cook, stirring often, until softened, about 2 minutes. Add the rice, tomatoes and garlic, then cook, stirring, until the grains are translucent at the edges, 1 to 2 minutes.
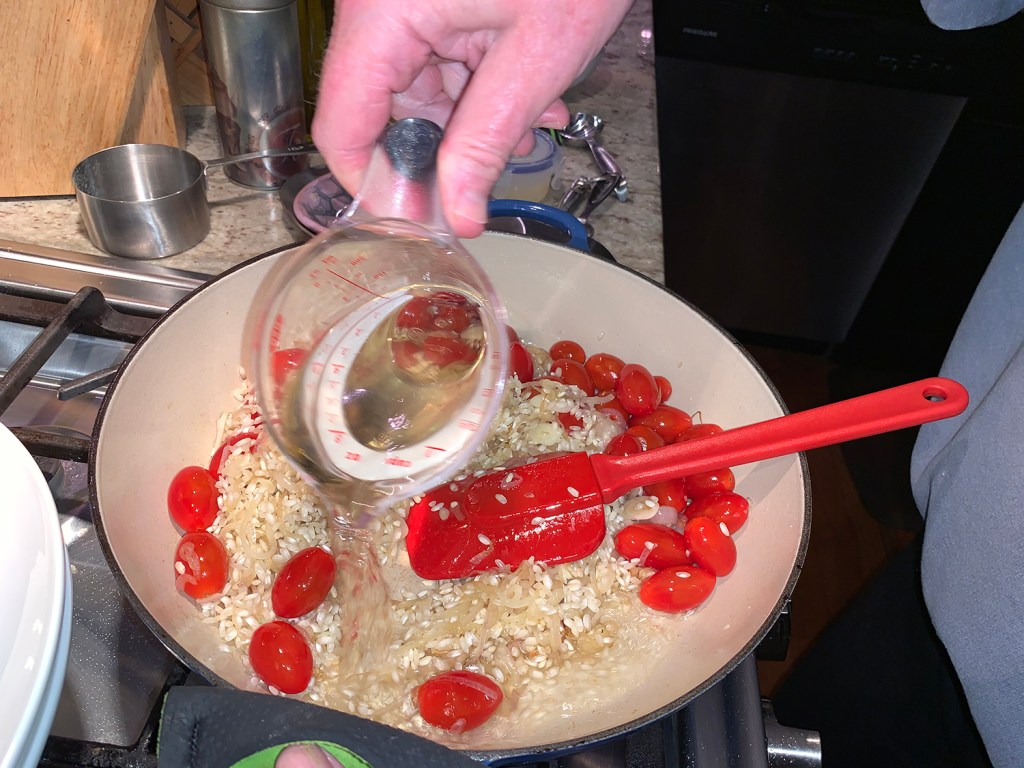
Add the wine and cook, stirring, until almost dry, about 4 minutes.
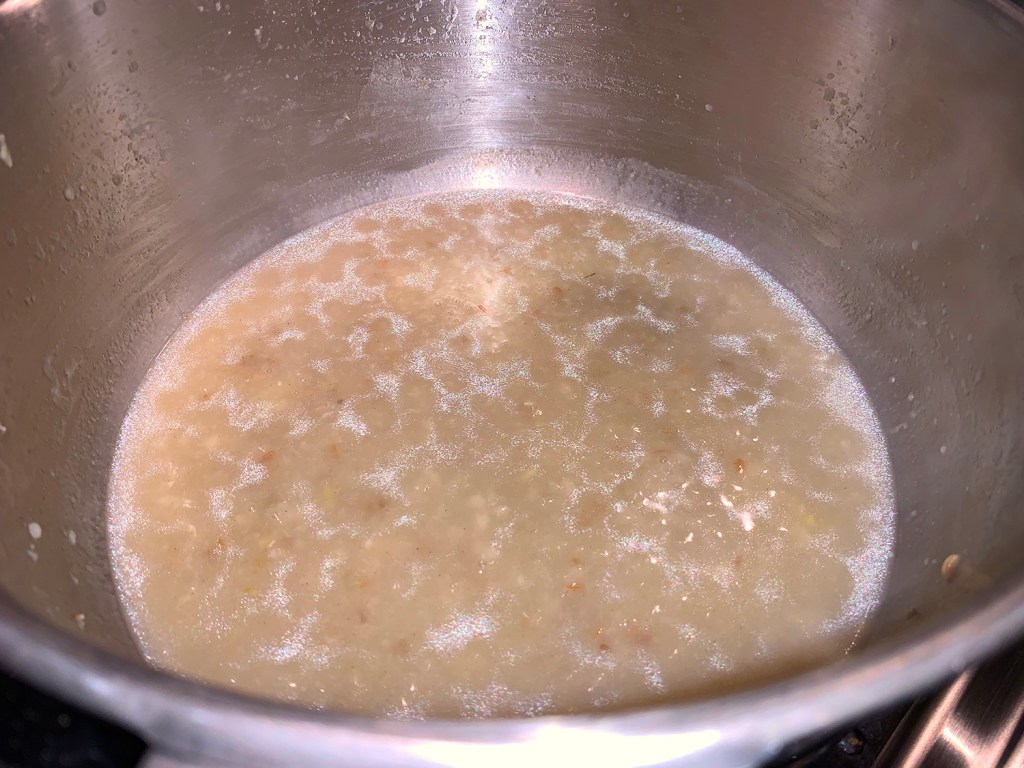
Add 3 cups of the hot liquid and cook, stirring often and briskly, until a spoon drawn through the mixture leaves a trail, 10 to 12 minutes.
Add the remaining hot liquid and cook, stirring, until the rice is al dente, 6 to 8 minutes. Remove from the heat and stir in the shrimp. Cover and let stand until the shrimp are opaque throughout, 5 to 7 minutes. The risotto should be loose but not soupy; if needed, stir in water 1 tablespoon at a time to achieve the proper consistency.
Stir in the remaining 2 tablespoons oil, the lemon zest and juice and all but 2 tablespoons of the basil. Taste and season with salt and pepper. Serve drizzled with additional oil and sprinkled with the remaining basil.
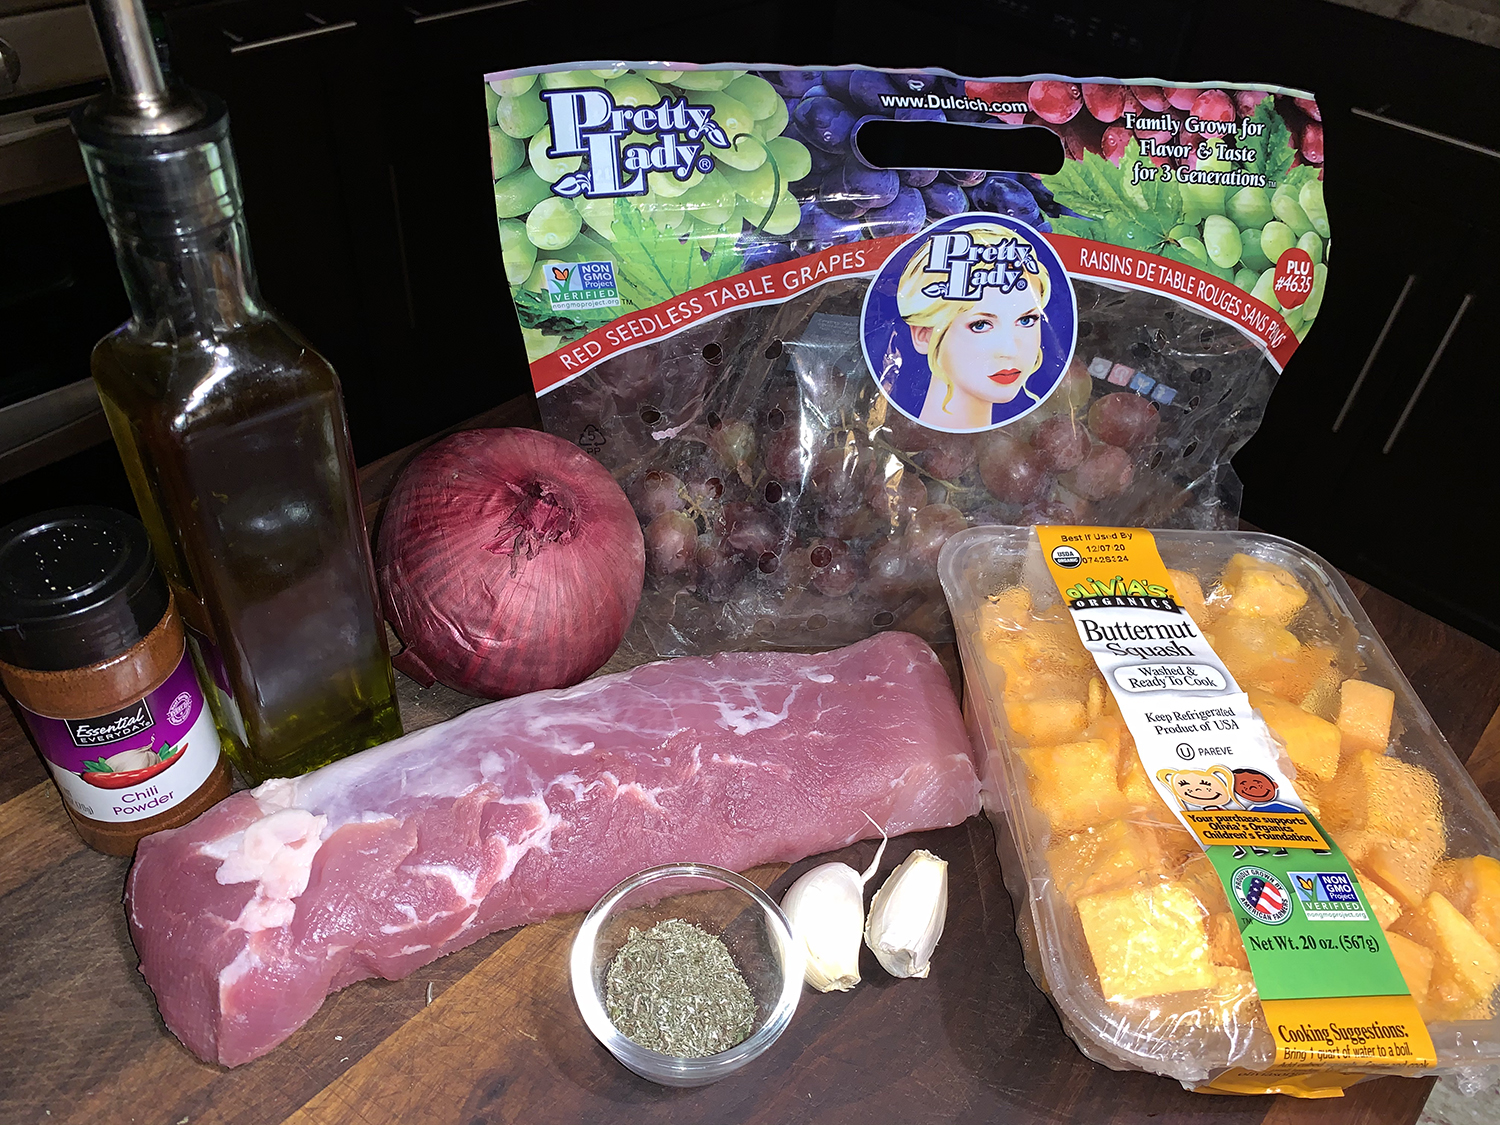
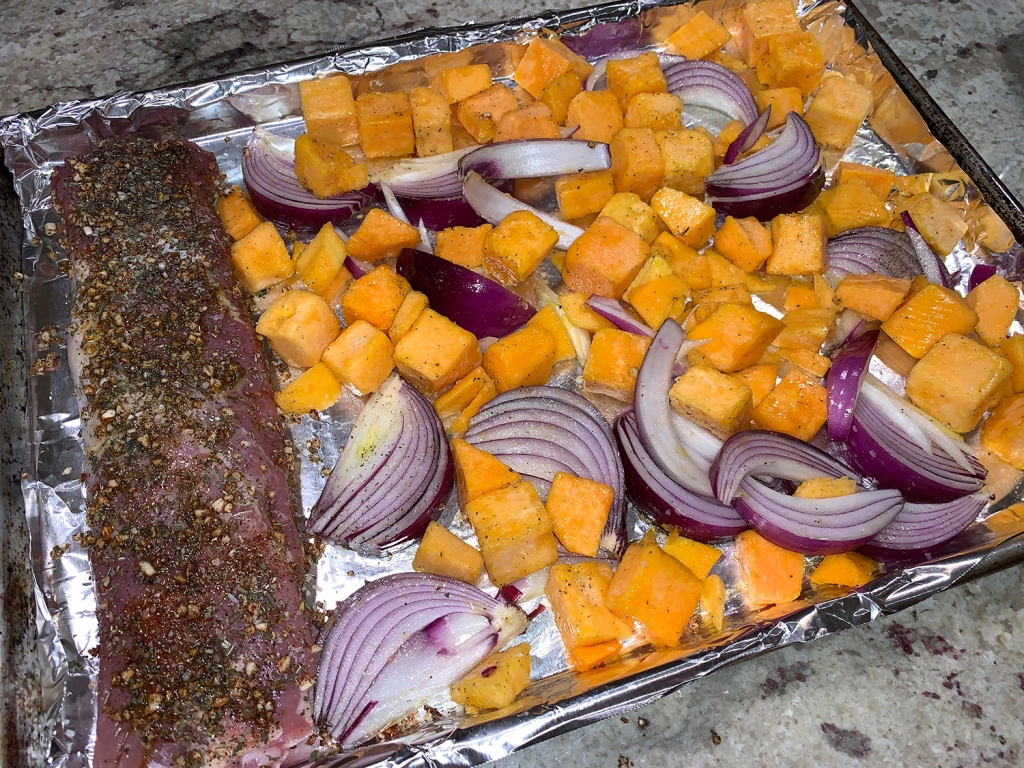
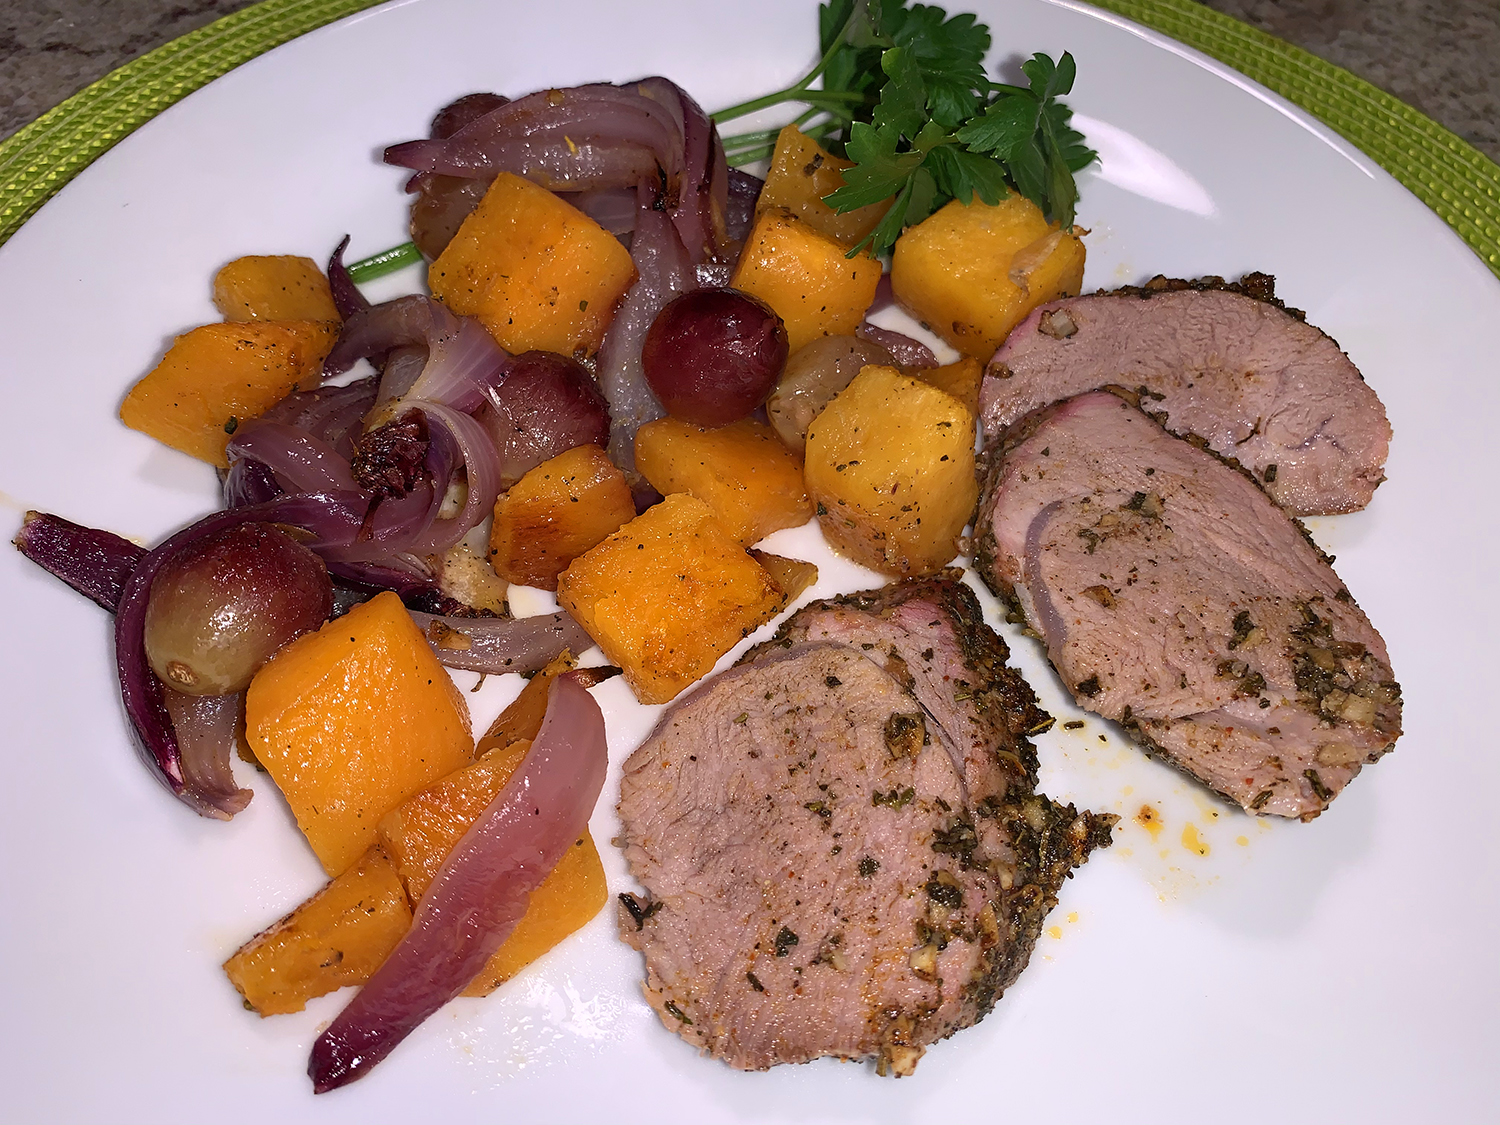
So simple, with minimal ingredients, using only one sheet pan, but packs a lot of flavor. Do I have your interest now? Here, fruit, vegetables, and pork tenderloin all roast on one pan for this hands-off dinner recipe. The sweet, wine-y flavor of grapes intensifies while roasting, a perfect pairing for the natural sweetness of pork.
I tweaked the recipe a tad by purchasing already-prepped butternut squash. I mean, who really likes peeling those things? Plus, the original directions had you buy a 2-pound squash, peel it, but only use half of it. Save yourself time and aggravation and buy it already cubed.
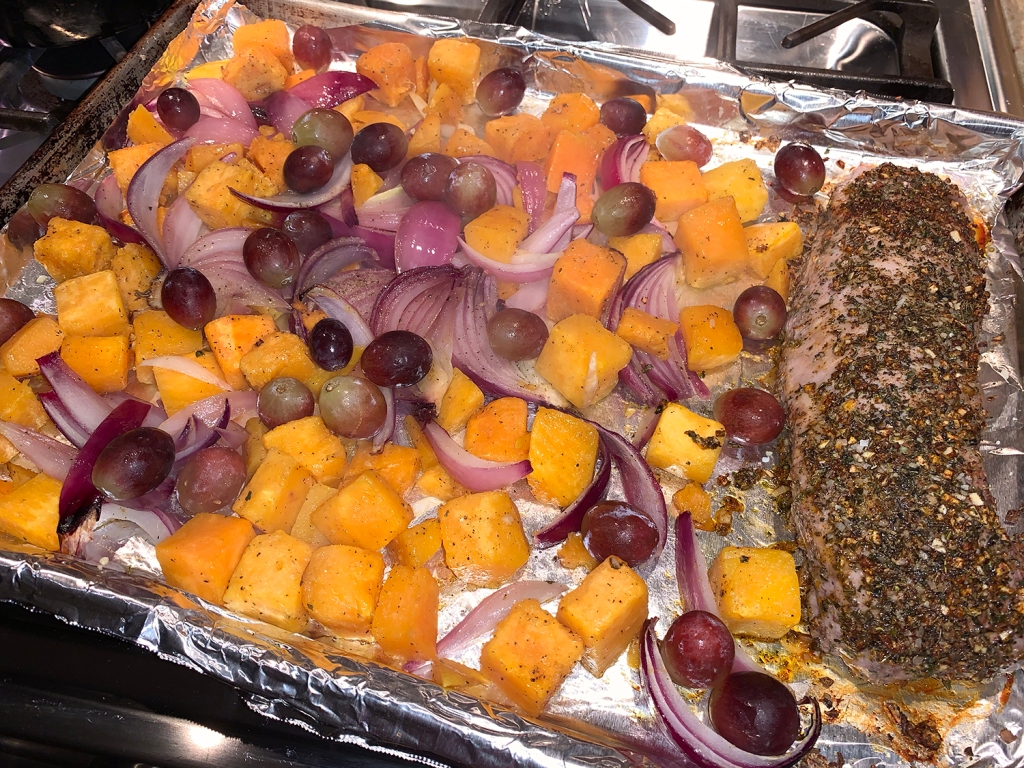
In addition, the original amount of grapes was 1 cup. If you try to measure 1 cup of whole grapes, it doesn’t amount to many. Therefore, I changed the quantity to 8 ounces, which ended up being a perfect amount.
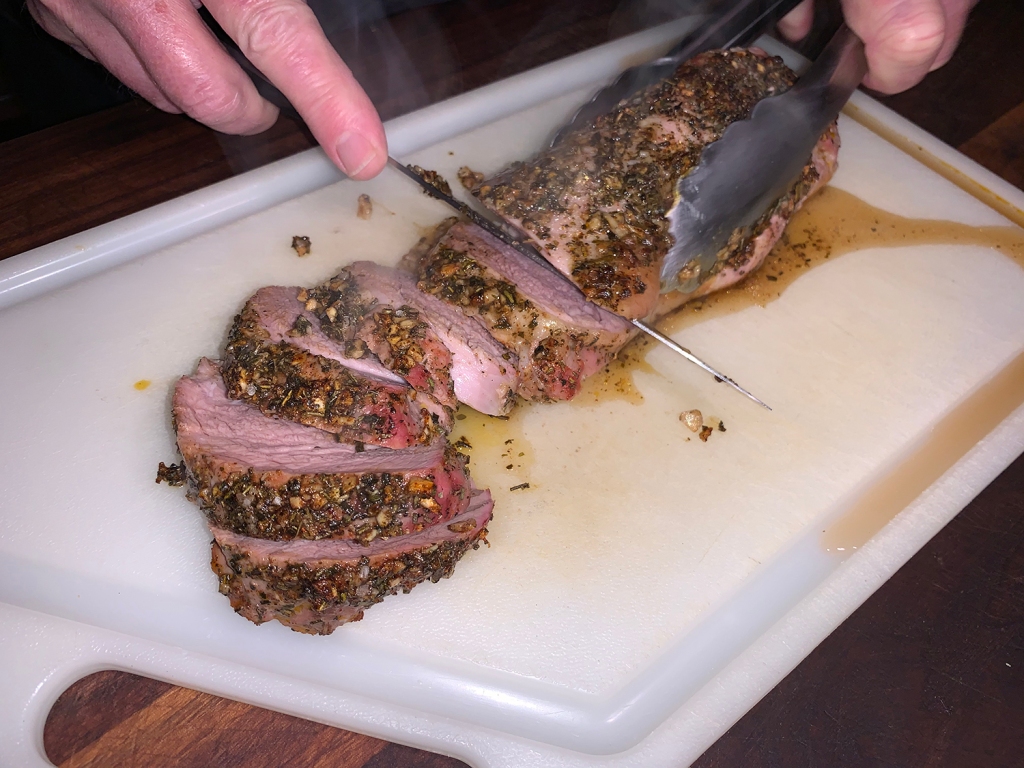
During the last step of roasting, make sure to check the meat after 10 minutes. I waited the full 15 minutes and our pork was a little more done than we prefer. After resting and slicing, pour any accumulated juices back over the meat.
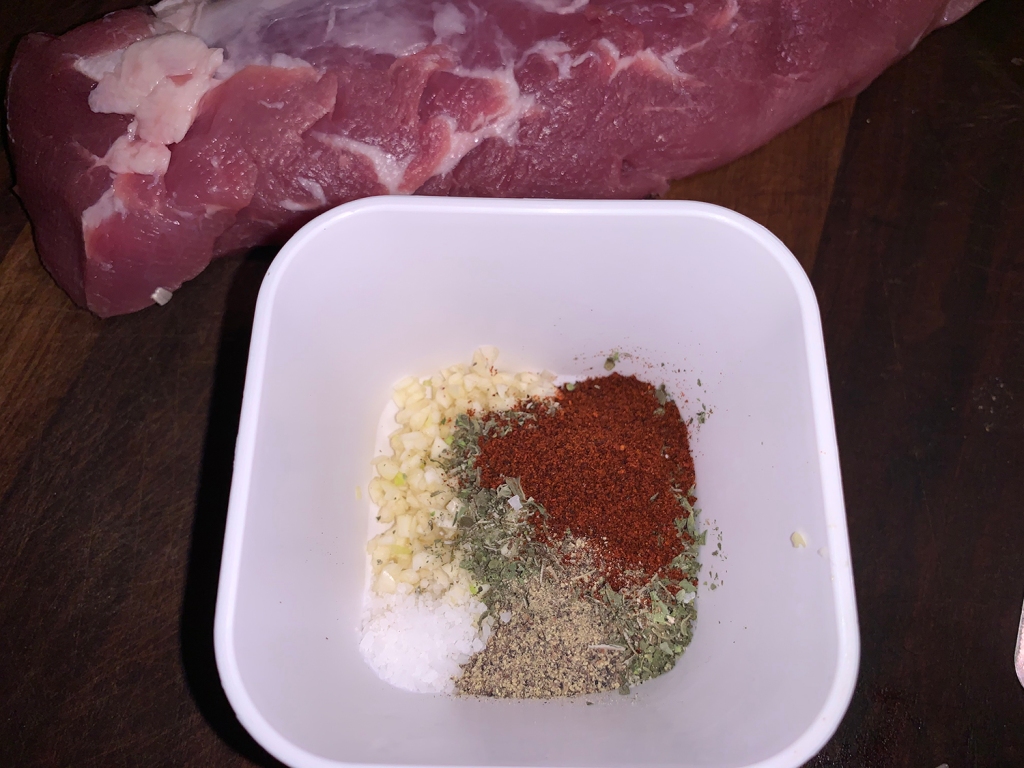
2 tsp. dried herbs, such as thyme, oregano, basil, and/or rosemary
1/2 tsp. chili powder
2 cloves garlic, minced
1/2 tsp. salt
1/2 tsp. freshly ground black pepper
1, 1 to 1 1/2 lbs. pork tenderloin
1 lb. butternut squash, already peeled and cut in 1- to 2-inch pieces
1/2 red onion, cut into wedges
2 Tbsp. olive oil
8 oz. seedless red grapes
Directions
Preheat oven to 425°F.
Line a large rimmed baking sheet with foil.
In a small bowl combine herbs, chili powder, garlic, 1/4 teaspoon salt, and 1/4 teaspoon black pepper. Rub all over pork.
Place pork on one side of prepared pan. Add squash and onion on other side of pan; sprinkle with 1/4 teaspoon salt and 1/4 teaspoon black pepper. Drizzle pork, squash, and onion with 2 tablespoons olive oil. Roast 15 minutes.
Stir squash and onion; add grapes. Roast 10 to 15 minutes more until pork is done (145°F). Remove pork to a moated cutting board, tent with foil and let rest 5 minutes before slicing.
Turn off the oven and leave the veggies in to keep warm while meat rests.