Monthly Archives: March 2025

Reuben Sandwich

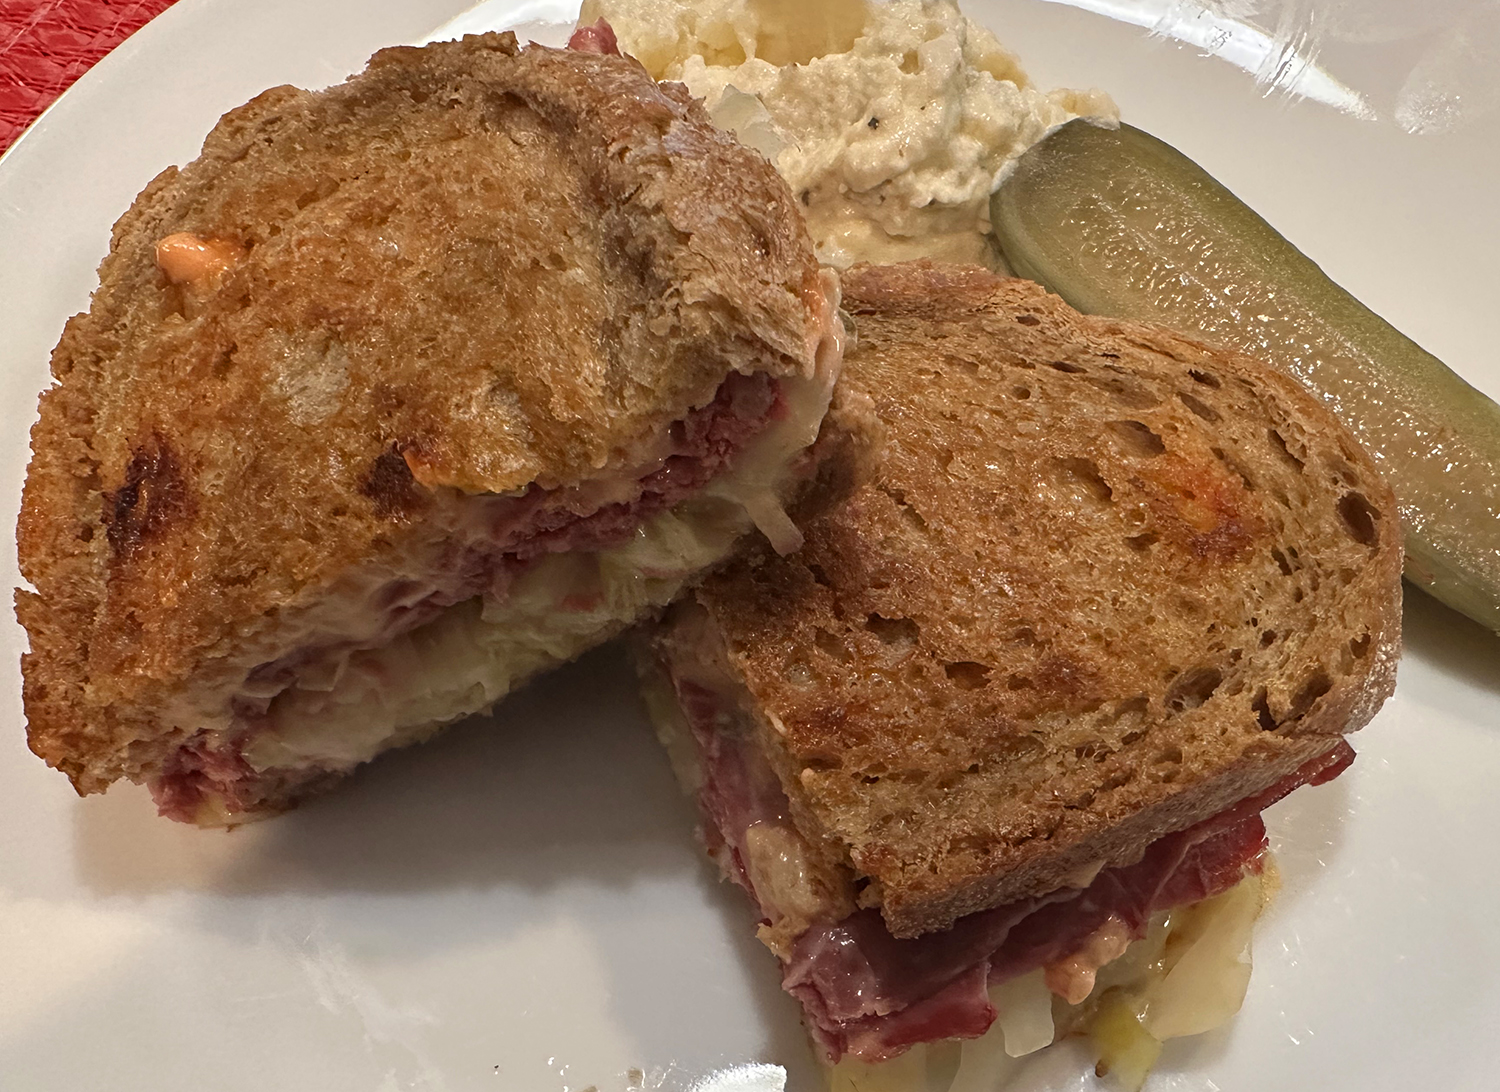
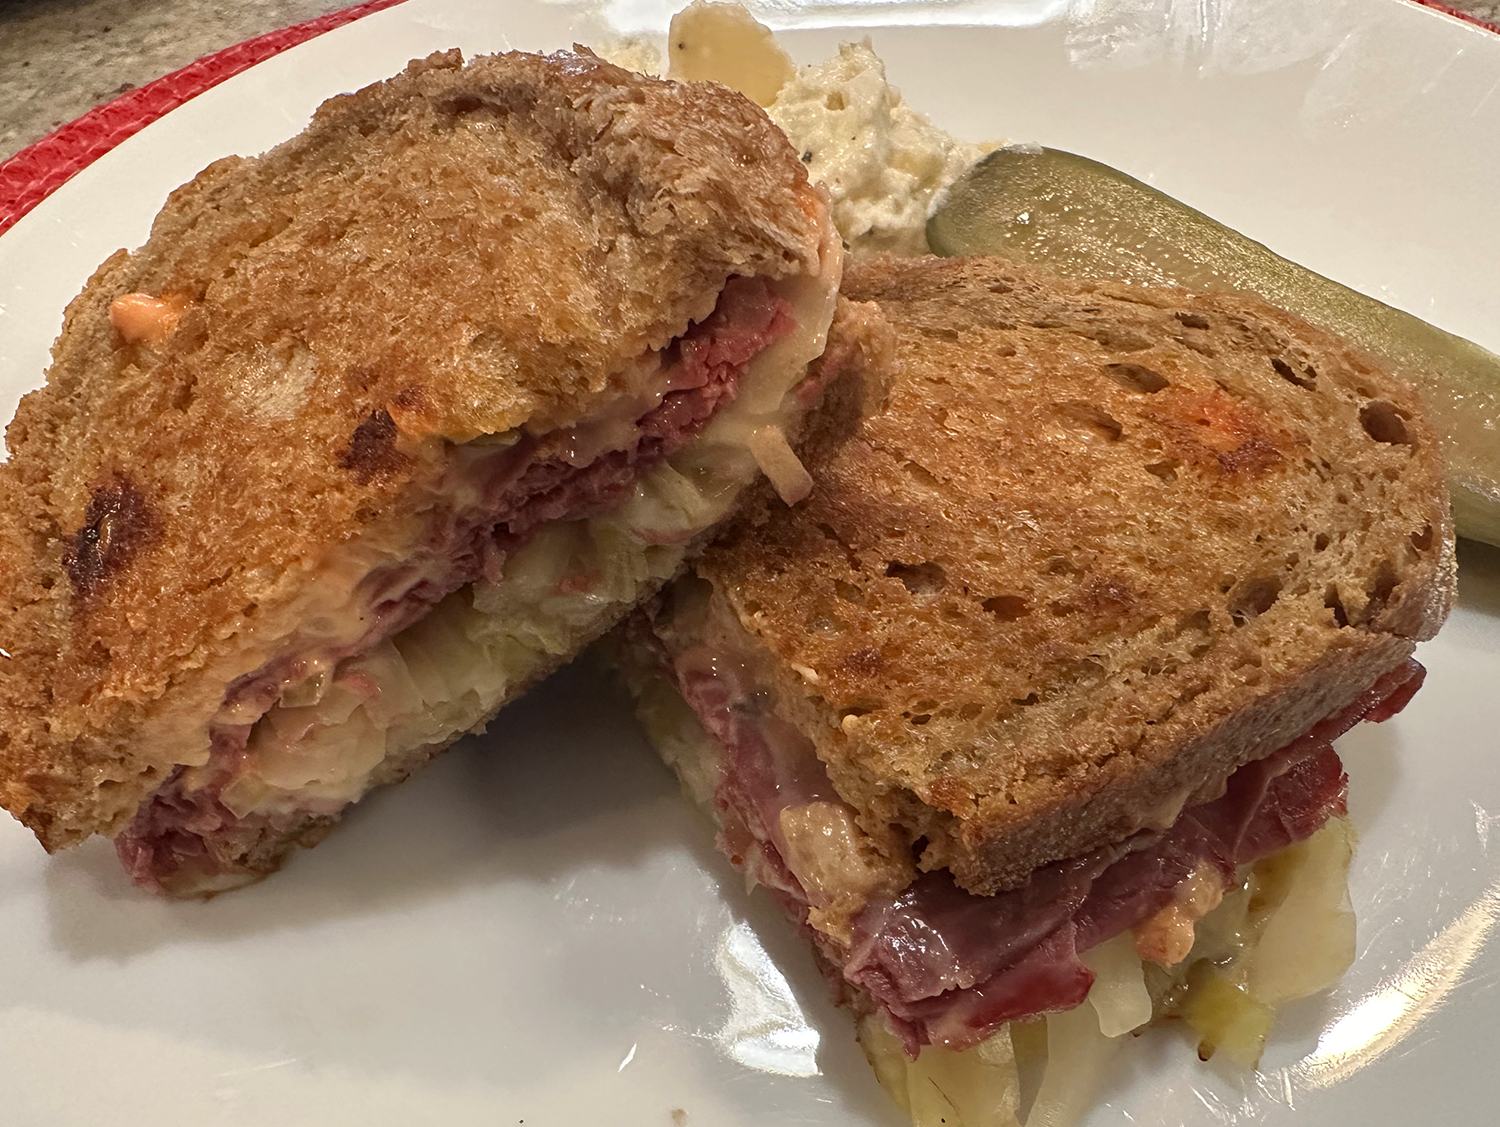
Although there are several versions as to the origins of a Reuben sandwich, today’s Reuben sandwiches feature corned beef, sauerkraut, Swiss cheese and a healthy smear of Russian dressing between toasted, buttered rye.

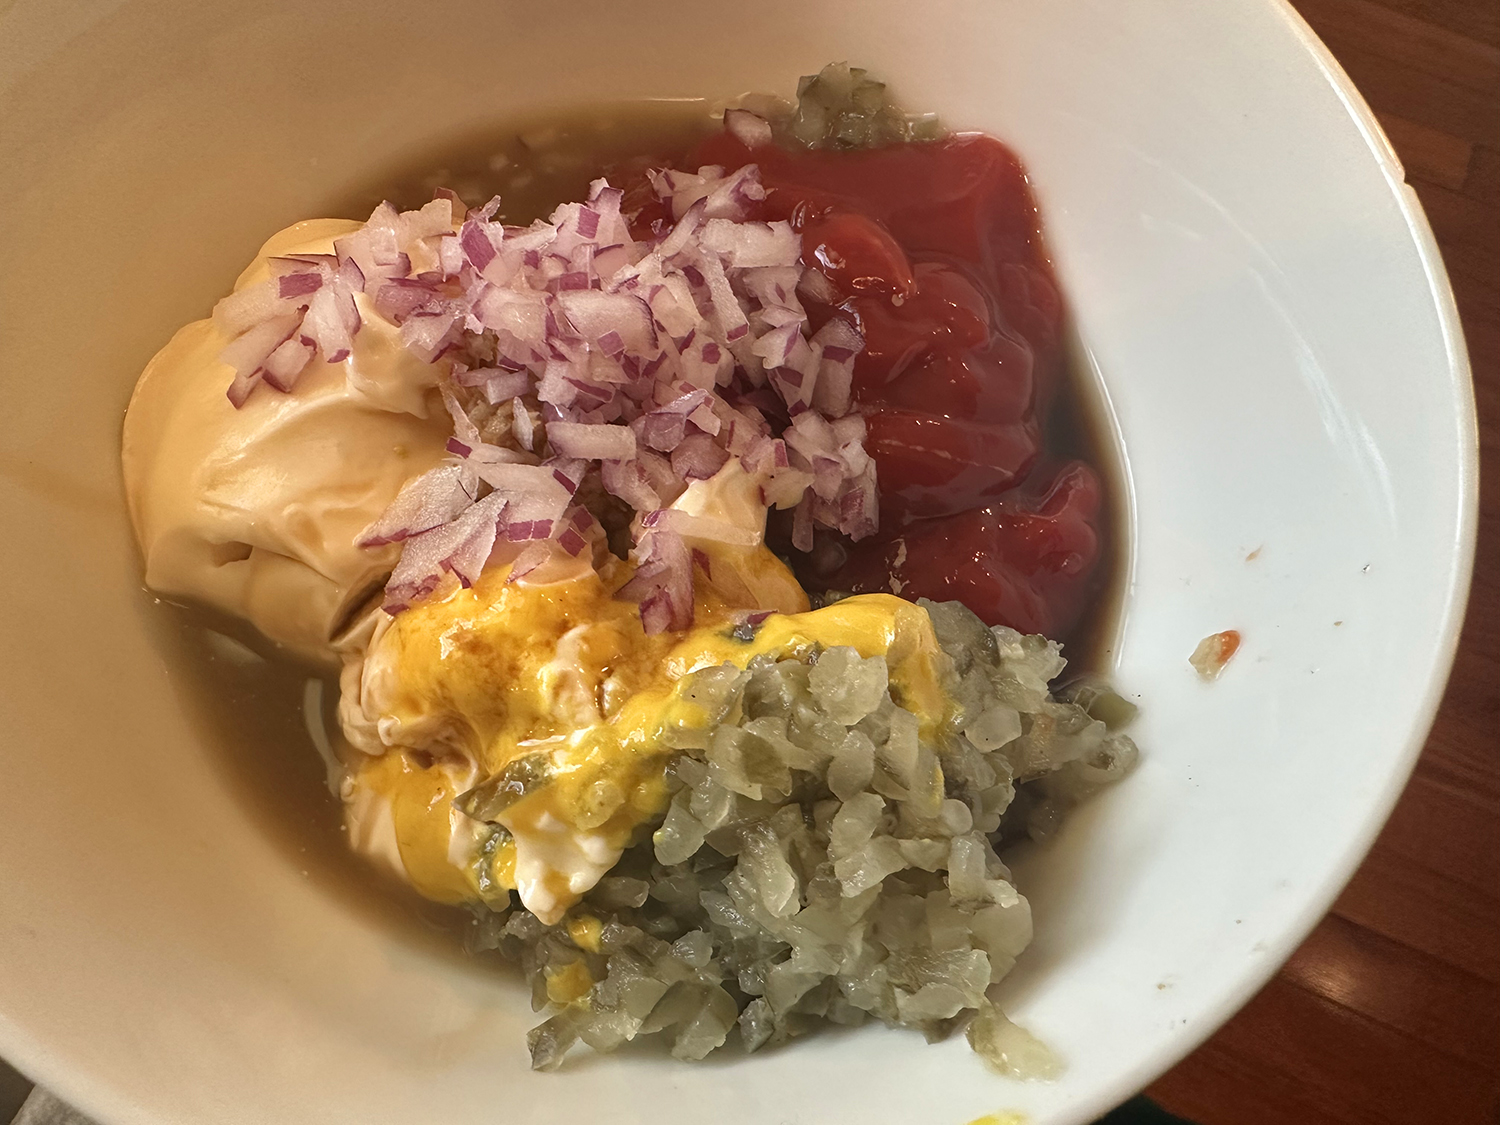
Instead of bottled dressing, make this homemade concoction. Homemade dressing has a brighter, fresher flavor than the store-bought variety, and comes together in just a few turns of a whisk. To achieve the prized crispy crust and gooey cheese, keep the heat low enough to allow the buttered bread to toast while the cheese melts.

We had homemade sauerkraut on hand which still contain the benefits of fermentation. But of course, supermarket varieties work just fine in this case. The quality of the rye bread, Swiss cheese and corned beef all come into play for an excellent outcome, so choose wisely.

The Russian dressing is fantastic. We added some horseradish for an additional brightness and kick. According to one reviewer, “The reason the Reuben is a great sandwich is because it contains, among its various ingredients, a good balance of all the basic flavors (sweet, sour, salt, bitter, umami). Without the horseradish the bitter is missing, and the sandwich just isn’t the sublime creation it can and should be.”

Instead of buttering the outsides of the bread, The Hubs chose to use mayonnaise as his spread. One note of caution, be very careful when flipping the sandwiches…

Reuben Sandwich

  • Servings: 4 sandwiches
  • Difficulty: easy
  • Print

Ingredients

For the Russian Dressing

  • ½ cup mayonnaise
  • 5 Tbsp. ketchup
  • 3 Tbsp. dill pickle relish (not sweet)
  • 1 Tbsp. minced onion
  • 1 tsp. yellow mustard
  • 1 tsp. Worcestershire sauce
  • 1/2 tsp. horseradish, more to taste

For the Sandwiches

  • 8 slices rye sandwich bread
  • 4 Tbsp. unsalted butter, at room temperature
  • 1 lb. thinly sliced corned beef
  • 1 cup drained sauerkraut
  • 8 slices Swiss cheese

Directions

  1. Make the Russian dressing: In a small bowl, combine all ingredients and mix well.
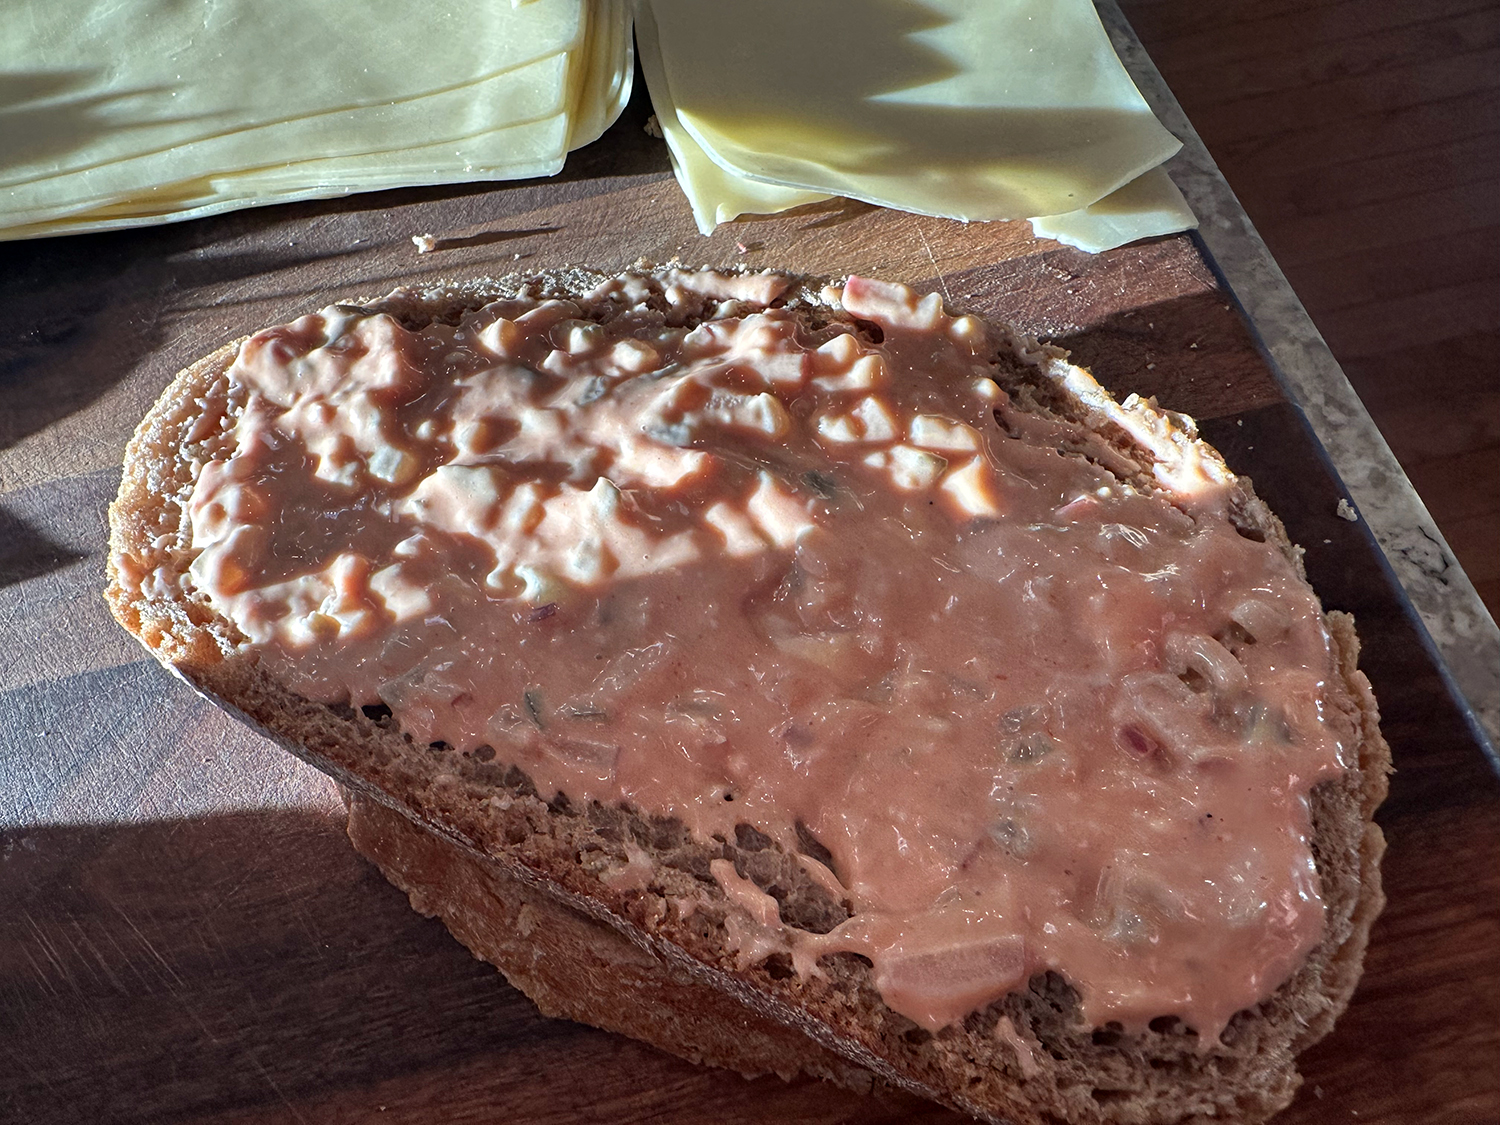
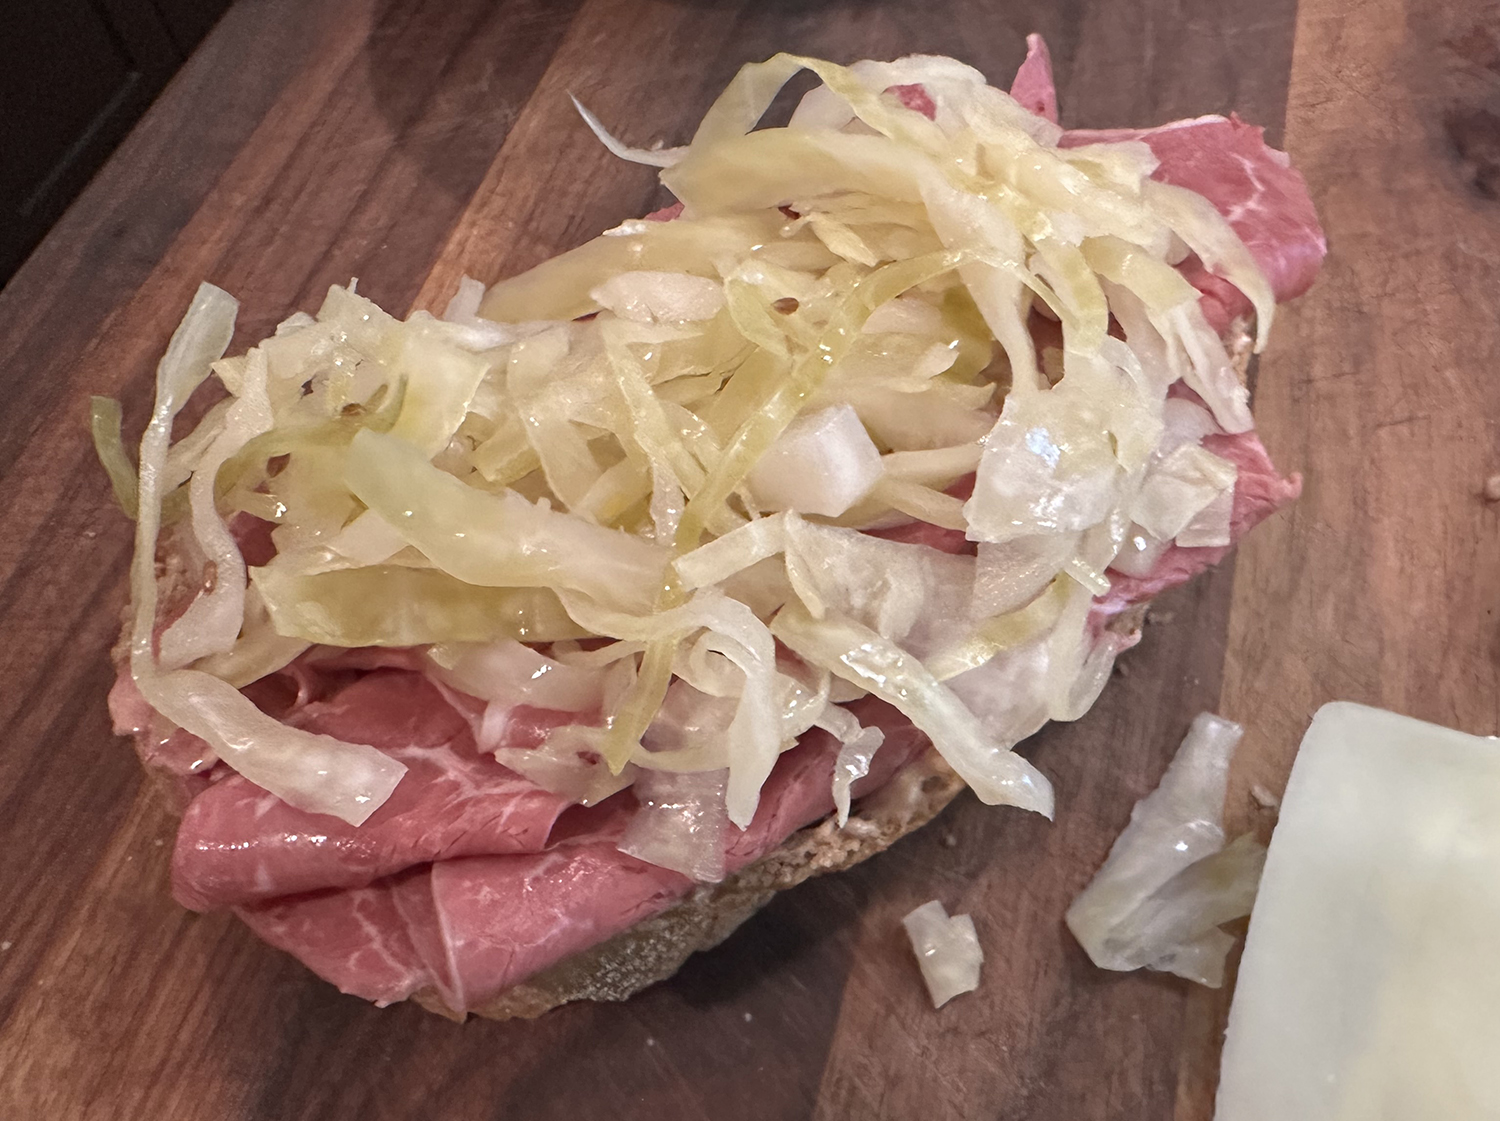
  2. Make the sandwiches: Spread one side of each bread slice with ½ tablespoon butter. In a large nonstick skillet (or flat griddle), arrange 2 slices of bread, buttered side down, over medium-low heat.
  3. Spread 2 tablespoons of Russian dressing on each slice of bread, then top each with ¼ pound corned beef, ¼ cup sauerkraut and 2 slices cheese. Top each with 1 slice of bread, buttered side up.
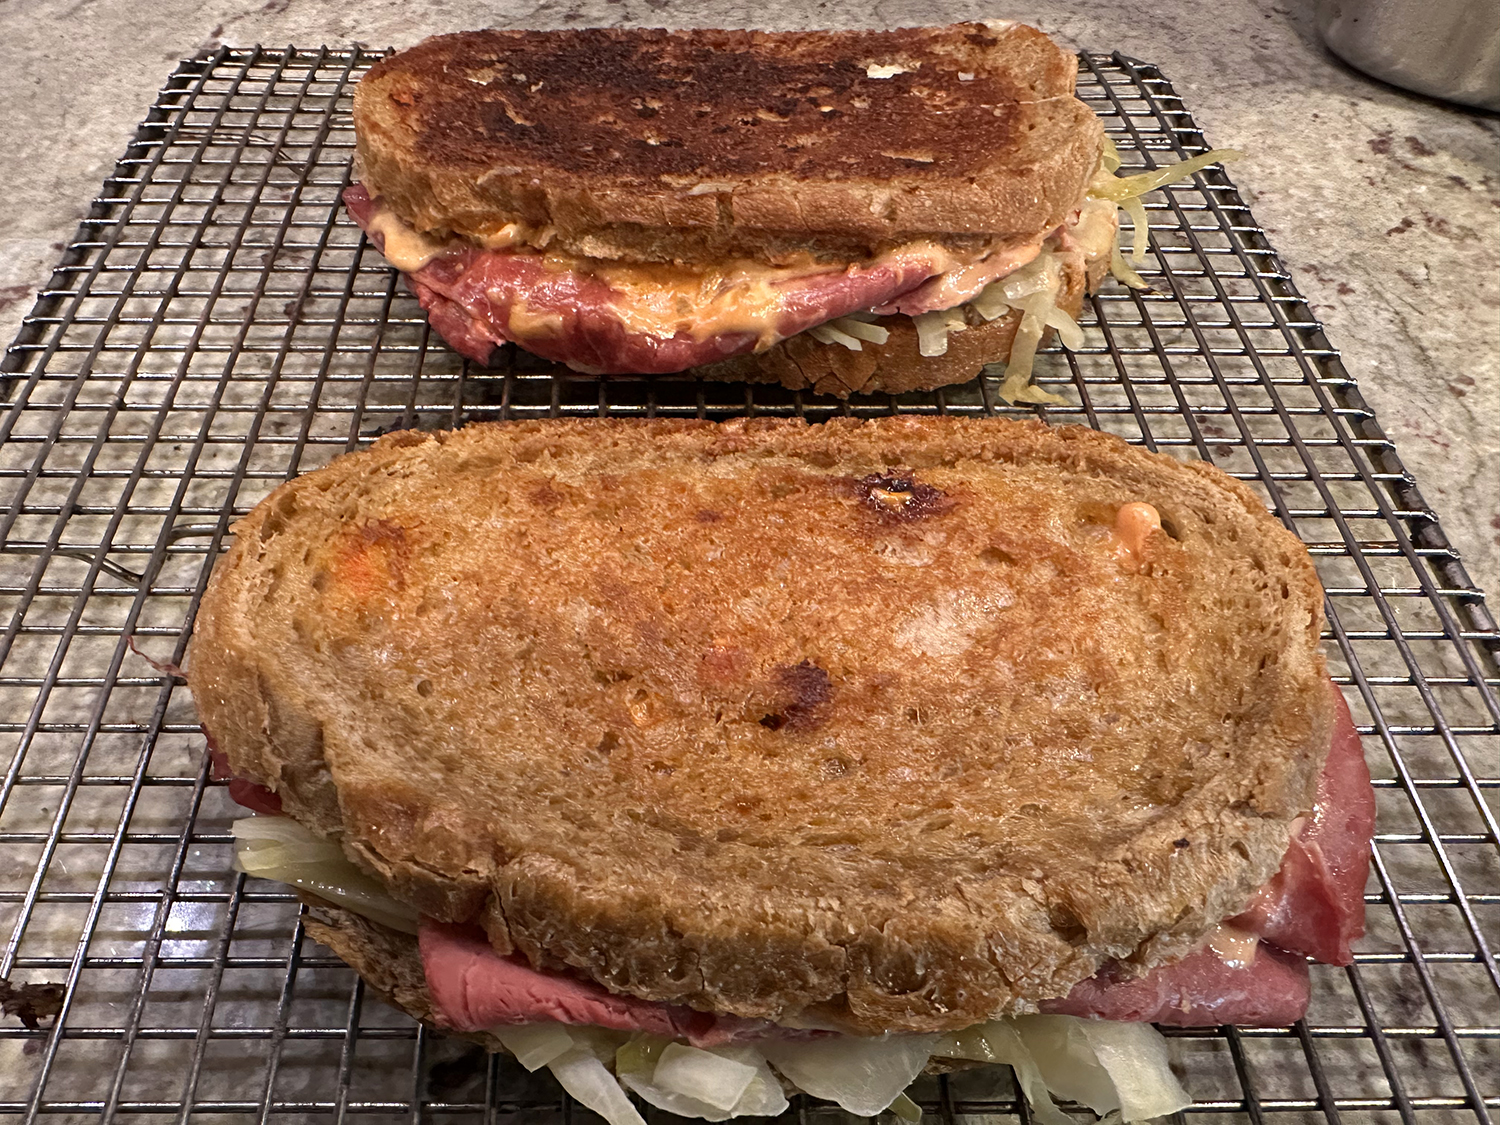
  4. Cook until golden and crispy underneath, about 5 minutes. Flip the sandwiches and cook, pressing down gently with a spatula, until second side is golden and cheese melts, about 3 minutes more.
  5. Transfer sandwiches to a wire rack for 5 minutes so that bread doesn’t get soggy underneath before putting them on plates. Wipe out skillet, and repeat with the remaining bread, sauce, corned beef, sauerkraut and cheese. Serve warm.

http://www.lynnandruss.com

Original recipe from Kay Chun for NYTimes Cooking

Shrimp Saganaki

Attending a Greek dinner party, we were tasked with supplying an appetizer to go with the theme. After a bit of a search, we decided on the Shrimp in a Skillet with Feta and Tomatoes from our “My Greek Table” cookbook by Diane Kochilas.

This Greek recipe is a taverna classic and beloved all over Greece, AND in Greek restaurants all over the world, too. It’s also very easy to prepare at home and can be served as a meze or as a main course. It’s delicious over rice or pasta, too.

There were a total of 10 guests at the party so we decided to double the recipe which required cooking the shrimp in two batches. Lucky for us, there were some leftovers which we served atop a bed of orzo for dinner a couple of days later.

Shrimp Saganaki

  • Servings: 4-6
  • Difficulty: easy
  • Print

Ingredients

  • 1 ½ lbs. large shrimp cleaned, with heads and tails intact
  • 6 Tbsp. ouzo
  • Juice of 1/2 lemon, strained
  • 4 Tbsp. extra virgin olive oil
  • 1 large red onion finely chopped
  • 1 large garlic clove minced
  • 1 green chile pepper (such as Anaheim), seeded and finely chopped
  • 2 cups chopped or grated fresh tomatoes, or diced canned tomatoes
  • Salt and freshly ground black pepper
  • 1 tsp. finely grated lemon zest
  • 2/3 cup Greek feta cheese, crumbled
  • 2 tsp. dried oregano
  • 2 Tbsp. finely chopped flat-leaf parsley

Directions

  1. Place the shrimp, 3 tablespoons of the ouzo and the lemon juice in a bowl. Cover, and refrigerate for at least 15 minutes or up to 2 hours.
  2. In a large, deep skillet, heat two tablespoons of the oil over medium heat. Add the onion and chile and cook, stirring until wilted, about 8 minutes. Stir in half the garlic. Add the tomatoes and bring to a simmer. Season lightly with salt and pepper. Raise the heat to medium-high and cook for 15 minutes, until most of the watery liquid from the tomatoes has evaporated.
  3. In a separate large skillet. heat the remaining two tablespoons of olive oil over medium-high heat. Add the shrimp and remaining garlic, toss to combine and cook until the shrimp turn pink. Carefully spritz with the remaining 3 tablespoons ouzo; it may flame up a bit.
  4. Add the shrimp and pan juices to the tomato sauce. Stir in the lemon zest and feta. When the feta starts to melt, gently stir in the oregano and parsley. Remove from the heat and serve.

http://www.lynnandruss.com

Adapted from a recipe by Diane Kochilas

Braised Chicken with Olives and Capers

With chicken being the most popular meat in America, it’s no wonder there are an endless variety of recipes worth your time and effort! This lovely Mediterranean-influenced braised dish from Williams Sonoma’s Test Kitchen is right up there with the best of them.

Braising chicken in white wine instead of red results in a lighter, brighter flavor, which in this recipe is heightened with piquant olives and capers. If desired, serve with a good loaf of bread, some mashed potatoes, or polenta so you can soak up the flavorful braising liquid, because it is worth every drop.

Instead of cutting up a whole chicken, you could certainly save some time buying a selection of bone-in, skin-on pieces such as thighs, breasts and legs. For us, the positive in using an entire bird, is saving the leftover parts (back, wingtips, etc.) for making home made stock at another time.

The regular amounts of white wine (3/4 cup) and chicken broth (2 1/2 cups) were way too much, thus causing the reduction time to increase considerably, from 5 to 20 minutes. The opposite was true of braising the chicken. Instead of the hour to hour-and-a-half noted in the original directions, the pieces were overdone after only 45 minutes.

To offset the chicken (especially white meat) from being overcooked, the oven temp gets lowered down to 325°F (braises are typically low heat). Additionally, pile the breast pieces on top of the dark meat 15 minutes after the the braise goes into the oven. In Step 3, the stovetop burner was reduced to medium. All of our corrections are noted in the recipe below.

To complete our meal, we served the chicken with sides of glazed carrots and a potato-parsnip mash. WOW, was that sauce amazing!!

Braised Chicken with Olives and Capers

  • Servings: 4
  • Difficulty: easy
  • Print

Ingredients

  • 1 whole chicken, about 3 1/2- to 4-lb, cut into 8-10 serving pieces
  • Kosher salt and freshly ground pepper, to taste
  • 1 Tbsp. olive oil
  • 3 Tbsp. unsalted butter
  • 1 onion, diced
  • 2 garlic cloves, chopped
  • 1/2 cup dry white wine
  • 1 1/2 cups chicken broth, preferably homemade
  • 3/4 cup pitted olives, such as Kalamata, halved
  • Zest of 1 lemon, peeled into strips using a vegetable peeler and
      then julienned
  • 3 Tbsp. capers, drained and rinsed
  • 2 tsp. fennel seeds
  • 8 oz. cup cherry tomatoes

Directions

  1. Preheat an oven to 325ºF.
  2. Pat the chicken dry and season with salt and pepper. In a Dutch oven over medium-high heat, warm the olive oil. Working in batches, brown the chicken on all sides, 8 to 10 minutes per batch. Transfer the chicken to a plate and carefully pour the fat from the Dutch oven.
  3. Reduce heat to medium. Add the butter to the Dutch oven. When it has melted, add the onion and sauté until translucent, 4 to 6 minutes. Add the garlic and continue to cook for 1 minute more.
  4. Add the wine and cook, stirring to scrape up the browned bits from the bottom, until the wine reduces slightly, about 2 minutes. Add the broth, olives, lemon zest, capers and fennel seeds.  Return the dark meat chicken to the Dutch oven and top with the tomatoes.
  5. Cover, place the Dutch oven in the oven. After 15 minutes of cooking, place the breast pieces on top of the dark meat, cover, and cook until the chicken is tender, 20 minutes more — 35 to 40 minutes total, checking with an insta-read thermometer at 35 minutes. The breast meat should register 155° and the thigh meat should be 165°.
  6. When the chicken is cooked, transfer the chicken pieces to a plate and place the Dutch oven over medium-high heat. Cook until the braising liquid is thickened a good bit, about 10-15 minutes. Season with salt and pepper and return the chicken to the Dutch oven. Serve immediately.

http://www.lynnandruss.com

Recipe was loosely adapted from one by Williams Sonoma Test Kitchen

Better-Than-My-Mom’s Chungking Pork

Although Sichuan is famous for its fiery food, the flavors in Chungking Pork are relatively mild on the heat scale, instead hitting you with a combination of three different fermented beans. However in this revised version by J. Kenji Lopez-Alt, it uses only fermented black beans, and a touch of hoisin sauce for sweetness.

Don’t forget to roughly chop the fermented beans. And if you have the time, try to marinate the pork for longer than 15 minutes. Our sliced meat did so for 3 and half hours and it turned out perfect.

In his revised recipe, it indicates it serves four. When we made it, which truth be told our pork weighed in at a bit under one pound, we didn’t even get 3 full servings, more like two-and-a-half. Something to keep in mind if you are meal planning for four people.

But lo and behold, it was absolutely delicious! A side salad rounds out the meal and provides more nutritious vegetables.

Better-Than-My-Mom's Chungking Pork

  • Servings: 3
  • Difficulty: easy
  • Print

Ingredients

For the Pork:

  • 1 lb. boneless pork loin or tenderloin cut into 1/4 by 1- by 2-inch pieces
  • 1 tsp. dark soy sauce
  • 1 tsp. Shaoxing wine or dry sherry
  • 1/4 tsp. baking soda
  • 1 tsp. cornstarch
  • 1/4 tsp. MSG (optional)

For the Sauce:

  • 2 Tbsp. dried fermented black beans, roughly chopped
  • 2 Tbsp. hoisin sauce
  • 2 tsp. dark soy sauce
  • 2 Tbsp. chicken stock or water
  • 1/2 tsp. hot red pepper flakes or ground Chinese hot chiles

For the Stir Fry:

  • 3 Tbsp. peanut, rice bran, or other neutral oil
  • 3 slices fresh ginger
  • 3 medium garlic cloves, peeled and lightly smashed with the side of a knife
  • 6 oz. green cabbage, cut into 1 1/2-inch squares
  • 2 scallions, sliced thinly on the diagonal for garnish (optional)

Directions

  1. For the Pork: Place the pork slices in a medium bowl, cover with cold water, and vigorously agitate it. Drain through a fine-mesh strainer set in the sink and press on the pork with your hands to remove excess water.
    Return the pork to the bowl and add the soy sauce, wine, baking soda and cornstarch. Stir vigourosly with your fingertips for 30 seconds. Set aside for 15 minutes at room temperature, or refrigerate for up to 8 hours.
  2. For the Sauce: Combine the fermented black beans, hoisin sauce, hoisin sauce, water or broth, and red pepper flakes in a small bowl and mix with a fork until homogenous.
  3. For the Stir-fry: Heat a wok over high heat until lightly smoking. Add 1 tablespoon of the oil and swirl to coat. Add 1 slice of the ginger and 1 garlic clove and let sizzle for 5 seconds. Immediately add the cabbage and stir-fry until lightly translucent and browned in spots, 1 to 2 minutes. Transfer to a large bowl.
  4. Wipe out the wok and return to high heat until lightly smoking. Add 1 tablespoon of the remaining oil and swirl to coat. Add 1 more slice of ginger and 1 more garlic clove and let sizzle for 5 seconds. Immediately add half of the pork and stir-fry until the pork is no longer pink and is mostly cooked through, about 1 minute. Transfer the pork to the bowl with the cabbage, wipe out the wok, and repeat with the remaining oil, ginger, garlic and pork.
  5. Return all the pork and cabbage to the wok. Add the sauce mixture and toss until the cabbage and pork are coated evenly. Transfer to a serving platter and serve immediately with steamed rice.

http://www.lynnandruss.com

Recipe from J. Kenji Lopez-Alt’s cookbook “The Wok”

Roasted Mushroom Soup

If you love mushrooms, then you must try this soup from Ali Slagle (for NYTimes cooking). It is noted that you don’t need fancy mushrooms to make a rich soup, you just need to brown them. To do that, spread creminis — no need for fancier mushrooms here — on a sheet pan and roast them until they’re juicy. Pour off and save the umami-heavy juices which will provide a savory backbone to the soup; then keep roasting the mushrooms until they’re glistening brown.

Blending so many mushrooms with plain water (or preferably stock, if you have some) creates a thick soup, not to mention one with a deeply earthy flavor. While the soup has a lot of flavor, it lacks in looks unless garnished with color and texture. For a more substantial meal, top with croutons (as shown), farro or sautéed spinach, or serve alongside buttered toast, roasted sausage or a green salad. Lots of options to round out the meal!

Roasted Mushroom Soup

  • Servings: 4
  • Difficulty: easy
  • Print

Ingredients

  • 2 lbs. cremini mushrooms, halved, quartered if large
  • 2 shallots, cut into wedges
  • 2 garlic cloves, minced
  • 4 thyme sprigs, plus 1 Tbsp. leaves for serving
  • ¼ cup extra-virgin olive oil
  • 2 Tbsp. soy sauce
  • Salt and black pepper
  • 3 cups water, or chicken broth
  • 2-3 Tbsp. sherry
  • ¼ cup heavy cream, plus more for serving

Directions

  1. Heat the oven to 400 degrees. On a sheet pan, toss together the mushrooms, shallots, thyme, oil and soy sauce until well combined. Sprinkle with salt and pepper and spread into an even layer.
  2. Roast until the mushrooms are pooling in liquid, about 15 minutes. Carefully pour the liquid into a small bowl and reserve. Return the sheet pan to the oven and roast, stirring occasionally, until browned, another 25 to 30 minutes.
  3. Discard the thyme sprigs and set aside ½ cup of the roasted mushrooms. If using an immersion blender, transfer the remaining mushrooms to a pot, or transfer to a regular blender. To the sheet pan, add some of the water (about ½ cup but no need to measure) and scrape off the stuck-on browned bits. Pour the mixture into the pot or blender, along with the remaining water, reserved mushroom liquid and sherry. Blend until smooth.
  4. Warm the soup on the stove over medium-high. Turn off the heat and stir in the cream. Taste; if the flavor is bland, add salt and pepper; repeat until the mushroom flavor is pronounced. Serve topped with a drizzle of cream, the reserved mushrooms and thyme leaves.

http://www.lynnandruss.com

Adapted from a recipe by Ali Slagle for NYTimes Cooking

Thai Vegetable Curry

This colorful, aromatic Thai Vegetable Curry recipe may be vegetarian, but it doesn’t skimp on flavor. Creamy coconut milk and Thai red curry paste create the perfect base for tender eggplant, crisp vegetables, and fragrant Thai basil. 

The beauty of this dish is its versatility. You can easily adjust the spice level by using less curry paste, and the vegetables can be swapped based on what you have in your fridge. We made some minor adjustments, but followed the recipe pretty closely otherwise. And it definitely has a kick to it, so cut back on the red curry paste if you have a more “delicate” palate.

Our Asian Mart was carrying Taiwan Basil as opposed to the Thai variety so we used that. And using just half of a red bell pepper? C’mon, that’s just silly, so we incorporated the entire pepper. We loved it!

Thai Vegetable Curry

  • Servings: 4
  • Difficulty: easy
  • Print

Ingredients

  • 3 Tbsp. neutral oil (such as vegetable, canola, or avocado oil)
  • 1 Chinese eggplant, sliced on an angle into ½-inch/1cm thick slices
  • 2 cloves garlic, minced
  • 2 slices ginger, peeled and minced
  • 4 oz. Thai red curry paste
  • 2 tsp. brown sugar (or palm sugar)
  • 1 small onion, cut into small wedges, root end removed
  • 1 red bell pepper, seeded and chopped into 3⁄4″ chunks
  • 1 zucchini, halved lengthwise, and sliced on an angle
  • 6 oz. green beans, ends trimmed, and cut in half crosswise
  • 5 oz. bamboo shoots, drained
  • 2 tsp. vegan fish sauce or soy sauce
  • 13.5 oz. coconut milk
  • ½ cup Thai basil leaves
  • ¼ cup roasted peanuts, chopped, optional

Directions

  1. Heat a wok or large cast iron/carbon steel skillet over medium-high heat until it just starts to smoke. Add 2 tablespoons of oil, and spread it around to coat. Add the eggplant, and stir-fry for about 7 minutes, until the eggplant is lightly browned and tender. Drizzle in a little more oil during this process if the eggplant looks dry, and try to keep it in one layer so it sears on all sides. Transfer the eggplant to a dish and set aside.
  2. Over medium-low heat, add the remaining 1 tablespoon oil to the pan, along with the garlic and ginger, and fry for 1 minute until fragrant. Increase the heat to medium-high, add the curry paste, and fry for another minute. Stir in the sugar.
  3. Add the onion, bell pepper, zucchini, green beans, bamboo shoots, and vegan fish sauce (or soy sauce/regular fish sauce), and fry for 3 minutes, until the vegetables begin to get tender. Then reduce the heat to medium, and add the coconut milk and eggplant. Bring to a simmer. (From this point on, keep the curry at a simmer. Avoid boiling it too vigorously, or the coconut milk may split.)
  4. Simmer for 4 minutes, or until the vegetables are crisp-tender. Stir in the Thai basil until wilted. Garnish with chopped peanuts if desired, and serve over steamed rice.

http://www.lynnandruss.com

Adapted from a recipe courtesy of The Woks of Life

Chicken and Chickpea Tray Bake

Another winner of a dinner from NYTImes Cooking! They claimed this easy chicken sheet-pan supper brings bold, warming flavors with minimal fuss—and they weren’t kidding. Tossed with ras el hanout, the chicken roasts alongside potatoes, sweet peppers and chickpeas, creating a richly flavored dish that practically makes its own sauce. The sheet pan may look crowded, but everything melts beautifully together as it cooks.

The peppers, potatoes and chickpeas simmer gently in the (reduced amount of) oil, while the chicken sits halfway in, its skin staying crispy as the juices mingle below. Any chickpeas peeking out get delightfully crisp, while the rest confit in the oil, becoming soft and smooth.

A finishing drizzle of sherry vinegar adds a bright, tangy kick, balancing the warm spices and bringing out the dish’s deep roasted flavors. Best of all, the prep is simple, and the oven does the rest, making this perfect for a cozy midweek dinner that still feels special. Although it does take a good bit more than one hour.

Here’s what we did differently: A huge reduction was made in the amount of oil, from 3/4 cup to just over a 1/4 cup. The quantity of Roma tomatoes was doubled from 3 to 6, and garlic from 1 head to 2. Unable to source romano peppers, we used the tricolored mini bell peppers. The potatoes were first cut in half crosswise, then sliced into small wedges. Since the homemade ras el hanout made about 2 1/2 tablespoons, the entire amount was incorporated.

TIP: It is really difficult to evenly toss all of the chicken and vegetables with the oil on the rimmed baking sheet. I used a very large mixing bowl instead. If you don’t have a large enough bowl, try oiling the ingredients in two batches before spreading onto the baking sheet.

There are numerous versions for the ras el hanout spice combination. It is a North African Spice and it’s name translates loosely to “House Blend”. It can contain as many as 50 ingredients including rosebuds and Spanish fly (say what??). If the recipe below doesn’t suit your tastes, feel free to create another mixture, or use a store-bought variety.

Chicken and Chickpea Tray Bake

  • Servings: 4-6
  • Difficulty: easy
  • Print

Ingredients

  • 6-8 bone-in, skin-on chicken thighs (about 3 ¼ lbs.)
  • 2 Tbsp. ras el hanout (store bought, or recipe below)
  • Fine sea salt and black pepper
  • 3 small Yukon Gold (or similar) potatoes, each cut into 1-inch-thick wedges
  • 1 15-oz. can chickpeas, rinsed
  • 4-6 medium Roma tomatoes, halved lengthwise
  • 4 romano peppers, halved lengthwise and stems removed (or 12 mini bell peppers)
  • 2 heads garlic, top ½ inch removed to expose the tip of each clove
  • ¼ cup + 1 Tbsp. extra-virgin olive oil
  • 2 Tbsp. sherry vinegar
  • ¼ cup roughly chopped fresh cilantro

Ras El Hanout Ingredients

Makes about 2 1/2 Tablespoons

  • 1 tsp. ground ginger
  • 1 tsp. turmeric
  • 1 tsp. salt
  • 34 tsp. sugar
  • 34 tsp. fresh ground black pepper
  • 12 tsp. cinnamon
  • 12 tsp. ground coriander
  • 12 tsp. cayenne
  • 12 tsp. ground allspice
  • 12 tsp. ground fennel
  • 14 tsp. ground cloves

Directions

  1. Heat the oven to 375 degrees.
  2. Season the chicken with the ras el hanout, 2 teaspoons of salt and a good crack of black pepper on a 13-by-18-inch sheet pan sprayed with cooking spray, and leave to marinate for 10 minutes.
  3. In a very large bowl, add the potatoes, chickpeas, tomatoes, peppers, garlic, oil, seasoned chicken thighs and 1 tablespoon of the vinegar, and gently mix so that everything is coated with oil. Spread the mixture as evenly as possible across the treated baking sheet arranging the chicken on top, skin-side up.
  4. Bake for 30 minutes, then give the pan a gentle shake to encourage everything into an even layer. Cook for another 35 minutes, until the chicken is tender and well browned.
  5. Use tongs to squeeze out the garlic cloves, discarding the papery skins. Use a fork to crush the tomatoes and the garlic cloves, then loosely mix them into the sauce. Sprinkle with the cilantro, mixing it in as well. Drizzle over the remaining 1 tablespoon vinegar before serving.

http://www.lynnandruss.com

Adapted from a recipe by Yotam Ottolenghi for NYTimes Cooking

Creamy Mushroom and Leek Pasta

The premise of a one-pot meal is always compelling. But after reading the reviewers comments from this NYTimes Cooking recipe, I decided numerous changes were necessary. It seems the original was bland (not our MO at all!), and using just one pot wasn’t the best approach.

It ended up being a deeply satisfying pasta, brimming with rich umami flavor. Once the leek, shallots, and mushrooms are caramelized and sticking to the pot, they’re deglazed to lift all the extra depth from the bottom of the pan. Using half a lemon as the original recipe suggested didn’t do such a great job of deglazing so I also dribbled in a couple tablespoons of white wine as well.

This recipe leaves the choice of mushrooms up to you: Cremini and shiitake are a good combination, but you could even use rehydrated porcinis. However, a mere 6 ounces is truly not enough, so increase the amount to at least 12, and up to 16 ounces. To round out the meal, add a green salad or side of a green vegetable such as broccolini.

Creamy Mushroom and Leek Pasta

  • Servings: 3-4
  • Difficulty: easy
  • Print

Ingredients

  • 4 Tbsp. olive oil
  • 1 leek, white part only, finely sliced
  • 1 large (or 3 small) shallots, diced
  • 2 garlic cloves, finely chopped
  • 12-16 oz. mixed mushrooms, such as cremini, shiitake or oyster, sliced
  • 1 lemon, halved
  • Zest of 1 lemon
  • 8 oz. short pasta, such as orecchiette, cavatappi, gemelli or penne
  • 2 cups vegetable or chicken stock
  • 1 Tbsp. white miso
  • 2 Tbsp. unsalted butter
  • ½ cup chopped fresh parsley, plus more for garnish
  • Kosher salt and black pepper
  • ½ to 1 cup whole-milk ricotta
  • ½ to 1 tsp. red-pepper flakes
  • ½ cup chopped parsely, more for garnish

Directions

  1. Heat a wide, deep 12-inch skillet or Dutch oven over medium-high. When hot, add 3 tablespoons of olive oil, leeks and shallots, reduce heat to medium and cook, stirring constantly, until softened and lightly golden, 5 minutes. Remove to a side dish. (In my photos, I neglected to do this before adding the mushrooms.)
  2. In the meantime, cook the pasta until al dente.
  3. Add remaining tablespoon of olive oil, garlic and mushrooms to hot pan. Cook, undisturbed, for 2 minutes, then stir and cook, undisturbed, until the mushrooms start to caramelize and stick to the bottom of the pan, another 2 to 3 minutes. (This allows the water from the mushrooms to evaporate, encouraging caramelization.) Return the leeks and shallots to pan with mushrooms. Add the juice of one lemon half to deglaze the pan and stir to combine. (White wine seems to do a better job of deglazing.)
  4. Drain the pasta and add it and 1 cup of the stock with miso mixed in to the pan; stir well. Add more liquid if necessary, a bit at a time. (I did not need to use any more, but if you included more pasta, you may need to do so.) Stir in the red pepper flakes.
  5. Cook for about 1 minute, turn off the heat and add the butter and parsley. Squeeze in the juice from the remaining lemon half and stir until butter is melted and dispersed. Season with salt and pepper.
  6. To serve, top with ricotta, more red-pepper flakes (to taste), and more chopped parsley.

http://www.lynnandruss.com

Chicken Tinga Tacos

We took a basic Chicken Tinga recipe using a rotisserie chicken and made tacos as our main dish. If you’ve never had it, chicken tinga has a smoky sweetness that’s hard to resist and uses easy-to-find ingredients such as tomatoes (canned or fresh), chipotle peppers in adobo, and of course, chicken.

The dish originates from Puebla, Mexico, and it falls under what a guisado: a meat or vegetable that is cooked with few ingredients and is stewy, homey, and delicious. There are many variations for this recipe so feel free to adjust to your own preferences.

The number of servings will vary depending on how and what you serve the tinga in. For us, one serving equaled two stuffed tacos and a side of rice and beans.

Not fans of anything too sweet with our meat, we reduced the amount of honey from three tablespoons down to one.

Chicken Tinga Tacos

  • Servings: 5-6
  • Difficulty: easy
  • Print

Ingredients

  • 1 Tbsp. olive oil
  • 1 medium white onion
  • 4 large cloves garlic
  • 2-4 chipotle chiles in adobo sauce (plus 1 Tbsp. of the adobo sauce)
  • 1 15-oz. can fire-roasted tomatoes
  • 1 cup chicken stock
  • 1 Tbsp. honey
  • 1 1/2 tsp. ground cumin
  • 1 tsp. dried oregano
  • 6 cups shredded cooked chicken (such as from a 3 1/2 lb. rotisserie chicken)
  • 1 bay leaf
  • Optional toppings: chopped fresh cilantro, shredded Mexican cheese blend, crumbled cotija cheese, fresh lime wedges, quick pickled red onions, sliced avocado, and/or Mexican crema
  • Corn tortillas, taco shells, or tostadas, for serving

Directions

  1. Heat oil in a large stockpot over medium-high heat. Add the onion and sauté for 5 minutes, stirring occasionally. Add the garlic and sauté for 1-2 minutes, stirring frequently, until fragrant. Remove stockpot from heat and transfer the onion mixture to a blender.
  2. Add the chipotles and 1 tablespoon of adobo sauce, tomatoes, chicken stock, honey, cumin and oregano to the blender. Cover and purée until smooth, then pour the sauce back into the stockpot.
    Alternatively, use a an immersion blender directly into the stockpot.
  3. Add the chicken and bay leaf to the sauce and toss until combined. Cook over medium-high heat for 5 minutes, stirring occasionally. Remove and discard the bay leaf.
  4. Season the chicken with salt and pepper to your taste.
  5. Serve it warm with your tortillas and choice of toppings.

http://www.lynnandruss.com

Adapted from a recipe from GimmeSomeOven.com