All posts by LynnHoll

Unknown's avatar

About LynnHoll

I have been an artist and designer all my life incorporating graphic design for websites, gardens, publications, fabrics, interior design and cooking. I am now retired from my professional job, but still create artistic visions in all forms on a daily basis.

French Chicken in a Pot

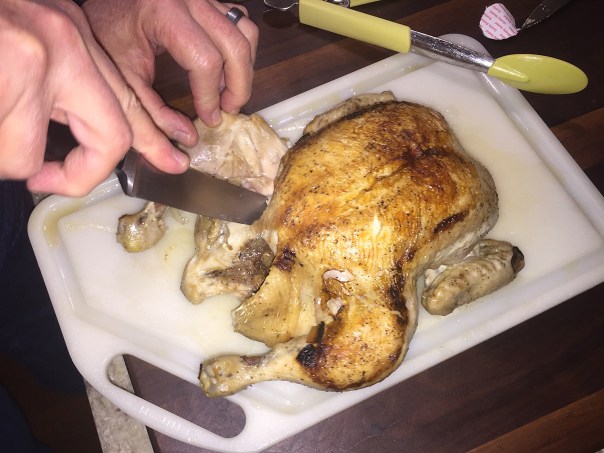
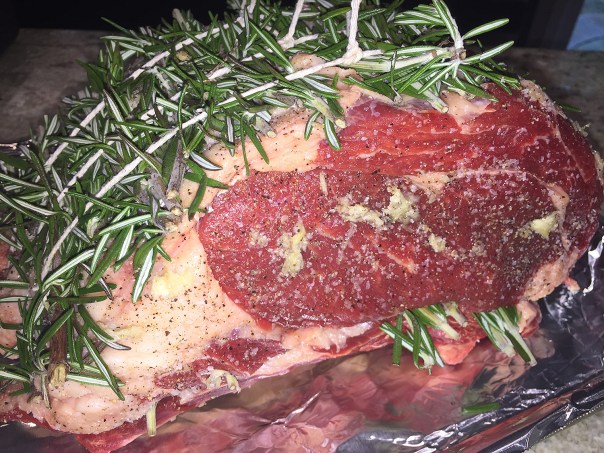
French Chicken in a Pot shares some similarities with braised chicken—both are cooked in covered pots in low-temperature ovens to yield tender, flavorful meat. Unlike braising, however, where lots of liquid is added to the pot, this chicken is placed in a dry pot and left to cook in nothing more than the essence of its own juices. The amount of incredibly yummy natural jus that comes out while cooking is amazing considering it isn’t braised in liquid.

The amount of jus will vary depending on the size of the chicken; season it with about 1/4 teaspoon lemon juice for every 1/4 cup. FYI, the cooking times in the recipe are for a 4 1/2- to 5-pound bird. A 3 1/2- to 4 1/2-pound chicken will take about an hour to cook, and a 5- to 6-pound bird will take close to 2 hours.

IMG_1227

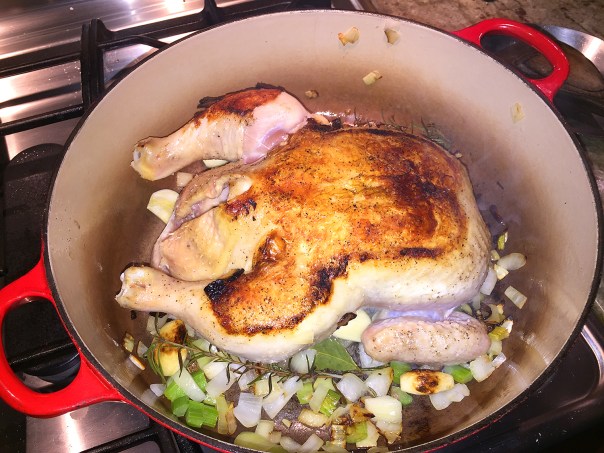
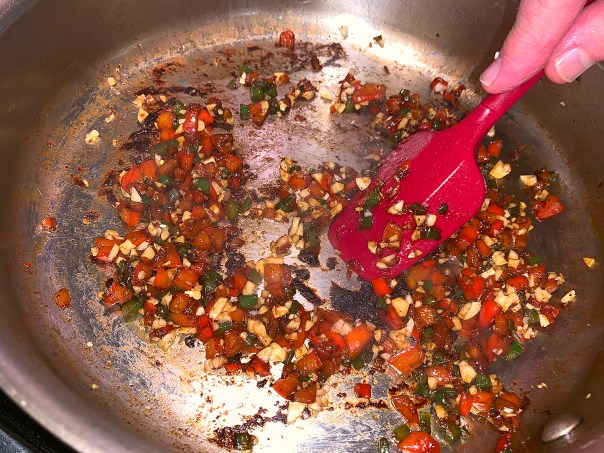
With only a handful of veggies, herbs and spices, this is one of the simplest dinners you can prepare. Next time I will scatter the onion, celery, garlic, bay leaf, and rosemary around chicken AFTER I flip the bird so that they don’t scorch. The original recipe has you add them when you first put the chicken breast side down (as seen in my photo below), but I indicated otherwise in the directions.

IMG_1211

French Chicken in a Pot

  • Servings: 4
  • Difficulty: easy
  • Print

Ingredients

  • 1 whole roasting chicken (4 1/2 to 5 pounds), giblets removed and discarded, wings tucked under back (see note)
  • 2 teaspoons kosher salt or 1 teaspoon table salt
  • ÂĽ teaspoon ground black pepper
  • 1 tablespoon olive oil
  • 1 small onion, chopped medium (about 1/2 cup)
  • 1 small stalk celery, chopped medium (about 1/4 cup)
  • 6 medium garlic cloves, peeled and trimmed
  • 1 bay leaf
  • 1 medium sprig fresh rosemary
  • ½ – 1 teaspoon juice from 1 lemon

Directions

  1. Adjust oven rack to lowest position and heat oven to 250 degrees. Pat chicken dry with paper towels and season with salt and pepper.
  2. Heat oil in large Dutch oven over medium heat until just smoking. Add chicken breast-side down. Cook until breast is lightly browned, about 5 minutes.
    IMG_1214
  3. Using a wooden spoon inserted into cavity of bird, flip chicken breast-side up and cook until chicken; scatter onion, celery, garlic, bay leaf, and rosemary around chicken. Cook until well-browned, 6 to 8 minutes.
    IMG_1216
  4. Remove Dutch oven from heat; place large sheet of foil over pot and cover tightly with lid. Transfer pot to oven and cook until instant-read thermometer registers 160 degrees when inserted in thickest part of breast and 175 degrees in thickest part of thigh, 80 to 110 minutes.
  5. Transfer chicken to carving board, tent with foil, and rest 20 minutes.
    IMG_1219
  6. Meanwhile, strain chicken juices from pot through fine-mesh strainer into fat separator, pressing on solids to extract liquid; discard solids (you should have about 3/4 cup juices).
    IMG_1221
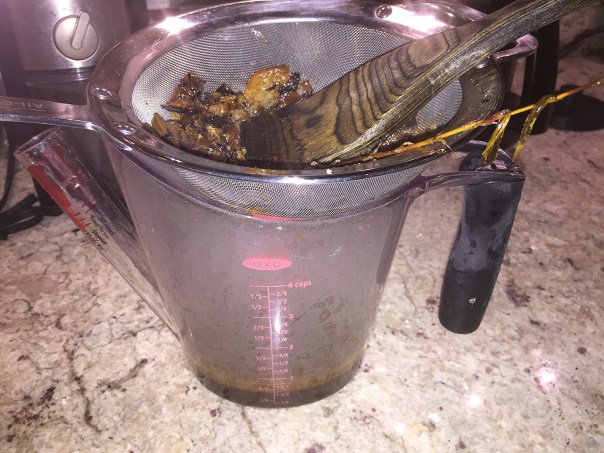
  7. Allow liquid to settle 5 minutes, then pour into saucepan and set over low heat.
  8. Carve chicken, adding any accumulated juices to saucepan. Stir lemon juice into jus to taste. Serve chicken, passing jus at table.
    IMG_1223
    IMG_1225

http://www.lynnandruss.com

Recipe from Cooks Illustrated

Roasted Brussels Sprout, Sweet Potato and Herbs

When the weather cools, there’s nothing quite like roasting Autumn veggies to bring out their caramelization. Two particularly complementary pals are Brussels sprouts and sweet potato, not only in taste but in contrasting color and texture.

Yes, it may be too late to harvest certain fresh herbs, but our rosemary, sage and thyme were still salvageable, if yours are not, just buy them at the supermarket. We served the roasted veggies as a side to crispy-skinned chicken breasts that were rubbed and basted with the same mixture of olive oil, spices and herbs, making them perfect companions on the dinner plate.

If you prefer a little crunch, top with a couple of crumbled strips of cooked smoked bacon.

IMG_8367

Roasted Brussels Sprouts, Sweet Potato and Herbs

  • Servings: 4-6
  • Difficulty: easy
  • Print

Ingredients

  • 1 large sweet potato, cut into 1″ cubes
  • 1 lbs Brussels sprouts, trimmed and halved
  • 1 1/2 Tbsp. olive oil
  • 1 1/2 Tbsp. maple syrup
  • 1 tsp. fresh rosemary, finely chopped
  • 1 tsp. fresh sage, finely chopped
  • Kosher salt
  • Fresh ground pepper
  • Optional: 2 strips smoked bacon, cooked and crumbled

Directions

  1. Preheat your oven to 400 degrees and line the bottom of a large rimmed baking sheet with parchment paper.
  2. Place the cubed sweet potatoes, and halved Brussels sprouts in a very large bowl and toss with the chopped herbs, olive oil, maple syrup, salt and pepper. Make sure to mix really well so all the vegetables are coated.
    IMG_8368
  3. Spread out in a single layer on baking sheet, trying not overcrowd the veggies—you want them to brown, not steam.
    IMG_8370
  4. Place the baking sheet in the preheated oven and bake for 20 minutes.
  5. After 20 minutes, stir around the veggies. Bake an additional 10-15 minutes until the veggies are fork tender.
    IMG_8373
  6. Transfer all the veggies into a large bowl, mix well and serve hot.

http://www.lynnandruss.com

IMG_8375

Rosemary Rib Roast with Horseradish Cream Sauce

I’ve had this blog in my “back pocket” ever since last May before the hot summer temps made their presence. I figured the weather was too hot to be appropriate for posting but now that Autumn has taken hold, it’s perfect.

Leave it to chef/author Molly Stevens to come up with an equally elegant version of a holiday fare beef rib roast for a smaller crowd, and in less time too! The high heat method here works perfectly for a small 2-rib roast. Carving the meat off the bones prior to cooking provides an opportunity to slide rosemary between the bottom of the roast and the bones adding depth of flavor to the meat.

While it is preferable to season the roast as far ahead of time as possible, it can also be done in just a few hours, which is what happened to us. Realizing it was a holiday without dinner plans (say what?), I suggested retrieving our prime rib from the freezer and making a special meal from that. (It had been a steal at the supermarket a few weeks prior at 50% off.)

IMG_3008

Our dilemma was the time factor, we had only about 7 hours until suppertime. So we did a quick-thaw method of the 5-pounder in some warm water, and then got busy thumbing through Molly’s All About Roasting cookbook to find this gem. And we highly recommend making the light and flavorful Horseradish Cream Sauce as an accompaniment.

When purchasing the meat, ask your butcher for a small-end (or first-cut) roast, meaning a roast cut from the loin end of the steer, where the meat is tender, flavorful and leaner than at the large end…

… And, you’re welcome!

One Hour Rosemary Rib Roast

  • Servings: 4-6
  • Difficulty: easy
  • Print

Ingredients

  • 1, 2-rib beef roast (4 1/2 – 5 lbs.)
  • 1 Tbsp.kosher salt
  • 3-4 garlic cloves, crushed to a paste
  • Coarsely ground black pepper
  • 14 fresh rosemary sprigs, (3-4″ each)
  • Horseradish Cream Sauce (see below)

Sauce:

  • 1/4 cup prepared horseradish sauce
  • 1 cup sour cream
  • 2 teaspoons Dijon mustard (optional)
  • 1/4 cup finely chopped green onions or fresh chives

IMG_2994

To make sauce: In a medium bowl whip heavy cream until it forms soft peaks. Stir in sour cream. Fold in horseradish sauce and Dijon mustard. If desired, top with green onions or chives.

Directions

  1. Carve the meat off the bones. Season the meat(and the bones) all over with salt and pepper, and rub with garlic paste.IMG_2974
    IMG_2981
    IMG_2985
  2. Wrap the roast in rosemary sprigs. Begin by laying 3 lengths of kitchen string long enough to wrap generously around the roast.
  3. Set the rack on the strings. Now arrange at least 4, preferably more, rosemary sprigs on the bones perpendicular to the ribs.
    IMG_2986
  4. Place the roast back on the ribs on top of the rosemary and add the remaining sprigs around the top circumference running in the same direction as the ones underneath.
  5. Tie the strings tightly around the roast (helpful to have someone else assist you). Once it is secured, set the roast on a tray or in a shallow baking dish and refrigerate, loosely covered for 4 hours, or up to 1 to 2 days. Let sit at room temperature for 2 hours before roasting.
    IMG_2987
  6. Heat the the oven to 450 degrees, 425 for convection.
  7. Place the roast on a heavy-duty rimmed baking sheet or in a shallow roasting pan not much bigger than the roast itself. (No need for a rack.)
    IMG_2997
    Our expensive oven thermometer has been on the fritz (low battery maybe?), so we used an instant-read in the end.
  8. Roast in the oven for 1 hour, then check the meat by inserting an instant-read thermometer in the center—the internal temperature of about 115 degrees for rare, or 120-125° for medium-rare. As you check for doneness, keep in mind that the high heat will cause the temp to rise rapidly. Once the roast gets above 100°, check every 5 minutes or so.
    IMG_2998
  9. Transfer the roast to a carving board, and rest for 20-30 minutes. Snip the strings, discard the charred rosemary, lift the meat off the bones, and cut it into 1/4-to-1/2-inch-thick slices.
    IMG_3001
    IMG_3003
  10. Spoon any juices over the meat as you serve it, and pass the horseradish cream sauce. (And you may have to fight over who gets the luscious bones to gnaw on!)
    IMG_3006

http://www.lynnandruss.com

Recipe from Molly Stevens “All About Roasting”

When In Spain, Again…

We’ve been traveling in Southwest Spain for about two weeks now, and I plan to post a more extensive blog once I’m settled back home. But I just couldn’t miss this opportunity to gush over a recent a “entrante” (first course) we shared at El Blanquillo in Ubeda, Jaen Province.

An FYI, Jaen is the olive capital of the world and while driving the countryside, all one can see is miles and miles of olive groves, a patchwork quilt if you will. Tomorrow we get to enjoy a personal 3-hour visit and tasting at the Oleotourismo in Begijar… but that’s another blog…

Alcachofas con Jamon y Queso Gratinada, otherwise known as Artichokes with Spanish Ham and Cheese, was absolutely divine! Since we were splitting the dish, they gave us four stuffed artichokes as opposed to the usual three.

Now I can’t guarantee this selection will be as good anywhere else (the rest of our meal was top-notch also), but I certainly want to give it a go once we are home and artichokes are in season!

Stay tuned for more postings on Spanish cuisine sometime in the near future…

Sweet or Hot, Your Choice

Orecchiette with Sausage and Arugula—A ragu of ground pork and wild fennel from Sardinia served as the inspiration for this quick and easy pasta dish. Dry vermouth and citrusy lemon zest perfectly balance the richness of the Italian sausage and the pepperiness of baby arugula.

IMG_4749

Orecchiette is a coin-sized, saucer-shaped pasta ideal for catching flavorful bits of sausage, scallions and fennel seeds; if you can’t find orecchiette, small shells and cavatelli work well, too.

Our preference is usually for the hot spicy sausage but I went with the sweet this time around. And as is customary for us, I reduced the amount of pasta down from one pound to 12 ounces (which is how many boxes are packaged nowadays anyway). It’s easy to do, but don’t forget to reserve 1 cup of the pasta cooking water before draining the pasta. You will need it to build the sauce.

IMG_4739

Orecchiette with Sausage and Arugula

  • Servings: 4-6
  • Difficulty: easy
  • Print

Ingredients

  • 1 lb. orecchiette pasta
  • 1 Tbsp. extra-virgin olive oil, plus more to serve
  • 1 lb. sweet or hot Italian sausage, casing removed
  • 2 bunches scallions, sliced, white and green parts reserved separately
  • 4 medium garlic cloves, chopped
  • 2 tsp. fennel seeds
  • ÂĽ cup dry vermouth or white wine
  • 1 tsp. grated lemon zest
  • 5 ounce container baby arugula, roughly chopped
  • 1½ ounces parmesan cheese, finely grated (Âľ cup), plus more to serve

Directions

  1. In a large pot, bring 4 quarts water to a boil. Add 2 tablespoons salt and the pasta, then cook, stirring occasionally, until just shy of al dente. Reserve 1 cup of cooking water, then drain. Return the pasta to the pot.
  2. While the pasta cooks, in a 12-inch skillet over medium-high, heat the oil until shimmering. Add the sausage and cook, breaking it into small chunks, until well browned, 6 to 8 minutes.
    IMG_4740
  3. Using a slotted spoon, transfer to a paper towel–lined plate, then pour off and discard all but 1 tablespoon of the fat.
  4. To the fat in the pan, add the scallion whites, garlic and fennel seeds. Cook over medium, stirring, until the scallions are softened, 2 to 3 minutes.
    IMG_4743
  5. Add the vermouth and cook, scraping up any browned bits, until most of the liquid evaporates, about 1 minute.
  6. Stir in the reserved cooking water, the lemon zest and half of the scallion greens. Bring to a simmer and cook until slightly thickened, 1 to 2 minutes.
    IMG_4744
  7. Pour the mixture over the pasta, then add the sausage. Cook over medium, stirring, until heated through, 1 to 2 minutes.
    IMG_4745
  8. Add the arugula and toss to wilt. Off heat, stir in the Parmesan.
     
  9. Serve sprinkled with the remaining scallion greens and drizzled with oil; offer additional Parmesan on the side.
    IMG_4749

http://www.lynnandruss.com

Recipe from 177milkstreet.com


Ground Beef Pad Thai

Traditional Bangkok-style Pad Thai—where it is the ultimate street food—is dry and light bodied, with a fresh, complex, balanced flavor. It should be reddish-brownish in color, not bright red and oily. It also happens to be one of the most ordered take-out dishes in America.

Commonly, Pad Thai is a stir-fry dish made with rice noodles, shrimp, chicken, or tofu, peanuts, a scrambled egg and bean sprouts. Here is an easy and approachable version made with ground beef and can be made in about 20 minutes.

The typical sauce is made with tamarind paste, palm sugar, fish sauce, and garlic. Now I’ve previously gone the make-it-yourself route, and the easiest and best way to make pad Thai is to make the sauce in advance and use as little or much as you need—which you can refrigerate up to a month; but for this quick recipe, go ahead and buy an already prepared jarred version.

Bulk up the serving size of this Beef Pad Thai recipe by adding in lots of healthy veggies like matchstick carrots, snap peas and scallions. Look for whole-grain brown-rice Pad Thai noodles to add an additional 3 grams fiber to each serving. And OK, if you insist, add in a scrambled egg or two.

IMG_0240

Ground Beef Pad Thai

  • Servings: 4
  • Difficulty: easy
  • Print

Ingredients

  • 8 ounces pad Thai rice noodles, preferably brown rice noodles
  • 2 teaspoons canola oil
  • Âľ pound lean ground beef
  • 2 cups stringless snap peas
  • 2 cups matchstick carrots
  • ½ cup chopped scallions
  • ½ cup prepared pad Thai sauce
  • Chopped peanuts, cilantro and lime wedges for serving

Directions

  1. Bring a pot of water to a boil. Cook noodles in boiling water according to package instructions until al dente. Reserve 1 cup cooking liquid and drain the noodles.
  2. Meanwhile, heat oil in a large nonstick skillet over medium-high heat. Add beef, and cook, crumbling with a wooden spoon, until browned, 4 to 5 minutes.
    IMG_0241
  3. Add snap peas, carrots and scallions, and cook, stirring often, until the peas are bright green, 2 to 3 minutes.
  4. Add sauce, the noodles and about half of the reserved cooking liquid; stir with tongs to coat. Reduce heat to medium-low; simmer, adding more of the reserved cooking liquid to moisten if necessary and stirring occasionally, until the vegetables are crisp-tender, 2 to 3 minutes longer.
    IMG_0244
  5. Serve hot with chopped peanuts, cilantro and lime wedges.
    IMG_0247

http://www.lynnandruss.com


Glazed Salmon. Eat and Repeat.

Glazed Salmon with Garlic-Miso Marinade is definitely an Asian-influenced approach brimming with pronounced flavors. If you prefer a sweeter sauce, just increase the amount of honey and use white miso instead of red. 

In case you are not familiar with miso paste, here’s a quick summary: White miso has a higher percentage or rice while red miso has more soybeans in it. A white miso is sweet while a red miso has a deep umami flavor. A white miso has a whitish to light beige color while a red miso is also reddish brown in color. White miso is used for mayonnaise and spreads while a red miso, the saltiest most pungent variety, is used for stews, braises and glazes. And they both last forever in the refrigerator. (There are also yellow and black miso pastes available.)

One pound of salmon easily satisfies two healthy portions of fish, but could also serve three people depending on appetites and other sides.

IMG_0302

Glazed Salmon with Garlic-Miso Marinade

  • Servings: 2-3
  • Difficulty: easy
  • Print

Ingredients

  • 1 Lb. salmon filet
  • 3 large cloves garlic, pressed
  • 1 Tbsp. red miso paste
  • 2 tsp. fresh grated ginger
  • 2 Tbsp. honey
  • 1/4 cup soy sauce
  • 1 tsp. sesame oil

Directions

  1. Preheat oven to 350°.
  2. Whisk together soy sauce, honey miso paste, ginger, garlic and sesame oil in medium bowl.
    IMG_0304
  3. Place marinade and salmon in a ziploc bag and marinate in the refrigerator from 1 to 12 hours.
    IMG_0305
  4. Preheat a large cast iron pan over medium-high heat with enough of peanut oil to lightly cover bottom of pan. Once the pan is extremely hot, sear the top of the salmon for about 1 minute to obtain a nice crust.
    IMG_0310
  5. Immediately flip the fish to top side up, place into preheated oven for 15-20 minutes until it reaches 125°, basting with marinade halfway through (see below).
    IMG_0313
  6. In the meantime, pour marinade out of ziploc bag into a small sauce pan. Bring medium-high heat to a boil, then reduce to a rolling simmer for about 5 minutes until reduced and thickened.
  7. Serve salmon with reduced sauce and sides.

http://www.lynnandruss.com

Grilled Lamb, Tomato, and Halloumi Skewers with Orzo Salad

It’d been over 3 years since I blogged about, or made, these tasty babies. My bad because they are delicious! In this recipe, tangy, garlicky marinade made with lots of fresh oregano pairs perfectly with full-flavored lamb. And the halloumi cheese, unlike most which melt at high heat, holds up well to grilling, so it makes a great addition to a kebab.

I made numerous changes this time around. For starters, I recalled the halloumi could easily crumble as it was threaded onto the skewer, and/or fall off into the grill, so for that reason and the fact that I wanted more of the outside to get brown and crispy, I cut it into smaller pieces and pan-fried it.

Next, I added red bell pepper and purple onion chunks to the outer ends of the skewers. This increased the veggie quotient and also utilized some leftover pieces in my vegetable bin that might otherwise have spoiled. The amount of cubed lamb was increased from 1 1/2 to 2 pounds, and the sizes of the chunks were cut a bit larger at about 1 1/2 inches.

Instead of 16 smaller cherry tomatoes, I used 10 large, but that could change depending on how many skewers you use altogether. Everything fit onto 5 for us, but if you thread the cheese, you’ll likely use more. This time I made the orzo salad which I didn’t make before, and sooo glad I did, it was a wonderful pairing with the other ingredients!

IMG_0205

Grilled Lamb, Tomato and Halloumi Skewers with Orzo Salad

  • Servings: 4
  • Difficulty: easy
  • Print

Ingredients

  • Kosher salt
  • 10 oz. (1-1/2 cups) dried orzo
  • 2 lb. boneless leg of lamb, cut into 1-1/2-inch pieces
  • 8 oz. halloumi, cut into 16 pieces, (32 if pan frying)
  • 1/3 cup extra-virgin olive oil
  • 1/4 cup red wine vinegar
  • 3 Tbs. chopped fresh oregano
  • 2 medium cloves garlic, minced
  • 1/4 tsp. crushed red pepper flakes
  • Freshly ground black pepper
  • 10-12 large cherry tomatoes
  • 1 large red bell pepper cut into 10 equal chunks
  • 1/2 large red onion, cut into 10 wedges from the outer layers, each 2 layers thick
  • 3 whole scallions, thinly sliced
  • 1/3 cup chopped fresh mint
  • 2 Tbs. fresh lemon juice; more to taste

Directions

  1. Bring a 3-quart saucepan of well-salted water to a boil. Boil the orzo according to package directions. Drain, rinse with cold water, and transfer to a medium bowl.
  2. Prepare a medium (375°F) gas or charcoal grill fire.
  3. Put the lamb and halloumi in a large bowl.
  4. In a small container with a lid, combine the olive oil, vinegar, oregano, garlic, red pepper flakes, 1 tsp. salt, and 1/2 tsp. pepper. Cover tightly and shake vigorously.
    IMG_0207
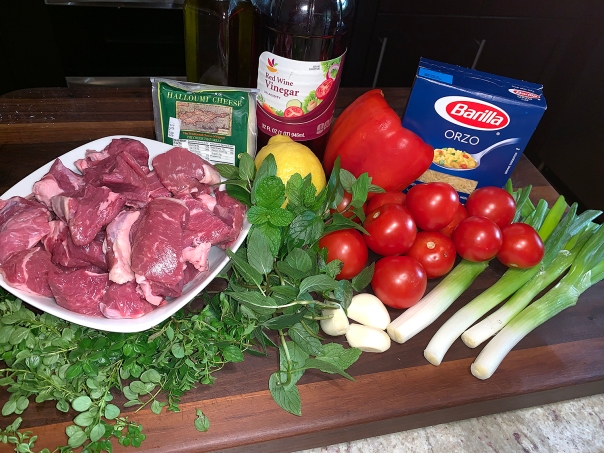
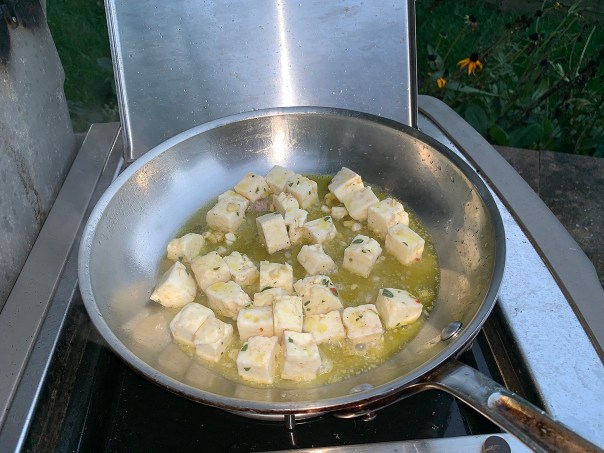
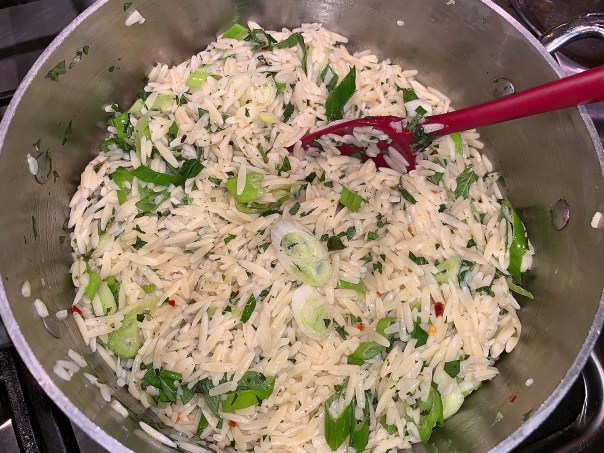
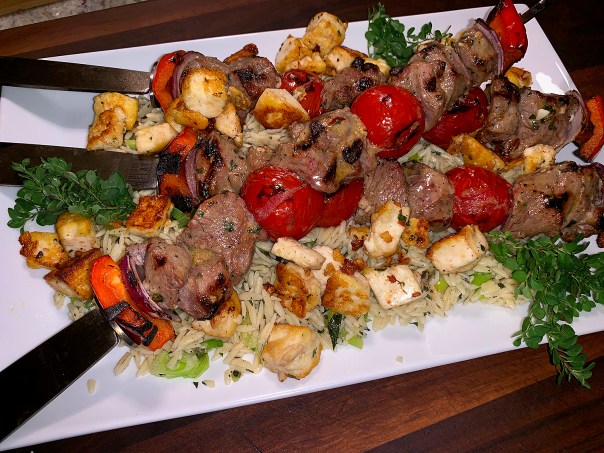
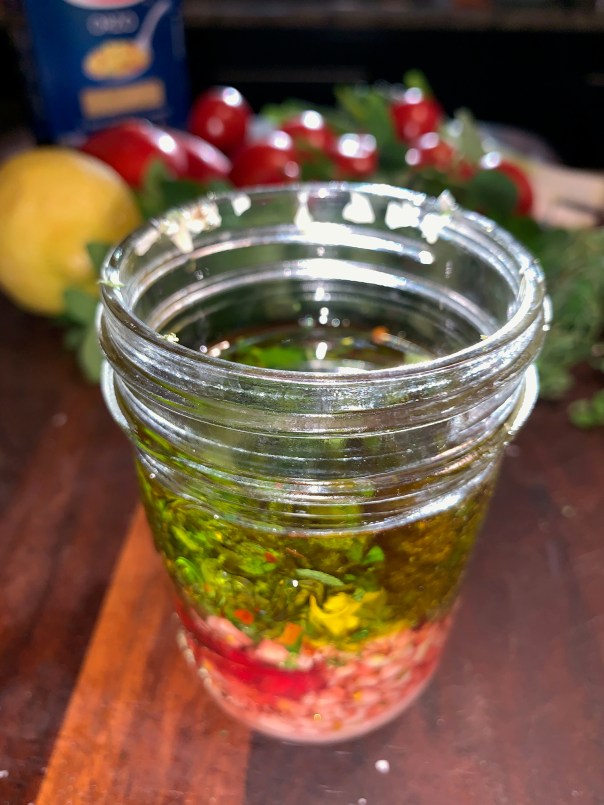
Toss the orzo with 1/3 cup of the mixture and pour the rest over the lamb and halloumi, tossing to coat.
    IMG_0209
  5. Thread skewers first with a piece of red pepper, followed onion, then by pieces of lamb, halloumi (if not pan frying), and tomatoes onto each of five to eight, 12-inch metal skewers. Alternating tomatoes, between lamb chunks and ending with onion and pepper last.
    IMG_0211
  6. Grill, turning once, until the the lamb is pink in the center (check with an instant read thermometer or cut into a piece to see), 6 to 7 minutes total.
    IMG_0215
    If pan frying halloumi, put cheese slices in a skillet over medium-high heat, turning occasionally until all sides are crispy brown.
    IMG_0217
  7. While the lamb is cooking, toss the scallions, mint, lemon juice, 1/2 tsp. salt, and 1/4 tsp. pepper with the orzo. Season to taste with more salt, pepper, and lemon juice.
    IMG_0212
  8. Serve the skewers with the orzo. If you pan fried the halloumi, arrange the cheese pieces around the skewers on the platter.IMG_0219
    IMG_0223

http://www.lynnandruss.com

Adapted from a recipe by Adeena Sussman from Fine Cooking

Tuna, Escarole and Chickpea Salad with Warm Herb-Garlic Vinaigrette

Sometimes a good salad is just the ticket to satisfy your craving. And this Tuna, Escarole and Chickpea Salad with Warm Herb-Garlic Vinaigrette is hearty enough to stand alone for dinner. Good-quality tuna is the fabulous secret weapon for this easy but satisfying meal. Its silky texture and slightly briny flavor makes this salad feel substantial.

As far as my personal adjustments, I used one 10.5 ounce jar of oil-packed tuna that provided exactly 1/2 cup of oil for the dressing; the can of chickpeas was 19-ounce as opposed to 15-ounce; and I introduced some kalamata olives for a salty bite.

Olives (a fruit rather than a vegetable) are one of those foods that you either love, or you hate—and we happen to love them! Even though they are small, they’re loaded with tons of powerful antioxidants and vitamins which give them the power to possibly prevent cancer, improve heart health, and protect us from chronic diseases and conditions like osteoporosis. What’s not to like about that?!

IMG_0086

Tuna, Escarole and Chickpea Salad with Warm Garlic-Herb Vinaigrette

  • Servings: 3-4
  • Difficulty: easy
  • Print

Ingredients

  • 10.5-oz. jar good-quality tuna in oil
  • Extra-virgin olive oil, as needed
  • 2 Tbs. minced shallot
  • 2 cloves garlic, finely chopped
  • 2 Tbs. fresh lemon juice
  • 2 Tbs. chopped fresh flat-leaf parsley
  • 1 tsp. finely chopped fresh rosemary
  • Pinch crushed red pepper flakes
  • 1 small head escarole, trimmed, cleaned, and cut into bite-size pieces
  • 1 19-oz. can chickpeas, drained and rinsed
  • 1/2 small red onion, very thinly sliced lengthwise
  • 1/2 cup pitted kalamata olives
  • Kosher salt and freshly ground pepper
  • 1 oz. Parmigiano-Reggiano, shaved with a vegetable peeler (a heaping 1/3 cup)

Directions

  1. Strain the oil from the tuna into a 1 cup measure. Add oil, if necessary, for a total of 1/2 cup. In a medium bowl, flake the tuna into large pieces and set aside.
  2. In a 1-quart saucepan, heat the oil and shallot over medium heat and cook, stirring occasionally, until softened, about 3 minutes.
  3. Add the garlic and cook until fragrant, about 1 minute. Remove from the heat, and whisk in the lemon juice, parsley, rosemary, and pepper flakes.
  4. In a large bowl, toss the escarole, chickpeas, olives and onion with enough of the warm vinaigrette to coat the greens well. Season to taste with salt and pepper.
    IMG_0089
  5. Divide the salad among four dinner plates and top each with a quarter of the tuna. Drizzle the remaining dressing over the tuna, top with the cheese, and serve.
    IMG_0096


Adapted from a recipe by Abby Simchak Donovan from Fine Cooking

Italian Sausage and Mushroom Ragu with Pappardelle

According to 177MilkStreet.com, where we got this fabulous recipe, the rich and hearty ragu was inspired by a recipe from Portland, Oregon, chef Vitaly Paley. Ground cinnamon, a hefty pour of red wine and crushed tomatoes build layers of flavor over a base of garlic, portobellos and Italian sausage.

IMG_0179

It is highly recommended that you don’t use Italian sausage links, even if the casings are removed. Bulk sausage is better because its grind tends to be finer than that of link sausage, so the meat breaks apart more readily during cooking.

Choose a full-bodied, dry red wine, such as cabernet sauvignon. Top with grated Parmesan cheese. For a pop of color and another flavor booster, garnish with a sprinkle of chopped fresh basil. It’s definitely a nice twist on pasta with meat sauce.

IMG_0157

Italian Sausage and Mushroom Ragu with Pappardelle

  • Servings: 4
  • Difficulty: easy
  • Print

4 servings, 45 min.

Ingredients

  • 2 Tbsp. salted butter
  • 5 garlic cloves, finely chopped
  • 1 Lb. portobello mushrooms, stems and gills removed, caps finely chopped
  • 2 large shallots, halved and thinly sliced
  • 1 Lb. bulk sweet Italian sausage
  • 1 cup dry red wine
  • 1½ cups low-sodium chicken broth
  • ½ tsp. cinnamon
  • Kosher salt and ground black pepper
  • 1 14½-oz. can crushed tomatoes
  • 12 oz. dried pappardelle pasta
  • Grated Parmesan for serving

Directions

  1. In a 12-inch skillet over medium, heat the butter and garlic until the butter has melted and the mixture has begun to sizzle.
  2. Add the mushrooms and shallots and cook, stirring, until the mushrooms have released their liquid and the shallots have softened, about 5 minutes.
    IMG_0161
  3. Add the sausage and cook, stirring and breaking the meat into small pieces, until no longer pink, 8 to 10 minutes. Discard any accumulated fat.
     

  4. Increase to medium-high and add the wine. Bring to a boil and cook, stirring, until the wine has almost completely evaporated, about 5 minutes.
  5. Stir in the broth, cinnamon and Âľ teaspoon pepper. Continue to simmer until the broth has reduced by about half, 5 to 6 minutes.
    IMG_0167
  6. Reduce to medium, stir in the tomatoes and simmer until slightly thickened, about 5 minutes. Taste and season with salt and pepper. Set aside, covered.
     

  7. While the sauce simmers, in a large pot bring 4 quarts of water to a boil. Add the pasta and 2 tablespoons salt and cook until the pasta is al dente.
  8. Reserve ½ cup of the cooking water, drain the pasta and return it to the pot. Add the sauce and toss to coat. If needed, toss in a few tablespoons of the reserved cooking water to thin the sauce to coat the pasta.
    IMG_0173

http://www.lynnandruss.com

Chipotle Chicken and Corn Tostadas

Dig Mexican cuisine? Then you must try this twist on a weeknight dinner to break up the usual suspects of tacos, burritos, enchiladas… you get my drift. We even made our own corn tostadas—and it was super-easy. Thanks Fine Cooking for the suggestion!

Charred corn and chicken have great summery flavors, but what really makes this tostada sing is the chipotle-lime cream sauce that holds everything on the base. You can buy prepared tostada shells or, as mentioned, make them yourself following the directions in the tip below.

IMG_0229

Chipotle Chicken and Corn Tostadas

  • Servings: 4
  • Difficulty: easy
  • Print

Ingredients

  • 1 chipotle in adobo sauce, minced, plus 2-1/2 Tbs. sauce (from one can of chipotles in adobo sauce)
  • 1 Tbs. canola or vegetable oil; more as needed
  • 2 tsp. finely grated lime zest
  • 1/2 tsp. dried oregano
  • Kosher salt
  • 1 lb. boneless, skinless chicken breast cutlets
  • 3 ears corn, husked
  • 1/2 cup sour cream
  • 2 tsp. fresh lime juice
  • 8 tostada shells
  • 1/2 cup coarsely chopped cilantro
  • Lime wedges, for serving

Directions

  1. Prepare a medium-high (400°F to 475°F) gas or charcoal grill fire.
  2. In a medium bowl, combine the minced chipotle and 2 Tbs. of the adobo sauce with the oil, zest, oregano, and 1/2 tsp. salt. Add the chicken and toss to coat. Cover and let marinate in the refrigerator for anywhere between 20 minutes and 1 hour.
     

  3. Brush the corn lightly with oil and season generously with salt. Grill the chicken and corn, turning the chicken once and the corn a few times, until the chicken is cooked through, 4 to 7 minutes, and the corn is charred in spots, about 12 minutes.
     

  4. Transfer to a cutting board, let rest for a few minutes, and then cut the chicken into bite-size pieces and cut the corn off the cob. (Doing so in a small rimmed baking sheet helps keep the kernels from flying about.)
    IMG_0244
  5. Mix the sour cream with the lime juice, the remaining 1/2 Tbs. adobo sauce, and 1/4 tsp. salt. Spread evenly onto the tostada shells.
    IMG_0245
  6. Top with the corn, chicken, and cilantro. Serve with the lime wedges on the side.
    IMG_0247

To make your own corn tostadas:

Arrange eight 6-inch corn tortillas on baking sheets in a single layer. Brush lightly on both sides with canola oil and sprinkle with kosher salt. Bake in a 400°F oven, flipping once, until golden and crisp on both sides, 9 to 12 minutes.


Be careful, because there’s a fine line between when they are done and when the tostadas are overdone, so keep a close eyeball on them.

http://www.lynnandruss.com

Recipe by Ruth Kaplan from Fine Cooking

Steak and Sauce: An Iconic Duo Sure to Impress

We are all familiar with iconic pairings such as peanut butter and jelly, gin and tonic, movies and popcorn, football and beer, to suggest just a sampling. But few duos impress like steak and sauce, am I right? Well this Seared Skirt Steak with Garlicky Tequila-Lime Salsa Verde recipe will surely win you over if you harbor any doubt at all.

IMG_0137

No grill required. Here, a sautéed steak is drizzled with an elegant pan sauce made from basic pantry ingredients that comes together in about a half hour or less. The dressy preparation demands remarkably little effort on your part.

The warm butter sauce riffs on both a familiar marinade and the ubiquitous Central American green salsa. It is a lot of butter, I agree, so if that bothers you, just be judicious on the amount you allow yourself—because it is sooo worth it; and your steak is a sponge for the intense flavors of the sauce.

Skirt steak—cherished in cuisines around the globe—is a long, thin cut from the beef plate between the brisket and flank. It is best prepared with high heat and quick cooking to preserve the chewy texture and ensure it stays as tender as possible. To maximize tenderness, slice the steak against its clearly defined grain.

If you liked this recipe, Fine Cooking has several more to pair with skirt steak. Chances are, I will be posting some of these in the near future:

IMG_0122

Seared Skirt Steak with Garlicky Tequila-Lime Salsa Verde

  • Servings: 4
  • Difficulty: easy
  • Print

Ingredients

  • 1-1/2 lb. skirt steak, trimmed of excess fatty patches, cut into 4 even pieces, at room temperature
  • Kosher salt and freshly ground black pepper
  • 3 Tbs. olive oil
  • 1/2 medium red bell pepper, cored, seeded, and finely diced (about 1/2 cup)
  • 1 medium jalapeño, cored, seeded, and finely diced (about 1/3 cup)
  • 2 cloves garlic, minced
  • 1/4 cup white tequila
  • 4 oz. (1 stick) unsalted butter, cut into small pieces
  • 1/4 cup fresh lime juice
  • 1 bunch fresh cilantro, soaked, thoroughly dried, and coarsely chopped (about 2 lightly packed cups); more chopped for garnish
    IMG_0114

Directions

  1. Pat the steak dry, and season with 1-1/4 tsp. salt and 1/2 tsp. pepper.
  2. Put a large, heavy-based stainless-steel skillet over medium-high heat for 1-1/2 minutes (it’s ready when a droplet of water instantly evaporates upon hitting the surface). Add 2 Tbs. of the oil. Once it’s shimmering hot, about 30 seconds, carefully add the steaks, evenly spaced. (We needed to do this in 2 batches because all 4 steaks would not fit in the pan at once.)
  3. Cook the steaks, undisturbed, until brown around the edges and a corner easily pulls up when lifted with tongs, about 3 minutes.
  4. Flip and cook the other side until medium rare, 2 to 3 minutes more; if checked with an instant-read thermometer, a thicker piece will register 130°F to 140°F and the steak will be bright pink when sliced.
    IMG_0123
  5. Transfer to a cutting board, and tent with foil. Rest for at least 10 minutes while you make the sauce.
  6. Return the skillet to the stovetop, and lower the heat to medium. Add the bell pepper, jalapeño, and remaining 1 Tbs. of the oil, sprinkle with 1/4 tsp. salt, and cook, stirring, until the peppers soften, about 2 minutes.
  7. Add the garlic and cook, stirring, until fragrant, about 30 seconds.
    IMG_0129
  8. Raise the heat to high, and carefully add the tequila. Using a wooden spoon to scrape up the browned bits on the bottom of the pan, cook until the tequila almost completely evaporates, about 2 minutes.
  9. Remove from the heat. Stir in the butter, accumulated meat juices, then the lime juice, and then the cilantro, and whisk until the butter melts. Season with 1/2 tsp. salt and 1/8 tsp. pepper.
     

    IMG_0131

  10. Spoon the sauce over the steak, garnish with more chopped cilantro, and serve immediately.
    IMG_0141

http://www.lynnandruss.com

By Tony Rosenfeld from Fine Cooking

Non Solo Pasta

Notta justa pasta place… Non Solo Pasta (NSP), nestled into a tiny, unassuming strip mall off a major road in Morrisville, PA, this fabulous Italian restaurant has been around for decades. Although it’s not BYO, a preferred option for us, they have a full-scale bar with a long list of available wines by the glass or bottle.

Back in the early 90’s, when there weren’t a plethora of dining options close by our Yardley home, NSP was one place my Ex, neighbors and boating friends often frequented. Then for some unexplained reason, I hadn’t patronized the place in years until my friend Jeremy mentioned going there for dinner after an art opening. Bingo, great idea!

There are no shortage of Italian restaurants in our surrounding area, but having frequented most of them many times over, it was 9 months since we had dinner at NSP after that previously mentioned art opening. When trying to think of where to dine one Friday night, it popped into Russ’s noggin’, so reservations we made.

On this visit, while not packed to the gills, a good two-thirds of the tables were already taken, with what sounded like mostly regulars. Once seated we were quickly given three menus, one of Specials, another with their regular offerings, and a large booklet of drink selections. With so many tempting choices, it took us some time for reflection, so while we pondered our options, the waitress brought us water and a basket of warm crusty rolls. Instead of using the prepackaged pats of butter, we asked for, and received, a dish of EVOO with herbs and red pepper flakes for dipping.

All entrées come with a choice of soup or salad, and both times everyone ordered the side salad with baby spinach, crisp greens, cucumber slices and grape tomatoes. Our after-the-art-opening dining choices with friend Jeremy are pictured below, followed by the second visit meal selections.

garden salad

bolognese bianca
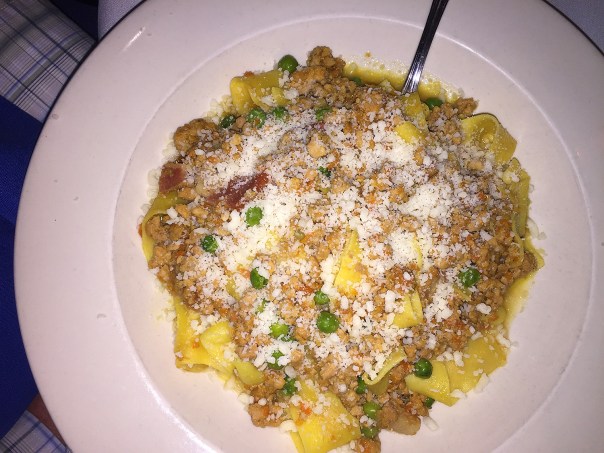
Bolognese Bianca with peas over pappardelle.

itlaian wedding soup
Italian Wedding Soup

portobello app
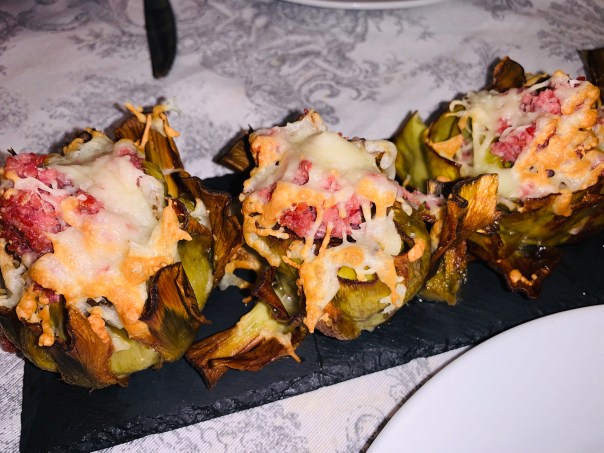
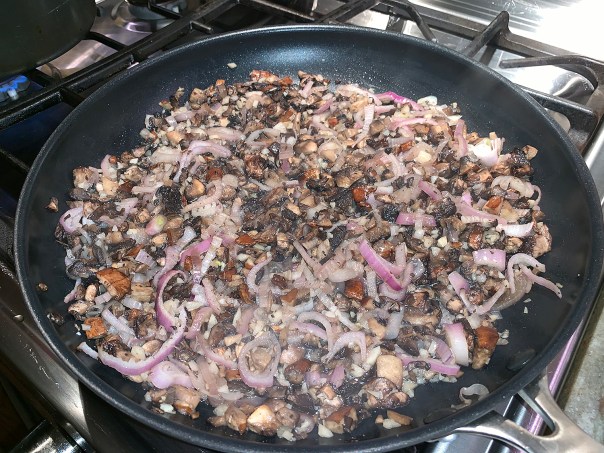
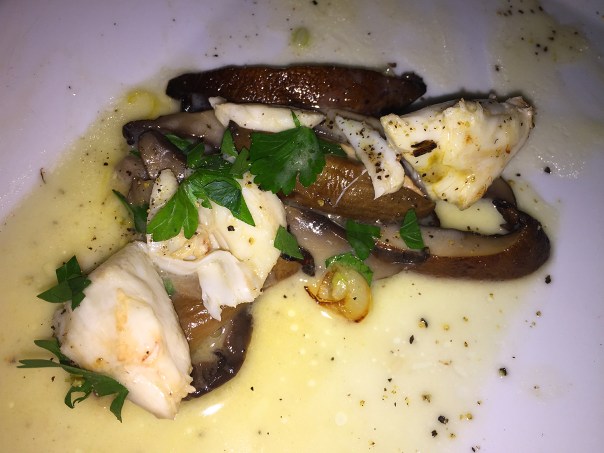
Portobello Mushroom appetizer.

raviolacci
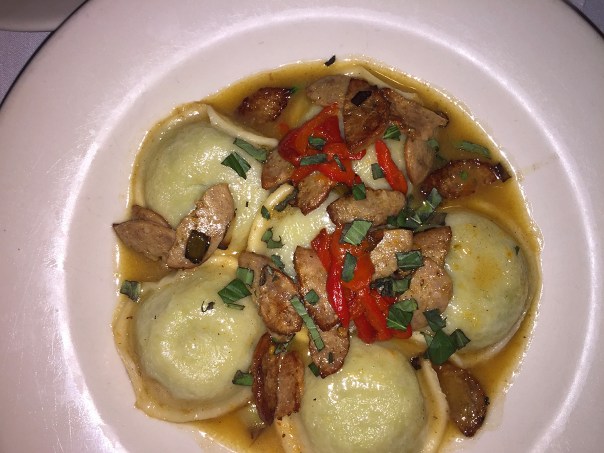
Raviolacci—Homemade ravioli filled with short ribs, sautéed mushrooms and red peppers with a parmigiano, brown butter and sage sauce.

On yet another visit with just the two of us, we first selected a bottle of wine, then we ordered the Long Hots with garlic and provolone as an appetizer. The cheese portion was unusually large (although doesn’t appear so in this photo), and we each tore off some bread chunks, dragged them through the olive oil and topped with a slice of pepper and cheese, perfecto!

Because the portions are more than ample, we both took doggie bags home, and couldn’t even fathom the idea of dessert, although based on what other diners were consuming, the desserts looked very good indeed. Non Solo Pasta will definitely go back into our rotation of Italian eating establishments.

longhots.provolone
Roasted Long Hots with garlic and sharp provolone.

chicken.sausage.cacciatore
Chicken and Sausage Cacciatore
with peppers, onions, herbs, in a light marinara, accompanied by the best side of potatoes I think I’ve ever eaten!

lamb.filettips.bolognese
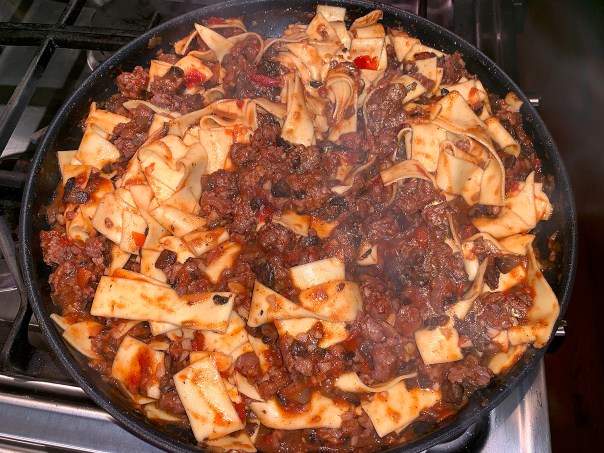
Lamb & Filet Tips Bolognese—Meat sauce with hints of a full-bodied red wine, Mutti Pomodoro over pappardelle.

We made it back again, coincidentally, after another art opening in which me and my friend Jeremy both had pieces in the exhibit. Luckily we had made an advanced reservation for 5, because the place was packed and we still had to wait for a table.

By this time, we knew that whatever we ordered, it was going to be good. The problem is trying to narrow down our choices from the regular and Specials menus. But with a bottle of red ordered, we got down to the business of choosing.

Positano—A seafood option from the regular menu, was chockfull of colossal lump crab meat with a choice of a light marina or white garlic sauce. Three of us opted for this entrée, one with penne, two over linguine, all with the marina topping.

Bronzino MediterraneoBronzino Mediterraneo—A grilled filet of Branzino accompanied by sautéed spinach and perfectly cooked asparagus in a Mediterranean Citronette was a special that night.

Veal NapoletanoVeal Napoletano—Pan sautéed veal in a San Marzano sauce with garlic, kalamata olives and capers also hailed from the regular dinner menu.

If you live or work in the area, Non Solo Pasta is a sure bet when it comes to real good Italian food. You may just want to make a reservation ahead of time…

Grilled Chicken Slouvaki

This flavor-packed dish will appeal to the Mediterranean diet-followers, white meat chicken lovers, healthy food eaters, or just those who appreciate a good home meal. Chicken Souvlaki is almost always made with chunks of boneless skinless breasts, which have a marked tendency to dry out when grilled. This is prevented by swapping the traditional overnight soak in an acidic marinade for a quick 30-minute brine while the grill heats.

IMG_0046

The chunks of chicken get tossed in a flavorful mixture of lemon, olive oil, herbs, and honey right before grilling. To prevent the end pieces from overcooking, they are protected by threading red pepper pieces on the ends. Once cooked, the chicken is tossed with reserved sauce to ensure that the exterior is nicely flavored and just as tender and moist as the interior while delivering a bright citrus punch.

Found on Cook’s Illustrated, I roughly adapted the recipe to suit our cooking needs. First, for more assertive flavor, I increased the amount of garlic in the tzatziki sauce from 1 small clove to 2 large (I mean, really?). I also introduced a red bell pepper for another pop of color and to protect the end pieces of the chicken. But most importantly, the veggies usually take longer to cook than the meat, so I threaded them on different skewers as opposed to altogether.

IMG_0022

Grilled Chicken Slouvaki

  • Servings: 4
  • Difficulty: easy
  • Print

Ingredients

Tzatziki Sauce

  • 1 tablespoon lemon juice
  • 2 large garlic clove, minced to paste (A garlic press makes quick work of turning the garlic into a paste.)
  • Âľ cup plain Greek yogurt
  • ½ cucumber, peeled, halved lengthwise, seeded, and diced fine (1/2 cup)
  • 3 tablespoons minced fresh mint
  • 1 tablespoon minced fresh parsley
  • â…ś teaspoon salt

Chicken

  • Salt and pepper
  • 1 ½ lbs. boneless, skinless chicken breasts, trimmed and cut into 1 ½ -inch chunks
  • â…“ cup extra-virgin olive oil
  • 2 Tbsp. minced fresh parsley
  • 1 tsp. finely grated lemon zest plus 1/4 cup juice (2 lemons)
  • 1 tsp. honey
  • 1 tsp. dried oregano
  • 1 green bell pepper, stemmed, seeded, quartered, each quarter cut into 4 chunks (16 pieces total)
  • Âľ red bell pepper, quartered lengthwise, 3 of the 4 slices cut into 2 chunks each (6 pieces total). Reserve the remaining slice for another use.
  • 1 small red onion, ends trimmed, peeled, halved lengthwise, each half cut into 4 chunks (8 pieces total)
    IMG_0032
  • Olive oil cooking spray
  • Steamed rice (preferably in chicken homemade stock instead of water)
  • 5 metal skewers

Directions

  1. FOR THE TZATZIKI SAUCE: Whisk lemon juice and garlic together in small bowl. Let stand for 10 minutes. Stir in yogurt, cucumber, mint, parsley, and salt. Cover and set aside.
    IMG_0028
  2. FOR THE CHICKEN: Dissolve 2 tablespoons salt in 1 quart cold water. Submerge chicken in brine, cover, and refrigerate for 30 minutes.
    IMG_0029
  3. While chicken is brining, combine oil, parsley, lemon zest and juice, honey, oregano, and 1/2 teaspoon pepper in medium bowl. Transfer 1/4 cup oil mixture to large bowl and set aside to toss with cooked chicken.
    IMG_0030
  4. Remove chicken from brine and pat dry with paper towels. Toss chicken with remaining oil mixture. (Make sure to reserve a 1/4 cup of the mixture.)
    IMG_0034
  5. Thread 1 piece of red bell pepper, concave side up, onto one 12-inch metal skewer. Thread one-third of chicken onto skewer. End with one more red bell pepper piece. Repeat on two more skewers.
  6. Thread the red onion pieces on the fourth skewer; and the green bell pieces on the final skewer. Spray each skewer of veggies on all sides with cooking spray.
    IMG_0037
  7. FOR A GAS GRILL: Turn all burners to high, cover, and heat grill until hot, about 15 minutes. Leave primary burner on high and turn other burner(s) to low.
  8. Clean and oil cooking grate. Place two veggie skewers on hot side of grill, turning a few times until charred on all sides, about 8 minutes total. Close lid between turns. Move skewers to low heat side of grill.
    IMG_0038
  9. Place chicken skewers on hotter side of grill and cook, turning occasionally, until chicken is well-browned on all sides and meat registers 160 degrees, 8 to 10 minutes. Close lid between turns.
     

  10. Using fork, push chicken and vegetables off skewers into bowl of reserved oil mixture. Stir gently, breaking up onion chunks; cover with foil and let sit for 5 minutes.
     

  11. Divide rice among 4 plates. Place chicken and veggies over the rice and serve with tzatziki sauce.
    IMG_0051

http://www.lynnandruss.com

Roughly adapted from a recipe by Cook’s Illustrated

Perfection Does Exist

OMG, this Sichuan Stir-Fried Pork in Garlic Sauce immediately garnered a spot on the short list, the VERY SHORT list! We came across the recipe on Cook’s Illustrated website and knew immediately we wanted to dine on this deliciousness. Now I know the prep is a bit time consuming and uses quite a few bowls for a weeknight meal, but it is SO worth it!

To re-create the succulent pork found in the best restaurant stir-fries (usually achieved by low-temperature deep frying), the pork is soaked in a baking soda solution, which tenderizes and moisturizes the meat, and then it’s coated it in a velvetizing cornstarch slurry, which helps it retain moisture as it cooks. And the secret to the sauce’s silken texture and rich flavor? Ketchup (not kidding) and fish sauce, both high in glutamates.

Meat soaked in a solution of baking soda and water? I admit it sounds pretty unappetizing, but there’s a good reason for it. Fact is, alkaline baking soda makes the meat more tender by raising its pH. According to Cook’s Illustrated, the tenderizing effect is twofold: First, as the meat’s fibers break down, its texture softens. Second, since the meat’s looser consistency retains water better, it’s less likely to contract and expel moisture when heated, ensuring that the meat stays juicy throughout.

Ingredient Notes: If Chinese black vinegar is unavailable, substitute 2 teaspoons of balsamic vinegar and 2 teaspoons of rice vinegar. If Asian broad-bean chili paste is unavailable, substitute 2 teaspoons of Asian chili-garlic paste or Sriracha sauce. Pork loin, the usual stir-fry choice, is lean and dry. Instead, use boneless country-style spareribs, which are fattier (they’re cut from the blade end of the loin) and more tender.

Serve with steamed white rice. The original recipe indicates it serves 4-6 people. We beg to differ. We only got 3 decent size portions, so keep that in mind when making.

IMG_0056

Sichuan Stir-Fried Pork with Garlic Sauce

  • Servings: 3-4
  • Difficulty: easy
  • Print

Ingredients

Sauce

  • ½ cup low-sodium chicken broth
  • 2 Tbsp. sugar
  • 2 Tbsp. soy sauce
  • 4 tsp. Chinese black vinegar
  • 1 Tbsp. toasted sesame oil
  • 1 Tbsp. Chinese rice wine or dry sherry
  • 2 tsp. ketchup
  • 2 tsp. fish sauce
  • 2 tsp. cornstarch

Pork

  • 12 ounces boneless country-style pork ribs, trimmed
  • 1 tsp. baking soda
  • ½ cup cold water
  • 2 tsp. Chinese rice wine or dry sherry
  • 2 tsp. cornstarch

Stir-Fry

  • 4 garlic cloves, minced
  • 2 scallions, white parts minced, green parts sliced thin
  • 2 Tbsp. Asian broad-bean chili paste
  • 4 Tbsp. vegetable oil
  • 6 ounces shiitake mushrooms, stemmed and sliced thin
  • 2 celery ribs, cut on bias into 1/4-inch slices

Directions

  1. FOR THE SAUCE: Whisk all ingredients together in bowl; set aside.
    IMG_0059
  2. FOR THE PORK: Cut pork into 2-inch lengths, then cut each length into 1/4-inch matchsticks. Combine pork with baking soda and water in bowl. Let sit at room temperature for 15 minutes.
    IMG_0060
  3. Rinse pork in cold water. Drain well and pat dry with paper towels. Whisk rice wine and cornstarch in bowl. Add pork and toss to coat.
  4. FOR THE STIR-FRY: Combine garlic, scallion whites, and chili paste in bowl.
    IMG_0062
  5. Heat 1 tablespoon oil in a large wok over high heat until just smoking. Add mushrooms and cook, stirring frequently, until tender, 2 to 4 minutes.
  6. Add celery and continue to cook until celery is crisp-tender, 2 to 4 minutes. Transfer vegetables to separate bowl.
    IMG_0069
  7. Add remaining 3 tablespoons oil to now-empty wok and place over medium-low heat. Add garlic-scallion mixture and cook, stirring frequently, until fragrant, about 30 seconds. Transfer 1 tablespoon garlic-scallion oil to small bowl and set aside.
  8. Add pork to wok and cook, stirring frequently, until no longer pink, 3 to 5 minutes.
    IMG_0075
  9. Whisk sauce mixture to recombine and add to wok. Increase heat to high and cook, stirring constantly, until sauce is thickened and pork is cooked through, 1 to 2 minutes.
    IMG_0077
  10. Return vegetables to wok and toss to combine. Transfer to serving platter, sprinkle with scallion greens and reserved garlic-scallion oil, and serve.
    IMG_0080
    IMG_0081

http://www.lynnandruss.com