Yum, Yum and YUM. Shiitake-Sesame Braised Chicken

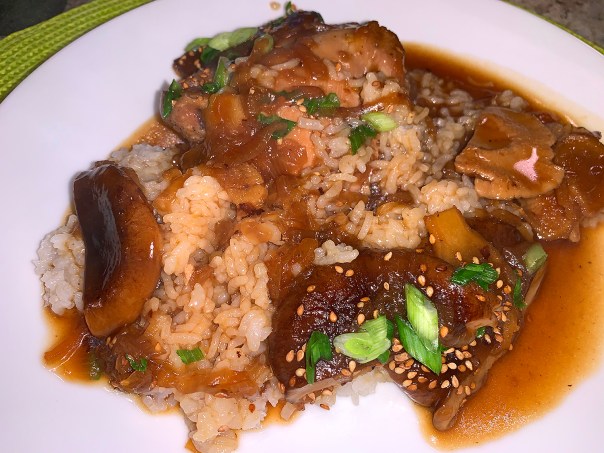
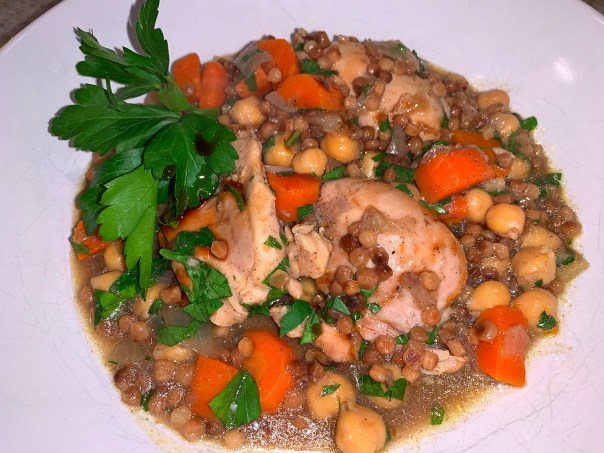
In Hong Kong, clay pot meals—called wu wei—arrive steaming with succulent marinated meat and savory rice in shops offering up to 60 combinations of toppings. Minced beef with egg. Chinese sausage with bits of salt-cured fish. Pulled chicken thighs with abalone. One constant—the flavor profile. The meat generally is marinated in a savory blend of soy sauce, sweet rice wine and oyster or fish sauce, as the recipe is here.

From Milk Street, this dish (now a favorite) packs tons of umami into the dish, while ginger adds a balancing piquancy. Although it seems a sacrilege, don’t forget to remove the chicken skins after searing. The skins are left on for browning to develop drippings that add depth to the finished dish and to render flavorful fat that’s used for sautéing the mushrooms and aromatics. But the skins will turn soggy when cooked in liquid, so remove them before nestling the thighs into the pot for braising.

IMG_4748

However, don’t necessarily discard the skin. If there’s a crispy skin lover in the family, (which typically I’m not), they will adore the treat. I tried one and was astounded by the taste and the crackle, so The Hubs proceeded to scarf the remainder as a pre-dinner nosh.

Some of you may be put off by large slices of ginger, quite the contrary for us, but if you rank among the latter group, either toss it after the cooking is done, or chop it finely at the get-go, but don’t disregard altogether.

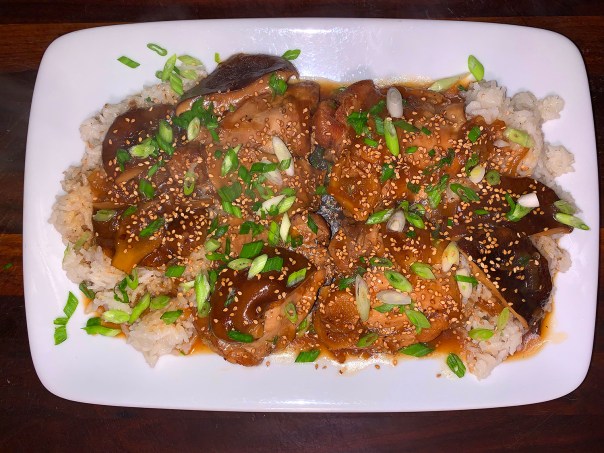
As a garnish, a sprinkle of sliced scallions add a freshness, while toasted sesame seeds lend a subtle nuttiness. I’m so glad we had leftovers for lunch the next day. YUM!

Shiitake-Sesame Braised Chicken

  • Servings: 4
  • Difficulty: easy
  • Print

IMG_4735

Ingredients

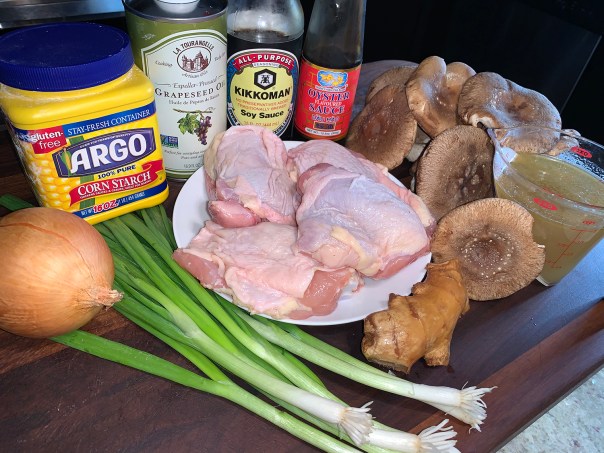
  • 2 lbs. bone-in, skin-on chicken thighs, trimmed and patted dry
  • Kosher salt and ground black pepper
  • 2 Tbsp. grapeseed or other neutral oil
  • 12 oz. fresh shiitake mushrooms, stemmed and halved
  • 1 medium yellow onion, halved and thinly sliced
  • 1 cup low-sodium chicken broth
  • 6 Tbsp. oyster sauce
  • ¼ cup low-sodium soy sauce
  • 3 Inch piece fresh ginger, peeled and thinly sliced
  • 1 tsp. cornstarch
  • Thinly sliced scallions, to serve
  • Sesame seeds, toasted, to serve

Directions

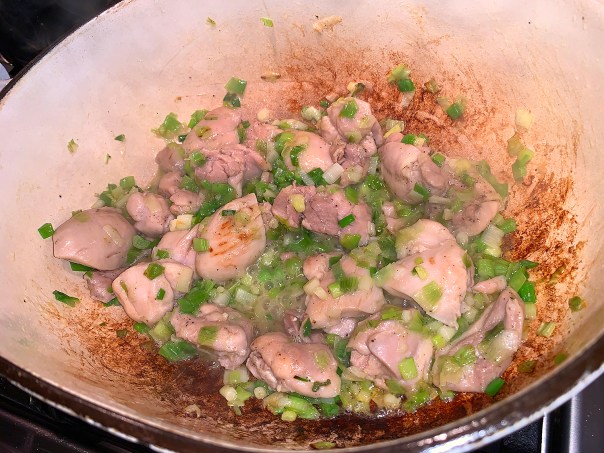
  1. Season the chicken with salt and pepper. In a large Dutch oven over medium-high, heat the oil until barely smoking. Add the chicken skin down, reduce to medium and cook without disturbing until the skin is well browned, about 10 minutes.
    IMG_4737
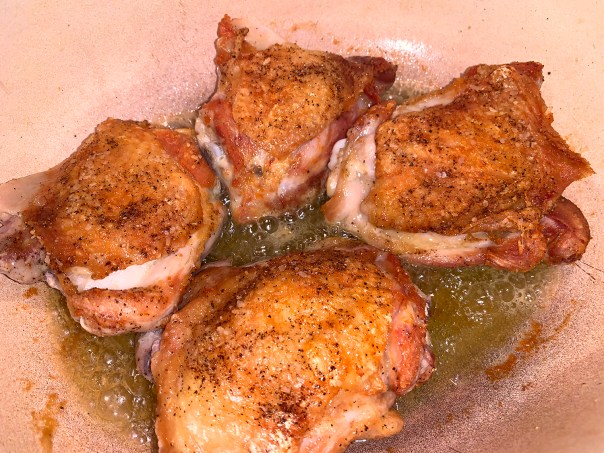
  2. Flip and cook until lightly browned on the second sides, about 3 minutes. Transfer to a large plate, then pour off and discard all but 3 tablespoons of fat from the pot. Remove and discard the skin from the chicken thighs.
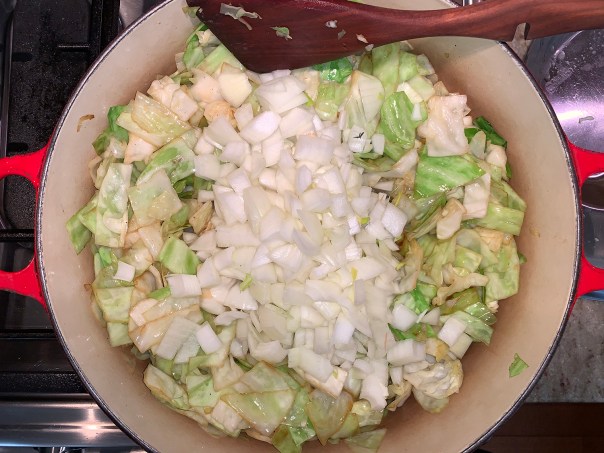
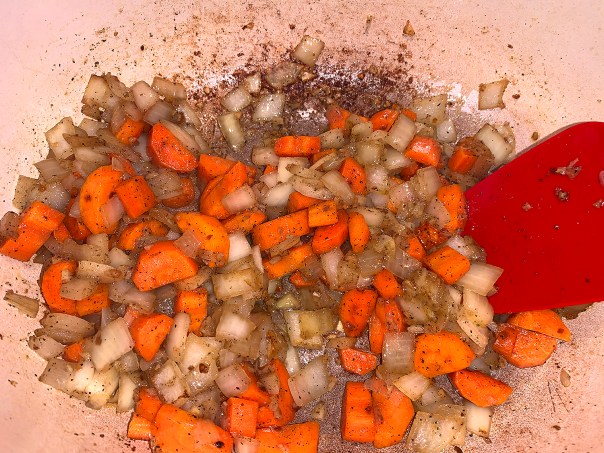
  3. Return the pot to medium and add the mushrooms and onion. Cover and cook over medium, stirring occasionally, until the mushrooms begin to brown and the onion has softened, 6 to 8 minutes.
    IMG_4742
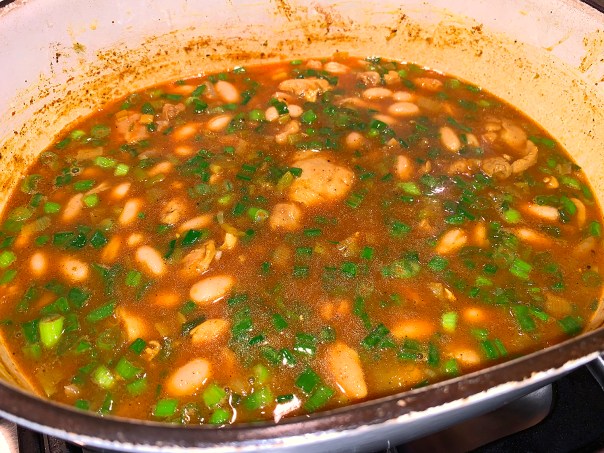
  4. Stir in the broth and 1 cup water, scraping up any browned bits. Stir in the oyster sauce, soy sauce and ginger, then bring to a simmer.
    IMG_4744
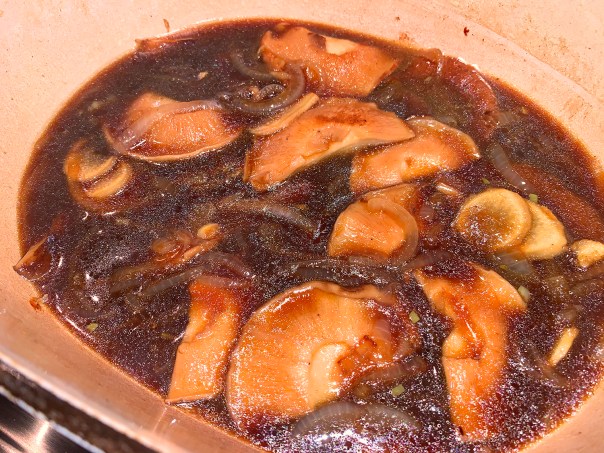
  5. Return the chicken and accumulated juices to the pot, cover and cook over medium until a skewer inserted into the largest thigh meets no resistance, about 40 minutes, flipping the pieces halfway through.
    IMG_4745
  6. Using tongs, transfer the chicken to a serving dish and cover to keep warm.
  7. In a small bowl, stir together 2 tablespoons water and the cornstarch, then whisk the mixture into the cooking liquid. Bring to a simmer over medium-high and cook, stirring constantly, until thickened, about 2 minutes.
    IMG_4747
  8. Taste and season with salt and pepper, then spoon the mushrooms and sauce over the chicken. Sprinkle with scallions and sesame seeds.
    IMG_4755

http://www.lynnandruss.com

Festoni Con Polpette Di Mamma

Another meatball recipe?? Why not, there are so many variations that it doesn’t make culinary sense to prepare the same old/same old each time. Take a walk on the wild side and break out of your solitary meatball confines. Although to be brutally honest, Mamma Gina’s Meatballs really aren’t all that novel.

But they’re definitely very good. The Hubs made them for a men’s group retreat a few weeks ago along with Sunday Sauce and the guys loved ’em! So with time on our hands, and the necessary ingredients in the house, we were good to go. In fact, I upped the fun factor by using Festoni pasta instead of the ho-hum penne or spaghetti.

IMG_4810

Festoni is a long, wide noodle, sort of like pappardelle only with curly edges, and it is swirled into little bunches that get dropped into boiling salted water. As they boil though, the nests unfurl into long strands. But of course, if you have a different shape of pasta on hand, just use that.

The sauce for this dish provides a lovely topping to pasta and the ‘bath’ for the meatballs to simmer in. No precooking or browning the meatballs beforehand. Once the meatballs are removed, the sauce carries the aroma of the meat and tastes wonderful on your pasta. Of course, we had to tweak it a bit by increasing the amount of crushed tomatoes, include additional garlic and a parmesan rind. Adjust the amount of crushed red pepper to suit your own preferences (we like it spicy).

The meatballs should be served along side the pasta, NOT on top, as that is the true Italian way.

IMG_4831

Festoni Con Polpette Di Mamma

  • Servings: about 22 meatballs
  • Difficulty: easy
  • Print

Ingredients

  • ½ lb. ground pork
  • ½ lb. ground veal
  • ½ lb. ground beef 85/15 blend
  • 1 Tbsp. chopped parsley
  • 1 Tbsp. kosher salt
  • 1 tsp. freshly ground black pepper
  • 2 eggs, beaten
  • 1 cup freshly grated Pecorino Romano cheese
  • 1 cup bread crumbs, preferably Italian seasoned
  • ½ cup milk
  • ½ cup brodo di mamma, cooled (see recipe below)

Directions

  1. In a large bowl, hand mix all the ingredients. The mixture will be very soft but resist the urge to add more bread crumbs, this makes a tender, melt in your mouth meatball!
    IMG_4816
  2. Once all the ingredients are just combined, wet your hands and pinch ¼ cup of the mixture and roll into balls. (Ours weighed about 2.2 ounces.) Place on a baking sheet.
  3. Carefully drop the meatballs into the sauce. If the pot seems to be full, simply shimmy the pot back and forth to make more room. (If you stick a spoon in the pot you will break the meatballs apart.)
    IMG_4823
  4. Allow to simmer in the sauce for 45 minutes or up to 2 hours.

*Mamma Gina’s meatballs freeze exceptionally well.  Freeze on the baking sheet and then transfer to freezer bags.  Will keep up to a month.  When ready to cook, make Mamma’s brodo and drop frozen meatballs right into the sauce.  And don’t forget to shimmy!  Cook for 1 hour or up to two.

http://www.lynnandruss.com

Brodo Di Mamma (Italian Red Sauce)

Brodo Di Mamma

  • Servings: 6-8
  • Difficulty: easy
  • Print

Makes about 8 cups of sauce

Ingredients

  • ½ cup Italian extra virgin olive oil
  • Fresh basil leaves; 5 whole, 1 Tbsp. chopped
  • 4 cloves garlic, peeled and smashed
  • 2 tsp. crushed red pepper (optional and more to taste)
  • 3 28 oz. cans crushed tomatoes
  • 2 cups of water
  • 2 Tbsp. tomato paste
  • 1 Tbsp. kosher salt
  • 1 tsp. freshly ground black pepper
  • 2″ parmesan rind, optional to throw into sauce

Directions

  1. In a small saucepan, combine olive oil with basil and garlic (crushed red pepper flakes for a spicy brodo). On very low heat, allow the basil and garlic to simmer in the olive oil for 10 to 15 minutes. This steeping process will allow olive oil to become fragrant. Careful that garlic gets toasted brown but not black.  Remove from heat and strain aromatics. Set aside.
    IMG_4813
  2. In a large pot or Dutch oven, pour in the tomato sauce and the water. Add tomato paste and salt and pepper.
    IMG_4814
  3. Pour reserved olive oil into the sauce and mix to combine. Bring to a boil and then immediately reduce to a simmer. If also making meatballs, remove ½ cup of the brodo and set aside to cool.
  4. Add parmesan rind to sauce. Partially cover the pot and allow sauce to simmer for at least 45 minutes or up to 2 hours. The longer it cooks, the better it tastes.
  5. Mix to combine in olive oil that has separated to the top and add chopped basil.
  6. Serve with your pasta of choice, in this case, festoni.
    IMG_4828

http://www.lynnandruss.com

Adapted from Mamma Gina’s Meatballs and Sunday Sauce found on annasheirloomkitchen.com

Southern Fried Cabbage, Y’all

Thanks to a conversation with cousin Maureen for introducing us to Southern Fried Cabbage. I noticed her posting on Facebook a few weeks back, and then we got to chatting via phone about our culinary endeavors while on the pandemic “lockdown.” She really gushed about how she and her husband Marty loved the dish, and I knew I had to get it into the dinner rotation soon.

Truth be told, I was a tad worried about the bacon factor. Now don’t get me wrong, I love the smell and taste of bacon, but it often doesn’t love me back. But I powered through my hesitation and went full steam with the recipe. Boy, am I glad I did, and so was the Mister.

Bacon gives it the smoky flavor that is put over the top by just enough brown sugar and apple cider vinegar—the right proportions so as not to overwhelm. The cabbage is melt-in-your-mouth tender and succulent, amazingly so because there is very little fat (just a couple of tablespoons from the bacon) and no other liquid.

Our steak entrées were first cooked in a water bath with fresh herbs and garlic. They were finished with a quick sear with a little butter and those herbs in a super-hot carbon steel pan. As a side dish, the cabbage was a perfect compliment to our medium-rare rib-eye steaks. Oh, and a glass of pinot noir didn’t hurt either… Bellísimo!

IMG_4782

Southern Fried Cabbage

  • Servings: 6-8
  • Difficulty: easy
  • Print

Ingredients

  • 5 strips bacon, diced raw
  • 1 head cabbage, chopped
  • 1 large onion, diced
  • 2 Tbsp. Worcestershire
  • 1 Tbsp. apple cider vinegar
  • 2 Tbsp. brown sugar
  • 1 tsp. garlic powder
  • Black pepper to taste

Directions

  1. Add chopped bacon to a large heavy pot such as a dutch oven.
  2. Cook bacon over medium heat until extra crispy.
    IMG_4783
  3. Remove bacon from pot, leaving the fat.
  4. Add cabbage to pot and cook over medium-high heat for 10 minutes, stirring every minute or so.
  5. Add chopped onion and continue cooking 5 more minutes, continue stirring every minute.
    IMG_4785
  6. Add Worcestershire, apple cider vinegar, garlic powder and brown sugar.
    IMG_4786
  7. Reduce heat to medium and continue cooking for 30 minutes, stirring occasionally, until cabbage is cooked through.
    IMG_4791
  8. Add cooked bacon to cabbage and taste to adjust seasonings and serve.
    IMG_4793
    IMG_4800

http://www.lynnandruss.com

Beef, Orange and Olive Stew (Boeuf À La Gardiane)

OK, now you don’t have the excuse of not enough time to make an hours-intensive recipe. As far as I know, pretty much the entire world is on lockdown due to the spread of the corona virus. And while this dish takes nearly five hours from start to finish, the pot sits in the oven for 3 1/2 of those hours, leaving you plenty of time to watch whatever show you’re currently bingeing on.

And while it’s getting all happy in the oven, the aromas will be wafting around the house teasing you into a frenzy, but be patient because the end game is truly memorable.

This hearty Beef, Orange and Olive Stew (Boeuf À La Gardiane) from Camargue, in the south of France, is traditionally made with taureau, or bull meat, but beef is a common substitute. Chuck roast is used instead because the fatty cut becomes tender and succulent with simmering.

The stew gets robust flavor from classic Provençal ingredients—red wine, olives, anchovies and garlic. Orange is traditional, too; it lends the braise a brightness that balances its depth and richness. A bold, full-bodied dry red wine such as Côtes du Rhône or syrah is ideal, as it holds its own among the other big flavors. Serve with rice, egg noodles (our choice) or potatoes.

BTW, don’t pull a rookie move and forget to zest the orange before juicing it. It’s much easier to grate the zest from a whole orange than from one that’s been halved and squeezed.

Don’t add all of the carrots to the pot with the beef. Adding some at the beginning gives the stew a subtle sweetness, but after hours of braising, these carrots are spent. More carrots are added near the end of cooking so that they are tender but still flavorful.

NO. 67: Use Less Liquid for More Flavor

IMG_4517

Beef, Orange and Olive Stew

  • Servings: 6-8
  • Difficulty: easy
  • Print

Ingredients

  • 6-7 lbs. boneless beef chuck roast, well trimmed and cut into 2-inch cubes
  • Kosher salt and ground black pepper
  • 4 Medium carrots, peeled and cut crosswise into ½-inch rounds, divided
  • 3 Anchovy fillets, patted dry
  • 2 Tbsp. extra-virgin olive oil
  • 2 Medium garlic cloves, thinly sliced
  • 1 Medium yellow onion, chopped
  • 1 Cup pitted kalamata olives, rinsed, patted dry and chopped, divided
  • 2½ Cups dry red wine
  • 1 Medium red bell pepper, stemmed, seeded and cut into 1-inch pieces
  • 1 Tbsp. grated orange zest, plus ⅓ cup orange juice
  • 2 tsp. red wine vinegar
  • 1 Cup lightly packed fresh flat-leaf parsley, roughly chopped

Directions

  1. Heat the oven to 325°F with a rack in the lower-middle position. In a large Dutch oven, toss the beef with 2 tablespoons salt and 2 teaspoons pepper. Add ½ the carrots, the anchovies, oil, garlic and onion, then toss. Cover, transfer to the oven and cook for 2 hours.
  2. Remove the pot from the oven and stir in ½ cup of the olives. Return to the oven uncovered and cook until a knife inserted into a piece of beef meets no resistance, 1 to 1½ hours.
    IMG_4524
  3. Using a slotted spoon, transfer the meat to a large bowl, leaving the vegetables in the pot. Set a fine mesh strainer over a fat separator or medium bowl. Pour the meat juices into the strainer, pressing on the solids to extract as much liquid as possible; discard the solids. You should have about 2½ cups liquid (we ended up with only 3/4 cup); if needed, add with water.
  4. Pour the wine into the now-empty pot and bring to a boil over medium-high, scraping up any browned bits. Reduce to medium and simmer, stirring occasionally, until the wine is reduced by half, about 8 minutes. Meanwhile, if you strained the meat juices into a bowl, use a spoon to skim off and discard the fat from the surface.
  5. Pour the defatted meat juices into the pot and add the remaining carrots and the bell pepper. Return to a simmer and cook, uncovered and stirring occasionally, until the vegetables are tender and the sauce is slightly thickened, 10. (After 10 minutes, cover the pot to maintain the juices and further soften the carrots, cooking for another 15 minutes.)
  6. Stir in the orange juice and beef. Continue to cook, stirring occasionally, until the sauce begins to cling to the meat, 3 to 6minutes.
    IMG_4546
  7. Off heat, stir in the remaining ½ cup olives, the orange zest, vinegar and half of the parsley. Taste and season with salt and pepper. Sprinkle with the remaining parsley.
    IMG_4547
    IMG_4550

http://www.lynnandruss.com

Adapted from a recipe by Milk Street: The New Rules.

Broiled Flank Steak, Asparagus, Scallions, and Radishes

Broiled flank steak served with nutty asparagus, charred scallions, and caramelized radishes makes an easy sheet-pan dinner—with little clean up! We were a bit skeptical of the roasted radishes, but came away converts. They were so good, especially in tandem with the other charred veggies.

IMG_4681

Remember Green Goddess Sauce? It pulled the meal together with a bright herby note. This light, creamy version is also delicious with roasted potatoes and fish, or as a dip with vegetables.

Our piece of steak weighed in a bit heavier at 2 pounds. One end was much thinner so we tucked it under the thicker portion. However, it still got done ahead of time, so we sliced the thin part off and tented with tinfoil on a cutting board with moat while the remaining ingredients continued broiling.

But then the veggies were done before the thick part of the steak, so those went under foil on a platter. Ideally everything would be a wrap at the same time, but you have to be ready to improvise if necessary.

As is, it’s a great low-carb dinner. For a heartier meal, serve with a cooked grain, such as quinoa or farro.

IMG_4656

Broiled Flank Steak, Asaparagus, Scallions and Radishes with Green Goddess Sauce

  • Servings: 4
  • Difficulty: easy
  • Print

Ingredients

For the green goddess sauce

IMG_4667

  • 2 anchovies, rinsed and patted dry
  • 1 medium clove garlic
  • 1/2 cup loosely packed fresh flat-leaf parsley leaves and tender stems
  • 2 Tbs. chopped scallions (from about 1 large scallion)
  • 1 Tbs. fresh tarragon leaves
  • 3/4 cup whole-milk yogurt
  • 3 Tbs. mayonnaise
  • 1 Tbs. fresh lemon juice
  • Kosher salt and freshly ground black pepper

For the steak and vegetables

  • 1-1/4-lb. flank steak
  • 1-1/2 tsp. granulated garlic
  • Kosher salt and freshly ground black pepper
  • Nonstick cooking spray
  • 1 lb. asparagus, trimmed
  • 1 bunch scallions, trimmed
  • 6 medium radishes, quartered
  • 2 Tbs. canola or vegetable oil

Directions

Make the green goddess sauce

  1. Put the anchovies and garlic in a mini food processor, and pulse until chopped.
  2. Add the parsley, scallions, and tarragon, and process until finely chopped.
    IMG_4658
  3. Add the yogurt, mayonnaise, lemon juice, 1 tsp. salt, and 1/2 tsp. pepper. Process until smooth. Season to taste with more salt and pepper.
    OR: To make the sauce by hand, mince the garlic, then mash with the anchovies. Put the mixture into a small bowl. Finely chop the herbs and scallions, and add to the garlic mixture. Stir in the yogurt, mayonnaise, lemon juice, salt, and pepper.
  4. The sauce can be made up to 1 day ahead. Store in the refrigerator in an airtight container.

Broil the steak and vegetables

  1. Season the steak with 1 tsp. of the granulated garlic, salt, and pepper, coating both sides. Let sit at room temperature for at least 30 minutes or up to 1 hour.
  2. Position an oven rack 4 inches from the broiler element, and heat the broiler on high. Line a large rimmed baking sheet with foil, and spray it lightly with cooking spray.
  3. Put the asparagus, scallions, and radishes on the baking sheet. Drizzle with 1 Tbs. of the oil and toss to coat. Sprinkle with the remaining 1/2 tsp. granulated garlic, and season with salt and pepper. Nudge the vegetables to the sides of the pan, keeping them in a single layer.
    IMG_4662
  4. Add the steak to the center of the pan, and drizzle with the remaining 1 Tbs. oil.
    IMG_4666
  5. Broil, flipping the steak once and stirring the vegetables, until the internal temperature of the steak is 125°F to 130°F for medium rare, about 5 to 6 minutes per side.
  6. Transfer the steak to a cutting board, and let rest for 5 to 10 minutes. Thinly slice the steak against the grain. Serve the steak and vegetables drizzled with the Green Goddess Sauce.
    IMG_4673
    IMG_4680

http://www.lynnandruss.com

Adapted from a recipe by Nicki Sizemore from Fine Cooking

Cardamom-Lime Chicken and White Beans

Another winner from Milk Street, Cardamom-Lime Chicken and White Beans. Their inspiration for this hearty braise was a chive and white bean soup from “Cooking In Iran” with some simplifications. They swapped canned white beans for the dried which saved tons of time. And substituting fresh lime zest in place of hard-to-find Persian limes saves your sanity.

Four bunches of scallions? I’m an allium lover and that even threw me for a loop. The scallions infuse every bit with pungency while also lending the recipe color. Not necessary to make them perfectly uniform in size, but they must be sliced thin. Remember to keep the white parts separate from the green as they are added at different times.

Don’t forget to save the liquid when draining the beans. It adds both body and flavor to the dish. If you do accidentally discard it, simply increase the chicken broth to 2⅓ cups. The braising liquid will be thinner, but the dish will still be tasty.

In many cases, I tend to increase the amount of meat/protein. Here, because our package of defrosting chicken thighs weighed only one pound, I decided to increase the white beans to two 19-once cans. If desired, you can serve the stew with rice, roasted potatoes or warmed flatbread. We enjoyed it without any accompaniments.

IMG_4588

Cardamom-Lime Chicken and White Beans

  • Servings: 4
  • Difficulty: easy
  • Print

Ingredients

  • 1½ lbs. boneless, skinless chicken thighs, trimmed and cut into 2-inch chunks
  • Kosher salt and ground black pepper
  • 3 Tbsp. salted butter
  • 4 bunches scallions, thinly sliced, white and green parts reserved separately
  • 2 Tbsp. tomato paste
  • 1 Tbsp. garam masala
  • 1½ tsp. ground cardamom
  • 1 tsp. ground turmeric
  • 2 15½-ounce cans cannellini beans, drained, liquid reserved
  • 1 cup low-sodium chicken broth
  • 2 tsp. grated lime zest
  • ¼ cup lime juice

Directions

  1. Season the chicken with 1 teaspoon salt and ¼ teaspoon pepper.
  2. In a large pot over medium-high, melt the butter. Add the chicken and scallion whites, then cook, stirring once or twice, until both the chicken and scallions begin to turn golden brown, 3 to 5 minutes.
    IMG_4593
  3. Add the tomato paste, garam masala, cardamom, turmeric, 1½ teaspoons salt and ½ teaspoon pepper.Cook, stirring constantly, until fragrant, 30 to 60 seconds.
    IMG_4594
  4. Add the bean liquid, broth, and lime zest and juice, then bring to a boil. Reduce to medium and cook, uncovered, stirring occasionally and adjusting the heat as needed to maintain a simmer, until the chicken is opaque when cut into, 5 to 7 minutes.
  5. Stir in the scallion greens and the beans, then cook until the beans are heated through, another 2 minutes.
    IMG_4598
  6. Taste and season with salt and pepper.
    IMG_4599

http://www.lynnandruss.com

Adapted from a recipe by Julia Krakow from Milk Street

Bake Well, Be Well with Mediterranean-Inspired Ingredients

Olive Oil Sugar Cookies with Pistachios and Lemon Glaze, now don’t they sound fantabulous? The Mr. found them during a favorite pastime of combing through online recipes, and thought it might be a great addition (or substitute) for my typical, but much-loved, Easter decorated sugar cookies. As soon as he told me about these, I knew immediately that I would double the amount (which made 62 cookies, to be exact, with a 2 1/4″ cookie cutter).

IMG_4654

They taste even better than they look. With ingredients such as extra-virgin olive oil, pistachios and lemon, we dubbed them “Mediterranean-Inspired” which prompts a more pious attitude when eating cookies, no? To that end, be sure to use a high-end more neutral olive oil such as an Arbequino.

IMG_4641

To begin, it’s worth remembering that extra virgin olive oil is similar to wine in key ways. Like Cabernet Sauvignon or Chardonnay, which are named for their grape varietals, Arbequina and Arbosana extra virgin olive oils are named for the olives that are crushed to make the oils.

The Arbequina olive hails originally from Catalonia, in Spain. It produces more delicate, fruity oil—great for baking. Here’s a couple novel ideas: Sprinkle over meats to bring out their intense flavors. OR, for a really easy treat, drizzle it on good French vanilla ice cream along with a tinkle of flaky sea salt. But I digress…

Enter the “Shelter-in-Place” mandate and now I had plenty of time to bake. Thank goodness because the only pistachios available at the grocery store were still in their shells, increasing the time component. Speaking of time, there is a lot of refrigerating/freezing you need to take into account, so plan accordingly.

Son David was also going to be celebrating a birthday on Easter weekend, so we did a drive-by (admittedly 2 weeks early) to drop off his present along with a gift box of these fabulous cookies. David, girlfriend Vikki and dog Olive are shown below keeping their 6-foot distance….

IMG_4633

Olive Oil Sugar Cookies with Pistachios and Lemon Glaze

  • Servings: 2 1/2 doz. cookies
  • Difficulty: easy
  • Print

Ingredients (Single batch. This makes about 2 1/2 dozen cookies)

Cookies

  • 1/3 cup whole pistachios, plus 1/3 cup chopped for sprinkling
  • 2 cups all-purpose flour
  • 1/2 tsp. baking soda
  • 1/2 tsp. salt
  • 4 Tbsp. (1/2 stick) unsalted butter, at room temperature
  • 3/4 cup granulated sugar
  • 1/4 cup confectioners’ sugar
  • 1/2 cup high-quality extra virgin olive oil
  • large egg
  • 1 tsp. pure vanilla extract

Lemon Glaze

  • 1 cup confectioners’ sugar
  • Grated zest of 1 lemon
  • 1 Tbsp. lemon juice
  • 2 to 4 Tbsp. heavy cream or whole milk

NOTES: For a double batch, I needed two lemons. However, my fruits were very large so I only used the zest from 1 1/2 lemons. As far as the milk, I used 4 Tbsp. for the double batch and the glaze was a perfect consistency.

Directions

Cookies

  1. Place the pistachios in a food processor fitted with a steel blade and pulse until finely ground. Add the flour, baking soda, and salt. Pulse to fully combine and set aside.
  2. In the bowl of a stand mixer fitted with a paddle, beat the butter on medium until creamy. Add the granulated and confectioners’ sugars and beat on medium until light and fluffy, 2 to 4 minutes.
  3. Add the olive oil and mix on low until combined. Scrape down the sides of the bowl and add the egg and vanilla, mixing on low until combined. Add the flour mixture and mix on low until combined.
  4. Gather the dough, wrap with plastic wrap, and chill in the refrigerator for at least 2 hours and up to 1 day.
    IMG_4640
  5. Lightly flour a work surface and roll the dough to 1/4-inch thick. Using a 2-inch (or slightly bigger) biscuit or cookie cutter, cut out circles. (Any dough scraps can be rewrapped and chilled while the cookies are baking/freezing.)
    IMG_4643
  6. Adjust the oven rack to the middle position. Preheat the oven to 350°F. Line two baking sheets with parchment paper.
  7. Gently slide a metal spatula underneath each round and transfer it to the prepared baking sheet. Place 12 on each sheet.
    IMG_4645
  8. Put the first baking sheet in the freezer for 10 minutes. After the dough has chilled, put the first pan of cookies in the oven, and then put the second pan in the freezer. Repeat with the leftover dough.
  9. Bake 10 to 12 minutes one sheet at a time, until the cookies are just beginning to brown on the edges. Transfer the baking sheet to a wire rack and let the cookies cool completely on the pan.

Lemon Glaze

  1. In a small bowl, whisk the confectioners’ sugar and lemon zest. Whisk in the lemon juice.
    IMG_4646
  2. Whisk in the heavy cream (or whole milk), 1 tablespoon at a time. Add just enough cream to make a thin glaze.
  3. Using an offset spatula or kitchen knife, spread a thin layer of the glaze on each cooled cookie.
  4. Sprinkle with the chopped pistachios and let the glaze set a few minutes before serving.
    IMG_4650

http://www.lynnandruss.com

Recipe by Sarah Kieffer found on Food52.com

Herb-Roasted Garlic Parmesan Baby Potatoes

Crispy golden on the outside, light and creamy interiors—a potato lover’s dream! Yes, I admit, I do like my spuds. And these babies, bursting with flavor, rank among the best.

One ingredient is roasted garlic paste which I make homemade with EVOO and always keep on hand in the fridge. If you don’t have any, don’t sweat it, just finely mince or grate some garlic cloves. The addition of melted butter and pancetta at the end is purely over-the-top, but the pop of green from the parsley is refreshing.

IMG_3635
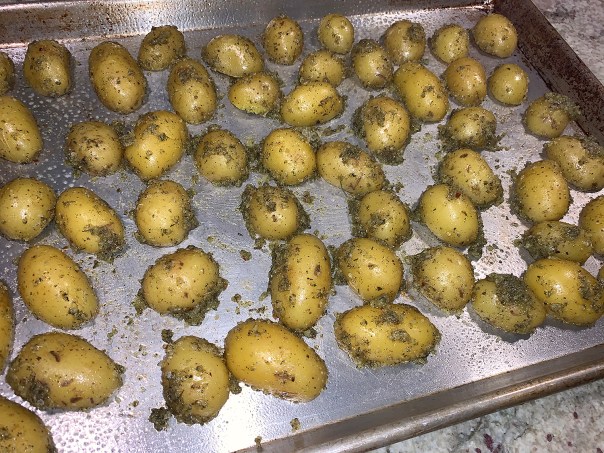
We served our potatoes with pan seared lamb loin chops and sautéed broccolini.

Herb-Roasted Garlic Parmesan Baby Potatoes

  • Servings: 4-6
  • Difficulty: easy
  • Print

Ingredients

  • 1.5 lbs. baby potatoes, such as Klondike Gourmet
  • 3 Tbsp. olive oil
  • 1 Tbsp. roasted garlic paste, or 4 cloves finely minced or grated
  • Salt and fresh cracked black pepper
  • 1 Tbsp. Italian seasoning*
  • 1/2 cup fresh grated Parmesan cheese
  • 1/2 cup unsalted butter (optional)
  • Fresh chopped parsley, for garnish
  • 2 oz. pancetta, small dice (optional)

*To make your own Italian seasoning: In a food processor, combine 2 Tbsp. each of basil, oregano, rosemary, marjoram, cilantro, thyme, savory and red pepper flakes. Blend for 1 minute, or until desired consistency is achieved.

Directions

  1. Preheat your oven to 400ºF. Grease a large rimmed baking sheet with non-stick spray or olive oil and set aside.
  2. If using pancetta, cook in a skillet over medium heat until crispy, move to a paper towel- lined plate and set aside.
  3. Parboil baby potatoes in boiling water for 5 to 8 minutes to precook them. They’ll be more tender on the inside when roasting. Cool slightly then cut in half.
  4. In a large bowl, combine olive oil, garlic paste, salt, herbs, pepper, and parmesan cheese together, mixing to combine. Add a little more olive oil if the parmesan cheese has absorbed most of it.
    IMG_3622
  5. Toss parboiled potatoes halves with the garlic parmesan mixture to evenly coat.
  6. Arrange the coated potatoes cut side down in a single layer onto the prepared baking sheet.
    IMG_3624
  7. Bake the potatoes, turning after 15 minutes with tongs or a spatula, until potatoes are browned and crisped at the edges, up to 10 minutes more.
    IMG_3627
  8. Allow the potatoes to cool down for a couple of minutes on the baking sheet before removing. This will ensure parmesan sticks to the potatoes, not on the baking sheet surface.
  9. In the meantime if desired, gently melt butter in the microwave and combine with fresh chopped parsley. Remove roasted potatoes for the oven, and drizzle with the butter parsley sauce. (Or just use the chopped parsley without butter.) Add pancetta bits, toss to coat well and serve immediately.
    IMG_3630

http://www.lynnandruss.com


Cavatelli with Shrimp and Asparagus

Perfectly succulent, extra-large shrimp always seems like a decadent choice either at home or when I’m out on the town. Unfortunately, as we continue this COVID-19 lockdown, there is no “night-on-the-town” so why not do something extra-special for your household of “sheltered-in-placers.”

Dressed with garlicky olive oil and lemon, shrimp and crisp-tender asparagus tossed with cavatelli make a delightful, fresh main course. It calls for a 1/2 cup of either dry white wine or vodka. Something tells me that a nice chilled glass of Sauvignon Blanc, with a plate of this pasta, is just the ticket to ward off some of those social isolation doldrums…

IMG_4554

Cavatelli with Shrimp and Asparagus

  • Servings: 6
  • Difficulty: easy
  • Print

Ingredients

  • 5 large cloves garlic, coarsely chopped (about 1/4 cup)
  • 1 tsp. dried thyme
  • 1/3 cup extra-virgin olive oil; more as needed
  • Kosher salt
  • 12 oz. cavatelli or similar pasta
  • 1 lb. asparagus, cut into 1-1/2-inch pieces
  • 1 large onion, finely chopped (about 1-1/2 cups)
  • 1 lb. extra-large shrimp, shells removed
  • 2 medium lemons, 1 zested and juiced, 1 cut into wedges for serving
  • Freshly ground black pepper
  • 1/2 cup dry white wine or vodka
  • 1 cup finely grated Parmigiano-Reggiano or Grana Padano; more for serving
  • 1 cup chopped fresh flat-leaf parsley

Directions

  1. Put the garlic and thyme in a small saucepan and add enough oil just to cover, about 1/3 cup. Warm the pan over very low heat so that the temperature of the oil is just below a simmer; you should see small bubbles rising from the oil at a slow, gentle rate. (If the oil begins to simmer, lower the heat. If you can’t reduce the heat any further, remove the pan from the heat to allow the oil to cool slightly, and then return it to the burner.)
    IMG_4557
  2. Continue to poach the garlic until it becomes slightly translucent (there should be no browning), about 20 minutes. Remove the pan from the heat and set aside.
  3. Meanwhile, bring a large pot of well-salted water to a boil. Cook the pasta according to package directions until al dente, adding the asparagus in the last 2 minutes of cooking. Reserve 1 cup of the cooking water, and then drain the pasta and asparagus.
  4. Heat 3 Tbs. of the garlic oil in a large skillet over medium-high heat. Add the onion and cook, stirring frequently, until translucent, about 2 minutes.
  5. Add the shrimp, lemon zest, 1/2 tsp. salt, and a few grinds of pepper, and cook, stirring frequently, until the shrimp begin to turn pink, about 1 1/2 minutes.
    IMG_4559
  6. Add the wine and cook, stirring occasionally, until the shrimp are pink and curled and most of the liquid has evaporated, about 3 minutes.
    IMG_4560
  7. Add the pasta, asparagus, cheese, poached garlic, and garlic oil to the pan, toss to combine, and heat through, about 2 minutes.
    IMG_4563
  8. Remove from the heat, add the lemon juice and parsley, and season to taste with salt and pepper. If necessary, add some of the reserved cooking water to loosen the sauce.
    IMG_4567

http://www.lynnandruss.com

Adapted from a recipe by Lisa Lahey from Fine Cooking

Dynamite Chicken Tenders; Portuguese Rice with Kale

These two dishes are fantastic, it’s that simple. The Central/South American based Mayo-Marinated Chicken with Chimichurri recipe came from J. Kenji Lopez-Alt from The Times Cooking website. Their version uses chicken cutlets pounded down to 1/4″ thickness. But because of the panic-buying during the COVID-19 Virus, chicken breasts of any kind were in very short supply, but one supermarket had the tenders, so I snapped them up.

IMG_4511

It actually saved me time because there was no cutting or pounding necessary. Due to thicker tenders, they’ll take a few more minutes to reach temperature of 160°. Now I know it may sound a little gross to slather mayo all over chicken that you are going to cook, but bear with me, the mayo-chimichurri marinade combo was out of this world.

According to Kenji, the magic of mayo is that it helps your other marinade ingredients spread evenly across the surface of the meat, delivering more consistent flavor, while improving browning. No argument from me! Then the deep chimichurri flavor enhances even more with a post-cooking drizzle of fresh sauce.

Using the mayo method, it could work with nearly any marinade using pesto, barbeque sauce, curry and teriyaki sauces, and so on, just use your noggin’ for inspiration…

In the Portuguese Rice with Kale and Tomatoes recipe, I also had an issue in obtaining an ingredient—specifically, plum tomatoes. So I substituted two large beefy tomatoes and made sure to remove as much of the watery pulp/seeds as possible.

IMG_4516

And instead of water, I incorporated our homemade chicken stock which of course added oodles of flavor. At the end, after 20 minutes simmering while covered, there was still too much liquid (probably due to those tomatoes), so I continued a rolling simmer without the lid for another 10-15 minutes while we seared the chicken tenders in a cast iron skillet.

Mayo-Marinated Chicken with Chimichurri

  • Servings: 3
  • Difficulty: super easy
  • Print

Mayo-Marinated Chicken with Chimichurri

Ingredients

  • 1 1/2 lbs. chicken tenders (about 9-10 tenders)
  • 1/3 cup store-bought or homemade mayonnaise
  • 1 cup chimichurri (see recipe below)

Directions

  1. Season chicken tenders on both sides with salt and pepper and set aside.
  2. Whisk together mayonnaise and 1/4 cup chimichurri in a large bowl. Reserve remaining chimichurri. Add chicken to the mixture and turn to coat. (Cook immediately, or for better flavor, transfer to a sealed container and refrigerate for 4 to 24 hours. Ours marinated for 4 hours.)
  3. Heat a large 12-inch” cast-iron or nonstick skillet over medium-high heat until a drop of water immediately balls up and dances across the surface.
  4. Add chicken tenders in a single layer and cook, flipping once until browned on both sides and just cooked through, about 6-8 minutes. You may have to cook them in two batches so as not to crowd the pan, which would steam the poultry instead of browning the pieces. (Test with an instant thermometer for the temperature to reach about 160°.)
  5. Transfer chicken to a serving platter. Spoon some of the remaining chimichurri over the chicken and serve the rest in a small bowl on the side.
    IMG_4506

http://www.lynnandruss.com

Chimicurri

There are countless variations of Chimichurri recipes out there, so if you have a fave, go ahead and use that. Basically, it is a loose, uncooked, oil-based condiment with dominant flavors of parsley and garlic. It is used to accompany grilled meat, or in the this case, chicken tenders seared in a skillet.

Chimichurri

  • Servings: about 1 cup
  • Difficulty: easy
  • Print

Ingredients

  • 1/2 cup olive oil
  • 2 Tbsp. red wine vinegar
  • 1/2 cup finely chopped parsley
  • 4 cloves garlic, minced
  • 2 small red chilies, deseeded and minced
  • 3/4 tsp. dried oregano
  • 1/2 tsp. salt, more to taste

Directions

Mix all ingredients in a bowl. Allow to sit for 5-10 minutes to release all of the flavors into the oil.
IMG_4487

http://www.lynnandruss.com

Portuguese Rice with Kale and Plum Tomatoes

A staple on the Portuguese table, arroz de grelos customarily is made with spicy turnip greens (grelos), but in Milk Street’s version, they opted to use easier-to-find lacinato kale. You can serve this simple yet remarkably flavorful one-pot dish as the center of a vegan or vegetarian meal, or offer it alongside almost any prepared seafood or meat, such as the chicken recipe above.

IMG_4513

RULE NO. 10: Braise Low and Slow to Tenderize Tough Greens

Portuguese Rice with Kale and Plum Tomatoes

  • Servings: 4
  • Difficulty: easy
  • Print

Ingredients

  • ⅓ cup extra-virgin olive oil
  • 1 medium yellow onion, chopped
  • 4 medium garlic cloves, finely chopped
  • 3 medium plum tomatoes, cored and chopped
  • Kosher salt
  • 1 bunch lacinato kale (about 1 pound), stemmed, leaves torn into 1½-inch pieces
  • ½ cup long-grain white rice, rinsed and drained
  • 2 1/2 cups homemade chicken broth, or water
  • 1 Tbsp. lemon juice

Directions

  1. In a large pot over medium-high, heat the oil until shimmering. Add the onion, garlic, a third of the chopped tomatoes and 1 tablespoon salt. Cook, stirring occasionally, until the tomatoes have broken down and the bits stuck to the bottom of the pot are dark golden brown, 7 to 10 minutes.
  2. Add the kale and cook, stirring and scraping up any browned bits, until wilted, about 1 minute.
    IMG_4497
  3. Stir in 2½ cups water (or homemade chicken stock) and bring to a simmer, then cover and reduce to medium-low. Cook for 10 minutes, then stir in the rice and remaining chopped tomatoes.
    IMG_4498
  4. Return to a simmer, cover and reduce to low. Cook, without stirring or lifting the cover, until the rice is tender and only a little liquid pools at the bottom of the pot, 20 minutes.
  5. Stir in the lemon juice and 1 teaspoon salt. Taste and adjust the seasoning with salt.
    IMG_4503

Tip: Don’t uncover the pot while the rice is cooking; it will release too much steam and the end result will be too dry.

http://www.lynnandruss.com

Adapted from a recipe   Milk Street “The New Rules” cookbook

Classic Steakhouse Combo with a Twist

During these bleak times, you may want to treat yourself every now and again. How about this classic steakhouse combo? Chard takes the place of spinach in this Sear-Roasted Rib-Eye with Creamed Chard riff. Any kind of chard will work well, but rainbow/red chard adds a great pop of color. Just make sure to rinse your chard real well, as it often contains a lot of grit.

I did not halve the steaks (about 3/4 pound each), but we each ended up with half left over, which made for delicious lunches the next day. Be aware that the amount of grated parmesan in the chard, is only 3/4 of an ounce, about a 1/4 cup. If you grate it yourself on a rasp grater, the volume increases to nearly 3/4 cup—which would be way too much if you are using the powdery pre-grated store version.

IMG_4409We completed our meal with a side of twice baked potatoes.

IMG_4395

A lovely, decadent meal in no time at all! Indulge yourself…

Sear-Roasted Rib-Eye with Creamed Chard

  • Servings: 4
  • Difficulty: easy
  • Print

Ingredients

  • 1 tsp. Worcestershire sauce
  • Kosher salt and freshly ground black pepper
  • 2, 1-1/2-inch-thick boneless rib-eye steaks (about 2 lb. total), each cut into two equal pieces and patted dry
  • 2-1/2 Tbs. olive oil
  • 2 large cloves garlic, minced
  • 1-1/2 lb. chard, washed, stems halved lengthwise and thinly sliced crosswise, leaves sliced into ribbons about 1/2 inch thick
  • 1 tsp. chopped fresh thyme
  • 2 Tbs. dry white wine
  • 1/2 cup heavy cream
  • 1-1/2 tsp. fresh lemon juice; more to taste
  • 3/4 oz. finely grated Parmigiano-Reggiano (3/4 cup grated on a rasp)

Directions

  1. Position a rack in the center of the oven and heat the oven to 425°F. Set a wire rack over a rimmed baking sheet lined with foil.
  2. In a small bowl, combine the Worcestershire sauce with 2 tsp. salt and 1/2 tsp. black pepper, and rub all over the steaks.
    IMG_4397
  3. Heat 1 Tbs. of the olive oil in a heavy-duty 12-inch skillet over medium-high heat until shimmering hot. Sear the steaks until well browned, about 3 minutes per side.
    IMG_4398
  4. Transfer to the rack and roast until medium rare (130°F), 8 to 10 minutes. Transfer to a platter, tent with foil, and let rest for at least 5 minutes.
    IMG_4401
  5. While the steaks are in the oven, return the skillet to medium heat, add the remaining 1-1/2 Tbs. oil and the garlic, and cook, stirring, until pale golden, about 1 minute.
  6. Add the chard stems, thyme, and a pinch of salt; cook, stirring occasionally, until just tender, about 5 minutes.
    IMG_4403
  7. In batches, add the chard leaves, tossing with tongs and 1/4 tsp. salt, until wilted, about 5 minutes. If necessary, transfer to a large sieve and press on the chard with the back of a spoon to drain as much liquid as possible. (We did not need to do this.)
  8. Return the chard to the skillet over medium heat and add the wine. Cook, stirring occasionally, until the wine is almost evaporated, about 2 minutes.
    IMG_4405
  9. Add the cream, bring to a boil, then adjust the heat to simmer until reduced by half, about 3 minutes.
    IMG_4406
  10. Off the heat, stir in the lemon juice and Parmigiano. Season to taste with more lemon juice, salt, and pepper. Serve with the steaks.
    IMG_4407

http://www.lynnandruss.com

Adapted from a recipe by Nadia Arumugam

Steamed Fish with Shiitake Mushrooms

A very satisfying fish dinner indeed! Meatless Monday for us typically centers around seafood and we’re always game to try new recipes, especially those that promise lots of taste and nutritional value. So when I spotted this gem in Milk Street’s “The New Rules” cookbook, I knew it had to make the short list.

Since lean white fish is mild in flavor, before steaming the fillets, season them boldly with garlic, ginger, oyster sauce and fiery-sweet Sriracha. A gentle even heat is best for keeping the delicate flesh of fish moist and tender. Steaming is ideal because the heat  surrounds the fish, cooking it from all sides without movement. Any fleshy white fish, such as cod (our choice), haddock, halibut or sea bass will work nicely here.

IMG_4430

For a little spice, drizzle the plated fish fillets with a little chili oil before sprinkling with the scallions. Or sprinkle with toasted sesame seeds. We served jasmine rice steamed with homemade fish stock, which not only added color, it boosted the flavor profile. Our other side was chopped bok choy stir-fried with garlic and ginger and a bit of that fish stock.

NOTE: Don’t uncover the pot before 8 minutes of steaming has elapsed. Opening the lid releases steam and cools the pot. If your fillets are thicker than 1″, don’t uncover the pot until at least 15 minutes. Ours took an entire 20 minutes to come to the recommended temperature of 130°.

RULE NO. 43: Cook Gentle, Season Strong

IMG_4418

Steamed Cod with Shiitake Mushrooms

  • Servings: 4
  • Difficulty: easy
  • Print

Ingredients

  • 3 Tbsp. oyster sauce
  • 1 Tbsp. sriracha
  • 1 Tbsp. grapeseed or other neutral oil
  • 8 medium garlic cloves, finely grated
  • 1 Tbsp. finely grated fresh ginger
  • 3 Tbsp. soy sauce, divided
  • Kosher salt and ground black pepper
  • 4 6-ounce skinless cod, haddock or halibut fillets (each about 1 inch thick)
  • 8 ounces shiitake mushrooms, stemmed and thinly sliced
  • 2 Tbsp. unseasoned rice vinegar
  • 1 Tbsp. packed light or dark brown sugar
  • ¼ cup water
  • 2 scallions, thinly sliced

Directions

  1. In a shallow bowl or pie plate, whisk together the oyster sauce, Sriracha sauce, oil, garlic, ginger, 2 tablespoons of soy sauce and ½ teaspoon each salt and pepper. Add the fillets and turn to coat, gently rubbing in the sauce.
    IMG_4421
  2. Add the mushrooms and toss until evenly coated. Marinate at room temperature for about 10 minutes.
    IMG_4422
  3. Place a steamer basket in a large Dutch oven. Add enough water to fill the bottom of pot without touching the basket. Remove the basket. Cover the pot and bring to a simmer over medium-high.
  4. Meanwhile, mist the steamer basket with cooking spray. Arrange the fish in an even layer in the basket and top the fillets with the mushrooms, evenly arranging them.
  5. Return the basket to the pot, cover and steam over medium until the fish flakes easily, 8 to 12 minutes. (Ours took 20 minutes to reach 130°.)
    IMG_4423
  6. Meanwhile, in a small bowl, stir together the vinegar, sugar, the remaining 1 tablespoon soy sauce and ¼ cup water.
    IMG_4420
  7. When the fish is done, use a thin metal spatula to transfer the fillets and mushrooms to a platter. Sprinkle with the scallions and serve with the sauce on the side.
    IMG_4429

http://www.lynnandruss.com


Toasted Pearl Couscous with Chicken and Chickpeas

WOW, was this good! According to Milk Street where we found this recipe, Palestinian maftoul, a pasta similar to pearl couscous, inspired this quick and easy one-pot meal. The wheaty flavor and aroma of the couscous is greatly enhanced by toasting until the seed-sized bits are richly browned before they’re cooked pilaf-style.

IMG_4350

RULE No. 25: Caramelize Pasta For Deeper, Richer Flavor.

A sauté of onions, allspice and cumin creates a flavorful base for simultaneously poaching boneless chicken thighs and steaming the toasted couscous. Our homemade chicken stock, in place of the 2 cups of water, also added an enriching depth of flavor. (I noticed the online version included cinnamon instead of cumin and added tomato paste.)

Oh, and that pomegranate molasses adds a perky brightness and pop of “yummy” so don’t omit it at the end, and as a drizzled garnish. My one little complaint would be to increase the amount of chicken by about 50% to 1 1/2 pounds of thighs.

IMG_4335

Toasted Pearl Couscous with Chicken and Chickpeas

  • Servings: 4
  • Difficulty: easy
  • Print

Ingredients

  • 3 Tbsp. extra-virgin olive oil, divided
  • 1 cup pearl couscous
  • 1 med. yellow onion, halved and thinly sliced
  • 4 med. garlic cloves, chopped
  • 3 large carrots, peeled, quartered lengthwise and cut into 1/2-inch pieces
  • Kosher salt and ground black pepper
  • 1/2 tsp. ground allspice
  • 1 Tbsp. ground cumin
  • 1 lb. boneless, skinless chicken thighs, trimmed and halved
  • 2 cups chicken broth, preferably homemade
  • 2 bay leaves
  • 15 ½-oz. can chickpeas, rinsed and drained
  • 1 tsp. pomegranate molasses
  • 1 cup lightly packed fresh flat-leaf parsley, roughly chopped

Directions

  1. In a large Dutch oven over medium-high, heat 1 tablespoon of oil until shimmering. Add the couscous and cook, stirring, until golden brown, about 3 minutes. Transfer to a small bowl.
    IMG_4337
  2. In the same pot over medium-high, heat the remaining 2 tablespoons oil until shimmering. Add the garlic and cook, stirring until beginning to brown, about 30 seconds.
  3. Add the onion, carrots, 2 teaspoons salt and 1 teaspoon pepper, then cook, stirring occasionally, until the onions are well-browned, 3 to 5 minutes.
    IMG_4338
  4. Add the cumin and allspice, then cook, stirring, until fragrant, about 30 seconds.
  5. Stir in the chicken, bay leaves, and 2 cups broth (or water). Bring to a boil, then cover, reduce to medium-low and simmer for 5 minutes.
    IMG_4339
  6. Stir in the couscous, cover and simmer until the chicken is opaque when cut into and the couscous is tender but not mushy, about 8 minutes.
    IMG_4340
  7. Off heat, stir in the chickpeas, pomegranate molasses and half the parsley. Remove and discard the bay leaves. Taste and season with salt and pepper.
    IMG_4342
  8. Transfer to a serving bowl, then sprinkle with the remaining parsley. Serve with additional pomegranate molasses for drizzling.
    IMG_4345

Tip: Don’t stir the onion too often as it cooks. Infrequent stirring allows the slices to brown deeply; this caramelization is essential for developing rich flavor in the dish.

http://www.lynnandruss.com

Adapted from a recipe by Milk Street “The New Rules” cookbook

Chinese Trinidadian Delight

Chef/author Grace Lee says this is one of the easiest dishes to stir-fry and guaranteed to satisfy. And Satisfy it did, with a capital “S”. It is said, with an easily accessible street-food culture and a fresh selection of fruits and vegetables year-round, it’s impossible to go hungry in the island paradise of Trinidad.

IMG_4327

This delicious Chinese Trinidadian Stir-Fried Shrimp with Rum recipe from Milk Street comes together super-quick, especially if you buy the shrimp already peeled and cleaned. Now I know the directions indicate to leave the shells on, and we usually buy them that way making use of the peeled shells in homemade shellfish stock. (Which we used BTW, in place of water for the steamed jasmine rice.) But truth be told, they had a sale on cleaned extra-large shrimp and we couldn’t pass it up—we did leave the tails on however.

A Trinidadian cooking practice said to remove the “fishy” taste is, before cooking, rinse the shrimp in lime juice. I never heard of this, but decided to go with it—in the end, not sure if I could tell much of a difference.

A couple of notations in the procedures. Grace always directs you to push the minced garlic (and in this case, ginger) to the side after it becomes fragrant. We have found that doing so, especially on such high heat, burns the aromatics so we remove them, reintroducing them to the wok after the shrimp and veggies have been stir-fried.

And about those veggies, we substituted a red bell pepper in place of the green because that’s what we had on hand. I think the dish would work with whatever color bell pepper suits your fancy. The sauce, which we loved, was just fine as is, but if “saucy” is your thing, it wouldn’t hurt to double it. We plan on doing so next time…

IMG_4314

Chinese Trinidadian Stir-Fried Shrimp with Rum

  • Servings: 3-4
  • Difficulty: easy
  • Print

Ingredients

  • 1 lb. large shrimp
  • Juice of 1/2 lime
  • 3 Tbsp. ketchup
  • 3 Tbsp. dark Jamaican rum
  • 2 tsp. soy sauce
  • 1/4 tsp. ground white pepper
  • 2 Tbsp. peanut or vegetable oil
  • 1 Tbsp. minced garlic
  • 1 Tbsp. minced ginger
  • 1/2 tsp. salt
  • 1 medium ripe tomato, cut into thin wedges
  • 1 large green bell pepper, cut into thin strips
  • 1 small onion, cut into thin wedges
  • 1 Tbsp. finely chopped cilantro

Directions

  1. Using kitchen shears, cut through the shrimp shells two-thirds of the length down the back of the shrimp. Remove the legs and devein the shrimp, leaving the shells and tails on.
  2. In a medium bowl toss the shrimp with the lime juice for a few seconds. Rinse the shrimp, drain, and set on a plate lined with paper towels. With more paper towels pat the shrimp dry.
    IMG_4317
  3. In a small bowl combine the ketchup, rum, soy sauce, and ground white pepper.
    IMG_4316
  4. Heat a 14-inch flat-bottomed wok or 12-inch skillet over high heat until a bead of water vaporizes within 1 to 2 seconds of contact.
  5. Swirl in the oil, add the garlic and ginger, then, using a metal spatula, stir-fry 10 seconds or until the aromatics are fragrant.
  6. Push the aromatics to the sides of the wok, carefully add the shrimp and spread them evenly in one layer in the wok. Cook undisturbed 1 minute, letting the shrimp begin to sear.
  7. Sprinkle on the salt and stir-fry 30 seconds or until the shrimp begin to turn orange.
    IMG_4319
  8. Add the tomatoes, bell peppers, and onions and stir-fry 1 minute or until the shrimp have turned almost totally orange. (Return the aromatics of garlic and ginger if you removed them earlier.)
    IMG_4321
  9. Swirl the ketchup mixture into the wok and stir-fry 1 minute or until the shrimp are just cooked through and the sauce coats the shrimp. Stir in the cilantro.

http://www.lynnandruss.com

Whole-Grain Farfalle with Spicy Shrimp and Roasted Peppers

Confession. Our go-to supermarket had varying types of whole grain pasta, but not the farfalle. BUT, they did carry Barilla “Protein +” which is a 100% plant-based protein containing among other flours, lentil, chick pea, barley and pea protein. AND, it contains 5 grams of fiber! Seemed like a good substitution to us…

Here, the rustic whole-grain (or plant protein) pasta is enhanced with the mild sweetness of roasted peppers and shrimp, and the kick of a spicy garlic marinade. You can use jarred roasted peppers, if you like, but roasting your own will make the pasta tastier, especially if you make them a day ahead—which will save you a chunk of time.

IMG_3883
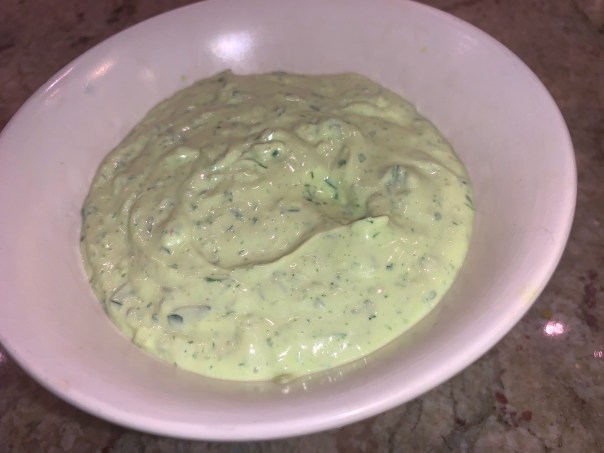
I make mine right on top of a gas burner, making sure to char all over, including the tops and bottoms. Seal them in a plastic bag for 15-20 minutes which will help in removing the burnt skin. Keep in mind, if you have to char your own peppers, it will add to the total time. You can always do this a day ahead.

Our gas oven broiler is sub par (that’s about the only advantage credited to an electric stove). So instead of arranging the marinated shrimp on a greased rimmed baking sheet, we did NOT pat the shrimp dry. Instead, on a gas burner, we heated a large cast iron skillet until smoking hot (with no additional oil), and arranged the shrimp in one layer for about 90 seconds. Then with a wooden spatula, we stir-fried them another minute and a half until just done, scraping them into a bowl covered with tinfoil until ready to use.

IMG_3891

Now about those Fresno chilis. As luck would have it, the grocery store was not carrying them the day we shopped. A good substitute? The Fresno pepper looks and tastes almost like the world’s most popular chili pepper, the jalapeño, but it can be slightly hotter. At its hottest, it reaches the heat level of a mild serrano pepper, which can be somewhat spicy for some. So we bought serrano chilis!

And, because it’s the way we roll, we added 1 teaspoon of smoked paprika—which is typically not a hot spice—in actuality, the spice itself is quite mild and sweet. Smoked paprika is a Spanish cousin to the more widely used sweet Hungarian paprika. It’s made from pimiento peppers that have been dried and smoked over an oak fire, then ground into a fine powder. You’ll sometimes see it called pimenton, smoked pimenton, sweet paprika, Spanish paprika, or any variation of those names, but you can always recognize this spice by its deep red color and powerful smoky aroma. 

IMG_3876

Whole-Grain Farfalle with Spicy Shrimp and Roasted Peppers

  • Servings: 4-5
  • Difficulty: easy
  • Print

Ingredients

  • 5 medium cloves garlic, peeled and crushed
  • 2 Fresno or other small fresh red chiles, cut into a few pieces (remove seeds and ribs for less heat)
  • 1/2 cup extra-virgin olive oil; more as needed
  • 2 tsp. crumbled dried oregano
  • 2 tsp. Aleppo pepper or 1/2 tsp. red pepper flakes; more to taste
  • 3/4 tsp. ground cumin
  • Fine sea salt
  • 3 rred bell peppers or a mixture of red, yellow or orange, roasted, peeled, seeded, and cut into 1-inch pieces
  • 1 tsp. smoked paprika
  • 1 Tbs. balsamic vinegar
  • 1 lb. extra-large shrimp, peeled and deveined
  • 12 oz. whole-grain farfalle
  • 4 oz. (1 cup) crumbled mild feta, preferably sheep’s milk
  • 1/2 cup lightly packed chopped fresh flat-leaf parsley
  • Finely grated Parmigiano-Reggiano for garnish

Directions

  1. In a food processor, pulse the garlic and chiles until finely chopped. Transfer to a medium bowl, and add the oil, oregano, Aleppo, cumin, and 1/2 tsp. salt; stir well with a fork to combine.
  2. Transfer half of the mixture to another medium bowl stir in the roasted peppers, smoked paprika and vinegar.
  3. Add the shrimp  to taste to the remaining marinade, gently toss to coat, and set aside to marinate for 15 minutes.
    IMG_3884
  4. Meanwhile, position a rack 4 inches from the broiler element, and heat the broiler on high. Bring a large pot of well-salted water to a boil, and cook the pasta according to package directions until al dente.
  5. While the pasta cooks, heat a cast-iron skillet (without any extra oil) until smoking hot. Place the marinated shrimp into the hot pan, flipping once, until opaque throughout, 3 minutes total. Move into a separate bowl covered with tinfoil until ready to use.
    IMG_3887
  6. Reserve 1/2 cup of the pasta cooking water. Drain the pasta and transfer to a large heated serving bowl.
  7. Add the peppers with the marinade, feta, parsley, and 1/4 cup of the pasta water. Gently toss with a large serving spoon for 1 minute to warm the feta, adding a bit more pasta water as needed to loosen the sauce. Season to taste with salt.
    IMG_3889
  8. Place pasta into a large shallow heated serving bowl. Sprinkle generously with the Parmigiano, and place shrimp on top. Serve, passing more cheese at the table.
    IMG_3893

http://www.lynnandruss.com

Adapted from a recipe by Maria Speck from Fine Cooking